

The Oar Board User Manual
®
Whitehall Rowing & Sail
85 Dallas Road, Victoria BC
Canada V8V 1A1
Sales@OarBoard.com
1-800-663-7481
. . . . . . . . . . . . . . . . . . . . . . . . . . . . . . . . . Pg 12
. . . . . . . . . Pg 11
. . Pg 10
. . Pg 8
Warranty
Care & Maintenance of your Inflatable SUP
Care & Maintenance of your Sculling Oars
. . . . . . . . . . . . . . . . . . . . . . . . . . . . . . . Pg 7
. . Pg 6
Oar Board® Tips - Do’s and Don’ts
. . . . . Pg 4
. . . . . . . . . . . . . . . . . . Pg 2
The Quick Release Strap
Attaching the Oar Board® to an SUP without deck rings
Attaching the Oar Board® to an SUP with deck rings
How to set up your Oar Board® Rower
Contents
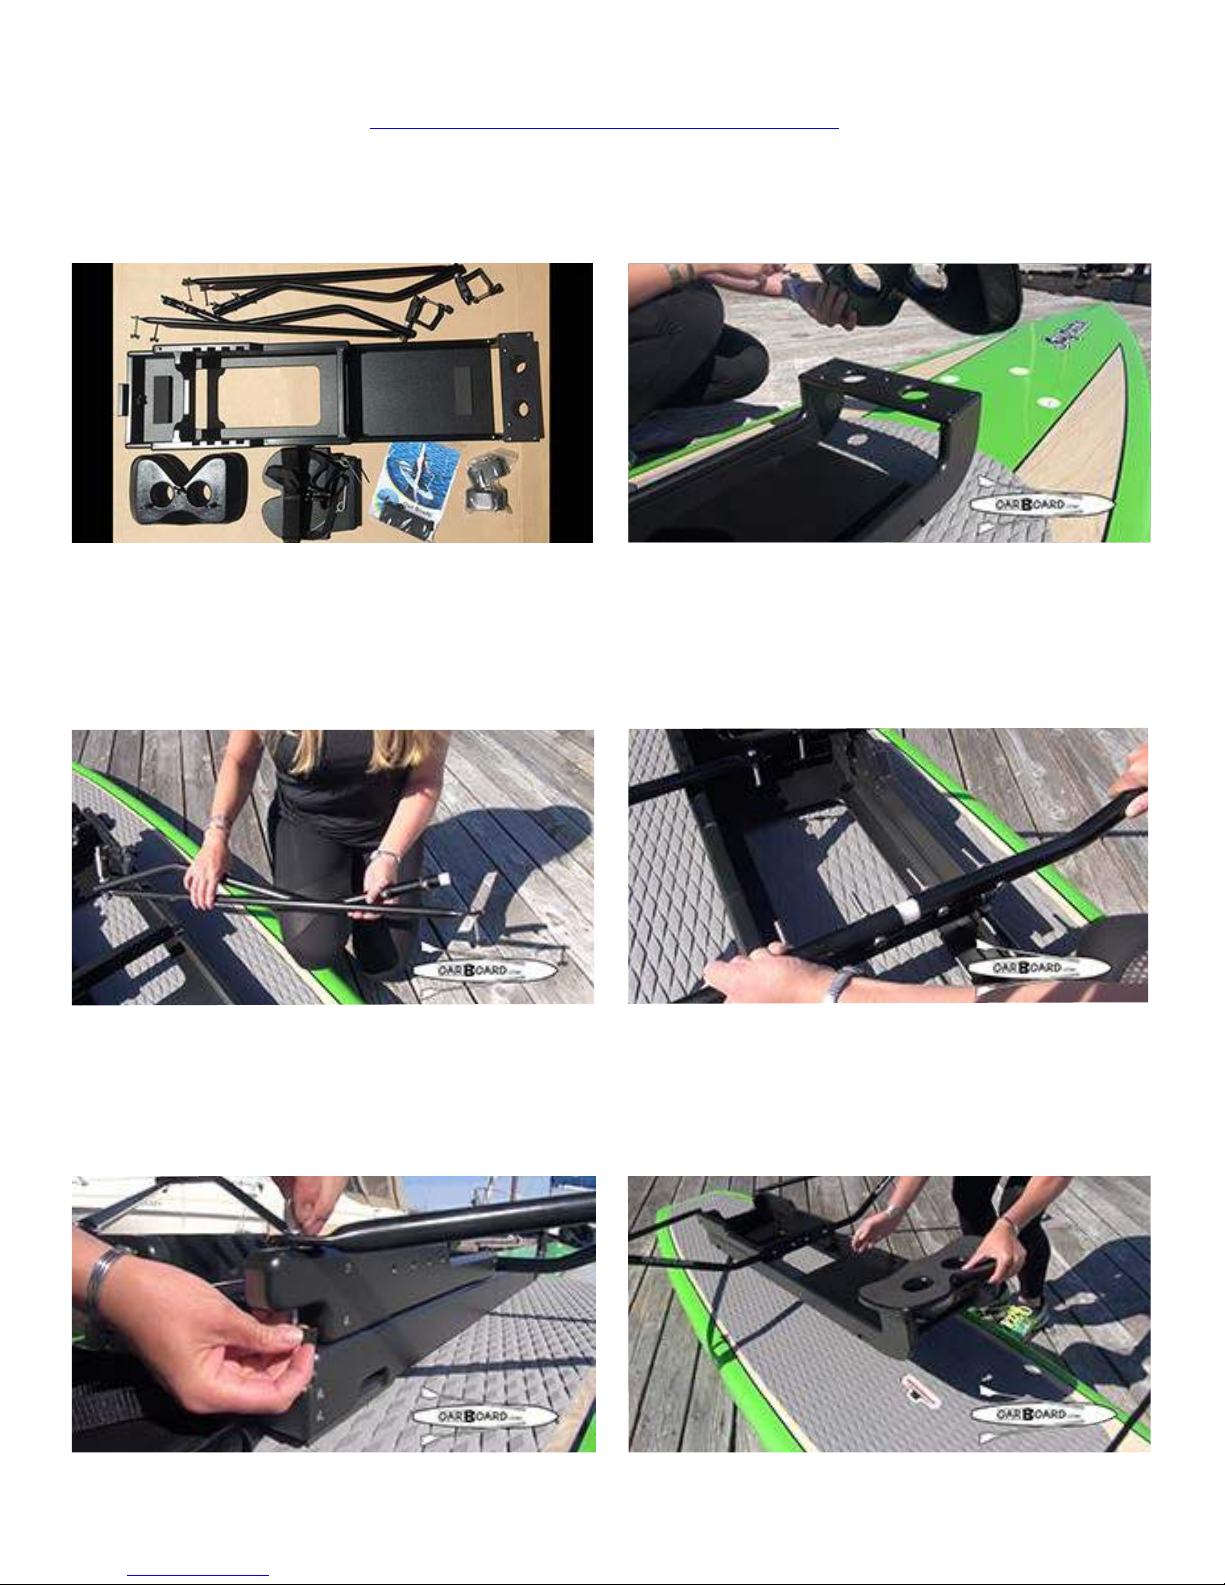
How to set up your Oar Board® Rower Unit
See the Video online at www.OarBoard.com
Step 1: Unpack the components and lift the unit out of the box; the carriage is already installed on the base.
Step 2: Take the seat and place it on the seat base aligning the three bolts with the three holes provided and press it into
position. Securely hand tighten the three wingnuts.
Step 1 Step 2
Step 3: To install the outriggers, remove the nylon wingnuts from the outrigger arms and resting the strut on the carriage,
plug the white nylon insert into the other arm. Push the four S.S. bolts firmly into the matching holes on the carriage.
Replace the wingnuts and tighten them.
*Note the oarlock/ pin assembly has been set up at the factory & does not need adjustment - the pitch of the Concept 2
oarlocks is 4%.
Step 3 Step 3
Step 4: Next position the strut arm using the larger bolt at the opposite end of the slider. Then mount the unit on the
board with the seat end of the unit at a point about 2 inches behind the lift handle or balance point of the board, and
centered in the middle of your board. You can fine tune the location with experience.
*Note - a little extra buoyancy forward makes for better rowing, especially into waves.
Step 4Step 4
Page 2

How to set up your Oar Board® Rower Unit
See the Video online at www.OarBoard.com
Step 5: The stopper fitting comes on and off with a single wingnut and functions to keep the carriage in place on the base.
Remove the stopper to slide the carriage off to carry it separately. The optional stern light/cam mount or the forward view
mirror locates on this fitting as well.
Step 5
Step 6: Insert the footboard into the correct position for your height. You m us t be a bl e to e xt en d yo ur l eg s al l th e wa y ou t. I f
the footboard is set too close you will push yourself off the seat when rowing. The footboard keeps your feet in position with
Velcro straps, and is held in position by the pin on each sid e. Make sure these pins are ful ly i nserted.
Step 6
Step 7: See the ‘Quick Release Foot Strap’ on page 7 for detailed instructions on the Quick Release feature, and
for more information see the video online at www.OarBoard.com
Step 8: See Attaching the Oar Board® Rower to your Adventure/Fitness Row SUP (page 4) or Attaching the Oar
Board®Rower to a Standard SUP without Deck Rings (Page 6) and for more information see the videos online to
get yourself ready to hit the water!
Step 6
Page 3

Attaching the Oar Board® Rower to an Adventure/Fitness Row SUP with deck rings
See the Video online at www.OarBoard.com
The Oar Board® Rower comes almost fully assembled, as compact as possible for shipping or storage.
See the ow to et or Oar Board ower nit ae and ee the online ideo for more information on how to set
it up and get it ready to attach to your Adventure/Fitness Row SUP.
Step 1: Place your Oar Board® with the seat end of the unit at a point about 2 inches behind the lift handle or balance
point of the board & centered in the middle. A little extra buoyancy forward makes for better rowing, especially into waves.
Step 2: Take your Kwik-Lok strap and fold the buckle back on itself so the sticker side is flush against the strap as shown.
Step Step
Step 3: Feed the strap through the gap in the Oar Board® Rower and through the SUP deck ring being sure to first go over
the deck ring then under and through.
Step 4: Continue feeding the strap back through the gap in to the Oar Board® going under the strap and buckle and out the
other side and directly through the SUP deck ring.
Step Step
Step Step
Page 4

Attaching the Oar Board® Rower to an Adventure/Fitness Row SUP with deck rings
See the Video online at www.OarBoard.com
Step 5: Loop the strap through the deck ring and back inside the Oar Board® Rower. Feed the strap under the buckle and
up through the back space and then down through the front space of the buckle.
Step Step
Step 6: Hand tighten the strap so that you have to put some pressure on to the buckle to flip it over and close it. The
sticker should now be facing up. *Note - don’t tighten straps to the max, only enough so the Oar Board® stays in place.
Tuck the excess end of the strap through the Oar Board® Rower.
Simply repeat this procedure with the second strap! Relieve tension on the straps when not in use.
To release simply grip the free end of the strap and pull up keeping your fingers clear.
Step Step
Step 7: Get out on the water and enjoy a row on your new Oar Board® Rower and Adventure/Fitness Row SUP!
Step
Page 5

Attaching the Oar Board® Rower to a Standard SUP without deck rings
See Video online at www.OarBoard.com
Step 1: Mount the unit on the board with the seat end of
the unit at a point about 2 inches behind the lift handle or
balance point of the board, and centered in the middle of
the board. You can fine-tune the location with experience.
*Note - a little extra buoyancy forward makes for better
rowing, especially into waves.
Step
Step 2: Take your Kwik-Lok strap and fold the buckle back on itself so the sticker side is flush against the strap as shown.
Thread the strap through the base of the Oar Board® and around the underside of the board. Once around the board,
thread the strap back through the base of the Oar Board®. Thread the strap under and through the back opening of the
buckle and then down and through the front opening.
Step Step
Step 3: Hand tighten the strap so that you have to put some pressure on to the buckle to flip it over and close it. The
sticker should now be facing up. *Note - don’t tighten straps to the max, only enough so the Oar Board® stays in place.
Tuck the excess end of the strap through the Oar Board® Rower. Simply repeat this procedure with the second strap!
Relieve tension on the straps when not in use. To release simply grip the free end of the strap and pull up keeping your
fingers clear.
Step Step
Step 4: You are now ready to launch your board and have a great row with your Oar Board® Rower!
Step
Page 6

Quick Release Strap
& Optional Pull Strap
See the Video online at www.OarBoard.com
Ste 1 Ste 1
Step1: First place your feet into the straps located on the foot stop. The two Velcro ends of the Quick Release
Strap are held in place by centering them horizontally on the inside flaps of each side of the 2” foot stop straps.
Ste Ste
Step 2: The Quick Release Strap runs across from the right foot to the left foot, and adheres to both sides of
the Velcro on the inside of the foot stop straps. When pulled, it will open both of the foot stop straps at once.
Ste Ste
Step 3: Another optional accessory is the Pull Strap that is recommended for use when rowing in conditions
where capsize is more likely. The Pull Strap attaches to the Quick Release Strap and to your leg.
To attach the Pull Strap to your leg circle the longer Velcro part of the Pull Strap snugly around the top of
your calf just below the knee. Orient the Pull Strap so it will hang down between your calves. The Pull Strap
makes it easier to release the foot stop straps, as you do not have to reach down to your feet.
Test! If the foot stop straps release when the Quick Release Strap is pulled it is set up correctly.
Page 7

Care & Maintenance of your Inflatable
Stand Up Paddle/SUP Board
You’re going to love your new SUP, and we want you to preserve that investment for years to
come. The elements can cause havoc on any item over an extended period of time especially
salt water and sunlight. It’s made to be enjoyed in the outdoors, so here are some guidelines for
its care and maintenance.
FEATURES: The deck fittings in stainless steel include a rectangular webbing strap type that
allows you to mount an Oar Board
strapping cargo down to the SUP board. A single -ring on the underside near the bow is
intended for adding a line for towing or tie-down.
Built-in soft carry handles are located on the top of the SUP at the bow (front end and the stern
(back end.
Fin: The box fin is installed once the SUP is inflated. The fin has a brass pin on one end and a
suare nut and bolt on the other end. Remove the suare nut from the bolt and drop it down into
the fin box slot and tip to slide it along into the suare hole. Then put the pin end of the fin in
and secure using the bolt provided by threading it into the stationed suare bolt.
hen arriving on shore before or after a paddle, place the SUP bottom up, to help protect the
fin. However, with an Oar Board
SUP with something of the right height or hang it over the edge of something.
Remove the fin from your SUP before deflating. It is also recommended that the fin be removed
after each use if leaving the SUP inflated. This can be a tedious task, but it will really help keep
the board in good shape, especially if you are travelling with more than one board.
Transport Bag: The wheeled roller bag is nylon, has lift handles top and bottom, carry handles
on both sides, and padded backpack straps with a waist strap. It also has 2 security straps top
and bottom on both sides. A great bag for travel, it also has a pouch on the front for your pump.
The deflated SUP is rolled up to fit inside this bag.
®
in several locations. There are also regular -rings for
®
in place turning the SUP over is not possible. So support the
Pump: The manual pump has a gage and two fill speeds, single and double action. Use the
double action speed when filling up to 1 to 12 PSI then switch the lever to the left to go to the
single action speed and fill the rest up to 15 PSI total. See Inflation below.
Repairs: Your inflatable SUP is constructed from strong durable materials and can withstand
most normal use. However, contact with very sharp objects such as rocks, glass, or edges can
puncture the outer skin. An orange plastic tube containing a repair kit with patches and glue is
included with your inflatable board, and can be used to patch the hole. If the hole is larger than
the patch, you may need to seek professional repair from a boating facility.
Also included in the kit is a valve tool. In the rare event of needing these, you can find
instructional videos on procedures for inflatable SUP repairs on You-tube.
Page 8

Inflation: You inflate your SUP using the valve, which must be kept clear of debris. Keep the
valve cover in place after inflation for this reason. Maximum inflation PSI is 15 for your SUP,
which is also printed on your SUP’s deck. hen storing your SUP between usage, if not rolled
up in the bag, reduce the pressure to between 13-14 PSI.
www.OarBoard.com
CAUTION: Overfilling the board may cause internal rupture/damage
MATERIAL MAINTENANCE: Follow the preventative instructions below to ensure longevity of
your SUP. For black marks that can occur from scuffing against surfaces, use of a cleaner such
as dish soap, Glue Gone or Simple Green are helpful. Some say Magic raser works.
SUN DAMAGE PREVENTION: Use a bag for your deflated SUP and travel with it in the bag to
keep it from being damaged - do not put it in the bag when wet. If leaving the SUP inflated,
purchase and use a full-length board bag for full UV and dirt protection.
Store it in a cool place, out of the sun. If exposed to the sun for prolonged periods, it may cause
damage both to the core of the SUP, and the outside.
GENERAL DAMAGE PREVENTION
Salt water usage: If you use the SUP in salt-water conditions, rinse the SUP, fin and fittings with
fresh water after each use to get rid of salt water and any sand or debris.
Freeing: If you live in a cold climate, make sure the SUP is dry before storing. Any water
caught inside when you roll it up, could freee and cause damage to the SUP.
ROAD TRANSPORTATION TIPS: hen carrying on the vehicle roof, only use straps
recommended for transporting SUPs. o not over tighten the straps, as this can cause damage
to the SUP. Pads are recommended to avoid damage to the SUP and vehicle.
Always place the SUP face up on the racks, with the fin facing forward towards the front of the
vehicle. Make sure to give adeuate spacing between the front and back racks. atch your
speed, as having a large SUP on top of your vehicle can make you experience wind shear.
Whitehall Rowing & Sail
85 Dallas Road, Victoria, BC
Canada V8W 1A1
Ph: 250-384-6574
Fax: 250-384-6506
Email: info@whitehallrow.com
Care & Maintenance of your Inflatable
Stand Up Paddle/SUP Board
See the video How To Inflate Your Adventure or Fitness Row SUP online at
Page

Care & Maintenance of your Sculling Oars
See the Video online at www.OarBoard.com
The following parts are included with 2 part Sculling oars:
Carbon Fiber Shaft
Fiberglass Blades - Black Gelcoat finish
Polyethylene Oar Collar - Blue
Adjustable Plastic Button with Stainless Steel Clamp/fastener
Grip Rubber
Push Button Spring Clip - stainless steel
Plus 1 spare pair Push Button Spring Clips - stainless steel
Integral fiberglass reinforcement sleeve - a 14 or 36cm long extension tube
aintenance ecoendations:
To keep your oars in good condition, separate the two sections and hose off with
fresh water after use. ipe with a cloth to remove salt, sand or dirt. If these two part
sculling oars are kept conjoined, any salt water, grit or sand that is left in the joint or
around the push button can cause sticking and eventually lead to permanent fusing of
the two sections completely. They would then no longer come apart.
Spray the metal parts with a silicon-based spray occasionally to keep them from
oxidiing. Store oars out of direct sunlight to reduce UV exposure. ax the carbon
fibre shaft and gelcoat blade using any auto wax to keep them shiny and protect
against UV damage. Before applying the wax, wash the surfaces and dry thoroughly.
sage:
One button per oar is set to suit the reuired overlap by locating them on the blue
plastic collar and using a slot screwdriver tightening them securely in place.
Your oars come with a red stripe and a green stripe at the base of the shaft near the
blade and a red stripe above the button on the second half of the shaft to match the
red striped oar blade section. ach oar fits its own individual shaft, so be sure to set
them up with red-to-red and green-to-green matched. To separate the shaft push
down on both push button spring clips on both sides of the shaft simultaneously while
pulling the two sections apart.
Page 1

Oar Board
• o not over tighten the buckles too much tension will produce an indent or print in
some SUP surfaces. Release the buckle’s tension or remove the Oar Board® Rower
from the SUP when not in use to prevent SUP surface printing.
• o make sure your foot stretcher pad pins are pushed down all the way into the
correct hole before rowing to ensure they don’t slip out.
• Keep Oar Board® tracks clean and free from sand, mud, or crusted salt to prevent
abrasion of the track.
• Make sure your Oar Board® is euidistant from the sides on the SUP on all four
corners before rowing (it might slip slightly off center while carrying to the water).
Handy tip: once you’re satisfied you have the ideal spot determined for your board,
making some marks or adding some stickers to the board at the four corners of the
®
Tips - Do’s and Don’ts
unit helps.
• Gaskets: Once your weight is on the unit the added pressure on the four neoprene
gaskets located on the bottom of each corner keep the unit in its centered position.
Remember to replace any gaskets that come off before using your Oar Board
Rower.
• o not use your Oar Board® rigger arms to pull the SUP up out of the water. Instead
remove the outrigger carriage from the board first, by removing the end stop and
sliding the carriage off the base. Use the Oar Board® seat base to lift and carry the
Oar Board®. Then lift your SUP out of the water using the SUP handles. See page 3
and see the ow to set up our ar oard ower Video online at
www.OarBoard.com
• Hose salt water off all surfaces after each use to help keep your Oar Board® Rower
pristine and prevent salt build up.
hitehall owing Sail
allas oad ictoria
®
anada
h: 2
a: 2
ail:
infowhitehallrowcom
Page 11

WARRANTY
Your Oar Board® fit-on-top SUP rowing/sculling unit is manufactured with fittings designed
for use in salt water or fresh. All metal parts are sleeved where they would come in contact
with dissimilar metals. Always ensure that your nylon sleeves are in place where stainless
steel bolts go through any part of the aluminum structure.
Your Kwik Lok straps stainless steel buckles must always be closed on the inside surface of
your unit’s base and never against the surface of your SUP. e recommend that you
release the Kwik Lok strap tension on the board when not in use to prevent strap imprinting
on the surface of your SUP. Follow the set up instructions provided with your unit.
For safety during transport by road ensure that your unit is securely fastened to the vehicle’s
roof rack. ouble-checking is always advised.
For maintenance we recommend hosing the entire unit off with fresh water and wiping down
with a cloth after use to minimie salt corrosion of the metal parts and/or excess scratching
and wear on the tracks due to salt crystals, sand, mud or grit. Occasional spraying with a
silicon-based spray will help keep metal parts from oxidiing and reduce friction.
We warrant this Oar Board® fit-on-top SUP rowing/sculling unit to the original owner for a
period of two years. In the event that the unit should be defective or develop a functional
problem hitehall Rowing & Sail will, at their discretion, either (a) provide the needed
replacement part(s) or (b) reuest that the unit be returned for repair or replacement.
First to establish a warranty claim for your unit with hitehall Rowing & Sail send your proof
of purchase to us via email, fax or mail. Next either phone, fax, email or write us to describe
the problem (with photos if possible) then wait to receive confirmation of your claim. Provide
us with the best way to reach you including time of day if a phone call is the preferred
contact method. e will endeavour to respond before the end of 4 business days.
o not return the item until you receive our instructions on where to send it and we have
gone over the unit’s problem with you to determine the best plan of action.
Once we confirm with you that the return of the unit is reuired, hitehall Rowing & Sail
accepts the return of the unit for repair or replacement during the warranty period (providing
you are the original owner and have already sent your proof of purchase to us via email,
mail or fax). Return the unit to us by carefully packaging all parts up with appropriate
packing material, in a similar manner to its original packaging, to prevent any scratching or
damage to parts during transport and ship to the address we will provide to you. If the
unit arrives incomplete the warranty is nullified. This return shipping cost is to be at your
own expense.
Whitehall Rowing & Sail
85 Dallas Road, Victoria, BC
Canada V8W 1A1
Ph: 250-384-6574
Fax: 250-384-6506
Email: info@whitehallrow.com
Page 12
 Loading...