

I N S T R U C T I O N M A N U A L
™
PROLUXE
convertible
convert i second! ...the bac t portabl!
your portable table
www.oakworks.com · 717.235.6807
converted to a lift table and back again

© Copyright 2011
akworks
O
®
, Inc.
Manual Part # MMMNST0022
1st Edition, January 2011
Printed in U.S.A.
All rights are reserved. No part
of this document may be
photocopied, reproduced or
translated to another language
without prior written consent
of Oakworks®, Inc.
Oakworks® is a registered
trademark of Oakworks®, Inc.
Notice
The information contained in this
document is subject to change
without notice and should not
be construed as a commitment by
Oakworks®, Inc.
Oakworks®, Inc. assumes no
responsibility for any errors that
may appear in this document nor
does it make expressed or implied
warranty of any kind with regard
to this material, including, but not
limited to, the implied warranties
of merchantability and fitness for
a particular purpose.
Oakworks®, Inc. shall not be liable
for incidental or consequential
damages in connection with or
arising out of the furnishing,
performance, or use of this
document and the program
material which it describes.

TABLE OF CONTENTS
Symbol Identification .................................................................................. pg 1
Warnings & Cautions .............................................................................pg 1
TABL E OF CO N T ENTS
Grounding Instructions ..........................................................................pg 2
Product Description & Specs ................................................................pg 3
Directions for Use
One time only set up ...........................................................pg 4 - 8
Loading your portable table .............................................. pg 9 - 11
Remove your portable table ................................................... pg. 12
Controls - Foot control & Hand control ................................... pg 13
Using your ProLuxe Convertible ................................................ pg 14
General care of equipment ....................................................................... pg 15
Electrical specifications .............................................................................. pg 15
Power & lead plug ID .................................................................................. pg 16
Contact Information ..................................................................... back cover
TABL E OF CO N T ENTS

SYMB O L I D E N TIFICATION - WARNIN G S & CA U T I ONS
SYMB O L IDE N T I F ICATIO N
This symbol, when used in this manual and on product labels, represents a caution
warning. Be sure to read and comply with all precautions and warnings.
This symbol, when used in this manual and on product labels, warns against an electrical
shock hazard. Be sure to observe and comply with all warnings.
This symbol, when used in this manual or on product labels, indicates a Protective
Earth (Ground) Terminal.
SYMB O L I D & WARN I N GS
This symbol when used in this manual or on product labels, warns that during transport
there should be no stacking of containers.
This symbol, when used in this manual or on product labels, indicates that the product
should be protected from moisture. The humidity specifications for Transport &
Storage are listed in the back of this manual.
This symbol, when used in this manual or on product labels, indicates that information
is given regarding the recommended temperature limits during transport and storing.
This symbol, when used in this manual or on product labels, indicates the date of
manufacture of the device.
This symbol, when used in this manual or on product labels, indicates alternating
current (AC).
~
This symbol, when used in this manual or on product labels, indicates direct current
----
(DC).
This symbol, when used in this manual or on product labels, indicates that
instructional information is included. It should be read carefully and completely .
W A R NINGS & C A U T IONS
WARNING
CAUTION
WARNING
CAUTION
1
Improper use of this device can cause injury. Be sure to read all operating instructions
prior to use.
Weight limit is defined by the portable table used with this product. (If the portable
table has a weight limit of 450 lbs, then the system is 450 lbs) up to a maximum of 550 lbs.
Be certain that the table is completely lowered prior to discharging an ambulatory
patient. The patient may lose balance and fall.
Electrical Shock Hazard. The power supply/control module is located below the base
of the table. No user serviceable parts are inside. Refer servicing to qualified personnel.
Before doing any work on the unit or cleaning with any liquid cleaner, unplug wall connector prior to contact with any cables connected to the power supply.
Plug table into an outlet that is surge protected to a level of 750J or higher.
Failure to do this may void all or part of the warranty.
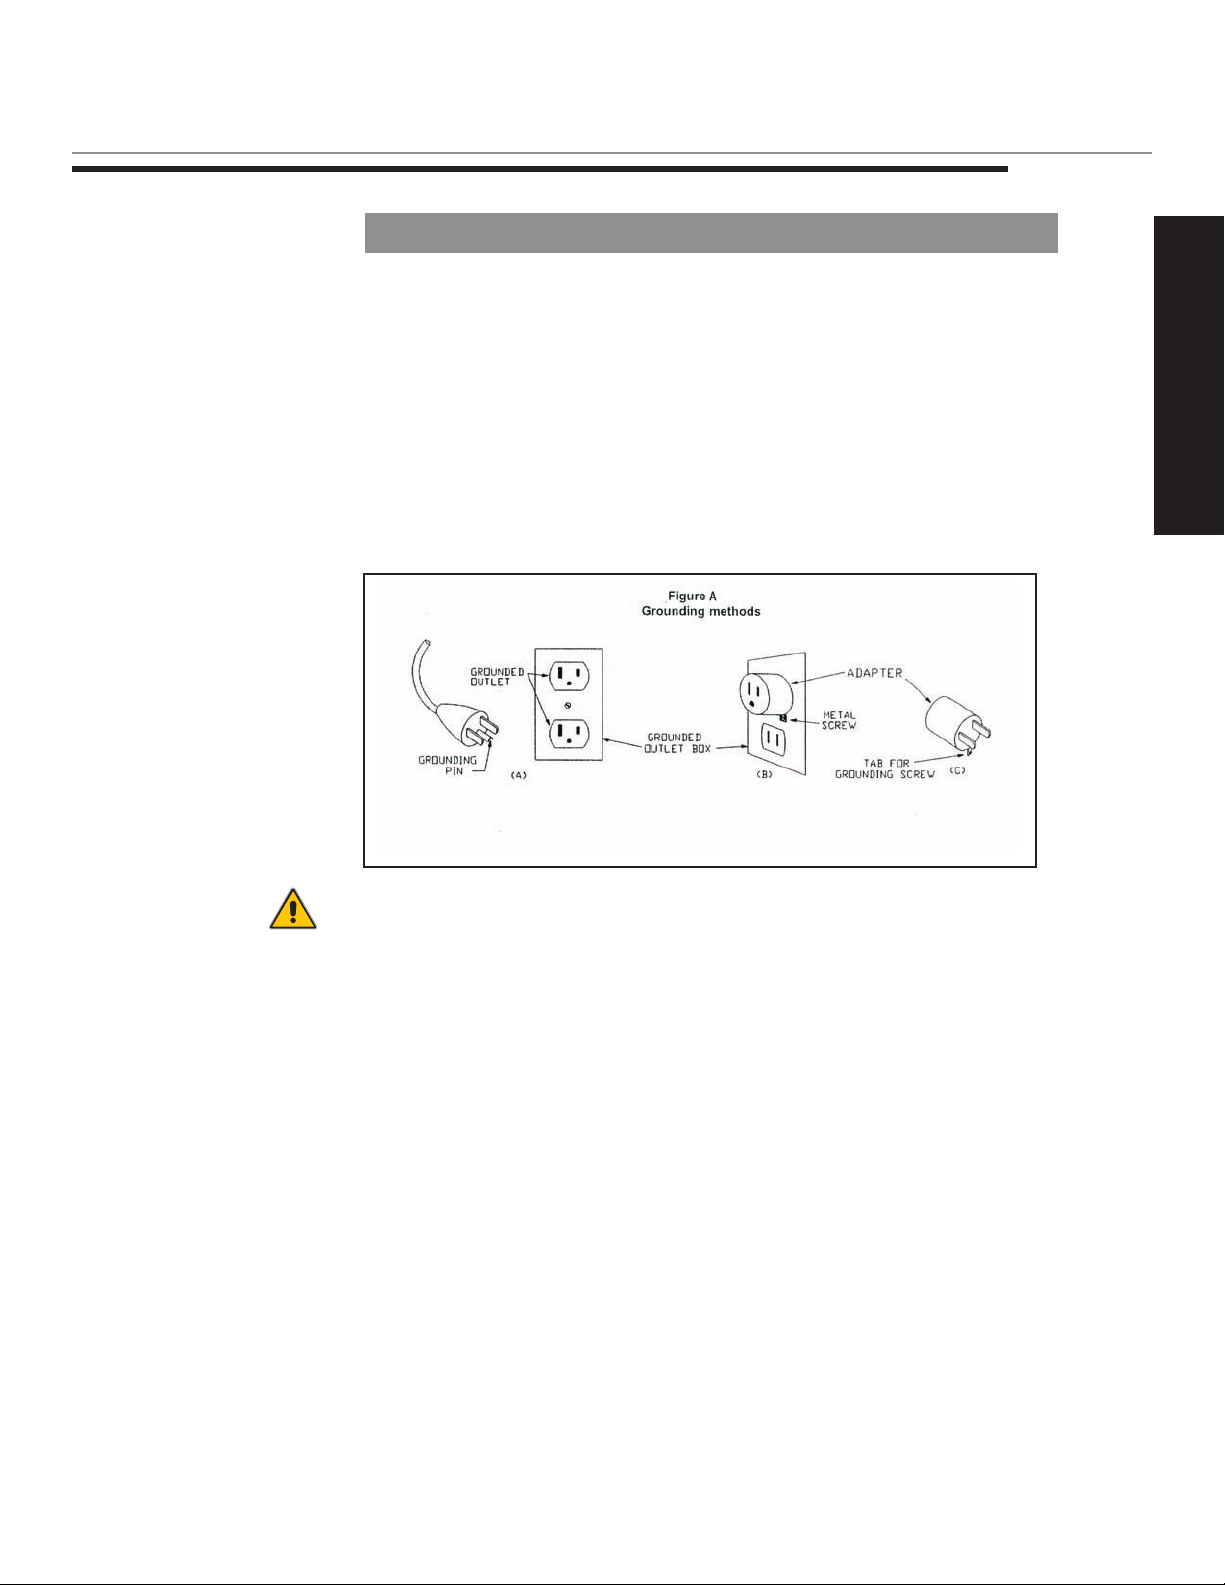
GROUNDING
INSTRUCTIONS
GROU N D ING
GROU N D I N G I N S T RUCTIO N S
This product must be grounded. If it should malfunction or breakdown,
grounding provides a path of least resistance for electrical current to reduce
the risk of electric shock. This product is equipped with a cord having an
equipment-grounding conductor and a grounding plug. The plug must be
plugged into an appropriate outlet that is properly installed and grounded in
accordance with all local codes and ordinances. See U.S. sample below.
GROU N D ING
This product is manufactured for use on a nominal 120-volt circuit for the
United States and a nominal 220-volt circuit for use in Europe. The plug has
a grounding pin in a pattern that varies by country as shown in the Product
Identification section of this manual. Make sure that the product is connected
to an outlet having the same configuration as the plug.
CAUTION
DA NGER -Improper connection of the equipment-grounding conductor
can result in a risk of electric shock. Check with a qualified electrician
or service man if you are in doubt as to whether the product is properly
grounded. Do not modify the plug provided with the product - if it will not
fit the outlet, have a proper outlet installed by a qualified electrician.
To reduce the risk of electric shock, this furnishing has a polarized plug
(one blade is wider than the other). This plug will fit in a polarized outlet
only one way. If the plug does not fit fully in the outlet, reverse the plug. If
it still does not fit, contact a qualified electrician to install the proper outlet.
Do not change the plug in any way.
No adapter should be used with this product.
2
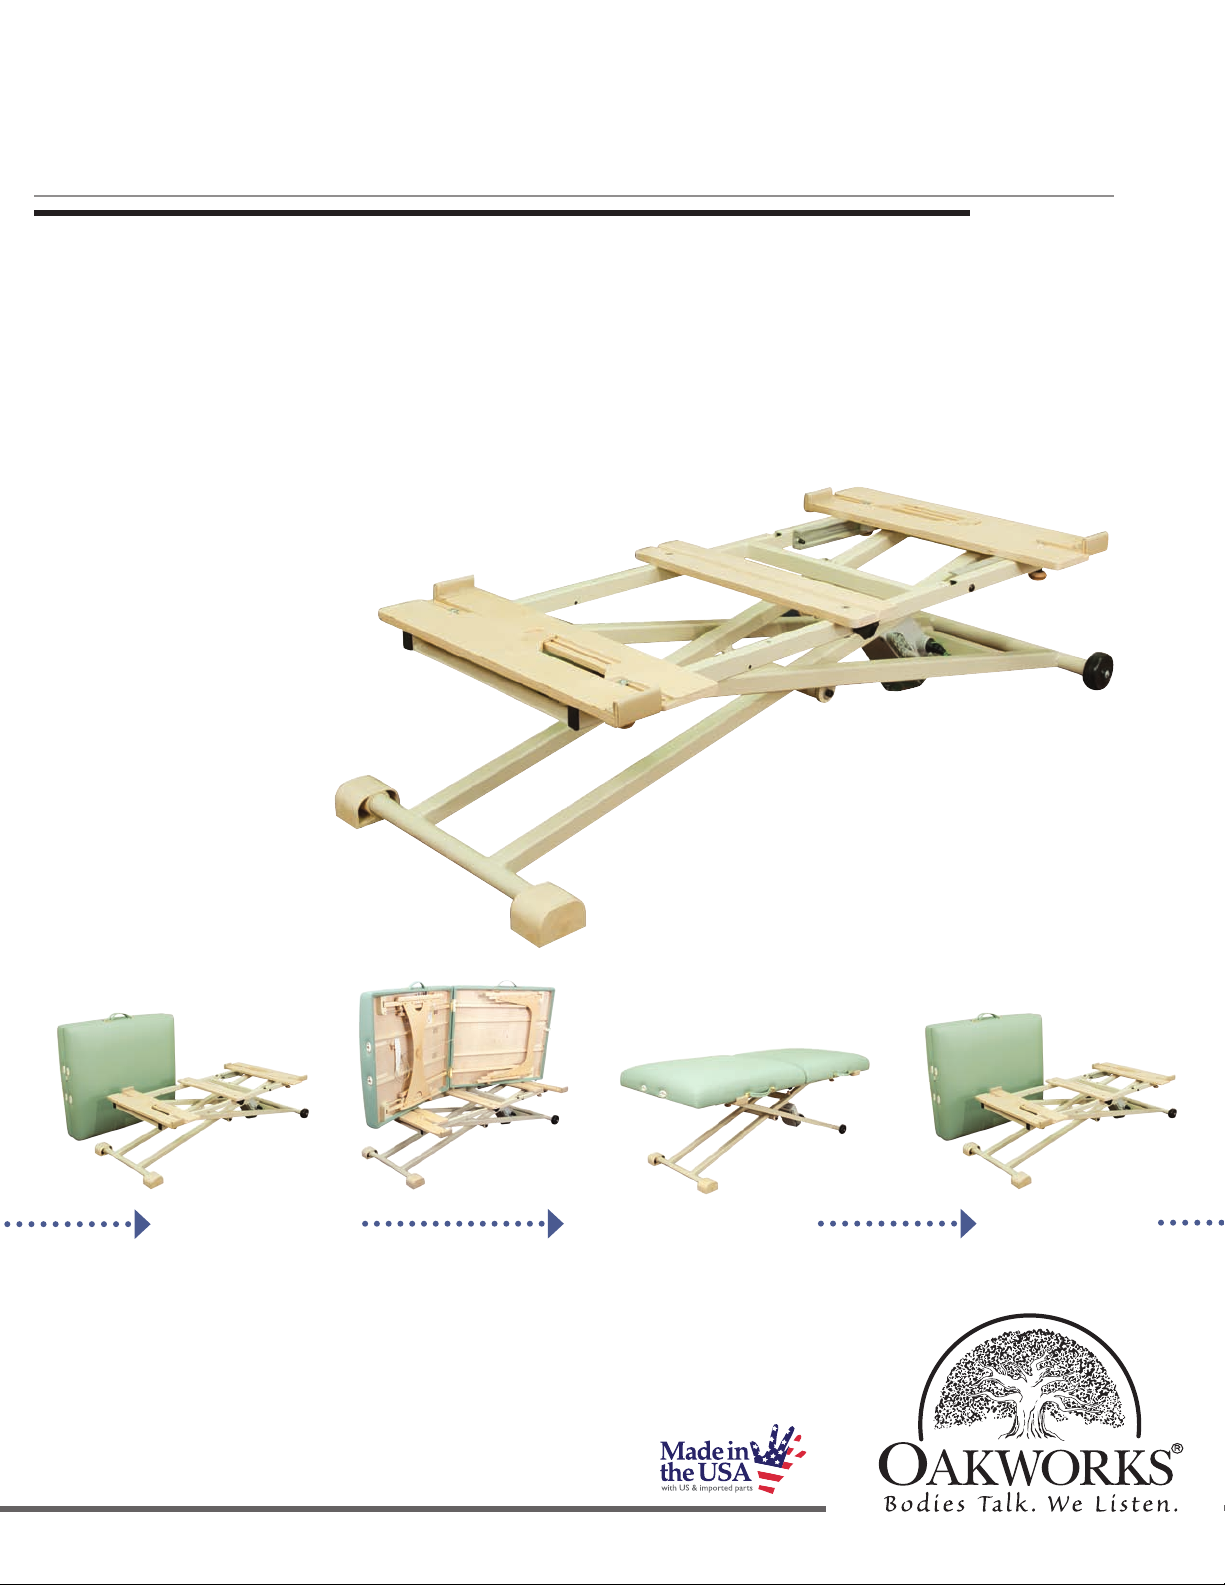
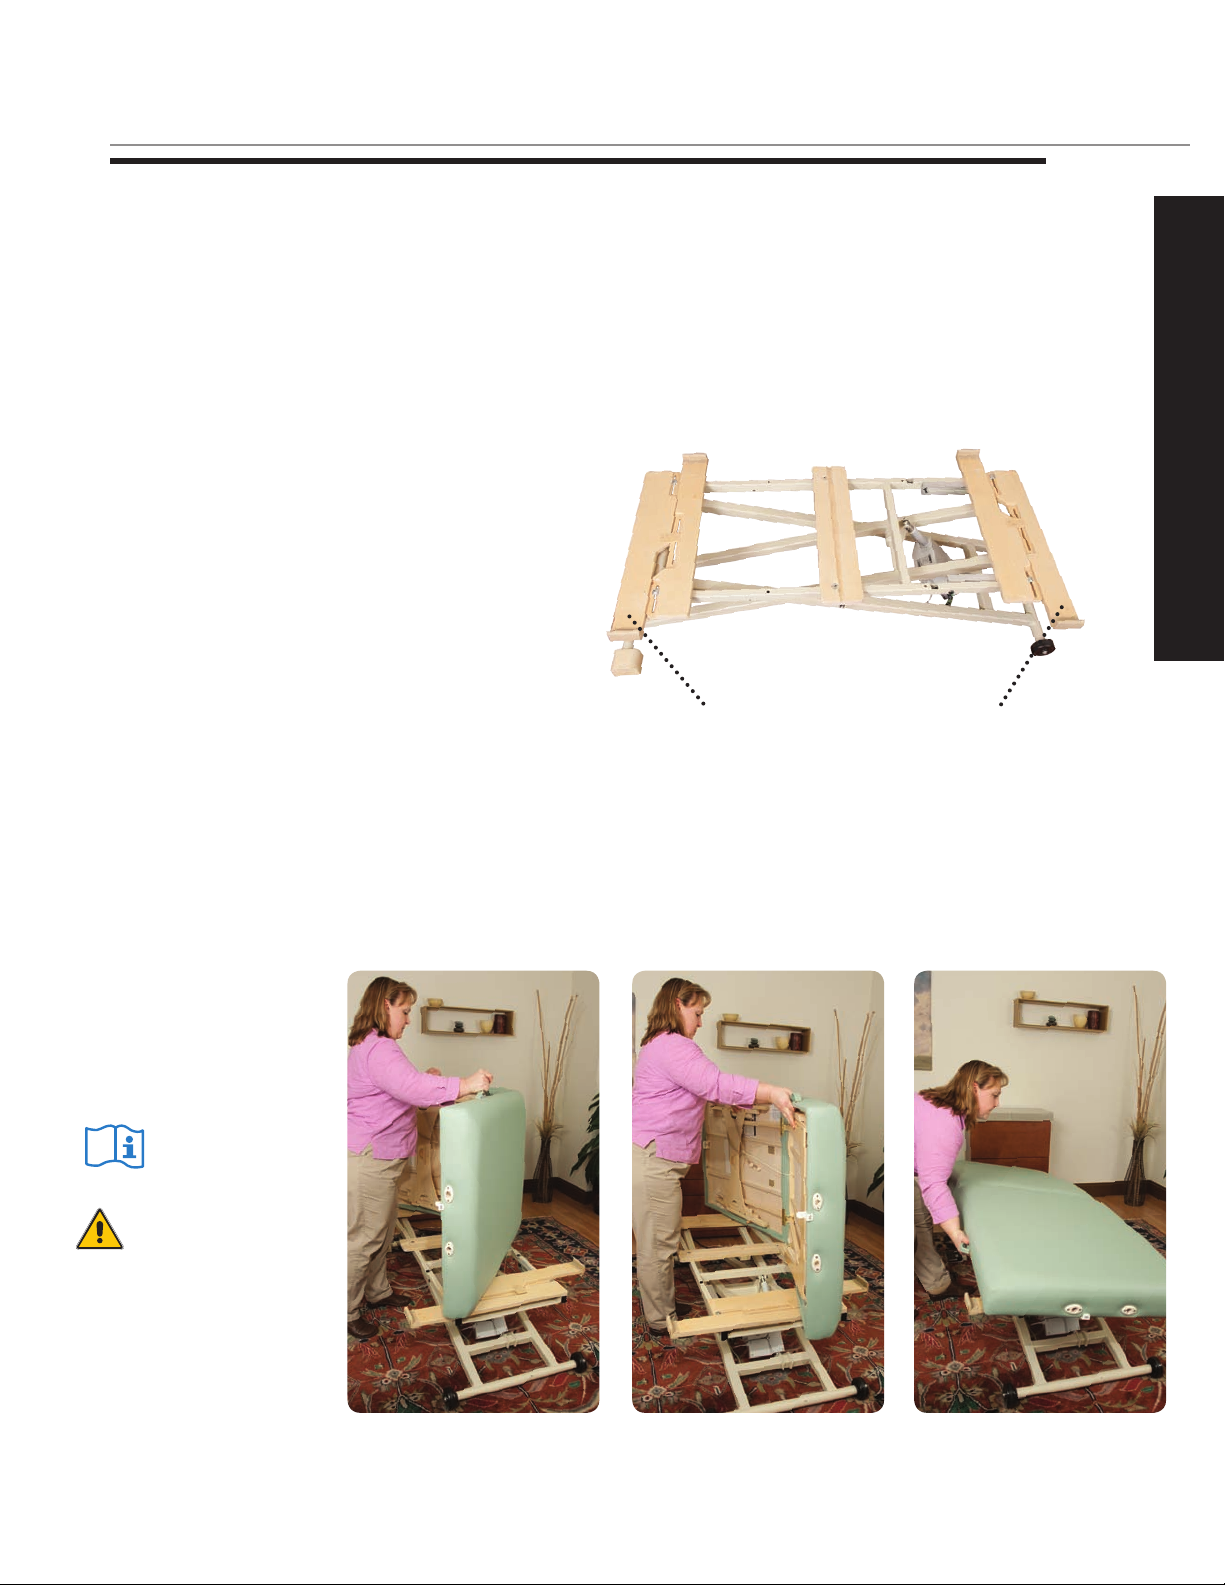
DIRE C T IONS FOR USE
PRODUCT
DESCRIPTION
DIRE C T IONS FOR USE
En d bum per o f
po r tab le ta ble
su p por t
Ad j ust able port able
ta b le s uppo rts ( 2 set s)
kn o bs ( 4)
wh e els (2)
el e ctr ic
mo t or
Ce n ter alig nmen t
gr o ove
Po r tab le ta ble
se c ure s tra p
TABL E SPEC I F I C ATIONS
• Height Range: 20” - 36”
• Width: fits portable tables 27” - 33” wide
• Lift Capacity: Weight limit is defined by the portable table
used with this product. (If the portable table
has a weight limit of 450 lbs, then the system is
450 lbs) up to a maximum of 550 lbs.
• Top: works with rectangular, round
corner, or backrest portable tables
• Electronics: 120v or 220v electric motor
(1) low voltage hand control or
(1) low voltage foot control
St r ap c l eat
Ho o k be h ind the c leat
3

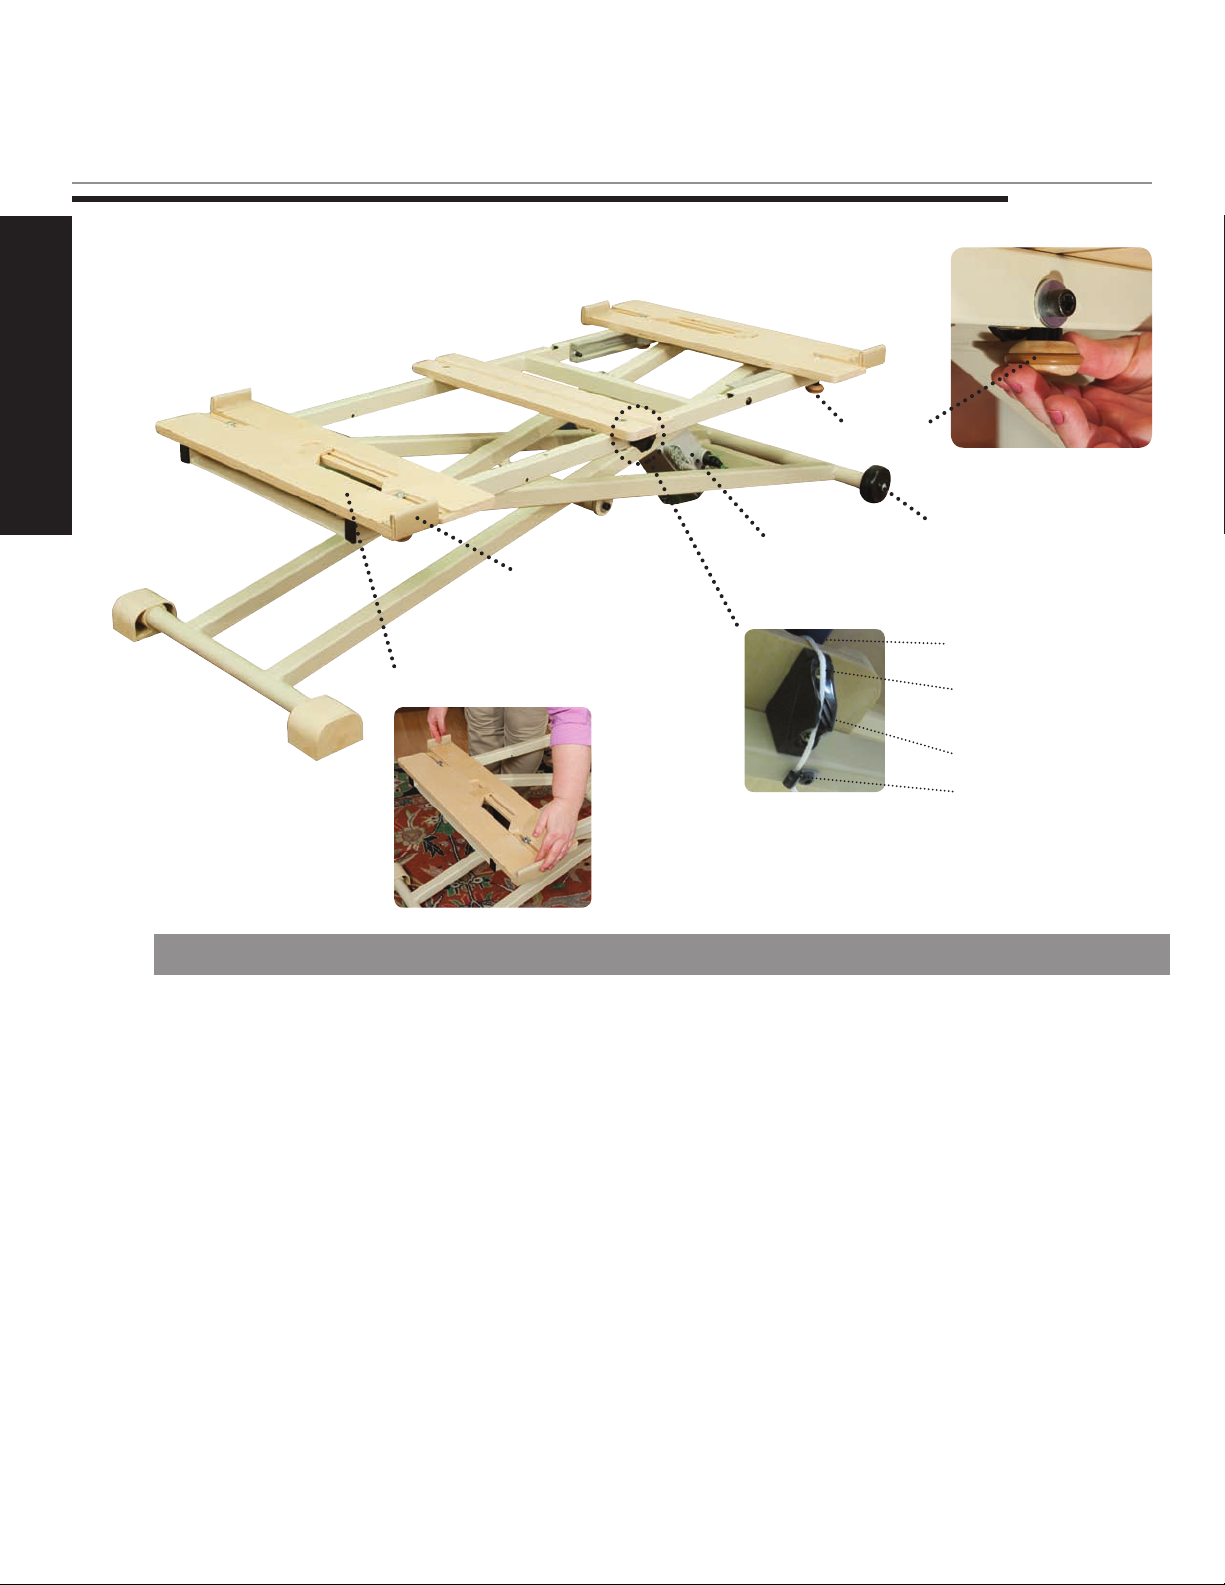
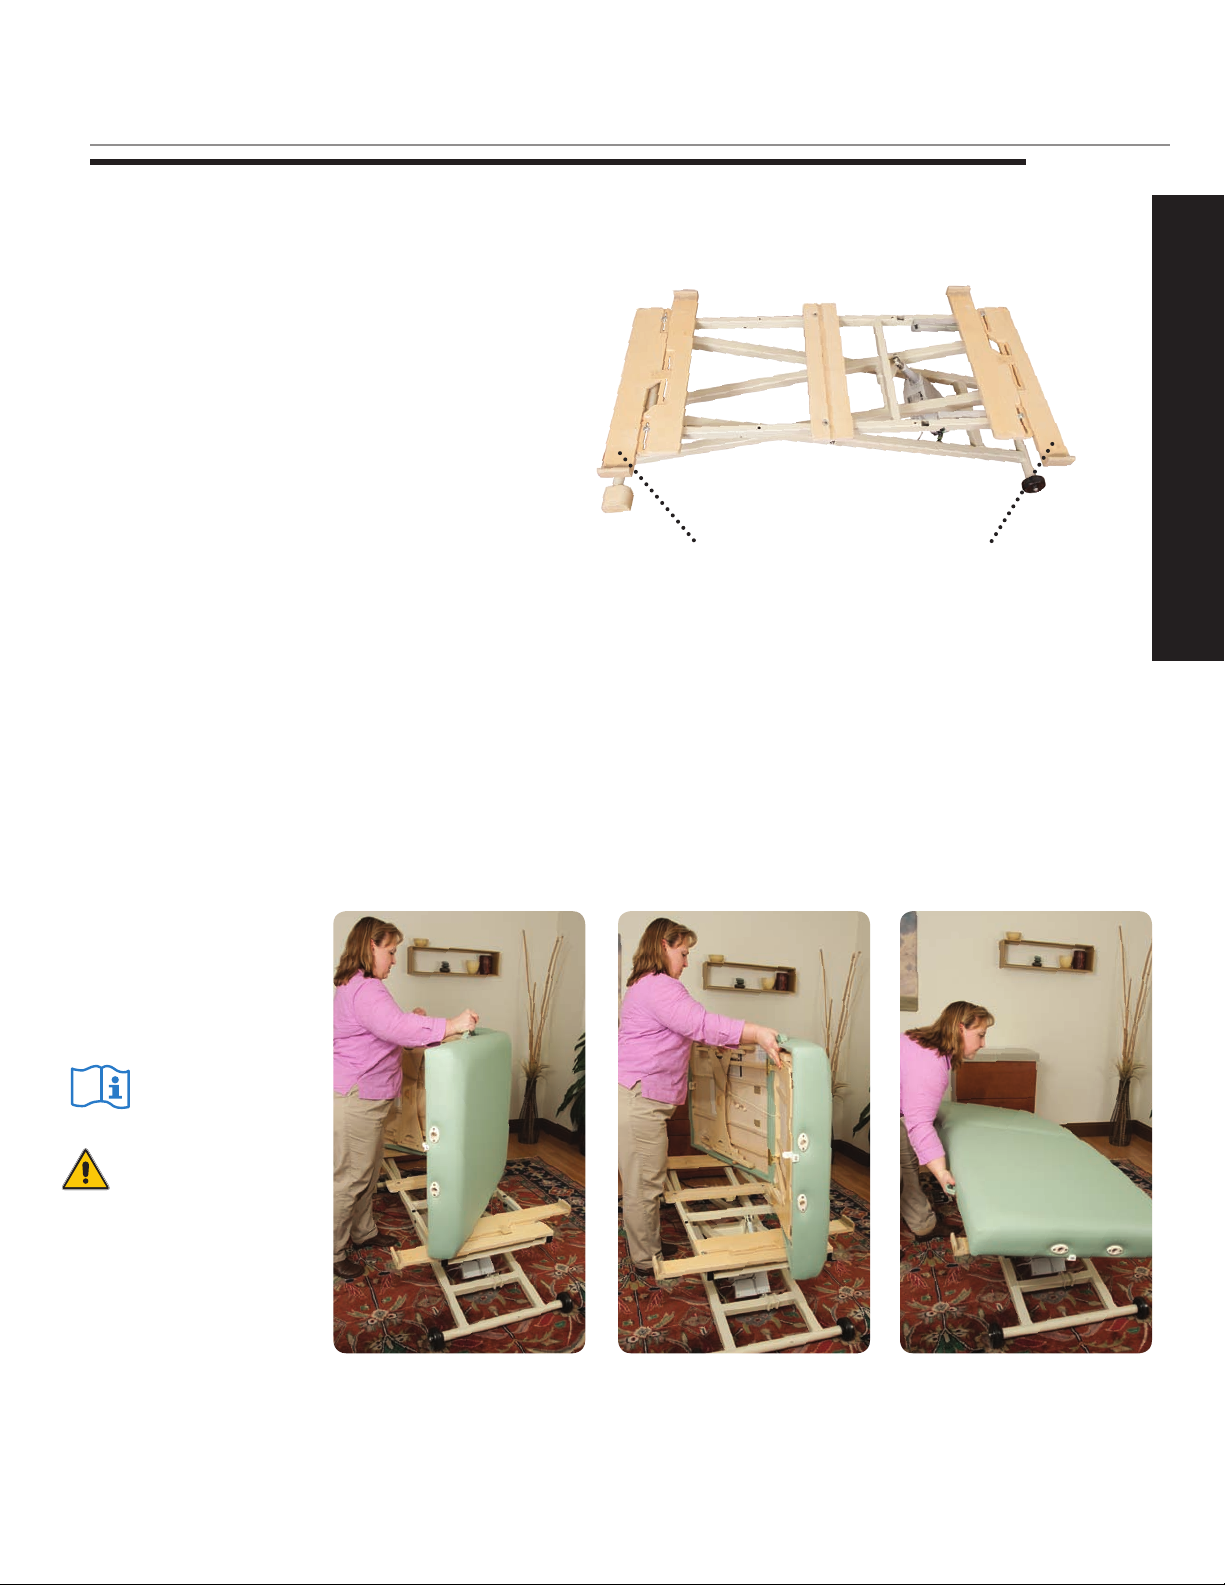
PREP A R E Y O U R P R OLUXE CONVERTIBL E
ONE TIME O NLY P R OLUXE CONVER T I B L E S E T - UP
This is a one time only procedure for each given portable table.
STEP 1
Loosen all knobs below the adjustable
portable table supports by turning the
knob counter-clockwise.
STEP 2
Slide the adjustable portable table
supports to their widest position.
STEP 3
Remove the portable table secure
strap from the strap cleat
(if necessary).
STEP 4
Plug in the Convertible and
lower to its lowest height
PREP A R E Y O U R P R OLUXE CONVERTIBL E
4
PREP A R E Y O U R P R OLUXE CONVERTIBL E
CAUTION
Follow your table
manufacturer’s instructions
for using the Shiatsu option
if your table has them.
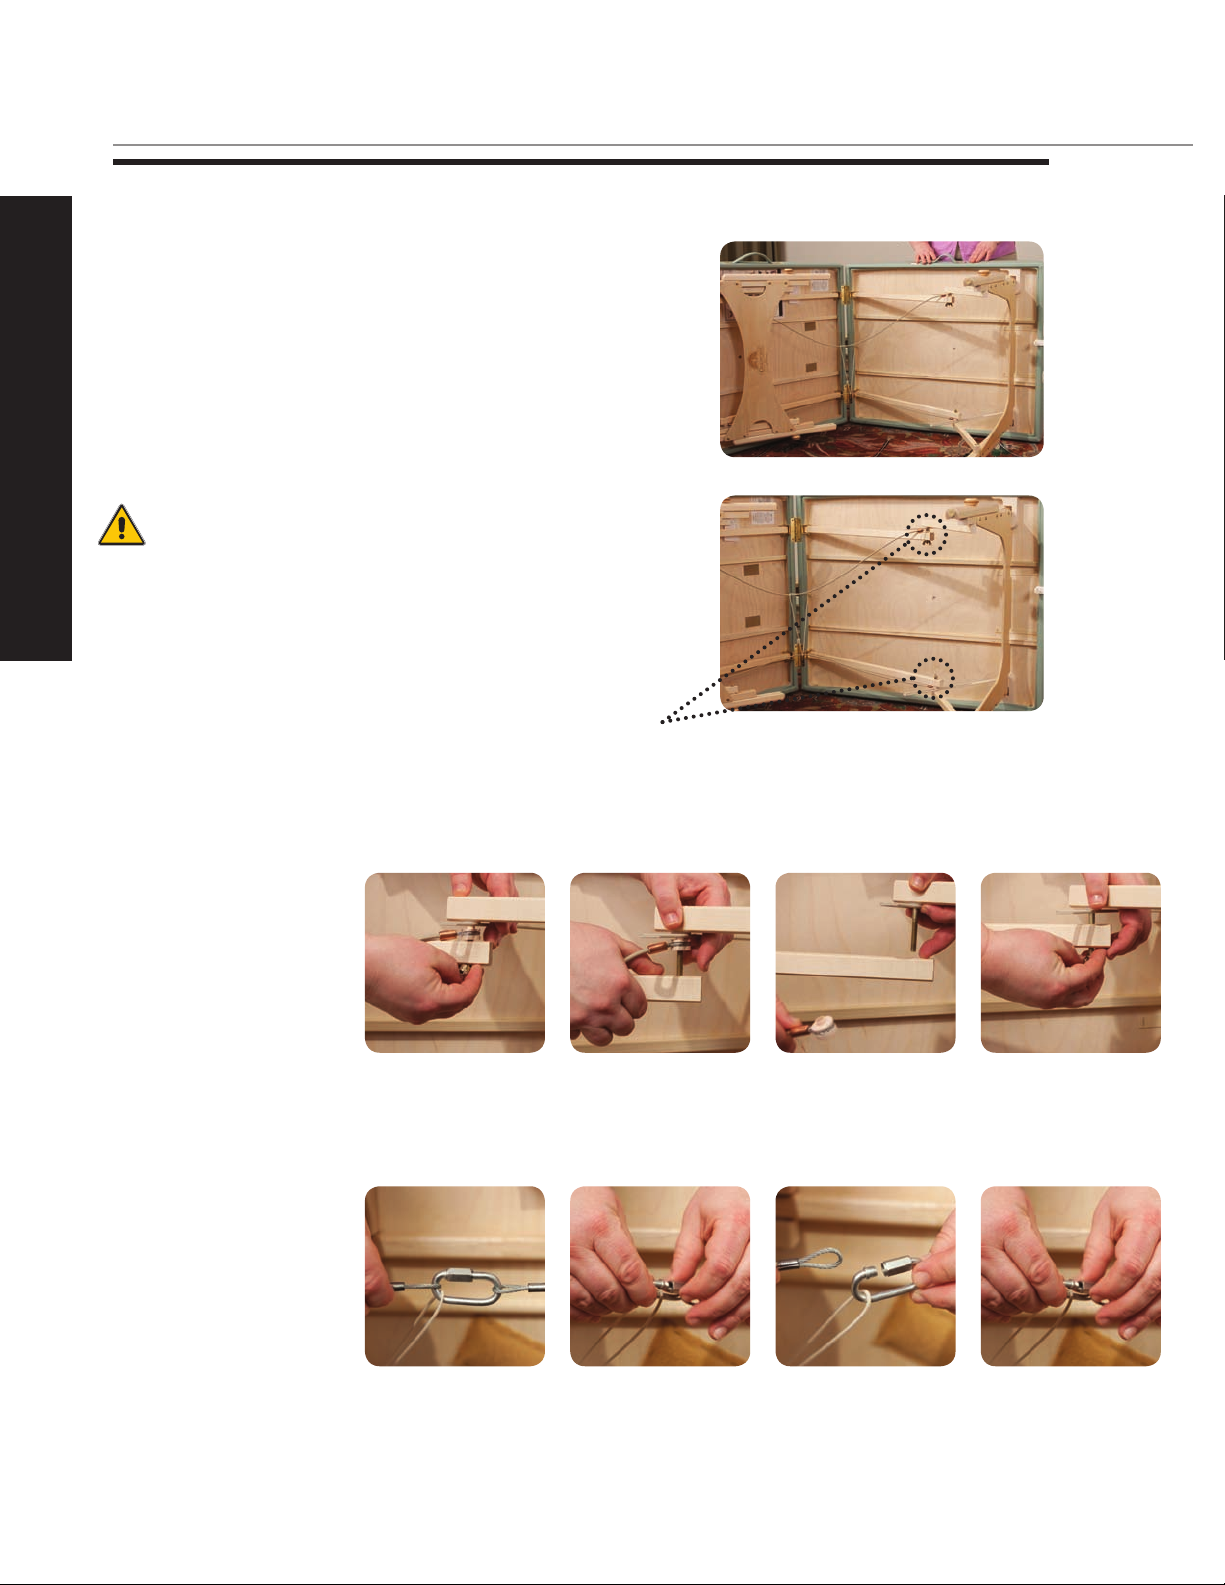
PREP A R E Y O U R P R OLUXE CONVERTIBL E
The instructions shown here
are for general reference
only.
STEP 5
Open your portable table on its side.
STEP 6
Remove the shiatsu cables or bolts on
one side to enable your table to lay at.
There are different types of shiatsu
cables. Follow the directions below
based on the type you have. Or follow
your table manufacturer’s instructions.
Lo c ati on of Shia tsu
re l eas e bol ts or
wi n g nu ts
WING NUT
Remove the wing nut
C-CLAMP
Repeat these steps on both sides of the table. Locations shown above.
Remove wood brace Remove cable Replace wood brace
Repeat these steps on both C-Clamps.
C-Clamp closed Open C-Clamp Remove Shiatsu
cable
and wing nut
Close C-Clamp
NOTE: Some systems may be slightly different such as; cable not between braces, hex nut
instead of wing nut. You may need to use a wrench to remove the bolt.
5
STEP 6
With your ProLuxe
Convertible at its lowest
height, stand at the side
where the portable table
supports are towards the
outside, as shown here.
PREP A R E Y O U R P R OLUXE CONVERTIBL E
Ha ve th e wid es t s id e o f the ad ju st abl e
po rt abl e tab le su pp or ts fa cin g you .
PREP A R E Y O U R P R OLUXE CONVERTIBL E
CAUTION
Be sure to read and follow
the directions on how to
center & secure your
portable table (shown on
page 7) before use.
STEP 7
Load your portable table
A
Lift your portable table onto
the ProLuxe Convertible
base.
B
Open your portable table
so that it is at and position
the bottom away from you.
C
Lower your portable
table onto the ProLuxe
Convertible base.
6
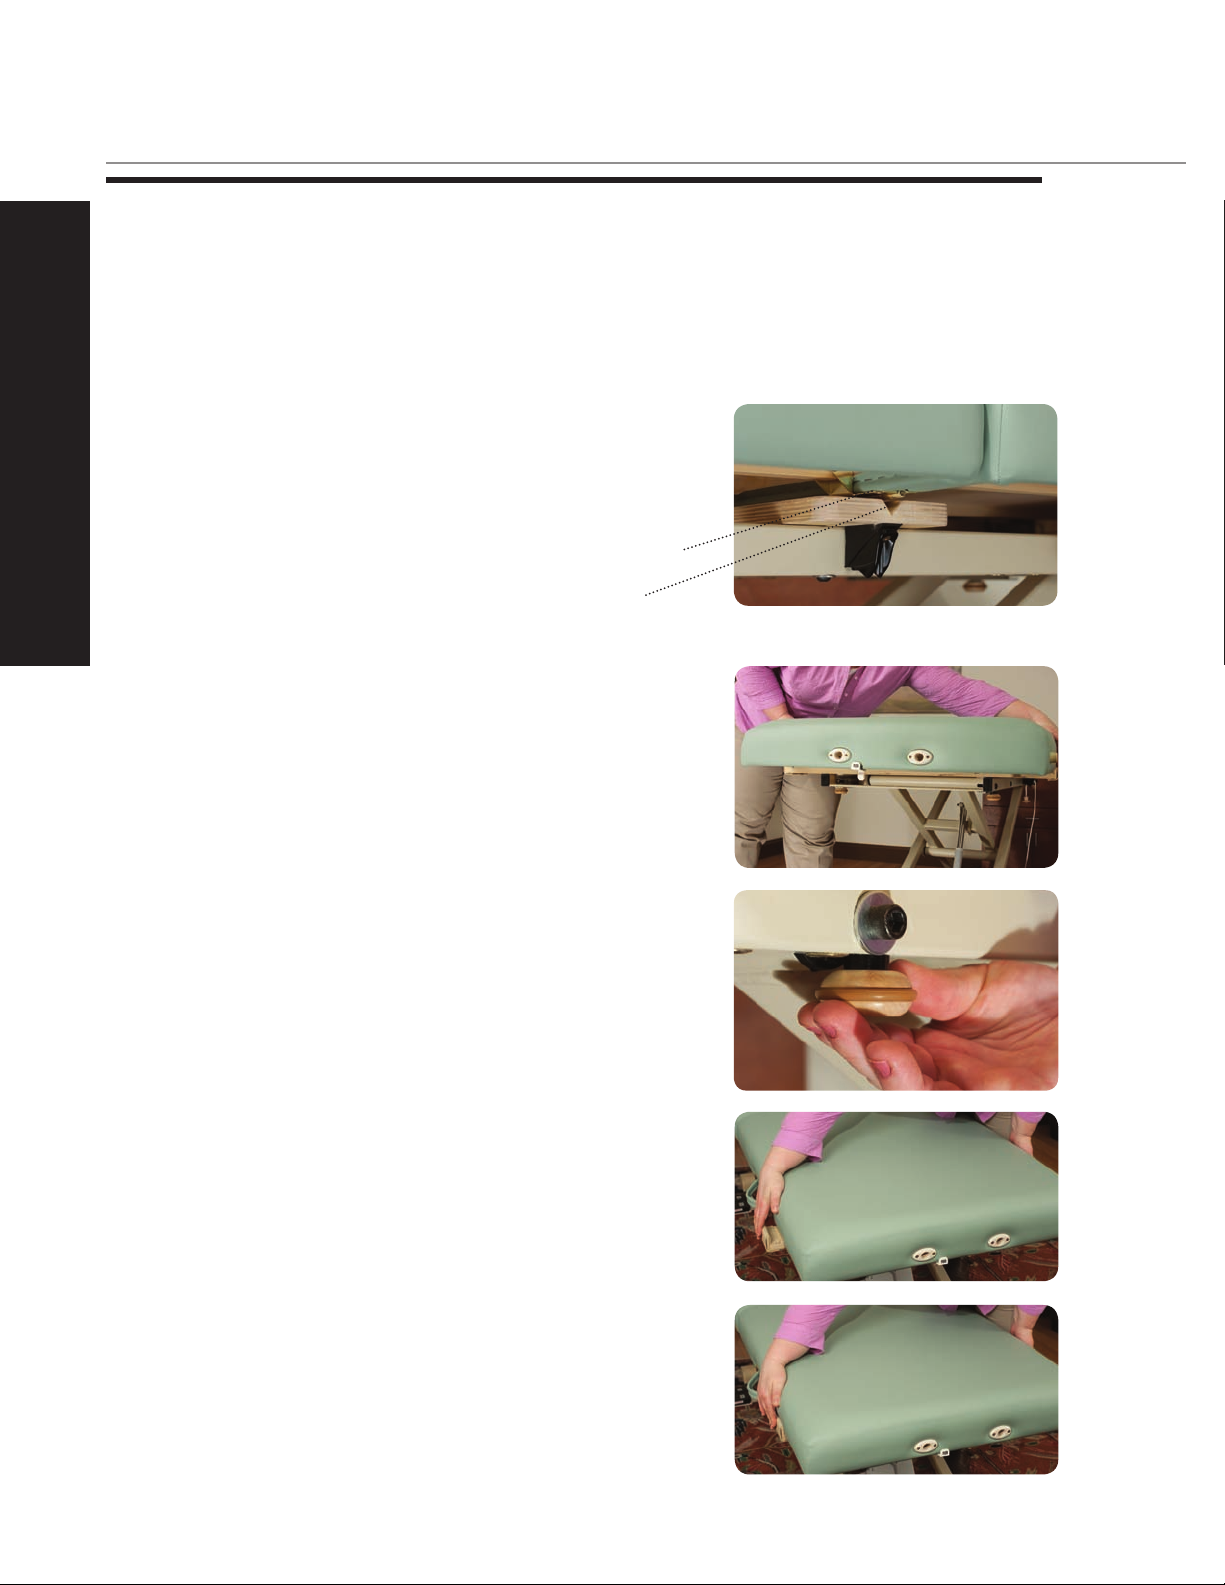
PREP A R E Y O U R P R OLUXE CONVERTIBL E
STEP 8
Once your portable table is on the ProLuxe Convertible, you are ready to align &
secure it to the base.
A
Align the hinge of the portable table
over the center alignment groove.
PREP A R E Y O U R P R OLUXE CONVERTIBL E
B
Visually center the portable table
with the base of the ProLuxe
Convertible on both ends.
Hi n ge o f por tabl e tab le
Ce n ter alig nmen t
gr o ove
C
Be sure that the knobs are loose so
you can adjust the table supports.
D
Keeping the portable table centered,
push the adjustable table supports
together against the sides of your
portable table.
7

E
Once the table supports are snug
against the sides of the portable
table, tighten the knobs to secure
into place.
NOTE: On tables with a backrest,
leave a little space between the end
bumpers and the backrest before
tightening to allow movement of
the backrest.
F
Double check that the hinge of the
portable table is still aligned over the
center alignment groove.
PREP A R E Y O U R P R OLUXE CONVERTIBL E
PREP A R E Y O U R P R OLUXE CONVERTIBL E
CAUTION
The table must be secured
properly to the base to insure
it is safe. Make sure the strap is
through the hook behind the
cleat.
G
Insert strap into the center of the
table. Attach one end of the strap
as shown. Hold strap with one
hand and with the other hand,
slide strap thru the cleat. Then,
loop strap gently through the hook
behind the cleat.
H
Pull the strap thru the center of
the table and down into the space
between the two top parts. Snugly
attach the other end of the strap as
shown. (Pull down, insert in cleat,
pull rmly through cleat, gently
loop cord over small hook behind
the cleat.)
I
Try to lift the portable table to check
for slack. There should not be much,
if any. If it is too loose, retighten
portable table secure strap.
8

DIRE C T IONS FOR USE
DIRE C T IONS FOR USE
CAUTION
Follow your table
manufacturer’s instructions
for using the Shiatsu option
if your table has them.
The instructions shown here
are for general reference
only.
LOAD I N G YO U R POR T A B L E T A B L E
This is done every time you remove and replace your portable table. All the
adjustments to the base do not need to be done again.
STEP 1
Open your portable table on its side.
STEP 2
Remove the shiatsu cables or bolts to
enable your table to lay at. There are
different types of shiatsu cables. Follow
the directions below based on the type
you have. Or follow your table
manufacturer’s instructions.
Lo c ati on of Shia tsu
re l eas e bol ts or
wi n g nu ts
WING NUT
Remove the wing nut
Repeat these steps on both sides of the table. Locations shown above.
Remove wood brace Remove cable Replace wood brace
and wing nut
C-CLAMP
9
C-Clamp closed Open C-Clamp Remove Shiatsu
Repeat these steps on both C-Clamps.
Close C-Clamp
cable
DIRE C T IONS FOR USE
Follow these steps to place your portable table on top of the ProLuxe Convertible. Make sure you have already completed the “one-time” set up section called
“Prepare your ProLuxe Convertible” (page 4-8)
STEP 3
With your ProLuxe
Convertible at its lowest
height, stand at the side
where the portable table
supports are towards the
outside, as shown here.
DIRE C T IONS FOR USE
CAUTION
Be sure to read and follow
the directions on how to
center & secure your
portable table (shown on
page 7) before use.
STEP 4
Lift your portable table onto
the ProLuxe Convertible
base.
Ha ve th e wid es t s id e o f the ad ju st abl e
po rt abl e tab le su pp or ts fa cin g you .
STEP 5
Open your portable table
so that it is at and position
the bottom away from you.
STEP 6
Lower your portable
table onto the ProLuxe
Convertible base.
10

DIRE C T IONS FOR USE
DIRE C T IONS FOR USE
STEP 7
Make sure your portable table ts
down and inside the end bumpers of
the portable table supports.
STEP 8
Align the hinge of the portable table
over the center alignment groove.
Hi n ge o f por tabl e tab le
Ce n ter alig nmen t
gr o ove
CAUTION
The table must be secured
properly to the base to insure
it is safe. Make sure the strap is
through the hook behind the
cleat.
STEP 9
Insert strap into the center of the
table. Attach one end of the strap
as shown. Hold strap with one
hand and with the other hand,
slide strap thru the cleat. Then,
loop strap gently through the hook
behind the cleat.
STEP 10
Pull the strap thru the center of
the table and down into the space
between the two top parts. Snugly
attach the other end of the strap as
shown. (Pull down, insert in cleat,
pull rmly through cleat, gently
loop cord over small hook behind
the cleat.)
STEP 11
Try to lift the portable table to check
for slack. There should not be much,
if any. If it is too loose, retighten
portable table secure strap.
11

REMO V I N G Y O U R PO R T A B LE T A B LE
STEP 1
Remove the portable table
secure strap.
REMO V E YO U R P O R TABLE TABLE
REMO V E YO U R P O R TABLE TABLE
CAUTION
Be sure to secure your
portable table’s Shiatsu
cables according to
manufacturer’s instructions
before use.
STEP 2
Lift your portable table off
the ProLuxe Convertible base.
STEP 3
Reattach your portable table’s cabling system to restore
your table to a safe operating conguration.
Fold your portable table & you’re ready to go!
12

DIRE C T IONS FOR USE
DIRE C T IONS FOR USE
CAUTION
When operating the
controls and making any
and all adjustments to the
table, move hands and
feet away from the working
mechanism of the table.
HAND CONTR O L OPE R A T I ONS
DIRE C T I O NS F O R U S E - C ONTROL S
The ProLuxe Convertible comes with choice of either hand or foot
control for easy height adjustments.
CAUTION
Children must be supervised
when around this equipment
by a responsible adult.
CAUTION
When operating the
controls be sure to observe
all cautions and warnings
given in the manual to
prevent injury to both
operator and client.
Foot Control:
DOWN
Hand Control:
UP
UP
DOWN
13

DIRE C T IONS FOR USE
USIN G YOUR PROLU X E CON V E R T IBLE - A C C E S SORIES
All of your portable table accessories will work with the ProLuxe Convertible.
Install according to manufacturer’s instructions.
FACE REST
Shown here with QuickLock™ Face
Rest & Boiance™ crescent.
ARM HAMMOCK
Shown here with QuickLock™
Face Rest, Aero·Cel crescent & Arm
Hammock.
DIRE C T IONS FOR USE
USIN G YOUR PROLU X E CON V E R T IBLE - A P P L I CATION
Adjust the height of your table to achieve optimal working height for multiple
therapists, clients or treatments without straining your body.
The powerful motor lifts up to 550 lbs. over a 16” height range, and the
super stable design insures your clients feel safe.
14

MAIN T E NANCE
GENE R A L CA R E OF EQUIPM E N T CO M P O N ENTS
•
Use only a mild solution of 4:1 diluted non-alcohol cleaner such as 409®, Fantastik® or some other non-abrasive
cleaner to wipe down the metal surfaces. Apply with a damp (not wet) lint-free cloth. Be sure excess liquid
does not drip onto, or into, any of the electrical controls or mechanisms. Be sure that the unit is unplugged
before cleaning these areas. Wipe these areas carefully with a lint free cloth.
• Electronic and or manual lift mechanisms require no general maintenance or lubrication.
MAIN T E NANCE
• If the table will be out of use for an extended period of time, the power cord should be unplugged from the
receptacle. To prevent inadvertent damage to the plug or cord, the cable should be coiled and secured with a wire
tie or rubber band.
• It is important to visually inspect your tabe on a quarterly basis to ensure all components are working properly
and safely. Be sure to tighten all bolts to be sure they are secure. Over time they may work their way loose,
leading to an unsafe condition.
ELEC T R I C AL S P E CIFICA T I O N S
Designed For: North America Europe Japan/Korea
Input Service
Current Draw
Maximum Monentary
Current Draw
Voltage Output
(control box)
Power Consumption
Electric Shock
Protection
Tabletop Applied Part
Table Top IEC 529
Rating
Mode of Operation
120 VAC/20amps
2.7 amps
9.0 amps
24 VDC
330 watts
Class 1 Equipment
Type B Applied Part
IPX0
Continuous Operation
@ 10% Duty Cycle
230 VAC/10amps
1.5 amps
5.0 amps
24 VDC
330 watts
Class 1 Equipment
Type B Applied Part
IPX0
Continuous Operation @
10% Duty Cycle
100 VAC/20amps
1.5 amps
11.0 amps
24 VDC
330 watts
Class 1 Equipment
Type B Applied Part
IPX0
Continuous Operation @
10% Duty Cycle
15
Storage &
Transport
Temperature: 32º - 100º F 0º-38º C Humidity: 60% relative humidity Pressure: no limitations known
During transport, DO NOT stack containers.
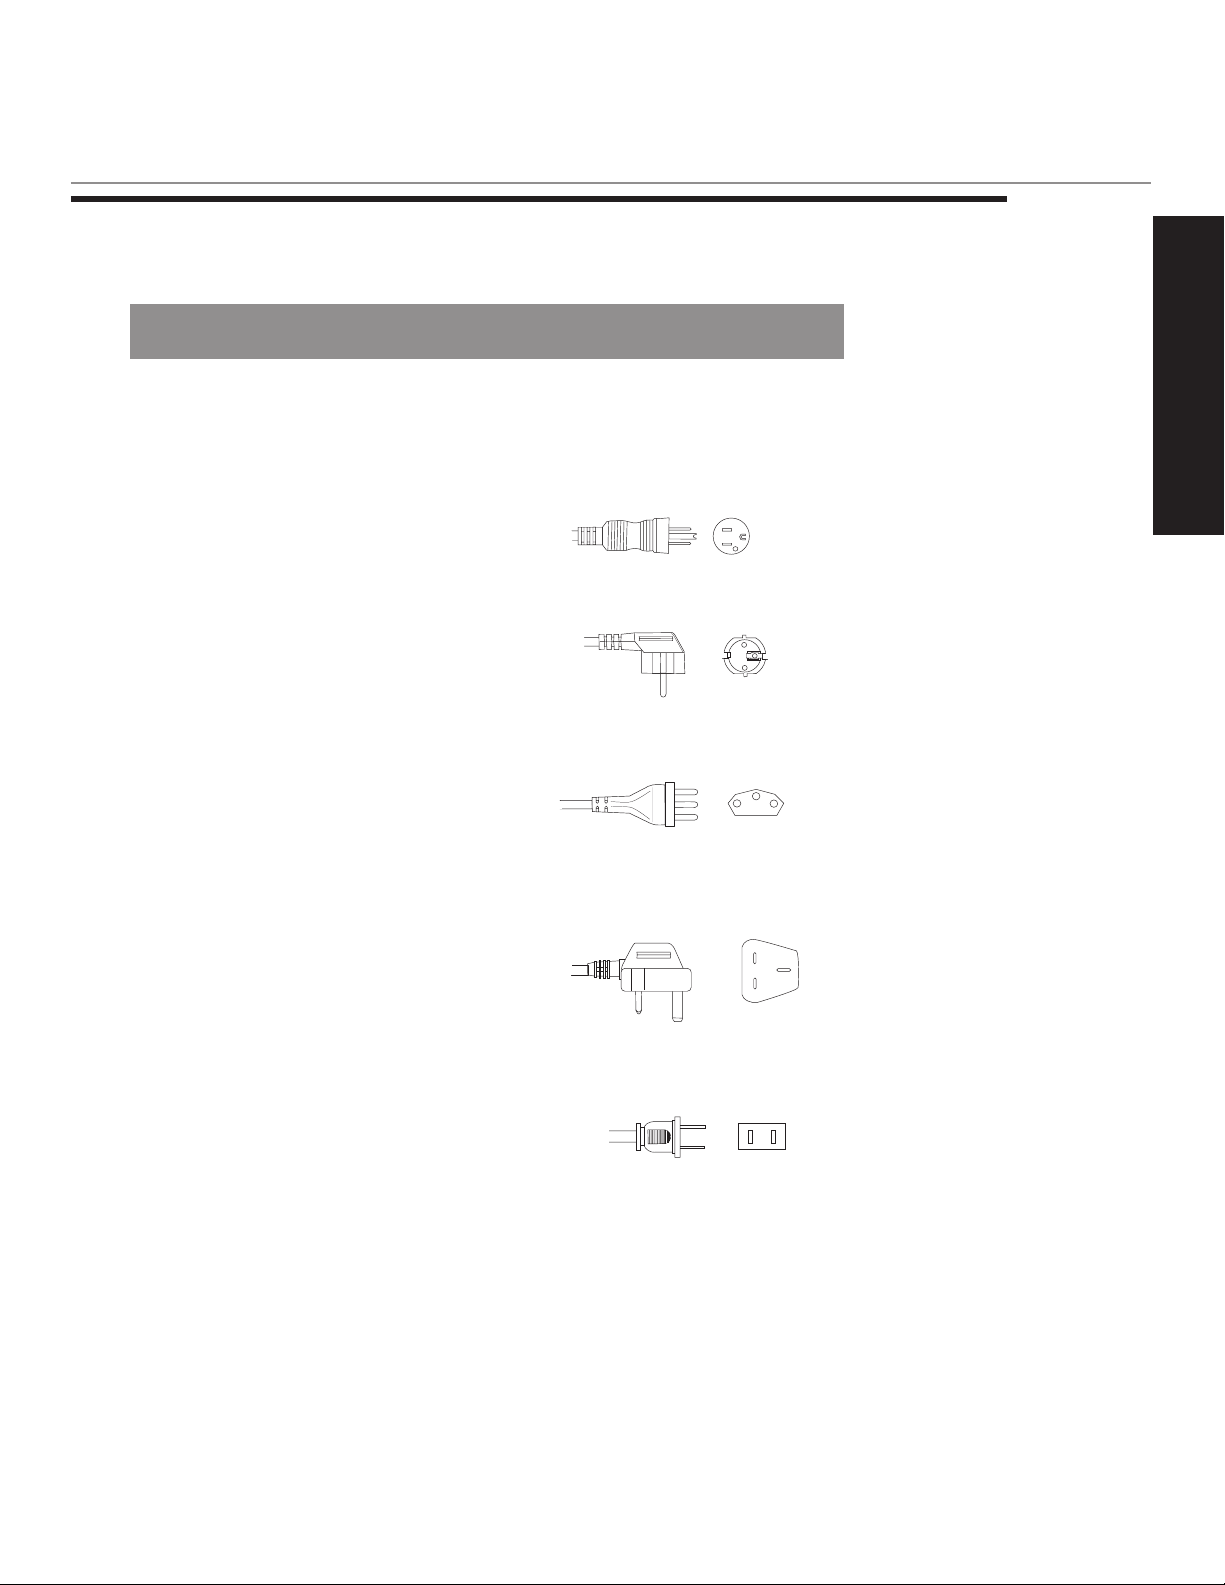
P R O DUCT I DENTIF I C A T ION - PO W E R LE A D PLU G S
Oak work s® Part #: Voltage (AC) Power Cord Plug
POWE R PL U G S
5097-11 120v 60 Hz 3 prong grounded
hospital grade;
North America
5097-3 220v 50 Hz Continental Plug; Europe
5097-4 220v 50 Hz Swiss plug; Switzerland
5097-2 220v 50 Hz British plug;
United Kingdom
POWE R PL U G S
N/A 100v 50/60 Hz 2 prong polarized plug;
(Plug comes Japan & Korea
w/Control Box;
order Control Box
pn #4046-3)
16

™
PROLUXE
CON TAC T I NFO R MAT ION :
Oak works® Inc.
923 East Wellspring Road
New Freedom, PA 17349
Toll Free (USA only): 800-916-4613
Phone: 717-235-6807
FAX: 717-235-6798
convertible
I N S T R U C T I O N M A N U A L
www. o a k w orks.c o m
Manual Part Number MMMNST0022
Revision date: 05.10.11
Edition 1, English
Printed in USA
 Loading...