

Page 1

COLE-PARMER
Sodium Ion Electrodes
Instruction Manual
GENERAL INSTRUCTIONS
The Cole-Parmer Sodium Ion Electrodes are used to quickly, simply,
accurately, and economically measure sodium ion concentrations in
aqueous solutions.
Required Equipment
1) A pH/mV meter or an ion meter, either line
operated or portable.
2) Semi-logarithmic 4-cycle graph paper for
preparing calibration curves when using the
meter in the mV mode.
3) A magnetic stirrer.
4) Cole-Parmer Sodium Ion Combination Glass
Electrode, Catalog No. 27502-43, or the ColeParmer Sodium Ion Combination Epoxy Electrode,
Catalog No. 27504-30.
5) Cole-Parmer Filling Solution, Catalog No.
27503-82, for both the 27502-43 and
27504-30 electrodes.
Required Solutions
1) Deionized or distilled water for solution and
standard preparation.
2) Cole-Parmer Ionic Strength Adjuster (ISA),
4M NH4Cl/4M NH4OH, Catalog No. 27503-54. To
prepare, add 214 grams of reagent grade
ammonium chloride (NH4Cl) to a 1000 ml
volumetric flask about half full of distilled
water. Add 270 ml of concentrated ammonium
hydroxide (NH4OH) under a hood, swirl to
dissolve, allow to cool and dilute to the mark
with distilled water. Cap the flask and
invert several times to mix the solution.
3) Cole-Parmer Sodium Electrode Storage Solution,
5 M NaCl, Catalog No. 27503-53. To prepare,
add 29.2 grams of reagent grade sodium
chloride (NaCl) to 100ml of distilled water.
To each 100 ml storage solution, add 2 ml of
1
Find Quality Products Online at: [email protected]
www.GlobalTestSupply.com
Page 2

ISA. ELECTRODES MUST NOT BE STORED IN
DISTILLED WATER OR AIR.
4) Dilute Electrode Rinse Solution. To prepare,
add 20 ml of ISA to a one liter volumetric
flask and dilute to the mark with distilled
water. Use this solution to rinse the
electrode between measurements. DO NOT RINSE
WITH DISTILLED WATER.
5) Cole-Parmer Sodium Standard, 0.1M NaCl,
Catalog No. 27503-33. To prepare, half fill a
1 liter volumetric flask with distilled water
and add 5.84 grams of reagent grade NaCl.
Swirl the flask gently to dissolve the solid.
Fill the flask to the mark with distilled
water. Cap the flask and invert several times
to mix the solution.
6) Cole-Parmer Sodium Standard, 1000 ppm Na
+
,
Catalog No. 27503-34. To prepare, half fill a
1 liter volumetric flask with distilled water
and add 2.542 grams of reagent grade NaCl.
Swirl the flask to dissolve the solid. Fill
the flask to the mark with distilled water.
6) Cole-Parmer Sodium Standard, 100 ppm Na+. To
prepare, half fill a 1 liter volumetric flask
with distilled water and add 0.254 grams of
reagent grade NaCl. Swirl the flask to
dissolve the solid. Fill the flask to the
mark with distilled water.
GENERAL PREPARATION
Electrode Preparation
Remove the rubber cap covering the electrode tip and the rubber
insert covering the filling hole of the reference electrode. Fill
the combination electrode with the filling solution shipped with
the electrode to a level just below the fill hole. No preparation
is required with a sealed reference electrode. Connect the
electrode to the proper terminal(s) of the meter as recommended by
the meter manufacturer. Soak the sodium electrode tip overnight
in the electrode storage solution.
2
Find Quality Products Online at: [email protected]
www.GlobalTestSupply.com
Page 3

Electrode Slope Check (with standard pH/mV meter).
(check the electrode each day)
1) To a 150 ml beaker, add 100 ml of distilled water and
2 ml of ISA. Place the beaker on a magnetic stirrer and
begin stirring at a constant rate. After assuring that
the meter is in the mV mode, lower the electrode tip
into the solution.
2) Using a pipet, add 1 ml of 0.1M or 1000 ppm sodium
standard to the beaker. When the reading is stable,
record the millivolt reading.
3) Using a pipet, add 10 ml of the same sodium standard
used above to the beaker. When the reading has
stabilized, record the millivolt reading.
4) Determine the difference between the two readings. A
difference of 56
+
2 mV indicates correct electrode
operation assuming the solution temperature is between
20o and 25oC. See the
TROUBLESHOOTING
section if the
potential change is not within this range.
Slope
is defined as the change in potential observed when the
concentration changes be a factor of 10.
Electrode Slope Check (with ion meter)
(check electrode each day)
1) Prepare standard sodium solutions whose
concentrations vary by tenfold. Use either the 0.1M
NaCl or the 1000 ppm Na
+
standard. Use the serial
dilution method for this preparation.
2) To a 150 ml beaker, add 100 ml of the lower value
standard and 2 ml of ISA. Place the beaker on the
magnetic stirrer and begin stirring at a constant rate.
Lower the electrode tip into the solution. Assure that
the meter is in the concentration mode.
3) Adjust the meter to the concentration of the standard
and fix the value in the memory according to the meter
manufacturer's instructions.
4) Rinse the electrode with the electrode rinse solution
and blot dry.
5) To a 150 ml beaker, add 100 ml of the higher value
standard and 2 ml of ISA. Place the beaker on a
magnetic stirrer and begin stirring at a constant rate.
3
Find Quality Products Online at: [email protected]
www.GlobalTestSupply.com
Page 4

Lower the electrode tip into the solution.
6) Adjust the meter to the concentration of the standard
and fix the value in the memory.
7) Read the electrode slope according to the meter
manufacturer's instructions. Correct electrode
operation is indicated by a slope of 90-100%. See the
TROUBLESHOOTING
section if the slope is not within this
range.
MEASUREMENT
Measuring Hints
All samples and standards should be at the same temperature for
precise measurement, preferably ambient temperature. A difference
of 1 degree C in temperature will result in about a 2% measurement
error. The electrodes should not be used above 70oC.
Constant, but not violent, stirring is necessary for accurate
measurement. Magnetic stirrers can generate sufficient heat to
change the solution temperature. To counteract this effect, place
a piece of insulating material, such as styrofoam sheet or
asbestos sheet, between the stirrer and the beaker.
Always rinse the electrode with electrode rinse solution from a
wash bottle. Blot dry with a clean, dry tissue between readings
to prevent solution carryover. Never use distilled water.
Store the electrode in electrode storage solution between
measurements. Do not store in air or distilled water. Always
soak new electrodes overnight in electrode storage solution prior
to first use. When making low level sodium measurements, use a
dilute sodium chloride storage solution, adjusting the pH by
adding ISA, for a storage medium.
Plastic labware should be used for low level measurements.
All measurements should be made in basic solution. All samples
and standards should be adjusted to a pH>9 with ISA.
For samples with high ionic strength, prepare standards whose
composition is similar to the sample.
Always check to see that the membrane is free from air bubbles
after immersion into standard or sample.
4
Find Quality Products Online at: [email protected]
www.GlobalTestSupply.com
Page 5

Sample Requirements
The sample measuring range is pH 9-12. Use the ISA recommended to
adjust the pH for best accuracy. Make sure that the samples and
standards are at the same temperature. The glass electrode
sensing bulb will not be attacked by most organic solvents.
Units of Measurement
Sodium concentrations are measured in units of parts per million,
equivalents per liter, moles per liter, or any other convenient
concentration unit. Table 1 indicates some of the concentration
units.
TABLE 1
: Concentration Unit Conversion Factors
ppm Na+ moles/liter Na+
229.90 1.0 x 10⁻²
22.99 1.0 x 10⁻³
2.30 1.0 x 10⁻⁴
Measurement Procedure
Direct Measurement
A simple procedure for measuring a large number of samples. A
single meter reading is all that is required for each sample. The
ionic strength of samples and standards should be made the same by
adjustment with ISA for all sodium solutions. The temperature of
both sample solution and of standard solutions should be the same.
Direct Measurement of Sodium (using a standard pH/mV meter)
1) By serial dilution of the 0.1 M or 1000 ppm
standards, prepare 10
-2
, 10-3, and 10-4M or 100
and 10 ppm sodium standards. Add 2 ml of ISA
per 100 ml of standard. Prepare standards
with a composition similar to the samples if
the samples have an ionic strength above 0.1M.
2) Place the most dilute solution (10-4M or 10
ppm) on the magnetic stirrer and begin
stirring at a constant rate. After assuring
that the meter is in the mV mode, lower the
electrode tip into the solution. When the
reading has stabilized, record the mV reading.
3) Place the midrange solution (10-3M or 100 ppm)
5
Find Quality Products Online at: [email protected]
www.GlobalTestSupply.com
Page 6
on the magnetic stirrer and begin stirring.
After rinsing the electrode with electrode
rinse solution, blot dry and immerse the
electrode tip in the solution. When the
reading has stabilized, record the mV reading.
4) Place the most concentrated solution (10
-2
M or
1000 ppm) on the magnetic stirrer and begin
stirring. After rinsing the electrode with
electrode rinse solution, blot dry and immerse
the electrode tip in the solution. When the
reading has stabilized, record the mV reading.
5) Using the semi-logarithmic graph paper, plot
the mV reading (linear axis) against the
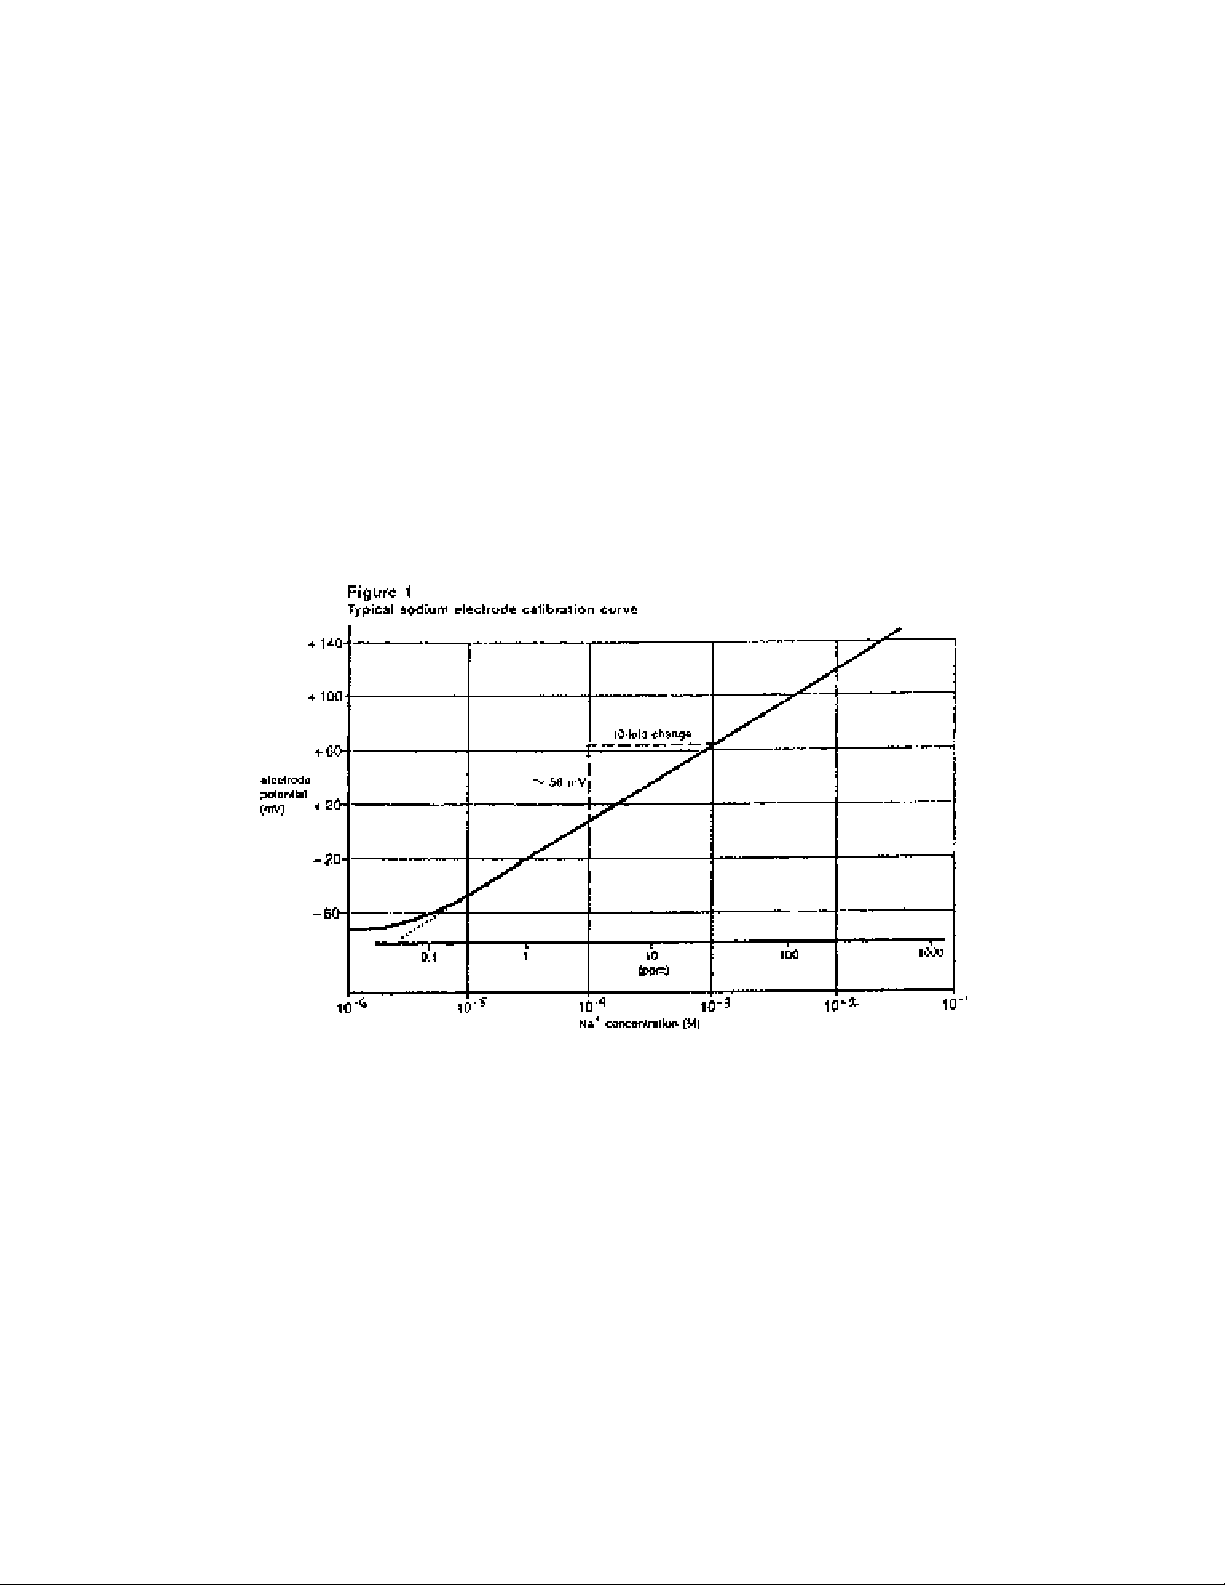
concentration (log axis). A typical
calibration curve can be found in Figure 1.
A calibration curve is constructed on semi-
logarithmic graph paper when using a pH/mV meter in
the millivolt mode. The measured electrode
potential in mV (linear axis) is plotted against
the standard concentration (log axis). In the
linear region of the curve, only three standards
are necessary to determine a calibration curve. In
the non-linear region, additional points must be
measured. The direct measurement procedures are for
the linear portion of the curve. The non-linear
portion of the curve requires the use of low level
procedures.
6
Find Quality Products Online at: [email protected]
www.GlobalTestSupply.com
Page 7

Extrapolate the curve down to about 5.0x10
-5
M
or 1 ppm. For measurements below this level,
follow the instructions for low-level measurement.
6) To a clean, dry 150 ml beaker, add 100 ml of
sample and 2 ml of ISA. Place the beaker on
the magnetic stirrer and begin stirring.
After rinsing the electrode tip with sodium
rinse solution, place the electrode tip in the
solution. When the reading has stabilized,
record the mV reading. Determine the
concentration directly from the calibration
curve.
7) The calibration should be checked every two
hours. Assuming no change in ambient
temperature, place the electrode tip in the
mid-range standard. After the reading has
stabilized, compare it to the original reading
recorded in Step 3 above. A reading
difference by more than 0.5 mV or a change in
the ambient temperature will necessitate the
repetition of Steps 2-5 above. A new
calibration curve should be prepared daily.
Direct Measurement of Sodium (using an ion meter)
1) By serial dilution of the 0.1M or 1000 ppm
sodium standard, prepare two sodium standards
whose concentration is near the expected
sample concentration. Measure out 100 ml of
each standard into individual 150 ml beakers
and add 2 ml of ISA to each.
2) Place the more dilute solution on the magnetic
stirrer and begin stirring at a constant rate.
Assure that the meter is in the concentration
mode.
3) Lower the electrode tip into the solution.
4) Adjust the meter to the concentration of the
sodium standard and fix the value in the
memory according to the meter manufacturer's
instructions after stabilization of the
reading.
5) Rinse the electrode with electrode rinse
solution and blot dry.
7
Find Quality Products Online at: [email protected]
www.GlobalTestSupply.com
Page 8

6) Place the more concentrated solution on the
magnetic stirrer and begin stirring at a
constant rate.
7) Lower the electrode tip into the solution.
8) Adjust the meter to the concentration of the
sodium standard and fix the value in the
memory according to the meter manufacturer's
instructions after stabilization of the
reading.
9) For low level measurements, place the rinsed,
dried electrode into a solution containing 100
ml of distilled water and 2 ml of ISA. After
stabilization, fix the blank value in the
meter according to the meter manufacturer's
instructions.
10) Place 100 ml of the sample and 2 ml of ISA in
a 150 ml beaker. Place the beaker on the
magnetic stirrer, and begin stirring.
11) Immerse the electrode tip in the solution and
wait for the reading to stabilize. Read the
concentration directly from the meter display.
12) The calibration should be checked every two hours.
Assuming no change in ambient temperature, place the
electrode tip in the first sodium standard. After the
reading has stabilized, compare it to the original
reading recorded in Step 4 above. A reading difference
by more than 0.5 mV or a change in the ambient
temperature will necessitate the repetition of Steps 2-8
above. The meter should be recalibrated daily.
Low Level Sodium Determination (using a standard pH/mV meter)
This procedure is recommended for solutions with ionic strength
less than 1.0 x 10⁻²M and a sodium concentration less than 1 x 10⁻⁵M
or 1 ppm. If the solution is high in ionic strength, but low in
sodium, use the same procedure, but prepare a calibration solution
with a composition similar to the sample. Use plastic labware for
low sodium measurements.
8
Find Quality Products Online at: [email protected]
www.GlobalTestSupply.com
Page 9

1) Using 20 ml of standard ISA, dilute to 100 ml with
distilled water.
2) Dilute 20 ml of the outer chamber filling
solution to 100 ml with distilled water and
fill the reference electrode if using a double
junction reference electrode.
3) Dilute 1 ml of the 0.1M standard to 100 ml to
prepare a 1.0 x 10
-3
M standard solution for
measurements in moles per liter. Dilute 10 ml
of the 1000 ppm standard solution to 100 ml to
prepare a 100 ppm standard solution for
measurements in ppm. Add 1 ml of low level
ISA to each 100 ml of standard. Standards
should be prepared fresh daily.
4) To a 150 ml plastic beaker, add 100 ml of
distilled water and 1 ml of low level ISA.
Add NH4OH, if necessary, to adjust the pH
above 9. Place the beaker on the magnetic
stirrer and begin stirring at a constant rate.
5) Place the electrode tip in the solution.
Assure that the meter is in the mV mode.
6) Add increments of the 1.0 x 10⁻³M or 100 ppm
standard as given in Table 2 below.
7) After the reading has stabilized, record the
mV reading after each addition.
TABLE 2: Stepwise Calibration for Low Level Sodium Measurements
Added Concentration
Step Pipet Volume (ml) M ppm
1 A 0.1 1.0 x 10⁻⁶ 0.10
2 A 0.1 2.0 x 10
-6
0.20
3 A 0.2 4.0 x 10⁻⁶ 0.40
4 A 0.2 6.0 x 10⁻⁶ 0.60
5 A 0.4 9.9 x 10⁻⁶ 0.99
6 B 2.0 2.9 x 10⁻⁵ 2.91
7 B 2.0 4.8 x 10
-5
4.76
Pipet A = 1 ml graduated pipet
9
Find Quality Products Online at: [email protected]
www.GlobalTestSupply.com
Page 10

Pipet B = 2 ml pipet
Solution = additions of 1.0 x 10
-3
M or 100 ppm
standard to 100 ml of distilled
water and 1 ml of low level ISA.
8) On semi-logarithmic graph-paper, plot the
millivolt reading (linear axis) against the
concentration (log axis) as in Figure 1.
9) Rinse the electrode with electrode rinse
solution and blot dry.
10) Measure out 100 ml of the sample into a 150 ml
plastic beaker, add 1 ml of low level ISA, and
place the beaker on the magnetic stirrer.
Begin stirring. Adjust the pH, if necessary,
to above 9. Lower the electrode tip into the
solution. After the reading has stabilized,
record the mV reading and determine the
concentration from the low level calibration
curve.
11) Prepare a new low level calibration curve
daily. Check the calibration curve every two
hours by repeating Steps 3-8.
Low Level Sodium Determination (using an ion meter)
Follow the procedure given for normal sodium determinations using
an ion meter and the blank correction procedure. Use plastic
labware for low level sodium measurement.
ELECTRODE CHARACTERISTICS
Reproducibility
Electrode measurements reproducible to
+
2% can be obtained if the
electrode is calibrated every hour. Factors such as
temperature fluctuations, drift, and noise limit reproducibility.
Reproducibility is independent of concentration within the
electrode's operating range.
Interferences
Table 3 lists some common cations that, if present in high enough
levels, will cause electrode interferences and measurement errors
or electrode drift when using the sodium ion electrodes.
Most samples do not contain or contain very little of the cations
shown in Table 3. The ammonium ion (NH
+
), found in the
4
recommended ISA, will not result in an error if all samples and
10
Find Quality Products Online at: [email protected]
www.GlobalTestSupply.com
Page 11

standards have the same level of ISA present.
Electrode drift and slow response could indicate the presence of
high interference from the ions listed. Soak the electrodes in
electrode storage solution when this happens to restore proper
response. See
Measuring Hints
section.
TABLE 3
Specified Levels of Sodium.
:
Levels of Interfering Ions Resulting in a 10% Error at
Interference 1.0x10⁻⁴M 1.0x10⁻³M 1.0x10⁻²M
Li+1 5X10⁻⁴M 5X10⁻³M 5X10⁻²M
K+1 1X10⁻²M 1X10⁻¹M 1M
Rb+1 3X10⁻¹M 3M --
+1
NH
3X10⁻¹M 3M --
4
Ag+1 3X10⁻⁹M 3X10⁻⁸M 3X10⁻⁷M
Tl+1 5X10⁻²M 5X10⁻¹M --
Interference 1 ppm 10ppm 100ppm
Li+1 1.5ppm 15ppm 150ppm
K+1 17ppm 170ppm 1700ppm
Rb+1 1.1X10⁴ppm 1.1X10⁵ppm --
+1
NH
1.8X10³ppm 1.8X10⁴ppm --
4
Ag+1 .0001ppm .001ppm .01ppm
Tl+1 4.5X1O3ppm 4.5X10⁴ppm --
11
Find Quality Products Online at: [email protected]
www.GlobalTestSupply.com
Page 12

Temperature Influences
Samples and standards should be at the same temperature, since
electrode potentials are influenced by changes in temperature.
A 1 degree C difference in temperature results in a 2% error at
the 10
-3
M level. Because of the solubility equilibria on which the
electrode depends, the absolute potential of the reference
electrode changes slowly with temperature. The slope of the
sodium electrode, as indicated by the factor "S" in the Nernst
equation, also varies with temperature. Table 4 indicates the
variation of theoretical slope with temperature.
Provided that temperature equilibria has occurred, the sodium ion
electrodes can be used at temperatures from -5o to 70oC. Room
temperature measurements are recommended, since measurements at
temperatures markedly different from room temperature may require
equilibrium times up to one hour. The electrode should not be
used at temperatures above 70oC, since damage to the membrane may
result.
TABLE 4: Temperature vs Values for the Electrode Slope
Temperature (oC) "S" (slope)
0 54.20
10 56.18
20 58.16
25 59.16
30 60.15
40 62.13
50 64.11
Electrode Response
Plotting the electrode mV potential against the sodium
concentration on semi-logarithmic paper results in a straight line
with a slope of about 56 mV per decade. Refer to Figure 1.
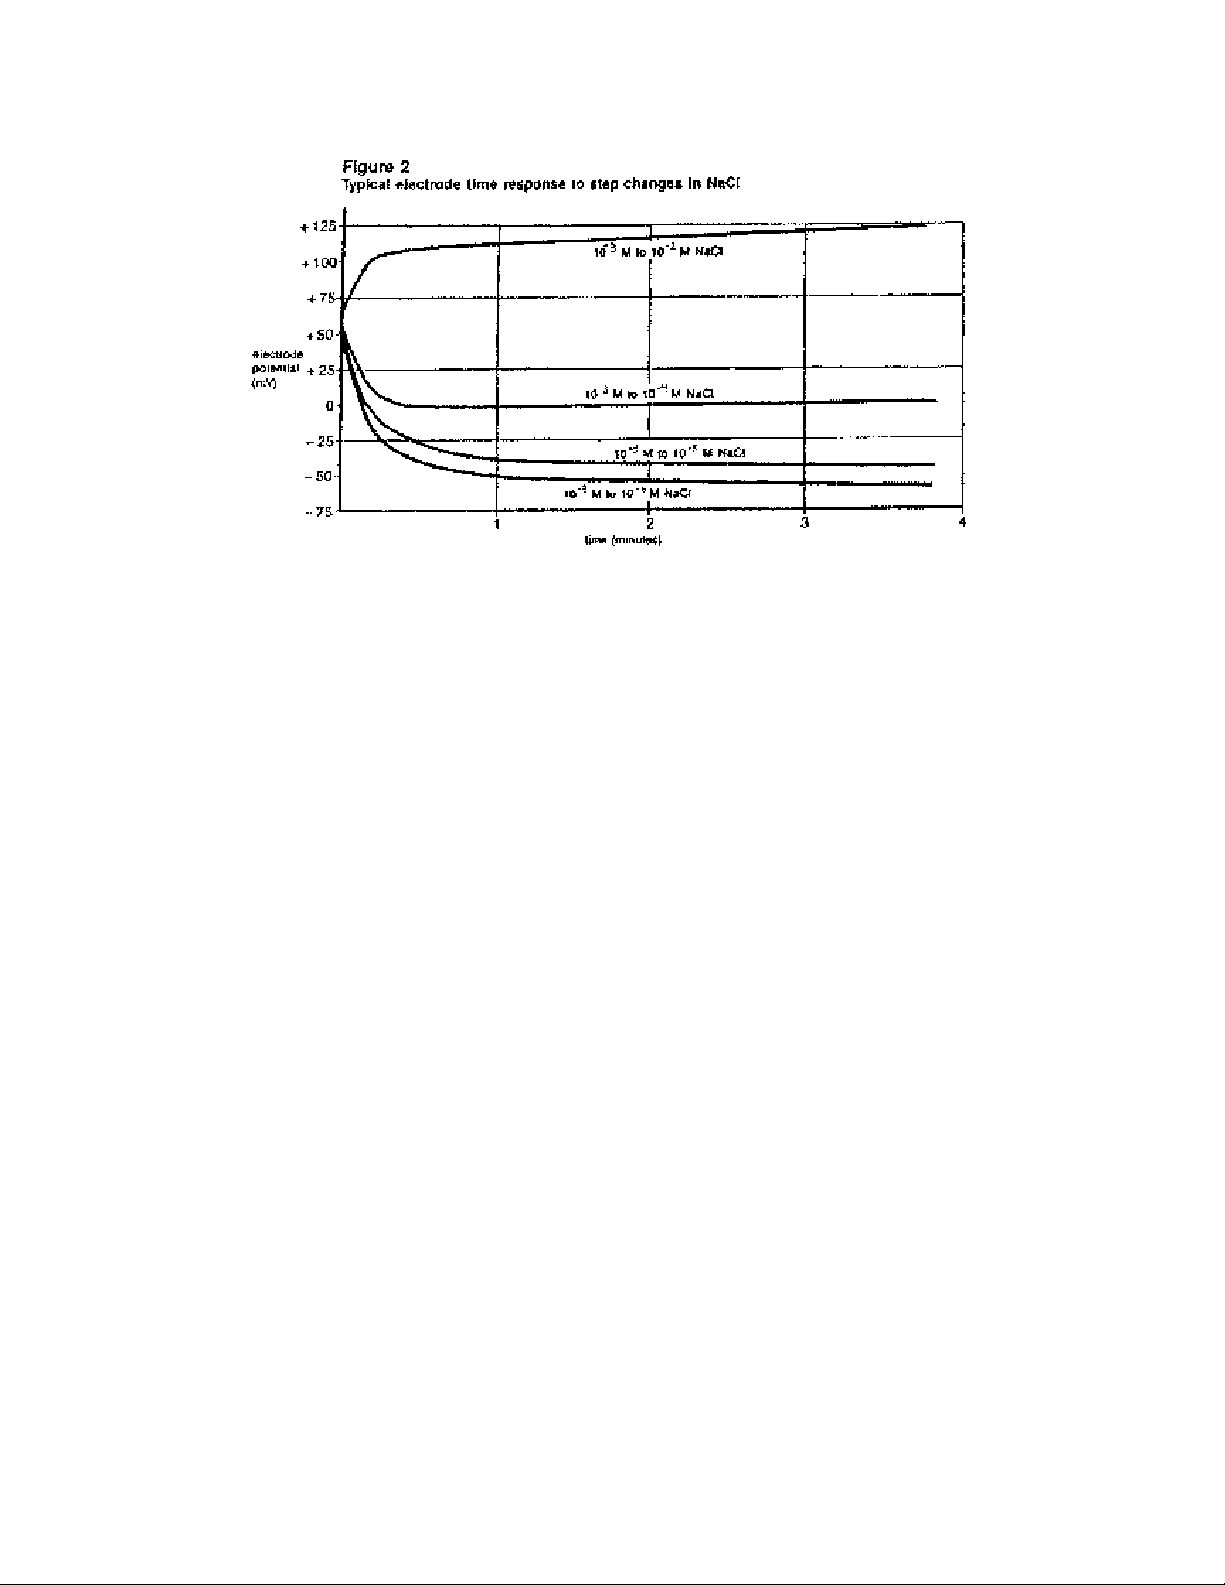
The time needed to reach 99% of the stable electrode potential
reading, the electrode response time, varies from one minute or
less for sodium concentrations above 1.0 x 10
-5
M to several minutes
near the detection limit. Refer to Figure 2.
12
Find Quality Products Online at: [email protected]
www.GlobalTestSupply.com
Page 13
Detection Limit
The upper limit of detection in pure sodium solutions is 1M. In
the presence of other ions, the upper limit of detection is above
-1
M sodium, but two factors influence this upper limit. Both the
10
possibility of a liquid junction potential developing at the
reference electrode and the salt extraction effect influence this
upper limit. Some salts may extract into the electrode membrane
at high salt concentrations, causing deviation from the
theoretical response. Either dilute samples between 1M and 10-1M
or calibrate the electrode at 4 or 5 intermediate points.
Free sodium ion concentration down to 1.0 x 10⁻⁶M or 0.1 ppm can be
measured in basic solutions. For measurements below 10-5M or 1
ppm, use plastic labware (and low level procedures) since a
significant pickup of sodium may occur from glassware due to
desorption from container walls.
pH Effects
The electrode response to sodium ions is greatly influenced by the
pH of the solution. Hydrogen ion interferes with measurements of
low level sodium ion measurements, although the electrode can be
used over a wide pH range. See Figure 3.
13
Find Quality Products Online at: [email protected]
www.GlobalTestSupply.com
Page 14
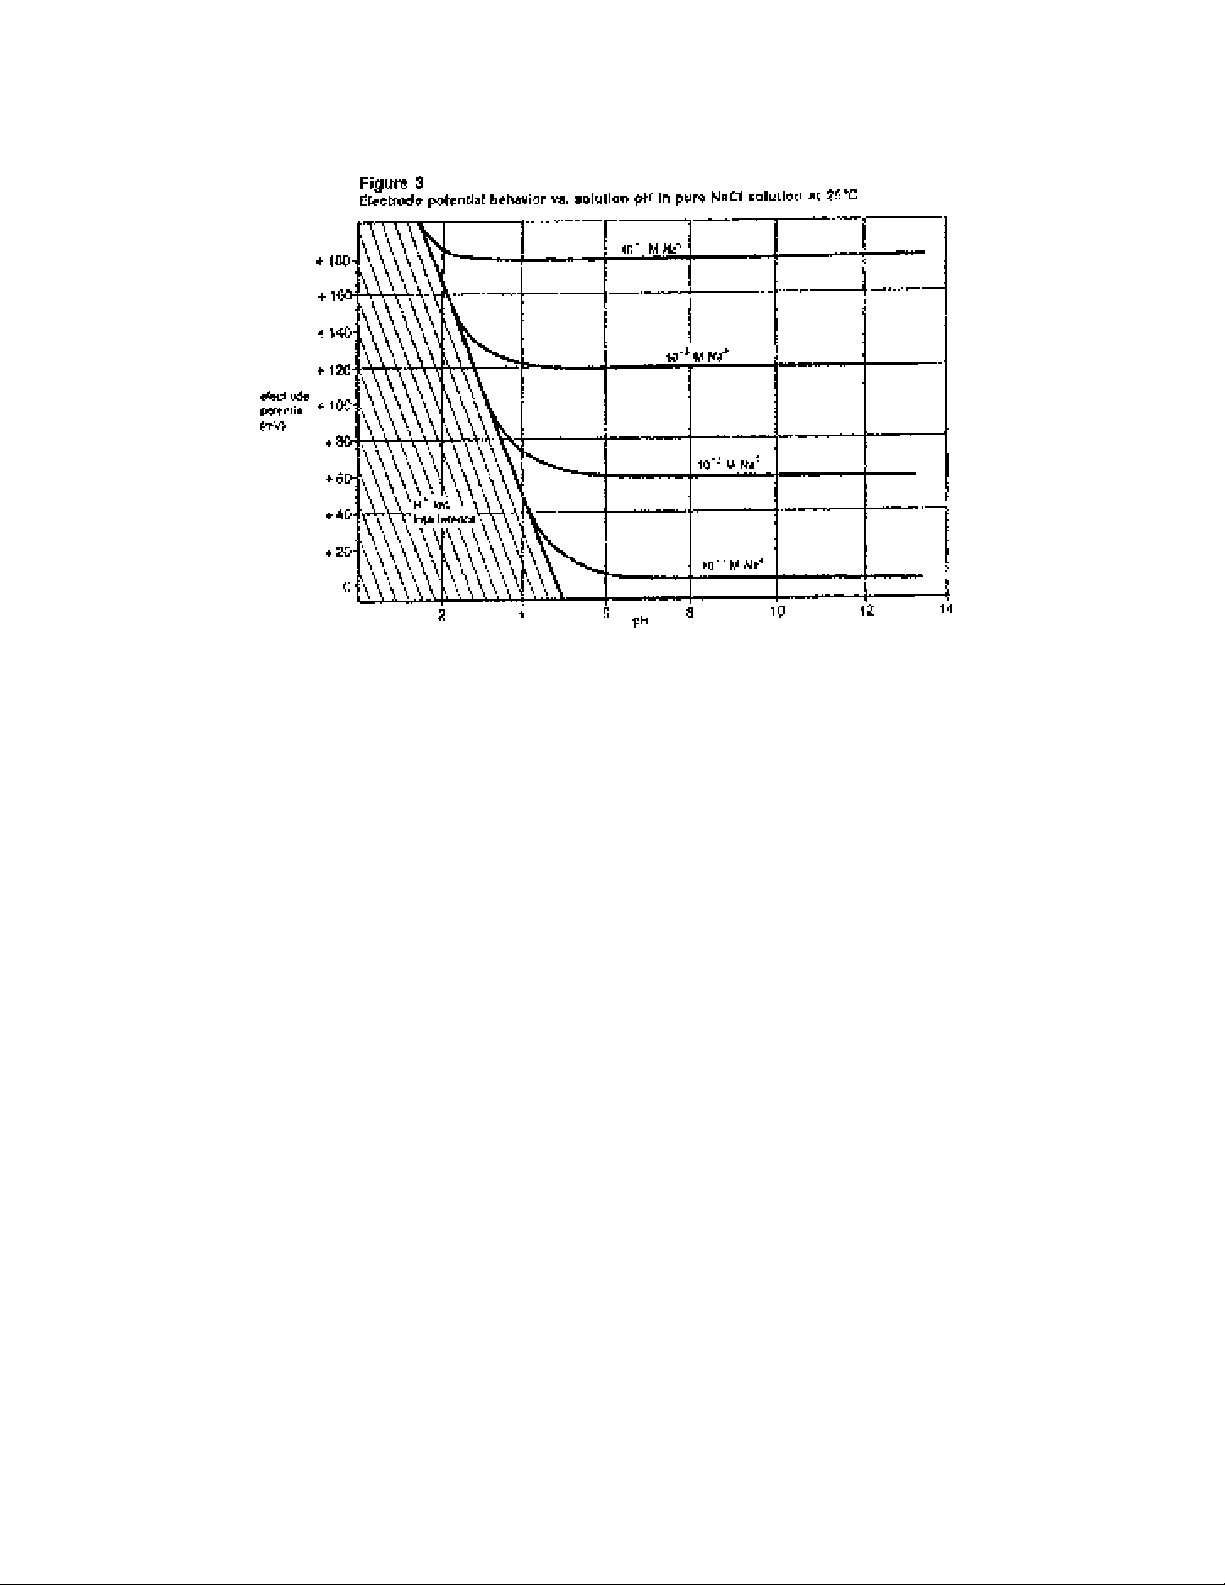
The edge of the shaded area (the straight line) shown in Figure 3
indicates a minimum pH at which dilute sodium measurements can be
made with less than 10% hydrogen ion interference.
The pH should be adjusted to a pH greater than 9 by the addition
of ISA to all standards and samples for optimal results over the
entire concentration range of sodium. Additional ammonium
hydroxide may be necessary to adjust the pH to the desired level
in some cases.
Electrode Storage
The Cole-Parmer Sodium Ion Electrodes should be stored in the
sodium electrode storage solution, never in air or in distilled
water. A more dilute sodium chloride solution with pH adjusted
through the use of ISA may be used for storage before low level
measurements. For longer storage (longer than two weeks), rinse
and dry the sensing glass and cover the glass tip with any
protective cap shipped with the electrode. The reference portion
of the combination electrode should be drained of filling
solution, if refillable, and the rubber insert placed over the
filling hole.
14
Find Quality Products Online at: [email protected]
www.GlobalTestSupply.com
Page 15

Electrode Life
The sodium electrode will last six months in normal laboratory
use. On-line measurements might shorten operational lifetime to
several months. In time, the response time will increase and the
calibration slope will decrease to the point calibration is
difficult and electrode replacement is required.
ELECTRODE
THEORY
Electrode Operation
The Cole-Parmer Sodium Ion Electrodes are composed of a sodiumselective glass membrane bonded to a glass body. When the
membrane is in contact with a solution containing sodium ions, an
electrode potential develops across the membrane. This electrode
potential is measured against a constant reference potential,
using a standard pH/mV meter or an ion meter. The level of sodium
ions, corresponding to the measured potential, is described by the
Nernst equation.
E = E
+ S logX
o
where:
E = measured electrode potential
E = reference potential (a constant)
S = electrode slope ( 56 mV)
o
~
X = level of sodium ions in solution
The activity, X, represents the effective concentration of the
ions in solution. The activity is related to the free ion
concentration, Cf, by the activity coefficient, γ , by:
X =
Cf
γ
Activity coefficients may vary, depending on the total ionic
strength, I, determined as:
I = 1/2Σ C Z
x2 x
where:
C = concentration of ion X
Z
x
= charge of ion
x
Σ = sum of all of the types of ions in
the solution
In the case of high and constant ionic strength relative to the
sensed ion concentration, the activity coefficient, γ , is
constant and the activity, X, is directly proportional to the
15
Find Quality Products Online at: [email protected]
www.GlobalTestSupply.com
Page 16

concentration.
To adjust the background ionic strength to a high and constant
value, ionic strength adjuster is added to samples and standards.
The recommended ISA for sodium is an ammonium chloride/ammonium
hydroxide buffer. Solutions other than this may be used as ionic
strength adjusters as long as ions that they contain do not
interfere with the electrode's response to sodium ions.
The reference electrode must also be considered. When two
solutions of different compositions are brought into contact with
one another, liquid junction potentials arise. Millivolt
potentials occur from the interdiffusion of ions into the two
solutions. Electrode charge will be carried unequally across the
solution boundary resulting in a potential difference between the
two solutions, since ions diffuse at different rates. When making
measurements, it is important to remember that this potential be
the same when the reference is in the standardizing solution as
well as in the sample solution or the change in liquid junction
potential will appear as an error in the measured electrode
potential.
The composition of the liquid junction filling solution in the
reference electrode is most important. The speed with which the
positive and negative ions in the filling solutions diffuse into
the sample should be as nearly equal as possible, that is, the
filling solution should be equitransferent. No junction potential
can result if the rate at which positive and negative charge
carried in the sample is equal.
TROUBLESHOOTING
GUIDE
The goal of troubleshooting is the isolation of a problem through
checking each of the system components in turn: the meter, the
glassware, the electrode, the standards & reagents, the sample,
nd the technique.
a
Meter
The meter may be checked by following the checkout procedure in
the instrument instruction manual.
Glassware
Clean glassware is essential for good measurement. Be sure to
wash the glassware well with a mild detergent and rinse very well
with distilled or deionized water. Clean glassware will drain
without leaving water droplets behind.
16
Find Quality Products Online at: [email protected]
www.GlobalTestSupply.com
Page 17

Electrodes
The electrodes may be checked by using the procedure found in the
sections entitled
Electrode Slope Check
.
1. Be sure to use distilled or deionized water when following the
procedures given in
Electrode Slope Check
.
2. If the electrode fails to respond as expected, see the
sections
Measuring Hints
and
Electrode Response
. Repeat the
slope check.
3. If the electrode still fails to respond as expected,
substitute another sodium ion electrode that is known to
be in good working order for the questionable electrode. If
the problem persists and you are using an electrode pair, try
the same routine with a working reference electrode.
4. If the problem persists, the reagent may be of poor quality,
interferences in the sample may be present or the technique
may be faulty. See
Technique
sections below.
Standards & Reagents
,
Sample
, and
5. If another electrode is not available for test purposes, or if
the electrode in use is suspect, review the instruction manual
and be sure to:
- Clean and rinse the electrode thoroughly.
- Prepare the electrode properly.
- Use the proper filling solution.
- Adjust the pH and the ionic strength of the solution by the
use of the proper ISA.
- Measure correctly and accurately.
- Review
TROUBLESHOOTING
HINTS.
Standards & Reagents
Whenever problems arise with the measuring procedure that has been
used successfully in the past, be sure to check the standard and
reagent solutions. If in doubt about the credibility of any of
the solutions, prepare them again. Errors may result from
contamination of the ISA, incorrect dilution of standards, poor
quality distilled/deionized water, or a simple mathematical
miscalculation.
Sample
Look for possible interferences, complexing agents, or substances
which could affect the response or physically damage the sensing
electrode (or the reference electrode) if the electrode works
17
Find Quality Products Online at: [email protected]
www.GlobalTestSupply.com
Page 18

perfectly in the standard, but not in the sample.
Try to determine the composition of the samples prior to testing
to eliminate a problem before it starts. See
Sample Requirements
, and
Interferences
.
Measuring Hints
,
echnique T
Be sure that the electrode's limit of detection has not been
exceeded.
Be sure that the analysis method is clearly understood and that
Good Laboratory Practice has been followed.
Refer to the instruction manual again. Reread
and
ELECTRODE CHARACTERISTICS
.
GENERAL
PREPARATION
If trouble still persists, call your Cole-Parmer at 1-800-323-4340
and and ask for the Technical Services Department.
TROUBLESHOOTING HINTS
ymptom
Possible Causes
Next Step S
Out of Range defective meter check meter with
Reading shorting strap (see
meter instruction
manual
electrode not unplug electrode
plugged in properly and reseat
reference electrode replenish reference
not filled filling solution
electrode not put electrode
in solution in solution
defective electrode check electrode
operation
air bubble on remove bubble by
membrane redipping electrode
"Incorrect Answer" incorrect scaling of plot millivolts on
(but calibration semilog paper the linear axis.
curve is good) On the log axis, be
sure concentration
numbers within each
decade are increas ing with increasing
18
Find Quality Products Online at: [email protected]
www.GlobalTestSupply.com
Page 19

concentration
incorrect sign be sure to note
number correctly
incorrect standards prepare fresh
standards
wrong units used apply correct con version factor:
10
-3
M = 23.0 ppm
as Na+1
sample pH too low adjust pH above 9
Drift (reading samples and standards allow solutions to
changing in one at different tempera- come to room tempdirection) ture erature before mea surement
incorrect reference use recommended
filling solution filling solution
electrode exposed soak overnight in
to interferences electrode storage
solution
pH too low adjust pH
ISA not used use recommended ISA
Low Slope or No Slope standards contami- prepare fresh
nated or incorrectly standards
made
ISA not used use recommended ISA
standard used as ISA use ISA
pH too low adjust pH
electrode exposed soak overnight in
to interferences electrode storage
solution
air bubble on remove bubble by
membrane redipping probe
Noisy or Unstable defective meter check meter with
Readings (reading shorting strap
changing randomly)
19
Find Quality Products Online at: [email protected]
www.GlobalTestSupply.com
Page 20

ISA not used use recommended ISA
meter or stirrer not ground meter or
grounded stirrer
defective electrode replace electrode
electrode exposed soak overnight in
to interferences electrode storage
solution
SPECIFICATIONS
Concentration Range: Saturated to 1.0 x 10
-6
M (0.02 ppm)
pH Range : 5 to 12 (depending on Na+ level)
Temperature Range : -5o to 70oC
Resistance : < 200 Mohm
Reproducibility : +2%
Size : 110 mm length
12 mm diameter
1 m cable length
Storage : store in 5M NaCl with added ISA
ORDERING INFORMATION
P/N DESCRIPTION
27502-43 Sodium Ion Electrode, combination, glass body
27504-30 Sodium Ion Electrode, combination, epoxy body
27503-33 Sodium Standard, 0.1M NaCl
27503-34 Sodium Standard, 1000 ppm Na
27503-82 Reference Electrode Filling Solution, .1M NH
Cl,
4
for both the 27502-43 and 27504-30 electrodes
20
Find Quality Products Online at: [email protected]
www.GlobalTestSupply.com
 Loading...