

Page 1

Wealth and Investment
Management
A guide to
Barclays Wealth
Online Banking
Latest enhancements
2. Secure messaging
Page 2

2
Contents
Contents
2. Secure messaging 3
2.1 Introduction to secure messaging 3
2.2 User setup 4
2.3 New functions 11
2.4 Account services 12
2.4.1 Close an account 16
2.4.2 Change statement address 19
2.4.3 Order copy statement 22
2.4.4 Order new certificate or interest 22
2.4.5 Order new cheque book/pay in book 22
2.4.6 Stop cheque 22
2.4.7 General enquiries 22
2.5 Payment queries 23
2.6 Order stationery 27
2.7 Stopping a card/cheque 31
2.8 General enquiries 35
2.9 View, respond and delete messages 39
Page 3

3
2.1 Introduction
2. Secure messaging
2.1 Introduction
Secure messaging introduces new functionality in our
servicing capability for our corporate and intermediary
clients.
It provides greater security than email and enables you to:
• Send and receive messages in near real-time to and from
our servicing team through Wealth Online Banking
• Order stationery e.g. cheque book, pay-in slips etc
• Request detailed information on payments sent/received
• Stop cheques
• Request account services e.g. account closures or
changes of address
• Request statement copies
• Request certificates of interest
Businesscall will receive Wealth Online Banking secure
messages in near real time, removing the need for further
ID&V and with all requisite data to process the request
captured first time.
Page 4
4
2.2 User setup
2.2 User setup
Please note:
1. Users can obtain access to Wealth Online Banking
by completing the relevant sections of the Integrated
Application Form
2. Your Business Partner will set up your company within
the system on a date agreed between you and your
Relationship Manager
3. If the bank has granted both secure messaging and
enhanced secure messaging services, it is down to you
to decide who in your organisation should have access
4. The administrator can only give access to secure
messaging once a Business Partner has granted your
company the secure messaging service
1. The administrator can use their Online Banking Card
and PIN to log in to Online Banking here:
URL : https://www.barclayswealth.com/login/
action/logon/unauthenticated/corporate/
loginSigningGemplus
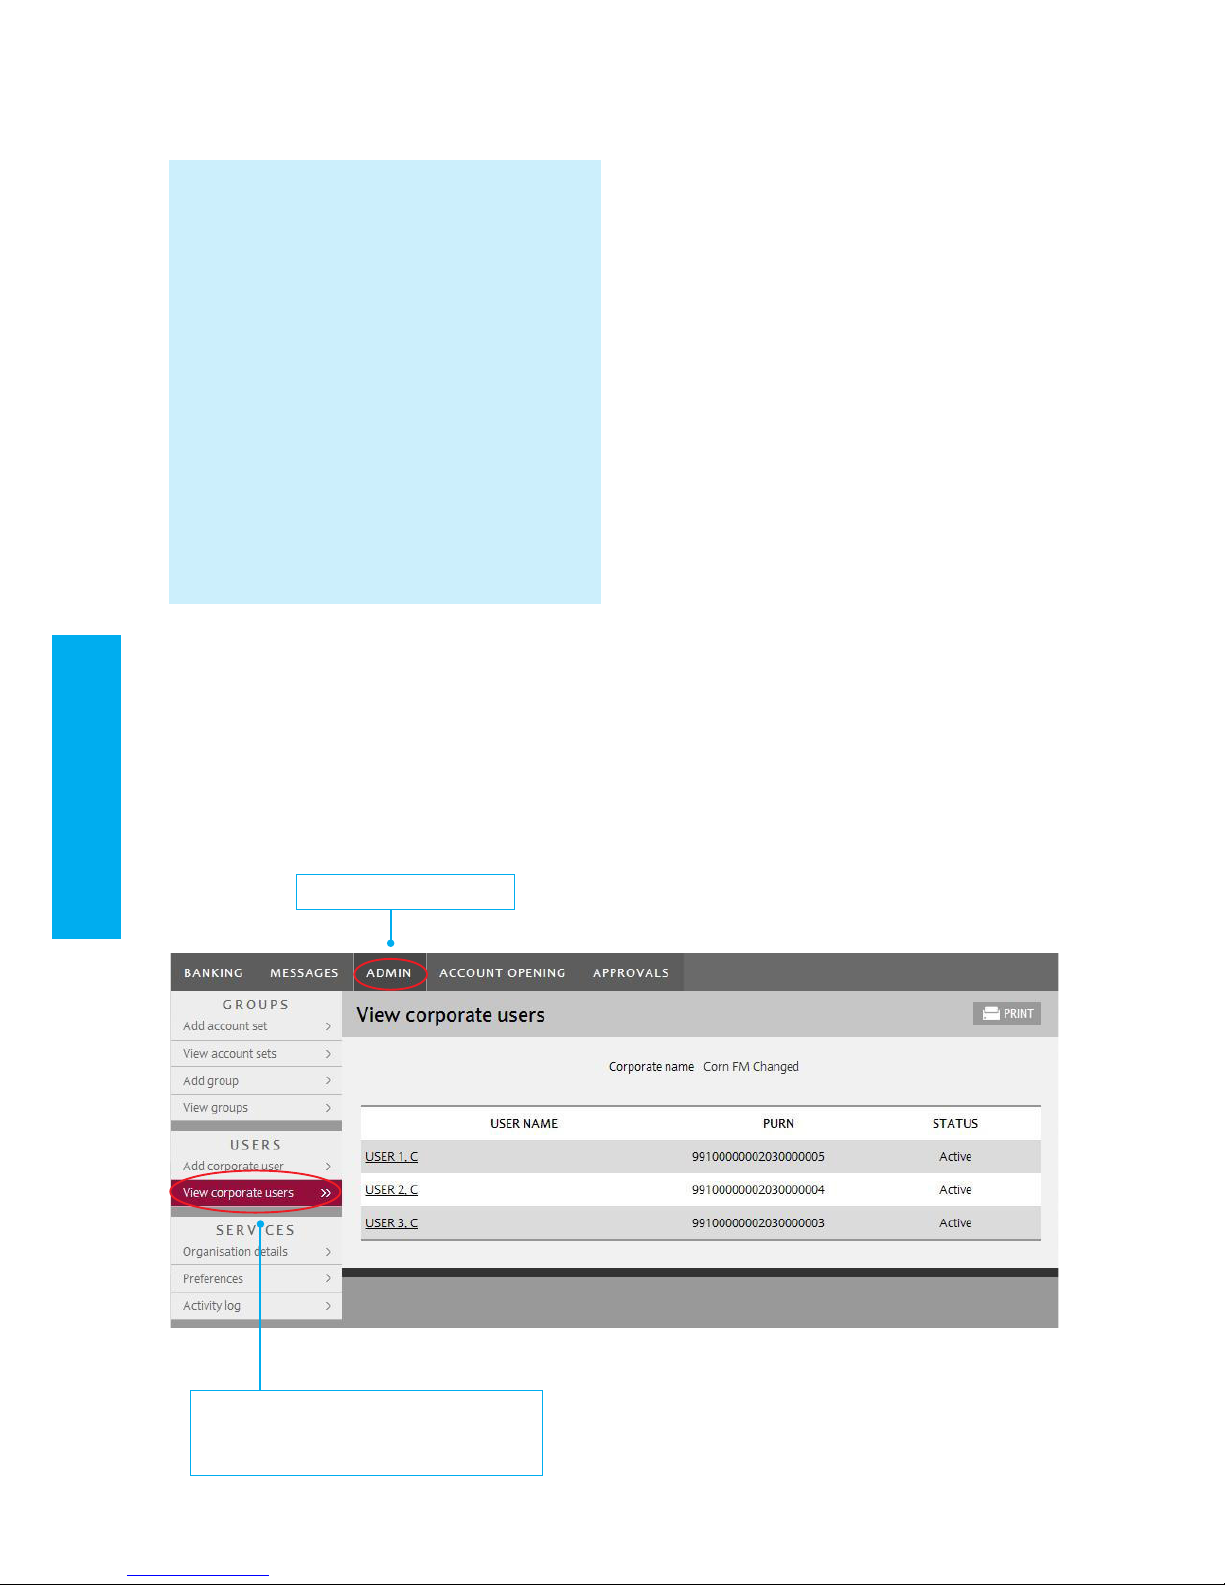
2. Click on the ‘Admin’ tab
3. Click on ‘Add corporate user’ (or ‘View corporate
users’ if amending)
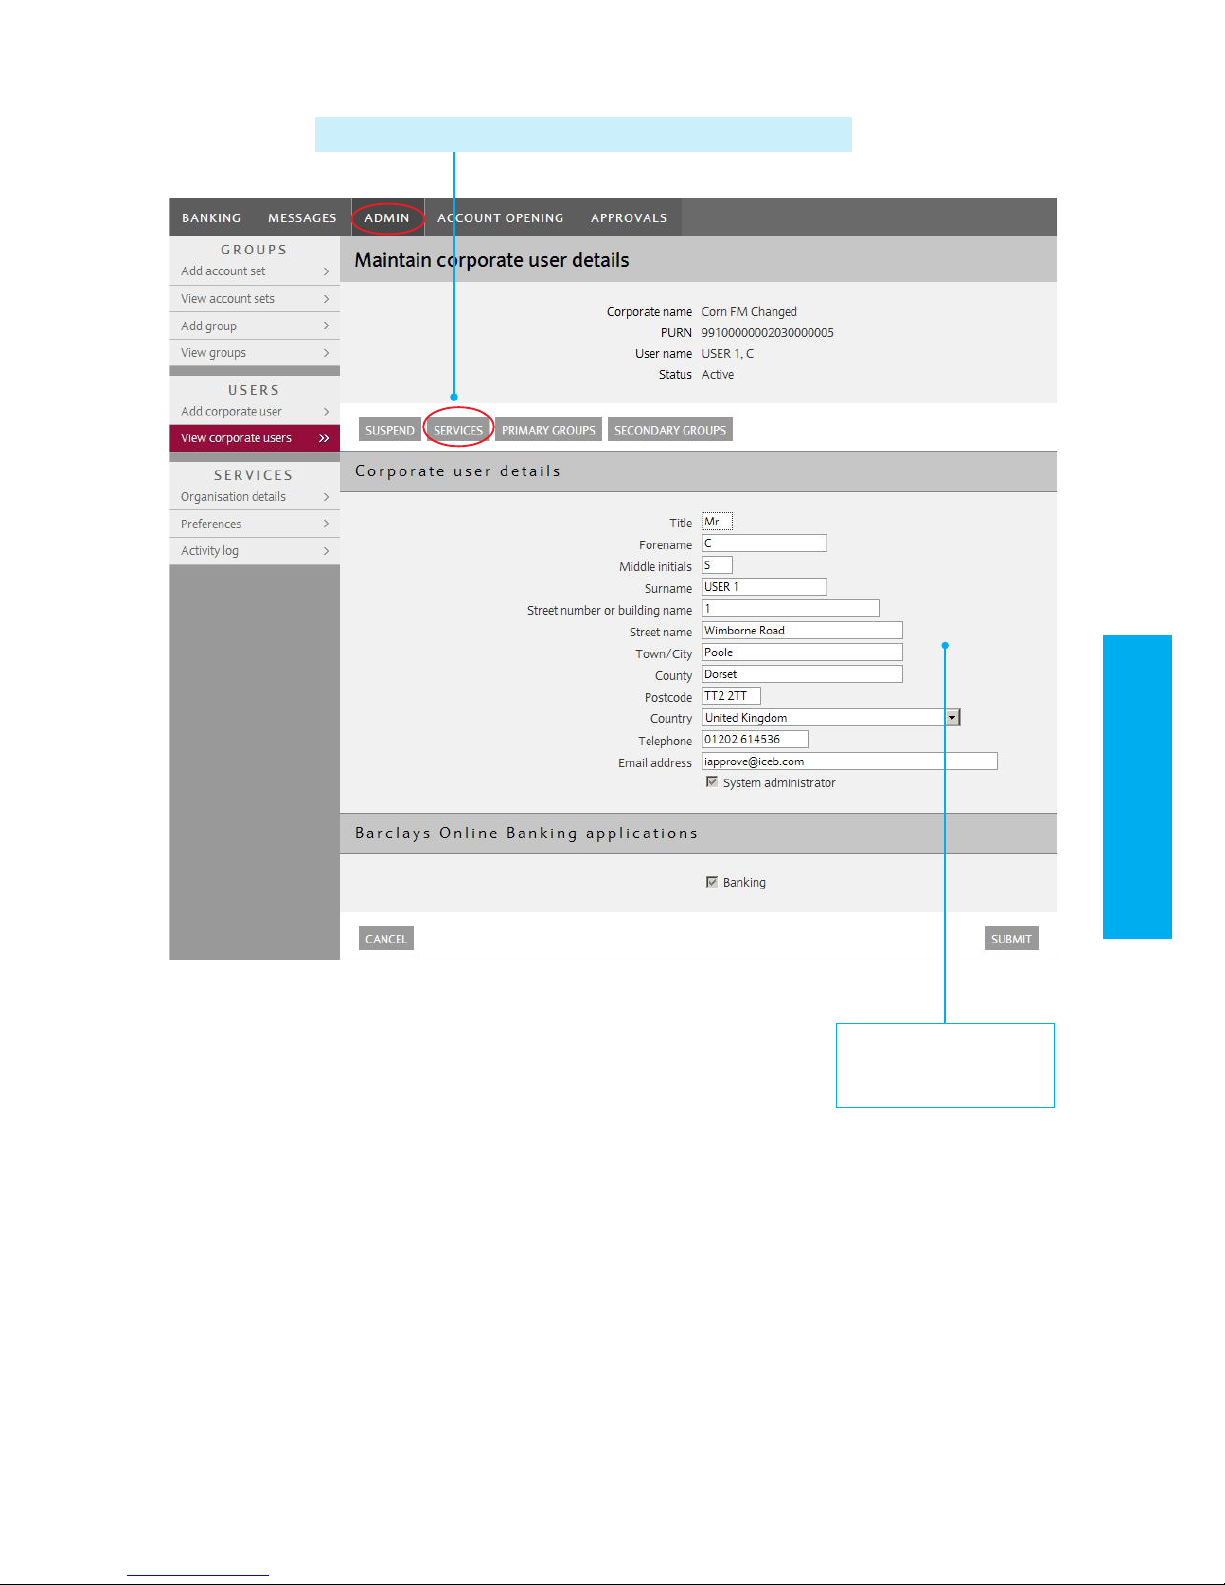
4. Populate/update the corporate user’s details
5. Click on ‘Services’
6. Ensure ‘Secure messaging’ is ticked
7. Scroll down until you see the ‘Secure messaging’
section
8. Tick if your organisation chooses to allow enhanced
secure messaging to users, providing access to the
account closure and/or change of address services
9. Click ‘OK’
10. You will be returned to the ‘Maintain corporate user
details’ screen, click ‘Submit’ – the changes will then
need approval by a second administrator
11 . Repeat the user setup steps for all the users within
your organisation as per your requirements for secure
messaging and enhanced secure messaging
2. Click on the ‘Admin’ tab
3. Click on ‘Add corporate user’ (or ‘View
corporate users’ if amending)
Page 5
5
2.2 User setup
4. Populate/update the
corporate user’s details
Please note: To amend account opening permissions, click ‘Services’
Page 6
6
2.2 User setup
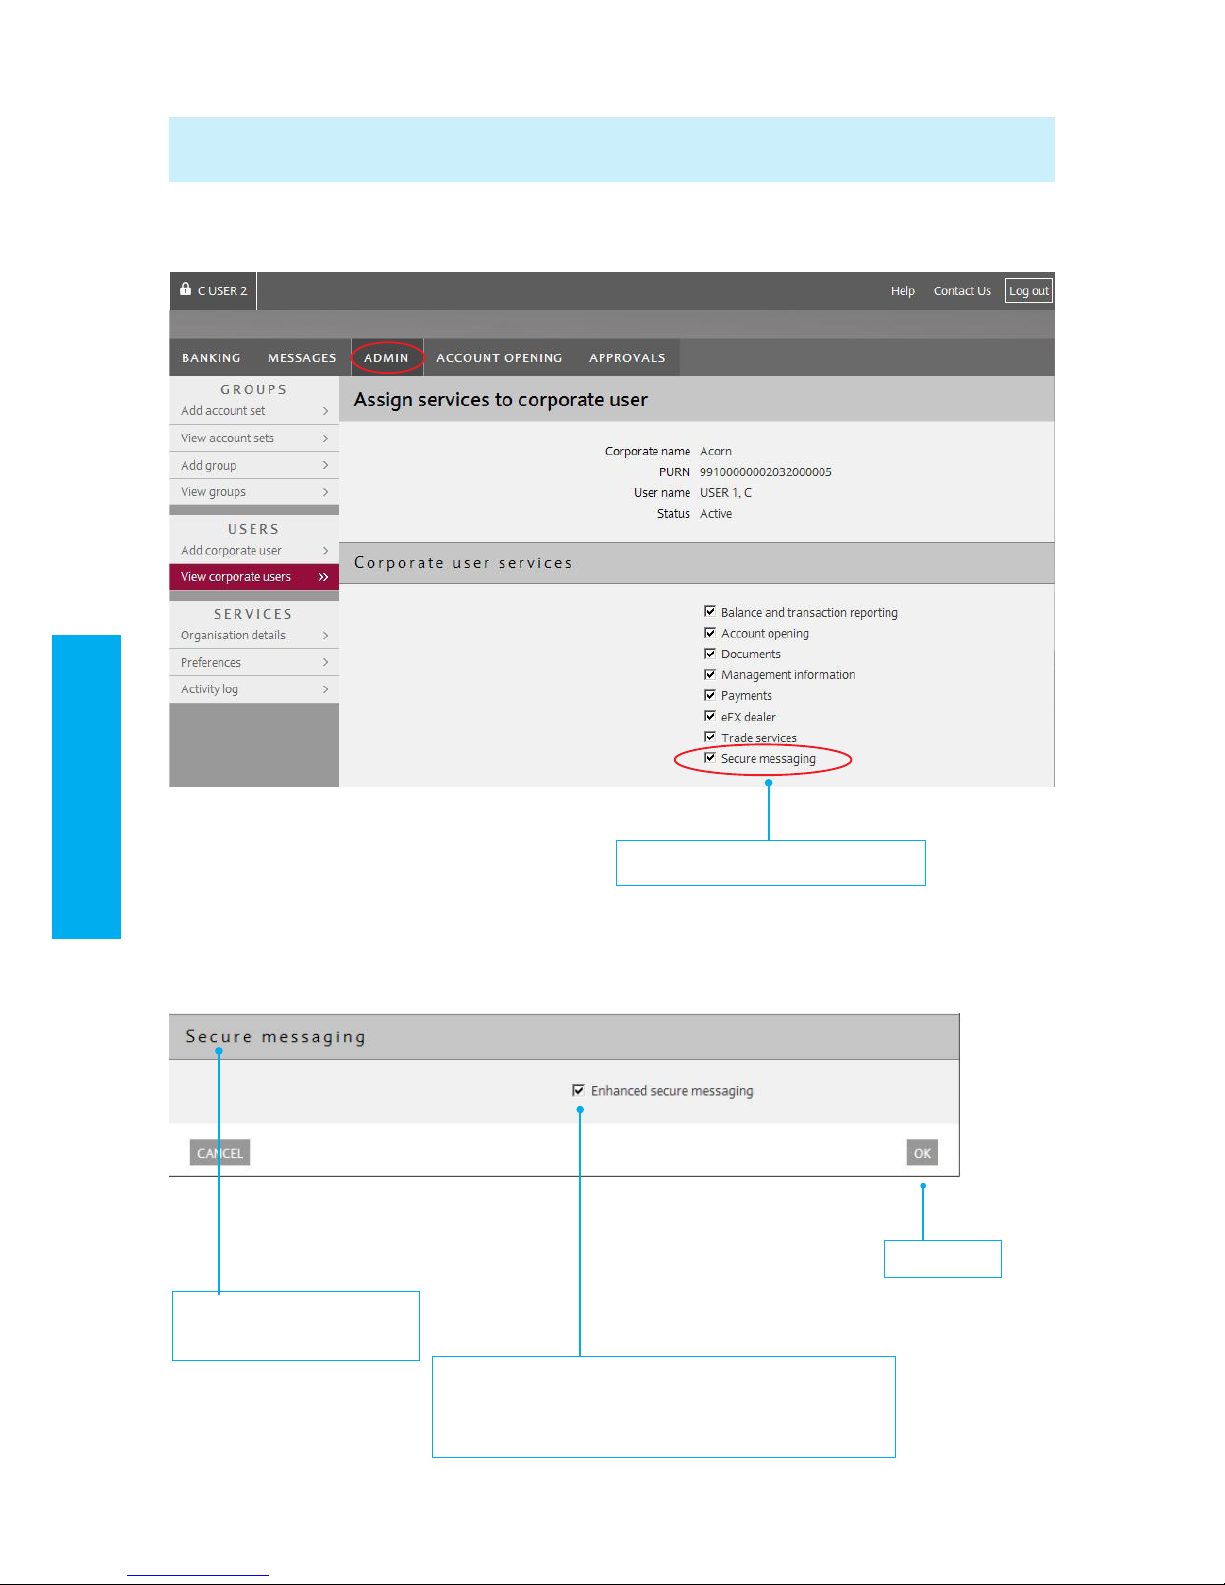
6. Ensure ‘Secure messaging’ is ticked
7. Scroll down until you see
‘Secure messaging’ section
8. Tick if your organisation chooses to allow enhanced
secure messaging to users, providing access to account
services e.g. account closure and/or change of address
9. Click ‘OK’
Please note: You can choose to allow only selected users to have enhanced secure messaging. If you do not want to
allow this privilege, please leave this box unticked.
Page 7

7
2.2 User setup
10. You will be returned to the ‘Corporate
user details’ screen, click ‘Submit’ – the
changes will then need approval by a
second administrator
11. Repeat the user setup steps for all the
users within your organisation as per your
requirements for secure messaging and
enhanced secure messaging
If dual authorisation is required then this must be completed by another administrator
Page 8
8
2.2 User setup
Approve users
Please note:
1. Users can obtain access to Wealth Online Banking
by completing the relevant sections of the Integrated
Application Form
2. Your Business Partner will set up your company within
the system on a date agreed between you and your
Relationship Manager
1. A second administrator can approve the changes
using they Online Banking Card and PIN to log in to
Wealth Online Banking here:
URL : https://www.barclayswealth.com/login/
action/logon/unauthenticated/corporate/
loginSigningGemplus
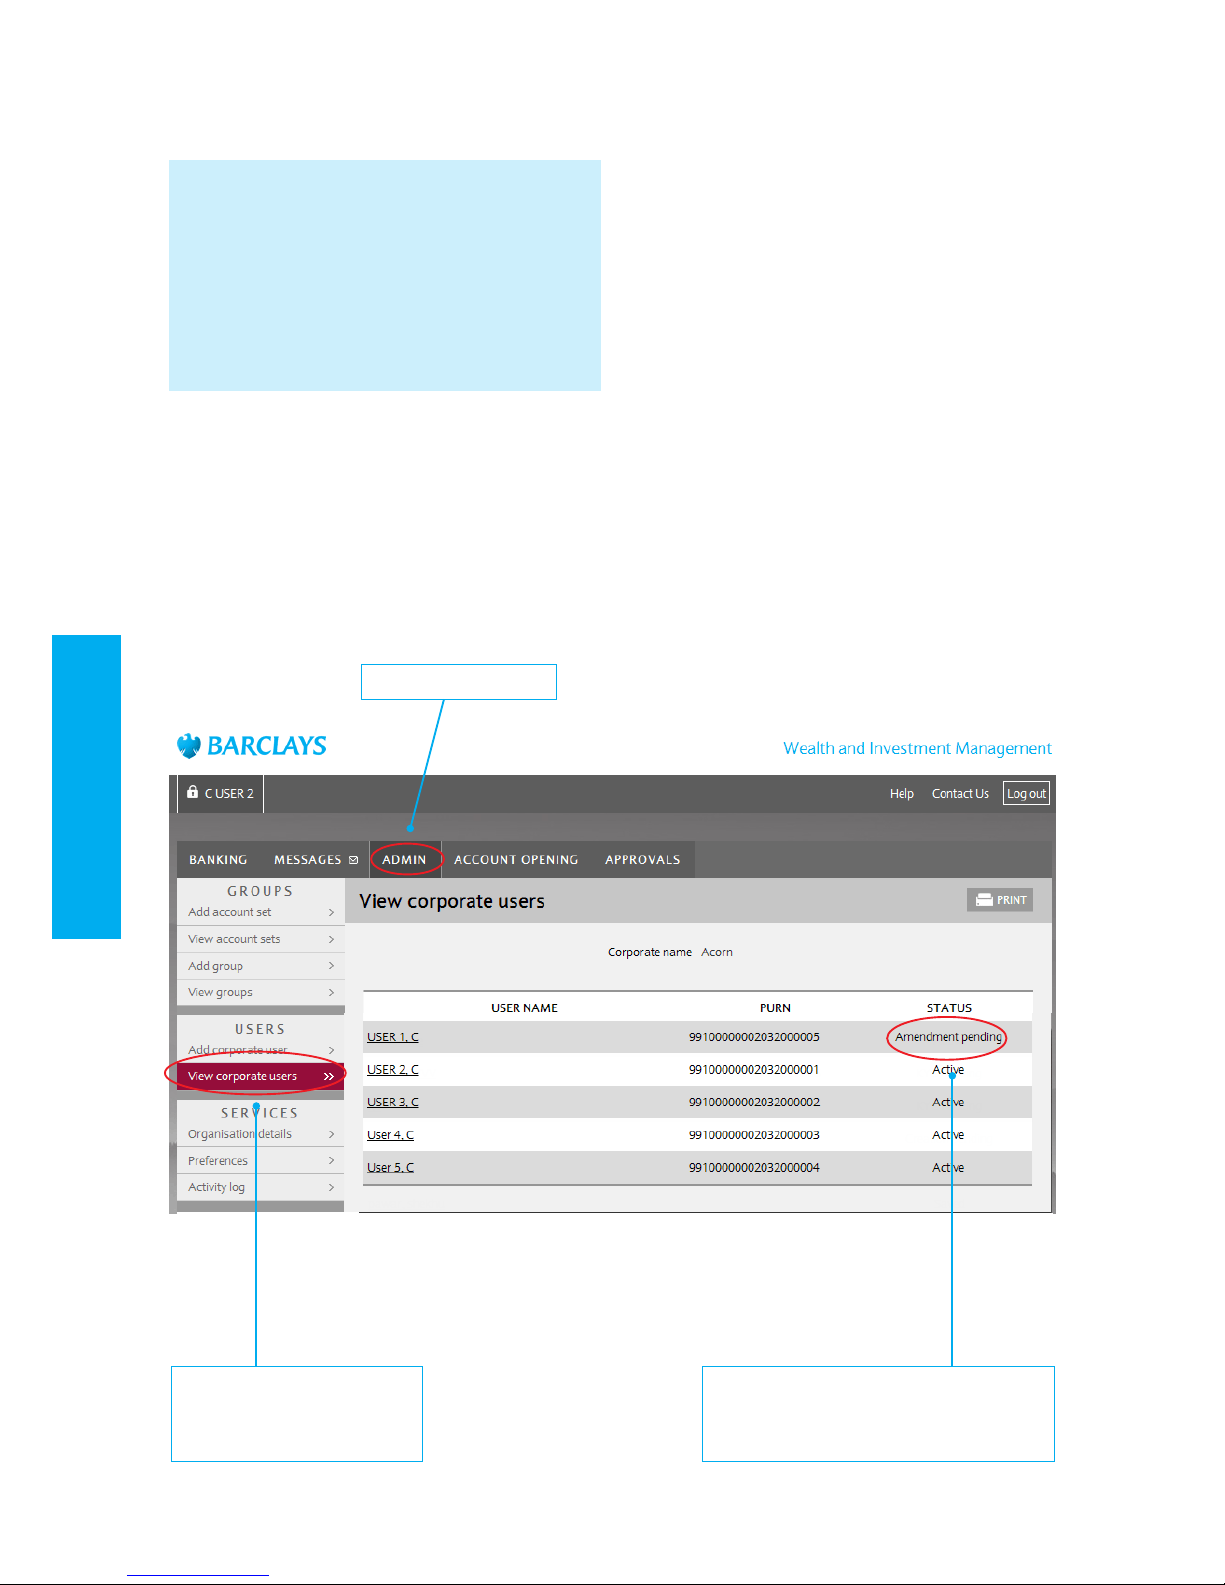
2. Click the ‘Admin’ tab
3. Click ‘View corporate users’ from the left hand menu
4. Here you will see the user status changed to
‘Amendment pending’
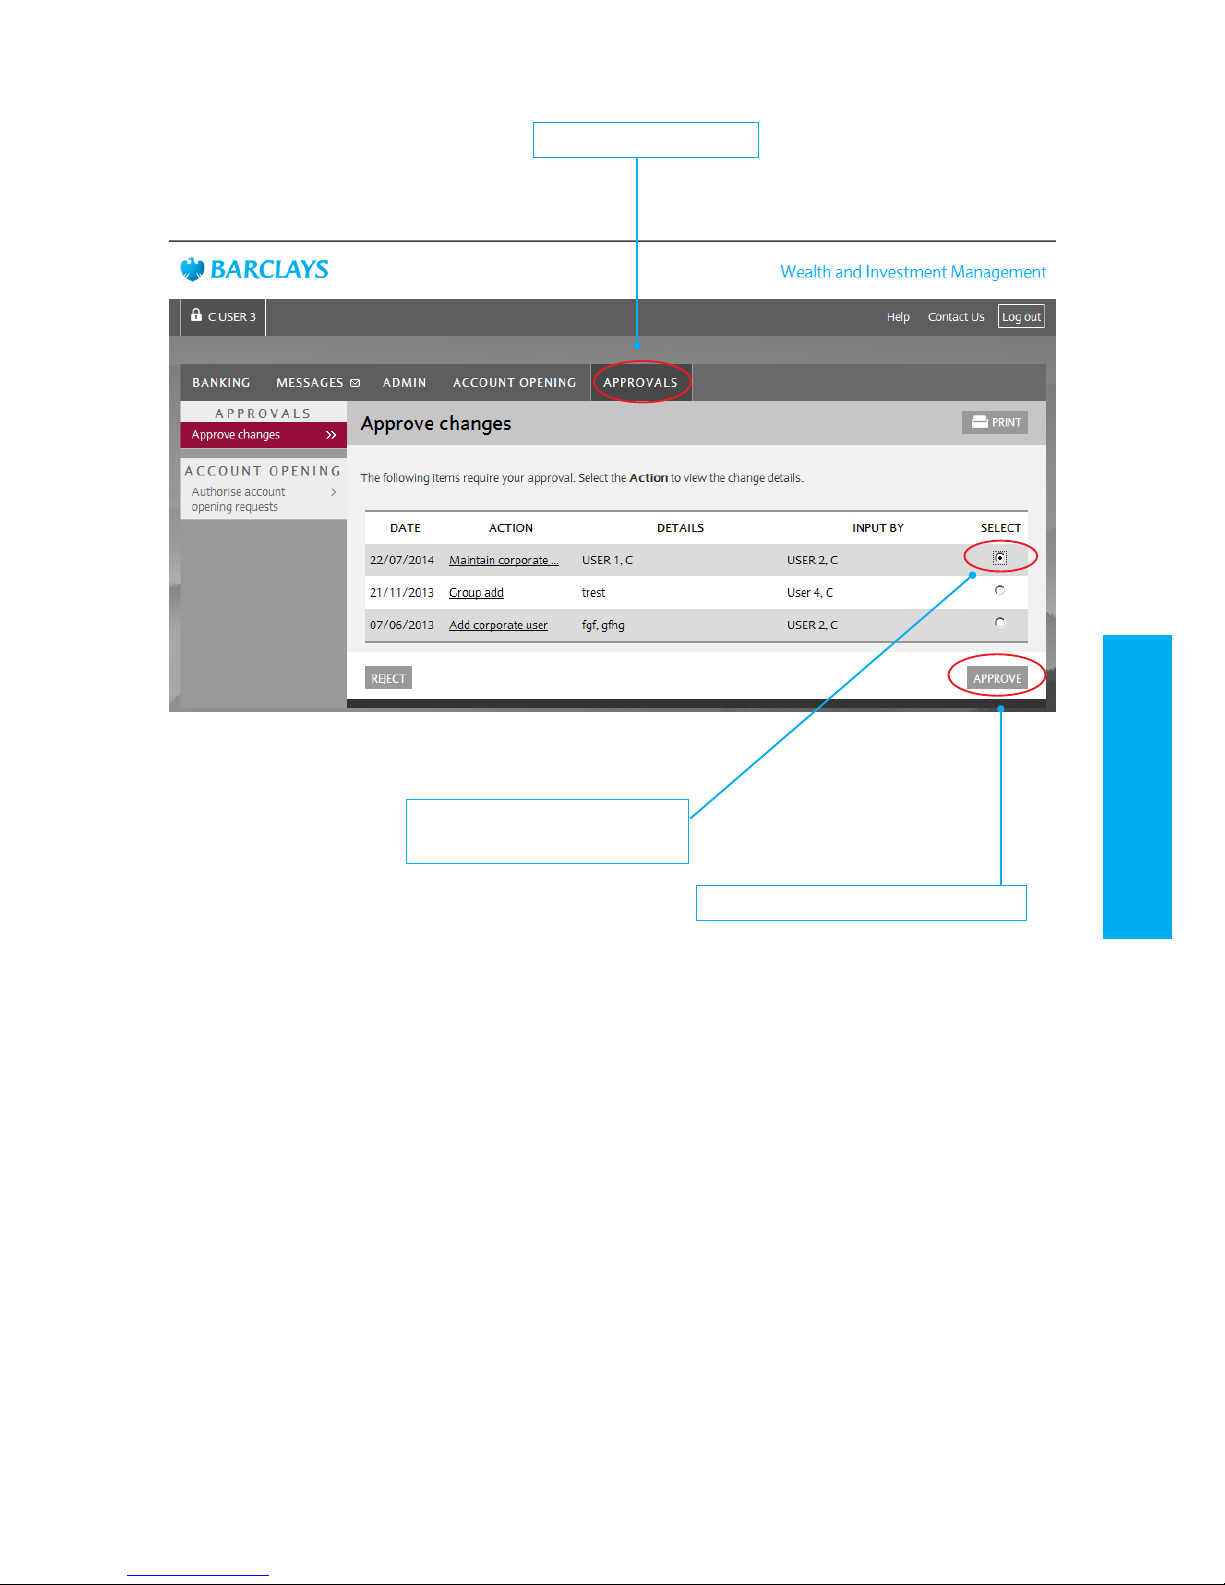
5. Click the ‘Approvals’ tab
6. Select the user by putting a dot against their name
7. Click ‘Approve’ to approve the changes
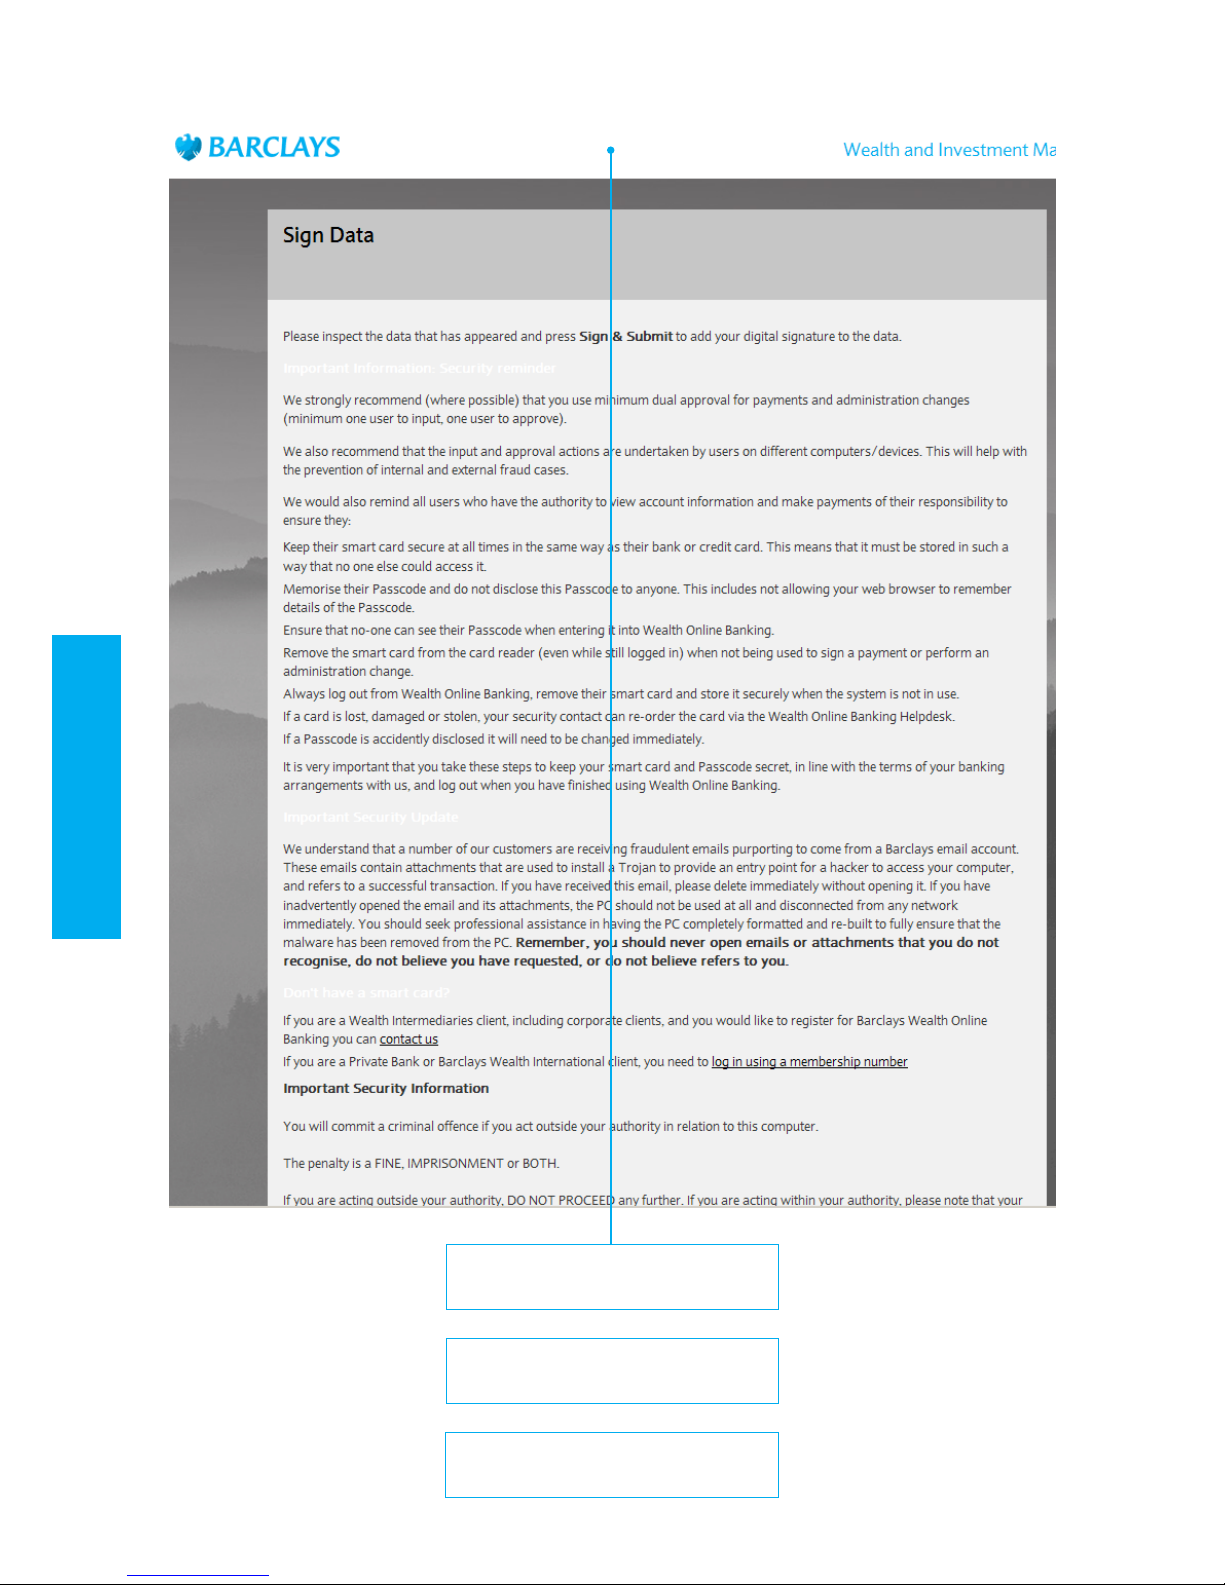
8. Please sign using your Online Banking Card and PIN
9. You will be returned to the approval screen again
10. Repeat the above steps for all users requiring approval
2. Click the ‘Admin’ tab
3. Click ‘View corporate users’
from the left hand menu
4. Here you will see the user status changed
to ‘Amendment pending’
Page 9
9
2.2 User setup
5. Click the ‘Approvals’ tab
6. Select the user by putting a dot
against their name
7. Click ‘Approve’ to approve the changes
Page 10
10
2.2 User setup
8. Please sign using your Online Banking
Card and PIN
9. You will be returned to the approval
screen again
10. Repeat the above steps for all users
requiring approval
Page 11
11
2.3 New functions
2.3 New functions
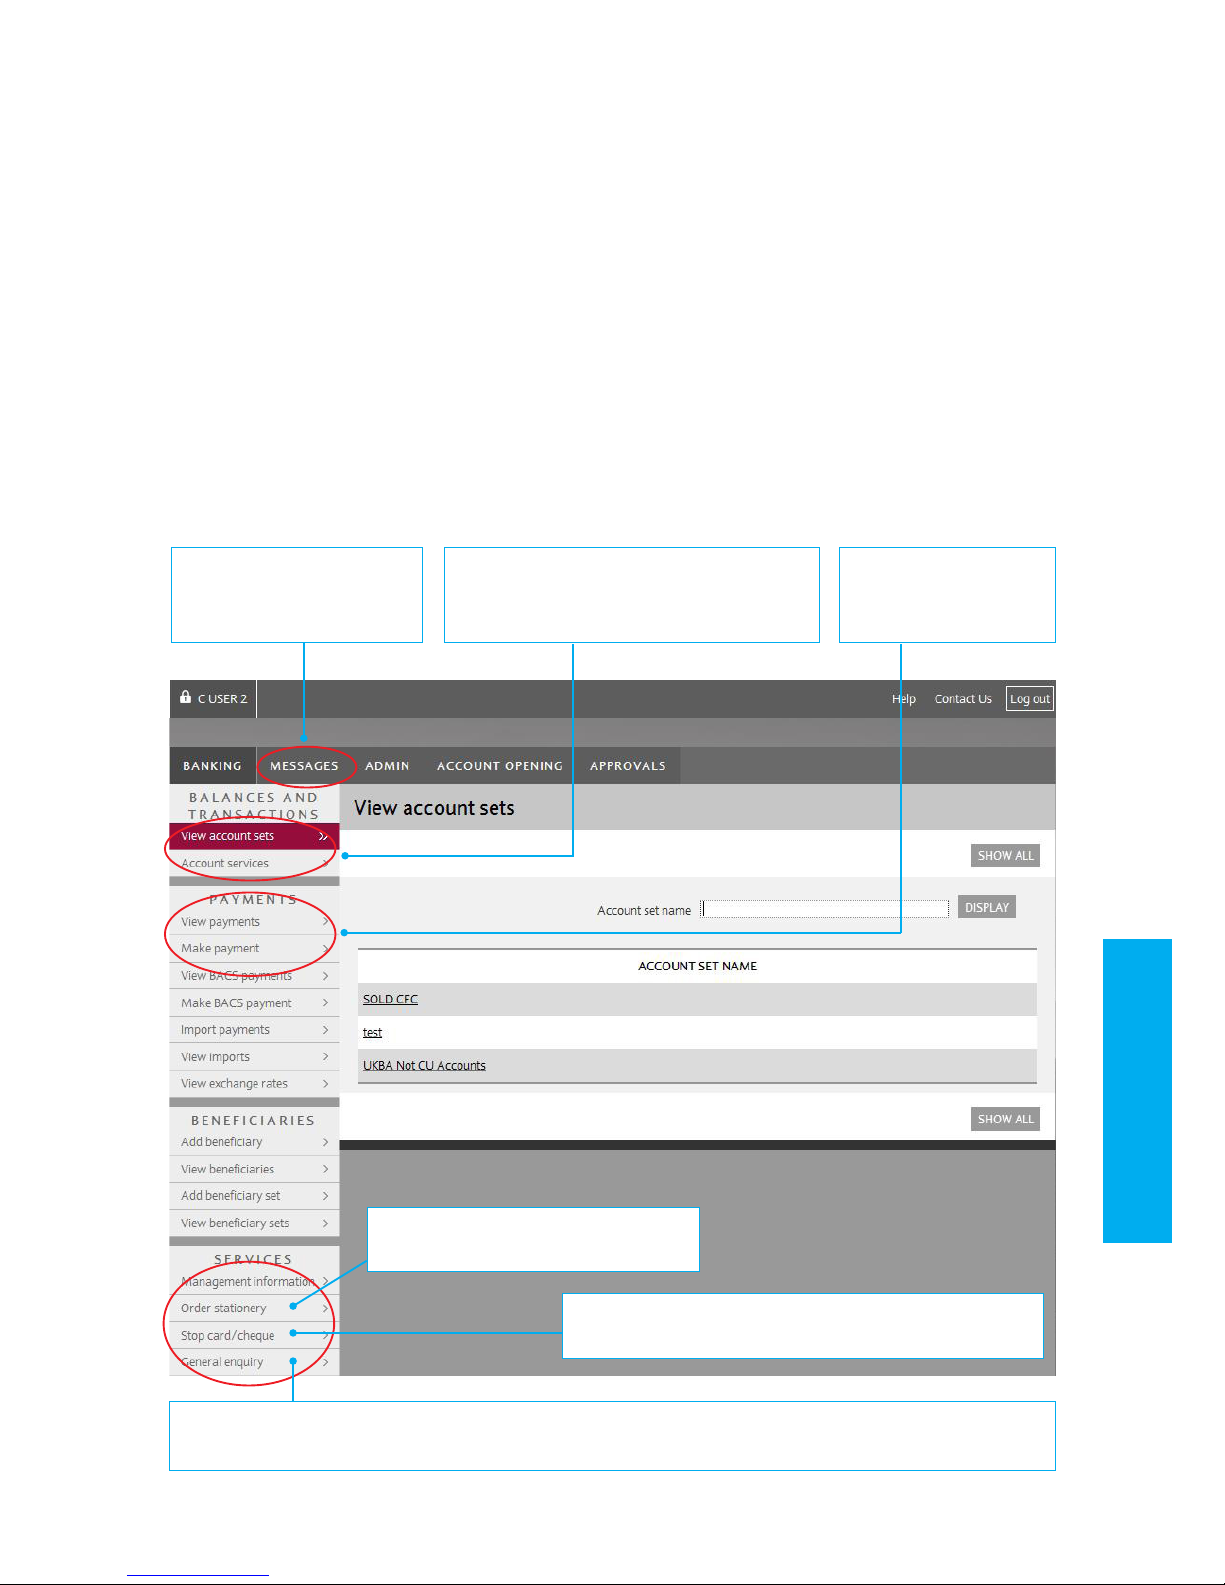
The following new functions have been added to your Navigation panes in Wealth Online Banking
1. ‘Messages’ allows you to see the secure messages
you have sent to Barclays
2. ‘Account services’ allows you to perform account
maintenance, e.g. close accounts, change address etc.
3. ‘View payments’ allows you to enquire about
completed payments
4. ‘Order stationery’ allows you to order cheque books,
pay-in slips etc.
5. ‘Stop card/cheque’ allows you to request to stop
a cheque
Please call the bank if your card is lost or stolen
6. You can use the ‘General enquiry’ option for any other
account related query
Please note that this is not suitable for complaints or
other non-banking messages
1. ‘Messages’ allows you to
see the secure messages
you have sent to Barclays
3. ‘View payments’ allows
you to enquire about
completed payments
4. ‘Order stationery’ allows you to order
cheque books, pay-in slips etc.
6. You can use the ‘General enquiry’ option for any other account related query
Please note that this is not suitable for complaints or other non-banking messages
2. ‘Account services’ allows you to perform
account maintenance, e.g. close accounts,
change address etc.
5. ‘Stop card/cheque’ allows you to request to stop a cheque
Please call the bank if your card is lost or stolen
Page 12
12
2.4 Account services
2.4 Account services
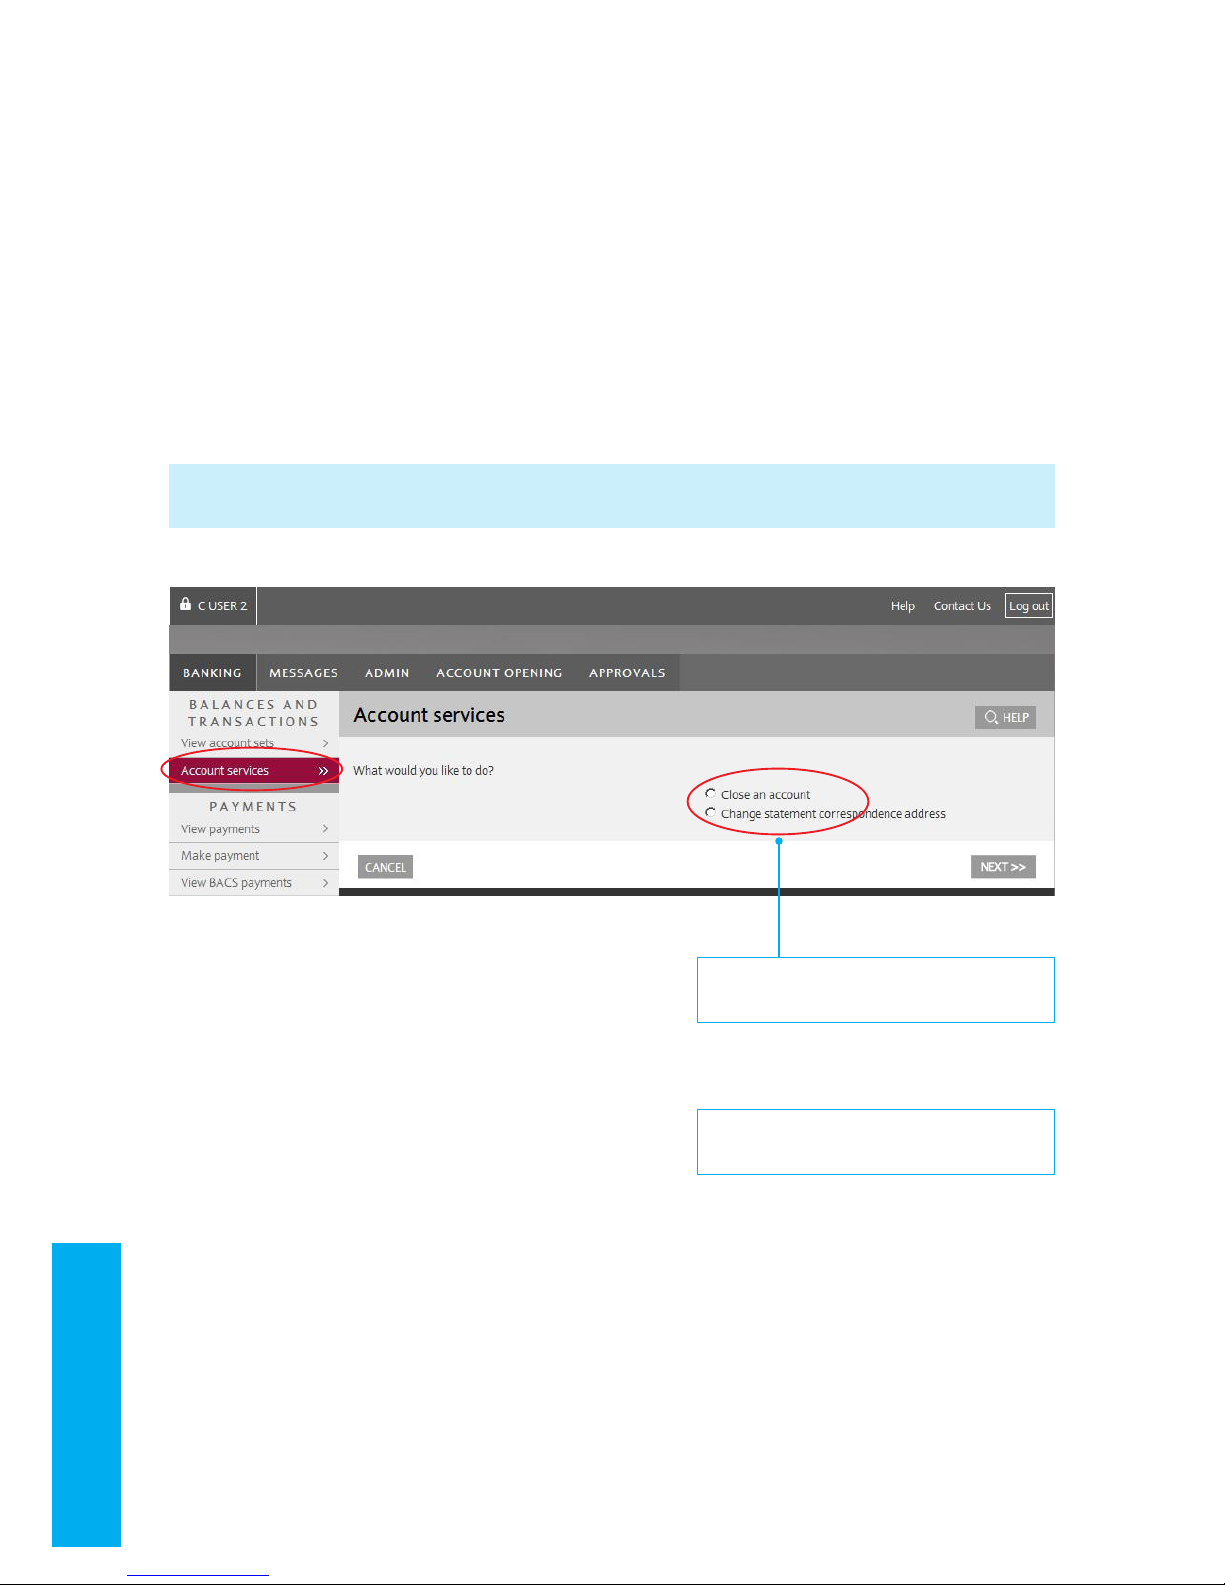
‘Account services’ can be selected from the left navigation pane. This function will give you the option to request the
closure of an account and to change statement addresses
1. You can close an account or change your
correspondence address
2. An account can be closed only if it has a zero balance
on the account
‘Account services’ offers a range of options such as account closure requests or change of business address, to users
with enhanced service messaging privileges.
1. You can close an account or change your
correspondence address
2. An account can be closed only if it has a
zero balance on the account
Page 13

13
2.4 Account services
For an expanded selection of options, go to the account for which you wish to select the service and click on ‘Services’
3. Click the ‘Banking’ tab
4. Click on the ‘Account set name’ to see the account
balances
5. In the ‘View balances’ screen you can view a list of
accounts and the balance for each
6. Click on any of the accounts you want to review
7. Click ‘Services’ to use secure messaging for the
account selected
8. You can choose from a range of secure messaging
options directly from ‘Account services’
9. Choose any option by placing a dot against it and
click ‘Next’
3. Click the ‘Banking’ tab
4. Click on the ‘Account set name’ to see
the account balances
Page 14

14
2.4 Account services
5. In the ‘View balances’ screen you can view a list
of accounts and the balance for each
6. Click on any of the accounts you want to review
Page 15

15
2.4 Account services
8. You can choose from a range of
secure messaging options directly
from ‘Account services’
9. Choose any option by placing a
dot against it and click ‘Next’
7. Click ‘Services’ to use secure messaging
for the account selected
Page 16

16
2.4.1 Close an account
2.4.1 Close an account
1. From the ‘Account services’ screen choose
‘Close an account’
2. Click ‘Next’
3. You are at the first stage of the account
closure process
4. Please review your account number, contact number
and account balance (it must be zero in order to
close the account)
5. Press ‘Next’ to move to the next stage
6. You are at the second stage of the account
closure process
7. Please review your account number, contact number
and account balance (it must be zero in order to close
the account)
8. Press ‘Send’ to move to the next stage
9. You are at the last stage of the account closing
process
10. Click ‘Finish’ to complete your request
1. Place a dot against ‘Close an account’
2. Click ‘Next’
Please note that ‘Close an account’ is only available to users with enhanced secure messaging privileges.
Page 17

17
2.4.1 Close an account
3. You are at the first stage of the
account closure process
4. Please review your account
number, contact number and
account balance (it must be zero
in order to close the account)
5. Press ‘Next’ to move
to the next stage
Please note that ‘Close an account’ is only available to users with enhanced secure messaging privileges.
Page 18

18
2.4.1 Close an account
6. You are at the second stage of
the account closure process
7. Please review your account number, contact
number and account balance (it must be zero
in order to close the account)
8. Press ‘Send’ to move
to the next stage
Please note that ‘Close an account’ is only available to users with enhanced secure messaging privileges.
You can go back to the previous screen by clicking ‘Back’ or ‘Cancel’ to exit the ‘Close account’ process
9. You are at the last stage of the
account closing process
10. Click ‘Finish’ to complete
your request
Page 19

19
Please note that ‘Change statement address’ is only available to users with enhanced secure messaging privileges.
2.4.2 Change statement
address
2.4.2 Change statement address
1. From the ‘Account services’ screen, choose ‘Change
statement correspondence address’
2. Click ‘Next’ to proceed
3. Enter the new address
4. Click ‘Next’ to proceed
5. Please review the account number and new address
6. Please read the message on what is an acceptable
address
7. Click ‘Send’ to send the message
8. Your message has been sent successfully
9. Click ‘Finish’ to complete your request
1. From the ‘Account services’ screen, choose
‘Change statement correspondence address’
2. Click ‘Next’ to proceed
You can click ‘Cancel’ to exit at any time
Page 20

20
2.4.2 Change statement
address
Please note that ‘Change statement address’ is only available to users with enhanced secure messaging privileges.
You can click ‘Cancel’ to exit at any time
3. Enter the new address
4. Click ‘Next’ to proceed
Page 21

21
2.4.2 Change statement
address
You can click ‘Cancel’ to exit at any time
5. Please review the account
number and new address
6. Please read the message on what is
an acceptable address
7. Click ‘Send’ to send the message
8. Your message has been sent successfully
9. Click ‘Finish’ to complete your request
Please note that ‘Change statement address’ is only available to users with enhanced secure messaging privileges.
Page 22

22
2.4.3 – 2.4.7
2.4.3 Order copy statement
Please see section 2.6 Ordering stationery
2.4.4 Order new certificate or interest
Please see section 2.6 Ordering stationery
2.4.5 Order new cheque book/pay in book
Please see section 2.6 Ordering stationery
2.4.6 Stop cheque
Please see section 2.7 Stopping a card/cheque
2.4.7 General enquiries
Please see section 2.8 General enquiries
Page 23

23
2.5 Payment queries
2.5 Payment queries
1. Click ‘View payments’
2. Change the payment ‘Status’ to ‘Completed’ from the
drop down menu
3. Click ‘Display’ to view a list of completed payments
4. Click on any of the payments that you would like more
information on
5. Click on ‘Transaction query’ to proceed
6. Select the question(s) you have in relation to the
selected transaction
7. Click ‘Next’ to proceed
8. Once you have checked that your request is complete,
click ‘Send’
9. Click ‘Finish’ to complete your request
10. You will be returned to the original transaction screen
1. Click ‘View payments’
2. Change the payment ‘Status’ to ‘Completed’
from the drop down menu
3. Click ‘Display’ to view a list
of completed payments
4. Click on any of the payments that you
would like more information on
Page 24

24
2.5 Payment queries
5. Click on ‘Transaction query’ to proceed
Page 25

25
2.5 Payment queries
6. Select the question(s) you have in relation to
the selected transaction
7. Click ‘Next’ to proceed
Page 26

26
2.5 Payment queries
8. Once you have checked that your
request is complete, click ‘Send’
9. Click ‘Finish’ to complete
your request
10. You will be returned to the original transaction screen
Page 27

27
2.6 Ordering stationery
1. Click ‘Order stationery’
2. Select your chosen option
3. For example, to order a new cheque book, select this
option
4. Click ‘Next’
5. Click the ‘Select group’ drop down menu to select
the account group for which you are requesting the
cheque book
6. Click ‘Go’ to populate the ‘Select account set’ field
7. Click the ‘Select account set’ drop down menu and
choose the account set, then click ‘Go’
8. Select the account you need the cheque book for and
click ‘Next’
9. Please select your stationery requirements (you can
select both options if required)
10. Click ‘Next’
11 . Check your account number is correct click ‘Send’
12. Confirmation that your message has been sent to the
bank and your request will be processed
13. Click ‘Finish’ to complete your request
14. You can repeat this process for any other stationery
requirement you might have e.g. certificate of interest
and/or a copy of your statement
2.6 Ordering stationery
1. Click ‘Order stationery’
2. Select your chosen option
This option allows you to order a certificate of interest, statement copies or a new cheque book/pay-in book. Please note
that you can also order stationery via account services
Page 28

28
2.6 Ordering stationery
3. For example, to order a new cheque book,
select this option
4. Click ‘Next’
This option allows you to order a certificate of interest, statement copies or a new cheque book/pay-in book. Please note
that you can also order stationery via account services
5. Click the ‘Select group’ drop down menu to select
the account group for which you are requesting the
cheque book
6. Click ‘Go’ to populate the ‘Select account set’ field
7. Click the ‘Select account set’ drop down menu and
choose the account set, then click ‘Go’
8. Select the account you need the
cheque book for and click ‘Next’
Page 29

29
2.6 Ordering stationery
This option allows you to order a certificate of interest, statement copies or a new cheque book/pay-in book. Please note
that you can also order stationery via account services
9. Please select your stationery requirements
(you can select both options if required)
10. Click ‘Next’
11. Check your account number
is correct click ‘Send’
Page 30

30
2.6 Ordering stationery
12. Confirmation that your message has been sent to the
bank and your request will be processed
13. Click ‘Finish’ to complete
your request
14. You can repeat this process for any other stationery requirement you might have e.g. certificate of interest
and/or a copy of your statement
This option allows you to order a certificate of interest, statement copies or a new cheque book/pay-in book. Please note
that you can also order stationery via account services
Page 31

31
2.7 Stopping a card/cheque
1. Click ‘Stop card/cheque’
2. Please note the message on the screen and if your
card is lost or stolen, please call the bank on this
number immediately
3. If you want to stop a cheque, please click ‘Next’
4. Click the ‘Select group’ drop down menu and select
the account group for which you are requesting the
cheque to be stopped
5. Click ‘Go’ to populate the ‘Select account set’
6. Click the ‘Select account set’ drop down menu and
choose the account set, then click ‘Go’
7. Select the relevant account and click ‘Next’
8. Please check the account number, and contact
details for the account for which the cheque needs to
be stopped
9. Select the reason why you want to stop the cheque
10. You can request to stop a single cheque, or all the
cheques in the cheque book if the cheque book has
been lost or stolen
11 . Please provide the necessary details for the cheque or
series of cheques
12. In the case of a single cheque, please provide the
cheque date, amount and payee
13. Select the account the cheque relates to and click
‘Next’
14. Please check the account number and contact details
for the account for which the cheque needs to be
stopped, along with the date of the cheque, the
amount and payee
15. Click ‘Send’ to submit your request
2.7 Stopping a card/cheque
1. Click ‘Stop card/cheque’
2. Please note the message on the screen and if
your card is lost or stolen, please call the bank
on this number immediately
3. If you want to stop a cheque,
please
click ‘Next’
Page 32

32
2.7 Stopping a card/cheque
4. Click the ‘Select group’ drop down menu and select
the account group for which you are requesting the
cheque to be stopped
5. Click ‘Go’ to populate the ‘Select account set’
6. Click the ‘Select account set’ drop down menu and
choose the account set, then click ‘Go’
7. Select the relevant account
and click ‘Next’
Page 33

33
2.7 Stopping a card/cheque
8. Please check the account number, and
contact details for the account for which
the cheque needs to be stopped
9. Select the reason why you want to stop
the cheque
10. You can request to stop a single cheque, or all
the cheques in the cheque book if the cheque
book has been lost or stolen
11. Please provide the necessary details for the
cheque or series of cheques
12. In the case of a single cheque, please provide
the cheque date, amount and payee
13. Select the account the cheque
relates to and click ‘Next’
Page 34

34
2.7 Stopping a card/cheque
14. Please check the account number and contact details
for the account for which the cheque needs to be
stopped, along with the date of the cheque, the
amount and payee
15. Click ‘Send’ to submit
your request
Page 35

35
2.8 General enquiries
2.8 General enquiries
1. Click ‘General enquiry’
2. Choose ‘None of the above – I want to raise a general
enquiry’
3. Click ‘Next’
4. If your question relates to any of these options, please
click on the relevant link
5. Click ‘Next’ if your question cannot be answered by
the links above
6. Please check the account number to which your
enquiry relates and type your question in the
box provided
7. Click ‘Send’ to submit your message
8. Confirmation that your message has been sent
9. Click ‘Finish’ to complete your request
1. Click ‘General enquiry’
2. Choose ‘None of the above – I want to
raise a general enquiry’
3. Click ‘Next’
Please note this option is for all account related (transaction, statements, cheques etc) enquiries and NOT for complaints
or any other messages.
Page 36

36
2.8 General enquiries
4. If your question relates to any of these options, please
click on the relevant link
5. Click ‘Next’ if your question cannot be
answered by the links above
You can go back to the last screen by clicking ‘Back’ or ‘Cancel’ to exit.
Page 37

37
2.8 General enquiries
6. Please check the account number to which your enquiry
relates and type your question in the box provided
7. Click ‘Send’ to submit
your message
Page 38

38
2.8 General enquiries
8. Confirmation that your message has been sent
9. Click ‘Finish’ to complete
your request
Page 39

39
2.9 View, respond and delete messages
1. All messages between you and the bank are visible
under the ‘Messages’ tab
2. Over a period of time, the list of messages will
increase and you may want to delete old messages
3. You can display your messages based on the search
criteria you enter
4. Select the account for which you want to archive or
delete messages
5. All the messages sent by you will receive an
automated response from the bank to confirm that
the message has been received
6. You can click the reference ID to view or respond
to messages (please do not respond to any
automated messages)
7. If you want to reply to a message from the bank you
can do this by typing your message in the box and
clicking ‘Send’
8. You can close or delete the message chain by clicking
the respective option.
If the message is deleted, then you will no longer
be able to view it in the ‘Message’ tab, however a
‘Closed’ message can still be viewed
2.9 View, respond and
delete messages
1. All Messages between you and the bank are visible under the ‘Messages’ tab
2. Over a period of time, the list of messages will increase and you may want to
delete old messages
Page 40

40
2.9 View, respond and
delete messages
3. You can display your messages based
on the search criteria you enter
4. Select the account for which you want
to archive or delete messages
Messages deleted by you are not physically deleted from the system. They are automatically archived and removed
from display
Page 41

41
2.9 View, respond and
delete messages
5. All the messages sent by you will receive an automated
response from the bank to confirm that the message has
been received
6. You can click the reference ID to view or respond
to messages (please do not respond to any
automated messages)
Page 42

2.9 View, respond and
delete messages
7. If you want to reply to a message from the bank you can do
this by typing your message in the box and clicking ‘Send’
8. You can close or delete the message chain by clicking
the respective option.
If the message is deleted, then you will no longer be
able to view it in the ‘Message’ tab, however a ‘Closed’
message can still be viewed
Page 43

Item Ref: IBIM2787. September 2014
 Loading...