

The Zeta 5 Window Series
ZETA5CW, ZETA5PW, ZETA5LW
Manual
Operation & Installation
sales@oakstoves.co.uk www.oakstoves.co.uk

Zeta 5W Series Manual - V2.8 © Oak Stoves 2018
2
IMPORTANT
READ BEFORE USE
We use Stove Bright® High Temperature Paint on all of our stoves and it is important that the paint
is cured properly during the rst burn of the stove. This is done to ensure the paint nish will be able
to withstand the high temperatures needed. Curing is done by following the instructions below. If this
process is not done properly during the rst burn of your stove, you may experience issues with the
paint peeling over time, especially when the stove is operated at a high heat.
Set / Cure the paint
For wood burning, follow these guidelines:
1. Build a small kindling re to start. The kindling re should be kept burning for 10 to 15
minutes.
2. Add fuel to build a medium size re to bring the stove surface temperature to about 450°F.
3. The medium size re should be kept burning for about 60 minutes.
4. For the nal stage of curing, add fuel to this re to make it a very hot re (surface temperature
above 600°F) and keep it at this level for about 60 minutes.
Once this initial process has been completed, the paint will be properly cured and you can operate
your stove normally according to the instructions provided in this manual. If any peeling of the paint
occurs on your stove this will only be as a result of improper curing or misuse of the stove such as
over fuelling or running the stove too hot. Therefore any peeling is not covered by your warranty.
NOTE: During the nal higher temperature burn phase there may be some visible smoke near the
stove surface. There may also be an unpleasant odour. To mitigate this effect, ventilate the room
with open windows and doors to provide airow.
HEALTH WARNING: The smoke from the curing process displaces oxygen. Small children, the
elderly and persons with existing breathing problems should vacate the area during the hot burn to
avoid the discomfort of lost oxygen. The smoke is primarily Carbon Dioxide, and therefore non-toxic
but uncomfortable.
Trouble Shooting: Paint Curing
Take care to build slowly to the medium temperature re. Building a hot re immediately will “shock”
the paint and cause it to release from the surface. The only remedy to this problem is to remove the
paint, prepare the surface for repainting, and repaint. To avoid problems during the curing process,
do not touch the surface with anything until the paint is fully cured.
Zeta 5W Series Manual - V2.8 © Oak Stoves 2018
3
Introduction
Thank you for purchasing an Oak Stove, we know that our stove will provide your home with many years of heat and
good service. We assure you that you have purchased a quality product that has been built to last, designed and
manufactured in the UK with an Eco-Cleanburn system to ensure a clean and efcient performance.
Please read the operation and installation guide carefully before commencing the installation and remember to keep this
manual safe for future reference.
Contents
EC Declaration Of Conformity 4
Technical Information 5
Operating Instructions
Recommended Fuels 6
Setting The Air Control Management 7
Lighting The Stove 8
Operating The Stove With The Door Open 9
Controlling The Stove 9
Refuelling 9
Cleaning & Maintenance 10
Ash Clearance 10
Throat, Bafe Plate & Flueway Cleaning 10
Chimney Sweeping 11
Combustion Air Supply 11
Seasonal Use 11
Troubleshooting 12
Placement & Fixing Advice 13
Installation Instructions
Health & Safety Precautions 15
Chimney 15
Hearth & Fire Surround 15
Flue Connection 16
Connecting The Flue 16
On Delivery Of The Stove 16
After Installation 16
Zeta 5W Dimensions 17
Zeta 5W Parts List 18
Maintenance 19
Warranty & Guarantee 20
DEFRA Requirements 22
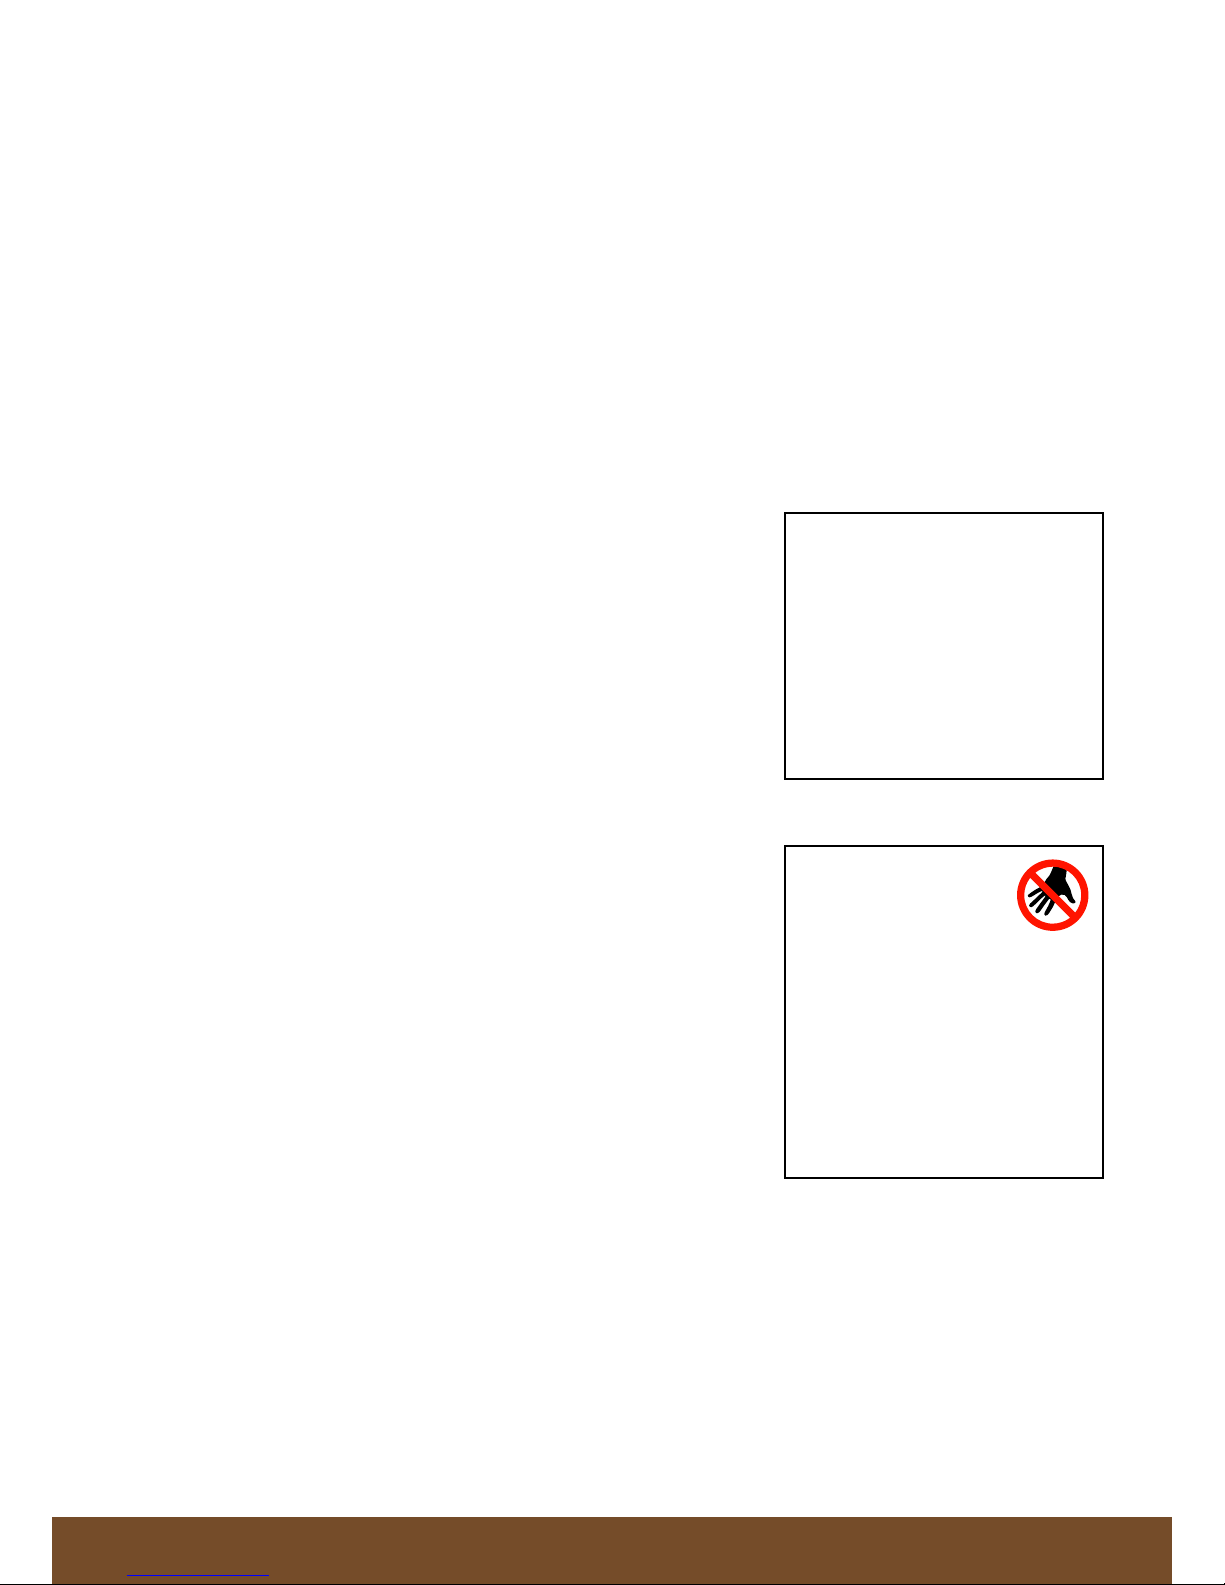
WARNING!
The appliance will
become very hot.
During operation, the entire stove
unit becomes very hot and will cause
burn injuries if touched. Heat is also
radiated from the stove, especially
the glass, and high temperatures
will be emitted. Always take care
when near the re and that there
are no ammable materials closer
than the recommended distance
specied.
NOTE:
Ensure you report the installation
of your stove to your local
authority.
The owner of the property is
personally responsible for ensuring
compliance with all mandatory
safety requirements and that the
installation is carried out by an
approved and qualied installer.
Zeta 5W Series Manual - V2.8 © Oak Stoves 2018
4
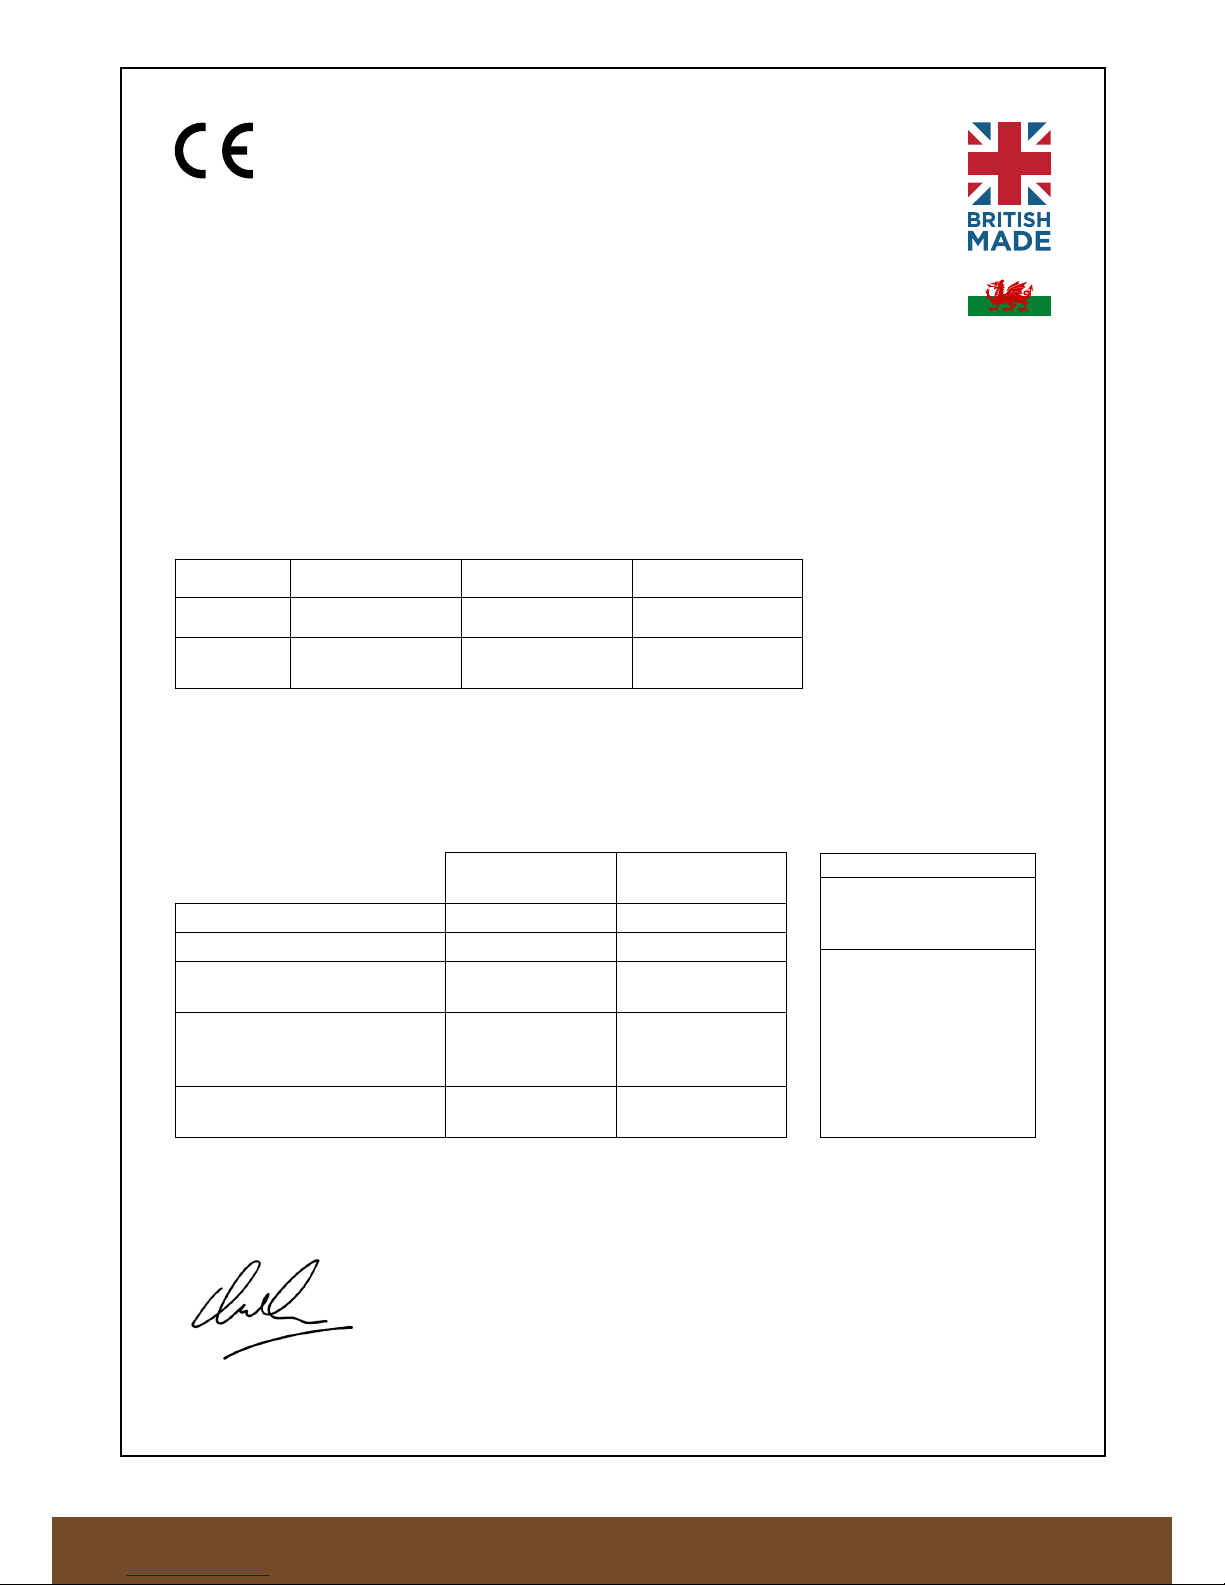
EC Declaration Of Conformity
MANUFACTURER
Name Oak Stoves
Address Unit 11, Village Farm Industrial Estate
Village Farm Road, Pyle
West Glamorgan, CF33 6BL
Telephone +44 (0)845 644 2815
Place Of Manufacture West Glamorgan, South Wales, United Kingdom
PRODUCT
Product Type Multi-Fuel Stoves red by solid fuel
Series Zeta 5W Series (Log Store, Pedestal & Compact)
Materials Used In Construction Plate Steel, Vermiculite Board, Ceramic Glass, Fire Rope.
Model Numbers
MODEL ZETA5LW ZETA5PW ZETA5CW
NAME Zeta 5 Log Store Zeta 5 Pedestal Zeta 5 Compact
CE Ref.
No.
ZETA5LW ZETA5PW ZETA5CW
Standard EN 13240 : 2001
Intended for use Heating of living accommodation
Fuels Wood logs & solid mineral fuel
Special conditions None
Date of issue 02/01/2018 - Version 2.8
WOOD
SOLID MINERAL
FUEL
NOMINAL OUTPUT 4.9kW 4.1kW
ENERGY EFFICIENCY (NET) 76.7% 77.7%
(Ancit)
CO EMISSION AT 13%
OXYGEN
0.47% 0.21%
CLEARANCE TO
COMBUSTIBLE MATERIAL
(MINIMUM)
75mm - REAR
500mm - SIDE
75mm - REAR
500mm - SIDE
AVERAGE FLUE GAS
TEMPERATURE
231
o
C 174oC
Manufacturer’s Declaration
The stove has been type tested by BSRIA Ltd. and fulls the applicable rules for EN-13240:2001 & CE
marking. Manufacture of the product has taken place in accordance with those specications. This forms
the relevant type approval certication and the required manufacturing processes and checks.
Richard Heatherill
Technical Director (Europe) - Oak Stoves
RECOMMENDED FUELS
WOOD LESS THAN 20%
MOISTURE
BRIQUETTED CLOSED FIRE
FUEL
THIS APPLIANCE IS CAPABLE
OF INTERMITTENT OPERATION
AND SHOULD ONLY BE USED
IN ACCORDANCE WITH THE
USER’S INSTRUCTIONS,
BURNING ONLY
RECOMMENDED FUELS.
THIS APPLIANCE IS NOT FOR
USE ON A SHARED FLUE
IMPORTANT
The CE plate can either be
found on the underside of
the door or log store.

Zeta 5W Series Manual - V2.8 © Oak Stoves 2018
5
Technical Information
All local regulations, including those referring to national and European Standards need to be complied with
when installing the appliance.
This manual is for the following models in the Zeta series:
MODEL ZETA5LW ZETA5PW ZETA5CW
NAME Zeta 5W Log Store Zeta 5W Pedestal Zeta 5W Compact
RANGE 4-6kW 4-6kW 4-6kW
EFFICIENCY 77.7% 77.7% 77.7%
MASS 140kg 130kg 130kg
THE MINIMUM FLUE DRAUGHT
FOR NOMINAL HEAT OUTPUT*
12pa (Pascals) 12pa (Pascals) 12pa (Pascals)
*where applicable, with open and closed redoors.
RECOMMENDED FUELS
WOOD LESS THAN 20% MOISTURE
BRIQUETTED CLOSED FIRE FUEL
THIS APPLIANCE IS CAPABLE OF INTERMITTENT OPERATION AND SHOULD ONLY BE USED IN
ACCORDANCE WITH THE USER’S INSTRUCTIONS, BURNING ONLY RECOMMENDED FUELS.
THIS APPLIANCE IS NOT FOR USE ON A SHARED FLUE
PLEASE COMPLETE ALL THE DETAILS BELOW AS THIS COULD AFFECT YOUR WARRANTY
SERIAL NUMBER DATE OF INSTALLATION
HETAS INSTALLER REGISTRATION NUMBER INSTALLER NAME
INSTALLER ADDRESS
Important To Remember
Installation By Authorised Technician
This manual contains instructions on how the stoves must be assembled, maintained and installed. To ensure the
function and safety of the stove, we recommend that the installation must be carried out by an authorised technician.
Contact one of our dealers to nd a suitable tter.
Structural Support
Check that the wood joists are strong enough to bear the weight of the stove and chimney. The stove and chimney can
usually be placed on a normal wooden joist in a single occupancy house, if the total weight does not exceed 400kg.
Building Permission
Before installing a stove or erecting a chimney, it is necessary for you to make an application for building permission to
your local authority. Ask your local authority for advice regarding building regulations and the application.
Hearth Plate
Due to the risk of embers falling out, a ammable oor must be protected by a hearth plate. It must extend 300mm in
front of the stove and 300mm on each side of the stove, or have a 200mm extension on each side of the opening. The
hearth plate can consist of natural stone, concrete, metal plate or glass.

Zeta 5W Series Manual - V2.8 © Oak Stoves 2018
6
Operating Instructions
NOTE: All multi-fuelled stoves must be installed by an approved installer, and all
necessary checks described in the Installation Instructions need to be carried out.
Only use the recommended fuels detailed below.
Recommended Fuels
The Zeta stoves are Multi-Fuel appliances, meaning they can burn a number of different
fuels, however you must ensure that you follow the instructions specic to your chosen type
of fuel and that your chimney is suitable for all the types of fuel you will use.
Wood
The wood you use to burn in this stove should only be dry and well seasoned. To prepare the
wood for burning ensure it is cut, split and then left to season in a dry, well ventilated area for
at least one year before burning. The ideal types of wood for this stove are hard woods such
as Ash, Beech or Oak. We recommend that all wood has a moisture content of less than 20%.
The rebox should have a bed of ash at the base for the wood to be placed on. The use of
unseasoned wood in this appliance can result in heavy tar deposits in the stove, on the glass
and within the chimney. Also unseasoned wood will produce lower outputs from the re.
Peat
Cut peat must be dried before using in the stove in order to reduce the amount of tar deposits
produced. You should burn Peat in the same way as wood fuel, on a bed of ash at the base
of the stove.
Smokeless Fuel (Solid Mineral Fuels)
A variety of smokeless fuels may be used in this stove, however you must check the necessary
precautions for each specic fuel to prevent damage. These fuels include:
• Ancit
• Anthracite Large Nuts
• Centurion
• Extracite
• Homere
• Maxibrite
• Phurnacite
Only smokeless fuels may be burnt in smoke control areas. Petroleum Coke and House Coal
is not suitable for use on this appliance, it’s use will void your warranty.
There are a few additional points to consider when lighting smokeless fuel res, please refer
to the ‘Burning solid mineral fuels’ section on the next page. Also when burning smokeless
fuels, the upper bafe vermiculite board (throat plate reboard) must be removed. Please
refer to page 19 for instructions on how to do this.
Operating Instructions

Zeta 5W Series Manual - V2.8 © Oak Stoves 2018
7
Operating Instructions
Setting The Air Control Management
The following is a recommendation only for maximum efciency.
When burning wood only or solid mineral fuels (smokeless fuels) the following settings are
recommendations only as it is all dependent on the moisture content of the material to be
burnt.
So if the moisture content is above 16 to 20% which is the recommended level in any of
these products you may well need to make adjustments to get the optimum burn efciency
out of this stove. So the following is a guide only to the position of the primary secondary and
tertiary air controls.
Please note that wood burns from the top of the re box down so more control is gained from
the secondary and tertiary slider control bar. This slider operates the clean glass air wash
system which assists in helping to prevent the glass blackening up. It also operates the EcoCleanburn at the rear of the re box which helps to insure that all of the gases given off from
the wood and solid mineral fuels are fully burnt prior to being exhausted up the chimney,
therefore giving maximum heat output and efciency to the stove.
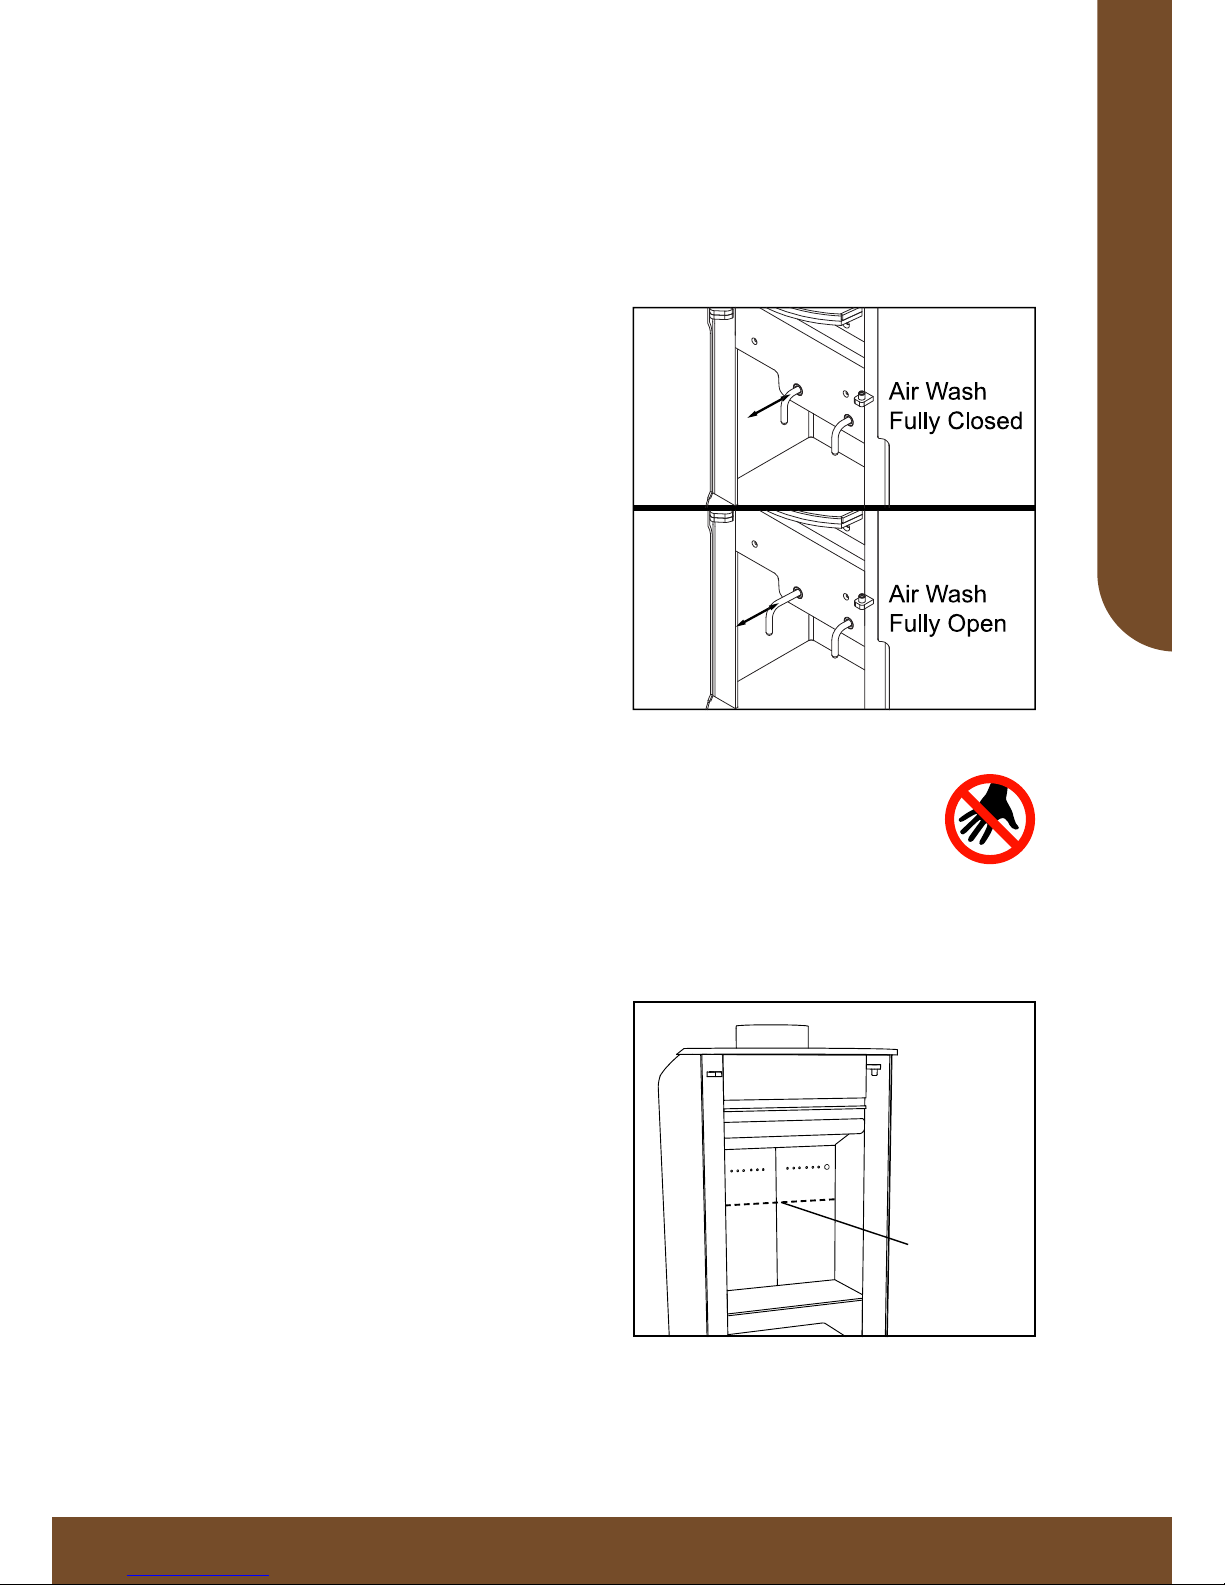
As you open and close the left hand slider (Fig. 2) for the clean glass air wash (secondary)
and the Eco-Cleanburn (tertiary) there is a balancing valve (which you never need to touch)
tted into the rear of the stove that automatically manages the volume of air being fed to each
of the outlet air controls so the optimum airow is delivered to the clean glass air wash down
the front of the glass and the Eco-Cleanburn afterburn at the rear of the re box.
However, solid mineral fuels burn from the bottom up so you require air ow from the right
hand slider (Fig. 1) and less from the secondary and tertiary control.
Please refer to the table below as a guide only to the position of the 2 air controllers. Also
note the required riddle grate position for each type of fuel. To change the riddle grate position
insert handle (see Fig. 4), then push backwards to close the grate or pull forward to open the
grate.
Burning wood only - (Rotating riddle should be in the closed position)
Position of air
management controls
Lighting the stove Once alight & burning
well
To shut the stove off
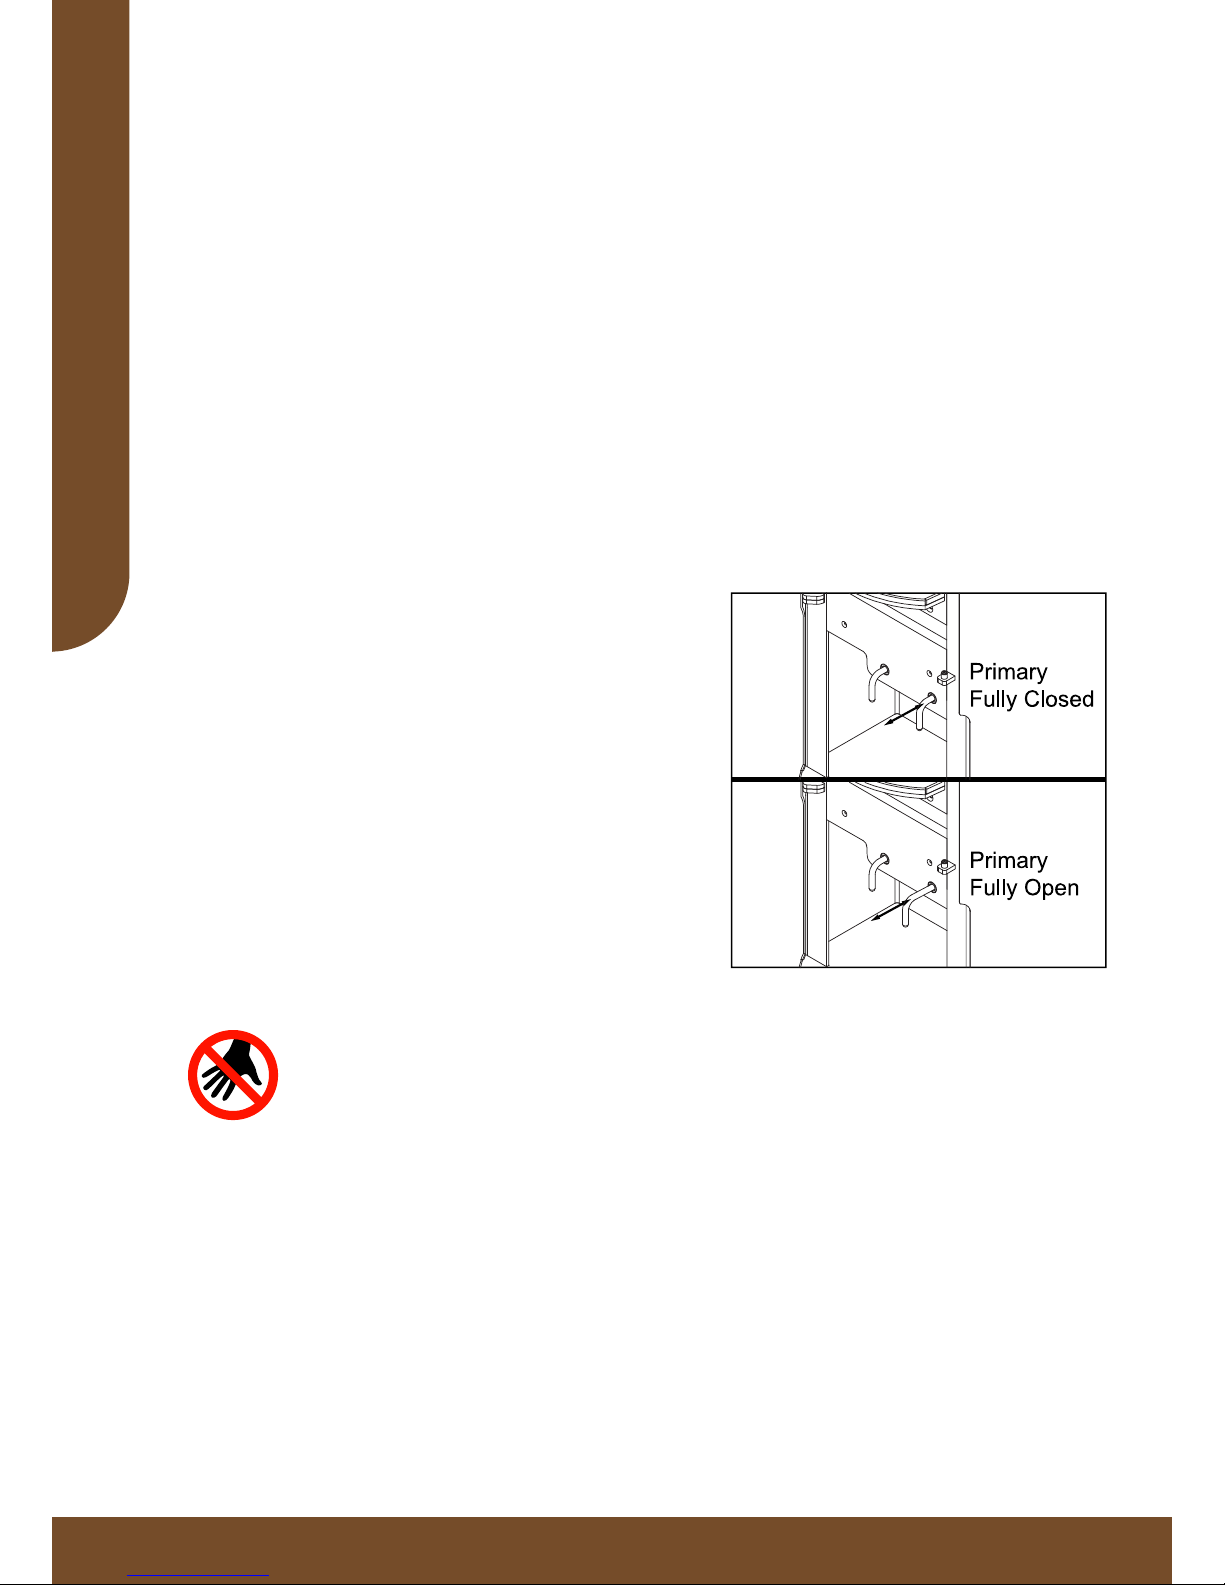
1
Primary slider
(right)
Fully open Push slider in to
approx 30% open
Close completely
2
Secondary slider
(left)
Pull slider out 75%
towards you
Push slider in to
approx 50% open
Push in fully to close
Burning solid mineral fuels - (Rotating riddle should be in the open position)
Position of air
management controls
Lighting the stove Once alight & burning
well
To shut the stove off
1
Primary slider
(right)
Fully open Push slider in to
approx 75% open
Close completely
2
Secondary slider
(left)
Pull slider out 75%
towards you
Push slider in
between 50% - 25%
Push in fully to close
Zeta 5W Series Manual - V2.8 © Oak Stoves 2018
8
Lighting The Stove
When lighting the stove for the rst time your appliance may give off an odour, this is caused
by the paint inside the stove reacting to the heat. This is completely normal and will cease
after a short time, however the room should be kept well ventilated while this is still occurring.
The stove door handle is located on the right hand side of the door, pull the handle out to
open the door and insert your fuel (Ensure riddle grate is in the appropriate position for your
fuel). When closing the door be careful not to slam it shut to avoid damage to the closing
mechanism or glass, also when opening the door be careful of any pieces of fuel or embers
that may be resting on the door. To begin you should only light a small re and allow it to burn
slowly for at least two hours. This initial re will evaporate any residual moisture contained
within the vermiculite bricks, allowing you to use the re as normal from then onwards.
When burning wood or peat ensure that there is a layer of ash at the base of the rebox
to prevent overheating and damage to the base. If there is no ash available when you rst
light the stove, you can add a layer of sand approximately 13mm (1/2 inch) thick to the base
instead.
Lighting the stove
To start the re you can use dry kindling wood with
either paper or re lighters. Place the paper or re
lighters along with the kindling on the base of the
rebox and cover with approximately 50mm of fuel.
Light the paper or re lighters to start the re, then
ensure the right hand primary air slider is open (See
Fig. 1) on the stove before closing the door, pull the
Air Wash control towards you to open the rear Air
Wash vent (see Fig. 2b). Allow the re to be fully
ignited before adjusting the air vents to the preferred
position, as detailed on page 7. Once fully lit, you
can partially close the primary slider.
Always take care when touching any part of the stove to prevent burning
yourself and we always advise using an appropriate glove when adjusting the
air vent, opening/closing the re door and when refuelling. Please note that
the stove can remain hot for long periods after the re has been extinguished.
When relighting the stove leave the ash from previous res on the base of the rebox, however
some may be removed if the build up starts to block the front grill. You should always ensure
there is enough ash at the bottom of the rebox to protect the stove’s base before lighting a
re.
Burning smokeless fuels
When loading the re with smokeless fuels it is advised not to put all the required fuel in at
once, load in two stages to ensure that the re will not be smothered and wait between each
stage for the ames to grow before adding the remaining fuel. Certain fuels may produce
more soot deposits than others, therefore it is essential for you to regularly clean the throat
plates to avoid build up. When relighting a smokeless fuel re ensure you have cleared the
grate and emptied the ashpan before starting a new re.
Fig. 1
Operating Instructions
Zeta 5W Series Manual - V2.8 © Oak Stoves 2018
9
Operating Instructions
Operating The Stove With The Door Open
This stove should not be operated with the door open, we do not recommend this. This stove
is designed to be operated with the door closed as this gives improved efciency and air
ows. Certain fuels such as wood and peat will burn better this way but it is vitally important
that you do not leave the re unattended with the door open at any time. Always keep
the door closed and the handle in the locked position.
Controlling The Stove
The right hand primary slider and the secondary
and tertiary slider bar below the door (see Fig.
2) control the rate of burning and in turn the
heat output. The clean air wash is known as the
secondary air control and the Eco-Cleanburn is
known as the tertiary. These are fully controlled
by the left slider bar. The primary air control slider
should only be left fully open when lighting or
when rapid burning is needed. If the slider is left
open for long periods then over-ring may occur.
Once lit we recommend the primary slider be left
slightly open, and adjust accordingly to control
the re.
The door handle, two control bars (air wash and primary) and riddle bar will heat
up when the re is lit and running. But when you need to touch them to adjust or
reload the re you must wear gloves. Therefore to avoid injury please wear
appropriate hand protection when touching any part of the stove as the body,
the glass and the primary air knob can get very hot.
Refuelling
Keep the rebox well lled to maintain the re
but for safety reasons it is important not to overll
the stove, your fuel must not be spilling over the
top of the front grill or touching the door or glass
panel. Doing this could cause the re to spill out
when opening the door. Overlling can also cause
the glass to black up. Do not ll past the ll line,
which is 50mm below the tertiary holes as this
may restrict airow to the Eco-Cleanburn bar.
(see Fig. 3).
When adding fuel ensure that the appropriate
protection is worn such as a heat resistant glove
and tools such as re poker, tong or shovel are
used.
Fig. 2
Fill Line
(50mm below
tertiary holes)
Fig. 3
A
B

Zeta 5W Series Manual - V2.8 © Oak Stoves 2018
10
Cleaning & Maintenance
Our stoves are nished with high temperature resistant paint which can withstand the
temperatures expected in normal use. You may clean the stove with a damp lint-free cloth,
but ensure the stove is completely cold throughout before doing so.
To clean the glass on the door, again use a damp lint-free cloth to clean and ensuring that
you wipe with a dry cloth afterwards. Do not use any chemicals to clean the glass, this will
cause permanent damage to the glass. You may get deposits on the glass after the re has
run, most of these will burn off if you run the re again at a fast rate for a few minutes. Do not
use abrasive cloths on the glass or paintwork as these can cause scratching and permanent
damage to the stove.
Ash Clearance
With wood or peat res you should allow some
build up of ash at the base of the rebox, however
it is necessary to remove some ash once the
build up gets too much. This will only be needed
when the build up starts to restrict the airow by
blocking the front grill. Burning smokeless fuels
will require the ashpan to be emptied regularly, it
is very important to do this as this ash must not be
allowed to overow over the grate.
This model has a Remote Riddle Plate Handle
located under the left side of the door, pulling
this bar will rotate the grills allowing excess ash
to drop through to the ashpan below the rebox
(see Fig. 4). Be sure not to completely empty
the base of ash.
It is very important that all ash is cool before attempting to remove it from either the base or
the ashpan. We advise emptying the cold ash into a bin liner and sealing it before disposing.
Throat, Baffle Plate & Flueway Cleaning
It is very important that the throat, bafe plates and the ueway are kept clean and obstruction
free, failure to do so could result in dangerous emissions not escaping correctly. These fumes
can pose a serious health risk to occupants therefore it is necessary to clean both the throat
and bafe plates and the ueways at least weekly, or more frequently if needed.
To clean the throat and bafe plates, rst remove the side bricks to enable you to easily
remove the throat plate. To access the ueway, remove the two saddle clips to release the
upper bre board that covers the ueway. Any build up of soot should then be swept off the
plate down onto the re. Ret parts in reverse order when cleaning is nished, for more detail
please refer to page 19.
Fig. 4
Operating Instructions
Rotating
Riddle
Handle

Zeta 5W Series Manual - V2.8 © Oak Stoves 2018
11
Operating Instructions
Chimney Sweeping
Your chimney should ideally be swept at least twice a year. Depending on your installation
you may be able to sweep your chimney through your appliance, if not your installer would
have inserted a soot door to access the chimney once the stove has been moved clear. When
sweeping through your appliance you will rst need to remove the throat plate, upper bre
board and front grill from the stove.
Your installer will advise on what tools you will need to sweep your chimney. After sweeping
you must ensure that all ueways are clear and no soot deposits have collected to form a
blockage particularly on any horizontal surfaces.
Combustion Air Supply
In order for the stove to work efciently and safely there needs to be an adequate supply of
combustion air in the room where the stove is installed. This is necessary where the room
is double glazed or where a ue draught stabiliser is operating in the room where the stove
has been installed. Provision of air to the stove must be in accordance with current Building
Regulations Approved Document J. An open window is not appropriate. Any air inlets must
be positioned in such a way as they cannot be blocked.
Seasonal Use
If the stove is not used for a long period of time (e.g. Summer) then it must be thoroughly
cleaned with ash and unburned fuel being removed. It is important to leave air controls fully
open when the stove is not being used, this will prevent build-up of condensation / corrosion.
It is important that the ue connections, any bafes, throat plate and chimney are swept clean
prior to lighting again.
Adverse Weather Conditions
If, due to adverse weather conditions, your stove does not operate properly and smoke is
emitted into the room, DO NOT treat this as a minor problem. Smoke indicates that Carbon
Monoxide (CO) is entering the room. Should this happen, turn your stove controls to their
minimum setting (still allowing the re to burn) open windows to ventilate the room. DO NOT
close the windows before the re has burned out.
The smoke entering the room is probably due to a poor draught or a blocked ue. It is advisable
to have the ue pressure checked. The minimum operating pressure for a ue is 12 Pascals.

Zeta 5W Series Manual - V2.8 © Oak Stoves 2018
12
Troubleshooting
Fire will not burn
Check that:
• the air inlets are obstruction free
• chimneys and ueways are clear.
• you are using a suitable fuel.
• an adequate air supply is entering the room.
• an extractor fan is not tted in the same room as the stove.
• the chimney has a sufcient draw. A draught reading of at least 2.5mm water gauge
should be seen (once the chimney is warm).
Door glass blacks up
Because chimneys differ greatly the best draught settings will take a few trials to gure out,
but the following tips should help:
• When re-fuelling place the fuel towards the back of the rebox, keeping it as possible
from the front grill and avoid over lling.
• The primary air vent on the door may be kept slightly open to assist in keeping the
glass clean or open up the secondary and tertiary slider bar further.
• Unseasoned wood will cause more deposits on the glass if the moisture level is more
than 20%.
Bear in mind it tends to be more difcult to keep the glass panel clean if you’re running the
stove very slowly for a long period of time. If blackening of the glass still occurs ensure that
all ue connections are well sealed with re cement, as this can decay over a long period of
time and may need resealing. Also the chimney draw needs to be sufcient and not affected
by down-draught.
When certain smokeless fuels you may notice some blackening of the glass below the
grill level, this is to be expected and shouldn’t obscure your view of the re or affect the
performance of the stove.
Fume emission
IMPORTANT: If this appliance is properly installed and operated it will not emit fumes.
Occasional fumes when de-ashing or re-fuelling are to be expected, but fumes during normal
use are NOT usual. Persistent fume emission can be very dangerous and should NOT be
ignored. If you notice persistent fume emission you should immediately:
• Open all doors and windows in order to ventilate the room.
• Let the re go out and safely dispose of the remaining fuel from the appliance.
• Check for any blockage to the ue or chimney and clean if required.
• DO NOT attempt to re-light the re until the cause of the fumes has been identied
and resolved. Seek professional advice if necessary.
The most likely cause of fume emission would be due to ue or chimney blockages. For your
own safety it is vital that you regularly check and clean your ue and chimney.
Operating Instructions
Zeta 5W Series Manual - V2.8 © Oak Stoves 2018
13
Operating Instructions
Free Standing External Air Supply
Fire blazing out of control
Check that:
• the door is tightly closed, the handle is locked and the seal is intact.
• the air vents are closed fully (primary, secondary and tertiary).
• a suitable and well prepared fuel is being used.
Chimney res
If your chimney is properly installed and regularly swept, chimney res should not occur.
However, if a chimney re does occur the rst step would be to ensure the door is tightly
closed and the air vents are fully shut (primary, secondary and tertiary), doing this should
cause the chimney re to extinguish itself. After this you must keep the door and air vents
closed until the stove’s re has gone out completely to prevent the chimney re reigniting.
Once this has happened and the stove has cooled you must then clean the chimney and
ueways to prevent the chimney re from reoccurring next time you light the stove.
If the chimney re does not extinguish after closing all the vents and door then you must
contact the re brigade immediately, do not attempt to ght the re yourself. After any chimney
re your chimney should be carefully examined for damage before you attempt to relight your
stove, contact a professional for advice if necessary.
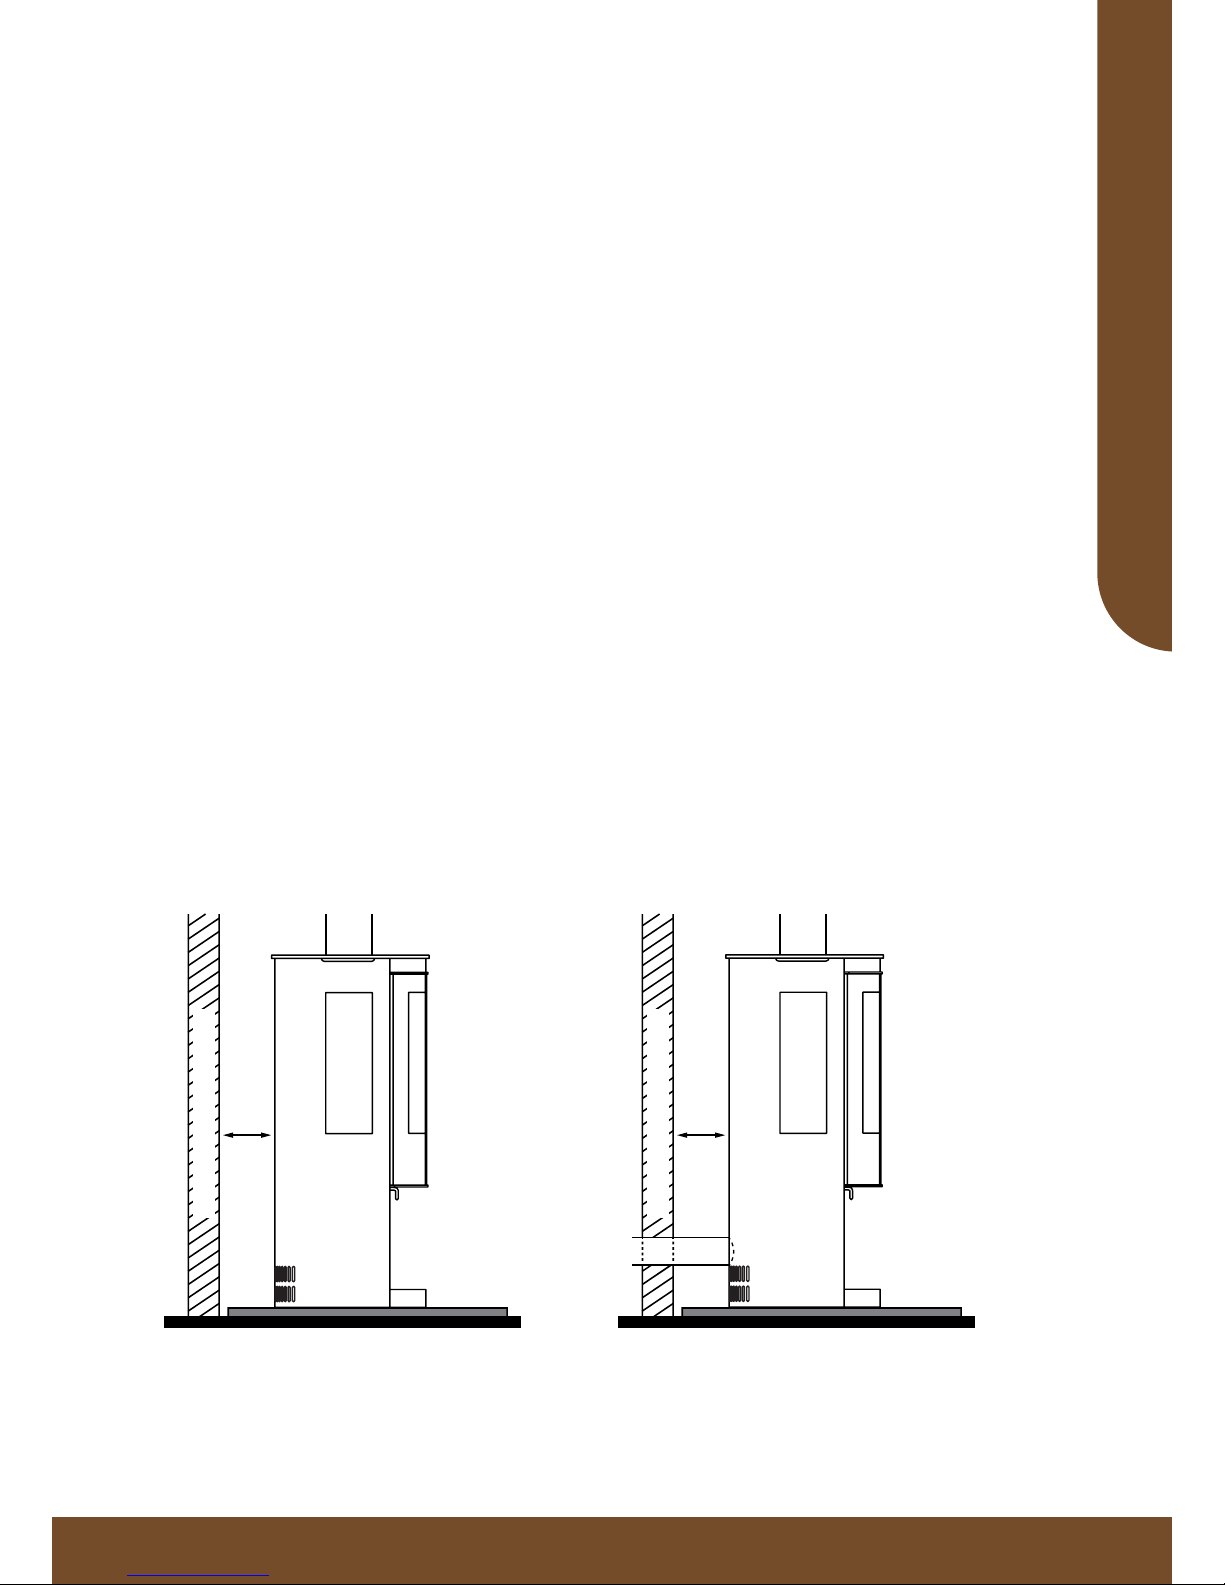
Placement & Fixing Advice
The placement of the stove is very important not only for safety reasons, but also to get the
best performance out of your appliance. Connecting the rear air supply to an external source
of cold air can improve the efciency of your stove, but it is not essential to do this for the
stove to perform normally. The below diagrams show examples of free standing and external
air supply installations. For more information see the Hearth & Fire Surround section.
75mm
COMBUSTIBLE WALL
75mm
COMBUSTIBLE WALL
Zeta 5W Series Manual - V2.8 © Oak Stoves 2018
14
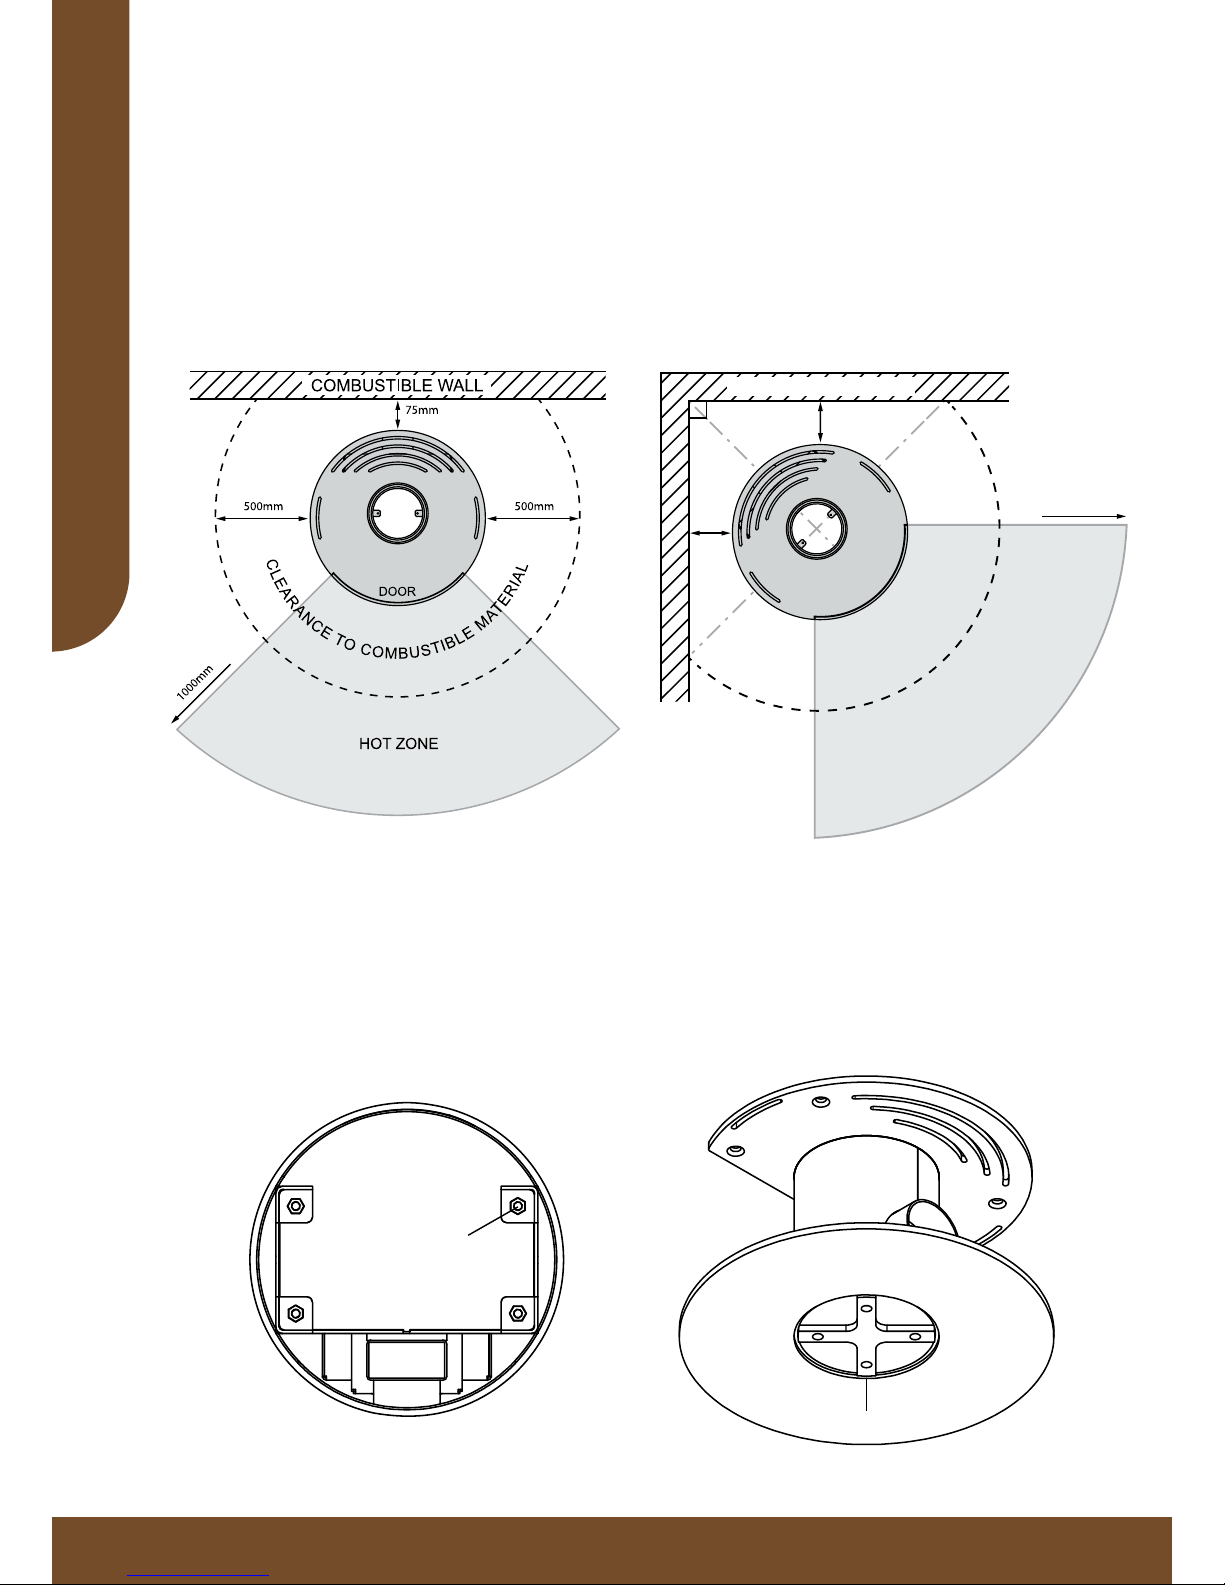
The minimum distance from the rear of the stove to a wall is 75mm, and 500mm to either side
of the appliance. No combustible material should be within this area (see below, left).
There is however an exception made when the stove is placed in a corner, the closest point
of the stove to both walls should be at least 100mm (see below, right). We also recommend
at least 1000mm clearance around the stove to glass (excluding hearths).
Please note the Hot Zone to the front of the stove extends 1000mm from the window and
ends in line with each side of the door edge. This area can be 90oC, so we do not recommend
any combustibles in this area.
Fixing Points
If you would like to x the stove to the ground, you can do this using the xing points shown
below. For anchoring the Pedestal model to your hearth you will need x4 M12 bolts and x4
M12 nuts (not supplied).The Log Store model has M12 nuts built into the base, therefore you
will only require x4 M12 bolts (not supplied) for this model.
Log Store Model Pedestal Model
x4 M12 Nuts
x4 14mm Holes
Views from underneath of the stoves
Operating Instructions
HOT ZONE
100mm
100mm
C
L
E
A
R
A
N
C
E
T
O
C
O
M
B
U
S
T
I
B
L
E
M
A
T
E
R
I
A
L
COMBUSTIBLE WALL
DOOR
1000mm
90
o

Zeta 5W Series Manual - V2.8 © Oak Stoves 2018
15
Installation Instructions
Health & Safety Precautions
Before you begin the installation process there are a number of things to consider:
• We recommend you avoid tting the stove in the same room as an extractor fan.
However, if this is unaviodable, seek specialist advice to ensure safe installation and
operation of the stove.
• If work needs to be carried out that could potentially disturb any asbestos in your
home then ensure appropriate protection is worn before commencing work.
• The room you are tting the stove in needs to have an adequate air supply, especially
if the room has double glazed windows. We recommend you check this with your
local building control ofcer and adhere to the building regulations requirements for
providing oxygen into the room (your installer will conrm this with you).
• The requirements of both the BS 8303 and BS EN 15287-1:2007+A1:2010 standards
must be fullled.
• We recommend you only use a HETAS Approved Installer
to carry out the stove installation. See hetas.co.uk.
• All local authority laws and building regulations must be
adhered to before installation and the required permission
to install must be obtained.
• Ensure you have a carbon monoxide and smoke alarm tted in the same room as
the appliance.
Chimney
For the stove to perform correctly and safely your chimney height must not be less than
4 metres high, this height is taken from the outlet of the stove body to the very top of the
chimney. The outlet on our stove is 5 inches in diameter, therefore your chimney must have
a minimum width of 5 inches but preferably be 7-8 inches wide. Your chimney can be either
square or circular, as long as it meets the minimum width specications.
If installing a stove into an existing replace, it must be swept and inspected to ensure that it is
in good condition and suitable for the type of stove you are installing. If any cracks, blockages
or excessive cross sections are found then you should consult a professional regarding
getting your chimney lined. The type of fuel you wish to burn needs to be considered before
getting your chimney lined so that a suitable lining is used.
If there is an excessive draw with the chimney then we recommend a draught stabilizer
be tted. Alternatively if there is too little draw or down-draught then you must consult a
professional before lighting your stove. You should have a minimum draw of 2.5mm water
gauge.
Hearth & Fire Surround
The stove must be installed on a at reproof hearth for stability and the area in front and
around the re must be clear of any combustible materials. The stove should not be at
Installation Instructions

Zeta 5W Series Manual - V2.8 © Oak Stoves 2018
16
against a wall, we recommend a minimum clearance of 75mm to prevent restricting airow.
Building regulations regarding these appliances govern that the hearth must extend at least
300mm out in front of the stove and 250mm to each side. For safety we recommend that you
ensure there is a minimum of 300mm clearance around the entire appliance. This appliance
needs a good amount of air circulation around it, however if you are installing the stove in a
replace ensure that there is at least 250mm gap to each side and at least 300mm above the
top of the stove in order to prevent overheating and allow for good heat output.
You may wish to connect the rear Air Wash vent up to an external supply of air, this can be done
provided the connection is secure and doesn’t prevent the Air Wash Control from opening
and closing fully. A rear clearance of 75mm is still recommended in these circumstances. Also
you will need to consider how close your mantelpiece or any other objects directly above the
replace are, to prevent damage due to high temperatures.
Flue Connection
The Zeta Series has a top output connection, the type of installation that is best for your home
will depend on the chosen location for the stove. You must ensure that all building and health
and safety regulations that apply to your chosen type of installation are conformed to before
you begin to use the stove.
Your stove will normally be delivered assembled ready for connection.
Connecting The Flue
The ue collar must be sealed with re cement and all ue connections must be well sealed.
Any horizontal sections of ue must not be longer than 150mm.
With most ue connections your installer should t a soot door in your chimney to allow
access to sweep it, alternatively this chimney can be swept through the stove (see Chimney
Sweeping section).
On Delivery Of The Stove
Please ensure that the vermiculite bricks, throat plate and bafe plate have not moved in
transit (see page 19) and that the glass window is intact. Also check that you have all the
required parts (see back page) before installation.
After Installation
Upon completion of the installation you should allow time for the re cement and mortar to
dry out and set properly. Once dry you may begin preparing the re for its rst re. Ensure
that the throat plate, bafe plate and front grill are in place and that the door and vents close
properly before lighting.
When you’re ready to start the re, follow the instructions detailed in the Lighting section
relevant to your type of fuel. Once alight, check that the fumes and smoke are being drawn
up through the chimney correctly and that all joints and seals are not emitting fumes.
Your installer should advise on the operation and maintenance of your stove and chimney
and retain this manual for future reference.
Installation Instructions

Zeta 5W Series Manual - V2.8 © Oak Stoves 2018
17
Installation Instructions
Zeta 5W Dimensions
All dimensions shown are in mm
The Zeta Log Store
5kW
Model ZETA5LW
A 1050mm
B 125mm
C 300mm
D 675mm
E 420mm
F 470mm
G 150mm
H 420mm
The Zeta Pedestal
5kW
Model ZETA5PW
A 1050mm
B 125mm
C 300mm
D 800mm
E 500mm
F 420mm
G 470mm
H 195mm
I 240mm
J 150mm
K 420mm
Front View Side View
Front View Side View
The Zeta Compact
5kW
Model ZETA5CW
A 850mm
B 125mm
C 300mm
D 675mm
E 460mm
F 420mm
G 470mm
H 420mm
I 150mm
Front View Side View
F
G
H
I
B
E
D
C
A
F
G
I
H
K
J
B
E
D
C
A
E
F
F
G
H
B
D
C
A

Zeta 5W Series Manual - V2.8 © Oak Stoves 2018
18
Zeta Parts List
Installation Instructions
Item Qty Part No. Description Warranty
1 1 Z501 Secondary Slider Y
2 1 Z502 Grate Support Y
3 1 Z503 Door Handle Y
4 1 Z504 Primary Slider Y
5 1 Z505 Rotating Riddle Plate N
6 1 Z506 Throat Plate Fireboard N
7 1 Z507 Rear Fireboard (2 parts) N
8a 1 Z508a Left Side Fireboard N
8b 1 Z508b Right Side Fireboard N
9 1 Z509 Top Plate (3 parts) N
10 1 Z510 Bafe Deector Fireboard N
11 1 Z511 Side Panel Y
12 1 Z512 Regulator Cover Plate Y
13 1 Z513 Pneumatic Door Closer N
14 1 Z514 Ash Pan N
Item Qty Part No. Description Warranty
15 1 Z515 Zeta 5 Curved Glass N
16 1 Z516 Ash Pan Handle N
17 1 Z517 Stove Body Y
18 1 Z518 Stove Door Y
19 1 Z519 CE Plate Y
20 1 Z520 Grate Shelf N
21 1 Z521 Fire Grate Retainer Bars N
22a 1 Z522a Left Outer Side Window N
22b 1 Z522b Right Outer Side Window N
23 1 Z523 Rotating Riddle Handle N
24a 1 Z524a Left Flat Inner Side Window N
24b 1 Z524b Right Flat Inner Side Window N
25 2 Z525 Side Grate Retainer Bars N
26 1 Z526 Air Inlet Assembly N

Zeta 5W Series Manual - V2.8 © Oak Stoves 2018
19
Maintenance
Fig. 6
Fire Brick Removal
1. Remove the two screws holding the rear
boards in place, the two rear reboards can be
removed by pulling out from the middle.
2. Remove both Side Bolts from inside the
rebox to free the top of the Side Fireboards,
remove these carefully as they are very fragile.
3. Lift the Top Fireboard up to slide it off its
retainers and remove.
4. Remove the Retaining Plate by pulling
towards you to get it off the retainers each side.
You can now slide the Throat Plate Fireboard
backwards, then forward to allow it to drop out.
5. Firebox is now ready to clean.
NOTE: All screws removed at this time must be
renewed.
Side Fireboard
Retainer
Throat Plate
Fireboard
Rear Fireboards
Fire Brick Assembly
1. Place Throat Plate Fireboard against the roof of the rebox and slide forward over the
location pins then x in position by slotting the Retaining Plate under it with the lip facing
down.
2. Place Top Fireboard in position on its retainers.
3. Put the two Rear Fireboards back into position before retting the screws.
4. Lastly reposition the Side Fireboards one at a time using the Side Bolts to keep them in
place.
Recommended Periodic Checks
Check The Following If Fault Found Recommended
Frequency For Checks
Chimney is sweeped Arrange a sweep Every 6 months
Check the glass is not cracked Replace Before every use
Check re bricks have not deteriorated Replace Weekly
Check bafe plate and throat plate are clean and clear Unblock / Clean Weekly
Check none of the door seal re ropes have worn excessively Replace Weekly
Check the riddle grate is not blocked Unblock Weekly
Check ue pipe for blockages Unblock Monthly
Check all chimney / ue joint seal cement hasn’t deteriorated
or is leaking
Reseal Monthly
If you discover any issues or require replacement parts, please call your retailer / installer.
Installation Instructions
Retaining Plate
Top Fireboard
Side Bolts

Zeta 5W Series Manual - V2.8 © Oak Stoves 2018
20
Installation Instructions
Warranty & Guarantee
Multi-Fuel – 10 Year Extended Warranty
It’s important to know what requirements need to be met in order to qualify for our extended
10 year warranty, as well as being aware of exactly what it covers. This warranty only applies
to Multi-fuel stoves.
If you have purchased your stove from an authorised stockist within our Premium Retailer
Network, then automatically your product will carry a standard 2 year warranty. The 2 year
warranty can be further extended to a total warranty period of 10 years by registering your
Oak Stove within 60 days of the purchase date or installation date which ever is shortest.
Accordingly, the start date for the warranty period is the date of purchase. During the
registration process, the Premium Retailer details will be required for your Extended Warranty
to be activated. Any product purchased outside of our Premium Retailer Network will carry a
standard 12 month, non-extendable warranty.
Once you have purchased your Oak Stoves you can only register your purchase online. It
is a condition of the Extended Warranty that the installation complies with relevant Building
Regulations and the rules in force, and is carried out by a suitably trained and qualied
individual HETAS registered in the United Kingdom (or equivalent in other countries) with a
certicate of installation and the appropriate commissioning report completed and retained
by the end-user.
It is also a condition of the Extended Warranty that your Oak Stoves is regularly serviced
(every 12 months) by a suitably trained and qualied individual (HETAS registered) in the
United Kingdom (or equivalent in other countries). Records and receipts of annual services
will be required in the event of a warranty claim during the period of the extended warranty.
This warranty is not transferable and is extended only to, and solely for, the benet of the
original purchaser of the stove. Please retain your dated sales receipt as a proof of purchase.
During your extended warranty period, only genuine Oak spare parts must be used in the
servicing and maintenance of your stove, these spare parts can be ordered via the Premium
Retailer directly.
Consumable items such as glass, paint, grate parts, log retainers, bafes, ash pans, internal
re brick linings, and rope seals which are either subject to normal wear and tear or parts that
require replacement in connection with normal maintenance are not covered, either by the
original or the Extended Warranty.
Should you experience problems with your stove, any claim must be submitted rst to the
Premium Retailer from where the stove was purchased. Your Premium Retailer will either be
able to offer immediate assistance or make contact with Oak Stoves on your behalf.
Warranty Exclusions and Limitations
No Warranty is extended to consumable service parts. Repair or replacement of parts which
are subject to normal wear and tear during the warranty period or parts that will require
replacement in connection with normal maintenance. Such parts include but are not limited
to glass, paint, rope seals, rebricks, grate parts, log retainers, bafes and ash pans.

Zeta 5W Series Manual - V2.8 © Oak Stoves 2018
21
Installation Instructions
The Oak Stoves Extended Warranty does not cover:
a) In normal usage the paint nish of your Oak Stove may change colour slightly. As these circumstances
are considered normal, they are not covered by the warranty.
b) Enamelled components where these parts are subjected to abnormally high temperatures, chemical
abrasion or thermal shocks, resulting in chipping, cracking, bubbling or discolouration and crazing of
the enamelled nish.
c) Damage resulting from installation and usage where the appliance has not been installed or used
in accordance with the Oak Stoves installation and operation instructions, or if the installation does
not conform to local building, re and safety regulations.
d) Defects or faults caused by specic local conditions such as draught problems, water damage,
condensation and chimney defects.
e) The Extended Warranty does not cover damage caused by over-ring of the appliance. (Please
see your Installation and Operating Instructions for further information)
f) Damage or premature wear caused by burning inappropriate fuels such as Bituminous coal, “PetroCoke” or any other Petroleum based coals, only smokeless approved fuels must be used. Please
visit the HETAS website, www.hetas.co.uk, for a full list of approved fuels which are covered by the
warranty. Fuels outside of this list are not covered by the warranty.
g) Damage caused by burning material with high creosote content or any other painted/treated timber.
h) Damage caused by unauthorised modications, use or repair.
i) Damage or defects caused by the product being stored in a damp, unheated environment.
j) Consequential loss (to the extent permitted by law) relating to other associated products that have
not been supplied by Oak Stoves.
k) Consequential loss (to the extent permitted by law) related to decorations, furnishings or other
household assets.
l) Delivery to/or return transport costs. Removal and re-installation costs or any labour cost to t parts.
Repaired or replaced products are covered only for the remainder of the original warranty
period. If you should ever wish to make a warranty claim because of a product fault or defect,
you must inform your retailer within a reasonable amount of time, this is within 14 days from
the date on which the fault or defect rst became apparent. If the product fault or defect is
notied after 14 days from the date on which the fault or defect became apparent, Oak Stoves
cannot accept any liability for events or issues which arise after the 14 day period or which
are caused or increased by the lack of notication which therefore prevented action being
taken to restrict or eliminate any consequences arising from the fault or defect at an earlier
date.
In the event of a product fault occurring during the warranty period, Oak Stoves will send the
appropriate component or goods necessary to rectify the fault, free of charge. but does not
cover any labour cost to t them. Nothing in the Extended Warranty shall make Oak Stoves
liable for any or special, incidental or consequential damages, injury to persons or property,
or any other consequential loss beyond the consumer’s statutory rights. The liability on these
issues is covered by Oak Stoves Terms and Conditions of Sale.
Oak Stoves’ total liability extends only to the purchase price paid for the goods by the Premium
Retailer, except where such a limitation is prohibited by statute. Oak Stoves, in the event of
a warranty claim, reserve the right to either replace the goods in question or to refund the
purchase price of the goods as paid by the Premium Retailer.
The Oak Stoves Extended Warranty does not affect your statutory rights. The above warranty
terms and conditions came into effect on 1st January 2013 and are applicable for all relevant
products purchased after this date.
Please note: This warranty is applicable for purchases within the United Kingdom and the
Republic of Ireland.

Zeta 5W Series Manual - V2.8 © Oak Stoves 2018
22
DEFRA Requirements
DEFRA Requirements – using this stove in Designated Smoke Control Areas
The Zeta 5Kw range are DEFRA exempt so they can be used to burn well seasoned wood in a smoke free zone
(designated smoke control area).
The Zeta 5 range is also a multi-fuel stove so smoke fuel mineral fuels can also be burn on the stove in
designated smoke free zone (designated smoke control area).
The Clean Air Act 1993 and Smoke Control Areas
Under the Clean Air Act local authorities may declare the whole or part of the district of the authority to be a
smoke control area. It is an offence to emit smoke from a chimney of a building, from a furnace or from any xed
boiler if located in a designated smoke control area. It is also an offence to acquire an “unauthorised fuel” for
use within a smoke control area unless it is used in an “exempt” appliance (“exempted” from the controls which
generally apply in the smoke control area.
The Secretary of State for Environment, Food and Rural Affairs has powers under the Act to authorise smokeless
fuels or exempt appliances for use in smoke control areas in England. In Scotland and Wales this power rests
with Ministers in the devolved administrations for those countries. Separate legislation, the Clean Air (Northern
Ireland) Order 1981, applies in Northern Ireland.
Therefore it is a requirement that fuels burnt or obtained for use in smoke control areas have been “authorised” in
Regulations and that appliances used to burn solid fuel in those areas (other than “authorised” fuels) have been
exempted by an Order made and signed by the Secretary of State or Minister in the devolved administrations.
Further information on the requirements of the Clean Air Act can be found at:
http://smokecontrol.defra.gov.uk/
Your local authority is responsible for implementing the Clean Air Act 1993 including designation and supervision
of smoke control areas and you can contact them for details of Clean Air Act requirements
Recommend Fuels for use in a Designated Smoke Control Areas
The Zeta 5 multi-fuel stove appliance has been recommended as suitable for use in smoke control areas when
burning:
• Well seasoned woods with a moisture content less than 20%. (If you are unsure of the moisture content in the
wood you can buy a moisture tester from you local stove retailer these on average cost less than £20)
• Smokeless Mineral Fuels. Such as ANCIT. When purchasing these products it will state on the packaging that
it is suitable for use in a designated smoke control areas
Please refer to page 6 for more details.
Refuelling on to a low re bed
If there is insufcient burning material in the re-bed to light a new fuel charge, excessive smoke emission can
occur. Refuelling must be carried out onto a sufcient quantity of glowing embers and ash that the new fuel
charge will ignite in a reasonable period. If there are too few embers in the re bed, add suitable kindling to
prevent excessive smoke
Fuel overloading
The maximum amount of fuel specied in this manual should not be exceeded, overloading can cause excess
smoke. Please refer to page 9.
Do Not Operate this appliance with door left open. Operation with the door open can cause excess smoke. The
appliance must not be operated with the appliance door left open.
Air controls (primary, secondary and tertiary air controls)
The air controls must be used in accordance with this manual as detailed on pages 8 to 11.
Installation Instructions

Zeta 5W Series Manual - V2.8 © Oak Stoves 2018
23
What comes with your stove?
Manual
Stove body with door and handle tted
Ash pan
Ash pan handle
Protective gloves
Flue collar
Fire grate retainer bars
Riddle grate handle bar

Oak Stoves, Unit 11, Village Farm Industrial Estate, Village Farm Road, Pyle, Bridgend, CF33 6BL
t: +44 (0)845 644 2815 e: sales@oakstoves.co.uk w: www.oakstoves.co.uk
1 Supplier name or trademark Oak Stoves
2 Model identier Zeta Log Store Clean
Burn Stove
3 Energy class A+
4 Direct heat output 4.9kW
5 Indirect heat output N/A
6 Energy efciency index 102.2%
7 Energy efciency at nominal heat output 76.7%
8 Specic precautions See Manual
1 Supplier name or trademark Oak Stoves
2 Model identier Zeta Pedestal Clean
Burn Stove
3 Energy class A+
4 Direct heat output 4.9kW
5 Indirect heat output N/A
6 Energy efciency index 102.2%
7 Energy efciency at nominal heat output 76.7%
8 Specic precautions See Manual
1 Supplier name or trademark Oak Stoves
2 Model identier Zeta Compact Clean
Burn Stove
3 Energy class A+
4 Direct heat output 4.9kW
5 Indirect heat output N/A
6 Energy efciency index 102.2%
7 Energy efciency at nominal heat output 76.7%
8 Specic precautions See Manual
 Loading...