


16 Bit SCSI Controller Card
Hard Disc Drives
User Guide

Neither the whole nor any part of the information contained in or the products described in this
manual may be adapted or reproduced in any material form without the prior written
permission of Shawbury Computers Limited (Oak).
The products described in this manual are subject to continuous development and
i
mprovement. All information of a technical nature and particulars of the products and their
uses are given in good faith. However, it is acknowledged that there may be errors or
omissions in this manual.
All correspondence should be addressed to:
Customer Support (SCSI)
Oak
Cross Park House
Low Green
Rawdon
Leeds
LS19 6HA
All maintenance and service on the products described in this manual must be carried out by
Oak or their authorised agent. Oak can accept no liability for loss or damage whatsoever
arising from the use of any information or particulars in, or any error or omission in this
manual.
No responsibility is accepted for the installation of the Hard Disc and podule, or for any
consequential damage which results from incorrect use.
Oak is a trademark of Shawbury Computers Limited.
Archimedes, Risc OS and R140 are trademarks of Acorn Computers Limited.
All other trademarks acknowledged.
Issue 1.3
0 Copyright Oak 1989/1990

WARNING (External Drives):
The winchester drive must be earthed
I
MPORTANT
The wires in the mains lead for the winchester drive are coloured in
accordance with the following code:
Green & Yellow
Earth
Blue
Neutral
Brown
Live
If the mains socket outlet available does not match the supplied
moulded 13A plug, either a different lead must be obtained, or the plug
should be cut off, disposed of, and the appropriate plug fitted and
wired as described below.
As the colours of the wires may not correspond with the markings
identifying the terminals in your plug, proceed as follows:
The wire coloured Green and Yellow must be connected to the
terminal in the plug which is marked by the safety earth symbol
or the letter E, the colour Green, or Green and Yellow.
The wire coloured Blue must be connected to the terminal marked with
the letter N, or coloured Black.
The wire coloured Brown must be connected to the terminal marked
with the letter L, or coloured Red.

Guidelines for safe operation
To ensure safe and reliable operation of your SCSI controller card and
winchester drive, the following guidelines should be observed.
Internal winchester drives should never be operated without a fan fitted
and working inside the Archimedes.
Keep the winchester at a room temperature of 5-35°C (41-95°F) and at
a relative humidity of 15-90% (non-condensing).
Avoid sudden changes of temperature, exposure to direct sunlight, heat
sources and moisture.
Do not block any ventilation slots in the winchester case, or the fan
outlet holes, and make sure that there is enough space around the
winchester for air to circulate.
Do not poke any objects through the ventilation holes in the winchester
casing.
Route cables sensibly to avoid kinking and tripping. Do not use the
cables to lift drives or controller cards.
Make sure you understand the fitting instructions before embarking on
installation. If in doubt, contact your dealer or Oak customer support.
Keep the original packing in case you need to transport your
equipment.
Never operate External winchesters with the cover removed.
Bear in mind that winchester drives are extremely fragile, and that
bumps and shocks can cause serious damage to the heads and disc
surfaces.

Contents
Conventions used in this manual
1
What is SCSI?
3
Installing the Hard Disc & Podule
5
Initial Testing
11
Using Your Oak SCSI Winchester
13
* Commands
15
Using SCSIFORM - Format/Configure Utility
29
Running Illegal Software
41
Booting from the SCSI drive
43
Trouble Shooting
44

Conventions used in this
manual
The mouse buttons are referred to by name using the standard Acorn
convention of:
Pressing and releasing a mouse button is known as `clicking'.
Pressing and releasing a mouse button twice in quick succession is
known as `double-clicking'.
Pressing and holding down a mouse button whilst moving the mouse is
known as `dragging'.
Text to be typed in at the keyboard will be shown in the following font:
*help commands
Special keys on the keyboard and mouse will be shown in square
brackets
eg:
[
Return]
Page 1

In descriptions of syntax for *commands, the following conventions
will be used.
< ... >indicates that an actual value must be substituted,
e.g. < f ilename> means that an actual filename must be supplied.
[
. ..]indicates that the item enclosed in square brackets is optional,
e.g.
*WPROT< D >[
U ]
means that the letter U is an optional
parameter to the WPROT command.
I
indicates an option.
e.g.
0 | 1
means that the value 0 or 1 must be supplied.
Page
2

What is SCSI?
The following brief description of SCSI does not set out to fully cover
SCSI in depth, but rather deals with SCSI in the context of the
Archimedes and the Oak SCSI controller card.
SCSI, (Small Computer Systems Interface) is a high speed interface
designed to connect a variety of peripherals to a host system (the
initiator - so called because it initiates the SCSI commands). Up to 7
devices may be attached to one host, with each device having a unique
SCSI ID number (0 to 7). The default ID for the Oak SCSI controller
card is 7, leaving 0-6 free for peripherals. One SCSI device may
actually be responsible for controlling more than one peripheral. For
example, the Adaptec hard disc controller card can control two ST506
winchesters, but appears as just one SCSI device, with the two drives
being differentiated by the Logical Unit Number [LUN]. Thus the first
drive may appear to the initiator as SCSI ID
3, LUN 0 and the second
drive as SCSI ID 3, LUN 1.
SCSI devices are `daisy chained' together, i.e. they are all connected
together in parallel to one 50 way bus. SCSI devices should therefore
provide 2 SCSI connections, effectively a `SCSI in' and a `SCSI out'
to allow further devices to be attached to the bus.
SCSI winchester drives include their own `in built' winchester
controller which is optimised for that particular drive, and thereby
allows the winchester manufacturer to employ a variety of techniques
to maximise both the storage capacity and the speed of the drive. Thus
SCSI winchesters are generally much faster than their equivalent
ST506 counterparts which interface to a standard ST506 controller.
Also, because of their on-board `intelligence' SCSI winchesters are
much easier to set up and use as they deal with their own defect
management, and `know' their own shape (No of heads, cylinders etc).
SCSI has an 8 bit data bus, and is capable of transferring data at a
maximum rate of roughly 2Mb/sec in asynchronous mode. This
maximum figure is limited in practice by the performance of the
peripheral. For example, a fast, modern 20Mb winchester would
typically be able to achieve a data transfer rate of 650Kb/sec
(compared with a 20Mb ST506 winchester at roughly 300Kb/sec), and
a fast 300Mb winchester would achieve close to 1.5Mb/sec. On the
bulk of SCSI systems, however, performance is degraded most by the
Page
3

inability of the initiating system to deal with such high data transfer
rates. Using an Archimedes with the Oak SCSI controller card avoids
this degradation of performance. The Oak card buffers the 8 bit data
from the SCSI bus in order to perform 16 bit memory transfers to and
from the Archimedes, thereby vastly reducing the normal handshaking
overhead.
SCSI imposes no restrictions on the numbers of any particular type of
device (up to a maximum of 7) on the SCSI bus; however, the Filecore
module within Risc OS allows a filing system (SCSIFS in the case of
the Oak SCSI controller card) to have only 4 winchesters, and also
li
mits the capacity of each winchester to 512Mb. Thus a total of 2
gigabytes of winchester storage is achievable under the SCSIFS filing
system.
Non-winchester SCSI devices (e.g. tape streamers, CD ROMs) may
also be addressed by the Oak SCSI controller card via SWIs which
allow low level access to SCSI commands, or via high level software
available separately such as the !OakTape tape backup software from
Oak.
Page
4

Page
5
I
nstalling the Hard Disc &
Podule
Warning
No special skills are required to fit the Hard Disc Drive. However, the
suppliers can accept no responsibility for any damage which may
result from incorrect installation. If in doubt, contact your supplier.
Tools
The only tools required are a number 2 cross-head screwdriver and a
large flat bladed screwdriver (A3000 only). Installation of internal
drives may also require a pair of wire cutters or scissors and a blade.
Safety
Ensure that the Archimedes power supply is switched off and that all
mains supply cords are disconnected before removing any covers. You
are warned that dangerous voltages exist in the Archimedes power
supply unit. Do not insert any objects into the ventilation holes of the
PSU case.
I
nstalling the Podule
(300/400/R140
Series Machines)
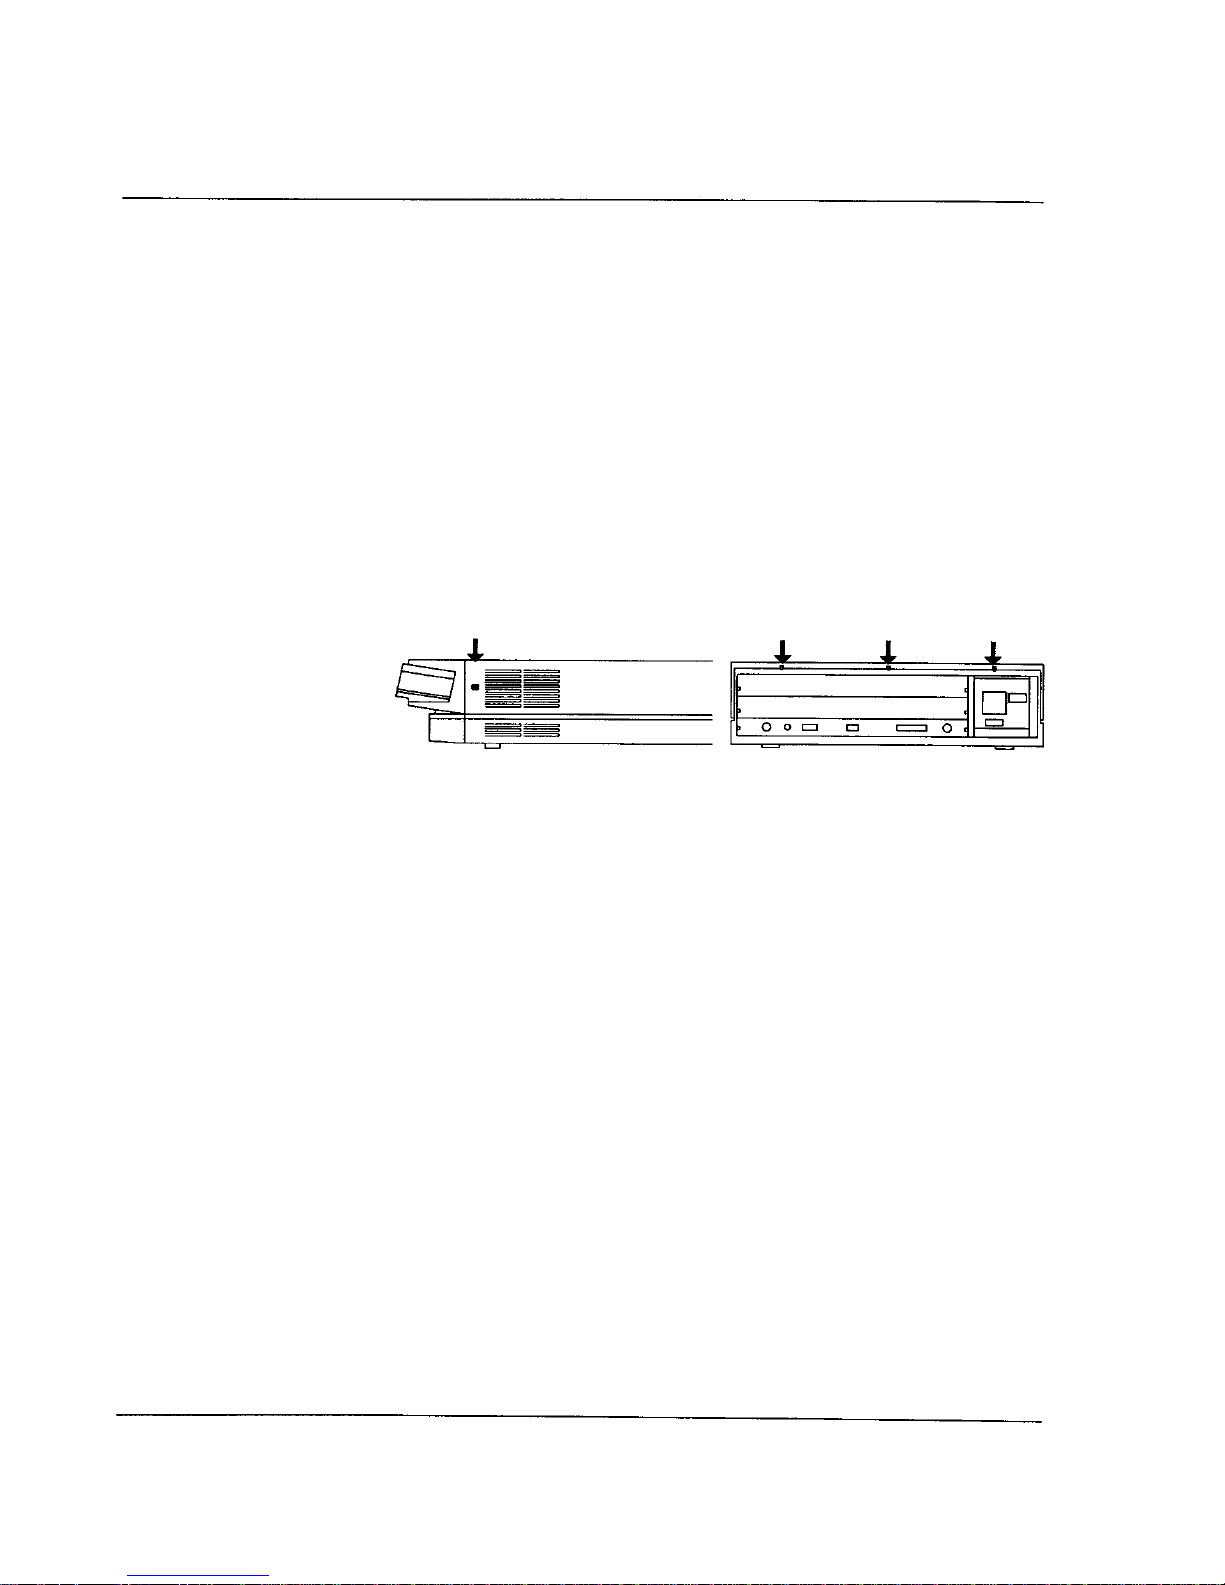
Disassembly
Unplug the mains power cord and all peripherals (including the
keyboard) from the Archimedes. The cover of the Archimedes is held
in place by 5 screws, three on the rear of the case above the podule
slots, and one at either side of the case close to the moulded plastic
front piece (as shown below). Remove all 5 screws and slide the lid
rearwards and off.
Positioning
The SCSI podule may be fitted in any of the four possible podule
positions. Remove the blanking plate related to your chosen podule
position from the rear of the Archimedes by undoing the screw at each
side. If you have removed a double width blanking plate, use the single
width blanking plate, T-Piece and screws supplied with your SCSI
card to build the podule backplate up to double width.
Carefully insert the SCSI card (component side up) into the desired
backplate socket on the Archimedes, making sure that the SCSI card is
held horizontally. The backplane is supported by a stout metal strip;
however it is wise to give the backplane additional support with one
hand whilst inserting the SCSI card. If there are no other podules fitted
in the Archimedes, it may be necessary to loosen the two screws at the
ends of the metal strip that reinforces the backplane, and carefully
reposition the backplane so that the SCSI card can be mounted flush
with the back of the Archimedes. Fasten the podule backplate
assembly to the back of the Archimedes with a screw at each end and
tighten the screws securing the backplane.
Page
6

Page
7
If your kit contains an internal winchester drive, move on to the section
headed installing an internal winchester. If your kit contains an
external winchester drive, replace the cover of the Archimedes (don't
refit the screws yet) and move on to the section headed installing an
external winchester.

I
nstalling the Podule (A3000)
On the A3000, the SCSI card is mounted externally at the rear of the
machine. The SCSI card is housed in a metal case with a mounting
bracket which bolts to the rear of the A3000. Ensure that the A3000 is
disconnected from the mains. Holding the SCSI card horizontally with
the angle bracket pointing upwards and towards the A3000, push the
card into the socket on the left hand side of the A3000 (when looking
from the rear). Check that the card is pushed fully home and then
screw the angle bracket to the rear of the A3000 with the 2 screws
provided.
Now move on to the section headed Installing an external winchester.
Page
8

I
nstalling an internal
winchester
Take off the plastic front panel of the Archimedes by removing the 3
self tapping screws underneath the front of the Archimedes, and the 1
at each side (normally obscured by the cover). The winchester
mounting brackets are supplied already fitted to the winchester. Mount
the winchester assembly (with the 50 way socket to the rear of the
Archimedes) using the 2 small self tapping screws provided, to the
metal bracket inside the Archimedes, next to the floppy disc drive.
(Owners of certain early Archimedes machines may find that the 2
holes are actually tapped - if this is the case, do not worry, but use the
self tapping screws anyway.)
Attach the power cable (terminated in a white, 4 way plastic connector)
from the Archimedes power supply to the winchester. (You may need
to carefully cut a nylon cable tie to release this power cable.)
Connect the 50 way ribbon cable between the winchester and the pin
connector on the SCSI controller card (making sure that polarising
bumps/slots mate correctly at the winchester end, and that the bump on
the 50 way cable points to the front of the Archimedes at the SCSI card
end -basically, if there is no twist in the ribbon cable, it's correct!).
Carefully remove the Archimedes badge from the Archimedes plastic
front panel (prising it off with a blade). Stick the badge supplied with
the winchester in its place. A few very early Archimedes machines
have a non standard spacing between the LED holes. If this is the case
with your machine, you will need to scrape some ink off the back of
the badge to allow the LED to be visible. Stick the LED on the trailing
lead from the winchester into the vacant hole behind the badge, using
bath sealant or any suitable adhesive.
If difficulty is experienced in locating the LED in its hole, the darker
coloured plastic front of the assembly may be detached by removing
the 2 recessed self tapping screws.
Screw the front panel back onto the Archimedes, and then refit the
cover (don't screw the cover to the Archimedes yet). Now move on to
the section headed Initial Testing.
Page
9

I
nstalling an external
winchester
Connect the external winchester to the back of the SCSI controller card
using the 50 way ribbon cable provided, making sure that the
polarising bumps on the cable sockets mate with the slots on the plugs
at the rear of the Archimedes and the Winchester. There are two 50
way plugs on the rear of the winchester drive to allow
other
SCSI
devices to be daisy chained. These plugs are wired in parallel and so
either can be used.
Now move on to the section headed Initial Testing.
Page
1
0

I
nitial testing
Power up the Archimedes. If the Archimedes does not start up
correctly, turn everything off and recheck all connections. If the
Archimedes still does not start up, refer to the section headed
`troubleshooting'. Note that each card and drive has been thoroughly
tested at the factory, and so any faults at this stage are most likely to be
caused by incorrect installation, a faulty backplane or faulty
Archimedes.
If the Archimedes does start up correctly, switch on the external
winchester (if fitted). You should hear the drive of the internal or
external winchester spin up to speed and make a few `seek' noises as it
initialises itself.
The winchester is supplied already formatted, and the SCSI card
already initialised, and so the system should now be ready for
configuring. DO NOT USE THE SCSIFORM PROGRAM AT THIS
STAGE. All the options you can set using SCSIFORM have already
been set at the factory! Using SCSIFORM before you are familiar with
the system is more likely to undo necessary settings rather than do
anything useful - you have been warned!
There is no need to type
*configure harddiscs 1
-this
command refers to ST506 winchesters running under ADFS. Only use
this command if you also have an ADFS winchester. Also note that the
*configure drive
command refers only to ADFS drives, so this
is best left set to `0' unless you have an ADFS winchester.
Various configuration values must now be set. Obtain a command line
prompt (e.g. by pressing F12 from the desktop) and type:
*configure scsifs 1 [Return]
then hold down [
Ctrl ]
whilst pressing and releasing [
Break ]
This enables SCSIFS - the filing system provided by the Oak SCSI
controller card. Next, type:
*configure scsidrive 4 [Return]
This makes sure that SCSIFS initially logs on to drive 4 when selected.
Page11

You will then have to decide how much memory to assign to the SCSI
directory cache. The value will depend on the amount of memory
available in your machine. A value of 4K is recommended: higher
values will allow more directories to be cached in RAM, a lower value
will allow fewer directories to be stored in RAM. To configure this
value, obtain a command line prompt and type:
*configure scsidircache 4K [Return]
or replace the 4K with the value you have decided on.
The next decision is whether or not to have the root directory of the
winchester set as the current directory at power on (this is equivalent to
ADFS's configure dir/nodir, and is effective only if the configured
filing system is SCSIFS). If you want the root directory set, type:
*configure scsidir [Return]
otherwise type:
*configure scsinodir [Return]
You may want the default filing system of the Archimedes at power up
to be SCSIFS (e.g. if you want to run a boot file from your SCSI
winchester). If this is the case type:
*configure filesystem scsi [Return]
To bring these configuration values into effect, hold down
[
Ctrl ]
whilst pressing and releasing [
Break ]
You may now enter the desktop and click on the new SCSI winchester
icon. A directory viewer should open. Open up the sprites directory
and double click select on one of the files. If a picture is loaded up
onto the screen. all is well and you may replace the screws in the
Archimedes case.
Page12

Using your Oak SCSI
winchester
I
n use, the SCSI filing system behaves as a normal Archimedes filing
system, (e.g. ADFS), and is operated from the desktop in exactly the
same way. The icon on the icon bar for the SCSI winchester appears as
a standard winchester icon with the legend SCSI, and the drive number
below.
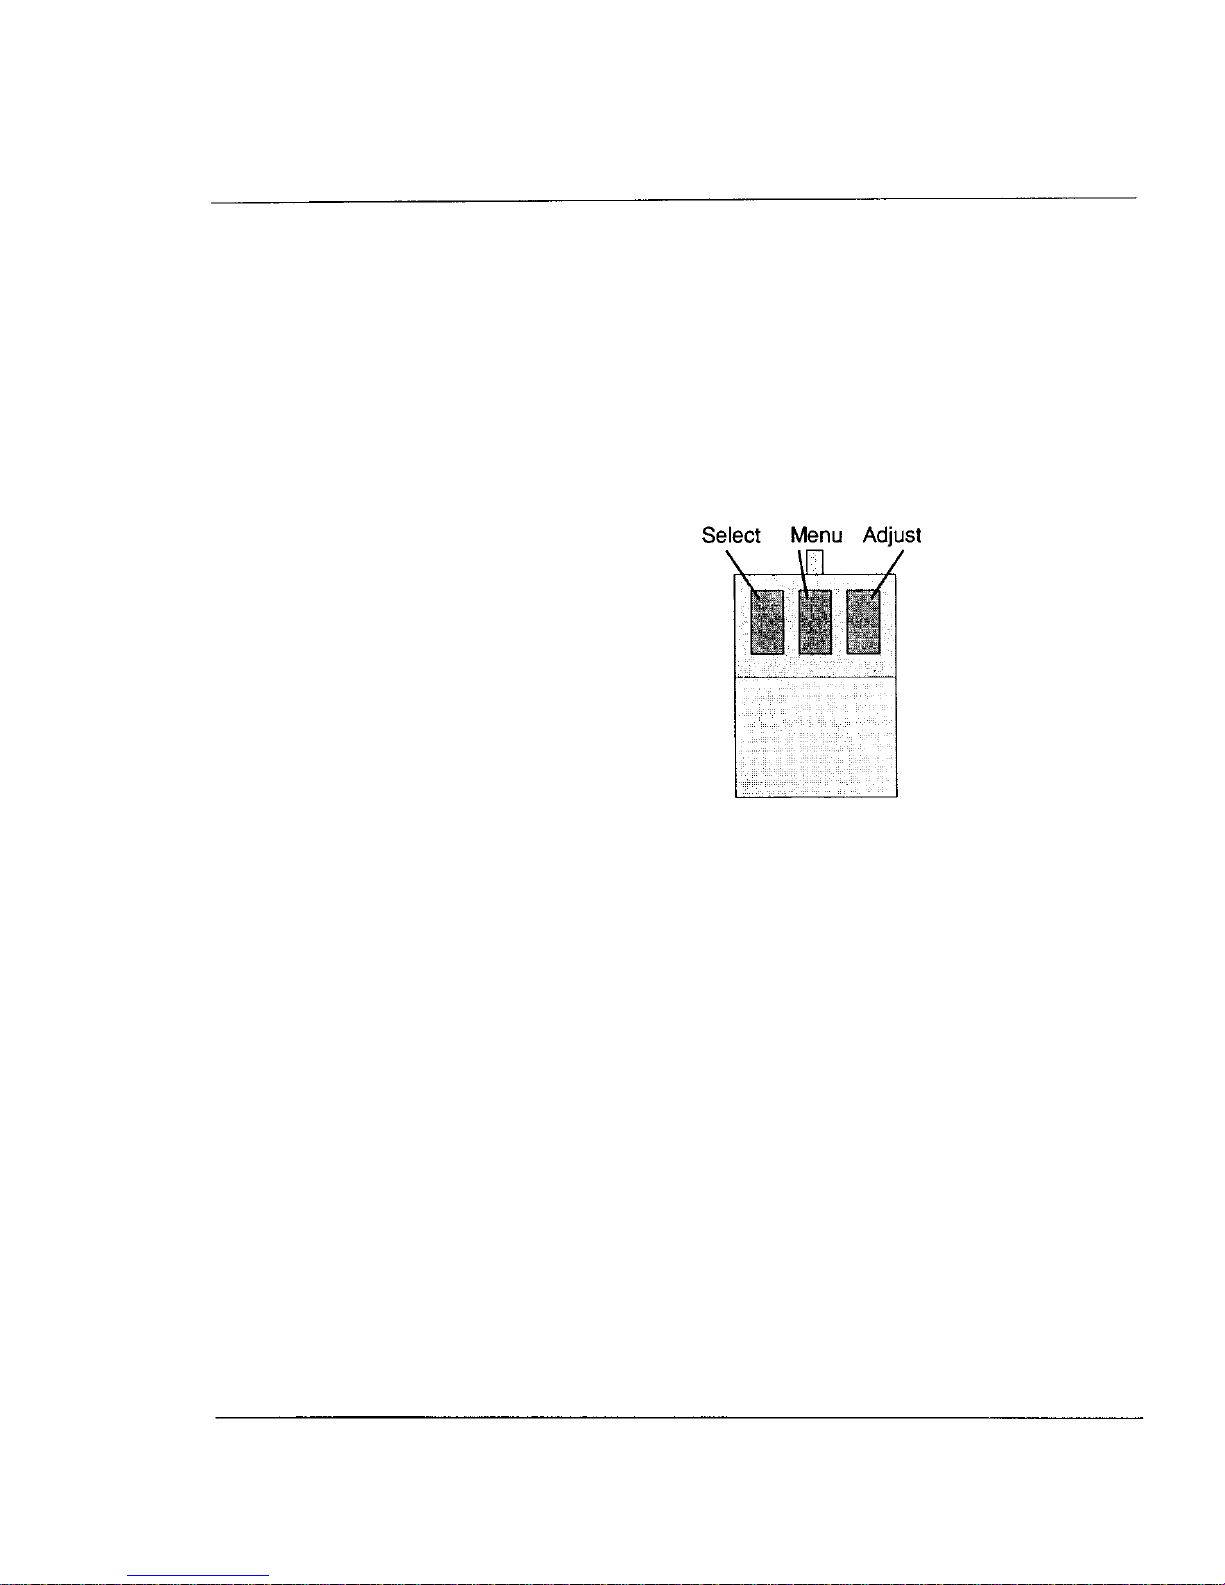
Clicking menu on the SCSI icon brings up a menu of 4 items:
Name disc
This option allows the name of the winchester to be changed. To
change the name of the winchester, wipe across the namedisc option
and either edit the current name or delete and retype it. Note that you
must not have 2 SCSI winchesters with the same disc name, as this
confuses the operating system.
Dismount
This option closes files, unsets directories and parks the heads of the
winchester. (N.B. Oak Winchesters have autoparking heads so this
option is normally only used for making sure that all files are closed.)
Verify
This option checks that the entire disc is readable.
Free
This option displays the amount of used and unused space on the
winchester.
Page13

Note that the full path name of any file under SCSIFS will be prefixed
SCSI ::
Outside the desktop, *SCSI selects SCSIFS as the current filing
system. Note that the floppy drives and the SCSI winchesters are on
different filing systems. This may cause some problems with certain
pieces of software which make illegal assumptions about filing
systems. To get around this problem, the command
*KillADFS
is
available (as documented in the section headed *commands) which
attempts to route ADFS calls to the SCSIFS module.
At the end of a session, it is good practice to use the dismount option
on the SCSI icon menu, or to type
*shutdown [Return]
to ensure that all files are closed, even though all Oak SCSI
winchesters have auto-parking heads.
Page14

Page15
*Commands
Oak SCSI winchesters work under a 'filecore'
type filing system (i.e.
like ADFS and RAMFS) and so use all the normal filing system
*commands (e.g. *copy). Additional *commands provided by the
SCSI system are documented on the following pages.

*SCSIMap
Lists EEProm configuration, showing SCSI ID, LUN, Block size and
Write protect status for each SCSI drive.
Syntax
*SCSIMap
Use
This command basically gives the mapping between the SCSI drive
numbers (4 to 7) and SCSI device ID / Logical Unit Numbers, and
additionally returns the block size (the size of the data blocks specified
by the disc format) and whether or not each drive is write protected.
Page16

*SCSI
Selects SCSIFS as the current filing system.
Syntax
*SCSI
Use
*SCSI selects the SCSI filing system as the filing system for
subsequent operations. Remember that it is not necessary to switch
filing systems if you use the full pathnames for objects, e.g. you can
refer to a file as SCSI : : 4. $ . fred even if the current filing system
is
ADFS.
Page17

*WProt
Write protects (or unprotects) a given SCSI drive.
Syntax
*WProt <Drive number> [U]
Parameters
<Drive number>
the SCSI winchester drive number (4 to 7) of the
drive to be write protected (or unprotected)
[
U ] if the U is included as a parameter, the drive is unprotected.
Use
Write protects (or unprotects) SCSI drive
<Drive number>.
The
protect state is stored in eeprom. The use of this command can be
locked out with the format/configure utility, and if this has been done,
a `write protect locked' error will result if you
try
changing the
protection on a locked drive. This only protects from SCSI filing
system operations, not writes performed with low level SWIs. This
command may be useful in a classroom situation, where students need
access to information on the winchester, but you do not want the
information to be altered either accidentally or otherwise.
Example
*WProt 4 U
Unprotects SCSI drive 4
Page
1 8

*KillADFS
Attempts to cause ADFS hard disk calls to be redirected to SCSIFS
and selects SCSIFS as the current filing system.
Syntax
*K
illADFS
Use
All calls to ADFS are redirected to SCSIFS but note that as SCSIFS
has no floppy drives, access to the floppies (other than via
ADFS_Disc0p, as used by PC emulator) will result in a `Bad Drive'
error. Note that some ADFS *Commands also will not work.
Page19

*UnKillADFS
Undoes the effects of a
*KillADFS
Syntax
*UnKillADFS
Use
Reverses the effects of a
*KillADFS
and allows calls to ADFS to be
processed by the ADFS filing system. This command does not reset
the current filing system.
Page
2 0

Page
21
*Configure SCSIDir
Sets the Root directory of the configured SCSIFS winchester at power
on. (N.B. for technical reasons this option appears twice in the *status
display.)
Syntax
*configure SCSIDir
Use
Sets the Root directory of the configured SCSIFS winchester as the
current directory at power on if SCSIFS is the configured filing
system.

*Configure SCSINoDir
No SCSIFS directory is selected at power on. (N.B. for technical
reasons this option appears twice in the *status display.)
Syntax
*Configure SCSINoDir
Use
Leaves SCSIFS with no current directory at power on. This is the
default setting.
Page
22

*Configure SCSIDirCache
Reserves an area of RAM for the SCSIFS directory cache.
Syntax
*Configure SCSIDirCache <n>
Parameters
<n>
is the amount of memory reserved in Kbytes.
Use
Reserves an area of memory for the SCSI directory cache. Directories
are stored in the cache to speed up disc operations.
Example
Configure SCSIDirCache 4
reserves 4K for the SCSIFS
directory cache.
Page
2 3

*Configure SCSIDrive
Sets the SCSI drive selected at power on.
Syntax
*Configure SCSIDrive <n>
Parameters
<n>
SCSI drive number (4 to 7)
Use
Sets the number of the drive which will automatically be selected at
power on (if SCSIFS is the configured filing system) or when SCSIFS
is first entered. The most common value
for
< n >
is 4.
Example
*Configure SCSIDrive 4
sets SCSI drive 4 as the default SCSI
drive.
Page
2
4

*Configure SCSIFS
Enables or disables SCSIFS after the next hard reset.
Syntax
*Configure SCSIFS [<n>]
Parameters
[
<n>]
if n = 1 or is not present then enable SCSIFS
if n = 0 then disable SCSIFS
Use
Enables (n=1 or not present) or disables (n=0) SCSIFS after next hard
reset.
Example
*Configure SCSIFS 1
enables SCSIFS after the next hard reset.
Page
25

*Configure FileSystem
Selects the filing system to be used at power on.
Syntax
*Configure FileSystem <n>
I
<name>
Parameters
<n>
filing system number (26 for SCSIFS)
< name >filing system name (e.g. SCSI)
Use
This command is not provided by the SCSI card, but is included here
to show how to configure SCSIFS as the current filing system at power
on.
Example
*Configure FileSystem SCSI
Page
2 6

SWIs and technical information
Sec the file SCSI_
INFO on the formatter disc for details of SWIs
provided by the SCSI card, and for additional technical information.
Page
27

Page 28

Using SCSIFORM
Format/Configure Utility
This program should not normally be needed as drives are supplied
formatted and initialised. If, however, for some reason the program is
needed, for example if you wish to connect a non-Oak drive, simply
double click on the program from a directory viewer. The program is
menu driven and fairly self explanatory in use to those with a good
knowledge of both Rise OS and SCSI.
Users without a sound knowledge of these fields are advised not to use
SCSIFORM if possible, as the results of doing something wrong can
be quite drastic.
The menu options within SCSIFORM are covered in detail on the
following pages. Note that many requests for information from
SCSIFORM
have default responses which appear on screen in square
brackets [...] these may be selected by simply pressing
[
Return ].
For safety reasons, certain responses such as the affirmative response
to `Are you sure you want to format drive n' are required to be in
upper case.
Page 29

A Add drive / edit configuration
This option allows a new winchester drive to be added to the SCSI
system, or allows details about an existing drive to be changed.
Information required by SCSIFORM is as follows:
Drive Number
SCSI drive number of the drive you wish to add or edit the
configuration of (4 to 7). Note that drives must be added in ascending
order, with drive 4 first.
SCSI Id No.
The SCSI Id number of the device you wish to add (usually `0' for Oak
Drives).
LUN
SCSI logical unit number of the unit you wish to add (usually 0 for
winchesters, but may be 1 for a second drive on an 'Adaptec' type
controller card).
WPROT
Whether or not you wish the drive to be write protected
(Y
write
protected / N unprotected).
WPROT Lock
Whether or not you want the write protect status to be alterable via the
*WPROT command
(Y
locked / N alterable via
*WPROT)
STOP UNIT
Whether or not to issue a SCSI Stop Unit command to the drive when
dismounting. With Oak Winchesters you should answer N to this
question. The SCSI Stop Unit command parks the heads of the
winchester, and also, on some drives, stops the spindle motor. This can
be a problem, as the next time the drive is accessed, it will return a not
ready error. Only answer
Y
to this question if the drive you are adding
does not have auto-parking heads and does not shut down completely
on receipt of the Stop Unit command (test this last feature by
experiment - if the drive subsequently returns a `not ready' error, don't
issue the Stop Unit command).
Page
30

R Remove drive
This option removes a SCSI drive from the SCSIFS system.
Information required by SCSIFORM is as follows:
Drive Number
SCSI drive number of the drive you wish to remove (4 to 7).
Page31

I
I
nitialise EEPROM
This
option initialises the EEPROM on the SCSI controller card which
stores the information about the connected drives and the drive
configurations. All information currently stored on the EEPROM is
deleted, so effectively all drives are removed. Note that this does not
affect any information stored on the winchester itself.
Page
32

Page
3 3
S Scan SCSI devices
This option scans the SCSI bus for information about all devices
currently connected. Information returned for each device includes
SCSI Id numbers, device names, storage capacities, block sizes and
sector interleave factors.

F Format Drive
This option formats the chosen SCSI drive, and should not normally be
required unless you specifically want to erase a winchester or change
the sector size or interleave, as SCSI drives are supplied pre-formatted.
Information required by SCSIFORM is as follows:
Drive number
or -ID
A positive number gives the SCSIFS drive number (4 to 7) of the drive
to be formatted, a negative value gives the SCSI ID x-1 of the drive to
be formatted.
Sector Size
Choose between 128, 256, 512 or 1024 bytes per sector by entering 0
to 3 respectively. The recommended value is 512.
I
nterleave
Sets the sector interleave factor. Normally, enter a value of 1. A value
of 2 will give improved speed performance in hi-res colour screen
modes such as 21, at the cost of reduced performance in other modes
with small drives (<= 70Mb). Larger drives tend to always run faster
with an interleave factor of 1.
Are you sure
This gives you a last chance to abort before formatting the drive - think
before you answer Y to this one!
The drive will then be formatted, which may take some time. When the
format is complete, you will be asked for a value for the large file
allocation unit. A value of 512 bytes is the default for 20Mb drives,
and 1024 bytes for all other sizes. On very large drives (>=300Mb), it
may be sensible to choose a larger value in order to reduce the amount
of space taken up by the disc map.
Page
3
4

M Initialise map and root
Initialises the map and root directory of a formatted SCSI drive. (Note
that the format option does this automatically.) This needs to be done
before a new SCSI drive can be used (this option is not required with
Oak drives as they are supplied already initialised).
Information required by SCSIFORM is as follows:
Are you sure
This gives you a last chance to abort before initialising the map and
root directory of the drive - think before you answerYto this one!
File allocation
unit
A value of 512 bytes is the default for 20Mb drives, and 1024 bytes for
all other sizes. On very large drives (>=300Mb), it may be sensible to
choose a larger value in order to reduce the amount of space taken up
by the disc map.
Page35

T Set retry timeout & other
options
Winchester drives take a short time to spin up to speed and initialise
themselves (typically about 15 seconds). This option allows the time
that SCSIFS allows for drives to spin up to be adjusted. It also allows
certain SCSI specific information to be configured. If you do not
understand any question asked by SCSIFORM, just take the default
answer. Information required by SCSIFORM is as follows:
Timeout period
Time in centiseconds allowed for SCSI drives to spin up to speed. If a
drive does not respond to the SCSI card after the specified timeout
period, a `drive not ready' error will be generated. (Default 2048)
SCSI Reset on
Reset/Break
Whether or not to issue a SCSI reset when a Reset or Break occurs on
the Archimedes. (Default Y)
SCSI Reset on
Hard Break
Whether or not to issue a SCSI reset when a hard break occurs on the
Archimedes. (Default Y)
SCSI Initiator Id.
Sets the SCSI Id number of the SCSI controller Card. (Default 7)
Page
3 6

C Check SCSI devices against
EEPROM
This option checks that the block and map sizes of the devices
connected to the SCSI bus match those it `knows' about in the
EEPROM, and reports accordingly.
Page37

X Transfer speed test
This option tests the average sustained data transfer rate from a given
formatted and initialised drive in screen modes 0, 15 and 21. Note that
this option requires a large amount of memory for a buffer, and
consequently may fail on a 1Mb machine with an `Out of memory'
error. This can be avoided by minimising memory allocation to other
areas within the wimp task manager, and assigning a large slot size to
SCSIFORM, or by running SCSIFORM from outside the desktop with
memory sizes configured to minimum values. The speed test requires
the Archimedes to enter mode 21, so the configured monitor type must
be '1', and there must be at least 320K of screen RAM available.
Information required by SCSIFORM is as follows:
Drive Number
SCSIFS drive number of the drive you wish to test (4 to 7).
When the transfer speed test is complete, the speed in Kbytes/second in
each of the 3 screen modes is reported.
Page
3
8

Q Quit
This option quits the SCSIFORM application. (Note: upper case Q
required)
Page
39

* *
commands
This option allows *commands to be issued from the SCSIFORM
program. Press [Return] when you have finished issuing
*commands to return to the main menu.
Page40

Illegal Software
Certain pieces of software make the illegal assumption that the
program is running on an ADFS drive. Note, that as SCSI becomes
more and more popular, illegal programs are rapidly diminishing in
number. However, if you encounter a program of this type, issue a
*KillADFS
command immediately before running the program -
this should make the program work correctly, however, note that
floppy discs will no longer work (except via ADFS_DiscOp as used by
the PC emulator) once the KillADFS command has been issued.
A similar assumption is sometimes made in HDInstall type programs
supplied with certain packages, in that the are designed to copy the
relevant files from ADFS drive 0 to ADFS drive 4. If you come across
a program of this type, you will need to edit the program so that all
references to :0 are changed to ADFS::O and all references to :4 are
changed to SCSI::4 (or SCSI::5 etc.).
In general, you are unlikely to encounter problems of this type with
software written for the Risc OS desktop environment.
PC emulator
If you have a version of the PC emulator prior to 1.33, load the
read_me file in the PC directory on the SCSI formatter disc for
information on running the PC emulator on the SCSI drive. Versions
from 1.33 onwards'know' about SCSI.
Page
4
1

Power up delays
To cope sensibly with drives spinning up, without excessive timeout
periods for real errors, the following is done
The first disc operation after a hard reset, which will nearly always be a
mount operation on the default drive, will retry for up to a configurable
amount of time if any error is reported (e.g. SCSI timeout or not ready
errors).
This copes with the differences in response to non-ready drives with all
Oak SCSI drives.
The timeout period is held in EEProm, and the default value is 20
seconds. The optimum value is a couple of seconds longer than the
spin-up/initialise time of the slowest drive in the system.
This avoids delays in reporting subsequent errors, or attempts to mount
non-existent additional drives, in particular when doing *Bye, as
FileCore Mounts drives before parking them (as it has to find the park
address from the disc record).
The only possible problem with this strategy is where there are
secondary drives which take longer to spin up than the default drive -
attempts to access them whilst spinning up will result in errors, and as
FileCore remembers errors when mounting drives, any subsequent
attempt to access the drive will return the same error (e.g. drive not
ready) that was obtained from the initial attempt to mount, despite the
fact that the drive is now ready. The only way round this is to either do
a hard reset, or *RMReinit SCSI.
Page
42

Booting from the SCSI drive
Page
43
For a boot file to be run from a SCSI drive on power up, the following
conditions must be met:
The Archimedes must be configured to boot.
(*configure boot)
The configured filing system should be SCSIFS.
(*configure filesystem SCSI)
The configured SCSIDrive should be the one on which your !boot file
exists.
(e.g.
*configure SCSIDrive 4)
The Configured SCSI drive must contain a program, obey or exec file
called $.!boot
The OPT 4 <N> setting of the configured SCSI drive should be set to 3
for an exec file or 2 for a program or obey file.
(e.g.
*opt 4 2)

Trouble Shooting
Your card and winchester have been comprehensively tested at our
factory, and so if the card/drive does not work when you install it,
unless the packaging looks damaged, the likelihood is that you have
not installed it correctly! The following points should help clear up any
trouble you may experience.
SCSI card installed, but does not appear to work
Check all connections.
Is the SCSI card pushed completely onto the backplane socket?
Have you done a *configure SCSIFS 1 ?
Is the `podule' module unplugged? (check by doing a *rommodules.
If the podule module is unplugged, remedy by doing a
*rmreinit podule.
N.B. certain games unplug the podule module when they are run!
Card installed correctly but no response from drive
Check power connections to winchester.
Check that 50 way cable is firmly connected at each end.
If you have ignored earlier warnings about running the SCSIFORM
program, and have upset the card's configuration, run SCSIFORM,
select the add drive option and enter sensible answers to prompts (refer
to the SCSIFORM section of this manual. Quit SCSIFORM and
[
Ctrl] [Break].
I
n use, the error `bad drive' occurs
This error most commonly occurs when SCSIFS is the current filing
system and an attempt is made to access the floppy drive as `:0'
instead of `ADFS::O'. Either use the full pathname (ADFS::O.) or
change filing systems to ADFS. Also, note that some users have
mistakenly thought that the *configure scsifs 1 configures
scsifs as the current filing system. This is not the case,
*configure filesystem SCSI must be used to configure
SCSIFS as the current filing system at power up.
Page44

I
n use, the error `SCSI Phase error' or
`
SCSI bus not free'occurs.
These errors are usually caused by either damaged 50 way cables, or
by having 2 or more devices on the SCSI bus with the same ID.
Visually inspect cables, and check ID numbers of connected SCSI
devices (if you don't know how to do this, you are unlikely to generate
the error by adding devices with the same ID number). These errors
can also be caused by an unterminated SCSI bus, or a SCSI bus with
too many termination resistors. The SCSI bus should have terminating
resistors in the devices at each end (typically the controller card and
the last drive), but not on any devices in between.
These are the most common errors that occur according to user
feedback. Further help may be found in the Read Me file on the
formatter disc. If you experience any difficulties, please let us know so
that we can include any additional helpful material in the Read
-
Me
file.
Page
45

Page 46

 Loading...