

O3 PURE LS Owner's Manual
Page Copyright © 2011 Kel Technologies - All Rights Reserved
Page 2 Copyright © 2011 Kel Technologies - All Rights Reserved

Page 3 Copyright © 2011 Kel Technologies - All Rights Reserved
Owners Handbook
O3 PURE LS FOR USE WITH COLD WATER ONLY
Installation instructions should be reviewed prior to installation
Prior to Installation
Open box, remove O3 Pure Eco Laundry System (LS) from packaging and inspect
for any shipping damage. Keep packaging in the event of return for warranty.
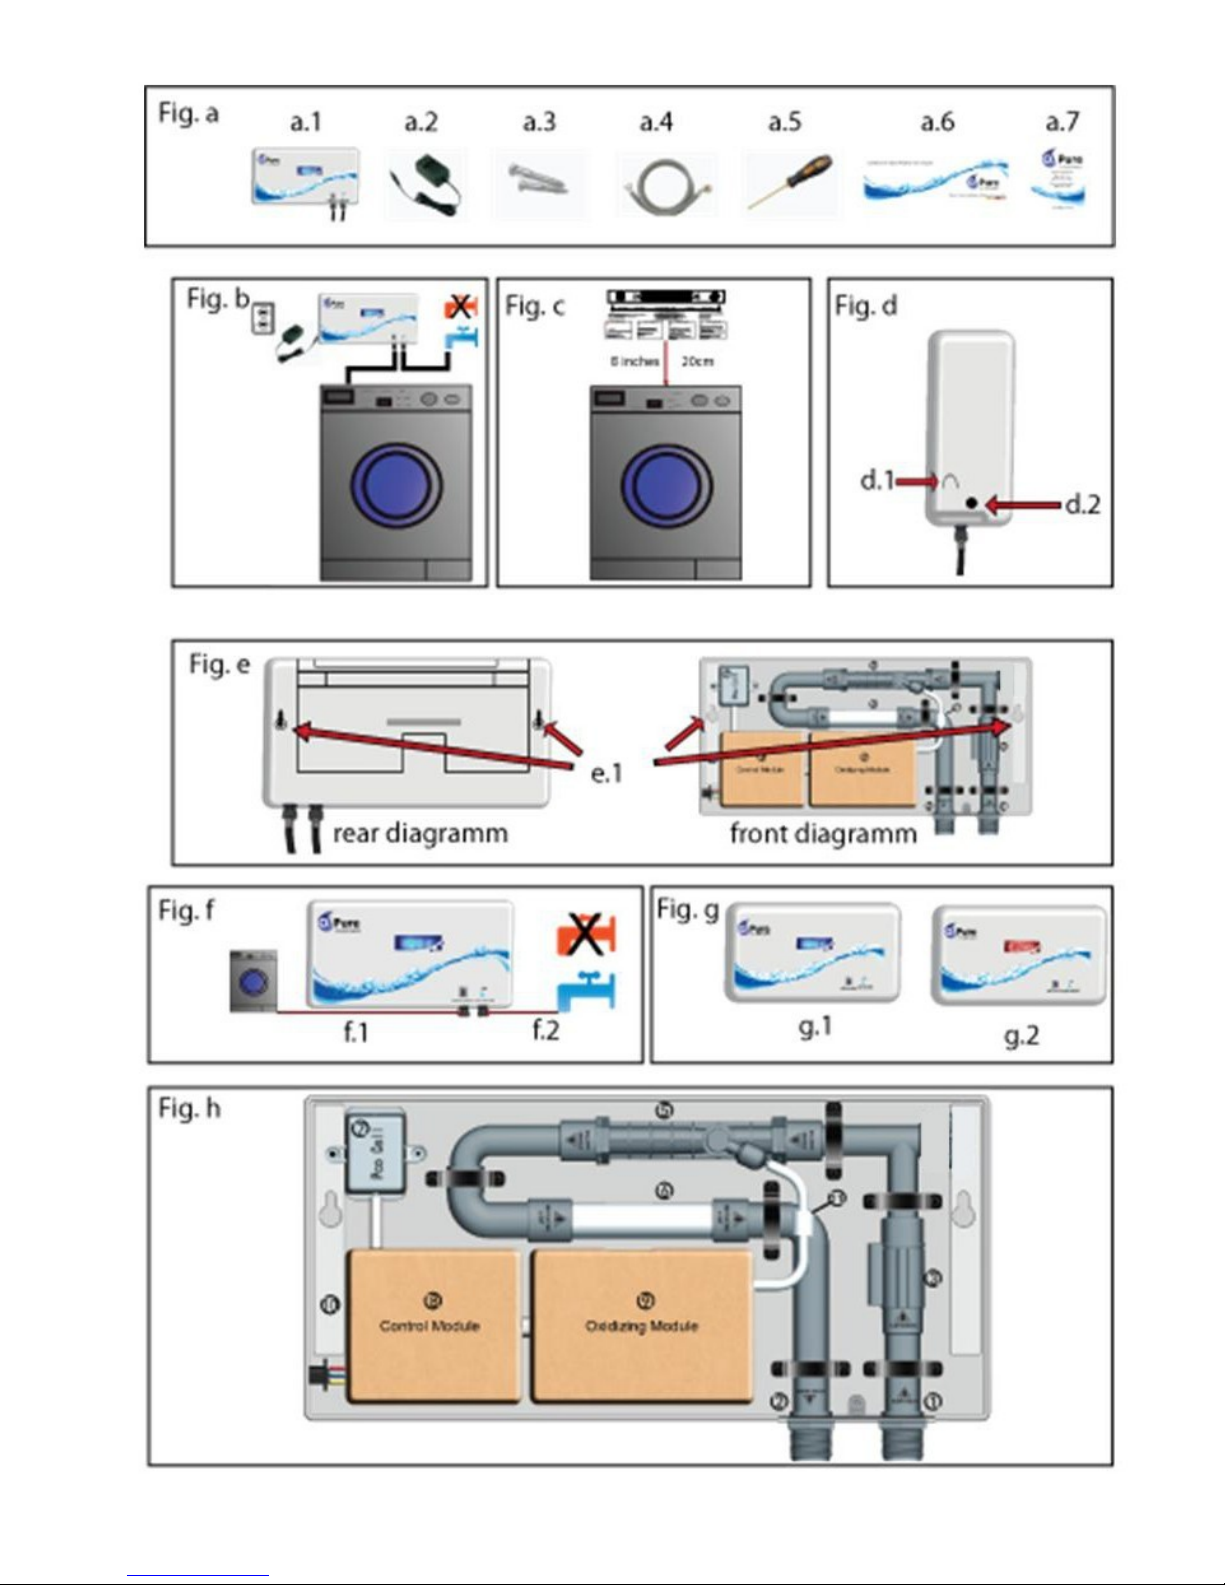
Check to ensure you have all components : (Fig. a) (a.1) 1 x O3 Pure LS Unit, (a.2)
1 x Power adaptor, (a.3) 2 x Screws and Molly’s, (a.4) 1 x Water hose, (a.5) 1 x
Screwdriver, (a.6) O3 Pure LS Quick Install Guide, (a.7) Owners Handbook with
Warranty card.
Remove power adapter from the box and water hose from the bag.
The O3 Pure LS should be attached to the wall just above and behind your washing
machine, check to make sure the power adapter will reach the electrical socket and
that the water hose will reach from the O3 Pure LS unit to the washing machine.
( Fig. b)
Use & Safety Considerations
Before using, please read the Owners Handbook carefully.
Do not operate the unit with the cover removed.
Disconnect all power before servicing.
Do not use an extension cord or power adapter other than the one provided with
your O3 Pure LS unit.
O3 Pure LS is not recommended for use in homes with high iron content water. If
your water has high iron content, consult a water filtration expert for available options.
Maximum water inlet pressure is 100psi.
Use the included new hose when connecting the O3 Pure LS unit to your washing
machine.
To prevent leakage caused by back-flow from the washing machine, do not disconnect the hot water hose. Change the wash and rinse cycles to cold/cold
Only use a soft cloth dampened with water when cleaning your O3 Pure LS unit.
Do not use harsh chemicals, abrasives or cleansers.
Mount the O3 Pure LS unit horizontally only.
O3 Pure LS is designed for residential use only and is not intended for use in a
commercial or industrial setting.
Water treated by your O3 Pure LS unit is intended for laundry and is not approved
for human consumption.

Page 4 Copyright © 2011 Kel Technologies - All Rights Reserved
Installation:
Place the Quick Install Guide on the wall in the desired location to determine the
spacing and placement of the mounting holes on the wall. A carpenters level
should be used to insure that the O3 Pure LS is mounted level in the horizontal
plane. (Fig. c)
Mark the location of the two mounting holes on the wall with a pencil. Drill appro-
priate sized holes for the screws or molly’s in each marked location. Install the
screws leaving them protruding from the wall by about 1/4 inch. It is recommended
that the mounting whole on the right side of the O3 Pure LS (above the water inlet/
outlet) be mounted to a wall stud, if possible. A set of mounting hardware (screws
and molly's) have been provided. If it is not possible to mount the O3 Pure LS to
wall studs, you should use the "molly" type expandable screw anchors. For any
other type of mounting scenario (concrete block, etc.) please consult your local
hardware store for assistance.
Remove the cover from your O3 Pure LS by pressing the tabs on each side of the
cover inwards. (Fig. d - d.1) While holding the tabs in, lift the cover up 1 inch (2.54
centimeter’s) and then straight out toward you.
Place the O3 Pure LS against the wall so that the protruding screws slip through
the “keyholes" (Fig. e - e.1) in the back of the unit. Gently slide the unit down into
the lock position of the keyholes. You can now tighten the two screws to hold the
unit firmly in place. DO NOT over tighten the screws, as it may cause damage to
the back panel of the unit.
Turn off the hot and cold water taps/faucets to your washing machine. Place a
pail under the cold water hose connection to the washing machine. Disconnect
the cold hose from the washing machine placing the end into the pail. Flush cold
water line with ½ gallon (2 litres) of water by turning the cold water tap on. Check
filter (if applicable) at the cold water inlet of washing machine. Clean residue from
filter if necessary. Check that the rubber washer in the hose is in place and connect the cold water hose from the cold water supply to the inlet supply of the O3
Pure LS (Fig. f - f.2). Properly tighten the hose to the inlet fitting, but do not over
tighten.
Using the new hose provided connect one end of the hose to the water outlet of
the O3 Pure LS and the other end of the hose to the cold water inlet of the
washing machine (Fig. f - f.1) Properly tighten both ends of the hose,
but do not over tighten.
Replace the cover on the O3 Pure LS.
Plug the power adaptor into the DC adaptor plug-in on the side of the O3 Pure LS
unit (d.2) and then plug the adopter into the wall outlet. (Fig. b)
Ensure all hoses are properly installed and tightened, and that the power supply
has been securely plugged in. SLOWLY turn the COLD water supply back on and
check for any leaks or drips. Gently re-tighten fittings if leaks are apparent, Be
careful not to over tighten.
Set the wash cycle on your washing machine to COLD WATER wash and COLD
WATER rinse.

Page 5 Copyright © 2011 Kel Technologies - All Rights Reserved
Alarm & Indicator lights
Alarm
Your O3 Pure LS unit is equipped with an internal leak detector. If a leak happens to
develop inside of the unit, water will accumulate on the bottom panel. The sensor will set
off an audible alarm and will automatically turn the unit off. This alarm will continue to
buzz until the leak is stopped and/or the unit is unplugged. If this alarm should occur,
you should unplug the unit, turn off the cold water valve and call your distributor for
assistance.
Indicator Light
The Indicator light, viewed through the window on the front of the O3 Pure LS unit, as
two states of operation. (Fig. g)
A blue light indicates the normal operating condition of O3 Pure LS unit. (g.1)
A flashing red light indicates that the fan or the active oxygen generator is not operating
properly. Please contact your distributor for service. (g.2)
Using Your O3 Pure LS
Daily Use
The use of your O3 Pure LS unit is very easy and convenient. As long as you install your
O3 Pure LS properly, you simply operate your washer according to the instructions provided by the manufacturer. O3 Pure LS is designed to automatically turn on as soon as
the washer demands water for the wash cycle and again for any rinse cycles. The only
differences are that you ONLY USE THE COLD WATER setting for both the wash and
rinse cycles on your washer.
Note: If hot water is used it dilutes and defeats the effectiveness of the enhanced and
Photo Catalytic Oxidizers that the O3 Pure LS unit has introduced into the wash water.
Stains
We suggest that you pre-treat stains, just as you would without an O3 Pure LS unit. For
normal soiled laundry, you should only need a very small amount of detergent or none at
all.
How to tell your O3 Pure LS unit is working?
You can easily tell if your O3 Pure LS unit is operating properly by looking through the
viewing window. The viewing window glows blue and you can see the production of enhanced oxidation bubbles in the tube through the window when the water is flowing
through (you can actually see it working)! If you do not see bubbles during the water input
cycles, please ensure that you have the correct O3 Pure LS unit for your washing machine (see model selection on the next page). When the water stops flowing, the O3 Pure
LS will automatically turn off following a short cool-down period.

Page 6 Copyright © 2011 Kel Technologies - All Rights Reserved
Model Selection
Most North American top-load washing machines use a standard O3 Pure LS high flow
unit but the O3 PURE low flow unit will work on standard top-load washers. However,
front-load and some high efficiency (HE) top-load washing machines require the O3 Pure
LS low flow unit. If a high flow O3 Pure LS unit is used with a washer that has a low fill
rate, there will be no bubbles and it will not provide the benefits of the correct O3 Pure LS
unit for the washing machine.
Benefits of using O3 Pure LS
Cleans, Deodorizes & Brightens Clothes
Ozone purifies the water by stabilizing chlorine residues, heavy metals, and vari-
ous organic impurities that cause unpleasant odors.
Advantages of O3 Pure LS
Residential Ozone Laundry Cleaning Performance System
Reduces Energy use: Reduced wash cycle times, reduced need for rinse
cycles, cold water wash (not paying for heating water)
Reduced Water Use: Ozone wash systems require fewer rinse steps reduc-
ing water consumption
Reduced Chemical Use: Ozone washing systems use little or no detergent
Purifies and Disinfects: Ozone washing systems can reduce up to 99.99%
of the bacteria
Improves Textile Life and Quality: Shorter wash cycle times, the use of
cold water and fewer rinse cycle’s means less wear and tear on fabrics. Fab-
ric life and color quality is also increased due to reduced exposure to chemicals.
Reduces damages to environment: Less chemical use equals less environmental damage in our water eco systems

Page 7 Copyright © 2011 Kel Technologies - All Rights Reserved
O3 Pure LS Technical Specifications
INTERNAL DIAGRAM (Fig.h)
In case there is an issue with your O3 Pure LS please contract customer service. The
diagram below will be a resource in locating the part(s) of the unit as the customer service representative guides you through troubleshooting and servicing your unit.
Model As Label
Electrical Input: AC 100-240V/ 50-60Hzs Output:12V 3 A
Water pressure 20 –100 PSI
Operating Temperature 40 F– 118 F (4.5 C – 48 C)
Active Ozone Output 800 mg/h
Active Ozone Concentration 0.5—1.0 mg/L
Water Volume 79 – 132 gal/h (300 -500 L/h)
Product Dimension 16 1/2 in X 8 in X 3 ¾ in (417mm X 202mm X
93mm)
Weight 4.9 Lbs (2.5 kg)
Install Wall Mounted
Warranty 3 year limited
Certification CE & RoHS
1 Water Inlet
Replacement Parts
2 Water Outlet
Part Name Part Number
3 Flow Switch
9 Oxidizing Module O3 Pure LS-OM
4 N/A
8 Control Module O3 Pure LS-CM
5 Venturi
7 PCO Cell O3 Pure LS-PCO
6 Static Mixer
11 Check Valve O3 Pure LS-CV
7 PCO Cell
4 N/A N/A
8 Control Module
9 Oxidizing Module
10 Mounting Plate
11 Check Valve

Page 8 Copyright © 2011 Kel Technologies - All Rights Reserved
O3 Pure LS Limited Warranty
Your O3 Pure LS is warranted to be free from all defects in material and workmanship in
normal household use for a period of (3) years limited from date of purchase. The warranty is granted only to the original purchaser and members of his or her immediate
household. Please retain your sales receipt. The warranty is subject to the following provisions. Any damages or malfunctions caused by negligence, abuse, or use not in accordance with the Owner's Use Handbook are not covered by this warranty. Likewise, any
defects or damages caused by unauthorized service or the use of other than O3 Pure LS
parts are not covered. O3 Pure will, as its option, repair or replace a defective O3 Pure
LS or part(s) for the O3 Pure LS that is covered by this warranty. As a matter of warranty
policy, O3 Pure will not refund the customer's purchase price.
What is not covered by the Limited Warranty?
THIS WARRANTY DOES NOT COVER CONSEQUENTAL OR INCIDENTAL DAMAGES
SUCH AS PROPERTY DAMAGE AND DOES NOT COVER INCIDENTAL COSTS AND
EXPENSES RESULTING FROM ANY BREACH OF THIS WARRANTY, EVEN IF FORESEEABLE. Some States or Provinces do not allow the exclusion or limitations of incidental or consequential damages, so the above limitation or exclusion may not apply to you
depending on the State or Province of purchase.
Nor does this warranty cover damages caused by the services performed by anyone
other than O3 Pure or it authorized service providers, use of parts other than genuine O3
Pure LS parts or external causes such as abuse, misuse, inappropriate power supplies or
acts of God.
Other Limitations
THIS WARRANTY IS EXCLUSIVE AND IS IN LIEU OF ANY EXPRESS WARRANTY,
WHETHER WRITTEN OR ORAL. IN ADDITION O3 PURE HEREBY SPECIFICALLY
DISCLAIMS ALL OTHER WARRANTIES WITH RESPECT TO YOUR O3 PURE LS, INCLUDING MERCHANTABILITY OR FITNESS FOR ANY PARTICULAR PURPOSE.
Some States or Provinces do not allow disclaimers of such implied warranties or limitations on how long an implied warranty lasts, so the above limitation may not apply to you
depending on the State or Province of purchase.
How do you obtain warranty service?
O3 Pure products are high quality appliances and, with proper care, are intended to provide years of satisfying performance. However, should the need arise for warranty servicing; simply visit our website or email us or call O3 Pure Customer Service (see last page
for links and phone numbers). Please do not return your O3 Pure LS unit for servicing
without first speaking to an O3 Pure Customer Service representative to obtain an Authorized to Return number (ATR). O3 Pure LS unit returned without an ATR number will
be returned to the sender without servicing. Please have your proof of purchase handy
when you make your call or O3 Pure will be unable to assist you.
Refer to last page for contact information and warranty card

Page 9 Copyright © 2011 Kel Technologies - All Rights Reserved
Manual de propietarios
O3 Pure LS PARA USO CON AGUA FRÍA SÓLO
Instrucciones de instalación deben revisarse antes de la instalación
Previo a la instalación
Abrir caja de, retirar O3 Pure Eco Laundry System (LS) del embalaje e inspeccionar
si existen daños provocados durante el envío. Mantener los envases en caso de
devolución de la garantía.
Compruebe que tiene todos los componentes:: (Fig. a) (a.1) 1 x O3 Pure LS unida,
(a.2) 1 x adaptador de alimentación, (a.3) 2 x tornillos y tuercas, (a.4) 1 x manguera de agua, (a.5) 1 x destornillador, (a.6) O3 Pure LS Quick Install Guide, (a.7) manual de propietarios.
Retirar el adaptador de alimentación de la caja y la manguera de agua de la bolsa.
El Pure O3 LS deberá instalarse en la pared justo por encima y detrás de su lavadora, compruebe que el adaptador de corriente llegará a la toma eléctrica y que llegará
la manguera de agua de la unidad de O3 Pure LS a la lavadora. (Fig. b)
Uso y consideraciones de seguridad
Antes de usar, lea atentamente el manual de los propietarios.
No operar la unidad con la tapa removida.
Desconecte la alimentación eléctrica antes de dar servicio.
No utilice de cable de extensión o un adaptador poder distinto del su unidad O3 Pure
LS.
O3 Pure LS no se recomienda para su uso en hogares con agua con alto contenido
de hierro. Si su agua tiene una alta concentración de hierro, consulte un experto en
filtración de agua para obtener las opciones disponibles.
Presión de entrada máxima del agua es de 20 –100 PSI / 1.4 – 7 Kgf/cm²
Utilice la manguera nueva incluida cuando conecte la unidad 03 Pure a la lavadora.
Para evitar fugas causadas por el retro flujo de la lavadora, no desconecte la man-
guera de agua caliente. Cambie los ciclos de lavado y enjuague frío/frío
Sólo utilice un paño suave humedecido con agua al limpiar su unidad O3 Pure LS.
No utilice productos químicos agresivos, abrasivos o limpiadores.
Montar la unidad 03 Pure LSúnicamente horizontalmente.
03 Pure está diseñado para uso residencial únicamente y no está diseñado para uso
en un entorno comercial o industrial.
El agua tratada por su unidad 03 Pure está diseñada solo para lavandería y no está
aprobada para consumo humano.

Page 10 Copyright © 2011 Kel Technologies - All Rights Reserved
Installation:
Colocar a la Guía de instalación rápida en la pared en la ubicación deseada para
determinar el espaciado y la colocación de los orificios de montaje en la pared. Un
nivel de carpinteros debe ser utilizado para asegurar que la O3 Pure LS se monta
nivel en el plano horizontal. (Fig. c)
Marcar la ubicación de los dos orificios de montaje en la pared con un lápiz. Taladre
los orificios de tamaños adecuados para los tornillos o tuercas en cada ubicación
marcada. Instale los tornillos dejándolos sobresaliendo de la pared de alrededor de
1/4 de pulgada. Se recomienda que el montaje de todo el lado derecho de la O3
Pure LS (por encima de la entrada y salida de agua) montándolo sobre un perno de
pared, si es posible. Se han proporcionado un conjunto de montaje (tornillos y de
tuercas). Si no es posible montar el O3 Pure LS a pernos de pared, debe utilizar los
delimitadores de tornillo expansible de tipo "tuercas". Para cualquier otro tipo de
escenario de montaje (bloque de hormigón, etc.) por favor consulte su ferretería
local para asistencia..
Quite la cubierta de su 03 Pure presionando las fichas a cada lado hacia adentro de
la cubierta. (Fig. d - d.1) Mientras mantiene las fichas presionadas, levante la tapa 1
pulgada (2,54 centímetros) y enderécelo hacia usted.
Coloque el O3 Pure LS contra la pared para que la parte protuberante de los tornillos se deslicen a través de los "orificios" en la parte posterior de la unidad. (Fig. e -
e.1). Deslice suavemente la unidad hacia abajo en la posición de bloqueo de los
orificios. Ahora puede apretar los dos tornillos para sujetar firmemente la unidad en
su lugar. NO sobre apriete los tornillos, ya que puede causar daños a la parte posterior de la unidad.
Apague los grifos/llaves de agua fría y caliente de la lavadora. Coloque un cubo en
la conexión de manguera de agua fría de la lavadora. Desconecte la manguera de
agua fría de la lavadora poniendo su extremo en la cubeta. Vacíe la línea de agua
fría con ½ galón (2 litros) de agua encendiendo el grifo de agua fría. Compruebe el
filtro (si procede) en la entrada de agua fría de la lavadora. Limpie el residuo del
filtro si es necesario. Asegúrese de que la arandela de caucho en la manguera esté
en su lugar y conecte la manguera de agua fría a la fuente de agua fría a la entrada
del O3 Pure LS (Fig. f - f.2). Apriete correctamente la manguera a la entrada de
conexión, pero no sobre apriete.
Utilizando la manguera nueva proporcionada conecte un extremo de la manguera a
la salida del agua delO3 Pure LS y el otro extremo de la manguera a la entrada de
agua fría de la lavadora (Fig. f - f.1) Apriete correctamente ambos extremos de la
manguera, pero no sobre apriete.
Reemplace la cubierta en la 03 Pure.
Conecte el adaptador de alimentación en el orificio para adaptador DC de la unidad
O3 Pure LS (d.2) y, a continuación, conecte el adaptador en la toma de pared. (Fig.
b)
Asegúrese que todas las mangueras están correctamente instaladas y apretadas, y
que la fuente de alimentación ha sido bien conectada. LENTAMENTE active el suministro de agua y busque y compruebe la existencia de cualquier fuga o goteo. Suavemente apriete la conexión si son evidentes fugas, tenga cuidado de no sobre
apretar.
Establezca el ciclo de lavado de la lavadora en agua fría y enjuague de agua fría.

Page 11 Copyright © 2011 Kel Technologies - All Rights Reserved
Alarma & Luces indicadoras
Alarma
La unidad 03 Pure está equipada con un detector de fugas internas. Si ocurre que una
fuga se desarrolle dentro de la unidad, se acumulará agua en el panel inferior. El sensor
activará una alarma audible y automáticamente apagará la unidad. Esta alarma se seguirá sonando hasta que se detenga la fuga o la unidad sea desconectada. Si ocurre
esta alarma, debe desconectar la unidad, apagar la válvula de agua fría y llamar a su
distribuidor para obtener ayuda.
Luz del indicador
La luz del indicador, visto a través de la ventana en la parte frontal de la unidad 03 Pure, tiene dos Estados de funcionamiento. (Fig. g)
Una luz azul indica la condición de funcionamiento normal de unidad 03 Pure. (g.1)
Una luz roja intermitente indica que el ventilador o el generador de oxígeno activo no
funciona correctamente. Póngase en contacto con su distribuidor para el servicio. (g.2)
Utilización de su 03 Pure LS
Uso diario
El uso de la unidad 03 Pure es muy fácil y cómodo. Siempre y cuando instale correctamente su O3 Pure LS, usted simplemente hace funcionar su lavadora de acuerdo con las
instrucciones proporcionadas por el fabricante. 03 Pure está diseñado para activarse
automáticamente tan pronto como la lavadora exija agua para el ciclo de lavado y de
nuevo para los ciclos de lavado. Las únicas diferencias son que sólo utiliza la configuración de agua fría para los ciclos de lavado y enjuague de la lavadora.
Nota: Si se utiliza agua caliente, diluye y deshace la eficacia de la mejora
y foto oxidantes catalíticos que ha introducido la unidad 03 Pure en el agua de lavado.
Manchas
Sugerimos que trate previamente a las manchas, al igual que lo haría sin una unidad 03
Pure. Para ropa sucia normal, sólo necesitará una muy pequeña cantidad de detergente
o ninguna en absoluto.
¿Cómo saber la unidad 03 Pure está trabajando?
Puede saber si su unidad 03 Pure está funcionando correctamente mirando a través de
la ventana de visualización. La ventana de visualización brilla en azul y se puede ver la
producción de burbujas de oxidación mejorada en el tubo a través de la ventana cuando
el agua fluye a través de (realmente puede verlo funcionando)! Si no ve burbujas durante
los ciclos de entrada de agua, asegúrese de que tiene la unidad 03 Pure correcta para su
lavadora.(ver el modelo de selección en la página siguiente ).
 Loading...