

Page 1

ENMET Corporation
PO Box 979
Ann Arbor, MI 48106-0979
Operation & Maintenance Manual
TARGET Series
Portable Gas Detector
Manual Part Number
80012-014
MCN-380, 11/07/07
Page 2

Table of Contents
1.0 Introduction.................................................................................................................................................. 1
1.1 Warnings and Cautions...............................................................................................................................................1
1.2 Unpack.......................................................................................................................................................................1
1.3 Check Order...............................................................................................................................................................2
1.4 Serial Numbers...........................................................................................................................................................2
2.0 TARGET Features.......................................................................................................................................... 2
2.1 Sensors.......................................................................................................................................................................2
2.2 Other features include:................................................................................................................................................2
2.4 Locations and Data logging.........................................................................................................................................4
3.0 Instrument Operation................................................................................................................................... 4
3.1 Turning the Instrument On and Off.............................................................................................................................4
3.1.1Turning the TARGET On .......................................................................................................................................4
3.1.2 Turning the TARGET Off ......................................................................................................................................4
3.2 Charging the Battery...................................................................................................................................................5
3.3 Display Backlight.......................................................................................................................................................6
3.4 Alarms .......................................................................................................................................................................6
3.4.1 Instantaneous Gas Alarm.....................................................................................................................................6
3.4.2 STEL/TWA Alarms...............................................................................................................................................6
3.4.3 Over-range and Under-range Alarms...................................................................................................................7
3.4.4 Low Battery.........................................................................................................................................................7
3.4.5 Fault....................................................................................................................................................................7
3.5 Pop-Up Menu.............................................................................................................................................................7
3.5.1 Auto-Zero ............................................................................................................................................................7
3.5.2 Calibration Status................................................................................................................................................8
3.5.3 Combustible Gas Display.....................................................................................................................................8
3.5.4 Locations.............................................................................................................................................................8
3.5.5 Internal Sampling Pump.......................................................................................................................................9
4.0 Basic User Operation................................................................................................................................. 10
4.1 Date/Time/Battery Information.................................................................................................................................10
4.2 Alarms Values..........................................................................................................................................................10
5.0 Advanced User Operation ......................................................................................................................... 11
5.1 Date/Time/Battery Information.................................................................................................................................11
5.2 Alarms Values..........................................................................................................................................................11
5.3 Min/Max Values.......................................................................................................................................................11
5.4 TWA Values ............................................................................................................................................................11
5.5 STEL Values............................................................................................................................................................11
6.0 Maintenance Operations............................................................................................................................ 12
6.1 Recommendations....................................................................................................................................................12
6.2 Standard Maintenance Menu.....................................................................................................................................12
6.3 Calibration ...............................................................................................................................................................12
6.3.1 Calibration Menu...............................................................................................................................................12
6.3.2 Zero Adjust........................................................................................................................................................13
6.3.3 Applying Span Gas.............................................................................................................................................13
6.4 Advanced Maintenance Menu, Software 4.94 version................................................................................................15
6.4.1 Calibration........................................................................................................................................................15
6.4.2 Setting Instantaneous Alarms .............................................................................................................................15
6.4.3 Enable Sensors...................................................................................................................................................16
6.4.4 Set Clock/Chirp..................................................................................................................................................16
6.4.5 Set Password......................................................................................................................................................16
6.4.6 Set Battery Type.................................................................................................................................................17
6.4.7 Set Operation Menu...........................................................................................................................................17
6.4.8 Internal Pump Calibration .................................................................................................................................17
6.4a Advanced Maintenance Menu, Software 6.0 version................................................................................................18
6.4a.1 Calibration ......................................................................................................................................................18
6.4a.2 Setting Instantaneous Alarms ...........................................................................................................................18
6.4a.3 Enable Sensors.................................................................................................................................................19
6.4a.4 Internal Pump Calibration ...............................................................................................................................19
Page 3

6.5 Replacing Battery Pack.............................................................................................................................................20
6.6 Replacing Internal Pump...........................................................................................................................................20
6.7 Replacing Sensors ....................................................................................................................................................21
7.0 Instrument Information.............................................................................................................................. 22
7.1 Replacement Parts List.............................................................................................................................................22
7.2 Target Specifications ................................................................................................................................................23
8.0 Default Alarm and Configurations............................................................................................................. 24
9.0 Flow Diagrams........................................................................................................................................... 25
9.1 Basic Operation Menu..............................................................................................................................................25
9.2 Standard Maintenance Menu.....................................................................................................................................26
9.3 Advanced Operation Menu .......................................................................................................................................27
9.4 Advanced Maintenance Menu, Software 4.94 version................................................................................................28
9.4 Advanced Maintenance Menu, Software 6.0 version..................................................................................................29
10.0 Troubleshooting....................................................................................................................................... 30
11.0 WARRANTY.............................................................................................................................................. 31
List of Figures and Tables
F
IGURE
1: F
F
IGURE
F
IGURE
F
IGURE
F
IGURE
F
IGURE
F
IGURE
T
ABLE
T
ABLE
F
IGURE 8A
F
IGURE
F
IGURE
F
IGURE 9A
F
IGURE
F
IGURE
T
ABLE
T
ABLE
T
ABLE
RONT VIEW
2: S
ENSOR VIEW
3: T
OP VIEW
4: B
OTTOM VIEW
5: M
AIN GAS DISPLAY
6: I
NSERT CHARGE JACK
7: R
EMOVE CHARGE JACK
1: B
ATTERY LIFE
2: P
ROGRAMMED FLAMMABLE GAS COEFFICIENTS
: C
ALIBRATION SHIELD ATTACHMENT
8: V
ARIOUS CALIBRATION ADAPTER ATTACHMENTS
9: R
EPLACING BATTERY PACK AND INTERNAL PUMP
: R
EPLACING INTERNAL PUMP FOR INSTRUMENTS WITH S/N
10: R
EMOVE SHORTING CLIP
11: R
EPLACING SENSORS
3: D
EFAULT ALARM
4: D
EFAULT CONFIGURATION
5: T
ARGET MENU QUICK REFERENCE
.........................................................................................................................................................3
.......................................................................................................................................................3
............................................................................................................................................................3
......................................................................................................................................................3
..............................................................................................................................................3
...........................................................................................................................................5
.........................................................................................................................................5
.......................................................................................................................................................6
.....................................................................................................8
.................................................................................................................13
...............................................................................................14
..............................................................................................20
0699
AND BELOW
.......................................................20
...................................................................................................................................21
.......................................................................................................................................21
.................................................................................................................................................24
...................................................................................................................................24
.......................................................................................................................25
Reference Information:
N
OTE
: [important information about use of the instrument.]
C
W
ARNING
AUTION
: [affects equipment – if not followed may cause damage to instrument, sensor etc…]
:
[affects personnel safety – if not followed may cause bodily injury or death.]
Page 4

TARGET Series ENMET Corporation
1.0 Introduction
1.1 Warnings and Cautions
The TARGET Series gas detectors are designed to detect hazardous atmospheric conditions. An indication of life
threatening hazards should be taken very seriously. NEVER ignore an alarm condition.
W
ARNINGS
C
N
OTE
1.2 Unpack
:
• Any rapid upscale combustible gas reading followed by a declining or erratic reading may indicate a gas
concentration beyond the upper-scale limit. This may indicate a flammable concentration.
• Off-scale readings may indicate a flammable concentration.
• Electromagnetic interference (EMI) signals may cause incorrect operation.
• CSA requirement: Before each day’s usage, instrument sensitivity must be tested on a known concentration of
methane between 25-50% LEL. Accuracy must be within –0 to +20% of the actual concentration applied.
Accuracy may be corrected, if necessary, by performing sensor calibration.
• Oxygen deficient conditions can cause lower combustible gas readings than actual concentrations.
• Oxygen enriched conditions can cause higher combustible gas readings than actual concentrations.
• The instrument batteries should only be charged in a non-hazardous location.
• The instrument should only be connected to a computer in a non-hazardous location.
AUTIONS
Any sensor that fails calibration procedures should be replaced and recalibrated immediately.
The combustible portion of this instrument has been assessed by CSA for performance. Users may refer to ANSI/ISA
RP12.13 or an equivalent international recommended practice for guidance in the use of combustible gas detection
equipment.
TARGET instruments with a CSA logo on the serial number label are approved for Intrinsic Safety when used in Class
1, Division 1, Group A, B, C, D Hazardous Location environments.
:
• In case of an atmospheric alarm condition, follow your organization’s established procedures for such a situation.
Evacuating the affected area is usually the first course of action, followed by ventilation and re-testing of the
environment prior to re-entry.
• Silicone compound vapors may adversely affect the TARGET instrument’s standard combustible sensor causing
lower readings than actual concentrations. If the instrument has been exposed to silicone vapors it is strongly
recommended that the instrument be recalibrated prior to its next use. Repeated exposure to silicone compounds
will prematurely destroy the standard combustible sensor.
NOTE: The optional MOS combustible sensor is much less susceptible to silicone poisoning, but instrument
calibration should take place on a more frequent schedule.
• The sensor sampling area must be kept clean. Contamination of this area can prevent proper operation of the
sensors.
: Any specifications stated in this manual may change without notice.
Unpack the TARGET Series instrument and examine it for shipping damage. If such damage is observed, notify both
ENMET customer service personnel and the commercial carrier involved immediately.
Regarding Damaged Shipments
N
OTE
: It is your responsibility to follow these instructions. If they are not followed, the carrier will
not honor any claims for damage.
This shipment was carefully inspected, verified and properly packaged at our company and delivered to the
carrier in good condition.
When it was picked up by the carrier at ENMET, it legally became your company’s property.
If your shipment arrives damaged:
• Keep the items, packing material, and carton “As Is.” Within 5 days of receipt, notify the carrier’s local office
and request immediate inspection of the carton and the contents.
• After the inspection and after you have received written acknowledgment of the damage from the carrier,
contact ENMET Customer Service for return authorization and further instructions. Have your Purchase Order
and Sales Order numbers available.
1
Page 5

TARGET Series ENMET Corporation
ENMET either repairs or replaces damaged equipment and invoices the carrier to the extent of the liability
coverage, usually $100.00. Repair or replacement charges above that value are your company’s responsibility.
The shipping company may offer optional insurance coverage. ENMET only insures shipments with the
shipping company when asked to do so in writing by our customer. If you need your shipments insured, please
forward a written request to ENMET Customer Service.
Regarding Shortages
If there are any shortages or questions regarding this shipment, please notify ENMET Customer Service within 5 days
of receipt at the following address:
ENMET Corporation
680 Fairfield Court
Ann Arbor, MI 48108
734-761-1270 734-761-3220 Fax
1.3 Check Order
Check, the contents of the shipment against the purchase order. Verify that the TARGET Series instrument is received
as ordered. Follow the procedure outlined in paragraph 2.0 to determine your instrument configuration. If there are
accessories on the order, ascertain that they are present. Check the contents of calibration kits. Notify ENMET
customer service personnel of any discrepancy immediately.
1.4 Serial Numbers
Each TARGET Series instrument is serialized. These numbers are on tags on the equipment and are on record in an
ENMET database.
2.0
TARGET
Features
2.1 Sensors
The TARGET Series by ENMET Corporation is a multi-gas portable instrument that may be configured with one to six
sensors. Sensors include:
• Oxygen
• Flammable
• Broad Range Hydrocarbon Toxic MOS (Metallic Oxide Semiconductor) Sensor
• Carbon monoxide
• Hydrogen sulfide
• Ammonia, Sulfur dioxide, Chlorine and many more will be available soon.
2.2 Other features include:
• Metal enclosure for improved durability
• RFI resistant design
• Four line display with backlight
• Push-button calibration procedure
• Programmable combustible sensor
• Optional internal sampling pump
• Audible alarms
• Visual alarm for each sensor
• Dual alarm levels for Toxic and Combustible gases
• Oxygen deficiency and enrichment alarms
• Maximum and Minimum tracking of gas readings
• Peak hold
• Latching alarms
• STEL and TWA alarms
• Datalogging
• Calibration reminder
• Intrinsically safe by design. CSA approved.
• CE approval pending
2
Page 6
TARGET Series ENMET Corporation
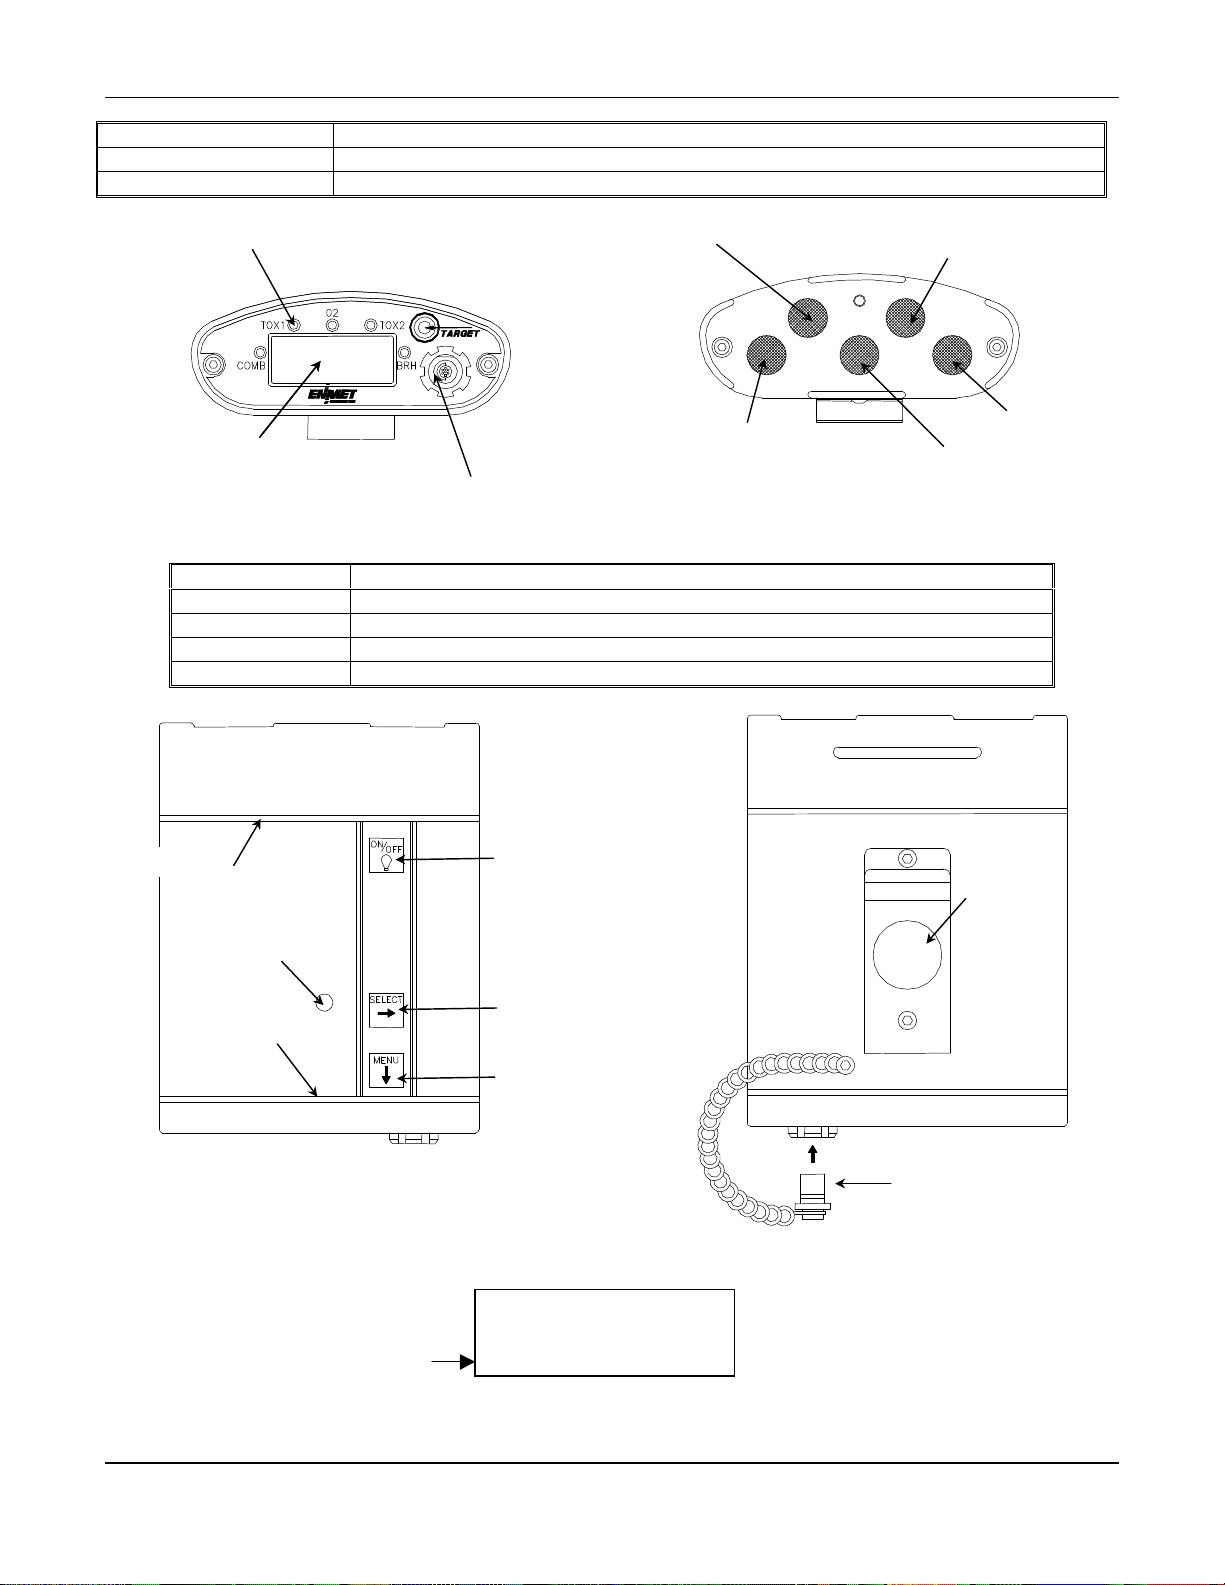
BRH
Menu
See Figures 1 and 2
Visual Alarms There are visual alarms for each of the gas sensors installed.
Display 4 line by 20 character dot-matrix LCD with on-demand back light.
I/O and Charging Port Connector for battery charger, computer cable, remote annunciator cable, and earphone.
Visual alarms
Display
Display
See Figures 3 and 4
Horn Audio Alarm
ON/OFF Button Power button and back light
SELECT Button SELECT button and audio defeat
MENU Button MENU button
Gasket For sealing instrument enclosure
Oxygen
Combustible
Tox 2
I/O and Charging Port
Figure 1: Front View Figure 2: Sensor View
Tox 1
Gasket
Gasket
On/Off
Button
Horn
Select
Button
Button
Dust Cap
Figure 3: Top View Figure 4: Bottom View
02 20.9%
CO 0ppm H2S 0ppm
Mth0%LEL BRH 0ppm
Status Line
Figure 5: Main Gas Display
Belt Clip
3
Page 7
TARGET Series ENMET Corporation
2.4 Locations and Data logging
The TARGET instrument has the ability to store users or location information and log exposure information. TARGET
Trakker software is required for these operations. Further details on its operation and interaction with the instrument is
provided in software manual. If desired, contact ENMET or your local distributor.
3.0 Instrument Operation
3.1 Turning the Instrument On and Off
3.1.1Turning the TARGET On
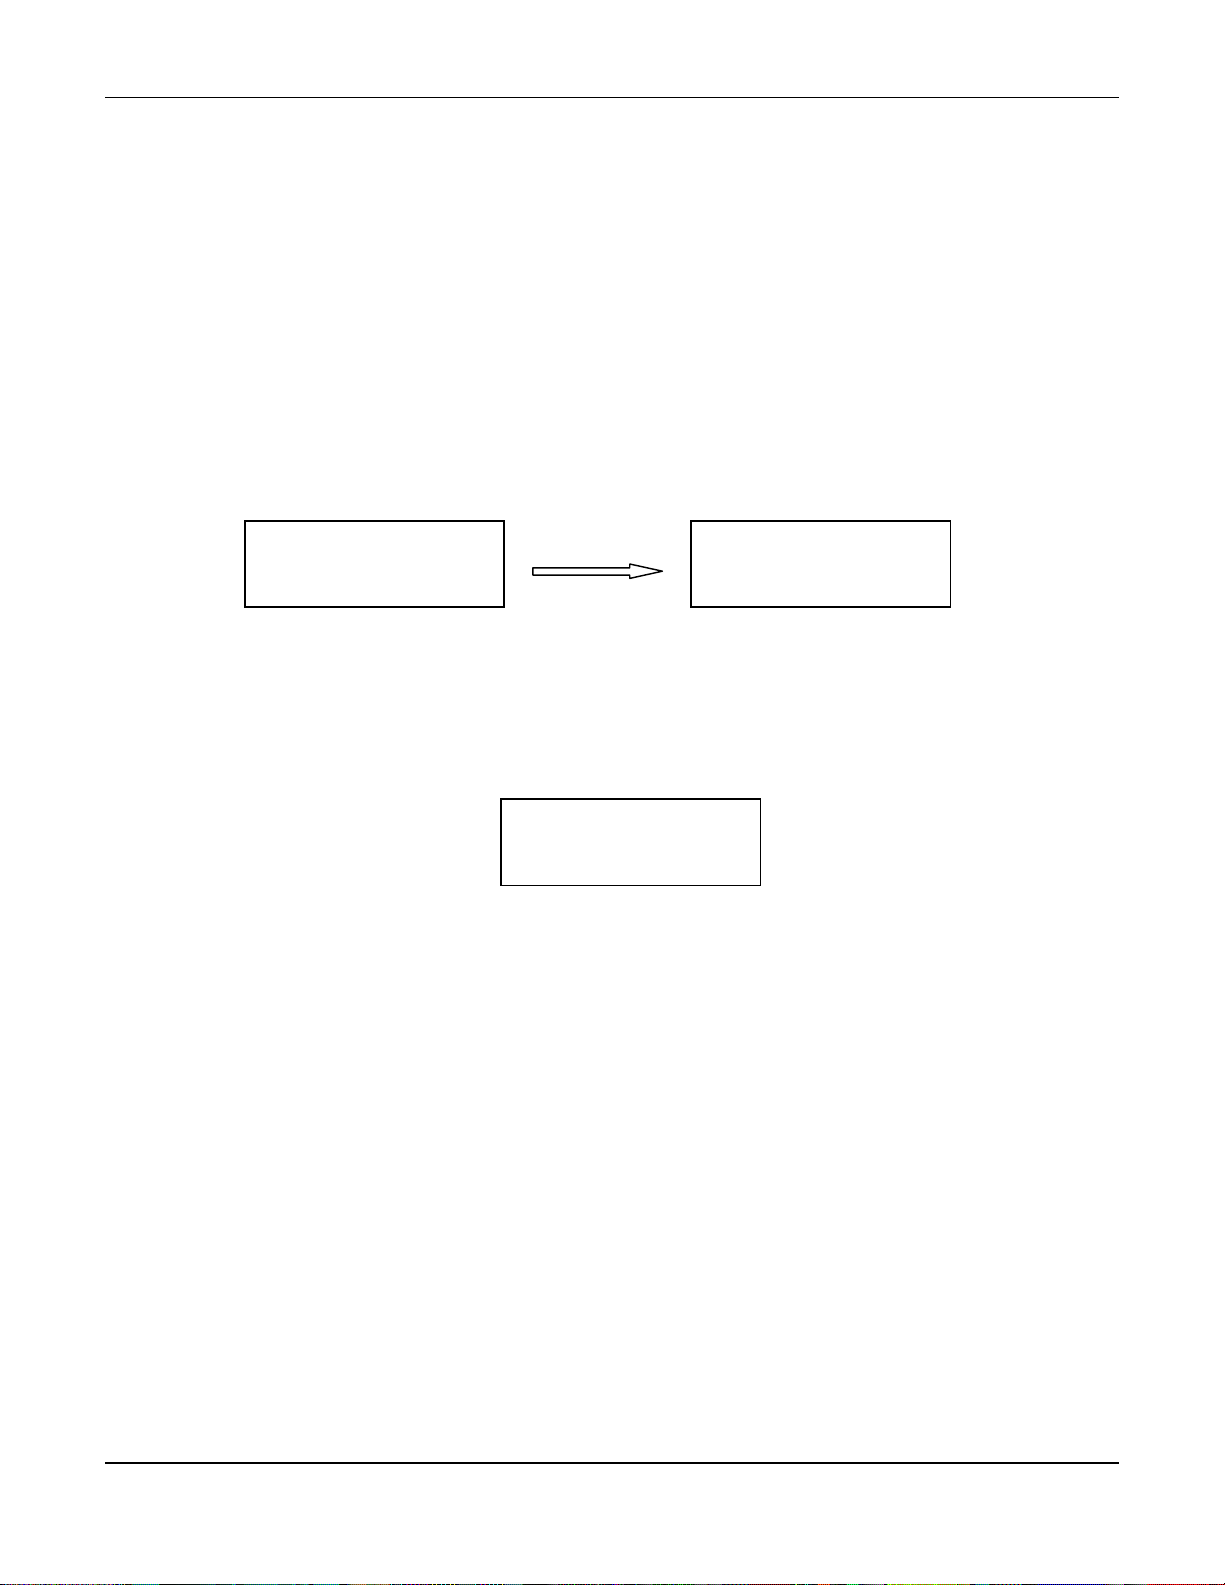
Press and hold the ON/OFF button. The audio alarm may squeal slightly while holding the ON/OFF button. This is
normal. When the instrument turns on, it beeps once and all of the alarm LEDs light up. The TARGET performs a one
minute warm-up procedure which includes a self test, checking sensor signals and instrument electronics. At the end
of the one minute warm-up procedure, the instrument will beep several times before giving the user the option to
perform an auto zero function, or other functions that appear in the Pop-Up menu. See section 3.5 for further
information.
ENMET CORP
TARGET Series
GAS MONITOR
Rev:3.0-3.1
02 20.9%
CO 0ppm H2S 0ppm
Mth0%LEL BRH 0ppm
Warming up...30
Example: Warm-up Displays
3.1.2 Turning the TARGET Off
Press and hold the ON/OFF button for approximately three seconds. The instrument shows a three second count
down and beeps just before shutting down. To protect the user from accidental shut down, the ON/OFF button must
be held for the duration of the three second count down. The audio alarm beeps once to indicate instrument shut
down.
POWER DOWN SEQUENCE
Press and hold power
switch for 3sec
2
Example: Power Down Display
4
Page 8
TARGET Series ENMET Corporation
♦
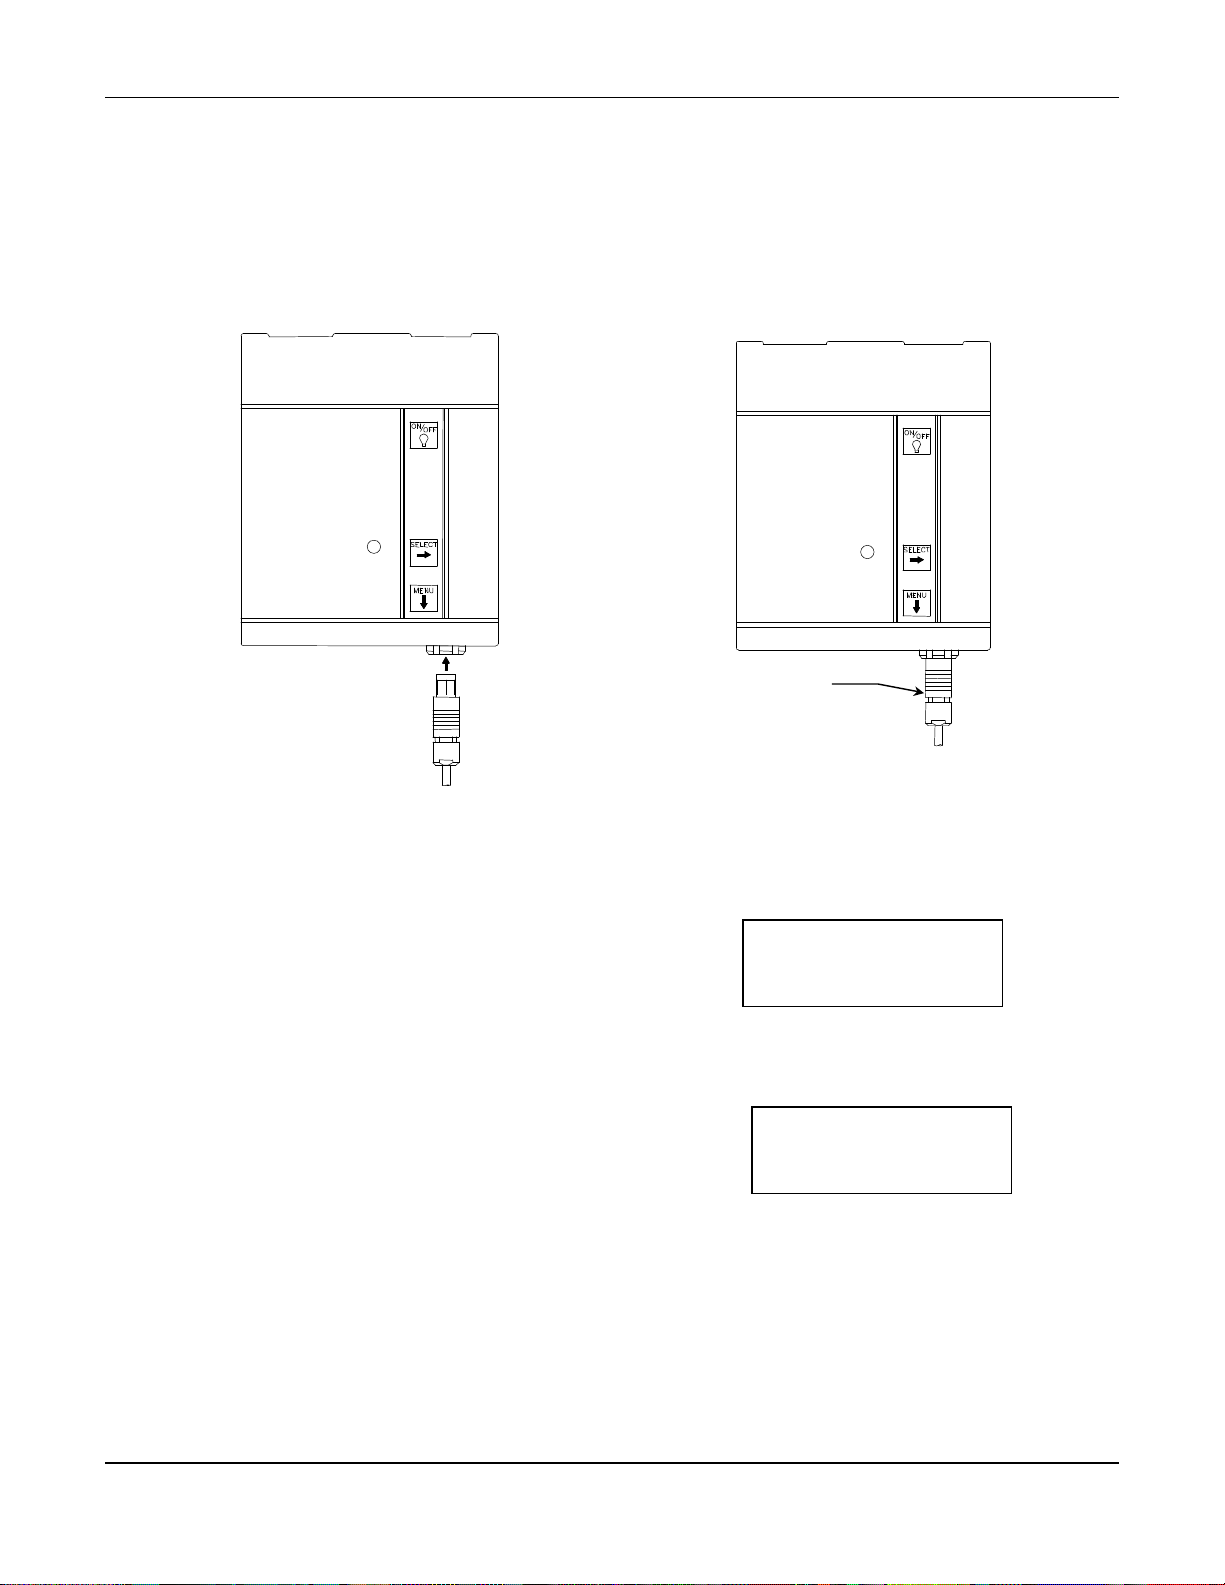
3.2 Charging the Battery
W
ARNING
:
Never charge the TARGET instrument in a hazardous location
The TARGET instrument has a 4.8 volt, nickel metal hydride (NiMH) battery pack. The supplied battery charger charges
the instrument batteries usually in three to four hours. The charger is supplied with a power cord for connection to 110
VAC wall outlet. The batteries may also be charged in the same time frame with a 12 VDC vehicle accessory adapter.
Instrument electronics protect alkaline battery packs from being charged by the TARGET battery charger.
N
OTE
: The connector is keyed and will only go in one way.
Grasp by ridged portion of
connector
♦ If cable is pulled connector
may be damaged
Figure 6: Insert Charge Jack Figure 7: Remove Charge Jack
Plug the battery charger into the wall and then plug
the charger connector in to the I/O and charging
port on the front of the TARGET instrument. See
figures 6 and 7.
Once inserted, the instrument’s display activates
and shows the charge status:
When the batteries are fully charged, the following
is displayed providing information on charge time,
capacity and status:
Example: Display, Battery Charging
BATTERIES CHARGING
Charge started:
May 15 1999 5:29:00 pm
Chrg:25% Time: 0:01
CHARGING DONE
Charge started:
May 15 1999 5:29:00 pm
Chrg:100% Time: 3:15
Example: Display, Charging Complete
N
OTE
: While charging the batteries, the instrument enclosure becomes warm to the touch. The instrument electronics
detect peak battery charge and stop charging at the appropriate time. Once charging is complete, the enclosure will
cool to room temperature.
The instrument may be left indefinitely on the charger. It is recommended to do so, to keep the battery pack at full
charge.
C
AUTION
: When removing the charge jack be sure to grab onto only the ribbed portion of the connector, otherwise the
connector will not release. See Figure 7.
5
Page 9

TARGET Series ENMET Corporation
Table 1: Battery Life
Normal operation with standard sensors
Normal operation with BRH toxic sensor installed
Or while using the optional internal pump.
Normal operation with the BRH sensor and optional
internal pump.
A fully charged NiMH battery pack may provide up to 18 hours
of operation. It may take several charge and discharge cycles to
achieve optimal battery performance.
If the BRH toxic gas sensor is installed or the internal motorized
sample pump is used continuously, instrument operation time is
reduced.
Typical operation time with the BRH sensor or the activated
internal pump is 11 hours.
Operation time with both the BRH sensor and pump activated is
approximately 8 hours.
3.3 Display Backlight
The TARGET display backlight automatically activates during an alarm condition. To manually activate the backlight,
quickly press and release the ON/OFF button. The backlight remains on for approximately 30 seconds.
3.4 Alarms
Never ignore an alarm condition!
procedures for such a situation. If the cause of the alarm is an atmospheric condition, evacuating the affected area is
usually the first course of action, followed by ventilation and re-testing of the environment prior to re-entry.
If an alarm for any sensor is acknowledged (silenced), the audio alarm reactivates in case of an additional alarm
condition for that sensor or any others occur.
In case of an alarm condition, follow your organization’s established
3.4.1 Instantaneous Gas Alarm
The TARGET Series instrument has two levels of instantaneous alarm for each installed sensor. For the oxygen
channel, the alarms are for oxygen deficiency and enrichment. For the toxic and combustible sensors, there are low
and high alarms. Default alarm values are shown in Section 9. Values in the instrument may be viewed by entering
the Operational Menu. See Section 4.2 or 5.2. All instantaneous alarms are latching and continue to activate audio
and visual indicators until they are acknowledged by pressing the SELECT button. If an alarm is acknowledged,
visual indication continues until the condition clears.
The low level alarm for toxic and combustible gases is identified by a flashing LED and a pulsed audio tone. The
audio alarm may be acknowledged and silenced by pressing the SELECT button. If the alarm condition doesn’t clear,
the audio alarm will reactivate in 10 minutes.
The high level alarms for toxic and combustible gases is identified by a steady LED and a continuous audio tone. The
oxygen alarms act in this same manner. The audio alarm may be acknowledged and silenced by pressing the
SELECT button. If the alarm condition doesn’t clear, the audio alarm will reactivate in 5 minutes.
During either instantaneous alarm condition, the display automatically peak holds the highest concentration of the
affected sensor until the alarm is acknowledged. If a low level “pulsed” alarm occurs, and is acknowledged, the audio
alarm reactivates as a steady tone if the high level alarm level is exceeded.
3.4.2 STEL/TWA Alarms
The STEL and TWA alarms are present for the TOX1 and TOX2 sensors. Default alarm values are shown in Section
9. Values in the instrument may be viewed by entering the Operational Menu. See Section 4.2 or 5.2.
A STEL or TWA alarm is identified by a steady LED and continuous audio tone. The status line of the LCD shows
the type of alarm. The audio alarm may be acknowledged and silenced by pressing the SELECT button. If the alarm
condition doesn’t clear, the audio alarm will reactivate in 5 minutes.
6
Page 10

TARGET Series ENMET Corporation
3.4.3 Over-range and Under-range Alarms
The over-range alarm activates audio and visual alarms. It can occur if the instrument is exposed to a gas
concentration higher than its display range. Over-range alarms cannot be acknowledged. An alarm for the Toxic or
Oxygen sensors clears once the over-range condition clears. The over-range alarm for the combustible sensor is
latching and will not clear until the instrument has been removed from the affected area, turned off and turned on in an
environment less than 100 %LEL. Under range conditions can occur if an instrument is auto-zeroed or calibrated in an
area with background levels of gas. Under range alarms can be cleared by performing an auto-zero function as
described in Section 3.5.1.
The over-range condition is indicated by OVERNG shown in the affected sensor location on the display. Under-range
is indicated by UNDRNG.
3.4.4 Low Battery
The TARGET Series instrument has a low battery alarm to provide the user with adequate warning of a low battery
condition. The instrument provides a steady tone audio alarm when there is approximately 15 to 30 minutes of battery
life left. A low battery warning message is displayed on the status line of the instrument LCD. The audio alarm can
be acknowledged by pressing the SELECT button. The audio alarm and backlight reactivate after approximately five
minutes. See section 3.2 for battery charging procedure.
3.4.5 Fault
Fault alarms have a steady audio alarm and are displayed on the status line of the LCD. The status line describes the
fault condition and appropriate action should be take to resolve the issue. See section 11 for troubleshooting
information.
3.5 Pop-Up Menu
The Pop-Up menu is displayed after the one minute instrument warm-up procedure. The instrument beeps several
times prior to showing this display. The Pop-Up menu provides the user the ability to perform an auto-zero, check the
last date of calibration, change the combustible gas display, set user locations and activate/deactivate the optional
internal pump, if installed.
POP-UP MENU
*Auto-Zero Comb disp
Cal Stat Location
Set Pump ON
Example: Pop-Up Menu
N
OTE
: The Pop-Up menu can be accessed at any time during normal instrument operation by pressing and holding the
MENU button for approximately two seconds while the instrument is at the Main Gas display.
3.5.1 Auto-Zero
To compensate for sensor aging and drift, the TARGET instrument has an Auto-Zero function. Zeroing the instrument
sets all gas readings to zero and sets the oxygen to 20.9%.
environment
.
To perform an Auto-Zero, press and hold the Menu button to enter the Pop-Up menu. Note the asterisk next to Auto-
Zero. Press the SELECT button. The instrument electronically compensates all sensor readings. OK is displayed
next to all sensors where valid adjustments are made. The sensor readings must be within an acceptable range when
the Auto-Zero function is initiated, otherwise FAIL or ERR is displayed next to the affected sensor.
POP-UP MENU
*Auto-Zero Comb disp
Cal Stat Location
SELECT
This function must be performed in a fresh air
O2 : OK
CO : OK
H2S: OK
Mth: OK BRH: OK
Example: Display, Auto-Zero from Pop-Up Menu
7
Page 11
TARGET Series ENMET Corporation
3.5.2 Calibration Status
The TARGET instrument keeps track of the date of last calibration for each sensor. To view the last calibration date,
press and hold the Menu button to enter the Pop-Up menu. Press the MENU button two times to move the asterisk to
the Cal Status position, then the SELECT button once to select the Calibration Status screen. The display shows
the status of up to three sensors. Press the SELECT button to view the remaining sensors. If any of the sensors are
overdue for calibration, Calibration due is displayed next to it. If a sensor has failed a calibration, Cal error is
displayed next to appropriate sensor.
N
OTE
:
OK appears next to each sensor that has been calibrated within the last 90 days.
Field tests must still be
performed to confirm the performance status of each sensor.
Auto-Zero Comb disp
POP-UP MENU
*Cal Stat Location
SELECT
SENSOR CAL STATUS
O2 OK May 15 1999
CO Calibration due
H2S OK May 15 1999
Example: Display of Calibration Status
3.5.3 Combustible Gas Display
Combustible gases vary considerably with respect to their flammable nature. Some gases are flammable at lower
concentrations than others. The TARGET instrument has ten flammable gases response characteristics programmed in
memory. Each gas has a different coefficient (K) that is used to compensate the instrument display:
Table 2: Programmed Flammable Gas Coefficients
Methane Mth K=1.00
Propane Prp K=1.88
Butane Btn K=2.04
Pentane Pnt K=2.30
Hexane Hxn K=2.35
Hydrogen H2 K=1.24
Ethane Eth K=1.54
Benzene Bnz K=2.51
Toluene Tln K=2.47
Xylene Xyl K=2.99
The combustible sensor cannot determine which gas is present. When the combustible gas is unknown, it is
recommended to change the display to higher K (coefficient) value gas. Hexane or Xylene may not be the gases
present, but using their K value substantially increase, the instrument’s sensitivity to flammable gases.
To select a different combustible gas display, press and hold the Menu button to enter the Pop-Up menu. Press the
MENU button three times to move the asterisk to the Comb disp position. Press the SELECT button once to choose
this screen. Press the MENU button to sequence through the list shown in Table 2. The instrument automatically
changes the combustible display to the last one displayed.
Auto-Zero *Comb disp
POP-UP MENU
Cal Stat Location
SELECT
SET COMB GAS DISPLAY
Select type:
MTH(K=1.00)
Example: Display, Combustible Gas
3.5.4 Locations
The TARGET instrument has the ability to store user name or locations. They are entered into the instrument using the
TARGET Trakker software package, see section 7.0 for part number information. Set in accordance with software
manual.
8
Page 12

TARGET Series ENMET Corporation
3.5.5 Internal Sampling Pump
If the TARGET instrument has the optional internal sampling pump installed, the Pop-Up menu provides the ability to
turn the pump on and off.
C
AUTION
: Some gases require that the pump be on for proper detection and calibration.
See Section 8.0, Tables 3 and 4.
To turn the pump on or off:
Press and hold the Menu buttons to enter the Pop-Up menu.
Press the MENU button five times to move the asterisk to the Pump position.
Press the SELECT button once to choose this screen.
Press the SELECT button to turn the pump on
Press the MENU button to turn the pump off.
POP-UP MENU
Auto-Zero Comb disp
Cal Stat Location
*Set Pump ON
SELECT
SAMPLING PUMP
SELECT=ON MENU=OFF
Current state: OFF
Example: Display, Internal Pump Status
If the pump is off, the bottom line of the display says “Set Pump ON”.
If the pump is on, the bottom line of the display says “Set Pump Off”.
N
OTE
:
The Pump feature is only displayed in the Pop-Up menu if the instrument is supplied with the optional internal
sampling pump.
Attach the sampling shield supplied with the instrument, to the bottom of the instrument in the same manner as the
calibration shield, see Figure 8. The calibration shield has a orange label. The sampling shield has an yellow label.
Attach the supplied 20 foot sampling hose or the optional 2 foot sampling wand to the hydrophobic filter on the back
of the shield.
Sensor response time, if the tubing is 20 feet long, allow at least 10 seconds for the test sample to make it through the
tubing. The sensor response time is typically 30 – 60 seconds to achieve 90% of the final reading, depending on the
specific sensor and the gas being detected. Therefore, the total 'system' response time for an instrument using the
internal sampling pump and 20 feet of hose is approximately 40-70 seconds to achieve 90% of the final reading.
N
OTE
:
The sampling shield and sampling hose or wand must be firmly and correctly attached to the TARGET
instrument for proper remote sampling operation.
The instrument monitors the sample pump operation and provides an audible alarm and visual indication on the status
line of the display, in the event of a low flow condition.
N
OTE
:
The sampling shield and sampling hose or wand must be removed from the TARGET instrument for diffusion
operation.
For instruments with internal sampling pumps, a calibration procedure is required whenever a pump is replaced or
when calibration is performed on the instrument sensors.
It is also recommended to perform pump calibration if any abnormal pump operation is observed. Pump calibration is
performed in the Advanced Maintenance Menu. See section 6.4.8 for pump calibration instructions.
9
Page 13

TARGET Series ENMET Corporation
4.0 Basic User Operation
The TARGET instrument has two operation levels, BASIC and ADVANCED. The BASIC mode is intended to
simplify instrument operation and discussed here. The ADVANCED menu provides additional information and is
discussed in section 5. The instrument may be changed to the ADVANCED menu by following the procedure
outlined in sections 6.3 and 6.3.7.
The TARGET operational menu is used to access various information stored in the instrument electronics. The MENU
button is pressed to display the operational menu and an asterisk is displayed next to a function or sub-menu. Pressing
the MENU button repeatedly, advances the asterisk once for each press. To display a sub-menu or listed function,
press the SELECT button when the asterisk is next to desired function or sub-menu. See section 9.1 for a flow
diagram of Basic Operation Menu.
4.1 Date/Time/Battery Information
From the main gas display, press the MENU button once to put the asterisk next to the Date/Time/Batt line. Press the
SELECT button to enter the Date/Time/Batt line screen. The ON: value is the elapsed time that the instrument has
been on. The battery gauge is a vertical bar graph on the bottom line of the display that provides relative information
on amount of battery life left. The temperature figure in the upper right hand corner of the display is the internal
enclosure temperature and is used for temperature compensation of the gas sensors. Press the MENU button to return
to the Operation menu.
*Date/Time/Batt
Alarm Values
Maintenance Menu
Return to Main displ
SELECT
May 21 1999 72°F
05:19:00pm On:10:05
Bat Gauge 4.80V
25%: |||||
Example: Display of Date, Time, Battery Level
4.2 Alarms Values
From the main display, press the MENU button once to access the Operation menu. Press the MENU button again to
move the asterisk next to the Alarm values line. Press the SELECT button to enter the View Alarms menu. The Low
level instantaneous alarms are displayed. Press the MENU button to return to the Operation menu.
Date/Time/Batt
*Alarm Values
Maintenance Menu
Return to Main displ
SELECT
CO 35ppm H2S 10ppm
Mth10%LEL BRH100ppm
02 19.5
ALARM VALUES
Example: Display of Alarm Values
10
Page 14

TARGET Series ENMET Corporation
5.0 Advanced User Operation
The TARGET instrument has two operation levels, BASIC and ADVANCED. The BASIC mode is intended to
simplify instrument operation and is discussed in Section 4. The ADVANCED menu provides additional information
and is discussed here.
The TARGET operational menu is used to access various information stored in the instrument electronics. Press the
MENU button to display the operational menu and an asterisk next to a function or sub-menu. Pressing the MENU
button repeatedly, to advance the asterisk once for each press. To display a sub-menu or listed function, press the
SELECT button when the asterisk is next to the desired function or sub-menu. See section 9.3 for the flow diagram of
the Advanced Operation Menu.
5.1 Date/Time/Battery Information
From the main gas display, press the MENU button once to put the asterisk next to the Date/Time/Batt line. Press the
SELECT button to enter the Date/Time/Batt line screen. The ON: value is the elapsed time that the instrument has
been on. The battery gauge is a vertical bar graph on the bottom line of the display that provides relative information
on amount of battery life left. The temperature figure in the upper right hand corner of the display is the internal
enclosure temperature and is used for temperature compensation of the gas sensors. Press the MENU button to return
to the Operation menu. Same as in section 4.1.
5.2 Alarms Values
From the main display, press the MENU button once to access the Operation menu. Press the MENU button again to
move the asterisk next to the View Alarms line. Press the SELECT button to enter the View Alarms menu. The Low
level instantaneous alarms are displayed. Press the SELECT button again to view the High level alarms. Press again
to view the STEL alarms. Press again to view TWA alarm points. Press the MENU button to return to the
Operation menu. Same as in section 4.2.
5.3 Min/Max Values
From the main display, press the MENU button once to access the Operation menu. Press the MENU button two
more times to move the asterisk next to the Min / Max Values line. Press the SELECT button to enter the Min / Max
Values menu. The Min Values are displayed. Press the SELECT button again to view at the Max Values. Press the
MENU button to return to the Operation menu.
SELECT
Date/Time/Batt
Alarm Values
*Min / Max Values
TWA Values
Example: Display Minimum and
Maximum Values
CO 0ppm H2S 0ppm
Mth0%LEL BRH 0ppm
02 20.3%
MINIMUM VALUES
5.4 TWA Values
From the main display, press the MENU button once to access the Operation menu. Press the MENU button three
more times to move the asterisk next to the TWA Values line. Press the SELECT button to enter the TWA Values
menu. The TWA current calculations are displayed. Press the MENU button to return to the Operation menu.
SELECT
Date/Time/Batt
Alarm Values
Min / Max Values
*TWA Values
Example: Display of TWA Values
CO 1ppm H2S 0ppm
TWA MEASURE
5.5 STEL Values
From the main display, press the MENU button once to access the Operation menu. Press the MENU button four
more times to move the asterisk next to the STEL Values line. Press the SELECT button to enter the STEL Values
menu. The STEL current calculations are displayed. Press the MENU button to return to the Operation menu.
SELECT
*STEL Values
Maintenance Menu
Back to main disply
Example: Display of STEL Values
CO 2ppm H2S 0ppm
STEL MEASURE
11
Page 15

TARGET Series ENMET Corporation
6.0 Maintenance Operations
6.1 Recommendations
Instrument calibration should be performed at least once every three months.
Field tests using gas concentrations above alarm level should be performed at least monthly or prior to each use for
seldom used instruments. For frequently used instruments, field tests should be performed bimonthly to weekly. A
field test consists of applying field test or calibration gas and confirming appropriate gas sensor response.
Instruments with sensors installed in the BRH location should remain on charge when not in use to stabilize sensor
response.
6.2 Standard Maintenance Menu
The Standard Maintenance menu provides the quickest and simplest access to the most common maintenance
procedure, instrument calibration.
To enter the Standard Maintenance menu, press the MENU button repeatedly from the main gas display or
Operation menu. Move the asterisk until it is next to the Maintenance Menu line. Press the SELECT button to
move to the password entry screen. The password is set to 1270 from the factory. Note the cursor under the first
digit. Use the MENU button to increment the digit and the SELECT key to move the cursor to the next digit. Press
SELECT when the password has been entered. If proper password is not entered, INVALID PASSWORD is
displayed and the instrument returns to Operation menu.
SELECT
Date/Time/Batt
Alarm Values
*Maintenance Menu
Return to Main displ
Example: Display, Password to
Enter Maintenance Menu
Enter Password
to access
STD MAINTENANCE MENU
1270
Once in the Standard Maintenance menu, the options are to enter the Calibration menu or exit. Press the SELECT
button to enter the Calibration Menu.
*Calibrate
Exit
Example: Display of Maintenance Menu
6.3 Calibration
6.3.1 Calibration Menu
Calibration is the process of aligning the instrument electronics to the installed sensors, making the instrument read
accurately. It consists of a zero reading which tells the instrument what it should read in fresh air, and a span reading
which tells the instrument what it should read in the presence of its target gas.
Instruments configured for the combination of gases CO/H2S/O2/Mth, sensors may be calibrated all at once with
multi-component gas. All other configurations, calibration must be performed for each sensor individually. See
section 7.0 for ENMET part numbers of available calibration gas.
To initiate a calibration procedure, move the asterisk to the appropriate location using the MENU button. Press the
SELECT button to choose the calibration procedure. If N/A appears next to a sensor then that sensor is not installed
in the instrument and calibration is not possible.
N
OTE
: The calibration procedure may be aborted by pressing the MENU button anytime during the process.
N
OTE
: If a sensor is installed in the BRH location, the instrument display may show BRH, HS+, CO+, Tol, or similar.
It will always appear above the O2/CO/H2S/Mth combination calibration. The instrument must be on charge
over night prior to calibration or field test.
CALIBRATION MENU
BRH
*O2/CO/H2S/Mth
Individual Sensors
SELECT
Example: Display of Calibration Menu
12
CAL: O2/CO/H2S/Mth
Apply CLEAN AIR
SEL: frwd MENU:Exit
Page 16

TARGET Series ENMET Corporation
End Cap
Groove
Calibration Shield
with Calibration
Thumb screw
End Cap
Flap of Shield
Calibration Shield
Thumb screw
6.3.2 Zero Adjust
The calibration zero procedure is activated by pressing the SELECT button again. This starts a 30 second count down
timer, at the end of which, the zero reading is stored in memory. The next screen displays the span gas concentration.
CAL: O2/CO/H2S/Mth
Sampling CLEAN AIR
MENU:Exit
Sample in 30 sec.
N
OTE
: The oxygen sensor requires only the initial 30 second clean air procedure.
Example:
Display of Calibration Count Down
CAL: O2/CO/H2S/Mth
Apply Multi-Blend
SEL: frwd MENU:Exit
6.3.3 Applying Span Gas
Attach the calibration adapter to the cylinder of span gas and calibration shield. See figure 8.
C
AUTION
: Some gas require that the Target Sampling Shield and flow demand regulator be used for calibration. See
Section 8.0, Table 3 and 4.
I
F A SENSOR IS INSTALLED IN
BRH L
OCATION
:
Place instrument on charge over night.
The BRH sensor should be calibrated before any others. If the BRH sensor is installed in the TARGET, it will
become contaminated if exposed to the combination or test gas and must be calibrated separately.
If the BRH sensor is being calibrated with the 04834-002 calibration fixture, fill the humidifier bowl approximately
1/3 full with clean, tap water. The tube should NOT go under the water line. No bubbles should be visible when
gas is flowing. See figure 8.
N
OTE
: The arrow on the humidifier bowl points in the opposite direction of airflow.
If the BRH sensor is being calibrated with the 04834-005 calibration fixture, fill the humidifier bowl to level
indicated. Use the storage case to support the humidifier while in use. See figure 8.
N
OTE
: The arrow on the humidifier bowl points in the same direction of airflow. 04834-005 calibration fixture
supplied starting November 2002.
Failure to follow both of the BRH steps will cause an inaccurate calibration.
F
OR ALL OTHER SENSORS INSTALLED
:
Use the reactive gases calibration adapter which does not have a humidifier bowl. For CO, O2, Methane sensor
calibration these sensors may be calibrated simultaneously or individually using the combination calibration gas and
reactive gases calibration adapter. See figure 8.
N
OTE
: When calibrating CO, O2 and CH4, with individual gas cylinders, the BRH calibration adapter should be used.
Failure to do so will cause an inaccurate calibration.
SPAN gas concentrations are not adjustable in this calibration procedure. SPAN gas concentrations are, by
design, the concentrations available with ENMET calibration kits. See Section 8.0 for the default
concentrations. If other concentrations are to be used for calibration, the calibration procedure in the
Advanced Maintenance menu must be followed.
N
OTE
: If the span gas value has been previously changed in the Advanced Maintenance menu, that change is
carried over to this procedure.
Threaded hole
for thumb screw
Sensor
Attach the calibration shield to the sensor end cap of the instrument. See Figure 8A. Guide the flap of the shield into
the groove on the bottom of the end cap and bring the top of the shield towards the top of the end cap. Tighten the
thumb screw into the threaded hole in the sensor end cap.
TOP
Sensor
Sensor End Cap
BOTTOM
Shield attached
Figure 8a: Calibration Shield Attachment
13
Page 17

TARGET Series ENMET Corporation
Calibration Adapter, BRH
§
←
Sensor end cap w/cal shield
Regulator
Humidifier Bowl
Cylinder,
Calibration Gas
Example of Storage
Calibration Adapter, BRH 04834-005
Case used as Support
for Humidifier
Sensor end cap w/cal shield
Sensor end cap
w/cal shield
Humidifier Bowl
Top View of Humidifier Bowl
To Sensor
Cylinder, Calibration Gas
04834-002
Apply the span gas and press the SELECT button to initiate the sample count down timer. Count down is shown on
the lowest line of the display, at the end of the count down the span reading is stored in memory. Remove the span gas
and the calibration shield. Calibration of this sensor is complete.
If the sensor is within acceptable sensitivity parameters, OK is displayed next to the gas momentarily before the
display returns to the Calibration menu.
If there is a problem, Cal error is displayed next to the appropriate channel. See section 10.0 for troubleshooting.
CAL: O2/CO/H2S/Mth
Sampling MULTI-BLEND
MENU:Abort
Sample in 120 sec.
Regulator
To Regulator
Cylinder, Calibration Gas
Calibration Adapter, Reactive Gases
Figure 8: Various Calibration Adapter Attachments
Example:
Display during and after Calibration
Regulator
O2: OK
CO: Cal error
H2S: OK
Mth: OK
Repeat the above procedure for each individual sensor as required. If a calibration error occurs it will also be
displayed as a general condition on the Status Line of the Main Gas Display and can be viewed in the Cal Status
screen of the Pop-Up menu.
Exit the Calibration menu when completed. Remove span gas and calibration shield. Then exit the Standard
Maintenance menu.
14
Page 18

TARGET Series ENMET Corporation
Enter Password
6.4 Advanced Maintenance Menu, Software 4.94 version
The Advanced Maintenance menu provides access to enhanced programming features of the TARGET instrument.
To enter the Advanced Maintenance menu, press the MENU button repeatedly from the main gas display or
Operation menu. Move the asterisk until it is next to the Maintenance menu line. Press the SELECT button to move
to the password entry screen. The password is set to 1270 from the factory. Press and hold the MENU button for
about two seconds. Note that the third line changes from STD Maintenance Menu to ADV Maintenance Menu.
Use the MENU button to increment the first digit and the SELECT button to move the cursor to the next digit. Press
SELECT when the proper password has been entered. If proper password is not entered, INVALID PASSWORD is
displayed and the instrument returns to Operation menu.
Enter Password
to access
ADV MAINTENANCE MENU
1270
*Set Password
Set Battery
Set Op. Menu Type
Pump Cal Exit
STD MAINTENANCE MENU
to access
1270
*Calibrate
Set Alarms
Enable Sensors
Set Clock/Chirp
Press and hold MENU
MENU
Example: Display of Advanced Maintenance Menu
6.4.1 Calibration
The calibration procedure in the Advanced Maintenance menu is very similar to the procedure in the Standard
Maintenance menu, section 6.3. The difference is that in the Advanced Maintenance menu version, the span values
can be modified and the zero and span settings must be acknowledged by pressing the SELECT button.
*Calibrate
Set Alarms
Enable Sensors
Set Clock/Chirp
SELECT
ADV CALIBRATION MENU
*BRH
O2/CO/H2S/Mth
Individual Sensors
Example: Display of Advanced Calibration Menu
If the BRH sensor is installed, see section 6.3.3 for applying span gas.
Expose the instrument to fresh air. When the mV reading on the bottom line is stable, press the SELECT button to set
the ZERO reading.
6.4.2 Setting Instantaneous Alarms
CAL: BRH
*ZERO: 0 ppm
SPAN: 100 ppm
BRH: 196 mV
SELECT
CAL: BRH
ZERO: 0 ppm
*SPAN: 100 ppm
BRH: 1504 mV
Example: Display of BRH Calibration
The asterisk now highlights the SPAN gas concentration. Default values for each sensor are listed in Section 8.0.
To modify the span value, use the Menu key to initiate the change and then increment the digits. The SELECT
button is used to select the digit. SELECT the last digit only after span gas has been applied and the mV reading is
stable.
If no modification is necessary, apply calibration gas and press the SELECT button when the mV reading is stable.
Repeat the procedure for each sensor as necessary.
From the Advanced Maintenance menu, press the MENU button once to put the asterisk next to the Set Alarms line.
Press the SELECT button to enter the Set Alarms screen. Use the MENU button to move the asterisk next to the
desired gas for alarm to be changed. Press the SELECT button to move the cursor to the first digit. The MENU
button is used to increment the digit and the SELECT button to move the cursor to the next digit. Press the SELECT
15
Page 19

TARGET Series ENMET Corporation
button at the Exit line to go back to the Maintenance menu. STEL and TWA alarms are preset at the factory and can
only be changed using the TARGET Trakker software package.
Calibrate
*Set Alarms
Enable Sensors
Set Clock/Chirp
SELECT
SET ALARMS
*O2 19.5 / 23.5 %
CO 35 ppm
H2S 10 ppm
Example: Display of Set Alarm Menu
6.4.3 Enable Sensors
From the Advanced Maintenance menu, press the MENU button twice once to put the asterisk next to the Enable
Sensors line. Press the SELECT button to enter the Enable Sensors screen. Use the MENU button to move the
asterisk next to the gas whose alarm needs to be changed. Press the SELECT button to toggle the sensor ON or OFF.
Press SELECT at the Exit line to go back to the Maintenance menu.
Calibrate
Set Alarms
*Enable Sensors
Set Clock/Chirp
6.4.4 Set Clock/Chirp
From the Advanced Maintenance menu, press the MENU button three times to put the asterisk next to the Set
Clock/Chirp line. Press the SELECT button to enter the Set Clock/Chirp screen. Use the MENU button to move
the asterisk next to the value that needs to be changed. Press the SELECT button to move a cursor to the first digit.
The MENU button is used to increment the digit and the SELECT button to move to the next digit.
Time must be entered in a 24 hour format (i.e. 4:30 pm is entered as 16:30). The confidence chirp sounds at interval
entered in this screen. Factory default value is 120 seconds.
Press the SELECT button at the Exit line to go back to the Maintenance menu.
SELECT
ENABLE SENSORS
*O2 ON
CO ON
H2S ON
Calibrate
Set Alarms
Enable Sensors
*Set Clock/Chirp
SELECT
*M/D/Y: 05/22/99
Time (24Hr): 18:53
Chirp (sec): 120
Exit
Example: Display while Setting Clock and Chirp interval
6.4.5 Set Password
From the Advanced Maintenance menu, press the MENU button four times to put the asterisk next to the Set
Password line. Press the SELECT button to enter the Set Password screen. Use the MENU button to increment the
digit and the SELECT button to move to the next digit. Any four digit password from 0000 to 9999 may be entered
by this operation.
*Set Password
Set Battery
Set Op. Menu Type
Exit
SELECT
CHANGE PASSWORD
Enter new value:
1270
Example: Display Changing Password
16
Page 20

TARGET Series ENMET Corporation
6.4.6 Set Battery Type
From the Advanced Maintenance menu, press the MENU button five times to put the asterisk next to the Set Battery
line. Press the SELECT button to enter the Set Battery screen. Use the MENU button alternate between NiMH
(rechargeable) and Alkaline. Press the SELECT button to choose the desired battery type. Setting the proper battery
type is important to achieve maximum life out of the battery pack.
W
ARNING
:
Substitution of batteries or other components may compromise the intrinsic safety of the instrument.
Set Password
*Set Battery
Set Op. Menu Type
Exit
SELECT
Set BATTERY TYPE
Select type:
NiMH
Example: Display Setting Battery Type
6.4.7 Set Operation Menu
From the Advanced Maintenance menu, press the MENU button six times to put the asterisk next to the Set Op. menu
type line. Press the SELECT button to enter the Set Op. menu type screen. Use the MENU button alternate
between Basic and Advanced. Press the SELECT button to choose the desired operational menu. The Basic menu
type is the default menu.
Set Password
Set Battery
*Set Op. Menu Type
Exit
SELECT
Set OP MENU TYPE
Select type:
Basic
Example: Display of Set Operation Menu
6.4.8 Internal Pump Calibration
For instruments with internal sampling pumps, a calibration procedure is required whenever a pump is replaced or
when calibration is performed on the instrument sensors. It is also recommended to perform pump calibration if any
abnormal pump operation is observed.
N
OTE
: The calibration or sampling shield should not be attached to the instrument during pump calibration.
Press the menu button to move the asterisk next to the Pump Calibration prompt.
Press the select button to initiate the procedure.
The pump will automatically come on. The instrument samples the pump signal for one minute. At the end of the
one minute, the instrument is ready for the blocked flow measurement.
Put your finger over one of the two sampling holes on the back of the sensor housing.
Press the select button. The instrument samples the blocked flow condition for 10 seconds and then stores the
reading. See figure 9, for location of sampling holes.
The low flow alarm is set automatically by the instrument based on the free flow and blocked flow readings. No
further adjustments are necessary.
Exit the Maintenance Menu when maintenance operations are complete.
17
Page 21

TARGET Series ENMET Corporation
Enter Password
6.4a Advanced Maintenance Menu, Software 6.0 version
The Advanced Maintenance menu provides access to enhanced programming features of the TARGET instrument.
To enter the Advanced Maintenance menu, press the MENU button repeatedly from the main gas display or
Operation menu. Move the asterisk until it is next to the Maintenance menu line. Press the SELECT button to move
to the password entry screen. The password is set to 1270 from the factory. Press and hold the MENU button for
about two seconds. Note that the third line changes from STD Maintenance Menu to ADV Maintenance Menu.
Use the MENU button to increment the first digit and the SELECT button to move the cursor to the next digit. Press
SELECT when the proper password has been entered. If proper password is not entered, INVALID PASSWORD is
displayed and the instrument returns to Operation menu.
Enter Password
to access
ADV MAINTENANCE MENU
1270
*Calibrate
Set Alarms
Enable Sensors
Pump Cal Exit
STD MAINTENANCE MENU
to access
1270
Enter Password
to access
ADV MAINTENANCE MENU
1270
Press and hold MENU
MENU
Example: Display of Advanced Maintenance Menu
6.4a.1 Calibration
The calibration procedure in the Advanced Maintenance menu is very similar to the procedure in the Standard
Maintenance menu, section 6.3. The difference is that in the Advanced Maintenance menu version, the span values
can be modified and the zero and span settings must be acknowledged by pressing the SELECT button.
*Calibrate
Set Alarms
Enable Sensors
Pump Cal Exit
SELECT
ADV CALIBRATION MENU
*BRH
O2/CO/H2S/Mth
Individual Sensors
Example: Display of Advanced Calibration Menu
If the BRH sensor is installed, see section 6.3.3 for applying span gas.
Expose the instrument to fresh air. When the mV reading on the bottom line is stable, press the SELECT button to set
the ZERO reading.
6.4a.2 Setting Instantaneous Alarms
CAL: BRH
*ZERO: 0 ppm
SPAN: 100 ppm
BRH: 196 mV
SELECT
CAL: BRH
ZERO: 0 ppm
*SPAN: 100 ppm
BRH: 1504 mV
Example: Display of BRH Calibration
The asterisk now highlights the SPAN gas concentration. Default values for each sensor are listed in Section 8.0.
To modify the span value, use the Menu key to initiate the change and then increment the digits. The SELECT
button is used to select the digit. SELECT the last digit only after span gas has been applied and the mV reading is
stable.
If no modification is necessary, apply calibration gas and press the SELECT button when the mV reading is stable.
Repeat the procedure for each sensor as necessary.
From the Advanced Maintenance menu, press the MENU button once to put the asterisk next to the Set Alarms line.
Press the SELECT button to enter the Set Alarms screen. Use the MENU button to move the asterisk next to the
desired gas for alarm to be changed. Press the SELECT button to move the cursor to the first digit. The MENU
button is used to increment the digit and the SELECT button to move the cursor to the next digit. Press the SELECT
18
Page 22

TARGET Series ENMET Corporation
button at the Exit line to go back to the Maintenance menu. STEL and TWA alarms are preset at the factory and can
only be changed using the TARGET Trakker software package.
Calibrate
*Set Alarms
Enable Sensors
Pump Cal Exit
SELECT
SET ALARMS
*O2 19.5 / 23.5 %
CO 35 ppm
H2S 10 ppm
Example: Display of Set Alarm Menu
6.4a.3 Enable Sensors
From the Advanced Maintenance menu, press the MENU button twice once to put the asterisk next to the Enable
Sensors line. Press the SELECT button to enter the Enable Sensors screen. Use the MENU button to move the
asterisk next to the gas whose alarm needs to be changed. Press the SELECT button to toggle the sensor ON or OFF.
Press SELECT at the Exit line to go back to the Maintenance menu.
Calibrate
Set Alarms
*Enable Sensors
Pump Cal Exit
6.4a.4 Internal Pump Calibration
For instruments with internal sampling pumps, a calibration procedure is required whenever a pump is replaced or
when calibration is performed on the instrument sensors. It is also recommended to perform pump calibration if any
abnormal pump operation is observed.
N
OTE
: The calibration or sampling shield should not be attached to the instrument during pump calibration.
Press the menu button to move the asterisk next to the Pump Calibration prompt.
Press the select button to initiate the procedure.
The pump will automatically come on. The instrument samples the pump signal for one minute. At the end of the
one minute, the instrument is ready for the blocked flow measurement.
Put your finger over one of the two sampling holes on the back of the sensor housing.
Press the select button. The instrument samples the blocked flow condition for 10 seconds and then stores the
reading. See figure 9, for location of sampling holes.
The low flow alarm is set automatically by the instrument based on the free flow and blocked flow readings. No
further adjustments are necessary.
SELECT
ENABLE SENSORS
*O2 ON
CO ON
H2S ON
Exit the Maintenance Menu when maintenance operations are complete.
19
Page 23

TARGET Series ENMET Corporation
Instrument
Battery
Pump
Internal Pump
Tubing to Pump from Sampling Holes
Internal Pump
6.5 Replacing Battery Pack
W
ARNING
C
Housing
:
Substitution of batteries or other components may compromise the intrinsic safety of the instrument.
Replacing the battery pack is accomplished by removing the two screws holding the sensor end-cap of the instrument
housing. A 2 mm allen key is required. Slide the battery pack out and disconnect it from the PCB connector.
AUTION
: the battery pack cable has a locking connector. The center tab must be pushed down before the connector can
be removed.
Connect the new battery pack to the PCB and slide the battery pack into the instrument housing. See figure 9.
Gasket
PCB Connector
(For instruments with s/n 0700 and above)
(Length shown for reference, they are about 1 ½”)
PCB
Sampling Hole, IN
Battery Pack
PCB Connector
Sensor End Cap
2mm Allen Screws
Figure 9: Replacing Battery Pack and Internal Pump
C
AUTION
: Be sure to properly install the gasket when re-assembling the instrument. The best technique is to thread the
screws most of the way in. Install the gasket, then tighten the screws.
C
AUTION
: Be sure that all wires and tubing will not be pinched or stressed when sensor end cap is replaced.
6.6 Replacing Internal Pump
Replacing the internal pump is accomplished by removing the two screws holding the sensor end-cap of the instrument
housing. A 2 mm allen key is required. Slide the internal pump out and disconnect it from the PCB connector and the
tubing from the pump.
C
AUTION
: the internal pump cable has a locking connector. The center tab must be pushed down before the connector
can be removed.
C
AUTION
: Be sure that all wires and tubing will not be pinched or stressed when sensor end cap is replaced.
For instruments with s/n 0700 and above:
Connect the new pump to the PCB and tubing. Pump IN port is indicated by arrow. See figure 9.
For instruments with s/n 0699 and below:
Connect the new pump to the PCB and tubing.
(For instruments with s/n 0699 and below)
Sampling Hole, IN
Pump IN port is indicated on the pump.
Attach pump to bracket. See figure 9a.
Bracket
Bracket
End View of Enclosure with Pump
Figure 9a: Replacing Internal Pump for instruments with s/n 0699 and below
20
Page 24

TARGET Series ENMET Corporation
Sensor
Bottom View
Sensor (PCB)
Bracket
6.7 Replacing Sensors
When sensors can no longer be calibrated, they must be replaced. Replacing them is accomplished by removing the
two screws holding the sensor end-cap of the instrument housing. A 2 mm allen key is required. Two #6-32 screws
hold a bracket over the sensor board. Remove the screws and bracket. Remove the 2 spacers beneath the bracket to
remove the sensor circuit board. Replace sensors as necessary and re-assemble. See figures 10 and 11.
C
AUTION
: New TOX1 and TOX2 sensors come with a shorting clip that must be removed for proper operation.
Figure 10: Remove shorting clip
Sensor End Cap
2mm, Allen Screws
Gasket
Sensors
Circuit Board
Spacers
2, #6-32 Screws
Figure 11: Replacing Sensors
N
OTE
:
Be sure to properly install the gasket when re-assembling the instrument. The best technique is to thread the
screws most of the way in. Install the gasket, then tighten the screws.
C
AUTION
: Be sure that all wires and tubing will not be pinched or stressed when sensor end cap is replaced.
If your TARGET instrument was ordered with less than five sensors installed, one or more sensor inserts have been
installed. These inserts are not operational and are installed to provide environmental and structure integrity of the
sensor housing. If activating any of these is desired, contact ENMET or your local distributor for upgrade
information.
21
Page 25

TARGET Series ENMET Corporation
7.0 Instrument Information
7.1 Replacement Parts List
Replacement Parts:
ENMET Part No. Description
04835-000 Sampling hose
04835-001 Sampling wand
04835-002 Hand aspirator, requires 04835-000 or 04835-001 or both
04833-000 Protective carrying case
04833-003 Alkaline battery holder
66014-003 Charger cable, 12 V
73083-007 Economy Black Transit Case with Lining
04832-000 Battery Charger, 100-240 VAC, req. cable 66018-000 or equiv.
66018-000 Power cable for charger, 110 VAC plug
67019-024 Battery Pack, NiMH
04833-002 Internal Pump, is round pump w/crimps & connector
for units with s/n 15-0699 and below
04833-004 Internal Pump, is square pump w/crimps & connector
for units with s/n 15-0700 and above
03620-017 Calibration/hand aspirator cover
04833-001 Computer Cable
04836-000 Sampling cover for internal sample pump
73089-068 Sampling filter
04833-005 Trakker software
80012-014 TARGET Series Operation and Maintenance Manual
DC
Calibration Gas and accessories:
ENMET Part No. Description
03388-000 Calibration Gas, 34 liter, 50% LEL CH4, 20ppm H2S, 100 ppm CO, 20.9% O
03286-100 Calibration Gas, 17 liter, 100ppm Toluene for BRH Sensor
03227-800 Calibration Gas, 17 liter, 800ppm Hydrogen, H
03220-050 Calibration Gas, 17 liter, 50% LEL Methane, CH
2
4
03219-100 Calibration Gas, 17 liter, 100ppm Carbon monoxide, CO
∆
03302-010
Calibration Gas, 34 liter, 10ppm Hydrogen chloride, HCL
03303-010 Calibration Gas, 34 liter, 10ppm Hydrogen cyanide, HCN
03314-020 Calibration Gas, 34 liter, 20ppm Hydrogen sulfide, H2S
03315-010 Calibration Gas, 17 liter, 10ppm Sulfur dioxide, SO
03318-025 Calibration Gas, 17 liter, 25ppm Ammonia, NH
∆
03331-005
∆
03332-005
Calibration Gas, 17 liter, 5ppm Chlorine, Cl
Calibration Gas, 34 liter, 5ppm
Ethylene oxide, ETO
2
3
2
03334-025 Calibration Gas, 34 liter, 25ppm Nitric oxide, NO
04834-001 Calibration Adapter, Reactive Gases
04834-005 Calibration Adapter, for BRH sensor
03620-017 Calibration Shield
*03510-002 Calibration Adapter, Flow Demand
2
*Required in use with ∆ calibration gases.
∆ These gases require the Sampling Shield p/n 04836-000 to be in place and pump activated for
accurate detection and calibration.
22
Page 26

TARGET Series ENMET Corporation
Replacement Sensors:
ENMET Part No. Description
03008-131
03008-012 Sensor, BRH012
03015-012 Sensor, HS+/CO+
03070-002 Sensor, Combustible (HW)
67016-1104 Sensor, Oxygen
67016-1114 Sensor, Oxygen (extended life)
67025-0100 Sensor, Chlorine
67025-0200 Sensor, Hydrogen sulfide
67025-0300 Sensor, Hydrogen cyanide
67025-0400 Sensor, Hydrogen chloride
67025-0500 Sensor, Sulfur dioxide
67025-0800 Sensor, Ozone
67025-0850 Sensor, Chlorine dioxide
67025-1200 Sensor, Carbon monoxide
67025-1202 Sensor, Carbon monoxide / Hydrogen sulfide
67025-1500 Sensor, Hydrogen
67025-1700 Sensor, Nitrogen dioxide
67025-1750 Sensor, Nitric oxide
67025-2400 Sensor, Ammonia
67025-4000
67025-5200
Sensor, BRH
for units with s/n 15-2499 and below
for units with s/n 15-2500 and above
for units with s/n 15-1999 and below that have not been modified
for units with s/n 15-2000 and above
Sensor,
Arsine
Sensor,
Ethylene oxide
7.2 Target Specifications
Element Specification
Dimensions 6 x 4.5 x 1.7 inches (150 x 115 x 45 mm)
Weight 32 ounces (900 grams)
Operating Temperature 5 F° to 122 F° (-15 C° to 50 C°)
Storage Temperature 122 F° to 140 F° (-30 C° to 60 C°)
Operating Humidity 5 – 99% (non-condensing)
Enclosure Material Aluminum Extrusion and Castings
Approval Rating Approved instruments are identified by the presence of the CSA logo on the
instrument serial number label.
CSA approval for Intrinsic Safety, Class 1, Div 1, Groups A,B,C,D
Power Source Battery Pack: Nickel-Metal Hydride
N
OTE
: Any specifications stated in this manual may change without notice.
23
Page 27

TARGET Series ENMET Corporation
8.0 Default Alarm and Configurations
Table 3: Default Alarm
Gas Full Scale
Display
Ammonia 99 ppm 1 ppm 25 ppm 50 ppm 25 ppm 35 ppm 25 ppm NH
Arsine 1.00 ppm 0.01 ppm 0.05 ppm 0.10 ppm 0.10 ppm 0.10 ppm 0.5 ppm PH
BRH 200 ppm 1 ppm 100 ppm 150 ppm X X 100 ppm C7H
Carbon monoxide 500 ppm 1 ppm 35 ppm 200 ppm 35 ppm 200 ppm 100 ppm CO
∆ Chlorine
Chlorine dioxide 3.00 ppm 0.01 ppm 0.10 ppm 0.30 ppm 0.10 ppm 0.30 ppm 1.0 ppm Cl
CO+ (BRH) 100 ppm 1 ppm 35 ppm 75 ppm X X 35 ppm CO
Combustible 99 %LEL 1 %LEL 10 %LEL 50 %LEL X X 50 %LEL CH
HS+ (BRH) 40 ppm 1 ppm 10 ppm 20 ppm X X 20 ppm H2S =
∆ Hydrogen chloride
Hydrogen cyanide 20.0 ppm 0.1 ppm 4.7 ppm 10.0 ppm 4.7 ppm 4.7 ppm 10 ppm HCN
Hydrogen fluoride 10.0 ppm 0.1 ppm 0.3 ppm 6.0 ppm 3.0 ppm 3.0 ppm 5.0 ppm HF
Hydrogen sulfide 200 ppm 1 ppm 10 ppm 20 ppm 10 ppm 15 ppm 20 ppm H2S
Ozone 3.00 ppm 0.01 ppm 0.10 ppm 0.30 ppm 0.10 ppm 0.10 ppm 0.3 ppm O
Oxygen 30 %volume 0.1 % volume 19.5% 23.5% X X 20.9 % O
Phosphine 2.00 ppm 0.01 ppm 0.30 ppm 1.50 ppm 0.30 ppm 1.5 ppm 0.5 ppm PH
Nitrogen dioxide 30.0 ppm 0.1 ppm 1.0 ppm 5.0 ppm 1.0 ppm 1.0 ppm 5 ppm NO
Sulfur dioxide 30.0 ppm 0.1 ppm 2.0 ppm 10.0 ppm 2.0 ppm 5.0 ppm 10 ppm SO
∆ Ethylene oxide
9.9 ppm 0.1 ppm 0.5 ppm 5.0 ppm .05 ppm 1.0 ppm 5 ppm Cl
20.0 ppm 0.1 ppm 5.0 ppm 10.0 ppm 5.0 ppm 5.0 ppm 10 ppm HCl
10 ppm 0.1 ppm 5.0 ppm 7.5 ppm 5.0 ppm 5.0 ppm 5 ppm ETO
Resolution Alarm 1 Alarm 2 TWA STEL Calibration
Gas Value
0.5 ppm /AsH
(toluene)
50 ppm CO
X = not applicable.
∆ These gases require the Sampling Shield p/n 04836-000 to be in place and pump activated for
accurate detection and calibration.
Sensor response time with internal pump, if the tubing is 20 feet long, allow at least 10 seconds for the test sample
to make it through the tubing. The sensor response time is typically 30 – 60 seconds to achieve 90% of the final
reading, depending on the specific sensor and the gas being detected. Therefore, the total 'system' response time for an
instrument using the internal sampling pump and 20 feet of hose is approximately 40-70 seconds to achieve 90% of the
final reading.
3
3
3
8
2
2
4
3
2
3
2
2
Table 4: Default Configuration
Operation Menu:
Confidence chirp interval:
Backlight duration:
Combustible gas display:
Datalogging:
Datalogging interval:
TWA/STEL Alarms:
Locations: Enabled (requires TARGET Trakker to set)
Basic
120 seconds
30 seconds
Methane
Active (requires TARGET Trakker to retrieve)
1 per minute
Active
24
Page 28

TARGET Series ENMET Corporation
9.0 Flow Diagrams
Table 5: Target Menu Quick Reference
Basic Operation:
See section 9.1
Advanced Operation:
See section 9.3
Standard Maintenance:
See section 9.2
Advanced Maintenance:
See section 9.4
9.1 Basic Operation Menu
02 20.9%
CO 0ppm H2S 0ppm
Mth
0%LEL
*Date/Time/Batt
Alarm Values
Maintenance Menu
Back to main disply
BRH 0ppm
Main Gas Display; Date/Time/Battery; Alarm Values; Maintenance Menu;
Back to Main Display
Main Gas Display; Date/Time/Battery; Alarm Values; Min/Max;
TWA Values; STEL Values; Maintenance Menu; Back to Main Display
Calibration; EXIT
Calibration; Set Alarms; Enable Sensors; Set Clock/Chirp; Set Password;
Set Battery; Set Operation Menu Type; EXIT
May 21 1999 72°F
05:19:00pm On:10:05
Bat Gauge 4.80V
25%: |||||
NOT CHARGING
Charge started:
May 20 1999 4:30 pm
Chrg:25% Time:3:38
Date/Time/Batt
*Alarm Values
Maintenance Menu
Back to main disply
Date/Time/Batt
SELECT
Alarm Values
*Maintenance Menu
Back to main disply
Date/Time/Batt
Alarm Values
Maintenance Menu
*
Back to main disply
02 19.5/23.5%
CO 35ppm H2S 10ppm
Mth10%LEL BRH100ppm
ALARM VALUES
Enter Password
to access
STD MAINTENANCE MENU
1270
Standard Maintenance Menu
*Calibrate
Exit
=
SELECT
=
MENU
25
Page 29

TARGET Series ENMET Corporation
*Calibrate
CALIBRATION MENU
Calibrate
02 20.9%
CALIBRATION MENU
CALIBRATION MENU
CALIBRATION MENU
CAL:
CAL:
OK
See below
See below
See below
SELECT
MENU
Auto
Auto
Auto
9.2 Standard Maintenance Menu
Exit
*Exit
*BRH
O2/CO/H2S/Mth
Individual Sensors
BRH
*O2/CO/H2S/Mth
Individual Sensors
BRH
O2/CO/H2S/Mth
*Individual Sensors
*Exit
CO 0ppm H2S 0ppm
Mth0%LEL BRH 0ppm
Enter any calibration procedure from above:
CAL: Gas Name Here
Apply CLEAN AIR
SEL: frwd MENU:Exit
Gas Name Here
Sampling CLEAN AIR
MENU:Exit
Sample in 30 sec.
Main Gas
Display
CAL: Gas Name Here
Apply Gas Level
SEL: frwd MENU:Exit
Gas Name Here
Sampling
MENU:Abort
Sample in 120 sec.
Gas Name:
Gas Level
=
SELECT
=
MENU
26
Page 30

TARGET Series ENMET Corporation
NOT CHARGING
MENU
MENU
MENU
MENU
MENU
MENU
MENU
MENU
MENU
MENU
MENU
MENU
9.3 Advanced Operation Menu
02 20.9%
CO 0ppm H2S 0ppm
Mth0%LEL BRH 0ppm
*Date/Time/Batt
Alarm Values
Min / Max Values
TWA Values
Date/Time/Batt
*Alarm Values
Min / Max Values
TWA Values
Date/Time/Batt
Alarm Values
*Min / Max Values
TWA Values
Date/Time/Batt
Alarm Values
Min / Max Values
*TWA Values
May 21 1999 72°F
05:19:00pm On:10:05
Bat Gauge 4.80V
25%: |||||
02 19.5/23.5%
CO 35ppm H2S 10ppm
Mth10%LEL BRH100ppm
ALARM VALUES
02 20.3%
CO 0ppm H2S 0ppm
Mth0%LEL BRH 0ppm
MINIMUM VALUES
CO 1ppm H2S 0ppm
TWA MEASURE
Charge started:
May 20 1999 4:30 pm
Chrg:25% Time:3:38
CO 200ppm H2S 15ppm
STEL ALARMS
02 20.9%
CO 20ppm H2S 3ppm
Mth3%LEL BRH 10ppm
MAXIMUM VALUES
CO 35ppm H2S 10ppm
TWA ALARMS
*STEL Values
Maintenance Menu
Back to main disply
STEL Values
*Maintenance Menu
Back to main disply
STEL Values
Maintenance Menu
*Back to main disply
CO 2ppm H2S 0ppm
STEL MEASURE
Enter Password
to access
STD MAINTENANCE MENU
CO 0ppm H2S 0ppm
Mth0%LEL BRH 0ppm
0000
02 20.9%
Main Gas
Display
=
SELECT
=
MENU
27
Page 31

TARGET Series ENMET Corporation
*Set Password
Set Password
Set Password
Set Password
ADV CALIBRATION MENU
*M/D/Y: 05/22/99
*M/D/Y:
0
5/22/99
9.4 Advanced Maintenance Menu, Software 4.94 version
*Calibrate
Set Alarms
Enable Sensors
Set Clock/Chirp
Calibrate
*Set Alarms
Enable Sensors
Set Clock/Chirp
Calibrate
Set Alarms
*Enable Sensors
Set Clock/Chirp
*BRH
O2/CO/H2S/Mth
Individual Sensors
CALIBRATION MENU
*Exit
SET ALARMS
*O2 19.5 / 23.5 %
CO 35 ppm
H2S 10 ppm
SET ALARMS
Mth50%LEL
BRH 100 ppm
*Exit
ENABLE SENSORS
*O2 ON
CO ON
H2S ON
CAL: BRH
*ZERO: 0 ppm
SPAN: 100 ppm
BRH: 196 mV
To change
zero gas
value
SET ALARMS
*O2 19.5 / 23.5 %
CO 35 ppm
H2S 10 ppm
ENABLE SENSORS
*O2 OFF
CO ON
H2S ON
CAL: BRH
ZERO: 0 ppm
*SPAN: 100 ppm
BRH: 1504 mV
To change
span gas
value
Calibration
complete
Calibrate
Set Alarms
Enable Sensors
*Set Clock/Chirp
Set Battery
Set Op. Menu Type
Pump Cal Exit
*Set Battery
Set Op. Menu Type
Pump Cal Exit
Set Battery
*Set Op. Menu Type
Pump Cal Exit
Set Battery
Set Op. Menu Type
*Pump Cal Exit
ENABLE SENSORS
*Mth ON
BRH ON
Exit
Time (24Hr): 18:53
Chirp (sec): 120
Exit
CHANGE PASSWORD
Enter new value:
1270
Set BATTERY TYPE
Select type:
NiMH
Set OP MENU TYPE
Select type:
Advanced
CO 0ppm H2S 0ppm
Mth0%LEL BRH 0ppm
02 20.9%
Time (24Hr): 18:53
Chirp (sec): 120
Exit
Main Gas
Display
=
SELECT
=
MENU
28
Page 32

TARGET Series ENMET Corporation
Calibrate
ADV CALIBRATION MENU
CALIBRATION MENU
SET ALARMS
ENABLE SENSORS
SET ALARMS
*Pump Calibration
*Pump Calibration
CAL: BRH
9.4 Advanced Maintenance Menu, Software 6.0 version
*Calibrate
Set Alarms
Enable Sensors
Pump Cal Exit
*Set Alarms
Enable Sensors
Pump Cal Exit
Calibrate
Set Alarms
*Enable Sensors
Pump Cal Exit
*BRH
O2/CO/H2S/Mth
Individual Sensors
*Exit
*O2 19.5 / 23.5 %
CO 35 ppm
H2S 10 ppm
SET ALARMS
Mth50%LEL
BRH 100 ppm
*Exit
ENABLE SENSORS
*O2 ON
CO ON
H2S ON
*ZERO: 0 ppm
SPAN: 100 ppm
BRH: 196 mV
To change
zero gas
value
*O2 19.5 / 23.5 %
CO 35 ppm
H2S 10 ppm
ENABLE SENSORS
*O2 OFF
CO ON
H2S ON
CAL: BRH
ZERO: 0 ppm
*SPAN: 100 ppm
BRH: 1504 mV
To change
span gas
value
Calibration
complete
Calibrate
Set Alarms
Enable Sensors
*Pump Cal Exit
Calibrate
Set Alarms
Enable Sensors
Pump Cal *Exit
*Mth ON
BRH ON
Exit
1st PT: Clear Flow
Menu: Exit
mV Sample
CO 0ppm H2S 0ppm
Mth0%LEL BRH 0ppm
02 20.9%
*Block Pump Inlet*
2nd PT:Blocked Flow
Set:Fwrd Menu:Exit
mV Sample
Main Gas
Display
=
SELECT
=
MENU
29
Page 33

TARGET Series ENMET Corporation
10.0 Troubleshooting
Symptom Possible Cause Action
Unit will not turn on. Dead battery Plug instrument into charger. Check
charge status.
Sensor fails calibration Failed sensor
Wrong gas concentration
Old calibration gas
Calibration due on status line Sensor hasn’t been calibrated in last 30
days.
Cal error on status line Sensor failed a calibration. Check Cal Status in Pop-Up menu.
Setup/config error on status line Memory failure
Battery back-up failure.
Fault displayed in sensor location Sensor missing.
Invalid sensor readings.
Replace sensor and recalibrate
Use proper calibration gas.
Replace calibration gas.
Check Cal Status in Pop-Up menu.
Calibrate affected sensor(s).
Calibrate affected sensor(s). Replace
sensor if necessary and recalibrate.
Return to factory/service center.
Return to factory/service center.
Properly install sensor.
Check sensor calibration. Replace if
necessary.
30
Page 34

TARGET Series ENMET Corporation
11.0 WARRANTY
ENMET warrants new instruments to be free from defects in workmanship and material under normal use for a period
of eighteen months from date of shipment from ENMET. The warranty covers both parts and labor excluding
instrument calibration and expendable parts such as calibration gas, filters, batteries, etc... Equipment believed to be
defective should be returned to ENMET within the warranty period (transportation prepaid) for inspection. If the
evaluation by ENMET confirms that the product is defective, it will be repaired or replaced at no charge, within the
stated limitations, and returned prepaid to any location in the United States by the most economical means, e.g.
Surface UPS/FedEx Ground. If an expedient means of transportation is requested during the warranty period, the
customer is responsible for the difference between the most economical means and the expedient mode. ENMET shall
not be liable for any loss or damage caused by the improper use of the product. The purchaser indemnifies and saves
harmless the company with respect to any loss or damages that may arise through the use by the purchaser or others of
this equipment.
This warranty is expressly given in lieu of all other warranties, either expressed or implied, including that of
merchantability, and all other obligations or liabilities of ENMET which may arise in connection with this equipment.
ENMET neither assumes nor authorizes any representative or other person to assume for it any obligation or liability
other than that which is set forth herein.
There are Return for Repair Instructions and Form on the last pages of this manual. This Form can be copied or used
as needed.
Manual Part Number
80012-014
July 1999
Updated September 1999
MCN-225; 12/16/99
MCN-235; 07/12/00
MCN-245; 09/26/00
MCN-250; 03/20/01
MCN-263; 08/22/01
MCN-275, 05/01/02
MCN-289, 11/22/02
MCN-302, 09/04/03
MCN-305, 09/16/03
MCN-337, 07/27/05
MCN-366, 06/20/07
MCN-380, 11/07/07
Notes:
31
Page 35

PO Box 979
680 Fairfield Court
Ann Arbor, Michigan 48106-0979
734.761.1270 Fax 734.761.3220
Returning an Instrument for Repair
ENMET instruments may be returned to the factory or any one of our Field Service Centers for regular
repair service or calibration. The ENMET Repair Department and Field Service Centers also perform
warranty service work.
When returning an instrument to the factory or service center for service, paperwork must be included
which contains the following information:
A purchase order number or reference number.
A contact name with return address, telephone and fax numbers
Specific instructions regarding desired service or description of the problems being
encountered.
Date of original purchase and copy of packing slip or invoice for warranty consideration.
If a price estimate required, please note it accordingly and be sure to include a fax
number.
Providing the above information assists in the expedient repair and return of your unit.
Failure to provide this information can result in processing delays.
ENMET charges a one hour minimum billing for all approved repairs with additional time billed to the
closest tenth of an hour. All instruments sent to ENMET are subject to a minimum $30 evaluation fee,
even if returned unrepaired. Unclaimed instruments that ENMET has received without appropriate
paperwork or attempts to advise repair costs that have been unanswered, after a period of 60 days, may
be disposed of or returned unrepaired COD with the $30 evaluation fee.
Service centers may have different rates or terms. Be sure to contact them for this information.
Repaired instruments are returned by UPS/FedEx Ground and are not insured unless otherwise
specified. If expedited shipping methods or insurance is required, it must be stated in your
paperwork.
Note: Warranty of customer installed components.
If a component is purchased and installed in the field, and fails within the warranty term, it can be
returned to ENMET and will be replaced, free of charge, per ENMET’s returned goods procedure.
If the entire instrument is returned to ENMET Corporation with the defective item installed, the
item will be replaced at no cost, but the instrument will be subject to labor charges at a rate of half
of the standard rate.
Page 36

Repair Return Form
Mailing Address:
ENMET Corporation
PO Box 979
Ann Arbor, Michigan 48106
Phone Number: 734.761.1270
FAX Number: 734.761.3220
Your Mailing Address: Your Shipping Address:
Contact Name: __________________________ Your Phone: _______________________
Your Reference Number: _________________ Your FAX: _______________________
Payment Terms: K COD
(check one) K VISA / MasterCard______________________ ________
Card number Expiration
Shipping Address:
ENMET Corporation
Attn: Repair Department
680 Fairfield Court
Ann Arbor, Michigan 48108
Return Shipping Method:
K UPS: K Ground K 3 Day Select K Next Day Air K ND Air Saver K 2-Day Air
K Federal Express: K Ground K Express Saver K P-1 K Standard K 2-Day Air
K FedEx Account number: ________________________
Would you like ENMET to insure the return shipment?
K No K Yes Insurance Amount: $_________________
 Loading...