

Page 1

We’re better, connected
User Guide
Xda Venn
Page 2

Welcome
Thank you for choosing the ø Xda Venn smartphone, with the Microsoft® Windows® Mobile™ 6.1 Standard
operating system. With its dual slider, the Xda Venn gives you the convenience of Windows® combined with a
familiar handset design. Furthermore, by using ActiveSync®, you can keep your new smartphone and your PC
synchronised at all times. The Xda Venn offers all the features listed below.
Key Features of the Xda Venn
• Microsoft® Windows® Mobile™ 6.1 for Smartphone OS
• Full graphic TFT 262K Colour LCD (240 x 320 pixels)
• Full QWERTY keyboard
• CMOS Camera (2.0 megapixels)
• Built-in Bluetooth® Technology
• Advanced Voice Command Technology
• 2-Way Text Messaging
• Multimedia Messaging Service
• E-mail Messaging Service
• microSD™ Card slot for External Memory (SDHC Support)
• Voice Memo
• Easy text entry using the XT9 text input mode
• Internet Access
Important Information
This Xda Venn user guide contains very important information about how to use and look after your
smartphone. Please read it thoroughly. Your warranty is enclosed on a separate card. Please take note of its
exclusions and limitations. These are designed to prohibit the use of unauthorised accessories or components.
Page 3

Important health, safety and legal information
Please read before proceeding.
The battery is not charged when you take it out of the box. Do not remove the battery pack when the
phone is charging. Your warranty is invalidated if you dismantle or attempt to dismantle the phone.
Privacy Restrictions
Some countries require full disclosure of recorded telephone conversations, and stipulate that you must inform the person with whom
you are speaking that the conversation is being recorded. Always obey the relevant laws and regulations of your country when using
the recording feature of your PDA Phone.
Intellectual Property Right Information
Copyright © 2009 Telefónica ø UK Limited. All Rights Reserved. Microsoft, MS-DOS, Windows, Windows® NT, Windows® Server,
Windows® Mobile, Windows® XP, Windows® Vista, ActiveSync, Windows® Mobile Device Centre, Internet Explorer, MSN, Hotmail®,
Windows® Live, Outlook, Excel®, PowerPoint®, Word®, OneNote and Windows® Media are either registered trademarks or trademarks
of Microsoft® Corporation in the United States and/or other countries. Bluetooth® and the Bluetooth® logo are trademarks owned by
Bluetooth® SIG, Inc. Java, J2ME and all other Java-based marks are trademarks or registered trademarks of Sun Microsystems, Inc. in
the United States and other countries. Copyright © 2008, Adobe Systems Incorporated. All Rights Reserved. microSD™ is a trademark
of SD Card Association.
Copyright © 2004-2008, Ilium Software, Inc. All Rights Reserved. Licensed by QUALCOMM Incorporated under one or more of the
following patents: 4, 901, 3075, 490, 1655, 056, 1095, 504, 7735, 101, 5015, 778, 3385, 506, 8655, 109, 3905, 511, 0735, 228,
0545, 535, 2395, 710, 7845, 267, 2615, 544, 1965, 267, 2625, 568, 4835, 337, 3385, 659, 5695, 600, 7545, 414, 7965, 657, 4205,
416, 797. All other company, product and service names mentioned herein are trademarks, registered trademarks or service marks of
their respective owners. Telefónica shall not be liable for technical or editorial errors or omissions contained herein, nor for incidental
or consequential damages resulting from furnishing this material. The information is provided “as is” without warranty of any kind
and is subject to change without notice. Telefónica also reserves the right to revise the content of this document at any time without
prior notice. No part of this document may be reproduced or transmitted in any form or by any means, electronic or mechanical,
including photocopying, recording or storing in a retrieval system, or translated into any language in any form without prior written
permission of Telefónica.
Disclaimers
DATA AND DOCUMENTATION ARE PROVIDED “AS IS” AND WITHOUT WARRANT Y OR TECHNICAL SUPPORT OF ANY KIND FROM
PANTECH. TO THE MAXIMUM EXTENT PERMITTED BY APPLICABLE LAW, PANTECH AND ITS AFFILIATES expressly disclaim any and
all representations and warranties, express or implied, arising by law or otherwise, regarding the Data, Documentation, or any other
Products and services, including without limitation any express or implied warranty of merchantability, express or implied warranty
of fitness for a particular purpose, non-infringement, quality, accuracy, completeness, effectiveness, reliability, usefulness, that
the Data and/or Documentation will be error-free, or implied warranties arising from course of dealing or course of performance.
Without limiting the foregoing, it is further understood that Pantech and its Providers are not responsible for Your use or misuse
of the Data and/or Documentation or the results from such use. WITHOUT LIMITING THE GENERALITY OF THE FOREGOING, YOU
ACKNOWLEDGE THAT THE DATA AND/OR DOCUMENTATION MAY INCLUDE INACCURACIES AND YOU WILL USE COMMON SENSE
AND FOLLOW STANDARD SAFET Y PRECAUTIONS IN CONNECTION WITH THE USE OF THE DATA OR DOCUMENTATION.
Limitation of Damages
TO THE MAXIMUM EXTENT PERMITTED BY APPLICABLE LAW, IN NO EVENT SHALL PANTECH OR ITS PROVIDERS BE LIABLE TO
USER OR ANY THIRD PARTY FOR ANY INDIRECT, SPECIAL, CONSEQUENTIAL, INCIDENTAL OR PUNITIVE DAMAGES OF ANY KIND,
IN CONTRACT OR TORT, INCLUDING, BUT NOT LIMITED TO, INJURY, LOSS OF REVENUE, LOSS OF GOODWILL, LOSS OF BUSINESS
OPPORTUNITY, LOSS OF DATA, AND/OR LOSS OF PROFITS ARISING OUT OF, OR RELATED TO, IN ANY MANNER, OR THE DELIVERY,
PERFORMANCE OR NONPERFORMANCE OF OBLIGATIONS, OR USE OF THE DATA OR DOCUMENTATION HEREUNDER REGARDLESS
OF THE FORESEEABILITY THEREOF.
Important Health Information and Safety Precautions
When using this product, the safety precautions below must be taken to avoid possible legal liabilities and damages. Retain and
follow all product safety and operating instructions. Observe all warnings in the operating instructions on the product. To reduce the
risk of bodily injury, electric shock, fire, and damage to the equipment, observe the following precautions.
Electrical Safety
This product is intended for use when supplied with power from the designated battery or power supply unit. Other usage may be
dangerous and will invalidate any approval given to this product.
Page 4

Safety Precautions for Proper Grounding Installation
CAUTION: Connecting to an improperly grounded equipment can result in an electric shock to your smartphone.
This product is equipped with a USB Cable for connecting with desktop or Notebook computer. Be sure your computer is properly
earthed (grounded) before connecting this product to the computer. The power supply cord of a desktop or notebook computer
has an equipment-earthing conductor and an earthing plug. The plug must be plugged into an appropriate outlet which is properly
installed and earthed in accordance with all local codes and ordinances.
SAFETY PRECAUTIONS FOR POWER SUPPLY UNIT
Use the correct external power source
A product should be operated only from the type of power source indicated on the electrical ratings label. If you are not sure of the
type of power source required, consult your authorised service provider or local power company. For a product that operates from
battery power or other sources, refer to the operating instructions that are included with the product.
Handle battery packs carefully
This product contains a Li-ion battery. There is a risk of fire and burns if the battery pack is handled improperly. Do not attempt to
open or service the battery pack. Do not dismantle, crush, puncture, short external contacts or circuits, dispose of in fire or water, or
expose a battery pack to temperatures higher than 60˚C (140˚F).
WARNING: Danger of explosion if battery is incorrectly replaced. To reduce risk of fire or burns, do not dismantle, crush, puncture,
short external contacts, expose to temperature above 60°C (140°F), or dispose of in fire or water. Replace only with specified
batteries. Recycle or dispose of used batteries according to the local regulations or reference guide supplied with your product.
Take extra precautions
• Keep the battery or phone dry and away from water or any liquid as it may cause a short circuit.
• Keep metal objects away so they don’t come in contact with the battery or its connectors as it may lead to short circuit during
operation.
• The phone should be only connected to products that bear the USB-IF logo or have completed the USB-IF compliance program.
• Do not use a battery that appears damaged, deformed, or discoloured, or one that has any rust on its casing, overheats, or emits a
foul odour.
• Always keep the battery out of the reach of babies and small children, to avoid swallowing of the battery. Consult the doctor
immediately if the battery is swallowed.
• If the battery leaks:
• Do not allow the leaking fluid to come in contact with skin or clothing. If already in contact, flush the affected area immediately
with clean water and seek medical advice.
• Do not allow the leaking fluid to come in contact with eyes. If already in contact, DO NOT rub; rinse with clean water immediately
and seek medical advice.
• Take extra precautions to keep a leaking battery away from fire as there is a danger of ignition or explosion.
Safety Precautions For Direct Sunlight
Keep this product away from excessive moisture and extreme temperatures. Do not leave the product or its battery inside a vehicle or
in places where the temperature may exceed 60°C (140°F), such as on a car dashboard, window sill, or behind a glass that is exposed
to direct sunlight or strong ultraviolet light for extended period of time. This may damage the product, overheat the battery, or pose a
risk to the vehicle.
Prevention of hearing loss
CAUTION: Permanent hearing loss may occur if earphones or headphones are used at high volume for prolonged periods of time.
Safety in Aircraft
Due to the possible interference caused by this product to an aircraft’s navigation system and its communications network, using this
smartphone’s phone function on board an aeroplane is against the law in most countries. If you want to use this smartphone when
on board an aircraft, remember to turn off your phone by switching to Airplane Mode.
Environment Restrictions
Do not use this product in petrol stations, fuel depots, chemical plants or where blasting operations are in progress, or in potentially
explosive atmospheres such as fuelling areas, fuel storehouses, below deck on boats, chemical plants, fuel or chemical transfer or
storage facilities, and areas where the air contains chemicals or particles, such as grain, dust, or metal powders. Please be aware that
sparks in such areas could cause an explosion or fire resulting in bodily injury or even death.
Explosive Atmospheres
When in any area with a potentially explosive atmosphere or where flammable materials exist, the product should be turned off and
the user should obey all signs and instructions. Sparks in such areas could cause an explosion or fire resulting in bodily injury or even
death. Users are advised not to use the equipment at refuelling points such as service or gas stations, and are reminded of the need
to observe restrictions on the use of radio equipment in fuel depots, chemical plants, or where blasting operations are in progress.
Areas with a potentially explosive atmosphere are often, but not always, clearly marked. These include fuelling areas, below deck on
boats, fuel or chemical transfer or storage facilities, and areas where the air contains chemicals or particles, such as grain, dust, or
metal powders.
Page 5

Road Safety
Vehicle drivers in motion are not permitted to use mobile phones, except in the case of emergency. In some countries, using
handsfree phones as an alternative is allowed.
Safety Precautions for RF Exposure
• Avoid using your phone near metal structures (for example, the steel frame of a building).
• Avoid using your phone near strong electromagnetic sources, such as microwave ovens, sound speakers, TV and radio.
• Use only original manufacturer-approved accessories, or accessories that do not contain any metal.
• Use of non-original manufacturer-approved accessories may violate your local RF exposure guidelines and should be avoided.
Interference with Medical Equipment Functions
This product may cause medical equipment to malfunction. The use of this phone is forbidden in most hospitals and medical clinics. If
you use any other personal medical device, consult the manufacturer of your phone to determine if they are adequately shielded from
external RF energy. Your doctor may be able to assist you in obtaining this information. Turn your phone OFF in health care facilities
when any regulations posted in these areas instruct you to do so. Hospitals or health care facilities may be using equipment that could
be sensitive to external RF energy.
Hearing Aids
Some digital wireless phones may interfere with some hearing aids. In the event of such interference, you may want to consult your
service provider, or call the customer service line to discuss alternatives.
Nonionising Radiation
Your phone has an internal antenna. This product should be operated in its normal use position to ensure the radiative performance
and safety of the interference. As with other mobile radio transmitting equipment, users are advised that for satisfactory operation of
the equipment and for the safety of personnel, it is recommended that no part of the human body be allowed to come too close to
the antenna during operation of the equipment. Use only the supplied integral antenna. Use of unauthorised or modified antennas
may impair call quality and damage the phone, causing loss of performance and SAR levels exceeding the recommended limits as well
as result in non-compliance with local regulatory requirements in your country.
To assure optimal phone performance and ensure human exposure to RF energy is within the guidelines set forth in the relevant
standards, always use your smartphone only in its normal-use position. Contact with the antenna area may impair call quality
and cause your smartphone to operate at a higher power level than needed. Avoiding contact with the antenna area when the
smartphone is IN USE optimises the antenna performance and the battery life.
GENERAL PRECAUTIONS
Avoid applying excessive pressure to the smartphone
Do not apply excessive pressure on the screen and the smartphone to prevent damaging them and remove the phone from your
trouser pocket before sitting down. It is also recommended that you store the phone in a protective case and only use the stylus
or your finger when interacting with the touch screen. Cracked display screens due to improper handling are not covered by
the warranty.
Warming of the phone after prolonged use
When using your phone for prolonged periods of time, such as when you’re on a long call, charging the battery or browsing the web,
it may become warm. In most cases, this condition is normal and therefore should not be interpreted as a problem with the phone.
Heed service markings
Except as explained elsewhere in the Operating or Service documentation, do not service any product yourself. Service needed on
components inside the phone should be done by an authorised service technician or provider.
Damage requiring service
Unplug the product from the electrical outlet and refer servicing to an authorised service technician or provider under the following
conditions:
• Liquid has been spilled or an object has fallen onto the product.
• The product has been exposed to rain or water.
• The product has been dropped or damaged.
• There are noticeable signs of overheating.
• The product does not operate normally when you follow the operating instructions.
Avoid hot areas
The product should be placed away from heat sources such as radiators, heat registers, stoves, or other products (including amplifiers)
that produce heat.
DO NOT use the phone in an extreme environment with high temperatures or humidity levels
Try to keep your phone in temperatures of between -20ºC (-4ºF) and +40ºC(104ºF).
Page 6

Avoid wet areas
Never use the product in a wet location. DO NOT try to dry your phone in a microwave oven. If you do, sparks can occur and cause
an explosion or fire.
Avoid using your phone after a dramatic change in temperature
When you move your phone between environments with very different temperature and/or humidity ranges, condensation may form
on or within the phone. To avoid damaging the phone, allow sufficient time for the moisture to evaporate before using it again.
NOTICE: When taking the phone from low-temperature conditions into a warmer environment or from high-temperature conditions
into a cooler environment, allow it to acclimatise to room temperature before turning on power.
Avoid pushing objects into product
Never push objects of any kind into cabinet slots or other openings in the product. Slots and openings are provided for ventilation.
These openings must not be blocked or covered.
DO NOT abuse the phone.
Avoid striking, shaking or knocking it. When not using it, lay it down to avoid possible damage due to instability.
DO NOT dismantle the phone or its accessories.
If a service or repair is required, return the phone to an authorised service centre. If the phone is dismantled, there may be a risk of
electric shock or fire.
DO NOT short-circuit the battery terminals with metal items, etc.
Mounting accessories
Do not use the product on an unstable table, cart, stand, tripod, or bracket. Any mounting of the product should follow the
manufacturer’s instructions, and should use a mounting accessory recommended by the manufacturer.
Avoid unstable mounting
Do not place the product with an unstable base.
Use product with approved equipment
This product should be used only with personal computers and options identified as suitable for use with your equipment.
Adjust the volume
Turn down the volume before using headphones or other audio devices.
Cleaning
Unplug the product from the power socket before cleaning. Do not use liquid cleaners or aerosol cleaners. Use a damp cloth for
cleaning, but NEVER use water to clean the LCD screen. Keep your mobile phone and its accessories out of the reach of young
children and pets.
Page 7

Contents
Welcome .............................................................................................................. 2
Section 1 Before Using Your Phone ................................................................. 19
Inside the Box .............................................................................................................20
Handset Description ..................................................................................................21
The Home Screen .......................................................................................................22
Battery Usage .............................................................................................................25
Section 2 Basic Operation ................................................................................28
Turning the phone on / off .......................................................................................29
Turning the phone on ............................................................................................. 29
Turning the phone off .............................................................................................29
Call functions ..............................................................................................................29
Making a call by entering a contact name ................................................................ 29
Making a call by entering a phone number .............................................................. 29
Making a call from an open contact ........................................................................ 29
Making a call from the call history list ...................................................................... 30
Making a call from a hyperlink phone number ......................................................... 30
Answering a call by pressing any key ....................................................................... 30
Answering or ignoring a call .................................................................................... 30
Answering a second call .......................................................................................... 30
Inserting a pause in a dialling sequence ................................................................... 31
Inserting a three-second pause in a dialling sequence .............................................. 31
Basic functions ..........................................................................................................31
Setting Up Your Voicemail ....................................................................................... 31
Locking the keypad ................................................................................................. 31
Auto-Locking the keypad ........................................................................................ 32
Setting the date and time ........................................................................................ 32
Setting the idle timer ............................................................................................... 32
Changing the look of your Home screen ................................................................. 32
Viewing operating system information ..................................................................... 33
Entering owner information ..................................................................................... 33
Page 8

Browsing files and folders ........................................................................................ 33
Silencing the ring tone of an incoming call ............................................................... 33
Making an emergency call ........................................................................................33
Entering text and numbers .......................................................................................34
Switching between uppercase, lowercase, and caps lock ......................................... 34
Changing the Multipress timeout ............................................................................. 34
Deleting characters .................................................................................................. 34
Entering a space ...................................................................................................... 34
Entering a symbol .................................................................................................... 34
Entering numbers in text boxes ................................................................................ 35
Entering punctuation in Multipress mode ................................................................. 35
Entering punctuation in XT9 mode .......................................................................... 35
Entering text in XT9 mode ....................................................................................... 35
Starting a new line .................................................................................................. 35
Turning on Caps Lock .............................................................................................. 36
Entering the plus sign for international calls .............................................................36
Changing the input mode ....................................................................................... 36
Section 3 Calendar, Contacts, Call history ...................................................... 37
Calendar ......................................................................................................................38
Scheduling an appointment ..................................................................................... 38
Deleting an appointment ......................................................................................... 38
Updating an appointment ....................................................................................... 38
Viewing appointments for the week ........................................................................ 39
Viewing today’s schedule ........................................................................................ 39
Viewing your schedule for a specific date................................................................. 39
Viewing your schedule for the month ...................................................................... 39
To make an appointment recurring .......................................................................... 40
Showing week numbers .......................................................................................... 40
Changing the working week display ........................................................................40
Changing the reminder time .................................................................................... 40
Page 9

Contacts ......................................................................................................................41
Creating a new contact ........................................................................................... 41
Sending a contact.................................................................................................... 41
Calling a contact from contact information .............................................................. 41
Calling a contact from the contact list ...................................................................... 42
Changing the default number for a contact ............................................................. 42
Duplicating a contact ............................................................................................... 42
Copying selected contacts to Device / SIM ............................................................... 42
Copying all contacts to Device / SIM ........................................................................ 43
Deleting a contact ................................................................................................... 43
Deleting all contacts in Device / SIM ......................................................................... 43
Creating a contact during a phone call ................................................................... 43
Filtering the contact list ............................................................................................ 43
Finding a contact ..................................................................................................... 44
Sending an e-mail to a contact ................................................................................ 44
Sending a text message to a contact .......................................................................44
Viewing and editing contact information .................................................................44
Adding a photo to a contact .................................................................................... 45
Removing a photo from a contact ........................................................................... 45
Assigning a category to a contact ............................................................................ 45
Assigning a ring tone to a contact ........................................................................... 46
Creating a speed dial ............................................................................................... 46
Using speed dials ..................................................................................................... 46
Viewing and editing a speed dial ............................................................................. 46
Deleting a speed dial ............................................................................................... 47
Sending a contact as a Vcard ................................................................................... 47
Call History ................................................................................................................47
Viewing call timers .................................................................................................. 47
Resetting call timers ................................................................................................. 47
Viewing the details of a call ..................................................................................... 48
Creating a contact from Call History ........................................................................48
Deleting a call from Call History ............................................................................... 48
Page 10

Dialling the last number called ................................................................................. 48
Inserting an international country code .................................................................... 48
Sending an e-mail via Call History ............................................................................ 49
Section 4 Voicemail and Messaging ............................................................... 50
Voicemail ....................................................................................................................51
Calling your voicemail box ...................................................................................... 51
Text messaging ..........................................................................................................51
Creating a text message .......................................................................................... 51
Deleting all messages .............................................................................................. 51
Multimedia Messaging ..............................................................................................52
Creating a Multimedia message ............................................................................... 52
Using the text box ................................................................................................... 52
Multimedia message Menu options ......................................................................... 52
Viewing a Multimedia Message ............................................................................... 54
Replying with a Multimedia Message ....................................................................... 55
Changing messaging account options ...................................................................... 55
Changing how the message list displays .................................................................. 55
Creating a message from a contact card .................................................................. 55
E-mail ..........................................................................................................................56
Synchronising e-mail messages ................................................................................ 56
During synchronisation ............................................................................................ 56
Connecting directly to an E-mail Server .................................................................... 56
Folder Behaviour during a direct connection to an E-mail Server .............................. 56
Creating an E-mail Account .....................................................................................57
Creating an E-mail message ..................................................................................... 57
Overview of e-mail security ..................................................................................... 58
Downloading an e-mail message ............................................................................. 58
Downloading an attachment ................................................................................... 58
Selecting a folder for synchronisation ...................................................................... 59
Adding a picture to an e-mail message .................................................................... 59
Verifying the digital signature on a message you receive .......................................... 59
Sending and receiving Internet e-mail messages ...................................................... 59
Page 11

Adding a voice recording to an e-mail message ....................................................... 60
Setting up an Internet e-mail account ..................................................................... 60
Deleting a message ................................................................................................. 61
Deleting an account................................................................................................. 61
Editing predefined text ............................................................................................ 61
Emptying the Deleted Items folder ........................................................................... 61
Forwarding a message............................................................................................. 61
Inserting predefined text into a message ................................................................. 62
Marking a message as Read or Unread .................................................................... 62
Moving a message to a different folder ................................................................... 62
Opening a message ................................................................................................. 62
Moving quickly between accounts ........................................................................... 63
Sending a message draft ......................................................................................... 63
Replying to a message ............................................................................................. 63
Saving a draft of a message ..................................................................................... 63
Setting the language for reading or composing a message ..................................... 63
To stop adding a signature to messages ................................................................... 64
Viewing an attachment ........................................................................................... 64
Viewing message folder contents ............................................................................ 64
Viewing the Inbox .................................................................................................. 64
Viewing the list of accounts ..................................................................................... 65
What is SSL? ............................................................................................................ 65
Section 5 Organiser ..........................................................................................66
Alarm ..........................................................................................................................67
Using the alarm ....................................................................................................... 67
Voice Note ..................................................................................................................67
Creating a voice note ............................................................................................... 67
Listening to a voice note .......................................................................................... 67
Deleting a voice note ............................................................................................... 68
Renaming a voice note ............................................................................................ 68
Setting a voice note as a ringtone ............................................................................ 68
Page 12

Notepad ......................................................................................................................68
To access Notepad: .................................................................................................. 68
Creating a memo ....................................................................................................68
Viewing a memo ..................................................................................................... 68
Sending a memo ..................................................................................................... 69
Deleting a memo ..................................................................................................... 69
Calculator ....................................................................................................................69
Using the calculator ................................................................................................. 69
World Time .................................................................................................................69
Using the world time ............................................................................................... 69
Tasks ............................................................................................................................70
Creating a task ........................................................................................................ 70
Changing a completed task to incomplete ............................................................... 70
Assigning a category to a task ................................................................................. 70
Deleting a task ........................................................................................................ 70
Marking a task as complete ..................................................................................... 71
Locating a task ........................................................................................................ 71
Section 6 Windows® Media player® .................................................................72
Windows® Media Player® ..........................................................................................73
Copying media files ................................................................................................. 73
Playing media files ................................................................................................... 74
Setting up a playlist ................................................................................................. 75
Section 7 Messenger, Office Mobile, Windows® Live .................................... 77
Messenger ..................................................................................................................78
Windows® Live Messenger ....................................................................................... 78
Office Mobile ..............................................................................................................78
Excel® Mobile .......................................................................................................... 78
OneNote Mobile ...................................................................................................... 78
PowerPoint® Mobile ................................................................................................. 78
Word® Mobile .........................................................................................................78
Page 13

Windows® Live ...........................................................................................................78
Hotmail® .................................................................................................................. 78
Windows® Live spaces ............................................................................................. 78
Live Search for Windows® Mobile ........................................................................... 79
Section 8 Camera .............................................................................................. 80
Camera / Camcorder mode ......................................................................................81
Selecting video quality ............................................................................................. 81
Copying an image to your phone ............................................................................. 81
Making video clips using a timer .............................................................................. 81
Adjusting pictures and video according to lighting conditions ................................... 82
Choosing where pictures are saved .......................................................................... 82
Creating a Pictures folder ......................................................................................... 82
Editing a picture ...................................................................................................... 82
Viewing pictures as a slide show .............................................................................. 83
Setting a picture as the home screen ....................................................................... 83
Sending a picture via Multimedia Message ..............................................................83
Saving a copy of a picture ........................................................................................ 83
Viewing pictures on your phone .............................................................................. 84
Camera / Camcorder operations .............................................................................. 84
Camera ...................................................................................................................84
Video ......................................................................................................................84
Recording a Video ................................................................................................... 84
Taking a Photo ........................................................................................................84
Taking a Photo (MultiShot) ....................................................................................... 84
Snapshot ................................................................................................................. 85
Viewing the saved photo file ................................................................................... 85
Camera / Camcorder controls ...................................................................................85
Camera Menu ........................................................................................................ 85
Camcorder Menu ................................................................................................... 86
General Settings ...................................................................................................... 87
Camera Settings ...................................................................................................... 88
Video Settings ......................................................................................................... 89
Page 14

Section 9 Internet Explorer ............................................................................. 90
Using Internet Explorer .............................................................................................91
Adding a Web page to the Favourites list ................................................................. 91
Changing connection options .................................................................................. 91
Changing Web page display options ........................................................................ 91
Clearing History, cookies, or temporary files ............................................................. 92
Creating a new folder in Favourites .......................................................................... 92
Deleting a Favourite ................................................................................................. 92
Disconnecting from the Internet .............................................................................. 92
Editing a Favourite ................................................................................................... 92
Go to a link ............................................................................................................. 93
Going to a Web page .............................................................................................. 93
Going to a Web page in the History list ................................................................... 93
Opening Internet Explorer ........................................................................................ 93
Returning to a Web page you visited in the same session ......................................... 93
Viewing a Favourite ................................................................................................. 94
Viewing a list of recently visited Web pages ............................................................. 94
Moving a Favourite to a folder ................................................................................. 94
Changing the Zoom Level on Web pages ................................................................. 94
Showing or hiding pictures on Web pages ............................................................... 94
Viewing a page in full screen mode ......................................................................... 94
Sending a link via e-mail .......................................................................................... 95
Adjusting the scrolling speed ................................................................................... 95
Section 10 PC Connectivity, Internet Sharing, Remote Desktop, Bluetooth® and Activesync®
96
ActiveSync® .................................................................................................................97
Installing and setting up ActiveSync ......................................................................... 97
Setting up an Exchange Server connection .............................................................. 97
Changing ActiveSync® settings ................................................................................. 98
Scheduling synchronisation as items arrive ............................................................... 98
Changing the synchronisation schedule ................................................................... 98
Starting and stopping synchronisation ..................................................................... 99
Viewing information about Sync status .................................................................... 99
Page 15

Changing settings for an information type ............................................................... 99
Connecting your phone ......................................................................................... 100
Deactivating the USB modem ............................................................................... 100
Connecting to a PC using a chargeable USB cable .................................................100
Connecting to a PC using Bluetooth® ..................................................................... 100
Changing e-mail security options ........................................................................... 101
Excluding an e-mail address from Reply All ............................................................ 101
Internet Sharing .......................................................................................................102
Internet Sharing via Bluetooth® .............................................................................. 102
Internet Sharing via a USB connection.................................................................... 102
Remote Desktop .......................................................................................................102
Bluetooth® ................................................................................................................103
Turning Bluetooth® on and off ............................................................................... 103
Pairing with another Bluetooth® device .................................................................. 103
Sending objects to another device ........................................................................ 104
Using your phone as a PC remote ......................................................................... 104
Advanced Bluetooth® features................................................................................ 104
Section 11 Applications ................................................................................. 106
Camera ......................................................................................................................107
File Explorer ..............................................................................................................107
Java ...........................................................................................................................107
JETCET PDF................................................................................................................107
Speed Dial .................................................................................................................108
System Info ...............................................................................................................108
Task Manager ...........................................................................................................108
Voice Commander ....................................................................................................108
Getting Started...................................................................................................... 108
Voice command features ...................................................................................... 109
“Voice Commander Settings” main functions .........................................................111
Page 16

Section 12 Settings ......................................................................................... 113
Phone ........................................................................................................................ 114
Auto Answer ..........................................................................................................11 4
Auto Lock ...............................................................................................................114
Band Select ............................................................................................................114
Call Barring.............................................................................................................114
Call Forwarding ......................................................................................................114
Call Options ...........................................................................................................115
Call Waiting ............................................................................................................115
Caller ID .................................................................................................................11 5
Channels ................................................................................................................115
Fixed Dialling ..........................................................................................................11 6
Networks ...............................................................................................................116
Owner Number ......................................................................................................116
Service Dialling Numbers (SDN) ...............................................................................116
Slide Options ..........................................................................................................11 6
Sounds ...................................................................................................................... 117
Changing sounds or turning them on or off ............................................................117
Deleting a sound ....................................................................................................117
Copying a sound from your PC to your Xda Venn ...................................................117
Profiles ......................................................................................................................118
Viewing the list of profiles ......................................................................................118
Editing a profile ......................................................................................................11 8
Changing the current profile ...................................................................................11 8
Home Screen ............................................................................................................118
Clock and Alarm .......................................................................................................119
Setting the date and time .......................................................................................119
Alarm .....................................................................................................................11 9
Connections ..............................................................................................................119
Wireless Manager ...................................................................................................11 9
Creating a Dial-Up connection ................................................................................119
Creating a GPRS connection .................................................................................. 120
Creating a Proxy connection .................................................................................. 120
Page 17

Creating a VPN connection .....................................................................................121
Deleting a Dial-Up connection ................................................................................121
Deleting a GPRS connection ...................................................................................121
Deleting a Proxy connection ...................................................................................121
Changing an intranet URL ...................................................................................... 122
Making your Xda Venn visible to other devices ....................................................... 122
USB to PC ............................................................................................................. 122
Modem Link .......................................................................................................... 122
Enrolling in a domain ............................................................................................. 122
Security .....................................................................................................................123
To enable the Device Lock ..................................................................................... 123
To disable the Device Lock ..................................................................................... 123
Activating the SIM PIN ........................................................................................... 123
Changing the SIM PIN ........................................................................................... 124
Changing PIN2 ...................................................................................................... 124
Viewing a security certificate ................................................................................. 124
Deleting a security certificate ................................................................................. 125
Encryption ............................................................................................................. 125
Changing the Master Clear Password .................................................................... 125
Master Clear .......................................................................................................... 125
Removing Programs .................................................................................................126
Power Management ................................................................................................126
Accessibility ..............................................................................................................127
Regional settings ....................................................................................................127
Owner Information ..................................................................................................127
About ........................................................................................................................128
Device Name .............................................................................................................128
Error Reporting ........................................................................................................128
Turning Error Reporting On / Off ........................................................................... 128
Customer Feedback..................................................................................................129
Windows® Update ....................................................................................................129
Setting up E-mail .....................................................................................................129
Managed Programs ..................................................................................................129
Page 18

Section 13 Games ............................................................................................ 130
Bubble Breaker .........................................................................................................131
How Bubble Breaker works .....................................................................................131
The Breaker Bonus ..................................................................................................131
Undoing a move .....................................................................................................131
Starting a game of Bubble Breaker ..........................................................................131
Setting Bubble Breaker options ...............................................................................131
Viewing Bubble Breaker statistics ........................................................................... 132
Solitaire .....................................................................................................................132
Starting a game of Solitaire ................................................................................... 132
How to move the cards ......................................................................................... 132
Playing Solitaire ..................................................................................................... 132
Section 14 Additional Safety Information .................................................... 133
WEEE Notice .............................................................................................................134
SAR information .......................................................................................................134
Safety Information for Battery Usage ....................................................................135
Declaration of Conformity (R&TTE) ........................................................................136
Page 19

19
Section 1
Before Using Your Phone
This section covers the very first things you
need to know about your phone including:
Inside the Box • Handset Description
Home Screen • Battery Usage
Page 20
20
Xda Venn
Full user manual access available
via the Getting Started CD
Pouch to protect your Xda Venn
Quick Start Guide Warranty card
USB cable
Moulded all-in-one headsetBattery
AC travel charger
Getting Started
With Windows Mobile sof tware. Includes M icrosoft®
ActiveSync® 4.5 , Windows Mobile Dev ice Center for
Vista and Microsof t® Outlook® 20 07 (Evaluation copy)
Full User Manual
All rights reserve d. Portions ©
2008 Microsof t Corporation
Xda Venn
Getting Started CD
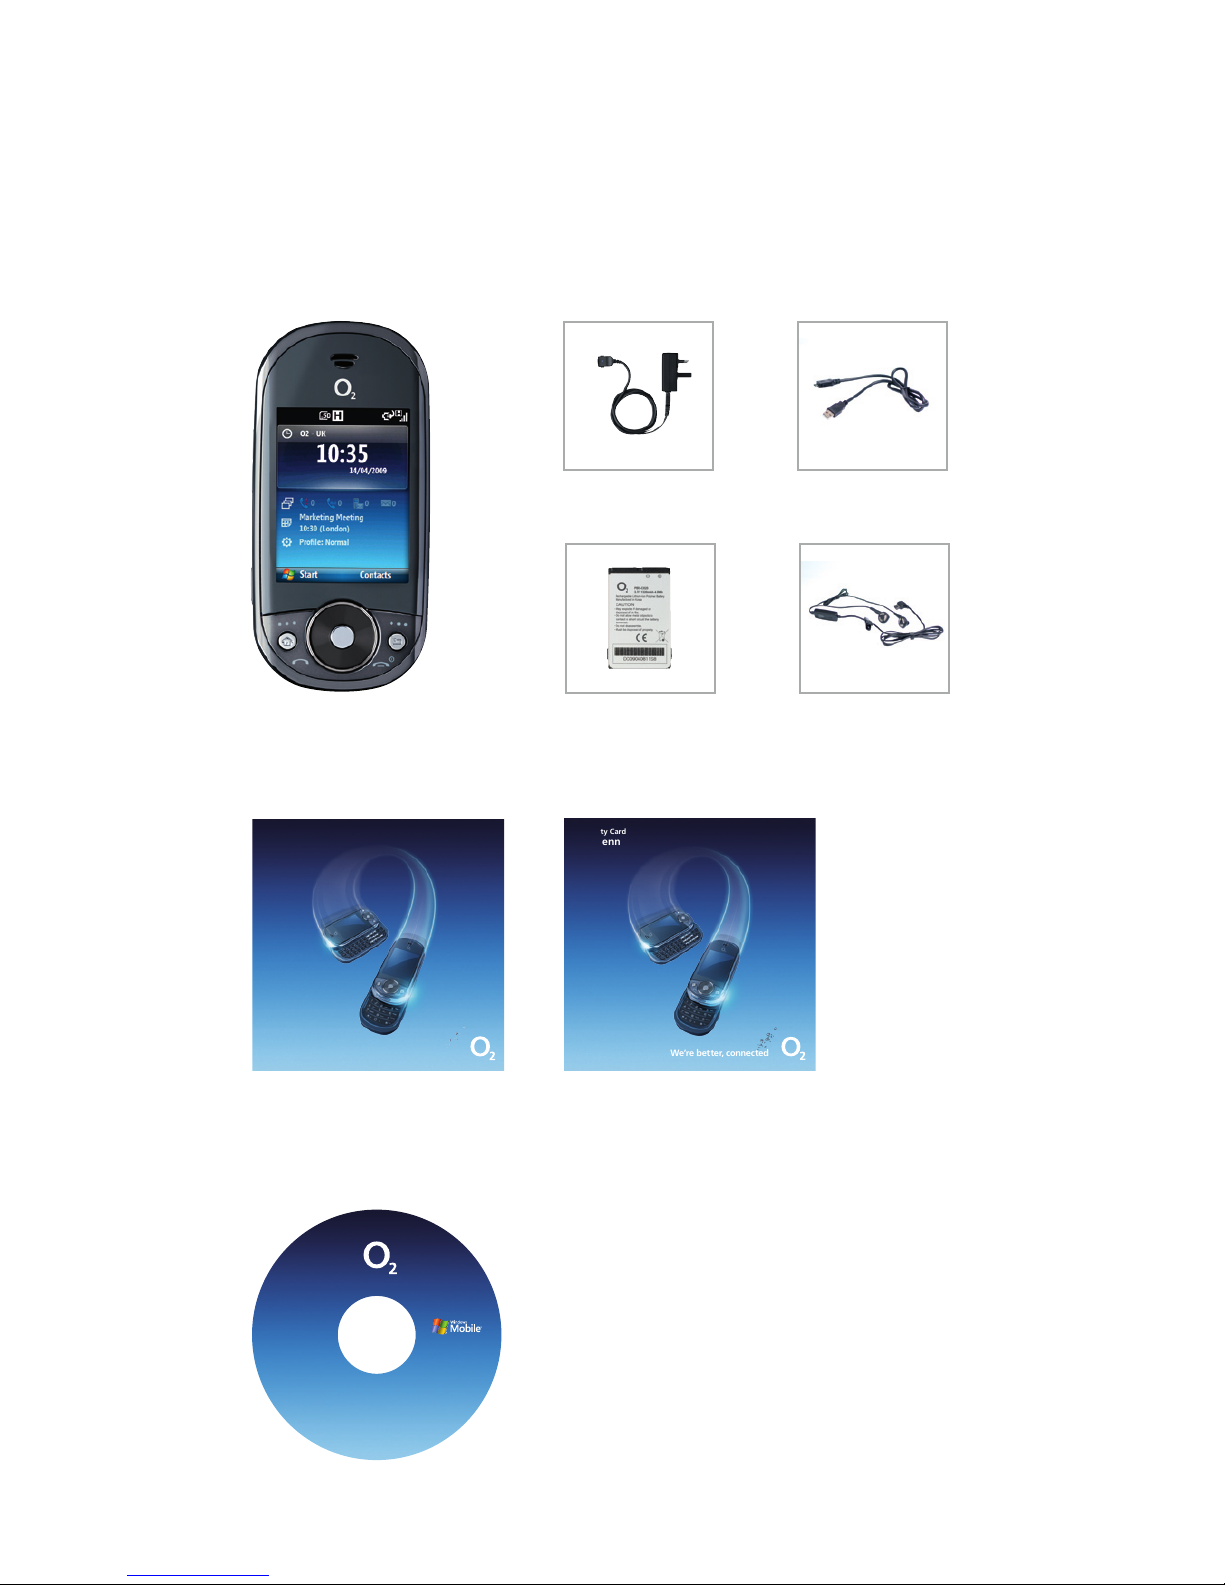
Inside the Box
This box should contain all the items pictured below.
If any are missing or different, you should immediately contact the retailer where you purchased the phone.
Warranty Card
Xda Venn
We’re be tter, c onnect ed
O2CN885N 6149VCCP04 /09 04/10
Quick Start Guide
Xda Venn
We’re be tter, c onnect ed
Page 21
21
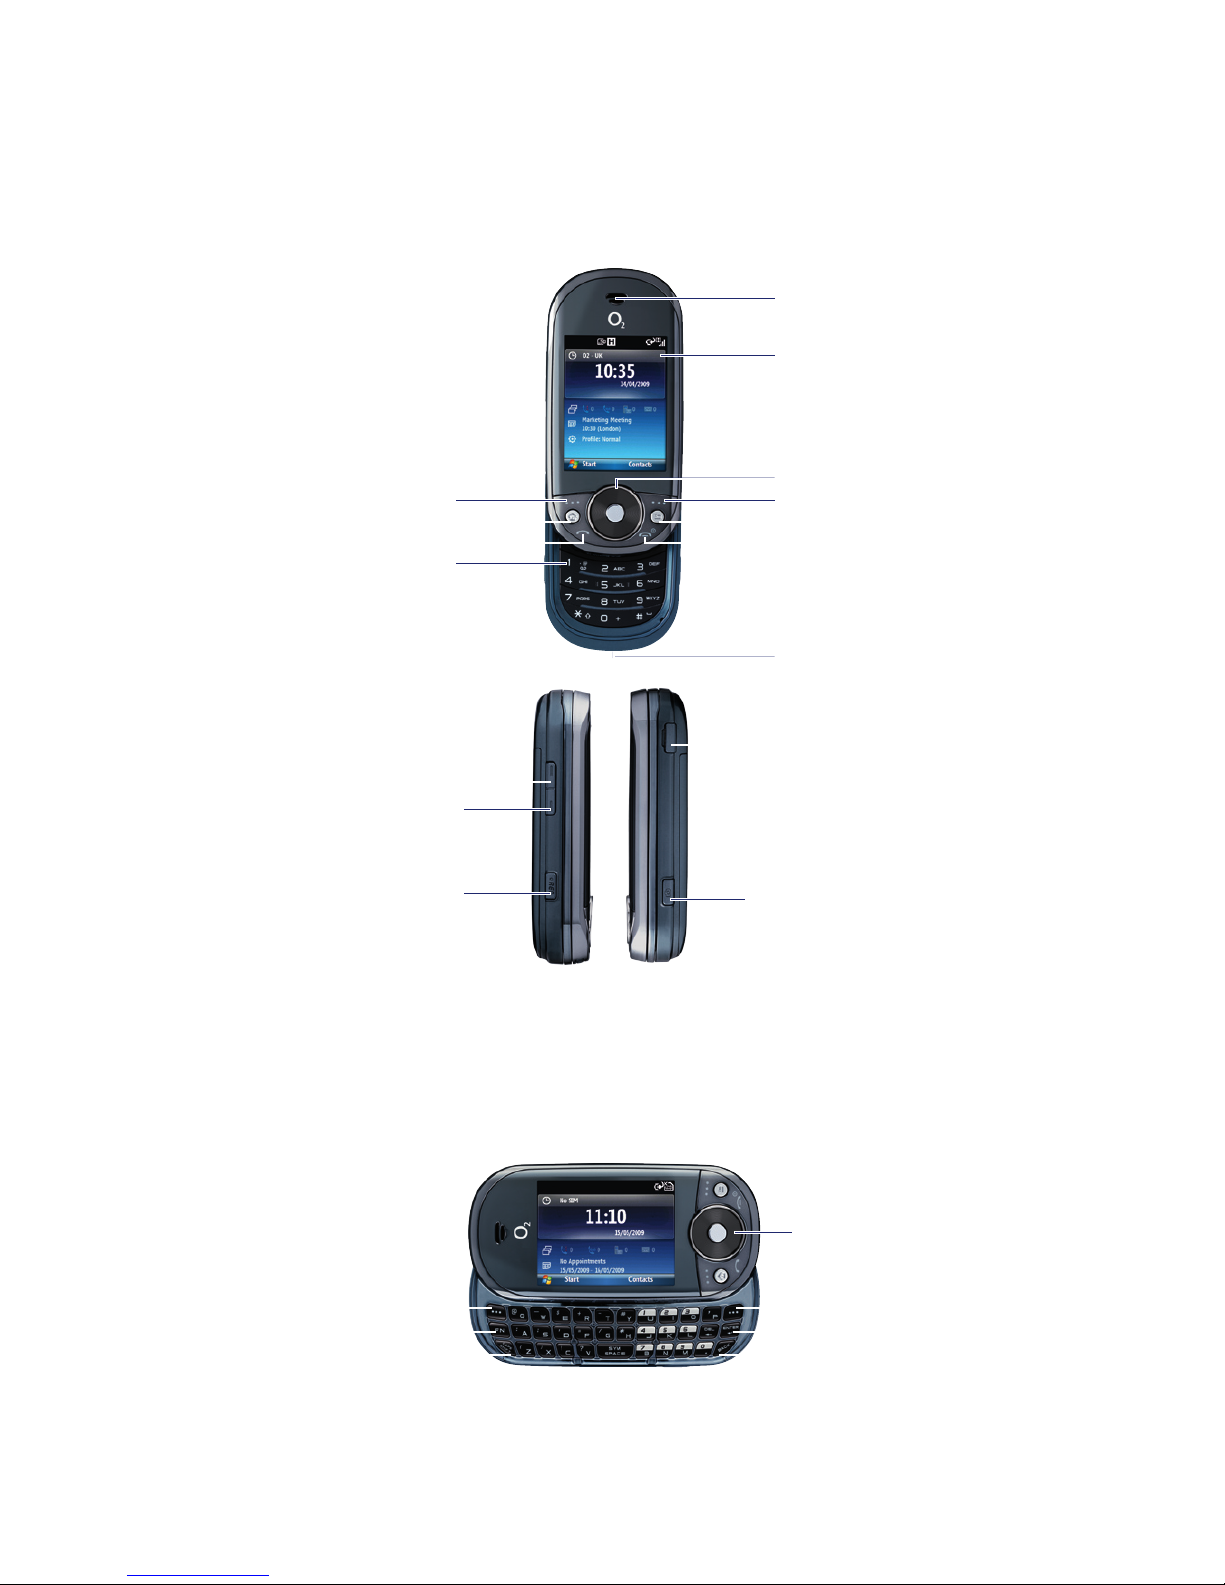
Handset Description
The Xda Venn weighs about 151.4 g. Its dimensions are 106 x 51 x 21.6 mm.
Number pad view
QWERTY keyboard view
Home key
Left soft key
Voicemail
Send key
Clear/back key
Right soft key
End key
microSD™ Card slot
Navigation key
Earpiece
Display
Left soft key
Function key
CAPS/Shift key
Right soft key
Navigaton key
Enter key
Back key
Volume down key
Quick list / REC key
Volume up key
Charging slot
Camera key
Page 22
22
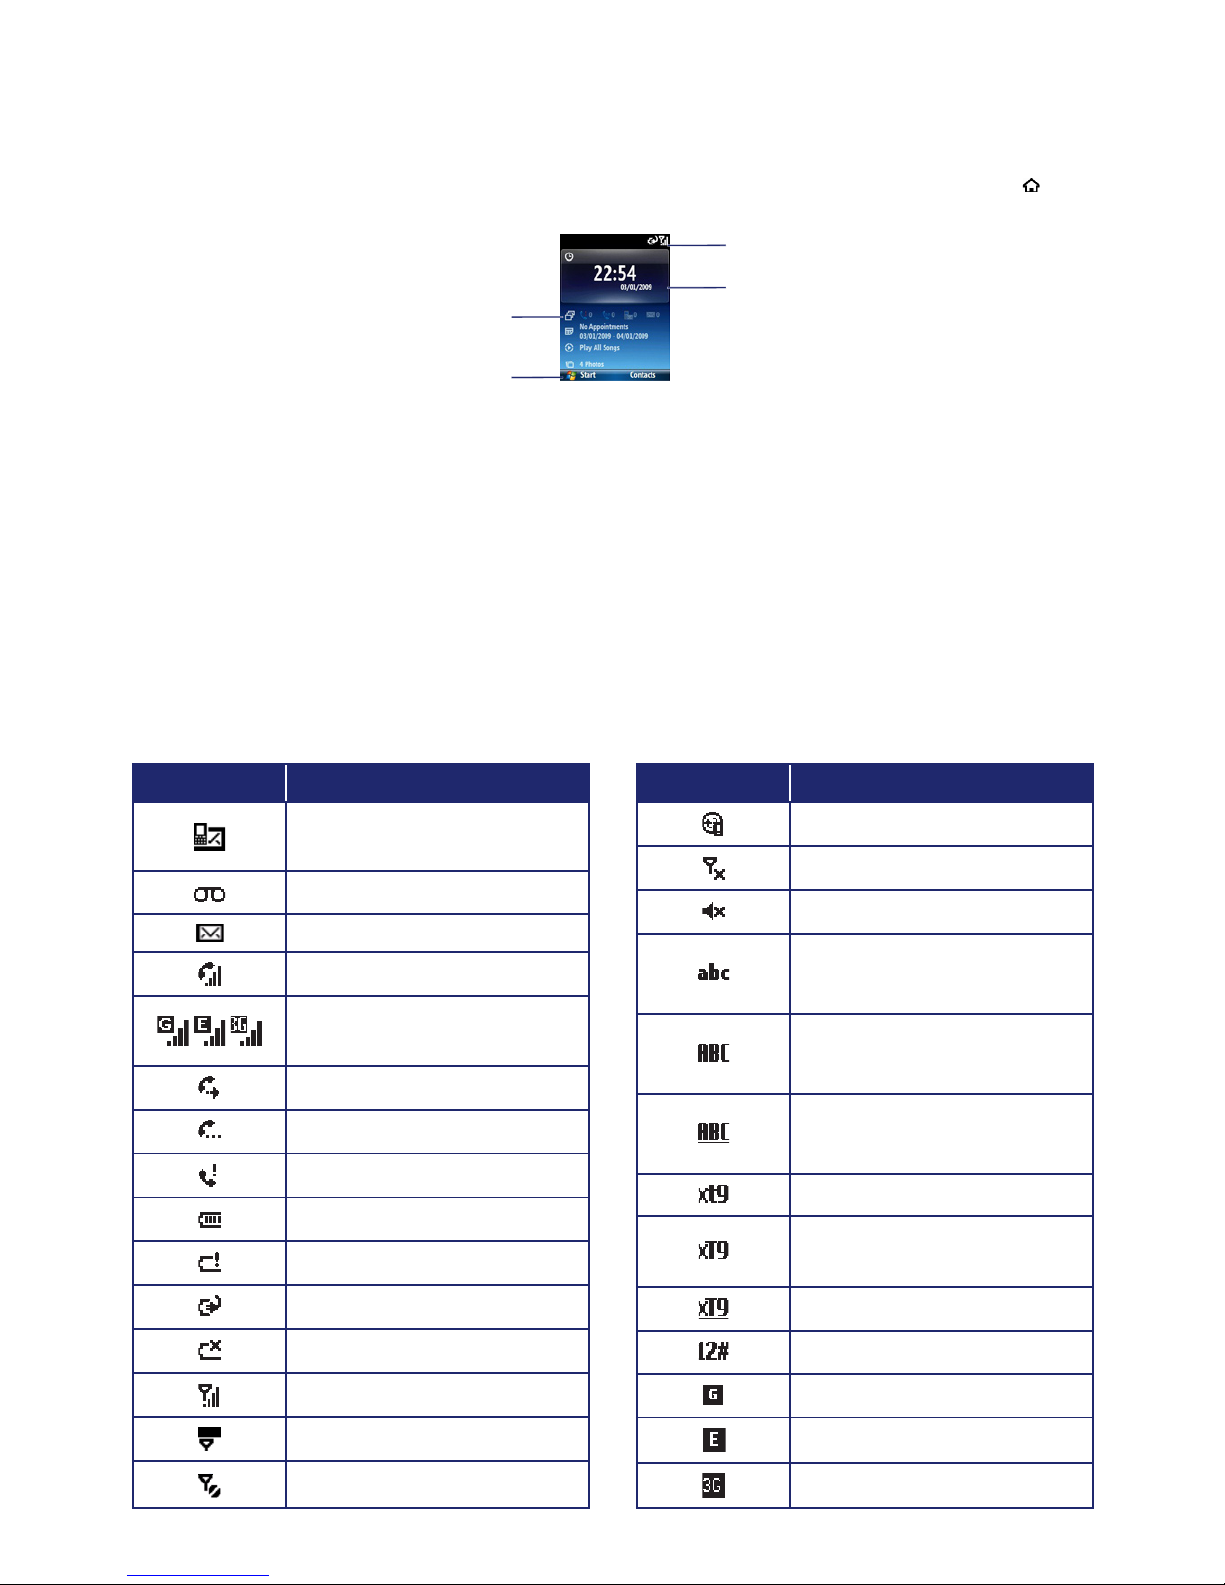
The Home Screen
The home screen plays a key part in helping you navigate around your Smartphone. It is the first screen
displayed every time the phone is turned on. You can easily return to the home screen by pressing the [
].
Home screen customisation
The home screen allows you to customise your start page. It can be used to display a variety of information,
such as phone-specific status, information from over-the-air services, and information from personal
information manager (PIM) applications. You can fully customise the home screen by installing new plug-ins
and schemes.
Home screen Icons
Status icons appear at the top of the screen and in the home screen. The following table lists common status
icons and their meanings.
Indicators for Phone status
Date and Time
Soft key commands
Select and press the
[OK] to access programs
Indicator Description
New Multimedia message
(MMS) or Text message (SMS)
New Voicemail
New e-mail
Voice call in progress.
GPRS / EDGE / 3G Data call in
progress
Call forwarding in progress
Call on hold
Missed call
Battery level
Low battery
Battery charging
No battery
Signal strength
No signal
No wireless coverage
Indicator Description
ActiveSync/ Synchronisation error
Phone off
Silent
Multipress text input mode,
lowercase
Multipress text input mode,
uppercase first character only
Multipress text input mode,
uppercase
XT9 text input mode, lowercase
XT9 text input mode, uppercase
first character only
XT9 text input mode, uppercase
Numeric input mode
GPRS connection available
EDGE connection available
3G connection available
Page 23
23
Quick and Easy
Indicator Description
Bluetooth® ON
Missing SIM card
Voice Command Enabled
microSD™ card inserted
Speaker phone on
Windows® Live Messenger
Conversation
Windows® Live Messenger
Online
Indicator Description
Windows® Live Messenger Busy
Windows® Live Messenger
Appear Offline
Windows® Live Messenger
Offline
Windows® Live Messenger Away
HSDPA in use
HSDPA available
HSDPA connecting
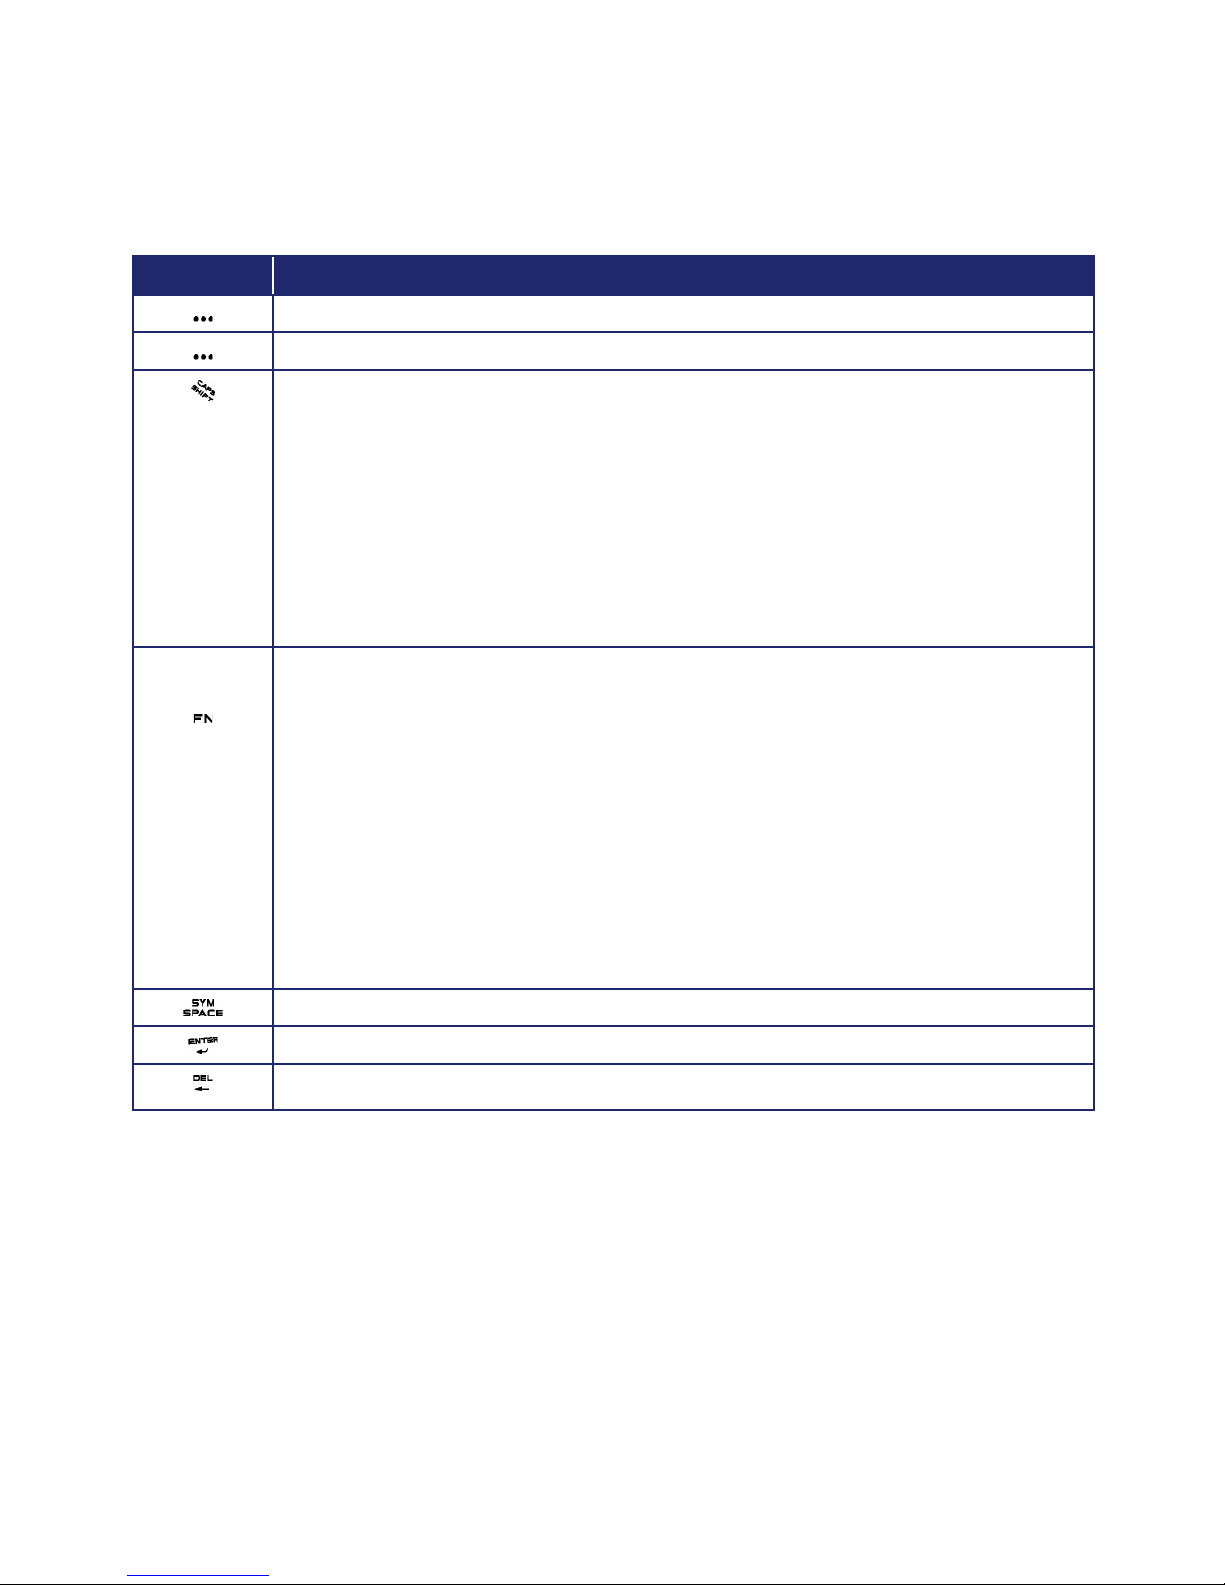
Keys Functions
Press to make or receive a call.
Short press: View Recent Calls.
Long press: Make a call to the
last number called.
Press to turn the phone on/off,
to terminate a call or to return
to the home screen.
Press to access the main
menu or the Menu functions
displayed on the bottom line.
Press to access Contacts or
Menu function displayed on
bottom line.
Press to clear a digit from the
display or to return to the
previous page.
A short press changes to capital
letters or symbols during text
entry mode.
A long press shows menu for
changing letters or symbols.
Keys Functions
Press and hold to insert a ‘+’ for
international call
Press to insert a space and long
press to enter choosing symbols
during text entry mode.
Press to return to the home
screen.
Press to adjust voice volume
during a call, and adjust audio
volume in standby mode.
Activates Quick List or Voice
Commander.
Short press to launch the Quick
List.
Long press enters Voice
Commander
Press and hold to launch the
camera application.
~
Press to enter numeric number
of corresponding alphabet each
situation.
Page 24
24
Using the QWERTY Keyboard
Your phone, with its specifically designed QWERTY keyboard, allows easy and comfortable text writing.
You can use all the phone functions with the keyboard closed or open. When you open the keyboard you
have the benefit of a full QWERTY keyboard, which you can use to write e-mail messages, notes, and so on.
Key Function
Press to access the Main Menu or the Menu functions displayed on the left at the bottom.
Press to access Contacts or Menu function displayed on the right at the bottom.
To type uppercase letters, hold down and then press one or more letter keys.
To type uppercase letters continuously, use the CAPS-LOCK mode. To change to the
CAPS-LOCK mode, double-tap the Shift key. Once the CAPS-LOCK mode is set, you
can type uppercase letters only.
To deactivate, double-tap the Shift key again.
To type an uppercase letter for the first letter of a word only, simply press the Shift key
once. Then, the first letter you type will be uppercase while the rest will be lowercase.
To type a special character or numbers, press the applicable key while holding down
the FN key.
To type special characters or numbers consecutively, use the FN-LOCK mode. To change to
the FN-LOCK mode, double-tap the FN key. You can type special characters or numbers
only in this mode. To deactivate, double-tap the FN key again.
To type a special character or number for the first letter of a word only, simply press the FN
key once. Then, the first letter you type will be a special character or number while the rest
will be normal letters.
To type a special character that is not placed on the keyboard, press FN + Space.
Press the Space key to type a blank space.
Press the Enter key to insert a line break.
Press the Delete key to delete a character to the left of the text cursor.
Page 25
25
Battery Usage
The battery is not charged when the phone is first purchased – fully charge the battery before first use.
The battery will charge faster if the phone is switched off while charging. Battery operating time gradually
decreases over time. If the battery fails to perform normally, you may need to replace it.
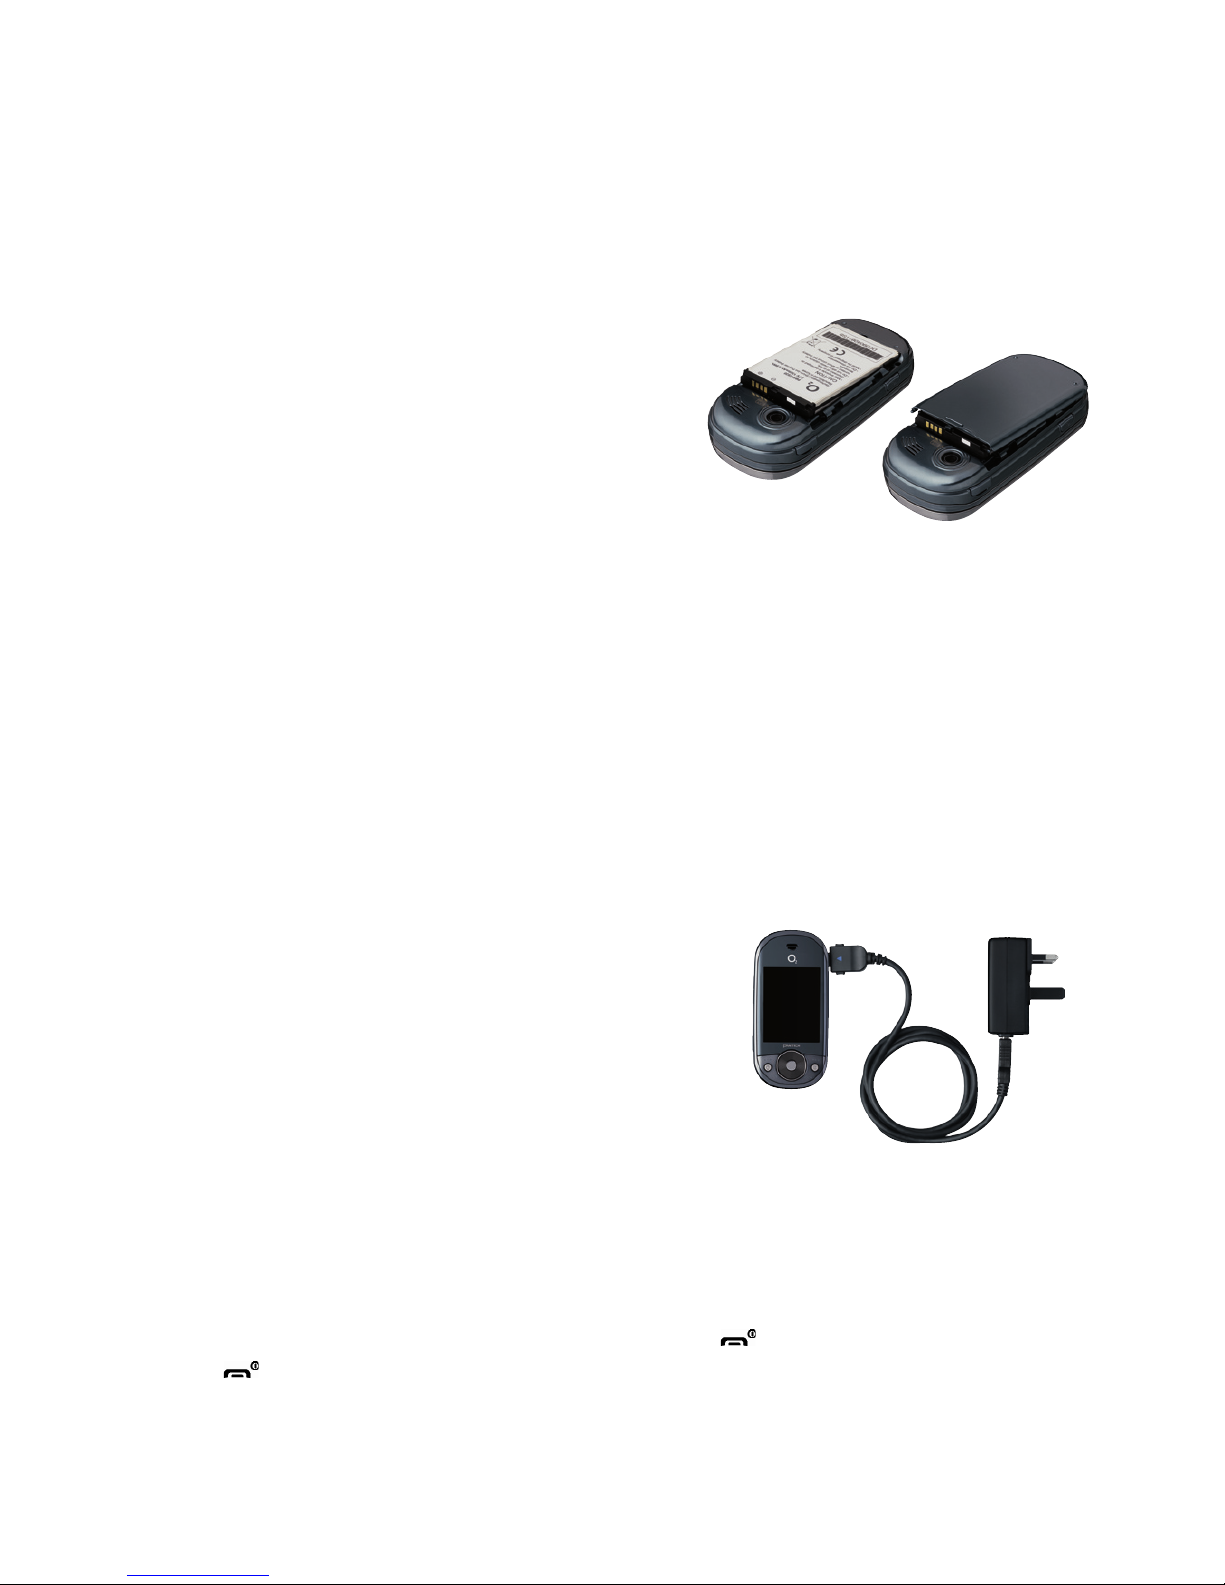
Battery Installation
Be sure to use only the batteries that have been provided
with the phone. Installation is easier if you have placed
the phone on a flat surface.
1. Place the battery on the back of the handset
and slide into place.
2. Push the battery down until it locks into place.
Battery Removal
Again, place the Xda Venn on a flat surface and use an even, steady pressure when removing the battery.
1. Pull the release latch upwards, lift up the battery.
2. Remove the battery from the handset.
NOTE: If the battery is not correctly placed in the compartment, the handset will not turn on and/or the
battery may detach during use.
Battery Charging
Make sure the battery is properly installed in the handset. Take care, as usual, when using a standard power
socket.
Power Connection
1. Plug the AC Charger into a standard socket.
2. Plug the other end of the AC Charger into the upper right side
of your phone. The battery must be installed in the phone.
Make sure you align the connectors correctly. If you do not,
the charging connector on the phone will be damaged and the
phone will not charge.
Power-Off Charging
• The Xda Venn will enter ‘power-off charging mode’ automatically
if you charge it with the phone switched off.
• The phone’s current charging status will be displayed (complete, 0% ~ 95% and error )
• Backlight will turn on for 5 seconds if you press any key except [
].
• Press [
] if you want to exit ‘power-off charging mode’ and turn on.
Page 26
26
Please Note:
• The battery may not be fully charged at the time of purchase.
• Fully charge the battery before use.
• The battery must be connected to the phone in order to charge it.
• Battery operating time gradually decreases over time.
• If the battery fails to perform normally, you may need to replace the battery.
• When the battery is discharged, the phone cannot be switched on. Connect the power and charge at least
5% of the battery – then switch on by pressing and holding [
].
Battery Usage Times
The operating time is subject to your handset usage and configuration.
Battery Capacity Talk Time
STD 1320 mAh Up to five hours
Battery Standby Times
The operating time is subject to your handset usage and configuration.
Battery Capacity Standby Time
STD 1320 mAh Up to 250 hours
NOTE: These times are for a new battery. Usage and Standby times may decrease over time.
Battery Handling Information
The correct usage and handling of batteries can preserve the lifetime of your phone and ensure proper
operation. Operating times are subject to the usage and configuration of your handset; please see the label on
your battery for your battery’s capacity. Follow these instructions carefully.
Dos
• Only use the battery and charger approved by the manufacturer.
• Only use the battery for its original purpose.
• Try to keep the battery in a temperature range of 41ºF (5ºC) to 95ºF (35ºC). Otherwise, it could significantly
reduce the capacity and lifetime of the battery.
• If the battery is stored in temperatures above or below the recommended range, give it time to warm up
or cool down before using it.
• Completely drain the battery before recharging. It may take one to four days to completely drain.
• Store the discharged battery in a cool, dark, and dry place.
• Purchase a new battery when its operating time gradually decreases after fully charging.
• Dispose of and recycle used batteries in accordance with local regulations.
Page 27

27
Don’ts
• Don’t use a damaged battery or charger.
• Don’t attempt to take the battery apart – it is a sealed unit with no serviceable parts.
• Don’t accidentally short circuit the battery by carrying it in your pocket or purse with other metallic objects,
such as coins, clips and pens. This may critically damage the battery.
• To prevent injury or burns, ensure that no metal objects come into contact with the + and – terminals
of the battery.
• Don’t dispose of batteries by burning; they may explode.
Page 28

28
Section 2
Basic Operation
This section covers the basic functions of your phone including:
Turning the phone on / off • Call functions • Basic functions
Making an emergency call • Entering text and numbers
Page 29

29
Turning the phone on / off
Turning the phone on
Press and hold the [ ] until your “Power On” logo appears.
• If “Password” appears on the display, enter your 4-digit password to unlock your phone.
• If the battery does not have enough charge to turn on the phone, the keypad will not light up.
You should charge your phone before turning it on.
Turning the phone off
1. Press and hold the [ ] until the “Power Off” logo appears.
Immediately change or recharge the battery when the battery low alert window appears on the display as
“Alert - Main Battery low.” To prevent possible data loss, replace or recharge the battery according to the
owner’s manual. The phone’s memory may possibly be damaged if the phone turns off due to the battery
completely draining. If the phone turns off, unsaved data may be lost.
Call functions
Your Xda Venn phone has many options. This section will show you how to use basic functions such as
making and receiving calls, locking and unlocking your phone, and changing the appearance and settings
of your phone.
Making a call by entering a contact name
Your phone allows you to call someone from your contact list or address book. It will auto-fill the contact
name as you begin to enter it.
1. On the home screen, begin entering the contact name.
2. When you see the contact name you want to call, select it and press Call.
Making a call by entering a phone number
1. On the home screen, begin entering the phone number.
Do one of the following:
• If you see the number or contact name to call, select it and press Call.
• If you do not see the number or contact name, finish entering the number and press [OK] or [
].
Making a call from an open contact
You can open contacts from the main screen and make a call to that contact.
1. On the home screen, press Contacts.
2. Select the contact to call and press [OK].
3. Select the phone number to call and press [OK], Call or [
].
TIP: If you have a long list of contacts, you can use a shortcut to find the one you want. Enter the first few
letters of the contact’s name. When you do this, the phone searches through the contact list and displays the
name. To call the contact, select the phone number and press [OK] or Call.
Page 30

30
Making a call from the call history list
Call History displays calls you have made, received, and missed.
1. On the home screen, press Start > All Programs > More > Call History.
2. Select the name or phone number to call.
3. Press [
].
NOTE: To see Call History and more programs, press All Programs.
Your phone will keep a list of recent calls you have made. These calls are always easily accessible for redialling.
1. On the home screen, press [
] to display a list of recent calls.
2. Select a name or phone number to make a call.
3. Press [
].
Making a call from a hyperlink phone number
You can quickly dial a phone number from an e-mail or text message that contains a hyperlink phone number.
A hyperlink phone number is underlined in the same manner as a web site address.
1. From a message containing a hyperlink phone number, select the phone number and press [OK].
Answering a call by pressing any key
You can set your phone to answer by pressing any key.
1. On the home screen, press Start > All Programs > More > Settings > Phone > Call Options.
2. Use the navigation key to select Any Key answer and press [OK] to check on the item and press
Done to finish.
Answering or ignoring a call
• To answer the call, press Answer or [ ].
• To reject the call, press Ignore or [
].
NOTE: Selecting Ignore will connect the caller to your voicemail if you subscribe to this service.
Answering a second call
• To put the first call on hold and answer the second call, press Answer or [ ].
• To switch between calls, press Swap.
• To end the second call and go back to the first, press [
].
Page 31

31
Inserting a pause in a dialling sequence
This function will only activate when the contact information is saved in the phone’s memory.
1. On the home screen, press Contacts.
2. Press the contact in whose phone number you want to insert a pause.
3. Select the phone number and press Menu > Edit.
4. Place the cursor where you want to insert the pause.
5. Press Menu > Insert Wait. The letter ‘w’ appears where the manual pause will occur in the
dialling sequence.
6. Press Done.
NOTE: To resume dialling after reaching a manual pause, press [OK].
Inserting a three-second pause in a dialling sequence
There may be occasions when you wish to pause dialling after you’ve selected a contact to call.
You can insert a three-second pause between selecting a contact to call and when the phone actually dials.
1. On the home screen, press Contacts.
2. Press the contact in whose phone number you want to insert a pause.
3. Select the phone number and press Menu > Edit.
4. Place the cursor where you want to insert the pause.
5. Press Menu > Insert Pause. The letter ‘p’ appears where the three-second pause will occur in the
dialling sequence.
6. Press Done.
Basic functions
Setting Up Your Voicemail
Setting up Voicemail
All unanswered calls to your Xda Venn are sent to voicemail, even if your phone is turned off. You’ll want to
set up your voicemail and personal greeting as soon as you activate your Xda Venn. Your service provider has
assigned your voicemail number to the [
]. Voicemail can be accessed by pressing and holding the [ ].
Checking Voicemail
When checking your voicemail, all unanswered calls will be played back in the order they were received. After
you have entered your voicemail, you will hear options, to save, delete, replay, or skip each message.
1. Press and hold [
] to call your voicemail box.
2. Follow the instructions to retrieve it.
Locking the keypad
On the home screen, press [ ] and select [Lock].
Page 32

32
Unlocking the keypad
On the home screen, press Unlock and press the [ ].
Auto-Locking the keypad
When deactivating the locked keypad, you have to enter [ ] additionally. However, with Auto-Lock, you
can deactivate the lock function automatically. Activate Auto-Lock as follows before using it.
1. On the home screen press Start > All Programs > More > Settings > Phone > Auto Lock.
2. Change the status of Auto-Lock to On.
3. Select Done.
Once Auto-Lock is activated, the keypad will become locked when the slide is lowered and the screen is turned
off. You can unlock the setting at this point by pressing the Unlock key or simply opening the slide.
Setting the date and time
Your phone is not preset with the current date and time, so you will need to set them.
1. On the home screen, press Start > All Programs > More > Settings or select Settings and press All Settings.
2. Select Clock & Alarm > [OK] > Date and Time.
3. In Date, edit the month, day, or year.
4. In Time, edit the hour, minute, and second.
5. Press Done.
Setting the idle timer
Your Xda Venn will automatically return to the home screen after a period of inactivity. You can adjust the
amount of time before the Xda Venn defaults to the home screen.
1. On the home screen, press Start > All Programs > More > Settings or select Settings and press All Settings.
2. Select Home Screen.
3. Select Time out, use the [
/ ] to set the amount of time for the phone to remain idle before the
home screen automatically appears.
4. Press Done.
Changing the look of your Home screen
The Xda Venn allows you to choose from many colour schemes and layouts and enables you to use a
background image for the main screen.
1. On the home screen, press Start > All Programs > More > Settings or select Settings and press All Settings.
2. Select Home Screen.
3. Select a Colour scheme, and Background image.
4. Press Done.
Page 33

33
Viewing operating system information
There may be instances when you wish to see basic information about your phone’s operating system.
This option allows you to see summaries of all the settings on your phone.
1. On the home screen, press Start > All Programs > More > Settings or select Settings and press All Settings.
2. Press More > About.
NOTE: To see About and more settings, press More.
Entering owner information
Entering and displaying owner information enables someone to return your phone to you, should it be lost.
1. On the home screen, press Start > All Programs > More > Settings > More… > Owner Information.
Complete the following:
• Name: Enter your name.
• Telephone number: Enter a number where you can be reached.
• E-mail address: Enter your e-mail address.
• Notes: Enter any other information you want to include.
2. Press Done.
NOTE: To see Owner Information and more settings, press More.
Browsing files and folders
File Explorer lets you browse the contents of folders on your phone. The base folder on the phone is named
My Device. My Device is similar to My Computer on a PC and contains the My Documents, Program Files,
Temp, Storage Card, and Windows® folders among others.
1. On the home screen, press Start > All Programs > More > Applications > File Explorer. The My Documents
folder and its subfolders are listed.
2. To find the folder you want, do the following.
3. Select one of the folders listed in the main window.
4. Press Menu and navigate through the folders listed there.
5. Select the item you want to open.
Silencing the ring tone of an incoming call
Press Volume down button until the ring is silenced. You may still answer the call if you want to.
Making an emergency call
Emergency calls do not depend on the availability of the 999 or 112 network in your area. The emergency
number will work independently of the network area you are in.
• Dial 999 (or 112) and press [OK].
NOTE: You can make calls to emergency service numbers under any circumstances, even if you have locked
the phone.
Page 34

34
Entering text and numbers
You can enter text, numbers and symbols by using the keypad. The phone supports four input modes for
entering text, numbers and symbols: Multipress, XT9, Numeric and symbols. Multipress and XT9 modes are
used for entering text, Numeric mode is used for entering numbers, and Symbols mode is used for entering
symbols like “@”, “/”, “$” and punctuation marks.
When you select a field that requires text or numbers, the phone automatically selects the appropriate input
mode. The status indicator on the top right side of the display screen shows the input mode that you are
currently using.
Switching between uppercase, lowercase, and caps lock
Press the [ ] to change between uppercase, lowercase, and caps lock within a text input mode.
TIP: In both Multipress and XT9 modes, the first letter of a sentence is automatically capitalised.
Changing the Multipress timeout
The Multipress timeout setting controls the amount of time you have to press a single key to get to the next
letter on that key. If the time expires, the phone moves the cursor to the next letter in a word or sentence.
1. On the home screen, press Start > All Programs > More > Settings.
2. Press More > Accessibility.
3. In Multipress timeout, select the length of the pause between key presses using [
/ ].
Deleting characters
You can only delete characters when you are in input mode, either for numbers, names, or text. The [ ]
operates in a similar way to a backspace key on a computer.
1. To backspace and delete a single character in any input mode, press [ ].
2. To backspace and delete an entire text or numeric field in any input mode, press and hold the [
].
Entering a space
Either with Multipress or XT9 mode, press the [ ].
Entering a symbol
There may be times when you need to use a symbol that is not displayed on the keypad. Additional symbols
are available by accessing a separate page.
1. Press and hold the [
].
2. In the menu that appears, press Symbols to display the Symbols page.
3. Select the symbol you want.
4. Press [OK].
Page 35

35
Entering numbers in text boxes
To enter numbers, use numeric mode. If you need to enter a number within a line of text, change to numeric
mode to enter the number, and then revert back to multipress or XT9 mode to finish entering the text.
1. Select the Numeric mode by pressing and holding the [
].
2. Enter the number or numbers using the keypad.
3. Select the XT9 mode by pressing and holding the [
], then finish entering your text.
NOTE: If a field permits a numeric entry only, such as a phone number, the input mode automatically defaults
to numeric mode.
Entering punctuation in Multipress mode
1. Press [ ] until you see the punctuation mark.
TIP: To see all of the available symbols, press and hold the [
].
Entering punctuation in XT9 mode
In a text box when in XT9 text entry mode, do the following:
1. Press [
], and select from a list of common punctuation.
Entering text in XT9 mode
To form a word in XT9 mode, press the number keys that contain the letters you want. As you enter letters,
XT9 analyses your key presses and attempts to complete the word. For example, to enter the word ‘shoe’,
press [
] [ ] [ ] [ ].
1. Press and hold the [
].
2. On the popup menu, select XT9 and press [OK].
3. The XT9 indicator appears at the top right of the screen.
4. Enter letters by pressing the keys on which the letters appear. Press a key only once for each letter.
If there is more than one choice in the XT9 dictionary for your entry, a list of available words is displayed.
5. Press the [
] to enter a space after the word is entered, or press one of the available words and the
space is added automatically.
6. If you do not see the desired word, press Add Word? from the list, and then enter the word using
Multipress.
Starting a new line
When you are entering information in a text box, if you want to add a line break, use the [OK].
1. In a multi-line text box such as the notes area of a contact or a calendar appointment, do the following:
2. In any input mode, press [OK].
Page 36

36
Turning on Caps Lock
You can toggle back and forth between having the caps lock on and off. The status indicator will tell you
which mode you are in.
1. In Multipress or XT9 mode, press the [
] until the status indicator for the text input mode
appears in all capitals.
2. Press the [
] to revert back to lowercase.
Entering the plus sign for international calls
Before dialling an international number you must insert the plus sign in the number. The [ ] functions
as the plus sign.
1. In a numeric entry field, press and hold [
].
Changing the input mode
There are several input modes available on your phone depending on whether you are entering contact
information, phone numbers, symbols or text. Be sure you are in the input mode you desire.
1. In text input mode, press and hold the [
].
2. A popup menu appears; select the input mode you want and press [OK].
3. The status indicator for the selected input mode appears at the top right of the screen.
Page 37

37
Section 3
Calendar, Contacts, Call history
This section covers using the calendar and contacts menu on your phone:
Calendar • Contacts • Call history
Page 38

38
Calendar
Scheduling an appointment
Your calendar allows you to schedule appointments and reminders by day, by time, or by event.
1. On the home screen, press Start > All Programs.
2. Select Calendar > [OK].
3. Press Menu > New Appointment.
4. Enter information about the appointment.
5. To schedule an all-day event, select End Time > All Day Event.
6. Press Done.
NOTE: All-day events do not occupy blocks of time in the Calendar. Instead, they appear in banners at the
top of the calendar. See also Change the reminder time.
TIP: On the home screen press [
/ ] to select Appointments and press [ / ]
to select the options.
Deleting an appointment
To delete an existing appointment, you will have the option of deleting just one appointment or the entire
series, if it is a recurring appointment.
1. On the home screen, press Start > All Programs.
2. Select Calendar > [OK].
3. In Agenda view, select the appointment to delete.
4. Press Menu > Delete Appointment.
NOTE: When you delete an appointment in Calendar on your phone, it is also deleted on your PC the next
time you synchronise. If the appointment has not been synchronised with a PC, it will be deleted only from
the phone.
Calendar items can be deleted only from Agenda view or from an open calendar appointment.
To delete from other views, open the appointment, and press Menu > Delete.
TIP: To cancel a deletion, press [
].
Updating an appointment
When your schedule or appointment information changes, you can easily edit the appointment with
new information.
1. On the home screen, press Start > All Programs.
2. Select Calendar > [OK].
3. Select the appointment and press [OK] > Menu > Edit > [OK].
4. Make your changes and press Done.
Page 39

39
Viewing an appointment
Your appointments should be easily viewable from the main calendar menu. The calendar menu is accessible
via the Start from the home screen.
1. On the home screen, press Start > All Programs.
2. Select Calendar > [OK].
3. Select the appointment to view and press [OK].
Viewing appointments for the week
Each week’s appointments are clearly displayed in the calendar, when you’ve selected week view.
1. On the home screen, press Start > All Programs.
2. Select Calendar > [OK].
3. Press Menu > Week View.
See also Change the display of the working week.
Viewing today’s schedule
For a single day’s schedule, select that day from one of the views in the calendar and select agenda view.
1. On the home screen, press Start > All Programs.
2. Select Calendar > [OK].
3. Press Menu > Go to Today > [OK].
4. From Week or Month in Calendar, press Menu > Agenda View.
TIP: To view previous or approaching dates, scroll left or right, or press Menu > Go to Date. To quickly view
today’s schedule, on the home screen, press an upcoming appointment (if there is one).
Viewing your schedule for a specific date
You can also select a specific date to check that day’s schedule.
1. On the home screen, press the Start > All Programs.
2. Select Calendar > [OK].
3. Press [Menu] > Go to Date > [OK].
4. Enter the date to view, and press Done.
Viewing your schedule for the month
The calendar function has week views and month views, giving you an overview of your schedule.
1. On the home screen, press Start > All Programs.
2. Select Calendar > [OK].
3. Press Menu > Month View > [OK].
Page 40

40
To make an appointment recurring
If you’ve already entered a single appointment in your calendar and would like to change it to a recurring
appointment, use the Occurs selection after selecting the appointment.
1. On the home screen, press Start > All Programs.
2. Select Calendar > [OK].
3. Select an appointment and press Menu > Edit.
4. Scroll to Occurs and use [
/ ] to select one of the recurrence options.
5. Press Done.
Showing week numbers
In many cases the weeks of the year are referred to by number – the calendar function allows you the option
of displaying the number of the week, between 1 and 52.
1. On the home screen, press Start > All Programs.
2. Select Calendar > [OK].
3. Press Menu > Tools > [OK] or press [
] to view options menu, then press [OK].
4. Scroll to Month View.
5. Select Show Week Numbers.
6. Press Done.
NOTE: In week view, the week number appears at the top of the screen. In month view, the week numbers
appear along the left side of the screen.
Changing the working week display
Depending on your schedule, you may want to change the default working week displayed. You can choose
any day of the week to start and/or finish.
1. On the home screen, press Start > All Programs.
2. Select Calendar > [OK].
3. Press Menu > Tools > [OK] or [
] > Options.
Then do one of the following:
• To specify the first day of the week, in First day of week, press Sunday or Monday.
• To specify the number of days you want to appear in a week, in Week view, press 5-day week,
6-day week, or 7-day week.
4. Press Done.
Changing the reminder time
By default, the reminder time is set 15 minutes prior to an appointment.
1. In Calendar, press Menu > Tools > [OK] or [
] > Options.
2. Scroll to Set Reminders > [OK].
3. Change the time.
4. Press Done.
Page 41

41
Contacts
Using the Contacts feature of your Xda Venn, you can manage all the phone information you need. There are
many options for adding contacts, retrieving contacts, and managing the information for each contact.
Creating a new contact
To enter a new contact manually, without having the caller on the phone, you can use the Contacts selection
from the home screen.
1. On the home screen, press Start > All Programs.
2. Select Contacts > [OK].
3. Press New.
4. Enter information for the new contact.
5. Press Done.
TIP: If someone who isn’t in your list of contacts calls you, or sends you a message, you can create a contact
from Call History or from the message by pressing Menu > Save to Contacts.
Sending a contact
You can use your phone to send a contact to somebody else’s phone.
1. On the home screen, press Start > All Programs.
2. Select Contacts.
3. Select the contact to send.
4. Press Menu.
5. Select Send Contact > Messages > [OK].
6. Select contact information to send.
7. Press Done.
8. Write the phone number of the recipient of this message.
9. Press Send.
Calling a contact from contact information
You can call a contact directly by selecting them from the Contacts page from the home screen.
1. On the home screen, press Start > All Programs > Contacts or directly press Contacts.
2. Select the contact to call and press [OK].
3. Scroll to the phone number to dial.
4. Press [OK] or [
].
Page 42

42
Calling a contact from the contact list
If you do not select one of the contacts’ phone numbers, but you press [ ], your phone will dial the default
number for that contact.
1. On the home screen, press Start > All Programs > Contacts or directly press Contacts.
2. Select the contact to call.
3. Press [
]. The contact’s default phone number is dialled.
TIP: To call a phone number other than the default, press the contact, press [OK] and scroll to the number you
want to dial, then press [
].
Changing the default number for a contact
The default number for the contact will be the first number displayed. If you need to change the default
number, you can use the navigation key to set the new one.
1. On the home screen, press Start > All Programs.
2. Select Contacts > [OK].
3. Select the contact whose default number you want to change.
4. Press the [
/ ] to select the number or other contact method that you want to set as the default.
For example, (m)obile, (h)ome or (w)ork.
Duplicating a contact
This feature allows you to copy contacts in Device or SIM to the same area. (Device -> Device, SIM -> SIM)
1. On the home screen, press Start > All Programs.
2. Select Contacts > [OK].
3. Scroll to the contact to duplicate
4. Press Menu.
5. Select Duplicate Contact from the popup menu and press [OK].
Copying selected contacts to Device / SIM
This feature allows you to copy selected contacts in Device or SIM to other areas.
(Device -> SIM, SIM -> Device)
1. On the home screen, press Start > All Programs.
2. Select Contacts > [OK].
3. Scroll to the contact to duplicate.
4. Press Menu.
5. To select SIM Contact, press Copy to Device > [OK].
6. To select Device Contact, press Copy to SIM > [OK].
Page 43

43
Copying all contacts to Device / SIM
This feature allows you to copy all contacts in Device or SIM to the other location.
(Device -> SIM, SIM -> Device)
1. On the home screen, press Start > All Programs.
2. Select Contacts > [OK].
3. Press Menu.
4. To select SIM Contact, press Copy All to Device > [OK].
5. To select Device Contact, press Copy All to SIM > [OK].
Deleting a contact
Deleting a contact is very simple. Just use the Menu once you have selected the contact.
1. On the home screen, press Start > All Programs.
2. Select Contacts > [OK].
3. Scroll to the contact to delete.
4. Press Menu.
5. Select Delete Contact from the popup menu and press [OK].
Deleting all contacts in Device / SIM
This feature allows you to delete all contacts in Device or SIM.
1. On the home screen, press Start > All Programs.
2. Select Contacts and press [OK].
3. Press Menu.
4. To select SIM Contact, press Delete All SIM > [OK].
5. To select Device Contact, press Delete All Device > [OK].
Creating a contact during a phone call
Creating a contact for someone while they’re on the phone to you, makes their details easier to retrieve later.
The contact can be added to the Contact list during the call.
1. During a call, press Menu.
2. Select Save to Contacts > [OK].
3. Select New Contact.
4. Enter information about the contact.
5. Press Done. The contact is added to your Contact list.
Filtering the contact list
Contacts that you have categorised are displayed in a list when filtered by category.
1. On the home screen, press Start > All Programs.
2. Select Contacts > [OK].
3. Press Menu.
4. Select Filter from the popup menu and press [OK].
5. Select a category to filter.
Page 44

44
Finding a contact
The contact section of your phone has an auto-fill feature that will allow you to find contacts more quickly.
While entering the number or name of the contact, the phone will auto-fill the rest of the information as you
press the keys, until you find the right contact.
1. On the home screen, press Start > All Programs.
2. Select Contacts > [OK].
3. Begin entering the name or phone number of the contact you want to find until the contact is displayed.
For example, to find “Sandra,” enter [
] [ ] [ ] [ ] [ ] [ ] because these
numbers correspond to the letters for that name.
Sending an e-mail to a contact
If you have a contact’s e-mail address in their contact details, you can send them an e-mail after selecting
them from the contact list.
1. On the home screen, press Start > All Programs.
2. Select Contacts > [OK].
3. Select a contact and press [OK].
4. Scroll to the e-mail address and press [OK].
5. Select the e-mail account to use.
6. Enter a subject, compose your message, and then press [Send].
Sending a text message to a contact
You can send a text message to someone on your contact list after selecting the contact and pressing
the Menu.
1. On the home screen, press Start > All Programs.
2. Select Contacts > [OK].
3. Select a contact, and press [OK].
4. Press Menu > Send Text Message.
5. Compose your message, and press [Send].
Viewing and editing contact information
You may want to change or update contact information once it has already been entered. You can do so via
the Contacts menu of the home screen.
1. On the home screen, press Start > All Programs.
2. Select Contacts > [OK].
3. Select a contact, and press [OK].
4. Press Menu > Edit > [OK].
5. When you have finished making changes, press Done.
Page 45

45
Adding a photo to a contact
You may wish to add a photo to a contact record. You can add an existing picture, or you can put the phone
in camera mode to take a photo and add it to the contact.
1. On the home screen, press Start > All Programs.
2. Select Contacts > [OK].
3. Select a contact, and press [OK].
4. Press Menu > Edit > [OK].
5. Using the navigation key, scroll down to Picture.
Then do one of the following:
• Select the picture you want to add.
• Press Camera and take a picture.
Removing a photo from a contact
Once a picture is attached to a contact, it can easily be removed or changed from the Contacts menu by using
the soft key and editing the field.
1. On the home screen, press Start > All Programs.
2. Select Contacts > [OK].
3. Select a contact, and press [OK].
4. Press Menu > Edit > [OK].
5. Press Menu > Remove Picture > [OK].
Assigning a category to a contact
It may be helpful to group your contacts in categories for easier reference. Then if you know the contact’s
category, you can easily retrieve the contact.
1. On the home screen, press Start > All Programs.
2. Select Contacts > [OK].
3. Select a contact, and press [OK].
4. Press Menu > Edit > [OK].
5. Press Categories.
6. Use the [
/ ] to select the category you want.
7. Press Done.
NOTE: Categories are shared between your contacts and tasks. A category will remain in the list of shared
categories as long as it is assigned to at least one contact or task.
Page 46

46
Assigning a ring tone to a contact
To easily identify who is calling you by the ring tone, you can assign a custom ring tone to each contact.
1. On the home screen, press Start > All Programs.
2. Select Contacts > [OK].
3. Select a contact, and press [OK].
4. Press Menu > Edit > [OK].
5. Press Custom ring tone.
6. Select the ring tone you want.
7. Press Done.
Creating a speed dial
You can create a speed dial for a phone number, e-mail address, or Web page address that is
stored in Contacts.
1. On the home screen, press Start > All Programs.
2. Select Contacts > [OK].
3. Select the contact for the speed dial and press [OK].
4. Select the phone number, e-mail address, or Web page address for the speed dial.
5. Press Menu > Add to Speed Dial > [OK].
6. In keypad assignment, select the speed dial number to use.
7. Press Done.
NOTE: The number [
] is reserved for calling your voicemail box.
Using speed dials
Set up speed dial codes to allow you to call contacts by pressing only one (or two) buttons from the
home screen.
1. On the home screen, press and hold the number on the keypad that you have assigned as a speed dial for
the phone number, e-mail address, or Web page.
If the speed dial is in two digits, press the first digit, and press and hold the second digit.
The phone dials the phone number, opens a new e-mail message, or goes to the Web page.
Viewing and editing a speed dial
You can view or edit all the contacts you’ve assigned to speed dial by entering the Speed Dial menu
from the Start.
1. On the home screen, press Start > All Programs > More.
2. Select Applications > Speed Dial > [OK].
3. Select a contact you want to change and press [OK].
4. Make any changes and press Done.
Page 47

47
Deleting a speed dial
You can delete a speed dial at any time by following these instructions.
1. On the home screen, press Start > All Programs.
2. Select Applications > Speed Dial > [OK].
3. Select the speed dial to delete.
4. Press Menu > Delete from the popup menu.
Sending a contact as a Vcard
You can send a contact to other mobile users as a Vcard
1. On the home screen, press Start > All Programs.
2. Select Contacts > [OK].
3. Select the contact you want to send as a Vcard and press [OK].
4. Select Press Menu, select Send as Vcard and then press [OK].
5. Fill out the recipient information and the subject field and press Send.
Call History
Call history provides details of all calls received, missed and dialled.
1. On the home screen, press Start > All Programs > More.
2. Select Call History > [OK].
TIP: To view only missed calls, incoming calls or outgoing calls, press [Menu], select Filter, and then press the
type of calls to view.
NOTE: Missed Call is viewed on the main screen. Select the icon and press [OK] to go directly to Missed Call.
Viewing call timers
You can time any call you receive or make, and review the length of each call, too.
1. On the home screen, press Start > All Programs > More.
2. Select Call History > [OK].
3. Press Menu > View Timers from the popup menu.
Resetting call timers
When call information is no longer required, the call timers can be set to zero.
1. On the home screen, press Start > All Programs > More.
2. Select Call History > [OK].
3. Press Menu > View Timers from the popup menu and press [OK].
4. Press Menu > Reset Timers > [OK].
5. Press Yes. All of the call timers are set to zero (0), except for the Lifetime calls timer.
Page 48

48
Viewing the details of a call
To review all the stored information about a call, you access the Call History function.
1. On the home screen, press Start > All Programs > More.
2. Select Call History > [OK].
3. Select a call to view details and press [OK].
Creating a contact from Call History
While you are in the Call History function, you can select any of the calls and automatically add that caller
to your contact list.
1. On the home screen, press Start > All Programs > More.
2. Select Call History > [OK].
3. Select the phone number for which to create a contact and press Menu > Save to Contacts in the popup
menu and press [OK].
4. Select New Contact > [OK].
5. Enter the remainder of the contact information and press Save. The new contact appears in your
contact list.
Deleting a call from Call History
You can delete any entry in the Call History by selecting the entry and then accessing the menu.
1. On the home screen, press Start > All Programs > More.
2. Select Call History > [OK].
3. Select the item to delete.
4. Press Menu > Delete from the popup menu.
TIP: To delete all items in Call History, press Start > All Programs > More > Call History > Menu > Delete List.
Dialling the last number called
If you need to quickly dial the last number you called, this shortcut lets you do so without using menus.
1. On the home screen, press [
].
2. Press [
] again.
Inserting an international country code
To make an international call you must include a country code at the beginning of the phone number.
1. Press and hold 0 until a plus (+) sign appears, enter the country code, and then enter the rest of the phone
numb er.
NOTE: You can insert a plus (+) sign into a contact’s phone number or dial it directly from the keypad.
Page 49

49
Sending an E-mail via Call History
To use this function, the e-mail address of the person you’re e-mailing must be included in their contact
information card.
1. On the home screen, press Start > All Programs > More.
2. Select Call History > [OK].
3. Select the contact you want to e-mail and press Menu.
4. Scroll to E-mail > [OK].
5. Select an e-mail account.
6. Compose the message and press Send.
Page 50

50
Section 4
Voicemail and Messaging
This section covers Voicemail, Text, Multimedia Message
and E
–
mail Messaging on your phone:
Voicemail • Text Messaging • Multimedia Message • E
–
Mail
Page 51

51
Voicemail
Voicemail is available 24/7. When you call your voicemail, the messages will be played back in the order they
were received. You will have options to save, delete, replay, or skip each message.
Calling your voicemail box
Retrieving your voicemail is simple. Your voicemail box can be accessed directly from the home screen.
1. On the home screen, press and hold [
] to call your voicemail box.
2. Follow the instructions to retrieve your messages.
Text messaging
You can create a text message, delete a text message, or clear all text messages. Contacts from the contact list
can be used for sending messages just as they can be used to make calls.
Creating a text message
The Xda Venn allows you to create text messages quickly. You create a text message by typing in a phone
number or by selecting a contact first.
1. On the home screen, press Start > All Programs > Messaging > [OK].
2. Select Messages > [OK].
3. Press Menu > New > Text Message.
4. In “To”, enter text message recipients’ phone numbers. Insert a semicolon (;) between multiple text
message recipients’ phone numbers.
5. Press [
] and compose message you want to send.
6. Press [Send]. Text messages are sent immediately.
TIP: You can quickly enter recipients’ phone numbers from your contact cards. In To, press Menu > Add
Recipient from the list. Then, select the recipient’s phone number. To cancel creating a message, just press
Menu > Cancel Message.
Deleting all messages
To clear all messages in a folder, you will need to view all the folders and select the one you want.
1. On the home screen, press Start > All Programs > Messaging > [OK].
2. Select Messages > [OK].
3. Press [Menu] > Folders.
4. Press [Menu] > Show all Folders.
5. Select the folder with the messages you want to delete.
6. Press Menu > Delete All.
7. Press Yes to confirm the deletion.
Page 52

52
Multimedia Messaging
The Multimedia Messaging Service allows you to send messages which can include text, graphics
and ring tones.
Creating a Multimedia message
Creating a Multimedia message is simple. You can add images or attachments to a text or email message.
1. On the home screen, press Start > All Programs > Messaging > [OK].
2. Select Messages > [OK] > Menu > New > Multimedia Message.
3. Enter an e-mail address or phone number.
4. Input a subject of this Multimedia message.
5. Input text message in text box.
6. To add an image, press Menu > Add Item > [OK] > Image.
7. Select an image from picture file browser and the image is added to the Multimedia message.
8. Press Send to send message.
9. If Multimedia message was sent successfully, a ‘Message sent successfully’ dialogue box will appear.
TIP: You can quickly enter recipients’ phone numbers from your contact cards. In To, press Menu > Add
Recipient from the list. Then, select the recipient’s phone number.
To cancel creating a Multimedia message, just press Menu > Cancel Composer.
Using the text box
Simply enter the text that you wish to send.
Multimedia message Menu options
The Menu supports advanced MMS composer option.
Menu option Description
Preview Press Menu >Preview
Preview is displayed when Multimedia message has content (image, sound,
text or video). Preview is not displayed when message is empty.
Add Recipient You can add the recipient’s address from Contact list or upload pictures to
HP’s Snapfish.
Press Menu > Add Recipient to select the recipient’s address from Contact list.
Press Menu > Add Recipient > Contacts: Add a contact from Contact list.
Press Menu > Add Recipient > Multi Contacts: Add multiple contacts from
Contact list at once.
Press Menu > Add Recipient > HP’s Snapfish: Upload photos on the web.
Press Menu > Add Recipient > Bcc: Show Bcc field to add recipients in
Bcc field.
Press Menu > Add Recipient > Cc: Show Cc field to add recipients in Cc field.
Page 53

53
Menu option Description
Check Name Press Menu > Check Name, convert phone number to corresponding name,
if that number is registered in contact list.
Add Item You can add content such as text, image, sound, video, vCard, vCalendar,
and Attachments.
Press Menu > Add Item > Text: Enter a text message in the text box.
Press Menu > Add Item > Image: Select image file from My Pictures.
Press Menu > Add Item > Sound: Select sound file from My Documents.
Press Menu > Add Item > Video: Select video file from My Videos.
Press Menu > Add Item > vCard: Select a vCard.
Press Menu > Add Item > vCalendar: Select a vCalendar.
Press Menu > Add Item >Attachments: Select any file from all of memory.
Create Item You can add a picture, video or sound from camera and Voice.
Press Menu > Create Item > Picture: Take a picture with camera and add it to
Multimedia message.
Press Menu > Create Item > Video: Record a video with Camcorder and add it
to Multimedia message.
Press Menu > Create Item > Sound: Record a Voice and add it to
Multimedia message.
Template You can add current components as a template, or replace with previous
saved templates.
Press Menu > Template > Add Template: Replace current components with
previous saved components.
Press Menu > Template > Save as Template: Save current components as a
new template.
Remove Item You can remove content such as image, sound, text and video.
Press Menu > Remove Item.
My Text Press Menu > My Text.
You can add predefined text messages to text field.
Copy/Paste Press Menu > Copy/Paste.
You can cut, copy, paste text messages to text field.
Priority Level You can set the importance of Multimedia message.
Press Menu > Priority Level > High: Set Multimedia message to be important.
Press Menu > Priority Level > Normal: Set Multimedia message to be normal.
Press Menu > Priority Level > Low: Set Multimedia message to be low.
Page 54

54
Menu option Description
Page Layout You can set the layout of Multimedia message in preview.
Press Menu > Page Layout > Image Top: Place image on top and text
below in preview.
Press Menu > Page Layout > Text Top: Place text on top and image
below in preview.
Options You can set the importance of Multimedia message.
Press Menu > Options > Insert Page: Insert a new page at current page.
Press Menu > Options > Delete Page: Delete current page.
Press Menu > Options > Move Page: Change the order of current page.
Press Menu > Options > Duration: Set durations between pages.
Press Menu > Options > Multimedia Msg. Options: Set properties of
Multimedia message such as profile, automatic download, delivery
reports, etc.
Press Menu > Options > Individual Msg. Setting: Set properties of each
message such as delivery report, read report, etc.
Press Menu > Options > About: Show information about Multimedia
Message client.
Save Press Menu > Save: Save Multimedia message in draft folder Back to Inbox.
Cancel Composer Press Menu > Cancel Composer: Cancel Multimedia message Back to Inbox.
Viewing a Multimedia Message
To view a Multimedia message, simply select Multimedia message from the messaging menu and you will see
a list of Inbox messages.
1. On the home screen, press Start > All Programs > Messaging > [OK].
2. Select the Multimedia message you want to see from the list of Inbox messages.
3. Press [OK] to play message.
Page 55

55
Replying with a Multimedia Message
After selecting Multimedia message from the Messaging menu, you can use the Menu to go through each
field that is available when composing a message.
1. On the home screen, press Start > All Programs > Messaging > [OK].
2. Select Messages and select the received message you want to reply to.
3. Press Menu > Reply to send a reply Multimedia message to sender and Cc, Bcc.
4. Press Menu > Reply to all to send a reply Multimedia message to all senders. Open Multimedia message
editor and display To field with RE: all sender addresses including Cc, Bcc sender.
5. Press Menu > Forward to forward Multimedia message, open Multimedia message editor.
6. Press Menu > Save Address to save address to phonebook.
7. Press Menu > Details to show detailed information about current Multimedia message, such as message
size, sender.
8. Press Menu > Delete to delete current message in the inbox list.
9. Press Menu > Back to terminate Multimedia message viewer and go back to the Inbox message list.
Changing messaging account options
Multimedia message, e-mail and text messages can be displayed differently and you can select from many
options for each.
1. On the home screen, press Start > All Programs > Messaging > [OK].
2. Select Messages or E-mail account > [OK].
3. Press Menu > Tools > Options.
4. Select the type of options to change.
5. Press Done.
Changing how the message list displays
You can change the order in which messages are displayed and show the date and time that messages
were received.
1. On the home screen, press Start > All Programs > Messaging > [OK].
2. Press Menu > Tools > Options > Display.
3. Change the display options and press Done.
Creating a message from a contact card
Just as you can make a phone call using a contact card, you can select a contact and send a message using
the contact card.
1. On the home screen, press Start > All Programs > Contacts > [OK].
2. Select a contact.
3. Select the messaging address or phone number to use.
4. Select the account to use and press [OK].
5. Use left soft key that displays corresponding action, or press [Menu] and select the message you want
to use. For example, ‘Send Text Message’ ‘Send Multimedia Msg.’
6. A new message opens ready for you to complete and send.
TIP: To cancel a message, press Menu > Cancel Composer.
Page 56

56
E-mail
The Xda Venn allows you to send e-mails with several options. You can copy, blind copy, set priority, and store
e-mails just as you would from a computer. The Xda Venn uses Outlook as the default mail program.
You can send and receive e-mail messages in one of these ways:
• Synchronise e-mail messages with Microsoft® Exchange or Microsoft® Outlook on your PC.
• Send and receive e-mail messages by connecting directly to an e-mail server through an Internet Service
Provider (ISP) or a network.
Synchronising e-mail messages
Use the Outlook E-mail account to send and receive e-mail messages by synchronising e-mail messages with
Microsoft® Exchange or Microsoft® Outlook on your PC. E-mail messages can be synchronised as part of the
general synchronisation process. You will need to enable Inbox synchronisation in ActiveSync.
During synchronisation:
• Messages are copied from the mail folders of Exchange or Outlook on your PC to the Outlook E-mail
folders on your phone.
• E-mail messages in Outlook E-mail on your phone are transferred to Exchange or Outlook, and then sent
from those programs.
Connecting directly to an E-mail Server
You can send and receive e-mail messages by connecting to an e-mail server. You’ll need to set up a remote
connection to a network or an ISP, and a connection to your e-mail server. When you connect to the e-mail
server, new messages are downloaded to the phone’s Inbox folder. Also, messages in the phone’s Outbox
folder are sent, and messages that have been deleted on the e-mail server are removed from the phone’s
message folders.
Folder Behaviour during a direct connection to an E-mail Server
The behaviour of the folders you create depends on whether you are using POP3 or IMAP4.
• If you use POP3 and you move e-mail messages to a folder you created, the link is broken between the
messages on the phone and their copies on the mail server. The next time you connect, the mail server
will see that the messages are missing from the phone and delete them. This prevents you from having
duplicate copies of a message, but it also means that you will no longer have access to messages that you
move to folders created from anywhere except the phone.
• If you use IMAP4, the folders you created and the e-mail messages you moved are mirrored on the server.
Therefore, messages are available to you any time you connect to your mail server. This synchronisation
of folders occurs whenever you connect to your mail server, create new folders or rename/delete folders
when connected.
Page 57

57
Creating an E-mail Account
You need to create a new account to be used for retrieving and sending e-mail messages.
To make a new account:
1. From the main Messaging screen, select Setup E-mail.
2. Enter your e-mail address. If you want to save your password, enter your password and select Save
Password > Next.
3. If you want to set up your account automatically from the Internet, select Try to get e-mail settings
automatically from the Internet and press Next.
4. If it couldn’t find the setting, press Next.
5. Select your e-mail provider, one or both of Internet e-mail or Exchange server.
6. Enter your display name and press Next.
7. Enter your Incoming mail server and select Account type and press Next.
8. Enter your user information, such as user name, password, and press Next.
9. Enter the Outgoing (SMTP) mail server names and press Next.
10. Select how often your phone automatically connects to the server and checks for incoming e-mails
11. Press Finish.
To edit an account:
1. From the main Messaging screen, scroll to the account you want.
2. Press the Menu > Settings.
3. Change the account settings as you would when creating it.
Creating an e-mail message
You can create an e-mail message from a contact card, or by typing in the address.
1. On the home screen, press Start > All Programs > Messaging > [OK].
2. Select E-mail.
3. Press Menu > New.
4. In To, Cc and/or Bcc enter the recipient’s e-mail addresses. Insert a semicolon (;) between the
multiple addresses.
5. Enter a subject.
6. Enter a message.
7. Press Send. E-mail messages are stored in Outbox and are sent to recipients the next time you synchronise
or connect to your e-mail server and send and receive mail.
TIP: You can quickly enter e-mail addresses from your contact cards. In To, press ENTER and select a recipient
from the list. Then, select the recipient’s e-mail address.
To set the priority, press Menu > Message Options. To cancel creating an e-mail message, press Menu >
Cancel Message.
Page 58

58
Overview of e-mail security
You can help prevent impersonation, tampering, and eavesdropping when sending e-mail messages from
your Outlook e-mail account by using Secure Multipurpose Internet Mail Extensions (S/MIME) digital
signatures and encryption.
A signature helps prevent impersonation and tampering. Impersonation occurs when a hacker sends e-mail
messages while pretending to be someone else. Tampering occurs when a hacker intercepts your e-mail
messages and changes the message without the recipient’s knowledge.
Signing a message applies the sender’s certificate (and public key) to the message. This proves to the recipient
that the message is from the sender and not from an impostor.
Encryption helps prevent eavesdropping, which occurs when a hacker intercepts and reads your e-mail
messages. Using a cryptographic message format such as S/MIME for encryption helps improve e-mail privacy
because it converts plain, readable text of the message into cipher (scrambled) text. The sender’s messaging
program uses the recipient’s public key to encrypt (lock) the e-mail message and attachments. Only the
recipient who has the private key that matches the public key you used to encrypt the message can decipher
(unscramble) the message.
A certificate is a digital means of proving your identity. When you send a digitally signed message, you are
sending your certificate and public key. Certificates can expire or be revoked.
NOTE: S/MIME encryption and digital signatures for Windows® Mobile-based devices are available only with
Exchange Server 2003 Service Pack 2 or a later version that supports S/MIME. If you aren’t using one of these
products, or have not yet synchronised, these options are unavailable.
Downloading an e-mail message
You can save e-mail messages and retrieve them at any time when you synchronise or connect to your
mail server.
1. On the home screen, press Start > All Programs > Messaging > [OK].
2. Select an e-mail account and the message to download.
3. Press Menu > Download Message. The complete message is retrieved the next time you synchronise
or connect to your e-mail server and send and receive e-mail.
Downloading an attachment
In an open message with an attachment to download, press the attachment. The attachment is downloaded
the next time you synchronise or connect to your e-mail server and send and receive e-mail.
NOTE: If there are multiple attachments in the message, all attachments are downloaded.
Page 59

59
Selecting a folder for synchronisation
When you synchronise your Outlook e-mail account with your PC, the same Inbox folders that are in Outlook
on your PC are created on your phone.
1. On the home screen, press Start > All Programs > Messaging > [OK].
2. Select Outlook e-Mail.
3. Press Menu > Folders.
4. Press Menu > Show All Folders.
5. Press Menu > Manage Folders.
6. Select a folder to synchronise and press Show Sync Folder.
7. Press Done. The next time you synchronise, the folder(s) that you selected on your phone are synchronised
with the corresponding folders in Outlook on your PC.
Adding a picture to an e-mail message
You can retrieve pictures that have been downloaded to your phone and insert them into your
e-mail messages.
1. In the message area of an e-mail message, press Menu > Insert > Picture.
2. Select the picture you want to add.
Verifying the digital signature on a message you receive
For additional security, you can check digital signatures on messages before opening them. In some cases,
the signatures may not be available.
1. Open the message that has been digitally signed.
2. At the top of the message, press View Signature Status.
3. Press Menu > Check Certificate.
NOTE: There can be several reasons why a digital signature is not valid. For example, the sender’s certificate
may have expired, it may have been revoked by the certificate authority, or the server that verifies the
certificate is unavailable. Contact the sender to report the problem.
S/MIME encryption and digital signatures for Windows® Mobile-based devices are available only with Exchange
Server 2003 Service Pack 2 or a later version that supports S/MIME. If you aren’t using one of these products,
or have not yet synchronised, these options are unavailable.
Sending and receiving Internet e-mail messages
Using the Xda Venn you can connect to the Internet to send and receive e-mails.
1. On the home screen, press Start > All Programs > Messaging.
2. Select the Internet e-mail account you want to use, to send and receive messages.
3. Press Menu > Send/Receive. The phone connects to your Internet e-mail server and sends and receives
your messages.
NOTE: To stop this process, press Menu > Stop Send/Receive.
Page 60

60
Adding a voice recording to an e-mail message
Inserting a voice recording is useful when you want to verbally explain information that is contained in
the message.
1. In the message area of an e-mail message, press Menu > Insert > Voice Note.
2. Press Record and start speaking into the phone’s microphone.
3. When you have finished speaking, press Stop.
4. Press Done.
5. Press Send.
Setting up an Internet e-mail account
Before you set up your Internet e-mail account, ensure that you have the necessary information to hand.
Setting Description
User name Usually the first part of your e-mail address, which appears before
the ‘at’ sign (@).
Password Choose a strong password. You will have the option to save your
password, so that you do not need to enter it each time you connect
to your e-mail server.
Domain The domain name. This may be required.
Account type The type of e-mail server that hosts your mailbox (POP3 or IMAP4).
Account name A name for this account. You must use a different name for each account
that you set up.
Network The type of network your e-mail server connects to.
Incoming mail server The name of your e-mail server (POP3 or IMAP4).
Require SSL connection Select this to ensure you always receive e-mail for this account using an
SSL connection. This enables you to receive personal information more
securely. Please note that if you select this and your ISP does not support
an SSL connection, you will not be able to connect to receive e-mail.
Outgoing mail server The name of your outgoing e-mail server (SMTP).
Outgoing server requires
authentication
Your outgoing e-mail server (SMTP) may require authentication. NOTE:
Your user name and password from above will be used.
Outgoing server settings Your outgoing e-mail server may require different authentication settings
than your incoming e-mail server.
Use different user name for
outgoing server
Check box, where you enter a separate setting for your outgoing
e-mail server.
User name Your user name for the outgoing e-mail server.
Password Your password for the outgoing e-mail server.
Domain The domain name of the outgoing e-mail server.
Require SSL connection
(Outgoing mail server only)
A connection that enables you to send personal information more
securely. Note that if you select this and your ISP does not support an SSL
connection, you will not be able to send e-mail.
Page 61

61
Deleting a message
Messages from any account can be deleted. Select the Messaging function from the home screen.
1. On the home screen, press Start > All Programs > Messaging > [OK].
2. Select an account.
3. Select the message to delete.
4. Press Menu > Delete.
NOTE: Messages deleted from the Outlook E-mail account will be deleted from Outlook on your PC
or Exchange Server the next time you synchronise.
Deleting an account
You can delete accounts you have previously set up in the Messaging function.
1. On the home screen, press Start > All Programs > Messaging > [OK].
2. Select an account to delete.
3. Press Menu > Delete.
Editing predefined text
You can edit the predefined text included with your phone to create words or phrases that you frequently
use in messages.
1. On the home screen, press Start > All Programs > Messaging > [OK].
2. Select an account.
3. Press Menu > New and scroll to the body of the message.
4. Press Menu > My Text.
5. Press Menu > Edit My Text.
6. Select the text to edit.
7. Edit the text and press Done.
Emptying the Deleted Items folder
If you don’t need to store deleted items, you can delete the Deleted Items folder itself.
1. On the home screen, press Start > All Programs > Messaging > [OK].
2. Select an account.
3. Press Menu > Tools > Empty Deleted Items.
Forwarding a message
When you have received a message, it is possible to forward the message to another account or user.
1. With the message you’ve received open, press Menu > Reply > Forward.
2. Enter a message in the message area.
3. Press Send.
NOTE: If you are forwarding e-mail from the Outlook e-mail account, you will send less data if you do not edit
the original message. This may reduce data transfer costs based on your rate plan.
Page 62

62
Inserting predefined text into a message
To save time when entering text, you can insert predefined text into messages.
1. On the home screen, press Start > All Programs > Messaging > [OK].
2. Select an account and press Menu > New.
3. Press Menu > My Text.
4. Press the text you want to insert.
TIP: Quickly insert text by entering its associated number.
Marking a message as Read or Unread
You have the option of marking messages you’ve received as Read or Unread for later retrieval.
1. On the home screen, press Start > All Programs > Messaging > [OK].
2. Select an account.
3. Select the message to mark.
4. Press Menu.
5. Press Mark as Read or Mark as Unread. The message display is changed to reflect its new status: normal
text for read messages and bold text for unread messages. When you synchronise or send and receive
e-mail, the message is displayed as read or unread in all locations.
Moving a message to a different folder
Whether a message is open or not, you can move it to another folder from any account.
1. On the home screen, press Start > All Programs > Messaging > [OK].
2. Select an account.
3. Scroll to the message to move.
4. Press Menu > Move.
5. Press the folder into which to move the message.
TIP: You can move an open message in the same manner, by pressing Menu > Move.
Opening a message
To review or use a message, you open it from its account in the Messaging function.
1. On the home screen, press Start > All Programs > Messaging > [OK].
2. Select an account.
3. Select the message to open and press [OK].
4. To return to the message list, press [
].
TIP: To open the next message in the list while you have a message open, press [
]; to open the previous
message in the list, press [
].
Page 63

63
Moving quickly between accounts
Your messages are stored in accounts. You’ll find it convenient to be able to move from account to
account quickly.
Do one of the following:
• If you have an account open, you can quickly switch to another account by pressing [
/ ].
• Press Menu > Tools > Switch Accounts.
Sending a message draft
If you wish to have a message draft reviewed by someone else, you can retrieve a stored draft or an open
draft and send it to them.
1. On the home screen, press Start > All Programs > Messaging > [OK].
2. Select an account.
3. Press Menu > Folders.
4. Press Drafts.
5. When you have finished composing the message, press Send.
Replying to a message
You can reply to a message easily when you have that message open.
1. With the message you’ve received open, press Menu > Reply > Reply or Reply All.
2. Enter a message in the message area.
3. Press Send.
4. If you are replying to an e-mail in the Outlook E-mail account, you will send less data if you do not edit the
original message. This may reduce data transfer costs based on your rate plan.
Saving a draft of a message
You can save a draft of a message you’re composing, to finish and send later.
1. While you have the message you’re composing open, press Menu > Save to Drafts. A draft of the message
is stored in the Drafts folder of the account you are in.
Setting the language for reading or composing a message
The Xda Venn has many languages and character sets to choose from. Each message can be read or
composed in whatever language you require. To choose a language for reading a message:
1. With the received message open, press Menu > View > Languages.
2. In Email message language, scroll to the language you need.
3. Press Done. The message is displayed using the appropriate characters for the language you have selected.
TIP: When you are composing press Menu > Message Options > Language to set the language.
Page 64

64
To stop adding a signature to messages
If you have previously added a signature to an account and wish to stop using it, you can turn the signature
off for that account.
1. On the home screen, press Start > All Programs > Messaging > [OK].
2. Select an account.
3. Press Menu > Tools > Options > Signatures.
4. If necessary, press [
/ ] to switch to the account that is using the signature.
5. Clear Use signature with this account and press Done. A signature will no longer be inserted in messages
you send from this account.
Viewing an attachment
Many e-mail messages come with attachments. You can view attachments for file types that are supported
by the phone.
First open the message, then select the attachment and it will open.
NOTE: You can view attachments only for file types that are supported by the phone. You may need to add
third party software to view documents, spreadsheets, presentations and .pdf files.
Viewing message folder contents
You can store messages in folders and create the types of folders you need.
1. On the home screen, press Start > All Programs > Messaging > [OK].
2. Select an account.
3. Press Menu > Folders.
4. Press the folder to view.
5. To return to the message list view of the Inbox folder, press Menu > Folders > Inbox.
TIP: To view all Outlook E-mail folders, including those not marked for synchronisation,
press Menu > Show All Folders.
Viewing the Inbox
Your messages are kept in an Inbox. You can review the messages stored in the Inbox.
1. On the home screen, press Start > All Programs > Messaging > [OK].
2. Select an account.
3. The Inbox message list displays your received messages.
TIP: To quickly view new messages, press the message notification area in the home screen.
Page 65

65
Viewing the list of accounts
If you have added accounts to your phone, you can see a list of all the accounts at once, if you wish.
1. On the home screen, press Start > All Programs > Messaging > [OK].
2. The list of accounts is displayed, with the number of unread messages in the Inbox of each account shown
in brackets.
TIP: You can open an account by selecting it from the list.
What is SSL?
Secure Sockets Layer (SSL) is a security protocol that enables you to send personal information more securely
over the Internet.
When you send a message from an account you have with an Internet service provider (ISP) or from an
account you access using a VPN server connection (typically a work account), Messaging always tries to use an
SSL connection. However, sometimes the e-mail server at the other end doesn’t support SSL, so the message is
sent without an SSL connection.
To ensure that your e-mail is always sent using an SSL connection, or not at all, select ‘Require SSL connection’
when you set up your e-mail account.
Page 66

66
Section 5
Organiser
Alarm • Voice Note • Notepad • Calculator • World Time • Tasks
Page 67

67
Alarm
Using the alarm
You can use the alarm clock to set a wake-up alarm or an alarm to remind you of an appointment.
1. On the home screen, press Start > All Programs > Organiser > Alarm > [OK].
2. Select Alarm1 or Alarm2 > [OK].
NEW Alarm registration
Set Time, Alarm1(or 2), Sound, Type, and Volume.
• Alarm1 (or 2) time: Time for wake-up alarm.
• Alarm1 (or 2): Alarm1or 2 activation on/off..
• Alarm1 (or 2) sound: Choose an alarm melody.
• Alarm1 (or 2) type: Choose an alarm type.
• Alarm1 (or 2) volume: Adjust alarm volume.
Voice Note
In addition to making and receiving calls, scheduling and keeping contacts, the Xda Venn allows you to save
your own reminders and messages in voice format.
Creating a voice note
To create a voice note, you follow a simple procedure, then just speak into the microphone as you would when
making a call.
1. On the home screen, press Start > All Programs > Organiser > Voice Note > [OK].
2. Briefly press Record and speak into the microphone to record your voice note.
3. Press Stop to stop recording a voice note.
4. The voice note is recorded and appears in the all notes list of voice note.
Listening to a voice note
You can retrieve any voice notes you wish. When voice notes are saved, they are recorded by time
and category.
1. On the home screen, press Start > All Programs > Organiser > Voice Note > [OK].
2. Select the voice note to play and press Menu > Play.
3. To stop listening to the voice note, press Stop while the voice note is playing.
NOTE: You can also play a voice note by selecting it in the All Notes list, then pressing [OK].
Page 68

68
Deleting a voice note
When you have no further need for a voice note, you can delete it completely from the phone.
1. On the home screen, press Start > All Programs > Organiser > Voice Note > [OK].
2. Select the voice note to delete.
3. Press Menu > Delete > [OK].
NOTE: If you delete a voice note that has a default name, such as Recording1, this name becomes available
for a new voice note.
Renaming a voice note
You can rename a voice note, or assign it to a different category.
1. On the home screen, press Start > All Programs > Organiser > Voice Note > [OK].
2. Select the voice note to rename.
3. Press Menu > Rename > [OK].
4. Enter a new name.
5. Press Done.
Setting a voice note as a ringtone
You can choose to set a voice note as ringtone.
1. On the home screen, press Start > All Programs > Organiser > Voice Note > [OK].
2. Select the voice note to set as a ringtone.
3. Press Menu > Set As Ringtone > [OK].
Notepad
Using Notepad, you can create, view, send and delete memos.
To access Notepad:
1. On the home screen, press Start > All Programs > Organiser > Notepad.
Creating a memo
1. Press New.
2. Enter the memo text and press Done.
Viewing a memo
To view memo details, select the memo you want from the list.
Page 69

69
Sending a memo
You can send your notes as part of an SMS or email message.
1. Scroll to the memo you want.
2. Press Menu > Send via Email or Send via Text Message.
3. Compose and send a message.
Deleting a memo
1. Scroll to the memo you want.
2. Press Menu > Delete.
3. Press OK to confirm the deletion.
Calculator
Using the calculator
Perform standard mathematical operations such as addition, subtraction, multiplication, and division.
1. On the home screen, press Start > All Programs > Organiser > [OK].
2. Select Calculator > [OK].
3. Enter a number using the keypad.
4. Press Menu and choose the type of calculation to perform and Equals to perform the operation,
then press [OK].
TIP: Press * to enter a decimal. Use the navigation key to display the available mathematical symbols:
up for plus (+), down for minus (-), right for division (/), and left for multiplication (x).
• Press [
] to make a negative number.
• Press [
] briefly to clear the last digit entered.
• Press [Clear] to clear the display.
World Time
Using the world time
You can set up the world clock with the time zones you want, and then check the current time of the city
you need, whenever you like.
1. On the home screen, press Start > All Programs > Organiser > [OK].
2. Select World Time > [OK].
3. Select one of the three time zone, and press Menu > Edit.
4. Press [
/ ] to move the time zone line. To apply daylight savings to the currently selected time zone,
press DST Off/On.
5. Press Done to save the selected time zone.
6. Press Local time to set the time.
7. Repeat from step 3 to select another time zone.
NOTE: On the world time screen, press Local time to set this zone as local time.
Page 70

70
Task s
Creating a task
The Xda Venn allows you to create a new task with reminders for your task list, from your phone or
from your PC.
1. On the home screen, press Start > All Programs > Organiser > [OK].
2. Select Tasks > [OK].
3. In the Enter new task here box, enter the task name and press [OK].
NOTE: You can synchronise information on your phone with your PC to keep your task list up to date in
both locations.
If you create a new task with a reminder on your PC, and then synchronise tasks with your phone, the
reminder will play at the time it was set on your PC.
Changing a completed task to incomplete
If you have marked a task as complete on your list and the status changes, you can easily go back to the task
and change its status to incomplete by “activating” the task again.
1. On the home screen, press Start > All Programs > Organiser > [OK].
2. Select Tasks > [OK].
3. Select the task and press Activate.
Assigning a category to a task
The categories you can assign to a task are the same as those categories you’ve defined for appointments
and contacts. You can also add categories from the Task menu.
1. On the home screen, press Start > All Programs > Organiser > [OK].
2. Select Tasks > [OK].
3. Select the task to assign and press Edit.
4. Select Categories and check the category you want.
5. Press Done.
NOTE: A category will remain in the list of shared categories as long as it is assigned to at least one
appointment, contact, or task.
Deleting a task
To remove a task from your list you have to delete it. Marking a task as complete will not delete the task
from your list.
1. On the home screen, press Start > All Programs > Organiser > [OK].
2. Select Tasks > [OK].
3. Select the task, and press Menu.
4. Select Delete Task > [OK].
Page 71

71
Marking a task as complete
To show a task has been finished, you can mark it as complete through the Tasks menu.
1. On the home screen, press Start > All Programs > Organiser > [OK].
2. Select Tasks > [OK].
3. Select the task and press Complete.
Locating a task
There are many ways to find a task on your list; you can view and sort the entire task list, or filter the
list by category.
1. On the home screen, press the Start > All Programs > Organiser > [OK].
2. Select Tasks > [OK]. In the task list, do one of the following:
• To sort the list, press Menu > Sort By. Choose a sort option and press [OK].
• To filter the list by category, to sort the list, press Menu > Filter.
Choose the category you want displayed and press [OK].
TIP: To filter your tasks further, press Active Tasks or Completed Tasks.
NOTE: Categories only appear in Tasks that are synchronised with your PC.
Page 72

72
Section 6
Windows
®
Media player®
This section covers Windows® Media Player®,
which lets you play and manage media files.
Windows® Media Player®
Page 73

73
Windows® Media Player®
Your ø Xda Venn smartphone comes with Microsoft® Windows® Media Player® 10.3. You can play Windows®
Media Audio, Windows® Media Video, and MP3 audio files that are stored on your phone, on a memory card,
or on the Web.
You can open Windows® Media Player® as follows:
1. On the home screen, press Start > All Programs.
2. Select Windows® Media Player® > [OK].
NOTE: Content providers use a technology called Digital Rights Management (DRM), to encrypt the files. That
makes some options unable to operate. The reason some digital media files are encrypted is to prevent these
files from being unlawfully distributed or shared.
Copying media files
You can use ActiveSync® to copy media files from a computer to your phone.
1. Connect your phone to the computer.
2. Start synchronisation.
3. Open the file directory on the phone using File Explorer.
4. Drag the media files and drop them into a folder.
Windows® Media Player® automatically retrieves. But, if the media files do not appear in Library, you can
update it by pressing the Windows® Media Player’s Menu and selecting Update Library.
You can also use the desktop Windows® Media Player® to copy media files. Licences and protected files are
copied. It is best to make sure that you have Windows® Media Player® 10.3 or later versions on your desktop
computer. If you use different version of your Windows® Media Player®, the procedure to copy files may vary.
1. Connect your phone to the computer.
2. Start synchronisation.
3. Open Windows® Media Player® on the computer.
4. Press the Sync > Edit Playlist.
5. Select the media files > [OK].
6. Select the saving location.
7. Select the quality level and press [OK].
8. Press Start Sync.
Page 74

74
To access libraries, press Menu from the player screen and then select Library. The library screen contains
categories, such as My Music, My Videos, My TV and My Playlists. From the library screen, press Menu and you
can see following options:
• Queue Up: adds the selected file to the end of the current playlist.
• Delete from Library: deletes the selected file or all files from the library.
• Now Playing: opens the current playlist.
• Library: allows you to select the library that you want to view.
• Update Library: adds new files to the library by searching your phone or a memory card.
• Open File: allows you to find and play files that are stored on your phone or a memory card,
but which are not in the library.
• Open URL: allows you to specify a URL address for a streaming service.
• Properties: displays information about the selected file.
• Player: closes the Library screen and displays the player screen.
Playing media files
If you have copied media files to your phone’s memory or memory card, you can play them using
Media Player®
Playing media files from a library
1. On the library screen, if necessary, press Menu > Library and select the memory from which you
want to retrieve files.
2. Press Menu > Update Library.
3. When libraries have been updated, press Done.
4. Select a category.
5. Scroll to the library you want to play and press Play.
If the file does not appear in a library, on the Library screen, press the Menu > Open File.
Then select the file you want to play. The player screen will appear and the file you have chosen will start
playing. Use the following options during playback:
• To adjust the Windows® Media volume, press [
/ ]. You can view the volume level on the screen.
• To adjust the earpiece volume, press ▲ / ▼.
• To move backward in a file, press and hold [
].
• To move forward in a file, press and hold [
].
• To access the next file, press [
].
• To access the previous file, press [
].
• To pause or resume playback, press [OK].
• To play the files in the playlist randomly or repeatedly, press the Menu > Shuffle/Repeat
> Shuffle or Repeat.
• To view the video on a full screen, press the Menu > Full Screen.
• To stop playback, press the Menu > Stop.
Page 75

75
Playing media files on a network
1. On the Library screen, press the Menu > Open URL.
2. Enter a URL address in the URL field, or scroll to one of the URL address that you have used from the
History field.
3. Press the [OK].
NOTE: To play media streaming, you must be connected to a network.
Setting up a playlist
You can add media files on the Library screen to a temporary playlist. It lists the file that’s currently playing,
as well as any files that have been queued up to play next.
Creating a playlist
1. On the library screen, select the category you want and scroll to the file you want to play.
If the file does not appear on the list, press the Menu > Update Library.
2. Press the Menu > Queue Up to add the file to the playlist.
3. Repeat steps 1 and 2 to add more files.
4. Press [OK] to return to the player screen or press Menu > Player.
5. Press [OK] to start playing the files.
6. To save the playlist, press Now Playing > Menu > Save Playlist.
7. Enter the list name and press Done. The list is saved in the My Playlists library.
Opening the playlist
1. On the player screen, press Now Playing. You can use various options by pressing the Menu.
Editing the playlist
• To change the order, press Menu > Move Up or Move Down.
• To delete selected files, press Menu > Remove from Playlist.
• To clear the playlist, press Menu > Clear Now Playing.
Page 76

76
Changing the Windows® Media Player® Settings
You can customise the screen and functionality of Windows® Media Player®. On the player screen, press the
Menu > Options. You can choose from the following:
• Playback: Select the options for playback. You can select the way time is displayed on the player screen,
or whether or not to pause playback when you launch another program, or resume playback after a
phone call.
• Video: Select the viewing options for playing videos on full screen.
NOTE: If there is a problem while playing MP4 files, deselect the Scale to fit window option. The problem
occurs because the file has been resized.
• Network: Change the connections speed and protocol for playing music and streaming video.
• Library: Select whether the player screen or the Library screen is displayed when you open Windows®
Media Player® .
• Wallpaper: Change the appearance of the player screen by selecting new wallpaper.
• Buttons: Assign Windows® Media Player® functions to the keys on your phone, to quickly control playback
without having to use the menus.
Page 77

77
Section 7
Messenger, Office Mobile,
Windows
®
Live
Messenger • Office Mobile • Windows® Live
Page 78

78
Messenger
Windows® Live Messenger
Your smartphone enables you to connect to Instant Messaging. First create an active account using your PC,
then you can connect and chat using Windows® Live Messenger:
1. On the home screen, press the Start > All Programs > More > Messenger.
Office Mobile
Excel® Mobile
View spreadsheets, even when you’re out of the office. You can use the Chart Wizard to view Microsoft®
Office Excel® Mobile charts when you’re on the go.
OneNote Mobile
Microsoft® OneNote Mobile is a tool for notetaking, information gathering, and sharing that information.
PowerPoint® Mobile
Practice your presentations and view your slides while you’re out and about, with Microsoft® Office
PowerPoint® Mobile.
Word® Mobile
View your Word® documents while you’re away from your desk.
Windows® Live
Access your favourite Windows® Live programs and features, from your smartphone. With Windows® Live for
Windows® Mobile, it’s almost like having your PC in your pocket.
Hotmail®
• Check your Hotmail®, Windows® Live, and MSN e-mail accounts when you're out and about.
• View and send emails including graphics, web links, and photos.
• Respond to your e-mails with voice recordings.
Windows® Live spaces
• Keep your friends posted with Spaces updates from your phone.
• Invite friends, edit your profile, and update your status. Upload photos you take with your phone’s camera
– and add blog entries to go with them.
Page 79

79
Live Search for Windows® Mobile
• Find the info you need, when you need it – like traffic updates, restaurant info, movie screening times,
and more.
• Get the latest news headlines, stock updates, and sports scores.
• Save your PC bookmarks to your mobile phone.
Page 80

80
Section 8
Camera
This section covers picture and video functions including:
Camera / Camcorder Mode • Camera / Camcorder Operations
Camera / Camcorder Controls
Page 81

81
Camera / Camcorder mode
Use the camera program to take, view, and edit pictures, as well as record and playback video clips stored on
your phone or on a memory card. You can also send photos and video clips, or set a picture as the background
of the home screen. You can view your pictures individually, as thumbnails, or as part of a slide show, and you
can edit them by cropping, rotating, and adjusting the brightness and contrast.
Selecting video quality
You can specify the quality (video resolution and sound fidelity) and size of the video clips you record.
1. On the home screen, press Start > All Programs > Applications > Camera.
2. Press Options > Camcorder to change the mode to camcorder.
3. Press Options > Settings.
4. Use [
/ ] to select Quality. Then select the setting you want and select [OK].
5. Press Close.
NOTE: Higher quality video clips require more memory.
Copying an image to your phone
You can upload standard image files from a PC to your phone. You can customise the size and resolution
of your images for display on the phone screen.
1. Connect your phone to your PC.
2. On your PC, copy the image file you want. The file format must be .gif, .jpg, or .bmp.
3. In ActiveSync® on your PC, click Explorer and double-click My Windows® Mobile-Based Device.
Then you can either double-click My Documents or double-click My Pictures, and paste the image
file into that folder.
If you plan to use the image as your home screen background, double-click Application Data, double-click
home, and paste the image into that folder.
NOTE: For best results, use images with the same screen resolution as your phone’s screen resolution
– either 240 x 320 pixels, or 176 x 200 pixels, depending on the phone.
See also Change the home screen appearance.
Making video clips using a timer
Thanks to the timer, you too can be in the video clip you make. Just place the phone on a stable support,
press the camera button and get in position.
1. On the home screen, press Start > All Programs > Applications > Camera.
2. Press Options > Camcorder to change the mode to camcorder.
3. Press Options > Settings.
4. Use [
/ ] to select Self-Timer. Then select the setting you want and select [OK].
5. Press Close.
6. Press [OK] and, after the timer interval, the video will start to record and will automatically be saved
to the default storage location.
Page 82

82
Adjusting pictures and video according to lighting conditions
To ensure the best possible colour in your photos and video clips, you need to adjust the camera according
to your environment. You do this using the White Balance setting.
You simply select the setting that matches the light conditions, as shown in the table below.
Lighting environment White Balance setting
Indoors (under normal domestic lamps) Incandescent – to avoid yellowing
Indoors (fluorescent or office lighting) Fluorescent
Outdoors (in bright conditions) Daylight
Outdoors (overcast conditions) Cloudy
If you are not sure of the setting to select, try Automatic.
Choosing where pictures are saved
You can set the default location where pictures are to be saved. If you select main memory, pictures are
saved to permanent storage on your phone, which may mean you have to re-think the storage needs of
your other programs.
1. Press Option > Settings.
2. Use [
/ ] to select Advanced Settings
3. Press General Settings > Storage, and then select the setting you want.
4. Press Done.
Creating a Pictures folder
You can create separate folders to help you organise and store your pictures and images.
1. On the home screen, press Start > All Programs > Applications > File Explorer > My Pictures.
2. Press Menu > Edit > New Folder.
Editing a picture
You can actually edit pictures and videos on the Xda Venn using the Menu.
1. On the home screen, press Start > All Programs > Applications > File Explorer > My Pictures.
2. Select the picture to edit > [OK].
3. Press Menu > Edit > [OK]. Do one of the following:
• To rotate a picture 90 degrees clockwise, press Menu > Rotate.
• To crop a picture, press Menu > Crop. Then, position the cursor to mark the upper left corner of the
picture. Press Next, then position the cursor to mark the lower right corner of the picture. Press Finish
to see the cropped picture.
To auto correct a picture, press Menu > Auto Correct. Press Done.
TIP: To undo an edit, press Menu > Undo. To cancel all unsaved edits you’ve made to the picture,
press Menu > Cancel.
Page 83

83
Viewing pictures as a slide show
However you have stored your pictures and videos, you can view them one after another,
in a slide show format.
1. On the home screen, press Start > All Programs > Applications > File Explorer > My Pictures.
2. Select the picture and press [OK].
3. Press Menu > Play Slide Show.
TIP: To stop the slide show, press the [
]. You can also rotate the view using [ / ].
To move forward or backward through the slides, press [
/ ].
Setting a picture as the home screen
Any picture you have uploaded can be saved as the background image for the home screen.
1. On the home screen, press Start > All Programs > Applications > File Explorer > My Pictures.
2. Select the picture to be set as the background > [OK].
3. Press Menu > Use as Home Screen.
4. Use the navigation keys to select the part of the picture you want to use, and press Next.
5. Use Adjust the transparency to select a higher percentage for a more transparent picture, or a
lower percentage for a more opaque picture.
6. Press Finish.
Sending a picture via Multimedia Message
You can attach pictures to messages and send them to people.
1. On the home screen, press Start > All Programs > Applications > File Explorer > My Pictures.
2. Select the picture to send.
3. Press Menu > Send via Multimedia Msg.
4. A new message is created with the picture attached.
5. Enter the recipient’s name and subject, and press Send.
Saving a copy of a picture
Store pictures on your phone by saving them to a folder created beforehand.
1. On the home screen, press Start > All Programs > Applications > File Explorer > My Pictures.
2. Select the picture to save > [OK].
3. Press Menu > Save > Save As…
4. Enter a name for the picture and press Done.
TIP: To cancel all unsaved changes, press Cancel.
Page 84

84
Viewing pictures on your phone
You can view pictures stored on your phone or on a memory card.
1. On the home screen, press Start > All Programs > Applications > File Explorer > My Pictures.
2. Select the picture > [OK].
TIP: To view pictures located on a memory card, press Start > All Programs > Applications > File Explorer
> My Pictures. Press Menu > Storage Card. (You may need to scroll to view this option.)
Camera / Camcorder operations
Camera
• Supports JPEG File Format (jpg)
Video
• Supports QCIF (176 X 144) size of video
• Supports 3gp File Format (3gp)
Recording a Video
Using the camera function, you can record a video clip by selecting the Camcorder option.
1. On the Home screen, press Start > All Programs > Applications > Camera > press [OK].
2. The icon to the top left of the screen changes to Camcorder
3. Point your camera and press [OK].
4. To stop recording, press [OK] again or [Stop] soft key.
5. You can see the first frame of the recording. Select Options > Delete to delete the video file, if you wish.
6. Select Options > Send via Multimedia Msg to attach it to a Multimedia message.
7. Play the recorded file.
8. Press [OK] or View Finder to make another video clip.
After you’ve recorded and stored a video file, you can retrieve it at any time and play it back on your phone.
1. The icon to the top left of the screen changes to Camcorder
2. Press My Video.
3. Choose the file that you want to play, and press [OK].
Taking a Photo
• Supports 144 X 176, 240 X 320, 480 X 640, 600 X 800, 1024 X 1280, 1200 X 1600 picture dimensions.
• Pictures are stored in JPEG file format (jpg)
• You can choose Low, Normal or High quality
Taking a Photo (MultiShot)
• Supports a maximum resolution of 144 X 176, 240 X 320
• Allows multiple still shots, up to a maximum of 9 shots
Page 85

85
Snapshot
To take a quick photo, you can use the phone’s snapshot feature. Afterwards, you can store your picture,
delete it, or forward it.
1. On the home screen, press Start > All Programs > Applications > Camera.
2. Press Options > Camera to change to photo mode
3. Point your camera and press [OK].
4. Change the camera screen to review screen.
5. Select Options > Delete to delete the file, if you wish.
6. Select Options > Send via Multimedia Msg to attach it to a Multimedia message.
7. Press [OK] or View Finder to take another picture.
Viewing the saved photo file
After a file has been saved, it’s very simple to view it using the My Photo feature.
1. On the home screen, press Start > All Programs > More > Applications > Camera.
2. Press Options > Camera to change to photo mode
3. Press My Photo.
4. Choose the file you want to view, and press [OK].
Camera / Camcorder controls
As with a conventional camera, you can adjust the settings on your phone to control the brightness, colour,
resolution etc. From the Menu you have access to all the image parameters you can adjust.
Camera Menu
You can get to the Camera Menu by selecting Camera from the home screen. It gives you access to the
following: White balance, Effect, Timer, Size, Quality and Advanced Settings.
1. On the home screen, press Start > All Programs > Applications > Camera.
2. Press Options > Settings.
3. Make your changes using the navigation keys.
4. Press [OK] to apply the changes.
Item Description
White Balance Choose white balance in Options > Settings > W/B.
Default value is Auto.
Daylight: Control of the white value.
Cloudy: Setting of the white value.
Fluorescent: Setting of the white value.
Incandescent: Setting of the white value.
Page 86

86
Item Description
Effect Choose the colour effect in Options > Settings > Effects.
Default value is Normal.
Normal: Colour effect is normal.
Grey: Colour effect is grey
Sepia: Colour effect is sepia
Negative: Colour effect is negative
Self-Timer Choose Self-Timer in Options > Settings > Self-Timer.
Default value is Off.
Off: Take a photograph instantly.
3 Seconds: Take a photograph after 3 sec.
5 Seconds: Take a photograph after 5 sec.
10 Seconds: Take a photograph after 10 sec.
Resolution Choose a Resolution in Options > Settings > Resolution.
Default value is 1200 X 1600.
144 X 176: Resolution is 144 X 176.
240 X 320: Resolution is 240 X 320.
480 X 640: Resolution is 480 X 640.
600 X 800: Resolution is 600 X 800.
1024 X 1280: Resolution is 1024 X 1280.
1200 X 1600: Resolution is 1200 X 1600.
Quality Choose image quality via Options > Settings > Quality.
Default value is High.
Low quality means a small file size and High quality a large one.
Low: Setting for still shot.
Normal: Setting for still shot.
High: Setting for still shot.
Camcorder Menu
The Camcorder Menu lets you control video features such as resolution and quality, select the mode, and turn
the audio on and off.
1. On the home screen, press Start > All Programs > Applications > Camera.
2. Press Options > Camcorder to change the mode to Camcorder.
3. Press Options > Settings.
4. Make your changes using the navigation keys.
5. Press [OK] to apply the changes.
Page 87

87
Item Description
White Balance Choose White Balance in Options > Settings > W/B.
Default value is Auto.
Daylight: Control of the white value.
Cloudy: Setting of the white value.
Fluorescent: Setting of the white value.
Incandescent: Setting of the white value.
Effect Choose the colour effect in Options > Settings > Effect.
Default value is Normal.
Normal: Colour effect is normal.
Grey: Colour effect is grey
Sepia: Colour effect is sepia
Negative: Colour effect is negative
Self-Timer Choose Self-Timer in Options > Settings > Self-Timer.
Default value is Off.
Off: Take a photograph instantly.
3 Seconds: Take a photograph after 3 sec.
5 Seconds: Take a photograph after 5 sec.
10 Seconds: Take a photograph after 10 sec.
Resolution Choose a Resolution in Options > Settings > Resolution.
176 X 144: Camera resolution is in 176 X 144.
Quality Choose the image quality via Options > Settings > Quality.
Default value is High.
Low quality means a small file size and High quality means a large one.
Low: Setting for still shot.
Normal: Setting for still shot.
High: Setting for still shot.
General Settings
Camera/Camcorder Settings allows you to control the time out – the time the camera or camcorder screen
remains inactive before it goes blank – and storage.
1. On the home screen, press Start > All Programs > Applications > Camera.
2. Press Options > Settings.
3. Use [
/ ] to select Advanced Settings.
4. Press General Settings and change the values using the navigation keys and [OK].
5. Press Done to apply the values you have chosen. The camera screen is displayed.
6. If you do not wish to apply new values, press [
].
Page 88

88
Item Description
Time Out Choose Time Out in list
Default value is 1 Min.
1 Min: Time Out is 1 Min.
2 Min: Time Out is 2 Min.
3 Min: Time Out is 3 Min.
Never; Time Out is off.
Storage You can choose where files are stored.
Default is Phone.
Phone: Files are stored in the phone’s file box.
External: Files are stored in the “SD Memory Card”
Camera Settings
Camera Settings lets you control how many shots you take in a burst in multi-shot mode and change the
image prefix.
1. On the home screen, press Start > All Programs > Applications > Camera.
2. Press Options > Settings.
3. Use [
/ ] to select Advanced Settings.
4. Press Camera Settings and make your changes using the navigation keys and [OK].
5. Press Done to apply the changes. The camera screen is displayed.
6. If you do not wish to apply the changes, press [
].
Item Description
Take Mode Choose Take Mode from the list.
Default value is Normal.
Change Multi Shot mode.
Resolution must be 176 X 144 or 320 X 240 on Multi Shot mode.
Multi-shot Count Choose Multishot from the list.
Default value is 4.
4: Take a photograph 4 times in a row.
6: Take a photograph 6 times in a row.
9: Take a photograph 9 times in a row.
Image Prefix Change image prefix.
Default image prefix is img.
Page 89

89
Video Settings
Camcorder Settings allows you to control how long you record for, whether or not you record sound,
and the video file prefix.
On the home screen, press Start > All Programs > Applications > Camera.
1. Press Options > Settings.
2. Use [
/ ] to select Advanced Settings.
3. Press Video Settings and make your changes using navigation keys and press [OK].
4. Press Done to apply the changes you’ve made. The camera screen is displayed.
5. If you do not wish to apply your changes, press [
].
Item Description
Recording Limits Choose Limit Recording in list.
Default value is No limit.
No limit: Recording does not stop.
1 Min: Recording is stopped after 1 Min.
3 Min: Recording is stopped after 3 Min.
5 Min: Recording is stopped after 5 Min.
10 Min: Recording is stopped after 10 Min.
Recording Sound Choose recording with audio or not.
Default value is On.
On: Sound Recording is on.
Off: Sound Recording is off.
Video Prefix Change video prefix.
Default video prefix is video.
Overview of the default hardware button assignments
By default, these hardware buttons are assigned to camera functions.
Hardware Button Camera/Camcorder Function
OK Start Record Video/Stop Record Video, Take a picture
Brightness down
Brightness up
Zoom in
Zoom out
Page 90

90
Section 9
Internet Explorer
This section covers Internet services and web browsing.
For more detailed information contact your service provider.
Using Internet Explorer
Page 91

91
Using Internet Explorer
Adding a Web page to the Favourites list
Internet Explorer functions on your phone much the same as it does on your PC. You can keep a list of
web sites in your Favourites list, adding each site to the list via the Internet Explorer menus.
1. On the home screen, press Start > All Programs > Internet Explorer.
2. Press Menu > Address Bar, enter the address of the page you want to add and press Go.
3. Press Menu > Add to Favourites.
4. Confirm or change the name and Web page address.
5. In Folder, select a location for this Favourite.
6. Press Add.
TIP: A quick way to add Favourites to your phone is to synchronise with your PC, using ActiveSync.
For more information, see ActiveSync® Help on your PC.
See also Go to a Web page.
Changing connection options
Depending on your location and your access settings, you can connect to different networks through
Internet Explorer.
1. On the home screen, press Start > All Programs > Internet Explorer.
2. Press Menu > Tools > Options.
3. Press Connections. Do one of the following:
• Default setting – Uncheck automatically detect settings and WAP network.
• Change to surfing internet to any web site through service provider Proxy server.
• Checking automatically detect settings will mean you can surf the internet using ActiveSync®.
In this setting, you can’t access sites like MEdia Net.
4. Press Done.
Changing Web page display options
There are several Web page display options to choose from: text size, one column (to avoid horizontal
scrolling), fit to screen, and desktop layout.
1. On the home screen, press Start > All Programs > Internet Explorer.
2. Select one of the web sites.
3. Press Menu > View. Select one of the following:
• Zoom Level: The text on the Web pages displayed on your phone can be made larger or smaller.
• One Column: Arranges the content into one column that is as wide as the screen. This means you
rarely need to scroll horizontally.
• Fit To Screen: This option offers a layout similar to what you see on a desktop computer, but makes
items smaller and arranges the content so you can see most of it, without having to scroll horizontally.
• Desktop: Keeps the same layout and size as a desktop computer, so both horizontal and vertical
scrolling are necessary.
Page 92

92
Clearing History, cookies, or temporary files
Internet Explorer usually stores a list of the sites you’ve visited (your History), cookies (files simplifying your
return to a site), or temporary files. Clearing any of these is simple.
1. On the home screen, press Start > All Programs > Internet Explorer.
2. Press Menu > Tools > Options.
3. Press Memory.
4. Select the type of memory to clear and press Clear.
5. Press Yes > Done.
Creating a new folder in Favourites
If you have more than a few websites on your Favourites list, you may want to organise them into folders.
1. On the home screen, press Start > All Programs > Internet Explorer.
2. Press Favourites.
3. Press Menu > Add Folder.
4. Enter a name for the folder.
5. Press Add.
Deleting a Favourite
Any Favourite can be deleted from the list at any time.
1. On the home screen, press Start > All Programs > Internet Explorer.
2. Press Favourites.
3. Select the Favourite to delete.
4. Press Menu > Delete.
5. Press Yes to confirm the deletion.
Disconnecting from the Internet
Be sure to disconnect from the Internet when you have finished surfing. Connections will time out
automatically if there is no activity, but it is still a good idea to disconnect manually.
1. Press [
] > Wireless Manager > [OK].
2. Press Menu > Disconnect Cellular Data.
Editing a Favourite
You can change the name, URL, or description of a web site in your Favourites list.
1. On the home screen, press Start > All Programs > Internet Explorer.
2. Press Favourites.
3. Select the Favourite to edit.
4. Press Menu > Edit.
5. Make your changes and press Done.
Page 93

93
Go to a link
If you have previously set up links, you can access them from the main page of Internet Explorer.
1. On the home screen, press Start > All Programs > Internet Explorer.
2. Scroll vertically or horizontally to see all available links.
3. Press the link.
Going to a Web page
The Internet Explorer on your phone accesses web pages by letting you enter the address in the address bar,
after pressing the >.
1. On the home screen, press Start > All Programs > Internet Explorer.
2. Press Menu > Address Bar.
3. Enter the address, and press Go.
Going to a Web page in the History list
You can also return to web pages you’ve already visited by using the History list in Internet Explorer.
1. On the home screen, press Start > All Programs > Internet Explorer.
2. Press Menu > History.
3. Select the Web page, and press Go.
NOTE: To return to the Web page you were viewing immediately before, press [
].
Opening Internet Explorer
Internet Explorer is easy to open from the home screen.
1. On the home screen, press Start > All Programs > Internet Explorer.
2. Refresh a Web page
To refresh a web page use the Menu and select Refresh.
1. On the home screen, press Start > All Programs > Internet Explorer.
2. If necessary, select the Web page in your Favourites or History list, and press Go.
3. Press Menu > Refresh.
Returning to a Web page you visited in the same session
You can return to a web page, or scroll back through pages you’ve visited in a session, just as you would use
the “Back” button on a PC.
1. On a Web page, press [
] repeatedly until the page you want appears.
Page 94

94
Viewing a Favourite
To visit a Favourite site at any time, just go into your Favourites list and select it.
1. On the home screen, press Start > All Programs > Internet Explorer.
2. Press Favourites.
3. Select a Favourite and press Go.
Viewing a list of recently visited Web pages
The History function of Internet Explorer lets you select a site you’ve already visited and return to that site.
1. On the home screen, press Start > All Programs > Internet Explorer.
2. Press Menu > History.
Moving a Favourite to a folder
Once you’ve created folders in your Favourites list, you can move any of the sites already on the list into
any of the folders.
1. On the home screen, press Start > All Programs > Internet Explorer.
2. Press Favourites.
3. Select the Favourite to move.
4. Press Menu > Edit.
5. Under Folder, scroll to the folder you want to move the Favourite into.
6. Press Done.
Changing the Zoom Level on Web pages
The text on the Web pages displayed on your phone can be made larger or smaller.
1. On the home screen, press Start > All Programs > Internet Explorer.
2. Press Menu > View > Zoom Level and select the size you want.
Showing or hiding pictures on Web pages
The images on Web pages can be shown or hidden on screen.
1. On the home screen, press Start > All Programs > Internet Explorer.
2. Press Menu > View > Show Pictures.
3. A check mark next to Show Pictures indicates that pictures will be displayed on Web pages.
Viewing a page in full screen mode
You can toggle back and forth between a full screen or minimised screen on your phone’s display.
1. On the home screen, press Start > All Programs > Internet Explorer.
2. Press Menu > View > Full Screen.
TIP: To exit full screen mode, press Menu > View > Full Screen and cancel the selection.
Page 95

95
Sending a link via e-mail
Your smartphone enables you to send links to web pages via e-mail. To do so, use the Tools menu
on the Internet Explorer menu bar.
1. On the home screen, press Start > All Programs > Internet Explorer.
2. Go to the Web page you want to send.
3. Press Menu > Tools > Send Link….
4. Select Messages or e-mail account.
5. A new message is created with the page address inserted in the message body.
Adjusting the scrolling speed
You can use your phone’s scrolling feature to view web pages – it can be adjusted to scroll as slowly
or as quickly as you like.
1. On the home screen, press Start > All Programs > Internet Explorer.
2. Open a Web page. Then either:
• Use the navigation key to scroll from link to link on the page.
• Press and hold the navigation key for more than three seconds to accelerate scrolling.
See also, Change Web page display options.
Page 96

96
Section 10
PC Connectivity, Internet
Sharing, Remote Desktop,
Bluetooth® and Activesync®
This Section Covers Bluetooth® And Activesync® Functions.
Activesync® • Internet Sharing • Remote Desktop • Bluetooth®
Page 97

97
ActiveSync®
Microsoft® ActiveSync® synchronises data between your phone and PC. ActiveSync® is already installed on your
smartphone, but you need to install it on your PC before you can synchronise data.
Installing and setting up ActiveSync
Install ActiveSync® on your PC, as described on the Windows® Mobile Getting Started Disc. After Setup has
completed, the Sync Setup Wizard automatically starts when you connect your phone to the PC.
Simply follow the instructions on the screen. In the Sync Setup Wizard, you can:
• Synchronise your PC with your phone and vice versa.
• Configure an Exchange Server connection to synchronise directly with an Exchange Server. To synchronise
your phone with an Exchange Server, obtain the name of the Exchange Server, your user name, password,
and domain name from your administrator before finishing the wizard.
• Choose the types of information you wish to synchronise.
NOTE: When you finish the wizard, ActiveSync® synchronises your phone automatically. Once this is completed,
you can disconnect your phone from your PC.
See also Connect the phone, Change ActiveSync® settings.
Setting up an Exchange Server connection
To be able to complete this configuration, you will need to get the name of the server and the server domain
name from your service provider or system administrator. You also need to know your Exchange user name
and password.
Before changing synchronisation settings on the phone, disconnect it from your PC.
1. From your phone’s home screen, press Start > All Programs > ActiveSync > OK.
2. Press Menu > Configure Server > OK. If you have not yet set up sync with Exchange Server, this will say
Add Server Source.
3. In Server address, enter the name of the server running Exchange Server, and press Next.
4. Enter your user name, password, and domain name, and press Next.
5. If you want the phone to save your password so you don’t need to enter it again when connecting, select
the Save password check box and press [OK].
6. Select the check boxes for the types of information that you want to synchronise with Exchange Server.
7. To change available synchronisation settings, select the type of information, and press Menu >
Settings > OK.
8. To change the rules for resolving synchronisation conflicts, press Menu > Advanced > OK.
9. Press Finish.
Page 98

98
Changing ActiveSync® settings
Once you’ve set up synchronisation using the Sync Setup wizard on your PC, you can change your
synchronisation settings:
• To change the settings for synchronising with your PC, use ActiveSync® on the PC. For more information,
see Changing the amount of information synchronised in ActiveSync® Help on the PC.
• If you want to change the settings for synchronising with the Exchange Server, use ActiveSync® on your
phone, as described in Change settings for an information type.
See also Install and set up ActiveSync®, Connect the phone, Change settings for an information type.
Scheduling synchronisation as items arrive
You can schedule automatic synchronisation between your phone and Exchange Server every time an item
arrives or is changed in Exchange Server, provided your company is running Exchange Server with Exchange
ActiveSync®, and after your first full synchronisation with Exchange Server.
1. On the phone home screen, press Start > All Programs > ActiveSync > OK.
2. Press the Menu > Schedule > [OK]. Choose one or both of the following:
• Peak times: select ‘As items arrive’. This is more cost-efficient to synchronise at regular intervals when
mail volume is high.
• Off-peak times: select ‘As items arrive’. This can be more cost-efficient than synchronising on a regular
schedule when mail volume is low.
3. Press Done.
NOTE: Before changing the phone settings for synchronisation, disconnect the phone from your PC.
Changing the synchronisation schedule
Before changing synchronisation settings, disconnect the phone from your PC.
1. On the phone home screen, press Start > All Programs > ActiveSync > [OK].
2. Press Menu > Schedule > [OK]. Do one or more of the following:
To sync Do this
When you are working, or e-mail volume is high Select an appropriately frequent interval in the Peak
times list.
When e-mail volume is low Select a longer interval or As items arrive in the Off-
peak times list.
While roaming Select the Use above settings while roaming check
box. To minimise roaming charges, clear the check
box, and synchronise manually while roaming.
When you Press Send in Messaging on the phone Select the Send outgoing items immediately
check box.
Page 99

99
NOTE: The phone’s power-down timer is reset each time you synchronise. If you schedule a synchronisation
interval that is shorter than the time interval set for the phone to automatically power down, the phone will
never turn off to save battery power.
TIP: To change peak time settings to more accurately reflect periods of e-mail volume for you, press Menu
> Peak Times.
Starting and stopping synchronisation
The ActiveSync® program allows you to access a PC to keep information on both the PC and the phone
current. There are several types of information you will want to keep updated on both.
1. On the phone home screen, press Start > All Programs > ActiveSync > [OK].
2. Press the Sync > [OK].
3. To stop synchronising, press Stop.
NOTE: You can start and stop synchronisation only if your phone already has a sync relationship with a PC
or Exchange Server.
Viewing information about Sync status
ActiveSync® keeps synchronisation status messages on a status page for you to view at any time.
You can view status in one of the following ways:
• When alert text is displayed on the ActiveSync® main page, press the alert text to open the status page.
• Press Menu > Status > [OK].
NOTE: Some errors interfere with automatic synchronisation. If you suspect that a scheduled synchronisation
has not occurred, you should attempt to manually synchronise your information. Successfully completing
manual synchronisation resets automatic synchronisation. For more information, see Synchronising Information
in ActiveSync® Help on the PC.
Changing settings for an information type
Before changing synchronisation settings on the phone, disconnect it from your PC.
1. On the home screen, press Start > All Programs > ActiveSync > [OK].
2. Press Menu > Options > [OK].
3. Select one of the information types. Do one of the following:
• To view or change settings for an information type (when available), press Settings.
• To view or change settings for a computer or Exchange Server, press Menu > Settings > [OK].
4. Change the amount of information to be synchronised or other settings.
5. Press Done (or Finish in the Exchange Server settings wizard).
Page 100

100
Connecting your phone
There are several options for connecting your phone to your PC. Both devices will need to use the
ActiveSync® program.
NOTE: To synchronise using ActiveSync®, you must install ActiveSync® on your PC before connecting
your phone to the PC.
1. Turn on the phone.
2. Connect your phone to your PC using a serial cable, USB cable, or Bluetooth® connection. For more
detailed information, see Connecting a mobile device to a PC in ActiveSync® Help on your PC.
See also Install and set up ActiveSync, Change ActiveSync® settings.
Deactivating the USB modem
This will allow you to use the ActiveSync® program.
1. On the home screen, press Start > All Programs > More > Settings > [OK].
2. Scroll to Connections > [OK].
3. Select Modem Link > [OK].
4. Use the [
/ ] to select status.
5. Select Inactive.
6. Press Done.
NOTE: You must deactivate the USB modem if you want to use ActiveSync®.
Connecting to a PC using a chargeable USB cable
The Xda Venn provides a USB connector for transferring data to and from your computer via a USB cable.
1. Plug the USB Data Cable into a standard USB connector on your computer.
2. Plug the other end of the USB Data Cable into the right side of your phone.
Connecting to a PC using Bluetooth®
Go to ActiveSync® Help on your PC and follow the instructions for configuring Bluetooth® on your PC
to support ActiveSync®.
1. From your phone’s home screen, press Start > All Programs > ActiveSync > [OK].
2. Press Menu > Connect via Bluetooth. Ensure that the phone and PC are close together.
3. If this is the first time you have connected to this PC via Bluetooth®, you must complete the Bluetooth®
wizard on the phone, and set up a Bluetooth® partnership with the PC before synchronising.
4. Press Sync.
5. When finished, press Menu > Disconnect Bluetooth.
6. To preserve battery power, turn off Bluetooth®.
 Loading...