

Page 1

Contents
Chapter 1 Before Using Your O2 Xda Stealth 6
1.1 What’s in the box 6
1.2 Familiarizing yourself with your O2 Xda Stealth 7
1.3 Key definitions 10
1.4 Features 10
1.5 Insert the battery & SIM card 11
1.6 SIM 12
1.7 Battery 12
1.8 Lock/Unlock 13
1.9 Memory expansion 14
1.10 Data backup 14
1.11 Power management 14
Chapter 2 Getting Started 16
2.1 Display information 16
2.2 Screen orientation 25
2.3 Setting time & date 26
2.4 Using the stylus 26
2.5 Screen alignment 26
2.6 Input method 27
2.7 Drawin g on the screen 29
2.8 Recording a message 29
2.9 Editing my info 30
2.10 Password setup 30
Chapter 3 Phone Functions 32
3.1 Phone screen and key introduction 32
3.2 Making a call 33
3.3 Receiving / Ignoring a call 33
3.4 International calls 33
3.5 Emergency calls 34
1
Page 2

2
3
Chapter 7 Messaging 70
7.1 Short Message (SMS) 71
7.2 Multimedia messages (MMS) 74
7.3 Voice mail 82
7.4 E-mail 83
7.5 Push E-mail 85
7.6 Pocket MSN 86
Chapter 8 Multimedia 90
8.1 Camera 90
8.2 Video recorder 93
8.3 JAVA 95
8.4 Photo Editor 95
8.5 Pictures & Videos 96
8.6 Recorder 97
Chapter 9 Applications 100
9.1 Calendar 100
9.2 Tasks 101
9.3 File Explorer 102
9.4 Internet explorer 102
9.5 Windows Media 103
9.6 Games 104
9.7 Download Agent 104
9.8 Calculator 104
9.9 Backup 104
9.10 Torch 104
9.11 ZIP 105
9.12 O
2 Auto Configurator 105
9.13 ClearVue 106
9.14 Excel Mobile 107
9.15 Notes 108
9.16 PowerPoint Mobile 109
9.17 Search 110
3.6 Volume adjustment 34
3.7 Contacts 34
3.8 Creating a new contact 35
3.9 Call history 35
3.10 Setting ring tone and password 35
Chapter 4 Settings 38
4.1 Personal settings 38
4.2 System settings 45
Chapter 5 ActiveSync Synchronization Tool 48
5.1 About synchronization 48
5.2 Installing ActiveSync 49
5.3 Choosing your synchronization type 50
5.4 Using ActiveSync tools 51
5.5 ActiveSync errors 53
Chapter 6 Getting Connected 56
6.1 Wireless Manager 56
6.2 GPRS 57
6.3 Bluetooth 58
6.4 Wi-Fi 64
6.5 USB card reader 65
6.6 Internet Sharing 65
6.7 Terminal Services Client 65
6.8 Cell Broadcast Setting 66
6.9 VPN 66
6.10 USB cable 66
6.11 Connecting to the Internet 66
Page 3

Chapter 1
Before Using Your O2 Xda Stealth
1.1 What’s in the box
1.2 Familiarizing yourself with your O
2 Xda Stealth
1.3 Key definitions
1.4 Features
1.5 Insert the battery & SIM card
1.6 SIM
1.7 Battery
1.8 Lock/Unlock
1.9 Memory expansion
1.10 Data backup
1.11 Power management
9.18 Voice Speed Dial 110
9.19 Word Mobile 110
9.20 Answer Machine 112
Chapter 10 Managing Your O2 Xda Stealth 114
10.1 O2 Auto Install 114
10.2 O2 Connect 114
10.3 Memory management 114
10.4 Running programs management 115
10.5 Adding or removing programs 115
Chapter 11 Specifications 118
Chapter 12 FAQs 122
Chapter 13 Safety Bit 126
13.1 Safety information 126
13.2 Phone care 126
13.3 Driving safety 128
13.4 Electronic devices 128
13.5 Other safety guidelines 130
13.6 Cautions 131
13.7 About this guide 131
Index 132
4
Page 4

1
2
5
6
3
4
7
8
6
Chapter 1. Before Using Your O2 Xda Stealth
1.1 What’s in the box
Thank you fo r select ing O2 Xda Stealth. Please check if your package comes with the following items.
If any of them i s missing, p lease co ntact you r retaile r.
O
2 Xda Stealth—your Windows Mobile-based Pocket PC phone
Stylus
Standard Battery
Univers al AC Adapter w ith four pl ugs for dif ferent countri es
High Quality Stereo Wired Headset
USB Cabl e
Gettin g Star ted Disc
User Manual
Quick St art Gui de
Warrant y Card
1
Before Using Your O2 Xda Steal th
7
1
1.2 Familiarizing yourself with your O2 Xda Stealth
This sect ion introduces you t o the hard ware of the dev ice and its functi on keys
No. Item Function
1 Receiver You can hear caller’s voice through receiver.
2 Touch screen Display screen. Use stylus to select items on the screen.
3 Call key You can make or answer a call by pressing
Call
key, or
press to launch Phone screen.
4 Window s key Press the W indows key to open
Start
menu options.
5 End key Press this key to end a call or to return to Today screen
from any sc reen.
6 OK key Press thi s key to execute or te rminate a s electe d functi on
or application.
7 5- Way navigation key Use up, down, l eft and r ight direc tions to n avigate.
Press the center key to execute the selected function or
application.
8 Dial keypa d You can use the dia l keypad to dia l telephon e number s.
Before Using Your O2 Xda Steal th
Page 5

16
17
13
14
15
109
12
11
No. Item Function
13 Headset plug Plug in head set, and th en you can li sten to the m usic via
the heads et or use the p hone’s hands -free k it.
14 Mini SD card slot You can insert your Mini SD card here to save data in
your card.
15 Soft res et butto n Press the b utton wi th the st ylus to sof t reset your device.
16 Camera key Press a nd hol d Camera key to launc h camer a functi on.
In Camera mode, p ress as 2-s tep shut ter key to captu re
pictures.
17 Volume key Slide this key u pwards or do wnwards to a djust volu me.
Press and hold this key to directly record voice note.
No. Item Function
18 Flash light Supp ort
Auto Flash, Force d Flash On
, and
Forced
Flash Off
modes.
19 Stylus h older & St ylus Us e the sty lus to touch t he screen panel.
20 Battery lock Pull down the battery lock to remove the battery.
21 Battery Power your O
2 Xda Stealth .
22 Camera lens The CMOS camera supports 2-mega-pixel photo and
high quality video.
23 Monophonic speaker Besides using earphones, you may play music/voice
through t he built- in speaker.
No. Item Function
9Power on/off Press and hold
Power
key for a few sec onds to pow er
on/off your device.
10 LED indicator The LED indicator indica tes the sta tus of your dev ice by
showing different colors.
Blue
: Bluetooth is activated.
Orange
: Wi-Fi i s activat ed.
Green
: mobile network is detected.
11 Microphone Talk on the phone call.
12 Mini USB / Charging slot Connect a charger adapter to this slot to start charging.
This slot is also a USB slot. You may connect your O
2
Xda Stealth to computers or other devices with a USB
cable an d transfe r files b etween t he phone an d that
device.
8
1
Before Using Your O2 Xda Stealth
9
1
Before Using Your O2 Xda Steal th
18
19
23
21
20
22
Page 6

1.3 Key definitions
Key Function
5-way n avigatio n key – Up Move c ursor up.
5-way n avigatio n key – Down Move curs or down.
5-way n avigatio n key – Left Move curso r to the left.
5-way n avigatio n key– Right Move curs or to the ri ght.
5-way n avigatio n key - Center Execute yo ur selec tion.
Call Pick up calls and make new calls.
End Press: return to Today screen.
Press and hold: torch light.
Power on/off Press: enter suspend mode.
Press and h old: pow er off.
Windows key Press : display or h ide
Start
menu.
OK key Press: exec ute the fun ction of t he top rig ht screen (
or
).
Press and hold: switch screen display to portrait or landscape.
Camera key Press a nd hold: e nter came ra mode.
Volume key Slide up : increas e volume.
Slide down: decrease volume.
Press: activate voice co mmand.
Press and hold: activate voic e note.
Soft res et butto n Soft reset yo ur O
2 Xda Stealth .
1.4 Features
Like a standard mobile phone, your O2 Xda S tealth su pport s basic dial ing featur es. Besi des, it
also integrates Personal Digital Assistant (PDA) capability. The following section provides more
informa tion abo ut the phon e’s features :
● Touch screen : 2.4” TF T LCD displa y with 65, 536 colors ef fective .
● 5-way navigation key.
● Windows key.
● Monophonic speaker & microphone.
● Slide- to-answer Mode .
● Mini- USB con nector f or connec tion and batter y chargin g.
● Camera: 2.0 mega pixels.
● Connections: Bluetooth, and Wireless L AN.
● Microsoft Windows Mobile 5.0: Pocket MSN, Pocket Outlook, Pocket Explorer, and Office tools
(Word, Excel, and PowerPoint). Also features Windows Media Player 10, Terminal Services Client,
Picture s & Videos , Calculat or, Games, Ac tiveSy nc, and File E xplorer.
● O
2 program s: O2 Connect, O2 Auto Install
● Other programs: Answer Machine, Phone Recording, Recorder, Spb GPRS Monitor, O
2 Auto
Configurator, Java su ppor t, Torch, Clea rVue PDF vi ewer, etc.
1.5 Insert the battery & SIM card
Before ins erting/re moving a SI M card, pl ease make sur e your O2 Xda S tealth is p owered of f and is not
connec ted to any powe r supply by th e USB cab le or charg er.
● Look at the b ack of the ph one. Pull do wn the bat tery lo ck and lif t the battery upw ard as show n below
in order to re move it.
● Find the SIM card slot and insert the SIM card with the metallic part facing down and the clipped
corner in the left direction.
● Inser t the batte ry back t o the batt ery slo t.
10
1
Before Using Your O2 Xda Steal th
11
1
Before Using Your O2 Xda Steal th
Page 7

1.6 SIM
Before using your O2 Xda Stealth , you must co ntact a net work op erator to ge t a persona l SIM
(Subscriber Identity Module). The SIM car d contains your O
2 Xda Stealt h number, the se rvic es
included in your subscription, and your personal data such as your phonebook and messages. The
phone is unusable (except for emergency calls) until a valid SIM card is inserted.
Please note
: If the phone or the SIM card is lost or stolen, you should contact your network operator
immediat ely in order t o prevent unau thorize d use.
1.7 Battery
You r O 2 Xda Steal th comes w ith a remov able and re chargea ble Li- Ion bat tery. The st andby time a nd
talk time will depend on your actual usage network coverage and whether the phone is on standby
mode. The battery life may also vary depending on how frequently the user switches between
functions.
Please note
: Using any battery pack or AC adapter (charger) not specified/endorsed by O
2 on this
phone may be d angerou s and may invali date any war ranty and approval given to the phone. Unplug
the charg er from th e power supp ly when it i s not in use.
Charging the battery
Please make s ure that th e batter y is inst alled and f ully char ged when u sing your O 2 Xda Stealth for
the first time. You may cha rge the bat tery in the follow ing ways:
● Universal AC Adapter: Plug your AC adapter into a suitable main power socket and plug the
connec tor to the ch arging sl ot of your O
2 Xda Stealth . The phone w ill start chargi ng automat ically.
● USB cable: Connect your O
2 Xda Stealth to your PC’s USB port with the USB cable supplied in your
package.
1.8 Lock/Unlock
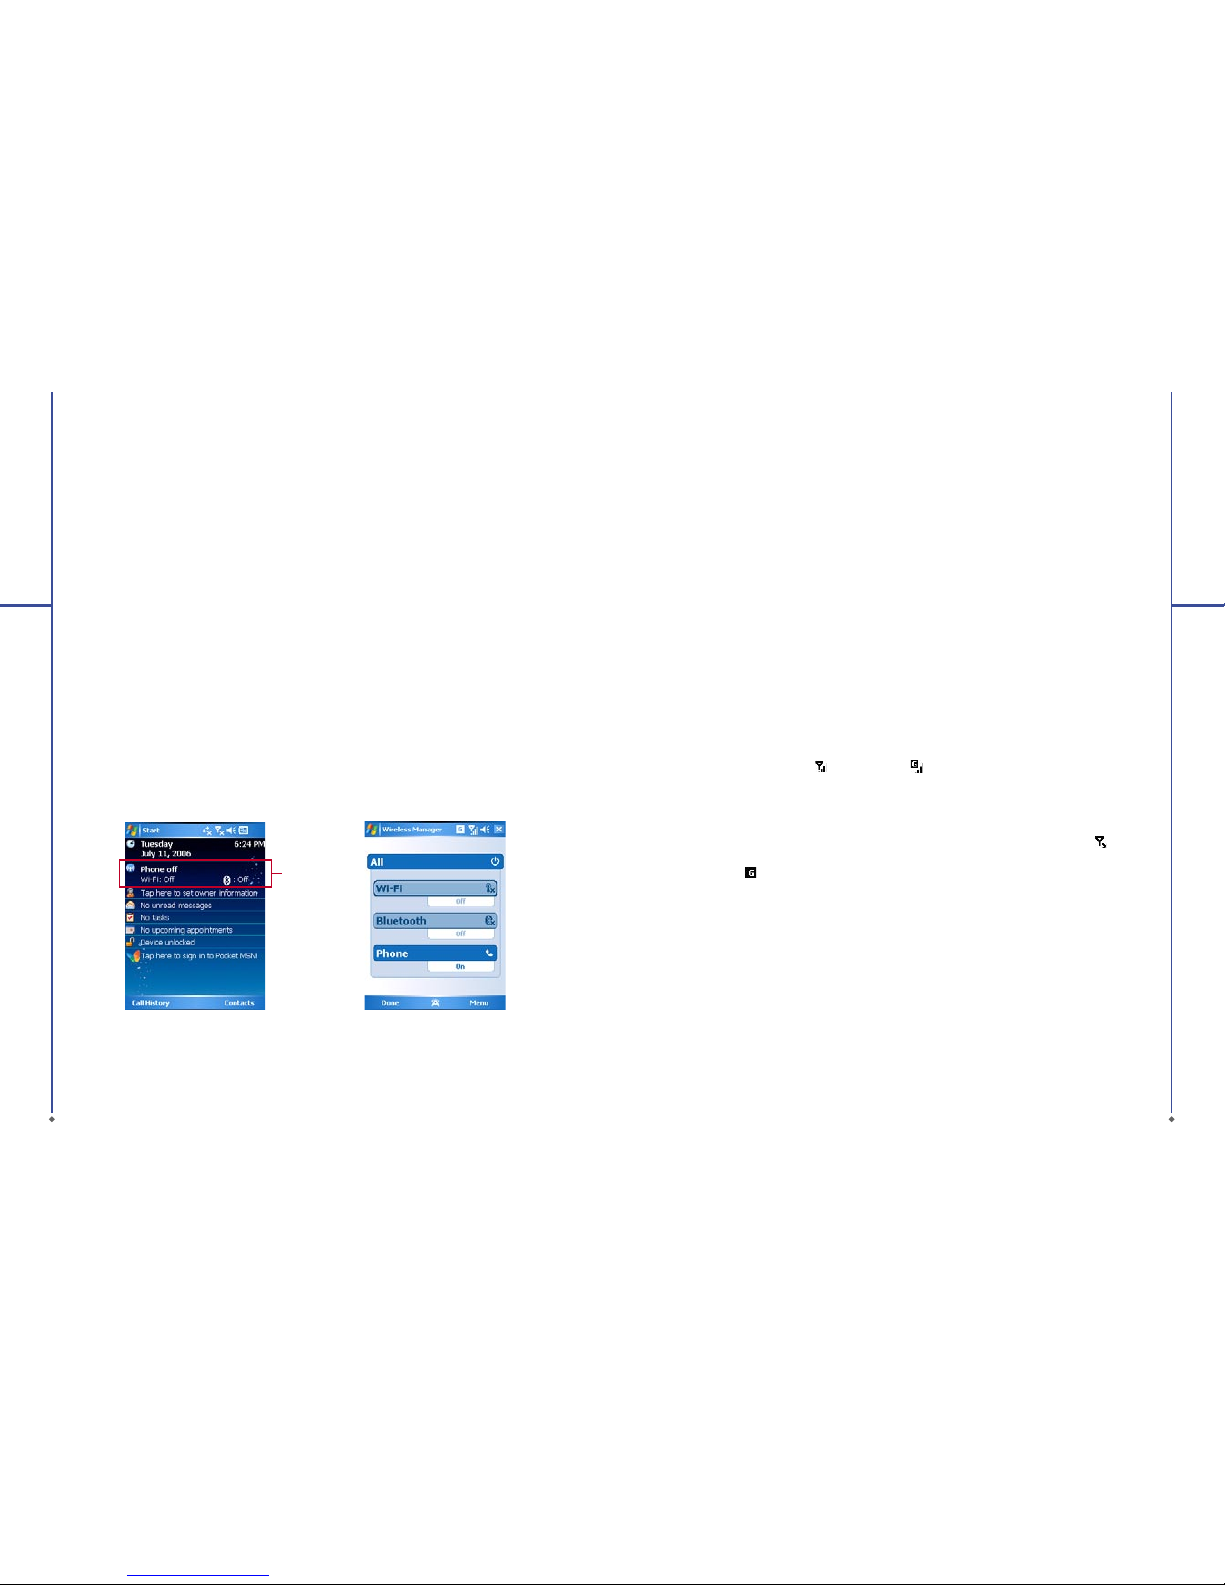
1. Lock the phone: On
Today
screen, t ap
Device
unlocked
to lock your O
2 Xda Stealt h. The
phone will not respond to touches on screen
nor will it react to any input on the keypad
when it is lo cked.
You may also enable the device lock
automati cally af ter the ba cklight o f the scre en is
turned off.
To enable automatic lock:
Tap
Start
>
Settings
>
System
tab >
Power
>
Extended
tab and che ck the box s hown on
the screen. Your O
2 Xda Stealth will enable lock
automati cally dur ing stand -by.
2. Unlock the phone:
● Ta p
Unlock
on the bottom left of the
screen,
● Then tap
Unlock
button on the newly
appeared screen and the phone is
unlocked.
1
2
12
1
Before Using Your O2 Xda Steal th
13
1
Before Using Your O2 Xda Steal th
Page 8

1.9 Memory expansion
To expand the memo ry of your O 2 Xda Stealth,
you can insert a Mini SD card into the card slot
located at the right side of the phone. Make sure
the card is inserted correctly.
1.10 Data backup
You r O 2 Xda Ste alth supp orts 6 4MB R AM
capacity; however, you may need to back up
data and any new programs that you install in
the RAM to guard against data loss. To back up
your
Contact, Calendar
, etc., pleas e set up the
synchronization partnership with your PC and
connec t the phone w ith PC. Ac tiveSy nc will sta rt
automatically.
1.11 Power management
To power on your O2 Xda Stealth
While the p hone is pow ered of f, press
Power
key on the top of t he phone to p ower it on.
To power off your O2 Xda Stealth
While the p ower is on, p ress and ho ld
Power
key on the top of t he phone fo r about 3 sec onds
to turn of f the devic e.
To reduce the power consumption of your device,
you may chan ge the back light dur ation and
brightness level. Also, you can save more power
by settin g the phone t o turn off a utomati cally if i t
is not in use fo r a specifi c perio d of time.
To check battery power level
Tap
Start
>
Settings
>
System
tab >
Power
>
Battery
tab. A bar indicates the remaining
batter y power level.
To turn off the device automatically
Tap
Start
>
Settings
>
System
tab >
Power
>
Advanced
tab and sel ect the dur ation bef ore
your device turns off by itself. This feature
controls the screen standby time.
To reduce the brightness level
Tap
Start
>
Settings
>
System
tab >
Backlight
>
Extended
tab and adj ust the br ightnes s level
of
Battery Power
or
External Power
, from
darkest to brightest.
To adjust the backlight duration
Tap
Start
>
Settings
>
System
tab >
Backlight
>
Battery Power
tab or
External Power
tab
to select backlight duration and condition for
backlig ht on/o ff under e ither bat tery p ower or
external power supply.
14
1
Before Using Your O2 Xda Steal th
Chapter 2
Getting Started
2.1 Display information
2.2 Screen orientation
2.3 Setting time & date
2.4 Using the stylus
2.5 Screen alignment
2.6 Input method
2.7 Drawing on the screen
2.8 Recording a message
2.9 Editing my info
2.10 Password setup
Page 9

●
Start menu
: Tap here to open Wi ndows
Start
menu on the to p left of the screen. To retu rn to
Today
screen at a ny time, tap
Start > Today
.
●
Status & Icon area
: It displays notification icons and system status such as battery status,
connection status, SIM card status, time, signal, volume, message arrival, etc. You can tap the icon
to view the de tail or set tings of the functi on.
●
Tod ay s cr e e n
: On
Today
screen, this area contains shortcuts to certain programs and important
information of
Today
. To change
Today
screen settings, tap
Start
>
Settings
> Personal tab
>Today.
● Command area: Depending o n the cur rent mode, t his area c ontains d iffer ent featur es such as in put
panel and commands to create or edit a file. On Today screen, it shows Call History on the left and
Contacts on the right.
Chapter 2. Getting Started
2.1 Display information
The main screen displays the following information:
Start menu Status & Icon area
Tod ay
screen
Command area
Start menu
Tap
Start
to bring up a l ist of menu:
1
2
3
4
5
No
Description
1 Quick ac cess to c ertai n fixed Mic rosof t program s.
2 The most re cent 5 pro grams you ha ve used.
3Tap on
Programs
to enter the p rograms s creen.
4Tap on
Settings
to enter the settings screen.
5Tap on
Help
to see deta il inform ation ab out your O
2 Xda Stealth.
16
2
Getting started
17
2
Getting started
Page 10
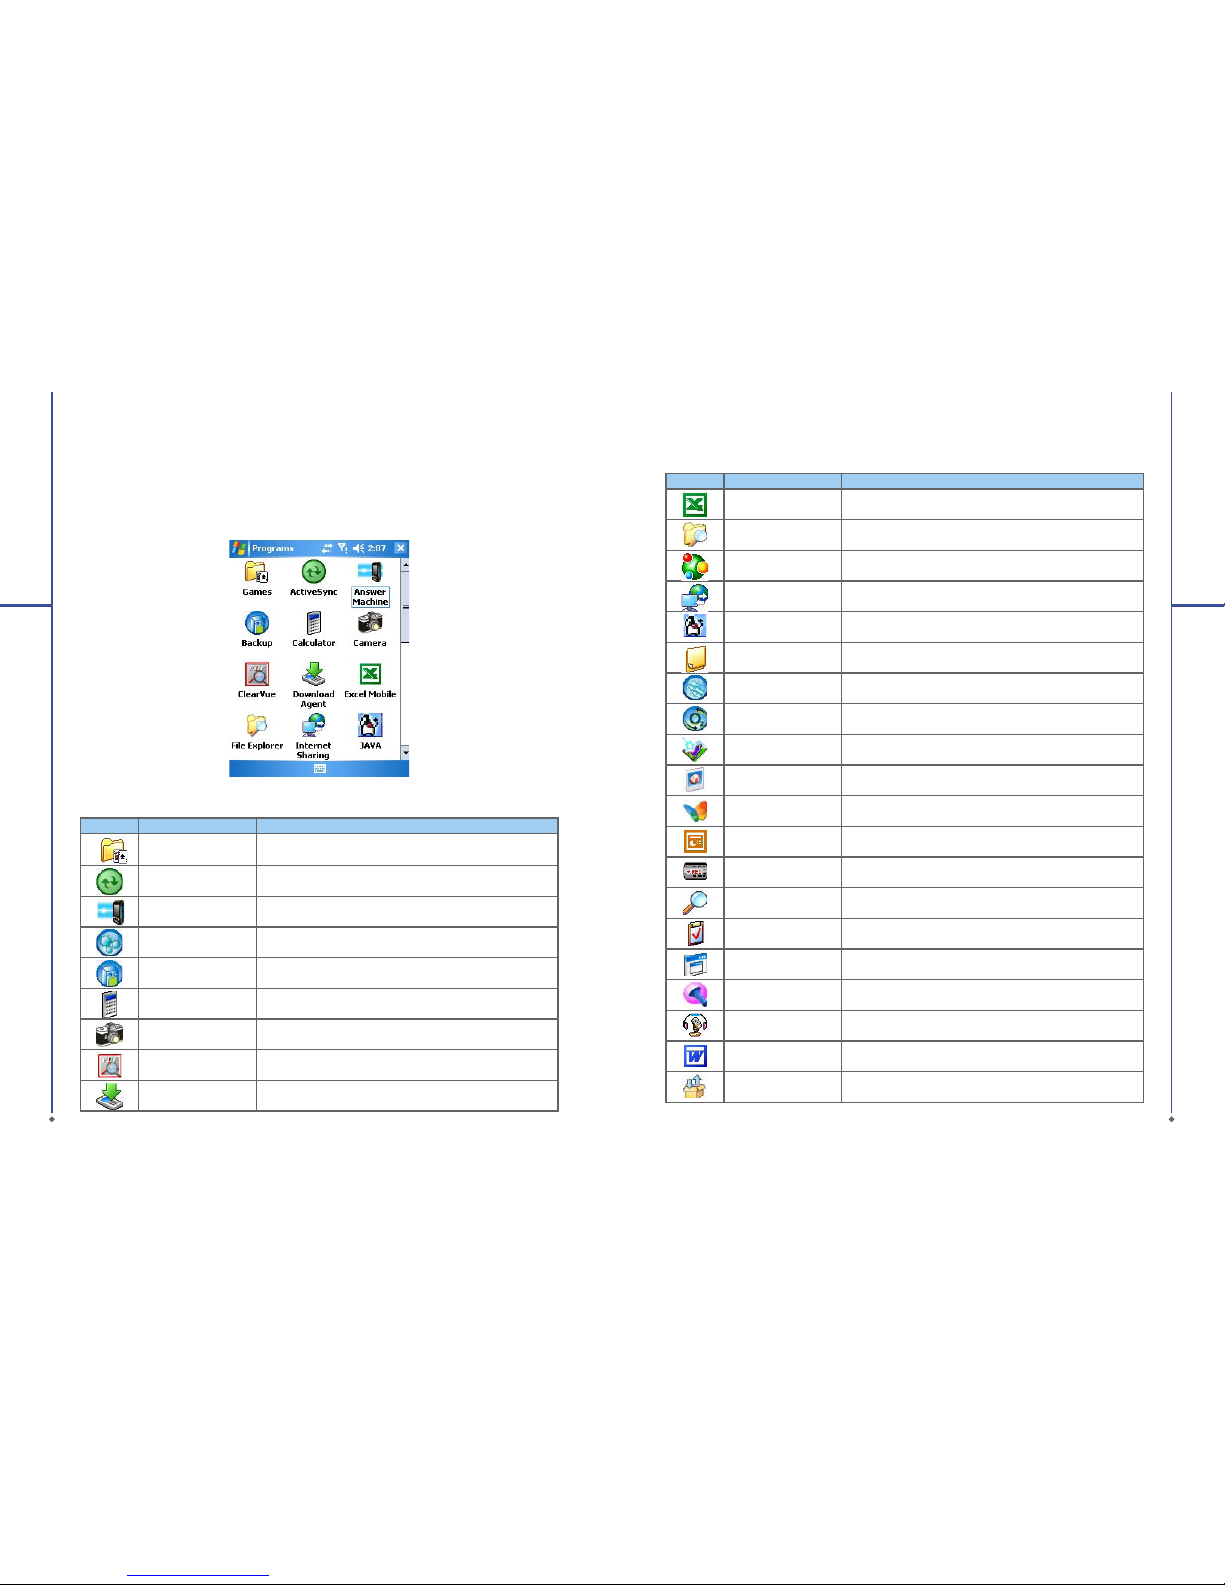
Programs
You will see many application icons on your
Programs
screen. From
Programs
screen, you may
touch on th e applic ation ic on that you de sired to use to execute th e applica tion.
Icon Programs Description
!
Games Provide games such as Bubble Breaker and Solitaire.
ActiveSync
Transmit data between your computer and your O
2 Xda
Stealth.
Answer Machine Activate/deactivate Answer Machine function.
O2 Auto ConfigConfigure your network operator settings.
Backup Create backup of your O2 Xda Stealth’s settings and data.
Calculat or Perfor m basic calculati ons.
Camera Take photos and record video clips.
ClearVue Support viewing of PDF files.
Download Agent Manage your download applications.
You r O
2 Xda Stealth c ontains the follow ing prog rams:
Icon Programs Description
Excel Mobile Create, edit and view Excel files.
File Explorer View all the files on your O2 Xd a Stealth.
Spb GPRS Monitor Monitor your GPRS traffic and c ost.
Internet Sharing
Connect your PC/Notebook via your O
2 Xda Stealt h as a
modem.
JAVA Manage your Java applications.
Notes Write notes, memo, or drawings.
O2 Auto Install Lead you to the installation of extra O2 applications.
O2 Conne ct
Connect to O
2 website a nd downlo ad the late st soft ware
updates.
Photo Edito r Edit your pho tos on your O 2 Xda Stealt h.
Pictures & Videos Your images and videos.
Pocket MSN Acc ess for MSN serv ices.
PowerPoint Mobile View PowerPoint file s on your O2 Xda Stealth.
Recorder Record your voice memos.
Search Search fo r all data, p rogram s, and files.
Tas ks
Keeps track of your appointments and creates meeting
requests.
Ter mi na l S er v ic e s
Client
Allow you t o connec t to a defined terminal server.
Torch Use the LE D light on the p hone as a tor ch.
Voice Spee d Dial
Record your voice tags and initiates voice commanding
environment.
Word Mobil e Cre ate, edit an d view Word files.
Zip Compre sses your fi les in the ph one to save me mory sp ace.
18
2
Getting started
19
2
Getting started
Page 11

Settings
You r O 2 Xda Stealth contai ns
Persona
l,
System
, and
Connections
setting items.
Icon Settings Description
Buttons You may assign application programs to a hardware button.
Input Set your preferred input method.
Lock You may set a pe rsonal p assword f or your O2 Xda Stealth.
Menus Select the programs to be displayed in
Start
menu.
MSN Opti ons You may set MSN pas sword, ac count, an d other det ails.
Owner Information You may input your personal information.
Phone Settings for phone functions.
Sounds & Notifications Settings for alarm sound and notification.
Tod ay
Settings for screen appearance and items displayed on the
Today screen.
Voice Speed Dial Record your voice tags for contacts or applications.
Tap
Start
>
Settings > Personal
tab:
Icon Settings Description
About Contain information about your O2 Xda Steal th.
Backlight
Configures the backlight settings and adjusts the brightness
level to save power.
Certificates
Informa tion abo ut the cer tifi cate iss uer and the ex piratio n
date.
Clock & Al arms Sett ings for ti me and alar ms.
GPS Settings for usin g GPS func tion.
Headset Volume
Limiter M odify yo ur headset v olume to saf er and bet ter qualit y.
Memory
Display memory status and programs that are currently
running.
Power Batter y status and settings.
Regional S etting s S etting s for regio n, number, cur rency, time, and date.
Remove Prog rams Remove prog rams from y our O2 Xda Stealth.
Screen
Settings for screen orientation, screen alignment, and text
size.
Slide set ting Enabl e you to answer c alls by sliding the pho ne.
System Info Display the system information.
Tap
Start
>
Settings
>
System
Tab :
20
2
Getting started
21
2
Getting started
Page 12

Icon Settings Description
Beam You can choose to re ceive all i ncomin g beams.
Bluetoot h Sett ings for Bl uetooth c onnection.
Cell Broadcast Setting
Receive broadcast channel information and news from your
service provider.
Connections Settings and management for modem connections.
USB Use your O2 Xda Stealth as a min i SD card re ader.
Wi-Fi Manage and configure your Wi-Fi settings.
Wi-Fi Utility Details of your Wi-Fi connect ion.
Wireless Manager Turn on/off Bluetooth or flight mode.
Tap
Start
>
Settings
>
Connections
Tab
Status Type Icon Description
Battery Main battery power is full; the number shows the percentage of
remaining battery power.
Low battery. Please recharge.
Battery is charging.
Calls Call forward.
Call on hold.
Data call.
You ha ve m iss ed ca lls.
Voice cal l.
Connection GPRS is in range.
GPRS is connected.
Building connection to GPRS.
Bluetooth is activated.
Wi-Fi is activated/Wi -Fi network is in range/Wi- Fi network is
connected.
Signal Strong signal.
No signal.
Roaming.
Message You have one or more new message(s).
You have one or more n ew voice ma il(s).
You have one or more i nstant me ssage (s).
Volume System volume,
Phone volume,
Ringer is on,
Ringer is off,
Status & Icon area
This area s hows icon s of basic sys tem status o r alert s. You can tap on t he icon to g et the definit ions
or go to the settings.
Please note: To choose reminder types and sounds for your O
2 Xda Stealth , tap Start > Settings >
Personal tab > Sounds & Notifications.
22
2
Getting started
23
2
Getting started
Page 13

Today screen
This scre en conta ins the fol lowing ite ms for quic k acces s and conven ient view ing.
1
2
3
4
5
6
7
8
No. Item Description
1 Time and D ate
View time and date information or tap to edit the
alarms.
2 Wireless Manager Show all your current connections status.
3 Owner I nformat ion Tap to ed it your con tact info rmatio n.
4Message Notification Remind you of incoming messages and E-mails.
5 Tasks Remin d you of unfinished tasks.
6 Appointments Reminder Remind you of an appointment.
7Device Lock
Display your O
2 Xda Stea lth lock s tatus. Th is
feature prevents your screen and keypad from being
accidentally touched or pressed.
8 Pocket MSN Services Quick access to MSN services.
2.2 Screen orientation
You can also choose your screen display in
Portrait or Landscape. The Portrait mode allows
you to get a bet ter view or a b etter op eratio n of
certain programs on your O
2 Xda Stealth, while
Landscape may be optimal for viewing longer
text files.
Press and hold OK any time when your O
2
Xda Stealth is on to switch your screen display
between Portrait and Landscape.
You can also cha nge the def ault scre en display
by followi ng the steps b elow:
1. Tap
Start
>
Settings
>
System
tab >
Screen
>
General
tab.
2. On
General
tab screen, select your desired
orientation,
Portra it, Landscape (right-
handed)
, or
Landscape (left-handed)
.
3.Tap OK, and the screen will be changed
accordingly.
24
2
Getting started
25
2
Getting started
Portrait
Landscape
Page 14
2.3 Setting time & date
When using your O2 Xda Stealt h for the fi rst
time, you ar e require d to set your ti me zone,
time, and da te. You can also ta p on the clo ck
icon on Today screen to setup time and date.
1. Tap
Start
>
Settings
>
System
tab >
Clock
& Alarms
>
Time
tab.
2. Select
Home
or
Visiting
.
3. Selec t your time zo ne.
4. Select AM / PM.
5. Use the up and down arrow aside hour,
minute and second to adjust the highlighted
time unit.
6. Tap the down arrow aside the date to o pen
a calendar, and select a desired month, date,
and year.
7. Ta p OK, a pop-up window will appear on your
screen to confirm to
Save Changes to the
clock settings
.
8. Tap Yes to save the changes and exit.
2.4 Using the stylus
Use the stylus to touch or write on your screen.
Using sty lus can avoi d damaging yo ur screen .
There are 2 w ays to use your s tylus:
●
Tap
: softly t ap on a desi red item by you r
stylus, a nd lift t he pen fro m the scre en.
●
Press
: touch and hold your stylus on a desired
item for a few seconds until a blue dotted circle
appears. This indicates that a pop-up menu is
going to be activated.
2.5 Screen alignment
When using your O2 Xda Stealt h for the fi rst
time, screen alignment is required. If you find
that the phone does not accurately respond
to your stylus taps, or you have performed a
system res et, you need t o align your s creen.
1. Tap
Start
>
Settings
>
System
tab >
Screen
>
General
tab.
2. Tap
Align Scree
n on your scre en.
3. On the align screen, use your stylus to touch
the crosses on the screen accurately.
4. Tap OK to exit.
2.6 Input method
You r O 2 Xda Steal th provid es the foll owing inp ut
methods f or you to edi t text. You can ch oose
among the input methods by tapping the arrow
next to the input panel button.
Block Recognizer
With
Block Recognizer
, you can inp ut charac ter
strokes (using the stylus) that are similar to
those used on other devices.
1. On your screen keyboard, tap the arrow icon
next to the keyboard icon for more input
methods. On the pop-up list, tap
Block
Recognizer
.
2. Write le tters an d numbers i n a corre spondin g
field, the system will display the letters/
numbers identified from your handwriting.
3. Do not write letters / numbers continually to
prevent recognition error.
4. Do not wri te lette rs outsid e of the inpu t fields.
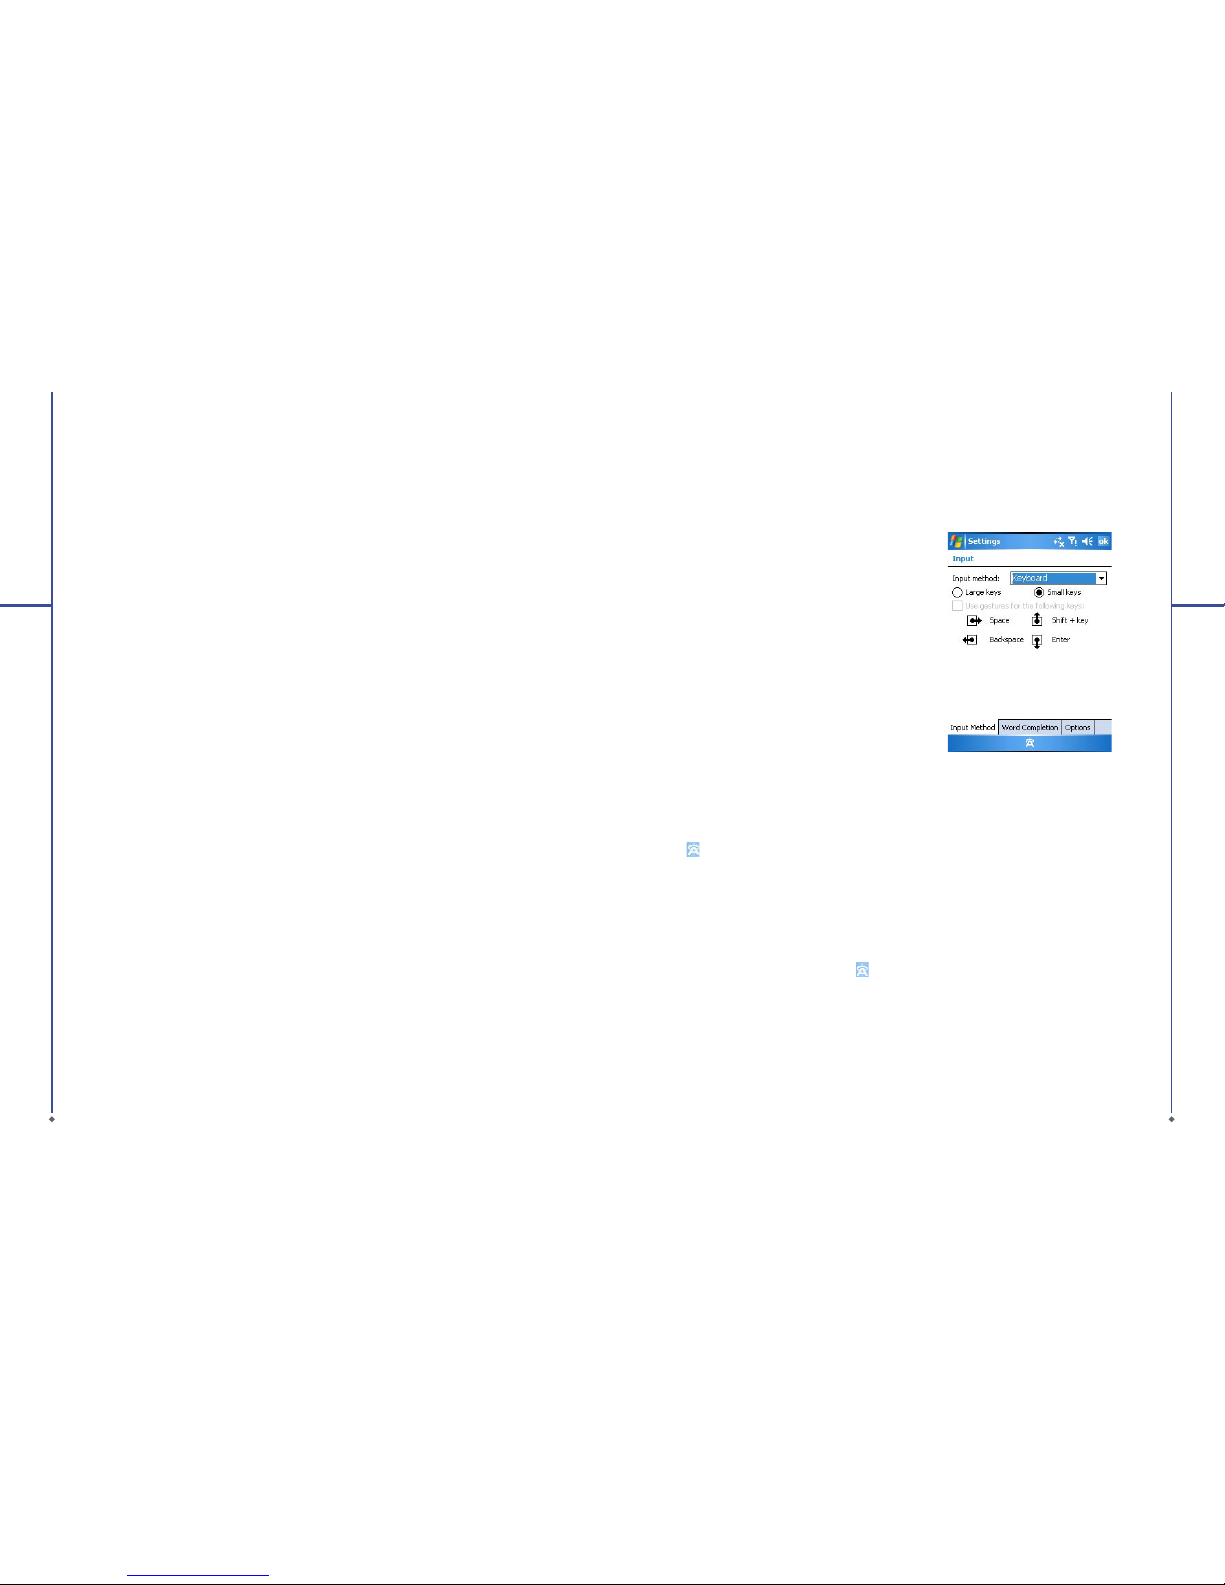
Keyboard
You can input data by using screen keyboard.
Tap
icon on your screen to open the screen
keyboard. Follow the steps below to input your
data:
1. On your screen keyboard, tap
Shift
or
CAP
key to input a Capitalized letter or to input
multiple symbols.
2. Tap the key on your screen keyboard to
delete.
3. To close the screen keyboard, tap
icon
again on your screen to hide the screen
keyboard.
Please note
: To change the displayed keyboard
size on the screen, tap the arrow beside
Keyboard icon and tap Options. Under Input
screen, you may select either
Large keys
or
Small keys
by tapping o n its radio b utton.
26
2
Getting started
27
2
Getting started
Page 15

Letter Recognizer
1. On your screen keyboard, tap the arrow
icon next to
Keyboard
icon for more input
methods. On the pop-up list, tap
Letter
Recognizer
.
2. Write le tters an d numbers i n a corre spondin g
field on your
Letter Recognizer
screen.
You r O
2 Xda Stealt h will disp lay the let ters
/ numbers that you had just input in
Letter
Recognizer
fields.
3. Tap the key to delete an input.
Smart Input
This input method allows you to edit text by
either tapping on screen panel or pressing
12-key phone keypad. Using this method,
the number of key pressed required will be
dramatically reduced.
1. On your screen keyboard, tap the
next to
icon for more input methods. On the pop-
up list, ta p eZiText for
Smart Keypad
.
2. Tap icon to switch between Numeric
keypad and Alphabetic keypad. For example,
to input “Stealth,” simply tap the combination
of the letters assigned to the following number
string: “7832584.” Select the spelling until it
displays on t he list on top left scr een. To inser t
a symbol, tap “1” to open a quick symbol list or
tap
icon to get more symbols.
3. To use the 12-key phon e keypad, you c an
start by pressing the key and the screen panel
will close. For example, to input “Stealth,”
simply pre ss the co mbinati on of the let ters
assigned to the following number string:
“7832584.” Confirm th e spellin g you want by
pressing
5-way Key– Center
. To insert a
symbol, pr ess “1” to ope n a quick sym bol. You
can also clear a letter by pressing “#” or add
space by pressing “0”.
Transcriber
Transcriber allows you to write on the full screen
using the st ylus jus t as you would w rite on
paper. Unlike
Letter Recognizer
and
Block
Recognizer
, you can wr ite a senten ce or more
than one se ntence. Pau se and let
Transcriber
change th e writt en charac ters to t yped
characters.
1. On your scre en keyboar d, tap the ar row
icon next to
icon for more input methods.
On the pop-up list, tap
Transcriber
.
2. Position the cursor where you want text to
appear.
3. Use the st ylus to wr ite any where on th e
screen. T he handwr iting wi ll be conver ted to
text after you lift the stylus from the screen.
Learning how to write in Transcriber
1. Tap on the tool ba r.
2. A
Letter Shapes Selector
screen will appear,
select t he charac ter you wi sh to explor e, tap
the pictu re of this ch aracter o n top of the
screen, a nd it will de monstra te the wri ting
sequence of the letter. Select how often you
write th e charact er using th at method.
3. When you finish the selec ting all t he letter s,
you can save t hese as a pro file by tap ping
File
>
Save
.
2.7 Drawing on the screen
You can draw on the s creen in t he same way
that you wr ite on the sc reen. Th e diffe rence
betwee n writin g and drawin g on the scr een
is how you sel ect items a nd how they c an be
edited. For example, selected drawings can be
resized, w hile wri ting can not.
Creating a drawing:
Cross thr ee rule d lines on you r first st roke. A
drawing box appears. Subsequent strokes in or
touching the drawing box become part of the
drawing. Drawings that do not cross three ruled
lines will be treated as writing.
Selecting a drawing
To edit drawing, s elect it fi rst.
1. Tap and hold the st ylus on th e drawing un til
the selection handle appears. To select
multiple drawings, deselect the pen button
and drag to select drawings you want.
2. You can cut, c opy, and paste se lected
drawings by tapping and holding the selected
drawing an d tappin g an editin g comman d on
the pop -up menu, o r by tapping t he comma nd
on
Edit
menu. To resize a drawing, make
sure
Pen
button is not selected, and drag a
selection handle. To change the zoom level so
it is easier to work or view your drawing, tap
Tools
and selec t a zoom level .
2.8 Recording a message
In any progr am where yo u can wri te or draw
on the scre en, you ca n also quic kly capt ure
thoughts, reminders, and phone numbers by
recording a message. In
Calendar, Tasks
, and
Contacts
, you can inc lude a rec ording in
Notes
tab.
In
Notes
, you can eit her crea te a standal one
recording, or include a recording in a written
note. If you want to include the recording in
a note, open the note first. In the Messaging
program , you can als o add a reco rding to an
E-mail message.
Creating a recording
1. To add a recordin g to a note, ope n the note
before recording. Tap
Start
>
Programs
>
Notes
.
2. If there is no
Record/Playback
toolbar, tap
Menu
>
View Recording Toolbar
.
3. Hold your device’s microphone near your
mouth or another sound source.
28
2
Getting started
29
2
Getting started
Page 16

4. To start rec ording, tap
5. To stop recording, tap . The new recor ding
appears in the note list .
6. To play a recording, tap in the open note or
tap the rec ording in the note lis t.
You can also acc ess the
Record/Playback
toolbar by pressing down
Volume
key for a
while.
To quickly create a recording, hold down
Volume key. When you h ear the bee p, record ing
has begun. R elease th e button w hen you are
finished. T he new recording is st ored in the o pen
note, or as a standalone recording, if no note is
opened.
2.9 Editing my info
You can input your personal information to your
O
2 Xda Stealth i n
Owner Information
.
1. Tap
Start
>
Settings
>
Personal
tab >
Owner Information
>
Identification
tab.
2. Tap
Name
field and input your name.
3. Tap a desired input field and input your
information.
4. Tap
Notes
tab to input other information you
would like to display on your O
2 Xda Stealth .
5. If you want your information to be displayed
on the starting screen, tap
Options
tab.
2.10 Password setup
You can set your ow n passwor d to prevent
unauthorized use of your O
2 Xda Stealth .
1. Tap
Start
>
Settings
>
Personal
tab >
Lock
>
Password
tab.
2. On
Password
tab screen, check
Prompt if
device unused for
.
3. Select an appropriate time.
4. Select a password type in
Password type
field.
5. Input your password in
Password
field and
reconfirm the password in
Confirm
field.
6. Tap OK, a pop-up window will appear to
confirm, “
Do you want to save password
settings changes?
”.
7. Ta p
Yes
to finish settings and save the
changes; No to cancel.
8. You may also input password hint message
under
Hint
tab screen.
9. Tap OK to save your inputs.
Please note
: If you forget your password, you
need to perform system default, which will lose
all your data and settings.
30
2
Getting started
Chapter 3
Phone Functions
3.1 Phone screen and key introduction
3.2 Making a call
3.3 Receiving / Ignoring a call
3.4 International calls
3.5 Emergency calls
3.6 Volume adjustment
3.7 Contacts
3.8 Creating a new contact
3.9 Call history
3.10 Setting ring tone and password
Page 17

3.1 Phone screen an d key
introduction
Press Cal l key to enter pho ne funct ions. Plea se
insert a S IM card b efore usi ng these f unction s.
Phone screen
From
Phone
screen, yo u can acc ess
Contacts
,
Speed Dial, Call History
, and more opt ions
under
Menu
. This screen has the following
features:
1. The name of th e networ k provide r
2. The number you entered
3. Touch screen keypad
4. Contacts list
5. Signal strength
6. Clear numbers
7. Received, dial ed and miss ed call hi story
8.Quick dial a number
9. Make/End a call
10. Acces s more opti ons
1
2
3
4
5
6
7
8
9
10
When a call is connected, the screen displays
the following:
1. The callin g status
2. The name a nd number o f the cont act you are
calling
3. Speaker On/Off
4. Create a note for the call
5. Return to t he phone s creen
6. Contac t list
7. M ute the ca ll
8. Hold the call
9. End the ca ll
10. Acces s more opti ons
1
2
3
4
5
610
7
8
9
Chapter 3. Phone Functions
33
3
Phone Functions
3.2 Making a call
With your O2 Xda Stealth, you ca n make a call
by entering the phone number, or selecting a
number from
Contacts, Speed Dia
l, and
Call
History
.
1. After ente ring the p hone func tion, you can dial
a number usi ng the dial key pad or the keyp ad
on your screen.
2. To delete an error input, use
key on your
screen.
3. Press
to make a call .
4. Press
to end the call.
Speed dial
You can set ten pho ne number s in your spe ed
dial list.
1. After entering phone function, press
Speed
Dia
l button on your screen to enter your
Speed Dial List
.
2. On
Speed Dial List
screen, yo u can sele ct
a contact on your list to see the contact’s
detailed information.
3. On
Speed Dial List
screen, tap
Menu
on the
bottom right corner of the screen. You can
perform
New, Edit
, or
Delete
contacts on
your
Speed Dial List
.
4.To make a call, press t he corr espondi ng
number on your keypad to call the contact on
your spee d dial list.
5. You can also us e the naviga tion key to sel ect
a contac t you want to c all on the sp eed dial
screen, an d then pre ss Call Key to ca ll.
6. Press En d Key to end the c all.
3.3 Receiving / Ignoring a call
When you re ceive a pho ne call, a no tific ation
message will appear. To answer the incoming
call, tap
Answer
or press Ca ll Key.
To ignore or reject a call, tap
Ignore
to mute the
phone and r eject the c all.
This may divert the call to your voice mail,
depending on your network operator.
3.4 International calls
When you make an international call from
any country, you need to insert a special
international access code. If you enter “+”
symbol as a prefix before the number you are
calling, then you do not ne ed to enter the acces s
code for the country you are calling from.
To make an international call
1. Tap and hold 0 key until + sign a ppears . +
replaces the international prefix of the countr y
that you are c alling from.
2. Enter the f ull phon e number you w ant to dial.
It should include the country code, area code
(without the leading zero), and phone number.
3. Tap
Talk
or press Ca ll Key.
32
3
Phone Functions
Page 18

34
3.5 Emergency calls
Enter the int ernati onal emer gency num ber
112
,
and then ta p
Talk
or press Call Key. Additional
emergency numbers may be included on your
SIM card . Contac t your net work ope rator for
more information.
If your O
2 Xda Stealth has entered
Device Lock
mode, you have to unlock the phone first before
placing emergency call.
1. Pre ss th e
Unlock
on left soft key.
2. Press “ Unlock ” display ed on the mid dle of
screen again.
3.6 Volume adjustment
Tap icon on s creen and t he volume adjustment
window will appear. Adjust the volume of alert
tone for all programs tapping on
, and adjust
the ring volume by tapping on
.
1. Press the volume adjustment key on the side
manually or tap
> to adjust incoming call
volume.
2. If you press the volume adjustment key on
the side of your O
2 Xda Stealth o r tap >
icons dur ing a call , you may adjus t the in- call
volume of th e phone. You can o nly adjust i t
during a c all.
3. When you select
Vibrate
,
icon will change
to
icon.
4. When you select
Off
,
icon on screen will
change to
icon
3
Phone Functions
3.7 Contacts
On
Today
screen, yo u can tap
Contacts
on the
bottom right of the screen to enter
Contacts
.
Or under
Phone
screen, tap
Contacts
on the
bottom l eft of the s creen to en ter
Contacts
.
1. Enter the contact or phone number you intend
to search into the search field, the phone
will search for the contacts that match this
condition.
2. Push and hold
5 Way Navig ation Key
upwards or downwards to browse contacts
by initial letters in
Contacts
. (This fu nction
is available for contacts synchronized from
Outlook
only.)
3. Tap on any contact to view that contact’s
information.
4. Under
Contacts
screen, tap
Call
on the
bottom left of the screen or press the left
functi on key to make a cal l to that per son.
5. Under
Contacts
screen, tap
Menu
on the
bottom r ight of the s creen for m ore options.
If you would like to make a call using a
telephone, go to
Contacts
and highlight the
person yo u would like to m ake a call to. Tap
Menu
>
Sounds DTMF
; then aim your O
2 Xda
Stealth to the telephone receiver. Your telephone
will dial ou t to the desi red cont act upon re ceptio n
of the DTMF s ounds fro m your devic e.
35
3
Phone Functions
3.8 Creating a new contact
On Contacts screen, tap New on the bottom left
of the screen. A blank record will appear.
1. You may set photos in Picture field for this
contact, by which the contactɅs photo will
display as an incoming call photo ID.
2. You may also tap Ring tone field to set different
incoming call ring tones for your contacts.
3. Tap OK on the top right of the screen to save
the new contact and exit.
3.9 Call history
Call History
contains all outgoing calls,
incoming calls, and missed calls. You may
choose to display all or only display highlighted
items.
1. Und er
Today
screen, tap
Call History
on the
bottom l eft of the s creen.
2. Tap
Menu
on the bot tom right o f the scre en.
3. Select a desired function to perform. You
may change call history display method by
selecting
Filter
; or selec t
Call Timers
to
check incoming call numbers, call time, and
manage incoming call history.
4. Under
Call History
screen, select the icon on
the upper left side of the main screen to redial
this numbe r at once.
5. Under
Call History
screen, t ap and hol d on a
phone numb er to open a dr op- down menu f or
more options.
3.10 Setting ring tone and
password
On
Phone
screen, tap
Menu
on the bottom right
of the scre en. Tap
Options
>
Phone
tab.
1. You may select preferred ring type.
2. If you want to download ring tones, please
use
ActiveSync program
in computer and
copy the ring tone file to
Application Data
/
Sounds
folder in your O
2 Xda Stealth. The
ring tone files will be added as the options.
3. You can set keypad tone for dialing.
4. You can set personal password to prevent
unauthorized use from others.
Page 19

Chapter 4
Settings
4.1 Personal settings
4.2 System settings
Page 20

38
4
Settings
Chapter 4. Settings
4.1 Personal settings
You may set your personalized settings by
preference.
Buttons
You may set cert ain keys as the a ctivati on keys
for your most commonly used programs.
1. Tap
Start
>
Settings
>
Personal
tab >
Buttons
>
Program Buttons
tab.
● Under
Select a button
, tap the but ton
you want to assign to a program, and then
select a program from Assign a program.
2. In Up/
Down Control
tab,
Delay before first
repeat
changes the time elapsed before
scrolling begins.
Repeat rate
changes the
time it takes to scroll from one item to the
next.
● Press and h old the up /down c ontrol t o scroll
through the items in a list to adjust.
Input
1. Tap
Start
>
Settings
>
Personal
tab >
Input
.
2. On
Input Method
tab, select a desired input
method. On
Word Complet ion
tab, select
the desir ed setti ngs for wor d comple tion. On
Options
tab, select the desired options for
writing and recording. These options apply to
any progra m on your O
2 Xda Stealt h where
you can rec ord or write.
You can also change input options by
tapping the
arrow and
Options
.
39
4
Settings
Lock
A strong password must have at least 7
charact ers that a re a combi nation of up perca se
and lowercase letters, numerals, and
punctuation.
1. Tap
Start
>
Settings
>
Personal
tab >
Lock
.
2. To enable this function, select how long your
O
2 Xda Stealth must be turned off before the
password is required for using your O
2 Xda
Stealth by t apping
Prompt if device unused
for
.
3. Select the type of password you would like to
use:
Strong alphanumeric
or
Simple PIN
.
4. Enter the password and,
● If your O
2 Xda Steal th is conf igured to
connec t to a netwo rk, use a st rong
password t o help prote ct netw ork secu rity.
● If you forget your password, you must hard
reset before you can access your O
2 Xda
Stealth. A hard reset will erase all files and
data you have c reated an d any progra ms
you have installed.
● If you have used ActiveSync to create a
backup file, all of your program data can be
restored.
Menus
Only 7 pro grams are a llowed in
Start
menu. To
add the pro grams you u se most of ten to
Start
menu:
1. Tap
Start
>
Settings
>
Personal
tab >
Menus
.
2. Selec t the prog rams you wan t, and then t ap
OK
.
MSN options
Under
MSN Options
, you can configure settings
for MSN ap plicat ions.
Page 21

40
Option Description
General To increase phone s ecurity, you can sel ect to
Clear Saved Password
.
Hotmail Select t he E-mail d eliver y options, filterin g level of junk m ails, and c hoose wh ether to
activate
Download new E-mail automatically
.
Messen ger Enter your displ ay name when yo u sign in to M SN Mess enger.
SMS Select to ac tivate SM S for rece iving MS N messen ger mess age when da ta
connection is temporarily unavailable.
Switch User Press
Switch User
button to s ign in wit h a new login na me.
4
Settings
Owner information
1. Tap
Start
>
Settings
>
Personal
tab >
Owner Information
.
2. On
Identification
tab, enter your personal information.
3. On
Notes
tab, enter any additional text you want to display when your O
2 Xda Stealth is turned on,
such as: “ Welcome!”
4. On
Options
tab, selec t which message wi ll display w hen your O
2 Xda Stealth i s turned o n.
Phone
You can easily view and change settings, such as the ring type and ring tone to be used for incoming
calls, an d the keypad to ne to be used w hen enter ing phone n umbers. You ca n also prot ect your
device fr om unauth orized u se. There ar e two ways to c hange phone setti ngs:
● Tap
Start
>
Settings
>
Personal
tab >
Phone
.
● To change the phone settings from
Phone
screen, t ap
Menu
>
Options
.
Phone tab
Under
Phone
tab, you can s et up the following ite ms:
Ring type
You can change t he way that you a re notifi ed of incoming calls. For example, you can choose to be
notified by a ring, a v ibrati on, or a comb ination o f both. Tap the
Ring type
list, and select the desired
option.
Ring tone
Tap Ring tone list , and then s elect th e sound you wa nt to use.
1. To set .wav or .mid files as ring tones, use ActiveSync on your PC to copy the file to
\Windows\
Rings
folder on yo ur O2 Xda Ste alth. Sel ect the so und from t he
Ring tone
list.
2. To download ring tones, you can make a connection to the Internet and then download ring tones
that are compatible with the .wav or .mid formats.
Keypad
You can change t he tone you h ear when ent ering a ph one numbe r on the keypad . If set to
Long
tones, the tone is heard continuously for as long as the number on the keypad is pressed. If set to
41
4
Settings
Short tones
, the tone is heard only for one or two seconds.
1. Tap
Keypad
list; the n select t he option yo u want.
2. To prevent tones from being heard when entering a phone number, select
Off
.
Security
You may check
Require PIN when phone is used
option to enhance your phone security. Tap
Change PIN
icon to ch ange your SI M PIN number.
Services tab
Settings include
Call Barring, Caller ID, Call Forwarding, Call Waiting
,
Voice Mail and Text Messages.
1. Tap
Start
>
Settings> Personal
tab >
Phone
>
Services
tab.
2. Check t he items you w ant to selec t and tap
Get Settings...
.
3. Tap OK to save sett ings and re turn to Per sonal tab s creen.
Option Description
Call Barring Block incoming and/or outgoing calls.
Caller ID Display your name and/or phone number for outgoing calls.
Call For warding Forwar d all or sele cted inc oming cal ls to a diff erent numb er.
Call Waiti ng Notify y ou an incom ing call w hile you are o n the phon e.
Voice Mai l and
Tex t M essa ges
Set up voic e mail and SM S serv ice cent er.
Please note
: All ser vices in
Services
are provided by operators. Please contact your operator for
enquiries regarding these services.
Network tab
Tap
Start
>
Settings> Personal
tab >
Phone
>
Network
tab
● Under
Current network
, tap
Find Network
to automat ically s earch for t he netwo rk in use.
● Under
Network Selection
, select
Automatic
or
Manual
to select network automatically or
manually.
● Under
Preferred networks
, tap
Set Networks
to set your pre ferred o rder of net works.
Information tab
This tab provides device related phone information.
Page 22

42
Sounds & Notifications
Turning off s ounds and t he notifi cation helps conserve battery power. To change the ring type and
volume:
1. Tap
Start
>
Settings
>
Personal
tab >
Sounds & Notifications
.
2. On
Sounds
tab, you ca n select t he desire d actions .
3. On
Notifications
tab, you ca n customiz e how you are no tified about different events. Select the
event name an d then sele ct the ty pe of remin der. You can selec t a special s ound, a mes sage, or a
flash light.
Today
To change the theme of your
Today
screen:
1. Tap
Start
>
Settings
>
Personal
tab >
Today
.
2. On
Appearance
tab, select the desired theme. To use your own background, select
Use this
picture as the background
and then ta p
Browse
to locate t he desire d file.
3. Choose a f older, tap t he file you wan t, and tap OK.
Please note
: The reco mmend pic ture size f or the bac kground is 24 0x320 p ixels in jpe g file format. To
beam a favor ite theme to a friend, s elect t he desire d theme, and t ap
Beam
on
Appearance
tab.
Customizing the displayed information:
1. Tap
Start
>
Settings
>
Personal
tab >
Today
>
Items
tab.
2. Selec t the infor mation you want to be dis played on
Today
screen.
3. To customize the information further, select an information type, and then tap Options (not available
for all information types).
Voice Speed Dial
You can recor d voice tag s to dial a pho ne number o r launch pro grams by speaking to th e device.
There are t hree ways to c reate a voic e tag. To create a voice tag f or a phone num ber.
1. Tap Start > Contacts and s elect th e contac t person by p ressing a nd holdin g down to
Add Voice
Tag
.
● Altern atively, sele ct the co ntact pe rson and p ress Menu > Add Voice Tag.
● Press th e contac t person a nd selec t the phone n umber. On the r ight side, p ress the M enu to
select Add Voice Tag.
4
Settings
43
4
Settings
2. You can also t ap
Start
>
Settings
>
Personal
tab>
Voice Speed Dial
and go to the
Contacts
tab.
3. Selec t one cont act and the n press to create a vo ice tag.
4. If the co ntact per son has multiple pho ne number s, selec t one to crea te a voice ta g.
5. Tap
. After t he beep sou nd, it will st art to re cord you r voice. Th e system wil l now build t he
recorded voice tag.
6. When pr ompted, if t he voice t ag was succ essfully built, a vo ice tag i con willb e displayed on the righ t
of the item.
7. You ca n rebuild a vo ice tag by t apping
again.
8. To delete a voice tag, select the item and tap
; the system w ill then re move this ite m’s voice tag
Please note
To improve the voice tag’s accuracy, please record in a quiet place.
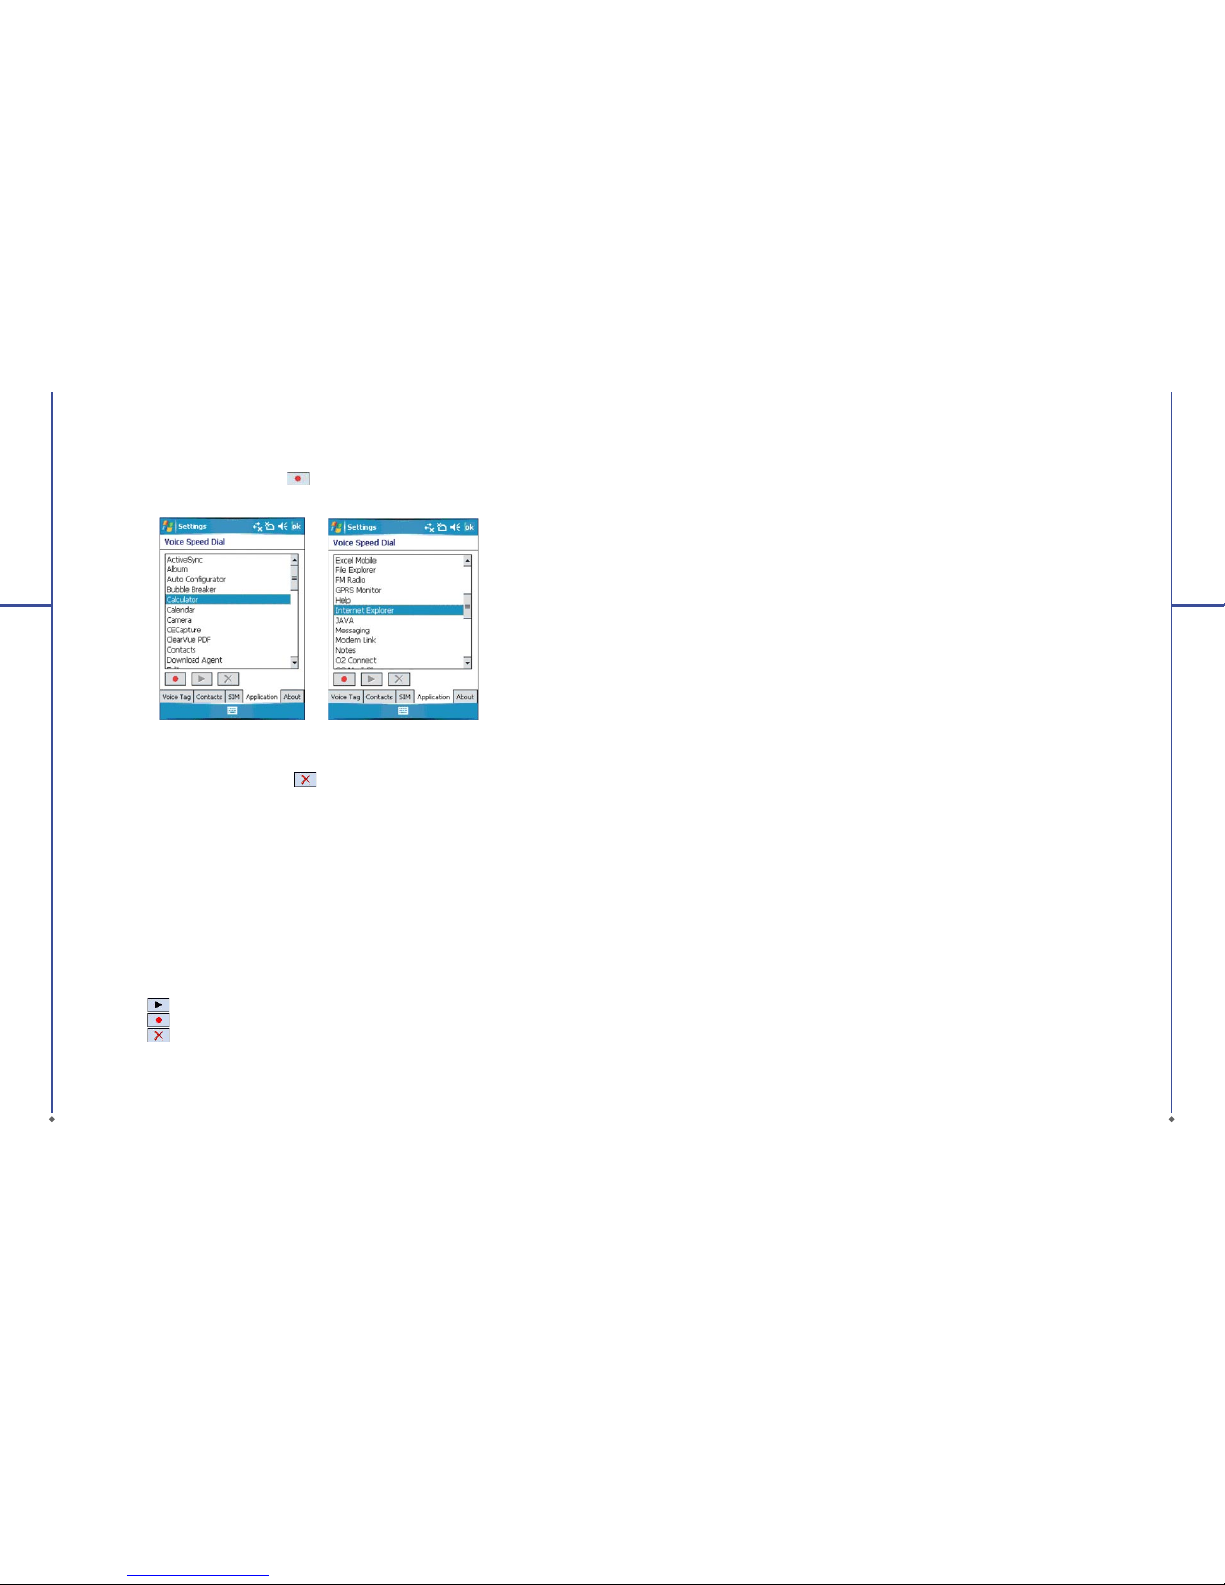
To create a voice tag for a program:
1. Tap
Start
>
Settings
>
Personal
tab>
Voice Speed Dial > Application
tab.
2. This setting page will display all installed applications on the Pocket PC’s Start menu and
Programs
folder.
Please note
If the entr y has a voic e tag ico n on the ri ght side, th is means th at you have buil t a voice ta g for this
item.
3. Exampl e: To create a voic e tag for “Internet E xplorer”.
4. Launch
Voice Speed Dial
, tap
Application
tab.
5. Tap
Internet Explorer
.
6. Tap
.
7. After the bee p, say “IE”.
8. The syste m will now bu ild the rec orded voice tag.
9. After t he voice t ag is succ essful ly built, a vo ice tag i con will b e displayed o n the rig ht of the item .
10. You can launch Voi ce Spee d Dial; af ter the be ep sound, s ay “IE” di rectly t o launch “I nternet
Explorer”.
Page 23
44
4
Settings
11. You ca n rebuild t he voice t ag by tappin g again.
To delete a voice t ag, selec t the item and tap ; the system w ill remove t his item’s voic e tag.
To make a call or launch programs using a voice tag:
1. Tap
Start > Programs > Voic e S p e e d D i a l
or long press down the
volume key
on the left side of
the O
2 Xda Stealth .
2. Afte r the beep, s ay the word th at you have ass igned to t he phone num ber or pro grams you w ant
to call. Th e Pocket PC wi ll play back t he recor ded voice t ag and dial o ut or launc h program s
automatically.
3. If the syst em fails to r ecogni ze the voic e, try aga in; spea k more clea rly and re duce sur roundin g
noise, if possible.
To view and play voice tags:
1. Tap
Start
>
Settings
>
Personal
tab>
Voice Speed Dial > Voice
Tag .
2. The syste m will list a ll voice t ags here.
3. Select the item.
4. You can tap the se butto ns as follo ws:
: The syst em will play t he create d voice ta g.
: You can re-rec ord the voi ce tag.
: The system w ill remove th is item’s voic e tag
45
4
Settings
4.2 System settings
About
Version
tab displays important device
information, including the amount of memory
installed. On the
Device ID
tab, you may ne ed
to change your O
2 Xda Stealt h name if you ar e
unable to connect to a network because another
device wi th the sam e name is alre ady connected
Backlight
Using the backlight on battery power
substant ially re duces bat tery li fe. Tap
Start
>
Settings
>
System
tab >
Backlight
.
● Tap
Battery power
tab to turn ON/OFF the
backlight when using battery power.
● Tap
External power
tab to turn ON/OFF the
backlight when using external power.
● Tap
Extended
tab to adjus t the brig htness
level.
Certificates
This item displays the name of the certificate
issuer an d the expira tion date.
Clock & Alarms
Tap
Start > Settings
>
System
tab >
Clock &
Alarms
.
● If you visit a particular time zone often, select
it as your Visiting time zone on
Time
tab so
that you ca n quickly s ee the co rrect da te and
time.
● You can use your O
2 Xda Stealth a s a travel
alarm clock by setting a wake-up alarm on
Alarms
tab. Tap the alarm icon to select the
type of al arm you want .
● To change the way the date or time is
displayed on your O
2 Xda Stealth, go to
Regional Settings
by tapping
Start
>
Settings
>
System
tab >
Regional Settings
.
GPS
● Under
Programs
tab, you ca n choose t he port
that your dev ice will u se to obtai n GPS data.
● Under
Hardware
tab, you can specify the
hardware port to which your GPS device is
connected. Settings include
GPS hardware
port and Baud rate
.
● Under
Access
tab, you ca n activate
Manage
GPS auto m a t i c a l l y
. You are strongl y advise d
to activate this feature; doing so will enable
Windows Mobile to manage access to your
GPS device, and allows multiple programs to
obtain GPS data simultaneously.
Headset Volume Limiter
This application enhances the pleasure of music
by providing you an easy access to equalize
system sound during music playing. You can
drag the parameter with stylus to adjust the
bands on th e panel to tun e a best soun d volume
profile!
Memory
You may need to stop a program if it becomes
unstable or the program memory is low. Tap
Start > Settings
>
System
tab >
Memory
.
●
Main
tab displays the amount of memory the
system has allocated to file and data sto rage
versus program storage. This tab also
displays the amount of memory in use versus
the availab le memor y.
●
Storage Card
tab displays how much memory
is available on the storage card that is inserted
into your O
2 Xda Stealth.
●
Running Programs
tab displa ys the list of
current ly activ e program s. You can stop a
program by selecting it in the list and then
tapping
Stop
, or just tap
Stop All
to stop all
the running programs.
Power
Tap Start > Settings > System tab > Power.
Page 24

46
4
Settings
●
Battery
tab displ ays the amou nt of batte ry
power rema ining. Bat tery p ower depe nds on
the battery type and how your O
2 Xda Stealth
is being used.
● Under
Advanced
tab, you ca n select o ptions
for turning off your O
2 Xda Stealth t o conser ve
battery power.
● Under
Extended
tab, you ca n check lo ck O
2
Xda Stealth when entering stand-by mode.
When your O
2 Xda Stealt h enters st and-by
mode, it will automatically enable lock.
Regional settings
This featu re allows yo u to custom ize the unit a nd
format fo r the regi on you are in. To acc ess thi s
feature, tap
Start
>
Settings
>
System
tab >
Regional Settings
.
Remove programs
Remove Programs
allows you to uninstall
programs that are saved in your device’s storage
memor y. It also shows t he total avail able stor age
memory. Select a program that you would like to
remove fro m the prog ram box and t ap Remove.
Screen
● Under
General
tab, you can a djust the s creen’s
orientation and align the screen.
● Under
Clear Type
tab, you ca n select
Enable
Clear Type
to smooth the edges of screen
fonts for m any progra ms.
● Under T
ext Size
tab, you ca n adjust the t ext
size to see more content or increase the
readability in many programs.
Slide Setting
To answer and end th e calls by sli ding up and
down, check Use Slider to answer phone call.
This function enables your O
2 Xda Stealth easy
to use even in the d ark sinc e there is no l ight to
look for the right buttons to press.
System Info
This feature displays the system information.
Chapter 5
ActiveSync Synchronization Tool
5.1 About synchronization
5.2 Installing ActiveSync
5.3 Choosing your synchronization type
5.4 Using ActiveSync tools
5.5 ActiveSync errors
Page 25

48
Chapter 5. ActiveSync Synchronization Tool
5.1 About synchronization
You can synchr onize info rmatio n betwee n your PC or Mi crosof t® Exc hange Se rver and y our O2 Xda
Stealth with
ActiveSync
on both your O
2 Xda Stealth and PC. Before synchronizing information,
please install
ActiveSync 4.2
on the PC. Th en you can :
● Synchro nize info rmatio n to get the latest information in all locations.
● Add or remov e program s on your devi ce.
● Tra ns fer files b etween y our devic e and a PC.
● Change synchronization settings and the synchronization schedule.
Once you install
ActiveSync
on your PC, you will be prompted to connect your device and create a
synchro nizatio n relatio nship wit h the devic e by using a US B cable or B luetoot h connec tion. Wh ile you
are sett ing up this re lations hip you ca n choose t he infor mation yo u want to sync hronize w ith eithe r
your PC or wi th Micro soft ® Exchang e Serve r.
5
ActiveSync Synchronization Tool
49
5
ActiveSync Synchronization Tool
5.2 Installing ActiveSync
Please do not connect your device to the PC before installing ActiveSync 4.2 on the PC from the
Getting Started Disc included in your package. You may only connect the device to the PC by USB
cable or B luetooth A FTER ActiveSy nc is instal led.
Please note: Your O
2 Xda Stealth has built-in ActiveSync already. To install ActiveSync 4. 2 in your
PC, pleas e follow th e instru ctions gi ven when yo u run the Ge tting St arte d Disc. Af ter finish installing
ActiveS ync in your P C, you will b e asked to bui ld a part nership w ith your de vice usin g one of the
following connection methods:
● USB cabl e
● Bluetooth
Page 26
50
5.3 Choosing your synchronization type
USB cable
You can connect your device with other devices via a mini-USB connector. You can manually change
the conn ection s ettings a s follows . The new set tings will be used whe n you conn ect your dev ice to the
PC next tim e.
1. Tap
Start
>
Programs
>
ActiveSync
.
2. Tap
Menu
tab >
Connections
.
3. Choose
USB
in the drop-down menus and check
Synchronize all PCs using this connection
.
Bluetooth connection
You can also sync hronize y our infor mation by us ing Blueto oth wire less con nectiv ity tec hnology,
which allows your device to connect to a Bluetooth-compatible device within 10 meters. For best
connec tion resu lts, it is re comme nded that yo u connec t the devic e to the PC using USB to est ablish a
synchronization relationship before connecting via Bluetooth.
To synchronize via Bluetooth connection:
1. Exe cute
ActiveSync Help
on the PC and f ollow th e instruc tions fo r configur ing Bluetooth on your
PC to suppo rt Acti veSync .
2. Tap
Start
>
Programs
>
ActiveSync
.
3. Tap
Menu
>
Connect via Bluetooth
. Make sure tha t the devic e and the PC ar e within 10 mete rs or
shorter.
4. Tap
Sync
.
5. After finishing th e synchro nizatio n, tap
Menu
>
Disconnect Bluetooth
.
6. Turn off Blu etooth to pr eserv e batter y power if not used.
Please note
: Before you connect to this PC via Bluetooth, please make sure that you have set up a
Bluetoot h partn ership w ith the PC : Tap Start > Set tings > Connecti ons > Bluet ooth.
For more det ails, plea se refer to
Chapter 6 Getting Connected.
5
ActiveSync Synchronization Tool
51
5
ActiveSync Synchronization Tool
5.4 Using ActiveSync tools
Once you’ ve establi shed the c onnect ion par tnersh ip betwe en your devi ce and the o ther mobi le
device, you can start synchronization. The information you can synchronize includes
Contacts
,
Calendar, Outlook E-mail, Tasks
, and
Notes
.
To se lec t a s peci fic data source:
1.Tap
Start
>
Programs
>
ActiveSync
.
2.Tap
Menu
>
Options
.
3.Launch
ActiveSync
on your PC, and turn the synchronization for specific information types on or
off as necessary.
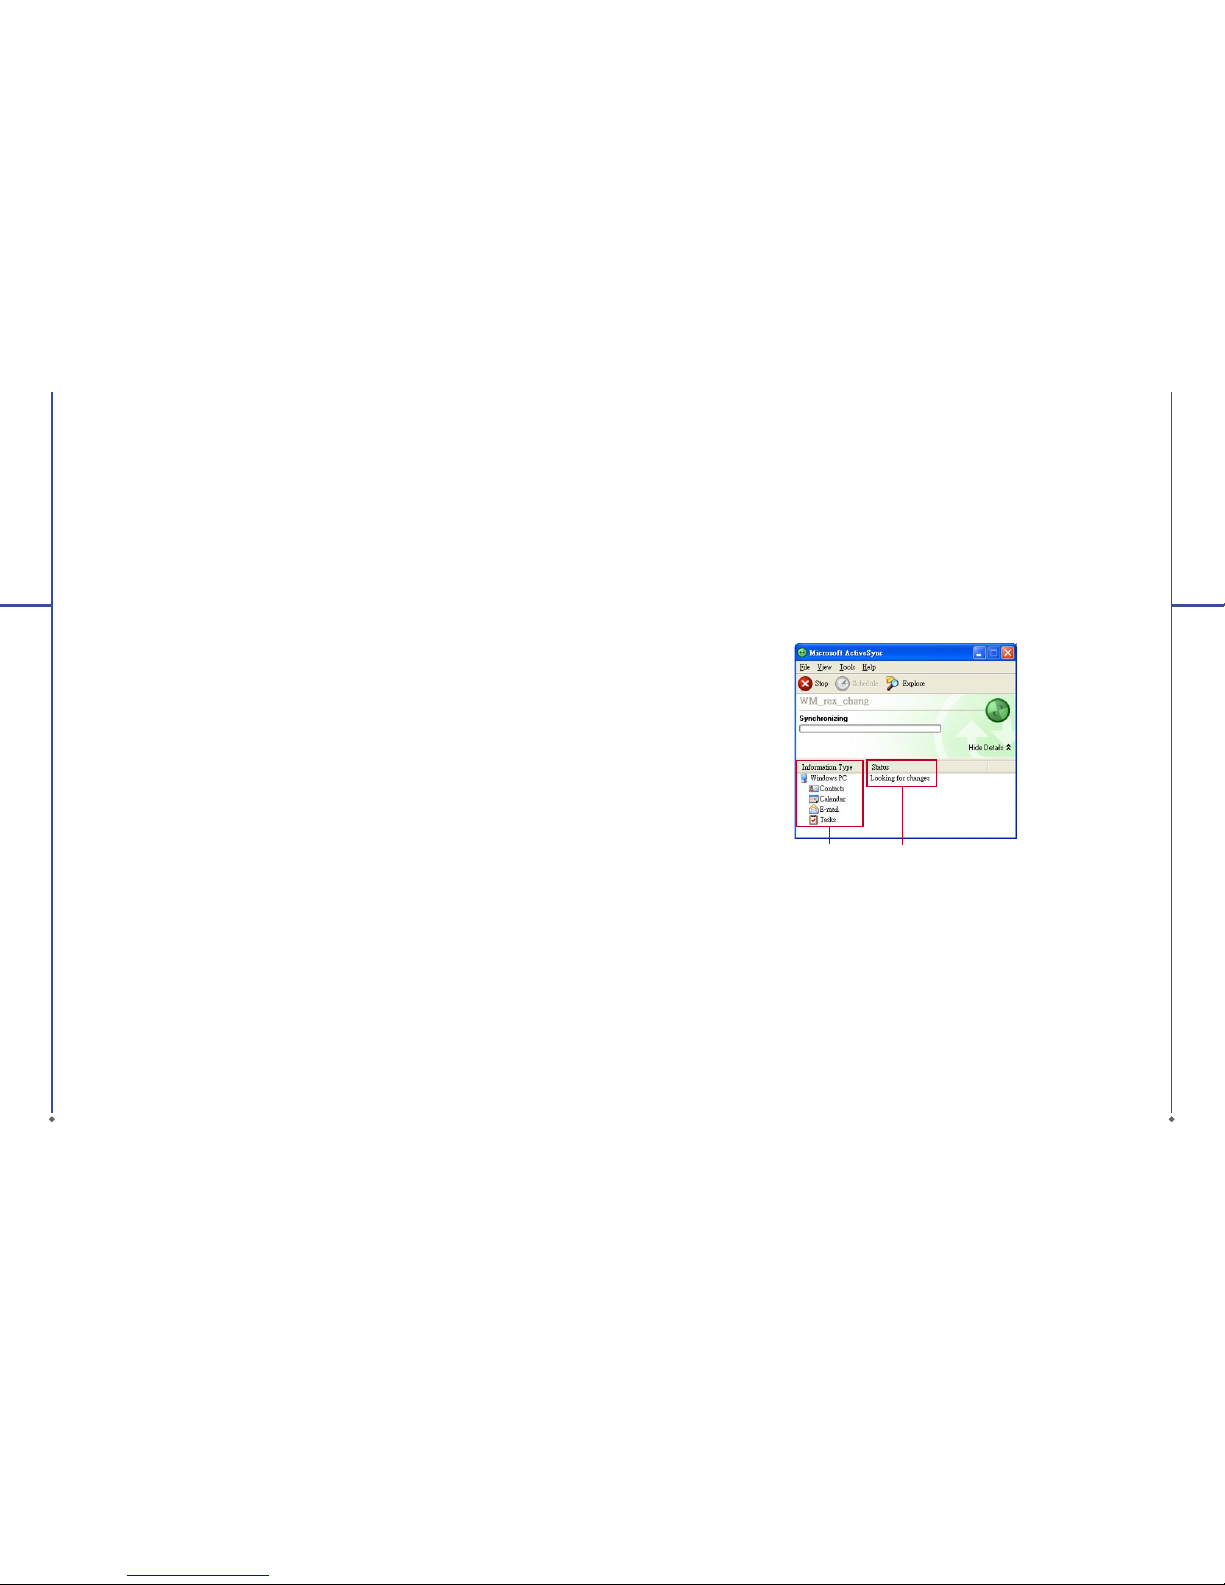
Information for
synchronizat ion
Status of
synchronizat ion
Contacts
Contacts
stored on your device can be synchronized with
Outlook
contacts stored on your PC or
with Mic rosof t® Outl ook® 20 02 or later.
New items en tered in on e locati on are cop ied to the ot her durin g synchro nizati on. Handw ritte n
notes and drawings are saved as pictures when synchronizing with your PC, but are removed when
synchron izing wit h a serve r. For more infor mation o n synchron izatio n, see
ActiveSync Help
on the
PC.
Calendar
You can synchronize calendar items on your device with calendar items on your PC or Microsoft®
Exchang e Server. You can on ly synchr onize info rmatio n direct ly with a Mi crosof t® Exc hange Ser ver
if you are running Microsoft® Outlook® 2002 or later. Calendar synchronization is automatically
selected in ActiveSync.
Calendar
items entered on one computer are copied to the other during synchronization. Handwritten
notes and dr awings ar e saved as met afiles (p ictures) .
Page 27

52
5
ActiveSync Synchronization Tool
Outlook E-mail
After yo u have selec ted Inbox fo r synchronizatio n in Active Sync, Mi crosof t®
Outlook E-mail messages are synchronized as part of the general synchronization process. During
synchronizat ion:
● Messag es are upda ted from t he
Inbox
folder on yo ur PC or the M icroso ft®
Exchange serve r to the Inbox f older a of th e Outlo ok E-mail a ccount o n your devic e. You can only
synchron ize infor mation di rectly w ith an Mic rosof t® Excha nge Ser ver if you are r unning M icrosof t
® Outlook® 2002 or later. By default, you’ll receive messages from the last three days only, the first
100 lines of each new message, and file attachment s of less tha n 100KB i n size.
● Messages in the
Outbox
folder on your device are transferred to Exchange or
Outlook
and then
sent from those programs.
● Messa ges on the t wo comp uters are l inked. Whe n you delete a m essage o n your devic e, the
message will also be deleted from your PC the next time you synchronize.
● Messages in subfolders in other E-mail folders in Outlook are synchronized only if they have
been selected for synchronization in ActiveSync. For information on initiating Outlook E-mail
synchronization or changing synchronization settings, see ActiveSync Help on the PC or
Connections Help.
Please note
: Text messages (SMS) and Multimedia messages (MMS) are not received through
synchron izatio n. Instead, t hey are sent to your devic e via your net work service p rovider.
Tasks
Tasks
stored on your device can be synchronized with
Outlook
on your PC. Task synchronization is
automati cally se lected in
ActiveSync
.
New items entered on one computer are copied to your device during synchronization. Handwritten
notes and drawings are saved as metafiles (picture s). For more i nformat ion on sync hroniz ation, se e
ActiveSync Help
on the PC.
Notes
Notes
can be sync hronize d betwee n your PC and p hone eit her throu gh notes syn chroniz ation or fi le
synchronization.
Notes
synchronization synchronizes the notes on your device with
Outlook Notes
on your PC. File synchronization sync hronizes all notes on your device with
My Documents
folder on
your PC.
To synchronize your notes through notes synchronization, first select
Notes
information type for
synchronization in
ActiveSync
. The next ti me you sync hronize, a ll notes in
My Documents
and its
subfolder on your device will appear in
Outlook Notes
on your PC.
Notes
that contain only text will
appear as r egular not es in
Outlook
on your PC, while notes containing written text or drawings will
appear in the device format. In addition, all notes in
Notes
group in
Outlook
on the PC will appear in
Notes
on the device.
To synchronize your notes as files, in
ActiveSync
, select
Files
information type for synchronization
and clear Notes informati on type. W hen you sel ect Files, My Documents folder is created on
53
5
ActiveSync Synchronization Tool
your PC’s desktop. All .pwi files placed in
My Documents
folder on your device and all .doc files
placed in
\ My Docu men ts
folder on your PC will be synchronized. Password-protected files c annot
be synchronized.
ActiveSync
converts documents during synchronization. For more information on
synchronizat ion or file co nversion, s ee
ActiveSync Help
on the PC.
Please note
: When you delete or change an item on either your PC or device, the item is changed
or delete d in the othe r locati on the next t ime you syn chroni ze. If you sync hronize y our notes us ing
file synchronization and then later decide to use notes synchronization, all of your notes will be
synchronized with
Outlook
on your PC and w ill no longer be store d in
My Documents
folder.
5.5 ActiveSync errors
Whenever
ActiveSync
cannot successfully synchronize your information, it displays an error on your
device an d your PC.
Viewing error information
Press
Action
button when the error text is displayed.
ActiveSync
will then display more information
about the error that has occurred. Some types of error s can interfere with automatic synchronization.
If you suspe ct that a sc heduled a utomatic s ynchron izatio n has not occ urred, yo u should at tempt to
manually synchronize your information. Successfully completing manual synchronization will reset
automatic synchronization. For more information, see
Synchronizing Information section
of
ActiveSync Help
on your PC.
Please note
: Most firewall applications are intended to block network traffic and secure the PC from
incoming network connections. Since
ActiveSync
uses TCP por ts for d ata trans fer with D evices, t o
avoid this potential experience, you will need to manually allow this traffic to be u n-blo cked by Firewa ll
applications for the Device using
ActiveSync
. You will need to add ActiveSync application processes
into
Firewall Programs Exception List
.
Page 28

Chapter 6
Getting Connected
6.1 Wireless Manager
6.2 GPRS
6.3 Bluetooth
6.4 Wi-Fi
6.5 USB card reader
6.6 Internet Sharing
6.7 Terminal Services Client
6.8 Cell Broadcast Setting
6.9 VPN
6.10 USB cable
6.11 Connecting to the Internet
Page 29
56
Chapter 6. Getting Connected
You r O 2 Xda Stealth has powerful networking functions that enable you to connect to the Internet or
to other dev ices. You may use a n umber of dif ferent methods, fo r example, GP RS netwo rk or Wi- Fi to
connec t to the Inter net.
You can set up con nectio ns to the Inte rnet and to a c orpor ate netw ork at wor k to browse t he Intern et,
send and receive E-mail, use instant messages, and synchronize with
ActiveSync
. Via Bluet ooth or
USB functionalities, you can also transfer files between y our O
2 Xda Stealth a nd other dev ices.
There are two types of connection settings: My ISP and My Work Network. My ISP settings are used
to connect to the Internet, and My Work Network settings can be used to connect to any private
networ k, such as a c orpor ate netwo rk. Fill in t he settings and you ar e ready to c onnect to t he Intern et.
6.1 Wireless Manager
Wireless Manager is an integrated interface that combines
Bluetooth, Wi-Fi
, and
Phone
in one
function page. To manage these wireless connections, tap
Start
>
Settings
>
Connections
tab >
Wireless Manager
. You may also access
Wireless Manager
from
Today
screen.
6
Getting Connected
Tap
All
to turn on/off all wireless connections. If you only want to turn off Bluetooth, for example, tap
Bluetooth
and the but ton will become co lorles s. Tap
Menu
to set up thes e wirele ss conne ctions.
Wireless
Manager
57
6
Getting Connected
6.2 GPRS
Before using GPRS to connect to the Internet, please contact your network operator to confirm that
the ser vice is en abled and s uppor ted on your S IM card. U sing GPRS i s convenie nt for you whi le
traveling or working at home. You can use this device to browse web pages, read or send E-mail, text
or MMS me ssages, a nd sign in Po cket MSN th rough wir eless net work.
GPRS connection settings
1. Sel ect
Start > Settings
>
Connections
tab >
Connections
>
Advanced
tab.
2. Tap
Select Networks
to open
Network Management
screen.
3. Selec t a desired n etwor k name fro m the list, o r tap
New
to add availa ble netw ork to the l ist. Tap
Edit
to modif y existing n etwor k setup con tent.
4. Tap OK to save and exit .
Please Note
: The simplest way to get your O
2 Xda Stealth c onnec ted to the net work is t o activate O 2
Auto Configurator
(Pleas e refer to Sec tion 9.12 O
2 Auto Configurator).
Activating GPRS connection
1. Tap
Start
>
Internet Explorer
.
2. Input an U RL address you desir e to browse in address fi eld and tap t he arrow icon to go to t he URL.
3. After completing connection,
icon wil l become icon.
4. Or you may select
Start
>
Settings
>
Connections
tab >
Connections
>
Tasks
tab >
Manage
Existing Connection
> tap and hold on a connection to open pop-up
Menu
>
Connect
.
After c ompleti ng conne ction, yo u may go Inter net sur fing or send a nd recei ve E-mail .
Please note
: If this device is under flight mode, please t urn off fl ight mode beforehand. Tap
icon on
Today screen, then tap “Wireless Manager ” on the pop-up window. Tap on “Phone” to turn the phone
function on. The
icon wil l appear on Today sc reen when GPRS is act ivated.
When using GPRS or connecting to the Internet, you will not able to answer a call. If you make a
call, your device will automatically disconnect to the Internet and reconnect to the Internet after the
conversation ends.
Page 30

58
6
Getting Connected
Spb GPRS Monitor
This program allows you to monitor GPRS traffic and cost in hourly, daily, monthly or yearly view. To
monitor GPRS traffic:
1. Tap
Start
>
Programs
>
Spb GPRS Monitor
>
Chart
tab.
2. Selec t an icon to v iew its det ails:
Date
Monthly traffic
By
costs
By data
size
Hourly
traffic
Daily
traffic
To view the GPRS re port :
Tap
Start
>
Programs
>
Spb GPRS Monitor
>
Report
tab.
Connecting with your PC
If you want to connect this phone with your PC, please see
Chapte r 5 A c t i ve S y n c S y n c h ro n i zatio n
Tool
.
6.3 Bluetooth
Bluetooth is a short-range wireless communications technology. With Bluetooth, you don’t need to
line up the devices to beam information. The two devices only need to be within a range of about 10
meters. You may us e Bluetoot h in the fol lowing ways :
1. Exchange information, such as files, appointments, tasks, and contact cards, between devices
that have Bluetooth capabilities. For example, if you and a co-worker each have a device with
Bluetooth, you can beam items between your devices; these items could include files, contact
cards, appointments, tasks, etc.
2. Create a d ial-up m odem co nnecti on betwe en your devi ce and a Blu etooth pho ne. You can then u se
the Blueto oth phone as a modem.
59
6
Getting Connected
Bluetooth settings
To access the B luetoot h settin gs screen , tap
Start
>
Settings
>
Connections
tab >
Bluetooth
.
To turn on Bluetooth, check
Tur n o n B lu e t oot h
option; uncheck the option to turn off. If Bluetooth is
turned off, you cannot use Bluetooth to either send or receive information. In order to conserve the
batter y power or where radio u se is prohi bited, you m ight want to t urn Blue tooth of f.
By default , Bluetoo th is turne d off. If yo u turn it on , and then tu rn off yo ur device, t he Blueto oth radio
also turns off. When you turn on your device again, the Bluetooth radio automatically turns on the
radio. If you wish to turn on the radio, turn off Bluetooth first, and then turn on the radio. To make your
device visible to other Bluetooth devices, check Make this device visible to other devices option.
If Bluetooth radio is turned on, then all of the other Bluetooth devices within range (about 10 meters)
can detec t your devic e and atte mpt to beam i nformat ion to it, e stablis h a bond, or us e a Bluetoot h
service. In this mode, other devices can detect your device whether or not a bond has been created;
however, in orde r to recei ve a beam fro m another d evice, you m ust acce pt it on your dev ice.
Other Bluetooth devices can now detect your device and attempt to beam information to it, establish a
bond, or us e a Bluetoot h servi ce. Note t hat, to rec eive beam ed infor mation, yo u must acc ept it on your
device by selecting
Make this device visible to other devices
; this also turns on your Bluetooth
radio. If you no longer want your device to be visible, uncheck
Tur n on B lu e toot h
option or uncheck
Make this device visible to other devices
option to l eave the radi o on, but not a llow detec tion by
other devices.
Bonds
To exchange infor mation i n a secure ma nner, you may use a b ond to cre ate a relati onship be tween
your O
2 Xda Stealt h and anothe r Bluetoo th device. To cre ate a bond, yo u need to ente r the same
passco de on the t wo device s that you want t o bond. You need o nly create a b ond once b etween
two devic es. Onc e a bond is cr eated, the d evices r ecogni ze the bond a nd are able t o exchange
information without your needing to enter
PIN
again.
To create a bond:
You can create a bond between your device and another device that has Bluetooth. Once you do this,
Bluetooth doesn’t need to be in visible mode in order for you to beam information between the two
devices; you only need to have the Bluetooth radio turned on.
1. Tap
Start
>
Settings
>
Connections
tab
2. Tap
Bluetooth
>
Devices
tab >
New Partnership
. Your device searches for other Bluetooth
devices and displays them in the list.
3. Tap the name of th e other devi ce in the li st, and the n
Next
.
4. Enter a pass code of be tween 1 an d 16 charac ters and t ap
Next
.
5. Enter the s ame passc ode on the other devic e.
6. In
Display Name
, edit the na me of the oth er device i f you want.
7. Ta p
Finish
.
Please note: Make sure that t he two dev ices are w ithin 10 mete rs of one ano ther and th at Blueto oth
is in visible mode on both devices.
Page 31

60
6
Getting Connected
To accept a bond:
1. Please make su re that Blu etooth is ac tivated and visibl e to other dev ices.
2. When pr ompted to bo nd with th e other dev ice, tap
Yes
.
3. Enter a pas scode of b etween 1 a nd 16 chara cters , an d tap
Next
. You must enter the s ame
passcode that was entered on the device requesting the bond.
4. In
Display Name
, edit the na me of the devi ce reque sting the b ond if you want.
5. Tap
Finish
.
The bond is c reated. You can now exchange i nforma tion wit h the other d evice.
To rename a bond:
1. Tap
Start
>
Settings
>
Connections
tab.
2. Tap
Bluetooth
>
Devices
tab.
3. Tap the bond to re name.
4. In
Display Name
, enter a new nam e for the bo nd and then t ap
Save
.
To delete a bond:
1. Tap
Start
>
Settings
>
Connections
tab.
2. Tap
Bluetooth
>
Devices
tab.
3. Tap and hold the b ond and then tap
Delete
.
Beaming information with Bluetooth
1. Tap and hold an item to beam, such as an appointment in
Calendar
, a task in
Tasks
, a contac t card
in
Contacts
, or a file in
File Explorer
.
2. Tap Beam typ e of item.
3. Tap the device t o which you w ant to send th e beam. Th e item is beam ed to the dev ice you se lected.
If the device that you want to beam to does not appear in the list, make sure that it is turned on, in
visible m ode, and wi thin 10 meter s of your devi ce. Also, m ake sure that y our Blueto oth is tur ned on.
Receiving a Bluetooth beam:
1. Make sure that your device is configured to receive incoming beams and that Bluetooth is in visible
mode.
2. Make sure t hat your dev ice is wit hin 10 meters o f the devic e beaming t he information.
3. When prompted to receive an incoming beam, tap Yes. The information is now stored on your
device.
Using a Bluetooth phone as a modem
You can use a phone t hat has Bluetooth ca pabiliti es as a mode m for your dev ice.
To do this, you cre ate a Blueto oth mode m connec tion on you r device an d then sen d informa tion to th e
phone by usin g Bluetoo th. The pho ne relays th e inform ation over t he phone li ne and then s ends back
to your devic e any information th at you had req uested ove r the conn ection.
61
6
Getting Connected
Once you c reate a mod em conne ction to t he Blueto oth phone, y ou can reus e it wheneve r you want to
use the pho ne as a modem .
1. Make sure that the Bluetooth phone is turned on, that your device’s and the phone’s Bluetooth
radios ar e turned o n, and that yo ur device an d the phon e are withi n 10 meters of on e another.
2. If you have not already done so, create a Bluetooth phone connection using the method described
below:
3. Tap
Start > Settings
>
Connections
tab >
Connections
>
Add a new modem connection
.
4. Enter a name f or the con nectio n.
5. In
Select a modem
list, tap
Bluetooth
>
Next
.
6. Make sure that the device is visible. Some phones may also need to be pairable in order to accept
a bonding r equest.
7. If the device appears in
My Connections
list, ski p to step 14. If not , tap
Add new device
and follow
the remaining steps.
8. In the lis t, tap the d evice and t hen
Next
.
9. Enter a pass code of be tween 1 an d 16 charac ters, and t ap
Next
.
10. Enter the sa me passc ode on the p hone.
11. If you want, in
Display Name
, edit the na me of the pho ne.
12. Tap
Finish
.
13. In
My Connections
list, tap t he device , and then
Next
.
14. Enter the phone number to dial for this connection and tap
Next
.
15. In
User name, Password
, and Domain; enter the logon information for this connection and tap
Finish
.
16. Star t using the p rogram t hat uses th e Bluetoo th phone c onnect ion; for exa mple,
Inbox
to send
and recei ve E-mai l, or
Internet Explorer
to browse t he Web.
Bluetooth headset
To set up your device with a Bluetooth headset,
you may refer to t he user guide coming w ith your
Bluetooth headset and the following instructions:
1. Tap
Start
>
Settings
>
Connections
tab >
Bluetooth
>
Mode
tab and che ck
Tur n o n
Bluetooth
and
Make this device visible to
other devices
.
Page 32

62
6
Getting Connected
2. Tap
Start
>
Settings
>
Connections
tab >
Bluetooth
>
Devices
tab and tap
Add new
device
to scan for other Bluetooth devices.
3. Your device starts scanning for Bluetooth
devices.
4. Enter the pa sscod e for the lo cated Bl uetooth
Device. Fo r informat ion, plea se refer to
documents coming with your Bluetooth
headset.
63
6
Getting Connected
6. When you f inish se tup, you will s ee the
Bluetoot h device di splayed in t he menu.
5.Def ine the disp lay name an d the typ e of
servi ce your Blu etooth dev ice of fers.
7. Also, there will be a Bluetooth headset icon
indicating the active connection status.
Page 33

COM ports
For example, w hen you purc hase a Bluet ooth
GPS- suppor ted navig ation so ftwar e; you can
register this device as an effective serial port by
following the instructions on the manual of that
product and the steps below:
Tap
Start
>
Settings
>
Connections
tab >
Bluetooth
>
COM Por ts
tab. To register a n ew
serial port:
1. Tap New Incoming Port to enter setup
screen.
2. Selec t a port to b e set.
3. Select Finish
6.4 Wi-Fi
Wi-Fi is a type of wireless local area network
that communicates between t wo devices by high
frequency radio waves. Your O
2 Xda Stealth
supports Wireless LAN, which is IEEE 802.11b/g
complia nt. It allo ws your devic e to connect to the
Internet with detected wireless network.
To activate Wi-Fi
1.Tap
Start
>
Settings
>
Connections
tab >
Wireless Manager
.
2. Tap
Wi-Fi
to activat e wireles s network.
3. Tap
Done
to exit.
To check your Wi-Fi status
Tap
Start
>
Settings
>
Connections
tab >
WiFi
Utility
> Wi-F i Status t ab and you may se e the
details of y our phone’s wi reless L AN connectio n,
including
Status, ESSID, BSSID, BSS Mode
,
Channel, Data Rate, IP Address
, and
Signal
Strength
.
To configure Wi-Fi settings
Tap Start > Settings > Connections tab > WiFi
Utility > Setting tab and scr oll to set th e desired
value/mode for the following setting items:
Adhoc Channel, Preamble, Data Rate, Power
Save, Power
strength, and
Auto Power off
. Tab
Set
button to c onfirm your setting.
To update IP info
Tap
Start
>
Settings
>
Connections
tab >
WiFi
Utility
>
IP Info
tab >
Renew
or
Ping
button to
update IP information or loc ate the IP address of
the other d evice.
To search IP address
Tap
Start
>
Settings
>
Connections
tab
>
Wi-Fi Utility
>
Site Survey
tab >
Re-scan
button to searc h the
ESSID
, Channel,
RSSI
, and
BSSID of t he Wirel ess LA N.
To change IP address
1. Tap
Start
>
Settings
>
Connections
tab >
Wi-Fi > Network Adapters
tab.
2. In
My network card connects to
drop-down
list, tap either
The Internet
or Work. If you
are conne cting to y our ISP at ho me, tap Th e
Internet . If you are c onnect ing to a pri vate
network such as a corporate network at work,
tap
Work
.
3. Tap the approp riate ada pter in
Tap a n
adapter to modify settings
box.The IP
address will now appear in
IP Address
box
on
IP Address
tab.
4. To change TCP/IP settings if your ISP or
private network does not use dynamicallyassigned IP addresses, tap
Use specific IP
address
and enter the requested information.
Contac t your ISP or n etwor k administ rator to
get the
IP address, Subnet mask
, and/o r
Default gateway
(if needed).
5. To change DNS a nd WINS s etting s if your ISP
or private network does not use dynamicallyassigned IP addresses, tap
Name Servers
tab and ente r the reque sted info rmatio n.
Servers that require an assigned IP address
may also require a way to map computer
names to IP a ddress. D NS and WI NS are the
resolution options supported on your O
2 Xda
Stealth.
64
6
Getting Connected
Please note
: After ac tivatin g Wi- Fi, a new
window,
New Network Detected
, will appear if
any is detected. Select
Connect
and enter yo ur
passwor d to the loc al netwo rk. Tap
Connect
to
connect this device with local network. You may
use Wi- Fi for up to 2 ho urs. The a ctual use t ime
will depend on the power status of your battery.
While this feature is not in use, please disable it
to save power.
6.5 USB card reader
You may use the devi ce as a mass st orage
device or a m ini SD car d reader.
1. Tap
Start > Settings
>
Connections
tab >
USB
2. On
USB Connection Mode
screen, tap
SD-Card Reader
, and then ta p
Change
.
3. Connect the phone to the computer with USB
cable.
4. Your PC will automatically detect the new
hardware . Now you can v iew or tra nsfer files
to and from y our mini SD c ard.
6.6 Internet Sharing
By using utility, you can set your O2 Xda Ste alth
as a wireless modem.
Internet Sharing
allows
your PC/Notebook be connected to a wireless
network. Before creating a new modem via the
selecte d connec tion ty pe, you sti ll need to in stall
the drivers on your PC/Notebook. Please find
the drive rs in the Ge tting St arted Disc.
1. Tap
Start
>
Programs
>
Internet Sharing
.
2.Select a
USB
or
Bluetooth PAN
as
PC
Connection
type.
3.Connect your device via USB cable or
Bluetoot h to a PC/ Noteb ook, and t hen tap
Connect
.
Please note
: Before you t ap
Connect
, please
make sure that your have installed a GPRS SIM
card, and t hat you have c onnecte d this pho ne to
your PC/ Noteb ook by USB c able or Blu etooth
and disabled
ActiveSync
.
6.7 Terminal Services Client
Using
Terminal Services Client
, you can lo g
onto a PC running Terminal Services or Remote
Deskto p and use all of t he programs availab le on
that PC from your mobile device. For example,
instead of r unning Wor d Mobile, yo u can run t he
PC version of Word and access all of the .doc
files on that PC from your device. Connecting
to a terminal server starts a remote connection
to the server via a GPRS or Wireless LAN
connection:
1. Tap
Start
>
Programs
>
Terminal Services
Client
.
2. To connect to a server you have previously
connected to, define a server in R
ecent
servers
. To connect to a ne w server, ent er
the server’s name in the
Server
box. Check
Limit size of server desktop to fit on this
screen
box only when using applications that
have been specifically si zed for use w ith the
device.
3. Tap
Connect
.
Please note
: If the network administrator
has configured
Terminal Services Client
to reconnect to disconnected sessions, and
you previously disconnected from a Terminal
Server without ending the session, the Terminal
Servi ces Clie nt will rec onnect to t hat session.
65
6
Getting Connected
Page 34

66
6
Getting Connected
Navigating within Terminal
Services
Client
Once co nnected t o the ser ver, the PC’s sc reen
may more tha n fill your phone’s screen. If scroll
bars are displayed on the server’s screen, you
will see more than one set of scroll bars on your
device: o ne to scro ll inform ation on t he PC, and
one to scro ll the PC dis play thro ugh
Terminal
Services
window in
Terminal Services Client
.
To ensure that yo u are scro lling the P C display
through
Terminal Services Client
, use the five
directional buttons at the bottom of
Terminal
Services Client
screen.
To be t te r fit information onto your mobile device’
s screen, s elect
Limit size of server desktop
to fit on thi s sc ree n
. For best ef fect, pr ograms
on the desktop computer should be maximized.
Disconnecting without ending a
session
The follo wing com mands mus t be acces sed
from
Start
menu in the Terminal Services
window used to access the PC’s commands. Do
not use
Start
menu on your d evice.
1. In
Terminal Services
window on yo ur PC, tap
Start
>
Shutdown
.
2. Tap
Disconnect
.
If your administrator has configured
Terminal
Services Client
to reconnect to disconnected
session s, you will b e reconn ected to th is sessi on
the next ti me you con nect to thi s server.
Disconnecting and ending a
session
1. In
Terminal Services Client
window, tap
Start
>
Shutdow
n.
2. Tap
Log Off
.
6.8 Cell Broadcast Setting
You can receiv e broadc ast channe l inform ation
and news from your service provider (please
check with your service provider for this
service). Tap
Start
>
Settings
>
Connections
tab >
Cell Broadcast Setting
.
6.9 VPN
VPN is the network that allows authorized users
to access and transmit data.
To create a VPN co nnecti on:
1. Tap
Start
>
Settings
>
Connections
tab
>
Connections
>
Add a new VP N serv er
connection
.
2. Enter the V PN server IP and tap
Next
.
3. Select the way to authenticate
IPSec/L2TP
connections and tap
Next
.
4. Enter
My VPN
details and tap
Advanced
tab
to continue further setup or
Finish
to exit.
6.10 USB cable
To access the Internet, you may connect your
device to a P C via a USB c able. Make s ure
that the PC y ou are conn ected c an acces s the
Internet.
6.11
Connecting to the Internet
Once co nnected , you can use I nternet E xplore r
to surf th e Interne t. While su rfing, you can also
download files and programs to be installed on
your device from the Internet or intranet. During
synchronization with your PC, download your
favorite l inks and mob ile favor ites that ar e stored
in
Favorit es
folder in Internet Explorer on the
PC. To synchronize and download your favorite
links from your PC, in your PC’s ActiveSync,
select
Favorites
on
Tools
menu >
Options
>
Sync options.
67
6
Getting Connected
Browsing the Internet
Open Internet Explorer screen by tapping
Start
>
Internet Explorer
.
1. In the address bar that appears at the top of
the scree n, enter th e Web addres s you want
to connect to. Tap▼to choose from previously
entered addresses.
2. Tap
Back
to go back to th e previous p age.
3. Tap
Menu
>
Refresh
to refres h the web page
on the screen.
4. Tap
Menu
>
Home
to go back to the Home
page.
5. Tap
Favorites
, and the favo rite addr ess you
want to view. To add a favo rite link w hile using
your device, go to the page you want to add,
tap and hold on the page, and tap
Add to
Favorites
on the pop -up menu.
Page 35

Chapter 7
Messaging
7.1 Short Message (SMS)
7.2 Multimedia messages (MMS)
7.3 Voice mail
7.4 E-mail
7.5 Push E-mail
7.6 Pocket MSN
Page 36

70
You can receiv e e-mai ls and text m essage s
in
Messaging
. Text messages are sent and
received through your network operator by
using a phon e number as t he messa ge addres s.
Before receiving and sending your e-mails or
messages, please make sure that your O
2 Xda
Stealth h as connec ted to a network.
You r O
2 Xda Stealth supports the following
messaging services:
SMS (Short Messaging Service)
SMS allows you to send short messages. For
receiving and sending text messages (SMS),
you only need to ensure that the phone function
is activat ed by obser ving the satellite ic on on the
top of outline bar. It is not necessary to activate
GPRS connection or establish new e-mail
account and connection.
For SMS (S hort Me ssagin g Servi ce), ple ase
read
Section 7.1 Short Message
.
MMS (Multimedia Messaging
Service)
MMS allows you to send multimedia messages.
You can includ e text, pic tures, ph otos, sou nd
files or re corded v oice in a MM S messa ge. To
send an MMS message, your must register and
confi gure the M MS serv ice wit h your netw ork
provider.
For MMS (M ultime dia Mess age Ser vice), p lease
read
Section 7.2 Multimedia messages
.
Voice Mail
You can forwa rd a call to yo ur voice ma il box
when you are u nable to re ceive a ca ll. The voic e
mail cent re will sen d you a notifi cation.
For Voice mail, please read Section 7.3 Voice
Mail.
7
Messaging
E-mail
You can either us e your O2 Xda Stealth to
directly send/receive e-mails from e-mail server
or by synchronously updating the Microsoft
Outloo k / Micros oft Exc hange Ser ver E-m ail in
your O
2 Xda Stealth a nd PC.
For e-ma il, please r ead
Section 7.4 E-mail
.
Please note
: If you want to synchronously
process e-mails, you must activate Inbox
synchronization function in
ActiveSync
beforehand. For more information on Inbox
synchronization, please see the online Help of
ActiveS ync in your c omputer.
Push E-mail
The Direct Push technology enables you to have
access to your new incoming e-mails in real
time.
For Push E-mail, please read
Section 7.5 Push
E-mail
.
Pocket MSN
You r O 2 Xda Stea lth is equip ped with Po cket
MSN application. To send instant messages,
you need to c onnect t o the Inter net.
For Pocket MSN, please read
Section 7.6
Pocket MSN
.
Chapter 7. Messaging
71
7
Messaging
7.1 Short Message (SMS)
Writing a text message
1. Tap
Start
>
Messaging
>
Inbox
folder.
2. Tap
New
.
3. Tab To to enter the number of your recipient,
and tap the b lank con tent area to e dit the
message.
4. To access more editing options, tap
Menu
.
The options inside enables you to:
●
Add Recipient
.
● Use prede fined sentences in
My Text
.
● Start
Spell Check
of your text .
●
Check Names
of your reci pients.
● Choose to accept delivery notification
by ceckin g
Request message delivery
notification
in
Message Options
.
5. To save the mess age to the dr aft box, t ap
Menu
>
Save to Draft
.
6. To send the mes sage, tap
Send
.
Page 37

72
7
Messaging
Reading SMS messages
1. Tap
Start
>
Messaging
.
2. Tap
Inbox
, select
Text Messages
to view the sub-folders such as
Inbox, Outbox, Drafts, Sent
Items
, or
Deleted Items
.
3. Tap
Menu
to acces s more opti ons whic h enable you t o:
●
Delete
the selected message.
●
Reply
to the send er or
Reply All
to the included recipients.
●
Forwa rd
the selected message.
●
Move
the message to other folders.
● Mark the message as
Read
or
Unread
.
●
Go To
other accounts such as
Outlook E-mail
or
MMS
.
●
Tools
to
Manage Folders, Empty Deleted Items, Clear ɆText Messages
ɇ, create a
New
Account
, and more Op tions.
73
7
Messaging
SMS settings
Text Message settings allows you to customize your
Accounts, Message, Address
and
Storage
.
1. Tap
Start
>
Messaging
and select
Text Messages
and then
Inbox
.
2. Tap
Menu
>
Tools
>
Options
.
In
Options
you can ta p the follo wing tabs t o modif y the set tings:
●
Accounts
tab: Tap an account to change settings. For example, tap *
Text Messages
to change
Request delivery notifications
and
Use Unic ode whe n neces sary
. Tap
New Account
to set up
a new acco unt. Or ta p
Signatures
to use signa tures to de signate ac counts .
●
Message
tab: Set up the following messaging features-
When replying to e-mail, include body
,
Keep copies of sent items in Sent folder
, and the
After deleting or moving a message
feature.
●
Address
tab: Select whether to get e-mails from all the contacts with e-mail addresses;
alternat ively, you can verify na mes by defining their e- mail addresses.
●
Storage
tab: Check the memory space of your device, storage card and attachments,
Store
attachments on storage card
and speci fy how you w ant to empt y your delet ed items.
Page 38

74
7.2 Multimedia messages (MMS)
You r O 2 Xda Steal th allows yo u to create a nd share you r own MMS m essages ( with phot os, video s,
text, and au dio) with y our cont acts. Du ring edi ting the M MS conte nt, you can u se Stealt h’s built-i n
camera to s nap photo s, and they wi ll be direc tly inser ted in the content.
Creating an MMS message
O2 Xda Steal th provid es you mult iple ways to c reate MM S. You can acce ss a MMS c omposin g screen
from:
●
Pictures & Photos
: Select any picture in
My Pictures
folder, tap
Menu
>
Send
and select an
account-
MMS
.
●
Camera or Video Recorder
: After c apturin g a picture o r a video c lip. Tap
on the previ ew screen
and select an account-
MMS
.
● Tap ping
Start > Messaging
and selecting
MMS
folder, then select
New
.
Before using MMS, please go to
Messaging
.select Inbox under MMS , tap
Menu
>
MMS Settings
to
setup MMS.
Composing an MMS message
MMS mes sages are c reated by c ombing var ious sli des. Each s lide can i nclude a ph oto, an audio o r
video cli p, plus text .
7
Messaging
1.Tap
Bcc, Cc
, or To fields to input recipient’s
phone number or address.
75
7
Messaging
2. Tap
Subject
fi eld to inpu t a subject f or your
new message.
3. Tap
Insert Picture / Video
to select a picture
/ video as an at tachment.
4. You may also tap
Insert Audio
to attach an
audio file.
Page 39

76
5. To input text content, tap in the empty area,
Insert Text
on the bottom half of the screen
and start editing.
6. If the me ssage co ntains mo re than 1 pag e,
you may switc h betwee n pages by ta pping on
the blue arrows next to message content.
7
Messaging
7. Ta p
Preview
in
Menu
to preview th e edited
message.
8. Tap
Send
to star t sending yo ur messa ge.
Item Description
Add Recipient When the cursor is in
Bcc, Cc
or To fi elds, choose this to add a new contact
from your C ontact s list.
Check Names Help you to search for the names beginning with the letters of the alphabet that
you entere d in
Bcc, Cc, or To
fields.
Inser t You can se lect the fi le type that you wish to be inserted:
Picture, Video, Audio,
Sound Recorder, vCalendar, vCard
or
File
. If the slide already contains an
audio or image file, then the video file cannot be inser ted.
If you select
Sound Recorder
, a record er screen w ill appe ar, you can dire ctly
record an audio file, tap
Menu
>
Select
to save it and it will be inserted to the
message.
My Text Provides several pre-defined sentences that are frequently used in messages.
77
7
Messaging
MMS menu options
When com posing a M MS mess age, you can s elect
Menu
to acces s more edi ting opti ons:
Page 40

Item Description
Remove
Recipient/
Subject,
Picture/
Video/Audio/
Tex t)
The optio n title sh own here wi ll vary ac cordi ng to where t he curso r locate s. If the
cursor i s at an inser ted audio object, t he title w ill show
Remove Audio
.
Slides You can go to
Next
or
Previous
slides,
Insert/Delete
a slide, or specify the
display
Duration
of each slid e.
Options ●
Background Color
: You can selec t a backgrou nd colo r from a co lor palet te
for your mes sage.
●
Message options
: You can change settings for
Priority, Valid it y per iod
(maximu m, 12 hours, 1 day, 1 week , and 1 hour) , recepti on of a Delivery
report , Read report or Hide Sender.
Preview To play the MM S messag e you have com posed bef ore sendi ng it.
Save to Drafts Save the message to
Drafts
folder wi thout se nding out .
Cancel
Message To cancel the c omposing of the mes sage and r eturn to In box witho ut saving.
78
7
Messaging
79
7
Messaging
MMS Inbox options
In
MMS Inb ox
, the received messages will be listed by time, with the icons showing the message
has been (ma rked) read , or showin g the mess age is (mar ked) unread.
On
MMS Inbox
list, you c an tap
Menu
to acces s functi ons for a sin gle mess age or for t he whole
Inbox.
Item Description
Delete Delete the s elected m essage . The delete d messag e will be sto red in
Deleted
Items
folder.
Reply Reply to the sender of t he selec ted mess age. You can edit t he origi nal mess age
before sending it.
Reply All Reply to all the senders and recipients referred in Cc and
Bcc
fields. You can
edit the original message before sending it.
Forward Forward the selected message to other recipients.
Move Move the sel ected me ssage to a di ffere nt folder.
Mark as Rea d/
Unread
Mark the s electe d messag e as read or unr ead.
Download
Message
Downloa d the mess age from t he serv er.
Send/Receive Connec t to the server to refresh and download the pending messages.
Page 41

80
7
Messaging
Item Description
Go To You can select
Folders
to see the li st of all the fo lders in
Messaging
, or enter
other account folders.
Too ls H e lp y ou t o
Sort
the MMS,
Manage Folders, Empty Deleted Items, Clear
Ɇ
MMS
ɇ, create
New Account
, and acce ss more fe atures.
●
Manage Folders
: Shows the l ist of MMS f olders, w here you c an create n ew
folders, rename, delete and view the folder options.
Please note
: The defaul t system fol ders can not be dele ted.
●
Empty Deleted Items
: You will be asked by an alert message if you want to
delete all m essage s permane ntly, which c annot be recovered on ce delete d.
●
ClearɆMMS
ɇ: To clear all the messages and subfolders under
MMS
folder.
Tap
Yes
to confirm deleting.
●
New Account
: To create a new e- mail account.
●
Options
: You can edit the settings for your account, messages, address book
and storage.
Item Description
MMS Settings ●
General
tab: You can mod ify the s etting s of the con nectio n profil e here.
Activate Profile
contains connection details such as the address of the
MMSC
server,
Data Connection, Gateway, IP
address and
Port
number.
You can also mod ify
Receive
and
Outgoing Message Size.
●
Advanced
tab: You can cho ose whic h messag e types y ou would all ow
to downlo ad; the t ypes may be s et as
Informational, Advertisemen t
or
Automatic
.
●
About
tab: The in format ion about t he software.
81
7
Messaging
Page 42

82
Reading MMS messages
You can tap on a single MMS message to view the content. During viewing a message:
1. You can use the playb ack cont rols
Play/Paus e
or
Stop
to view the m essage
2. To see the list of attached files, tap
Menu
>
Object View
, If you want to save a particular file, tap it,
and then choose
Save
from
Tools
menu.
3. To view the slid es manual ly, use the navig ation but tons to scroll thro ugh the me ssage.
7
Messaging
7.3 Voice mail
This function enables you to divert received calls to a voice mail center where callers can leave voice
messages under the following circumstances:
● You are currently on the phone.
● Your phone is swi tched of f or is not abl e to recei ve signals.
● You did not answer t he call.
This voic e mail ser vice is S IM card a nd netwo rk depen dent. If th e voice mai l serv ice is not in cluded
in your mobile network operator’s package, you will have to subscribe to the service separately and
configure the settings manually. Once you have successfully subscribed this service, you will be
notified of a voic e mail mess age by an icon on
Today
screen.
Calling the voice mail center
Initiate
Phone
screen >
Speed Dial
and call
Speed Dial 1
. You will enter the v oice mail c enter.
83
7
Messaging
7.4 E-mail
You can recei ve e-mai ls in
Messaging
. E-mails a re sent by usin g an addres s that you re ceive fr om
your Internet network operator (ISP), an E-mail network operator, or your employer. You can also
send and receive e-mails by synchronizing with your PC, or by connecting to a Post Office Protocol 3
(POP3) or Internet Message Access Protocol 4 (IMAP4) mail server. Aside from the default Outlook
E-mail ac count, you need to man ually set up o ther E-m ail acco unts.
How you download copies of messages depends on how you are receiving messages:
● If you rece ive e-m ails thro ugh a remot e E-mail s erver, foll ow the inst ructi ons as desc ribed in the 7.5
Push E-mail.
● If you rece ive e-m ails thro ugh Acti veSync, b egin sync hroniz ation.
Synchronously processing E-mail
With synchronization, messages are synchronized between your O2 Xda Stealt h and the PC by u sing
ActiveSync and Microsoft Exchange or Outlook. If you want to synchronously process E-mail, you
must activate the
Inbox
synchronization function in ActiveSync beforehand. For more information on
Inbox
synchronization, please refer to Chapter 5 Synchronization.
Please be aw are of the fo llowing I nbox Sync hroniza tion pro cess ru les:
● Please select a desired cooperation relationship on
New Cooperation Relationship
screen in
computer to synchronously transmit information. If you select not to perform synchronization, you
may manuall y copy or move E -mail me ssages be tween yo ur O
2 Xda Stealth a nd the co mputer.
● Only the ma ils in
Inbox
of your com puter will b e synchro nized.
● Only the ma ils in
Exchange
or
Outlook
can be synchronized.
● The mail from
Outbox
folder in your O
2 Xda Stealth will be sent to your computer first, and then it
will be del ivered th rough Mic rosof t Exchang e Serve r or Micro soft
Outlook
.
● If a specific letter is deleted in your O
2 Xda Stealth, then it will also be deleted in your computer
when you re connec t your devic e with co mputer.
● SMS in your d evice wil l not be sync hronize d.
Establishing E-mail services
If you have E-mail accounts from ISP or company network, you may use
Messaging
to receive or
send e- mails. Pl ease refer t o the follo wing inst ructi ons to set up a new E -mail ac count in
Messaging
.
1. Please acq uire the fo llowing i nformat ion from I SP or company netwo rk admini strator :
● E-mail ad dress, us er name and p assword.
● POP3 or I MAP4 ser ver name of Intranet E- mail
● SMTP ser ver name for outgoin g E-mail
2. Establish E-mail services:
Tap
Start
>
Messaging
>
Menu
>
Tools
>
New Account
, and then follow the instructions on the
screen to s et up a new E-m ail acco unt.
3. See Section
6.1 Wireless Manager
to connec t your O
2 Xda Stealth t o a networ k and start recei ving
and sending e-mails and messages.
Page 43

84
7
Messaging
4. Connec t with E- mail Ser ver:
● Tap
Messaging
>
Menu
>
Send and Receive
.
● Tap
Messaging
>
Menu
>
Tools
>
Options
>
Accounts
tab to chan ge E-mai l accoun t settin gs.
When you finish, your new E-ma il accou nt will be dis played und er this men u. You can star t connec ting
to your E-mail server at this point. You can set up several E-mail accounts, including your Outlook
E-mail account.
Connecting to the server
You may directl y receive n ew e-ma ils from E- mail se rver wit hout co nnectin g to a compu ter. You may
select to use it online or offline; if it is online, you may directly read and reply mail when your O
2 Xda
Stealth i s connec ted to E-m ail serv er. You can reply a mail d irectl y by simply ta pping
Send
.
You may select to disconnect to the internet after downloading only the subjects of new messages
or partial messages and decide whether to download the full message later. When you reconnect
next time,
Inbox
will download in accordance to appointed methods, and send out unsent e-mails in
Outbox
.
You may choose to read just the e-mails within the last few days, mail subjects only, or complete
mail. You can also choose to receive only the attachments less than specific file size. To make these
settings, tap
Start
>
Messaging
>
Menu
>
Tools
>
Options
, and change E-mail account setup by
requirement.
Composing and sending an e-mail
Tap
Start
>
Messaging
>
New
to write a ne w e-mai l. After w ritin g a new e-m ail, sele ct
Send
on the
bottom l eft of the s creen to se nd this new e -mail.
When com posing a ne w e-mai l, you can :
1. Tap
Bcc, Cc, To
fields to input recipients’ E-mail addresses.
2. Tap
Subject
field to input a subject for your new e-mail
3. You may enter mail c ontent in the empty ar ea on the bot tom half of the scree n.
4. Tap
Send
to star t sending yo ur e-ma il.
5. Selec t the icon o n the bott om center o f the scre en to activ ate or disab le screen key pad.
6. Tap
Menu
to open menu .
Reading and replying an e-mail
Tap
Start
>
Messaging
>
Menu
, and then select
Send
and
Receive
from
Menu
to start sending and
receiv ing new e- mails. S elect
Inbox
on the top left of the screen to view Inbox. Tap on any unread
e-mai l to view its c ontent.
When reading e-mails, you can:
1. Tap on a contact in
Bcc, Cc
, or To field to save t his cont act as a new c ontact .
2. Tap
Reply
to compose a reply e-mail.
3. Tap
Menu
to open menu .
On the e- mail content scree n, select a nd hold to ac tivate pop-up Me nu.
85
7
Messaging
7.5 Push E-mail
With Push E-mail, you can have access to new incoming e-mails in real time. This Direct Push
Technology can be enabled by the Exchange Server 2003 administrator, bringing the latest
information to you. To use Push E-mail, please turn on Wi-Fi or GPRS to connect to the Exchange
Server.
Enabling Direct Push on your O2 Xda Stealth
1. On your O2 Xda St ealth, ta p
Start
>
Programs
>
ActiveSync
>
Menu
>
Add Server Source
.
2. Input th e IP addre ss of your ser ver in
Server Address
.
3. Input you r networ k
User name, Password
, and
Domain
, and then ta p
NEXT
.
4. In Active Sync on your O
2 Xda Stealth , tap
Menu
>
Schedule
.
5. Set
Peak times
to
As items arrive
and
Off-peak times
to
As items arrive
. Tap OK.
Now you have es tablish ed a coop erative r elation ship for you r O
2 Xda Stealt h and the Exc hange
Server. The n ext time w hen you tap
Start
>
Programs >ActiveSync
>
Sync
, you may synch ronize
with Exch ange Ser ver using Wi-Fi or G PRS.
Once you ar e connec ted to the n etwor k, you may loo k up your
Global Address List
over the air
from your O
2 Xda Stealth by t apping
Contacts
. You may send an e-mail to a contact on your
Global
Address Lis
t followi ng the same s teps as sen ding E-ma il to a cont act saved o n your O
2 Xda Stealth .
Please not e: To be able to use di rect pus h, you need to h ave an exchang e serve r. Microsof t Exchange
Server 2003 also supports useful functions such as remote device wipe. To find out more on the
benefit and usage of Microsoft Exchange server, please visit Microsoft’s website: http://www.
microsoft.com
Page 44

86
7.6 Pocket MSN
Pocket MSN p rovides y ou MSN fea tures inc luding:
● Seeing you r contac ts list.
● Sending and receiving instant messages.
● Instant c hatting w ith your single cont act or wit h groups of c ontacts.
● Editing an d showing yo ur MSN ti tle.
● Notif ying con tacts of yo ur on-l ine statu s.
● Blocki ng conta cts from s eeing you r status or s ending you m essage s.
● Composing your
MSN Hotmail
.
● Connecting to
MSN Mobile Home
.
● Getting help from
Pocket MSN Help
.
Before usi ng the MS N Messen ger, you will ne ed to:
● Register an MSN Messenger account or Hotmail account.
● Turn on your GPRS o r Wi-F i connec tion
● Sign in to MS N Messenger.
To register a Mic rosof t Passpor t account, go to ht tp:// www.p asspor t.com.
To set up a Hotmail ac count, go to http: //ww w.hotmail.com.
7
Messaging
87
7
Messaging
Signing in MSN Messenger
1. Set up the con nectio n to the Inte rnet
2. Tap
Start
>
Programs
>
Pocket MSN
>
MSN Messenger
>
Tap here to sign in
.
3. Enter your M SN or Hot mail E-m ail addre ss and password. Your sign-in name is usually in the form:
username@domain.com
4. Tap
Sign In
.
Please note
: Signing in to an Exchange account may take several minutes depending upon your
connection speed.
MSN Hotmail
1. Tap
Start
>
Programs
>
Pocket MSN
>
MSN Hotmail
.
2. Input yo ur MSN or Ho tmail E- mail addr ess and pas sword.
3. Tap
Sign In
to enter
MSN Hotmail Inbox
screen.
4. In
MSN Hotmail Inbox
, you may rece ive your MS N or Hotma il E-mai l through n etwor k.
Compose Hotmail
1. Tap
Start
>
Programs
>
Pocket MSN
>
Compose Hotmail
.
2. Input yo ur MSN or Ho tmail E- mail addr ess and pas sword.
3. Tap
Sign In
to enter
MSN Hotmail Inbox
screen.
MSN Mobile Home
Tap
Start
>
Programs
>
Pocket MSN
>
MSN Mobile Home
.
Pocket MSN Help
1. Tap
Start
>
Programs
>
Pocket MSN > Pocket MSN Help
.
2. Selec t a topic of int erest by tap ping on the t opic.
Page 45

Chapter 8
Multimedia
8.1 Camera
8.2 Video recorder
8.3 JAVA
8.4 Photo Editor
8.5 Pictures & Videos
8.6 Recorder
Page 46
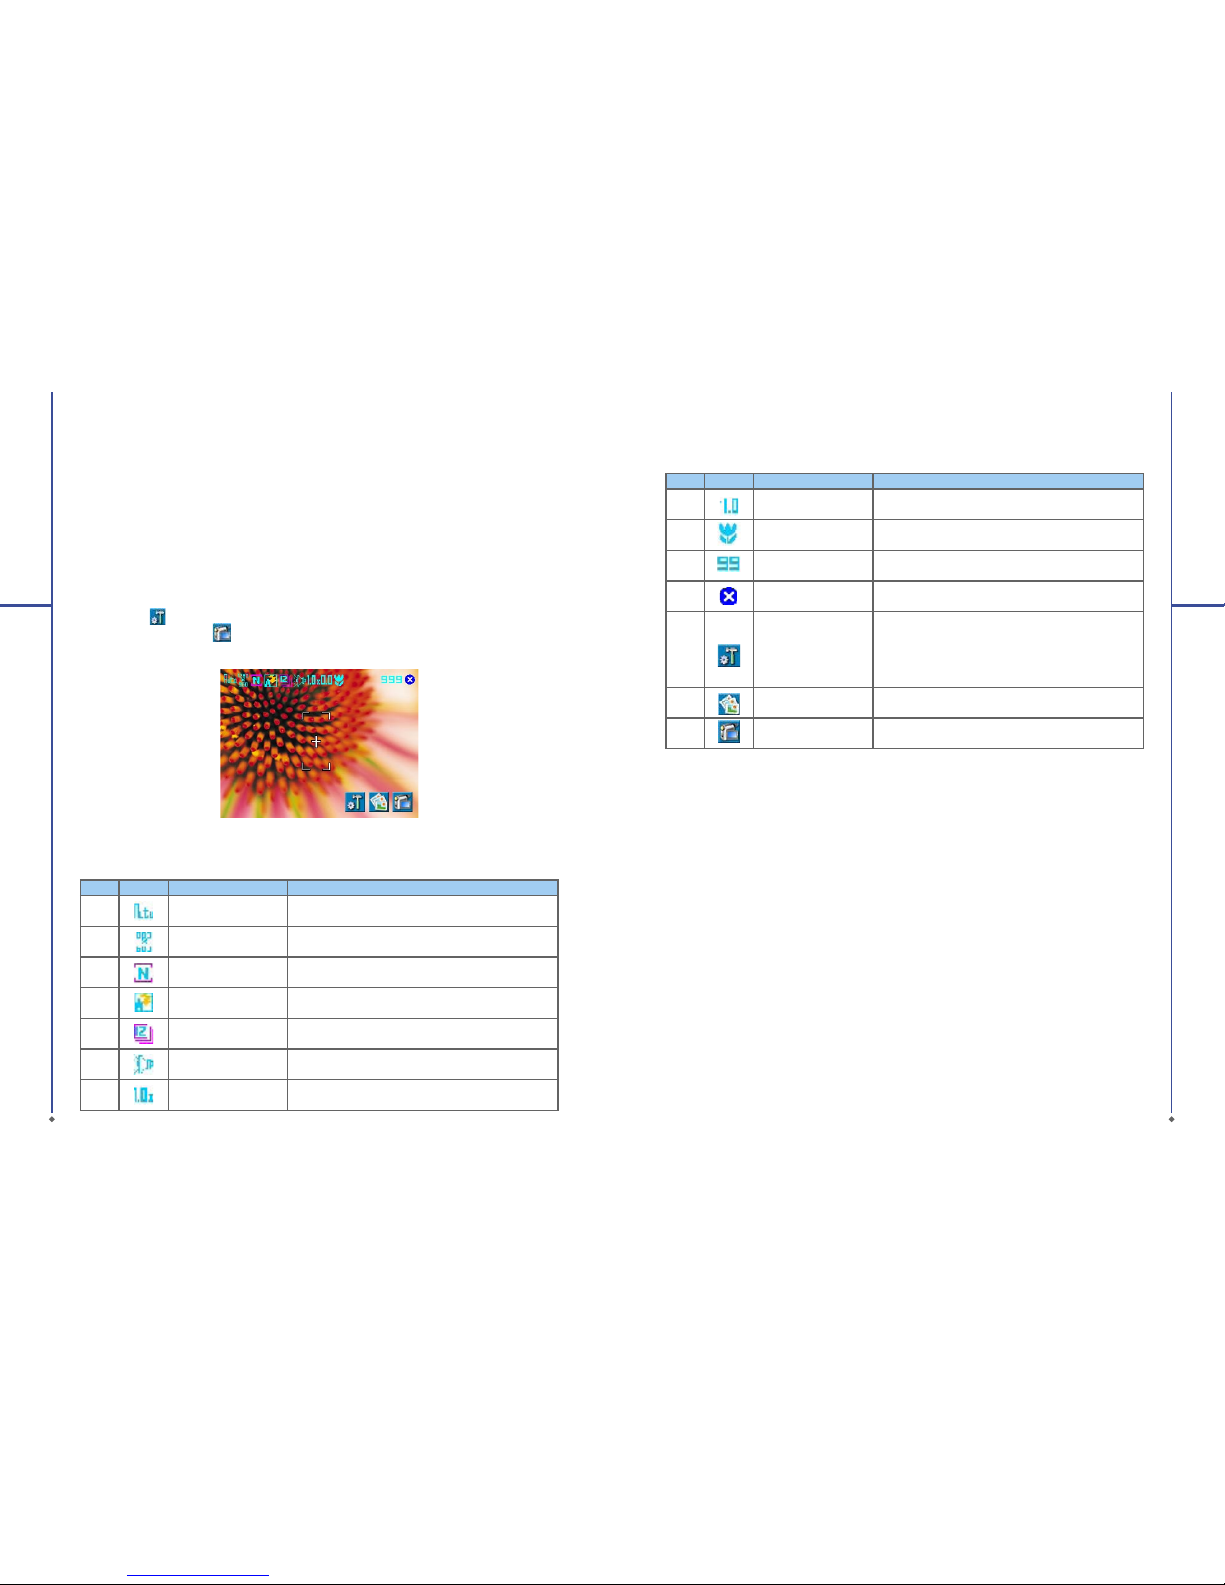
90
Chapter 8. Multimedia
8.1 Camera
You may use camer a functi on in your O2 Xd a Stealth t o capture i mport ant moments.
Tap
Start
>
Programs
>
Camera
, or press down
Camera
key at standby m ode to launc h camera .
Capture mode
During c apture mo de, you can t ap the ico ns on the top o f the scre en to switc h through d iffere nt
modes, or tap
to open the full camera options menu. To switch to Video mode, simply press the
center nav igation key o r tap to enter the video standby mode.
No Icon Function Description
1
Image Mode
Includes the following modes: Auto (default) / Day /
Cloudy / Flu oresce nt and Nigh t
2
Image Size
You can choose among:1600 x 1200 / 1280 x 960 / 800
x 600 / 6 40 x 480 (de fault) / 320 x 24 0 / 160 x 120
3
Image Quality N ormal (default), Fine, Low.
4
Flash Light Auto (default), On, Off.
5 Sequential Shot 18,12,6,3,Off (default)
6 Shutt er Sound On (defau lt), Of f
7
Zoom
Zoom Rang e: 1.0x (defa ult) / 1.2x / 1.4x / 1.6x / 1. 8x /
2.0x / 2. 2x / 2.4x
8
Multimedia
91
8
Multimedia
No Icon Function De scription
8
EV Compensation
Provides t he follo wing value s: +2.0 / +1.5 / +1.0 / + 0.5 /
0.0 (defaul t) / -0.5 / -1.0 / -1.5 / -2. 0
9
Macro/Normal mode
Tap this icon to sw itch bet ween Mac ro (withi n 10~6 0
cm) mode and normal mode
10
Remained Shots
Indicates estimate number of photos you can take
using the c urrent st orage loc ation.
11
Exit Tap this icon to exit camera mode
12
Options Menu
Tap this icon to open options menu, in which the
followi ng options a re provid ed: Mod e, Effect , EV ,
Size, Quality, Timer, Sequential Shot, Flash, Shutter
Sound, Storage, Reset Camera Settings and Flicker
Freque ncy.
13
Pictures & Videos
Tap this icon to go to Pictures & Videos where the
taken photos and videos are stored.
14
Video Mode Tap this icon to change to Video mode
Taking a photo
1. On Camera c apture mo de, focus o n the objec t.
2. Use volum e adjustm ent side key to zo om in and out .
3. You can also ta p on the ic ons on the to p or open opt ions menu t o change c amera set tings.
4. Lightly p ress
Camera
key to auto- focus, fu lly press
Camera
key to shoot.
5. After y ou take a phot o, the image w ill be cate gorized in
Pictures& Videos
.
Please note
: The defaul t storage l ocatio n is phone me mory.
Page 47
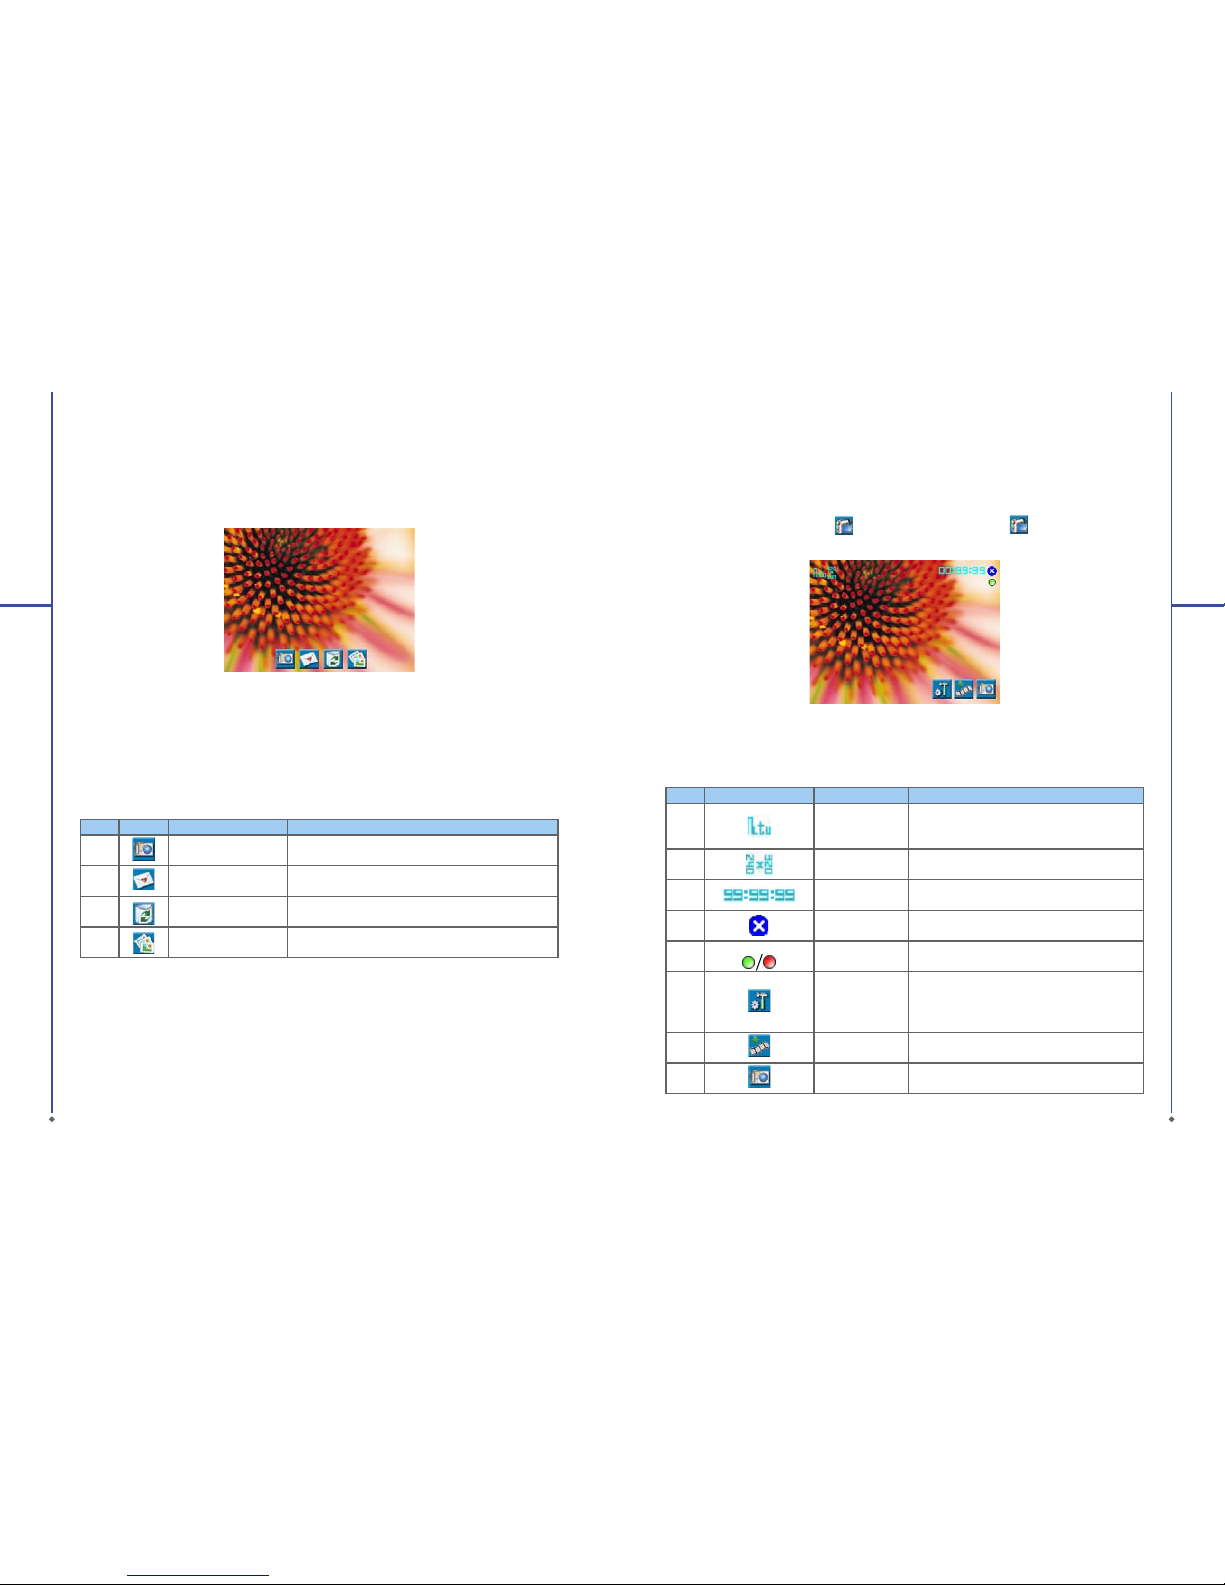
92
Photo confirm screen
After t aking a phot o, you will ent er the con firm screen where you can cho ose to delete or send out the
image.
On this sc reen you ca n tap the fo llowing i cons to:
No Icon Function Description
1
Camera Return to camera capture mode.
2 Send Choose to se nd out this p hoto via E- mail or MM S.
3 Delete Delete the photo on screen.
4
Pictures & Videos Go to Pictures & Videos.
Viewing & editing photos
For details of photo viewing, please refer to
Section 8.5 Pictures & Video s
; for editi ng photos,
please ref er to
Section 8.4 Photo Editor
.
8
Multimedia
93
8
Multimedia
8.2 Video recorder
The phone c amera can also be use d as a video r ecorde r to recor d memorab le moment s of your life .
Tap
Start
>
Programs
>
Camera
>
, or direct ly press
Camera
key > to enter video mode.
No Icon Function Description
1
Video Mode
Tap this icon to switch among the following
modes: Au to (defaul t) / Day / Cloud y /
Fluorescent and Night
2
Video Si ze Set to be 320 x 24 0
3
Remained Video
Length
Indicat es the est imated len gth of vid eo you can
take using the current storage location.
4
Exit Tap this icon to exit video mode
5
Prepared to
record
/Recording
Indicat es the vid eo recor der statu s
6
Options Menu
Tap this icon to open options menu, in which
the follo wing opti ons are prov ided: M ode,
Effect , Video For mat, MM S Video,St orage and
Flicker Frequency.
7
Pictures & Videos
Tap this icon to go to Pictures & Videos where
the taken c lips are sto red.
8
Video Mode Tap this icon to change to Video mode
Page 48

94
Recording a clip
1. On Video re corde r mode, foc us on the obj ect. You can al so tap on th e icons on t he top or op en
options menu to change video recorder settings.
2. Press
Camera
key to star t video filming.
3. Press
Camera
key again to sto p filming.
4. After yo u record a c lip, it will be catego rized in
Pictures & Videos
.
Please note
: The defaul t storage l ocatio n is phone me mory.
Video confirm screen
After re cordin g, you will en ter the co nfirm scr een wher e you can ch oose to del ete or send o ut the clip.
On this sc reen you ca n tap the fo llowing i cons to:
No Icon Function Description
1
Video Return to video mode.
2 Send C hoose to se nd out this c lip via E-mail or MM S.
3
Delete Delete the photo on screen.
4 Pictures & Videos Go to
Pictures & Videos
.
Viewing video clips
For details o f video vie wing, ple ase refer to
Section 8.5 Pictures & Videos
.
8
Multimedia
95
8
Multimedia
8.3 JAVA
This devic e suppor ts JAVA, pr oviding yo u the free dom of usin g JAVA applica tions and g ames. You
can manage and execute the Java applications here.
Installing JAVA applications
You can run the in stallat ion of a JAVA applic ation stored on your d evice or st orage ca rd:
Please note:
A JAVA applicat ion suite n ormally c onsist s of a .jad file and a .jar file that have the identical file name.
They ought to b e stored at t he same loc ation.
1. Tap
Start
>
Programs > JAVA
>
Option > Install,
and select either
My Document
or
Storage
Card.
2. Double tap the .jad file you wish to i nstall.
3. Choose t he category you wi sh the app licatio n to be plac ed in, and th e install ation wil l begin.
Running JAVA applications
1. Once an JAVA appli cation i s succes sfully installed , you can tap
Start
>
Programs > JAVA
, and
enter the c ategor y to locate the applic ation.
2. Selec t the appli cation a nd tap
Option
>
Launch
to execute it.
3. You can also ch oose
Make a shortcut
to create a sh ortcu t in
Programs
.
8.4 Photo Editor
You can handwr ite mess ages on pho tos, or app ly color ful fr ames and st amps by tap ping
Start
>
Programs
>
Photo Editor
.
On the edit or scree n, you can t ap
Undo
to reverse t he steps, or t ap
Menu
to get further editing
options.
Page 49

96
8.5 Pictures & Videos
You may use
Pictures & Vide os
function to
manage your photos or videos. By tapping
Start
>
Programs
>
Pictures & Videos
, you can:
1. Enter different folders
2. Select photo arrangement
3. Tap on a thumbnai l pictur e to view the p icture.
4. Select
Menu
for more options.
8
Multimedia
In
Menu
, you may resize the picture, also
perfo rm funct ions suc h as
Set As Today
Background
, and
Play Slide Show
, or
Send
.
97
8
Multimedia
8.6 Recorder
Use
Recorder
to record voice memo and make
note taking simple and efficient. Tap
Start
>
Programs
>
Recorder
.
1. Tap
to activate sound recording function.
2. Tap
to stop rec ording so und.
3. Before you start recording, you may set the
recording time in
Duration
to set the duration
of the recording.
4. Check
History
to show all your rec orded files.
Tap on any record ed file on your history list to
play the file.
5. Uncheck
History
to hide the history window.
6. Tap
Menu
>
Save To
to choose the file
location.
7. Ta p
to leave recorder screen while still
keep reco rding on th e backgrou nd; or tap
Menu
>
Exit
, to stop rec ording an d exit.
8. When recording in the background, tap
to
return to Re corder. Tap
to stop rec ording.
The tool ba r on the bot tom also pr ovides 7 functions :
No Icon Function De scription
1
Save
This button appears after you have modified a picture.
Tap this to save the c urrent im age.
2
Undo Revert
3
Pen Size Choo se a brush s ize
4
Choose Color
Choose a color of your pen from color palette or mix a
paint by yourself
5
Effect
5 effect s are availa ble: Gray / B lur / Embos s / Negativ e
/ Classic
6
Choose Fra me 3 photo frame s are availab le: Star / Fall / Flower
7
Add Stamp
5 stamps fo r you to add mo re fun touc hes to your
picture.
Page 50

Chapter 9
Applications
9.1 Calendar
9.2 Tasks
9.3 File Explorer
9.4 Internet explorer
9.5 Windows Media
9.6 Games
9.7 Download Agent
9.8 Calculator
9.9 Backup
9.10 Torch
9.11 ZIP
9.12 O
2
Auto Configurator
9.13 ClearVue
9.14 Excel Mobile
9.15 Notes
9.16 PowerPoint Mobile
9.17 Search
9.18 Voice Speed Dial
9.19 Word Mobile
9.20 Answer Machine
Please note
: If there is an incoming call during recording, answering the call will automatically
terminate recording. If you want to continue recording after ending call, you need to reactivate
recording function.
98
8
Multimedia
Page 51

100
Chapter 9. Applications
9.1 Calendar
Appointments and meetings
You ma y us e
Calendar
to arrange appointments, meetings, and other events. You may view your
appointments in different display modes. You may select preferred display mode by tapping on the
bottom l eft of scr een to swit ch betwe en day, week, mon th, and year.
1. Tap Start > Calendar, Selec t a date to go to th e desire d date.
2. Selec t an appoin tment on th e list to view o r edit appo intment d etails.
3. Tap on
Day
(or
Week, Month, Year
and
Agenda
) on the bottom left of the screen to switch
between display modes.
4. Tap on the keypad ic on to acti vate or hide sc reen keypad.
5. Tap
Menu
on the bot tom right o f the scre en to open me nu.
6. Tap
Options
in
Menu
, you may change the display setup of Calendar by preference.
Creating an appointment
1. Tap
Start
>
Calendar
. Select t he date and ti me of appoi ntment.
2. Highlight the desired date and time, and then tap
Menu
>
New Appointment
.
3. Tap OK to save the ent ry and re turn to ca lendar.
4. Tap
Subject
to edit the fi eld or select predefined text.
5. Tap
Location
to edit the fi eld.
6. Tap
Starts
to select t he star t time.
7. Ta p
Ends
to change t he end time .
8. You can add your p ersona l notes in
Notes
tab.
9. Tap OK to save the ap pointme nt and retur n to
Calendar
screen.
If you select
Remind Me
in
Reminder
field, then your O
2 Xda Stealth w ill remin d you acco rding to th e
settings in
Start
>
Settings
>
Personal
tab >
Sounds & Notifications
.
Viewing and updating calendar
Select an appointment on
Calendar
to view appointment summary. If you want to change the details
of an appoin tment, t ap
Edit
.
Sending a meeting notice
You may use
Calendar
to set meeting notice by combining with the information on
Outlook
or
Pocket Outlook
. When you synchronize messages or connect your O
2 Xda Stealt h with e- mail
server, meeting reminders will be generated automatically. Tap
Calendar
>
Menu
>
Options
>
Appointments tab, and select desired meeting sending method in Send meeting requests via field.
9
101
9
Applications
Generating a meeting notice
1. Tap
Start
>
Calendar
>
Menu
>
New Appointment
.
2. Tap
Attendees
field. You will enter
Contacts
.
3. Selec t attende es from t he e-ma il addres ses of your c ontact s.
4. The new mee ting noti ce will be g enerate d automat ically an d saved in
Outbox
folder.
9.2 Tasks
You may use
Tasks
to help you tr ack unfinished tasks.
1. To add a new task, tap
Tap here to add a new task
.
2.
” ! ” Represent first priority.
3. Selec t a single ite m to enter the d etails sc reen of this time.
4. Select a s ingle ite m and hold to ac tivate the pop-u p menu.
5. You may change t he arrang ement of th e tasks list . On
Tasks
screen, t
ap Menu > Sort By
.
6.You may choose to disp lay a speci fic task categor y on your tas ks list. Tap
Menu
>
Filter
.
Adding a new task
1. On Task s scr een , tap
Tap here to ad d a new ta sk
to add the new text’s subject. The newly
created task will show on
Tasks
list.
2. Tap on the new task to enter the detail information screen of task.
3. Tap
Edit
to enter the e diting sc reen.
4. Select
Starts
and
Due
field to set t he first and t he last day of the task.
4. You may select
Occurs
to select w hether th is task has p eriodi city.
5. You may select
Reminder
to set a time to r emind you o r select
None
(unnecessar y to aler t).
6. To appoint a task as certain category, tap on
Categories
field to select a categor y from the options
list.
7. To add notes, tap
Note
tab and inp ut desire d content h ere.
8. Tap OK to save the ta sk and retur n to tasks screen.
Checking and updating tasks
You may select a task from tasks list to view task summary. To change the details of this task, select
Edit
.
Applications
Page 52

102
9.3 File Explorer
This featu re allows yo u to view and m anage all t he files s aved in your O 2 Xda Steal th or them e
memory card. To access
File Explorer
, tap
Start
>
Programs
>
File Explorer
. Select the source of
where the files are saved.
To so rt files by it s types , tap
Sort By
and select a sorting method:
Name, Date, Size
, and
Type
. Tap
Up
to go up a level on t he file hierarchy.
Tap Menu to acce ss optio ns:
9
Applications
Option Description
My Documents Display files saved in My D ocument .
Open Path Create a new path to o pen a file.
Send Send the selected document via e-mail.
Beam File Send the file via Infrared or Bluetooth.
Refresh Refresh the document display screen.
Show All Fi les Show all the sto red files.
New Folder Create a new f older.
Rename Rename a file.
Delete Delete a file.
Edit Manage the file list by using Undo, Cut, Copy, Paste, Paste Shortcut,
and Select All.
Tap and hold on a file for more options:
Option Description
Set As Ring tone Set the file (must b e in music fo rmat) as you r current r ingtone.
Set As Today Backg round Set the file (must be i n picture f ormat) as yo ur today bac kground.
Add to Zip Fil e Compre ss the file.
9.4 Internet Explorer
Connecting to the web
1. Connect your O2 Stealth with the Internet using GPRS or WI-FI.
2. Tap
Start > Internet Explorer
.
3. Input website address in the blank text field
● Select the arrow next to the blank field to go to the link.
● You may use navigat ion keys or the s croll on b rowser sc reen to adj ust your sc reen brows ing
content .
● Tap
Back
to return to pr evious pag e
● Tap the keypad icon in the bottom center to hide or reveal screen input panel or select input
method.
● Tap Menu to open Menu.
● Select an d hold any lo cation o f website c ontent to op en the pop -up menu.
103
9
Applications
Viewing favorites
1. On browser s creen, t ap
Menu
>
Favorites
.
2. On
Favorit
es screen , select t he website y ou want to vie w.
● Select t he website y ou would like t o go to.
● You may add or delete f olders o r URL links .
Mobile Favorites folder
After installing ActiveSync to your computer,
Mobile Favorites
folder will be added to
Favorites
in
your comp uter. Only ite ms saved in M obile Favor ites can be synchro nized wit h your O2 Stealth. Follow
the steps b elow to add yo ur favori te website to
Mobile Favorites
:
1. On your comp uter, selec t
Internet Explorer
>
Tools
>
Create Mobile Favorites
.
2. To change name , enter the ne w name in the n ew window.
3. To change stor age loca tion, sel ect
Create In>>
to create a ne w folder or s elect a fo lder in th e new
window.
4. Click on OK to add this we bsite to you r
Mobile Favorites
folder.
9.5 Windows Media
You can use Micr osoft W indows Me dia Player 10 to p lay the audi o and video fi les store d in your O2
Xda Stealth or from Internet.
Tap
Start
>
Windows Media
to activat e Windows M edia Player.
1. Tap
Menu
>
Library
to display t he librar y screen.
2. Select a library folder.
3. Tap
Menu
, and then select
Open File
to open files not in the library; Select
Update Library
to
update lib rary lis t.
4. Select a nd hold th e file or folder for playing, and then select
Play
or
Queue Up
.
5. By tapping
Back
icon, you c an return t o the Wind ows Media P layer cont rol panel.
Playing Audio or Video Files
1. Tap to vie w in full scr een.
2. Tap
to connect to Windows Media Mobi le website, from which you can find t he music an d image
you want to play.
3. Tap
to return to t he begin ning of cur rent file or previous file.
4. Tap
or to play or pause
5. Tap
to skip to next file
6. Tap
or to adjust volume
7. Tap the
icon to ac tive or dis able soun d.
You may use synchr onizati on to copy so und and ima ge files from your computer to this device. The
Windows M edia Player i n this devic e can play Windows Me dia and MP 3 files.
Page 53

104
9
Applications
9.6 Games
You may access
Games
to select g ames you li ke in your O2 Xda Stealth for entertainment.
1. Tap
Start
>
Programs
>
Games
.
2. Tab
Bubble Breaker
or
Solitaire
to launch a ga me.
9.7 Download Agent
Download Agent
allows you t o manage dow nloade d files, including installation or deletion.
Select t he desire d downloa ded file an d tap
Install
or
Cancel
to install the file or cancel installation.
Installing applications
O2 Xda Stealth is powered by Windows Mobile 5.0. It allows installation and removal of external
applications downloaded from the web, purchased from stores or sent to you from friends over
Bluetooth, e-mail or other means.
Please note
: Always tr y to inst all applic ations t o your Stor age Card in stead of the p hone in or der to
leave more m ain storag e space fo r your Cont acts, Me ssages , E-mail a nd other sys tem applic ations.
9.8 Calculator
Calculat or allows yo u to run sim ple opera tions in you r O2 Xda Stea lth.
Tap
Start
>
Programs
>
Calculator
to use your c alculato r.
9.9 Backup
You can create ba ckup of your p ersonal setting s and data, a nd restor e the data la ter.
1. Tap
Start
>
Programs
>
Backup
.
2. Check
Create backup image
to create system backup. Check
Restore
to restore the settings and
data. When you select to create a backup or restore an image, your O
2 Xda Stealth will need to
reboot.
Please note
: If you inst all a new vers ion firmware on your O
2 Xda Stealth , the backu p file of previous
version c an’t be use d to restor e on the new on e.
9.10 Torch
By tappin g this ico n, you can sw itch on /off t he LED light b eside the c amera lens to get signi ficant light
to let you see i n the dark . At standby m ode, you ca n also hold
End
key to turn the l ight on, and p ress
5
Way Navigation key Center
or OK key to turn the l ight off.
105
9
Applications
9.11 ZIP
You can save stora ge space a nd increa se efficiency of your O2 Xda Stealt h by compre ssing so me of
your files with this ZIP tool.
Zipping files
1. To zip a file, tap
Start > File Explorer
.
2. Tap and hold on a fi le you would l ike to zip. A pop -up menu will appea r.
3. Select
Add to Zip file
in the pop -up menu . In the newl y appeare d window, you m ay:
● Select a zi p method ac cording to your nee d.
● Set a passwo rd, which w ill be asked for when you u nzip the file.
4. Tap
Start
to star t compre ssing the fi le.
Unzipping Files
1. To unzip a file, tap
Start
>
Programs
>
ZIP
.
2. Tap
Unzip
button o n the pop -up wind ow. A list of zipp ed files will appear.
3. You may select a d iffer ent folder f or more zip files. In the file list, tap on t he file you would like to unzi p.
4. Tap OK and enter th e passwor d (if requi red) to dec ompress t he zip file.
9.12 O2 Auto Configurator
When you first switch on your O2 Xda Ste alth, you c an use
O
2
Auto Configur ator
to setup your
GPRS for us ing MMS an d surfi ng the Inter net. Thi s applic ation pro vides a use r-frien dly way to set up
operator specific settings, including GPRS, WAP, and MMS. The auto-confi guration process can be
perfo rmed as so on as the SI M card is ac cessible.
Page 54
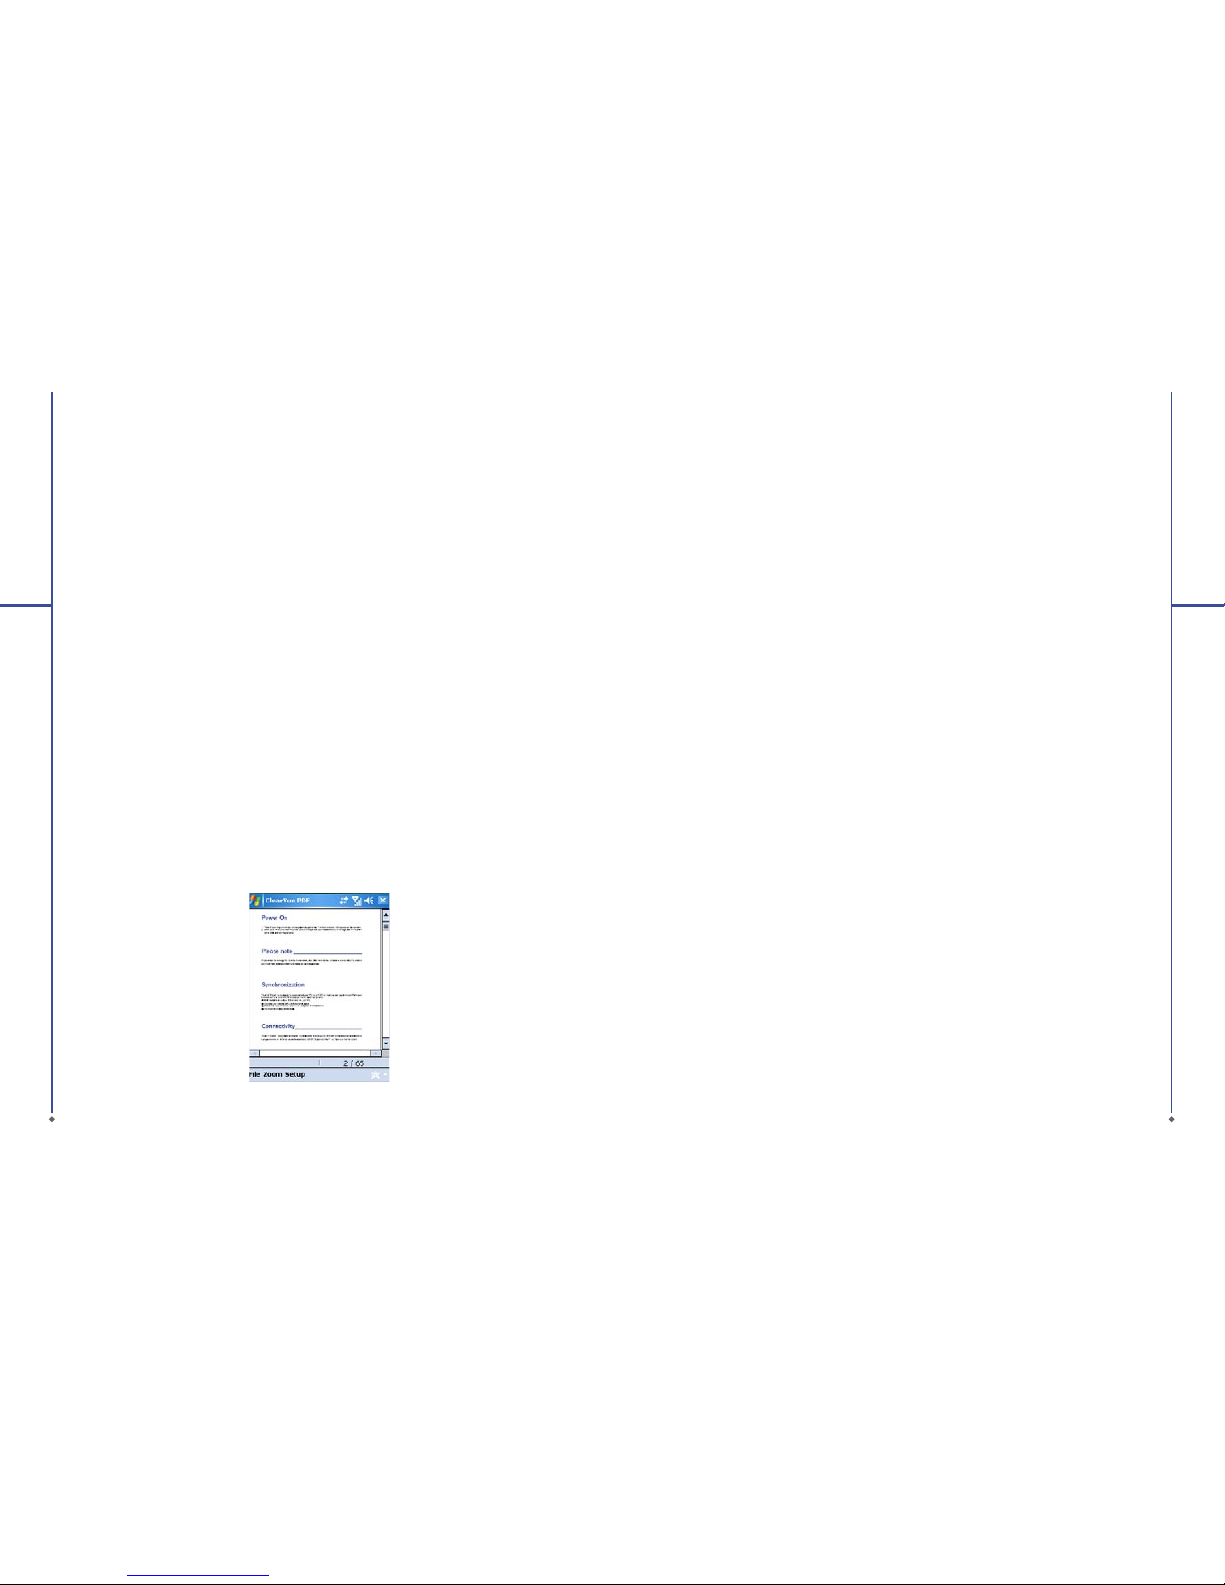
106
9
Applications
9.13 ClearVue
ClearVue
allows you to read Portable Document Format files. These files usually have a .pdf
extensio n.
Opening a PDF file
1. Tap
Start
>
Programs
>
ClearVue
2. Tap
File
>
Open
to view a list of PDF files stored on your O
2 Xda Stealth , and choo se the file you
would like to view.
Reading a PDF file
107
9
Applications
You can move aroun d using scr oll bars i n the page wh en a docum ent is large r than one sc reen:
● Tap the up/do wn and rig ht/le ft arro ws to move one l ine in the de sired dire ction.
You can also use t he navigat ion pad to mo ve around th e screen.
● Click and h old the spa ce betw een the ar row and the s croll ba r to move one sc reen to the d esired
position.
● Use the lef t, right, up and down a rrow keys on t he soft keyb oard to move to the desire d position.
● You can also tap a nd hold and t hen drag t he scree n to move aroun d the docu ment to the d esired
position.
Zooming in/out
The Zoom feature all ows you to enlarge or reduc e the document co ntent on display. Zoom is available
from
Zoom
menu.
To get a different view of a document, select from the preset
Zoom
settings, or choose a
Custom
Zoom.
9.14 Excel Mobile
You may use
Excel Mobile
in your O2 Xda Stealth with Microsoft Excel in your computer to
easily copy or move files between your O
2 Xda Stealt h and your co mputer. Thro ugh comp uter
synchro nizatio n, you can kee p updated c ontent in both your O
2 Xda Stealth a nd your co mputer.
Creating a new Excel document
Tap
Start
>
Programs
>
Excel Mobile
>
New
, and the scr een will o pen a new Exc el file.
Please note
: Your
Excel Mobile
can only open one file at a time. When you open a second file at the
same time, your O
2 Xda Stealth w ill ask you to s ave first file. T he saved Exc el Mobi le file in your O2
Xda Stealth c ould be opened by sele cting fr om
Excel Mobile
list scre en.
Deleting / copying or sending a document
To delete, copy or send a file, tap and hold t he desire d file name to open pop-up menu. Your
Excel
Mobile
provides basic worksheet tools, for example, formula, function, sorting and filtering. To show
toolbar, tap
View
>
Toolbar
.
Synchronizing with Excel files on you PC
Excel Mobile workbooks can be synchronized with Excel workbooks on your PC. To synchronize
files, select the Files type for synchronization in ActiveSync Options settings on your PC. When you
select
Files
, a \
My Documents
folder is created on your PC’s desktop. Place all the files you wan t to
synchronize with your O
2 Xda Stealth i n this fold er. Password -protec ted files cannot be synchronized.
All Exce l Mobile fi les that are stored in \
My Documents
and its subfolders are synchronized with the
PC.
ActiveSync
conver ts docume nts durin g synchron ization . When you de lete a file on your PC or
your O
2 Xda Stealth , the file wil l be delete d in the othe r locati on the next t ime you sync hronize. Fo r
more information on synchronization or file conversion, see
ActiveSync Help
on the PC.
The ways in wh ich this f unction o perates a re:
1. During ever y cold /warm b oot, your O
2 Xda Stealt h will com pare the o perator I D with the c urrent
settin g. If these t wo don’t m atch, a dial og box will a sk if you want t o perfo rm netw ork con figuration
now. Once confirmed, th e auto confi gurator will be launched to configure your O
2 Xda Stealth t o the
current preferred network.
2. By tapping
Start
>
Programs
>
O
2
Auto Config
, the same detection process will be carried out
and possible selections will be listed in the preferred network. Confi rm your cho ice and ta p Done to
apply the s etting o r tap
List All Settings
to choose other operator settings. If you cannot find your
operato r networ k in the list , you can al ways setup da ta conne ction ma nually.
Launch
O
2
Auto Config
by tapping
Start
>
Program > O2 Auto Config
. The appli cation w ill searc h
from its i nternal da tabase fo r approp riate net work set ting pro files and d isplay the n ames of the se
profiles in the
Preferred Network
list.
Please note
: Please ensure your SIM card is inserted and flight mode is turned off, for The auto-
configuration process is started only when your O
2 Xda Stealth i s in
HOME
network (not international
roaming).
Page 55

108
9
Applications
Workbook conversion
Excel f iles (.xls) a nd templat es (.xlt), c reated in E xcel ver sion 5.0 /95 o r later on th e PC, will be
converted to Excel Mobile workbook (.pxl) or template (.pxt) files. The conversion takes place during
the follo wing act ions:
● During file synchronization.
● When you c opy an Excel fi le to your dev ice fro m the PC.
● When you op en an e-m ail mess age with a n Excel fil e as an attac hment.
Excel Mobile
workbooks are converted to
Excel
workbooks when they are synchronized or copied
back to the PC.
Tips:
When working with
Excel Mobile
, the follo wing tips w ill help si mplify y our tasks :
1. Tap
View
>
Full Sc re e n
to view in full screen. To exit full screen view, tap
View
>
Full Sc re e n
to
return to ge neral vi ew.
2. You can free ze panes: se lect a ce ll, then ta p
View
>
Freez e Pa nes
. You may freeze the t op and
most left window cell on worksheet. Once you freeze the panes, you can see the fr ozen window cell
no matter where the screen is scrolled.
3. You can split t he worksh eet to view di ffere nt areas of t his worksh eet on the s ame scree n. Tap
View
>
Split
, and then dr ag the spli t line to the d esired lo cation . To remove the spli t, selec t
View
>
Remove Split
.
4. Display or hide full horizontal and vertical lines. To hide a row or a column, select any cell on the
row or column you wish to hide, then tap
Menu > Format
>
Row
or
Column
>
Hide
. To unhide a
column or row,
Menu
>
Format
>
Row
or
Column
> and selec t
Unhide
.
Please note
: When you are s ynchron izing or c opying files from your O
2 Xda Stealt h to PC, Exce l
Mobile files will be transformed into Excel files. While most of the settings will be kept during this
transfo rmatio n, some of th e format an d proper ties may be lost.
9.15 Notes
You may use text note s or voice n otes to rec ord infor mation . You may also reco rd voice i n
Notes
. If
a note file contains voice notes in addition to text, a small icon representing voice notes will appear
in the content area of the note. If notes recording is done under the notes file list, then th e record ing
content will be saved as a single file. You can a lso share yo ur notes wi th other s through e -mail a nd
PC synchronization.
Creating a new note
Tap
Menu
>
View Recording Toolbar
to show or hid e record ing tool ba r. To add a new note:
1. On
Notes
screen, t ap
New
.
2. You may generate notes by writing, drawing, text entry and recording.
● Tap the keypad icon to hide or display screen input panel.
● Tap ▲ next to the keypad icon to select input method.
109
9
Applications
● Tap
Menu
for
Options
.
● Tap
OK
to save the not e and retur n to
Notes
screen.
3. To insert the date in a note, deselect and make sure that no drawings are selected. Next, tap and
hold anywhere on the note and tap
Insert Date
.
Sending a note by e-mail
In
Notes, Word Mobile, Excel Mobile, PowerPoint Mobile
, and
Pictures & Videos
, you can sen d
files and in format ion to other d evices v ia e-m ail.
1. First you mus t set up
Messaging
to send and receive messages.
2. From the pr ogram, se lect the i tem you want t o send.
3. Tap
Menu
>
Send
. A new messa ge is creat ed with th e item att ached.
4. Enter the recipient name and subject and tap
Send
. The message will be sent the next time you
synchronize your O
2 Xda Stealth .
Beaming a note
To beam a note, on the n ote list, t ap and hold t he note. On t he pop- up menu, tap
Beam File
.
9.16 PowerPoint Mobile
You ma y us e
PowerPoint Mobile
in your O2 Xda Stealth with Microsoft PowerPoint in your computer
to easily copy or move document bet ween your O2 Xda Ste alth and yo ur comput er. Through c omputer
synchronizatio n, you may keep the files in both your O
2 Xda Stealth a nd your co mputer upd ated. You
may use
PowerPoint Mobile
to browse or p lay PowerPo int file.
Opening a PowerPoint file
Tap
Start
>
Programs
>
PowerPoint M obile
, the screen will show your PowerPoint files list, from
which sel ect the fil e you want to op en.
1. Select th e folder t ype displ ayed in the li st.
2. Select
Name
(or
Date, Size, Type
) to change t he arrang ement of li st.
3. Selec t the docum ent to open .
4. Select a nd hold a do cument to ac tivate po p-up m enu.
5. Tap
Open
to open a file.
6. Selec t the keypad ic on to hide or reveal scre en input pan el and sele ct input m ethod.
7. Ta p
Menu
for options.
Page 56

110
9
Applications
Overriding the playback options in a PowerPoint presentation
1. Tap
Start
>
Programs
>
PowerPoint Mobile
.
2. Open the presentation file you want to view, t ap▲>
Show Options
.
3. Tap Playback ta b, select t he Overr ide playba ck option s for all files, and do any of the following:
● To turn off bui lds and othe r animati ons, sele ct
Show without animation
.
● To prevent slide tra nsition s from playi ng, selec t
Show without slide transition
.
● To use the timing s record ed with ea ch slide in a p resenta tion, sel ect
Use timings, if present
.
● To automatic ally advan ce to the f irst slid e after t he last slid e in a presen tation, s elect
Loop
continuously.
4. Tap OK.
Zooming in / out
Zoom in to se e a port ion of a slide i n more det ail and zoo m out to see th e entire sli de again.
1. In a PowerPoint Mobile presentation, tap▲ arrow >
Zoom In
.
2. Do one of t he follow ing:
● To zoom in anothe r level, tap
.
● To zoom out, tap
.
● To return to the sl ide show, tap
.
9.17 Search
This featu re allows yo u to searc h a file easily.
Finding a file
1. Tap
Start
>
Programs
>
Search
.
2. Enter the file name on
Search for
field and se lect a file type in
Type
field.
3. Tap Search to st art se arching a nd the resu lt will be di splayed in
Results
field.
9.18 Voice Speed Dial
You can press dow n volume key to lau nch voice c ommanding proced ure, or tap he re to star t speaki ng
voice commands to your O2 Xda Stealth. P lease cre ate your own vo ice tag b efore usin g this func tion.
9.19 Word Mobile
You may use
Word Mobile
in your O2 Xda Stea lth with
Microsoft Word
in your computer to easily
copy and move d ocument b etween t he phone an d your comp uter. Throug h comput er synchro nizati on,
you may keep updated contents in both your O
2 Xda Stealth a nd your co mputer.
You may use
Word Mobile
to generate documents like letters, meeting minutes and reports.
111
9
Applications
Generating a new word document
Tap
Start
>
Programs
>
Word Mobile
>
New
, a new blank document will appear on screen. You may
also select default settings from
Menu
>
Options
.
Please note
: Your
Word Mobile
can only o pen one doc ument at a ti me. When yo u open a sec ond
document at the same time, your O
2 Xda Stealt h will ask you t o save the first document first. When
creating a new document or editing an old document, you may choose to save in the following format:
Word file, RTF fi le and text-only file.
The saved
Word Mobile
file in your O
2 Xda Stealth could be opened by selecting from Word Mobile
list scre en. To delete, copy, or se nd a file, select and hold desired file names to ope n pop- up menu.
After op ening a Word M obile file, you may tap
View
to set
Toolbar, Wrap to Window
, and
Zoom
.
1. Select a fo lder cate gory sh own on list d isplay field.
2. Tap
Name
(or
Date, Size, Type
) to change the arrangement of list.
3. Tap on a file to open i t.
4. Tap and hold a file to o pen pop -up menu
5. Tap
New
to create a ne w documen t.
6. Tap the keypad ic on to show or hi de scree n input pane l and sele ct input met hod.
7. Ta p
Menu
to open menu f or more opt ions.
Synchronizing with Word files on you PC
Word Mobile
documents can be synchronized with Word documents on your PC. To synchronize
files, select the Files type for synchronization in ActiveSync Options settings on your PC. When you
select Files, a
\My Documents
folder is created on your PC’s desktop. Place all the files you want to
synchronize with your O
2 Xda Stealth in this folder. Please note that password protected files cannot
be synchronized. All
Word Mobile
fi les that are stored in
\My Documents
and its subfolders are
synchronized with the PC. ActiveSync will convert the documents during synchronization. When you
delete a file on your PC or your O
2 Xda Stealth , the file wil l be delete d in the othe r locati on the nex t
time you synchronize. For more information on synchronization, or file conversion, see
ActiveSync
Help
on the PC.
Document Conversion
The Word documents (.doc) and templates (.dot), created in Word 6.0 or later on the PC, are co nverted
to Word Mobile documents (.psw) and templates (.psw). The conversion takes place during the
following actions:
● During file synchronization.
● When you co py a Word file fr om the PC to yo ur O
2 Xda Stealth .
● When you op en an e-m ail mess age with an a ttache d Word file on your O
2 Xda Stealth .
Please note
: When you ar e synchron izing or c opying files from your O
2 Xda Stealt h to PC, Word
Mobile files will be transformed into Word files. While most of the text and paragraphing will be kept
during th is transf ormati on, some of t he format and prope rties m ay be lost.
Page 57

Chapter 10
Managing Your O2 Xda Stealth
10.1 O2 Auto Install
10.2 O
2 Connect
10.3 Memory management
10.4 Running programs management
10.5 Adding or removing programs
112
9
Applications
9.20 Answer Machine
This func tion is di fferen t from voic e mail, you m ay use answer m achine in y our O2 Xda St ealth to
directly save caller’s message to it, which allows you to listen to message more easily and also save
call expenses.
Tap
Start
>
Program
>
Answer Machine
.
1. Che ck
Enable Answer Machine
to activat e answer mac hine func tion.
2. Tap
Save In
to select a s torage lo cation f or messa ges.
3. Select
Recording Time
to set the time length for a caller message.
4. Select
Activate Time
to set how many seconds that your answer machine will wait before
answering an incoming call.
5. Select
Greeting Setup
to set up answe r machine g reeting.
6. Tap OK to save setup a nd return t o
System
tab screen.
You wi ll find callers’ messages in
My Greeting
folder.
Greeting Setup
Tap
Greeting Setup
to set default answer machine greeting or record your own greeting. Press on
the file name to liste n to the cur rent greet ing. To record a n ew greeti ng
1. Tap
User Define
under
Greeting Setup
column.
2. User can type in the file name preferred or use the default one.
3. Tap the recor d button t o record yo ur own gre eting.
4. Tap the play butt on to listen t o greeting r ecorde d.
5. Tap OK to validate the settings and exit.
Please note:
1. Your answer machi ne will sto p record ing when c aller end s the call. A fter ac tivatin g answer mac hine,
you may pres s
Stop
to stop rec ording wi thout inte rrupti ng the conve rsatio n.
2. When Caller 1 is leaving a message, the incoming call from Caller 2 will become call waiting. You
may select to answer or reject call waiting. If you select to answer call waiting, the message of
Caller 1 wi ll stop; if y ou selec t to reject c all waiting, the cal l waiting f rom Caller 2 will con tinue to ri ng
until Call er 2 enters vo ice mail .
3. If you have c hecked
Auto Answer
in Phone, An swer Mach ine will au tomatic ally be dea ctivate d.
Page 58

114
Chapter 10. Managing Your O2 Xda Stealth
10.1 O2 Auto Install
O2 Auto Inst all
er provides you with a list of ready-to-install applications for your O
2 Xda Stealth.
These optional applications can help you do more with your device. When you need them, you can
choose to install them anytime by tapping
Start
>
Programs
> O
2 Auto Install
> checki ng
Option
next to the a pplicat ion and ta p
Next
to start.
10.2 O2 Connect
O2 Connect
gives you a direct access to the latest software upgrades, downloads, repair center
locations, helpdesk numbers, products and promotions.
Accessing O2 Connect
You can acces s O2 Connect
via Acti veSync, G PRS or Wir eless L AN.
Once co nnected , you can sync hronize i nformat ion to your O
2 Xda Stealth and read it offline. If you
find an item in O
2 Connect
that you wou ld like to dow nload, you c an do so and i nstall it i nstantl y, or
choose to install later.
Options
Some con tent items r equire a use r name and pa ssword. You ca n save this use rname an d passwor d
on your O
2 Xda Stealt h so you don’t ha ve to enter the m again; si mply tap
Menu
>
Options
and then
enter your user name and password when prompted. You can program your O
2 Xda Stealth t o receive
O
2 Connect updates at 1, 2, 4, 8 and 12-hour intervals through an ActiveSync connection, or choose
between 6 and 12-hour intervals through an active Internet connection.
Enabling/disabling O2 Connect
To di sa b le O2 Connect
, tap
Menu
>
Options
and then select S
top O2 Connec t Se r vic e
. To enable
O
2 Connect
, tap
Menu
>
Options
and then select
Star t O2 C onn ec t se r vic e
. By default, if your O
2
Xda Stealth i s connec ted to the I nternet vi a Active Sync, O
2 Connect
will make a connection to the O
2
Server eve ry 4 hour s to refres h content s. You will always h ave acces s to the late st inform ation.
10.3 Memory managem ent
When the memory is insufficient, this device cannot automatically alloca te memor y, you may follo w
the steps b elow to fre e up more mem ory:
Moving some files to m ini SD car d
1. Tap Start > File Explorer.
2. Tap and hold selected items.
3. Tap Cut on th e pop- up menu.
4. Switch to Storage Card category
5. Tap and hold and t hen tap Past e.
10
115
10
Managing Your O2 Xda Stealth
Deleting the unwanted files
1. Tap
Start
>
File Explorer
.
2. Tap and hold se lected it ems.
3. Select
Delete
.
Saving attachments to mini SD card
1. Tap
Start
>
Messaging
>
Menu
>
Tools
>
Options
>
Storage
tab.
2. If you have in serte d a memor y card, ch eck
Store attachments on storage card
.
3. E-mai l attach ments wil l automati cally be s aved to memo ry card.
Clearing hi stories and deleting files from Internet Explorer
1. Tap
Start
>
Internet Explorer
>
Menu
>
Tools
>
Options
>
Memory
tab.
2. Tap
Clear History
and
Delete Files
to delete browsed web page related record.
10.4 Running programs management
1. Tap
Start
>
Settings
>
System
tab >
Memory
>
Main
tab:
Display cu rrent me mory st atus of this d evice.
2. Tap
Start
>
Settings > System
tab >
Memory
>
Storage Card
tab:
Display th e memor y status of s torage c ard in this d evice.
3. Tap
Start
>
Settings
>
System
tab >
Memory
>
Running Programs
tab:
Display all current running programs in this device. Select any program from
Running Programs
List
, you may sele ct to
Activate
or
Stop
.
Activate
: run the highlighted programs
Stop
: stop runn ing highli ghted pro grams
Stop All
: stop runn ing all pro grams on
Running Programs List
10.5 Adding or removing programs
All prog rams pre -insta lled in th e device wi ll be saved in R OM (Read O nly Mem ory) and ar e not
removable. Data saved in ROM will not be lost by accident. All programs that you installed will be
saved in R AM (Ran dom Acc ess Memo ry). As long as t here is suf ficient space in this device, you may
install suitable programs by preference.
Adding programs through ActiveSync
1. Before installing the program, please make sure that your O2 Xda Stealth processor is suitable for
the soft ware. Tap
Start
>
Settings
>
System
tab >
About >Version
tab to chec k for information of
this device.
2. Download the desired software to your computer (Please select software that is designed for
Pocket PC and t his device).
3. Read installation instructions, readme file, or acc ompanie d program s provide d to you.
4. Connec t your com puter wit h this devic e.
5. Install executive file to your compute r.
Managing Your O2 Xda Stealth
Page 59

116
10
Managing Your O2 Xda Stealth
If this file contains installation program, the installation wizard will automatically activate. Please
follow the instructions on screen. Once the installation on your computer is completed, the program
will automatically be installed to this device. If this file does not contain any installation program, an
error me ssage wi ll show on the s creen an d tell you this program is invalid, which is not suitable for
your computer. You must move this program to this device manual ly. If you cannot find any installation
instructions for this program, please use “Browse” function of
ActiveSync
to copy program file to
Program Files
folder in this device. After completing installation, tap
Start
>
Programs
, and then
select the program icon to launch that program.
Adding programs through Internet
You may download s oftw are suita ble for thi s device f rom Inter net.
1.Before installing the program, please make sure that your O
2 Xda Stealth p roces sor is suit able for
the software.
Tap
Start
>
Settings
>
System
tab >
About
> V
ersion
tab to check information in this device.
2.Directly download programs to this device by using
Internet Explorer
in this device. (Please select
programs designed for Pocket PC and this device)
3.Read installation instructions, readme file, or accompanied programs provided to you.
4.Run installation executive file in your computer.
Adding programs to Start menu
Tap
Start
>
Settings
>
Persona
l tab >
Menu
.
1. Check the programs to be displayed on
Start
menu.
2. Tap OK to save settings and return to Personal tab screen.
Removing programs
Tap
Start
>
Settings
>
System
tab >
Remove Programs
.
Select the programs you would like to delete from
Programs in storage memory
list, and then select
Remove
to delete highlighted programs. If the installed programs list does not contain the program
you intend to r emove, you may u se
File Explor er
in this device to find the program and delete it by
select ing and hol ding the pr ogram’s name an d then sel ect
Delete
from the p op-up m enu.
Chapter 11
Specifications
Page 60
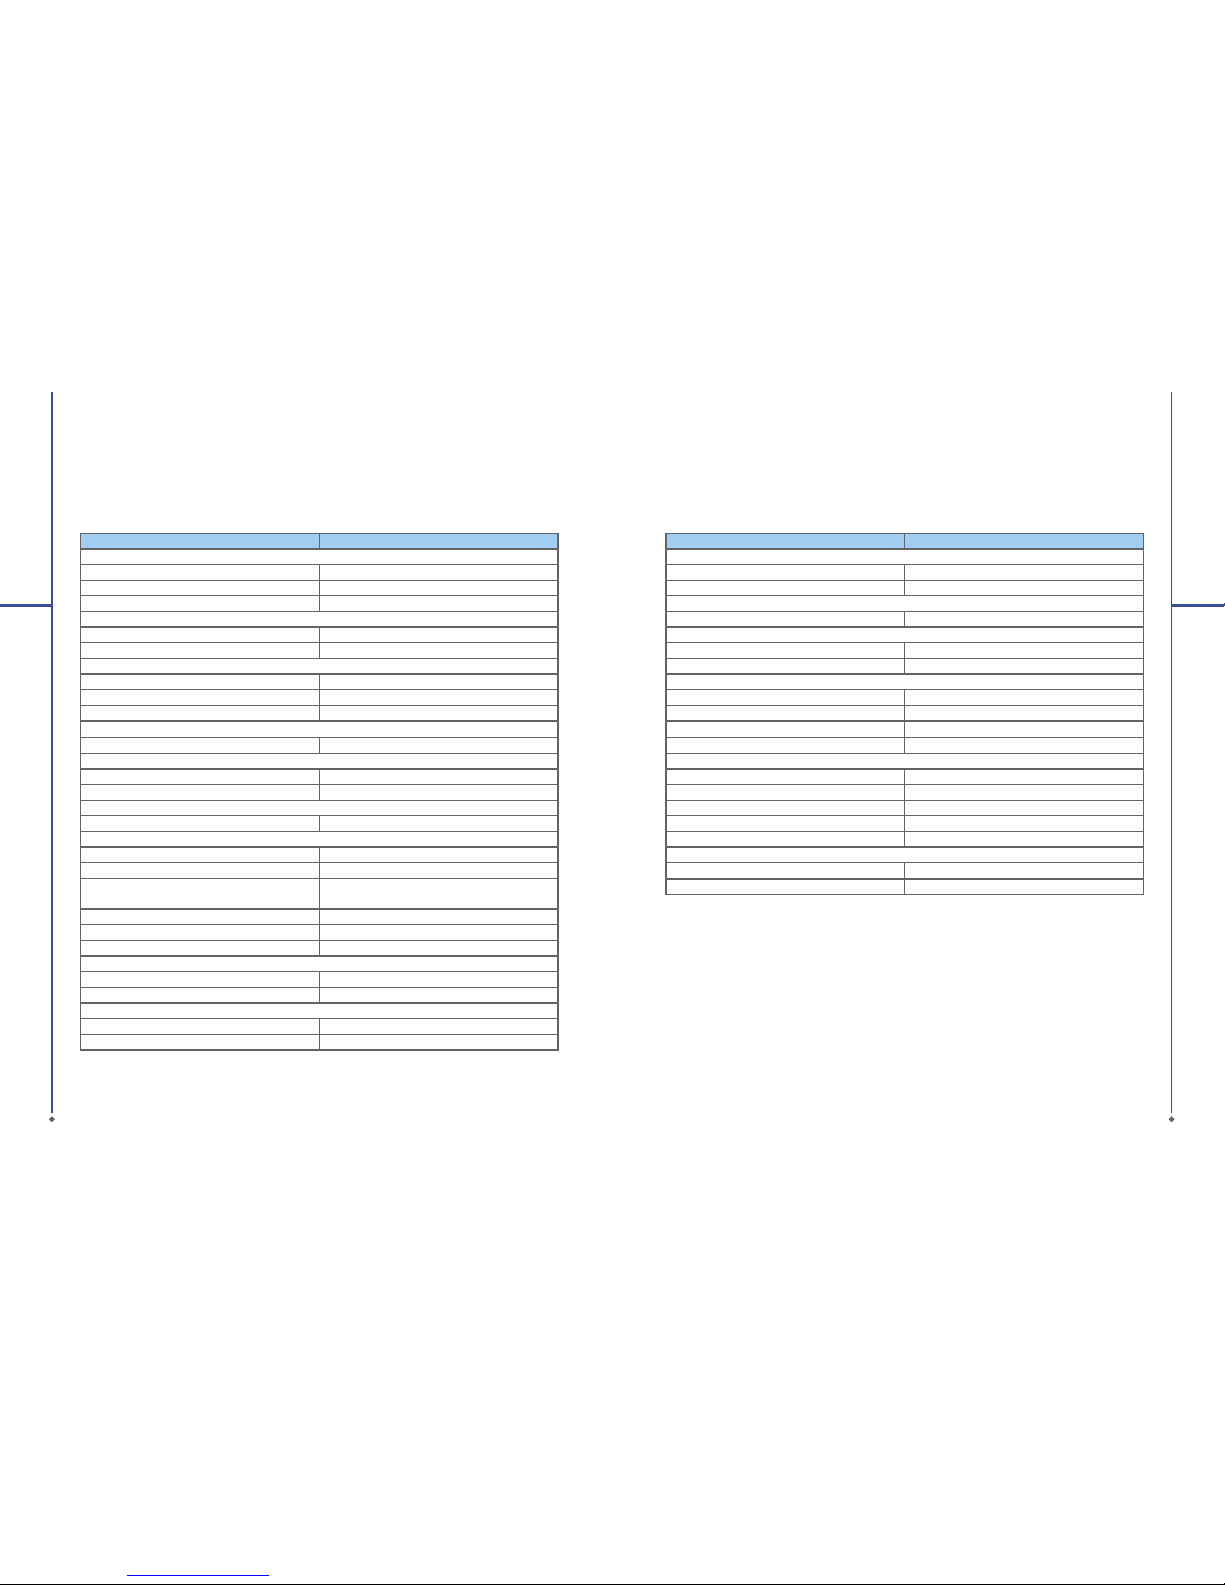
118
Chapter 11. Specifications
11
Specifications
Item Specifications
System Information
Operating System Windows Mobile 5.0
Proces sor Intel PX A 272 416MHz
Memory 192 MB ROM, 64MB SDRAM
Size
Dimensions (mm) 110 x 53 x 22.5
Weight (in gr ams) 150g (wi th batte ry)
Battery
Battery capacity Li-Polyma pack1300 mAh or higher
Standby t ime 150Hr
Tal k t ime 4. 5Hr
Charging time
Charger 1.5Hr
Display Characteristics
Type 2.4-inch, 65k-color TFT LCD touch panel
Resolut ion 240 x 320
Band
Band GSM 900/1800/1900
Connectivity
Bluetooth 1.2
WLAN IEEE 802.11b/g
GPRS GPRS Class A/B
GPRS Uplink/Downlink Class 10
WAP Yes
CSD Yes
USB 1.0
Image
Format JPG/ GIF/PNG
Max size (per) Depends on available RAM
Audio
Format MP3/WAV/WMA/ MIDI/AMR/AAC/AAC+
Max size Depends on available RAM
119
11
Specifications
Item Specifi cations
Video
Format PEG4/ 3GPP/ WMV
Max size Depends on available RAM
Phonebook
Size Depends on available RAM
Ring tone
Type MP3, WAV, SMF
Polyphone 192 Polyphonics
Digital camera
Typ e J PEG
Pixels 2.0 mega-pixel
Auto focus Yes
Video recording Yes
Messaging
Push E-mail Windows Direct Push
SMS Yes
MMS Yes
E-mail Yes
MSN Yes
External memory
Typ e Mi ni SD Card
Max size Supp ort up to 1 G B
Page 61

Chapter 12
FAQs
Page 62

122
Chapter 12. FAQs
Why can’t I turn on my device as I press the power key?
Either you didn’t press the key long enough, or the device has shut down because the battery power
level is too l ow to make cal ls. Please r echarg e the batt ery.
How do I suspend the screen display or wake up the device?
Press and h old the po wer key to turn of f the device. If the sc reen disp lay is off, p ress the p ower key to
wake up your dev ice.
Why does the scr een freezes and does not respond to my commands or input?
Reboot the system to free up memory. The system shall operate more efficiently. If the system still
lags after rebooting, you will need to clean boot your O
2 Xda Stealth. To clean boot, power off your O2
Xda Stealth a nd then pre ss Windo ws key, OK key and the Pow er key at the sam e time, for ab out
5 second s. Your O
2 Xda Stealt h will reset t o factor y defaults and reboo t.
Please note
: When you perform a clean boot on your O
2 Xda Stealth, all your personalized settings,
informa tion, and p rograms i nstalle d will be re moved. The sy stem will r eset to fac tory def aults.
Why does my device display “INSUFFICIENT MEMORY” when I open a file or a program?
The devic e memor y is shared by b oth storag e and prog rams. You can fr ee up some me mory by
removing some of the rarely used programs you installed or removing rarely used files.
Why doesn’t the screen respond accurately to my stylus taps?
Tap
Start
>
Settings
>
System
tab >
Screen > General
tab. Select
Align Screen
to align the
screen.
Why does my O
2 Xda Stealth launch wrong programs or ignore my command when I press a
device key?
Tap
Start > Settings
>
Personal
tab >
Buttons
and check w hether t he progra ms assign ed to each
key is correct. You can change these key assignments by preference.
My O
2 Xda Stealth can’t form a successful connection with ActiveSync.
Please make s ure you have in stalled A ctiveS ync 4.2 or l ater on your c ompute r. You can find
ActiveS ync in the i nstallat ion CD, or yo u can downl oad the lat est versi on from Mi crosof t’s websi te.
Please make sure you have connected your O
2 Xda Stealth t o the comp uter by plug ging in the U SB
cable to both your O
2 Xda Stealt h and the co mputer. Make su re that you ar e not runni ng anothe r
program that uses the same serial port. If the connection still fails, remove ActiveSync on your
computer and reinstall it.
12
FAQs
123
12
FAQs
Why does my device display ‘Insert SIM’, what does this mean?
Please ins ert th e SIM card b efore you c an use the d evice. If i t is already i nstalle d, remove an d clean
the metal c ontacts area with a d ry clot h, and then insert it again.
Why does my device display ‘EMERGENCY ONLY’, what does this mean?
You may not have your SI M card pro perly in stalle d, or you are ou t of networ k range.
Why does my device display ‘NO NETWORK’, what does this mean?
You’re outside net work range. If you’re i nside a buil ding or a bas ement, tr y moving towards a win dow.
Why are there double entries in my Contacts list?
You may have select ed Show SIM Contacts in Contacts menu. If you have already copied your SIM
contac ts to your O
2 Xda Stealth , then you do n ot need to se lect this o ption.
Why are some calls not processed?
Certain call barring function may have been set to restrict device usage. Check the call barring status
and cancel as necessary.
Can I send and receive e-mails and surf the Mobile Internet on my device?
O
2 Xda Stealth allows you to access the Internet from your device. For instructions on how to send
and recei ve e-ma ils, plea se refer to th e user manu al or cont act O2 Customer Servic e.
Why can’t my O
2 Xda Stealth make any sound alerts?
Tap on the speaker i con
on the top r ight cor ner of the sc reen, and t hen adjus t the aler t or ring
volume. You coul d also use t he volume key on t he left si de of your O
2 Xda Stealth to adjust volume.
Where can I check why my device has gone wrong?
Please have yo ur warra nty card a nd devic e ready and c ontact yo ur local d ealer.
Page 63

Chapter 13
Safety Bit
13.1 Safety information
13.2 Phone care
13.3 Driving safety
13.4 Electronic devices
13.5 Other safety guidelines
13.6 Cautions
13.7 About this g uide
Page 64

126
Chapter 13. Safety Bit
This chapter contains important information on safe and efficient operation. Please read this
information before using your O
2 Xda Stealth .
13.1 Safety information
You r O 2 Xda Stealth Pocket PC Phone has been designed, manufactured and tested so as not to
exceed the li mits for exp osure to el ectroma gnetic fie lds recom mended by t he Counci l of the Europ ean
Union. Th ese limit s are par t of compr ehensiv e guidelines developed by independent scientific
organizations.
European standards provide for the amount of radio frequency electromagnetic energy absorbed by
the body w hen using a ph one to be mea sured by refe rence to t he Speci fic Absorption Rate (SAR).
The highe st SAR valu e for your O
2 Xda Stealt h when teste d for use at th e ear is 0.62 6 W/kg.
The maxi mum SAR val ues for the O
2 Xda Stealth a re:
• 0.436 W /kg @10g (CE)
• 0.224 W /kg @1g (FCC) h ead
• 0.786W/ kg @1g (FCC ) body
13.2 Phone care
You should never attempt to open the phone casing. There are no user-serviceable parts inside, and
you might damage sensitive electronic circuits and components.
Un-authorized disassembly will void the warranty. You should never leave your device in the window
of your car or otherwise expose it to strong sunlight or excessive heat for a prolonged period of time
as this may dam age it. You shou ld never hand le your devi ce with wet h ands or expo se it to mois ture or
liquids of any kind. Continuous changes from a cold to a warm environment may lead to condensation
inside the device, resulting in corrosion and possible damage. If you pack your device in your suitcase
during travel, beware not to damage it. Cramming a suitcase may crack the LCD display. While
in flight, switch your O
2 Xda Stealth to flight mode. (Turn off device or wireless functions). When
instructed to do so, turn off your device when on board an aircraft. As with all other radio devices,
touching the built-in antenna area during telephone conversation may impair the quality and lead to
shorte r standby t ime due to inc reased power consu mption.
The battery
Your device is equipped with a high performance Li-Ion battery. Optional battery types may be
available, check w ith your local ret ailer. Observe the maintenance guidelines and your battery should
give you a lon g servi ce life.
13
127
13
Safety Bit
● At the begi nning of the b atter y’s life, fully charg e and discha rge (let it g o flat) three times.
● Do not over charge the Li-Ion battery, as this can result in a reduction in battery performance and
life span. T he recom mended m aximum c harge tim e is 2.5 hou rs.
● Avoid repeated short charging. It is preferable to let the battery go flat and then recharge it
completely.
● Avoid charging in strong heat or extreme cold. Ambient room temperature is preferable. The battery
has its opti mum per forman ce in an ambi ent tempe rature of + 5 °C to +50 °C.
● Don’t store a battery near a fire or heat sourc e.
● Use only the battery approved by the manufacturer.
● Never replace the battery with a non-approved battery.
● Never soak t he batte ry in wate r or any other fl uid.
● Never tr y to open the b atter y as it contains subst ances th at might be ha rmful i f swallowe d or allowed
to come int o contac t with unpr otected s kin.
● Never shor t-c ircuit th e batter y, as it may overh eat and cau se a fire. Keep away from jewellery and
other metal objects.
● Never disp ose of the b atter y in a fire. It c ould expl ode and rel ease har mful subs tances i nto the
environment.
● Never dispose of the battery with your regular household waste. Take it to a hazardous material
collection point.
● Do not touc h the batt ery ter minals.
Caution: Risk of exp losion i f batter y is replaced by an inco rrect t ype.
The charger
● Use only th e charger s upplied w ith your dev ice.
● Never pull t he charge r cord to re lease it fr om the mai ns – pull the c harger it self.
Memory card
● Do not remove or insert a memory card or turn off the handset whilst data on the card is being
edited.
● Do not touc h the metal t erminal s with your h ands or met al objec ts.
● Do not bend the memory card or subject it to violent impacts. Keep away from water and high
temperatures.
● Keep all mem ory ca rds out of th e reach of sm all child ren.
● Do not short circuit the contact points or expose it to liquids or moisture. When not in use, keep it in
the antistatic container it came in.
● Do not use fo rce when i nsert ing or hand ling the ca rd, and do no t expose to exc essive he at or stron g
magnetic fields.
Safety Bit
Page 65

128
13
Safety Bit
Cleaning and storing
● Your device should always be handled with care and protected from dirt, dust and damp. To avoid
scratches, never place your device face down.
● If cleaning is necessary, switch the device off and wipe carefully with a soft, slightly damp (not
wet) cloth. U se a cott on swab to cl ean the ca mera lens . Allow th e device to d ry com pletely be fore
switching it on. Never use solvents for cleaning.
● If you are not g oing to use yo ur device f or some ti me, fully c harge the b atter y and store the device i n
a dry place away from direct sunlight. Your device should be switched off during storage. Recharge
every 6 to12 months .
● Never expos e your devic e to heat or strong sunli ght.
● Never expos e your devic e to moisture or liquid s of any kind.
● Do not paint your device or otherwise block the keypad, microphone or earpiece function, i.e. with
stickers.
13.3 Driving safety
Never use th e handhel d devices w hilst dr iving. It i s an offen ce whils t driving t o hold a pho ne or cradl e
it in your neck, at any point during the setup, making or taking of a phone call, text message or any
other data related mobile communication. Use of fully installed car kits is still permitted, as are the use
of alternate hands-free accessori es.
In the inter est of safet y, we would rec ommend t o use crad le whilst us ing any for m of hands- free
accessory.
We recomm end that you u se voicem ail whereve r possib le, and that yo u listen to yo ur messag es when
you are not in t he car. If you mu st make a hands -free call when dr iving, keep it brief.
An airbag inflates with great force. Do not place objects, including both installed and portable
wireless equipment, in the area over the airbag or in the air bag deployment area. If in-vehicle
wireless equipment is improperly installed and the air bag inflate s, serio us injur y could re sult.
Warning: Failure to follow these instructions may lead to serious personal injury and possible
property damage.
13.4 Electronic devices
Most modern electronic equipment is shielded from RF energy. However, certain electronic equipment
may not be shie lded agai nst the RF s ignals fr om your poc ket PC phone.
Pacemakers
The Healt h Industr y Manuf acture rs’ Assoc iation r ecomme nds that a min imum sepa ration of si x
(6”) i nches be ma intaine d betwee n a phone and a p acemaker t o avoid potent ial inter ferenc e with
the pacemaker. These recommendations are consistent with the independent research by and
recommendations of Wireless Technology Research.
129
13
Safety Bit
If you have a pacemaker
● Always kee p your devic e more tha n six inche s from your p acemake r when it is tu rned on.
● Do not car ry your d evice in a br east pocke t.
● Use the ear o pposite t he pacem aker to minim ize the pot ential fo r interf erence
● If you have any re ason to susp ect that i nterfe rence is t aking pla ce, turn yo ur device o ff imme diately.
Hearing aids
Some digital phones may interfere with some hearing aids. In the event of such interference, call O2
Customer S ervi ce to discu ss alter natives.
Other medical devices
If you use any other personal medical device, consult the manufacturer of your device to determine
if they are adequately shielded from external RF energy. Your physician may be able to assist you in
obtaining this information.
Tur n you r d ev ic e off in healthcare facilities when any regulations posted in these areas instruct you to
do so.
Hospitals or healthcare facilities may be using equipment that could be sensitive to external RF
energy.
Vehicles
RF signals may affect improperly installed or inadequately shielded electronic systems in motor
vehicles. Check with the manufacturer or its representative regarding your vehicle. You should also
consult t he manufa cturer of a ny equipme nt that has be en added to yo ur vehicl e.
Posted facilities
Turn your phone off where posted notices so require.
Magnetic media
Magnetic fields generated by Pocket PC Phone may damage data on magnetic storage media such as
credit cards, computer discs or tapes. Do not place your device next to such media. You should never
expose you r device to st rong magn etic fields as this may cause temporary malfunction.
Page 66

130
13
Safety Bit
13.5 Other safety guidelines
Aircraft
Regulations prohibit using your device while in the air. Switch off your device before boarding an
aircraf t or change to flight mode.
Blasting areas & Potentially explosive atmospheres
The user ne eds to swit ch off th e device wh en expose d to areas wit h potentially explos ive atmos pheres
such as pet rol stati ons, chem ical sto rage depo ts and blas ting oper ations.
Sparks in s uch areas c ould cau se an explos ion or fire resulting in bodily injury or even death.
Areas with a potentially explosive atmosphere are often, but not always, clearly marked. They include
fuelling areas such as petrol stations; below deck on boats; fuel or chemical transfer or storage
facilities; vehicles using liquefied petroleum gas (such as propane or butane); areas where the air
contains chemicals or articles, such as grain, dust, or metal powders; and any other area where you
would nor mally be ad vised to t urn off y our vehicl e’s engine.
FCC Regulations
This mobi le phone c omplies w ith par t 15 of the FCC Rule s. Operat ion is subj ect to the f ollowin g two
conditions: (1) This device may not cause harmful interference, and (2) this device must accept any
interference received, including interference that may cause undesired operation.
This mobi le phone ha s been teste d and found t o comply w ith the li mits for a Cl ass B digit al devic e,
pursuant t o Part 15 of the FC C Rules. Th ese limit s are desig ned to provi de reason able prote ction
against harmful interference in a residential installation. This equipment generates, uses and can
radiate radio frequency energy and, if not installed and used in accordance with the instructions, may
cause har mful interferen ce to radio c ommunications . However, ther e is no guaran tee that int erfer ence
will not occur in a particular installation If this equipment does cause harmful interference to radio
or televis ion rece ption, whi ch can be d etermin ed by turnin g the equip ment off a nd on, the us er is
encoura ged to tr y to corr ect the int erfer ence by one o r more of the f ollowin g measures :
● Reorient or relocate the receiving antenna.
● Increas e the separ ation bet ween the equipment a nd recei ver.
● Connec t the equip ment into an o utlet on a ci rcuit dif ferent from that to wh ich the re ceiver is
connec ted.
● Consult t he dealer o r an experi enced ra dio/ TV technician fo r help.
Changes or modification s not expres sly approv ed by the par ty resp onsible f or compl iance co uld void
the user‘s authority to operate the equipment.
Choking
Keep your devi ce away fro m childre n as the SIM c ard or othe r small par ts present a chokin g hazard.
131
13
Safety Bit
13.6 Cautions
Your Pocket PC Phone is a high quality piece of equipment. Before operating the equipment, read
all instructions and cautionary markings. Use only original or manufacturer approved accessories,
batteries and chargers.
● Do not use this equipment in an extreme environment where high temperature or high humidity
exists.
● Do not abuse the equipment. Avoid striking, shaking or giving it a shock. When not using the unit,
lay it down to avoid possible damage due to instability.
● Do not expose this equ ipment to r ain or spill ed beverag es.
● Do not use unauthorized accessories.
● Do not disassemble the device or its accessories. If service or repair is required, return the unit to
an author ized ser vice centre. If th e unit is disa ssembl ed, the ris k of elect ric shoc k or fire may result.
● Do not short-c ircuit the batter y terminals with me tal items , etc.
13.7 About this g uide
This document is provided as a user guide to the O2 Xda Stealth Pocket PC Phone and to this system
only. O
2 Xda Stealt h is a tradem ark of the O 2 group of companies.
Latest ver sion of user guide can b e found on ou r website
http:/ /SeeO2.com. Year of M anufact uring: 200 6
Mandatory statements
We hereby declare that the O2 Xda Stealth is in co nformit y to all the e ssentia l require ments of
Directive 1999/5/EC.
Page 67

132
133
Index
Index
Index
A
About 45
ActiveSync Synchronization Tool 48
Answer Machine 112
Applications 100
Attac hments 115
B
Background 42
Backlight 14, 45
Backup 14, 104
Batter y 12, 14
Beam 60, 109
Block Recognizer 27
Bluetooth 58
Bluetooth Connection 5 0
Bluetooth Headset 61
Bonds 59
Brightness 14
Buttons 38
C
Calculat or 104
Calendar 51, 100
Call Barr ing 41
Caller ID 41
Call Forw arding 41
Call Waiti ng 41
Call Histo ry 35
Camera 90
Charging the Battery 12
Cell Bro adcast Se tting 6 6
Certificates 45
ClearVue 10 6
Connections 5 6
Contac ts 34
D
Device Lo ck 13, 24
DNS 64
Downloa d Agent 104
Drawing o n the Scre en 29
Drivin g Safety 128
E
E-mail 83
E-mail Ac count 52, 83
Emergenc y Calls 34
Excel Mo bile 107
eZiText 28
F
Favorites 66, 103
File Explorer 102
Flash light 9, 90
Flight Mo de 57, 106
Frame 96
G
Games 104
GPRS 57
GPS 45
H
Headset Volu me Limite r 45
Headset Pl ug 8
Icons 23
Input 38
Input Met hod 27
Inser t the batte ry & SIM c ard 11
Installing ActiveSync 49
International Calls 3 3
Internet E xplorer 6 6, 102
Internet S haring 65
ISP 57, 65
J
JAVA 95
K
Keyboard 27
Keypad Tone 40
L
Landscape 25
LED Indic ator 8
Letter Recognizer 28
Lock (Device Lock) 13
Lock 41
M
Making a c all 33
Menus 39
Memor y 45
Memor y Manage ment 114
Memor y Expans ion 14
Messaging 70
Micros oft® E xchange Server 82, 85
MSN Acc ount 86
MSN Hotm ail 87
MSN Messenger 86
MSN Opti ons 39
Multimedia messages (MMS) 74
N
Navigati on Key 7, 10
Notes 108
O
O2 Auto Configurator 105
O
2 Auto Installer 114
O
2 Connec t 114
Outloo k E-mail 52
Owner Inf ormati on 3 0
P
Password 30, 35
Personal settings 38
Phone 40
Photo Edito r 95
Pictures & Videos 96
PIN 41
Pocket MSN 86
POP3 83
Power 45
Power Management 14
Power on /off 8
PowerPoint Mobile 109
Portrait 25
Program s 20
Push E-mail 85
Page 68

134
Index
R
Receiving/Ignoring a call 33
Recorder 97
Recording a Message 29
Recording a Clip 94
Recording Time 97
Regional Settings 46
Remove Programs 46
Reset 8
Ring Tone 35
S
SAR 126
Safety Information 126
Screen 46
Screen Orientation 25
Screen Alignment 26
Search 110
Show SIM Contacts 123
Shutter Sound 90
Signing in MSN Messenger 87
SIM 12
SMS 71
Smart Input 28
Sounds & Notifications 42
Spb GPRS Monitor 58
Speed Dial 33
Spell check 71
Start Menu 16
System Info 46
T
Taking a Photo 91
Tasks 101
Terminal Services Client 65
Today 13
Torch 104
Transcriber 28
U
USB Cable 66
USB Card Reader 65
V
Vibrate 34
Voice Mail 82
Voice Speed Dial 42, 110
VPN 66
W
Wi-Fi 64
Wi-Fi Utility 64
Windows Media 102
Wireless LAN 64
Wireless Manager 56
Word Mobile 110
Z
Zoom In/Out 91, 110
ZIP 104
 Loading...