

Page 1

I
II
Quick Start Guide
Xda Ignito
o2.co.uk
Telefónica O2 L imited, 260 Bath R oad, Slough, Be rks, SL1 4DX.
Regist ered in England No .1743099. Reg istered off ice as above.
© Telefónica O2 U K Limited 2008 . Correct at time o f going to press (0 6/08).
O2CN573N 529 4VCCP06/0 8 05/09
We’re better, connected
Page 2

III
Contents
Welcome to the Xda Ignito
Getting to know your
Xda Ignito
What’s in the box 1
A tour of your Xda Ignito 5
Inserting your SIM card 8
and battery
Charging the battery 9
Switching on your Xda Ignito 10
Settings 11
Making your first call
Making your first call 12
Entering information 13
Adding contacts 13
Contacting others
Sending text messages 14
Sending picture and 14
video messages
Bluetooth 15
Setting up Wi-Fi 17
Setting up an internet 18
email account
Browsing the internet 20
Personalising your Xda Ignito
Changing phone settings 21
Photo and video 23
Synchronising music files 26
Listening to music 27
Getting organised
Synchronising your Xda Ignito 28
with your PC
Keeping track of appointments 30
Keeping track of things to do 31
Copying files 32
Resetting your Xda Ignito 33
Help and troubleshooting
Help online 34
Talk to us 34
Status indicators
Icons and meanings 35
Welcome to the Xda Ignito
This Quick Star t Guide will help you get your Xda Ignito
up and running as smoothly as possible.
For a more complete guide to using your Xda Ignito,
please see your Full User Manual PDF, which you’ll find
on your Applications CD included in this b ox.
The Applications CD also has some additional
programs on it that you can install.
We’re better, connected
Page 3
1
2
Getting to know your Xda Ignito
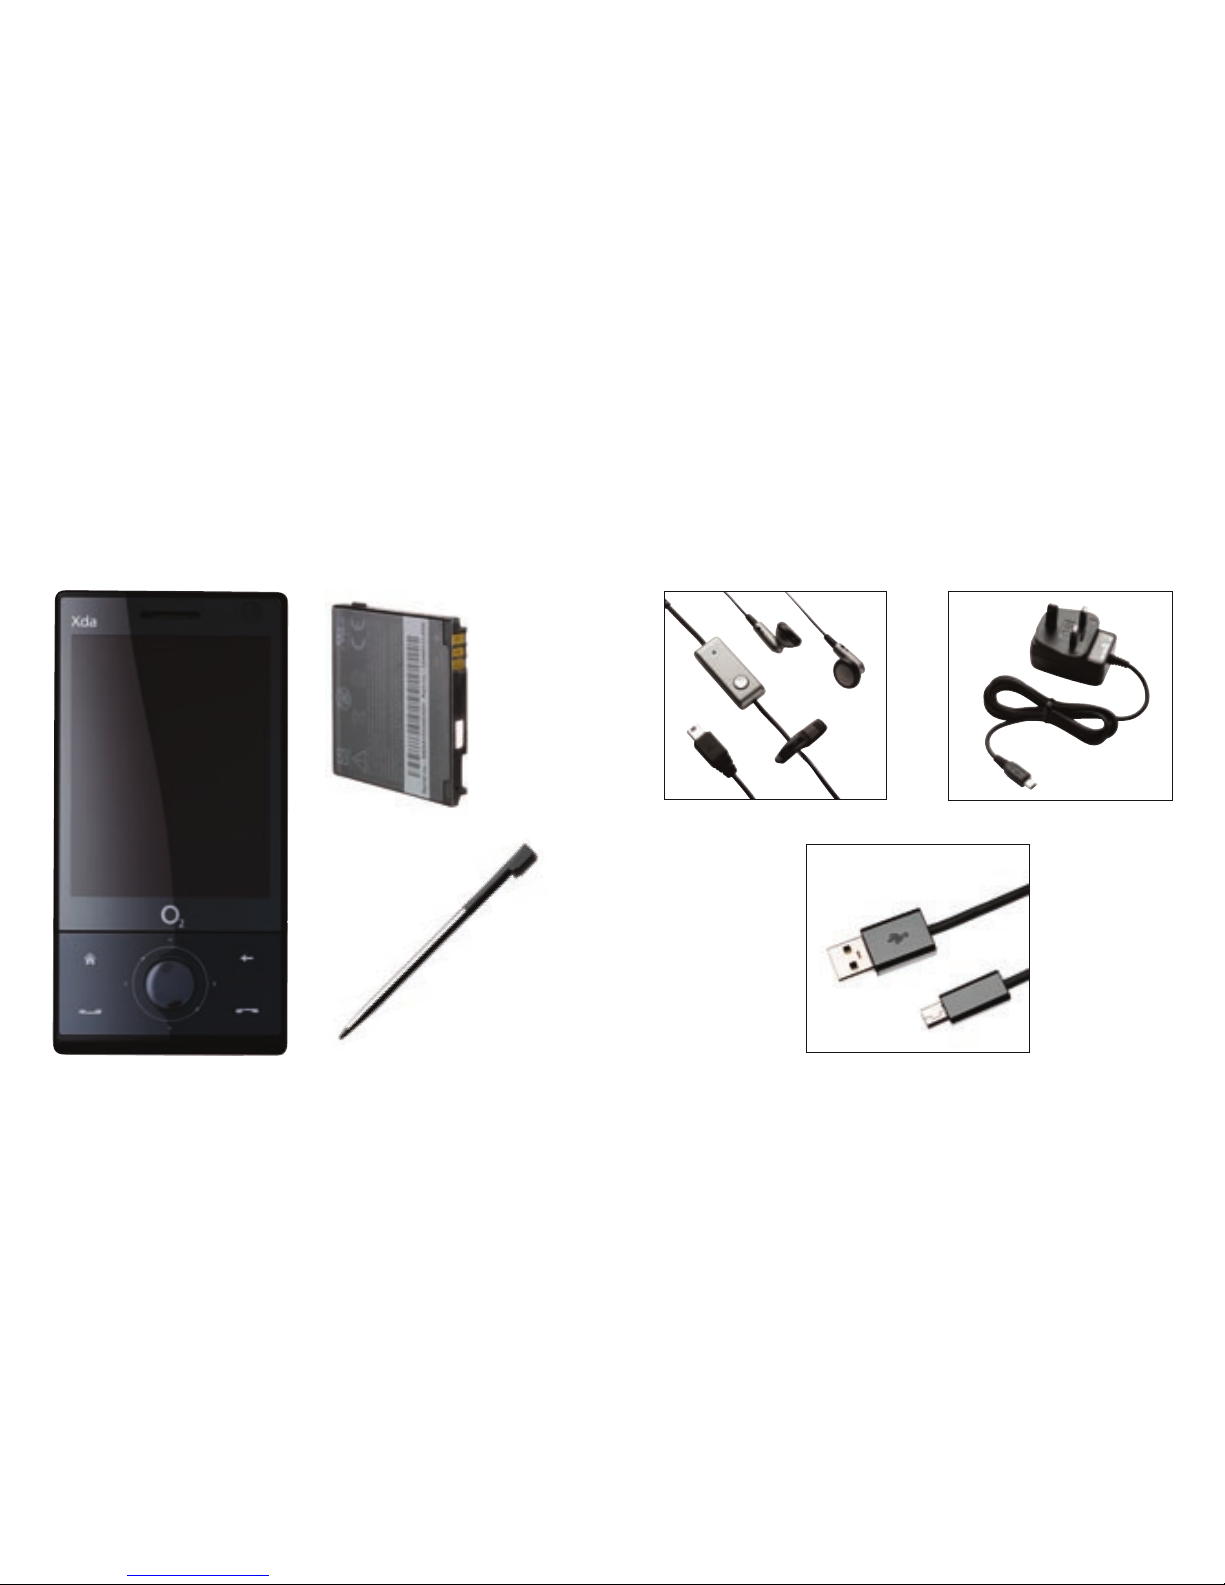
What’s in the box?
You should find the following items inside this box.
02 may change the contents of the Xda Ignito box in the future.
The image s here are purely t o illustrate wha t’s in the box – the ac tual content s may look slightl y different .
Xda Ignito Battery Stereo headset AC adapter
USB sync cable
Extra stylus
Page 4
3
4
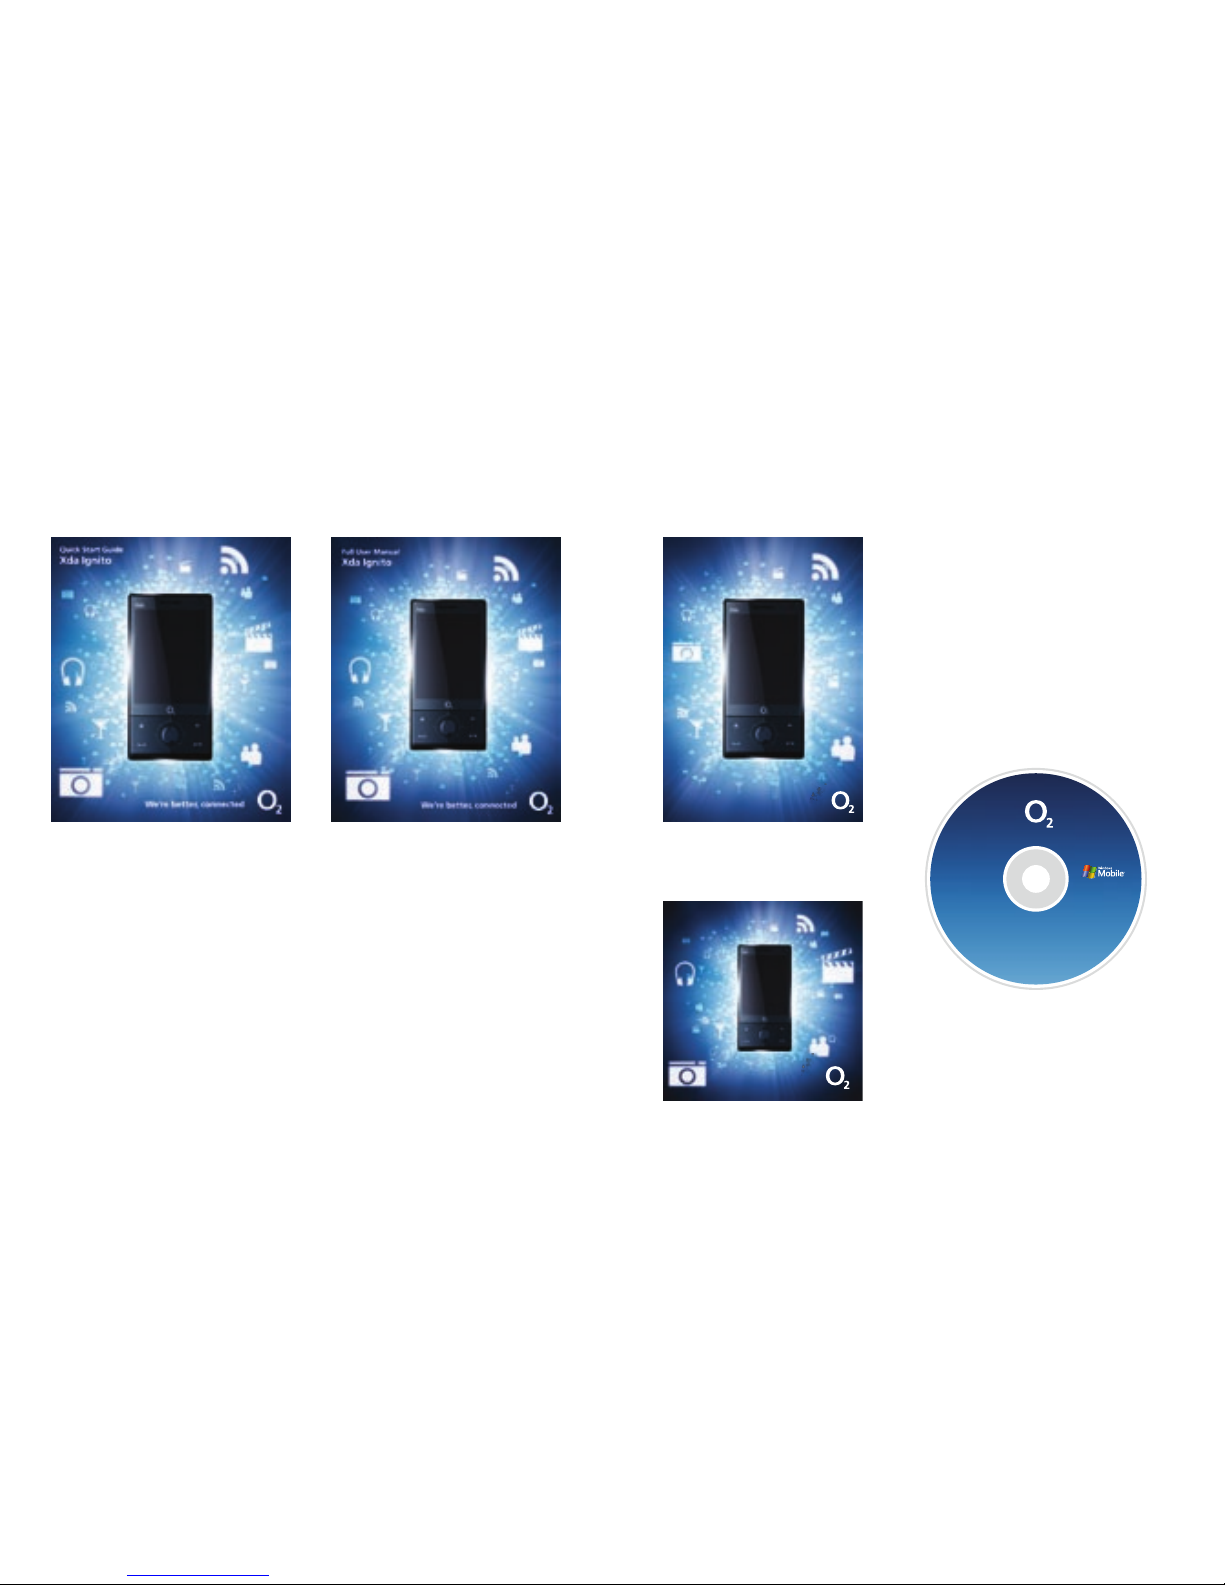
Applications CD with Windows Mobile™
software
CD Contents include:
Applications
GPRS Monitor & Sprite Backup.
Getting Started
With Windows Mobile™ software.
Includes Microsoft® ActiveSync® 4.5,
Windows Mobile Device Center for
Vista and Microsoft® Outlook® 2007
(Evaluation copy)
Full User Manual
M[Ãh[X[j j[h"Yedd[Y j[Z
MWhhWdjo9WhZ
NZW?]d _je
JekY^<BE):
NZW?]d _je
M[Ãh[X[j j[h"Yedd[Y j[Z
This booklet,
your Quick Start Guide
Full User Manual available
on the Applications CD
Warranty card
TouchFLO™ 3D guide
7ffb_YWj_edi
<EGHBdc^idgHeg^iZ7VX` je#
=[jj_d]IjWhj[Z
L^i]L^cYdlhBdW^aZ hd[ilVgZ#
>cXajYZhB^Xgdhd[i 6Xi^kZHncX)#*8dccZX i^k^in
Hd[ilVgZVcYB^Xgdhd[ iDjiadd`'%%,:kVajV i^dcXden
<kbbKi[hCWdkWb
6aag^\]ihgZhZgkZY#E dgi^dch
'%%,B^Xgdhd[i8dged gVi^dc
NZW?]d_je
Page 5
5
6
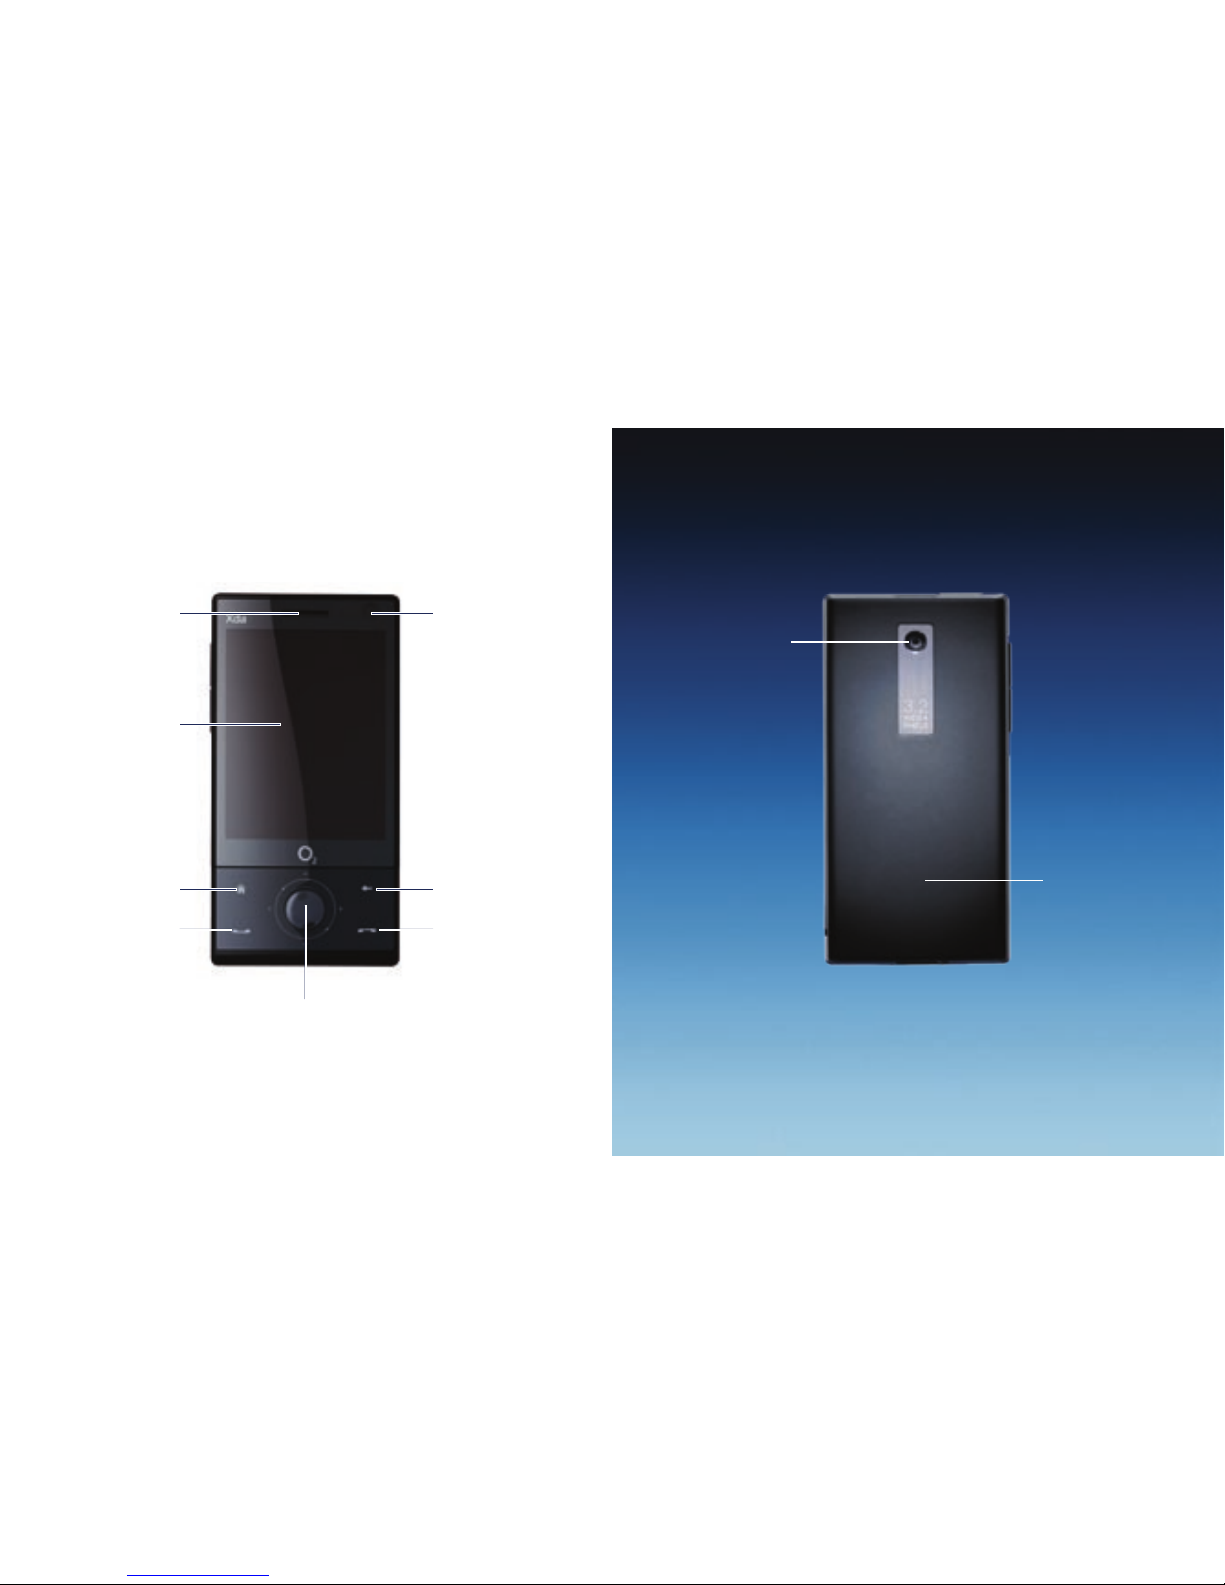
Earpiece
Second Camera
Touch Screen
Back Key
Navigational Control
Home
Talk/Send
End Key
3.2 Megapixel
Camera
Back Cover
A tour of your Xda Ignito
Page 6
7 8
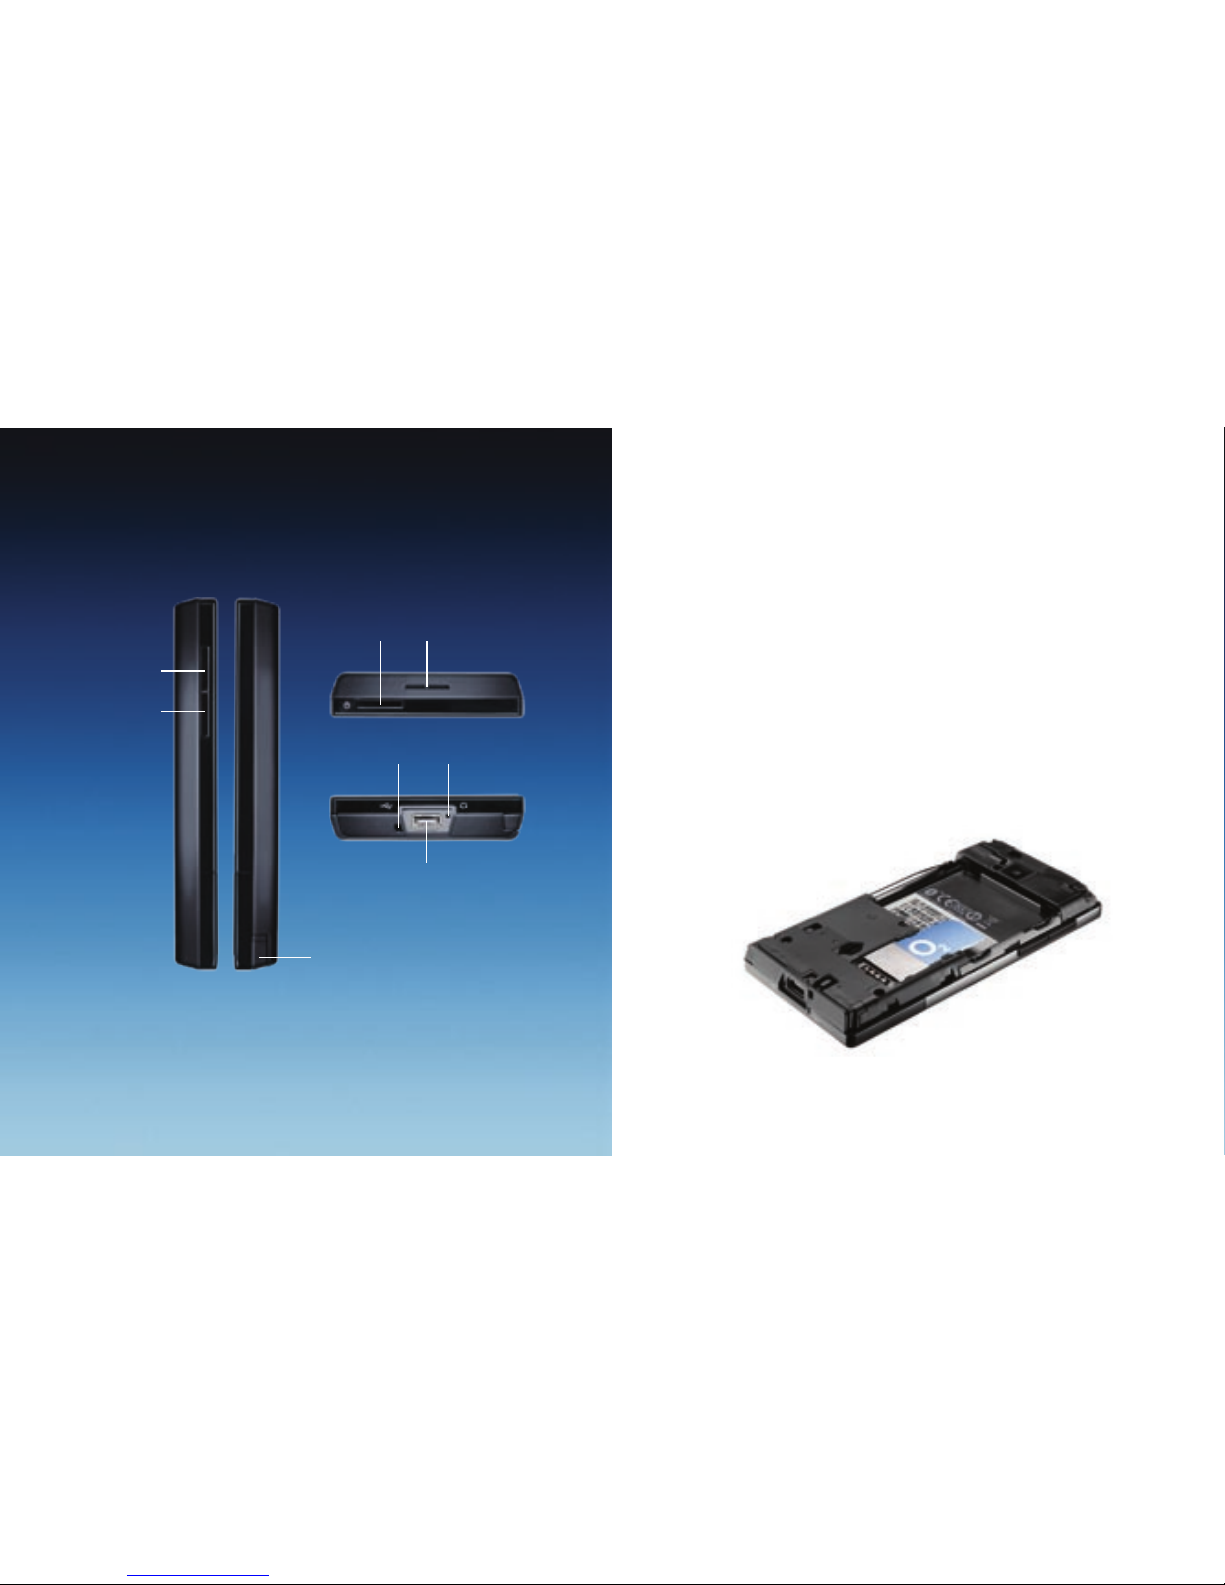
Inserting your SIM card and battery
Make sure your Xda Ignito is turned off and remove the back cover before installing
your SIM card and battery. To do this, hold your Xda Ignito with both hands with
the front panel facing down.
Then push the back cover down with your thumb and slide up to remove.
To insert the SIM card
Look for the SIM card slot, then place the SIM card with its gold contacts facing
down and its cut corner facing out from the card slot. Slide the SIM card
completely into the slot.
Volume Up
Volume Down
Stylus
Microphone
Speaker
Strap Holder
Power
Sync/Connection/Earphone Jack
Page 7

10
To insert the battery
Line up the battery’s exposed copper contacts with the connectors inside the
battery compartment. Insert the contact’s side of the battery first and then gently
push the battery into place. Replace the back cover.
Charging the battery
Before you start using your Xda Ignito, you’ll need to fully charge the battery.
Charge the battery by plugging in the AC adapter plug to an electrical outlet.
Plug the USB end to the sync connector port at the bottom of your Xda Ignito.
The battery will be fully charged after about 3 hours of charging.
9
Switching on your Xda Ignito
After inserting your SIM card and charging the battery, just press and hold the
Power button for a few seconds.
A Quick Start Wizard will guide you through the calibration of the screen and
the set up of regional settings, date and time and password. Simply follow the
onscreen instructions to finish the Quick Start Wizard. After the Quick Start Wizard
finishes, your Xda Ignito will install the customisation settings, then restart.
Note: After your Xda Ignito restarts, you may be asked to set up an email account.
Page 8

12
11
Setting up your data connection settings
After your Xda Ignito restarts, you’ll be asked if you want to automatically set up
its data connections. This means the Xda Ignito will set up your 3G /GPRS
and WAP for you.
To automatically set up your data connection settings
1. When you see the Connection Setup message at the bottom of the screen,
tap Yes . Connection Setup then starts to set up your Xda Ignito’s data
connection settings.
2. After the Connection Setup is complete, tap Restart.
Your Home Screen
Once the Xda Ignito restarts after setting up your data
connections, you’ll be taken to the Home screen. The
default home screen of the Xda Ignito is the TouchFLO™
3D Home screen, which allows touch screen access to
functions such as contacts, text messages, email, internet
and more.
For more information about TouchFLO 3D, see
your TouchFLO 3D Guide and Full User Manual.
12
Making your first call
1. On the Home screen, tap Phone or you can press the Talk/Send button once.
2. Enter the phone number using the keypad.
Tip: If you tap in the wrong number, simply tap
to delete each number one
by one. To delete the entire number, just tap and hold.
3. Press the Talk/Send button to make the call.
Tip: When calling someone, use the Volume Up/Down buttons on the side of
the Xda Ignito to change the phone volume.
Your Xda Ignito can also be used to make video calls – as long as you and the
person you want to call are using a 3G-enabled SIM card and are inside a 3G
coverage area.
To make a video call, simply dial the number of the
person you want to start a video call with and tap
Menu > Video Call.
Page 9

13
14
Entering information
Your Xda Ignito gives you different ways to enter text. Choose one of the
available onscreen input options. Just tap the screen to choose another option.
To enter characters, simply tap the keys on the keyboard. Depending on the
keyboard layout you choose, you may need to tap the same key more than once
to get to the character you want.
For detailed information about using the available onscreen options, see Chapter 4
of the Full User Manual.
Adding contacts
To add a contact to your device
1. On the Home screen, slide to the People tab and then tap All People.
2. Tap New.
3. Enter the contact information, then tap OK.
Copying your SIM card contacts to your Xda Ignito
1. On the Home screen, tap Start > Programs > SIM Manager.
2. In SIM Manager, tap Menu > Select All.
3. Tap Menu > Save to Contacts.
Contacting others
Sending text messages
1. On the Home screen, slide to the Messages tab and tap.
2. In To, enter the mobile phone number of the person you want to send
the message to.
Tip: You can also tap To to select a contact from your Contacts list.
3. Type your message and then tap Send.
Sending picture and video messages
1. On the Home screen, slide to the Messages tab and tap All Messages.
2. Tap Menu > New > MMS and then tap Custom.
3. Enter the recipient’s mobile number or email address in To and enter
the Subject line.
4. Attach your picture or video message by tapping Insert picture/video,
Insert text here, and Insert audio.
5. Tap Send.
Page 10

15
Bluetooth
Pair your Xda Ignito with other Bluetooth-enabled devices or a Bluetooth
headset if you have one.
To pair your Xda Ignito with a Bluetooth device
1. On the Home screen, slide to the Settings tab and then tap
Menu > Bluetooth Devices > Devices tab.
2. Tap Add new device. Your Xda Ignito tells you the names of other
Bluetooth devices within range.
3. Tap the device name in the box, then tap Next.
4. Choose a passcode to establish a secure connection. The passcode can be
1 up to 16 characters.
5. Tap Next.
6. Wait for the other device to accept the partnership. The owner of the
other device needs to enter the same passcode that you specified.
7. The name of the other device is then displayed. You can edit and enter
a new name for that device if you wish.
8. Select the check boxes of services you want to use from the other device,
then tap Finish.
To pair your Xda Ignito with a Bluetooth headset
1. Make sure that both your Xda Ignito and your Bluetooth headset are turned on
and within close range and that the headset is visible. See the manufacturer’s
documentation to find out how to set the headset in visible mode.
2. On the Home screen, slide to the Settings tab and then tap
Menu > Bluetooth Devices > Devices > Add new device.
3. Tap the name of the Bluetooth headset, then tap Next. Your Xda Ignito will
automatically pair itself with the Bluetooth headset.
Windows Mobile will automatically try one of the preconfigured passcodes
(0000, 1111, 8888, 1234) to pair your Bluetooth headset with your Xda Ignito.
If this fails, you have to enter the passcode delivered with your headset
manually. For more information about Bluetooth, please see Chapter 9
of the Full User Manual.
16
Page 11

17
18
Setting up Wi-Fi
To connect to an open Wi-Fi network
1. On the Home screen, slide to the Settings tab.
2. On the Settings screen, tap Communications > Wi-Fi to turn on Wi-Fi.
3. The network names of the detected wireless networks are displayed on
a pop-up message window. Tap the open (unsecured) wireless net work,
then tap OK.
To learn how to connect to a secured network, see Chapter 8 of the
Full User Manual.
Setting up an internet email account
It’s really simple to set up a personal email account such as Gmail or Yahoo!
on your Xda Ignito.
1. On the Home screen, slide to the Mail tab and tap
New account.
2. Enter the Email Address and Password of your
personal email account and select the Save password
checkbox. Tap Next.
3. After the Xda Ignito finds the settings for the email
account, tap Next.
Note: If the settings are not found in the device,
the device needs to try to retrieve the settings.
4. Enter Your name and the Account display name and then tap Next.
Note: The Account display name is the name you’ll see on the Mail tab
on the Home screen.
5. Select how often you want your Xda Ignito to check for new messages
on the server in Automatic Send/Receive and then tap Finish.
6. Choose whether or not you want to download messages from the
email account.
Tip: An Unlimited Web Bolt On is a great way to get the best value when
downloading emails and browsing the internet.
Page 12

19
20
To send email using your internet email account
1. On the Mail tab of the Home screen, tap the icon
of your internet email
account you’ve just set up.
2. Tap
3. Enter the email address of the person you want to email in To and enter
a Subject line.
4. Type your email and then tap Send.
You can also synchronise your Xda Ignito with your company’s Microsoft
Exchange Server to send and receive emails and have real time access to your
inbox, calendar and contacts. Please refer to the Full User Manual if you want to
access your company email using your Xda.
Browsing the internet
You can use your Xda Ignito to go online with 3G or Wi-Fi.
Turn your Xda Ignito sideways to browse the web in landscape mode.
To open Opera Mobile and browse the web
1. On the Home screen, slide to the Internet tab and then tap Browser.
2. On the Opera Mobile screen, tap the address bar.
3. Enter the URL address and tap.
Use the touch screen to search the web pages. For more details on how to use
Opera Mobile, see Chapter 8 of the Full User Manual.
Page 13

22
21
Personalising your Xda Ignito
Changing phone settings
You can customise your phone settings to suit you.
To change the ringtone
1. On the Home screen, slide to the Settings tab and then tap Sound.
2. On the Sound screen, slide down to Ringtone and tap it.
3. On the Ringtones screen, tap the ringtone you want to use and tap Done.
To set an alarm
1. On the Home screen, slide to the Settings tab and then tap All Settings.
2. On the Systems tab, tap Clock & Alarms.
3. On the Alarms tab, select a checkbox and change the Description.
4. Tap the days you want the alarm to sound and then tap OK.
To secure your Xda Ignito
You can enter a password to lock your Xda Ignito if it hasn’t been used for
a while.
1. On the Home screen, slide to the Settings tab and then tap All Settings.
2. On the Personal tab, tap Lock.
3. Select the Prompt if device unused for check box and enter the time
you want.
4. Select the Password type.
5. Enter and confirm your password and then tap OK.
22
To activate your SIM card PIN
Activating your SIM card PIN requires you to choose a password before you
can use the phone features of your Xda Ignito.
1. On the Home screen, slide to the Settings tab and
then tap All Settings.
2. On the Personal tab, tap Phone > PIN tab and
then choose the Require PIN when phone is used
check box.
3. Follow the onscreen instructions to set the
PIN number.
To change battery and backlight settings
You can save battery power by adjusting the battery and backlight settings.
1. On the Home screen, slide to the Settings tab and then tap All Settings.
2. On the System tab, tap Power.
3. On the Backlight tab, set the brightness of the backlight by dragging
battery power and external power sliders.
4. On the Advanced tab, set when you want the backlight and Xda Ignito
to turn off when using battery and external power. Tap OK.
Note: When the backlight turns off, it only turns off the screen. Your Xda Ignito
is still “on.” To turn the screen back on, press the power button.
Page 14

24
Photo and video
Taking photos
Use the 3.2 megapixel camera of your Xda Ignito to take photos and shoot
videos.
To take a photo
1. On the Home screen, slide to the Photos and Videos tab and then tap
the camera icon
. The screen automatically switches to landscape
mode when you open the camera programme.
2. Aim your Xda Ignito at the subjec t.
3. Press Enter on the Navigation Control. This activates the auto -focus
feature of the camera. When the focus is set, the camera automatically
takes the shot.
Filming videos
1. On the Home screen, slide to the Photos and Videos tab and then tap the
video icon
. The screen automatically switches to landscape mode when you
open the camera programme.
2. Aim your Xda Ignito at the subject.
3. Press Enter on the Navigation Control. This activates the auto-focus feature
of the camera. When the focus is set, the camera automatically starts
capturing video.
4. Press Enter again to stop recording video.
To learn more about the other modes and functions of the camera, please refer
to the Full User Manual on your Applications CD.
23
Page 15

25
26
Viewing Photo and Videos
Use the Album feature on your Xda Ignito to browse photos and play back video.
Note: Album can display files in the BMP, GIF, PNG, JPG, Animated GIF, 3GP, MP4,
and WMV formats.
To view photos
1. On the Home screen, slide to the Photos and Videos tab and tap Album.
2. Tap an image to view it in full screen mode.
3. Use the touch screen to go to the next/previous image or to zoom in/out.
Slide your finger clockwise on an area to zoom in.
Slide your finger counter-clockwise to zoom out.
To rotate images
While viewing images, you can automatically rotate the image by simply turning
your Xda Ignito sideways.
To playback video
Tap the screen to show the playback controls.
1. On the Home screen, slide to the Photos and Videos tab and tap Album.
2. Tap the video you want to playback.
For more information about Album, see Chapter 11 of the Full User Manual.
Synchronising music files
Synchronise music files on your PC and the internal storage of your Xda Ignito so
you can listen to them when you’re on the move.
1. On your computer, open Windows Media® Player and then connect your
Xda Ignito to your computer.
2. On the Device Setup dialog box, enter a name for your Xda Ignito and
click Finish.
3. Click Stop Sync and then on the left panel of Windows Media® Player,
right-click the name of your Xda Ignito and click Set Up Sync.
4. Select the music playlist(s) that you want to sync between your computer
and the internal storage and then click Add.
5. Click Finish.
Page 16

28
Listening to music
After synchronising music files to your Xda Ignito, you can use the Music tab on
the Home screen to play back music.
To listen to music
1. On the Home screen, slide to the Music tab and then tap Library.
2. Slide to the All Songs tab and then tap the song you want to play.
Touch and hold on this bar to display the Jog bar: Drag right or left on the
Jog bar to move for ward or backward in the music.
For more information about the Music tab, see the TouchFLO 3D Guide and
Full User Manual.
27
Getting organized
Synchronising your Xda Ignito with your PC
Synchronise information and files between your PC and Xda Ignito.
Note: See Chapter 5 of the Full User Manual to find out which information
and files you can synchronise.
Set up synchronisation software on your PC
Depending on the Operating System of your PC, you’ll need either Microsoft
ActiveSync® 4.5 (or later) or Windows Mobile® Device Center to synchronise
your device with your PC.
To synchronise your Xda Ignito with a Windows XP PC
1. Install ActiveSync 4.5 on your PC from the Getting Started section of your
Applications CD.
2. Connect your Xda to your PC using the supplied USB cable.
The Synchronisation Setup Wizard automatically starts and guides you
to create a synchronisation partnership. Click Next.
3. Your Xda will ask you to choose a connection type – ActiveSync or Disk Drive.
You should select ActiveSync.
4. Clear the Synchronise directly with a server running Microsoft
Exchange check box and click Next. Select what you want to synchronise
and then click Next.
Page 17

29
5. Select whether or not you want to allow wireless data connections on your
Xda Ignito while it’s connected to your PC. Click Next.
6. Click Finish.
To synchronise your Xda Ignito with a Windows Vista PC
1. Connect your Xda to your PC using the supplied USB cable. Windows Mobile
Device Center will open. On the screen, click Setup your device.
2. Your Xda will ask you to choose a connection type – ActiveSync or Disk Drive.
You should select ActiveSync.
3. Select the information you want to synchronise and click Next.
4. Enter the name for your Xda Ignito and then click Setup.
For more information about synchronisation, see Chapter 5 of the
Full User Manual.
Keeping track of appointments
Use Calendar to help remind you of your upcoming appointments.
To enter an appointment into your Xda Ignito
1. On the Home screen, tap Calendar.
2. On the Calendar screen, tap Menu > New Appointment.
3. Use the onscreen keyboard to enter the appointment details.
4. After entering the appointment details, tap OK.
The appointment will show on the Home screen.
30
Page 18

3231
Keeping track of things to do
Use Tasks to help you remember things you have to do.
To create a to-do list
1. Tap Start > Programs > Task s.
2. On the Tasks screen, tap Tap here to add a new task and then enter the
task name.
3. Tap the ENTER button on the onscreen keyboard.
Tip: You can also tap outside the field to enter the task.
See Chapter 12 of the Full User Manual to learn more about the advanced
features of Tasks.
Copying files
Your Xda Ignito comes with a built-in 4GB internal storage.
To copy files from the PC to your Xda Ignito’s internal storage
1. Connect your Xda Ignito to your PC using the USB cable in the box.
2. Your Xda will ask you to choose a connection type – ActiveSync or Disk Drive.
You should select Disk Drive.
3. Click File Management > Browse the contents of your Xda in
Windows Mobile Device Center or click Explore in ActiveSync on your PC.
This opens Windows Explorer on your PC and shows the contents of your
Xda Ignito.
4. Browse the folders on your PC, right-click the file you want to copy and
then click Copy.
5. Go to My Windows-Based Mobile Device > Internal Storage and then
right-click on the screen and click Paste.
When you want to copy media files such as music and videos to your Xda Ignito
from your PC, it’s recommended that you use Windows Media Player.
Page 19

33
34
Resetting your Xda Ignito
1. Pull out the stylus.
2. Use the stylus to press the Reset button found at the opening of the stylus
compartment.
3. Your Xda Ignito should restart and show you the Home screen.
You can also do a hard reset. After a hard reset, the Xda Ignito is restored to
its default settings – the way it was when you first bought it and turned it on.
Only Windows Mobile® software and other pre-installed programs will remain.
To learn how to perform a hard reset, see Chapter 13 of the Full User Manual.
Help and troubleshooting
Help online
Need technical help with your Xda? For help with using or setting up your Xda
Ignito, visit our dedicated Xda web site at o2.co.uk/xda
Talk to us
O2 will be able to help if you have any general questions about your Xda Ignito,
questions about charges on your account or activation of O2 services. You’ll find
their contact details printed on your monthly bill. If you’re a corporate customer,
we recommend you contact your internal help desk first.
Page 20

35
36
For Full Health and Safety Precautions, please refer to o2.co.uk/xda
Status Indicators
* The USB to PC icon appears on the Today screen when you are connected to your computer with a USB connection.
For more inf ormation abo ut USB to PC, refer to t he Full User Manual .
Status icon Meaning
New email or te xt mess ages;
SMS noticat ion of voicemail
New multimed ia (MMS) message
New MSN mess age
There are more notic ations
Tap the icon to view all
Speakerphone on
Voice call in progress
Calls are forwar ded
Call on hold
Missed c all
Maximum sig nal strength
No signal
Status icon Meaning
Phone is turne d off
No phone serv ice
Searching for phone s ervice
GPRS available
GPRS conne cting
GPRS in us e
Roaming
Connect ion is activ e
Connect ion is not acti ve
Synchronisat ion in progress
Synchronisat ion error
Status icon Meaning
Wi-Fi f unction is enabled bu t the
Xda Stellar is not yet connected to a
wireless n etwork
Wireless ne twork(s) detecte d
Connect ing to wireles s network
(arrows moving)
Connecte d to wireless networ k
Synchronising v ia Wi-Fi
Vibration mode
Sound on
Sound off
Alarm
Status icon Meaning
No SIM card ins erted
Batter y is fully charged
Batter y power is very low
Batter y charging
Device is locke d
Device is unloc ked
Bluetooth head set detected
GPRS Monito r currently a ctive
Serial USB conne ction active
The USB to PC icon*
ActiveSy nc notication
 Loading...