

Page 1
Copyright 07/05 O2 Group of companies
All information is correct at time of production
Services may be modified, supplemented or withdrawn
Terms and Conditions apply
See in store leaflet or visit our O2 website for details
Xda is a registered trademark of O2 Group of companies
O2 is a registered trademark of O2 Group of companies
O2 Active is a trademark of O2 Group of companies
ActiveSync, Windows Mobile and Windows Media Player
are registered trademarks of the Microsoft Corporation
Bluetooth is a registered trademark owned by the Bluetooth SIG, Inc.
Copyright O2 Group of companies 2005
Correct at time of going to press (July 2005) O2C2666N LN 0705
O2.co.uk/xda
O2.ie/xda (for Irish customers)
See what you can do
O2 Group of companies, 260 Bath Road, Slough, Berkshire, SL1 4DX
Registered Office as above. Registered company number 1743099
A quick guide to your Xda
®
Exec
Page 2

Section
Section
Section
Section 1
Getting started
Insert your SIM card
Insert the battery and
replace the battery cover
Charge the battery
Turn on and set up for
the first time
Enter your pin
Synchronise with your PC
4
4
4
5
5
6
7
Section 2
Work more conveniently
Mobile phone
Video and pictures
Internet and messaging
A world of connections
In the box
A tour of your Xda Exec
Mobile phone mode
Laptop mode
Navigation bar
Base menu bar
Stay connected
Messaging
Calls
O
2
Video
Media centre
Extras
Favourites
10
10
10
10
10
12
14
20
20
22
23
24
24
24
24
25
25
25
25
Section 3
Help and troubleshooting
Help online
Talk to us
General questions
28
28
28
28
Page 3
Insert your SIM card
Remove the rear cover by
gently sliding the square button
in the direction of the arrow
then lift the cover off.
Lift up the flap of the SIM
holder and insert the SIM so
that the gold contacts are face
down. (You’ll need to match
the SIM’s angled corner to the
angled corner of the holder.)
Then push the SIM holder lock
into place.
Please be careful not to force
any of the SIM reader
components, as this may cause
damage. It doesn’t take much
pressure to insert the
SIM correctly.
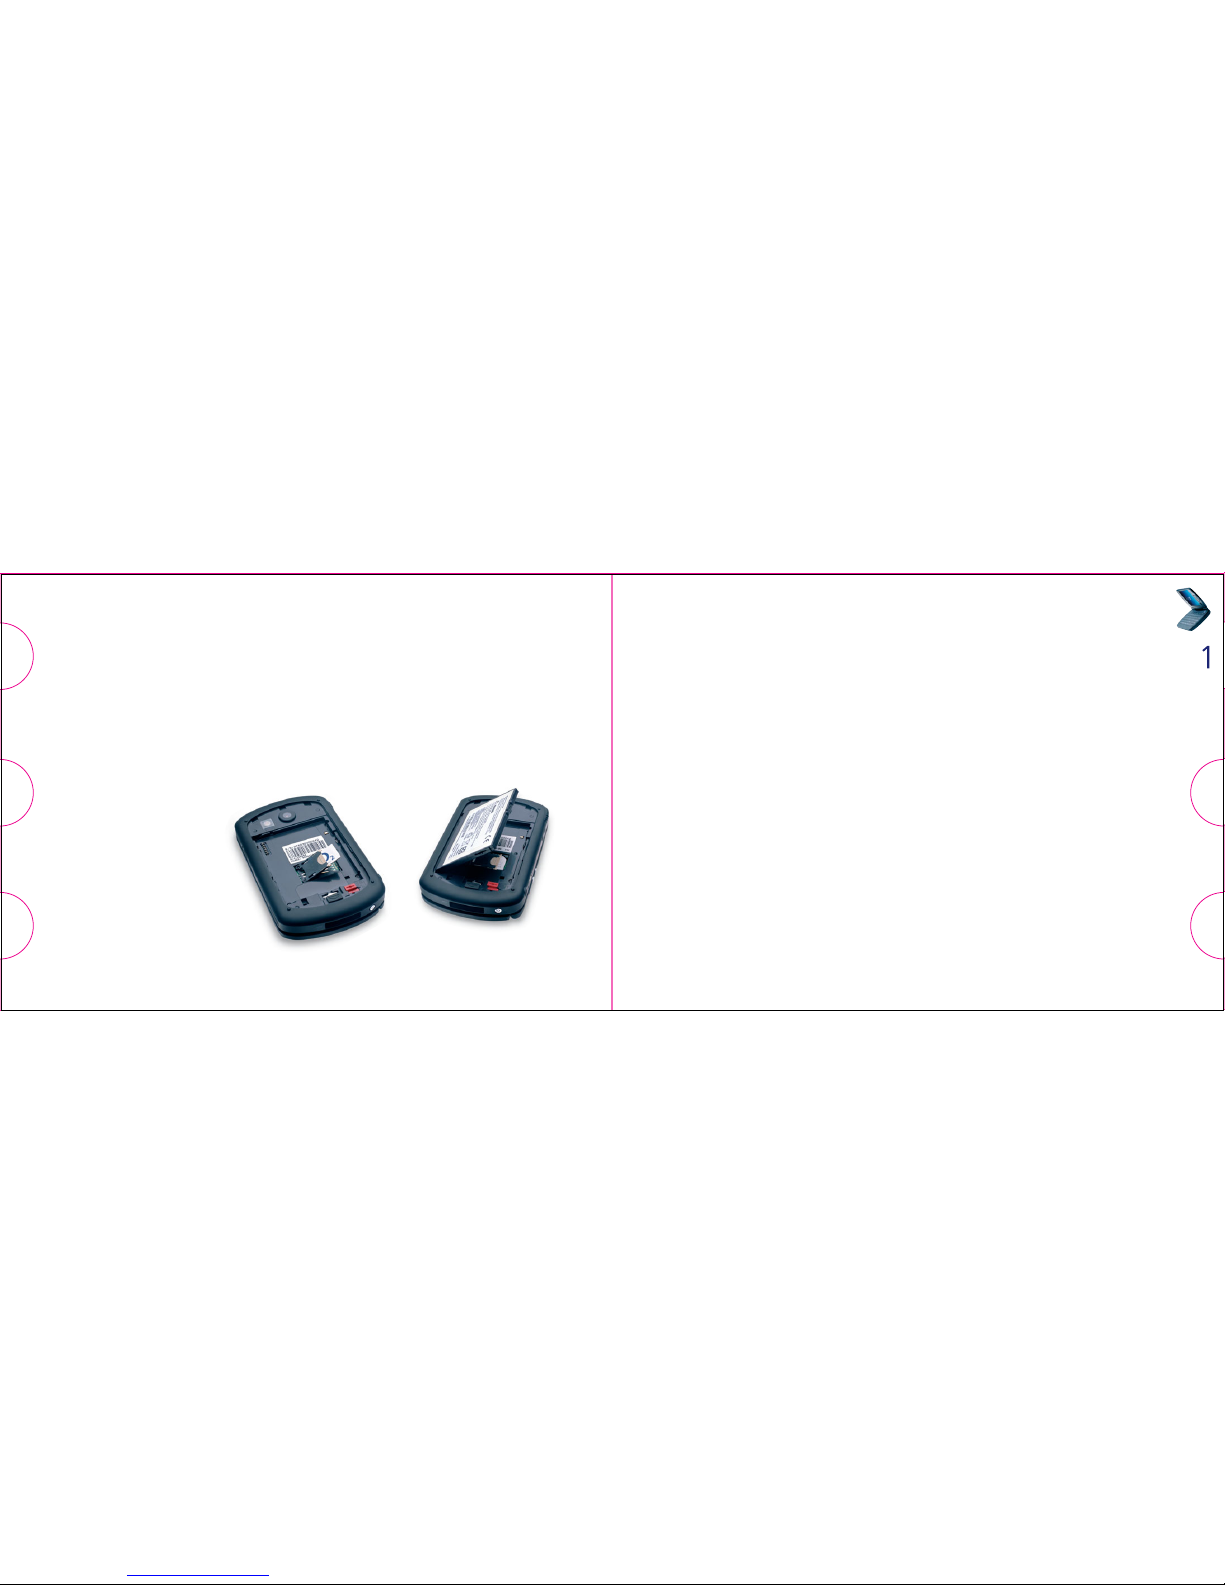
Insert the battery
and replace the cover
Carefully connect the battery
so the gold contacts connect
with the row of connectors on
Getting started
4
the top left hand side of the
Xda Exec (just below the
camera lens). You can only fit
the battery one way and you
shouldn’t need to use force.
Gently press the battery
down to secure it in place.
Slide the red catch into the
Lock position.
Slide the battery cover towards
the camera lens then gently
snap into place.
Charge the battery
You need to charge the battery
fully before using your Xda Exec
for the first time.
Connect the AC charger to your
Xda Exec and plug it into the
wall. We recommend you use
the AC adaptor the first time
you charge your Xda, and not
the PC synchronisation cable.
A solid amber light shows your
Xda Exec is being charged. This
light will turn green when the
battery is fully charged. We
recommend you charge the
battery for at least eight hours
before using your Xda Exec for
the first time.
Turn on and set up for the
first time
Turn on your Xda Exec by
pressing the power button
on the left-hand edge.
A welcome screen will appear.
It will prompt you to tap the
screen to set up your Pocket PC.
You can do this by following
the on-screen instructions.
5
Page 4

Your Xda Exec will start to set
itself up and add applications
supplied by O2. After one or
two minutes, you’ll see a
customisation screen which lets
you tailor your Xda Exec in a
way you’re comfortable with.
Personal (default): gives you
the full Xda Exec experience,
including the O
2
Active menu.
We recommend this if you are
a new user.
Basic: configures your connection
settings and adds extra touches
so that the Xda is even easier
to use. We recommend this if
you’re an experienced Xda user
or if you want to load third
party applications that use the
Today screen.
Corporate: a tailored solution
from O
2
. No settings or O
2
enhancements are installed –
this option is only available if
your Xda is supplied by your
IT manager.
For Personal and Basic options,
choose your country and
connection settings. The default
is Postpay GPRS/3G but you can
use the slower GSM settings
if you prefer.
Tap Finish to complete your set
up. Your Xda Exec will then
restart itself.
Enter your PIN
When your Xda Exec restarts,
it may ask you to enter the
PIN for your SIM. (All new
connections to O
2
have a PIN
on their SIM.)
Tap in your PIN and select Enter
.
6
Please note: If you enter the
wrong PIN three times, the SIM
card will be blocked
automatically and you won’t be
able to make or receive any calls,
texts or picture messages. To
unblock your SIM card, please
contact your service provider.
Synchronise with your PC
Because your Xda Exec is
designed to complement your
PC as a PDA, you can work with
the same information in both
places. You can synchronise
your Xda Exec with Microsoft
®
Outlook® on your PC. This will
let you keep a copy of your
address book, appointments
and emails on both your Xda
Exec and computer. Whenever
you add appointments or write
emails on your Xda, you can
copy them across to your PC
each time you connect.
This way, you’ll always have
a back up copy of your
information. To synchronise
your Xda Exec with your
Windows PC, you need to install
Microsoft ActiveSync®.
(You’ll find ActiveSync on the
Companion CD in your Xda Exec
box, along with a copy of
Microsoft Outlook 2002 and a
single PC licence.)
After you’ve installed ActiveSync,
connect the USB cable to your
PC and Xda Exec then follow
the on-screen instructions to
get synchronised.
7
Page 5

Section
Page 6

The Xda Exec is one of the most
powerful, connected handhelds
available. It gives you more
control over the way you work
– and where you work. It keeps
you in touch wherever you go.
You can access contact
information, take notes, track
appointments and much more.
Mobile phone
Use your Xda Exec just like
a mobile phone to keep in
contact. Get in touch with
the office, make video calls to
clients or send text messages.
Video and pictures
Take detailed pictures or shoot
video with sound. The Xda Exec
has a high-resolution camera
built-in with flash, and a large
high-quality colour screen.
Internet and messaging
Use Outlook Mobile to send
and receive emails with
attachments, keep track of
meetings and events, and keep
in sync with Outlook on your
PC. Compose and send picture
messages, or text your contacts
for a fast response.
Internet Explorer Mobile
gives you fast connection to
the Internet. Do your banking,
check your market prices or
catch up with the day’s news.
A world of connections
With onboard support for
3G/GPRS and Wireless LAN, you
have several ways of connecting
to the Internet at a range of
speeds. Just choose what suits
you and your location.
Bluetooth means you’re wire
free and can use your Xda with
car kits and headsets.
10
Work more conveniently
11
Page 7

In the box - What your Xda Exec box contains.
12
3. Stylus – to operate
the touch sensitive
screen
2. Xda Exec battery –
to power your
Xda Exec
1. Xda Exec – your
all-in-one phone
and handheld PC
6. Warranty Card for
Europe or Asia
5. Xda Exec case –
to protect and
carry your Xda
4. Connection Cable –
to connect your
Xda to your PC
13
9. Quick Start Guide –
this booklet
8. AC Adaptor –
to charge your
Xda Exec
7. Microsoft Windows
Mobile Companion
CD, including
ActiveSync and
Outlook 2002
11. Handsfree stereo
headset
10. Microsoft Windows
Mobile 5.0 user
guide
Please note: O2 may
change the contents of
the Xda Exec box in the
future. The images here
are purely to illustrate
what’s in the box; the
actual contents may
look slightly different.
Page 8

1. SD/MMC card slot
Insert either MMC or SD cards
in this slot. The slot also
supports SDIO – please see the
Windows Mobile 5.0 user guide
to find out more.
2. Microphone
Speak here when making
a call or voice recording.
3. Power button
Press and hold to turn the
screen backlight on and off
(you can also do this using the
screen backlight button see
number 9 on page 17).
When you close the lid the
screen goes off; if you leave the
lid open, the backlight will time
out (after 30 seconds) and then
the screen will switch off.
A single press of the power
button will turn the screen
on or off.
The phone is turned on at startup, after the SIM pin is entered.
If the screen goes off, the phone
will still remain connected.
4. Bluetooth™/Wireless LAN light
This LED will flash blue slowly
when Bluetooth is active, and
quickly when Bluetooth is being
used (such as with a car kit or
headset). It will flash green
when Wireless LAN is on. It will
alternate blue and green when
both Bluetooth and Wireless
LAN are on.
A tour of your Xda Exec
14
5. Charge/Coverage/Alarm light
This light has many functions.
Here they are from lowest to
highest priority:
Phone Coverage: Flashes red
when searching for a network
to connect to. Flashes green
when connected to a
GSM/UMTS network.
Alarm: Flashes red quickly when
an alarm has been triggered.
Charging: The light turns
solid amber during charging.
4
3
2
5
15
1
Page 9

17
9
8
7
11127
6
10
6. External speaker
Accept calls without even
opening the screen – just put
your ear to this speaker to listen.
7. Front stereo speakers
8. Volume control
You can change the phone
volume by sliding this along.
You can also change the PDA
volume when in this mode.
9. Screen backlight
Press this to turn the screen
backlight on and off.
10. Infrared port
Exchange files or data – without
cables – with other devices.
11. Voice record
Press and hold to record a short
voice note.
12. Camera
Press to activate the camera
function and whenever you
want to take a picture/video.
16
Page 10

13. Stylus slot and stylus
Keeps the stylus safely
and neatly tucked away.
14. Call key
Press to accept a call or to go
to the phone keypad. Press
and hold this if you want
to activate/de-activate the
speakerphone during a call.
15. End call key
Press to end a call. Press
and hold to end a GPRS/3G
data connection.
16. Sync/Charge USB connector
Use this connector when
synchronising data or
charging your battery.
17. Reset
Sometimes you may need to
restart your Xda. Gently press
the stylus into this hole to reset
your Xda.
18. Headset connector
This connector lets you use your
headset to make/receive calls
or listen to music. You can also
use standard headphones for
listening to music but you won’t
be able to answer/end calls
(and there’s no microphone
to speak into).
18 19
1716151413 18
Page 11

1
2
56
4
3
7 8 9 10 11 12
21
11. Soft key two
(its function changes
depending on which
application you’re running)
12. End call key
13. Video calling
You can use the second
camera for video calls.
To do this, you need to be
connected, via 3G/UMTS, to
a compatible mobile device.
14. Navigation pad
You can also use the
navigation pad to move
around the screen and
activate applications.
13
14
Mobile phone mode
With this, the screen is in
portrait mode (top to bottom,
lengthways) so that you can use
your Xda as a normal mobile
phone. Use the keys on the left
side of the device to make and
receive calls. The volume
control is on the top right side.
1. End call key
2. Answer key
3. Speaker
4. Volume control
(up/down)
5. Navigation pad
6. Action key
(in the middle of the pad)
Laptop mode
In this setting, the screen is in
landscape mode (left to right),
so that you can use it like a minilaptop or to make video calls.
7. Answer key
8. Soft key one
(its function changes
depending on which
application you’re running)
9. Address book
10. Video call key
(make/receive a video call)
20
Page 12

Navigation bar
The navigation bar, along the
top of the screen, shows the
Active name, programme and
current time (if selected). Next
to the G icon is the notification
bar, which is where important
messages will be displayed
(e.g. New Messages, Low Battery,
Voicemail). The bubble icon will
appear if you have more than
one notification. If you tap the
bubble icon, you’ll see a second
row with these other items:
22
Tap this icon to go to the Today screen at any time.
The application you’re in at the time won’t close
Status
icon
Meaning
Tapping this icon will take you to the battery applet,
which will give you more information
Tap to adjust the device volume, and the phone volume
Battery is only 20% full. You’ll need to charge it soon
Battery is nearly empty
Battery is empty
Base menu bar
This bar along the bottom gives
you some extra options to
control your Xda:
23
Status
icon
Meaning
Phone is on with strong coverage
Coverage is average
Coverage is poor
Phone is searching for a network to connect to
Phone is switched off
There’s no network available to connect to, or no SIM in your Xda
Status
icon
Meaning
Battery is being charged
There is more than one notification
Speakerphone is active
You’ve missed a call
Searching for an accessible Wireless LAN hotspot
Connected to a Wireless LAN hotspot
New instant message in MSN Messenger
New email, text or picture message(s)
You’re connected to GPRS/3G
You are connecting/connected to GPRS 3G
Video Telephony is not available (you need to be in 3G
coverage for Video Calling to work)
You’re connected to a foreign network (you’re roaming)
Page 13

25
Video
Options to make a video call,
or activate the camera in stillshot or video-record mode.
Media centre
Download short video clips
from our Mobile Video service,
covering sports, fashion,
entertainment and the news.
Listen to music when out and
about, or even play a game to
pass the time on the train!
Media centre links you to:
Windows Media Player
Video downloads
Games
Extras
This is how you can customise
your Xda Exec. Use Profiles to
choose flight, meeting or silent
mode. The Hotspot directory
tells you where to find O
2
Wireless LAN hotspots and a
location finder when you’re out
and about. Power Save lets you
set the phone to switch on and
off at your predetermined times
e.g. off at 11pm on Friday,
on again at 8am Monday.
And you can use Task Manager
to manage running applications.
Extras links you to these
helpful applications:
O
2
Hotspot Directory
Task Manager
Bluetooth
Email Setup
Backup/Restore
O
2 Ireland customers should
visit www.o2.ie/wirelesszone to
find local hotspots
Favourites
A list of your web links–add
your own most often used links
and tap to go straight there.
Music, pictures, video
messaging, games, chat – think
of your Xda Exec as a mobile
entertainment system to enjoy
in your spare time.
Messaging
Your Xda Exec is a powerful
device for messaging. Its builtin keyboard makes composing
messages and replying to them
easy. You can record a short
video clip and send it direct
to a mobile phone. You can
email text, pictures and
even sound bites.
Here are some of the options:
Inbox – straight to your mailbox
Email set up – set up your email
with just your email address
and password. If you set up
a number of email accounts,
these will all be listed here
for easy access
Text – go straight
to text messaging
Multimedia – go straight
to picture messaging*
MSN Messenger – go straight
to MSN’s online instant
messaging application
* Playback depends on receiving phone model
Calls
Activate the phone application,
so you can make a call.
O
2
Activate the web browser and
visit the O
2
internet portal,
for the latest news and
entertainment.
24
Stay connected
Page 14

Section
Page 15

29
Can I receive phone calls or text
messages while using the
Internet or synchronising email
on my Xda Exec?
Yes, you can make and receive
phone calls when using Wireless
LAN or 3G. In 3G mode, your
connection speed will be reduced
to around 64kbps during a
phone call. This will increase to
full speed again when you’ve
finished the call. If you’re
actively using your connection
in GPRS mode, your phone calls
will be forwarded as you’ve
chosen in your phone settings
e.g. diverted to voicemail
(if it’s set up) or another
number. However, you can
make and receive calls if your
GPRS is idle.
What are the maximum
speeds of GPRS and 3G?
In GPRS mode, Xda Exec has a
download speed up to 53kbps,
and upload speed up to 26kbps.
In 3G mode, the download speed
is up to 128kbps, and upload
speed is up to 64kbps.
What happens if I move in
and out of 3G coverage?
If this happens, your Xda will
automatically switch over to
GPRS (if it’s available). If you’re
transferring data while the
changeover happens, there’ll
be a pause of up to 60 seconds.
Your data will then start
flowing again.
How do I turn the phone
off and go into PDA mode?
Tap the antenna icon at the top
of the screen, and select
Turn on flight mode.
Help online
Need technical help with your
Xda Exec? Send an email to our
support team:
(UK) o2datasupport@o2.com
(EIRE) support@o2.ie
We will try to get back to you
within 24 hours or on the next
business day.
Talk to us
If you have any general
questions about your Xda Exec,
your service provider will be
able to help. You’ll find their
contact details printed on
your monthly bill. If you’re
a corporate customer, we
recommend you contact
your internal help desk.
Need to ask about charges
on your account or services
not activated? Please contact
the service provider where
you bought your Xda from.
Our technical support team
can only help you with how
to use your Xda Exec.
General questions –
Can I use software designed
for the Xda II series or Windows
Mobile 2003 with my Xda Exec?
Xda Exec uses Microsoft
Windows Mobile 5.0 as the core
system. Applications written for
the Xda II family (such as IIs, IIi
or II mini) may not work correctly.
You should contact the
software vendor to check if the
application will work correctly
with Windows Mobile 5.0.
28
Help and troubleshooting
Page 16

or leave it as the default of 15
minutes. Tap Next twice and
then Finish.
(Charges may apply if you
frequently check for email.)
How can I delete email
from my mail server?
By default, your Xda will only
download a copy of the email
from your mailbox. To delete
them from your mailbox, select
Start > Messaging > Inbox >
Menu > Tools > Options >
Storage. Change the Empty
deleted items dropdown box
to Immediately. The next time
you synchronise with your
mailbox, the emails should be
deleted. However, your Internet
Service Provider (ISP) may not
support this service.
31
When I’m overseas, why do I
see a white triangle at the top
of the screen?
The triangle means you’re
roaming on a foreign network
and roaming charges apply.
Can I close applications
using one of the buttons?
In PDA mode, press the End call
key. In laptop mode, press the
OK key or the End call key or
tap the X in the top right corner
of the application.
How can I display
my own number?
Choose Start > Programs >
SIM Manager > Tools >
List of Own Numbers.
Tap number 1 in the list.
Tap in your name and mobile
number. Tap Change. Tap OK
to exit. If you choose Phone >
Menu > Tools > Options, you’ll
see your number.
How do I set up my email
account to regularly check
for new email?
First, create an email account.
In the O
2
Active menu select
Messaging > Email Set up and
follow the instructions. Once
complete, tap Start >
Messaging > Menu > Tools >
Options > Accounts. Tap on
your email account. Tap Next
three times. Tap Options. Tick
Connect and Check for
messages every: and type a
number in minutes up to 60,
30
 Loading...