

Page 1
o2.co.uk
O2 (UK) Limited, 260 Bath Road, Slough, Berkshire SL1 4DX
Registered in England No. 1743099. Registered Office as above.
© O2 (UK) Limited 2003. Correct at time of going to press (August 2004)
O2CXXXXN KGL 08/04
O2X3™– How to use it
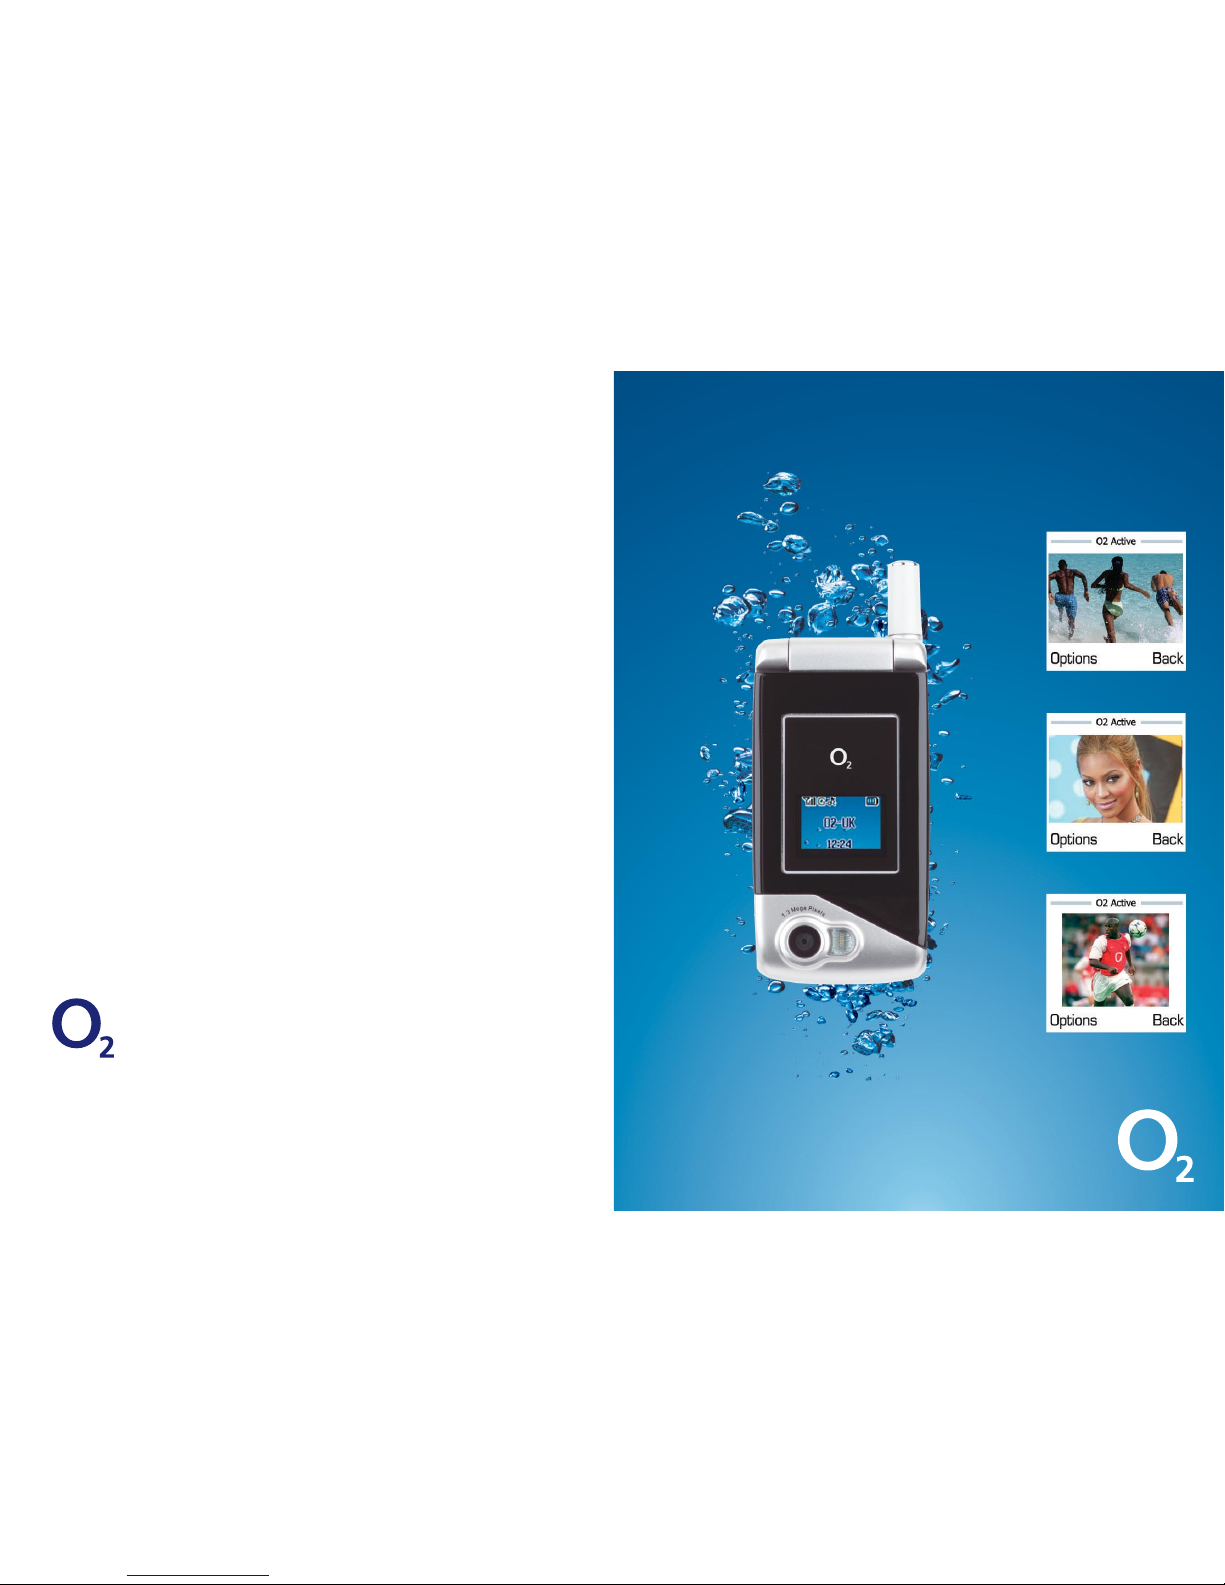
Send and receive video
messages
Download pictures and
send to your friends
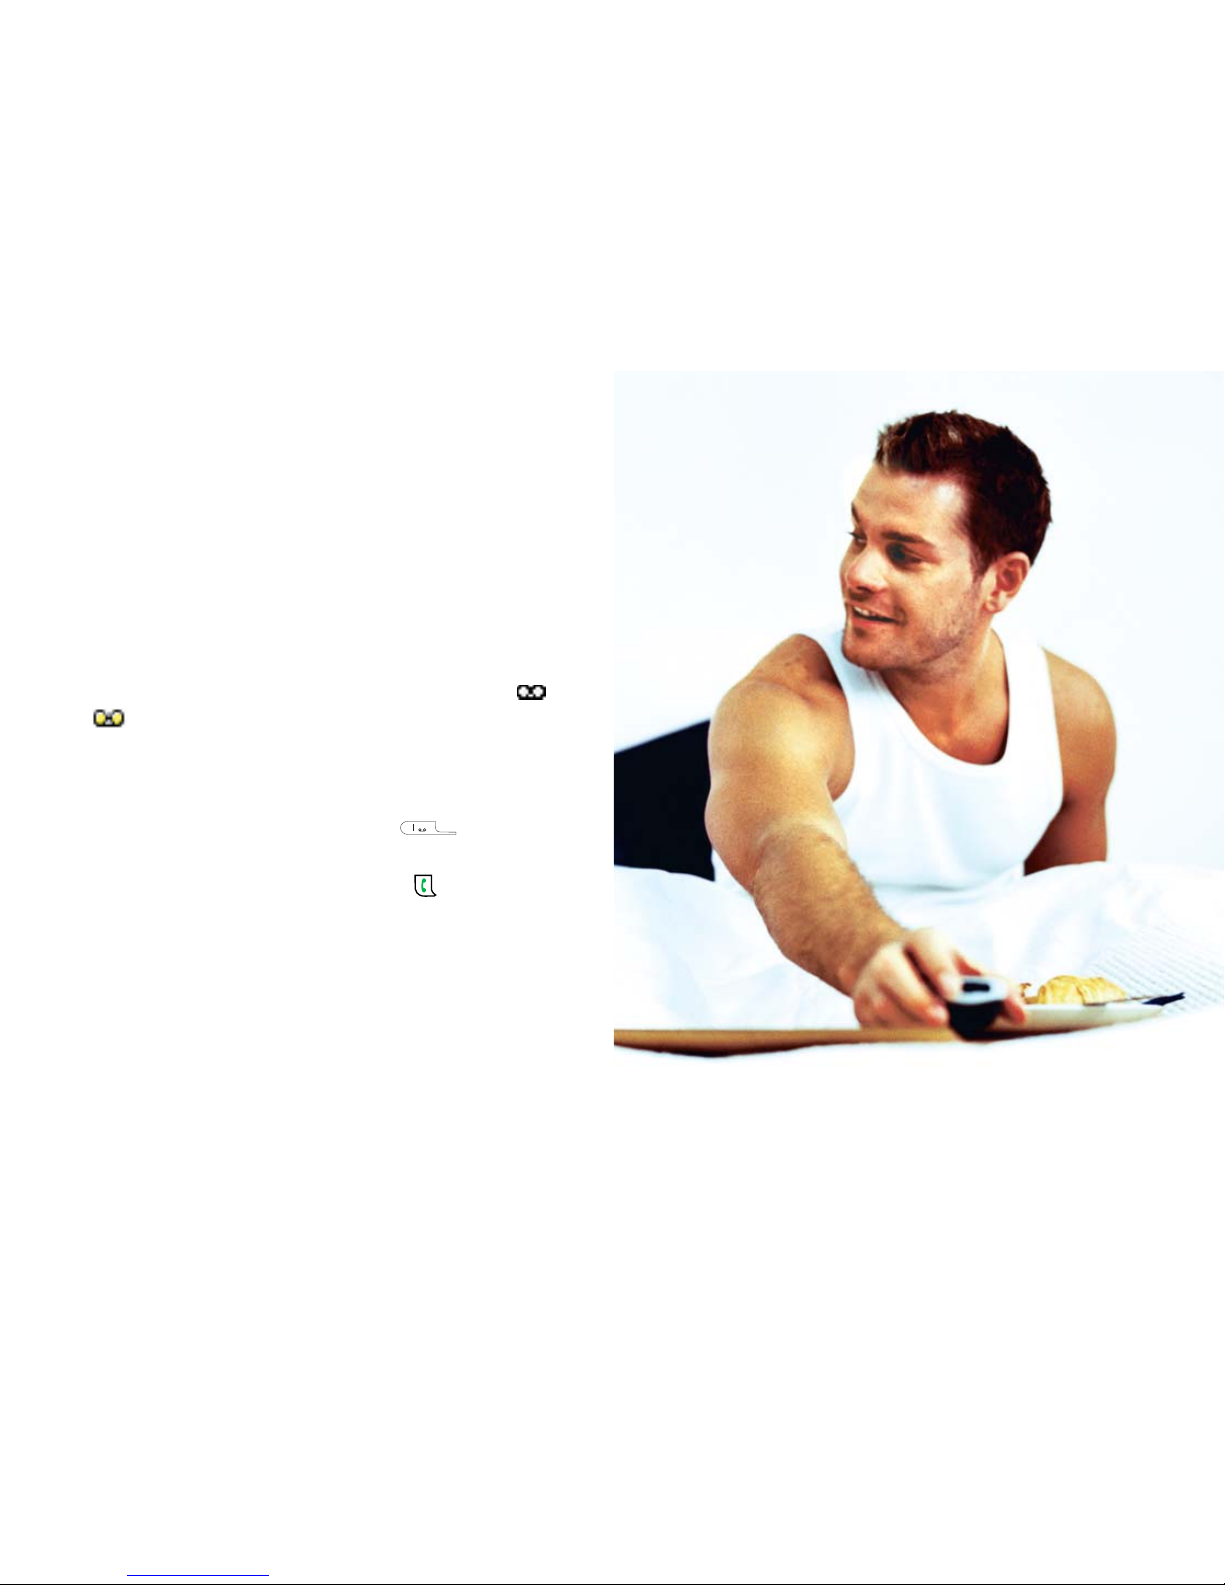
Get the latest sports news
Page 2

Quick start guide to O2X3
Introduction
Thanks for purchasing an O2X3. The O2X3 has an excellent
set of features including a 1.3 megapixel camera with
flash, a 262,000 colour screen, video capture and playback,
an MP3 player and all the other features you’d expect from
a phone. In the box, you’ll have a handset, battery, stereo
headphones doubling up as a hands-free kit, 32MB
memory card, polishing cloth and a CD-ROM with a USB
cable for connecting the handset to your PC.
Here are some quick instructions on how to get started. If
you want more detail, please refer to the detailed sections
of the guide:
Setting up
•Insert the SIM into the slot on the back of the O
2
X3
handset, connect the battery to the O2X3 and insert the
memory card into the slot at the bottom of the phone
• Check these items are securely in place, then open the
flip and hold and press until the screen turns on.
Then enter a PIN if necessary*
•You’re now ready to use the O
2
X3
Charging the handset
•Insert the lead from the charger to the base of the
handset into the charging socket
• Connect the charger to the correct electrical socket. The
phone will start charging
•When the phone is fully charged disconnect the charger
from the socket and then from the phone
* The default PIN code is 4321 or 5555. If you enter an incorrect PIN code three
times in succession, your SIM card will lock and you must enter the PUK code
to unlock it. Please contact O2 customer service in this event.
Quick start guide
iii
Page 3
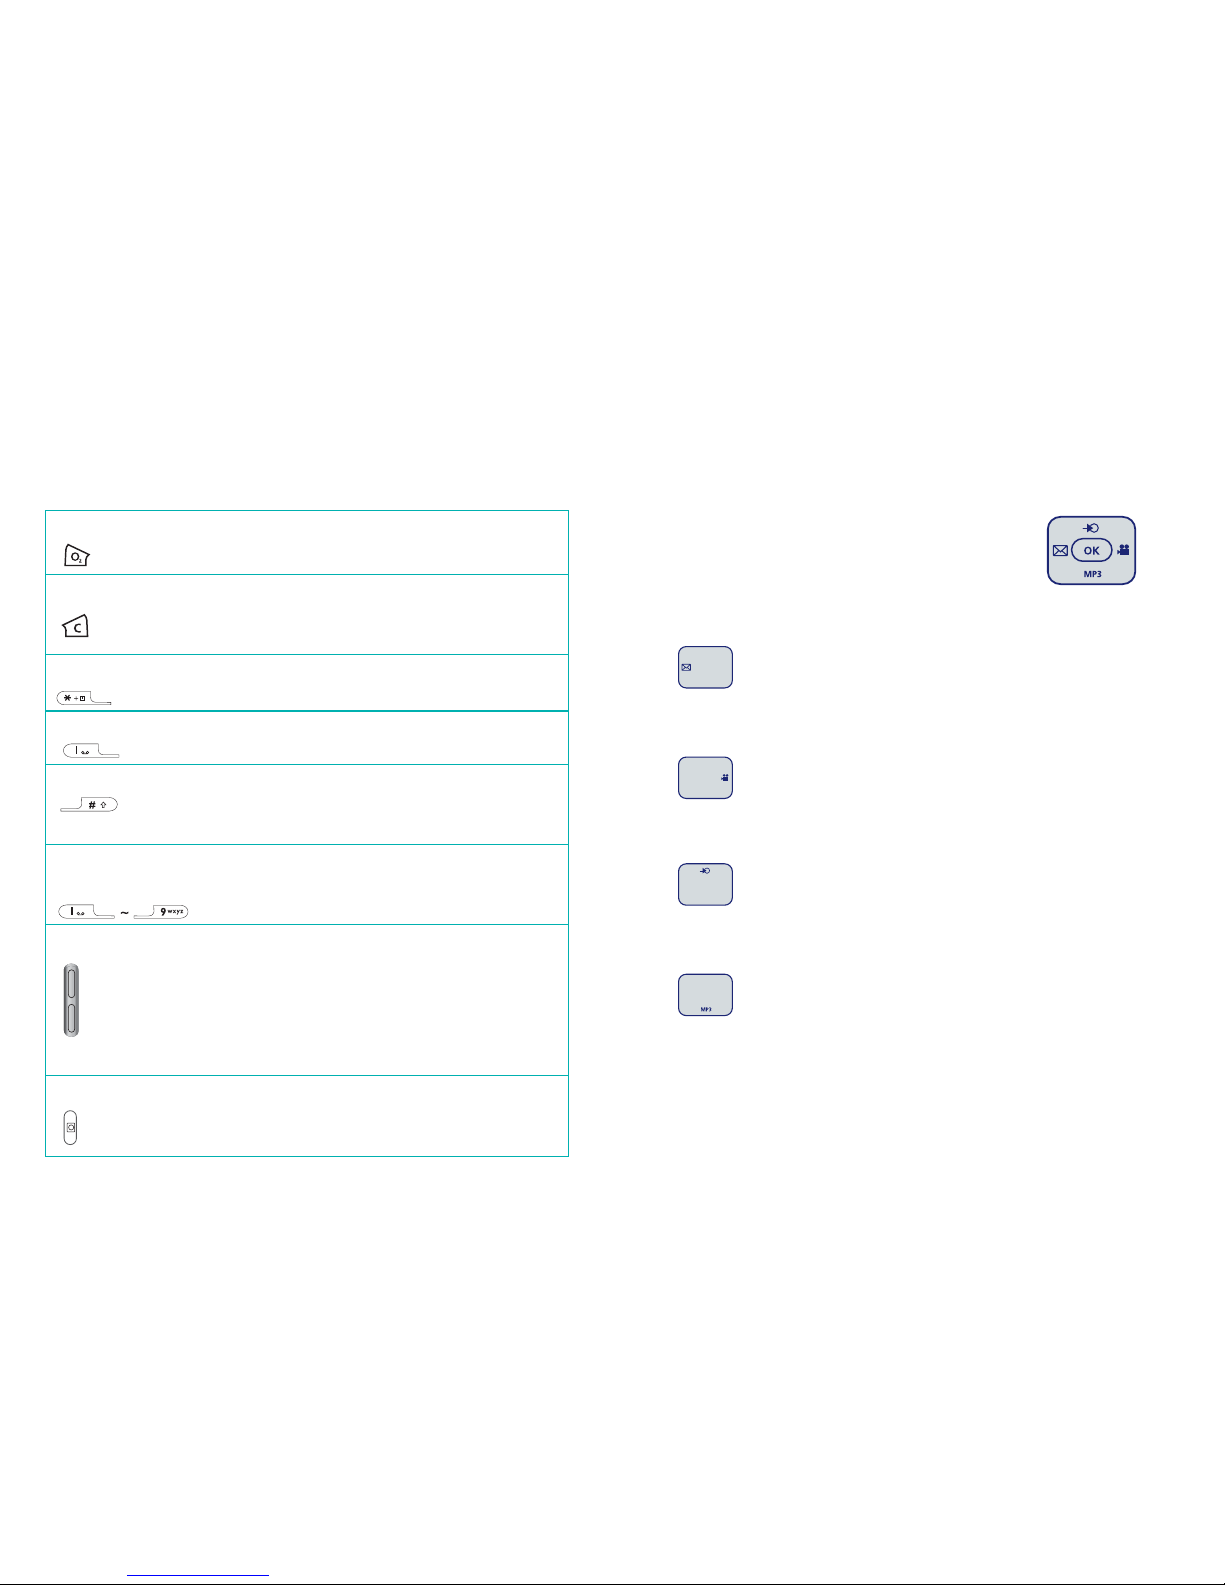
Basic Navigation
Here’s how to navigate when using the X3.
•Use to move up, down, left or right
•Press or to select an item
•Press or to go Back or delete
•Press to go back to the standby screen
How to make a call
•Type the number of the person you wish to call by using
the numbered keypad or press to select Contacts and
scroll up and down to find the contact
•Press to dial the number. Your O
2
X3 will start to dial
the number
• After you’ve connected, press to end the call
How to create and send a text message
•Press to enter the New message screen
•You can now start typing your message using the
keypad. The O
2
X3 uses ITAP, a predictive text input.
Press to flip through text input options
• Once you’ve finished typing your text, press the
•Type the number in of the person that you wish to send
the text to or select their contact number from your
phonebook
•Press and your message will be sent to the recipient
How to take a picture
•From the idle screen press to select the Camera and
enter the viewfinder mode
• Focus the camera on the picture subject. You can press
to zoom in on the subject and also to adjust
the light
• If you’re taking a picture in dark conditions, you can use
the indoor mode and flash mode. Select Options – Switch
to Indoor or/and Switch on Flash
• Once you’re ready, press to take a picture. The O
2
X3
will automatically save the picture to the Media Centre
•Press to go back to the viewfinder screen and take
another picture
•To use the 1.3 megapixel feature, select Options – Size
and then select 1.3m. If you’re taking a picture in dark
conditions you can use the flash option – select Options –
Flash On/Off, then take your picture
Quick start guide
iviii
Page 4

Please note:
It is not possible to send a 1.3 megapixel image via a media
message. To download such images you can use the data
cable. For further information please see page 25.
How to record a video
•From the idle screen press and enter the
viewfinder mode
•Press to start recording. To stop press
•Your video will automatically be saved to the
Media Centre
•Press to go back to the viewfinder screen and shoot
another video
Top tips
•You can assign a picture or small video clip to a contact,
so when that person calls you, their photo or video
appears on screen. See page 44 for details
•Take a picture and then change facial expressions via
Face morphing or add funny animations via Face
dressing. See page 129 and 132 for details
•You can download 1.3 megapixel camera pictures to
your PC via the USB cable and CD-ROM supplied in the
box. See page 25
•From the main menu, select Media Centre – Video and
then select the O
2
Digital Music Player video for a great
demonstration of video playback
•When the handset is closed, press the volume key
for quick access to the calendar. The calendar will
then be displayed on the external display screen
for you to view
•To take a picture of yourself, when the handset is closed,
press and hold the side camera key for 3 seconds. The
external display will then act as a viewfinder. Once
you’re ready to take your picture, press to capture the
image
•Use the polishing cloth provided to keep your handset
smudge free!
•You can read texts and view missed calls on the external
screen. Press to read and view
Quick start guide
viv
Page 5

Contents
Welcome xiii
Chapter 1 – Before using your mobile 1
What’s in the box 2
Handset description 4
External display 8
Main idle screen 10
Icons 11
Function keys 13
Navigation key 15
Chapter 2 – Preparing your mobile for use 17
Inserting your SIM card 18
Using the battery 20
Charging the battery 21
Important battery information 23
Inserting your SD card 24
CD-Rom and USB cable 25
Chapter 3 – Basic functions 27
Turning your mobile on and off 28
Menu navigation 30
Basic functions 34
Making a call 34
Ending a call 35
Receiving calls 35
Making an international call 36
O2 X3 is a trademark of O2 Limited.
viiivii
Page 6

– Archive 75
– Delete 75
– Message settings 75
Media 77
– Create a media message 77
– Read messages 85
– Inbox 86
– Sent items 87
– Drafts 88
– Archive 89
– Delete 89
– Settings 89
Camera 91
Camera settings 92
Additional camera settings 95
Take a picture 96
Managing your pictures 97
View your pictures 98
Video 99
Video settings 100
Additional video settings 102
Shoot a video clip 103
Enabling long video recording 103
Managing your video clip 104
View your video clips 105
O2Active 106
How to access O2Active 117
How to close your browser 117
x
Making emergency calls 36
Voicemail 38
Chapter 4 – Main menu 41
Contacts 42
Adding contacts to you phonebook 42
Finding contacts in your phonebook 45
Copy 46
Delete 47
Caller groups 48
Memory 49
Calls 51
Missed, dialled and received calls 51
Delete 53
Display 54
Information 54
Operations during a call 57
Call menu 62
Messages 65
Text 65
Media 65
Broadcast 67
Text 68
– Write a text message 68
– Read messages 70
– Inbox 72
– Sent items 72
– Drafts 74
ix
Page 7

Games 119
O2Games Arcade 119
Media Centre 124
Images 124
Fun ways to edit your images 127
Videos 134
Music Player 138
Create your own ring tones 143
Wallpaper 146
Tools 149
My services 149
Alarm 149
Calendar 152
Calculator 156
Currency converter 157
Clock options 158
Countdown timer 162
Stopwatch 164
Connection settings 165
Settings 167
Date and time 167
Profiles 170
Display 175
Call settings 177
Network 181
Security 182
Power saving 185
Language 185
Memory 187
Factory reset 187
Chapter 5 – Miscellaneous 189
Abbreviations and acronyms 190
Questions and answers 193
Technical data 196
Chapter 6 – Safety 199
Safety information for mobiles 200
Mobile care 201
Memory card 205
Driving safety 206
Electronic devices 207
Other safety guidelines 209
Cautions 210
R&TTE Directive 1999/05/EC 211
xiixi
Page 8
xiv
Welcome
Thanks for buying the new O2X3 Mobile – we know you
won’t be disappointed.
Quite simply the O2X3 represents the latest that mobiles
have to offer combining new advances in audio, visual and
data technologies.
The first thing to point out is the high quality camera
offering 1.3 megapixel imaging (that’s really high quality)
and the option to record your own video footage. How
cool is that?
xiii
Secondly the O2X3 has a screen that offers 262,000 colours
making your pictures and videos more lifelike than ever.
After all, what good’s a really cool camera if your screen
makes the pictures look rubbish?
You’ve also got yourself a top class personal MP3 player
which will allow you to play MP3 files.
Because the sound and picture quality on the O2X3 is so
good, we figured you’d probably want to create and store
more files than usual so we’ve included a memory
expansion slot with a 32mb miniSD card.
There’s also a cable to connect your mobile directly to your
PC so you can download and email videos or images that
might be too big to send directly from your mobile.
Page 9
By connecting through O2Active™,
you’ll be able to access streaming
footage of newsclips, sports highlights,
music videos etc.
And at last you have a phone screen
that is worthy of some of the classic
games that are available to download.
All in all, we’re pretty pleased with the
O2X3. We hope you feel the same way.
O2 does not suggest in any way that the celebrities featured in this guide are
endorsing O2 products or services.
©Mr Goodliving Ltd. All Rights Reserved.
About the user guide
This user guide relates only to
the O2X3.
Please note that a small
proportion of the functions
available differ between
Pay & Go and Pay Monthly
customers.
xvixv
Page 10

Before using your mobile
• What’s in the box
• Handset description
• External display
• Main idle screen
• Icons
• Function keys
• Navigation key
Chapter 1
1xvii
Page 11
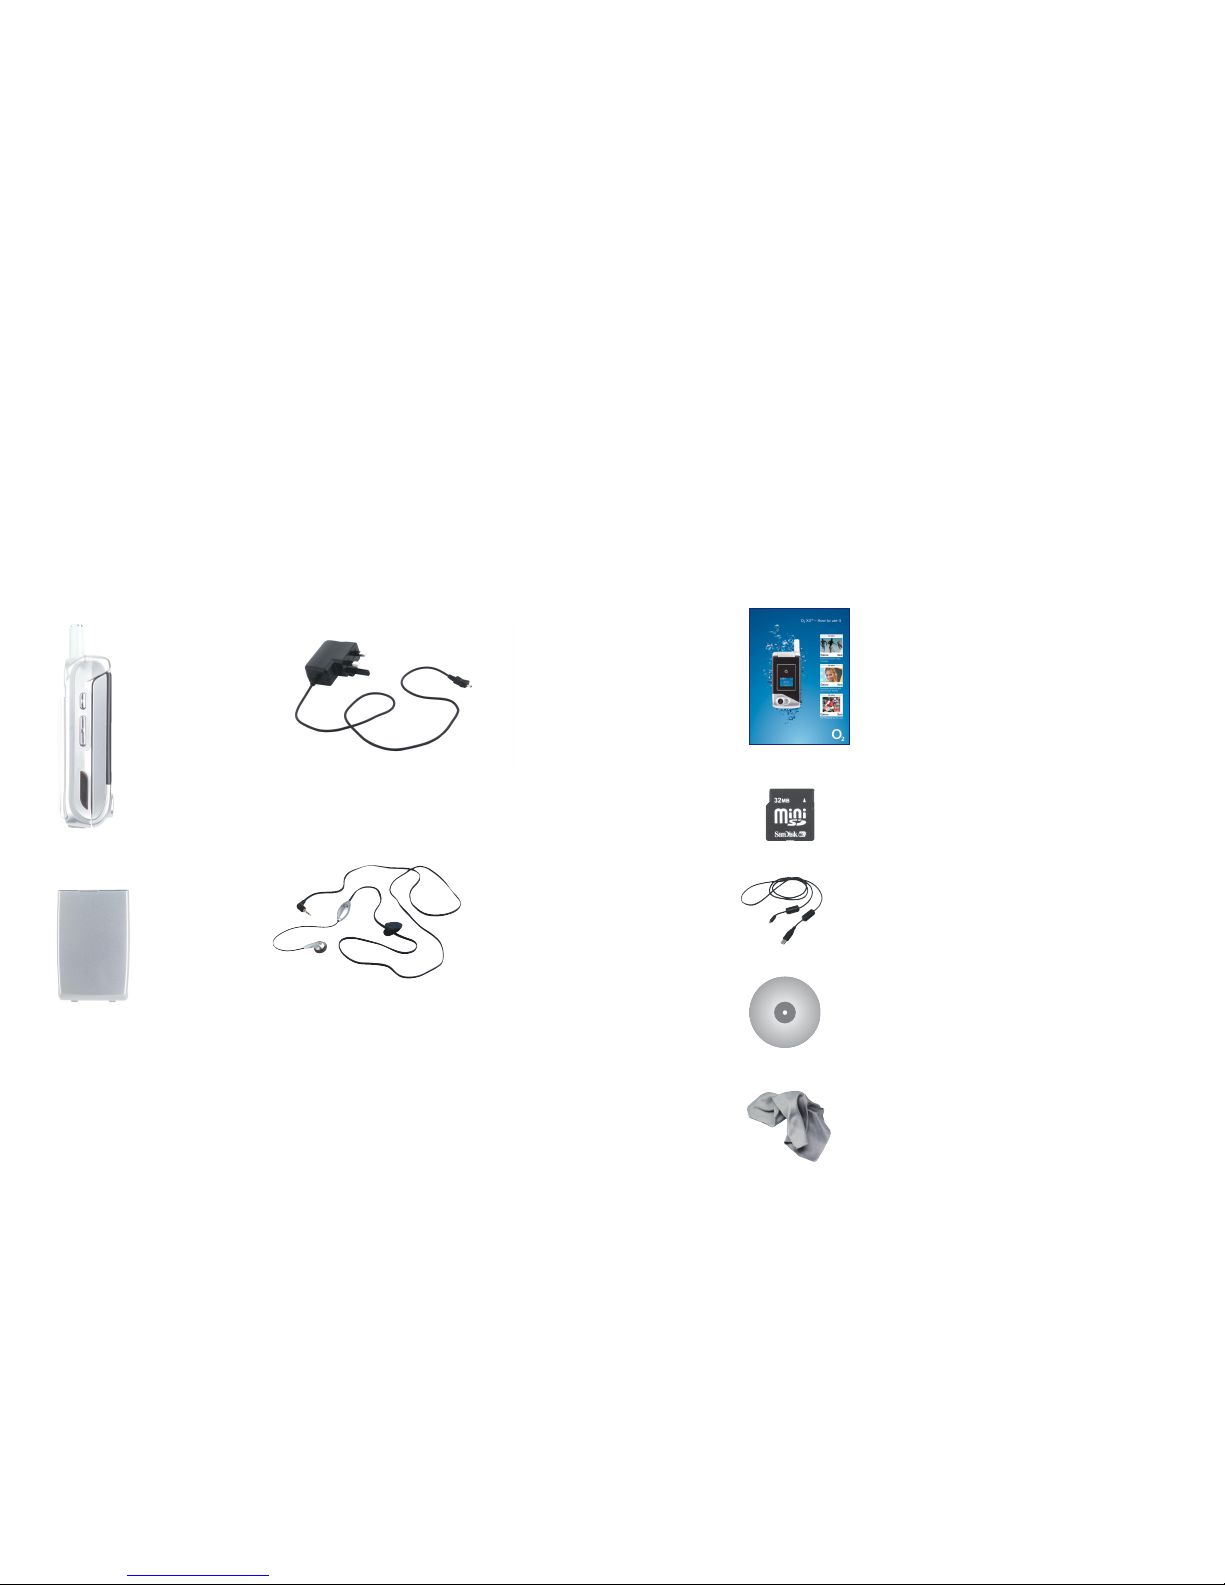
3
What’s in the box
2
Thank you for purchasing your O2X3. Take a look in the
box for the following items. Please check the product
contents to see if you have all the available items as shown.
Your O
2
X3 – How to use
it guide
32MB SD memory card
Download cable
CD Rom
Polishing cloth
Mobile
phone
Charger
battery Hands-free
kit/Stereo
headphones
Page 12
Handset description
Closed view
Antenna
Camera flash
1.3 megapixel
Camera lens
4000 colour
external display
Earpiece
262,000 colour
main display
Microphone
Right soft key
OK key
Dial/Answer key
Keypad – alphanumeric
Power on/off key
Navigation keys
Clear key
Left soft key
O2 Active key
Inside view
54
Page 13
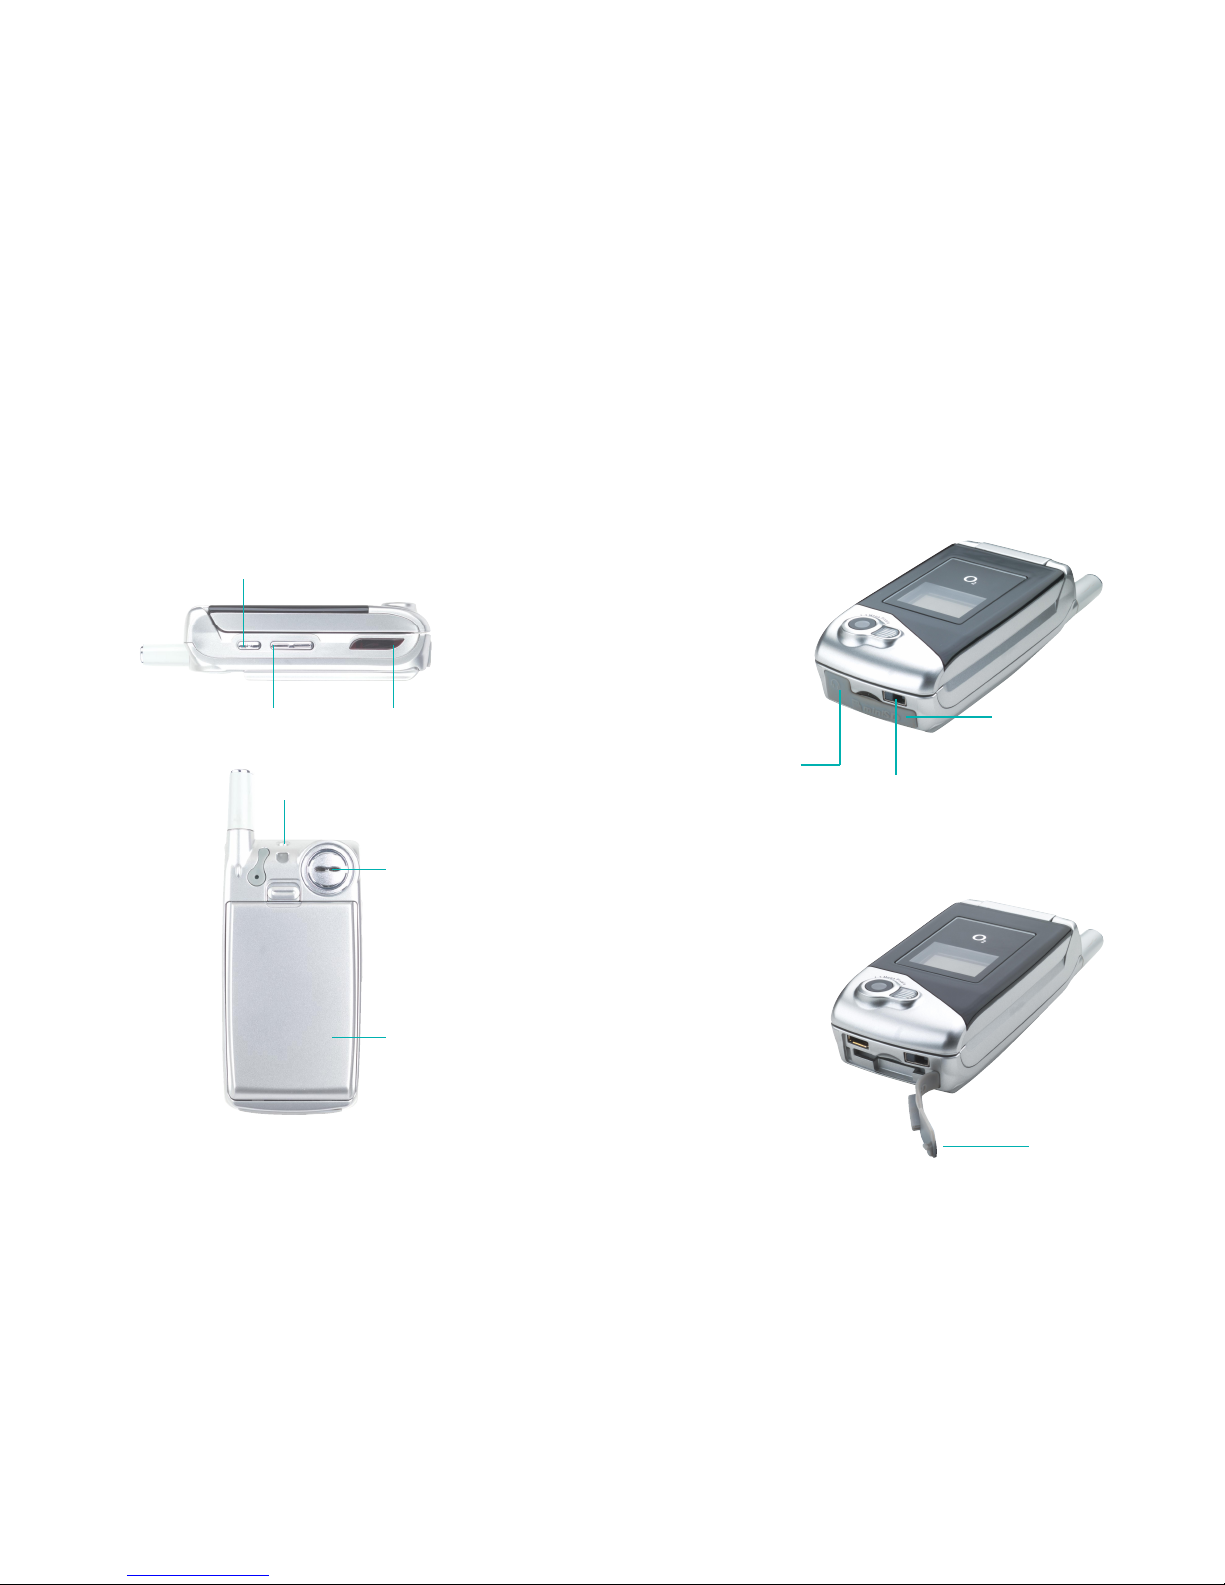
76
Volume keys
Quick camera access key
Carrying strap holder
Speaker
IrDa Sensor
Battery
Side and back views Bottom view
Charger socket
Hands-free headset/
Data cable jack
miniSD slot
Cover
To view the bottom of your handset correctly, please lift
the rubber cover and twist to the right.
Page 14

98
External display
When the flip is closed, the external display’s status bar will
show icons for network signal strength, battery power,
alarm (if active), the current time and the current profile in
use. The external display can also alert you to incoming
calls, text messages and missed calls.
Please note:
•To set the time on the external display, please refer to
page 167
•In the default setting, the external display will show the
time. The external display will then temporarily power
off. You can turn it back on by pressing the lower
portion of the volume key on the side of your mobile
•You can set a wallpaper to be displayed when the
external display turns off. For more details please refer
to page 146
• Photos taken using your mobile’s camera can also be set
as wallpapers. Please refer to page 146 for details
•When the mobile’s flip is closed, pressing the upper
portion of the volume key will display the calendar.
Pressing the key repeatedly will display the previous or
next month’s calendar. To close the calendar and return
to the standby screen press the side key
Battery power
Current time
Signal
Name of
operator
Current
profile
Page 15

Time
Signal
Name of operator
Wallpaper
Press to enter
the camera function
Press to access
your contacts
Press to enter
the main menu
Main idle screen Icons
The icons below appear on the external display and/or the
main display.
Signal strength – The number of bars shows
signal strength
Battery – Current battery charge level
GPRS network – GPRS services have been activated
on your SIM card
Message – Shows that a text message, media
message or video message has been received or that
there are unread messages. If the icon appears in red
on the main display then your message memory is full
WAP message – You’ve a WAP message (This icon
will only appear when there are no incoming or
unread text and media messages)
Voicemail – Indicates that you have Voicemail
messages
Alarm – Appears when an alarm is set
1110
Page 16
1312
Line in use – Shows the number of the line currently
in use
Silent – Appears when vibration is set as a ring tone.
In the standby screen, press and hold to
activate the silent profile
Normal – Shows the Normal profile is in use. To set a
different profile please refer to page 170
Meeting – Shows that the Meeting profile is in use
Outdoors – Shows that the Outdoors profile is in use
Headset – Shows that the Hands-free profile is in use
Flight Mode – Shows the Flight Mode profile is in use
Divert – Appears when the call divert function is active
Roaming – Indicates roaming has been activated
(It is not your regular network)
Mini SDcard – Indicates the SDcard has been
inserted into your mobile
Power on/ • Long press to turn your mobile on/off
off key •Press to reject an incoming call or cancel
a call being dialled
•Press to return to the standby screen
Send/ •Press to dial or answer a call
Answer key
•Press to access the list of the last
missed/dialled/received calls
OK key •Press to open up the main menu
•Press to select when browsing through
the menu
Left soft key •To access the camera function from
standby screen
•Press to select when browsing through
lower menu levels from standby mode
Right soft key •Press to access your contacts
•Press and hold to turn the silent profile
on or off
•Press to select Back when browsing
through the menu
Navigation key •To browse through the menu
Function keys
Page 17
O2Active key •To access O2Active
Clear key •Press to delete entered digits
•Press to go back when browsing through
the menu
Asterisk key •To insert an asterisk
•Press and hold to select +
Voicemail •Press and hold to access
your Voicemail
# key •To insert #
•Press, when creating a message, to access
predictive text (ITAP) or manual text input
Alphanumeric •Press to enter a digit
keys • Shortcut keys – press and hold to
immediately access a function
Volume key •To adjust the call volume
• When there is an incoming call, press and
hold the upper portion of the volume key
to reject the call; press and hold the lower
portion to silence the ring tone for an
incoming call
Side key •Press to access the camera function
1514
When in standby mode, the navigation
keys can be used to access shortcuts we
have set up for you.
Left – To create a text message
Right – To access the video function
Up – To access profiles
Down – To use the MP3 Music Player
Navigation key
Page 18

Preparing your mobile for use
•Inserting your SIM card
•Using the battery
• Charging the battery
•Important battery information
•Inserting your SD card
• CD-Rom and USB cable
Chapter 2
1716
Page 19
1918
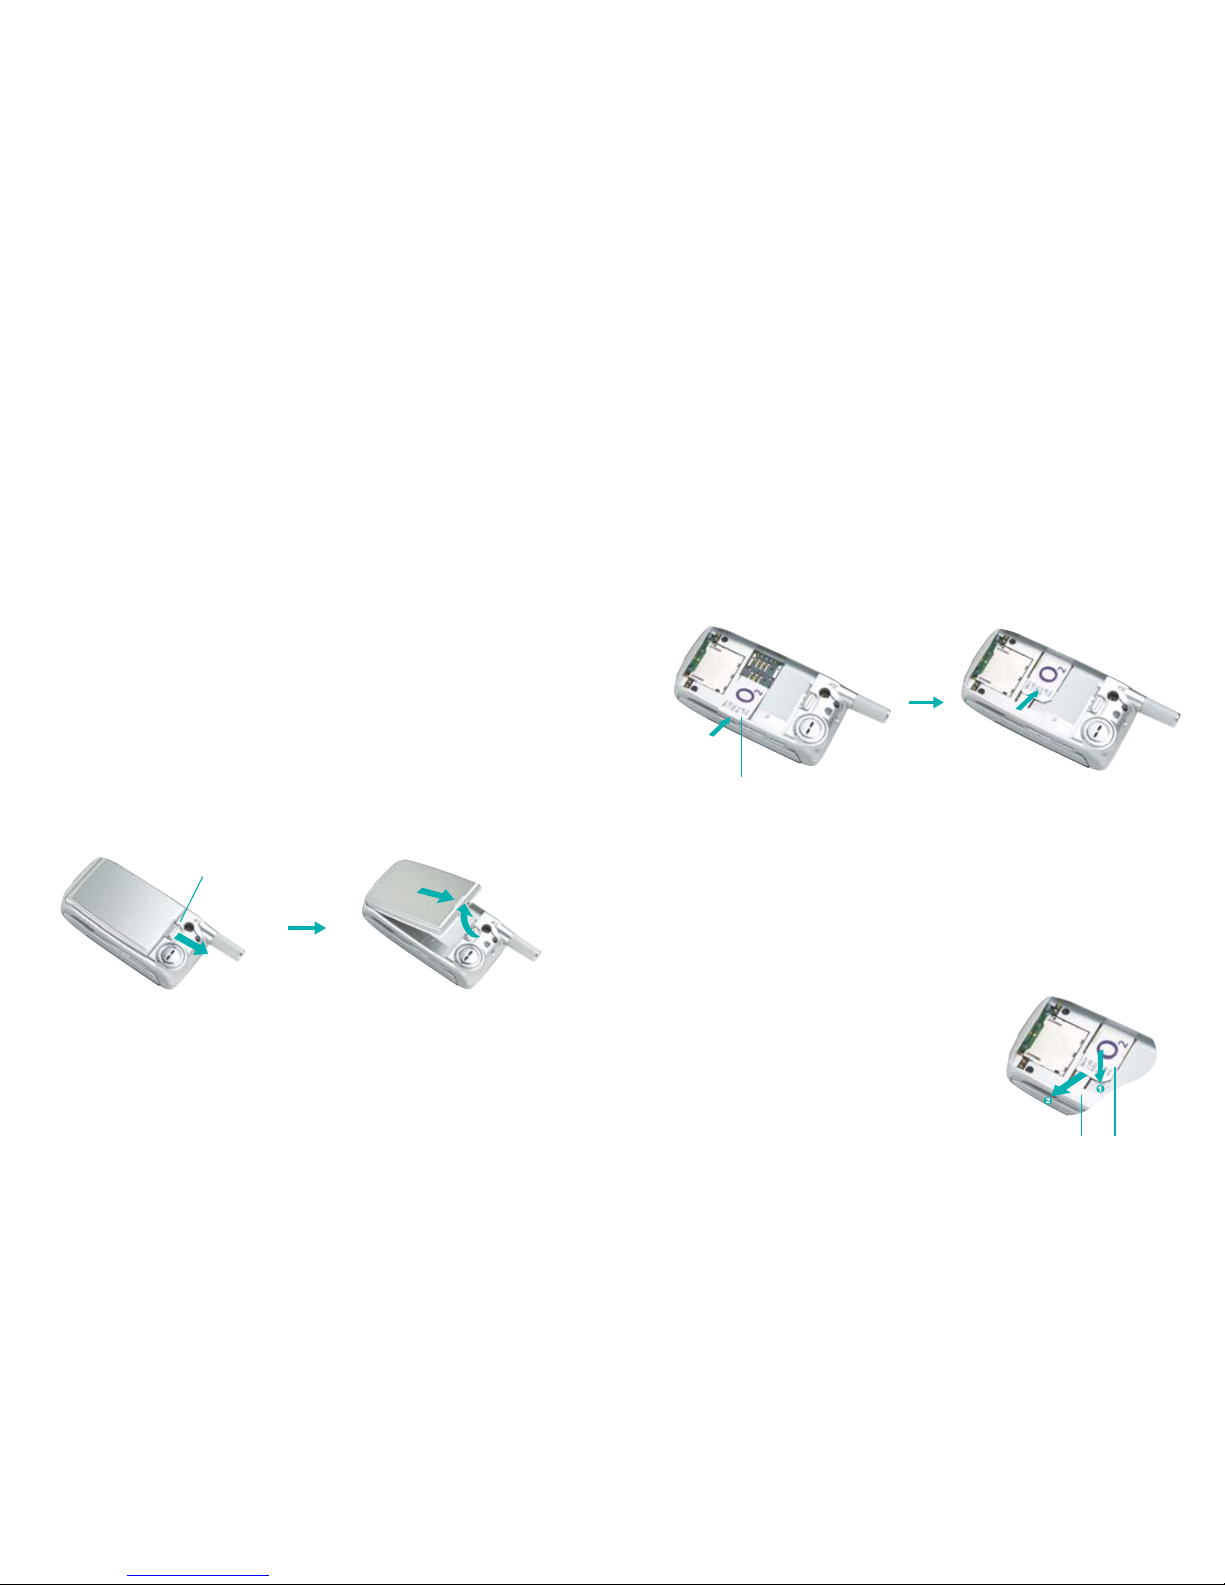
To use your mobile, a SIM card is required at all times –
this contains important information about your mobile and
network. The message Insert SIM appears when the SIM
card is not installed.
Please take care of your SIM card and don’t keep it near
magnetic and electronic devices as this can interfere with
data storage and network operations.
•Turn your mobile over and release the battery latch
• Lift the battery off the mobile
Please note:
Do not remove the battery when the mobile is on. Doing
so could cause you to lose personal settings or data stored
either on your SIM card or in the mobile’s memory.
• Slide the SIM card in under the metal grooves in the SIM
card slot, with the SIM card’s metal contacts facing down
and the cut corner at the top right
Please note:
A SIM card can be easily damaged if its metal contacts
become scratched. Therefore, take special care when
holding or inserting it.
If you wish to remove the SIM
card, you must first press down
the stay, then push the SIM card
out of the slot.
Inserting your SIM card
Battery latch
SIM card
Stay
SIM card
Page 20
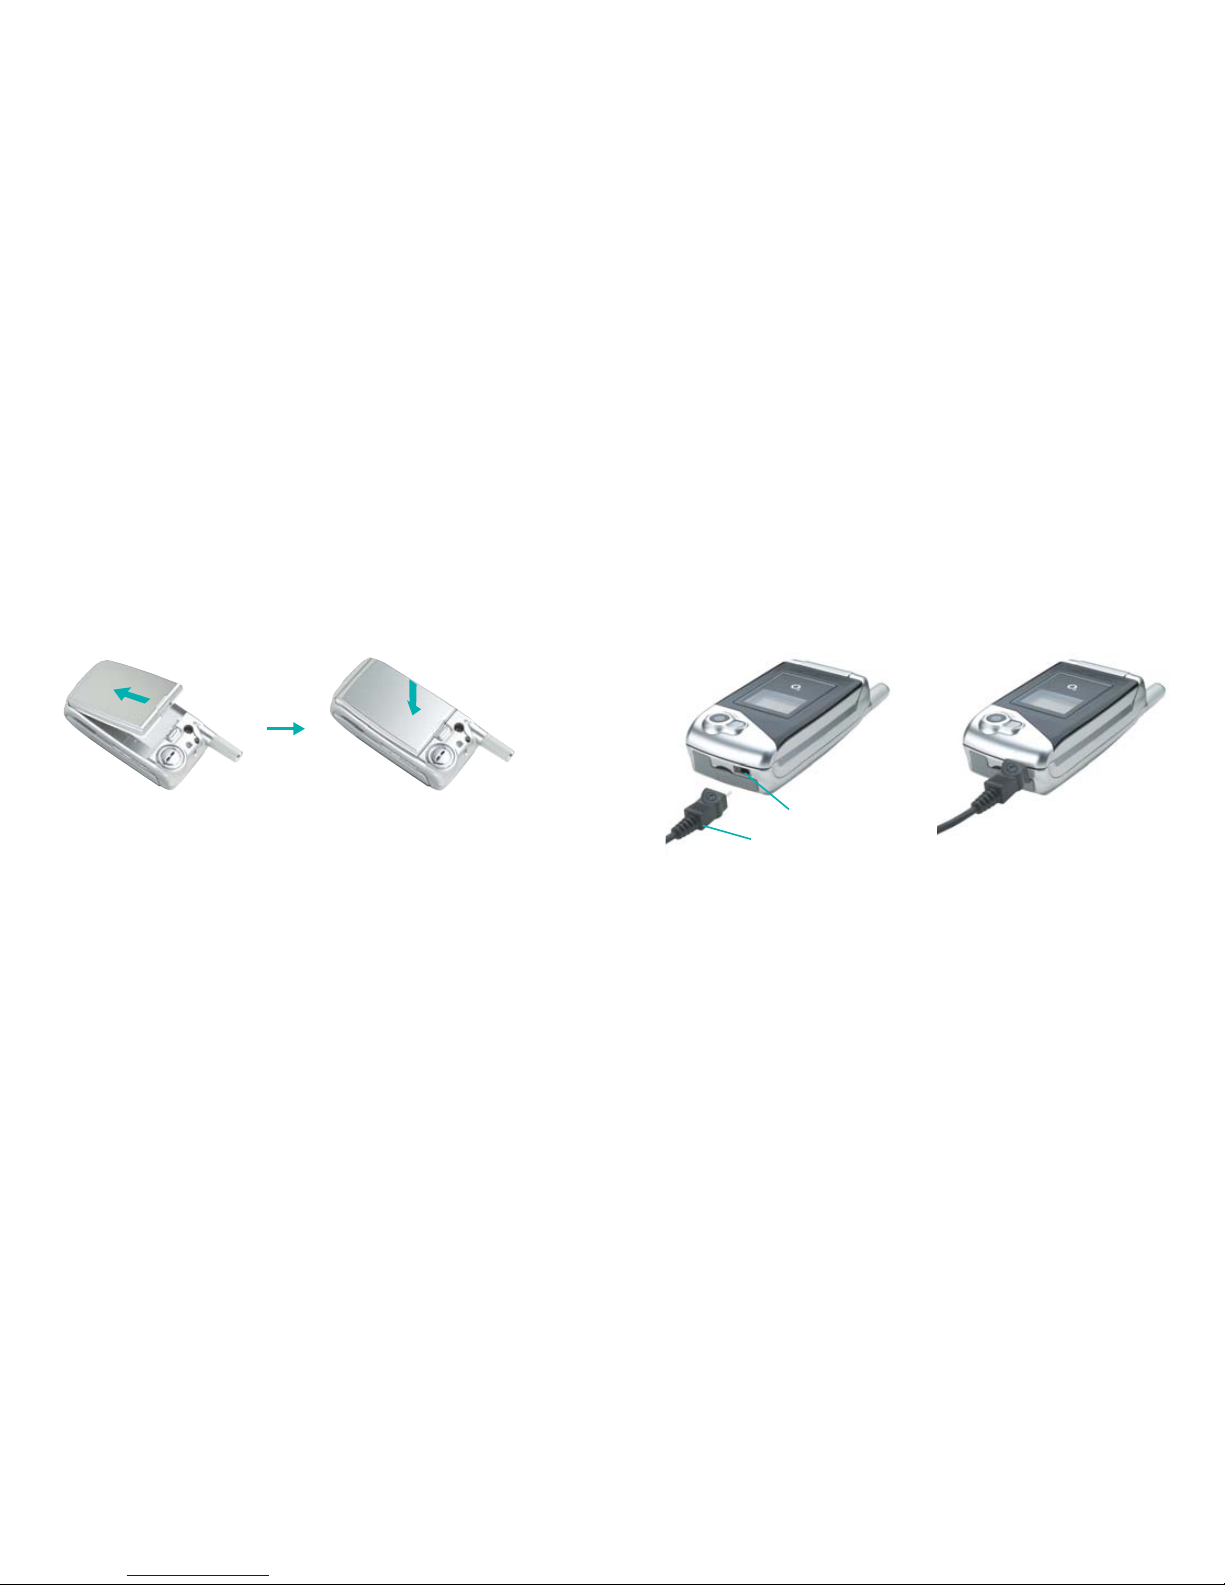
Power connection
Insert the charger’s contact point into the slot and plug the
charger in at the socket.
Please ensure you insert the charger the right side up.
Please note:
Before you use the battery for the first time, make sure
you charge it for at least four hours. Charging the battery
fully each time will help prolong its lifetime – and is much
better than frequent short bursts of charging.
21
Installing the battery
Insert the bottom of the battery into the groove at the
bottom of the mobile. Then push down the battery until it
locks into place.
Removing the battery
Pull down the tab with one hand and then lift the top of
the battery to separate from the mobile.
Please note:
The battery must be securely placed in the battery
compartment. If the battery is improperly inserted your
mobile will not turn on or the battery may slip off
during use.
Using the battery
20
Charging the battery
Charger socket
Charger connector
Page 21

• Do not remove the battery while your mobile is
charging
• Never store a battery near a fire
• Don’t attempt to take the battery apart. Only use the
battery approved by the manufacturer
•Never touch the battery terminals with a metallic
object, as this can lead to short circuiting. Take special
care when carrying a battery in your pocket
•Misuse of the battery can lead to burns from hot
temperatures and even explosion. Never drop or
apply any physical shock to the battery as it may
damage the battery and even cause fire
• Please keep your battery out of children’s reach and
in a dry and cool area
•Store and charge your battery at room temperature.
Extremes of temperature can prevent full charging
and affect battery life and performance
• Since a battery is a consumable product, the
operating time will gradually decrease through use
• Keep the terminals of the battery clean and dry
•When there is risk of lightning, remove the charger’s
plug from the socket to protect the mobile
Important battery information
23
Charging status
Whilst charging, your mobile will show an animation.
The battery level will scroll until fully charged.
When the battery is out of power, your mobile will play
an alert sound to remind you to recharge it and will
eventually turn off automatically.
As the O2X3 comes with an extended battery, charging
will take approximately 4-5 hours. To ensure the battery
charges as quickly as possible, close the flip whilst the
handset is charging.
Maximising battery life
To make your O2X3 battery last longer, try the
following tips:
•Use the power saving mode. See page 185 to
activate this
•Close the flip when you‘re not using your mobile
• Close the WAP (O2Active) connection when not in use
22
Page 22
Your O2X3 comes with a CD-Rom and USB cable in the box.
This allows you to connect your mobile to a PC and download
selected digital images or video clips and much more. It is
extra security for those files you do not want to lose.
Software installation
•Insert the supplied CD-Rom into your CD-Rom drive
• The CD-Rom will launch and the installation begins
• Follow the on-screen instructions to complete the
installation and use the software
Please note:
• The CD-Rom and USB cable are not essential to
using your mobile, so installation is a choice of
personal preference
•Your mobile may not recognise the USB cable if it is
connected whilst an application is running. Connect the
USB data cable during stand-by
•You may not be able to download certain application
such as games, ring tones or wallpapers to your PC for
copyright reasons
25
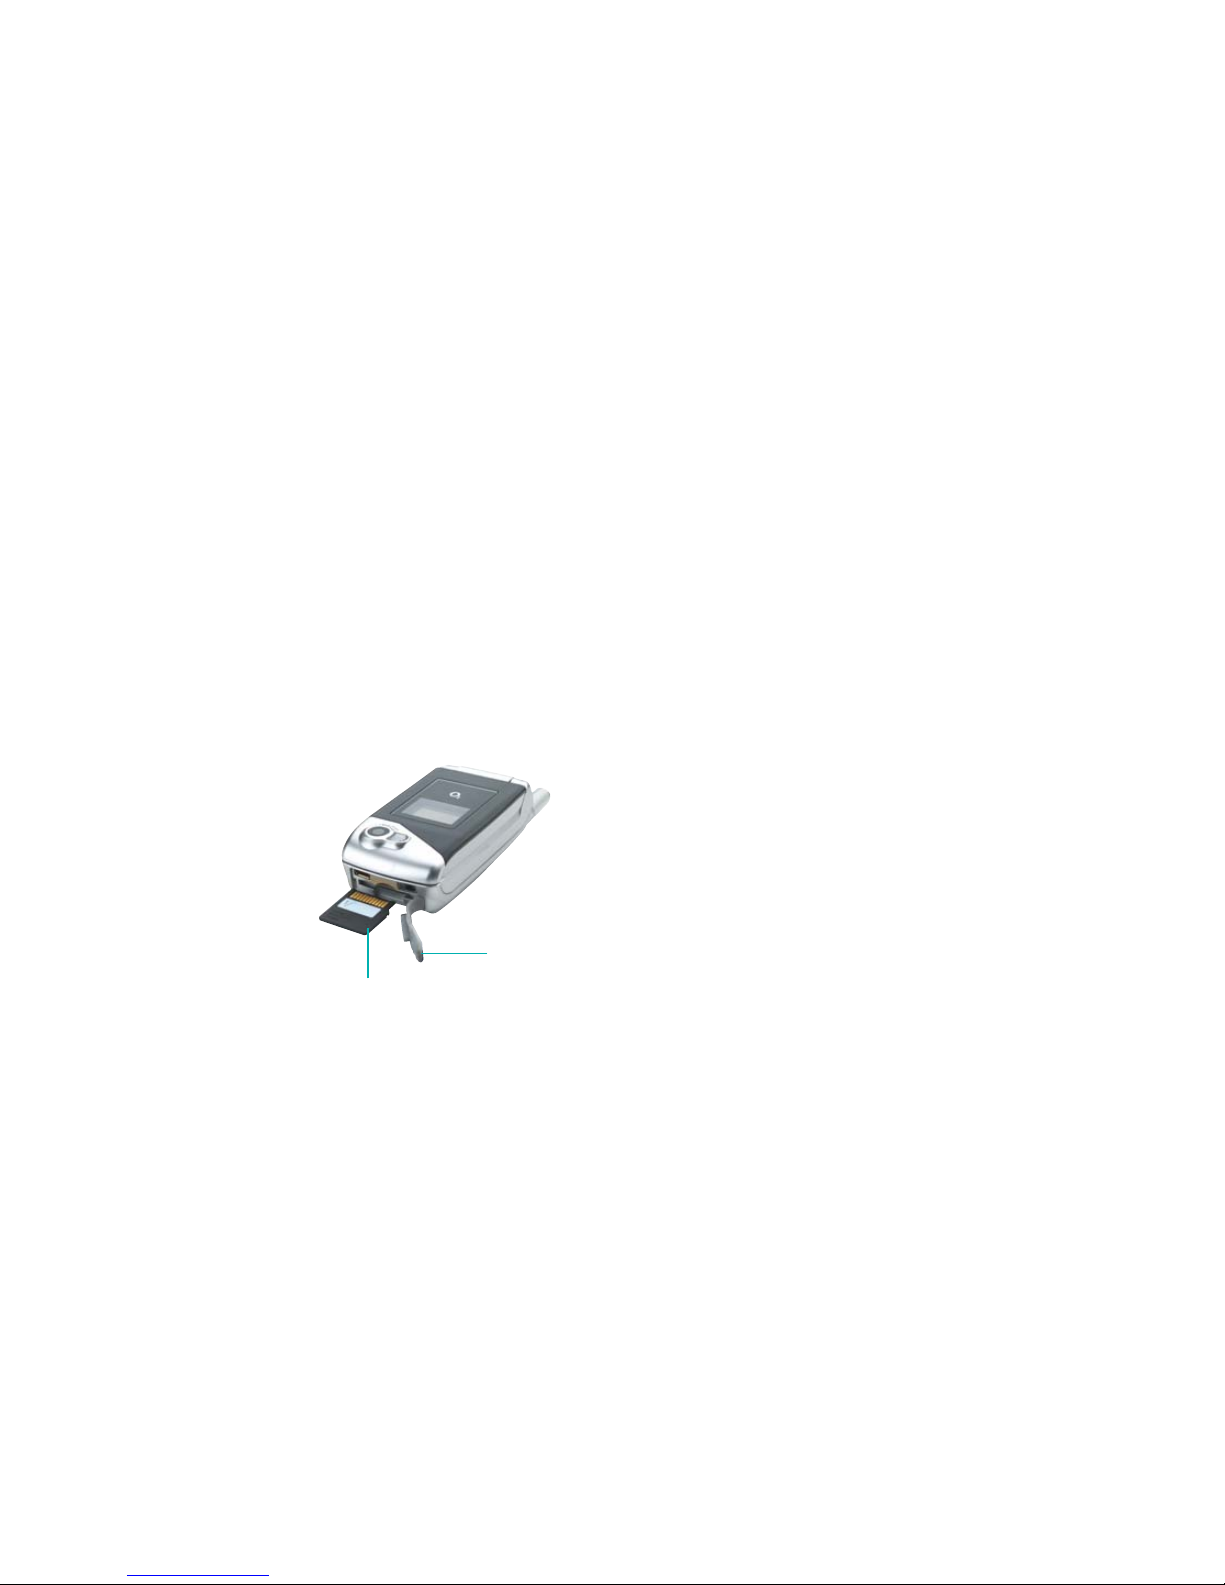
When you buy the O2X3 you’ll also be supplied with the
mini SD card. It’s a removable flash memory card designed
to add greater storage to your mobile. The memory card
supplied is 32Mb meaning you‘ll be able to store loads of
pictures, videos and MP3s.
For greater storage, flexibility and excellent security at an
incredibly small size, all you have to do is insert the card
into your O2X3.
• Remove the SD card slot
cover from the bottom of
your mobile
•Insert the mini SD card
with the metal contacts
facing upwards and push
into place
•Replace the cover
If you wish to remove the mini SD card, open the cover
and press the mini SD card to release.
If you need more space, you can purchase a memory card
with more space from an O2Retail store.
Inserting your SD card
24
Cover
miniSD card
CD-Rom and USB cable
Page 23

Basic functions
•Turning your mobile on and off
•Menu navigation
• Basic functions
•Voicemail
Chapter 3
2726
Page 24
Turning your mobile off
When the SIM card is installed
• Press and hold until the screen
turns off
Please note:
• If the message LOW BATTERY WARNING POWER OFF is
displayed, the mobile will turn itself off. You will need to
charge the battery
• If the battery is removed whilst the mobile is on, any
unsaved messages could be lost and the SIM card’s
memory might be damaged
2928
Turning your mobile on and off
Turning your mobile on
When the SIM card is installed
• Open the mobile’s flip
• Press and hold until the screen turns on
•When your mobile is PIN protected, PIN1
Code is displayed on the screen*
• Enter the 4-digit PIN to unlock the mobile, then
press
•Your default PIN code is 4321 or 5555**
•You can now use your mobile
Please note:
If you enter an incorrect PIN code three times in succession,
your SIM card will lock and you must enter the PUK code
to unlock it. Please contact O2Customer Service.
* If you have purchased a Pay & Go mobile, entering a PIN number is not
required.
** Please see page 182 for further information on PIN codes.
Page 25
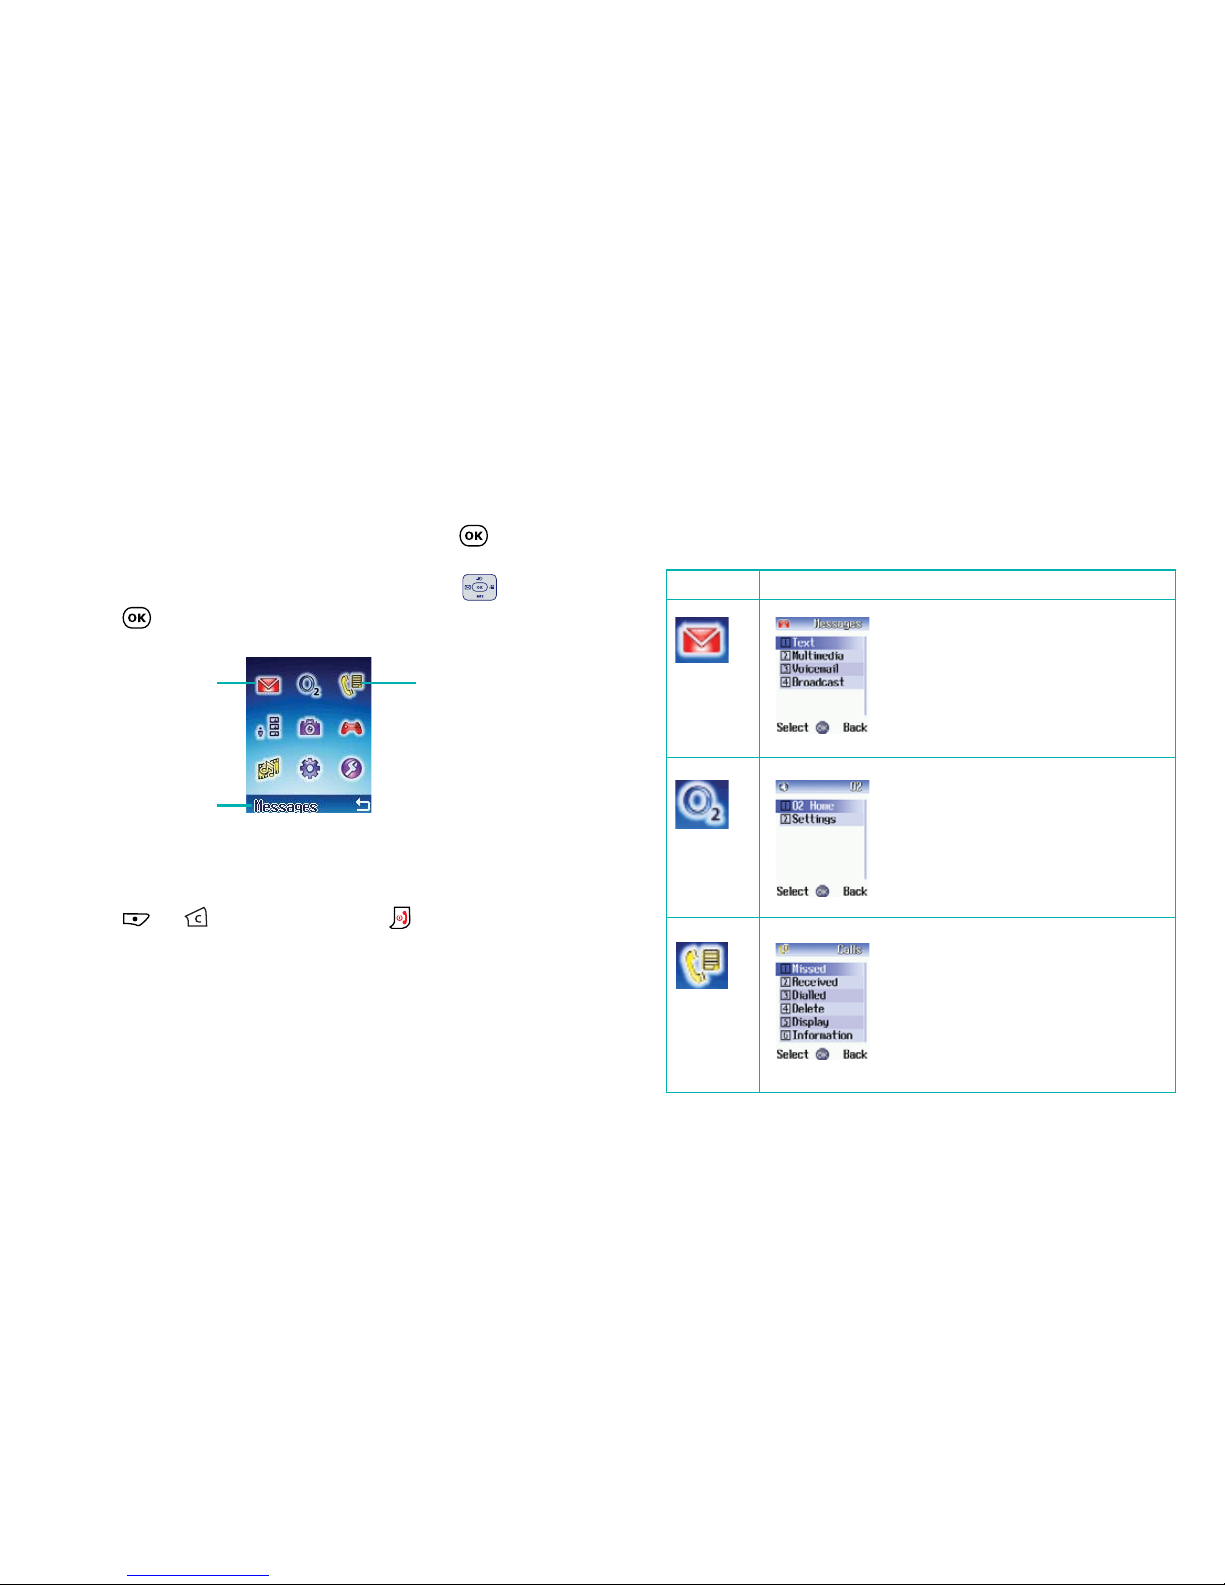
Main menu map
Select To enter
31
•When your mobile is in standby mode, press to
access the main menu
• Scroll to the menu icon you require by using
• Press to enter the menu icon highlighted
• Press or to go back or press to return to the
standby screen
Menu navigation
30
The main menu
item to which you
have scrolled will
be displayed as
an animation.
The name of the
main menu item
you have
scrolled to.
Each icon
represents a
sub-menu.
O
2
Calls
Messages
Page 26
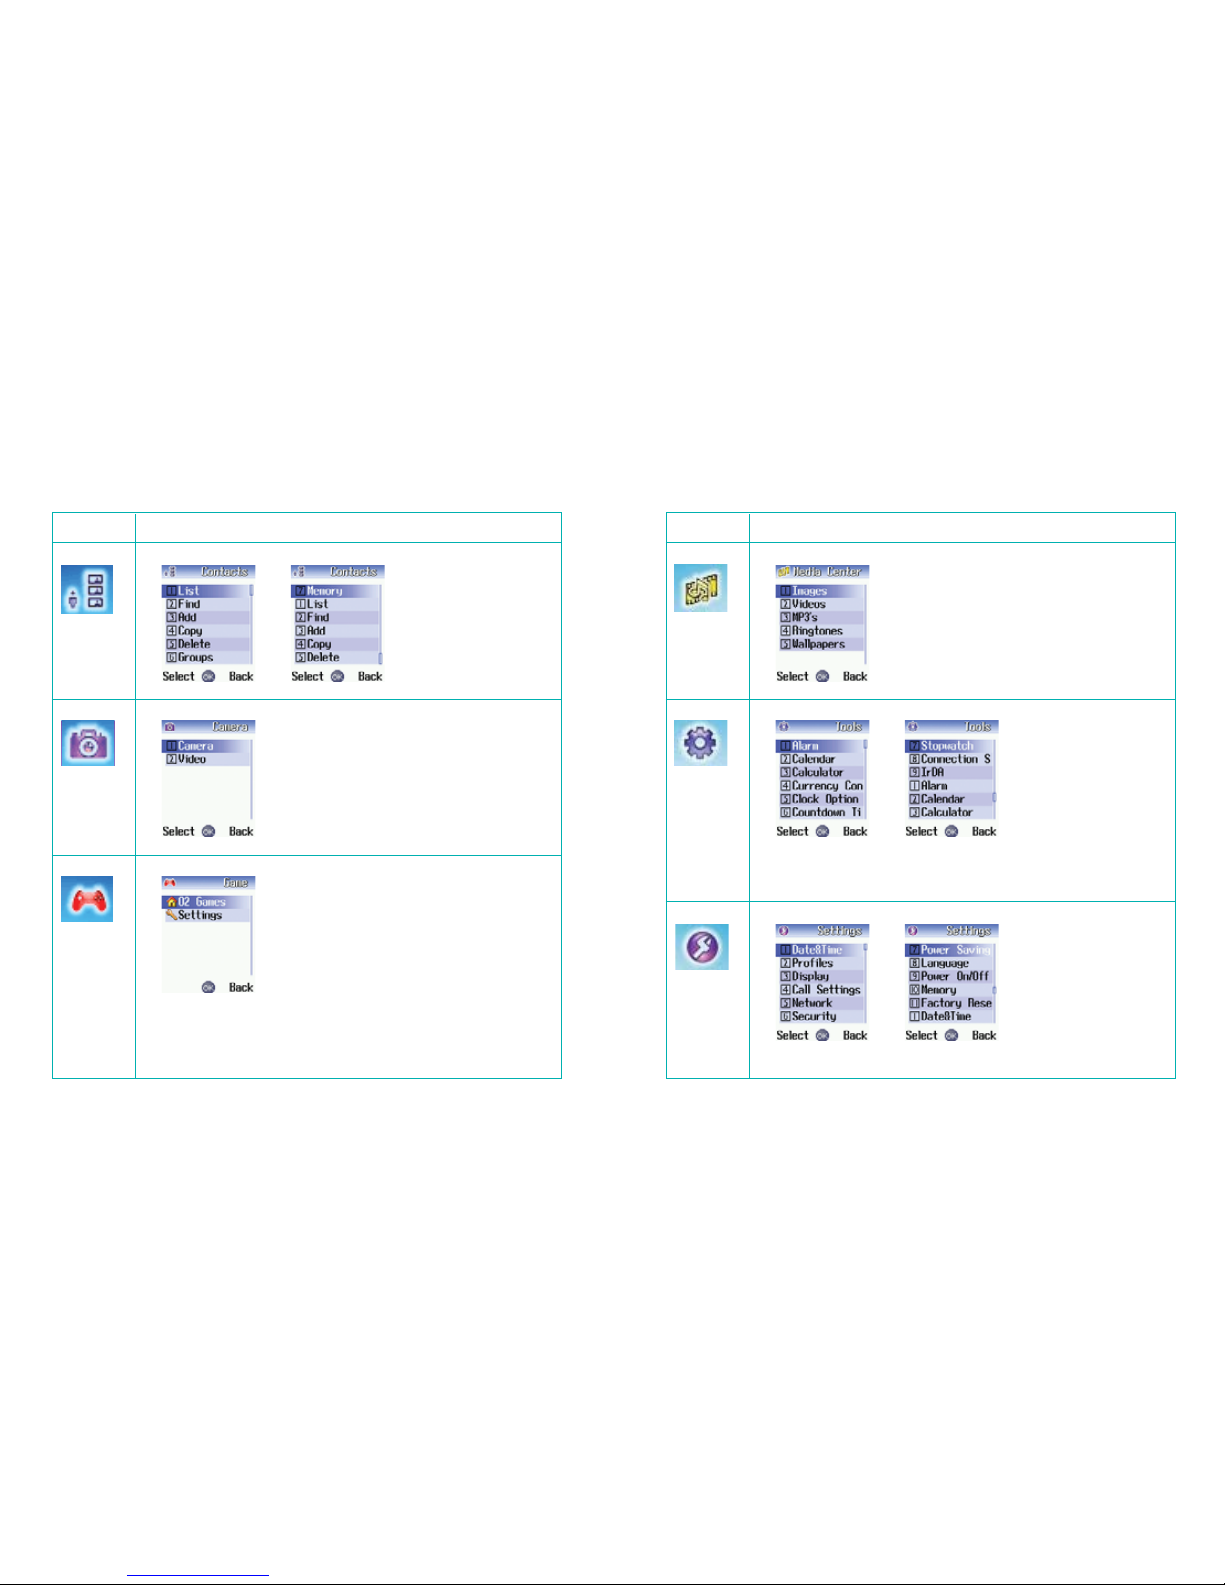
Select To enter
Pay & Go customers will see My Services as item
number 1.
33
Select To enter
32
Contacts
Games
Camera
Media
Centre
Tools
Settings
Page 27

Ending a call
• Press or close the flip* to end a call
Receiving calls
Answering a call
•To answer a call, open the flip or, if the flip is already
open press
To r e je ct a call
• Regardless of whether the flip is open or closed, you can
reject an incoming call by pressing and holding the
upper portion of the volume key on the left hand side
of your mobile
•When the flip is open, you can reject an incoming call by
closing the flip or pressing
*Please note:
If the flip function has not been activated, you cannot end
a call or cancel dialling by closing the flip. To activate or
cancel the flip function, go to Settings – Call Settings –
Answer Mode – Flip Open. For more details please refer to
page 177.
35
Making a call
• Open the flip and ensure that the standby screen is
shown on the main display
•Enter a phone number
• If you make a mistake while dialling, you
can erase the last number you entered by
pressing
•Once you have entered the number,
press . The O2X3 will start dialling
the number
Basic functions
34
Page 28
37
Making an international call
For Pay Monthly customers
• Press and hold until + appears on the screen
•Enter the recipient’s country code, area code and
phone number
• Press to dial the number
For Pay & Go™customers
Please consult your O2Pay & Go welcome pack for details
on how to use your mobile whilst abroad.
Making emergency calls
•To call emergency services, enter 112 (the international
emergency number) or 999
•Then press to dial the call
You can make an emergency call even if your mobile is
locked or cannot access your network, or there is no SIM
card inserted, so long as you are within range of a network
of the type supported by your mobile.
36
Page 29
39
Your O2X3 provides you with Voicemail if your Voicemail is
activated. See your O2Welcome Pack for more information
on setting up Voicemail. This service takes messages for you
when your O2X3 is switched off, engaged, you don’t
answer a call or you are out of signal range.
When you receive a new Voicemail message the icons
and will be shown in the external and main
display’s status bars, respectively.
To listen to your Voicemail message
• In the standby mode, press and hold to dial
your Voicemail
•Alternatively, simply dial 901 and press
Voicemail
38
Page 30

Chapter 4
Main menu
• Contacts
• Calls
•Messages
• Camera/Video
•O2Active
• Games
•Media Centre
•Tools
• Settings
4140
Page 31

43
Contacts
42
From the standby menu, press then scroll to Contacts
and press to select
Adding contacts to your phonebook
You can either use the SIM card or the built-in contacts
database as your Phonebook. Your mobile is set up to
save to your mobile’s memory.
The phonebook in your mobile’s memory can store up to
500 contacts.
To add a contact to the phonebook
•In the standby screen enter the number you wish to
store then select to Save
•The screen will show the phonebook data
fields for a new contact
• Scroll through the contact data fields that
you wish to edit
• Select
Edit by pressing and enter the relevant data
• Press to save
The data fields provided by the phonebook are:
–The contact’s name
–The contact’s mobile phone number
–The contact’s office phone number
–The contact’s home phone number
–The contact’s email address
–Used to select a caller group for the contact
– Scroll through the different groups by selecting
Edit and then pressing the left and right keys on
the navigation key
– Press to confirm
Page 32

4544
–To set the image, photo, animation or video clip
that will appear on your mobile’s display when
there is an incoming call from the contact
– Select Set by pressing then choose the video or
photo for that contact
Please note:
The photo set in this field will replace the animation or
image associated with the contact’s caller group.
–To set a ring tone for the contact. When there is an
incoming call from the contact, your mobile will
play this ring tone
– Select Set by pressing then choose the ring tone
for that contact
Please note:
The ring tone set in this field will replace the one
associated with the contact’s caller group.
–Used for notes about the contact
Once you’ve gone through the fields detailed above, go to
the Add screen and the press to select Save.
Finding contacts in your phonebook
•In the standby mode, press to select
Contacts and display contacts you have
saved
• Press to scroll through your list of
contacts until the one you need is highlighted
•Alternatively, press the alphanumeric key that
corresponds to the first letter of the name you wish to
locate, the appropriate number of times e.g. If the name
starts with ‘K’, press twice. The names that begin
with ‘K’ will appear. Press until the one you need is
highlighted
• Press to call the first phone number saved under
that contact
If the contact has multiple phone numbers:
• Press to show all the data fields for that contact
• Scroll to the number you wish to call and press
5
jkl
Page 33

46 47
Copy
If you are using the phonebook stored in your mobile’s
memory, you can copy the data to the SIM card’s phonebook,
and vice versa.
•In the
Contacts menu, scroll to Copy and
press to select
• Scroll to
SIM to Phone or Phone to SIM
and press to select
• Scroll to
Move and press to confirm. When
transferring a contact from your SIM card to your
phone memory a copy of the contact will remain on
your SIM card memory as well
• Then scroll to
All or select a particular contact and press
to select
• Once you have selected the contact(s) you wish to
transfer press to select
Done
Delete
•In the Contacts menu, scroll to Delete and
press to select
• If the contact(s) you wish to delete is
saved to your SIM phonebook scroll to
SIM record or alternatively Phone Record
and press to confirm
• Then scroll to
All or select a particular contact and press
to select
• Once you have selected the contact(s) you wish to
delete press to select
Done
• Press to confirm deletion
Page 34

4948
Caller groups
Caller groups are combinations of phone settings used to
identify a particular group of contacts, such as, Colleagues,
Family, Friends, VIP and Others. You can associate a ring
tone and image with one group, and when a member of
that group calls, your mobile will use the group’s ring tone
and display its image.
•In the
Contacts menu, scroll to Caller Group and select
by pressing
• Scroll to one of the groups and then;
– Press to select
Option. You can then
select the ring tone or image that will
identify that caller group. You can also rename the
caller group
– Press to view a list of all the names that belong to
that caller group. Scroll to the desired contact and
press to select Option. You can then add or delete
a particular contact to/from that group
Memory
•In the Contacts menu, scroll to Memory
and select by pressing
Used space
View the number of occupied phonebook entries both on
your SIM card and mobile memory as well as the maximum
number of entries that your mobile can store.
Memory in use
You can choose to save your phonebook contacts to your
SIM card’s memory or to your mobile’s memory.
•In the
Contacts menu, scroll to Memory and select by
pressing
• Scroll to memory in use and press to select
• Scroll up or down to select
SIM or Phone and press
to select
Own number
This option allows you to save your SIM card number and
name to your SIM card’s memory.
Page 35

5150
Calls
•From the standby menu, press then scroll to Calls and
press to select
Missed, dialled and received calls
• Scroll to Missed / Received / Dialled and press to
select. You can then view all the latest missed, received
or dialled calls. Alternatively, in the standby mode, press
to view a list of all the most recent missed, dialled
and received calls
• Press to scroll to the desired phone number
–this icon will appear beside missed calls
–this icon will appear beside dialled calls
–this icon will appear beside received calls
Please note:
• If a phone number has already been stored as a contact
in your phonebook, the display will show the name of
this contact
• If the number of the person calling you is not available
then the list will not show a number for the call
Page 36

Delete
To erase all call records at the same time or by the types of
calls e.g. missed, received or dialled.
•In the
Calls menu, scroll to Delete and press
to select
• Scroll to
All, Missed, Received or Dialled, and press
to select
•Then press to select
Yes, or to select No and
return to the Delete menu
5352
When the number for a missed, dialled, or received call is
highlighted, you can perform the following tasks:
• Press to view the time, date and telephone
number* of the call
• Press to re-dial the number
• Press to select
Option and bring up a pop-up menu:
List – if the phone number for the call has not been
stored in the phonebook you will be able to create a
contact for this number. If the phone number is already
stored as a contact you will be able to edit this
information for this contact
Delete – select to erase the record of the call from the list
* If the telephone number has been withheld, the number will not be displayed.
Page 37

To reset the duration of the last call to zero, scroll to
highlight the relevant information and press to
select Reset.
All calls
Shows the total time of all calls.
Please note:
To reset the total time of all calls to zero you will need to
enter your PIN2 code.
Received
Shows the total time for all received calls and allows you to
reset the data to zero.
Dialled
Shows the total time for all dialled calls and allows you to
reset the data to zero.
55
Display
Your mobile can display duration and cost information
during a call or when a call ends, or in both circumstances.
Show call timer
• Call active – selecting this option will set your mobile to
display duration during a call. Scroll to highlight this
option and press to select it
•
Call end – selecting this option will set your mobile to
display duration when a call ends
When you have finished press to select
Done to save
the changes you have made.
Information
Here you can view the duration of the calls you have made.
Last call
Shows the duration of your last call.
54
Page 38

Operations during a call
Adjusting the earpiece volume
• During a call, you can press the volume key on the
left side of your mobile to adjust the call volume
Accessing your contacts
• During a call, you can press to select Names and
access your contacts
Viewing recently dialled and received calls
•Whilst on a call, you can press to view recently
received calls or to view recently dialled numbers
Putting a call on hold*
When the call is active:
• Press to put the active call on hold
• Press to end this call
5756
Page 39

Call waiting
*
If you receive an incoming call whilst you are on the
phone, a tone will sound through the earpiece and the
display will show that a second call is currently waiting.
You can handle the waiting call and currently active call in
the following ways:
Answer the waiting call
• Press . The currently active call will automatically be
placed on hold
• However, if there is already another call on hold, a menu
will appear on the display allowing you to select a call to
end and then answer the waiting call
Reject the waiting call
• Press to select End
* Only available on a Pay Monthly calling plan.
5958
When the call is on hold:
• Press to take off hold and resume the call
• Press to end this call
When there is an active call and a call on hold:
• Press to resume the call that is on hold, and put
the active call on hold
Making a second call
*
To make a second call:
• Enter a phone number, or select one from your
contacts by pressing
• Press to dial
The currently active call will automatically be placed on
hold. However, if there is already an active call and
another on hold, this action will fail.
* Only available on a Pay Monthly calling plan.
Page 40

61
For other options available, press to select Option.
A pop-up menu will appear with the following options:
End and next
This will enable you to end the current call and accept the
call that is waiting.
DTMF off
For further information please refer to the call menu on
page 62.
Main menu
For further information please refer to the call menu on
page 63.
Text reply
This enables you to send a text message to the caller
waiting. To help you further there are text templates
available or you can create your own.
60
Page 41

62 63
Call menu
• Press during a call to select Option and enter the
Call menu
• Press to scroll to the desired item, please refer to
the list below
End current
Press to select and end the current call.
Mute/Unmute
This allows you to activate or cancel the silent mode. Just
scroll to Mute/Unmute and select by pressing .
DTMF on/off
When your mobile is connected to other devices or
services, you can send DTMF (Dual Tone Modulation
Frequency) strings. DTMF strings are keypad tones that can
be sent via the microphone as you dial another number.
Your mobile will emit the tones in order to communicate
with answering machines, pagers, computerised telephone
services, and so forth.
•Enter the phone number and then press to send the
DTMF string
Main menu
• Contacts – enables you to enter the contact menu
•
Calls – enables you to enter the calls menu
•
Messages – enables you to enter the messages menu
Multiparty
*
If you have one call on hold and another active you can
then do the following.
•
Join all – enables you to join both calls and talk to
both parties
•
Hold all calls – enables you to put both parties on hold
•
Private – enables you to talk to one caller
•
Transfer – enables you to toggle between callers
* Only available on a Pay Monthly calling plan.
Page 42

Messages
•In the main menu, scroll to Messages and select by
pressing
Then select;
Text
For further information on text messaging please refer to
page 68.
Media
For further information on Media Messaging please refer
to page 77.
Voicemail
• Scroll to Voicemail and press to select
Get voicemail
Select to listen call your Voicemail number
6564
Page 43

6766
Settings
Box numbers
In Box Numbers you can store your Voicemail number as
well as the numbers controlling the Voicemail feature:
•
Home Mbox – this is your Voicemail number that you
dial to listen to your Voicemail messages
•
Roam Mbox – this is the number you dial to listen to a
Voicemail message when roaming on another network
•
Voice No. – this is the number you dial to request O2to
give you a call when you receive a new Voicemail
•
Message No. – this is the number you dial to request O
2
to send you a text message alert when you receive a
new Voicemail
Broadcast
Cell Broadcast (CB) provides you with messages about your
O2service. Details are available from O2. When you receive
a CB it will display automatically in the display.
Please note that Cell Broadcast is not available to Pay & Go
customers. Charges may apply for customers using CB. For
more information please contact O2Customer Service.
Page 44

• Press * to bring up options to insert characters such
as ?, !, & and @. Using the navigation key scroll to
the character you would like to insert and press
to select
To send your text message
•After you have finished editing your message, press
or select Send by pressing
•Then either enter the recipient’s mobile number or select
Contacts by pressing to select a contact from your
phonebook
• Press to scroll through your contacts and press
to select the desired contacts
•After you have selected the contacts from your
phonebook, select Done by pressing
•Then press to send your text message to the
numbers you have previously selected. When the
message is sent a copy will be saved in the Sent Items
folder. If a message fails to send it will save in
the Outbox
6968
Text messaging is fun with O2X3. You can send long
messages, and personalise them.
•In the main menu, scroll to Messages and select by
pressing , then select Text
Write a text message
•In the Text menu select New
Please note:
To enter the New screen directly from the standby display
screen, press
• Enter your text message using the alphanumeric keys.
Your message can be up to a maximum of 456
characters. One standard text consists of 160 characters
Please note:
• Press 0 to enter a space between words
• Press # to switch between input modes e.g. abc, itap,
123 etc
• The O2X3 uses ITAP, which is a predictive text imput
method. ITAP allows you to type text quickly
Text
Page 45

Reply – to reply to the text message
Delete – to delete the text message
Call Sender – to call the sender of the text message
Forward – to forward the message
Edit – allows you to edit the content of the message
Extract numbers – enables you to extract a number from
within the text message or the sender’s mobile number. You
can then press to select Save and create a contact for
this number in your phonebook, or press to select Call
Save to archive – to save the message to an archive folder
Save to SIM – to save the message to your SIM card memory
If you wish to read the message later press to return
to the standby screen. The message will be stored in the
inbox and the icon will appear in the standby screen.
Read messages on the external screen
If you receive a text message when the O2X3 is closed, you
can view texts on the outer screen, without having to open
the flip. When you receive a text this will be indicated on
the outer screen. Press to scroll up and down and
press to view.
71
• If you have manually typed the recipient’s number in,
then select to send
Read messages
When you receive a new message 1 will appear on the
external display whilst an incoming message alert will be
shown on the internal display (and with a tone or vibration
if selected).
Please note:
If the sender is a contact saved in your
phonebook their name will also appear in the
message alert rather than the number – so
you know who sent you the message before
you open it.
• Press to select View and enter the Inbox screen
• Press to open the message and read it
• Select Option by pressing , then select either:
70
Page 46

Delete – deletes the message
New Folder – allows you to create a new folder for your
messages in Sent Items
Move To – enables you to transfer your messages into
a folder
• Select Move To and press to confirm
• Press to scroll through your folders available
• Press to select Paste and transfer the text
message into the chosen folder
• Scroll to the end of your messages and select Delete All
to selete all messages in your sent items
• Press to read the message. After reading the
message you can press to select Option
and select:
Delete – deletes the message
Forward – allows you to edit and forward the message
73
Inbox
•In the Messages menu, select Text, then scroll to Inbox
and select by pressing
•You are now in the inbox. indicates a read message,
while indicates an unread message
• Select the desired message and press to read
•To return to the main menu press three times or
press to go back to the standby screen
Sent Items
In the Sent Items you can view all the text messages that
you have previously sent.
•In the Messages menu, select Text, then scroll to Sent
Items and select by pressing
• Scroll to the desired message record
Then you can:
• Press to select Option and then select;
72
Page 47

New Folder – allows you to create a new folder for your
messages in Sent Items
Move To – enables you to transfer your messages into
a folder
• Select Move To and press to confirm
• Press to scroll through your folders available
• Press to select Paste and transfer the text
message into the chosen folder
• Press to directly edit the contents of the message
Archive
Stores all the messages you have saved to archive.
Delete
You can delete messages saved in your Inbox, Sent Items,
Drafts, Archive or All.
Message settings
Your O2X3 is already set up to send and receive text
messages. If you are unable to send text messages, then
please contact O2Customer Service.
75
to other recipients
Edit – allows you to edit the content of the message
Extract numbers – enables you to extract a number from
within the text message or the sender’s mobile number.
You can then press to select Save and create a
contact for this number in your phonebook, or press
to select Call
Save to SIM – to save the message to your SIM
card memory
Drafts
This option allows you to preserve message drafts that you
have saved.
•In the Messages menu, select Text, then scroll to Drafts
and select by pressing
• Scroll to the desired message record
Then you can:
• Scroll to the end of your messages and select Delete All
to delete all messages in your drafts folder
• Press to select Option and then select;
Delete – deletes the message
74
Page 48

76 77
Colour Media Messaging means you can do more than tell
people what’s going on – you can show them exactly what’s
happening with video clips, pictures, sound and text. Take a
photo or film a video clip and send it as a media message to
people showing them exactly where you are or, if you are
in need of inspiration, you can grab a full colour picture or
image from the O2Gallery – such as celebrity shots and
greeting cards (see O2Active on page 106) and send it with
your own message to people.
•In the main menu, scroll to Messages and select by
pressing , then select Media
Create a media message
•In the Media menu select New
With text
• Scroll to Create and press to select
• Enter your message using the alphanumeric keys
For further information on entering text please refer to
page 68.
Media
Page 49

Please note:
• If you can not find the image you require it could be
that the image is on the phone memory or miniSD card
depending on which memory you are currently using.
Press to select Option and then scroll to Phone
Memory or mini SD Card and select
•Media messages allow only small pictures to be attached,
meaning that some picture types cannot be sent by
Media Messaging. The alternative way to send a large
picture is to download to your PC via the USB cable and
CD-ROM supplied
Video
You can insert video clips of your favourite artist, or video
clips you have taken yourself or even downloaded from
O2Active.
• Scroll to
Video and press to select
• Press to scroll through the video clips available
•To view the video, select
Option by pressing , then
scroll to View and select by pressing .
79
With an attachment
•Whilst writing your message, select Option by pressing
• Select
Insert to enter the following:
Image
You can insert images you have stored on your mobile such
as photos you have taken with your mobile’s digital
camera, or images you have received from others or
downloaded from O2Active.
• Press to select
Image
• Press to scroll through the images available
•To view the image clearly, select
Option by pressing
, then scroll to View and select by pressing
•To insert the image into your media message press .
If you prefer to choose another image press to
select
Back and select another image
78
Page 50

Please note:
Media messages only allow small sound clips to be
attached, meaning that some sound clips cannot be sent
by media message.
When you are editing your media message you can press
to select
Option at any time to perform the following tasks:
Send to – to go directly to the To : screen. For further
details please see page 82
Insert – to insert an image, video clip, audio file or to
insert a new page
Set time duration – to set the length of time a slide is
shown on the display when playing the message. The unit
is 1 second e.g. if you enter ‘30’, it means 30 seconds
Preview – to preview your media message
•Once you have entered all the files required in your
media message press to confirm and return to the
New screen
81
Please note:
For details on how to play the video, please refer to page 134.
•To insert the video into your media message press . If
you prefer to choose another video clip press
to select Back and select another
Please note:
• If you can not find the video clip you require it could be
that it has been saved to the phone memory or miniSD
card depending on which memory you are currently using.
Press to select Option and then scroll to Phone
Memory or mini SD Card and select
• Media messages only allow small video clips to be
attached. If your video clip is too large you will not be
able to send as a media message
Audio
You can insert an audio file in the same way you inserted a
video clip or image. Scroll to Audio and press to select.
Then follow the instructions similar to inserting an image
or video clip.
80
Page 51

•When you have finished press to select Done and
return to the New screen, displaying all the phone
numbers and email addresses you have chosen
To send your message as a carbon copy to others scroll to
Cc: and repeat the instructions above.
Enter a subject
• Scroll to Subject: and select by pressing
•Enter the subject for your media message
and press to confirm
Priority
• Choose between Low, Medium or High by pressing
to select Change
To send your media message
•After you have finished editing your media message,
scroll to Send and select by pressing
83
Select the recipient(s)
You can send your media message to a recipient’s mobile
or email address.
• Scroll to
To : and press to select
To enter a number of email address directly
•Type in the recipient’s phone number or
email address
If there are multiple numbers and email addresses:
• Press to open up the symbols field along the
bottom of the screen
• Press to select a comma, semicolon, or space
•To insert into the editing screen and separate the
different numbers and email addresses press
To select a number or email address from your phonebook
• Press to select Contacts or Email list
• Scroll to highlight the name of the desired
contact and press to select
82
Page 52

85
Read messages
When you receive a new message 1 will appear on the
external display whilst an incoming message alert will be
shown on the internal display (and with a tone or vibration
if selected).
Please note:
If the sender is a contact saved in your phonebook their
name will also appear in the message alert rather than the
number – so you know who sent you the message before
you open it.
• Press to select View and enter the Inbox screen
• Press to open the message and read it
• Press to select Option, then select:
Reply – to reply to the media message
Delete – to delete the media message
Call Sender – to call the sender of the media message
Forward – to forward the media message to someone else
Edit – allows you to edit the content of the media
message
Extract numbers – enables you to extract a number from
within the media message or the sender’s mobile
84
Page 53

number. You can press to select Save and create a
contact for this number in your phonebook, or press
to select Call
Save to archive – to save the message to an archive
folder
Save to SIM – to save the message to your SIM card
memory
If you wish to read the message later press to return to
the standby screen. The message will be stored in the
inbox and the icon will appear in the standby screen.
Inbox
•In the Messages menu, select Media, then scroll to Inbox
and select by pressing
•You are now in the inbox. indicates a read message,
while indicates an unread message
• Select the desired message and press to read
•To return to the main menu press
8786
Sent Items
In the Sent Items you can view all the media messages that
you have previously sent.
•In the Messages menu, select Media, then scroll to Sent
Items and select by pressing
• Scroll to the desired message record
• Press to read the message
Page 54

Drafts
This option allows you to preserve message drafts that you
have saved.
•In the Messages menu, select Media, then scroll to
Drafts and select by pressing
• Scroll to the desired message record
Then you can:
• Press to select Option and then select;
Send – allows you to send the message
Edit – allows you to edit and forward the message
Delete – deletes the message
Forward – allows you to edit and forward the message
Delete All – deletes all messages in the drafts folder
• Press to directly edit the contents of the message
8988
Archive
Stores all the messages you have saved to archive.
Delete
You can delete messages saved in your Inbox, Sent Items,
Drafts, Archive or All.
Settings
Your O2X3 is already set up to send and receive media
messages. If you are unable to send media messages, then
please contact O2Customer Service.
Page 55

Your O2X3 has a superb integrated 1.3m megapixel
camera, giving you fantastic digital quality pictures.
What’s more, the flash feature means you can take
great pictures in dark conditions. The O2X3 allows
you to take a picture and then set it as a wallpaper
for the main displays standby screen, or send to others
in a media message.
•In the standby screen, press to select Camera and
enter direct into the preview mode
Alternatively, in the main menu, scroll to Camera and
press to select, then select Camera again.
•You can now view your subject through the
viewfinder
Camera
9190
Page 56

Switch to Indoor
Enhances camera quality to allow you to take better
quality pictures in indoor conditions.
Switch on flash
If you turn the flash on in these settings your camera
phone will always flash regardless of the surrounding
lighting conditions.
Quality
Sets the quality sharpness at which the photo is taken.
Select from High or Normal.
Contrast
This setting allows you to adjust the contrast level that
ranges from -1 to +1.
Sound Off
This determines whether your camera phone makes a
sound when your image is captured.
93
Camera settings
Before you take your picture you can amend the
camera settings.
• Press to select Option
•In the camera setting screen select;
Size
Select to adjust the size of the photo you intend to
capture. Choose from:
1.3 1280 x 960 – This is the largest resolution available and
sets the image to 1280 x 10, or 1.3 megapixels
VGA 640 x 480 – Sets the image size to VGA 640 x 480 pixels
Wallpaper 128 x 160 – Sets the image size to 128 x 160
pixels so that you can use the image as a wallpaper
Media 128 x 128 – Sets the image size to 128 x 128 pixels
so that you can send your photo to someone else in a
media message
Portrait 96 x 64 – Sets the image size to 96 x 64 pixels so
that you can use the captured image as a caller ID photo in
your phonebook contacts
92
Page 57

Additional camera settings
Zoom
Press to zoom in and press to zoom out.
Brightness
Press to decrease the brightness level and press to
increase the brightness.
95
Save to Phone/Save to Memory Card
By default, camera images will be saved to the memory
card. Select this option to save your image to your
phone’s memory.
Images
Select to access the image library where your photos
are stored.
Please note:
If you can not find the image you require it could be that
the image has been saved to your phone’s memory or the
miniSD card depending on which memory you are
currently using. Press to select Option and then scroll
to Phone Memory or miniSD Card.
• Once you have completed all the necessary camera
settings, press to return to the viewfinder screen
94
Page 58

97
Ta ke a picture
•When your object is in focus, press to
photograph the object
Please note:
To take a picture of yourself, close your mobile’s flip and
use the external display as the viewfinder. To take the
picture press .
Your photo will then show up on the main display.
•Your photo will save automatically to Media
Centre – Images
Please note:
•When taking photos, do not block or touch the
camera lens
•Always photograph your object with the source of light
behind you
• Do not shake your mobile when taking photos
• Please be sure that the lens is perfectly clean before
taking photos. Use a soft cloth to wipe the lens if it is
not clean
96
Managing your pictures
•After taking your picture, press to select Option
and choose from the following:
Send – enables you to send this photo to
someone as a media message. You can
also send a media message by entering
Messages – Media. For further
information on Media Messaging please
refer to page 77
Please note:
Media messages only allow small pictures to be attached,
meaning that some pictures cannot be sent by media
message. The alternative way to send a large picture is
to download to your PC via the USB cable and CD-ROM
supplied.
Rename – select to give your photo a new file name
Delete – select to delete the photo you have just
captured
Images – Select to access the image library where your
photos are stored
Page 59

99
Please note:
If you can not find the image you require it could be that
the image has been saved to your phone’s memory or the
miniSD card depending on which memory you are
currently using. Press to select Option and then scroll
to Phone Memory or miniSD Card.
Set Wallpaper
– designates this photo as the wallpaper
for either the main display’s or external display’s
standby screen
View your pictures
Pictures that you have previously taken will be saved
to Media Centre – Images. For further information on
viewing your images and the Media Centre please refer
to page 124.
Please note:
By default the O2X3 will save pictures and videos to the
supplied SD memory card.
98
Your O2X3 has an in-built video camcorder to shoot video
clips. You can even send selected video clips to a friend in
a media message.
•In the standby screen press and enter direct into the
preview mode
Alternatively, in the main menu, scroll to Camera and press
to select, then select Video
•You can now view your subject through the viewfinder
Video
Page 60

CIF 352 x 288 – select to set the video image to 352 x 288
pixels in CIF mode. A video clip shot in this mode must be
saved to the miniSD card. The file format is *.mp4
Switch to Indoor
Enhances video quality to allow you to take better quality
video recordings in indoor conditions.
Quality
Sets the quality sharpness at which the video clip is shot.
Select from High or Normal.
Contrast
This setting allows you to adjust the contrast level.
Save to Phone
By default video recordings will be saved to the memory
card. Select this option to save recordings to your phone’s
memory.
Videos
Select to access the video library where your video clips
are stored.
101
Video settings
Before you shoot your video clip you can amend the
video settings.
• Press to select Option
•In the video setting screen select;
Size
Select to adjust the size of the video clip you wish to shoot.
Choose from:
Caller ID 96 x 64 – this option sets the video image to 96 x
64 pixels to record a video caller ID for your phonebook
contact. The maximum length of the video clip in this
mode is 5 seconds. The file format is *.mp4
Media 128 x 128 – select to set the size of the video image
to 128 x 128 pixels so that it can be sent in a media message.
The file format is *.3gp
QCIF 176 x 144 – this sets the size of the video to 176 x 144
pixels in QCIF mode. A video clip shot in the mode must be
saved to the miniSD card. The file format is *.mp4
100
Page 61

Shoot a video clip
•When you are ready to shoot your video
clip press to start recording. The
length of the video will be shown in the
upper right hand corner of the screen
•To stop recording press
Please note:
•If you receive an incoming call at the same time as
recording a video clip, your mobile will stop recording
and save the clip
•If you press during a recording, your mobile will
stop and save the video clip before returning to the
standby screen
Enabling long video recording
By default the O2X3 will record a few seconds of video to
enable you to send the video as a video message. To allow
longer recordings:
103
Please note:
If you can not find the video clip you require it could be
that it has been saved to your phone’s memory or the
miniSD card depending on which memory you are
currently using. Press to select Option and then scroll
to Phone Memory or miniSD Card.
• Once you have completed all the necessary video
settings, press to return to the viewfinder screen
Additional video settings
Zoom
Press to zoom in and press to zoom out.
Brightness
Press to decrease the brightness level and press to
increase the brightness.
102
Page 62

Delete – select to delete the video clip you have just
recorded
Rename – select to give your video clip a new file name
Videos – Select to access the image library where your
video clips are stored
Please note:
If you can not find the image you require it could be that
the image has been saved to your phone’s memory or the
miniSD card depending on which memory you are
currently using. Press to select Option and then scroll
to Phone Memory or miniSD Card.
View your video clips
Video clips that you have previously shot will be saved
to Media Centre – Videos. For further information on
viewing your images and the Media Centre please refer
to page 134.
Please note:
By default the O2X3 will save pictures and videos to the
supplied SD memory card.
105
• Delete any video files in the Media Centre that are not
required
• Then in the video viewfinder mode select Options – Size
and select either QCIF or CIF
• Carry on recording as detailed above
Please note:
If you record in these size formats, the file size will be
bigger than standard and you will be unable to send the
video as a video message.
Managing your video clip
• Press to select Option and choose
from the following:
Play – select to playback the video clip
Send – enables you to send your video clip
to someone else in a media message. You can also send a
media message by entering Messages – Media. For
further information on Media Messaging please refer
to page 124
104
Page 63

It’ll let you share your day with friends with full colour
images or video and quality sound. It’s where the sports
news and entertainment gossip you care about is sent
straight to your mobile, and where finding the fun is
easier with info on movies, gigs and great events
happening near you.
Change your world. There’s so much you can do with
O2Active.
* Terms and conditions apply to O2 Active. Please visit www.o2.co.uk for details.
O2 Active is a trademark of O2 Limited. Services are handset and network
dependent.
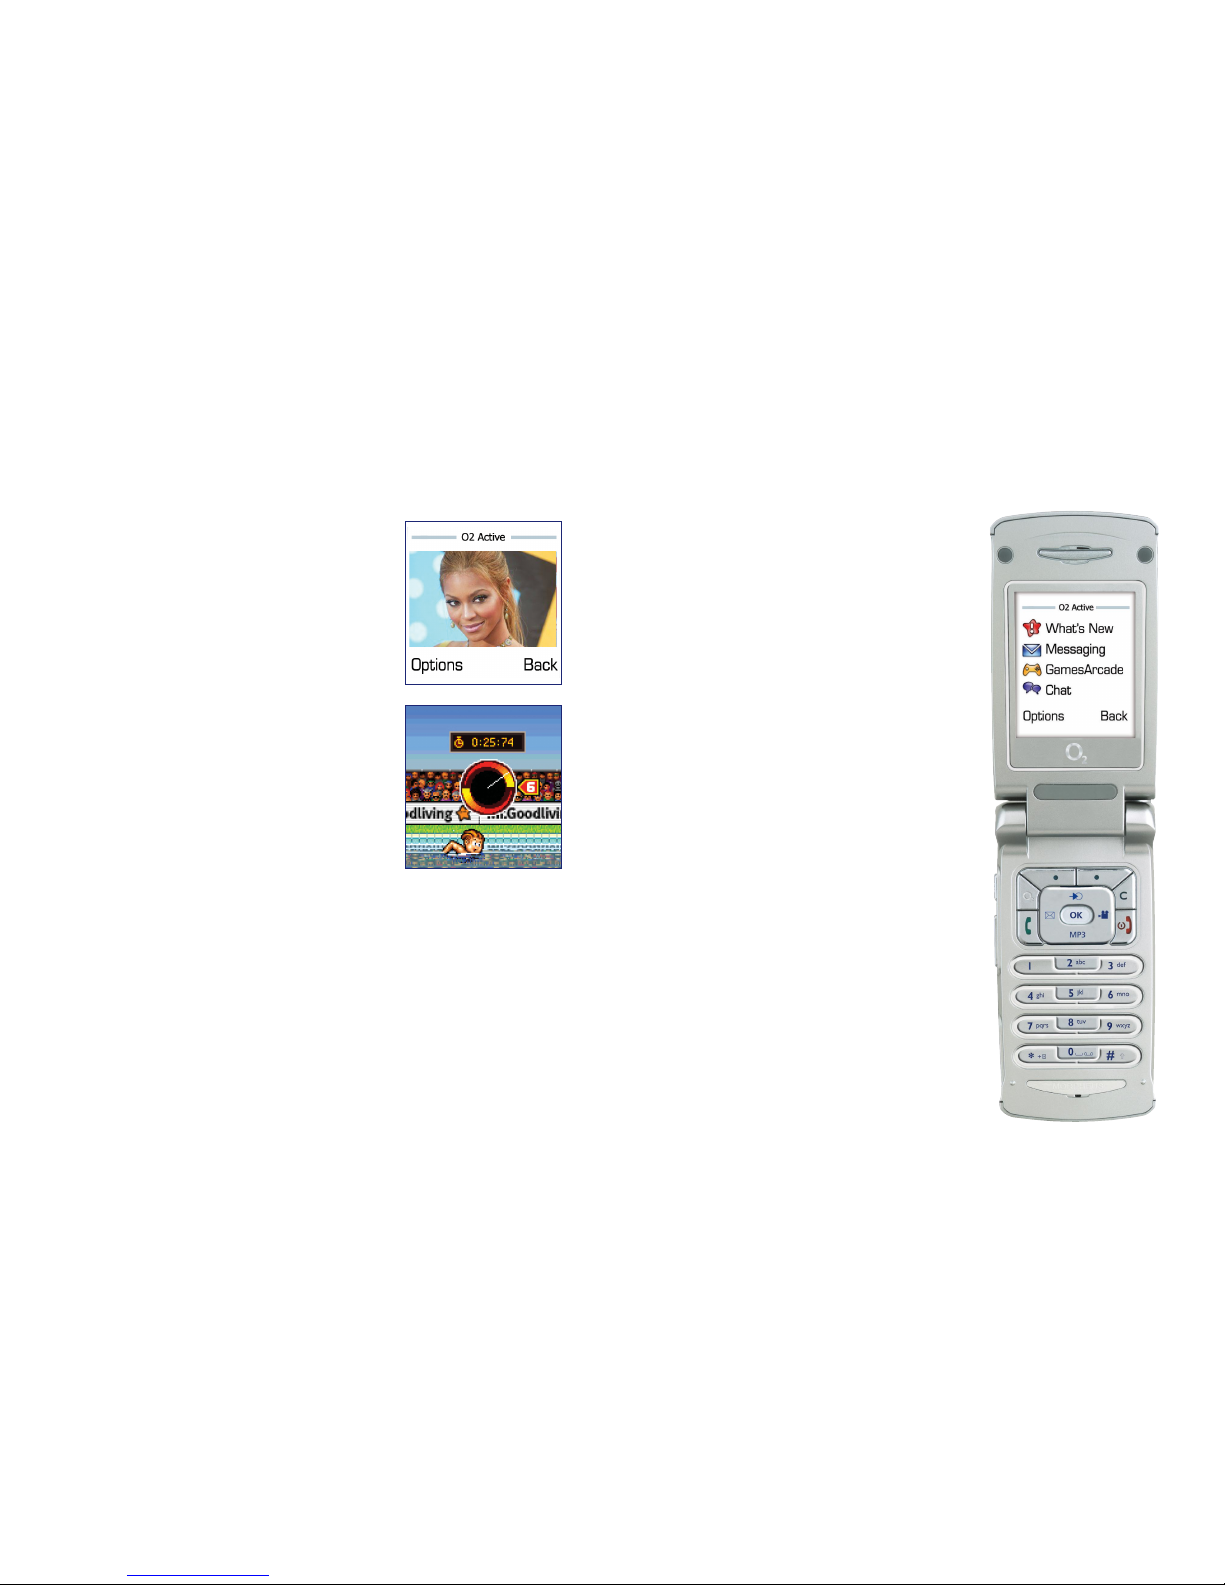
107107106
O2Active
TM
Your new mobile has a WAP browser, which enables you to
access O2Active and other Mobile Internet services.
O2Active
Get ready for the bigger, brighter, vibrant world of
O2Active*.
This is your world, where you can download your
favourite tunes, play games that’ll get you hooked and
watch video entertainment and information.
video picture messaging media messaging colour games downloads chat music sport news info travel enter tainment
Page 64

Games Arcade
Mobile gaming has never been so good.
Preview and download a massive range of
full colour, funky and action packed
games. Check out the game of the month,
O2’s top ten games or choose from arcade,
action, puzzles, sports games and more.
For further information on the O2Games
Arcade please refer to page 119.
Chat
Our anonymous Chat service is the place to meet friends
around the country or have a little flirt on our special
speed dating service.
109
What’s new?
Here’s where to head for to get into anything new in the
world of O2Active. You’ll also find the latest competitions
that could win you fantastic prizes.
Messaging
Now you can show your mates exactly what’s
going on – in full colour. With O2Active, it’s
easy. Create and send unique messages by
shooting photos or videos and adding text
and sound. You can download images from the O2Active
online Gallery, as well as store your own messages, pictures
and photos. Plus get essential Picture Alerts* such as sports,
entertainment gossip and babes or male models of the day.
108
* Cost: standard rate for each message sent. From 18p for each message
received. Terms and conditions apply.
© Mr Goodliving Ltd. All Rights Reserved.
Games featured are for illustratory purposes. Games will be available but these
featured titles may not be supported by the O2 X3.
Page 65

Time Out Eating Guide, Clubs and Bars –
Whether you’re a curry fiend or pasta freak,
into busy bars or quaint boozers, these
reviews will help you find the best
restaurants, clubs and bars to match
your taste.
TV Guide – Fancy a night in? Put your feet up and find out
what’s on the box.
Gossip – You’ll hear it here first. Get the hot news from
the movie and music worlds – and find out who’s up to what
and with who. And if you can’t get enough scandal on the
stars, simply sign-up for daily alerts* about every little detail.
Time Out Stars – Want to know how your career, finances
and love life are written in the stars? Here’s where you
find out.
Bollywood – The top 10 chart, interviews, intrigue and
glamour with the best of Bollywood direct to your mobile.
Cartoons – Have a laugh with the latest Garfield or Dilbert
cartoon – then share the joke with your mates by sending
it on.
* Standard cost to send text to 80202. From 13p to receive texts except
‘Footy Alerts’ – 18p to receive.
O2 does not suggest in any way that the celebrities featured in this guide are
endorsing O2 products or services.
111
Downloads
Bring your mobile to life with downloads.
Get your favourite tune as a polyphonic ring
tone. Try TrueTones that sound just like real
music or Soundbytes, from animal noises to
sounds of nature. Download wallpapers from motors and
bizarre to music, animals and male or female model of the
day. Plus video downloads from news, weather and sports
to comedy, catwalk fashions and pop star interviews.
Entertainment
Whether you want to dance into the small hours or catch the
latest Hollywood blockbuster, O2Active will point you in the
right direction. Wherever you are, it’s all you need for a crazy
night out or a cosy night in.
Films and Gigs – Check out what’s on near you – movies,
gigs, comedy nights – and more.
* Subject to network coverage.
110
Page 66

News
Even when you’re engrossed in O2Active,
you can stay in-touch with what’s going on
around you. Or if you really want to see
what’s happening in the world you can
stream video news clips direct.
Get the breaking stories direct from the BBC, covering
national and international affairs or business,
technology, entertainment, and more – in text and with
full-colour pictures. Or if you really want to see what’s
happening in the world you can stream video news
clips direct.
Music
If you’re into music, then get into O2Active.
You can download your favourite tune as a
polyphonic ring tone or a TrueTone that
sounds like the real thing. Dress up your
mobile with pictures of your favourite music artists or watch
video interviews with the hottest artists and bands.
O2 does not suggest in any way that the celebrities featured in this guide are
endorsing O2 products or services.
113
Sport
If you can’t be at the match, the match can
come to you. With O2Active, you can stay
on top of the latest sports action, wherever
you are.
Access special ‘live’ sections to keep up-to-date with the
latest events and results. Get all the action from the
Premiership and Champions League football. Keep up-todate with this year’s Olympics and Extreme Games, all
the F1 races and the major tennis, golf and cricket
tournaments. In fact, you can read all the day’s sports
news with full-colour pictures and even stream video
highlights. Find out about the best sport on TV with the
sports guide or be one of the first to get the red-hot
sports stories by signing up for Text and full-colour Picture
Sports Alerts. Plus download sports themed Java Games
and Football legends wallpapers to extreme sports videos.
* Subject to network coverage.
112
Page 67

Info Services
Text Alerts* – Whatever’s important to you,
whether it’s footy scores, the latest showbiz
gossip or the top news story, you can keep
bang up-to-date with O2Text Alerts. You can
subscribe and unsubscribe to alerts in a few easy clicks on
your handset within the text alerts menu.
Train Times – Tired of delayed trains or cancellations. Check
train times on the move and get updates wherever you are.
Time Out City Guides – Access information on the top ten
European cities to visit, including the best places to stay,
eat, drink and party.
lastminute.com – Make last minute holiday plans, gift
purchases, dinner reservations and more using your mobile
with lastminute.com and O2Active. In addition to the O
2
Active service, shortcode 5959 can be
used to access lastminute.com
Thomson Local Directory – Cabs, fast food, restaurants and
shops, find the phone numbers you need fast, while you
are on the move.
National Lottery – Look up your winning numbers
wherever you are with National Lottery results.
* Cost: standard rate for each message sent. From 13p for each message
received. Terms and conditions apply.
115
O2Active has all the stories and pictures behind the songs so
you can find out which music stars are making headlines with
music news and gossip.
You can also get the latest weekly single and album charts
and sign up for weekly text chart alerts. If there is a track
you’ve heard but don’t know the name, you can tag it with
your mobile. Just click on Shazam* under O
2
Active Music,
aim your mobile at any loud music and Shazam* will text you
back the name of the track.
Plus keep your finger on the pulse and use your O
2
Active
mobile to find out what live gigs and music events are
happening near you.
* Cost: 50p per tag
114
Page 68

117
Maps and routes – Find your way around
by car, bike or foot without ever having to
carry a map, ask a stranger or phone a
friend with full colour route and walking
maps. All you have to do is enter where
you are and where you are going and the maps will show
you the way.
My WAP – Impress your friends with your own WAP site.
It’s so easy to set up and all from your mobile. Want to
organise a night out? Update your WAP site with all the
info and get your friends to access your homepage to find
out where they are going and what you have organised
for them.
116
How to access O2Active
Your O2X3 is already set up to access O2Active.*
•From the standby screen, press and hold to access
O2Active
The O2X3 will then access O2Active and the O2Active
icons homepage will load on your screen.
•Alternatively, to access O2Active select O2from the main
menu. You will then be taken to the WAP service screen
• Select and the O2X3 will then access O2Active, and
the O2Active homepage menu will load onto your screen
How to close the browser
•Whilst online, press and hold
* Terms and conditions apply to O2 Active. GPRS charges may apply. Please visit
www.o2.co.uk for details. O2 Active is a trademark of O2 Limited. Services are
handset and network dependent.
Page 69

119118
Games
You can experience the latest full-colour, console-style
games in full effect on your O2X3. Get ready for a gripping
gaming experience that takes your breath away.
•In the main menu, scroll to Games and select by
pressing
• Scroll to O2Games Arcade* and press
O2Games Arcade
Welcome to the era of fast and furious mobile gaming.
The O2Games Arcade brings you full colour, quality games
from classic puzzles to championship footy. Choose from
arcade, action, puzzles, sport, the O2Top Games and Game
of the Month. Games are easy to download and you can
preview them beforehand. You will only be able to view
games that are available on your mobile.
* WAP charges may apply. See www.o2.co.uk or check your calling plan
for more details. Terms and conditions apply.
Page 70

121
Rubik’s Cube
®
Get your fingers moving and your mind
boggling as this worldwide favourite makes
its way onto your phone. It’s got all the
moves of the original and even a cheat guide
so you don’t have to try and pick the stickers off anymore!
Pub Pool
Play pool in an authentic public house
setting, everything about this game is
realistic; from the dodgy house rules to the
dreadful flock wallpaper. The only thing
missing is a pint and packet a crisps!
Turbo Camels
Racing just got hairy! Fast and hilarious,
Turbo Camels brings fun back to mobile
racing. Race your turbocharged 1500 – camel
power beast against international Camel
Jockey stars. Use any means necessary to win!
No trick is too dirty in the desert.
120
How to download games
• Once you’re in the Games Arcade you can see the O2Top
10 games, Game of the Month, or select Get Games to
see a list of all the games
•You will then see a list of all the categories – New,
Arcade, Action, Puzzles, Sport and Others
• Select the category you want and a list of all the
available games will appear on screen
•Just choose the game you want to play and select to get
a full description
• If you want to buy the game select
Buy
• On the following screen select Download. It may take a
minute for the game to download – please don’t cancel
before it has finished downloading
• The game will now be stored on your mobile
To play a game you have downloaded
• Select Games from the main menu
•Then scroll to
Games and press
• Select the game that you have downloaded
•You’re now ready to play!
Rubik®and Rubik’s Cube®are registered trademarks of Seven Towns Ltd and
used under license.
©
Iomo. ©Copyright Mr. Goodliving Ltd 2003. All rights
reserved. Games featured are for illustratory purposes. Games will be available
but these featured titles may not be supported by the O2 X3.
Page 71

123
Playman Shoot N Splash
TM
On your marks, get set, GO! The sequel to
the best selling Summer Games is here!
With 4 new challenging events (swimming,
high board diving, archery and skeet),
superb graphics and animation, single event
and training modes and the option to
compete with up to 10 players in
tournament mode.
Space Invaders
®
A pixel perfect recreation of the arcade
classic and a must for mobile gamers. Zap
the shuffling aliens, dodging their laser
missiles, using the bases for cover to achieve
the highest score.
122
PAC-MAN
TM
Munch your way around the monster ridden
maze whilst avoiding Blinky, Pinky, Inky and
Clyde in this arcade classic from Namco. Can
you get the perfect score?
Te tris
®
The most addictive puzzle game ever is now
available for your mobile, complete with
retro sound track!
Ancient Empires
Take the role of King Galamar in Ancient
Empires and defend your Kingdom from
Valadorn, Galamar’s evil twin brother. Battle
for survival in this epic battle between good
and evil. You will need strategy, planning
and nerves of steel to create and control
your army for the final battle.
©1980, 2001, 2003 Namco LTD. All rights reserved.
Tetris®; © Elorg 1987 and Tetris™; © Elorg 1999. Tetris Logo created by Roger
Dean; © 1997 The Tetris Company. All Rights Reserved. Produced and published
by iFone Ltd.
© Copyright 2002-2004 Macrospace Ltd. All Rights Reserved.
© Mr Goodliving Ltd. All Rights Reserved.
© Taito Corp. 1978, 2003.
Games featured are for illustratory purposes. Games will be available but these
featured titles may not be supported by the O2 X3.
Page 72

Please note:
If you can not find the image you require it could be that the
image has been saved to your phone’s memory or the miniSD
card depending on which memory you are currently using.
Press to select Option and then scroll to Phone Memory
or miniSD Card.
• Press and scroll through the images previewed and
press to view fully
Managing your images
To manage your images select Option by pressing , and
choose from the following options:
Send
Enables you to send your video clip to someone else in a
media message. You can also send a media message by
entering Messages – Media. For further information on
Media Messaging please refer to page 77.
125
The media centre stores all the images, animations, photos,
video clips, MP3 files, ring tones and wallpapers you have
either taken, downloaded or received.
•In the main menu, scroll to Media Centre
and select by pressing
Then select;
Images
The image library contains all the images, animations and
photos that have been stored to the phone’s memory or on
to the miniSD card.
• Scroll to Images and press to select
When you enter this menu the most recently
saved images will be displayed as thumbnails
(small miniature versions of the photos you
have taken), and the bottom of the screen
will display the file name of the currently
highlighted thumbnail.
124
Media Centre
Page 73

Fun ways to edit your images
• Select Media Centre from the main menu and then
select Images
• Scroll to the image you would like to edit and press
to view, then press to select Option, scroll to
Edit and press to select
Edit
• Scroll to Edit and press to select
•In the Edit Mode screen press to select
Option, then choose from the following:
Add frame
Add a frame to surround your image.
• Scroll to Add Frame and select by pressing
• Press to select the desired frame and
press to confirm your selection
• Press again, then enter a new file
name and press to confirm and save
127
Organise
Select Organise so that you can rename the file name or
set as your wallpaper. Then choose from:
•
Set Wallpaper – designates this photo as the wallpaper
for either the main display’s or external display’s
standby screen
Edit
You can edit your images in various ways. For further
information on editing your images please refer to
page 127.
Delete
Select to delete the image stored.
Slide show
After selecting this option the images will be presented as a
slide show to you. Press during the slide show to stop
the background ring tone, select a different ring tone, or
choose a different slide style.
126
Page 74

Left rotate
Select to rotate your image 90 degrees to the left.
• Scroll to Left Rotate and press to select
• Press , then enter a new file name and press to
confirm and save
Face morph
Change people’s face expressions shown in the photos you
have taken with the Face Morph feature, then save the
photos showing different expressions of the same person.
• Scroll to Face Morph and press to select
The Face Morph function will generate various expressions
for a person’s face according to the four red spots you
manually have to position on the photo. In the Face Morph
function the first red spot will appear on the screen.
• Press to position the red spot and once in position
press to confirm
• The next red spot will then appear on the screen. Follow
the same instructions until all four have been completed
129
Add stamp
Add a stamp to your image to convey a particular message –
add ‘thumbs up’, ‘a plaster’, ‘a broken heart’ or ‘I love you’.
• Scroll to Add Stamp and select by pressing
• Press to select the desired stamp and
press to confirm your selection
• Then press to move the stamp to the
desired position and press to select
Paste
• Press , then enter a new file name and
press to confirm and save
Right rotate
Select to rotate your image 90 degrees to the right.
• Scroll to Right Rotate and press to select
• Press , then enter a new file name and press to
confirm and save
128
Page 75

Please note:
To return to the original photo with no expression effects
you can press to select Normal at any time.
• Press to intensify/reduce the expression effects.
Intensity levels will be displayed at the top right corner
of the screen ranging from 0 to 10; the default value is 8
•When the photo shows the desired expression effect for
the person’s face, press
•Enter a new file name and press to save. Your new
image will be saved to Media Centre – Images
•After you have saved the photo showing the expressions
you want, the original photo will reappear. Again you
can press corresponding number keys to create more
photos showing various facial expressions
131
Please note:
•To generate the best expressions place the first red spot on
the outer corner of the right eye; the second on the outer
corner of the left eye; the third on the right corner of the
mouth and the fourth on the left corner of the mouth
•To reset a red spot’s position, press to select Undo
•When the spots are in the desired position press
•Then the Press number key to change prompt will
appear on the screen, followed by the person’s face
remaining unchanged
• Press a corresponding number key to generate the
desired facial expression effects for the person’s face
The chart below shows each number key and their
matching expression effects:
130
Key Expression Key Expression
Smile Angry
Young Make face
Slim Alien
Kiss Koala
Sleepy Monkey
Sad Fox
#
6
mno
5
jkl
0
4
ghi
9
wxyz
3
def
8
tuv
2
abc
7
pqrs
Page 76

third on the right corner of the mouth and the fourth on
the left corner of the mouth
•To reset a red spots position, press to select Undo
•When the spots are in the desired position
press
• Then select the to preview the
animation
•Keep on scrolling to find the animation
that your prefer
Please note:
To return to the original photo with no
animations you can press to select
Normal at any time.
•When you have selected the desired animation, press
• Enter a new file name if required and press to save.
Your new image will be saved to Media Centre – Images
133
Face Dressing
Add animations to photos you have taken of people’s
faces. For example insert an animated wig, crown or rain
clouds around someone’s face, then save the edited photo.
• Scroll to Face Dressing and press to select
The Face Dressing function will generate various
animations around the persons face. To do this you need to
position 4 red spots on the picture. The first red spot will
appear on the screen.
• Press to position the red spot and once in position
press to confirm
• The next red spot will appear on the screen. Follow the
same instructions until all four red dots have been
placed
Please note:
•To generate correctly placed animations, ensure that the
persons face is in the centre of the photo
•Place the first red dot on the outer corner of the right
eye; the second on the outer corner of the left eye; the
132
Page 77

Whilst the video is playing, press the keys listed below to
perform the following actions:
•When the video has finished press to select Back
Pre-installed Digital Music Player advert
The memory card supplied with the O2X3 comes with the
O2Digital Music player advert pre-installed. For a great
demonstration of video playback, sound and the screen
quality select Video then select DMP ad. Then select Play to
view the video.
135
Videos
The video library contains video clips stored in the phone
memory and miniSD card.
• Scroll to Video and press to select
When you enter this menu the most recently saved videos
will be listed.
Please note:
If you can not find the video you require it could be that
the image has been saved to your phone’s memory or the
miniSD card depending on which memory you are
currently using. Press to select Option and then scroll
to Phone Memory or miniSD Card.
• Press to scroll through the video file names
• Press to display the video in full on the screen
• Press to start playing the video
134
Press To
Freeze the desired image/resume playback
Press and hold to rewind video content
Press and hold to fast forward video content
Stop playback
Page 78

Organise
Select Organise so that you can rename the file name or
create a new folder to store your video clip. Then select:
•
Rename – select to amend the file name
Delete
Select to delete the saved video clip.
137
Managing your video files
To manage your video files select Option by pressing
when in the video list screen, and choose from the
following options:
View
Select to play the video clip.
Send*
Enables you to send your video clip to someone else in a
media message. You can also send a media message by
entering Messages – Media. For further information on
Media Messaging please refer to page 77.
miniSD Card/Phone Memory
Select to change memories and view the list of videos
available on the miniSD card or phone memory.
* You may not be able to send a video clip if the file is too large. See Media
Messaging for further details.
136
Page 79

•When the MP3 player screen appears, follow the
instructions below to control the MP3 player:
139
Music player
Your mobile has an in-built digital music player to
play MP3s.
Please note:
• The MP3 player can only play audio files saved in MP3
format, saved as *.mp3
•To play MP3s using your mobile’s MP3 player, the
miniSD card, where all the MP3 audio files are stored
must be inserted into your mobile
Listening to MP3s
• Scroll to MP3s and press to select
Alternatively, in the standby screen, press to enter
directly into the MP3 player.
138
Elapsed time
during playback
Press to
increase/descrease
volume during
playback
Press to
select the
previous MP3
The file name of the
MP3 being played
Press to set
the play mode,
repeat once,
repeat all, off.
Press to
select the next
MP3
Press to
stop the MP3
Press to start playing the
selected MP3 /pause during
playback/resume playback
Page 80

Uploading MP3 files to the O2X3
MP3 files can be uploaded to the O2X3 by using the
supplied mini SD card and a PC or laptop. You will need to
obtain or purchase a mini SD to standard SD adapter. You
can purchase this from an O2store.
•When you’ve got the adapter simply insert your mini SD
card into the adapter. Please ensure that this is fitted
securely
If you have an SD slot on your laptop or PC
•Insert the adapter into the SD slot of your PC or laptop
•You can now drag and drop MP3 files between the
PC/laptop and the memory card
• Once you’ve uploaded the MP3 to the memory card,
remove the SD adapter from the slot on your PC or
laptop. Then remove the mini SD card from the adapter.
Then insert the mini SD card back into your O
2
X3
• Select
Menu from the standby screen, then Media Centre
– MP3. Select the MP3 in order to play the file
141
Managing your MP3 files
To manage your MP3 files select Option by pressing ,
and choose from the following options:
Edit play list
You can choose which files you want the MP3 player
to play.
• Scroll to
Edit Play List and press to select
• Scroll to the file name of the MP3 you would like to play
and press to select
•When you have finished selecting your files, press
to select Done
View play list
This is the album directory where the files you want the
MP3player to play are stored.
View all files
Here you can view all the available audio files stored on the
miniSD card, and then select which ones you wish to delete.
140
Page 81

143
If you do not have an SD port on your PC or laptop
•You will need to purchase the mini SD to SD adapter
detailed above and also a media reader/writer, to allow
your memory card to connect to your PC/laptop
•Insert the mini SD card into the adapter as detailed
above. Refer to the media reader/writer instructions
for set up
• Once you’ve set the media reader/writer up you’ll be
able to drag and drop MP3 files from your PC to the
mini SD card
•Once you’ve uploaded the MP3 file, follow the
instructions above to play the file
Please note:
Do not use this feature illegally. Music can be protected by
copyright. The recording of such music is permitted for
your personal use only. It is illegal to copy such music tracks
for the purpose of selling or distribution. O2do not in
anyway support the unauthorised use of content on the
O2X3 MP3 player.
142
Create your own ring tones
Your O2X3 enables you to produce actual audio recordings
to use as ring tones for incoming calls. Record your own
voice, a particular piece of music or an unusual sound…
• Scroll to Ringtones and press to select
• Scroll to Compose Voice and press
• Press to select Option, then select Add
•Press to select Yes when prompted to start recording
• Record your ring tone. When you have finished press
to stop recording
• Enter a file name for your recording and press to
save to your phone’s memory in Media Centre – Ringtones
Please note:
You can then set your new recording as your mobile’s ring
tone for an incoming call. Go to Settings – Profiles and
then change your selected ring tone.
Page 82

Managing your ring tones
When you have recorded some new ring tones you can set
them as your ring tone, rename them or even delete them.
•In the Ringtones menu, scroll to List and select by
pressing
• Scroll to one of your saved ring tones and press to
select Option
• Then select from a number of options available
Please note:
If you cannot find a list of ring tones it could be that the
ring tone is stored on your mobile’s memory or on the SD
card. Select Options and then Phone Memory or SD card.
145144
Page 83

• Scroll through the list of images and press to select
one or several
•When you have made your selection(s), press to
select Option
• If you have selected several images, scroll to Slide Show
and press to see a preview
•Once your selection is confirmed, scroll to
Done and press to confirm
• Return to the standby screen and view
your wallpapers
147
Wallpapers
Change the wallpaper on your mobile’s main and external
displays. Choose from the list available or even select an
image that you have taken with your mobile’s built-in
digital camera, downloaded from O2Active or received
from friends in a media message.
• Scroll to Wallpapers and press to select
• Select External Display or Main Display
• Scroll though the list of preset wallpapers and press
to select View and preview your new wallpaper
• Press to confirm your selection
You can also select an image that you have saved rather
than one of the preset wallpapers.
• Scroll down through the list of wallpapers to
User
Defined, then press to select Option
• Scroll to Phone Memory or miniSD Card depending on
where your image is saved and press to select
146
Page 84

•In the main menu scroll to Tools and select by
pressing
My Services
• Select My Services if you are on Pay & Go to access a list
of useful numbers and services
Please note:
My Services is only available to Pay & Go customers. If you
are on a Pay Monthly calling plan your first menu option
within Tools is Alarm (please see below).
Alarm
• Scroll to Alarm and press
• Select the alarm you wish to set and activate
and press to select
Please note:
If you activate the alarm feature, when the specified date
and time arrive, your mobile will sound the alarm, even if it
is switched off.
Tools
149148
Page 85

– Set the snooze mode. When the alarm goes off you
can press to select Snooze to stop the alarm
and go back to sleep. The alarm will sound several
minutes later
• Scroll to highlight this option and press to turn
the snooze mode on or off – Snooze on/Snooze off
When the snooze mode is turned on, you can also
do the following:
Set the time period the snooze alarm waits before
sounding again
•Press to set the desired time period in minutes.
A maximum of 20 minutes can be set
Determine how many times the snooze alarm goes
off again
•Press to set the number of times the alarm
sounds. You can set the alarm to go off up to
five times
• Once complete press to save the Alarm settings.
To confirm that the alarm is set a press will appear
in the standby screen
151
Then, use the following steps to complete
the alarm settings:
– Enter the time when an alarm will
go off
–Use to set the alarm mode:
Off – alarm is turned off
Once – alarm will go off only once
Weekday – alarm will go off Monday through
Friday. It will not go off on weekends
Always – alarm will go off every day at the specified
time
–To set the ring tone for the alarm
•Press to select Set
• Scroll through the options available and press
to select
– Set the vibration
•Press to turn the vibration on or off
150
Page 86

To set a memo
•In the calendar screen, press to move
the blue box to the date where you wish to
create a memo. You can jump to the
previous or next month’s calendar by
pressing to select Prev or to select Next
•To go to a future or past date, press
and then select Go to Date. Enter the
desired date and press
•When the desired date is highlighted,
press to enter the calendar menu, and
then scroll to Add Memo and press to select and
open the memo editor
•In the memo editor screen, scroll to the data field you
wish to edit
You can enter data in the following fields:
– Change the memo’s assigned date by pressing the
appropriate number keys
– Enter a time for the event associated with the
memo by using the appropriate number keys
153
Please note:
When the alarm rings, there are two ways to
turn it off:
•Press to select OK. Your alarm will not
sound until the next scheduled time
•Press and select Snooze. The alarm will sound again
minutes later
Calendar
You can use the calendar to set up forthcoming events
such as a meeting, an appointment, or a friend’s birthday.
The calendar will also remind you about events you have
previously scheduled.
• Scroll to Calendar and press
•When you open the calendar, the current
date will be highlighted
Please note:
If you have not set the current time and date on your
mobile, go to the menu Settings – Date & Time and set.
152
Page 87

– Choose whether the memo will regularly remind
you about the event after the scheduled date.
Choose between None, Daily, Weekdays, Weekly or
Monthly
– Record any notes about the event associated with
the memo
• After entering the data in each of the fields, press
to save the memo to that date
You can then perform the following tasks when in the
Today’s Memo screen:
•Press to select Option and select whether to Edit or
Delete the highlighted memo or Add a new memo
•Press to view the details of the highlighted memo.
Then press to select Option and choose whether to
Edit or Delete the memo, or Send By Text
•Press to select Back to return to the Calendar menu
and choose from the following options:
Day’s memos – view the current date’s memo(s)
Add memo – add a new memo
View all – browse all of the memos set up for different dates
155
– Enter a name for the event associated with the
memo
– Set your mobile to ring or vibrate on the appointed
date when the scheduled time arrives. Press to
choose one of the following:
None – your mobile will not ring or vibrate
Ring Only – your mobile will ring you to remind you
of the scheduled event
Vibrator Only – your mobile will only vibrate to
remind you about the scheduled event
Ring & Vibrator – your mobile will ring and vibrate
to remind you about the scheduled event
–To select a ring tone for the memo reminder.
This option is not available if you select None or
Vibrator Only.
• Select Set by pressing , scroll to the ring tone
you want and press to select
• If you can not see the ring tone you want in the
list, select Option and switch between the Phone
Memory and miniSD Card
154
Page 88

Currency converter
• Scroll to Currency Converter and press to select and
enter the currency converter screen
Step one:
•To set the exchange rate, press to select
Set and bring up the
pop-up menu
• Select Set Foreign Rate to enter the rate for
converting the amount to the desired
foreign currency, and select Set Local Rate to
enter the rate for the conversion to your
local country
• Once complete press
Please note:
•Press to enter a decimal point
• The exchange rates can be up to nine
digits long
157
Go to date – go to the date you require
Delete all – select to delete all existing memos
•Press twice to select Back and return to the
Calendar screen. The dates that already contain memos
will now be marked by a yellow box
Calculator
Allows you to use your mobile as a calculator.
• Select Calculator by pressing to open the
calculator screen
• Use the keypad to type in
the numbers you wish
to calculate
•Use to perform
the mathematical
operations on the screen
•Press * to enter a decimal point
• Once completed press to select =
Please note:
You can enter numbers up to a maximum of 8 digits in length.
156
Entered numbers
and calculation
results appear in
this field
Page 89

• Scroll through the cities available by pressing or
press to jump to the next or previous page
•When the desired city is highlighted,
press to mark that city. The cities
you have chosen are indicated with
a checked box. To uncheck certain
boxes, scroll to the relevant city
and press
• Once complete select Done by pressing . You will
then return to the screen showing the current date and
time for the city/cities you have selected
Please note:
If you have not set the current time and date on your
mobile, go to the menu Settings – Date & Time and set.
159
Step two:
•Return to the currency converter screen
•Either enter the amount for the Local
currency or the Foreign currency. The
amounts can be up to nine digits long
• Then press . The converted amount will
appear in the field for the other currency
Clock options
World clocks
The world clocks feature simultaneously displays current
local time and date for major cities around the world on
one screen. You can choose up to six cities and display
them, so it is easy to find out the time in Los Angeles,
Hong Kong and Beijing all at the same time.
• Select Clock Options and then select World Clocks by
pressing
•Press to select Edit
158
Page 90

Hour minder
If you activate this option your mobile will emit a beep
every hour as a reminder.
• Select Clock Options and then select Hour Minder by
pressing
• Then select either On or Off
161
Time zones
If, during travel, you move between time zones, your
mobile will automatically adjust the time displayed on
the screen so that you always have access to accurate
local time.
Please note:
If you have not set the current time and date on your
mobile, go to the menu Settings – Date & Time and set.
• Select Clock Options and then select Time
Zones by pressing
On – the time displayed on your mobile will
be reset automatically according to the local
network operator’s time zone prompts
Off – Your mobile will display the time you set even if you
travel into other time zones. Your mobile will ignore time
zone prompts issued by the local network operator
Confirm First – your mobile will ask for your confirmation
before it resets the time
160
Page 91

163
Countdown timer
• Scroll to Countdown Timer and
press
•Press to select Set and enter the
amount of time to count down – this can
be up to 23 hours, 59 minutes and 59 seconds.
Then press to confirm
•Press to start the timer
• The timer will start and work its way down to zero
Please note:
You can use the timer in the same way you would the
stopwatch. For further information please refer to
page 164.
162
Page 92

165
Connection settings
The connection settings option allows you to use your
mobile’s connection services, namely:
• PC synchronisation
• Modem
• IrDA
•USB download cable
Select the connection service you want and press
to select.
164
Stopwatch
• Scroll to Stopwatch and press
•Press to start the
stopwatch
•While the stopwatch is running, you can
press to select Record and save up to nine elapsed
times (such as in a race).
•Press to halt the stopwatch
• Once stopped press to select Comp
and view the list of recorded times
•Press to select Reset to zero the
stopwatch
Please note:
Pressing to select Back whilst the stopwatch is running
will return you to the Tools main menu.
Page 93

•In the main menu scroll to Tools and select by
pressing
My Services
• Select My Services if you are on Pay & Go to access a list
of useful numbers and services
Please note:
My Services is only available to Pay & Go customers. If you
are on a Pay Monthly calling plan your first menu option
within Tools is Alarm (please see below).
Alarm
• Scroll to Alarm and press
• Select the alarm you wish to set and activate
and press to select
Please note:
If you activate the alarm feature, when the specified date
and time arrive, your mobile will sound the alarm, even if it
is switched off.
Tools
149148
Page 94

– Set the snooze mode. When the alarm goes off you
can press to select Snooze to stop the alarm
and go back to sleep. The alarm will sound several
minutes later
• Scroll to highlight this option and press to turn
the snooze mode on or off –
Snooze on/Snooze off
When the snooze mode is turned on, you can also
do the following:
Set the time period the snooze alarm waits before
sounding again
• Press to set the desired time period in minutes.
A maximum of 20 minutes can be set
Determine how many times the snooze alarm goes
off again
• Press to set the number of times the alarm
sounds. You can set the alarm to go off up to
five times
• Once complete press to save the Alarm settings.
To confirm that the alarm is set a press will appear
in the standby screen
151
Then, use the following steps to complete
the alarm settings:
–Enter the time when an alarm will
go off
–Use to set the alarm mode:
Off – alarm is turned off
Once – alarm will go off only once
Weekday – alarm will go off Monday through
Friday. It will not go off on weekends
Always – alarm will go off every day at the specified
time
–To set the ring tone for the alarm
• Press to select
Set
• Scroll through the options available and press
to select
– Set the vibration
• Press to turn the vibration on or off
150
Page 95

To set a memo
•In the calendar screen, press to move
the blue box to the date where you wish to
create a memo. You can jump to the
previous or next month’s calendar by
pressing to select Prev or to select Next
•To go to a future or past date, press
and then select Go to Date. Enter the
desired date and press
•When the desired date is highlighted,
press to enter the calendar menu, and
then scroll to
Add Memo and press to select and
open the memo editor
•In the memo editor screen, scroll to the data field you
wish to edit
You can enter data in the following fields:
– Change the memo’s assigned date by pressing the
appropriate number keys
–Enter a time for the event associated with the
memo by using the appropriate number keys
153
Please note:
When the alarm rings, there are two ways to
turn it off:
• Press to select
OK. Your alarm will not
sound until then next scheduled time
• Press and select
Snooze. The alarm will sound until
again minutes later
Calendar
You can use the calendar to set up forthcoming events
such as a meeting, an appointment, or a friend’s birthday.
The calendar will also remind you about events you have
previously scheduled.
• Scroll to
Calendar and press
•When you open the calendar, the current
date will be highlighted
Please note:
If you have not set the current time and date on your
mobile, go to the menu Settings – Date & Time and set.
152
Page 96

– Choose whether the memo will regularly remind
you about the event after the scheduled date.
Choose between None, Daily, Weekdays, Weekly or
Monthly
–Record any notes about the event associated with
the memo
•After entering the data in each of the fields, press
to save the memo to that date
You can then perform the following tasks when in the
Today’s Memo screen:
• Press to select
Option and select whether to Edit or
Delete the highlighted memo or Add a new memo
• Press to view the details of the highlighted memo.
Then press to select
Option and choose whether to
Edit or Delete the memo, or Send By Text
• Press to select Back to return to the Calendar menu
and choose from the following options:
Day’s memos – view the current date’s memo(s)
Add memo – add a new memo
View all – browse all of the memos set up for different dates
155
–Enter a name for the event associated with the
memo
– Set your mobile to ring or vibrate on the appointed
date when the scheduled time arrives. Press to
choose one of the following:
None – your mobile will not ring or vibrate
Ring Only – your mobile will ring you to remind you
of the scheduled event
Vibrator Only – your mobile will only vibrate to
remind you about the scheduled event
Ring & Vibrator – your mobile will ring and vibrate
to remind you about the scheduled event
–To select a ring tone for the memo reminder.
This option is not available if you select
None or
Vibrator Only.
• Select Set by pressing , scroll to the ring tone
you want and press to select
• If you can not see the ring tone you want in the
list, select Option and switch between the Phone
Memory and miniSD Card
154
Page 97

Currency converter
• Scroll to Currency Converter and press to select and
enter the currency converter screen
Step one:
•To set the exchange rate, press to select
Set and bring up the
pop-up menu
• Select Set Foreign Rate to enter the rate for
converting the amount to the desired
foreign currency, and select Set Local Rate to
enter the rate for the conversion to your
local country
• Once complete press
Please note:
• Press to enter a decimal point
• The exchange rates can be up to nine
digits long
157
Go to date – go to the date you require
Delete all – select to delete all existing memos
• Press twice to select
Back and return to the
Calendar screen. The dates that already contain memos
will now be marked by a yellow box
Calculator
Allows you to use your mobile as a calculator.
• Select Calculator by pressing to open the
calculator screen
•Use the keypad to type in
the numbers you wish
to calculate
•Use to perform
the mathematical
operations on the screen
• Press
* to enter a decimal point
• Once completed press to select =
Please note:
You can enter numbers up to a maximum of 8 digits in length.
156
Entered numbers
and calculation
results appear in
this field
Page 98

• Scroll through the cities available by pressing or
press to jump to the next or previous page
•When the desired city is highlighted,
press to mark that city. The cities
you have chosen are indicated with
a checked box. To uncheck certain
boxes, scroll to the relevant city
and press
• Once complete select Done by pressing . You will
then return to the screen showing the current date and
time for the city/cities you have selected
Please note:
If you have not set the current time and date on your
mobile, go to the menu Settings – Date & Time and set.
159
Step two:
• Return to the currency converter screen
• Either enter the amount for the Local
currency or the Foreign currency. The
amounts can be up to nine digits long
•Then press . The converted amount will
appear in the field for the other currency
Clock options
World clocks
The world clocks feature simultaneously displays current
local time and date for major cities around the world on
one screen. You can choose up to six cities and display
them, so it is easy to find out the time in Los Angeles,
Hong Kong and Beijing all at the same time.
• Select Clock Options and then select World Clocks by
pressing
• Press to select Edit
158
Page 99

Hour minder
If you activate this option your mobile will emit a beep
every hour as a reminder.
• Select Clock Options and then select Hour Minder by
pressing
• Then select either On or Off
161
Time zones
If, during travel, you move between time zones, your
mobile will automatically adjust the time displayed on
the screen so that you always have access to accurate
local time.
Please note:
If you have not set the current time and date on your
mobile, go to the menu Settings – Date & Time and set.
• Select Clock Options and then select Time
Zones by pressing
On – the time displayed on your mobile will
be reset automatically according to the local
network operator’s time zone prompts
Off – Your mobile will display the time you set even if you
travel into other time zones. Your mobile will ignore time
zone prompts issued by the local network operator
Confirm First – your mobile will ask for your confirmation
before it resets the time
160
Page 100

163
Countdown timer
• Scroll to Countdown Timer and
press
• Press to select Set and enter the
amount of time to count down – this can
be up to 23 hours, 59 minutes and 59 seconds.
Then press to confirm
• Press to start the timer
• The timer will start and work its way down to zero
Please note:
You can use the timer in the same way you would the
stopwatch. For further information please refer to
page 164.
162
 Loading...