

Page 1
o2.co.uk
O2 (UK) Limited, 260 Bath Road, Slough, Berkshire SL1 4DX
Registered in England No. 1743099. Registered Office as above.
© O2 (UK) Limited 2003. Correct at time of going to press (April 2004)
O2C1954N KGL 04/04
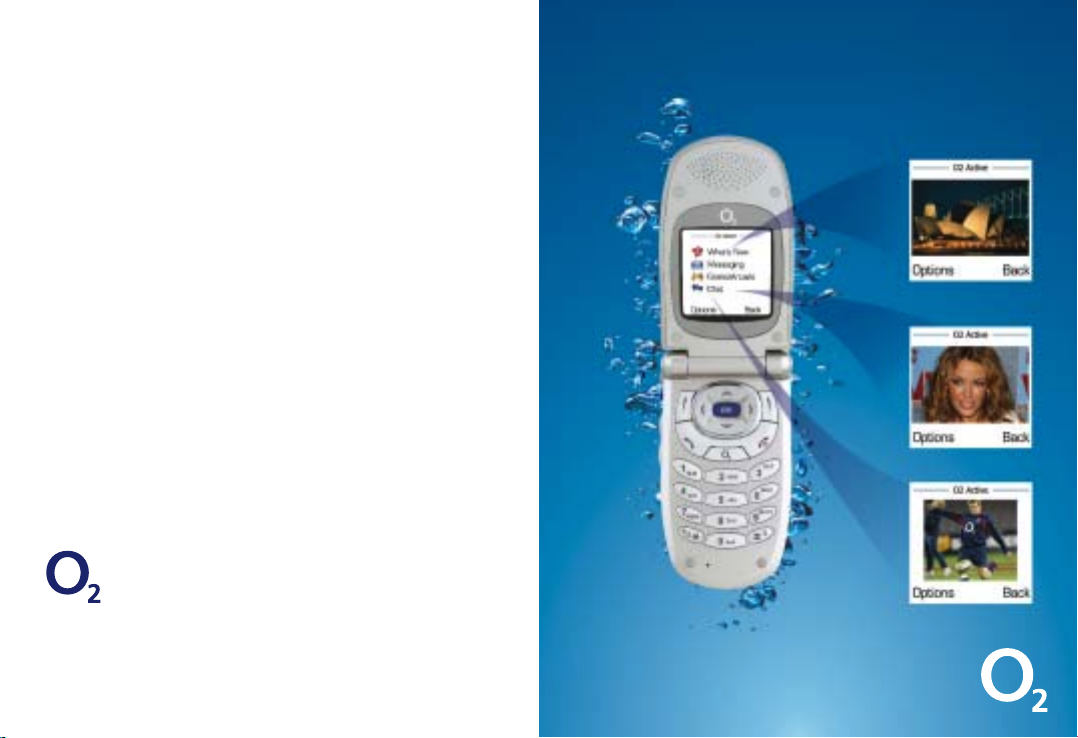
O2X2 user guide
Download pictures and
send to your friends
Find out everything there
is to know about music
Get the latest sports news
Page 2

Contents
Welcome vi
Chapter 1 – Before using your mobile 1
Package contents 2
Handset description 3
External display 6
Main idle screen 7
Icons 8
Function keys 10
Navigation key 12
Chapter 2 – Preparing your mobile for use 15
Inserting your SIM card 16
Using the battery 18
Charging the battery 19
Important battery information 21
Chapter 3 – Basic functions 23
Turning your mobile on and off 24
Menu navigation 26
Basic functions 30
Making a call 30
Ending a call 31
Receiving calls 31
Making an international call 32
Making emergency calls 32
Voicemail 34
O2 is a trademark of O2 Limited.
i
Page 3

Chapter 4 – Main menu 37
Contacts 38
Adding contacts to you phonebook 38
Finding contacts in your phonebook 43
Edit 44
Copy 44
Delete 45
Caller groups 45
Privacy Manager 46
Business card 48
Memory in use 48
My number 49
SIM status 49
Calls 51
Missed, dialled and received calls 51
Delete all 53
Duration 53
Costs 54
Operations during a call 56
Call menu 60
Messaging 63
Text 63
Multimedia 63
Voicemail 63
Delete messages 64
Memory status 64
Text messaging 65
– Write a text message 65
– Read messages 70
ii
– Inbox 71
– Outbox 71
– Sent items 72
– Drafts 73
– Templates 74
– Message settings 74
Media Messaging 77
– Create a media message 77
– Read messages 87
– Inbox 89
– Outbox 90
– Sent items 90
– Drafts 92
– Templates 93
– Settings 93
Camera 95
Camera settings 96
Take a picture 98
Managing your pictures 99
View your pictures 101
O2Active 103
O2Active 103
How to access O2Active 111
Start browser 111
WAP message 115
Enter address 115
Resume 115
Clear cache 115
WAP settings 116
iii
Page 4

Games 119
O2Games Arcade 119
Organiser 125
Calendar 125
Alarm clock 131
To do list 133
Notes 135
Voice memo 136
Currency converter 138
Tools 141
My services 141
Calculator 141
Melodies 142
Stop watch 148
Countdown timer 149
Memory status 149
Settings 151
Wallpaper 151
Date and time 153
Profiles 155
Display 160
Audio 165
Call settings 165
Flip activate 169
Network 170
Security 171
Power saving mode 175
Language 175
Factory reset 175
Input 175
Chapter 5 – Miscellaneous 177
Abbreviations and acronyms 178
Questions and answers 182
Tec hnical data 185
Chapter 6 – Safety 187
Safety information for mobiles 188
Mobile care 190
Driving safety 194
Electronic devices 195
Other safety guidelines 197
Cautions 198
R&TTE Directive 1999/05/EC 199
viv
Page 5

Welcome
Your new O2X2 mobile features the latest in handset
technology. It’s one of the best, most up-to-date ways to
stay in touch, have fun, get things done and much more.
As well as a dazzling 65,000 colour screen, your new
mobile features an integrated camera, picture messaging,
polyphonic ring tones, stunning games and is also a
tri-band handset so you can use your O2X2 in the USA
and Canada. Plus with its handy Organiser and Phonebook
you’ll be in full control of your contacts.
You can also access the fantastic O2Active™service using
the latest technology. Up-to-the-minute information is at
your fingertips wherever you are and whenever you
need it*. Access O2Active†by pressing and holding
and you can access the following and much more:
•Plan your night out with
Time Out
•Play fantastic colour games
* Subject to network coverage.
†
Terms and conditions apply. See www.o2.co.uk
©Copyright 2002 – 2004 Macrospace Ltd.
All rights reserved.
vi
•Download the latest pictures from
the O2Media Messaging gallery
and send them to your friends
This guide will help you get the most
from your new mobile – and all the
fantastic features of the O2network.
About the user guide
This user guide relates only to the O2X2.
Please note that a small proportion of the functions
available differ between Pay & Go and Pay Monthly
customers.
O2 do not suggest in any way that the celebrities featured in this guide
are endorsing O2 products or services.
vii
Page 6

Chapter 1
Before using your mobile
• Package contents
•Handset description
• External display
•Main idle screen
•Icons
• Function keys
•Navigation key
1viii
Page 7

Package contents
Thank you for purchasing this product. Please check the
product contents to see if you have all the available items
as shown below.
Handset description
Closed view
Antenna
Charger
Mobile
phone
Hands-free
kit
Standard
battery
Manual
Status indicator light
The status indicator light has the following functions:
•Flashes blue when your mobile detects a network or
is charging
•Flashes purple when the battery is fully charged
•Flashes blue rapidly for incoming and outgoing calls
Please note
To turn off the status indicator light, you must start up the
power saving mode. Please refer to Settings – Power
saving mode.
2
Status indicator light
External display
External speaker
3
Page 8
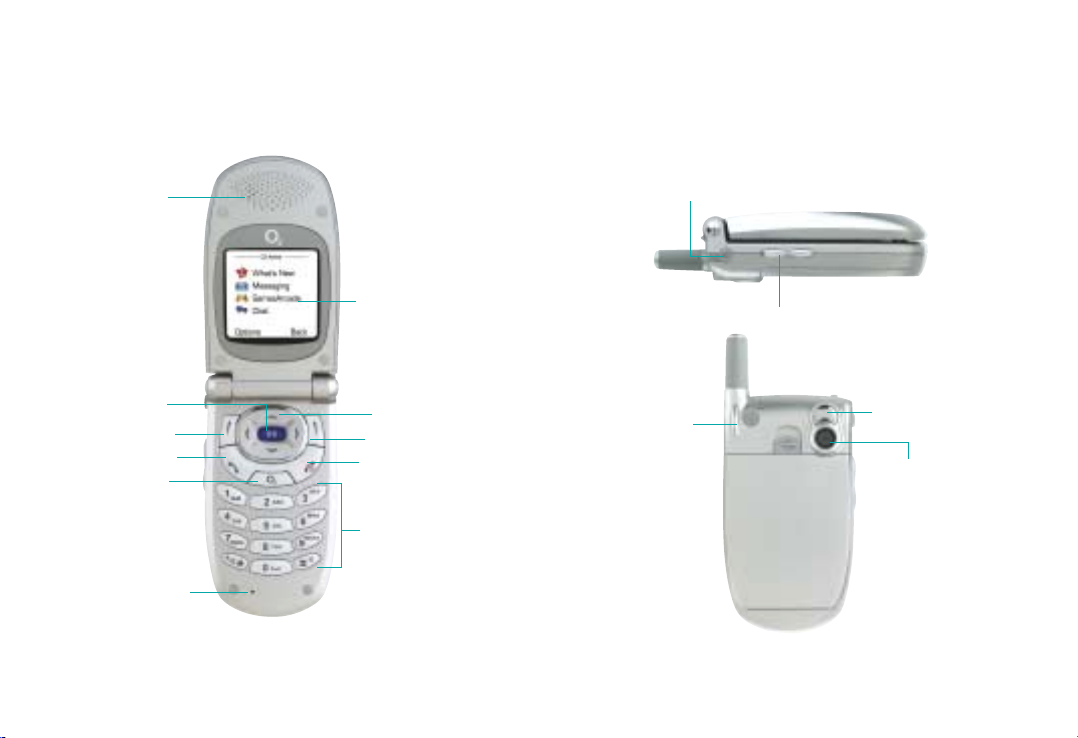
Earpiece
Main display
Microphone
Right soft key
Scroll key
OK key
Dial/Answer key
Alphanumeric keys
Power on/off key
O
2
Active key
Left soft key
Inside view
Side and back views
Hands-free handset/Data cable jack
Volume key/Reject key
Neck strap
socket
Mirror used to take
self photos
Camera lens
54
Page 9
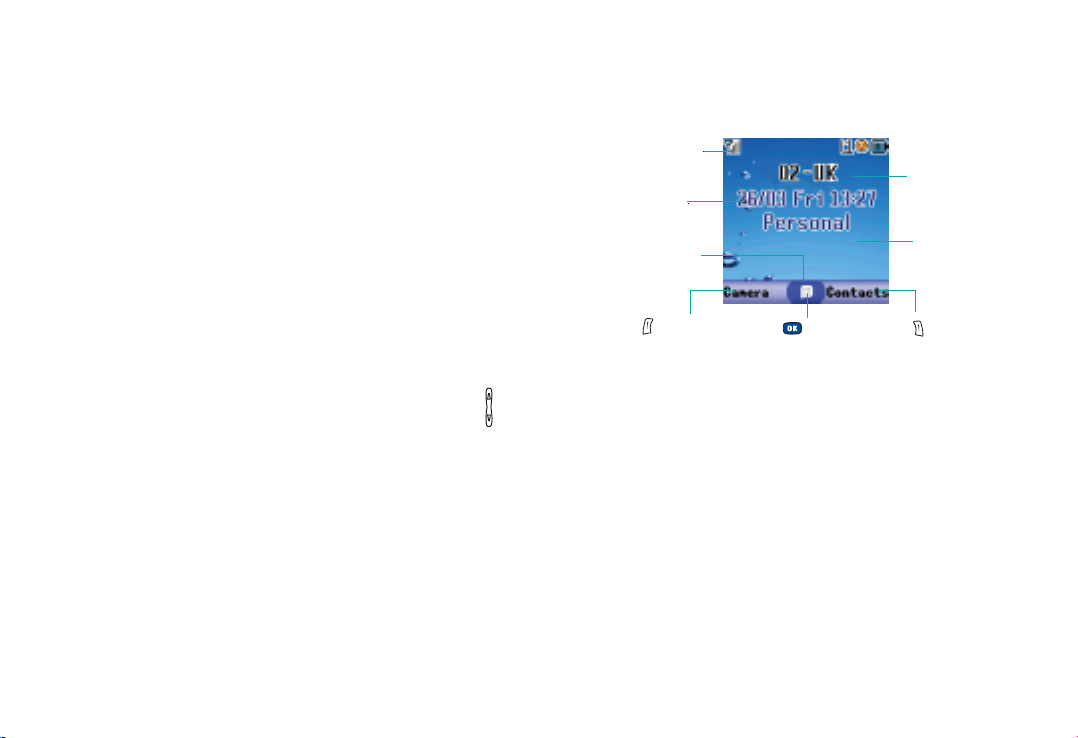
External display
Main idle screen
When the flip is closed, the external display’s status bar will
show icons for network signal strength, battery power,
alarm (if active), the current time and the current profile in
use. The external display can also alert you to incoming
calls, text messages and missed calls.
Please note:
•To set the time on the external display, please refer to
page 153
•In the default setting, the external display will show the
time. The external display will then temporarily power
off. You can turn it back on by pressing the volume keys
on the side of your mobile
•You can set the external display’s cycling mode, for
further information please refer to page 162
•To choose the animations that are shown on the external
display, please see page 162
Signal
Time and date
Soft key bar
Press to enter
the camera function
Press to enter
the main menu
Name of network
operator
Wallpaper
Press to access
your contacts
76
Page 10
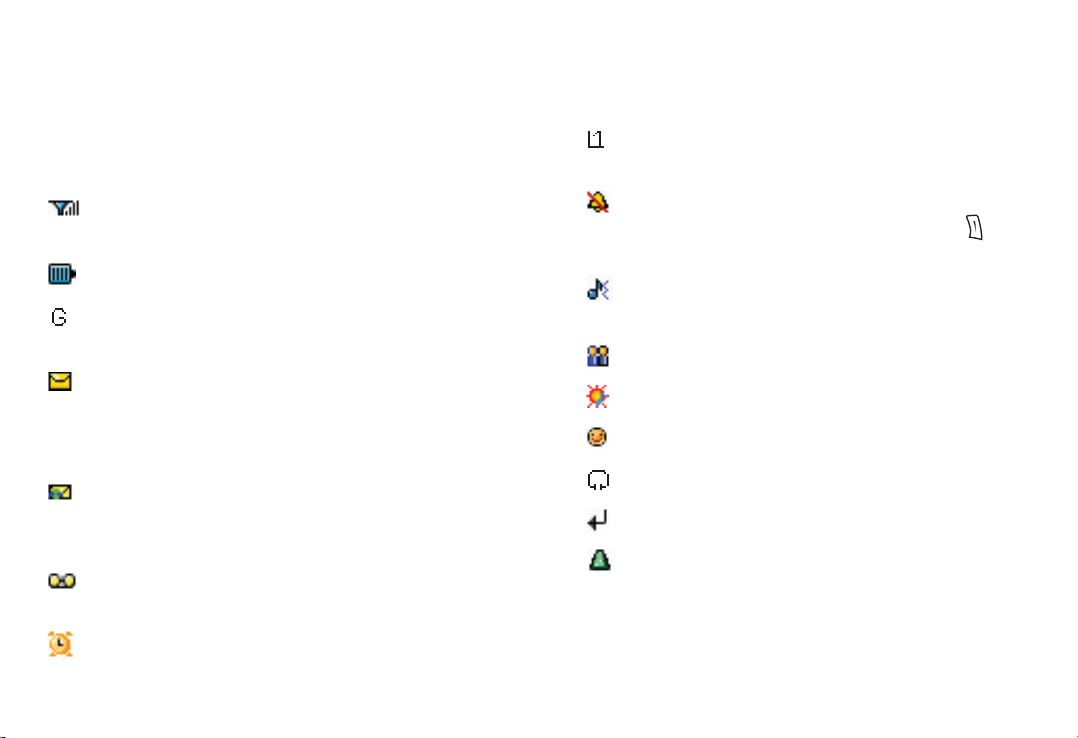
Icons
The icons below appear on the external display and/or the
main display.
Signal strength – The number of bars shows
signal strength
Battery – Current battery charge level
GPRS network – GPRS services have been activated
on your SIM card
Message – Shows that a text message or media
message has been received or that there are unread
messages. If the icon appears in red on the main
display then your message memory is full
WAP message – You’ve a WAP message (This icon
will only appear when there are no incoming or
unread text and media messages)
Voicemail – Indicates that you have Voicemail
messages
Alarm – Appears when an alarm is set
Line in use – Shows the number of the line currently
in use
Vibrate – Appears when vibration is set as a ring
tone. In the standby screen, press and hold to
activate the silent profile
Normal – Shows the Normal profile is in use. To set a
different profile please refer to page 155
Meeting – Shows that the Meeting profile is in use
Outdoors – Shows that the Outdoors profile is in use
Personal – Shows that the Personal profile is in use
Hands-free – Shows that the Hands-free profile is in use
Divert – Appears when the call divert function is active
Roaming – Indicates roaming has been activated
(It is not your regular network)
98
Page 11
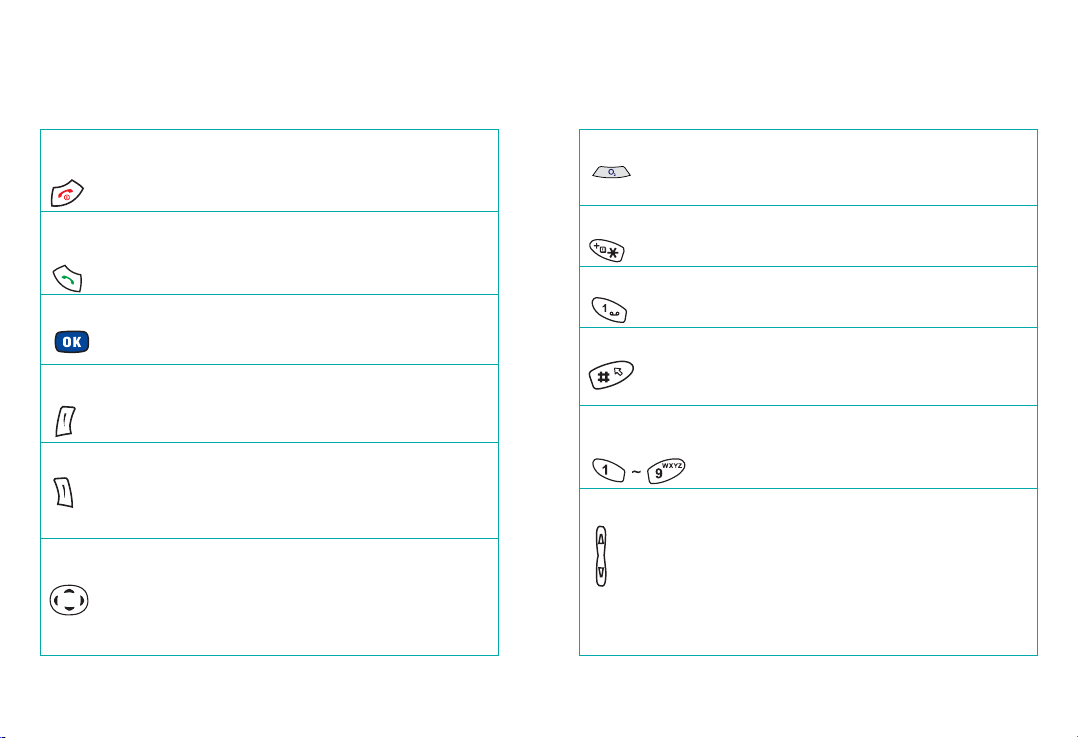
Function keys
Power on/ • Long press to turn your mobile on/off
off key •Press to reject an incoming call or cancel
a call being dialled
Send/ •Press to dial or answer a call
Answer key • Press to access the list of the last
missed/dialled/received calls
OK key •Press to open up the main menu
Left soft key •To access the camera function
Right soft key • Press to access your contacts
•Press to delete entered digits
•Press and hold to turn the silent profile
on or off
Navigation key •To browse through the menu
O2Active key •To access O2Active
Asterisk key •To insert an asterisk
•Press and hold to select +
Voicemail •Press and hold to access
your Voicemail
# key •To insert #
Alphanumeric •Press to enter a digit
keys • Shortcut keys – press and hold to
immediately access a function
Volume key •To adjust the call volume
•When there is an incoming call, press
and hold the upper portion of the
volume key to reject the call; press and
hold the lower portion to silence the
ring tone for an incoming call
1110
Page 12

Navigation key
When in standby mode, the navigation
keys can be used to access shortcuts we
have set up for you.
Left – To create a text message
Right – To access your profiles
Up – To access the main menu
Down – To access the main menu
12
13
Page 13

Chapter 2
Preparing your mobile for use
•Inserting your SIM card
•Using the battery
• Charging the battery
•Important battery information
1514
Page 14

Inserting your SIM card
To use your mobile, a SIM card is required at all times –
this contains important information about your mobile and
network. The message Insert SIM appears when the SIM
card is not installed.
Please take care of your SIM card and don’t keep it near
magnetic and electronic devices as this can interfere with
data storage and network operations.
•Turn your mobile over and release the battery latch
•Lift the battery off the mobile
Battery latch
Please note:
Do not remove the battery when the mobile is on. Doing
so could cause you to lose personal settings or data stored
either on your SIM card or in the mobile’s memory.
•Slide the SIM card in under the metal plate in the SIM
card slot, with the SIM card’s metal contacts facing down
and the cut corner at the top left
Metal plate
SIM card
Please note:
A SIM card can be easily damaged if its metal contacts
become scratched. Therefore, take special care when
holding or inserting it.
If you wish to remove the SIM card, you must first press
down the stay, then push the SIM
card out of the slot.
Stay
SIM card
1716
Page 15
Using the battery
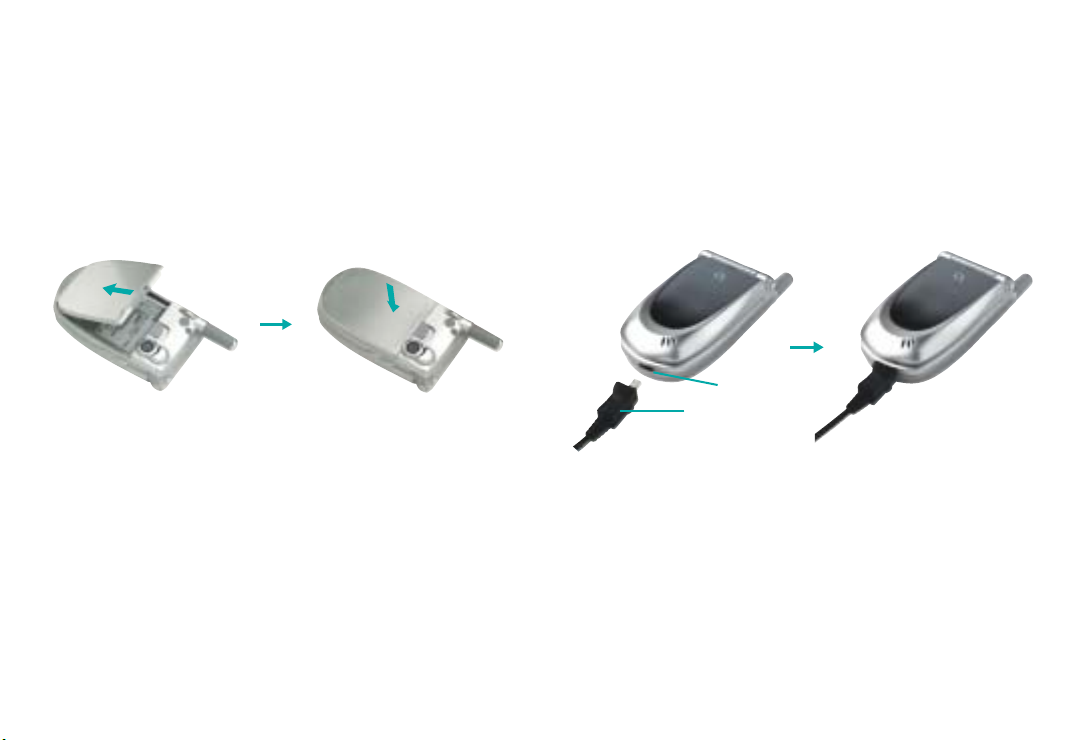
Charging the battery
Installing the battery
Insert the bottom of the battery into the groove at the
bottom of the mobile. Then push down the battery until it
locks into place.
Removing the battery
Pull down the tab with one hand and then lift the top of
the battery to separate from the mobile.
Please note:
The battery must be securely placed in the battery
compartment. If the battery is improperly inserted your
mobile will not turn on or the battery may slip off
during use.
18
Power connection
Insert the charger’s contact point into the slot and plug the
charger in at the socket.
Please ensure you insert the charger the right side up.
Charger socket
Charger connector
Please note:
Before you use the battery for the first time, make sure
you charge it for at least four hours. Charging the battery
fully each time will help prolong its lifetime – and is much
better than frequent short bursts of charging.
19
Page 16

Important battery information
Charging status
If you charge your mobile;
•whilst it is turned off, the external and main displays will
be activated, and the status indicator light will flash blue
•the lines showing the battery power level will scroll
until the battery is fully charged
•whilst it is turned off, the main display shows
the animation
•whilst it is on, the main display shows the icon.
The lines showing the battery power will scroll until
the battery is fully charged
When the battery is fully charged the status indicator
(please refer to page 3) will flash purple.
When the battery is out of power, your mobile will play an
alert sound to remind you to recharge it and will then
automatically turn off.
Please note:
Do not remove the battery while your mobile is charging.
20
•Never store a battery near a fire
• Don’t attempt to take the battery apart. Only use the
battery approved by the manufacturer
•Never touch the battery terminals with a metallic object,
as this can lead to short circuiting. Take special care
when carrying a battery in your pocket
•Misuse of the battery can lead to burns from hot
temperatures and even explosion. Never drop or apply
any physical shock to the battery as it may damage the
battery and even cause fire
•Please keep your battery out of children’s reach and in a
dry and cool area
•Store and charge your battery at room temperature.
Extremes of temperature can prevent full charging and
affect battery life and performance
•Since a battery is an expendable product, the operating
time will gradually decrease through use
•Keep the terminals of the battery clean and dry
•When there is risk of lightning, remove the charger’s
plug from the socket to protect the mobile
21
Page 17

Chapter 3
Basic functions
•Turning your mobile on and off
•Menu navigation
• Basic functions
•Voicemail
2322
Page 18
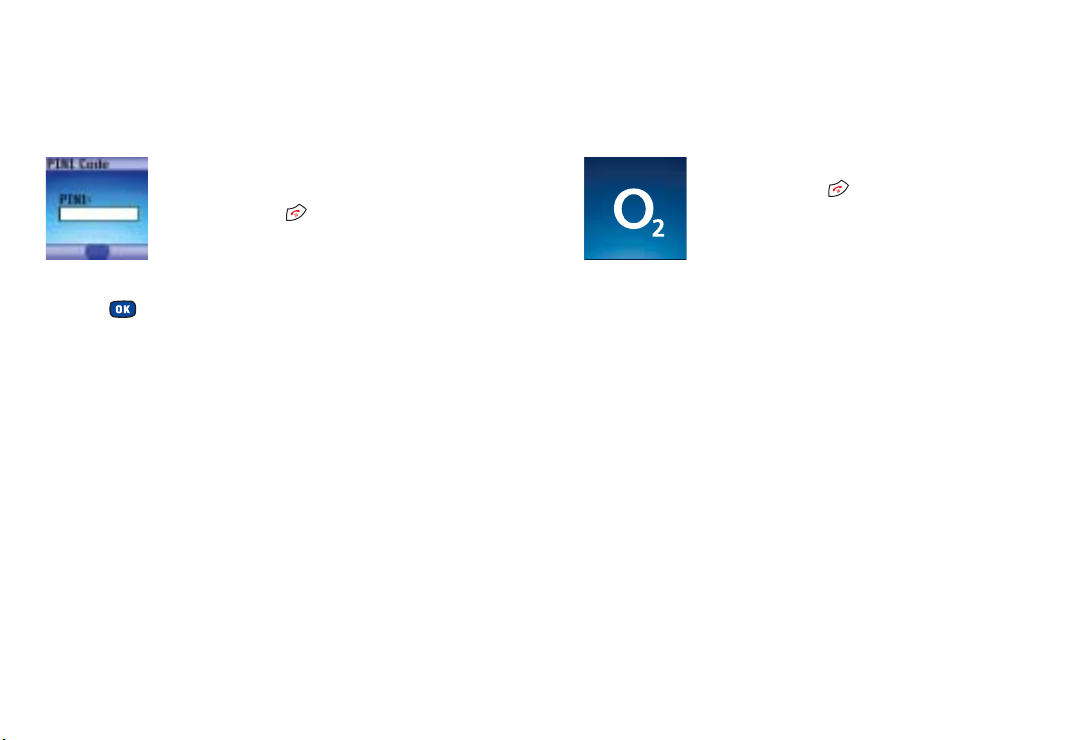
Turning your mobile on and off
Turning your mobile on
When the SIM card is installed
• Open the mobile’s flip
•Press and hold until the screen turns on
•When your mobile is PIN protected, PIN1
Code is displayed on the screen
• Enter the 4-digit PIN to unlock the mobile, then
press
•Your default PIN code is 4321 or 5555*
•You can now use your mobile
Please note:
If you enter an incorrect PIN code three times in succession,
your SIM card will lock and you must enter the PUK code
to unlock it. Please contact O2Customer Service.
* Please see page 171 for further information on PIN codes.
Turning your mobile off
When the SIM card is installed
•Press and hold until the screen
turns off
Please note:
• If the message LOW BATTERY WARNING POWER OFF is
displayed, the mobile will turn itself off. You will need to
charge the battery
• If the battery is removed whilst the mobile is on, any
unsaved messages could be lost and the SIM card’s
memory might be damaged
2524
Page 19
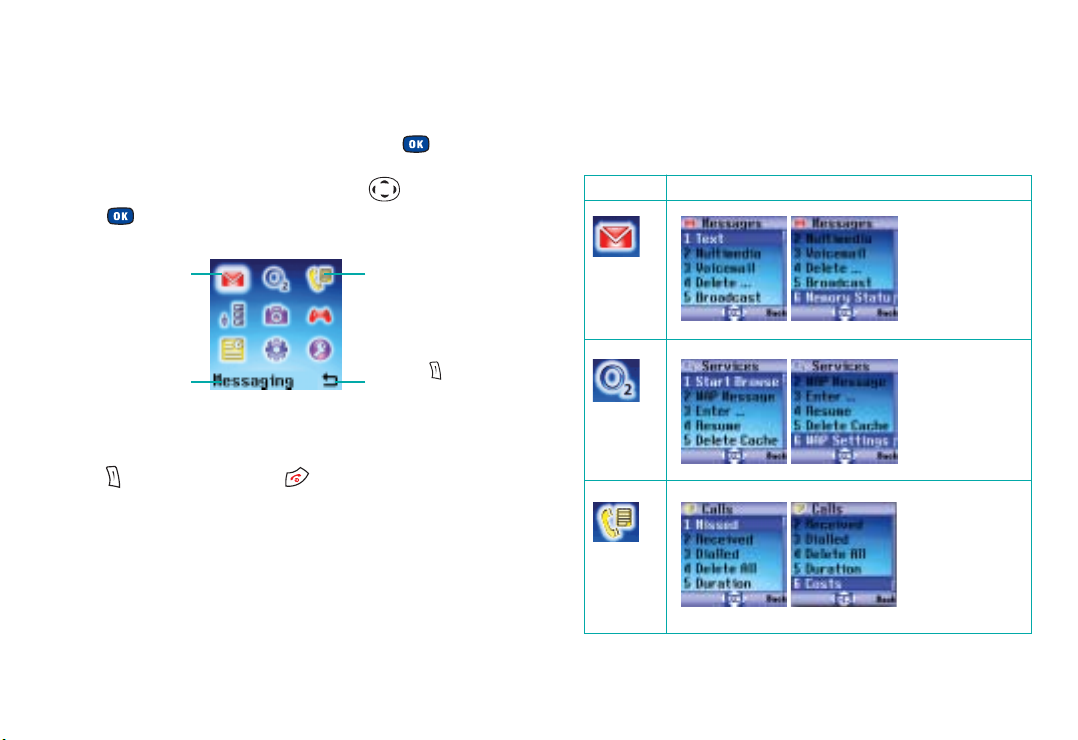
Menu navigation
•When your mobile is in standby mode, press to
access the main menu
•Scroll to the menu you require by using
•Press to enter the menu highlighted
The main menu
item to which you
have scrolled will
be displayed as
an animation.
The name of the
main menu item
you have
scrolled to.
Each icon
represents a
sub-menu.
Indicates that
pressing will
return the
display to the
standby screen.
•Press to go back or press to return to the
standby screen
26
Main menu map
Select To enter
Messaging
O
2
Calls
27
Page 20
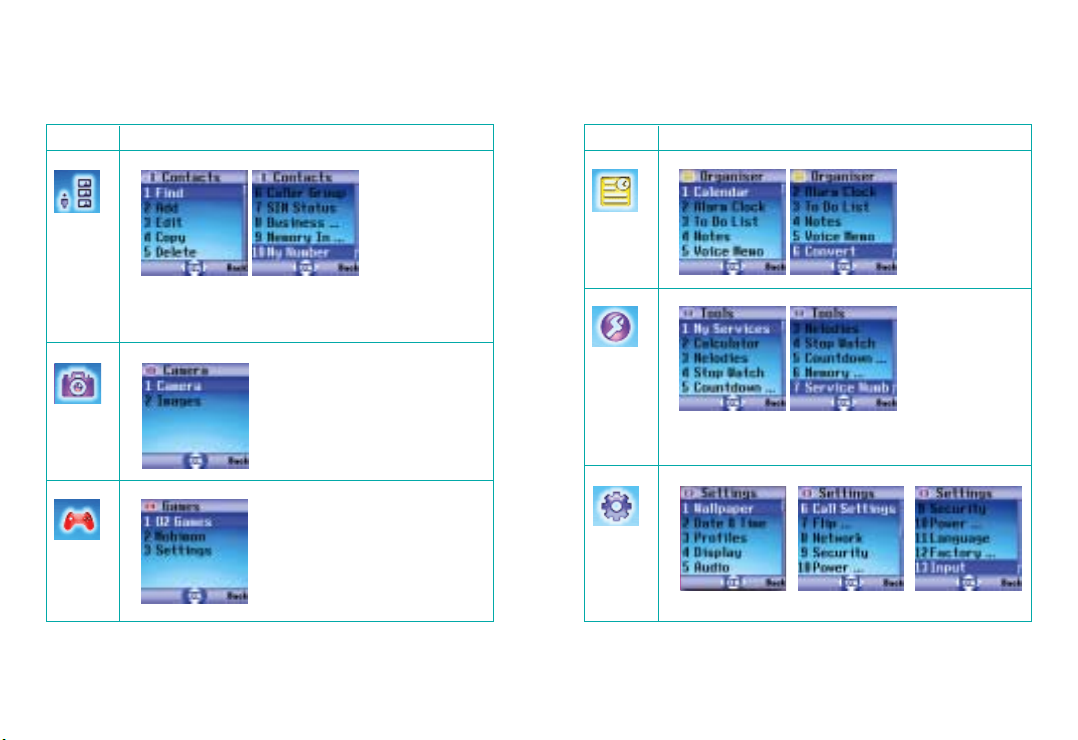
Select To enter
Select To enter
Contacts
Camera
Games
28
Organiser
When using the phonebook stored in your SIM
card’s memory, the seventh item is SIM status.
There is no Privacy Manager item.
Tools
Pay & Go customers will see My Services as item
number 1.
Settings
29
Page 21

Basic functions
Making a call
•Open the flip and ensure that the standby screen is
shown on the main display
• Enter a phone number
• If you make a mistake while dialling, you
can erase the last number you entered by
pressing to select Delete
•Once you have entered the number,
press . The O2X2 will start dialling the number
30
Ending a call
•Press or close the flip to end a call
Please note:
If the flip function has not been activated, you cannot end
a call or cancel dialling by closing the flip. To activate or
cancel the flip function, go to Settings – Flip Activate.
Receiving calls
Answering a call
•To answer a call, open the flip or, if the flip is already
open press
To reject a call
• Regardless of whether the flip is open or closed, you can
reject an incoming call by pressing and holding the
upper portion of the volume key on the left hand side
of your mobile
•When the flip is open, you can reject an incoming call by
closing the flip or pressing
31
Page 22

Making an international call
For Pay Monthly customers
•Press and hold until + appears on the screen
• Enter the recipient’s country code, area code and
phone number
•Press to dial the number
For Pay & Go™customers
Please consult your O2Pay & Go welcome pack for details
on how to use your mobile whilst abroad.
Making emergency calls
•To call emergency services, enter 112 (the international
emergency number) or 999
• Then press to dial the call
You can make an emergency call even if your mobile is
locked or cannot access your network, or there is no SIM
card inserted, so long as you are within range of a network
of the type supported by your mobile.
32
33
Page 23

Voicemail
Your O2X2 provides you with Voicemail. This service takes
messages for you when your O2X2 is switched off, engaged,
you don’t answer a call or you are out of signal range.
When you receive a new Voicemail message the icons
and will be shown in the external and main
display’s status bars, respectively.
To listen to your Voicemail message
•In the standby mode, press and hold to dial
your Voicemail
•Alternatively, simply dial 901 and press
Please note:
To save or modify a Voicemail number, go to Messages –
Voicemail – Edit
34
35
Page 24

Chapter 4
Main menu
• Contacts
•Calls
•Messaging
• Camera
•O2Active
•Games
•Organiser
•Tools
• Settings
3736
Page 25
Contacts
From the standby menu, press then scroll to
Contacts and press to select
Adding contacts to your phonebook
You can either use the SIM card or the built-in contacts
database as your Phonebook. Your mobile is set up to
save to your SIM card.
The phonebook in your mobile’s memory can store up to
500 contacts. The number of contacts on the SIM card
depends on your O2service option.
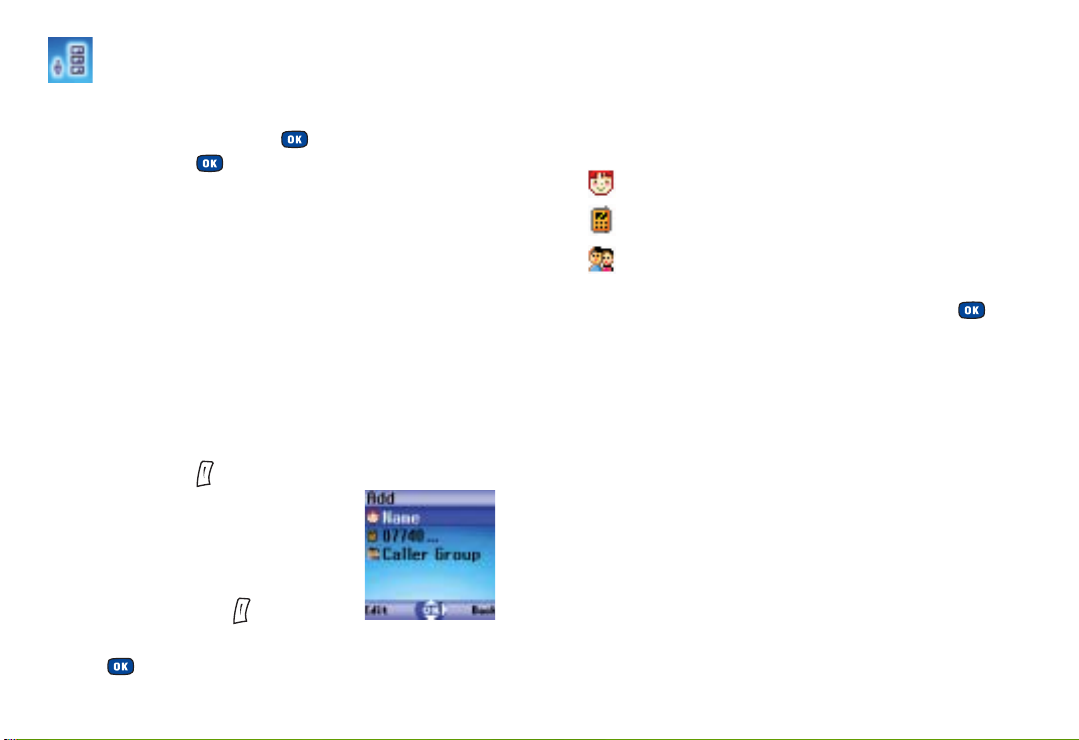
To add a contact to the SIM phonebook
•In the standby screen enter the number you wish to
store then select to Save
• The screen will show the phonebook
data fields for a new contact
•Scroll through the contact data fields
that you wish to edit
• Select Edit by pressing and enter
the relevant data
•Press to save
38
The data fields provided by the SIM card phonebook are:
– The contact’s name
– The contact’s mobile phone number
–Used to select a caller group for the contact
• Scroll through the different groups and press
to confirm
•When there is an incoming call for this contact, the
ring tone assigned to this group will sound and the
display will show the animation/image associated with
the group
Please note:
To set a ring tone and animation/image for each caller
group go to Contacts – Caller Group.
39
Page 26
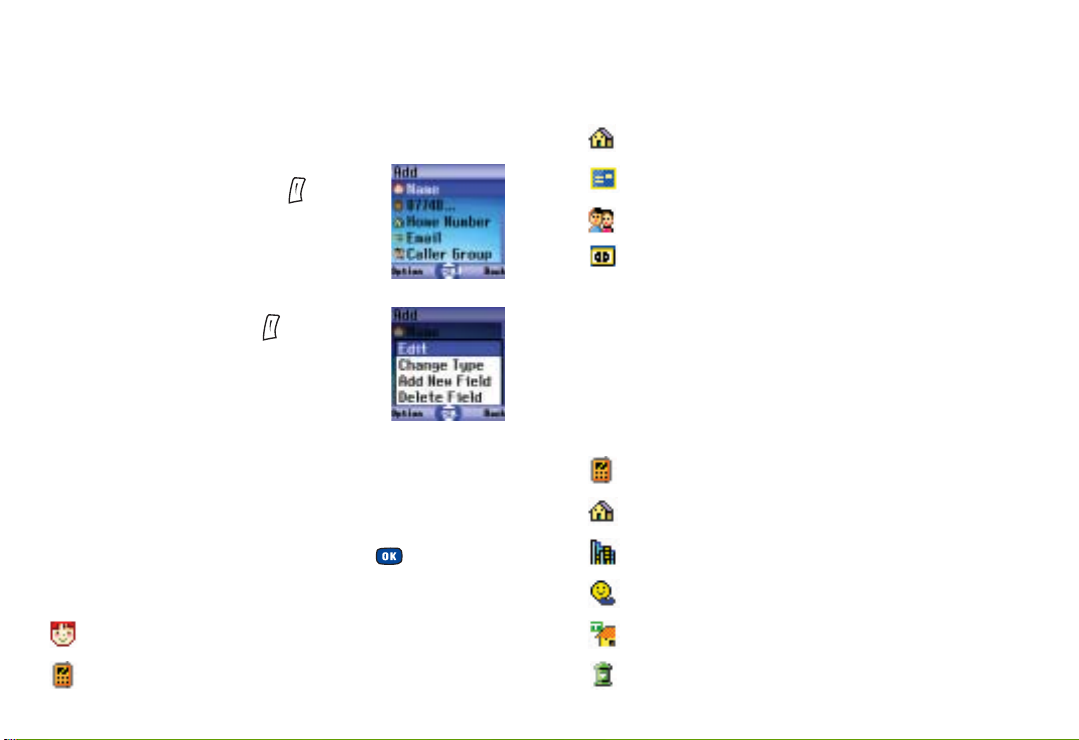
To add a contact in the mobile’s memory
•In the standby screen enter the number
you wish to store then select to Save
• The screen will show the phonebook data
fields for a new contact
• Scroll through the contact data fields
that you wish to edit
• Select Option by pressing to bring up
a pop-up menu
•You can then:
Edit – Edit the information in the
selected field
Change type – Change the category of the phone
number e.g. from Mobile Number to Home Number
Add New Field – Adds other data fields for a contact
Delete Field – Removes the selected data field
•After completing the various fields press
– The contact’s home phone number
– The contact’s email address
– To assign a contact to a caller group
– To assign a voice dialling prompt to a phone
number
•After the beep, speak the contact’s name into the
microphone
•After it is successfully recorded, your mobile will
play back this voice dialling prompt
In addition to the contact fields above you can also add
the data fields listed below by selecting Add New Field:
– The contact’s mobile number
– The contact’s home phone number
– The contact’s work phone number
The data fields provided by the mobile phonebook are:
– The contact’s name
– The contact’s mobile number
– Other phone number for the contact
– The contact’s home address
– The contact’s work address
4140
Page 27
– The contact’s company name
– The contact’s department name
– The contact’s job title
– Used for notes about the contact
– Used to mark dates of special significance associated
with the contact
– Used to set a ring tone for the contact. When there
is an incoming call from the contact, your mobile
will play this ring tone
Please note:
A ring tone set in this field will replace the one associated
’
with the contact
s caller group, if any.
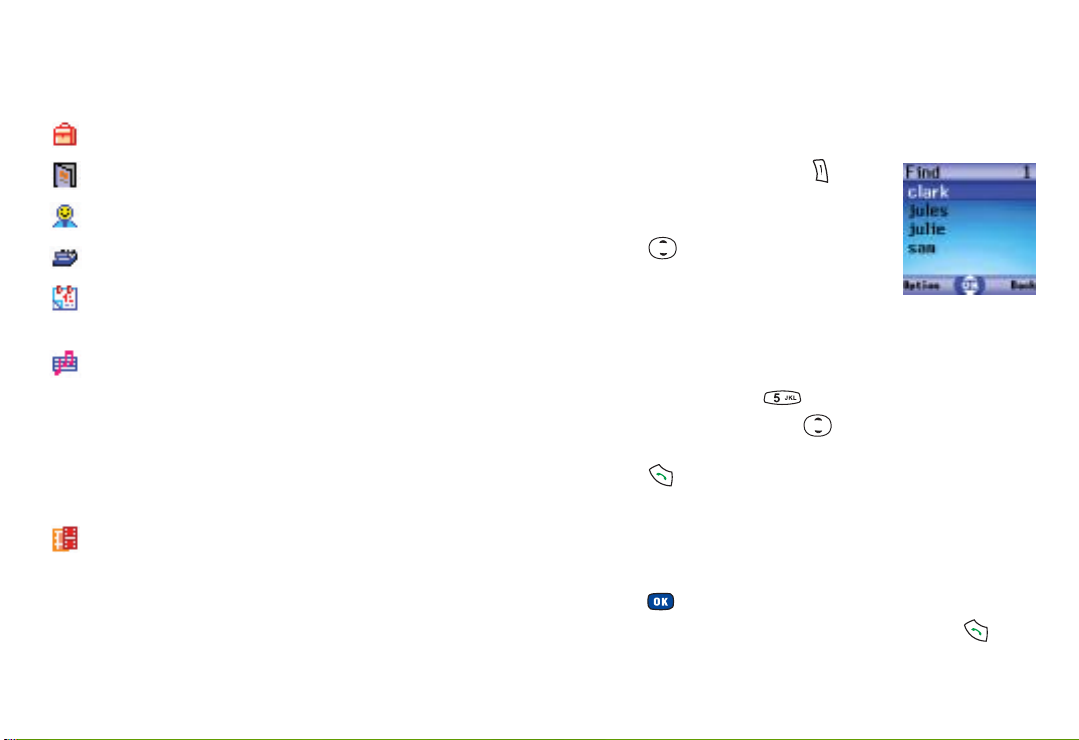
Finding contacts in your phonebook
•In the standby mode, press to
select Contacts and display contacts
you have saved
•Press to scroll through your list
of contacts until the one you need is
highlighted
•Alternatively, press the alphanumeric key that
corresponds to the first letter of the name you wish to
locate, the appropriate number of times e.g. If the name
starts with ‘K’, press twice. The names that begin
with ‘K’ will appear. Press until the one you need is
highlighted
•Press to call the first phone number saved under
that contact
– Used to set the photo that will appear on your
mobile’s display when there is an incoming call from
the contact
Please note:
The photo set in this field will replace the animation/image
associated with the contact
’
s caller group, if any.
42
If the number is not the first phone number saved under
that contact:
•Press to show all the data fields for that contact
• Scroll to the number you wish to call and press
43
Page 28

Edit
•In the Contacts menu, scroll to Edit and press to
select
•Using scroll to the contact you wish to edit, then
press
• Scroll through the data fields and press to select Edit
and amend the data
Delete
•In the Contacts menu, scroll to Delete and press to
select
• Scroll to the contact you wish to delete or to Delete All
from Phone, then press
• Press to select Yes and confirm deletion
Copy
If you are using the phonebook stored in your mobile’s
memory, you can copy the data to the SIM card’s phonebook,
and vice versa.
•In the Contacts menu, scroll to Copy and press to
select
• Then scroll to a contact to copy to the other phonebook
or scroll to Copy All Contacts to SIM or Copy All SIM
Phonebook to Phone and press to confirm
Please note:
If you select Delete All from Phone you will need to enter
in your phone password. The default is 1234.
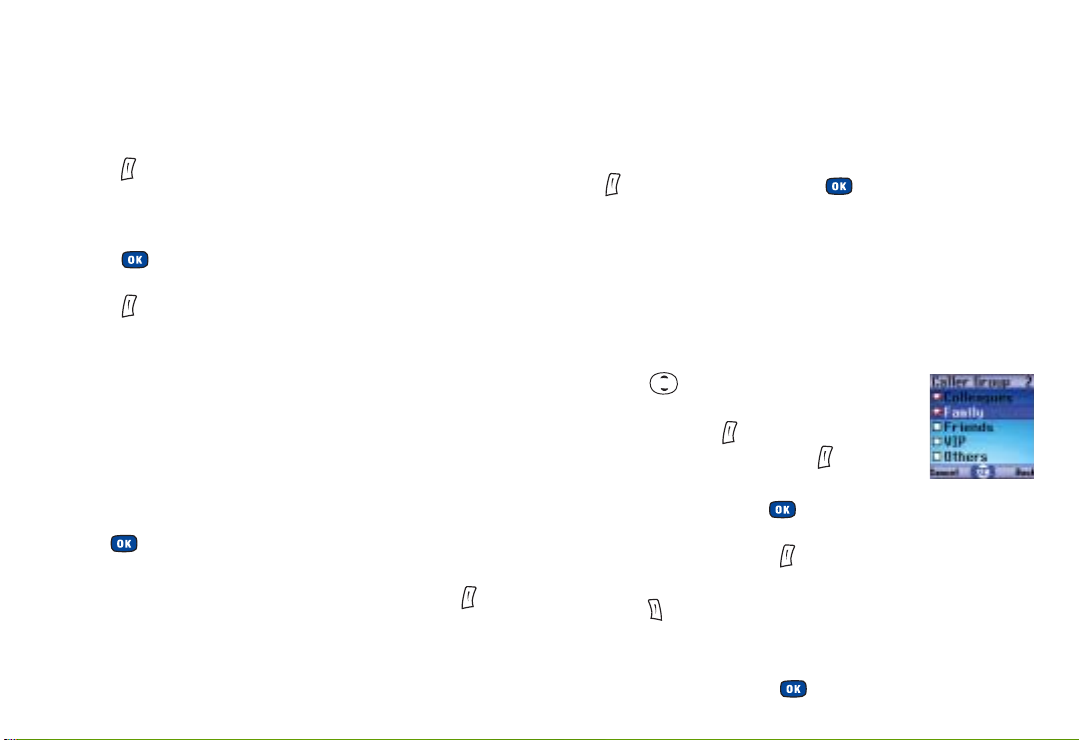
Caller groups
Caller groups are combinations of phone settings used to
identify a particular group of contacts, such as, Colleagues,
Family, Friends, VIP and Others. You can associate a ring
tone and animation with one group, and when a member
of that group calls, your mobile will use the group’s ring
tone and display its animation.
•In the Contacts menu, scroll to Caller Group and select
by pressing
4544
Page 29
• Scroll to one of the groups and then;
– Press to select Option. You can then select the ring
tone or animation that will identify that caller group.
You can also rename the caller group
• The names of the contacts who are already on the
selected list will be displayed. If the list is empty, press
to select Edit, then press to select Add to
choose contacts to include in the list
– Press to view a list of all the names that belong to
that caller group. Scroll to the desired contact and
press to select Option. You can then add or delete a
particular contact to/from that group
Privacy Manager
This option allows you to set your mobile to reject certain
calls, or alternatively, specify which calls to accept, rejecting
all others.
•In the Contacts menu, scroll to Privacy Manager and
press to select
•Create a list of calls that you wish to accept or reject
by scrolling to Accept List or Reject List, then press
to select Edit
46
You can select all the members of a caller group to be
added to a list, or you can select contacts from the
phonebook individually (the screen will first display the
caller group option).
•Press to scroll to the caller group or
contacts that you wish to add to the list,
and then press to select Select to
make your selections. Press again
to Cancel
•Once complete press . The screen will display the
names of the contacts you have added to the list. If
needed, you can press to select Option and add or
remove contacts.
•Press to select Back to return to the Privacy
Manager menu
•Finally, select whether to activate the Accept List or
Reject List by pressing
47
Page 30
If you choose to activate Accept List you will only be able
to receive calls from contact in the Accept List. However,
if you activate the Reject List, your mobile will not be
able to receive calls from contacts in the Reject List.
Please note:
If you are currently using the phonebook on your SIM card
you will not have access to the Privacy Manager feature.
Business card
You can use this option to enter your own business card
information.
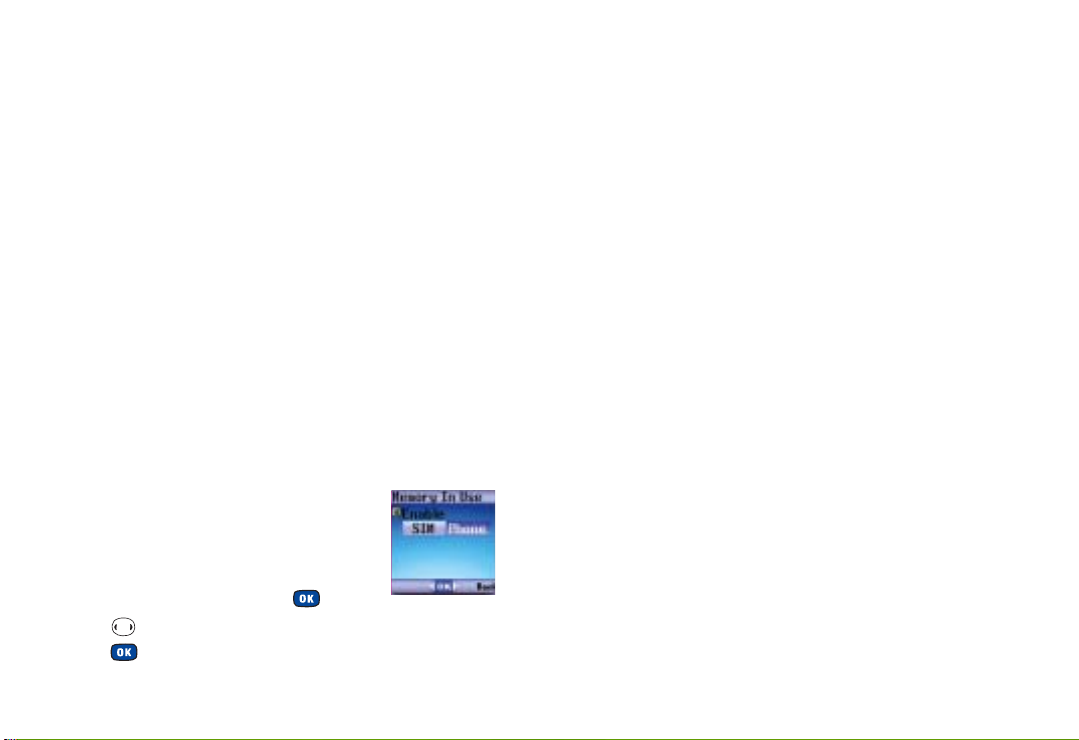
Memory in use
Used to activate the phonebook stored in
your mobile’s memory or on your SIM card.
•In the Contacts menu, scroll to Memory
In Use and select by pressing
•Press to highlight the desired phonebook and
press to select
My number
This option allows you to save your SIM card number and
name to your SIM card’s memory.
SIM status
Used to view how many additional entries can be stored in
the SIM card’s phonebook and the maximum number of
entries that it can store.
48
49
Page 31

Calls
• From the standby menu, press then scroll to Calls and
press to select
Missed, dialled and received calls
• Scroll to Missed / Received / Dialled and press to
select. You can then view all the latest missed, received
or dialled calls. Alternatively, in the standby mode, press
to view a list of all the most recent missed, dialled
and received calls
•Press to scroll to the desired phone number
–this icon will appear beside missed calls
–this icon will appear beside dialled calls
–this icon will appear beside received calls
Please note:
• If a phone number has already been stored as a contact
in your phonebook, the display will show the name of
this contact
• If the number of the person calling you is not available
then the list will not show a number for the call
5150
Page 32

When the number for a missed, dialled, or received call is
highlighted, you can perform the following tasks:
•Press to re-dial the number
•Press to select Option and bring up a pop-up menu:
Call – select to dial the phone number
Save or Edit – if the phone number for the call has not
been stored in the phonebook, select the Save option to
create a contact for this number. If the phone number is
already stored as a contact, select the Edit option to edit
this information for this contact
Delete – select to erase the record of the call from the list
Delete All – select to erase all the calls in the list
•Press to display the details on this call
Delete All
To erase all recent missed, received and dialled numbers.
•In the Calls menu, scroll to Delete All and press
to select
• Then press to select Yes, or to select No and
return to the Calls menu
Duration
•In the Calls menu, scroll to Duration and press
to select
Last Call Time
Shows the duration of the last call.
The name of the contact
for the call (if the phone
number has not been
stored as a contact, then
‘Unknown’ will be displayed).
Press to select whether
to dial the number, save or
edit it, or erase the record of
the call.
The date and time
of when the call
was made.
The phone number
for the call.
All Calls Time
Shows the total time for all calls.
Received Calls Time
Shows the total time for all received calls.
5352
Page 33

Dialled Calls Time
Shows the total time for all dialled calls.
Delete
Deletes all call cost records.
Delete
Deletes all call time records.
Please note:
You must enter your PIN2 code in order to clear call time
records. The PIN2 is the second PIN code. Its main use is to
control restricted services e.g. call time limits and restricted
phone numbers. For further information about the PIN2
code, please refer to page 171-172.
Costs
•In the Calls menu, scroll to Costs and press to select
Last Call Cost
Shows the cost of your last call.
All Calls Cost
Shows the total cost of all calls.
54
Call Cost Limit
Shows the current limit set for total call costs.
Set Cost Limit
Allows you to set a limit for total call costs. If call costs
exceed this limit, your mobile will no longer be able to dial
calls. When this feature is activated, the remaining cost will
be displayed in the information box on the screen each
time you end a call.
Please note:
To set your cost limit you will need to enter the PIN2 code.
Set Units
Allows you to first enter the unit price and a currency for
calculating call costs.
Please note:
To set the unit price you will need to enter the PIN2 code.
55
Page 34

Operations during a call
Adjusting the earpiece volume
•During a call, you can press the volume key on the
left side of your mobile to adjust the call volume
Mute
•Press to select Mute and turn off the microphone.
The person on the other end of the line will not be
able to hear your voice
•To restore the microphone’s function, press to
select Unmute
Putting a call on hold*
When the call is active:
•Press to select Hold and hold this call
•Press to end this call
When the call is on hold:
•Press to select Unhold to resume the call
•Press to end this call
When there is an active call and a call on hold:
•Press to select Swap to resume the call that is on
hold, and put the active call on hold
•Press to show on the display a list of calls that you
can end
Making a second call
To make a second call:
• Enter a phone number, or select one from your contacts
•Press to dial
The currently active call will automatically be placed on
hold. However, if there is already an active call and another
on hold, this action will fail.
* Only available on a Pay Monthly calling plan.
*
5756
Page 35

Call waiting
If you receive an incoming call whilst you are on the
phone, a tone will sound through the earpiece and the
display will show that a second call is currently waiting.
You can handle the waiting call and currently active call in
the following ways:
Answer the waiting call
•Press . The currently active call will automatically be
placed on hold
•However, if there is already another call on hold, a menu
will appear on the display allowing you to select a call to
end and then answer the waiting call
Reject the waiting call
•Press or to select End
* Only available on a Pay Monthly calling plan.
*
58
59
Page 36

Call menu
•Press during a call to enter the Call menu
•Press to scroll to the desired item, please refer to
the list below
• Then press to select
You can return to the previous menu at any time by pressing
to select Back or to return to the Call menu press .
Access your contacts
Access entries in your phonebook.
Calls
You can view information on missed, received and dialled
calls. For more information on missed, received and dialled
calls please refer to page 51.
Send DTMF
When your mobile is connected to other devices or
services, you can send DTMF (Dual Tone Modulation
Frequency) strings. DTMF strings are keypad tones that can
be sent via the microphone as you dial another number.
Your mobile will emit the tones in order to communicate
with answering machines, pagers, computerised telephone
services, and so forth.
• Enter the phone number and then press to send the
DTMF string
End call
You can then select whether you end all calls or just the
active calls, all calls that are on hold or just a single call.
Hold/Unhold/Swap
Allows you to toggle the call status.
Mute/Unmute
This allows you to activate or cancel the silent mode.
* Only available on a Pay Monthly calling plan.
*
60 61
Page 37

Messages
Enables you to enter the messages menu.
Calculator
Allows you to use the calculator. For further information
please refer to page 141.
62
Page 38

Messaging
•In the main menu, scroll to Messaging and select by
pressing
Then select;
Text
For further information on text messaging please refer to
page 65.
Multimedia
For further information on Media Messaging please refer
to page 77.
Voicemail
• Scroll to Voicemail and press to select
Call – Select to call your Voicemail number
Edit – Select to amend your Voicemail number
For further information on Voicemail please refer to
page 34.
6362
Page 39

Text messaging
Delete messages
•Scroll to Delete messages and press to select
•You can now select whether to delete;
• All
• Inbox
• All Read
• Outbox
• Sent Items
• Drafts
Memory status
•Scroll to Memory Status and press to select and
view how much free space is still available
Text messaging is fun with O2X2. You can send long
messages, and personalise them with pictures and sounds
(EMS). You can also store pictures and sounds.
•In the main menu, scroll to Messaging and select by
pressing , then select Text
Write a text message
•In the Text menu select New
• Enter your text message using the
alphanumeric keys. Your message can
be up to a maximum of 456 characters
Please note:
•Press 0 to enter a space between words
•Press # to switch between input modes e.g. abc, itap,
123 etc
•Press * to bring up options to insert characters such
as ?, !, & and @. Using the navigation key scroll to
the character you would like to insert and press
to select
6564
Page 40

With an attachment
•Whilst writing your text message select Option by
pressing to perform the following tasks:
• Select View by pressing to view the icon
•Press to insert the icon into your message
Insert
Select Insert to enter the following objects:
•Text Template
Your mobile has a list of templates that can be used
instead of entering the text message yourself. You can
use the factory default templates or templates of your
own that you have created. Scroll through the templates
available and press to insert into your text message
To create your own template, please refer to page 74.
•Image
You can select an EMS icon from the EMS icon library to
insert into your message
•Press to scroll through the names of the icons
available
66
• Animation
You can select an EMS animation from the EMS
animation library to insert into your message
•Press to scroll through the names of the
animations available
• Select View by pressing to view the animation
•Press to insert the animation into your message
•Melody
You can select an EMS ring tone from the EMS ring tone
library to insert into your message. When the recipient
of the message reads it, the inserted ring tone will be
played by the recipient’s mobile
• Scroll to the name of the ring tone you wish to use
•Press to insert the ring tone into your message.
The inserted ring tone will be displayed as a musical
note within the message’s text
67
Page 41

• vCard
You can select a contact’s data from your phonebook to
attach to your message. After receiving your message,
the recipient can save the attached contact data to their
own phonebook
• vCalendar
You can select a calendar memo and then attach
it to your message. After receiving your message,
the recipient can save this attached memo to their
own calendar
•Press to scroll through your contacts and press
to select the desired contacts
•After you have selected the contacts press
Then select:
Send message – to send your text message to the numbers
you have previously selected. When the message is sent a
copy will be saved in the Sent Items folder. If a message
fails to send it will save in the Outbox. If the save fails then
Save to Outbox Failed! will appear on your screen and the
send operation will stop
Text alignment
Select Text Alignment to select the type of text alignment
for your message’s content. Choose between Left
Alignment, Centre Alignment or Right Alignment.
To send your text message
•After you have finished editing your message, press
or select Option by pressing , then To :
• Then either enter the recipient’s mobile number when
prompted or select Contacts by pressing to select a
contact from your phonebook
68
Preview – to view the contents of your message
Save to draft – to save your message to the Drafts folder
so that you can send at a later time
Edit content – you can edit your text message before
you send it
69
Page 42

Read messages
When you receive a new message 1 New Msg will appear
on the external display whilst an incoming message alert
will be shown on the internal display (and with a tone or
vibration if selected).
Please note:
If the sender is a contact saved in your phonebook their
name will also appear in the message alert rather than the
number – so you know who sent you the message before
you open it.
•Press to open the message and read it
• Select Option by pressing , then select either:
Reply – to reply to the text message
Delete – to delete the text message
Call – to call the sender of the text message
Forward – to forward the message
Details – to view the date and time of when the message
was sent
Save – select to save the content of the message, such as
the sender’s number to your phonebook or ring tone,
animation and calendar attachments
Save all – saves all objects attached to the message
If you wish to read the message later press to return to
the standby screen. The message will be stored in the
inbox and the icon will appear in the standby screen.
Inbox
•In the Messages menu, select Text, then scroll to Inbox
and select by pressing
•You are now in the inbox. indicates a read message,
while indicates an unread message
• Select the desired message and press to read
•To return to the main menu press
Outbox
If a message fails to send, a copy will save to Outbox.
70
71
Page 43

Sent Items
In the Sent Items you can view all the text messages that
you have previously sent.
Forward – allows you to edit and forward the message
to other recipients
Delete – deletes the message
•In the Messages menu, select Text, then scroll to Sent
Items and select by pressing
• Scroll to the desired message record
Then you can:
•Press to select Option and then select;
Resend – allows you to edit and send the message to its
original recipient
Forward – allows you to edit and forward the message
to other recipients
Delete – deletes the message
Delete All – deletes all the messages in your outbox
•Press to read the message. After reading the
message you can;
Resend – allows you to edit and send the message to its
original recipient
72
Drafts
This option allows you to preserve message drafts that you
have saved.
•In the Messages menu, select Text, then scroll to Drafts
and select by pressing
• Scroll to the desired message record
Then you can:
•Press to select Option and then select;
Send – allows you to edit and send the message
Forward – allows you to edit and forward the message
Delete – deletes the message
Delete All – deletes all messages in the drafts folder
•Press to directly edit the contents of the message
73
Page 44

Templates
You can use the quick message templates in this menu to
compose a message without having to enter the entire
text character by character. You can use the factory
default templates, or templates that you have previously
saved to the list.
• Scroll to the desired template and then press
to select
•You can then edit the text as you wish and then send
the message
To create your own quick message templates;
• Select Option and then select Add
•You can then enter the text for the template and press
to save it
Message settings
Your O2X2 is already set up to send and receive text
messages. If you are unable to send text messages, then
please contact O2Customer Service.
74
75
Page 45

Media Messaging
Colour Media Messaging means you can do more than tell
people what’s going on – you can show them exactly what’s
happening with pictures, sound and text. Take a photo and
send it as a media message to people showing them exactly
where you are or, if you are in need of inspiration, you can
grab a full colour picture or image from the O2Gallery –
such as celebrity shots and greeting cards (see O2Active on
page 103) and send it with your own message to people.
•In the main menu, scroll to Messaging and select by
pressing , then select Multimedia
Create a media message
•In the Multimedia menu select New
Select the recipient(s)
You can send your media message to a recipient’s mobile
or email address.
• Scroll to To : and press to select
To enter a number of email address directly
•Type in the recipient’s phone number or email address
76 77
Page 46

If there are multiple numbers and email addresses:
•Press to open up the symbols field along the
bottom of the screen
•Press to select a comma, semicolon, or space
•To insert into the editing screen and separate the
different numbers and email addresses press
To select a number or email address from your phonebook
•Press to select Contacts
• Scroll to highlight the name of the desired contact
•Press to select and display that contact’s number(s)
and email address(es)
•Press to mark the number(s) or email address(es)
you want
•To return to the list of contacts again press
•You can then repeat the same steps to select other
contacts from your phonebook
•When you have finished press to return to the
recipient list, displaying all the phone numbers and
email addresses you have chosen
To send your message as a carbon copy or a confidential
carbon copy to others scroll to Cc: or Bcc: and repeat the
instructions above.
Content
• Scroll to Content: and select by pressing
• Enter your message using the alphanumeric keys
For further information on entering text please refer to
page 65.
With an attachment
•Whilst writing your message, select Option by
pressing
• Select Insert to enter the following:
78
79
Page 47

Animation
You can select an animation from the library to insert into
your message.
•Press to scroll through the names of the
animations available
• Select View by pressing to view the animation
•Press to insert the animation into your message
Image
•Press to scroll through the names of the
pictures available
• Select View by pressing to view the picture
•Press to insert the picture into your message
Photo
You can select a photo that you have previously saved to
your Images folder. For more information on the camera
please refer to page 95.
•Scroll to the file name of the desired photo
•Press to insert the photo into your media message
Voice memo
• Scroll to the file name of the voice memo you would like
to attach and select Option by pressing
• Scroll to Send and select by pressing
Please note:
You can also add a new voice memo. In the voice memo
screen, select Option by pressing . Then select Add by
pressing , and record a new voice memo.
For further information on recording voice memos please refer
to page 136.
Melody
You can select a ring tone saved in your mobile to insert
into your media message.
•Scroll to highlight the file name of the desired ring
tone, and then press to insert
Please note:
• Each media message is only able to accommodate one
image and one audio file. If you insert another image or
audio file into the same message, the newly inserted file
will replace the existing one
80
81
Page 48

•After an audio file such as a voice memo or a ring tone is
inserted into a media message, the icon will appear
on the top of that page
When you are editing your media message, you can
press to select Option at any time to perform the
following tasks:
Text Template
Your mobile has a list of templates that can be used
instead of entering the text message yourself. You can
use the factory default templates or templates of your
own that you have created.
•Scroll through the templates available and press
to insert into your media message
To create your own template, please refer to page 93.
New photo
Enables you to take a new photo using your mobile
camera and insert it into the media message you have
opened. For further information on using the camera
please refer to page 95.
’
s
82
Preview – plays all the pages you have created in sequence
Remove picture – removes an image or photo from the
currently displayed page
Remove sound – removes a ring tone or voice memo from
the currently displayed page
Remove text – deletes all of the text from the current page
Remove page – deletes the current page from your
media message
Previous page – displays the previous page
Next page – displays the next page
Page duration – allows you to set the length of time that
each page is displayed on the screen when playing your
media message
83
Page 49

Enter a subject
•Scroll to Subject: and select by pressing
• Enter the subject for your media message and press
to confirm
When you have completed all the fields required to send
your media message, press to select Option and choose
from the following:
Preview – play all of the pages you have created
Save to draft – saves the media message to the Drafts
folder so that you can send at a later time
Receipt – press to choose from the following
receipt modes;
Both delivery read – asks the recipient to return a
confirmation after receiving and reading your message
Only delivery – asks the recipient to return a confirmation
after receiving your message
Only read – asks the recipient to return a confirmation
after reading your message
None – cancels this function
Priority – Determines this media message’s priority
To send your media message
•After you have finished editing your media message,
scroll to Send: and select by pressing
84
85
Page 50

Read messages
When you receive a new message 1 New Msg will appear
on the external display whilst an incoming message alert
will be shown on the internal display (and with a tone or
vibration if selected).
Please note:
If the sender is a contact saved in your phonebook their
name will also appear in the message alert rather than the
number – so you know who sent you the message before
you open it.
•Press to open and play the message’s pages in
sequence
Whilst playing you can perform the following tasks:
•Press to select Pause. When the message has stopped,
you can press to select Play and resume playing the
message starting with the currently displayed page.
Alternatively, press to scroll to the page you want
to view and then press to select Play and resume
playing the message starting with that page
•Press to select Stop
86
87
Page 51

When your mobile finishes playing the entire message, you
can do the following:
•From the message’s last page press to replay the
last page. If you want to replay the other pages, you
must return to the first page using and then press
to start
•Press to select Option, then select:
Reply – to reply to the media message
Delete – to delete the media message
Call – to call the sender of the media message, or dial a
phone number in the contents of the message. Scroll to
the desired number and press to dial
Forward – allows you to edit the content and then
forward to someone else
Details – to view the date and time of when the media
message was sent
Save – enables you to save the sender’s phone number
to your phonebook, or save a number that was displayed
in the message’s content. You can also select the
contents of a media message and save to your mobile’s
memory, such as an image, photo or ring tone
Save all – saves all the objects attached to the message
If you wish to read the message later press to return to
the standby screen. The message will be stored in the
inbox and the icon will appear in the standby screen.
Inbox
•In the Messages menu, select Multimedia, then scroll to
Inbox and select by pressing
•You are now in the inbox. indicates a read message,
while indicates an unread message
• Select the desired message and press to read
•To return to the main menu press
8988
Page 52

Outbox
If a message fails to send, a copy will save to Outbox.
•Press to read the message. After reading the
message you can;
Sent Items
In the Sent Items you can view all the media messages that
you have previously sent.
•In the messages menu, select Multimedia, then scroll to
Sent Items and select by pressing
• Scroll to the desired message record
Then you can:
•Press to select Option and then select;
Resend – allows you to edit and send the message to its
original recipient
Forward – allows you to edit and forward the message
to other recipients
Delete – deletes the message
Delete All – deletes all the messages in your outbox
Resend – allows you to edit and send the message to its
original recipient
Forward – allows you to edit and forward the message
to other recipients
Delete – deletes the message
9190
Page 53

Drafts
This option allows you to preserve message drafts that you
have saved.
•In the Messages menu, select Multimedia, then scroll to
Drafts and select by pressing
• Scroll to the desired message record
Then you can:
•Press to select Option and then select;
Send – allows you to edit and send the message
Forward – allows you to edit and forward the message
Delete – deletes the message
Delete All – deletes all messages in the drafts folder
•Press to directly edit the contents of the message
Templates
You can use the quick message templates in this menu to
compose a message without having to enter the entire
text character by character. You can use the factory
default templates, or templates that you previously saved
to the list.
• Scroll to the desired template and then press to
enter its text into your message
•You can then edit the text as you wish and then send
the message
Settings
Your O2X2 is already set up to send and receive media
messages. If you are unable to send media messages, then
please contact O2Customer Service.
9392
Page 54

Camera
You can take photos using your mobile’s embedded
camera, and then set a photo as your wallpaper for the
main display’s standby screen, or send them to others
in a media message.
•In the standby screen, press to select Camera and
enter direct into the preview mode
Alternatively, in the main menu, scroll to Camera and
press to select, then select Camera again.
•You can now view your subject
through the viewfinder
9594
Page 55

Camera settings
Before you take your picture you can amend the
camera settings.
•Press to select Option
•In the camera setting screen select;
Light condition
Select to amend the light conditions of your environment.
Your camera will then automatically adjust its colour
balance in order for you to take the best quality pictures.
Select between, Normal, Indoor, Outdoor and Night.
Resolution
Select to set the desired resolution for your photograph.
You have the following resolution values to choose from:
Represented ResolutionOption
High
Medium
Low
Lowest
640 x 480
320 x 240
160 x 120
80 x 60
Please note:
The Face Mask option on page 97 is not available if the
resolution is set to Low.
96
Free space
Select to view the amount of memory remaining for
storing photos.
Face Mask
When you have selected this option, the camera’s
viewfinder will display a mask that is used to position the
face of the person being photographed in good focus.
You can then change the person’s facial expressions using
the Face Morph function. For further information please
refer to page 99.
To cancel the Face Mask function, press to select
Option and then select Normal Preview.
97
Page 56

Take a picture
•When your object is in focus, press to photograph
the object
Managing your pictures
After you have saved a photo to your mobile’s memory,
you can manage it using the options below:
Your photo will then show up on the main display.
•Press to select Save. Your photo will be saved to
Camera – Images
• If you are not satisfied with your photo, press to
select Back and take another photo
Please note:
• The external camera does not have a flash. Please take
photos in a well-lit area
•When taking photos, do not block or touch the camera
lens on the back of your mobile
•Always photograph your object with the source of light
behind you
• Do not shake your mobile when taking photos
•Please be sure that the lens is perfectly clean before
taking photos. Use a soft cloth to wipe the lens if it is
not clean
98
Send – Enables you to send this photo to someone as a
media message. You can also send a media message by
entering Messaging – Multimedia. For further information
on Media Messaging please refer to page 77.
Set to wallpaper – Designates this photo as the wallpaper
for the main display’s standby screen. You can also do so by
going to Settings – Wallpaper. For further information on
Wallpaper please refer to page 151.
Rename – Select to give your photo a new file name.
Details – Select to view the photo’s name, date, resolution
and file size.
Face morph – If you have activated the Face Mask option
before photographing someone, after a photo is taken and
saved, you will be able to change her/his facial expression
shown in the photo with this Face Morph feature, and
then save photos showing different expressions of the
same person.
99
Page 57

•Press to select Face Morph
• Then Press number key to change prompt will appear on
the screen, followed by the person’s face remaining
unchanged
•Press a corresponding number key to generate the
desired facial expression effects for the person’s face
The chart below shows each number key and their
matching expression effects:
Key Expression Key Expression
•Press to intensify/reduce expression effects. Intensity
levels will be displayed at the top right corner of the
screen ranging from 1 to 5; the default value is 2
•When the photo shows the desired expression effects for
the person’s face, press
• Enter this new photo’s file name, and press to save
to Camera – Images
•After you have saved the photo showing the expressions
you want, the original photo will reappear. Again you
can press corresponding number keys to create more
photos showing various facial expressions
100
Smile Angry
Young Funny
Slim Alien
Kiss Koala
Sleepy Monkey
Sad Fox
View your pictures
To view pictures that you have previously taken and saved
to your mobile’s memory;
•From the main menu, scroll to Camera and press
• Scroll to Images and select by pressing
• Scroll through the list of images previewed and press
to view fully
•You can then manage your image by selecting Option
and then by selecting, Send, Set to Wallpaper, Rename,
Details, Delete or Face Morph
101
Page 58

picture messaging media messaging colour games downloads
chat music sport news info services entertainment
O2Active
TM
Your new mobile has a WAP browser, which enables you to
access O2Active and other Mobile Internet services.
O2Active
Get ready for the bigger, brighter, vibrant world of
O2Active*.
This is your world, where you can download your
favourite tunes, play games that’ll get you hooked and
share your day with friends with full colour images and
quality sound. It’s where the news and gossip you care
about is sent straight to your mobile, and where finding
the fun is easier with info on movies, gigs and great
events happening near you.
Change your world. There’s so much you can do with
O2Active.
* Terms and conditions apply to O2 Active. Please visit www.o2.co.uk for details.
O2 Active is a trademark of O2 Limited. Services are handset and network
dependent.
103102
Page 59

What’s new?
Here’s where to head for to get into
anything new in the world of O2Active.
You’ll also find the latest competitions that
could win you fantastic prizes.
the game of the month, O2’s top ten games or choose from
arcade, action, puzzles, sports games and more. Some of
the great titles include Alpha Wing, Cannons, Cave Man,
Crash N Burn, Detonate, Dragon Island, Pipeworks and
Soccer Unlimited.
Messaging
Now you can show your mates exactly
what’s going on – in full colour. With
O2Active, it’s easy. Create and send unique
messages by shooting photos and adding
text and sound. You can download images from the
O2Active online Gallery, as well as store your own
messages, pictures and photos. Plus get essential Media
Alerts* such as sports, entertainment gossip and babes
or male models of the day.
Games Arcade
Time to fill? Mobile gaming has never been
so good. Preview and download a massive
range of full colour, funky games. Check out
* Cost: standard rate for each message sent. From 18p for each message
received. Terms and conditions apply.
© Copyright 2002-2004 Macrospace Ltd. All rights reserved.
104
For further information on the O2Games Arcade please
refer to page 119.
Chat
Our anonymous Chat service is the place to meet friends
around the country or have a little flirt on our special
speed dating service.
Downloads
It’s easier than ever to personalise your mobile. Whether
you’re into Rock, Pop or R’n’B, it’s simple to get your favourite
tune as a ring tone or try Truetones for sound quality that’s
just like real music. You can select from the top ring tones or
simply search by artist or song. And now you’ve got greater
choice when it comes to downloading wallpapers. From
umpteen categories like Urban, Motors and Bizarre, to the
Top 10 – and even hot pics of the male or female model of
the day. Visit www.o2.co.uk/ringtones to see the full range.
105
Page 60

Entertainment
Whether you want to dance into the small hours or catch the
latest Hollywood blockbuster, O2Active will point you in the
right direction. Wherever you are, it’s all you need for a crazy
night out or a cosy night in.
Films and Gigs – Check out what’s on near you – movies,
gigs, comedy nights – and more.
Time Out Eating Guide, Clubs and Bars –
Whether you’re a curry fiend or pasta
freak, into busy bars or quaint boozers,
these reviews will help you find the best
restaurants, clubs and bars to match
your taste.
TV Guide – Fancy a night in? Put your feet
up and find out what’s on the box.
Gossip – You’ll hear it here first. Get the hot news from
the movie and music worlds – and find out who’s up to
what and with who. And if you can’t get enough scandal
on the stars, simply sign-up for daily alerts* about every
little detail.
Time Out Stars – Want to know how your career, finances
and love life are written in the stars? Here’s where you
find out.
106
Bollywood – The top 10 chart, interviews, intrigue and
glamour with the best of Bollywood direct to your mobile.
Cartoons – Have a laugh with the latest Garfield or Dilbert
cartoon – then share the joke with your mates by sending
it on.
Sport
If you can’t be at the match, the match can
come to you. With O2Active, you can stay
on top of the latest sports action, wherever
you are.**
Access special ‘live’ sections to keep up-to-date with the
latest events and results. From Premiership and
international football, to rugby and cricket internationals,
all the F1 races and the major tennis and golf
tournaments. In fact, you can read all the day’s sports
news with full-colour pictures. Plus, you can find out
about the best sport on TV and sign-up for SMS and
full-colour Media Alerts to be one of the first to get the
red-hot sports stories.
* Standard cost to send text to 80202. From 13p to receive texts except
‘Footy Alerts’ – 18p to receive.
** Subject to network coverage.
107
Page 61

News
Even when you’re engrossed in O2Active,
you can stay in-touch with what’s going on
around you.
Get the breaking stories direct from the BBC, covering
national and international affairs, business, technology,
entertainment, and more – in text and with full-colour
pictures.
Plus visit O2Active to keep up-to-date with the latest weekly
single and album charts.
Shazam – Heard a new song you like or an old favourite
and just don’t know the name of the title or artist? Tag it
with Shazam. Simply dial 2580 or click on Shazam in
O2Active, aim your mobile at any loud music for 30 seconds
and Shazam will text you back the song title and artist.
Try it!
See www.o2.co.uk for terms and conditions.
Music
Downloads – Get into the groove and
download ring tones, pictures of your
favourite music artists and more. From
greasy haired Rock to smooth grooves,
to downright cheesy tunes, as well
as TV and film themes, you can find
the right ring tone to suit you.
It’s simple, you can order in just a few
clicks, with no pincodes to remember – just order
sounds straight from your mobile.
News and Charts – Get the stories and pictures behind the
songs and find out which music stars are making the news.
108
Info Services
You can now get text alerts* in a few easy clicks on your
mobile if you are set up for WAP. From Top News Story to
Sport alerts to jokes and more – click on Info Services to
subscribe and unsubscribe to text alerts.
Train Times – Tired of delayed trains or cancellations. Check
train times on the move and get updates wherever you are.
Time Out City Guide – Access information
on the top ten European cities to visit,
including the best places to stay, eat, drink
and party.
* Cost: standard rate for each message sent. From 13p for
each message received. Terms and conditions apply.
109
Page 62

lastminute.com – Make last minute
holiday plans, gift purchases, dinner
reservations and more using your
mobile with lastminute.com and O2Active. In addition to
the O2Active service, shortcode 5959 can be used to access
lastminute.com
Thomson Local Directory – Cabs, fast food, restaurants and
shops, find the phone numbers you need fast, while you
are on the move.
Walking Maps – Find your way around on
foot without ever having to carry a map,
ask a stranger or phone a friend with full
colour walking maps. All you have to do is
enter where you are and where you are
going and the maps will show you the way.
My WAP – Impress your friends with your own WAP site.
It’s so easy to set up and all from your mobile. Want to
organise a night out? Update your WAP site with all the
info and get your friends to access your homepage to find
out where they are going and what you have organised
for them.
Help – Having problems? Got a question? Here’s where you
will find the answer.
How to access O2Active
Your O2X2 is preconfigured to access
O2Active.
•Press to access the WAP Service
screen
Start Browser
•In the O2 WAP service screen the first sub menu is Start
Browser, press to start up the browser and connect
to the homepage – set as the O2WAP service homepage
Browsing a web page
– The soft keys refer to the commands at the
bottom of the screen. Press to perform needed tasks whilst
browsing.
– Press to scroll up and down the web pages.
110
111
Page 63

How to close the browser
•Whilst online, press and hold
• If you are already viewing a WAP web page, long-press
, or from the browser’s menu press , select Exit
and press to select
How to display the browser’s menu
•Whilst browsing press to display the
browser’s menu
• Scroll through the options available and
press to Select or press to Exit
the browser menu
Bookmarks – to open the Bookmarks menu to view sites
you have previously saved or save the current web page
you are browsing
•View
•In the Bookmarks screen select View
• Scroll to the desired bookmark or bookmarks folder
and press:
– to select Go and link to the web page you have
selected. If you have selected a bookmarks folder select a
bookmark from within the folder
Back – select to take you to the page you viewed
previously
Home – returns to the O2Active homepage
Exit – select to close the browser and return you to the
main menu screen
Inbox – when your mobile receives a message that can only
be viewed using a WAP browser, you enter this WAP inbox
to read the message
112
– to select Menu and display the following options:
Details – displays the bookmark’s title and the URL
Delete – to delete the bookmark or bookmarks folder
New bookmark – creates a new bookmark
New folder – creates a new bookmark folder
Move to folder – to move a bookmark to a designated
folder
113
Page 64

Delete all – to delete all the bookmarks and bookmarks
folders
Hotkeys – allows you set a numerical key as a hotkey for
a bookmark. After completing the setting, you can press
this numerical key to directly link to the web page
represented by the bookmark
•Mark Site
•In the Bookmarks screen select Mark Site. You can
then follow the prompts to add the current web page
to your bookmarks list
Settings
Your O2X2 is already set up with the correct settings
to enable you to get the most out of O2Active. If you
have any problems with your settings please call
O2Customer Service.
WAP Message
Starts up the browser and displays the WAP inbox so you
can read WAP messages.
Enter Address
Starts up the browser and connects to the URL you enter.
Go to URL – Select Edit and enter the URL of the web page
that you wish to browse, then scroll to Go and select to
link to that URL
Save items – When viewing a web page, if you discover
that it contains an image that can be downloaded, you can
access this option to save the image to your mobile. You
can then send this image on to someone else or save as a
wallpaper on your mobile
Reload – Reloads the current web page
114
Resume
Returns to the last web page you viewed.
Clear Cache
To clear the web page content that the browser
temporarily stores in its memory.
115
Page 65

WAP Settings
Your O2X2 is already set up to access O2Active, so you
won’t have to do a thing. However, if you want to change
your settings, then see below:
To activate another set of WAP server settings
•In the WAP Settings menu, scroll to the group of settings
you wish to use and then press . Your mobile
will activate these settings for use in connecting
to the Internet
For detailed information on changing your WAP settings
please contact Customer Service. If you are a Pay Monthly
customer you can find your Customer Service number
on a recent bill. If you are a Pay & Go customer please
call 08705 678 678.
116
117
Page 66

Games
You can experience the latest full-colour, console-style
games in full effect on your O2X2. Get ready for a gripping
gaming experience that takes your breath away.
•In the main menu, scroll to Games and select by
pressing
O2Games Arcade
Welcome to the era of fast and furious mobile gaming.
O2Active’s Games Arcade brings you full colour, quality
games from classic puzzles to championship footy. Choose
from arcade, action, puzzles, sport, the O2Top 10 and
Game of the Month. Games are easy to download and you
can preview them beforehand.
• Scroll to O2Games Arcade and
press
How to download games
•In the O
press to select
•Here you can see the O
Month, or select Get Games to see a list of all the games
Active main menu, scroll to Games and
2
Top 10 games, Game of the
2
119118
Page 67

•You will then see a list of all the categories – New,
Arcade, Action, Puzzles, Sport and Others
• Select the category you want and a list of all the
available games will appear on screen
•Just choose the game you want to play and select to get
a full description
• If you want to buy the game select Buy
•On the following screen select Download. It may take a
minute for the game to download – please don’t cancel
before it has finished downloading
• The game should now be saved
To play a game you have downloaded
• Select Games from the main menu
• Then scroll to Games and press
• Select the game that you have downloaded
•You’re now ready to play!
120
Alpha Wing
Fight through alien defences to destroy
their base in this graphically stunning
action packed shoot ‘em up. Collect
weapons and power ups as you prepare for
the final battle! Compete with other O
2
gamers and post your score to the O2Games high score
league table.
Cannons
Destroy the enemy tank by setting the
right angle and power for your shell. Hit
the power ups to gain an advantage, use
trees to give you natural cover and watch
out for the wind! Featuring 3 different
levels of difficulty and multiple landscapes.
Cave Man
Help Fred the cave man collect all the coins
from all 10 levels by solving puzzles and
avoiding monsters and falling rocks. Make
sure you avoid those eggs.
© Copyright 2002-2004 Macrospace Ltd. All rights reserved.
For terms and conditions, and charges see www.o2.co.uk
121
Page 68

Crash N Burn
Make your opponents crash and burn in this
awesome top down racer. With 3 different
game modes, multiple car upgrades and
whopping 24 races and 8 different tracks,
this is the ultimate mobile racer.
Detonate
As Lt. Commander Zack Masters of the
Freedom Alliance your mission is to destroy
the Xieon Empire weapons guarded by
Dr Zork and his army of robots. Featuring
12 levels and 4 secret power ups with
progressively intelligent AI.
Dragon Island
Take control of a mighty axe wielding hero
in this graphically lush platform adventure.
You must battle your way past multiple
enemies on your way to Dragon Island
where you must defeat the ancient dragon
and restore peace to the kingdom.
122
Pipeworks
Build the longest water pipe possible
before the water reaches the end of the
pipe. Keep an eye out for the next piece in
the top right hand corner and don’t forget
that bonus points are awarded for using
both directions of a cross-pipe!
Soccer Unlimited
Packed full of crunching tackles, inchperfect 50 yard passes, diving headers and
curled shots, Soccer Unlimited is footballing
perfection for your pocket!
© Copyright 2002-2004 Macrospace Ltd. All rights reserved.
For terms and conditions, and charges see www.o2.co.uk
123
Page 69

125124
Organiser
•From the standby menu press , then scroll to
Organiser and press to select
Calendar
You can use the calendar to set up memos for forthcoming
events such as a meeting, an appointment, or a friend’s
birthday. The calendar will also remind you about events
you have previously scheduled.
• Select Calendar by pressing
•When you open the calendar, the current
date will be highlighted
Please note:
If you have not set the current date on your mobile, go to
the menu Settings – Date & Time and set.
•In the calendar screen, press to move the red box
to the date where you wish create a memo
Page 70

127126
Enter a name for the event associated with the memo.
Enter the scheduled location for the event associated
with the memo.
Enter the names of the participants in the event
associated with the memo.
Record any notes about the event associated with
the memo.
Scroll to this option to set up your mobile to
remind you about an event. On the appointed date,
when the scheduled time arrives, the memo will
appear on the screen and the alarm clock will ring.
First press to activate this feature. The time field
will appear beneath, and you can enter the time
when you wish to be reminded about the event.
•After entering data in each of the fields, press to
save the memo to that date.
•To go to a future or past date, select
Option by pressing and select
Go to Date, then enter the desired
date and press
•When the red box is highlighting the
desired date, select Option by pressing and then
select Add by pressing to open
the memo editor
•In the memo editor screen, scroll to
the data field you wish to edit, and
then select Edit by pressing , or
press the alphanumeric keys to begin
entering data
You can enter data in the following fields:
Change the memo’s assigned date. In the calendar
screen, press to scroll to the date where you
wish to create the memo, and then press .
Enter a time for the event associated with the memo
by using the appropriate number keys.
Page 71

129
Your mobile will display this date’s memo list, including the
event name and time for the memo you just saved. If the
alarm clock has been set to remind you about the event
associated with the memo, the icon will appear beside
the event name.
You can now perform the following tasks:
•Press to view the information in the memo
• Then press to Edit or Delete the memo or select Send
vCal to send the memo to someone else in a
text message
• Select Back to return to the calendar screen. You can
then move the red box to other dates to create
additional memos (dates that already contain memos
will be marked by a yellow box); you can also create a
second memo for the same date. The procedure is
identical to that described previously
128
After creating all the event memos you wish, return to
the calendar screen. Select Option by pressing and
then select:
Delete All – Deletes all currently saved memos
Auto Delete – If this feature is activated, all event memos
for dates prior to the current date will be automatically
deleted
Page 72

131130
Alarm clock
• Scroll to Alarm clock and press
Then, use the following steps to set an alarm:
• Select an alarm you wish
to set and press
•Press to select On. The
configuration fields for the alarm will
appear in the lower part of the screen
Please note:
If you activate the alarm clock feature, when the specified
date and time arrive, your mobile will sound the alarm,
even if it is turned off.
Day
Set the alarm to go off on a particular day of the week.
• Select Edit to display the days of the week
• Scroll through the days and press to Select or Cancel
•Press to return to the Alarm Setting screen. The day
field will now indicate the days on which the alarm will
go off
Page 73

To do list
You can use this feature to create a list of work tasks or
personal projects.
• Scroll to To Do List and press to select
To add a task
• Select Option then select Add to bring up the editor
window
• Enter the name of the task and confirm this to do item
by pressing
You can also perform the following tasks:
•In the list screen, scroll to the desired to
do item and press to select Option
• Then select:
Add – to add a new to do item
Edit – to amend the selected item
Delete – to delete the selected item
Delete all – to delete all items in the to do list
133132
Time
• Enter the time when you want the alarm to go off
Time duration
Allows you to set the length of the alarm.
• Select Edit to select the desired alarm duration and
then press
•When you have completed all your current alarm clock
settings press to save
After completing the alarm clock settings, will appear
in the external display’s status bar and will appear in
the main display’s status bar.
Please note:
When the alarm rings, there are two ways to turn it off:
•Press to select Snooze to stop the alarm.
The alarm will ring again five minutes later
•Press to turn off the alarm. The alarm will not ring
until the next scheduled time
Page 74

Auto delete – in the list screen you can scroll to the
item that has already been completed and press
to mark it and remind yourself that the task has
been done. However if you activate Auto Delete,
any items that you have marked as completed will
automatically clear
Notes
You can use this feature to create a list of notes.
• Scroll to Notes and press to select
To add a note
•Select Option then select Add to bring up the
editor window
• Enter the desired text and press
•A message on the screen will ask whether you wish to
add a password for this note. If you select Yes, you will
from then on need to enter the password in order to
view the contents of the note. Select No to save the note
without adding a password
You can also perform the following tasks:
•In the list screen, scroll to the desired note and press
to select Option
• Then select:
Add – to add a new note
Edit – to amend the selected note
Delete – to delete the selected note
Delete all – to delete all notes
135134
Page 75

You can also perform the following:
•In the Vo ic e Memo screen press to select Option
• Then select:
Add – to record a new voice memo.
Rename – to rename the current voice memo.
Delete – to delete the current voice memo.
Send – to send the current voice memo to friends or
colleagues via a media message.
Please note:
For details on composing and sending a media message
please refer to page 77.
137
Voice memo
•Scroll to Voice Memo and press .
•In the Voice Memo screen press to select Option, and
then select Add
• Then:
– press to start recording
– press to stop recording
– press to play back the voice memo
•Once complete, select Save, then enter in a name for the
recording and press to confirm
136
Page 76

Currency converter
•In the main menu scroll to Convert and select
Below is a description of the convert screen:
Once you enter the convert screen, the default currencies
will be displayed, as shown in this example:
Step one
•To set the currencies for conversion,
select Option and select either Currency
1 (to set the currency at the top of the
screen) or Currency 2 (to set the currency
at the bottom of the screen), then press
to confirm
•After selecting a currency from the list, press
Step two
•To set the exchange rate, select Option
and then Rate Setting
• Enter the rate from converting between
currency 1 and currency 2
• The conversion calculation result will be displayed at the
bottom of the screen. Use to scroll and view
Please note:
• The calculation can provide precision up to two
decimal places
• The exchange rate field can accommodate a maximum
of five digits (including decimal digits)
•Press * or # to enter a decimal point
138
139
Currency 1:
GBP (GB pounds)
For entering the
amount for
conversion
Currency 2:
EUR (euros)
The current exchange
rate setting
Page 77

Step three
• Return to the currency converter screen
and select one of the currencies
• Enter an amount that you wish to
convert into the other currency. The
amounts can be up to six digits long
Step four
•Press . The converted amount will
appear in the field for the other
currency
140
Page 78

Tools
•In the main menu scroll to Tools and select by
pressing
My Services
• Select My Services if you are on Pay & Go to access a list
of useful numbers and services
Please note:
My Services is only available to Pay & Go customers. If you
are on a Pay Monthly calling plan your first menu option
within Tools is Calculator (please see below).
Calculator
Allows you to use your mobile as a calculator.
• Select Calculator by pressing to open the
calculator screen
•Use to perform the
mathematical operations
on the screen
•Press * or # to enter a decimal point
Please note:
You can enter numbers up to a maximum of 8 digits in length.
Entered numbers
and calculation
results will appear
in this field.
141140
Page 79

Melodies
• Scroll to Melodies and press
My Melodies
This ring tone library includes your mobile’s default ring
tones, as well as ring tones received in EMS messages, or
downloaded from O2Active or that you have created
with the composer function.
•In the Melody screen select My Melodies
• Scroll to the desired ring tone and select Option to
perform the following tasks
Set ring tone – Makes the ring tone the alert sound for
incoming calls. Some ring tones such as Chimes High
cannot be set as your mobile’s alert for incoming calls so
they do not offer this menu option.
Edit – Allows you to edit the ring tone. Your mobile’s
default ring tones cannot be edited.
Delete – Deletes ring tones that you have created. You will
be unable to delete your mobile’s default ring tones.
Send – Enables you to send ring tones in a message. Only
EMS format ring tones, such as Chimes High can be sent
with a message. Non-EMS ring tones (including default ring
tones and user created ring tones that can be set as the
alert sound for incoming calls) do not provide this option.
Information – Displays the name of the ring tone, its file
size, and whether it is a default ring tone, or a file that
you have saved or downloaded yourself (noted as
User Defined).
Composer
You can create your own polyphonic ring tone melodies,
and use them as alert sounds for incoming calls.
A polyphonic ring tone consists of musical tones in
multiple channels. The Composer function allows you to
create a maximum of 8 channels, mixing them to create
the final polyphonic ring tone.
Octave
Sharp
Note format
You can enter numbers up to
a maximum of 8 digits
in length.
Length
Pitch
142
143
Page 80
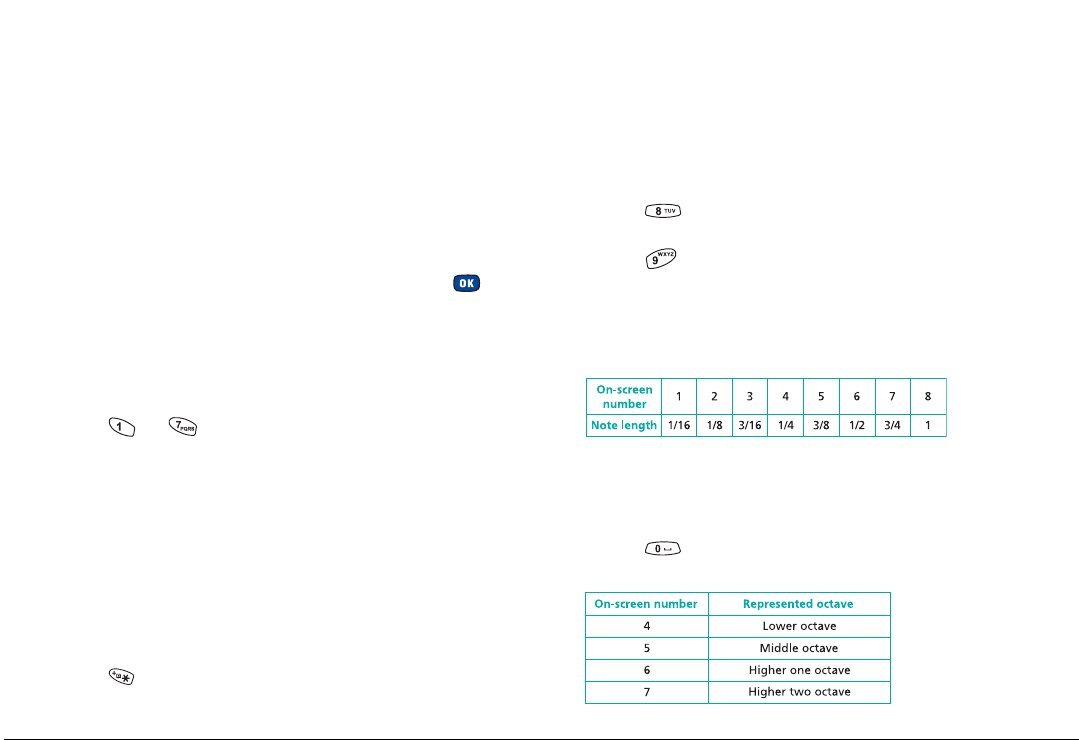
Create a polyphonic ring tone
•In the Melody screen select Composer
• The first time you enter the Composer menu, you will
see 8 channels that you can select for editing. Each
channel can be used to save one passage of music that
you have created
•Scroll to the channel that you wish to edit and press
• Edit notes according to the following procedures
described. For further information refer to Tools –
Melodies – Help
Entering default notes
•Press to to enter the eight pitches in an
octave as quarter notes e.g. Do Re Mi Fa So La Ti
•The screen will display 4C5, 4D5, 4E5, 4F5, 4G5, 4A5
and 4B5
Please note:
The 4 on the left shows that the represented note is a
quarter note; the 5 indicates that it is in the fifth octave.
Entering a default rest
•Press to enter a quarter rest
Adjusting the length of a note
• The default note length is a quarter note (the screen
uses the number 4 to represent a quarter note)
•Press to increase the note’s length (the number on
the screen will increase)
•Press to reduce the note’s length (the number on
the screen will decrease
Various note lengths are represented by the numbers
shown in the chart:
Adjusting a note’s octave
• The default notes just entered are in the middle octave
(represented on the screen by the number 5)
•Press to adjust a note’s octave. The octave of a
note is represented by the numbers shown in the chart:
144
145
Page 81

Adding a sharp to a note
•Press to add a sharp #, which raises the note
a semitone
•To remove a sharp from a note, press
•Once complete, press to return to the channel list
You can now repeat the above steps to create another
channel of music.
Please note:
A sharp cannot be added to an E or B note.
Please note:
•To modify a note after you have entered several notes,
press to move the cursor to the right of the note
that you wish to change. You can then adjust the length,
octave, sharp/unsharp, and so on
•Press to select Delete and delete a highlighted note
•When editing the music in a channel, select Option to
access the following options:
Play – Plays the notes in the channel
Instrument – To select the instrument that will play the
notes in the channel
Time Beat – Sets the tempo (tempo range: 40 to 200)
146
When you have finished with all the channels that you
wish to fill with notes, select Option in the channel list
screen to access the following options:
Play All – Plays the polyphonic ring tone that results from
mixing all channels
Play Channel – Plays the channel you have currently
scrolled to (if this channel does not contain any music that
you created, this option will not appear)
Save – Select this option and your mobile will
automatically mix the music you have created in the
channels into a polyphonic ring tone, and save in Tools –
Melodies – My Melodies. Press and enter a name for
the ring tone
147
Page 82

Stop watch
•Scroll to Stop Watch and press
•Press to start the stopwatch
•While the stopwatch is running, you can press to
select Split and save up four elapsed times (such as in a
race). The display will show the saved times in the lower
part of the screen
•Press to halt the stopwatch
•Once the stopwatch has stopped, select
Reset to zero the stopwatch
Please note:
Pressing to select Back while the stopwatch is running
will bring up the Quit? warning message although the
stopwatch will continue to run. Selecting Yes will stop the
stopwatch and No will return to the timer screen.
Countdown timer
• Scroll to Countdown Timer and press
• Enter the amount of time to count down – this can be
up to 23 hours, 59 minutes and 59 seconds
•Press to start the timer
•When the countdown has finished, the screen will
display Time’s up
• Select Exit to leave the screen
Please note:
You can press at any time to stop the
countdown timer.
Memory status
• Scroll to Memory Status and press
This shows the amount of memory, including space for
storing pictures, animations, and ring tones on your mobile.
The amount will be displayed as Free Space.
148
149
Page 83

Settings
The settings menu is used to set basic parameters for your
mobile such as language, time and date, profiles, security,
network and call settings.
•In the main menu scroll to Settings and press
Wallpaper
Your mobile says a lot about you so ensure you choose the
wallpaper for your main display’s standby screen carefully.
• Scroll to Wallpaper and press
•To select an image/animation to use,
scroll through the list of
images/animations available
151150
Page 84

You can then do the following tasks:
• Select Option by pressing and select;
View – to view the image/animation
Send – to send the image/animation to
someone attached in a text message
Information – to find out the name, size
and origination of the image
• Select to confirm your selection
You can also download celebrity photos, cartoons and
other graphics from O2Active in a few easy clicks and give
your mobile a new look. Please refer to page 103 for more
information.
Date and time
You can set the time and date, as well as the format
in which the time and date will be displayed on the
start up screen.
• Scroll to Date & Time and press
Time
• Select Time by pressing
•Press to choose between the
Auto or Set mode, then press
Auto
This is the automatic time zone adjustment. If during
travel, you move between time zones, your mobile will
automatically adjust the time displayed on the screen so
that you always have access to accurate local time.
Set
Your mobile will always display the time you set even if
you travel into other time zones.
• If you select Set you can then complete the time and
date fields
152
153
Page 85

Format
•In the Date & Time menu select Format
From here you can decide the format in which the time
and date appear in the standby screen.
Secondary time
•In the Date & Time screen select Secondary time
Allows you to display the local time as well as the time in
another designated zone on the standby screen.
Profiles
Change the settings that determine how your mobile alerts
you to an incoming call – whether through a ring tone or a
vibrating alert.
• Scroll to Profiles and press
•Press and scroll to
the profile that best suits the environment you are in
• Then press to activate
Choose from the following:
Normal
This is the default profile. Once activated
the display’s status bar will show the
icon.
Meeting
The options in this profile have been preset to suit a
meeting environment e.g. no audible ring tone or keypad
tones. Once activated the display’s status bar will show .
154
155
Page 86

Outdoors
The options in this profile have been preset to suit an
outdoor activity e.g. the highest volume ring tone or
activation of both ring tone and vibrating alerts. Once
activated the display’s status bar will show .
You can adjust the settings for each of the profiles to suit a
particular environment.
• Scroll to the desired profile and press to select Edit
Headset
This profile is only active when a hands-free kit is attached
to your mobile. Once activated the display’s status bar will
show .
Personal
You can use this profile as a group of custom settings, and
rename the profile if desired. Once activated Personal will
appear beside in the display’s status bar.
You can also rename this profile so that the name you
choose will appear on the standby screens. Please refer to
Rename on page 159.
156
Then select one of the available options;
Vibrate
•Ring only
•Vibrate only
•Ring and vibrate
•Vibrate then ring
Tones
Choose from a selection of ring tones. Scroll to your
preferred ring tone and press to select.
You can also download your favourite tunes and save
them as your ring tone from O
page 103 for more information.
Active. Please refer to
2
157
Page 87

Messages
Choose a tone to alert you when you receive a message.
Alarm
Select the ring tone for your alarm clock.
Answer mode
• Send key – allows incoming calls to be answered only
by pressing
• Any key – allows incoming calls to be answered by
pressing any key except , which is used to reject
incoming calls
Calendar
Choose a ring tone for the alarms set for events or
reminders on your calendar.
Keypad
Determines whether keypad tones are played when keys
are pressed.
Tone Volume
Press to adjust the ring tone volume or mute the
ring tone.
158
Rename
Allows you to provide a new name for the profile (only
available for the personal profile).
Restore
To return all settings to the original factory settings.
Please note:
The restore setting requires a password. The default for
this is 1234.
159
Page 88

Display
Adjust your mobile’s display settings including the welcome
note, outer display and more...
•Scroll to Display and press
• Then select the following options:
Contrast
•Adjust the contrast of the screen’s
display using and press
to confirm
Brightness
•Adjust the brightness of the mobile’s display
backlighting using and press to confirm
Backlight
Turn your mobile’s keypad and display
backlighting on or off and also set the
length of time that the backlighting
remains activated after a key has been
pressed or the flip is opened.
•To adjust the backlight, scroll to Time Duration and
press to select Edit
• Then set the length of time and press to confirm
Welcome message
You can enter a greeting, set an animation/picture and
select the music that is played each time your mobile is
turned on.
Animation – select to display animation only
Image – only the picture selected in this option will be
displayed. Images that have been saved from messages or
downloaded from O2Active can also be set for use in the
welcome screen
Text – only the welcome message entered in this option
will be displayed. Your welcome message is limited to
15 characters
Image and text – the picture and welcome message will
be displayed
Off – to return to the original factory settings
160
161
Page 89

Outer display
Animation
Select the animations you want to show on your mobile’s
external display.
•Press to make your selections
•When finished press
Duration
Amend the length of time the external display’s animations
are activated.
• Default – the time and animations will go through one
cycle and then power off. To activate again press the
volume key or open and close the flip
• Cycle – the time and animations will go through one
cycle and then power off for 15 seconds before it repeats
the cycle again
• Always on – the external display will remain on, cycling
continuously through displays of the time and
animations
Please note:
The external display drains power from the battery when
it is on so selecting Cycle or Always on will reduce
battery life.
162
163
Page 90

Audio
This menu allows you to set various sounds that the mobile
uses, such as Tones, Messages, Alarm, Calendar as well as
the Tone Volume and Call Volume.
• Scroll to Audio and press . Then select from the
options available
Please note:
Some of the options provided in this menu and the Profiles
menu are identical. Please refer to Profiles on page 155.
Call settings
• Scroll to Call settings and press
• Then select from the following options:
Call divert*
Forward incoming calls to another designated phone
number or your Voicemail.
Forward all – forwards all incoming calls. After the
Forward all mode is activated will be displayed in the
standby screen
When busy – forwards calls when you are on another call
* Pay & Go customers can only divert to Voicemail 901.
165164
Page 91

No reply – forwards calls when you do not answer
Not reachable – diverts calls when your mobile is turned
off or outside network coverage
Cancel all – to cancel all call forward settings
Call waiting*
If there is an incoming call when you are in the middle of
another call, the screen will display the number of the
incoming call and call waiting message to alert you.
Call barring*
You can lock your mobile to reject incoming calls or bar
outgoing calls, domestic or international. Call barring is a
password protected network service, and details should be
acquired from O2Customer Service.
All outgoing – blocks dialling of any calls from your mobile
Intl. out – if activated no international calls can be made
from your mobile
Intl. except home – if activated, your mobile can only be
used to dial local calls and calls to your home country from
abroad. Other international calls will be barred
All incoming – rejects all incoming calls
Incoming when roaming – if you are in another country
(using roaming), activating this option will cause your
mobile to reject all incoming calls
Cancel all – cancels all call barring settings. You must enter
your password in order to cancel these settings
Change password – To change your password
166
Auto redial
If there is no answer at a number you have dialled, your
mobile will automatically redial.
Show number
You can decide whether or not to display your phone
number on the recipient's phone when you make a call.
On – the recipient’s phone will display your phone number
Off – your phone number will not be shown on the
recipient’s phone
Preset – whether your phone number will be displayed on a
recipient’s phone will be determined by the default set by O
Please note:
If this feature is turned off, you may not be able to make
phone calls in certain countries, such as Singapore and China.
* Available to Pay Monthly customers only.
167
2
Page 92

Fixed dial number*
After this feature is activated, your mobile will only be able
to dial numbers on the fixed dial number list. If a number is
not on the list, calls cannot be made to this number.
Active line*
You can use two different phone numbers on one mobile,
designating one number for dialling calls, while accepting
incoming calls dialled to both numbers.
Before activating the fixed dial number feature:
• Select View, then Option and select Add to create a
fixed dial number list
• Enter the PIN2 code, and then add a new number to
your fixed dial number list
After creating the list, you can view, edit and delete
numbers in the list.
Please note:
If the PIN2 code is entered incorrectly three consecutive
times, the PIN2 code will be locked down. You will need
the PUK2 code to unlock the PIN2 code. Contact
Customer Service to obtain the PUK2 code.
168
Connect alert
Activating this feature enables your mobile to provide
a ring tone or vibrating alert, or flash the backlighting
when the recipient of a call has answered.
Minute beep
Once this option is activated, your mobile will emit a beep
once every minute during a call.
Flip activate
Select to activate/deactivate the active flip
feature. By activating the active flip
feature you will be able to answer your
mobile by opening the flip.
* Available to Pay Monthly customers only.
169
Page 93

Network
Mode selection
You can choose whether the network selection mode that
your mobile uses when turned on is automatic or manual.
Automatic – when outside the coverage of your regular
network, your mobile will automatically search for usable
networks
Manual – when outside the coverage of your regular
network, your mobile will list available networks and allow
you to choose
Available list
This will show a list of countries available for you to select.
Band setting
According to your requirements, you can set an
appropriate band in the GSM network system.
* Only available whilst abroad with your O2 X2 mobile.
*
170
Connection mode
Set your mobile to search for a GPRS / GSM network when
it is turned on.
GPRS & GSM – when it is turned on, your mobile will
search for available GPRS and GSM networks
GSM only – when it is turned on, your mobile will search
only for a GSM network
Security
Prevent unauthorised use of your mobile by using a PIN
code, phone password and SIM card lock.
PIN code
A PIN code will prevent unauthorised use of the SIM card.
Unless the correct PIN code is entered when your mobile is
turned on, the SIM card cannot be used, even if it is
inserted in another mobile.
PIN1 code
Select to activate/deactivate or change the PIN1 code. To
change the PIN1 code, you must press in the Enable
item to select On, so that you will be able to enter and
confirm the new password.
171
Page 94

PIN2 code*
Used to change the PIN2 code. The procedure is the same
as for the PIN1 code.
Phone lock
Select to activate/deactivate or change your mobile’s startup
password which prevents unauthorised use of your mobile.
Once activated, your mobile will be locked down when it is
turned on unless this password is correctly entered. If an
incorrect password is entered, your mobile will remain
locked down, and cannot be unlocked even if the SIM card
is replaced by another one. When the mobile is locked, you
will only be able to make emergency calls.
The procedure for setting the phone lock password is the
same as for the PIN1 code and the default password is 1234.
SIM lock
Used to prevent unauthorised use of your mobile with
other SIM cards. After you activate the SIM lock, only the
SIM card present when the feature was activated will be
accepted by the mobile.
* Available to Pay Monthly customers only.
172
Before setting the SIM lock feature, you must enter the
previously set SIM lock password – the default password is
1234. Your new password must be between 4 and 8 digits
in length.
Please note:
Your mobile can recognise up to three different SIM
cards. The first time you enter a new SIM card your
mobile will request the SIM lock password. If entered
correctly, the mobile will be able to recognise the new
SIM card and use it normally. The next time your mobile is
turned on with this SIM card inserted, you will not be
asked to enter the SIM lock password again.
Screen lock
Once activated, if you don’t perform any
tasks for a set period of time, your mobile
will automatically activate the screensaver
shown on the right, the purpose being to
prevent personal information on your
mobile from being viewed by others.
To return to the original screen, after pressing any key, you
must enter the password you set for this feature.
173
Page 95

To set the screen lock feature
• Enter the default Screen lock password which has been
preset as 1234
•In the Enable option, press to select On
•Scroll to Timeout and press to select Edit or press
to set the period of inactivity before your mobile enters
screen lock mode
• Complete all the settings and press to confirm
You will then be prompted to either change the password
• If you do not wish to change the password press to
activate the screen lock feature using the previously
set password
•To change the password, enter the new password in the
New Password and Confirm fields, then press to
confirm and activate the screen lock feature
Power saving mode
After you activate the power saving mode, keypad and
display backlighting will be turned off, as will the status
indicator lights on the flip, in order to conserve power.
Language
Select to choose the language your mobile will use to
display information.
Factory reset
Restores all of your mobile’s settings to their factory
defaults.
Input
You can set the default input mode that
will be automatically activated whenever
you open the editing window for entering
information into a text message or the
phone lock.
174
175
Page 96

Chapter 5
Miscellaneous
•Abbreviations and Acronyms
•Questions and answers
•Technical data
177176
Page 97

Abbreviations and Acronyms
What is roaming?
Roaming allows you to move from one base station (cell)
to another or from one network to another without
affecting the call.
What is digital?
Early mobile phones relied on analogue systems. Analogue
radio systems transmit the voice signal in its original form,
whereas digital technology transforms the microphone
signal into number sequences (digits) and transmits these.
When received, the digital signal is decoded so that you
can hear the sender’s voice. Digital signals do not degrade
in quality as long as the data is received, and they can be
compressed to take up less memory.
What is tri-band?
A tri-band mobile has the capability to automatically switch
between frequencies. It can therefore operate on three
frequency bands, e.g. 900 Mhz, 1800 Mhz and 1900 Mhz.
X2 is a tri-band mobile.
The O
2
178
What is a SIM?
Subscriber Identity Module or SIM is the little gold-plated
plastic card that you get from O2and which holds the
unique data the network needs to identify your mobile.
What is PIN* and what is PUK?
Access to use a mobile is most often protected by a code
known as ‘PIN’ – Personal Identification Number. Your SIM
card comes with a default PIN that you can change to any
code you prefer. See page 171 for details. If you forget
your code, or by mistake enter a faulty code three times in
a row, the SIM card will lock. To unlock, you must enter the
Personal Unblocking Key or ‘PUK’ code which you can get
from O
What is IMEI?
IMEI stands for International Mobile Equipment Identifier
and is an identification system that can recognise every
mobile by a specific number. If a mobile is stolen, the IMEI
system is capable of blocking it on all network operators
that support the system.
* Pay & Go mobiles are not set up with a default PIN code.
Customer Service.
2
179
Page 98

What is WAP?
Wireless Application Protocol or WAP is a standard
developed for mobile phones. It was designed to give
quicker access to mobile content than existing web
protocols. Using WAP will open services to you such as
O2Active which offers a wide variety of mobile services
and entertainment.
What is GPRS?
General Packet Radio System is a service protocol built on
GSM technology. GPRS allows several mobile phone users
to share the same connection. Charges may therefore be
based on the amount of transferred data rather than
on airtime.
What is CSD?
A wireless service protocol used for WAP. CSD stands for
Circuit Switched Data and will enable continuous connection
and payment by the amount of time spent on connection.
What is a URL?
Uniform Resource Locator or URL is an address system
used on the Internet. All WAP homepages have a unique
address, allowing browsers to distinguish one from the
other. A WAP URL always starts with the text string:
http://wap followed by the address.
What is APN?
APN stands for Access Point Name and is basically
a URL address on the Mobile Internet.
What is ISP?
ISP stands for Internet Service Provider.
181180
Page 99

Questions and answers
Q: Why does my mobile not turn on when I press the
key?
A: The key press has been too short or the mobile has shut
down because the battery power level is too low to make
calls. Recharge the battery fully.
Q: The stand-by time seems too short. Why is this?
A: You have made excessive use of the games or the
organiser, or the display light has been on continuously
due to unintentional key activation.
Q: My mobile displays ‘Insert SIM’, what does this mean?
A: You must insert the SIM before you can use the mobile.
If it is already installed, remove and clean the blank area
with a dry cloth, then reinsert.
Q: My mobile displays ‘INVALID SIM’, what does this mean?
A: The mobile is SIM-locked and will not accept the
inserted SIM. Insert the correct SIM or contact your dealer.
Q: My mobile displays ‘EMERGENCY CALLS ONLY’, what
does this mean?
A: Your SIM card is not properly installed or configured, or
you are out of network range.
182
Q: My mobile displays ‘NO NETWORK’, what does
this mean?
A: You are outside network range or there is no clear path
to the transmitter. If you are inside a building, try moving
towards a window.
Q: Some calls are not processed. What is wrong?
A: A call bar has been set to restrict mobile usage. Check
call barring and cancel as necessary.
Q: Someone else is receiving my calls. What is wrong?
A: The mobile has been set to forward your calls to
another number. Cancel call forwarding as necessary.
Q: Can I send and receive emails and surf the Mobile
Internet on my mobile?
A: Yes. Your mobile has WAP capability, which means
that you can access the Mobile Internet from your
mobile. For sending and receiving emails, please contact
Customer Service.
O
2
Q: What is ITAP?
A: ITAP text input is a predictive text editor that allows you
to type using just one click per letter and saves you time
when writing SMS, text entries, etc.
183
Page 100

Technical data
Q: What type of networks are supported?
A: Check the technical specifications on page 185.
Q: Can I use my mobile inside a car?
A: Please refer to ’Driving Safety’ on page 194.
Q: How do I clean my mobile if it becomes soiled?
A: See ‘Mobile care’ on page 190.
Q: My mobile has been lost or stolen. What do I do?
A: Contact O
account and prevent misuse. If your mobile has been stolen
you should report the incident to the local police.
Q: How do I reset my mobile to factory defaults.
A: Enter the Settings menu and scroll to ‘Restore settings’
and when prompted enter the code.
Customer Service immediately to close your
2
184
Size: H 81 x W 44 x D 21(mm)
Weight: 89g
Ta lk time: 2 - 3.5 hours
Standby time: 80-170 hours
Display: 65k colour screen
(128 x 128 pixels)
Camera: VGA camera with
night mode
Band: Tri-band
GPRS: Class 10
Accessories
Contact local retailer
Personalised features
Greeting
Wallpaper
Polyphonic ring tones
Screensavers
Flashing LED
Digital external display
Leisure
Get into O
Download games from
O
Games Arcade
2
Organising features
Calendar
Alarm
Calculator
To do list
Notes
Voice Memo
Active
2
185
 Loading...