

Page 1
o2.co.uk
O2 (UK) Limited, 260 Bath Road, Slough, Berkshire SL1 4DX
Registered in England No. 1743099. Registered Office as above.
© O2 (UK) Limited 2006. Correct at time of going to press (September 2006)
O2 Jet is a trademark of the O2 Gr
O2BUO15N KGL 09/06
oup of companies.
Jet
User Manual
Page 2

Before you start …
…Firstly, thank you for buying an O2Jet mobile. We
know you’ll find it useful and reliable.
Secondly, our Quick Start guide tells you all you
need to know about getting your mobile up and
running. The remaining chapters explain the
additional features and functions your mobile offers
– definitely worth a read when you have the time.
Page 3

Quick start guide
Below are some instructions to get you started quickly. If you want
to know more, take a look at the detailed sections of
this guide.
Setting up
•
Slide open the back of your O2Jet mobile and insert the SIM into
the slot provided. Close the SIM catch to ensure it is secure, then
insert the battery and replace the back. For more detailed help on
setting up your phone go to chapter 2
•
Check everything is securely in place, then hold and press
until the screen turns on. Enter a PIN if necessary*.
See page 175 for more information on PIN codes
•
You’re now ready to use your O2Jet mobile phone
Charging the handset
Using the handset charger cable
•
Insert the lead from the charger into the charging socket on the
base of your handset
•
Connect the charger to the correct electrical socket. Make sure
the socket is switched on. Your phone will now start charging
•
When the phone is fully charged disconnect the charger from the
socket and then from the phone
ect PIN code thr
If you enter an incor
*
and you must enter the PUK code to unlock it. Please contact O2 Customer Service
or visit www
r
.o2.co.uk/PUK and follow the instructions.
ee times in succession, your SIM card will lock
i
Using the desk stand
If you prefer, you can plug your charger into the desk top stand
and stand your handset in the device to charge.
Please note
If you’re in hurry the fastest way to charge your O2Jet Mobile is to
use the mains charger and plug it straight into the phone instead
of using the USB cable or the desk stand.
Basic navigation
Here’s how to navigate when using your O2Jet mobile.
• Use the navigation key to move up, down, left or right
• Press the left soft key or to select an item
• Press the right soft key to go Back or delete digits entered
• Press to go back to the standby screen
How to make a call
•
Type the number of the person you wish to call by using the
numbered keypad. Alternatively, press down on the navigation
key or press the right soft key to select Contacts and enter
the contacts menu. Then scroll up and down to find the contact
you require or enter one or more letters from the beginning of a
contact’s name, then you can find their entry much quicker than
just by scrolling up and down
•
Press . Your O2Jet mobile will start to dial the number
•
After you’ve connected, press to end the call
ii
Page 4
How to create and send a text message
•
Press the left hand side of the navigation key to enter the New
message screen. Alternatively, press the left soft key to
select Menu, then select Messages – Text Message – New
Message
•
Type in your text message using the alphanumeric keys. For
further information on entering text, go to page 97
•
Once you’ve finished typing your message press or select
Options – Send To
•
Type the number of the person you wish to send the text to.
Alternatively, press to select a contact from your phonebook.
Scroll to the contact you require and press to select. Once
completed press the left soft key to select Done and return
to the messaging screen. You can send your message to up to
10 recipients
•
Once complete press the left soft key to select Send and
your message will be sent
iiiiv1
Page 5

Contents
Welcome 5
Chapter 1 – Before using your mobile 8
What’s in the box 9
Handset description 15
Main display 20
Icons 21
Function keys 22
Navigation key 24
Chapter 2 – Getting your mobile ready to use 26
Inserting your SIM 27
The battery 29
Charging the battery30
Battery information 32
CD-Rom and USB cable 33
Chapter 3 – Basic functions 36
Turning your mobile on 37
Turning your mobile off 38
The menu 39
Chapter 4 – Calling options 46
The basics 47
During a call 49
In-call menu 54
Voicemail 901 56
Chapter 5 – Main menu 58
O2 59
O2 Home 60
Bookmarks 60
History62
Go to Address 62
Push Messages 62
Settings 63
Counter 64
Calls 65
Missed, dialled and received calls 65
Call duration 67
Tools 69
Bluetooth 69
Calculator 75
File Manager 76
My Files 76
Memory 79
Currency Converter 80
Unit Converter 82
Voice Recorder 84
BMI Check 86
O2 87
Clock 88
Set Alarm 89
Clear Alarm 89
Set Time and Date 89
Change Location 90
Settings 92
Messages 95
Text Message 97
Multimedia Message 106
Email 122
Cell Broadcast 96
Text Message 97
– New message 97
2
Page 6

– How to read messages 101
– Inbox 103
– Drafts 104
– Sent 104
– Templates 105
– Settings 105
Multimedia Message 106
– Create a media message 106
– Select a contact 106
– Enter a subject 107
– Add content to your media message 109
– Send your media message 112
– Reading media messages 114
– Inbox 115
– Drafts 116
– Sent 116
– Outbox 117
– Templates 117
– Settings 118
Email 122
– Create an email 123
– Reading an email 129
– Inbox 130
– Drafts 131
– Sent 131
– Outbox 131
– Send and Receive 132
– Settings 132
– Delete All Folder 135
Profiles 136
Selecting a profile 136
Profile selector key 138
Personalise your profiles 141
Flight Mode 146
Calendar 147
To set a task reminder 148
Contacts 151
Adding contacts to your phonebook 151
View contacts 154
Speed dial 157
Settings 159
Settings 163
Battery Saving 163
Display Settings 163
Call Settings 168
Network Settings 173
Phone Settings 174
Security Settings 175
Chapter 6 – Glossary and trouble shooting 180
Glossary 181
Trouble shooting 184
Chapter 7 – The important safety bit
at the back 188
Safety information 189
Mobile care 190
Driving safety 193
Electronic Devices 194
Other safety guidelines 196
Cautions 197
Warranty statement 198
Mandatory statements 202
3
4
Page 7

Welcome
Congratulations on choosing the O2Jet mobile, the perfect choice
when you’re on the move. With its sheer simplicity, the O
Jet mobile
2
has all the features you need without complicating matters with
features you don’t.
Jet mobile provides you with more battery life, so you’re
Your O
2
always contactable when you’re out and about. Better yet, your
Jet mobile has a built in Battery Saving Mode to extend your
O
2
mobile’s battery life even further. The inconvenience of a dead
battery will hopefully be a thing of the past!
Plus, with your desk stand and car charger, you can charge your
O
Jet mobile in style or whilst you’re on the move – whichever
2
suits you best.
5
We’ve also added features that we think will be of help
•
There’s the calendar and alarm clock to keep you organised
•
You can also enjoy all the benefits of Bluetooth to forward
files easily
• You have a dedicated profile switch – with a standard, vibrate
and silent option, so you can easily turn your phone on silent
when you’re in a meeting; or when you just want to enjoy some
peace and quiet
• There is a Bluetooth shortcut – press and hold to activate
Bluetooth and take you straight to your paired devices
•
Your O2Jet mobile still has the benefits of having O2Active*, so
you have all the information you need at your fingertips
About the user guide
This user guide relates only to the O2Jet mobile phone. Please note
that a small proportion of the functions available differ between
Pay & Go and Pay Monthly customers.
*O2Active is a trademark of the O2 gr
oup of companies.
6
Page 8

Chapter 1
Before using your mobile
•
What’s in the box?
•
Handset description
•
Main display
•
Icons
•
Function keys
•
Navigation key
7
8
Page 9
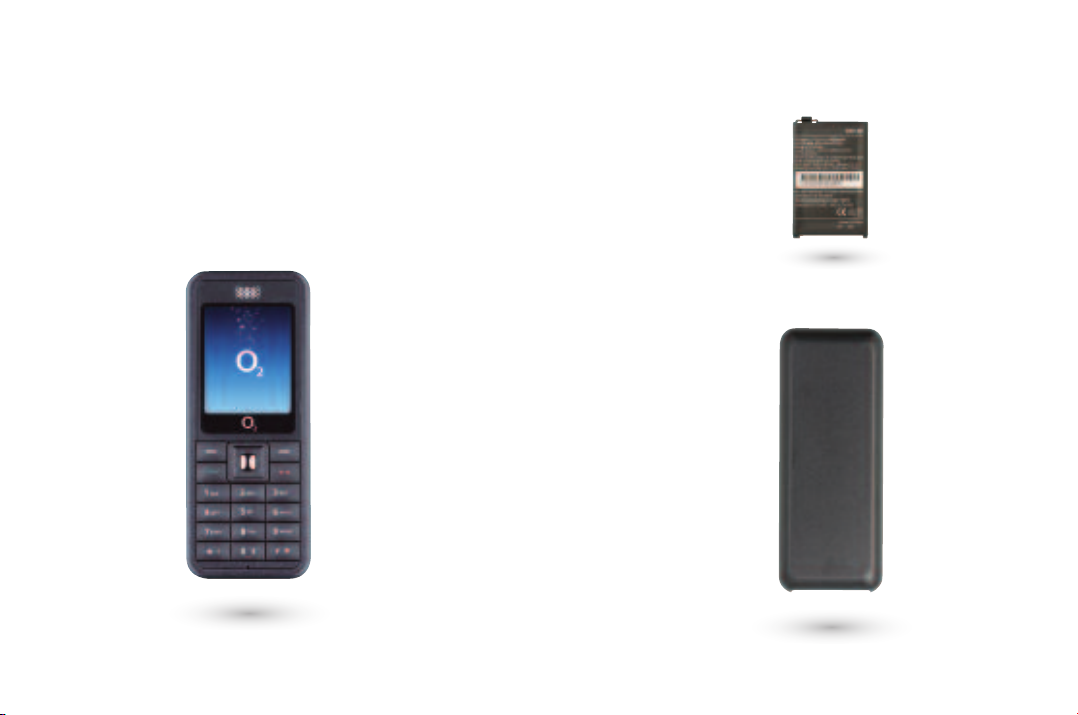
What’s in the box?
Thank you for purchasing your O2Jet mobile. Before you do
anything else, please take a look in the box and check you have the
items shown below.
Mobile phone
9
Battery
Battery cover
10
Page 10
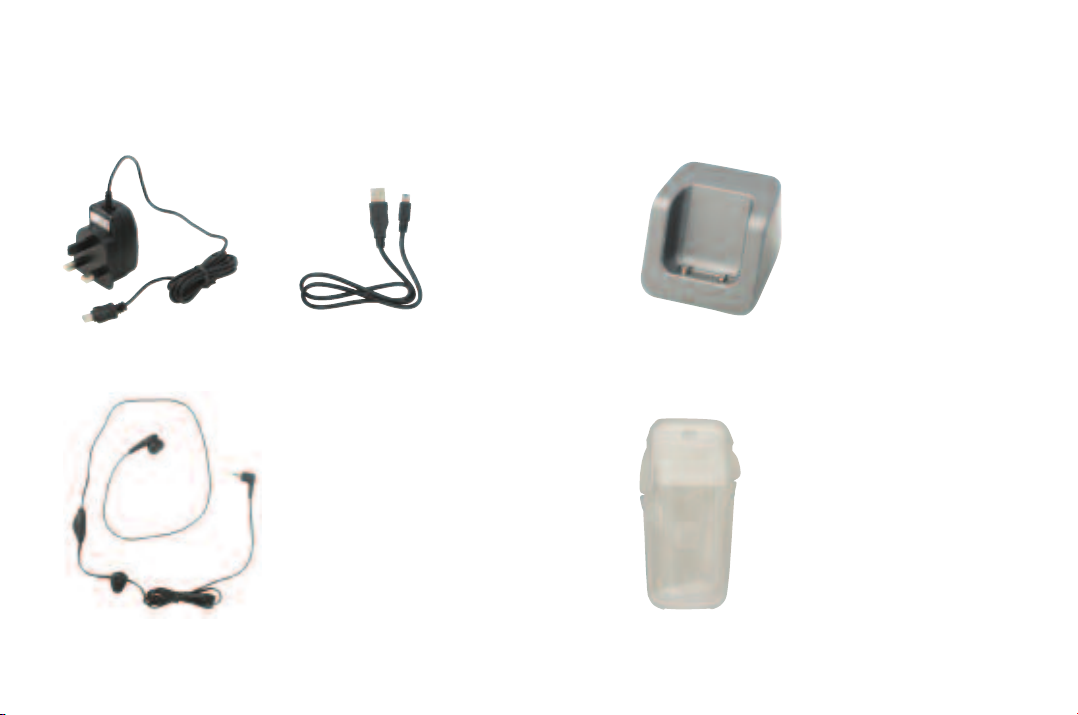
Power lead & USB cable
Desk stand
Hands-free headset
Protective case
Provides extra protection against scratches to your mobile phone.
11
12
Page 11

Your O
Jet mobile phone – user manual
2
CD-RomCar charger
13
14
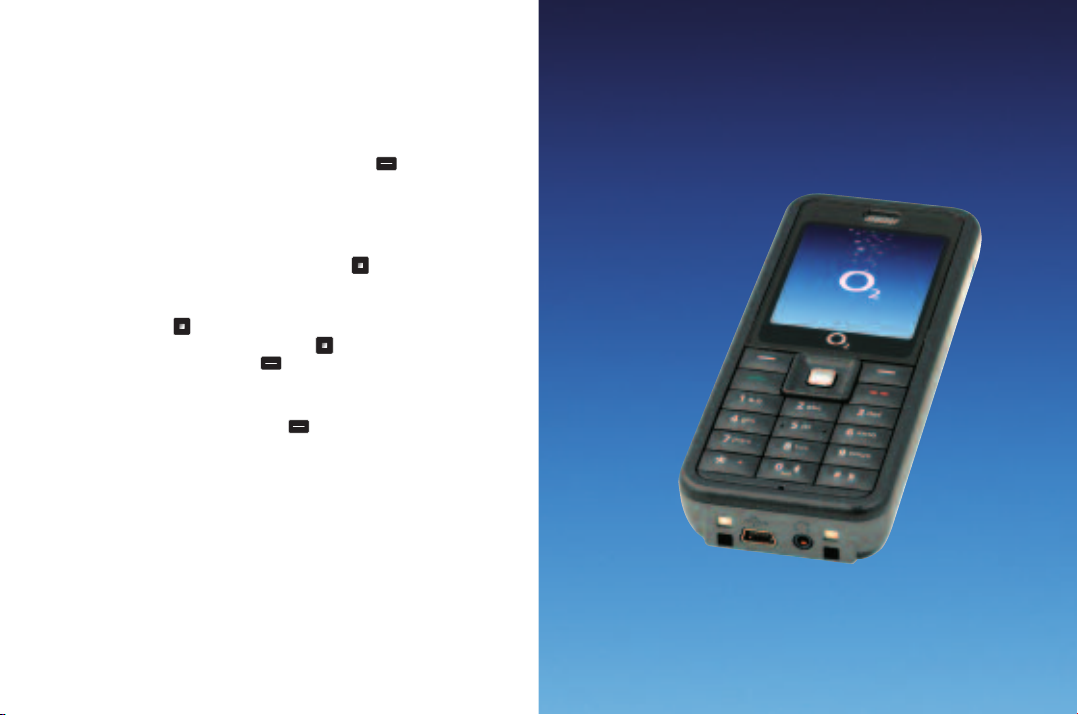
Page 12
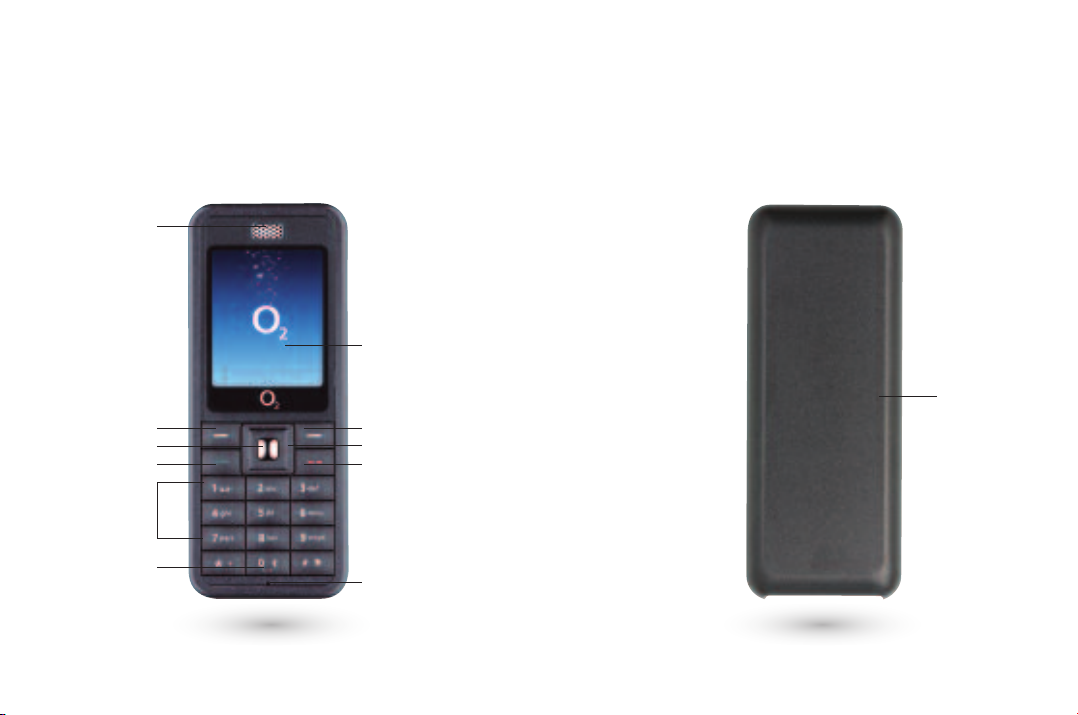
Handset description
Earpiece
Centre key
Dial / Answer key
Keypad –
alphanumeric
Back viewFront view
65,000 colour
main display
Battery cover
Right soft keyLeft soft key
Navigation key
Power on / off key
Bluetooth
shortcut key
Microphone
15
16
Page 13

Volume key
Right side viewLeft side view
Hands-free speaker
17
18
Page 14
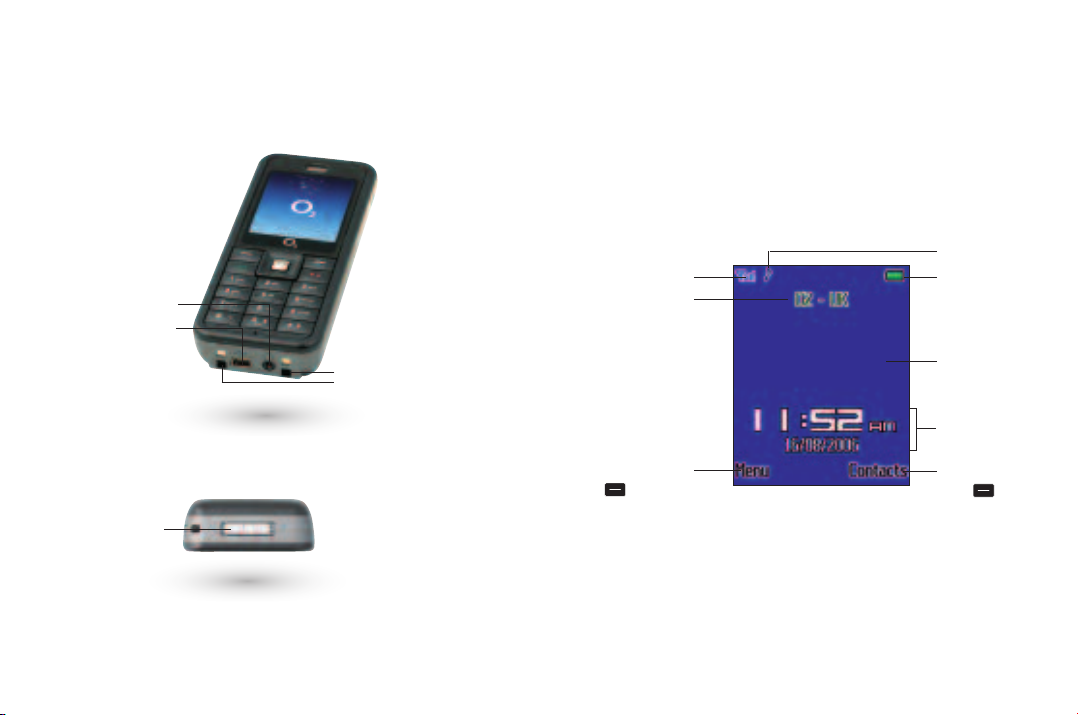
Main display
Bottom view
Hands-free
headset port
Mini USB port
Positioning slots
for desk stand
Top view
Profile selector key
For more info on the Profile selector key go to page 138.
19
The main display will show icons for network signal strength,
battery power, alarm (if active), the current time and the current
profile in use. The screen can also alert you to incoming calls, text
messages and missed calls.
Signal
Name of
operator
Press left soft key
to access
the Menu
20
Current profile
Battery power
Wallpaper
Date and time
Press right soft
key to
access Contacts
Page 15

Icons Function keys
The icons below appear on the display.
Signal strength The number of bars shows signal strength
Battery Current battery charge level
Message Shows that a text message has been received
or that there are unread messages or you have a
voicemail message
Media message Shows a media message has been
received or there are unread media messages
Alarm Appears when an alarm is set
Normal Shows the Normal profile is in use. To set a
different profile please refer to page 136
Outdoor This word will be displayed on screen when this
profile is chosen
Vibrate Only Shows that the Vibrate Only profile is in use.
Silent Shows that the Silent profile is in use
Headset Shows that the Headset is in use
Call forward This icon indicates that all calls have been
forwarded to another number
Roaming Indicates roaming has been activated
(It is not your regular network)
21
Power on/off key
•
Long press to turn your mobile on/off
•
Press to reject an incoming call or cancel a call being dialled
•
Press to return to the standby screen
Send/Answer key
•
Press to dial or answer a call
•
Press to access the list of the last
missed / dialled / received calls
Centre key
•
Press to select when browsing through the menu
•
The centre key can often be used as an alternative to the left soft
key to select menu items
Left soft key
•
Press to open up the main menu
•
Press to select when browsing through lower menu levels from
standby mode
Right soft key
•
To access your contacts
Navigation key
•
To browse through the menu
22
Page 16

Navigation key
Asterisk key
•
To insert an asterisk
•
To open the symbols menu whilst creating a text message
•
Press twice to insert +
0 key
•
Press and hold to activate or deactivate Bluetooth
•
To insert a space between words when writing a text message
# key
•
To insert #
•
Press, when creating a text message,
to access predictive text (T9) or manual text input
Alphanumeric
•
Press to enter a digit
•
Shortcut keys – press and hold to immediately access a function
1 key
• We have preset voicemail for you. Press and hold to access your
voicemail messages. You can configure keys 2 – 9 as speed dial
keys – see page 157
23
When in standby mode, you can use the
navigation keys to access shortcuts we have
set up for you.
Left To access the new text messaging screen
Right To access your calendar
Up To access the shortcut list. For further
information go to page 40
Down To access your contacts
24
Page 17

Chapter 2
Getting your mobile ready to use
•
Inserting your SIM
•
The battery
•
Charging the battery
•
Battery information
•
CD-Rom and USB cable
25
26
Page 18
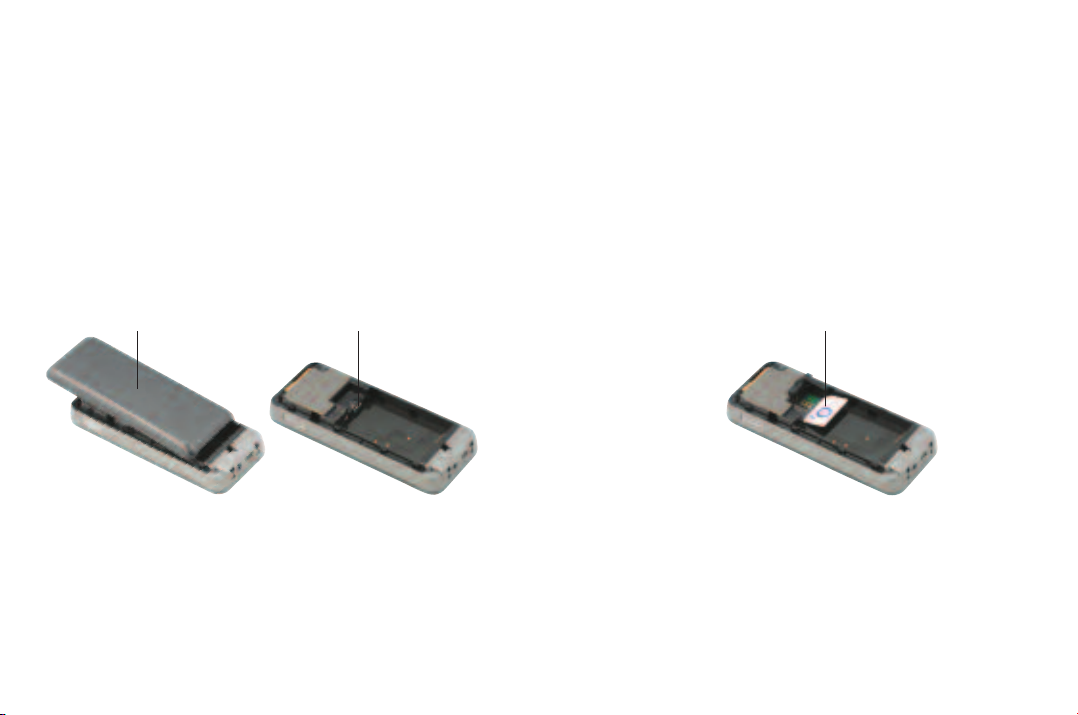
Inserting your SIM
•
You’ll always need a SIM card to use your mobile. This contains
important information about your mobile and network. The
message Insert SIM appears when the SIM card is not installed.
Please take care of your SIM card and don’t keep it near magnetic
and electronic devices as this can interfere with data storage and
network operations.
Battery cover SIM card catch SIM card
Turn your mobile over and slide off the back cover
•
Release the battery catch and lift the battery out of the mobile
•
Lift the SIM card catch and insert the SIM card into the slot.
Make sure the SIM card’s metal contacts are facing down and the
cut corner is at the top right
•
Ensure the SIM card is secure by closing the SIM card catch
27
28
Page 19
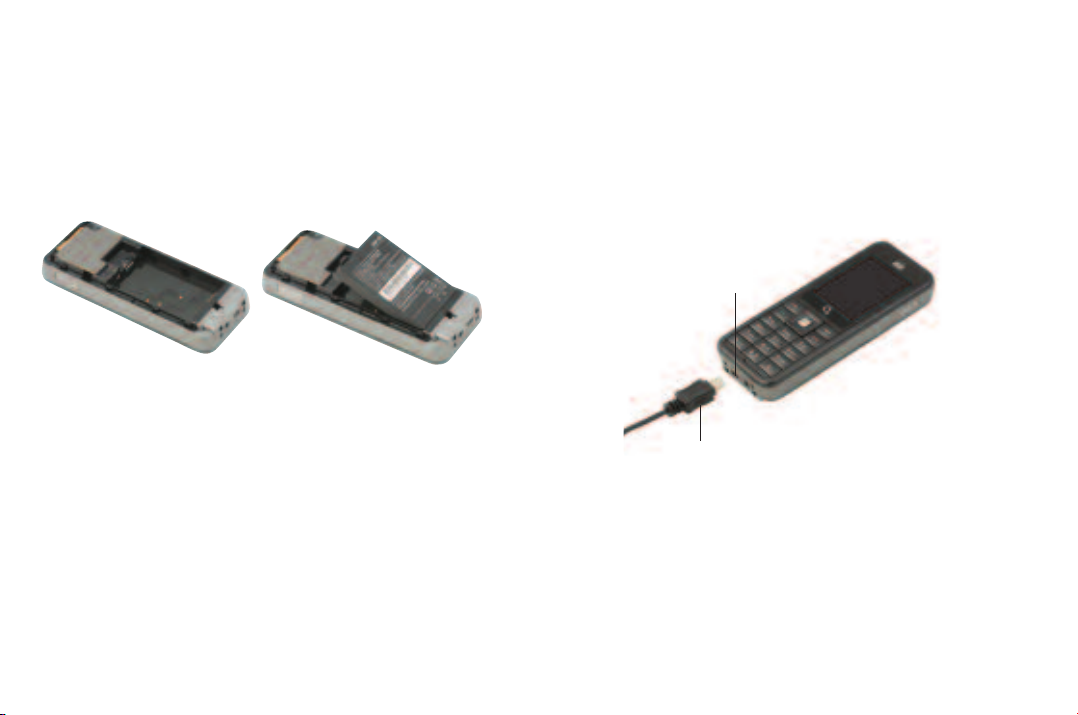
The battery Charging the battery
Installing the battery
Insert the battery into the space at the back of your mobile
ensuring the metal contacts are touching. Push it down until it sits
securely. It should ‘clip’ into place.
Please note
Do not remove the battery when the mobile is on. You could lose
personal settings or data stored either on your SIM card or in the
mobile’s memory.
Your SIM card can be easily damaged if its metal contacts become
scratched. So take special care when holding or inserting it.
Removing the battery
Using your fingernail release the battery catch and lift the battery
from your O
Please note
The back cover of your mobile must be securely replaced. If the
cover does not hold the battery in properly, your mobile will not
turn on or the battery may fall out during use.
Jet mobile phone.
2
29
Using the handset charger cable
Insert the charger’s contact point into the slot at the bottom of
your mobile and plug the charger in at the socket.
Make sure you insert the charger the right way up.
Charger socket
Charger connector
30
Page 20

Using the desk stand
You can plug your charger into the desk stand and stand your
headset in the stand to charge the battery.
Please note
Charging the battery fully each time will help prolong its life – and
is much better than frequent short bursts of charging.
Charging status
Whilst charging, the battery level icon will animate until
fully charged.
When the battery is getting low, your mobile will play an alert
sound to remind you to recharge it and will eventually turn
off automatically.
Maximising battery life
To make your battery last longer, try the following tips
•
Activate the Battery Saving mode. See page 163 to turn this on
•
Close the WAP (O2Active) connection when not in use
•
When you don’t need the Bluetooth function, ensure it is
turned off
Battery information
•
Do not remove the battery while your mobile is charging
•
Do not over charge the Li-Ion battery, as this can result in a
reduction in battery performance and life span
•
Never store a battery near a fire
•
Don’t attempt to take the battery apart. Only use the battery
approved by the manufacturer
•
Never touch the battery terminals with a metallic object, as this
can lead to short circuiting
•
Take special care when carrying a battery in your pocket
•
Misuse of the battery can lead to burns from hot temperatures
and even explosion. Never drop or apply any physical shock to
the battery as it may damage the battery and even cause
a fire
•
Please keep your battery out of children’s reach and in a dry and
cool area
•
Store and charge your battery at room temperature. Extremes of
temperature can prevent full charging and affect battery life
and performance
•
Since a battery is a consumable product, the operating time will
gradually decrease through use
•
Keep the terminals of the battery clean and dry
•
When there is risk of lightning, remove the charger’s plug from
the socket to protect the mobile
31
32
Page 21

CD-Rom and USB cable
Your O2Jet mobile comes with a CD-Rom and USB cable. This allows
you to connect your mobile to a PC and download selected digital
images, even back-up your contacts from your SIM card plus
much more.
It is extra security for those files you do not want to lose.
Software installation
• Insert the O
• If it does not auto run, go to RUN – Browse – CD ROM drive,
then select the Install.exe. file in the folder
• Select Open, then select run from the following Run window
• Follow the on screen instructions and connect your device to your
PC using the USB cable when requested, remembering to select
Sync/ COM port on the device when it is plugged in
Jet SyncManager CD into the PC’s CD-ROM drive
2
33
Please note
•
The CD-Rom and USB cable are not essential for using your
mobile, so installation is up to you
•
Your mobile may not recognise the USB cable if it is connected
while an application is running. Connect the USB data cable
during standby
•
You may not be able to download certain applications such as
games, ringtones or wallpapers to your PC for copyright reasons
•
Windows may ask you if you would like to accept this installation,
in which case you should select accept.
•
Turning your mobile on and off
•
The menu
34
Page 22

Chapter 3
Basic functions
•
Turning your mobile on and off
•
The menu
35
36
Page 23

Turning your mobile on Turning your mobile off
When the SIM card is installed
•
Press and hold until the screen turns on
•
If your mobile is PIN protected, PIN code will be displayed on
the screen. Enter the 4-digit PIN* to unlock the mobile, then
press
•
You can now use your mobile
Watch out
• If you enter an incorrect PIN code three times in a row, your SIM
card will lock and you’ll have to enter the PUK code to unlock it.
To get the PUK code you’ll need to contact O2 Customer Service
or visit www.o2.co.uk/PUK and follow the instructions
•
When you turn your mobile on/off you’ll hear the
welcome/goodbye sound. To turn this off see page 144
*Please see page 175 for more information on PIN codes.
37
When the SIM card is installed
•
Press and hold until the screen turns off
Please note
If the message LOW BATTERY WARNING POWER OFF is displayed,
the mobile will shortly turn itself off and you will need to charge
the battery.
If the battery is removed when the mobile is on, any unsaved
messages could be lost and the SIM card’s memory might
be damaged.
38
Page 24
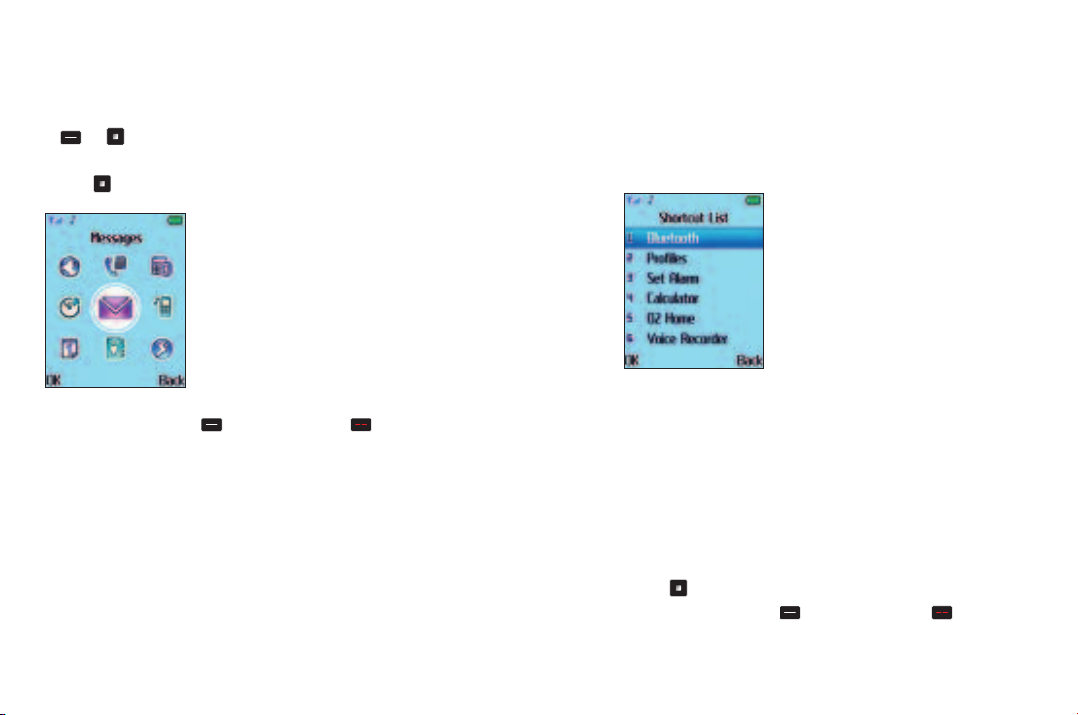
The menu
•
When your mobile is in standby mode, press the left soft key
or to access the Menu
•
Scroll to the menu icon you require by using the navigation key
•
Press to enter the menu icon highlighted
Shortcut List
•
When your mobile is in standby mode, press up on the navigation
key to access the shortcuts
•
Press the right soft key to go back or press briefly to
return to the standby screen
39
Bluetooth Select to access the Bluetooth menu. For more help see
page 69
Profiles For details on setting different profiles go to page 136
Set Alarm For more info on setting an alarm, go to page 89
Calculator For help on calculations go to page 75
O2 Home See page 60 for details on O2 Home
Voice Recorder To start a recording see page 84
•
Scroll to the menu icon you require by using the navigation key
•
Press to enter the menu icon highlighted
•
Press the right soft key to go back or press briefly to
return to the standby screen
40
Page 25
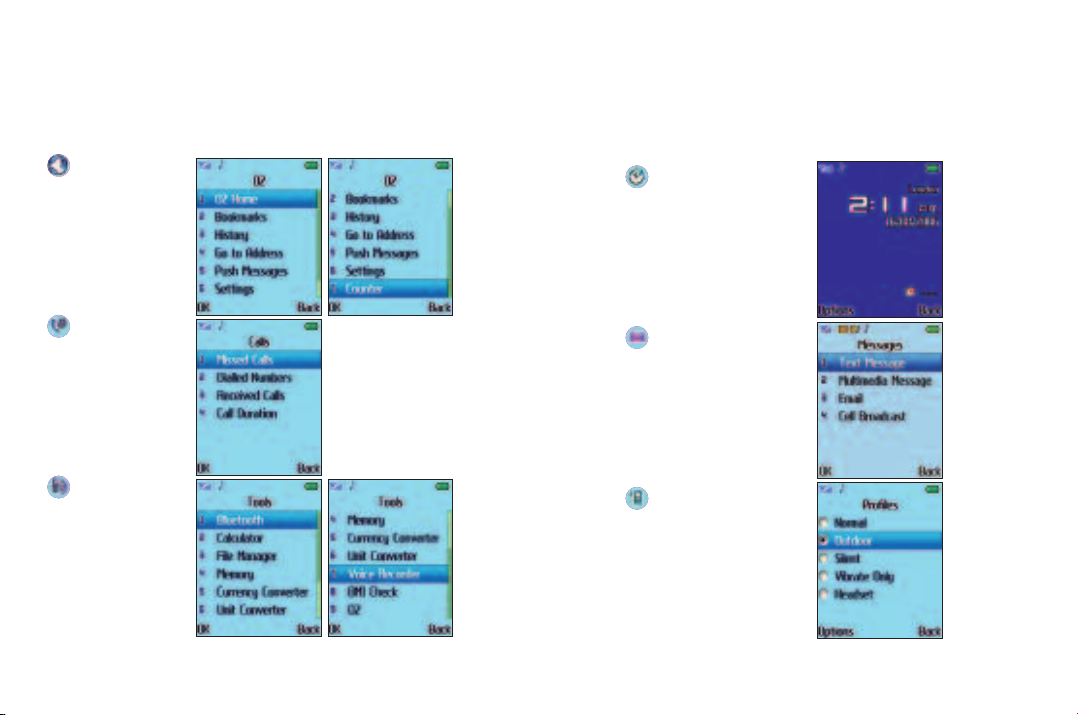
Main menu map
O2
Calls
Tools
If you have a new SIM card you will have the O2 option.
If your SIM is old you will not see this.
41
Clock
Messages
Profiles
42
Page 26
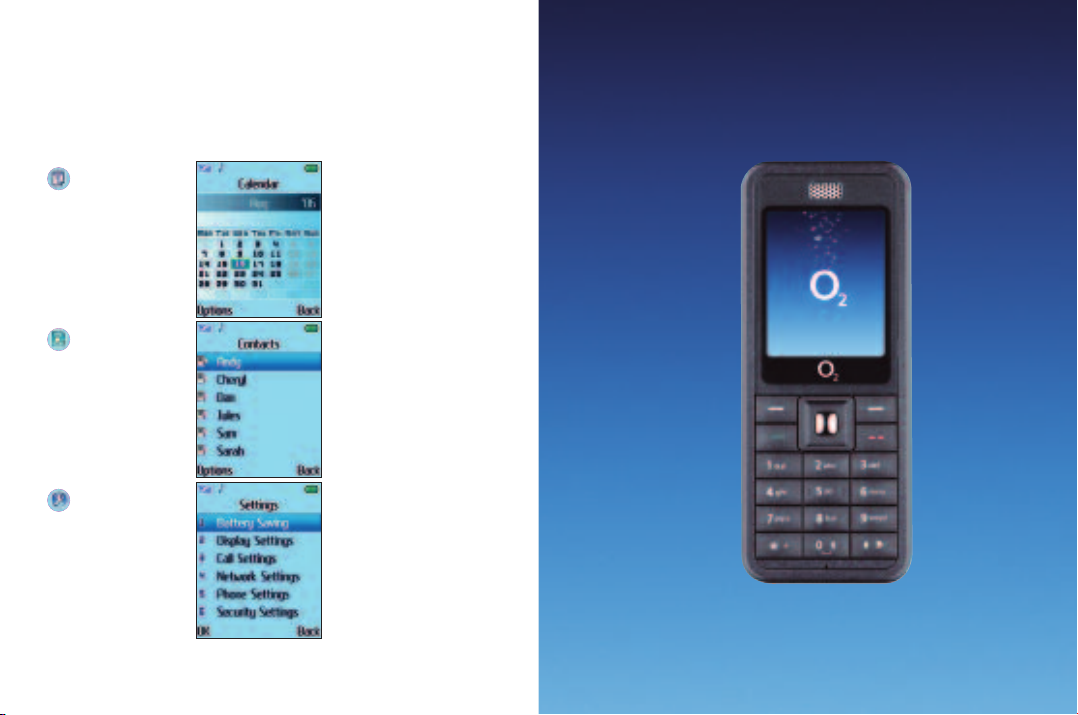
Calendar
Contacts
Settings
43
44
Page 27

Chapter 4
Calling options
•
The basics
•
During a call
•
In-call menu
•
Voicemail 901
45
46
Page 28

The basics
Making a call
•
Enter a phone number
•
If you make a mistake while dialling, you can erase the last
number you entered by pressing the right soft key to
select Clear
•
Once you have entered the number, press . Your O2Jet
mobile will start dialling
Ending a call
•
Press to end a call
47
Receiving calls
Answering a call
•
To answer a call press or the left soft key
To reject a call
•
You can reject an incoming call by pressing or the right
soft key
Making an international call
•
Press twice until + appears on the screen
•
Enter the recipient’s country code, area code and phone number
•
Press to dial the number
Emergency calls
•
To call emergency services, enter 112 (the international
emergency number) or 999
•
Then press to dial the call
You can make an emergency call even if your mobile is locked or
cannot access your network, so long as you are within range of a
network type supported by your mobile.
48
Page 29

During a call
Your O2Jet mobile puts several features at your fingertips while
you’re making a call.
Adjusting the earpiece volume
•
During a call, you can press the volume key on the left side of
your mobile to adjust the call volume
Mute
•
Press the left soft key to select Options or press and
scroll to highlight Mute. Press the left soft key to select On
or to activate
•
To restore the microphone’s function, press the left soft key
and scroll to highlight Mute again. Then press the left soft key
to select Off
49
Loud Speaker
•
Press the right soft key to select LoudSp. You can then hear
the caller’s voice and you can speak to them without holding the
phone near your ear
•
To restore the handset speaker function, press the right soft key
to select Handset
Please note
If you are connected to a Bluetooth headset you will not be able to
activate the loudspeaker.
Making a second call
To make a second call
•
Enter the phone number or select one from your contacts. For
further information please refer to the in-call menu on page 54
•
Press to call
The currently active call will automatically be placed on hold.
However, if there is already an active call and another on hold, this
action will fail.
•
To retrieve the original call press End
*Only available on a Pay Monthly calling plan.
*
50
Page 30

Putting a call on hold
When the call is active
•
Press the left soft key , then select Hold-call to put the active
call on hold. The following graphic will appear on the screen
*
Indicates that this is the call on hold
Indicates that this is the active call
Conference
• Select Options then scroll to Conference
• Press the left soft key or to connect all 3 parties
• To split the call back select Options, then scroll to Split. Press the
left soft key or . This will leave the 2 parties connected
on your mobile with one on hold and the other call active
Call Transfer
• Select Options, then scroll to Transfer. Press the left soft key
or to transfer the live call to the other parties. This will
disconnect you from the call
•
Press to end this call
When the call is on hold
•
Press the left soft key and scroll to Retrieve-call and select to
resume the call
When there is an active call and a call on hold
•
To swap between the calls scroll to the relevant number and
Call waiting
If you receive an incoming call whilst you are on the phone, a tone
will sound through the earpiece and the display will show that a
second call is currently waiting.
You can handle the waiting call and currently active call in the
following ways
*
select Options – Swap to resume the call that is on hold, and put
the active call on hold. Alternatively, scroll and highlight the
number you require and press to swap
*Only available on a Pay Monthly calling plan. *Only available on a Pay Monthly calling plan.
51
52
Page 31

In-call menu
Answer the waiting call
•
Press to answer. The currently active call will automatically be
placed on hold
•
However, if there is already another call on hold, a menu will
appear on the display allowing you to select a call to end and
then answer the waiting call
Reject the waiting call
• Press the right soft key to select Reject
53
•
Press the left soft key during a call to select Options and
enter the in-call menu
•
Scroll down to the desired item using the navigation key – please
refer to the list below
Hold-call / Retrieve-call For further information on placing a call on
hold see page 51
Mute For further details see page 49
End Select to end the call
Phonebook Enables you to enter the contacts menu and select a
contact
Text Message Select to enter the text messaging screen. For further
information on creating a text message go to page 97
Voice Recorder Select to start a recording of your conversation.
For further information on a voice recording go to page 84
54
Page 32

Voicemail 901
DTMF
When your mobile is connected to other devices or services, you
can send DTMF (Dual Tone Modulation Frequency) strings. DTMF
strings are keypad tones that can be sent via the microphone as
you dial another number. Your mobile will emit the tones in order
to communicate with answering machines, pagers and so forth.
55
This service takes messages for you when your O2Jet mobile is
switched off, engaged, you don’t answer a call or you are out of
signal range.
To set up voicemail
Voicemail must be activated before you can use it. To activate
voicemail on a Pay Monthly tariff enter 1750 and then press .
If you are a Pay & Go customer your voicemail 901 service has
already been activated.
To listen to your voicemail message
•
In the standby mode, press and hold to dial your voicemail
•
Alternatively, simply dial 901 and press
For further information on call forwarding to your voicemail 901
please see page 168 or your O
welcome pack.
2
56
Page 33

Chapter 5
Main menu
•
O2
•
Calls
•
Tools
•
Clock
•
Messages
•
Profiles
•
Calendar
•
Contacts
•
Settings
57
58
Page 34

O2
Your O2Jet mobile puts a fast internet browser in the palm of your
hand. You can access O
Active and other Mobile Internet services.
2
You’ll discover a whole new way to access the information you
want. Bring your mobile to life with full colour pictures or
download the latest ringtones and wallpapers. Get the latest news,
sports updates and celebrity gossip. Book your next weekend
escape or plan a night out with restaurant and bar guides as well
as info on the latest films and showtimes at your local cinema.
It’s fun, it’s fast and it’s really convenient whilst on the move*.
• From the standby screen press the left soft key to
select Menu or press
•
Scroll to O2 and press to select
*Subject to network coverage.
59
O2 Home
•
Select O2 Home to start browsing
For further information on O
Active section within your welcome pack.
the O
2
Active check out o2.co.uk or read
2
Bookmarks
Use this to store and visit your favourite web links and save time
while browsing.
•
Scroll to Bookmarks and select OK
We’ve saved some great bookmarks for you already so you can go
direct to the sites to download the latest news and information, or
the latest wallpapers and ringtones.
60
Page 35

Whilst in the Bookmarks menu you can select Options and choose
from the following
Go To To go direct to the highlighted bookmark
Edit To edit the name or internet link for the saved bookmark
Delete To delete the highlighted bookmark
Delete All To delete all bookmarks that are currently saved
Add Bookmark Select to add a new bookmark
•
Select Add Bookmark and then enter the name of the bookmark
and the internet link when prompted. When complete select Save
History
Select to see what sites have been visited from your mobile.
•
Highlight a site, then select Options and choose from
the following
Go To To go direct to the highlighted site
Delete Delete the highlighted web address
Delete all Delete all web addresses stored in History
Go to Address
•
Scroll to Go to Address and select, then type in the web address
you want to visit
•
Then select Options – Done to go direct to the requested site –
saving you time!
Push Messages
•
Select Push Messages to view all the messages you have received
•
Scroll to highlight one of the messages and select Options and
choose from the following
Read To read the message
Delete To delete the highlighted message
Delete All To delete all the push messages
61
62
Page 36

Settings
O2 has set up the O2Jet mobile for optimum use so you should
not need to change anything. However, should you need to, you
are able to alter your connection settings.
Here are all the settings that help you browse
Profiles You can Edit or Activate your connection settings. We’ve
entered all the settings for you. If you need further assistance
contact O2 Customer Service
Browser Here you can amend the Browser settings. You can alter
the Timeout settings and also select whether images are shown on
the screen while you surf. Just follow the on screen prompts
Bearer Settings These are the settings that your device uses to
connect to the O2 network. You can edit or activate different
settings dependent upon how you want to connect to the network.
If you need further assistance contact O2 Customer Service.
Push Settings Here is where the settings for push messages are
stored. If you don’t want to receive push messages just select Off –
it’s up to you
Clear Cache To delete the history of all sites you have visited
Clear Cookies A cookie is a mechanism used by some websites to
store general surfing information about users when using their
website. Here you can clear all cookies you have stored
Counter
Select to view how much data has been sent and received via GPRS
since the last time the counter was zeroed or in the last file that
was sent or received.
•
To reset the GPRS counters to zero, scroll to either Last Sent / Last
Received / All Sent / All Received and press the left soft key
to select Reset. Then select OK to confirm
63
64
Page 37

Calls
These options make sure that you are always in control by putting
your call history at your fingertips.
•
Press to access the Menu, scroll to Calls and press
to select
Missed, dialled and received calls
•
Scroll to Missed / Dialled / Received and press to select the
type of call you wish to check up on. You can then view all the
latest missed, received or dialled calls
•
Scroll down to the desired phone number
this icon appears beside missed calls
this icon appears beside dialled calls
this icon appears beside received calls
Alternatively, in the standby mode, press to view a list of the
most recent missed, dialled and received calls.
Please note
•
If a phone number has already been stored as a contact in your
phonebook, the display will show the name of this contact
•
If the number of the person calling you is not available then the
list will not show a number for the call
65
When the number for a missed, dialled, or received call is
highlighted, you can perform the following tasks
•
Press to view the Call Info and view the date, time and
telephone number* of the call, as well as the number of times
the call was missed, received or dialled
•
Press the left soft key to select Options and select from the
following
Call Select to call the number or contact listed
Save If the phone number for the call has not been stored in the
phonebook you will be able to create a new contact for this
number or update an existing contact. For more information on
adding contacts to your phonebook go to page 151
Edit Before Call Select to edit the telephone number before you
make the call. Once you have edited the number you can save
the details to your phonebook
Send Text Message Select to send a text message to the number
or contact listed. For further information on sending text
messages please refer to the Messages section on page 100
Send Multimedia Message Select to send a media message to the
number or contact listed. For more information on sending media
messages go to page 112
Clear Select to erase the record of the call from the list
Clear All Select to delete all call records
*If the telephone number has been withheld, the number will not be displayed.
66
Page 38

Call duration
Here you can view the duration of the call you have made.
Last Call Shows the duration of the last call
Total Dialled Calls Shows the total time of all dialled calls
Total Received Calls Shows the total time for all received calls
•
Press the left soft key to reset all counters to zero, then
select OK to confirm
67
68
Page 39

Tools
Life can be hectic, so to help we’ve included a range of useful tools
to keep you organised and connected on the move.
•
In the main menu, scroll to Tools and press
Bluetooth
•
In the Tools menu, scroll to Bluetooth and select
®
Switch On/Off
•
To turn Bluetooth on or off, scroll to Switch On/Off and press
•
Scroll to Off or On and press to select
Top tip
For quick access to turning Bluetooth on, press and hold from
the standby screen. Your O
Jet mobile will automatically take you
2
to your paired devices for easy connection.
69
Add Devices
•
To search and add devices you can pair with, scroll to Add
Devices and press to select
Please note
If Bluetooth isn’t activated you will be prompted to turn it on. Press
the left soft key to select OK.
•
Your O2Jet mobile will search for headsets or other handsets in
pairing mode. Pairing mode is the process where a headset or
phone and another phone talk to each other before connecting
•
A discovered devices list will appear on the screen. Scroll to the
device you wish to pair with and press the left soft key to
select Pair
•
You’ll be prompted to enter a PIN number. To pair with other
handsets just ensure the receiver enters the same PIN you choose
e.g. 0000. If the received entered the same PIN you’ll be paired
Please note
To find the PIN number for your Bluetooth headset, please refer to
your headset user manual.
My Devices
View the mobiles or headsets that you have previously paired with.
•
Scroll to My Devices and press to select
•
You can now view the devices you have previously paired with
using your O
Jet mobile
2
70
Page 40

You can then perform the following options
•
Scroll to highlight one of the devices and press the left soft key
to select Options, and choose from
Connect Select to attempt a connection with the highlighted device
Add Devices Select to search for other devices you could pair with
Delete To delete the device listed
Delete All To remove all devices from the list
Rename Select to rename the device e.g. change the handset name
to the owner’s name so it can be easily identified
Profiles Your paired device will be set up automatically to a profile
with differing experiences depending on your preference
Connected Devices
Select to view the devices you are currently paired with.
Settings
Scroll to Settings and select, then choose from the following
options
Visibility Decide whether other people can view your handset when
Bluetooth is turned on. Turn your handset’s visibility On or Off
My Device Name Change the name of your phone, perhaps to
your name so that friends and colleagues can find your
O
Jet mobile
2
Reroute Audio This setting manages the incoming sound from a
call when paired with a Bluetooth device
About
Select to view the Bluetooth details of your O2Jet mobile.
See what you can do with Bluetooth
Your O2Jet mobile supports the sending and receiving of the
following over Bluetooth
Speech Make and receive calls
Contacts Send and receive contact information for your phonebook
Images Send and receive wallpapers and photos
Audio Send and receive unprotected audio files
Please note
•
Your O2Jet mobile will not allow the sending of copyright
protected material
•
Sending images, audio files and business cards also depends on
whether the recipient’s mobile has the ability to accept them
Making calls
•
Enter the phone number and press to call
•
To end your call press
Sending contact details from your phonebook
•
From the main menu select Contacts
•
Scroll through your contact list and press the left soft key to
select Options
•
Select Send as Biz Card – Bluetooth
•
Your O2Jet mobile will list phones or computers that are available
•
Select the phone or computer you want and select Send
•
Your contact details will be sent
71
72
Page 41

Please note
•
If you are not currently paired with the handset or computer you
have chosen you will be prompted with Pair with XXX? select OK
•
Enter a PIN code – just ensure the receiver enters the same PIN
you choose e.g. 0000. If the recipient enters the same PIN you’ll
be paired
•
Your contact details will be sent automatically
Sending content
•
From the main menu select Tools – File Manager
•
Scroll to My Files and select
Please note
You won’t be able to send files from the Protected Files folder as your
O
Jet mobile will not allow the sending of copyright protected material.
2
Then select
Received To find a file you have received by media message or
downloaded from O
Images To find images you have saved to your O
Active
2
Jet mobile
2
Audio To find audio files you have recorded
For further help on the File Manager see page 76.
•
Scroll to the item of content you wish to send, then select
Options – Send via – Bluetooth
•
Your O2Jet mobile will list phones or computers that are available
•
Select the phone or computer you want and select Send
•
Your content will be sent
Please note
•
If you are not currently paired with the handset or computer you
have chosen you will be prompted with Pair with XXX? select OK
•
Enter a PIN code – just ensure the receiver enters the same PIN
you choose e.g. 0000. If the recipient enters the same PIN you’ll
be paired
•
Your content will be sent automatically
73
74
Page 42

Calculator
Select calculator to do those sums you can’t do in your head.
•
Use the keypad to type in the numbers you wish to calculate
• Use the navigation key to perform the mathematical operations
on screen
•
Press to insert a decimal point
•
Once completed press the centre key to select =
Entered numbers and
calculation results
appear in this field
File Manager
The File Manager stores all the images, photos, and audio files you
have either downloaded or received. Keeping them in one place
means you can get to them easily to send in messages or just to
refresh your memory.
•
From the main menu select Tools – File Manager
My Files
These are the images you have downloaded from O2Active,
received from other people, or sound files you have recorded.
•
Select My Files to view the folders for files you have Received,
Audio and Images
75
76
Page 43

Managing your folders
•
Select Options and then choose from one of the following
Open Select to open the folder
Create Folder Select to create a new folder within either Received,
Images or Audio
Rename To rename Received, Images or Audio
Delete To delete a folder
Managing your files
•
Select Received, Images or Audio
•
Scroll through any sub folders you have created to find a
particular image or sound file
•
Then select Options and choose from the following
View To view the image you have saved
Play Audio To listen to the audio file
Send via Select to set as a ringtone, send via MMS, Email or Bluetooth.
For further information on ringtones see page 142, for Media
Messaging see page 106, for Email see 122 and for Bluetooth see
page 69
Set as Select to set your chosen image as your mobile phone’s
wallpaper. For details on wallpapers go to page 164
Detail To view the filename, file format, the date it was saved and
the size
Rename To rename the filename
Copy Select the file to copy to and press the soft left key or
Move to Select the file to move to and press the soft left key
or
Delete Select to delete the file
Delete All Select to delete all files
Sort by You can arrange to sort your files by Name, Type, Time or
Size. Otherwise select None
Protected Files
Protected files are those which are copyright protected.
77
78
Page 44

Memory
Select to keep tabs on what memory you’ve used up.
Contacts See how much space you have left both on your SIM card
and also on you phone’s memory. To save contacts to your SIM rather
than your phone or vice versa see page 162
Tasks View to see how much task space you have on your mobile
Text Message View how much space you have remaining on your SIM
card’s memory and your phone’s memory. You can store up to 20 text
messages on your SIM card and up to 150 on your mobile’s memory
MMS Check out how much space you have remaining. You can store
up to 100 media messages on your mobile’s memory
My Files See how much space you have left remaining for images and
audio files you have received or downloaded from O
Your O
Jet mobile can store up to 55.9Mb
2
Protected Files View the remaining space for copyright audio and
image files that you have downloaded. Your O
up to 4.9Mb
79
Active.
2
Jet mobile can store
2
Currency Converter
•
Scroll to Currency Converter and press to select and enter the
converter screen
Step 1
•
In the Currency Exchange screen enter the exchange rate using
the alphanumeric keys, then press the left soft key to
select OK or press
80
Page 45

Step 2
•
In the Rate box check that your conversion will be correct
e.g. 1.56:1 or 1:1.56. To change press left and right on the
navigation key
•
Once complete scroll to the Original box. Insert the figure you
want to convert from and press the left soft key to select
OK to confirm or press
•
Result! The conversion will appear in the bottom panel
Top tip
•
Press to enter a decimal point
Unit Converter
•
Scroll to Unit Converter and press to select
Step 1
•
On your O2Jet mobile you can convert weight and length
measurements – select Weight or Length
Step 2
•
In the Converting Units box, press left and right on the navigation
key to select what criteria you want to convert e.g. kilograms to
pounds or kilometres to miles
Please note
On your O2Jet mobile you can do the following conversions
Weight
Kilograms to pounds
Kilograms to ounces
81
82
Page 46

Length
Kilometres to miles
Metres to yards
Metres to feet
Centimetres to inches
Step 3
•
Once complete scroll down to the next box and insert the unit
you intend to convert from and press the left soft key to
select OK to confirm
•
Result! The conversion will appear in the bottom panel
Top tip
•
Press to enter a decimal point
Voice Recorder
Use your mobile like a dictaphone so you don’t forget important
conversations or information.
•
From the Tools menu, select Voice Recorder
•
Select Options by pressing the left soft key and choose from
the following
Please note
The options below will appear if you’ve not recorded a voice recording
on your O
options you’ll see are the same as those on the voice recording
menu – see page 85.
Record Select to start a new recording. For further info on
recording see below
Settings Select to change the file format you are recording. You
have a choice between AMR or WAV. Press left and right on the
navigation key to change the formats and select OK to confirm.
You’ll be informed how much recording time you have available –
view and select OK
To create a new voice recording
•
•
•
Jet mobile before. If you’ve already recorded a file the
2
Select Record to start recording
To pause a recording press the left soft key and to resume
recording press the left soft key to select Cont.
To stop the recording, press the right soft key . You’ll then
be prompted to enter a file name. Press the right soft key to
select Clear and delete the current file name and enter a new
one if you wish, then select Options – Save
83
84
Page 47
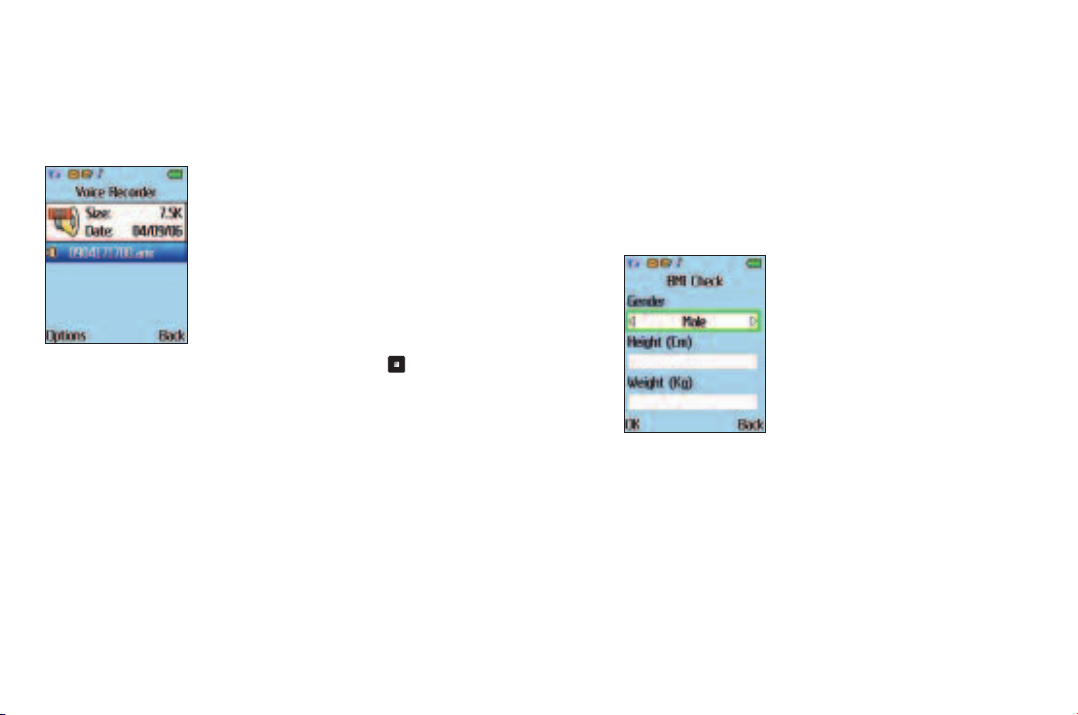
To play your voice recording
•
From the Tools menu, select Voice Recorder
•
Scroll to highlight one of the voice recordings and press to play
Voice recording menu
If you have previously saved voice recordings you can choose from
the following options
•
From the Tools menu, select Voice Recorder, then select Options
and choose
Record To create another voice recording
Play To play the highlighted voice recording
Append To add more audio to an existing file
Rename To rename the file name of the highlighted voice recording
Delete To delete the file currently highlighted
Delete all To delete all voice recordings
Settings To amend the file format – choose between AMR and WAV
Send via Select to send your voice recording in a media message, by
Email or via Bluetooth. For further information on media messaging
see page 106, for Email see 122 and for Bluetooth see page 69
BMI Check
Check your body mass index.
•
From the Tools menu, select BMI Check, then select OK
•
Scroll to Gender and by pressing left and right on the navigation
key select Male or Female
•
Then scroll to Height and enter your details. Make sure the
number is calculated in centimetres
•
Then scroll to Weight and enter the number in kilograms
•
When completed select OK to find your BMI result
Top tip
You can use the unit converter to calculate kilograms and centimetres.
85
86
Page 48

Clock
O2
Select O2 – Get Settings to receive the media messaging and
Active settings by text message to your mobile*. Just follow the
O
2
instructions on how to save them.
Depending on the age of your SIM, the O2 experience in this option my dif
*
may not be available.
87
fer or
Set the correct time and date on your mobile, and set an alarm as a
wake up call or simply as a reminder.
•
From the main menu scroll to Clock and select by pressing
•
To view the clock menu select Options by pressing the left soft
key
88
Page 49

Set Alarm
•
Scroll to Set Alarm and press
•
Using the alphanumeric keys insert the time you wish the alarm
to sound
•
Scroll to AM/PM and by pressing left and right on the navigation
key, select AM or PM
•
Your alarm is now set and will now appear on the
standby screen
Please note
You’ll need to ensure the correct time is set on your O2Jet mobile.
For more details go to Set Time and Date below.
Clear Alarm
•
To cancel the alarm scroll to Clear Alarm and select OK
to confirm
Set Time and Date
•
To set the correct time and date on your O2Jet mobile, scroll to
Set Time and Date and select
•
Scroll to Time and insert the correct time using the alphanumeric
keys
•
Scroll to AM/PM and by pressing left and right on the navigation
key, select AM or PM
•
Scroll to Date and insert the current date using the
alphanumeric keys
•
Once complete press the left soft key to select OK
Change Location
If, during travel, you move between different time zones, you can
now adjust the time displayed on your screen so that you always
have access to the accurate local time – just update with a different
away city.
The change location feature enables you to display the Home
Location time and date and the time and date for a different
location on one screen – so when you’re abroad you’ll always know
the current time, and the time at home as well.
•
Scroll to Change Location and select
89
90
Page 50

Home Location
•
To set your home location scroll to Home Location and select Edit
•
Scroll through the list available and select OK when the location
you require is highlighted
Away Location
•
To set the away location scroll to Away Location and select Edit
•
Scroll to highlight your required location and press the left soft
key to select Options, then scroll to Select and press the left
soft key to select OK
•
If you return to the standby screen both locations’ dates and
times will appear on the screen
Please note
To remove the away location from the standby screen select Clock
– Options – Change Location. Then scroll to Away Location and
select Edit. Then select Options – Remove.
Settings
Select to change the format for the date and time as well as the
alert tone and volume for your alarm.
•
Select Settings and then choose from the following
Clock 12/24 hour
Choose between the 12 and 24 hour clocks.
•
Scroll to Clock 12/24 hour and select
•
Then scroll to 12 hours or 24 hours and press
Date Format
Change the format for how the date is displayed on your
Jet mobile phone screen.
O
2
•
Scroll to Date Format and select
•
Scroll to highlight one of the options available and select OK
to confirm
91
92
Page 51

Alarm Tone
Set the ringtone for your alarm.
•
Scroll to Alarm Tone and select
•
Scroll through the list available. By highlighting each one you will
be able to listen to the tone
•
Once you’ve decided, highlight the particular tone and select OK
Please note
If you’ve selected Silent or Vibrate Only for your mobile’s profile,
you won’t be able to listen to the tones. See page 136 for more
info on profiles.
Alarm Volume
Change the volume for your alarm
•
Scroll to Alarm Volume and select
•
Press left and right on the navigation key and then select OK
to confirm
Daylight Saving
Select to adjust the daylight saving times. This can be done for
both the home location and also the away location.
•
Scroll to Daylight Saving and select
•
Then select either Home Location or Away Location
•
Then scroll to and select either Winter Time / Summer Time
(+1 hr) / Summer Time (+2 hr) and select OK to confirm
Top tip
If the dual clock is activated (e.g. you require your O2Jet mobile to
display both home and away locations on the standby scr
een), the
away location may be incorrect if the home time isn’t accurately set
to the correct winter / summer time.
If you intend to use this function we recommend that you use the
daylight saving option to accurately change the time and therefore
ensure that the away time is updated automatically as well.
93
94
Page 52

Messages
More than just a phone, your O
to communicate with friends, family and colleagues. You can choose
from text, multimedia messages and email.
•
In the main menu, scroll to Messages and select by pressing
Then select
Jet mobile gives you loads of ways
2
Text Message
For more information on text messaging go to page 97.
Multimedia Message
For more information on media messaging go to page 106.
Email
For more information on email go to page 122.
95
Cell Broadcast
Cell Broadcast (CB) has the ability to enable O2 to provide you with
information on specific services. Details are available from O2.
When you receive a CB it will display automatically in the display.
Cell Broadcast is not available to Pay & Go customers. Charges may
apply for customers using CB. For more information please contact
O2 Customer Service.
96
Page 53

Text Message
With text messaging you can stay in touch anytime, anywhere*.
•
In the Messages menu, select Text Message
Top tip
To enter the text messaging screen directly from the standby display
screen press the left hand side of the navigation key.
New message
•
In the Text Message menu select New Message
Create your message
•
Enter your text message using the alphanumeric keys. Your
message can be up to 456 characters. One standard text consists
of 160 characters
*Subject to network coverage.
97
Useful tips
•
Press to enter a space between words
•
Press to switch between input modes e.g. abc, T9, 123 etc.
Or select Options – Input Method
•
Your O2Jet mobile can use T9 – a predictive text input method
allowing you to type quickly. Type in the word using the
alphanumeric keys. If the word you want isn’t on the screen press
down on the navigation key to view other options. The bottom
of the screen will show you the number of options available
•
Press to bring up options to insert characters such as ?, !, &
and @. Using the navigation key, scroll to the character you
require and press to select. Or select Options – Insert Symbol
98
Page 54

Select a contact
• Select Options by pressing , then select Send To otherwise
simply press once you have finished entering text
•
In the Send MSG To screen enter the number of the person you
want to send a text to, or press and select a contact from
your phonebook
•
Scroll through the list available and press to select. You can
choose more than one. Once complete press the left soft key
to select Done
Please note
•
You can send your text message to up to 10 people
• If you send to more than one contact, only the first contact will
show in your sent messages. If multiple recipients are selected,
only the first name will appear in sent
To send your message
•
Press the left soft key to select Send
•
When the message is sent a copy will be saved in the Sent items
folder. If a message fails to send it will be saved in the
Drafts folder
Other options are available in the New text message screen, press
the left soft key to select Options and choose from the
following
Send To Select to add a contact from your phonebook
Save to Drafts You can save your message to the drafts folder and
send it at a later time
Templates Save time texting by selecting one of the templates
we’ve created for you, such as ‘Call me now’, ‘Thank you’ etc.
Just select from the list available
Input Method Choose from ABC mode, T9 mode or 123 mode
Insert Symbol Choose a symbol to insert in your message, such as
?, *, & or £. Scroll to highlight a symbol and select by pressing the
left soft key or
My Words Your O
Jet mobile saves new words that you have
2
created that are not currently in its dictionary
T9 Help Get help on predictive text input
Second Language Text in German, English or Spanish – you choose
Advanced Your O
•
Word Completion Your O2Jet mobile will try to predict the word
Jet mobile even offers the following options
2
you are typing and suggest the remaining letters
99
100
Page 55

• Word Prediction Your O
Jet mobile will try to predict the next
2
word you are typing based on your previous typing
• Smart Capitalisation This will change the input method to capitals
once a full stop and space is inserted
• Add Word Not Matched This is your personal dictionary and you
can add new words for your mobile to remember
How to read messages
When you receive a text message Message from.... will appear on
the display together with a tone or vibration if selected.
Please note
If the sender is a contact saved in your phonebook their name will
appear in the message alert rather than the number – so you know
who sent the message before you open it.
• Press the left soft key to select Read or press
Please note
If you’d rather save the text message and read it later, press the
right soft key to select Back and return to the standby screen.
The message will be stored in the inbox and the icon will
appear on the standby screen.
•
Select Options by pressing the left soft key
then select from the following
or press
,
Reply Select to reply to the text message
Forward Forward the message to someone else
Delete To delete the message from the inbox folder
Use Number Enables you to extract a number from within the text
message or the sender’s mobile number. Select Use Number and
then scroll to highlight one of the numbers listed and press the left
soft key to select Options or press . You can then choose
to Call / Add to contacts / Save to Existing Contact. For further
information on adding contacts go to page 151
Use Email Address Enables you to extract an email address.
Select Use Email Address, then scroll to the email address you
require and select Options. You can then choose to Send Email /
Add to contacts / Save to Existing contact
Use URL Enables you to extract a URL from the text message.
Select Use URL, then select Save and add the address to your
Bookmarks. For further information on bookmarks go to page 60
Update My Words Select to update your mobile’s vocabulary
101
102
Page 56

Inbox
•
In the Text Message menu, scroll to Inbox and select by
pressing
•
You are now in the inbox
Indicates a read message
Indicates an unread message
Then you can
•
Scroll to the desired message and press to read it, or
•
Press the left soft key to select Options and then select
Read Select to read the message
Reply To reply to sender
Delete Delete the message from the folder
Move Move the message from your phone’s memory to your SIM
card’s memory or vice versa
Copy Copy the message from your phone’s memory to your SIM
card’s memory or vice versa
Delete All You can select to delete messages from the SIM and
Phone memory or just from the Phone or SIM memory. Just follow
the on screen prompts
Move All Select to move all your messages in the draft folder from
the SIM to Phone or Phone to SIM
Copy All Select to copy all your messages in the draft folder from
the SIM to Phone or Phone to SIM
Update My Words Select to update your mobile’s vocabulary
Drafts
This option allows you to work with the message drafts you
have saved.
•
In the Text Message menu, select Drafts
Then you can
•
Scroll to the desired message and press to read it, or
•
Press the left soft key to select Options and then select
Read Select to read the draft message
Delete Delete the message from the Drafts folder
Move Move the message from your phone’s memory to your SIM
card’s memory or vice versa
Copy Copy the message from your phone’s memory to your SIM
card’s memory or vice versa
Move All Select to move all your messages in the draft folder from
the SIM to Phone or Phone to SIM
Delete All Select to delete all your messages in the draft folder.
You can select to delete messages from the SIM and Phone
memory or just from the Phone or SIM memory. Just follow the on
screen prompts
Copy All Select to copy all your messages in the draft folder from
the SIM to Phone or Phone to SIM
Sent
Select to view the messages that you have sent. You can then read,
delete, move or resend the messages just select Options and follow
the on screen prompts.
103
104
Page 57

Multimedia Message
Templates
Use the quick message templates to compose a message rather
than entering the entire text message character by character. You
can even edit the current templates so they fit more in line with
your requirements.
Settings
Your O2Jet mobile is already set up to send, receive and retrieve
messages. If you experience any difficulty please contact
O2 Customer Service. In the settings menu you can check how
much memory space you have used for your text messages both
on your SIM card and you phone’s memory.
Text Message Counter
Your O2Jet mobile has a counter that will count the number of text
messages that you have sent and received. You can reset the
counter for each by pressing the left soft key – useful if you
want to track the number of messages you are using each month.
105
Sending a media message is similar to sending a text message but
you can attach images or audio files.
•
In the Messages menu select Multimedia Message
Create a media message
•
From the Multimedia Message screen, select New message
Select a contact
•
Scroll to To and press
•
You can send your media message to a phone number or
email address
•
Scroll to Add Number or Add Email and select OK
•
Enter the number or email address of the person you want to
send your message to, or press the left soft key to select
Search and choose the details from your phonebook. Press the
left soft key to select OK
106
Page 58

To add additional contacts or edit contacts already selected press the
left soft key to select Options and choose from the following
Add Number To add an additional number
Add Email To add an additional email contact
Edit To edit contacts you have already selected
Delete To delete contacts already selected
Done Select once all contacts have been added to return to the To
screen
To send your message as a carbon copy or a confidential carbon
copy to others scroll to CC or Bcc and repeat the instructions above.
Enter a subject
•
To enter a subject for your message, scroll down to highlight
Subject and press
•
Enter the subject name using the alphanumeric keys
While entering the subject for your media message, press the
left soft key to select Options at any time to perform the
following tasks
Done Select to confirm you have finished entering the subject
name and return to the media message screen
Input method Choose from ABC mode, T9 mode or 123 mode.
For further information on entering text please refer to page 98
Insert symbol Select to insert a symbol. For further info on entering
symbols see page 98
My Words Add words to your mobile’s dictionary. Select My Words
– Add. Then enter the word you want your O
Jet mobile to
2
remember and select Save
T9 Help Get help on predictive text input
Second Language Text in German, English or Spanish – you choose
Advanced Your O
•
Word Completion Your O2Jet mobile will try to predict the word
Jet mobile even offers the following options
2
you are typing and suggest the remaining letters
• Word Prediction Your O
Jet mobile will try to predict the next
2
word you are typing based on your previous typing
• Smart Capitalisation This will change the input method to capitals
once a full stop and space is inserted
• Add Word Not Matched This is your personal dictionary and you
can add new words for your mobile to remember
107
108
Page 59

Add content to your media message
•
Scroll to Edit Content and press to edit your media message
With text
•
Enter the text you would like to accompany your media message
For more about entering text take a look at page 97.
With an attachment
•
After entering your text message select Options and then select
either Add Image / Add Audio / Add Attachment
With an image
You can insert images you have stored on your O2Jet mobile
phone e.g. images you have r
Active. For more details on O2Active go to page 60.
from O
2
•
Scroll to Add Image and press to select
•
In the File Manager screen select My Files. For further information
on File Manager go to page 76
eceived from others or downloaded
Please note
You will not be able to forward any Protected Files as these are
rights protected.
•
Scroll to Received (for images you have received) or Images and
select. Scroll through the images saved or open a folder you have
created and search for further images. For more information on
folders and File Manager see page 76
•
To insert a particular image into your media message press the
left soft key to select OK
Add Audio
You can jazz up your media message by adding music or sounds –
the recipient will be able to hear it when they view the rest of your
message.
•
Select Options – Add Audio. Then select My Files from the File
Manager screen
Please note
You will not be able to forward any Protected Files as these are
rights protected.
•
Scroll to Received (for sounds you have received) or Audio and
select. Scroll through the sounds saved or open a folder you have
created and search for further sounds. For more information on
folders and File Manager see page 76
•
To insert a particular audio file into your media message press the
left soft key to select OK
109
110
Page 60

Add an attachment
If you’re not sure what you want to add, you can select Add
Attachment to choose either audio or stored images and files.
•
Select Add Attachment to scroll through and view all the images
and audio files available. To add an attachment see the
instructions for With an image or Add audio on page 109
Helpful tips
When you’re creating your media message you can press the left
soft key to select Options and choose from the following
Done Select when you have added all your attachments or added
your text message to return to the main media message screen
Input method Choose from ABC mode, T9 mode or 123 mode.
For further information on entering text please refer to page 98
Add Image / Edit Image / Delete Image Select to add a new image,
change the image if one is already chosen or delete the image from
your media message
Add Audio / Edit Audio / Delete Audio Select to add a new sound
file, change the file if one is already chosen or delete the sound file
from your media message
Add attachment / Edit attachment / Delete Attachment Select to
add a new file, change the file if one is already chosen or delete
the file from your media message
Insert New Slide / Delete Slide Select to add a new page to your
media message
Previous Slide / Next Slide To view the next slide or view the
previous slide if you have added another
Preview Select to play the pages you have created in sequence.
Whilst playing press the right soft key to select Stop. To resume
press the left soft key to select Play
Slide Timing (sec.) Allows you to control and set the length of time
each page is displayed on the screen when playing your media
message. Select Slide Timing, then press the right soft key to
select Clear. Insert a number using the alphanumeric key to select
the number of seconds, then select Options – Done
Send your media message
•
After you have finished editing your media message press the left
soft key to select Options, then select Done
•
Then press the left soft key to select Done again and choose
from one of the following options
111
112
Page 61

Send Only To send your media message
Save and Send To save your media message to the outbox after
sending
Save to Drafts Save your media message to your drafts folder so
you can send it at a later date
Options Select from the following sending options
•
Validity Period This is set to max as default and makes sure the
message will be available to be downloaded as long as possible
•
Delivery Report Get confirmation when your media message has
been sent. Scroll to Delivery Report and amend by pressing the
left and right hand side of the navigation key to select On or Off
•
Read Report* Get confirmation when the recipient has read your
message. Select On or Off using the navigation key
•
Priority Choose from High, Normal or Low. Use this to set the
order in which messages in your outbox are sent
Once completed select Save to confirm
Exit Select to exit media messaging. Then select OK to save or
Cancel to delete
*Network dependent.
Reading media messages
When you receive a new message New Multimedia Message will
appear on the display with a tone or vibration if selected.
• Press the left soft key to select OK or press
Please note
If you’d rather save the message and read it later, press the right
soft key to select Cancel and return to the standby screen.
The message will be stored in the inbox and the icon will
appear on the standby screen.
While playing the message you can perform the following tasks
•
Press the right soft key to select Stop
113
114
Page 62

When your O2Jet mobile finishes playing the entire message, you
can do the following
•
Select Options by pressing the left soft key , then select from
the following
Play To play the media message again
Next Slide Select to play the next slide
View attachments To view the attachments that have been inserted
into your media message
Save Image as To save the image to your folders in File Manager.
This will appear if an image has been sent
Save Audio as To save the audio to your folders in File Manager.
This option will appear if an audio file has been sent
Call XXXXX If a telephone number appears in the text message
accompanying the media message, you have the option to call
this number
•
Select Back to return to the Inbox
Inbox
•
In the Messages menu, scroll to Multimedia Message – Inbox and
select by pressing
•
You are now in the inbox
Defines a read media message
You have an unread media message
•
Select the desired message and press to read it
Drafts
This option allows you to work with message drafts you have
saved.
•
In the Messages menu, select Multimedia Message – Drafts
•
Scroll to the desired message record
•
Press the left soft key to select Options and then select
View Lets you view your message
Properties Enables you to view the details of the media message,
such as the subject name, date and time it was created and size of
the file where applicable before it was saved to the drafts folder
Send Select to send your media message
Edit Message Enables you to edit the content of your message
before you send it
Delete Select to delete the message from the draft folder
Delete All Select to delete all messages saved in the draft folder
Use Number Select to extract a number
Use URL Select to extract a URL
Use Email Address Select to extract an email address
Sent
Lets you view the messages you have sent. You can view, forward,
edit and delete them – just follow the on screen prompts.
115
116
Page 63

Outbox
Here you can find messages that could not be sent.
Templates
Save time texting by selecting one of the templates we’ve created
for you, such as ‘Call me now’, ‘Thank you’ etc.
•
From the Messages menu, select Multimedia Message – Templates
•
Scroll through the list of templates available and highlight one.
Then select Options to choose from the following
View Select to view the media template
Properties Select to view the properties of the media message
New Message Create a new message including the template
Settings
Your O2Jet mobile is already set up to send, receive and retrieve
messages. If you experience difficulty please contact
O2 Customer Service.
You can access the settings for multimedia messages and amend
the settings for when you compose, send or receive a message.
You can set up filters, change the profile and check the memory
status.
•
Select Messages – Multimedia Messages – Settings
•
Then select
Composing
Amend the settings associated with creating a media message.
Creation Mode This is set to Free to give you maximum options in
creating your message.
117
118
Page 64

Image Resizing You can set your O
Jet mobile to reset the size of
2
the images you attach in your media messages. Select from 160 x
120, 320 x 240, 640 x 480 or select Off
Auto Signature You can select whether your media message
includes your signature sign off, select On or Off
Edit Signature Select to create a signature to be added at the end
of your media message
Sending
Amend the settings for sending a media message.
Validity Period This is set to max as default and makes sure the
message will be available to be downloaded as long as possible
Delivery Report Get confirmation when your media message has
been sent. Select On or Off
Read Report* Get confirmation when the recipient has read your
message. Select On or Off
Priority Choose from High, Normal or Low
Slide Timing (sec.) Allows you to control and set the length of time
each page is displayed on the screen when playing your media
message. Press the right soft key to select Clear and insert a
number using the alphanumeric key to select the number of
seconds
Delay Delivery Select the time delay for sending your media
message. You can choose between Immediate, In one hour, In 12
hours or In 24 hours
*Network dependent.
Retrieval
Amend the settings associated with receiving a media message.
Home Network Select whether your O2Jet mobile automatically
downloads the attachments, downloads upon request or denies
downloads
Roaming Adjust the settings for your O2Jet mobile when abroad
for downloading attachments – select As Home, Manual Download
or Deny Download
Read Report Decide whether the sender of the message receives a
read report from you. Choose from Never Send, On request, Send
Delivery Report Select On or Off
Filters
Control which messages you receive
Anonymous Select whether you can receive media messages from
people that are not in your phonebook. Select Allow or Reject
Max Size Set the maximum size media message you can receive.
The maximum size for a message has been set to 300k, this may
be lower for other networks
Advertisements Select whether or not you wish to receive or reject
advertisements that are sent to your mobile
119
120
Page 65

Email
Profiles
These are the network settings for your media messages.
This should be defaulted to the appropriate setting depending
on whether you are using a prepay or postpay SIM card.
Memory Status
Check the memory status for the media message capacity on your
Jet mobile.
O
2
121
Make productive use of travel time, by sending and receiving emails
wherever you are.
You can send and receive internet based emails with attachments
from POP3 / IMAP4 email providers. You can access an existing web
based email account, such as O2.co.uk, Yahoo etc. And to do this
you don’t need to open your web browser and go to your email
provider’s website each time you want to check your mail. You can
configure your O
Jet mobile so that you can access emails as they
2
are downloaded into your inbox.
You can also access your work emails. To have access to your work
email you’ll need to have internet based means of accessing your
company server, such as POP3 or IMAP4. For more details you’ll
need to discuss this with your IT manager.
Don’t forget, you can also access your O2 emails by accessing
Active. For more information on O2Active go to page 60.
O
2
• From the menu select Messages – Email
• You will then be presented with the following options
122
Page 66

Create an email
Please note
You will need to set up an email account before you can proceed.
For more information go to Settings on page 132.
• Scroll to New Email and select by pressing
Select a contact
• Scroll to To and press the left soft key to select Edit or ,
then select Add to add a new email contact address
• Enter the email address of the person you wish to contact, or press
the left soft key and select the details from your
phonebook. Scroll to the contact you require and press
• To confirm select Options – Done
• To add additional contacts or edit contacts already selected
press the left soft key to select Options and choose from
the following
Add Select to add another email address. You can send your email
to up to 4 contacts
Edit Select to edit contacts you have already selected
Delete To delete contacts already selected
Delete All To delete all contacts selected
To return to the Email screen press the right soft key to
select Back
To send your email as a carbon copy scroll to CC and repeat the
instructions above.
Enter a subject
• To enter a subject for your message, scroll to highlight Subject
and press
• Enter a subject name using the alphanumeric keys
While entering the subject for your media message, press the left
soft key to select Options at any time to perform the
following tasks
Done Select to confirm you have finished entering the subject
name and return to the email screen
Input Method Choose from ABC mode, T9 mode or 123 mode.
For further information on entering text please refer to page 97
Insert Symbol Select to insert a symbol. For further info on entering
symbols see page 98
123
124
Page 67

My Words Add words to your mobile’s dictionary. Select My Words
– Add. Then enter the word you want your O
Jet mobile to
2
remember and select Save
T9 Help Get help on predictive text input
Second Language Text in German, English or Spanish – you choose
Advanced Your O
• Word Completion Turn this option on and your O
Jet mobile even offers the following options
2
Jet mobile will
2
complete words you are texting
• Word Prediction Your O
Jet mobile will try to predict the next
2
word you are typing based on your previous typing
• Smart Capitalisation This will change the input method to capitals
once a full stop and space is inserted
• Add Word Not Matched This is your personal dictionary and you
can add new words for your mobile to remember
With an attachment
Attach a file from your file manager and send in your email.
You can attach images and sound files you have saved on your
Jet mobile e.g. images you have received from others or
O
2
downloaded from O
Active. For more details on O2Active go
2
to page 60.
Please note
You won’t be able to forward any Protected Files as these are
rights protected.
• Scroll to Attachment and press to select
• You can attach up to three files to your email message
• Scroll to an available space in the attachment list screen and select
Options – Edit. Then scroll through all the files available and select
a file to attach. For further help on File Manager go to page 76
• To add another attachment select Options – Edit once again from
attachment list screen
You can manage your attachments by following the details below
• In the attachment list screen, scroll to an attachment listed and
select Options and select from the following
Edit Select to replace the file attached
View / Play Select to view the attached image or listen to the sound file
Delete Select to remove the attachment
• Once you’ve added all of the attachments you require select Back
to return to the email screen
Prioritise your email
Decide the importance of your email.
• Scroll to Priority and press left and right on the navigation key to
choose between High, Normal or Low
125
126
Page 68

Add content to your email
• Scroll to Content and press to select
• Enter your email message using the alphanumeric keys. For more
details about entering text go to page 97
Send your email
• After you have finished editing your email press the left soft key
to select Options, then select Done
• Then press the left soft key to select Done again and choose
from one of the following options
Send To send your email
Send and Save To save your email to the outbox after sending
Save to Drafts Save your email to your drafts folder so you can
send it at a later date
Quit Without Saving Delete the email you have been creating
127
128
Page 69

Reading an email
When you receive a new email, the icon will appear on screen,
as well as a tone or vibration if selected.
To access you emails just go to the Inbox – see page 130.
Please note
• If you haven’t set your O
automatically then you will not be notified of any new emails.
Instead you will need to manually check for emails –
see Send and Receive on page 132
• To amend the settings so that you’ll be notified of new emails go
to Email – Settings, then scroll to the email account you have set
up and select Options – Edit – Profiles – Check Interval and
change from Off to either 5 min, 30 min, 1 hour or 2 hours
• Please note that if you activate the Check Interval option you will
be charged each time your O
Jet mobile to check for emails
2
Jet mobile checks for mail
2
Inbox
• In the Messages menu, scroll to Email – Inbox and select by
pressing
• You are now in the inbox
Defines an unread message
Defines a read message
• You can also see the time and date the email was received as
well as the subject of the message
• Scroll to the desired message and press the left soft key to
select Read
• You can then scroll through the email and read the message
content and any attachments
• Once you have read a message select Options and choose from
the following
129
130
Page 70

Reply Select to respond to the contact who sent you the email
Reply Without Content Respond without including the original mail
content in the message
Reply All Respond to everyone who was sent the original email
Reply All Without Content Respond to everyone copied without
including the original mail content in the message
Forward Select to forward the email to someone else
Delete Select to delete the email from your inbox
Update My Words Select to update your O
Jet mobile’s dictionary
2
Drafts
This option enables you to edit or delete emails you saved to your
drafts folder – after editing them you can then send or resave.
• In the messages menu, scroll to Email – Drafts
• Scroll to the desired email record and press the left soft key
to select Options, or press
and select from the following
Edit Select to amend the current email content before you send it
Delete Select to delete the message from the drafts folder
Sent
Here you can view the messages you have sent. To view, forward,
edit or delete sent messages – follow the on screen prompts.
Outbox
Here you’ll find all the messages that could not be sent. You can
then attempt to edit, delete or send your message or just save the
message until later in the drafts folder.
Send and Receive
Select to check for new emails and send email waiting in your outbox.
Settings
Select to create an email account so you can access emails on your
Jet mobile.
O
2
Please note
• To set up work emails you’ll need to discuss the details with your
IT manager
• To set up an o2.co.uk account you will need to register online at
www.o2.co.uk
• Scroll to Settings and select. Then scroll to Profile1 / Profile2 or
Profile3 to choose a location for your email settings and select
Options. You can access up to three email accounts
• Then select Edit to amend the settings and gain access to your
email account from your O
• You then need to choose from the following and then follow the
on screen prompts
Jet mobile
2
131
132
Page 71

Profiles
Set the details for your email account. To help you most of the
information has already been entered for you.
Profile Name Amend the name. If you wish to access your
O2 account amend Profile1 to o2
Bearer Settings This should be set to Email Profile. If this is not the
case select Bearer Settings – GPRS – Email Profile
Protocol This will be either be POP3 or IMAP4 depending on your
email provider
Check Interval You can set your mobile to check for emails every
5 min, 30 min, 1 hour, 2 hours. Otherwise you can set this to Off
Please note
You will be charged each time your mobile checks for emails.
Download Size This has been preset to the Maximum
Retain Emails We recommend you set this to On so that a copy of
the email remains on your internet account so you can still access
the email from your PC as well
• Once you have entered all the relevant data press the left soft key
to select Save
Outgoing Server
Now enter all the information so you can send emails. We’ve
entered most of the information for you.
Outgoing Server You’ll be prompted with smtp.mail.changeme.co.uk.
You’ll need to amend changeme.co.uk to reflect your account
details e.g. smtp.mail.o2.co.uk
Outgoing Port This has been preset for you
Display Name Change this so when you send an email this name
will be displayed in the recipient’s inbox
E-Mail Address Change the email address to your email address
Username Amend changeme and add your username (the prefix
before @)
Password Enter the password associated with your email account
• Once you have entered all the relevant data press the left soft key
to select Save
Incoming Server
Now enter all the information so you can receive emails.
We’ve entered most of the information for you.
Incoming Server You’ll be prompted with
pop.mail.changeme.co.uk. You’ll need to amend changeme.co.uk
to reflect your account details e.g. pop.mail.o2.co.uk
Incoming Port This has been preset for you
Username Amend changeme and add your username (the prefix
before @)
Password Enter the password associated with your email account
• Once you have entered all the relevant data press the left soft key
to select Save
133
134
Page 72

Profiles
Signature
Add a signature to your emails, so your full name and all your
contact details are at the bottom of the email.
Activate Scroll to activate and choose between On and Off by
pressing left and right on the navigation key
Associate Picture Add an image to your signature
• Scroll to Associate Picture and select Select from File by pressing
left and right on the navigation key, then press (if you don’t
want a picture scroll to None)
• Then select Select from File again and follow the prompts to
choose an image from your file manager. For further info on File
Manager go to page 76
Content Add the body copy such as your full name and contact details
• Once you have entered all the relevant data press the left soft key
to select Save
Activate your account
After you’ve entered all the settings select Messages from the main
menu followed by Email – Settings. Scroll to the profile you have
updated or require and press to activate.
Delete All Folder
Select to delete emails – you can choose emails in your Inbox /
Outbox / Sent / Drafts or all of them.
135
Change the settings that determine how your O2Jet mobile alerts
you to an incoming call or message. You can also change the ring
type and volume.
•
Scroll to Profiles in the main menu and press to select
•
Then scroll to the profile that best suits the environment you
are in
•
Then press to select
Choose from the following
Selecting a profile
Normal
This is the default profile. Once activated the display’s status bar
will show the icon. There’s a quicker method to activate the
normal or standard profile. See the profiles shortcut device on
page 138.
136
Page 73

Outdoor
The options in this profile have been preset to suit conditions
where it is difficult to hear, like an outdoor activity e.g. the highest
volume ringtone or activation of both ringtone and vibrating alerts.
Once activated the word Outdoor will be displayed on the
standby screen.
Silent
Sets all phone noises to the minimum level. Ideal if you are
relaxing, or in a quiet environment. Once activated the display’s
status bar will show . To activate this profile see the shortcut
device on page 138.
Vibrate only
For when you don’t want ringing to disturb anyone else, for instance
in the cinema. Once activated the display’s status bar will show .
To activate this profile see the shortcut device on page 138.
Headset
This profile is only active when a hands-free kit is attached to your
mobile. Once activated the display’s status bar will show .
Profile selector key
Rather than accessing the profile menu you can change profiles by
using the profile selector key.
Please note
•
This only applies to the Silent, Standard and Vibrate Only profiles
•
The standard profile relates to both Normal and Outdoor. If you
have selected Normal in the profiles menu the standard profile
will default to Normal. The same applies if Outdoor was selected.
To change between the Normal and Outdoor menu go to page 136
Slide the profile selector key
from left to right to choose
from Silent, Standard or
Vibrate Only
137
138
Page 74

•
In the standby mode slide the profile selector from left to right to
choose one of the available profiles
Silent Slide the profile selector to the far left. The silent icon
will appear on the standby screen as well as the word Silent
Standard Slide the profile selector to the middle. This relates to
either normal or outdoor depending on which one had been
chosen from the profiles menu. The icon will appear on the
standby screen if the normal profile had been selected. The word
Outdoor will appear if this profile had been selected from the
profiles menu
Vibrate Only Slide the profile selector to the far right. The vibrate
only icon will appear on the standby screen as well as the
words Vibrate Only
139
140
Page 75

Personalise your profiles
You can personalise each of the profiles to suit a particular
environment, except for Silent and Vibrate Only. Just adjust the
settings by following the instructions below.
•
From the main menu select Profiles
•
Scroll to highlight a particular profile, except Silent and Vibrate
Only and press the left soft key
•
Scroll to Personalise and select OK by pressing the left soft key
or press
•
Then choose from the following
Tone Settings
Select to amend the tone settings on your O2Jet mobile and select
from the following
Incoming Ringtone
Select to amend the ringtone of that particular profile
•
Scroll to Incoming Ringtone and press
•
You can then choose from one of the default ringtones that we
have set on your O
Jet mobile or you can create a new ringtone
2
from sounds you have recorded or received from others in a
media message or ringtones you have downloaded from
Active. For more information on media messages see page
O
2
106, for O
Active go to page 60 and for details on recording
2
your own sounds see page 84
141
142
Page 76

•
Default Ringtones
–
Select Default Ringtones, then scroll through and listen to the
options available
–
Set a particular ringtone by pressing the left soft key
•
Custom Ringtones
–
Select to customise your profile’s ringtone from sounds you
have recorded, received by media message or downloaded from
Active
O
2
–
Select Custom Ringtones
Please note
If you haven’t added ringtones to your custom ringtones you will
need to add them before you select a particular ringtone.
You can manage your ringtones by selecting Options followed by
Insert Tone Select to add a new tone to your custom ringtones.
Just scroll through your audio files saved in File Manager and select.
For more information on File Manager go to page 76
Once you have added a ringtone you can manage your custom
ringtones by selecting Options and then
Set as Incoming Ring Select to set the highlighted file as
your ringtone
Remove Tone Select to remove the tone from your Custom
Ringtone folder
Replace Tone To replace the existing ringtone with another file
Power On
Select the tone for when you turn your mobile on.
•
Scroll to Power On and select
•
Then choose from the list available or Silent and press the left
soft key to select OK
Power Off
Select the tone for when you turn your mobile off.
•
Scroll to Power Off and select
•
Then choose from the list available or Silent and press the left
soft key to select OK
Message Tone
Select the tone for how your mobile alerts you when you receive
a message.
•
Scroll to Message Tone and select
•
Then choose from the list available or Silent and press the left
soft key to select OK
Key Tone
Determine whether keypad tones are played when keys are pressed.
Select from Silent, Tone or DTMF.
Volume
Select to amend the volume for an incoming call and key tones.
•
Scroll to Volume and select, then select Incoming Volume or Key
Tone Volume
•
Press left and right on the navigation key to increase or decrease
the volume level and press the left soft key to save
143
144
Page 77

Please note
The profile selector key (see page 138) will override all profile
settings when activated into silent or vibrate. The central position
will activate either the normal or outdoor modes.
Ring Mode
Scroll through the options available and select either
Ring Only
Vibrate
Vibrate & Ring
Silent
Please note
The profile selector key (see page 138) will override all profile
settings when activated into silent or vibrate. The central position
will activate either the normal or outdoor modes.
Ring Type
Scroll through the options available and select either
Once
Repeat
Ascending
Misc Tones
Select whether your mobile emits a tone for the following options.
• Scroll and highlight one of the options and press to select and
press the left soft key to Save
Alert Tone Your O
Jet mobile will emit a sound when alerting you
2
to all other notifications
145
Error Your mobile will emit a sound each time you make a key
press mistake
Answer Mode
You can set your O2Jet mobile so that you can only answer a call
by pressing . Alternatively, you can adjust the settings so that
you can answer a call by pressing any key apart from .
•
Select Answer Mode and then select Any Key and press to
select Save
Flight Mode
There are times or places where mobile phones are prohibited, such
as in an airplane. By selecting flight mode, although you won’t be
able to make or receive calls, you can continue to use other features
such as the calendar, calculator, view your images, listen to your
audio files and use the currency converter so you are prepared
when you arrive at your destination.
This is because in flight mode your mobile will not emit radio
waves and disturb other electronic systems. So keep listening,
preparing and organising your day!
•
From the main menu scroll to Profiles and select
•
Then select Options – Flight Mode
•
Then select Off or On and press the left soft key to select OK
Please note
Some airlines may have restrictions as to when you may use
electronic equipment during flight. For safety reasons you must
adhere to these restrictions at all times.
146
Page 78

Calendar
You can use the calendar to set up forthcoming events such as a
meeting, an appointment, or a friend’s birthday. The calendar will
also remind you about events you have previously scheduled.
•
Scroll to Calendar and press
•
When you open the calendar, the current date will be highlighted
Please note
To use this tool efficiently you’ll need to ensure that the correct
current time and date is set on your mobile. From the main menu
select Clock and follow the prompts. For more info see page 89.
147
To set a task reminder
•
In the calendar screen, use the navigation key to move the blue
box to the date where you wish to create a task reminder
•
Once the required date is highlighted select Options by pressing
the left soft key and scroll to Add Task and select
You can then scroll through a number of fields
Date Change the task’s assigned date by pressing the appropriate
number keys
Start Time Enter a start time for the event associated with the
memo by using the appropriate number keys
AM/PM Press left and right on the navigation key to scroll between
the two options
End Time Enter the expected finish time
AM/PM Press left and right on the navigation key to scroll between
the two options
Content Enter the details for the task reminder. Scroll to Content
and press . Enter the details and select Options – Done to confirm
Alarm Notify Select whether an alarm will sound to remind you.
Press left and right on the navigation key to select Activate or
Deactivate
Alarm Type Select how often your O
• Scroll to Alarm Type and press to select. Scroll to Once, Hourly,
Jet mobile alerts you of the task
2
Everyday, Days, Weekly or Monthly and press the left soft key
to select OK
148
Page 79

Please note
If you select Days you can choose which day or days of the week
the alarm will sound. Scroll to days and press the left soft key
to select Options. Scroll through the days listed and press
to select. Once complete press the left soft key to select OK
•
After entering the data in each field, press the left soft key
or to select Save and save the memo to that date
Please note
When you return to the main calendar screen the date you have
saved a task to will be underlined in red.
You can also perform the following from the calendar screen
•
Press the left soft key to select Options, and choose from
Go to Date Lets you specify a date to view
Go to Today Go direct to today’s date
Add Task For further instructions on adding a new task go to
page 148
View All Tasks Enables you to view all tasks you have saved
•
Scroll to a date where you have saved a task and press ,
then press the left soft key to select Options, and
choose from
View Select to view the details of the task reminder you have saved
Add Select to add another task
Edit Task Select to edit the task you have saved
Delete Task Enables you to delete the task you have previously saved
Delete All Tasks Select to delete all tasks saved in your calendar
Send via Send the details of the task to someone else by text
message, media message or Bluetooth. Please note the success of
this is dependent upon the recipient’s device capability. Otherwise
save the file to your mobile’s memory.
149
150
Page 80

Contacts
Managing your contacts has never been easier. Here you can edit
or create details, send messages, call them or delete them from
your life completely. You can assign different ringtones to personalise
different groups or a specific contact so you know who is calling.
•
From the main menu select Contacts, or select Contacts from the
standby screen by pressing the right soft key
Please note
To progress further you will need to add contacts to your
O
Jet mobile.
2
Adding contacts to your phonebook
You can either use the SIM card or the built-in contacts database
as your phonebook. You can store up to 1000 contacts on your
mobile’s memory and up to 250 on your SIM card memory.*
•
From the standby screen enter the number you wish to store,
then press the left soft key to select Save
•
The screen will show the data fields for a new contact
*Dependent on type of SIM.
•
Scroll through the contact data fields that you wish to edit
•
To edit a field press , then enter the relevant data
The data fields provided by the phonebook are
Name Your contact’s name
Number Your contact’s main number
Home Number Your contact’s home number
Office Number Your contact’s office phone number
Fax Number Your contact’s fax details
Company Name Their company name
Email Address Their email address
Incoming Ringtone Assign an individual ringtone to your
contact’s details
•
Scroll to Incoming Ringtone, then press left and right on the
navigation key to scroll through the available tones. There are 14
different tones to choose from
•
When there is an incoming call for this contact, the ringtone
you’ve assigned will sound
•
If you don’t want to choose a specific ringtone for this contact
select None. When this contact calls the general ringtone you
have saved in profiles will sound. For further information go to
page 136
151
152
Page 81

Please note
•
The ringtone in this field will replace any ringtone associated with
the contact’s caller group. For information on Groups see page 159
Group Assign a group to your contact
•
Scroll to Group, then press left and right on the navigation key to
scroll through the options to select either None / Friends / Family /
VIP / Business or Others
Please note
•
When there is an incoming call for this contact, the ringtone
assigned to this group will sound
•
To set a ringtone for each caller group go to Contacts – Settings
– Groups. Scroll to a specific group then select Options – Group
Settings and follow the on screen instructions. For further
information see page 161
Once you have finished press the left soft key to select Save
Please note
•
If you save your contact to your SIM’s memory you will only be
able to detail information in the following fields – name and
number. To change the default from SIM memory to mobile
phone memory or vice versa go to Contacts – Options – Settings
– Default Storage. For more information go to page 162
View contacts
•
From the standby screen press the right soft key to
select Contacts
Please note
If you are unable to view any contacts it may be because you need
to add contacts (see page 151) or you don’t have access to view all
contacts (see Display Contacts on page 161)
Identifies that your contact is saved to your SIM’s memory
Indicates that your contact’s details are saved to your
phone’s memory
•
Scroll through the list of contacts available using the navigation
key. For quick access to a certain contact start typing in their
name using the alphanumeric keys. The letters will appear in a
box on the bottom of the screen and your O
search for that particular contact
Jet mobile will
2
153
154
Page 82

When the required contact is highlighted
•
Press to view the contact details. You can then press the left
soft key to select Edit and amend any details. Once
complete just press the left soft key to select Save
•
Press to call your contact
•
Press the left soft key to select Options and then choose
from the following
View To view your contact’s details
Call To call your contact
Add a Contact To add a new contact to your phonebook. For
details on doing this go to page 151
Send Message Select to send a text message or media message to
the contact highlighted. For details on text messages go to page 97
and for further information on media messages go to page 106
Edit Select to change your contact’s details
Delete Select to delete the contact’s entry or all contacts.
Select Delete and then select Delete again to delete that particular
contact or Delete All to delete all contacts stored
Speed Dial Select to turn the speed dial function on or off and
create a speed dial list. For further information see page 157
Move Select to move your contact’s details from your phone
memory to your SIM memory depending on where it was originally
stored. Just follow the on screen prompts
Copy Select to copy your contact’s details from your phone memory
to your SIM memory depending on where it was originally stored.
You can also select to copy all your contacts, just follow the on
screen prompts
Send as Biz Card Send your contact’s details as an electronic
business card either by text message or by Bluetooth. For more
information on sending a text message go to page 97, for
information on Bluetooth go to page 69
My Biz Card Create your own business card, so that you can send
all your details upon request by text message or by Bluetooth.
Select My Biz Card and follow the on screen instructions. For more
information on sending a text message go to page 97, for
information on Bluetooth go to page 69
Settings Here you will find all the details on your phonebook
settings. For more information on Settings go to page 159
155
156
Page 83

Speed dial
Create a speed dial, it’ll save you time when searching for those
contacts you call more regularly – they’ll just be one key press away.
•
From the main menu select Contacts – Options – Speed Dial
•
To enable you to use the speed dial tool you will need to activate
it. Select Speed Dial On / Off and then scroll to On and select OK
by pressing the left soft key
Creating a speed dial list
•
Select Contacts – Options – Speed Dial – Assigned Numbers
•
You can see that we have alr
for you – all you need to do to access your voicemail messages is
press and hold from the standby screen
eady set a voicemail speed dial up
•
To set up a speed dial link scroll to the next available space and
select Options – Edit
•
Scroll through your contacts listed and press the left soft key
to select OK and confirm
Please note
If you change your mind at any time just scroll to the speed dial
number in question and select Options and then Edit or Delete.
157
158
Page 84

Settings
Select to manage all your settings in the contacts menu. You can
edit your Groups set up, check the memory status, amend how you
display your contact information and even delete certain contact
fields you do not require.
•
From the main menu select Contacts – Options – Settings then
choose from the following
Groups
By selecting Groups you have options to add and delete members
as well as amend the Groups caller ringtones.
Please note
You can only select contacts as group members if their details are
saved to your phone’s memory. If your contact is saved to your
SIM’s memory you will need to copy their details to the phone
memory first.
•
Select Groups to view the different groups available. You can
choose from Friends / Family / VIP / Business / Others
•
To manage a particular group, scroll to highlight the group and
press the left soft key to select Options, then select
Group Members
•
Select Groups Members and view all the members you have
allocated to that particular group
•
You can then delete or add new contacts to that group by
selecting Options – Add / Delete and follow the on screen prompts
159
160
Page 85

Group Settings
•
To amend the name of the group, the ringtone associated with
that group, scroll to Group Settings and select
Group Name To amend the name of the group scroll to Group
Name and select Edit
Incoming Ringtone By pressing left and right on the navigation key
you can amend the ringtone associated with that group
View Members Select to view the members associated with that
group and then delete or add new contacts
Memory Status
Select to view how much memory space you have left remaining
for new contacts on both your SIM card and phone memory.
Display Contacts
Decide whether you only wish to view contacts saved to your SIM
card, handset or both.
•
Select Display Contacts and then scroll to SIM / Handset / SIM &
Handset and select OK by pressing the left soft key
Default Storage
You can choose whether new contacts are saved to your SIM card
or phone memory.
•
Select Default Storage and then scroll to SIM or Handset and
select OK
Contact Fields
Select to delete some of the contact fields if they are not required.
•
Select Contact Fields and then scroll through the options available
and press to delete a particular field
•
Once complete pr
ess the left soft key to select Save
161
162
Page 86

Settings
The settings menu is used to customise how your phone works.
You can choose different display messages and screensavers, as
well as changing basic parameters for your mobile such as, security,
network and call settings.
•
In the main menu scroll to Settings and press to select
Battery Saving
After you activate the battery saving mode the keypad and display
backlighting will be turned off as well as the keypad tones to
conserve power. Bluetooth is also turned off after 5 minutes if
Bluetooth is not in use.
•
Select Battery Saving and then scroll to On or Off and select
Display Settings
This allows you to change your display settings – change the
wallpaper, customise your home screen and adjust the brightness
of your O
The display menu lists these choices
Jet mobile screen.
2
163
Wallpaper
Your mobile says a lot about you so ensure you choose the wallpaper
for your display carefully.
You can choose from the default images or animations we’ve
saved to your O
have downloaded from O
Jet mobile, or even select an image that you
2
Active or received from friends in a
2
media message.
•
Scroll to Wallpaper and press to select
Then choose from
Default Wallpapers
•
Select Default Wallpapers to choose one of the pre-defined
wallpapers we have saved to your O
164
Jet mobile
2
Page 87

•
Scroll through the list available and press the left soft key
to View
Top tip
To view the other available wallpapers, simply press left and right
on the navigation key.
•
Then select OK to confirm your selection
•
To choose a different wallpaper select Back and choose another
Custom Wallpapers
Select an image you’ve saved. These can be photos you’ve received
by media message or downloaded from O
Active, such as celebrity
2
photos, cartoons and other graphics. Check out page 60 for more
info on O
•
•
Active.
2
Select Custom Wallpapers
Then choose either Received or Images and select one of the
images saved in either folder by following the on screen prompts
Home Screen
Choose what text is displayed on your home screen.
•
Scroll to Home Screen and select
•
Select whether your home screen displays the date and time, and
the current profile
•
Scroll through the list and when highlighted press to select or
remove, then press the left soft key to Save
For more information on setting the date and time go to page 89,
and for help on setting a profile go to page 136.
165
166
Page 88

Brightness
How bright do you like your display?
Please note
You can change the brightness levels for the display when your
mobile is in or out of the docker (desk stand). For more info on the
desk stand go to page 31.
•
Select Brightness, then select either Standard Display or In Docker
•
Scroll left and right on the navigation key to move the brightness
levels up and down
•
Pr
ess the left soft key to select OK and save
Please note
Battery Saving reduces the brightness of the display to save battery
life. If Battery Saving is ON it needs to be switched OFF before the
brightness can be changed. For more information on Battery Saving
go to page 163.
167
Call Settings
Select for options on dealing with calls simply and quickly.
You can change the settings for
Hide My Number
You don’t need to let everyone know who’s calling. You can decide
to show or hide your mobile identity when it suits you.
Please note
If this feature is turned off, you may not be able to make phone
calls in certain countries, such as Singapore and China.
Call Waiting*
If there is an incoming call when you’re in the middle of another call,
request your mobile to alert you. Just follow the on screen prompts.
Call Forwarding**
Choose when to divert your calls. You can forward incoming calls
to another phone number or your voicemail.
vailable to Pay Monthly customers only
*A
**Pay & Go customers can only divert to voicemail 901.
.
168
Page 89

All calls Select to forward incoming calls. Once activated will
be displayed on the standby screen
Not reachable Diverts calls when your mobile is turned off or
outside network coverage
Not answered Forwards calls when you don’t answer
When busy Forwards calls when you are on another call
Divert All Data Calls Select to divert all data calls
Cancel Cancel all call forward settings
•
Scroll through the options available and press or the left soft
key to select
•
Then choose from the following
Activate Select to activate and then enter the telephone number
Deactivate Select to deactivate the call divert
Check Status Check the status of the diverted calls
Call Barring*
Are there some people you simply don’t want to keep in touch
with? Or some calls you don’t want to be made from your phone?
Here’s the place to keep in control.
Call barring is a password protected network service and details
should be acquired from O2 Customer Service.
Choose from the following options
Outgoing Calls
Scroll to Outgoing Calls and then choose
All calls Blocks dialling of any calls from your mobile
International Calls If activated no international calls can be made
from your phone
Intnl. Except Home No. If activated, your mobile can only be used
to dial local calls and calls to your home country from abroad.
Other international calls will be barred
*Network dependent and available to Pay Monthly customers only.
169
170
Page 90

Incoming Calls
Scroll to Incoming Calls and then select
All Calls Rejects all incoming calls
When Roaming If you’re in another country, activating this option
will ensure your mobile rejects all incoming calls
Cancel All
Cancels all call barring settings. You’ll need to enter a password.
Change Password
Change your password to something more memorable.
Call Barring per No.*
There are more ways to decide which calls get through – choose to
bar certain numbers and only accept those ‘privileged’ few. It’s your
Jet mobile, so you decide.
O
2
•
Scroll to Call Barring per No. and select, then choose from
the following
Barred Numbers
You can choose to reject or accept unknown calls, and even enter
particular numbers into the call barring list. Just follow the on
screen prompts.
*Network dependent and available to Pay Monthly customers only.
Privileged Numbers
Set numbers as privileged numbers. Just follow the on screen
prompts to enter numbers directly or from your phonebook. Once
this is activated you will only be able to make or receive calls from
the privileged number list.
Settings
You can turn the call barring off, only set call barring for the barred
numbers or only accept calls from numbers in your privileged list –
you choose. Just follow the on screen prompts.
Call Time Display
This option allows you to see the duration of calls you make.
•
Select Call Time Display, then scroll to Off or On and select by
pressing the soft left key or
Auto redial
Do you want your mobile to automatically redial busy numbers?
•
Scroll to on or off and press to select
171
172
Page 91

Network Settings
Network Selection
Your mobile can search for a network automatically or you can do
it manually. Decide which you prefer here. The default setting is
Automatic.
•
Scroll to your preferred choice and press the left soft key to
select OK
Automatic When outside the coverage of your regular network,
your mobile will automatically search for usable networks
Manual When outside the coverage of regular network, your
mobile will list available networks and allow you to choose
Band Selection
According to your requirements, you can set an appropriate band
in the GSM network system.
•
Scroll through the band settings available and press the left soft
key to select OK. Not sure? Just select Automatic and your
Jet mobile will select the best band setting
O
2
GPRS Connection
Contains options for how you connect to the O2 network. Y
mobile works on a GPRS connection, connecting you faster.
•
Scroll to GPRS Connection and select either When Needed or
Always Available
our
Phone Settings
Pre-pay/Post-pay
Your O2Jet mobile will recognise the SIM type you have once the
SIM is inserted and will automatically default to the correct postpay
or prepay settings.
If you find this not to be the case, follow the on screen prompts
to amend.
Please note that incorrect settings may prevent you from using
some of the relevant prepay or postpay services e.g. O
Language
You can set the language your mobile uses. Select from
the following
English Your mobile’s display will be in English
Deutsch Your mobile’s display will be in German
Español Your mobile’s display will be in Spanish
Voice Mail
You can store different voicemail numbers.
Active.
2
173
174
Page 92

Security Settings
Prevent unauthorised use of your O2Jet mobile by setting up a
PIN code for your SIM card, a phone lock code or by activating the
automatic keypad lock.
SIM PIN
A SIM PIN code will prevent unauthorised use of the SIM card.
Unless the correct PIN is entered when your mobile is turned on,
the SIM card cannot be used, even if it is inserted in another mobile.
•
Select SIM PIN, then select Off or On to disable or enable
•
To enable you will need to enter the default PIN code, which is
5555, 4321 or 0000 Please see your welcome pack for your
SIM PIN.
•
To change the PIN code to something more memorable go to
Change Password – see page 178. You’ll need to enter the
original PIN as well as confirming your new PIN number
Please note
If the PIN code is entered incorrectly three times your mobile will
automatically disable. The screen will display the message PIN
blocked or Enter PUK (Personal Unblocking Key). Don’t try to enter
your PIN again. Contact O2 Customer Service for a PUK code to
unblock your mobile.
Phone Lock Code
Select to prevent unauthorised use of your mobile.
Once activated, your mobile will lock when turned on unless this
password is entered correctly. If an incorrect password is entered,
your mobile will remain locked, and can’t be unlocked even if the
SIM card is replaced by another one.
When the mobile is locked, you can only make emergency calls.
•
Select Phone Lock Code, then select either Off or On
•
To enable you will need to enter the default code which is 1234
You can also change the password to something more memorable,
see page 178.
Auto Keypad Lock
You can set your mobile’s keypad to lock after a certain period of
time. This will ensure that certain keys are not pressed accidentally.
To return to the original screen, after pressing any key, you must
enter the password you set for this feature.
•
Scroll to Auto Keypad Lock and select
•
You can then turn the keypad lock Off or select to activate it
after a certain period of time, such as 5 seconds, 30 seconds,
1 minute or 5 minutes
•
Scroll to one of the options and press the left soft key to
select OK
Please note
To unlock your keypad when activated press the left soft key
to select Unlock, then press .
175
176
Page 93

Fixed Dial*
After this feature is activated, your mobile will only be able to dial
numbers on the fixed dial number list. If a number is not on the
list, calls cannot be made to this number.
•
Scroll to Fixed Dial and select, then select Fixed Dial On/Off
•
You can then choose to turn this option On or Off
•
To enable you will be requested to enter the PIN2 code which,
you can obtain by calling O2 Customer Service. To change it to
something more memorable see Change Password on page 178
Please note
If the PIN2 code is entered incorrectly three consecutive times, the
PIN2 code will be locked down. You will need to enter the PUK2
code to unlock it. Contact O2 Customer Service to obtain the
PUK2 code.
•
To add numbers to your fixed dial list, select Fixed Dial –
Number List
•
Then press the left soft key to select Add
•
You can then edit by adding new names and numbers
vailable to Pay Monthly customers only
*A
.
Barred dial
Barred dial is a future capability that is reliant on development in
the network in order to work. At the current time this capability is
not supported.
Change Password
Here you can change the passwords to something more memorable.
•
Scroll to Change Password and select
•
Choose from PIN, PIN2 or Phone Lock Code
•
When prompted enter the original PIN code and select OK
•
When requested enter your new PIN code and confirm by
selecting OK
•
For confirmation you will need to enter the PIN code once more
Reset Factory Default
Changes all settings back to how they were when you received
your new phone.
•
Scroll to Reset Factory Default and select OK
•
Enter the password – the default is 1234
•
You can then decide whether to Restore Default Settings or
Delete All User Data
Please note
By selecting Restore Default Settings you will not delete any messages,
content, call logs or contacts but by selecting Delete All User Data
you will.
177
178
Page 94

Chapter 6
Glossary and trouble shooting
•
Glossary
•
Trouble shooting
179
180
Page 95

Glossary
Roaming
Roaming allows you to move from one base station to another or
from one network to another without affecting the call.
Quad band
Mobile phones operate in different countries. A quad band mobile
can switch between four frequencies e.g. 850 Mhz, 900 Mhz, 1800
Mhz and 1900 Mhz. Your O
Jet mobile is a quad band mobile.
2
SIM card
A SIM is the card that you receive from O2 which holds the unique
data the network needs to identify your mobile.
PIN*and what is PUK
Access to use a mobile is most often protected by a code known
as ‘PIN’ – Personal Identification Number. If you forget your code,
or by mistake enter a faulty code three times in a row, the SIM card
will lock. To unlock, you must enter the Personal Unblocking Key or
‘PUK’ code which you can get from O2 Customer Service.
PIN2
PIN2 is a security code that you can obtain by calling
O2 Customer Service.
*Pay & Go mobiles ar
e not set up with a default PIN code.
181
IMEI
IMEI stands for International Mobile Equipment Identifier and is an
identification system that can recognise every mobile by a specific
number. If a mobile is stolen, the IMEI system is capable of blocking
it on all network operators that support the system.
WAP
Wireless Application Protocol or WAP is a standard developed for
mobile phones. It was designed to give quicker access to mobile
content than existing web protocols. Using WAP will open services
to you such as O
services and entertainment.
Active which offers a wide variety of mobile
2
GPRS
General Packet Radio System is a service that transmits data to and
from your phone. Charges are based on the amount of transferred
data rather than on airtime.
GSM data
A wireless service protocol used for WAP. This allows you continuous
WAP connection. You pay for the time spent connected rather than
the amount of data.
182
Page 96

Trouble shooting
URL
Uniform Resource Locator or URL is an address system used on
the Internet. All WAP homepages have a unique address, allowing
browsers to distinguish one from the other. A WAP URL always
starts with the text string: http://wap followed by the address.
APN
APN stands for Access Point Name.
ISP
ISP stands for Internet Service Provider.
183
Why does my mobile not turn on when I press the
key?
The key press has been too short or your mobile has shut down
because the battery power level is too low to make calls. Recharge
the battery fully.
The standby time seems too short. Why is this?
You may have been using the calendar too much, or the display
light has been on continuously due to unintentional key activation.
Utilise the keypad lock to prevent unintentional use. For further
information go to page 176.
My mobile displays ‘Insert SIM’, what does this mean?
You must insert the SIM before you can use your mobile. If it is
already installed, take it out and clean the blank area with a dry
cloth, then put it back again.
My mobile displays ‘INVALID SIM’, what does this mean?
Your mobile is SIM-locked and will not accept the SIM you’ve
inserted. Put in the correct SIM or contact O2 Customer Service.
I can’t connect to my Bluetooth headset
Please ensure that your headset is ON and in ‘pairing mode’.
For further information go to page 69.
Can’t re-connect to headset when it is ON once it has
already been working?
Please ensure that your headset is just on and not in ‘pairing mode’.
184
Page 97

My mobile displays ‘EMERGENCY ONLY’, what does
this mean?
Your SIM card is not properly installed or configured, or you are out
of network range.
My mobile displays ‘NO SERVICE’, what does this mean?
You are outside network range or there is no clear path to the
transmitter. If you are in a building, try moving towards a window.
Some calls are not processed. What is wrong?
A call bar has been set to restrict mobile usage. Check call barring
and cancel as necessary.
Someone else is receiving my calls. What is wrong?
Your mobile has been set to forward your calls to another number.
Cancel call forwarding.
Can I send and receive emails and surf the Mobile
Internet on my mobile?
Yes. Your mobile has WAP capability, which means you can access
the Mobile Internet from your mobile. For sending and receiving
emails, please contact O2 Customer Service.
What is T9?
T9 text input is a predictive text editor that allows you to type using
just one click per letter and saves you time when writing text
messages, text entries, etc.
What type of networks are supported?
Check the network settings on page 173.
Can I use my mobile inside a car?
Please refer to ’Driving Safety’ on page 193.
How do I clean my mobile if it gets dirty?
See ‘Mobile care’ on page 190.
My mobile has been lost or stolen. What do I do?
Contact O2 Customer Service immediately to bar your mobile and
prevent misuse. If your mobile has been stolen you should report
the incident to the local police.
How do I reset my mobile to factory defaults?
Enter the Settings menu, then select Security Settings – Reset
Factory Default. For further information go to page 178.
I’ve attempted to download/upload files with my PC
using the supplied USB cable, but the handset manager
program doesn’t recognise the phone is connected.
What do I do?
Make sure the cable is plugged securely into both the phone and
the computer, and that your mobile is turned on. When prompted
ensure you select the correct storage option e.g. Mass Storage. If your
problems persist we recommend that you restart your computer.
185
186
Page 98

Chapter 7
The important safety bit at the back
•
Safety information
•
Mobile care
•
Driving safety
•
Electronic devices
•
Other safety guidelines
•
Cautions
•
Warranty statement
•
Mandatory statements
187
188
Page 99

Safety information
Mobile care
Read this information
Your O2Jet mobile phone has been designed, manufactured
and tested so as not to exceed the limits for exposure to
electromagnetic fields recommended by the Council of the
European Union. These limits are part of comprehensive guidelines
developed by independent scientific organisations.
European standards provide for the amount of radio frequency
electromagnetic energy absorbed by the body when using a mobile
phone to be measured by reference to the Specific Absorption Rate
(SAR). The SAR limit for the general public is currently 2 watts per
kilogram averaged over 10 grams of body tissue.
Jet mobile phone SAR value is GSM 900 – 0.561 & DCS
Your O
2
1800 – 0.176 watts per kilogram
189
Never attempt to open the mobile casing other than to remove
the battery cover. There are no user-serviceable parts inside, and
you might damage sensitive electronic circuits and components.
Unauthorised disassembly will void the warranty.
Never leave your mobile in the window of your car or otherwise
expose it to strong sunlight or excessive heat for a prolonged
period of time as this may damage it.
Never handle your mobile with wet hands or expose it to moisture
or liquids of any kind. Continuous changes from a cold to a warm
environment may lead to condensation inside the mobile, resulting
in corrosion and possible damage.
If you pack your mobile in your suitcase during travel, beware not
to damage it. Cramming it in a suitcase may crack the LCD display.
Remember to switch off your mobile during air travel or switch to
flight mode.
As with all other radio devices, touching the built-in antenna area
during telephone conversation may impair the quality and lead to
shorter standby time due to increased power consumption.
The battery
Your mobile is equipped with a high-performance Li-Ion battery.
Observe the maintenance guidelines and your battery should give
you a long service life.
•
At the beginning of the battery’s life, fully charge and discharge
(let it go flat) three times
190
Page 100

•
Do not over charge the Li-Ion battery, as this can result in a
reduction in battery performance and life span. The recommended
maximum charge time is 6-8 hours
•
Avoid repeated short charging. It is better to let the battery go
flat and then recharge it completely
•
Avoid charging in strong heat or extreme cold. Ambient room
temperature is preferable. The battery has its optimum
performance in an ambient temperature of +5 °C to +50 °C
•
Don’t store a battery near a fire or heat source
•
Use only the battery approved by the manufacturer
•
Never replace the battery with a non-approved battery
•
Never try to open the battery as it contains substances that might
be harmful if swallowed or allowed to come into contact with
unprotected skin
•
Never short-circuit the battery, as it may overheat and cause a
fire. Keep away from jewellery and other metal objects
•
Never dispose of the battery in a fire. It could explode and release
harmful substances into the environment
•
Do not touch the battery terminals
•
Caution: Risk of explosion if battery is replaced by an
incorrect type
The charger
•
Use only the charger supplied with your mobile
•
Never pull the charger cord to release it from the mains – pull the
charger itself
Cleaning and storing
•
Your mobile should always be handled with care and protected
from dirt, dust and damp. To avoid scratches, never place your
mobile face down
•
If cleaning is necessary, switch the mobile off and wipe carefully
with a soft, slightly damp (not wet) cloth. Use a cotton swab to
clean the camera lens. Allow the mobile to dry completely before
switching it on. Never use solvents for cleaning
•
If you’re not going to use your mobile for some time, fully charge
the battery and store the mobile in a dry place away from direct
sunlight. Your mobile should be switched off during storage.
Recharge every 6 to 12 months
•
Never expose your mobile to heat or strong sunlight
•
Never expose your mobile to moisture or liquids of any kind
•
Do not paint your mobile or otherwise block the keypad,
microphone or earpiece function, i.e. with stickers
Caring for the environment
Disposal of your cellular telephone and accessories
Please do not dispose of your old cellular telephone or electrical
accessories, such as batteries or chargers, with your household
waste. Please take them to your nearest O2 store.
191
192
 Loading...