

Page 1

Page 2

Contents
Welcome x
Chapter 1 – Before using your mobile x
What’s in the box? x
Cocoon description x
The Nest x
External display x
Internal display x
Function keys x
Navigation key x
Chapter 2 – Getting your Cocoon ready to use x
Inserting your SIM x
The battery x
Charging the battery x
Important battery information x
Inserting your memory card x
CD Rom and USB cable x
Chapter 3 – Basic functions x
Turning your mobile on x
Turning your mobile off x
The menu x
Shortcuts x
Main menu map x
Chapter 4 – Before using your mobile x
The basics – making and ending calls x
During a call x
Voice in-call menu x
Video in-call menu x
Voicemail 901 x
Chapter 5 – Profiles x
Selecting a profile x
Customise your profile x
Reset your profile settings x
Chapter 6 – Multimedia x
Pictures x
Video & Sounds x
Camera x
Video camera x
Other files x
Manage
Chapter 7 – Clock & Alarm x
Clock x
Alarm x
Locations x
Settings x
Chapter 8 – Browser x
O2Active x
Bookmarks x
Enter address x
History x
Manage x
Chapter 9 – Messages x
Create new message x
Reading messages x
Inbox x
Drafts x
Sent messages x
Unsent messages x
Email x
Message settings x
Memory status x
Page 3

Chapter 10 – Email x
Create an email x
Checking for emails x
Reading an email x
Inbox x
Drafts x
Sent x
Outbox x
Settings x
Chapter 11 – Music player x
Before you dive in x
Windows Media Player 11 x
Copying music to your Cocoon x
Downloading music on the move x
Receiving music via Bluetooth x
Music player menu x
Listening to music x
Listening to the radio x
Chapter 12 – Tools & Games x
Bluetooth x
Games x
Calendar x
Calculator x
Notepad x
Voice recorder x
World Clock x
Stopwatch x
Converter x
Synchronisation x
O2 x
Memory status x
Chapter 13 – Contacts x
Adding contacts x
View contacts x
Managing your contacts x
Chapter 14 – Settings x
Internal Display x
External Display x
Phone x
Calling x
Music & Calls x
Network connections x
Network x
Connections x
Security x
Factory reset x
Chapter 15 – Get synching x
Synchronise your contacts and calendar x
Transfer music files x
External storage device x
Sync with your Apple Mac x
Chapter 16 – Don’t panic x
In plain English x
Trouble shooting x
Chapter 17 – The important safety bit at the back x
Safety information for mobiles x
Mobile care x
Driving safety x
Electronic devices x
Other safety guidelines x
Cautions x
Warranty statement x
Mandatory statements x
Page 4

Welcome to your new O2Cocoon
Thanks for buying the O2Cocoon. You’re in for a treat. You’ve got so much more
than just a fantastic music phone. It’s an extraordinary piece of technology, delivered
in a cool, sleek style.
Once you’ve been through this guide, you’ll be able to make and receive phone calls,
listen to music, download all kinds of media, send text and multimedia messages, take
photos, record videos and much, much more. And the phone’s controls are arranged
logically, in a familiar way, so you’ll get to grips with the easy menus very quickly.
No doubt you’ll have already found and read the smaller guide included within the
Cocoon box to help you get it up and running. But this more detailed guide is well
worth reading too, as it contains absolutely everything you need to know, so you can
get the most life from your Cocoon. Get to know your phone inside and out, and be
able to customise it, adapt it – make the Cocoon completely yours.
You’ll find this guide very straightforward to use. The CD Rom format means that
you’ll be able to move easily between chapters, finding the information you need.
And you can print it out, so you have it for handy reference for when you’re not
near a computer.
Click her
e to r
etur
n to contents page.
Page 5

Chapter 1
Before using your mobile
• What’s in the box?
• Cocoon description
• The Nest
• External display
• Internal display
• Function keys
• Navigation key
Click her
e to r
etur
n to contents page.
Page 6
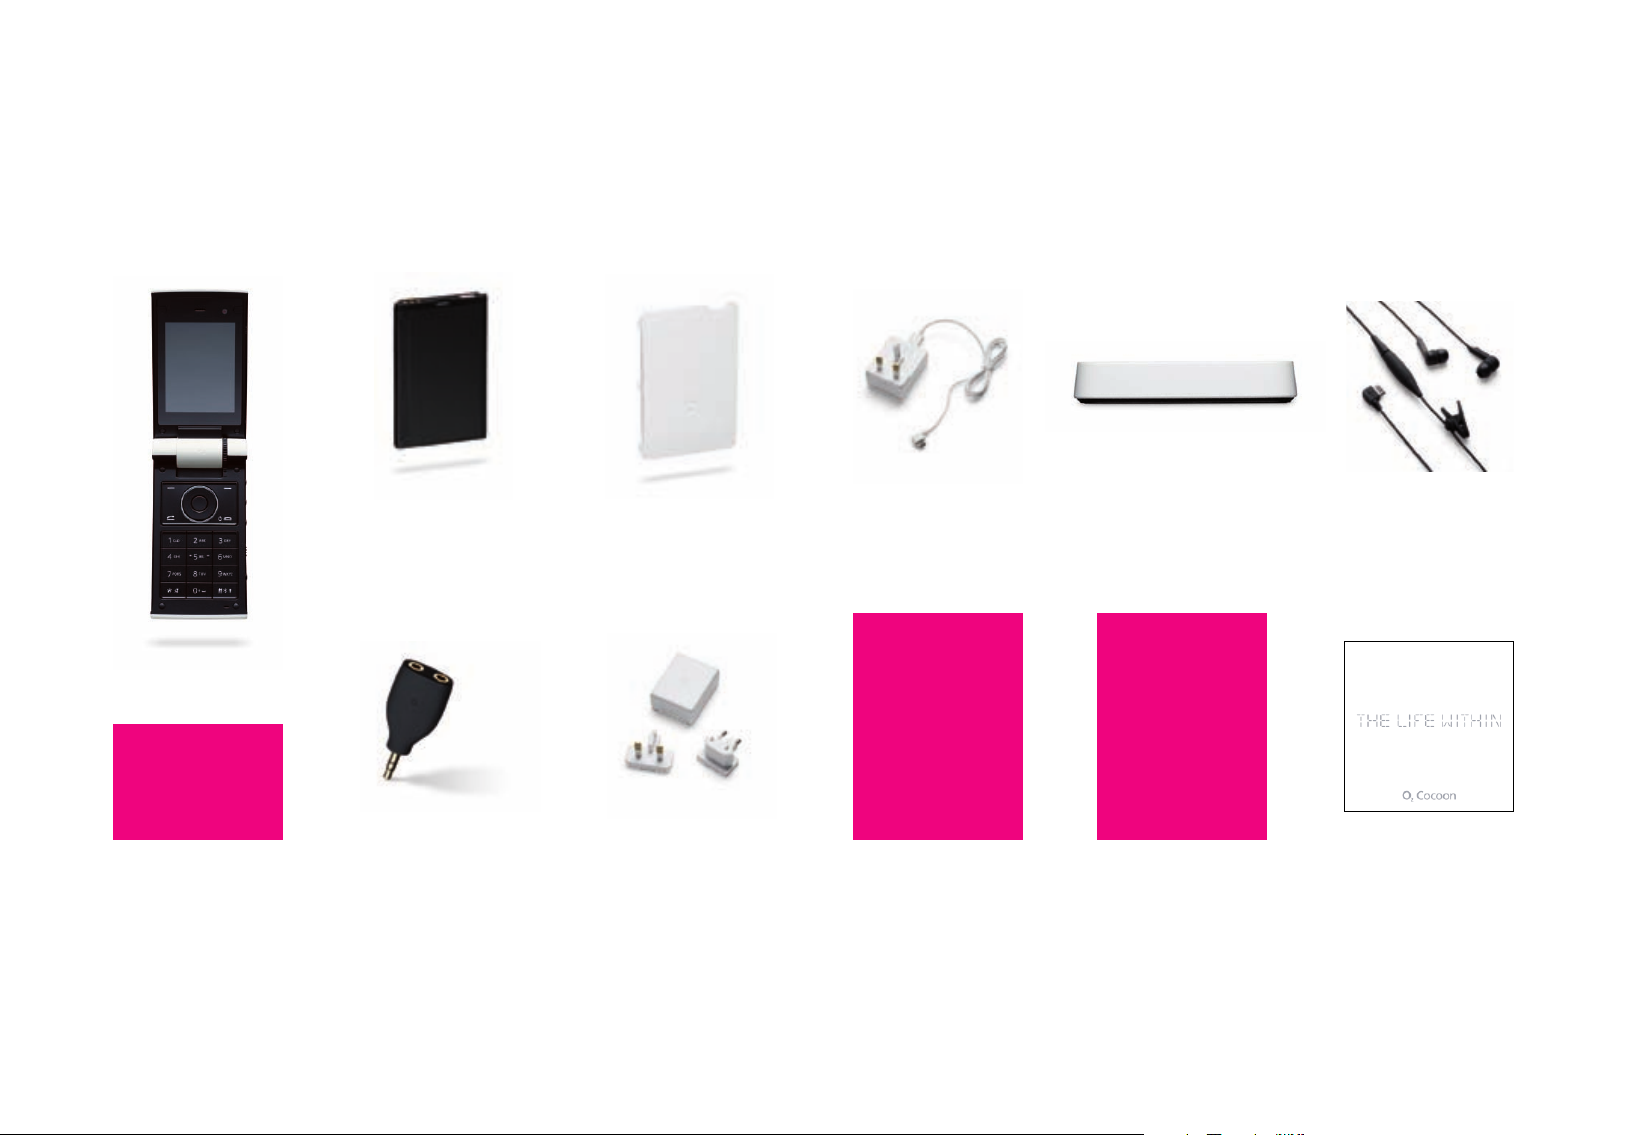
What’s in the box?
Thanks for buying your O2Cocoon. We know you want to get started, exploring what
your Cocoon can do. But before you do anything else, have a look in the box and
check you have all the items shown below.
Mobile phone
e to r
Click her
Battery Battery cover Combined power
Pouch Sharer (an adapter
which allows two pairs
of headphones to be
used to listen to music
on your Cocoon)
n to contents page.
etur
Charger, with UK and
European adapters
lead and USB cable
2
The Nest Hands-free kit
including headphones
Aerial CD Rom O2Cocoon quick
start guide
Page 7
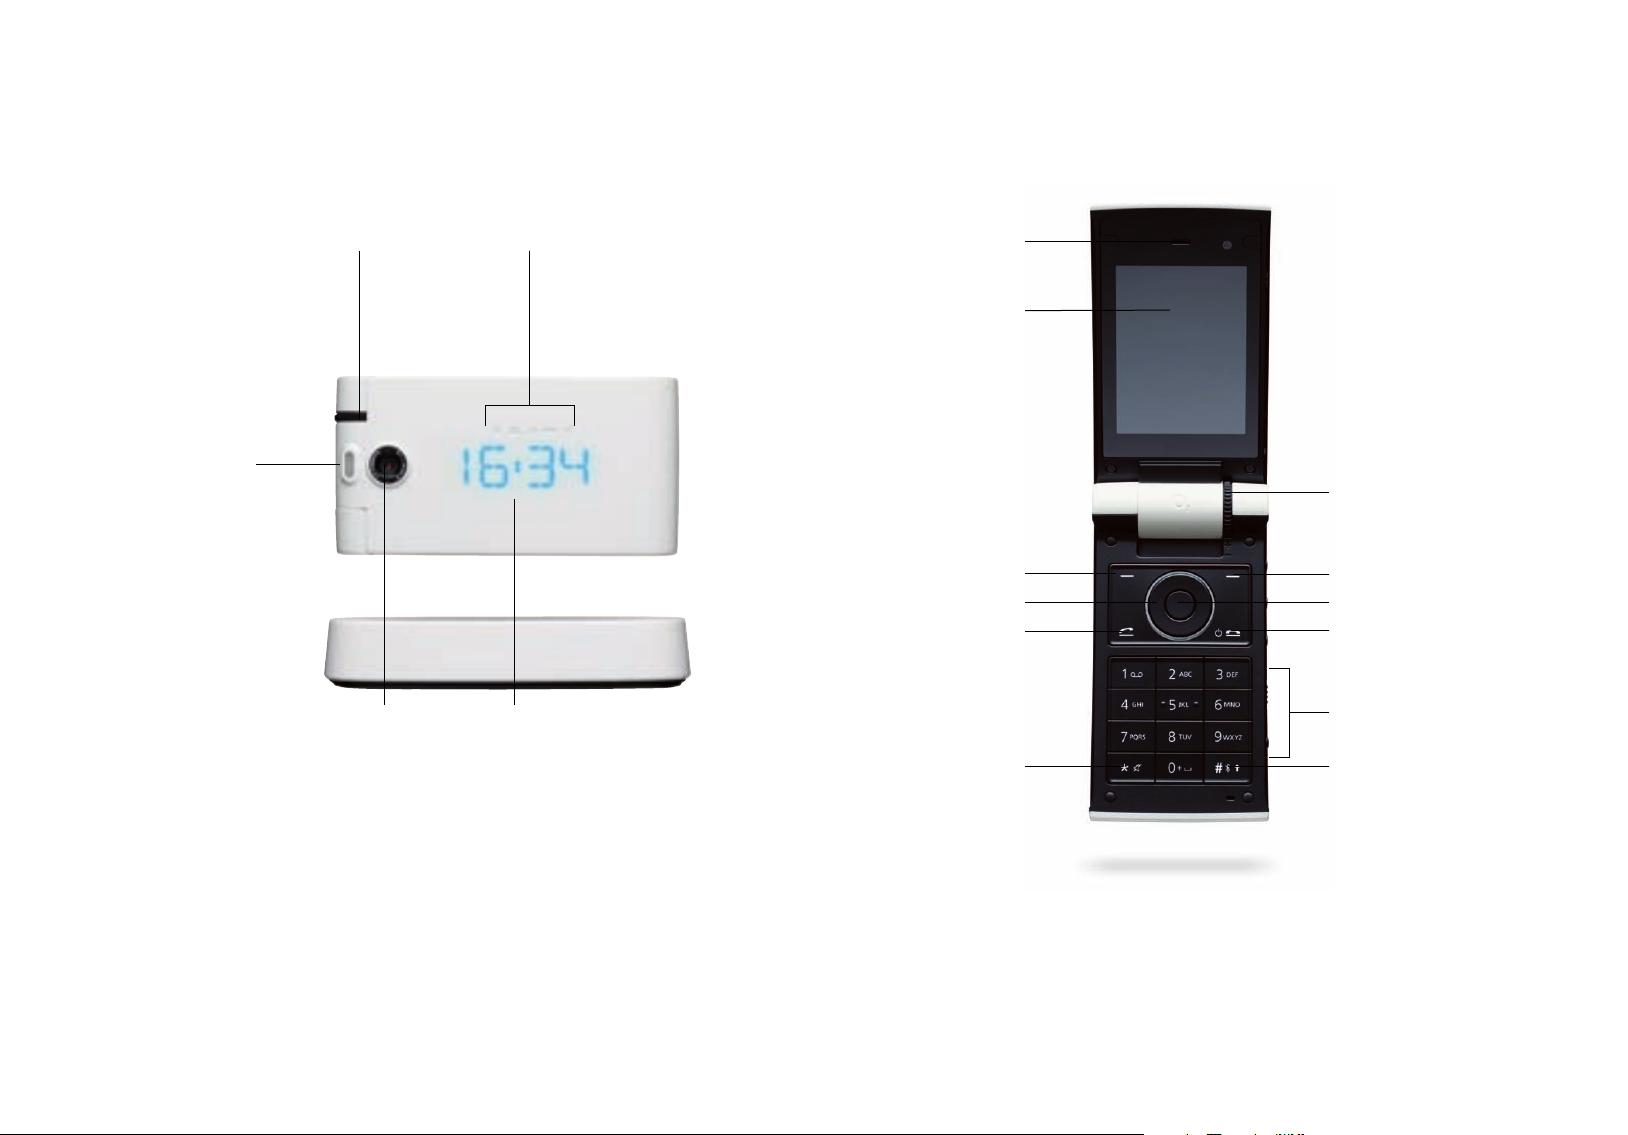
Cocoon description
Closed view
Flash
Volume wheel
2.0 megapixels camera lens Scrolling LED display
Icons – Click here to find out more
Inside view
Earpiece
262K colour internal
display screen
Left soft key
Navigation key
Dial / Answer key
Vibration mode shortcut key
Volume wheel
Right soft key
Centre key
Power on / off key
Keypad – alphanumeric
Bluetooth shortcut key
Cocoon tip
When the flip is closed and you receive an incoming call, use the volume
wheel to silence the ringtone.
n to contents page.
etur
e to r
Click her
3
Page 8
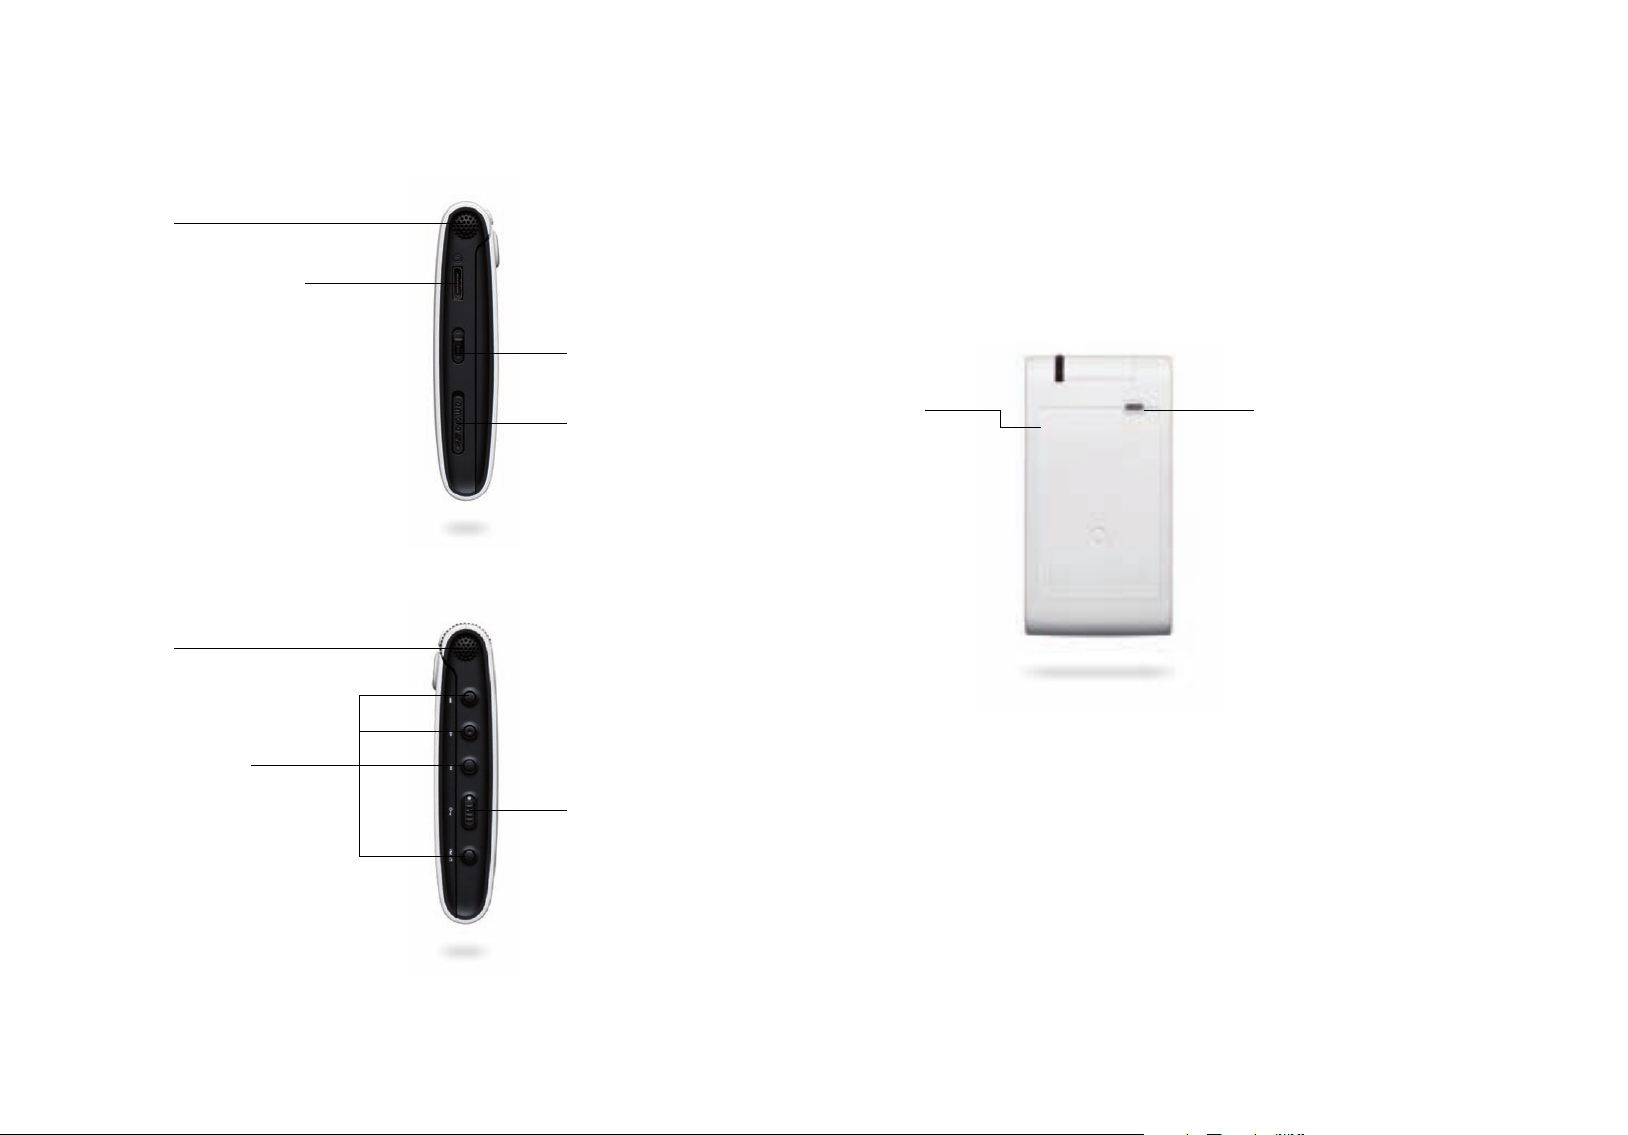
Left side view
peaker
S
Hands-free headset port /
mini USB port / charger socket
Cocoon tip
Use the control keys to manage the music player or silence the alarm. To find out more
about these keys click here. For more about the music player click here. And to find
out about the clock and alarm click here.
Help hint
For details on the memory card click here.
Right side view
Speaker
Music player controls
Battery cover release catch
MicroSD memory card slot
Slide Key Lock* – lock your
Cocoon so keys aren’t
O
2
accidentally pressed
Back view
Battery cover Carry strap holder and antenna
*The slide key lock is only active when your O2 Cocoon is closed as it only affects the outside keys.
If your mobile is open, the slide lock key becomes inactive.
Click here to return to contents page.
4
Page 9
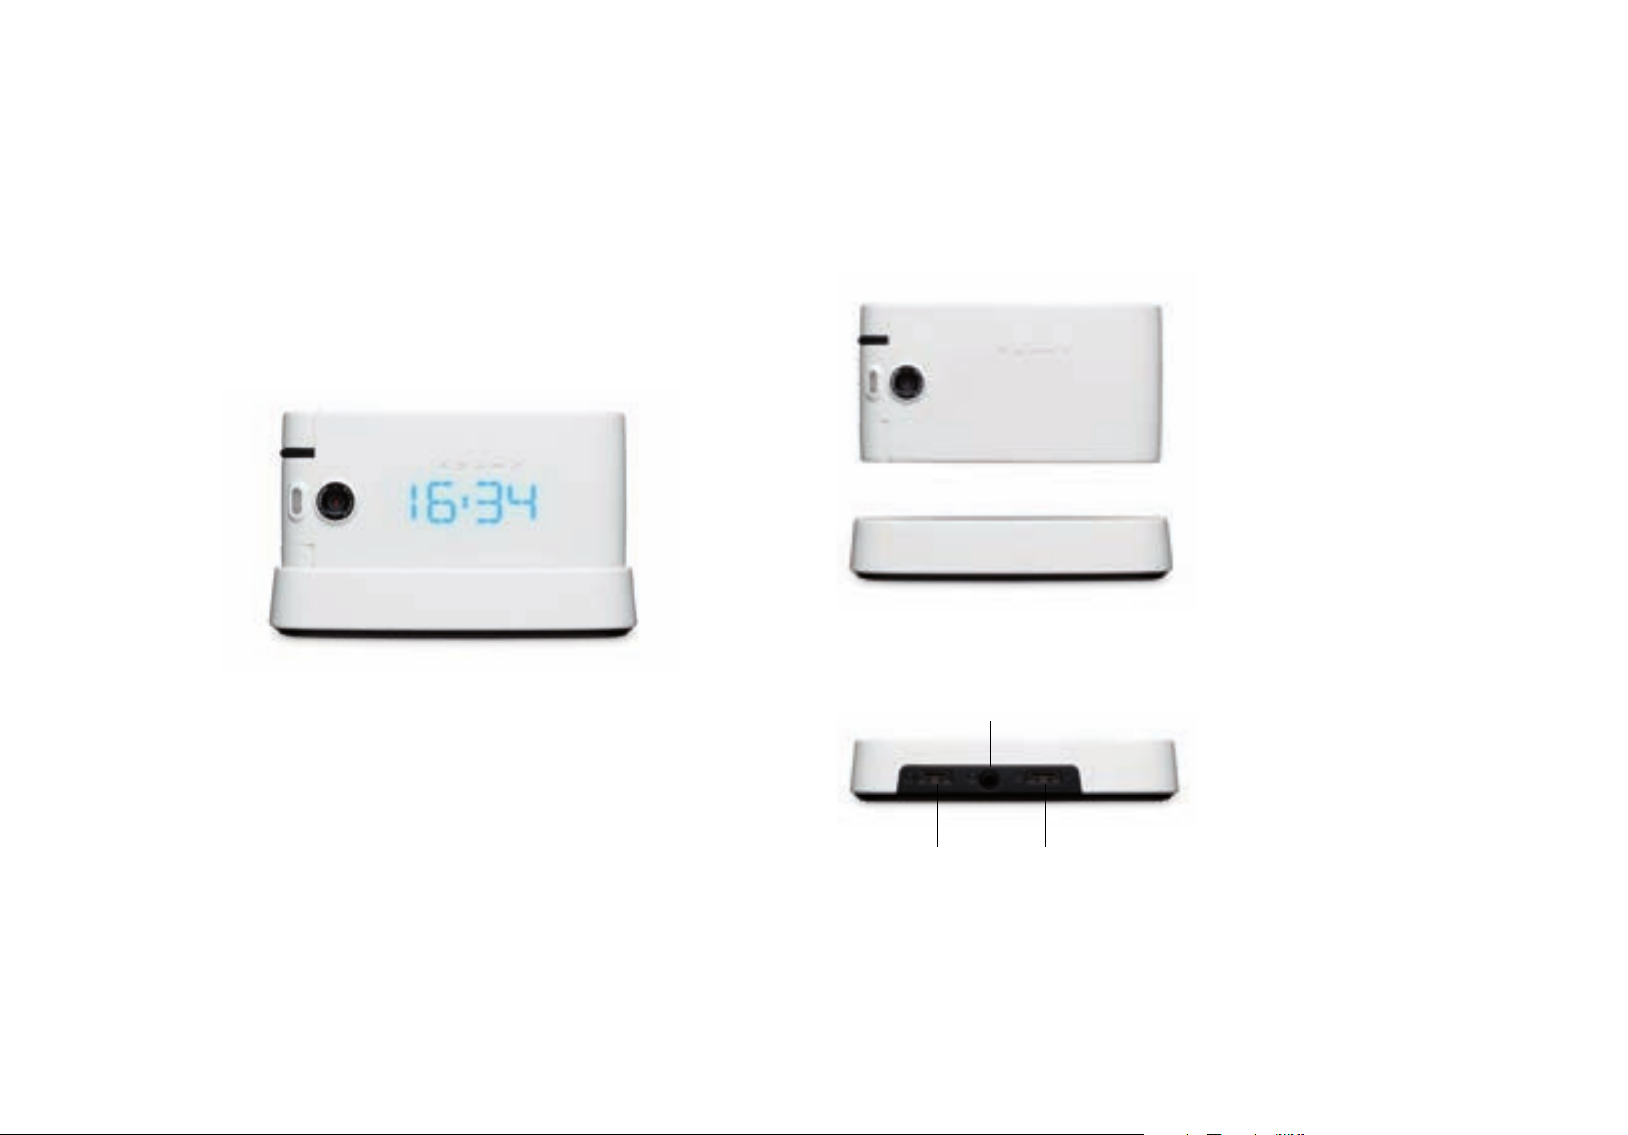
The Nest
The Nest is another one of those special things that makes your O2Cocoon really stand
out. It’s a dock into which you can place your Cocoon, so it’s safely secured.
You can charge your Cocoon’s battery while it’s resting in the Nest. Or with a touch of
a button it can become a stylish upright alarm clock radio, and MP3 player. You’ll be
able to see the time, alar
to, displayed on your Cocoon’s pristine white skin.
Check out the music player section of this guide here, and the alarms section here.
m, the radio station or the name of the artist you’re listening
Placing the O2Cocoon in its Nest
Simply lower the Cocoon into its Nest until you hear it click into place. Make sure that
the charger plug on the Nest is lined up with the charging socket on the mobile.
Back view
Headphone sharer / adapter
Click her
e to r
etur
Headphone socket Charger socket
n to contents page.
5
Page 10
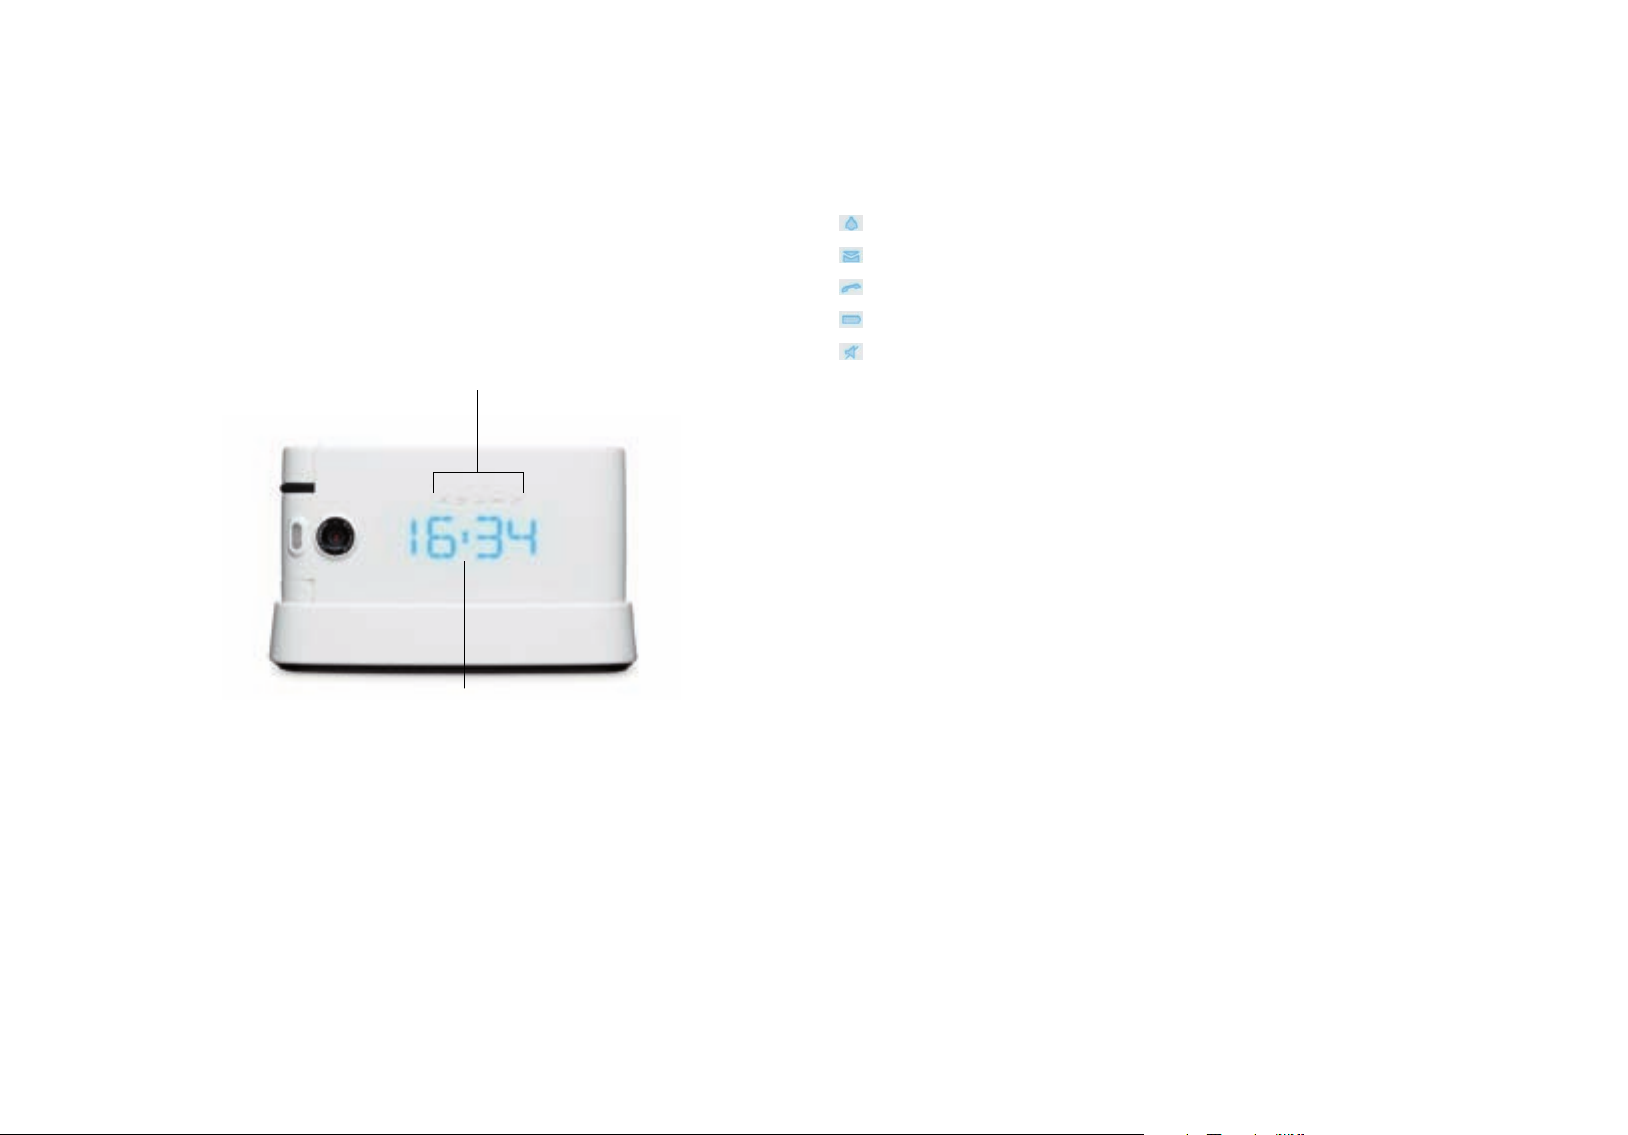
External display
When the O2Cocoon’s flip is closed, an external display will show you the icons for any
alarm that you’ve set, any calls you’ve missed, new messages you’ve received, whether
the vibrate only profile is activated, and what the battery status is.
And of course, beneath the Cocoon’s white skin is a scrolling LED display which will
pulse with light, to alert you to your incoming calls, text messages, any alarms if you’ve
set them and the time.
Icons – Click here to find out more
LED – alerting you to incoming calls and incoming messages,
missed calls and messages, the current time and alarm time
External display icons
When lit, indicates an alarm has been set
Indicates a new email or message
Indicates you’ve missed a call
The icon will illuminate blue when charging and red when the battery is low
Informs you that that the vibration only profile is active
Please note
For these icons to be active, your handset will need to be turned on.
Please note
• To set the correct time on the your O2Cocoon click here
• For further details on the scrolling LED click here
n to contents page.
etur
e to r
Click her
6
Page 11

Internal display
Cocoon’s internal display shows icons for the signal strength of our network,
battery power, any alarms you might have set, the current time and the current
profile you’re using. The screen will also alert you to incoming calls, emails, messages
and missed calls.
3G Bluetooth
Signal
Name of operator
Press left soft key to
access the main menu
Current profile
Battery power
Time and date
Wallpaper
Shortcuts
Press the right softkey
to access O
Active
2
Click her
e to r
etur
n to contents page.
7
Page 12

Internal display icons
Signal strength The number of bars shows signal strength
Battery Current battery charge level
3G network The 3G icon shows when you are in an area with 3G coverage. In this
area, you can make and receive video calls and access O
GPRS When a 3G network is not available, your O
2G network
Bluetooth Indicates that Bluetooth is active
USB Indicates that the USB cable is connected
Message Indicates that a text message has been received or that there are unread
messages
Media message Indicates that a media message has been received or there are
unread media messages
Email Indicates a new email or there are unread emails
Voicemail Indicates you have a voicemail message
Messages are full Your message inbox is full and you’ll need to delete some
Active at faster speeds
2
Cocoon uses an available
2
Silent Shows that the silent profile is in us
Headset Shows that the headset is in us
Flight Indicates the flight profile has been activated
Music mode The music profile is active. Click here for help on the music profile
Car Indicates your O
Cocoon is plugged into your hands-free car kit
2
Divert Appears when the call divert function is active
Roaming Indicates roaming has been activated (It is not your regular network)
MicroSD card Shows when the memory card has been inserted
Alarm Appears when an alarm is set
Normal Shows the normal profile is in use. To set a different profile click here
Loud Shows that the loud profile is in use
Vibrate only Shows that the vibrate only profile is in use. To activate this profile
from the standby screen, press and hold
Click here to return to contents page.
8
Page 13

Function keys
9
W
XYZ
Power on/off key
• Long press to turn your mobile on/off
• Press to reject an incoming call or cancel a call being dialled
• Press to return to the standby screen
Send/Answer key
• Press to dial or answer a call
• Press to access the list of the last missed / dialled / received calls
Centre key
• Press to select when browsing through the menu
• The centre key can be used as an alternative to the left soft key when selecting
menu items
Left soft key
• Press to open up the main menu from the standby screen
• Press again to change how the main menu is viewed on screen – choose from / List
/ Grid / Large
• Press to select when browsing through lower menu levels
Right soft key
• To access O
Active from the standby screen
2
• Press to select Back when browsing through menu levels
Navigation key
• To browse through the menu
Asterisk key
• To insert an asterisk
• To open the symbols menu whilst creating a text message
• To turn the silent profile on / off
0 / + key
• Press and hold to insert +
• To insert a space between words when writing a text message
# key
• To insert #
• Press, when creating a text message, to access predictive text (T9) or manual
text input
• Press and hold to activate or deactivate Bluetooth
Alphanumeric –
• Press to enter a digit
1 key
• We have preset Voicemail as a speed dial for you. Press and hold to access your
voicemail messages.
Cocoon tip
If you are a Pay Monthly customer you can configure keys 2 – 9 as speed dial keys. For
help on setting up speed dials click here. If you’re a Pay & Go customer these have
been pre-configured for you. See your O2 welcome pack for more details.
• For further details on the navigation key click here
Click here to return to contents page.
9
Page 14

Navigation key
When in standby mode, you can use the navigation keys to access shortcuts we have
set up for you.
Left / right / up To access your shortcuts. For help on shortcuts click here
Down To access your contacts
Click her
e to r
etur
n to contents page.
10
Page 15

Chapter 2
Getting your Cocoon ready to use
• Inserting your SIM
• The battery
• Charging the battery
• Important battery information
• Inserting your memory card
• CD Rom and USB cable
Click her
e to r
etur
n to contents page.
Page 16
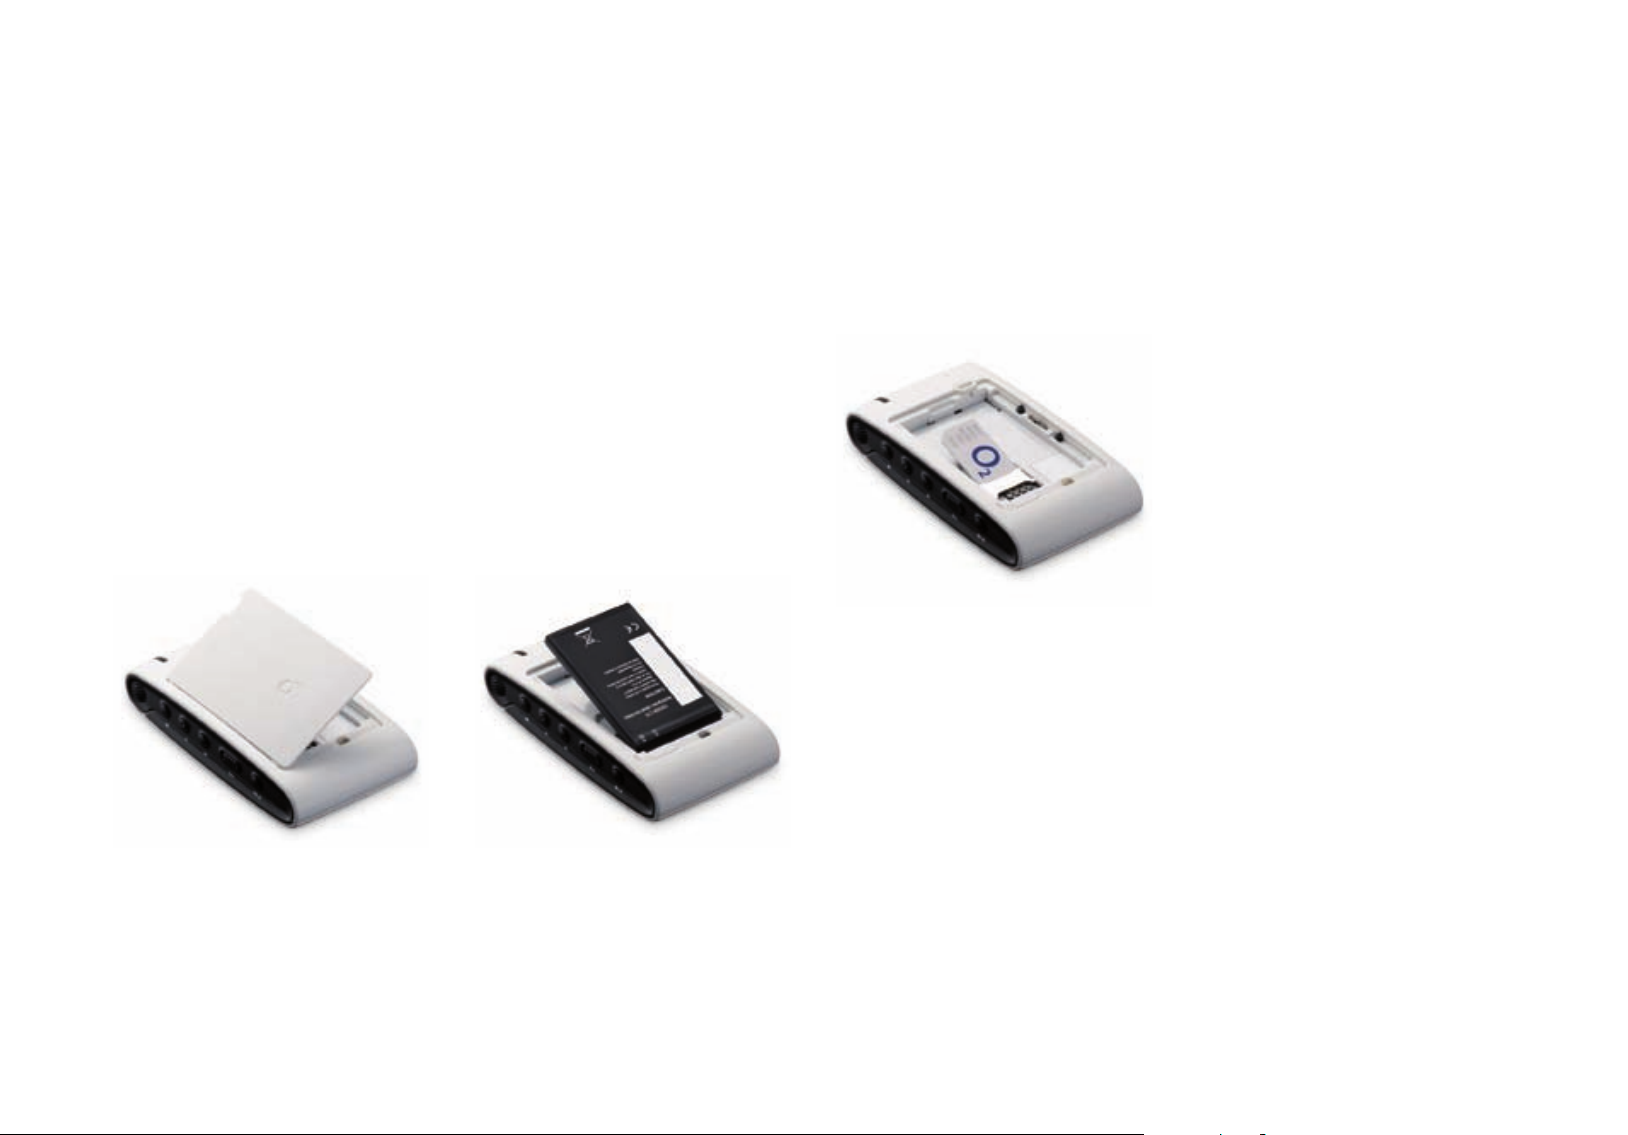
Inserting your SIM
Your O2Cocoon will always need to have a SIM card installed. The SIM card contains
important information about your mobile and our network, and without it your
Cocoon won’t work.
If a SIM card is not installed, you will see the message Please insert SIM card on the
mobile’
s screen.
Please look after your SIM card. Don’t keep it near magnetic and electronic devices as
that could interfere with the data it stores and the way it works with our network.
To install the SIM card into your Cocoon
• Turn your mobile over and release the battery cover by sliding the battery cover
release catch on the side of your mobile. Click here for details on the battery cover
release catch
• Lift the battery cover off the mobile
• Remove the battery from the mobile
Cocoon tip
Don’t remove the battery when the mobile is on. You risk losing personal settings or
data stored either on your SIM card or in the mobile’s memory.
• Slide the SIM card in under the metal grooves in the SIM card slot. Make sure the
SIM card’s metal contacts are facing down and the cut corner is at the top left
Cocoon tip
Your SIM card can be easily damaged if its metal contacts become scratched. So take
special care when holding or inserting it.
Click her
e to r
etur
n to contents page.
12
Page 17
The battery
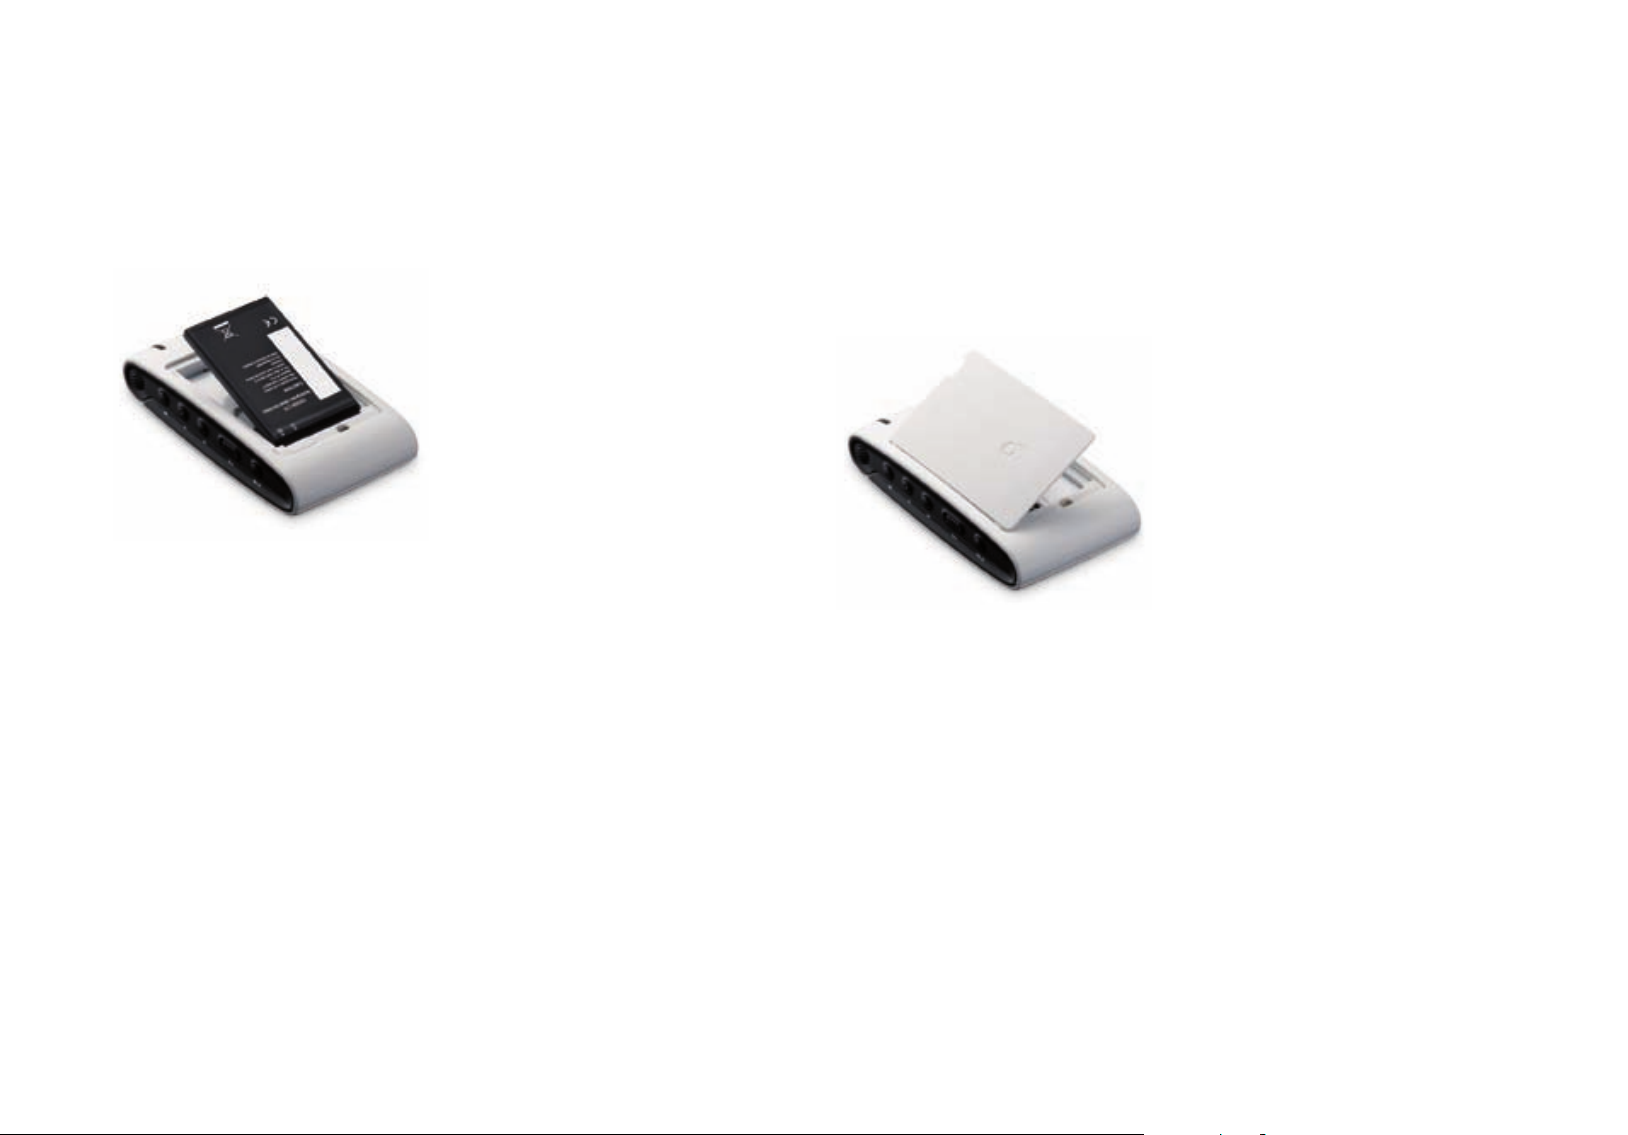
Installing the battery
Insert the battery into the space at the back of your O2Cocoon ensuring the metal
contacts are touching. Push it down until it sits securely. It should ‘clip’ into place.
Removing the battery
Using your fingernail release the battery and lift from the mobile.
Please note
The back cover of your mobile must be securely replaced. If the cover doesn’t hold the
battery in place, your mobile will not turn on or the battery may fall out during use.
Click her
e to r
etur
n to contents page.
13
Page 18
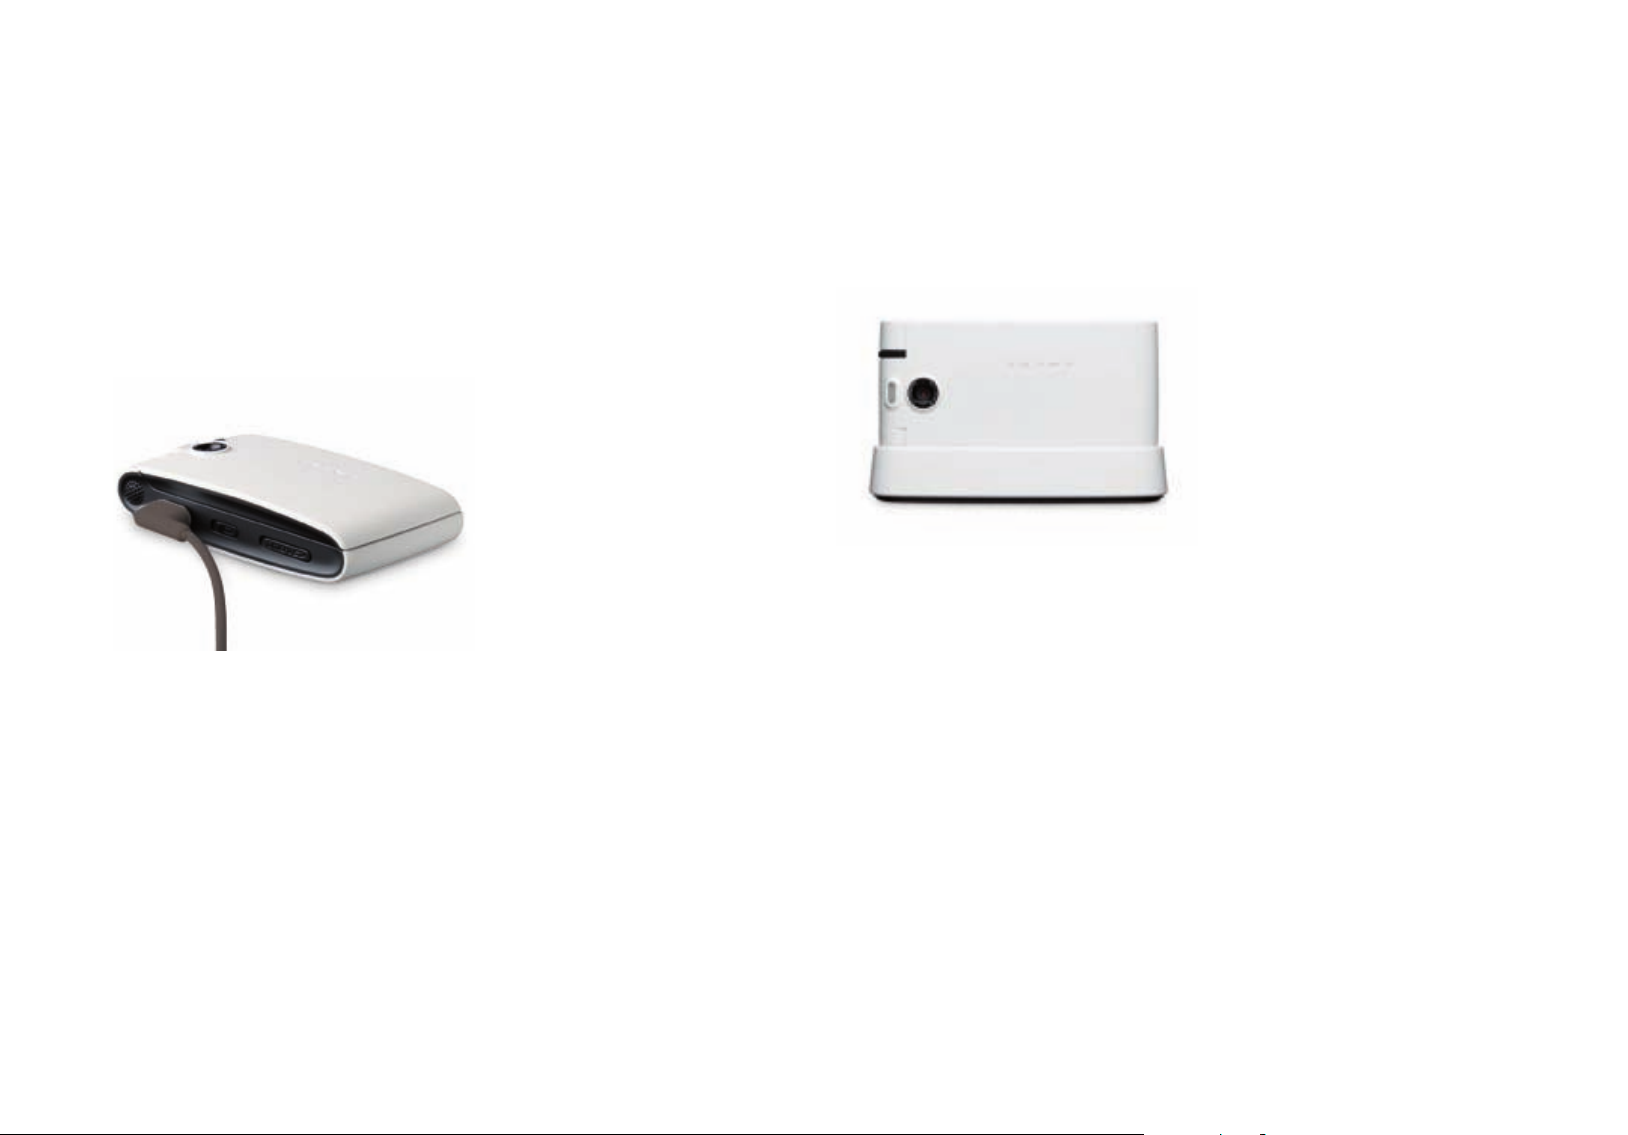
Charging the battery
You can make sure your O2Cocoon is always powered up by charging it in one of
three ways: through the mains, a USB cable, or the Nest.
Mains power connection
Insert the charger’s contact point into the slot on the left hand side of your mobile
and plug the charger in at the socket.
Make sure you insert the charger the right way up.
USB cable
Your O2Cocoon’s charger is a combined USB cable and charger so you can charge
your handset at the mains or by connecting it to your computer.
Using the Nest
• Plug your charger into the Nest
• Now insert your O
Cocoon tip
If you charge the battery fully when you recharge it, it will have a longer lifespan. It’s
much better than charging the battery frequently, for short periods of time.
Cocoon into the nest to charge the battery
2
• Insert the USB cable into your computer
• Now insert the charger’s contact point into the slot on your O
Cocoon
2
Please note
Charging your Cocoon using the USB cable and computer will take over double the
usual charging time.
n to contents page.
etur
e to r
Click her
14
Page 19

Charging status
Internal display
Whilst charging, the battery level icon animates until fully charged.
If you charge your mobile while turned off, you will also be shown what percentage
full the battery is.
When the battery is getting low, your O
recharge it and will eventually turn off automatically.
External display
Red battery icon Your battery is low and you need to recharge, or you’ve just
started recharging
Blue battery icon Your battery is being charged and has been for a while.
The battery icon also lights up blue when it isn’t charging so you know your
O
Cocoon has enough power
2
Cocoon plays an alert sound to remind you to
2
Maximising battery life
To make your battery last longer, try the following tips
• Close the flip when you‘re not using your mobile
• Close the WAP (O
• Adjust the backlight timer and the screensaver settings. Click here for more details
on the internal and external displays
• When you don’t need the Bluetooth function, ensure it is turned off
Active) connection when not in use
2
Click her
e to r
etur
n to contents page.
15
Page 20

Important battery information
• Don’t remove the battery while your mobile is charging
• Do not over charge the Li-Ion battery, as this can result in a reduction in battery
performance and life span
• Never store a battery near a fire
• Don’t attempt to take the battery apart. Only use the battery approved by the
manufacturer
• Never touch the battery terminals with a metallic object, as this can lead to short
circuiting
• Take special care when carrying a battery in your pocket
• Misuse of the battery can lead to burns from hot temperatures and even explosion.
Never drop or apply any physical shock to the battery as it may damage the battery
and even cause a fire
• Please keep your battery out of children’s reach and in a dry and cool area
• Store and charge your battery at room temperature. Extremes of temperature can
prevent full charging and affect battery life and performance
• Since a battery is a consumable product, the operating time will gradually decrease
through use
• Keep the terminals of the battery clean and dry
• When there is risk of lightning, remove the charger’s plug from the socket to
protect the mobile
n to contents page.
etur
e to r
Click her
16
Page 21

Inserting your memory card
The available internal memory on your O2Cocoon is approximately 2GB, enabling you
to store loads of pictures, videos and MP3s.
In addition, your mobile has a slot for a removable MicroSD* memory card that adds
greater storage to your mobile. Your Ccooon can take up to a 2GB MicroSD card.These
cards are available from any O2 store.
Insert your memory card into your O
Cocoon by following these steps
2
• Remove the card slot cover from the right hand side of your mobile
MicroSD memory card slot
• Insert the card with the metal contacts facing upwards and push into place
• Replace the cover
• Check that your mobile recognises your memory card as should appear on the
internal display
To remove the MicroSD memory card, open the cover and press the card to release.
*This may be r
e to r
Click her
eferred to as Trans-Flash or T-Flash memory by some manufacturers.
n to contents page.
etur
17
Page 22

CD Rom and USB cable
You’ve found the CD Rom and USB cable in the box. But have you installed all
the software so you can benefit from synching?
By installing the software, you’ll be able to connect your O
Cocoon to your PC and
2
download selected digital images, even back-up your contacts from your SIM card,
download MP3 files and video clips to your mobile and much more.
It’s extra security for those files you do not want to lose.
Make sure you’ve installed
• O2 PC Suite
• Quicktime 7
• Windows Media Player 11
To find out how to sync your O
Cocoon and your PC click here to find all the details.
2
Please note
• The CD Rom and USB cable are not essential for using your mobile, so installation
is up to you but your computer will not recognise your Cocoon, when plugged in,
unless you’ve installed the PC suite
• Your mobile may not recognise the USB cable if it is connected while an application
is running. Only connect the USB data cable when in standby mode
• You may not be able to download certain applications such as games, ringtones or
wallpapers to your PC for copyright reasons
• Windows may ask you if you would like to accept this installation, in which case
you should select accept
Click her
e to r
etur
n to contents page.
18
Page 23

Chapter 3
Basic functions
• Turning your mobile on
• Turning your mobile off
• The menu
• Shortcuts
• Main menu map
Click her
e to r
etur
n to contents page.
Page 24

Turning your mobile on Turning your mobile off
When the SIM card is installed
• Press and hold until the screen turns on
• You can now use your mobile
Cocoon tips
• Protect your SIM card by using a PIN code. Once it is activated, you’ll need to enter
your 4-digit PIN each time you turn on your mobile. Be careful though. If you enter
an incorrect PIN code three times in a row, your SIM card will become locked, and
you’ll have to enter a PUK code to unlock it. To get a PUK code, you’ll need to
contact O2 Customer Service or visit o2.co.uk/PUK and follow the instructions. For
more information about PIN codes click here
• When you turn your mobile on or off, you’ll hear the welcome / goodbye sound. To
turn this sound off, click here
When the SIM card is installed
• Press and hold until the screen turns off
Please note
If the message BATTERY EMPTY PLEASE RECHARGE is displayed, the mobile will turn
itself off and you will need to charge the battery.
If the battery is removed when the mobile is on, any unsaved messages could be lost
and the SIM card’s memory might be damaged.
Click her
e to r
etur
n to contents page.
20
Page 25
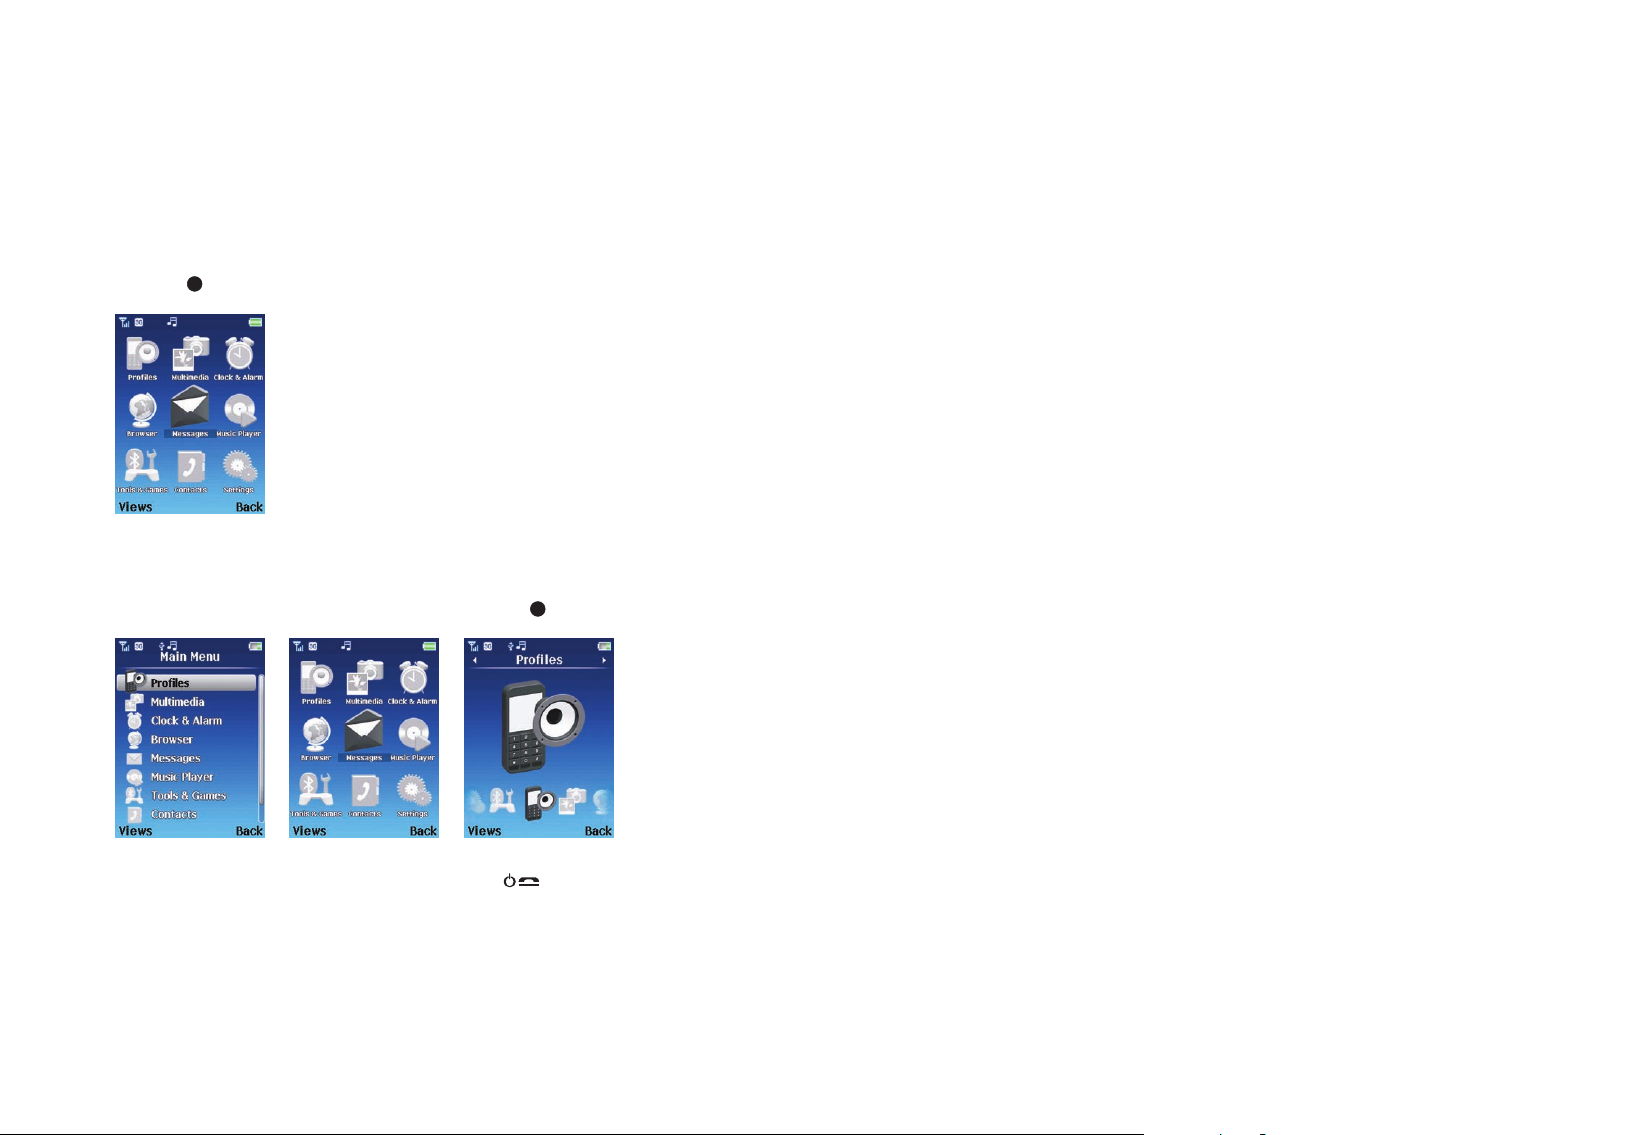
The menu
When your mobile is in standby mode, press the left soft key to select and access
the Main Menu
• Scroll to the menu icon you require using the navigation key
• Press to enter the highlighted menu icon
Cocoon tip
You can change how you view the main menu – press the left soft key to select Views.
Scroll to List View / Grid View / Large View and press to select.
• Press the right soft key to select Back or press briefly to return to the
standby screen
n to contents page.
etur
e to r
Click her
21
Page 26

Shortcuts
To make it easier for you to access what you want, we’ve also set up a shortcuts menu
on the standby screen.
You can personalise your shortcuts menu by removing, replacing and adding new icons
so you can access the menus you use more often more quickly.
• When your mobile is in standby mode, press left or right on the navigation key to
access the shortcuts menu
• Scroll to the menu icon you require, and once highlighted press to access
• Press the right soft key to select Back or press briefly to
return to the standby screen
Personalise your shortcuts menu
• Press left or right on the navigation key to access the shortcuts display bar,
then press the right soft key to select Manage – you’re now in the Manage
Shortcuts menu
To replace a shortcut
• Scroll to highlight a shortcut and select Change
• Scroll to Replace and select
• Now scroll to highlight your preferred shortcut and press to select
• Your preferred shortcut is now saved
To remove a shortcut
• Scroll to highlight a shortcut and select Change – Remove
• Confirm by pressing the left soft key to select Yes
Add a new shortcut
Add a new shortcut, even a contact – you can even set their picture in the
shortcut menu.
• Scroll to an empty shortcut – Add Shortcut – and press the left soft key to
select Add
• Scroll to highlight a shortcut listed and press the left soft key to select
Click her
e to r
etur
n to contents page.
22
Page 27
Main menu map
Profiles
Multimedia
Clock & Alarm
Browser
Messages
Click here to return to contents page.
23
Page 28
Music Player
Contacts
Tools & Games
If you have a new SIM card, you will have the O2 option.
If your SIM is old, you will not see this.
n to contents page.
etur
e to r
Click her
Settings
24
Page 29

Chapter 4
Before using your mobile
• The basics – making and ending calls
• During a call
• Voice in-call menu
• Video in-call menu
• Voicemail 901
Click her
e to r
etur
n to contents page.
Page 30

The basics
Making a call
• Open the flip and ensure that the standby screen is shown on the main display
• Enter a phone number
• If you make a mistake while dialling, you can erase the last number you entered by
pressing the right soft key to select Clear
• Once you’ve entered the number, press . Your O
Cocoon tip
You can also make a call when the hands-free kit is connected. Before you make a call,
attach the hands-free headset. The should appear on the internal display screen.
Now make a call as described above.
Cocoon will then dial
2
Ending a call
• Press or if the flip* is activated, close the handset to end a call
• If the hands-free kit is connected, press the button on the headset to finish the call
or press , or if the flip is activated just close the handset.
Receiving calls
Answering a call
• To answer a call open the flip* or if the flip is already open or not activated, press
, or the left soft key to select Accept
• The caller’s number will be shown unless hidden, and their name and caller image
if saved to your contacts. For further help on contacts click here
Cocoon tip
If your headset is connected, just press the button on the hands-free kit to accept.
To reject a call
• Reject an incoming call by pressing
Cocoon tips
• If you can’t take a call but don’t want the caller to know you’ve rejected them
select Silent. The caller will continue to hear the dialling tone and you won’t be
disturbed
• You can’t reject an incoming call when the flip is closed. Just turn the volume
down using the volume wheel
• Don’t miss any important calls by rejecting or silencing them – set your voicemail.
For more details on your Voicemail 901 service click here
*Please note
If the flip function has not been activated, you can’t answer a call or end a call or
cancel dialling by closing the flip. For more details on activating or cancelling the flip
function click here.
For further help and tips on how you can answer voice calls click here.
Click here to return to contents page.
26
Page 31

Making a video call*
• Open the flip and ensure that the standby screen is shown on the main display
Making an international call
• Press and hold until + appears on the screen
• Once you’ve entered a telephone number select Options – Video Call
If your call is accepted by your contact, you’ll see their face in your main display.
You can also see yourself in a thumbnail screen at the bottom right of the display.
Please note
If the other person does not have a 3G phone or video calling isn’t enabled on their
handset, a message will be displayed on your mobile’s screen Video Call is not available
Try Voice Call?. Select Yes or No.
Receiving a video call*
When the flip is closed
• If your O2Cocoon’s flip** is closed when you receive a video call, your external
display will alert you to an incoming call. Just open the flip to start the video call
When the flip isn’t activated
• Your mobile will alert you to an incoming call
• Open the flip – now follow the instructions below for when the flip is open
When the flip is open
• If someone makes a video call to you, your screen will say Video call – their number
will also be shown unless hidden, and their name and caller image if saved to your
contacts. For further details on contacts click here
• Press the left soft key to select Accept or press the right soft key to select Silent
• Enter the recipient’s country code, area code and phone number
• Press to dial the number
Please note
Make international video calls to friends, family and colleagues overseas –
just remember the country code.
Emergency calls
• To call emergency services, enter 112 (the international emergency number) or 999
• Then press to dial the call
You can make an emergency call even if your mobile is locked or cannot access your
network, so long as you are within range of a network type supported by your mobile.
• To reject the call press
For further help and tips on video calls click here.
* Only available with 3G coverage. If this doesn’t work please contact O2 Customer Service.
** If the flip function has not been activated, you can’t accept or end a call or cancel dialling by closing
the flip. For more details on activating or cancelling the flip function click here.
Click here to return to contents page.
27
Page 32

During a call
Your O2Cocoon puts several features at your fingertips while you’re making a call.
Adjusting the earpiece volume
• During a call, scroll the volume wheel up and down to adjust the call volume
For further details on the volume wheel click here.
Mute
• Select Options – Mute. will be displayed in the internal display screen
• To restore the microphone’s function, select Options – Mute off
Cocoon tip
For video calls press the right soft key to select Mute / Unmute.
Loudspeaker*
• Press the right soft key to select Loudsp. You’ll be able to hear the caller’s voice
and you can speak to them without holding the phone near your ear
• A speaker icon appear on screen
• To restore the handset speaker function, press the right soft key to select Handset
Please note
If you are connected to a Bluetooth headset or hands-free kit, you won’t be able
to activate the loudspeaker.
Making a second call*
To make a second call
• Enter the phone number or select one from your contacts by selecting Options –
View Contacts. For further info click here to refer to the in-call menu
• Press to call
The currently active call is automatically placed on hold. However, if there is already
an active call and another on hold, this action will fail.
Putting a call on hold*
When the call is active
• Press the left soft key to select Options, then select Hold to put the active call on hold.
When the call is on hold
• Select Options – Unhold to resume the call
When there is an active call and a call on hold
• To swap between the calls scroll to the relevant number and select Options – Swap
to resume the call that is on hold, and put the active call on hold. Alternatively,
scroll and highlight the number you require and press to swap
Identifies that the call is on hold
This call is currently active call
*Not an option for video calling.
.
Click here to return to contents page.
* Not available for video calling.
28
Page 33

Conference
• Select Options then scroll to Join and select to connect all 3 parties
If your Cocoon shows the message Join failed please contact O2 Customer Service for
further details on this function.
Call waiting*
If you receive an incoming call whilst you are on the phone, a tone will sound through
the earpiece and the display will show that a second call is currently waiting.
You can handle the waiting call and currently active call in the following ways.
Answer the waiting call
• Press or select Options – Accept. The currently active call will automatically be
placed on hold
• If there’s already an active call and a call on hold, select Options – End & Next to
answer the waiting call. The active call will be disconnected but the call on hold
will remain
Reject the waiting call
• Select Reject
Click her
e to r
etur
*Not available for video calling.
n to contents page.
29
Page 34

Voice in-call menu
• Press the left soft key during a call to select Options and enter the in-call menu
• Scroll to the desired item using the navigation key – please see the list below
Mute / Mute off Activate or cancel the silent mode
Hold / Unhold Enables you to toggle the call status
View contacts Select to enter the contacts menu to find a contact
View message Select to enter your Inbox. For further details on messaging
click here
Create message Select to enter the text messaging screen. For help on creating a text
message click here
View calendar Useful so you don’t double book. For info on the calendar
click here
Notepad Take notes during a call. Click here for further details on notepad
Voice recording / Stop recording Select to start recording your conversation. You’ll
know your O
Cocoon is recording as the symbol will appear on screen. For further
2
information on a voice recording click here
DTMF off / DTMF on When your mobile connects to other devices or services, you can
send DTMF (Dual Tone Modulation Frequency) strings. DTMF strings are keypad tones
that are sent via the microphone as you dial another number. Your mobile will emit the
tones to communicate with answering machines, pagers etc.
Disconnect Select to end the current call, the active call or all calls
Click her
e to r
etur
n to contents page.
30
Page 35

Video in-call menu
• Select Options during a video call and enter the in-call menu
• Scroll down using the navigation key and select one of the options below
View contacts Select to enter the contacts menu and find a number
View message Select to enter your Inbox. For further details on messaging click here
Create message Select to enter the text messaging screen. For help on creating a text
message click here
View calendar Useful so you don’t double book. For info on the calendar click here
Notepad Take notes during a call. Click here for further details on notepad
Camera off / on You decide whether the recipient of your video call sees an image of
you or not on their mobile
Mute / Mute off Activate or cancel the silent mode
Advanced settings Select to go through to the video advanced settings menu.
Main display
Decide what appears in the main display.
Partner main The other person’s image will appear in the main display and you’ll
•
appear as a thumbnail in the corner
Main picture Your image will appear in the main display and the caller / recipient
•
will be viewed as a thumbnail
Images instead
Instead of showing your face on screen, scroll through your pictures and choose a
photo instead.
• Scroll to Images instead and select Options – Customise
• Scroll through all your images available and select
• To save select Options – Save
Cocoon tips
• Some files are too large to be selected
• To reset select Options – Reset to default
• After each change select Options – Save
Hold / Unhold Enables you to toggle the call status
Partner only Select so only the other person can be viewed on screen
•
Only my picture Remove the other person from the display and show only you
•
n to contents page.
etur
e to r
Click her
31
Page 36

Voicemail 901
This service takes messages for you when your O2Cocoon is switched off, engaged,
you don’t answer a call or you are out of signal range.
To set up voicemail
Voicemail must be activated before you can use it.
• To activate on a Pay Monthly tariff, enter 1750 and then press
• If you’re a Pay & Go customer, your Voicemail 901 service is already activated
To listen to your voicemail messages
• In the standby mode, press and hold to dial your voicemail
• Alternatively, simply dial 901 and press
For further information on call forwarding to your voicemail 901, click here or check
out your O2 welcome pack.
To retrieve your voicemail messages when abroad dial 0044 7802 090 100.
Click her
e to r
etur
n to contents page.
32
Page 37

Chapter 5
Profiles
• Selecting a profile
• Customise your profile
• Reset your profile settings
Click her
e to r
etur
n to contents page.
Page 38

Profiles
Your O2Cocoon is waiting for your personal touch. Set a ringtone and a volume level
to suit you. Give different ringtones to particular people in your Contacts. It’s another
way to make the O
In this section, we’ll tell you how to adjust your profile on the mobile, and the way
you’re alerted when calls and messages arrive.
• Scroll to Profiles in the main menu and press to select
• Now scroll to the profile that best suits the environment you’re in and press
to activate
Cocoon tip
There’s a quicker route to access profiles from the standby screen. Click here for
more details.
Cocoon uniquely yours.
2
Click her
e to r
etur
n to contents page.
34
Page 39

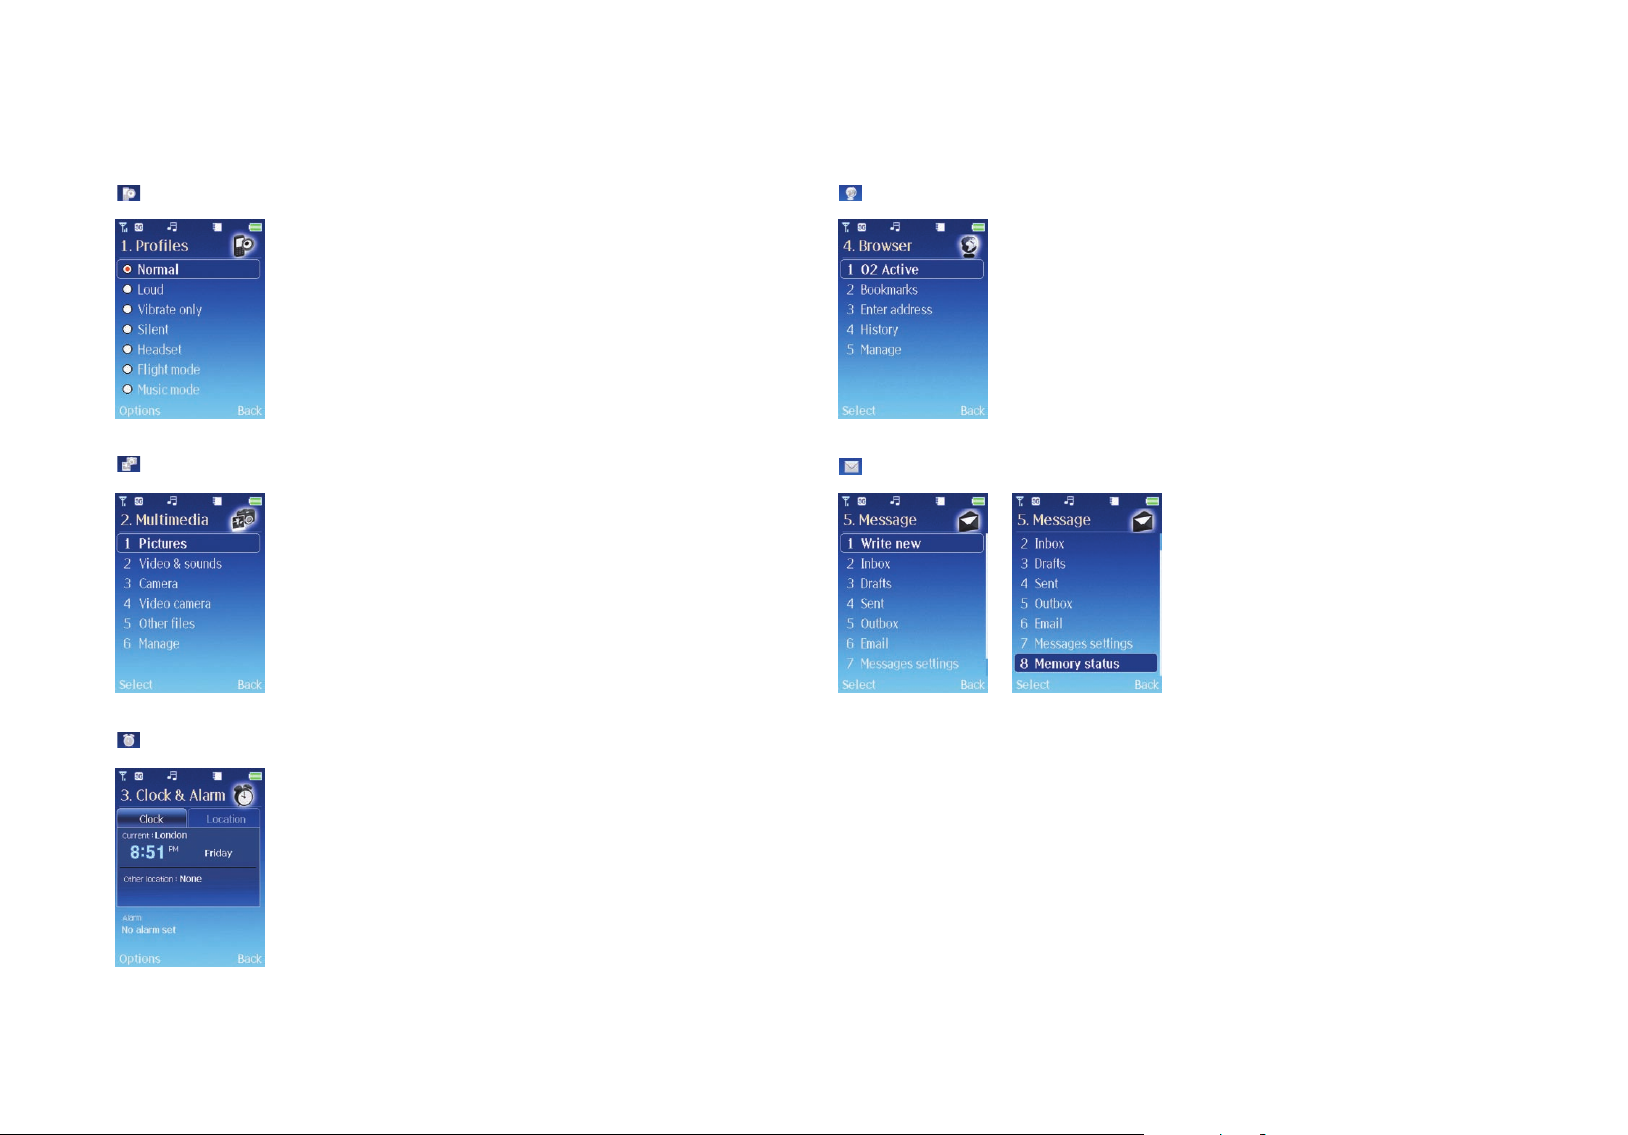
Selecting a profile
Choose from the following
Normal
This is the default profile. Once activated, the display’s status bar shows the icon.
Loud
The options in this profile have been preset to suit conditions where it is difficult to
hear, like an outdoor activity e.g. the highest volume ringtone or activation of both
ringtone and vibrating alerts.
Once activated, the internal display’s status bar shows and the word Loud appears
on the standby screen.
Vibrate only
The ideal profile when you don’t want to disturb anyone but you can’t miss a call. For
instance in the cinema.
Once activated the display’s status bar shows and the words Vibrate only appear
on the standby screen.
Silent
Sets all phone noises to minimum. Ideal if you’re relaxing, or in a quiet environment –
we’re thinking the quiet carriage on the train!
Headset
This profile is only active when a hands-free kit is attached to your mobile. Once
activated, the display’s status bar shows , and Headset.
Flight mode
There are times or places where mobile phones are prohibited, such as in an airplane.
By selecting flight mode, there will be no service available so you won’t be able to
make or receive calls, but you’ll be able to continue using other features – listen to
your audio files, play games you’ve already downloaded, view your images and videos,
use the calendar and currency converter so you’re prepared when you arrive at your
destination.
In flight mode, your mobile won’t emit radio waves and disturb other electronic
systems. So keep listening, playing, and organising your day!
Once activated, the display’s status bar shows and the word Flight mode appears
on the standby screen.
Please note
Some airlines may have restrictions as to when you may use electronic equipment
during flight. For safety reasons, you must adhere to these restrictions at all times.
Music mode
If you want to listen to your music and have no interruptions, then select this profile.
It’s your ‘do not disturb’ to calls, messages or alarm tones.
When you’ve finished listening to your music player, your O
of the calls and texts you’ve missed.
You’ll know that this profile is selected as appears in the status bar and Music
mode appears on screen.
Cocoon details a summary
2
appears in the status bar and Silent appears on the screen once activated.
Cocoon tip
To activate this profile from the standby screen, press and hold
n to contents page.
etur
e to r
Click her
35
Page 40

Customise your profile
Personalise each of the profiles to suit a particular environment, except vibrate only,
silent, flight mode and music mode. Set the latest music track as your ringtone or
alarm tone, increase the volume and enable the vibrate alert – it’s over to you…
Just adjust the settings by following the instructions below.
• In the Profiles menu, scroll to highlight a particular profile – excluding vibrate only,
silent, flight and music – and select Options
• Scroll to Customise and press to select
• You can now amend the following
Voice call
Choose the ringtone that sounds when you receive a voice call.
Please note
You’ll only be selecting the voice call ringtone for that particular profile; it won’t affect
any of the other profiles or change any of your contact specific ringtones. For more
information on customising a particular ringtone to one of your contacts click here.
Help tips
• For info on sharing files by media messages click here, for Bluetooth click here, for
Active click here or check out o2.co.uk or your welcome pack, and for details
O
2
on recording your own sounds click here
• If you haven’t added any ringtones or music files, you’ll need to add them first
• Scroll through all the music files and sounds available and select Options – Select
Cocoon tip
You can listen to the sound file before you select it by choosing Options – Play.
Video call
Choose the ringtone that’ll alert you when you receive a video call. The instructions are
the same as choosing a ringtone for voice calls – click here for help.
Ringtone volume
Select to amend the volume for incoming voice, music and video calls.
• Scroll to Ringtone Volume and press left and right on the navigation key to increase
or decrease the volume level
• Once complete select Save
• Select Voice call by pressing
• You can now choose from one of the default ringtones that we’ve saved to your
mobile or one of the sounds you’ve recorded or received from others, or ringtones
and other music tracks you’ve downloaded from O
n to contents page.
etur
e to r
Click her
Active
2
36
Page 41

Vibrate on / off
Decide whether your mobile vibrates or not.
Power on / off volume
Adjust the volume for when you turn your O2Cocoon on and off.
• Scroll to Vibrate on / off and press
• Then select Off or On by pressing
Message sound
Select the tone for how your mobile alerts you when you receive a message. Just
follow the on screen prompts.
Message volume
To adjust the volume of your message alert, press left and right on the navigation key
to increase or decrease the volume level – don’t forget to select Save.
Alarm volume
To adjust the alarm volume on you O2Cocoon, press left and right on the navigation
key to increase or decrease the volume level – don’t forget to select Save.
For help on setting your alarm clock click here.
Key volume
You decide whether keypad tones play when keys are pressed. Use the navigation key
to amend.
Message reminder
It isn’t always convenient to read messages…but you don’t want to forget about them.
Set this tool to remind you about unread messages. You can choose between Off,
Every 2 min or Every 5 min.
Cocoon tip
Don’t forget to save all the settings you changed – select Options – Save.
Power on / off sound
Select the tone for when you turn your mobile on and off.
n to contents page.
etur
e to r
Click her
37
Page 42

Reset your profile settings
You can reset your profiles at anytime.
• Select Profiles from the main menu
• Scroll to highlight one of the profiles and select Options – Reset to default
Please note
You won’t be able to reset vibrate only, silent, flight mode or music mode as you are
unable to customise them.
Click her
e to r
etur
n to contents page.
38
Page 43

Chapter 6
Multimedia
• Pictures
• Video & Sounds
• Camera
• Video camera
• Other files
• Manage
Click her
e to r
etur
n to contents page.
Page 44

Multimedia
There’s so much inside your O2Cocoon. It’s already fitted with everything you could
want in this multimedia age. Capture still and moving images, record sounds and
voices, download games and music tracks, or use your O
Keeping them in one place means you can get to them easily and send them in allsinging, all-dancing multimedia messages, emails or by Bluetooth to friends and
contacts. Otherwise keep them to simply refresh great memories.
This is not just a phone, this is hours of fun.
• Select Multimedia from the main menu
Cocoon as an MP3 player.
2
Click her
e to r
etur
n to contents page.
40
Page 45

Pictures
This library contains all the images, animations and photos you’ve saved. It’s here that
you can store and manage the files.
• Scroll to Pictures and select
Enter this menu, and there’s a Default folder of images we’ve already saved for you,
followed by your Daily Wallpaper folder and then the most recently saved images
you’ve taken. If you haven’t taken any pictures yet, then click here for the details.
For further details on the Daily Wallpaper folder click here.
The images are displayed as thumbnails (small miniature versions of the photos you’ve
taken), and the bottom of the screen displays the file name of the currently highlighted
thumbnail as well as the file size.
Please note
If you’ve a memory card inserted into your O2Cocoon, indicates that your pictures
are saved to your MicroSD memory card rather than to your phone.
Managing your images
• Scroll through the images available using the navigation key
• Whilst viewing your selected image as a thumbnail, select Options and then select
View Select to view the highlighted thumbnail
Set as Set the image as either the wallpaper or screensaver for the internal display. For
further details on the wallpaper click here, and for the screensaver click here
Please note
If the image is saved to your memory card you can’t set it as a wallpaper or
screensaver. Copy the file across to your phone’s memory first.
Send by If you like the image you’ve taken then send it to someone else, either in a
media message, by email or via Bluetooth. For help on Media Messaging click here, for
email click here, and for Bluetooth click here
Click her
e to r
etur
Rename Select to rename the image you’ve highlighted
Copy to Copy the highlighted file to your phone or memory card
n to contents page.
41
Page 46

Move to Move the highlighted file to your phone or memory card
Delete If you don’t want the image then it’s easy to delete, although you can’t delete
the pre-defined images/wallpapers already saved to your mobile – they’re the ones
saved in the Default folder
Delete all Select to delete all the images you’ve saved
Slide show View all the images you’ve saved one after the other as a slide show. You
can pause and restart the slide show by selecting Pause and Play
Properties Select to view the name and size of the file, when it was taken, and the
resolution
Multiple select Allows you to select more than one image at a time by scrolling to the
ones you want and selecting them by pressing . Then select Options and choose to
move or copy to another memory or delete. You can also choose to select or unselect
all. Just follow the prompts
Please note
Be aware that some options are only available to images you have taken, received or
downloaded. They’re not available to predefined images/wallpapers saved to your
mobile in the default folder. Protected content cannot be shared or transferred to any
other device using Bluetooth or a USB cable.
For additional options scroll to highlight a picture and press to view, then select
Options and choose from the list available including
Lists Select to return to the image list
Zoom mode Select to have a closer look at the image you’ve taken. If the picture is too
big, use the navigation key to scroll around
n to contents page.
etur
e to r
Click her
42
Page 47

Video & Sounds
This library contains all the videos you’ve either taken or downloaded, and sounds that
have been stored to the phone’s memory or on to the additional memory card. In the
music folder you’ll find all the tracks you’ve loaded onto your O
Cocoon.
2
• Scroll to Video & Sounds and select
Reviewing your files
When you enter this menu there’s a Default folder of sounds we’ve already saved for
you, followed by your Music folder and then the most recently saved videos and voice
recordings you’ve saved – all in alphabetical order.
Default
• Select default and scroll through all the saved files. The files are in alphabetical
order and the bottom left of the screen indicates the file size
• The sounds in the default folder are rights protected so you are restricted to what
you can do with them. Select Options and choose from the following
Music
You’ll need to add music to your O2Cocoon before you can access these files. For
further information click here.
Once you’ve added music, your O
Cocoon organises all your albums and tracks for
2
you so you can find them easily.
• Scroll to Music and select
• You can now choose from the following
Artist
Select to see the alphabetical list of all the artists you’ve saved to your O
Cocoon
2
• Select Artist, and select one from the list by pressing
• You’ll be taken to the list of albums where that artist is featured
Set as ringtone Set as your O
Cocoon’s main ringtone
2
Play Select to listen to the sound file
n to contents page.
etur
e to r
Click her
• Select a particular album to view all the tracks on that album
• Scroll through all the tracks and highlight one – for further options on managing
your music tracks click here
43
Page 48

Album
View all the different albums you’ve loaded onto your mobile
• Select Album and then select one of the albums in the list
• You can now view all the tracks on that album
• Scroll through all the tracks and highlight one – for further options on managing
you music tracks click here
Tracks
Know the name of the track rather than the artist? Then select tracks and scroll
through the list available. For further options on managing your music tracks click here.
Genre
In the mood for a particular kind of music, select genre and scroll through to find
alternative, rock, pop or jazz – it’s your music
• Select a particular genre of music – you can now view all the artists your
Cocoon has saved under that genre
O
2
• Select an artist – then an album – and then scroll to a particular track
• For further help on managing your music tracks click here
Other sounds and videos
All other sounds you’ve recorded and all the videos you shot will be listed below. If you
haven’t recorded or filmed any then you’ll need to do that first.
Indicates a sound recording. For details on creating a recording click here
This icon shows you it’s a video file. To learn how to shoot a video click here
Managing your music tracks, videos and sounds
• Scroll through the sound and video files available using the navigation key
• Whilst scrolling through the lists, highlight one of the files and select Options and
choose from the following
Please note
You are restricted to the options available for the pre-defined recordings. Click here to
view the options related to the default file.
Play Select to listen to the sound file or play the video recording
Set as ringtone Set the sound file as your mobile’s ringtone. This option is not available
for video files
Send by Send the videos you’ve filmed or the latest music files to someone else, either
in a media message, by email or via Bluetooth. For help on Media Messaging click
here, for email click here, and for Bluetooth click here
Rename Select to rename the file you’ve highlighted
Copy to Copy the highlighted file to your phone or memory card
Click her
e to r
etur
Move to Move the highlighted file to your phone or memory card
n to contents page.
44
Page 49

Delete If you don’t want the file then it’s easy to delete, although you can’t delete the
pre-defined sound files already saved to your mobile – they’re the ones saved in the
Default folder
Delete all Select to delete all the sound files and video clips you’ve saved to your
O
Cocoon
2
Properties Select to view the name and size of the file as well as the recording date
Use video camera This isn’t available to sound files but you can select to shoot another
video. For help on filming click here
Multiple select Allows you to select more than one sound file or video at a time by
scrolling to the ones you want and selecting them by pressing . Then select Options
and choose to move or copy to another memory or delete. You can also choose to
select or unselect all. Just follow the prompts
Click her
e to r
etur
n to contents page.
45
Page 50

Camera
Your O2Cocoon has a 2 mega pixel camera with flash and zoom. It also has auto focus
to ensure great photos are taken. Take pictures and then set them as your wallpaper,
or send to others in a media message, by email or via Bluetooth.
• Select Camera – you can now view your subject through the viewfinder
Before you take your picture you’ve got some choices
• Select Options and choose from
Capture To take a picture
Funny frames Add cheeky borders to your images before you take them. This option is
only available when taking a photo in a landscape format. To change formats, scroll
down to Landscape View and select. Click here for help and advice on adding funny
frames
Video Camera mode Select to change from camera stills to video camera mode
Photos & Images To view the photos and images you’ve previously saved
Settings Lets you scroll through and change the default settings before you take the
photo: take your photo in black and white rather than colour; change the file size and
name, and even get in the photo yourself. For further details on the camera settings
click here
Adding funny frames
Funny frames don’t work with some image sizes. To add a funny frame to your image
you’ll need the resolution to be 144 x 176 pixels. No need to change anything now
though as your O
Please note
The funny frames option is only available when taking a photo in a landscape format.
To change formats select Camera – Options – Landscape view.
• Select Funny Frames. If your camera is set to the wrong resolution, you’ll be
prompted to change. Just select Yes
• Scroll through the options available using the navigation key to add a cheeky
border to your photo
• To select your border, press the left soft key
Please note
If you change your mind and don’t want to add a frame to your picture or want to
choose another, select Options – No Frame or Change frame.
Cocoon makes all the necessary changes for you.
2
Landscape view / Portrait view Take a portrait or landscape shot
n to contents page.
etur
e to r
Click her
46
Page 51

Camera settings
From the viewfinder screen select Options – Settings, then scroll through and change
the following
Flash
Change the settings for the flash on your O2Cocoon.
Auto flash The camera on your O
Lantern Select to turn the light on permanently as you set the shot
Flash on The flash will go off each time you take a photo
Flash off Turn the flash off at all times
W/B (White Balance)
Change to fit the lighting environment, choose from Auto / Daylight / Tungsten /
Fluorescent.
Effect
Select to change the colour setting and alter the effect. Choose between Sepia /
Negative / B&W. Otherwise select Off for no effect at all
Self timer
Set the timer so you can be in the picture as well – you have 5 or 10 seconds to get
into the frame.
Change your mind and become camera shy – just select Off
Cocoon will use the flash if required
2
Resolution
Select to change the resolution of the image you are to capture
Wallpaper Sets the image size to the lowest resolution available so you can save as
wallpaper
160 x 120 Sets the image size to 160 x 120 pixels
176 x 144 Sets the image size to 176 x 144 pixels
320 x 240 Sets the image size to 320 x 240 pixels
640 x 480 Sets the image size to 640 x 480 pixels. This is the maximum size you can
use when adding a funny frame
1024 x 768 Sets the image size to 1024 x 768 pixels
1280 x 1024 Sets the image size to 1024 x 1280 pixels
1600 x 1200 This is the largest resolution available and sets the image to 1600 x 1200,
or 2.0 mega pixels. The maximum size of a picture when taken at a resolution of
1600 x 1200 is 180Kb and fits perfectly within the current Media Messaging limit
of 300Kb.
Please note
If you take lower resolution images, you can send them in a media message, but
higher quality images will need to be transferred and viewed on your computer. You’ll
need to use the USB cable. Click here for details.
Click her
e to r
etur
n to contents page.
47
Page 52

Advanced settings
Select and then choose from the advanced settings below
Quality Select from Low, Medium or High
Save location Choose to save the image to your phone’s memory or external memory.
You’ll need to buy a MicroSD card. If you return to the viewfinder screen, the following
icons will indicate where the photo will be saved
Indicates you’re using your mobile’s memory
Your picture will be saved to your MicroSD memory card
Shutter sound Choose from the list available or turn it of
Take a picture
• When your object is in focus, press to take a picture
Timer sound Select the countdown sound for the self timer. Turn it off or choose the
one we’ve saved for you
File name Select a name for the photo you’re going to capture
Additional camera settings
In the viewfinder screen, change more settings instantly
Zoom Press up and down on the navigation key to zoom in and out. This ranges from
x1 to x10 but is also limited at different sizes. You can’t use this function if you’ve set
the resolution size to 1280 x 1024 or above
Brightness Press left and right on the navigation key to increase / decrease the
brightness level. This ranges from -2 to +2
Now you’re ready to take a picture – read on.
n to contents page.
etur
e to r
Click her
• Your photo will save automatically to Multimedia – Pictures
Top tips for great photos
• Don’t block or touch the camera lens
• Always photograph your object with the source of light behind you
• Don’t shake your mobile when taking photos
• Make sure the lens is perfectly clean – you can wipe it with a soft cloth
48
Page 53

Managing your pictures
• After taking your picture, select Options and choose from the following
Send by Lets you send this photo in a media message, by email or via Bluetooth. To
find out more about Media Messaging click here, for email click here and for Bluetooth
click here
Cocoon tip
Sending mega pixel images via a media message may take some time. A quicker way
to send a large picture is to download it to your PC via the USB cable and CD Rom
supplied, and then send by email. For info on the USB cable click here.
Set as Wallpaper Select to set this photo as your wallpaper, replacing the image
currently on the standby screen
Set Screensaver Set this photo as your screensaver
Rename Choose a name for this photo
Properties Provides information about this photo, such as the name of the file, the date
it was taken, the file size and the quality of the shot
View your pictures
Pictures that you have previously taken will be saved to Multimedia – Pictures. You can
find out more about viewing your images by clicking here.
Delete Select to delete the photo you’ve just taken
Set as contact image Select to allocate this photo for a specific contact. When the
chosen contact calls, the image will be shown on your display. For more details
click here
n to contents page.
etur
e to r
Click her
49
Page 54

Video camera
Your O2Cocoon has a built-in video camera. You can even send them to someone in a
media message.
• In the Multimedia menu, select Video camera
• You can now view your subject through the viewfinder
Please note
When you enter the viewfinder mode for video, the default size setting allows you
to send the video as a video message. If you want to view video on a larger screen
select Options – Settings – Resolution. Remember though, if you
change the size of your video clip then the resulting file may be too large to send
as a video message.
Using the video camera – the settings
Before you shoot your video clip, make a choice from the Options menu
Record Press to start recording a video clip
Camera mode Select this to change from video camera to stills camera
My videos Select to look at your saved videos
Settings Lets you scroll through and change the default settings before you shoot a
video – film in black and white rather than colour; change the file size and name, and
even get in your video by using the self timer. For further details on the video camera
settings click here
Landscape view / Portrait view Film in either a portrait or landscape format on your
Cocoon
O
2
Video camera settings
From the viewfinder screen select Options – Settings, then scroll through and change
the following
Flash
Change the settings for the flash on your O2Cocoon.
Lantern Turn the light on as you film
Flash on The flash will illuminate when you’re filming
Flash off Turn the flash off at all times
W/B (White Balance)
Change to fit the lighting environment, choose from Auto / Daylight / Tungsten /
Fluorescent.
Effect
Select to change the colour setting and alter the effect. Choose between Sepia /
Negative / B&W. Otherwise select Off for no effect at all
Self timer
Set the timer so you can be in the video as well – you have 5 or 10 seconds to get into
the frame.
Change your mind and become camera shy – just select Off
Click her
e to r
etur
n to contents page.
50
Page 55

Resolution
Select to change the resolution
96 x 128 (MMS) The lowest resolution on your O
Cocoon
2
144 x 176 (MMS) Medium resolution
96 x 128 The lowest resolution on your O
Cocoon
2
144 x 176 Medium resolution
240 x 320 Highest available resolution
Please note
The MMS versions make sure the user can send the video in a media message by
placing a time limit on the duration of the clip. The maximum file size that can be sent
via a media message is currently 300Kb.
Advanced settings
Select and then choose from the advanced settings below
Quality Select from Low, Medium or High
Size For further details on size click here
Sound recording Select whether you record sound when you shoot your video. Choose
from On or Off
Save location Choose to save the video to your phone’s memory or external memory.
You’ll need to buy a MicroSD card. If you return to the viewfinder the screen the
following icons will indicate where the video is saved
Indicates you’re using your mobile’s memory
Your video will be saved to your MicroSD memory card
Timer sound Select the countdown sound for the self timer. Turn it off or choose the
one we’ve saved for you
File format Choose from MP4, 3GP or 3G2
File name Select a name for the video you’re shooting
Additional video camera settings
In the viewfinder screen you are able to instantly change more settings
Zoom Press up and down on the navigation key to zoom in and out. This ranges from
x1 to x4
Brightness Press left and right on the navigation key to increase / decrease the
brightness level. This ranges from -2 to +2
Now you’re ready to shoot a video – read on.
Shoot a video clip
• When you are ready to shoot your video clip press start recording. The length of
the video will be shown in the bottom left of the screen
• To finish recording select Stop
Please note
• If you receive an incoming call at the same time as recording a video clip, your
mobile will stop recording and save the clip. When you’ve finished the call you’ll
return to the saved clip
• If you select Stop during a recording, your mobile will stop and save the video clip
• If you select Pause or press during a recording, your video will pause. To carry on
recording, select Record or press again
Click her
e to r
etur
n to contents page.
51
Page 56

Managing your video clip
• When you’ve stopped filming, select Options and choose from the following
Send by Lets you send your video in a media message, by email or via Bluetooth. To
find out more about Media Messaging click here, for email click here, and for
Bluetooth click here
Cocoon tip
Sending videos via a media message may take some time. A quicker way to send a
large video is to download it to your PC using the USB cable supplied, and then send
by email. For info on the USB cable click here.
Delete Select to delete the video clip you’ve just recorded
Play Replay the video you have just shot
Rename Select to give your video clip a new file nam
Properties View information about your video clip, such as the name of the file, the
date it was shot, the file size, the resolution and the quality of the clip
View your video clips
Video clips that you have previously shot will be saved to Multimedia – Videos &
Sounds. For further information on viewing your videos click here.
Click her
e to r
etur
n to contents page.
52
Page 57

Other files
This folder stores other content that does not fit into the other categories. These can
be word or PPT files you’ve transferred to your O
your handset as a storage device. For further information on transferring files to your
mobile click here.
Please note
You can’t view Powerpoint, Word or Excel documents on your O2Cocoon.
Cocoon from your mobile – using
2
Click her
e to r
etur
n to contents page.
53
Page 58

Manage
Keep tabs on the multimedia files you’ve collected by seeing how much memory they
are using up and whether their use is restricted.
Memory status
This option lets you see how much memory you have used saving your multimedia
files, and how much you have left.
If you’ve inserted a memory card, press right on the navigation key to view the
memory status of the external memory.
Browse Rights Objects
This shows you which videos, sounds and images that you have downloaded are Rights
Protected. You cannot distribute these files without consent.
Format memory card
Formatting the memory card will permanently delete any files you may have on it.
VOD settings (Video on demand)
Accept Incoming Call Choose to either Accept or Reject an incoming call whilst
managing your media player
Profiles Choose between prepay or postpay
If you change your SIM card from a Pay & Go SIM to a Pay Monthly SIM, the VOD
settings will change once the new SIM card is detected.
n to contents page.
etur
e to r
Click her
54
Page 59

Chapter 7
Clock & Alarm
• Clock
• Alarm
• Locations
• Settings
Click her
e to r
etur
n to contents page.
Page 60

Clock & Alarm
Imagine waking up to your favourite tune, that song that gets you going in the
morning, your choice your call. Or enjoy your favourite breakfast show from the
moment you open your eyes. Set in the Nest, your O
phone into a stylish alarm clock and radio. But you keep complete control and wake
up to the energising sounds you love, not the annoying buzzer someone else has
chosen.
• Select Clock & Alarm from the main menu
Cocoon tip
Set the correct time on your O2Cocoon so the alarm can be used to wake you up or
alert you to do something.
Cocoon turns from a cool music
2
Click her
e to r
etur
n to contents page.
56
Page 61

Clock
• Select Clock from the main menu
• To change the date or time, ensure Clock is highlighted and select by pressing
Change time
• Select Change time and then amend using the alphanumeric keys
Change date
• Select Change date and then amend using the alphanumeric keys
• Once complete, select Save
Cocoon tip
Check you have the correct date format. To change go to Clock & Alarm – Options –
Settings – Date format.
• Once complete, select Save
Cocoon tips
• If your O2Cocoon is programmed to use the 12-hour clock then to amend AM to
PM or vice versa, press up or down on the navigation key
• Ensure you have the correct time format. To change between the 12- and 24- hour
clock go to Clock & Alarm – Options – Settings – Time format or click here
n to contents page.
etur
e to r
Click her
57
Page 62

Alarm
Set an alarm clock
• Scroll to highlight Alarm and press
• Using the alphanumeric keys, insert the time you wish the alarm to sound, then
select Save
Cocoon tips
• If your O2Cocoon is programmed to use the 12-hour clock then to amend AM to
PM or vice versa, press up or down on the navigation key
• Ensure you have the correct time format. To change between the 12- and 24- hour
clock go to Clock & Alarm – Options – Settings – Time format or click here
• To check that the alarm has been set go to the standby screen and make sure
is there
• To change or delete the alarm select Clock & Alarm, then scroll to Alarm and select
Options – Change alarm or Delete alarm and follow the on screen prompts
Wake up sound
No need to wake up to annoying buzzers anymore. With your O2Cocoon, you can
wake up to the latest music tracks or one of your old favourite tunes, or even your
favourite DJ on breakfast radio.
• Scroll to Alarm and select Options – Wake up sound
• Choose whether you want to wake up to a certain music track or a particular radio
station. Simply scroll to Music or Radio and press to select. Now you need to
choose a track or station
Music
With your new mobile storing up to 500 tracks, no morning wake up call needs to be
the same.
• Select Music
Click her
e to r
etur
• Scroll through the sounds and music available.
• To listen to the track or tune press or select Options – Play
• To set as your wake up sound select Options – Set as sound
Radio station
Radio 1, Radio 2…..wake up to your favourite FM radio station.
The station name also appears on the external display so you’ll know who you’re
tuned into.
n to contents page.
58
Page 63

• Select Radio
• Scroll through all the radio stations listed and press to select. If there are no
preset radio stations available in your area you’ll need to set them. For further
details click here
You can preset radio stations so you can wake up to your local FM station. Click here
for further details on the radio.
• Once complete select Save
Wake up name
Set a name for your alarm.
• Scroll to Alarm and select Options – Wake up name
• Insert a name for the alarm and select Save
• When your alarm sounds, Good Morning or Hello followed by the name of your
alarm will scroll across the external display or the internal display if your mobile
is open
When the alarm sounds
When the alarm rings, there are various options snooze or turn it off depending on
whether your O
When your O2Cocoon is opened
When the alarm sounds, the following screen will appear.
Cocoon is open or closed or in the nest.
2
• Press the right soft key to select Stop. Your alarm will not sound again unless you
reschedule the alarm
• Press the left soft key to select Snooze. The alarm will ring again five minutes later
When your O2Cocoon is closed or in its Nest
When the alarm sounds Good morning or Hello followed by the name of the alarm
and time will scroll across the LED screen.
• To snooze the alarm, press any of the buttons on the top of the handset
• To stop the alarm, open the O
Cocoon and select Stop
2
Cocoon tip
If the slide lock key is active you won’t be able to snooze the alarm using the buttons
on the side of your O
Cocoon.
2
Click her
e to r
etur
n to contents page.
59
Page 64

Locations
If, during travel, you move between different time zones, you can now adjust the time
displayed on your screen so that you always have access to the accurate local time –
just update the ‘current’ and ‘other’ cities.
The location feature enables you to display the time and date for two locations on one
screen – so when you’re abroad you’ll always know the current time, and the time at
home as well. Or if you’re travelling to another country, you’ll know what time it is
where you are and where you’re going.
• Ensure Location is highlighted by scrolling across to the right using the navigation
key, then select Options and choose from the following
Add city
• Select Add city, then scroll through the list of cities and countries
• Press to select
Cocoon tip
For speed you can also type in the name of the city or country into the search menu at
the bottom of the screen. Once you’ve found the city or country you require, press
to select.
Other location options
Once you’ve set another location, you can amend as follows
• Select Clock & Alarm – Location – Options and choose from the following
Add city
Select to add another city to your location list.
Delete city
Travelling on…then change the locations on your O2Cocoon.
• Select Delete city, then confirm whether you want to delete the city by selecting
Yes or No
Set as current city
While visiting a city or country, set it as your home city so you’ll always have the
correct local time.
• Simply select Set as current city – Yes
Set as other city
As your current city changes so will the other city.
Click her
e to r
etur
• Select Set as other city – Ye s
Settings
For full details on the Clock & Alarm settings click here
n to contents page.
60
Page 65

Settings
Select to change the format for the date and time and how the info is displayed on
your internal display.
• Select Settings and then choose from the following
Date format Change how the date is displayed
• Press to select, then choose between the three date formats and press
to confirm
Time format Choose between the 12 and 24-hour clocks
• Press to select, then choose either 12 Hours or 24 Hours and press
to confirm
Daylight saving Select to adjust the daylight saving time for the current city
• Press to select, then select Off / +1 Hr or +2 Hrs and press the left soft key to
select
Other DLS Select to change the daylight saving time for the ‘other’ city
Top tip
If the dual clock is activated (e.g. you require your O2Cocoon to display both current
and other locations on the standby screen), the other location may be incorrect if the
home time isn’t accurately set to the correct winter / summer time.
If you intend to use this function, we recommend that you use the daylight saving
option to accurately change the time and therefore ensure that the away time is
updated automatically as well.
• Once complete select Options – Save
Dual clock Decide whether both current and other city’s times are shown on the
display
• Press to select, then select On or Off and press the left soft key to select
Alarm ascending Select to turn on or off
• Press to select, then select Off or On and press the left soft key to select
n to contents page.
etur
e to r
Click her
61
Page 66

Chapter 8
Browser
• O2Active
• Bookmarks
• Enter address
• History
• Manage
Click her
e to r
etur
n to contents page.
Page 67

Browser
Out and about? You don’t have to be out of touch. You can browse and download as
much as you want, check the news, gossip and much more. The O
mobile that keeps you in the know. In style.
With the Cocoon you have a fast internet browser in your hand. Through it you can
access O
Active, where you can find out about whatever you’re into – sports, games,
2
ringtones and music. (You can also access other mobile internet services).
Active is a whole new way to get the entertainment and information you want.
O
2
Bring your Cocoon to life with full colour pictures. Or why not download the latest
ringtones and wallpapers. You can get the latest headlines, sports results and showbiz
scandal. You can also plan your next night out, using our restaurant and bar guides, as
well as finding out what’s on at your local cinema. And if that leaves you feeling tired,
you can even book your next weekend away.
Active: its fun, fast and fabulously convenient whilst you’re on the move.*
O
2
• Select Browser from the main menu
Cocoon is the
2
*Subject to network coverage.
n to contents page.
etur
e to r
Click her
63
Page 68

O2Active
• Select O2 Active by pressing and start browsing
Cocoon tip
Access direct from the standby screen by pressing the right soft key to select
O2 Active.
For further information on O
within your welcome pack.
Active check out o2.co.uk or read the O2Active section
2
Click her
e to r
etur
n to contents page.
64
Page 69

Bookmarks
Use this to store and visit your favourite web links and save time while browsing.
• Scroll to Bookmarks and press to select
We’ve saved some great bookmarks for you already so you can go direct to the sites to
download the latest wallpapers, ringtones, videos and games.
• To create your own bookmarks select Options, then scroll to Create new and select
and follow the prompts
You can also create bookmarks while browsing. Just go to the site you want to
bookmark and select Options – This page – Add bookmark and follow the prompts.
Whilst in the bookmarks menu, select Options and choose from the following
Please note
Options differ depending on whether you’ve highlighted a bookmark we’ve saved for
you or one you’ve saved yourself.
Create new Select to create a new bookmark and follow the on screen prompts
Send URL Send the bookmark URL to someone by text or media message or by email
Send Bookmark Select to send your bookmark link in a message or by Bluetooth.
For more information on sending text messages click here and by Bluetooth click here
Delete To delete the highlighted bookmark or folder. You won’t be able to delete
pre-saved bookmarks
Go To go direct to the highlighted bookmark
View To view the name and the URL to the bookmark you have saved
Edit To edit the name or internet link for the saved bookmark. You can’t rename any
pre-saved bookmarks
n to contents page.
etur
e to r
Click her
65
Page 70

Enter address
• Select Enter address and type in a web address you want to visit
• Then select Open to go direct to the requested site. It’s a real time saver
Click her
e to r
etur
n to contents page.
66
Page 71

History
Select to see what sites you’ve visited. You can view what you browsed today,
yesterday and even 5 days ago. View by sites you’ve visited the most or by
alphabetical order.
• Select History
Please note
If your O2Cocoon is arranging the sites in date order you’ll need to select a date
before you continue. For further info see Sort below.
• Scroll to highlight a site you browsed and select Options and choose from
the following
Open Go direct to the highlighted site
Sort Select to reorganise the sites – by date; by site name; by last visited or most visited
Delete Delete the highlighted web address
Delete all Delete all web addresses stored in History
n to contents page.
etur
e to r
Click her
67
Page 72

Manage
Here are all the settings that enable you to browse – they’re the management options
for WAP profiles, memory, security and saved pages etc.
O2 has set up your O
Cocoon for optimum use so you should not need to change
2
anything. However, should you need to, you’re able to alter your connection settings.
If you need further assistance, contact O2 Customer Service.
Click her
e to r
etur
n to contents page.
68
Page 73

Chapter 9
Messages
• Create new message
• Reading messages
• Inbox
• Drafts
• Sent messages
• Outbox
• Email
• Message settings
• Memory status
Click her
e to r
etur
n to contents page.
Page 74

Messages
More than just a phone, your O2Cocoon is a stylish media centre giving you loads of
ways to communicate with friends, family and colleagues. This is the cool way to chat,
text, exchange media messages and email – all from your phone, anytime of day, from
anywhere that’s in signal range, right from the palm of your hand.
• In the main menu, scroll to Messages and select
Then select
Click her
e to r
etur
n to contents page.
70
Page 75

Create new message
Messaging on your O2Cocoon is simple. You don’t need to choose between text
messages (SMS) and media messages (MMS) as your mobile does all the hard work for
you. From the content your sending, your Cocoon detects whether you need to send a
text or media message. All you need to do is send the message…
• Select Write new
Cocoon tip
For quick access to the message screen, select New Message from the shortcut menu.
For help and advice on shortcuts click here.
Select a contact
• In the To: screen, enter the number of the person you want to send a message to,
or select Options – Add contact to add a contact(s) from your phonebook
Scroll through the list available and press to select. You can choose more than one
•
Please note
• You can send your text message to up to 10 people
• If you send to more than one contact, only the first contact will show in your
sent messages
Create your message
• Scroll down and enter your text message using the alphanumeric keys. Your
message can be up to a maximum of 456 characters. One standard text consists of
160 characters. If you use more than 160 characters in your text message, you’ll be
charged for two or more messages
Cocoon tips
• Press to enter a space between words
• Press to switch between input modes e.g. abc, T9, 123 etc. Or select Options
– Input mode. Your O
you to type quickly. Type in the word using the alphanumeric keys. If you have
turned T9 Select list on (click here for more details) your Cocoon will not only
predict the word you want but also show you other options for you to choose
from. If T9 Select list is turned off you’ll need to press down on the navigation key
to view other word options
Cocoon uses T9 – a predictive text input method allowing
2
• Once complete, press the left soft key to select Done
Click here to return to contents page.
• Press to bring up options to insert characters such as ?, !, & and @. Using the
navigation key, scroll to the character you require and select Insert. Or select
Options – Input mode – Symbols
• If there are multiple numbers, insert a semicolon from the symbols list between
each one
71
Page 76

Enter a subject
• Select Options and scroll down to Add subject and select
Please note
Adding a subject will change your text message to a media message. If you’re happy to
proceed, select Yes .
• Enter a subject for your message using the alphanumeric keys
Saved pictures
• Select Saved pictures
• You now have access to all the saved images in Multimedia – Pictures
• Scroll through the pictures available and select Options – View or press
• If you’d rather have a different image, press left and right on the navigation key to
view other images
With an attachment
• After entering your text message or subject select Options and then select either
Add picture / Add sound / Add video / Add other file
Add Picture
You can insert images you’ve stored on your mobile, such as photos you have
taken with your mobile’s digital camera, or images you’ve transferred, received from
others or downloaded from O
your message.
Active. You can also take a new picture to insert into
2
• To insert into your message, press the left soft key for Select
Take picture
• Select Take picture – you can now view your subject through the viewfinder
• When your object is in focus, take a picture by selecting Options – Capture or
press
Please note
Before you take the picture, you can amend the camera settings and change the
format from portrait to landscape. For more details, check out the camera instructions
by clicking here.
• When you’ve taken your photo select Options and choose from the following
Insert To insert the picture into your message
Delete Select to delete the photo you’ve just taken and take another
Rename Change the name of the file
Properties Provides information about this photo, such as the name of the file, the
date it was taken, the file size and the quality of the shot
Please note
• Adding a picture will change your text message to a media message
• You can’t attach any rights protected files
Click her
e to r
etur
n to contents page.
72
Page 77

Add sound
Jazz up your media message by adding music or sounds – the recipient will be able to
hear it when they view the rest of your message. You can also record a new file.
Record sound
• Select Record sound – you’re now in the voice recorder function. For further details
on the voice recorder click here
Saved sounds
• Select Saved sounds
• You now have access to all the saved sound files in Multimedia – Video & Sounds
• Scroll through the sound files you’ve saved – sounds you’ve recorded and music
files you’ve saved
• To listen to the file, select Options – Play
• To choose another sound, select Back, then scroll to another file
• To insert the sound into your message, select Options – Select or Options – Add
sound depending on where you’ve navigated to
n to contents page.
etur
e to r
Click her
• To start a recording, select Options – Record or press
Please note
You can change the settings for the voice recorder. Click here for further details.
• When you have finished, select Stop
Your sound recording will now be saved to your message.
Please note
• Adding a sound file will change your text message to a media message
• You can’t attach any rights protected files
73
Page 78

Add a video
Insert video clips of your favourite artist, or video clips you have taken yourself or even
downloaded from O
Saved videos
Active.
2
• Select Saved videos
• You now have access to all the saved video files in Multimedia – Video & Sounds
• Scroll through the videos you’ve saved
• To view the video, select Options – Play
• To choose another video, select Back, then scroll to another file
• To insert a video into your message, select Options – Select or Options – Add video
depending on where you’ve navigated to
Record video
• Select Record video – you’re now ready to shoot a video. For further details on the
shooting a video click here
Please note
Change the video settings for before you start filming. For more details check out the
video instructions by clicking here.
• When you’ve shot your video select Options and choose from the following
Insert To insert the video into your message
Delete Select to delete the video recording and shoot another
Play To view the video
Rename Change the name of the file
Properties Provides information about the video clip, such as the name of the file,
the date it was taken, the file size and the quality of the file
Please note
• Adding a video will change your text message to a media message
• If the file size is too large, you won’t be able to send the video by media message.
You’ll need to change the size in the settings menu
• To start filming select Options – Record or press
• When you’ve finished recording select Stop
n to contents page.
etur
e to r
Click her
• You can’t attach any rights protected files
Add other file
If you’ve saved any other files to your O2Cocoon such as Powerpoint files or word
documents you can add them from here.
• Select Add other file and scroll through all the files available
• To add an attachment select Options – Select
Cocoon tip
To add PPT files or word documents to your Cocoon you can transfer them from your
PC using the USB cable. For further information click here. You won’t be able to view
these files on your Cocoon.
74
Page 79

Cocoon tip
When you’re creating your message, press the left soft key to select Options and
choose from the following
Send When you’ve composed your message, select send to complete
Add contact Select to add a new contact
Save to drafts To save your message to your drafts folder so you can view later. For
more information on your drafts folder click here
Add subject Select to add a subject to your media message. Adding a subject changes
your messages from a text (SMS) to a media message (MMS)
Input mode Choose from Number mode, T9 mode or ABC mode. You can also select
to insert a symbol. For details on entering text click here, and for more information on
inserting symbols click here
T9 advance setting Choose from
Predict word on / off your O2Cocoon will try to predict the next word based on
•
your previous typing
•
Select list view on / off When turned on your O2Cocoon will show possible word
matches for you to choose when using predictive text
My word your O2Cocoon will save words that you’ve used that are not currently in
•
its dictionary. Edit the list, delete them or add new ones
Remove subject Delete the message subject name
Add picture Select to add a new picture, or replace or delete ones you’ve already taken
Saved pictures Add a file from your save pictures. Click here for more details
•
Take picture Take a new picture and add to your message. Click here for
•
instructions
Replace Select to replace the image you’ve chosen with another. Only an option if
•
you’ve already selected an image
Delete Delete the image from your message. This option is only available if you’ve
•
already attached a picture
Add sound Select to add a new sound file, change the file if one is already chosen or
delete the sound file from your media message. Choose from Saved sounds / Record
sound / Replace sound / Remove sound
Add video Add a new video recording, or one from your saved files. Also delete or
replace videos you’ve already chosen. Choose from Saved videos / Record video /
Replace video / Remove video
Add other file Add, delete and replace files – just follow the prompts
Preview Select to play the pages you have created in sequence
Current Select to view the current page
•
Whole message View all the pages you’ve created
•
Cocoon tip
You can Pause the preview by pressing the left soft key, and press again to Resume.
Press the right soft key to select Stop.
Click her
e to r
etur
n to contents page.
75
Page 80

Page options
Page duration Allows you to control and set the length of time each page is
•
displayed on the screen when playing your media message. Select Page duration,
then select Clear to delete the default which is set at three seconds. Insert a
number using the alphanumeric keys, then select OK
Delete page Select to delete pages that you’ve created
•
Click her
e to r
etur
n to contents page.
76
Page 81

Reading messages
When you receive a new message you’ll be alerted on the external display, together
with a tone or vibration if selected.
Please note
• If the sender is a contact saved in your phonebook their name will appear in the
message alert rather than the number – so you know who sent the message before
you open it
• You can also set your mobile to show a preview of the message on the external
display. Click here for more details
• To view your message, open your handset to view the internal display
• If the sender is a contact saved in your phonebook their name will appear in the
message alert rather than the number – so again you’ll know who sent the
message before you open it
• Press the left soft key to select View
Please note
If you’d rather save the text message and read it later, press the right soft key to select
Close and return to the standby screen. The message will be stored in the inbox and
the following icons will appear at the top of the standby screen
Indicates there is an unread text message
You’ve stored an unread media message
• Select Options by pressing the left soft key and choose from the following
Play Select to play the media message again. This option is not available for
text messages
Use Click on the image, sound file or video file to view this option. You can then save
the attachment to the internal or external memory or forward to someone else. If you
receive an image you can set as the caller ID or set as your wallpaper
Reply Select to reply to the sender of the message
Reply to all Select to reply to all the original recipients
Click her
e to r
etur
n to contents page.
Forward Forward the message to someone else
Delete To delete the message from the inbox folder
Call To make a video or voice call to the sender
Save To save the sender’s details as a new contact, or to update an existing contact
Details / Properties To view information on your message such as the phone number
and the time it was received
77
Page 82

Inbox
Select to view all the messages you’ve received.
• Select Messages – Inbox
Indicates a read text message
Indicates an unread text message
Defines a read media message
You’ve an unread media message
• Select the desired message and press to read it
Click her
e to r
etur
n to contents page.
78
Page 83

Drafts
This option allows you to work with message drafts you have saved.
• Select Messages – Drafts
• Scroll to the desired message record
• Select Options and then choose from
Edit View and then edit the content of your message. Also press
when a message is highlighted to view and then edit
Delete Select to delete the highlighted message
Delete all Delete all the messages saved to your drafts folder
Click her
e to r
etur
n to contents page.
79
Page 84

Sent messages
View all the messages you’ve sent. You can view, forward, edit and delete them – just
follow the on screen prompts.
Click her
e to r
etur
n to contents page.
80
Page 85

Outbox
Here you’ll find messages that couldn’t be sent.
• To resend, scroll to highlight the message and press , otherwise select
Options – Resend
You can also edit and delete them – just select Options and follow the prompts.
Click her
e to r
etur
n to contents page.
81
Page 86

Email
For further information on email click here.
Click her
e to r
etur
n to contents page.
82
Page 87

Messages settings
Here you’ll find all the settings for text messaging, multimedia messaging, voicemail
and push messages.
Your O
Cocoon is already set up to send, receive and retrieve messages. If you
2
experience difficulty please contact O2 Customer Service.
Click her
e to r
etur
n to contents page.
83
Page 88

Memory status
Check the memory capacity for text and media messages on both your O2Cocoon’s
SIM and internal memories.
Click her
e to r
etur
n to contents page.
84
Page 89

Chapter 10
Email
• Create an email
• Checking for emails
• Reading an email
• Inbox
• Drafts
• Sent
• Outbox
• Settings
Click her
e to r
etur
n to contents page.
Page 90

Email
Make productive use of travel time, by sending and receiving emails wherever you are.*
You can send and receive internet based emails with attachments from POP3 / IMAP4
email providers. You can access an existing web based email account, such as
o2.co.uk, Yahoo etc. And to do this you don’t need to open your web browser and go
to your email provider’s website each time you want to check your mail. You can
configure your O
your inbox.
You can also access your work emails. To have access to your work email you’ll need to
have internet based means of accessing your company server, such as POP3 or IMAP4.
For more details you’ll need to discuss this with your IT manager.
Cocoon so that you can access emails as they are downloaded into
2
Don’t forget, you can also access your O2 emails by accessing O
information on O
Active click here or check you O2 welcome pack.
2
• From the main menu select Messages – Email
• You will then be presented with the following options
* Subject to network coverage.
n to contents page.
etur
e to r
Click her
Active. For more
2
86
Page 91

Create an email
Cocoon tip
You’ll need to set up an email account before you can proceed. For full details click
here for Settings.
• To get started select Write new
Select a contact
• Scroll to To and enter the email address of the person you wish to contact, or press
and select Add contact to select the details from your phonebook
• Scroll through the list available and press to select. You can choose more
than one
Please note
• If you send to more than one contact, only the first contact will show in your sent
email records
To send your email as a carbon copy or blind carbon copy scroll to Cc: or Bcc: and
repeat the instructions above.
Enter a subject
• To enter a subject for your message, scroll to highlight Subject
• Enter a subject name using the alphanumeric keys
Enter your email message
Enter your email message using the alphanumeric keys. For more details about
entering text click here.
• Once complete press the left soft key for Done
n to contents page.
etur
e to r
Click her
87
Page 92

With an attachment
You can insert pictures or photos, music and sound files, and video clips.
These can be files you’ve taken, filmed or recorded yourself, such as photos you have
taken with your mobile’s digital camera, or videos you’ve transferred or received from
others or music you’ve downloaded. For full details click here and check out the
Multimedia instructions for your O
• Scroll to Attachments and select Options – Add attachment
• Select Pictures / Sound / Video or Other files and scroll through the files available.
To add the file to your email select Options – Select
You can then manage your attachments by following the details below
• Scroll to Attachments and select Options – Edit Attachments
• In the attachment list screen, scroll to an attachment listed and select Options and
select from the following
View Select to view the attached image
Cocoon.
2
Cocoon tip
• You won’t be able to forward any protected files as these are rights protected
• There is a limit to the size and amount of attachments. Your O
Cocoon will keep
2
you updated to how much space is available
The percentage of memory you’re
currently using with your new email
When you’re creating your email you can press the left soft key to select Options and
choose from the following
Send When you’ve finished composing your email select send to complete
Add contact Select to add a new contact
Save to drafts Select to save to your drafts folder so you can view at a later date. For
details on your drafts folder click here
Priority Choose between High, Normal or Low
Input mode Choose from Number mode, T9 mode or ABC mode. You can also select
to insert a symbol. For details on entering text click here, and for more information on
inserting symbols click here
Play Select to listen to the sound file or view the video
Delete Select to remove the attachment
• Once you’ve added all of the attachments you require select Back to return to the
email screen
n to contents page.
etur
e to r
Click her
88
Page 93

T9 settings Choose from
Predict word on / off Your O2Cocoon will try to predict the next word you are
•
typing based on your previous typing
Select list view on / off When turned on your O2Cocoon will show possible
•
word matches for you to choose when using predictive text
My word Your O2Cocoon will save words that you’ve used that are not currently
•
in its dictionary. You can edit the list, delete them or add new ones
Use template Save time typing by selecting a template. There are several to choose
from including ‘Apologies – running late, will call shortly’, ‘No problem’ and ‘Wish you
were here’
Click her
e to r
etur
n to contents page.
89
Page 94

Checking for emails
If you haven’t set your O2Cocoon to check for emails automatically then you won’t be
notified of any new emails. Instead you’ll need to manually check for emails.
• Select Receive from server
• If you’ve created more than one email account on your O
Cocoon you can check
2
just one account or all. To set up an account click here
• Scroll to All or another account such as O2 EMAIL and select
• Your O
Cocoon will now check for new emails and send emails waiting in
2
your outbox
• When your Cocoon has finished checking for emails you will be presented with a
download summary on screen
Cocoon tip
• To amend the settings so that you’ll be notified of new emails click here
• If is displayed on the standby screen, you’ve got unread emails in your inbox
Click her
e to r
etur
n to contents page.
90
Page 95

Inbox
• In the Messages menu, scroll to Email – Inbox and select by pressing
• You’re now in the inbox
Defines an unread message
Defines a read message
• You can also see who sent you the email, the date it was received, as well as the
subject of the message
• Scroll to the desired email and press Options and choose from the following
View Select to read the email. For full details on reading your emails click here
Reply Select to respond to the contact who sent you the email
Reply to all Respond to everyone who was sent the original emai
Forward Select to forward the email to someone else
Sort by Arrange the emails in your inbox either by date, sender, subject or email
account
Reading your new email
• Scroll to the desired email and press Options – View
• You can now view the overall details of the email, such as the subject, who it was
sent from, the date and time it was sent and who the email was sent to. You can
view whether there were any attachments and also the size of the email/file
• Select Options – View again
• You can then scroll through the email and read the message content
• Once you have read a message select Options and choose from the following
Reply Select to respond to the contact who sent you the email
Reply to all Respond to everyone who was sent the original email
Forward Select to forward the email to someone else
Delete Select to delete the email from your inbox
Delete Select to delete the email from your inbox
Delete all To delete all emails in your inbox
n to contents page.
etur
e to r
Click her
91
Page 96

Drafts
This option enables you to edit or delete emails you saved to your drafts folder – after
editing them you can then send or resave.
• In the messages menu, scroll to Email – Drafts
• Scroll to the desired email record and press the left soft key to select Options, or
press and select from the following
Edit Select to view and amend the current email content before you send it
Send Select to send your email
Sort by Arrange the email in your drafts folder by the date they were created, by
sender, by subject or by email account
Delete Select to delete the message from the drafts folder
Delete all Select to delete all emails in the drafts folder
Click her
e to r
etur
n to contents page.
92
Page 97

Sent
Here you can view the messages you have sent. To view, forward, sort or delete sent
messages – follow the on screen prompts.
Click her
e to r
etur
n to contents page.
93
Page 98

Outbox
Here you’ll find all the messages that could not be sent. You can then attempt to edit,
delete or send your message or just save the message until later in the drafts folder.
Click her
e to r
etur
n to contents page.
94
Page 99

Settings
Select to create an email account so you can access emails on your O2Cocoon.
• Select Settings and then choose from the following
Email accounts
• To set up an account select Email accounts
Please note
• To set up work emails you’ll need to discuss the details with your IT manager
• To set up an o2.co.uk account you’ll need to register online at
you continue
o2.co.uk before
• To get you started we’ve started to create an O2 email account for you. Just follow
the instructions to get you set up.
• To set up your O2 email select Options – Edit
Cocoon tip
To create a new account select Options – Create. You can access up to three
email accounts
• You then need to choose from the following and then follow the on screen prompts
Account name
Enter an account name. For your O2 emails we’ve called the account name O2 EMAIL .
Connection type
Select from the list – depends whether you’re on a prepay or postpay account.
Click here to return to contents page.
Email address
Enter the email address you have just set up on o2.co.uk. You’ll need to enter the full
email address. You just need to amend change.me to your details e.g. johnsmith@o2.co.uk
Incoming server
If you’re amending your O2 account we’ve set this for you – mail.o2.co.uk. If you’re
setting up an new account you need to change o2.co.uk to reflect your account details
e.g. mail.hotmail.co.uk
95
Page 100

Incoming protocol
This will be either POP3 or IMAP4 depending on your email provider. Your O2 email
will be POP3.
General Settings
For general email settings select here to add a signature to your email or save
sent emails.
Incoming port number
This has been preset for you – 110 .
Incoming user name
Amend change me and add your username (the prefix before @).
Incoming password
Enter the password associated with your email account.
Outgoing server
If you’re amending your O2 account we’ve set this for you – smtp.o2.co.uk. If you’re
setting up an new account you need to change o2.co.uk to reflect your account details
e.g. smtp.hotmail.co.uk
Outgoing port number
This has been preset for you – 25.
Authentication
Your ISP will inform you whether this item should be enabled.
Outgoing user name
Amend and add your username (the prefix before @).
Outgoing password
Enter the password associated with your email account
• Once you have entered all the relevant data press the left soft key to select Save
From Name
Change this so when you send an email this name will be displayed in the
recipient’s inbox.
Save sent mail
Select Ye s to save copies of emails you send.
Add signature
Add a signature to your emails, so your full name and all your contact details are at the
bottom of the email. You can choose here to add them to all emails or only new
emails. You can also turn this feature off by selecting None.
Signature
Create your signature. For details on entering text click here.
Delete on server
We recommend you set this to No so that a copy of the email remains on your internet
account so you can still access the email from your PC as well.
Sync options
Choose to download the whole message or set a limit and just download a preview.
Download Choose to download only the headers or set a maximum file size by
•
selecting Smaller than
Max size Set the maximum size file to be downloaded. You can only alter this
•
setting if you’ve selected Download – Smaller than
• To activate the account select Options – Select
n to contents page.
etur
e to r
Click her
96
 Loading...