

Page 1
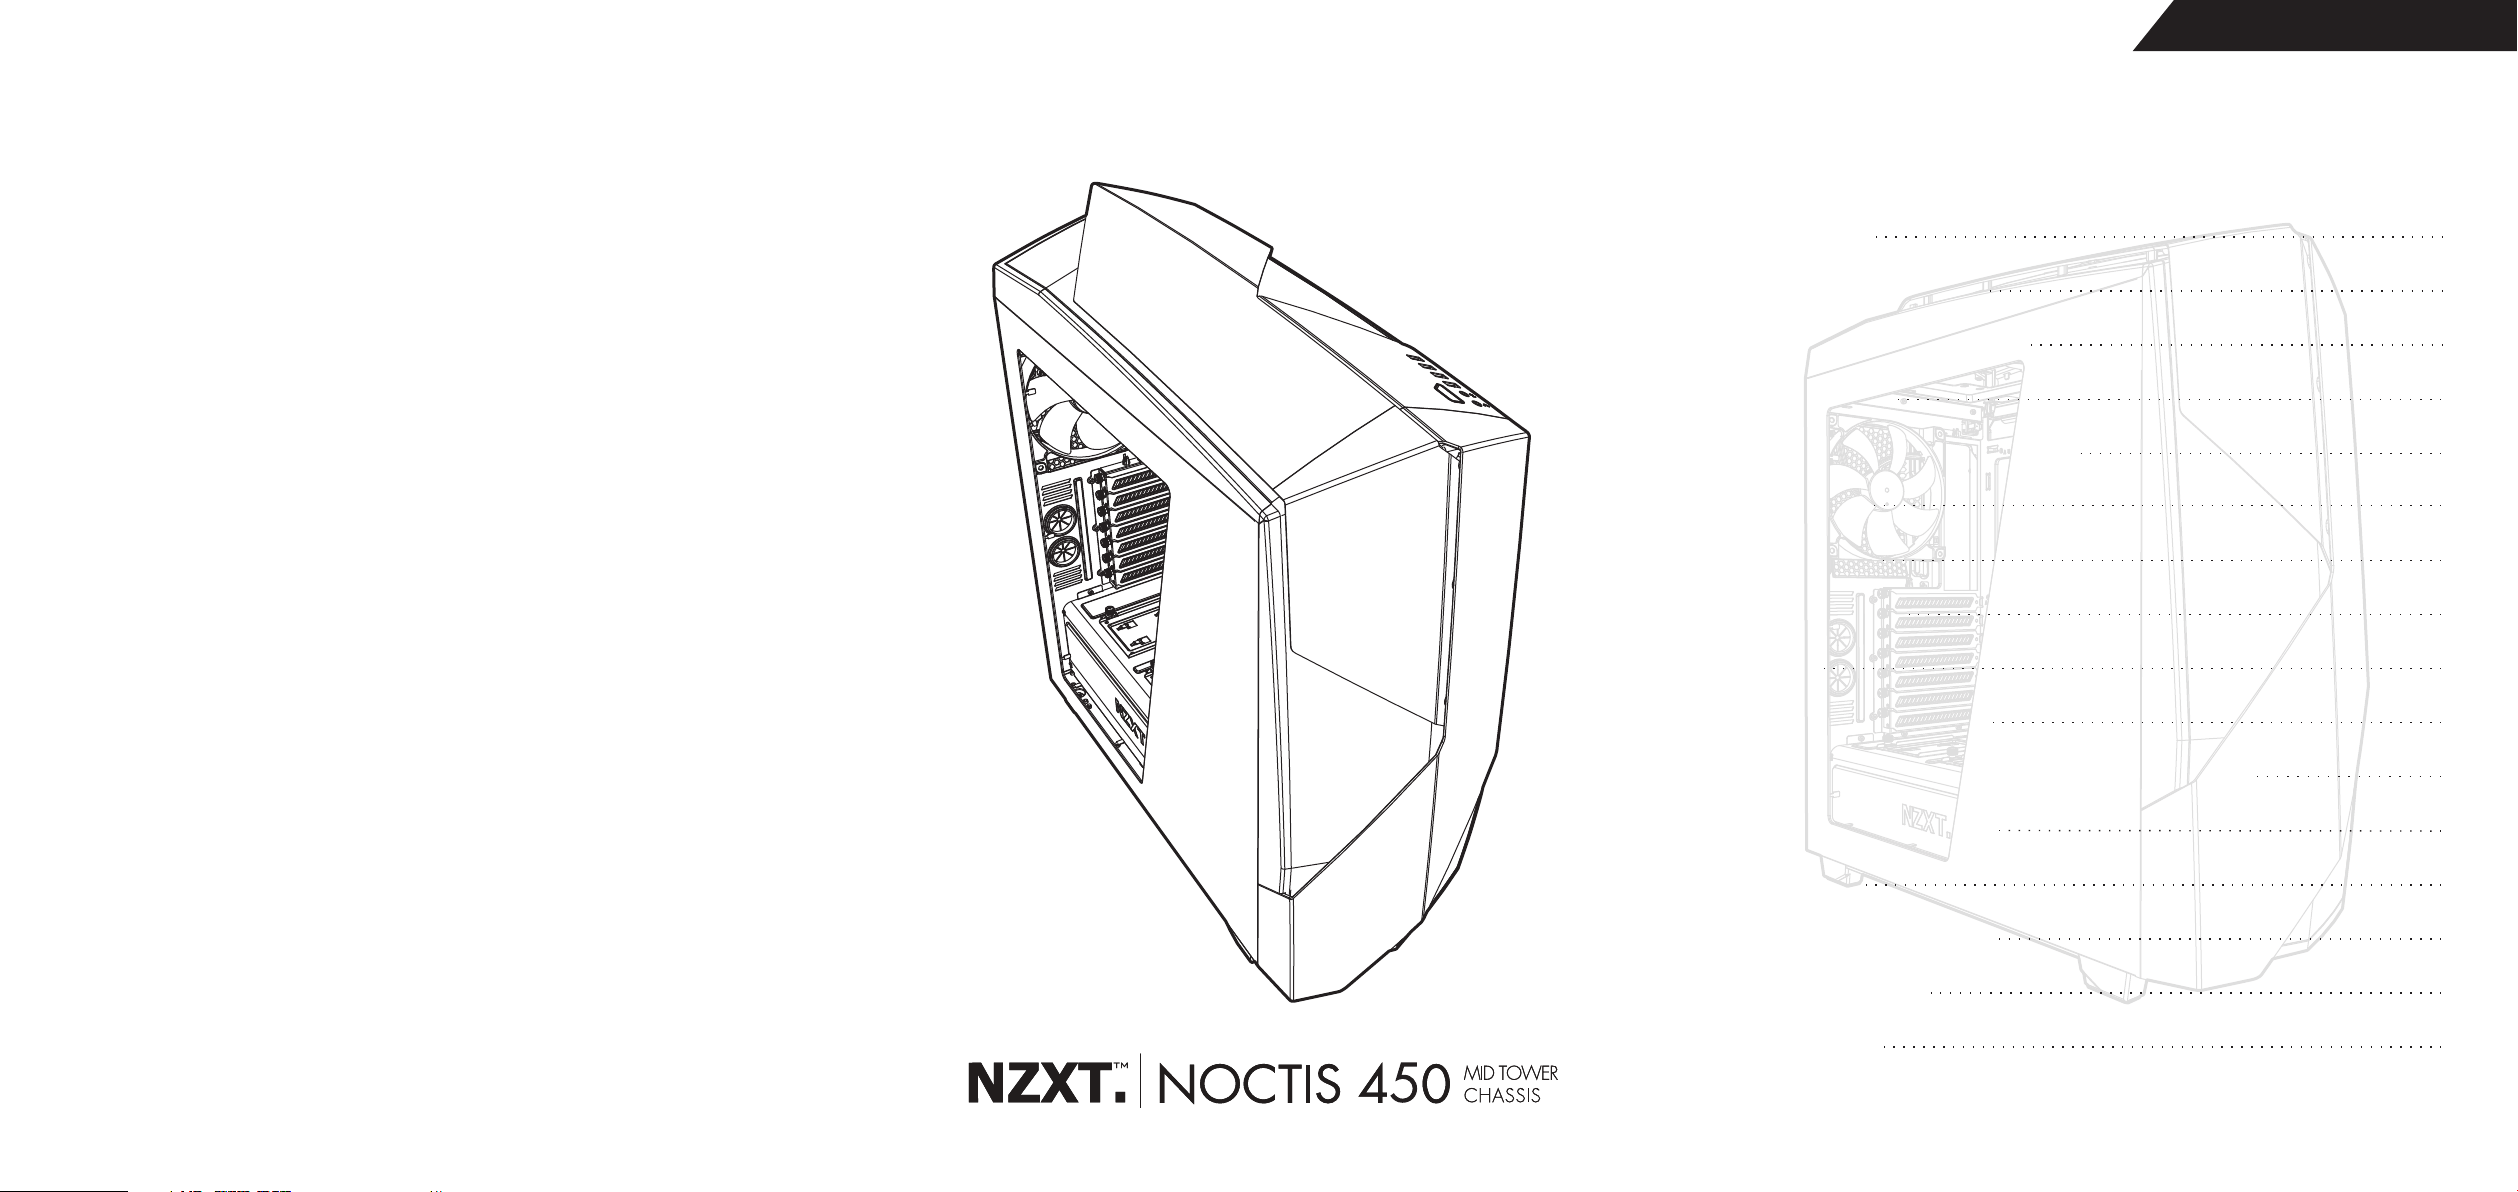
TABLE OF CONTENTS
EXPLODED VIEW 2
BUTTONS AND CONNECTIONS
CLEARANCES AND SPECIFICATIONS
COMPONENT LIST 9
CONNECTIONS AND ELECTRICAL SYSTEMS
FILTRATION SYSTEM 17
AIRFLOW
MOTHERBOARD INSTALLATION
POWER SUPPLY INSTALLATION / EXPANSION CARD INSTALLATION
HDD /SSD DRIVE INSTALLATION
5
7
11
13PWM FAN HUB
15PANEL REMOVAL
16
19
20
21
SUPPORT AND SERVICE
NZXT WARRANTY
23FAN SUPPORT
24WATERCOOLING INSTALLATION
25
26
1
Page 2

EXPLODED VIEW
EXPLOSIONSDARSTELLUNG
VISTA DETALLADA
VUE ÉCLATÉE
VISUALIZAÇÃO DESTACADA
ПОКОМПОНЕНТНЫЙ ВИД
部件分解图
展開図
1
7
6
2
4
15
5
8
10
1. Top Panel
2. Right Side Panel
3. Front Panel
4. Left Side Panel
5. Clear Side Window
6. USB Module
7. LED Switch
8. Front Filter
9. Bottom Rear Filter
10. Rear 140mm Fan
11. Front 120mm Fans
12. Under Glow LED
13. 2.5“ Drive Tray
14. External Watercooling Parts
15. LED Hub Module
16. Fan Hub Module
17. Hard Drive Tray
18. 3.5’ & 2.5” Hard Drive Mount
19. Internal NZXT Logo LED
20. Internal LED
14
9
13
19
20
1. Obere Blende
2. Recht Blende
3. Frontblende
4. Linke Blende
5. Durchsichtiges Seitenfenster
6. USB-Modul
7. LED-Schalter
8. Frontlter
9. Unterer hinterer Filter
10. Hinterer 140-mm-Lüfter
11. Front 120-mm-Lüfterung
12. Darunterliegende leuchtende LED
13. 2,5-Zoll-Laufwerkseinsatz
14. Anschlüsse für externe Wasserkühlung
15. LED-Hub-Modul
16. Lüfter-Hub-Modul
17. Festplatteneinsatz
18. 3,5- & 2,5-Zoll-Festplattenhalter
19. Interne NZXT logo LED
20. Interne LED
11
1. Panel superior
2. Panel derecho
3. Panel frontal
4. Panel lateral izquierdo
5. Ventana lateral transparente
6. Módulo USB
7. Conmutador de LED
8. Filtro frontal
9. Filtro inferior posterior
10. Ventilador posterior de 140 mm
11. Ventiladores frontales de 120 mm
12. LED de iluminación inferior
13. Bandeja para unidades de 2,5”
14. Puertos para refrigeración por agua externos
15. Módulo concentrador de LED
16. Módulo concentrador de ventiladores
17. Bandeja para unidades de disco duro
18. Soporte para unidades de disco duro de
3,5” y 2,5”
19. Interno NZXT logo LED
20. LED interno
1. Panneau supérieur
2. Panneau droit
3. Panneau avant
4. Panneau latéral gauche
5. Fenêtre latérale transparente
6. Module USB
7. Interrupteur DEL E/S
8. Filtre avant
9. Filtre inférieur arrière
10. Ventilateur arrière 140 mm
11. Ventilateurs avant 120 mm
12. LED à éclairage par le dessous
13. Bac de lecteur 2,5 “
14. Ports de refroidissement externes
15. Module du concentrateur à DEL
16. Module du concentrateur de ventilateurs
17. Bac de disque dur
18. Espace de mont
19. Interne NZXT logo LED
20. LED interne
3
1. Painel superior
2. Painel direito
3. Painel frontal
4. Painel lateral esquerdo
5. Janela lateral transparente
6. Módulo USB
7. Comutador do LED
8. Filtro frontal
9. Filtro traseiro inferior
10. Ventoinha traseira de 140 mm
11. Ventoinha frontal de 120 mm
12. LED de iluminação inferior
13. Compartimento de unidade de 2,5"
14. Portas externas de refrigeração a água
15. Módulo hub de LED
16. Módulo do concentrador de ventoinha
17. Compartimento do disco rígido
18. Suporte de montagem para unidade de disco rígido de 2,5" e 3,5''
19. LED do logótipo NZXT interno
20. LED interno
17
18
1. Верхняя панель
2. Боковая шумоизоляция
3. Передняя панель
4. Левая боковая панель
5. Прозрачное боковое окошко
6. USB-модуль
7. Переключатель ввода/вывода со
светодиодной подсветкой
8. Передний фильтр
9. Задний нижний фильтр
10. Задний вентилятор 140 мм
11. Передние вентиляторы 120 мм
12. Индикатор подсветки
13. Лоток для жестких дисков 2,5“
14.
15. Модуль концентратора с подсветкой
16. Модуль концентратора для вентиляторов
17. Лоток для жестких дисков
18. Крепление для жестких дисков 3,5” и 2,5”
19. Внутренняя подсветка логотипа NZXT
20. Внутренний индикатор
12
1. 顶部面板
2. 右边面板
3. 前面板
4. 左边面板
5. 透明侧窗口
6. USB 模块
7. LED 开关
8. 前部滤网
9. 后下部滤网
10. 后面 140mm 风扇
11. 前面 120mm 风扇
12. 底部LED灯
13. 2.5”驱动器托盘
14. 外部水冷端口
15. LED枢纽模块
16. 风扇枢纽模块
17. 硬盘驱动器托盘
18. 3.5” & 2.5”硬盘驱动器安装架
19. 内部 NZXT 标志 LED
20. 内置LED灯
16
1. トップパネル
2. 右サイドパネル
3. フロントパネル
4. 左サイドパネル
5. クリアサイドウィンドウ
6. USBモデュール
7. LEDSW
8. 前面フィルター
9. 底後面フィルター
10. 背面140mmファン
11. 前面120mmファン
12. グローLEDの下で
13. 2.5“ドライブトレイ
14. 水冷用チューブ通し穴
15. LEDハブモデュール
16. ファンハブモデュール
17. HDDトレイ
18. 3.5“及び2.5”HDD用台
19.内部NZXTロゴLED
20.内部LED
2 43
Page 3
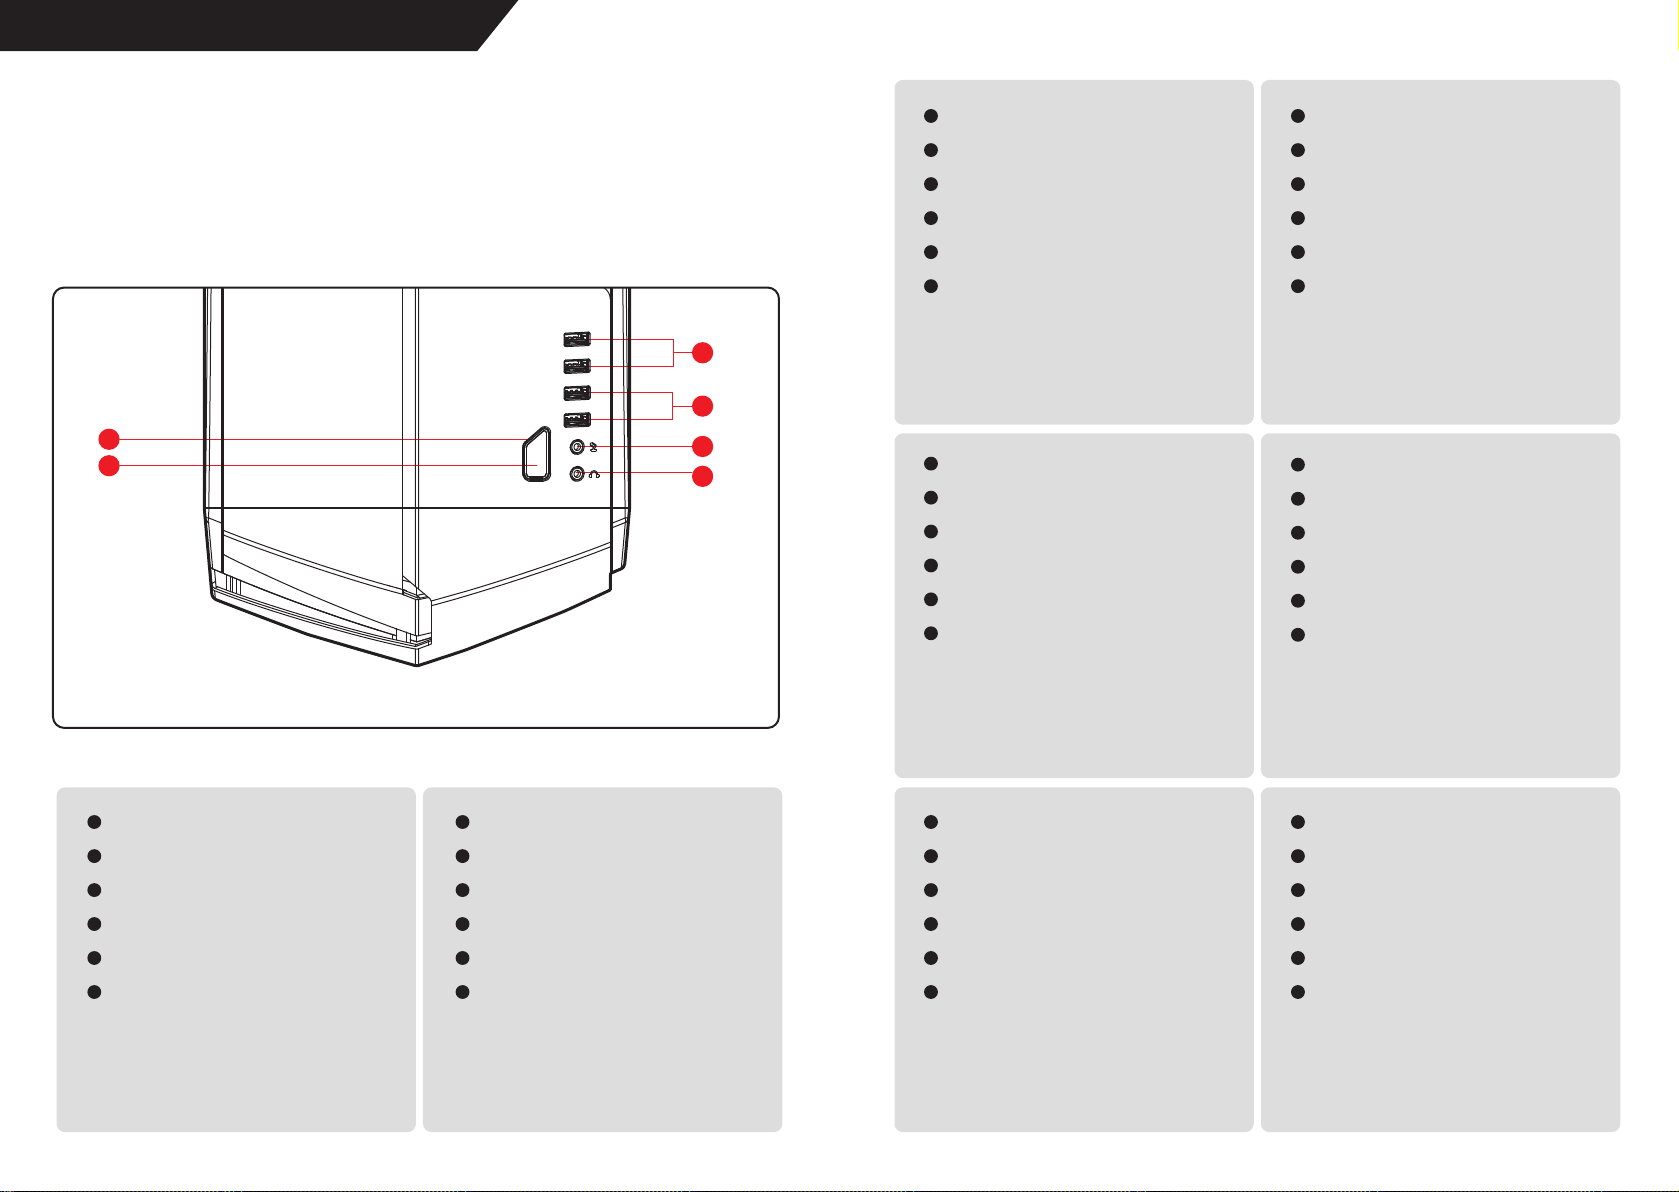
BUTTONS AND IO CONNECTIONS
TASTEN UND EIN-/AUSGÄNGE
BOTONES Y CONEXIONES DE E/S
BOUTONS ET CONNEXIONS E/S
BOTÕES E LIGAÇÕES DE ENTRADA E SAÍDA
КНОПКИ И ВХОДНЫЕ/ВЫХОДНЫЕ РАЗЪЕМЫ
按钮和连接
ボタン 及びI/Oコ ネクタ
2
1
1
Botón de encendido
2
LED de Botón E/S
3
Salida de Audio HD
4
Entrada de micrófono
5
Puertos USB 3.0
6
Puertos USB 2.0
1
Interrupteur marche/arrêt
2
Témoin d’alimentation
3
Sortie audio HD
4
Entrée micro
5
Ports USB3.0
6
Ports USB2.0
6
5
4
3
1
Comutador de alimentação
2
LED indicador de alimentação
3
Saída de áudio de alta denição
4
Entrada do microfone
5
Portas USB3.0
6
Portas USB2.0
1
Выключатель питания
2
Индикатор питания
3
Звуковой выход HD
4
Разъем для подключения микрофона
5
Порты USB3.0
6
Порты USB2.0
1
2
3
4
5
6
5
Power switch
Power LED
Audio jack
Mic jack
USB 3.0
USB 2.0
1
Netzschalter
2
Power LED
3
HD-Audioausgang
4
Mikrofoneingang
5
USB 3.0-Ports
6
USB 2.0-Ports
1
电源开关
2
电源 LED
3
音频输出
4
麦克风输入
5
USB3.0 端口x2
6
USB2.0 端口x2
1
パワースイッチ
2
パワーLED
3
HD オーディオ アウトプット
4
Mic イ ン プ ット
5
USB3.0 ポ ート
6
USB2.0 ポ ート
6
Page 4
CLEARANCES AND SPECIFICATIONS
Motherboard Support
3.5" HDD Support
2.5" SSD Support
Expansion Slots
GPU Clearance
Cable Management
CPU Cooler Clearance
Top Radiator
Front Radiator
ITX, MICRO-ATX, ATX
6
8
7
305mm (With Hard Drive)
406.2mm (Without Hard Drive)
17.7mm (Lowest Point)
32.5mm (Highest Point)
180mm
140mm x2 / 120mm x3
140mm x2 / 120mm x3
Cartes mère prises en charge
HDD 3,5’’ pris en charge
SSD 2,5’’ pris en charge
Fentes d’expansion
Dégagement GPU
Gestion du câblage
Dégagement refroidisseur CPU
Radiateur supérieur
Radiateur frontal
ITX, MICRO-ATX, ATX
6
8
7
305 mm (avec disque dur)
406.2 mm (sans disque dur)
17.7mm (Point le plus bas)
32.5mm (point le plus haut)
180mm
2x 140 mm / 3x 120 mm
2x 140 mm / 3x 120mm
Motherboard-Unterstützung
3,5-Zoll-HDD-Unterstützung
2,5-Zoll-SSD-Unterstützung
Erweiterungssteckplätze
GPU-Abstand
Kabelverwaltung
CPU-Kühlerabstand
Oberer Kühlkörper
Vorderer Kühlkörper
ITX, MICRO-ATX, ATX
6
8
7
305mm (mit Festplattenlaufwerk)
406.2mm (ohne Festplattenlaufwerk)
17.7mm(niedrigster Punkt))
32.5mm(höchster Punkt)
180mm
140mm x2 / 120mm x3
140mm x2 / 120mm x3
主板支持
3.5" HDD 支持
2.5" SSD 支持
扩充槽
GPU 间距
线缆管理
CPU 散热器间距
上面散热器
前面散热器
ITX, MICRO-ATX, ATX
6
8
7
305mm (含硬盘盒)
406.2mm(不含硬盘盒)
17.7mm (最低点)
32.5mm(最高点)
180mm
140mm x2 / 120mm x3
140mm x2 / 120mm x3
マザーボードサポート
3.5“HDDサ ポ ート
2.5“SSDサ ポ ート
エクス パ ン ション ス ロ ット
GPUクリアランス
ケーブルの管理
CPUクーラークリアランス
トップラディエ ー ター
前面のラディエータ
ITX, MICRO-ATX, ATX
6
8
7
305mm(ケージ含む )
406.2mm(ケージ取り外し )
17.7mm(最低点)
32.5mm(最高点)
180mm
140mm x2 / 120mm x3
140mm x2 / 120mm x3
Compatibilidad Placa Base
Soporte para HDD de 3,5"
Soporte para SSD de 2,5"
Ranuras de Expansión
Medidas del GPU
Administración de los cables
Medidas del refrigerador del CPU
Radiador superior
Radiador Frontal
ITX, MICRO-ATX, ATX
6
8
7
305 mm (con unidad de disco duro)
406.2 mm (sin unidad de disco duro)
17.7mm (punto más bajo)
32.5 mm (punto más alto)
180mm
140mm x2 / 120mm x3
140mm x2 / 120mm x3
Placa-principais suportadas
Unidades de disco rígido de
3,5” suportadas
Unidades SSD de 2,5”
suportadas
Ranhuras de expansão
Folga para a GPU
Gestão dos cabos
Folga para dissipador de calor da CPU
Radiador superior
Radiador frontal
ITX, MICRO-ATX, ATX
6
8
7
305mm (com unidade de disco rígido)
406.2 mm (sem com unidade de disco
rígid)
17.7 mm (ponto mais baixo)
32.5 mm (ponto mais alto)
180mm
140 mm x2 / 120 mm x3
140 mm x2 / 120 mm x3
Поддержка материнской
платы
Поддержка жестких дисков
3,5"
Поддержка твердотельных
накопителей 2,5"
Разъемы расширения
Зазор для графического
процессора
Организация кабельных
систем
Зазор для кулера процессора
Верхний радиатор
Передний радиатор
ITX, MICRO-ATX, ATX
6
8
7
305 мм (с жестким диском)
406.2 мм (без жесткого диска)
17.7 мм (в самой низкой точке)
32.5 мм (самая высокая точка)
180mm
140 мм x2 / 120 мм x3
140 мм x2 / 120 мм x3
Abstände und technische Daten
MEDIDAS Y ESPECIFICACIONES
DÉGAGEMENTS ET SPÉCIFICATIONS
ESPECIFICAÇÕES TÉCNICAS
ТЕХНИЧЕСКИЕ ХАРАКТЕРИСТИКИ И ЗАЗОРЫ
间距和规格
空間と仕 様
220 mm
544 mm
567 mm
7 8
Page 5

A
B
C
D
E
x9
Installed: 9
Accessory Box: 0
x18
Installed: 18
Accessory Box: 0
x4
Installed: 0
Accessory Box: 4
x34
Installed: 0
Accessory Box: 34
x32
Installed: 0
Accessory Box: 32
COMPONENT LIST
ITEMVISUAL
Thumb screw 6-32 x 6mm
Rändelschraube 6-32 x 6mm
Tornillo de pulgar 6-32 x 6mm
Vis de serrage à main 6-32 x 6mm
Parafusos borboleta 6-32 x 6mm
Винт с барашком 6-32 x 6mm
指旋螺丝 6-32 x 6mm 2.5"驱动器托盘和扩充槽。
サムネジ6-32 x 6mm
Un-removable thumb screw
Unverlierbare Rändelschraube
Tornillo de apriete manual no extraíble
Vis moletée non amovible
Parafuso de aperto manual xo.
Неудаляемый винт с накатанной головкой
不可拆下的翼形螺丝
非可動ツマミネジ
Hexagon screw 6-32 x 6mm
Sechskantschraube 6-32 x 6mm
Tornillo hexagonal 6-32 x 6mm
Vis hexagonale 6-32 x 6mm
Parafuso hexagonal 6-32 x 6mm
Винт с шестиграннойголовкой 6-32 x 6mm
六角螺丝 6-32
6角ネジ
Screw 6-32 x 5mm
Schraube 6-32 x 5 mm
Tornillo 6-32 x 5mm
Vis 6-32 x 5mm
Parafuso 6-32 x 5mm
Винт 6-32 x 5 мм
6−32x5mmネジ
Screw M3 x 5mm
Schraube M3 x 5 mm
Tornillo M3 x 5mm
Vis M3 x 5mm
Parafuso M3 x 5mm
Винт M3 x 5 мм
螺丝M3 x 5mm
M3x5mmネジ
2.5" drive trays and expansion slots.
2.5-Zoll-Laufwerkseinsätze und Erweiterungssteckplätze.
Bandejas para unidades de 2.5” y ranuras de expansión
Bacs de lecteur 2.5 " et ports d'extension.
Ranhuras de expansão e compartimentos de unidade de 2.5".
Лотки для жестких дисков 2,5" и разъемы расширения.
2.5“ドライブトレイ及び拡張スロット用。
Side panels, 3.5" drive trays, and PSU bracket.
Seitenblenden, 3.5-Zoll-Laufwerkseinsätze und Netzteilhalterung.
Paneles laterales, bandejas para unidades de 3.5” y
soporte para PSU.
Panneaux latéraux, bacs de lecteur 3.5 " et crochet PSU.
Painéis laterais, compartimentos de unidade de 3.5" e
suporte para a fonte de alimentação.
Боковые панели, лотки для жестких дисков
скоба для крепления блока питания.
侧面板,3.5" 驱动器托盘 PSU 托架。
サイドパネル、3.5“ドライブトレイ及びPSUブラケット用
Power supply installation.
Netzteilinstallation.
Instalación de fuente de alimentación.
Installation du bloc d’alimentation.
Instalação da fonte de alimentação.
Установка блока питания.
安装电源。
電源固定用。
Motherboard and 3.5 hard drive tray installation.
Installation der Hauptplatine und 3.5 des Festplattenträgers.
Instalación de la placa base y 3.5 la bandeja de disco duro.
Installation de la carte mère et 3.5 plateau du disque dur.
Instalação da placa principal e de 3,5 compartimento de
disco rígido
Установка системной платы и 3.5 лотка для жесткого диска.
主板和3.5硬盘托盘安装。螺丝6-32 x 5mm
マザーボードと3.5HDDトレイ固定用。
2.5 hard drive installation.
Installation 2.5 des Festplattenträgers.
Instalación de 2.5 la bandeja de disco duro.
installation de 2.5 plateau du disque dur.
Instalação 2.5 compartimento de disco rígido
Установка 2.5 лотка для жесткого диска.
2.5硬盘托盘安装。
2.5HDDトレイ固定用。
APPLICATION
3.5"
COMPONENT LIST
ITEMVISUAL
F
Installed: 16
Accessory Box: 4
G
и
。
Installed: 8
Accessory Box: 1
H
Installed: 1
Accessory Box: 0
I
Installed: 0
Accessory Box: 1
J
Installed: 0
Accessory Box: 20
Screw KB5 x 10mm
Schraube, KB 5 x 10 mm
Tornillo KB5 x 10mm
Vis KB5 x 10 mm
Parafuso KB5 x 10 mm
Винт KB5 x 10 мм
x20
螺丝 KB5 x 10mm
Standoff 6-32 x 6.5+4mm
Abstandsbolzen 6-32 x 6.5+4mm
Separador 6-32 x 6.5+4mm
Douille-entretoise 6-32 x 6.5+4mm
Espaçador 6-32 x 6.5+4mm
Распорка 6-32 x 6.5+4mm
x9
柱杆 6-32 x 6.5+4mm
スタンドオフ6角支柱 6-32 x 6.5+4mm
Positioning standoff 6-32 x 6.5+4mm
Abstandhalter 6-32x 6.5+4mm positionieren
Separador de posicionamiento 6-32 x 6.5+4 mm
Support de montage 6-32x 6.5+4 mm
Pinos de suporte de posicionamento de 6-32
x 6.5+4 mm
Позиционирующая стойка 6-32 x 6.5+4 мм
x1
位置取り用支柱 6-32 x6.5+4mm
Standoff wrench
Schlüssel für Abstandsbolzen
Llave para separador
Clé pour douille-entretoise
Chave de espaçadores
Ключ для установки распорки
x1
六角柱扳手
スタンドオフ用レンチ
Cable tie
Kabelbinder
Brida para cables
Collier de serrage
Braçadeira de cabos
Хомут
x20
ケーブルタイ ケーブル整理用。
Fan installation.
Installation des Lüfters.
Instalación de ventilador.
Installation du ventilateur.
Instalação da ventoinha.
Установка вентилятора.
安装风扇。
ファン固定用。KB5 x 10mmネジ
Motherboard installation.
Installation der Hauptplatine.
Instalación de la placa base.
installation de la carte mère.
Instalação da placa principal.
Установка системной платы.
主板安装。
マザーボード固定用。
Motherboard installation.
Installation der Hauptplatine.
Instalación de la placa base.
installation de la carte mère.
Instalação da placa principal.
Установка системной платы.
主板安装。定位支架 6-32 x 6.5+4mm
マザーボード固定用。
Motherboard installation.
Installation der Hauptplatine.
Instalación de la placa base.
installation de la carte mère.
Instalação da placa principal.
Установка системной платы.
主板安装
マザーボード固定用
Cable management.
Kabelverwaltung.
Administración de Cables.
Gestion du câblage.
Gestão dos cabos.
Организация кабельных систем.
线缆管理。束线带
APPLICATION
109
Page 6

CONNECTIONS AND ELECTRICAL SYSTEMS
BUTTONS AND ACTIVITY LIGHTS
These cables are connected to the motherboard for the
power button and activity LED.
Diese Kabel sind für Ein-/Austaste und
Aktivitäts-LED mit dem Motherboard verbunden
Estos cables están conectados a la placa base
para el botón de alimentación y el LED de
actividad.
Ces câbles sont branchés sur la carte mère pour
l’alimentation du bouton de mise en marche et le
voyant LED d’activité
Estes cabos são ligados à placa principal para o
botão de energia e LED de atividade.
Этими кабелями к системной плате подключена
кнопка питания и индикатор работы
这些线缆连接到主板,用于电源按钮和活动 LED。
これらのケーブルは、電源ボタンおよびアクティ
ビティ LED のためにマザーボードに接続されま
す。
- P LED
+ P LED
POWER SW
BLACK
BLACK
BLACK
BLACK
-
1
+
2
1
2
HD AUDIO
This connector attaches to your sound card or motherboard and is
used to provide the front panel mic input and headphone output.
Dieser Anschluss wird mit Ihrer Festplatte oder dem Motherboard
verbunden und dient der Bereitstellung von Mikrofoneingang
und Kopfhörerausgang an der Frontblende.
Este conector se enchufa a la tarjeta de sonido o a la placa base
y se utiliza para proporcionar la entrada de micrófono y la
salida de auriculares del panel frontal.
Le connecteur se relie à votre carte sonore ou carte mère et sert
à fournir l'entrée du microphone et la sortie casque sur le
panneau avant.
Este conector é ligado à sua placa de som ou placa principal e é
utilizado para proporcionar ao painel frontal entrada para
microfone e saída para auscultadores.
Разъем подключения звуковой платы или материнской
платы, используется также для подключения входа
микрофона передней панели и выхода для головных
телефонов.
这些接口连接到声卡或主板,用于提供前面板麦克风输入和耳
机输出。
このコネクタはサウンドカードもしくはマザーボードに接続
、フロント部のマイク入力やヘッドホン出力を提供するため
に使用します。
IO
AUD
HD
USB 3.0 CONNECTOR
This cable connects to the USB 3.0 header on the
motherboard to enable the front USB 3.0 ports.
Dieses Kabel dient dem Verbinden der USB
3,0-Stiftleiste am Motherboard zur Aktivierung der
frontseitigen USB 3,0-Ports.
Este cable se conecta a la base de conexiones USB
3.0 de la placa base para habilitar los puertos USB
3.0 frontales.
Ce câble se branche à une tête USB 3.0 sur la carte
mère pour activer les ports USB 3.0 à l'avant.
Este cabo é ligado ao conector USB 3.0 da placa
principal para ativar as portas USB 3.0 frontais.
Кабель подключения к разъему
USB 3.0 на материнской плате,
используется для включения
передних портов USB 3.0.
此线缆连接到主板上的 USB
3.0 插口,用于启用前面 USB
3.0 端口。
このケーブルは前面のUSB3.0
ポートを有効にするために、
マザーボード上のUSB3.0ヘッ
ダーに接続します。
ELECTRICAL SYSTEMS
PWM Fan Hub
Connect CPU Cooler
ELECTRONICS POWER
This MOLEX cable connects to the power supply to provide
power for the included fan hub and LED lighting.
Dieses MOLEX-Kabel wird mit dem Netzteil verbunden und
versorgt den enthaltenen Lüfter-Hub und die
LED-Beleuchtung mit Strom.
Este cable MOLEX se conecta a la fuente alimentación para
proporcionar energía al concentrador de ventiladores
incluido y a la iluminación de los LED.
Ce câble MOLEX se branche à l'alimentation pour alimenter
le concentrateur de ventilateurs inclus et l'éclairage à DEL.
Este cabo MOLEX é ligado à fonte de alimentação para
alimentar o concentrador de ventoinha incluído e a
iluminação LED.
Этот кабель MOLEX подключается к блоку питания и
используется для подачи питания на прилагающийся
концентратор для вентиляторов и ламп светодиодной
подсветки.
此 MOLEX 线缆连接到电源,用于给风扇毂和 LED 照明
提供电源。
このMOLEXケーブルコネクタは付属のファンハブ及び
LED照明に電力を供給ために電源に接続します。
+
12VDC
1
GND
2
3
GND
+
4
5VDC
PWM Cable
Connect to CPU_FAN or CPU_OPT
USB 2.0 CONNECTOR
This cable connects to the USB 2.0 header on the motherboard to enable the front USB 2.0 ports.
Dieses Kabel dient dem Verbinden der USB 2.0-Stiftleiste am Motherboard zur Aktivierung der frontseitigen USB 2.0-Ports.
Este cable se conecta a la base de conexiones USB 2.0 de la placa base para habilitar los puertos USB 2.0 frontales.
Ce câble se branche à une tête USB 2.0 sur la carte mère pour activer les ports USB 2.0 à l'avant.
Este cabo é ligado ao conector USB 2.0 da placa principal para ativar as portas USB 2.0 frontais.
Кабель подключения к разъему USB 2.0 на материнской плате, используется для включения передних портов USB 2.0.
此线缆连接到主板上的 USB 2.0 插口,用于启用前面 USB 2.0 端口。
このケーブルは前面のUSB2.0ポートを有効にするために、マザーボード上のUSB2.0ヘッダーに接続します。
2 NC
U
SB
2
.0
11 12
BLACK
KEY
+
GND
GREEN
WHITE
RED
KEY
GND
D1+
D1-
VCC1
1
3
5
7
9
4 GND
BLACK+GND
6 D2+ GREEN
8 D2- WHITE
10 VCC2 RED
To Power Supply
LED Hub
Input connector
Please refer to page 13 for PWM Fan
Hub installation.
LED Control Switch
I/O LED
Logo LED
Underglow LED
Underglow LED
Page 7

CONNECTIONS AND ELECTRICAL SYSTEMS
PWM FAN HUB PWM FAN HUB
The NZXT PWM fan hub supports pulse width modulation (PWM) control via the motherboard CPU_FAN header and
can power up to 8 fans with a combined maximum output of 30 watts by external 12V 4-pin Molex power.
For full PWM support, please connect the PWM cable from the hub to the “CPU_FAN” or “CPU_OPT” port on the
motherboard. If no PWM signal is provided, the connected fans will spin at full speed. The white pin header located
on the PWM fan hub is reserved for connecting the CPU cooler. If necessary, please use the included extension cable
to connect the CPU cooler to the hub. When connecting the fan hub to the CPU_OPT port on the motherboard, please
connect a single fan to the white header for PWM functions to work properly. To provide power to the fan hub and the
connected fans, connect the attached Molex connector to the power supply.
NOTE: Not all 4-pin fan ports on the motherboard support true PWM. Please consult the motherboard manufacturer’s
documentation for PWM specications.
PWM-Lüfterhub
Der PWM-Lüfterhub von NZXT unterstützt Pulsweitenmodulationssteuerung (PWM) über die MotherboardCPU_FAN-Stiftleiste und kann bis zu 8 Lüfter mit einer kombinierten maximalen Ausgabe von 30 Watte über den
externen 4-poligen 12-V-Molex-Anschluss mit Strom versorgen. Für vollständige PWM-Unterstützung schließen Sie
bitte das PWM-Kabel vom Hub am „CPU_FAN“- oder „CPU_OPT“-Anschluss am Motherboard an. Falls kein
PWM-Signal bereitgestellt wird, drehen die angeschlossenen Lüfter bei voller Geschwindigkeit. Die weiße Stiftleiste
am PWM-Lüfterhub ist für die Stromversorgung des CPU-Kühlers reserviert. Bei Bedarf verwenden Sie bitte das
mitgelieferte Erweiterungskabel zum Anschließen des CPU-Kühlers am Hub. Bei Anschluss des Lüfterhubs am
CPU_OPT-Port des Motherboards verbinden Sie bitte einen einzelnen Lüfter mit der weißen Stiftleiste, damit die
PWM-Funktionen richtig arbeiten. Zur Stromversorgung von Lüfterhub und angeschlossenen Lüftern verbinden Sie
den angebrachten Molex-Anschluss mit dem Netzteil.
Hinweis: Nicht alle 4-poligen Lüfteranschlüsse am Motherboard unterstützen echtes PWM. PWM-Spezikationen
entnehmen Sie bitte der Dokumentation des Motherboard-Herstellers.
Concentrador de ventoinhas PWM
O concentrador de ventoinhas PWM NZXT suporta controlo de modulação de largura de impulsos (PWM) através
do conector CPU_FAN da placa principal e pode fornecer energia a até 8 ventoinhas com uma potência máxima
total de 30 watts através de alimentação externa de 12V com conector Molex de 4 pinos. Para suporte total de
PWM, ligue o cabo PWM do concentrador à porta “CPU_FAN” ou “CPU_OPT” da placa principal. Se não for
emitido nenhum sinal PWM, as ventoinhas ligadas irão rodar à velocidade máxima. O conector de pinos branco
localizado no concentrador de ventoinhas PWM está reservado para ligação do dissipador da CPU. Se necessário,
utilize o cabo de extensão incluído para ligar o dissipador da CPU ao concentrador. Quando ligar o concentrador
de ventoinhas à porta CPU_OPT da placa principal, ligue apenas uma ventoinha ao conector branco para que as
funções de PWM funcionem corretamente. Para fornecer energia ao concentrador de ventoinhas e às ventoinhas
ligadas ao mesmo, ligue o conector Molex à fonte de alimentação.
NOTA: Nem todas as portas de ventoinha de 4 pinos da placa principal suportam PWM real. Consulte as
especicações de PWM na documentação do fabricante da placa principal.
Moyeu de ventilateur MLI
Le moyeu du ventilateur MLI NZXT soutient une modulation de largeur d'impulsion (MLI) via l'en-tête de la carte mère
CPU_FAN et peut alimenter jusqu'à 8 ventilateurs avec une puissance maximale combinée de 30 watts par
alimentation externe de 4 broches Molex de 12V de puissance. Pour un support MLI complet, veuillez connecter le
câble MLI du moyeu au port « CPU_FAN » ou « CPU_OPT » sur la carte mère. Si aucun signal MLI est fourni, les
ventilateurs connectés tourneront à pleine vitesse. La barrette mâle blanche située sur le moyeu du ventilateur MLI est
réservée pour la connexion du refroidisseur du CPU. Si nécessaire, veuillez utiliser le câble d'extension fourni pour
connecter le refroidisseur du CPU sur le moyeu. Pour brancher le moyeu du ventilateur sur le port CPU_OPT de la
carte mère, veuillez connecter un seul ventilateur à l'en-tête blanche an que les fonctions MLI fonctionnent
correctement. Pour alimenter le moyeu du ventilateur et les ventilateurs connectés, branchez le connecteur Molex
attaché à l'alimentation.
REMARQUE : Pas tous les ports de ventilateur à 4 broches sur la carte mère prennent en charge MLI. Veuillez
consulter la documentation du fabricant de la carte mère pour les caractéristiques MLI.
Concentrador de ventiladores PWM
El concentrador de ventiladores PWM de NZXT admite control por modulación de ancho de pulsos (PWM) mediante
la base de conexiones CPU_FAN de la placa base y puede proporcionar alimentación a hasta 8 ventiladores con
una salida máxima combinada de 30 vatios mediante el conector Molex externo de 4 contactos y 12 V. Para
compatibilidad PWM total, conecte el cable PWM entre el concentrador y el puerto “CPU_FAN” o “CPU_OPT” de la
placa base. Si no se proporciona señal PWM, los ventiladores conectados girarán a máxima velocidad. La base de
conexiones de contactos blanca ubicada en el concentrador de ventiladores PWM está reservada para conectar el
disipador de la CPU. Si es necesario, utilice el alargador incluido para conectar el disipador de la CPU al
concentrador. Cuando conecte el concentrador de ventiladores al puerto CPU_OPT de la placa base, conecte un solo
ventilador a la base de conexiones blanca para que las funciones PWM se realicen correctamente. Para
proporcionar alimentación al concentrador de ventiladores y a los ventiladores conectados, enchufe el conector
Molex incluido a la fuente de alimentación.
NOTA: No todos los puertos de ventilador de 4 contactos de la placa base admiten la funcionalidad PWM
verdadera. Consulte la documentación del fabricante de la placa base para conocer las especicaciones PWM.
Концентратор для вентиляторов с ШИМ
Концентратор для вентиляторов с ШИМ NZXT поддерживает управление широтно-импульсной модуляцией
(ШИМ, PWM) через разъем материнской платы CPU_FAN и может обеспечивать питание до 8 вентиляторов с
суммарной максимальной выходной мощностью 30 Ватт при внешнем питании через 4-контактный разъем
Molex 12 В. Для полной поддержки ШИМ подключайте кабель ШИМ от концентратора к порту CPU_FAN или
CPU_OPT на материнской плате. Если сигнал ШИМ не подается, то подключенные вентиляторы будут
вращаться на полной скорости. Разъем с белыми контактами, расположенный на концентраторе для
вентиляторов с ШИМ, зарезервирован для подключения кулера ЦП. При необходимости используйте
прилагаемый удлинительный кабель для подключения кулера ЦП к концентратору. При подключении
концентратора для вентиляторов к порту CPU_OPT на материнской плате для правильной работы функций
ШИМ подключайте один вентилятор к белому разъему.
Для подачи питания на концентратор для вентиляторов и подключенные вентиляторы подсоединяйте
прилагаемый разъем Molex к источнику питания.
ПРИМЕЧАНИЕ. Не все 4-контактные порты вентилятора на материнской плате поддерживают настоящую
ШИМ. Обратитесь к документации производителя материнской платы за спецификациями ШИМ.
PWM风扇集
NZXTPWM风扇集线器支持经由主板CPUFAN插口的脉冲宽度调制(PWM)控制,并且可以通过外部12V4针
Molx电源的最大30瓦组合输出最多为8个风扇供电。 要 获得完全PWM支持,请将PWM线从风扇集线器连接到
主板上的“CPUFAN”或“CPUOPT”端口。如果没有提供PWM信号,则所连风扇将全速旋转。PWM风扇集线器上
的白色针脚插口专为连接CPU散热器而保留。必要时,请使用附带的延长线将CPU散热器连接到风扇集线器 。将 风
扇集线器连接到主板上的CPUOPT端口时,请将单个风扇连接到白色插口PWM功能才能正常工作。要给风扇集
线器和所连风扇供电,请将所连的Molx接头连接到电源。
注意:并非主板上的所有4针风扇端口都支持真正的PWM。请查阅主板制造商文档以了解PWM规格。
PWMファンハブ
NZXTのPWMファンハブは、マザーボードのCPU_FANヘッダを経由してパルス幅変調(PWM)制御をサ
ポートし、外部12V4ピンのモレックスパワー(コネクタ)よりの合計最大出力30ワットで持って、8個のファンを
パワーアップできます。PWMのフルサポートにつきましては。マザーボード上の “CPU_FAN”或いは “CP
U_OPT“のポートにハブのPWMケーブルを接続して下さい。 PWM信号が供給されない場合は、接続されたフ
ァンはフルスピードで回転します。 PWMファンハブ上にある白いピンヘッダはCPUクーラーを接続するための
ものです。必要に応じて、ハブにCPUクーラーを接続するために、付属の延長ケーブルをご使用ください。ファンハ
ブをマザーボード上のCPU_OPTポートに接続する場合は、PWM機能が正しく動作するために、白のヘッダに
シング ルファンを接 続して 下さい。 ファンハブ及び接続されたファンに電力を供給するため、備え付けてあるモレッ
クスコネクタを電源に接続して下さい。
注:マザーボード上の4ピンのファンポートのすべてが本当にPWMをサポートしているかどうかについては、マザ
ーボードの製造元のマニュアルを参照して、それらがPWM仕様かどうかを確認して下さい。
线器
13 14
Page 8

PANEL REMOVAL
BLENDE ENTFERNEN
EXTRACCIÓN DE PANEL
RETRAIT DU PANNEAU
REMOÇÃO DOS PAINÉIS
СНЯТИЕ ПАНЕЛИ
卸下面板
パネルの取り外し
B
B
B
B
1 2 3 4
15
16
Page 9

AIRFLOWFILTRATION SYSTEM
FILTERSYSTEM
SISTEMA DE FILTRACIÓN
SYSTÈME DE FILTRATION
SISTEMA DE FILTRAGEM
СИСТЕМА ФИЛЬТРАЦИИ
过滤系统
防塵システム
LUFTZIRKULATION
FLUJO DE AIRE
CIRCULATION DE L’AIR
VENTILAÇÃO
ЦИРКУЛЯЦИЯ ВОЗДУХА
气流装置
エアーフロー
17 18
Page 10

MOTHERBOARD INSTALLATION POWER SUPPLY INSTALLATION
INSTALLATION DER HAUPTPLATINE
INSTALACIÓN DE LA PLACA BASE
INSTALLATION DE LA CARTE MÈRE
INSTALAÇÃO DA PLACA PRINCIPAL
УСТАНОВКА СИСТЕМНОЙ ПЛАТЫ
主板安装
マザーボードの装着
1
INSTALLATION DER STROMVERSORGUNG
INSTALACIÓN DE LA FUENTE DE ALIMENTACIÓN
INSTALLATION DE L’ALIMENTATION
INSTALAÇÃO DA FONTE DE ALIMENTAÇÃO
УСТАНОВКА ИСТОЧНИКА ПИТАНИЯ
电源安装
電源の装着
G
H
2
IMPORTANT
Install the PSU with the fan facing down
C
19
D
A
3
EXPANSION CARD INSTALLATION
INSTALLATION DER ERWEITERUNGSKARTE
INSTALACIÓN DE LA TARJETA DE EXPANSIÓN
INSTALLATION DE LA CARTE D’EXTENSION
INSTALAÇÃO DA PLACA DE EXPANSÃO
УСТАНОВКА ПЛАТЫ РАСШИРЕНИЯ
扩展卡安装
拡張カードの装着
20
Page 11

HDD/SSD DRIVE INSTALLATION
HDD/SSD-LAUFWERKSINSTALLATION
INSTALACIÓN DE LA UNIDAD DE DISCO DURO Y DE LA UNIDAD DE ESTADO SÓLIDO
INSTALLATION DE LECTEUR HDD/SSD
INSTALAÇÃO DA UNIDADE HDD/SSD
УСТАНОВКА ЖЕСТКОГО ДИСКА / ТВЕРДОТЕЛЬНОГО НАКОПИТЕЛЯ
HDD/SSD 驱动器安装
HDD/SSDドライブの装着
1
2
For 2.5” hard drive
For 3.5” hard drive
3
2.5"
3.5" HDD
For 2.5” hard drive, use screw
For 3.5” hard drive, use screw
E
D
D
E
4
5
D
2.5” DRIVE INSTALLATION
A
21
E
22
Page 12

FAN SUPPORT
WATERCOOLING INSTALLATION
LÜFTERUNTERSTÜTZUNG
SOPORTE DEL VENTILADOR
SUPPORT DE LA VENTILATION
SUPORTE DAS VENTOINHAS
ОПОРА ВЕНТИЛЯТОРА
风扇支座
ファン サ ポ ート
Top
120mm x 3
140mm x 2
INSTALLATION DER WASSERKÜHLUNG
INSTALACIÓN DE LA REFRIGERACIÓN LÍQUIDA
INSTALLATION DU SYSTÈME DE REFROIDISSEMENT À EAU
INSTALAÇÃO DA REFRIGERAÇÃO A ÁGUA
УСТАНОВКА СИСТЕМЫ ВОДЯНОГО ОХЛАЖДЕНИЯ
水冷却系统安装
水冷クーラーの装着
Top
120mm x 3
140mm x 2
Rear
120mm x 1
140mm x 1
23
Front
120mm x 3
140mm x 2
Rear
120mm x 1
140mm x 1
Front
120mm x 3
140mm x 2
24
Page 13

SUPPORT AND SERVICE
Support and service
If you have any questions or problems with the NZXT
product you purchased, please don’t hesitate to contact us
using our support system. www.nzxt.com/support
Please include a detailed explanation of your problem and
your proof of purchase. For comments and suggestions, you
can e-mail our design team, designer@nzxt.com. Lastly we
would like to thank you for your support by purchasing this
product.
For more information about NZXT, please visit us online.
NZXT Website: www.nzxt.com
Join the NZXT communities:
www.nzxt.com/forum
www.facebook.com/nzxtcorp
www.reddit.com/r/nzxt
www.twitter.com/NZXTCorp
Служба поддержки и обслуживания
В случае возникновения вопросов или неисправностей в
приобретенных вами продуктах NZXT обращайтесь по
адресу: service@nzxt.com с подробным описанием
проблемы и подтверждением покупки. О наличии
запчастей можно узнать, обратившись по адресу:
www.nzxt.com/support. Замечания и предложения
отправляйте в адрес нашей группы разработчиков:
designer@nzxt.com. Благодарим вас за покупку продукта
NZXT. Более подробная информация о компании NZXT
представлена на наших веб-сайтах. Веб-сайт NZXT:
www.nzxt.com. Для участия в сообществах NZXT посетите
веб-сайт:
www.nzxt.com/forum
www.facebook.com/nzxtcorp
www.reddit.com/r/nzxt
www.twitter.com/NZXTCorp
Assistência e manutenção
Caso tenha questões ou problemas com o produto NZXT
adquirido, não hesite em contactar-nos através do
endereço service@nzxt.com fornecendo a explicação
detalhada do seu problema e a prova de compra. Poderá
solicitar peças de substituição através do endereço
www.nzxt.com/support. Para comentários e sugestões,
contacte a nossa equipa de design através do endereço de
e-mail, designer@nzxt.com. Obrigado por ter adquirido um
produto NZXT. Para mais informações acerca da NZXT,
visite-nos online. Web site da NZXT: www.nzxt.com
Junte-se às comunidades da NZXT:
www.nzxt.com/forum
www.facebook.com/nzxtcorp
www.reddit.com/r/nzxt
www.twitter.com/NZXTCorp
支持和服务
如果有任何疑问或者在使用 NZXT 产品的过程中遇到任何
问题,欢迎联络 service@nzxt.com,联络时请提供关于问
题的详细说明及购买凭证。您可以向
www.nzxt.com/support 查询更换部件。如有任何意见或建
议,欢迎致信我们的设计团队,电子邮件地址是
designer@nzxt.com。感谢您购买 NZXT 产品。有关 NZXT
的更多信息,请造访我们的在线网站。NZXT 网站:
www.nzxt.com。欢迎加入 NZXT 社群:
www.nzxt.com/forum
www.facebook.com/nzxtcorp
www.reddit.com/r/nzxt
www.twitter.com/NZXTCorp
25
Support et service
Si vous avez des questions ou des problèmes avec le produit
NZXT que vous avez acheté, n’hésitez pas à contacter
service@nzxt.com avec une description détaillée de votre
problème et votre preuve d’achat. Vous pouvez aussi
commander des pièces de remplacement auprès
www.nzxt.com/support. Pour les commentaires et les
suggestions, envoyez un email à notre équipe de design,
designer@nzxt.com. Merci d'avoir acheté ce produit de
NZXT. Pour plus d'informations sur NZXT, visitez notre site
Web. Site Web de NZXT : www.nzxt.com Joignez la
communauté de NZXT :
www.nzxt.com/forum
www.facebook.com/nzxtcorp
www.reddit.com/r/nzxt
www.twitter.com/NZXTCorp
Kundendienst und service
Falls Fragen oder Probleme bezüglich Ihres NZXT-Produktes
auftreten, wenden Sie sich bitte mit einer detaillierten
Problembeschreibung und Ihrem Kaufbeleg an
service@nzxt.com. Ersatzteile können Sie unter
www.nzxt.com/support anfragen. Kommentare und
Anregungen senden Sie bitte per designer@nzxt.com an
unser Designteam. Vielen Dank, dass Sie ein NZXT-Produkt
erworben haben. Weitere Informationen über NZXT erhalten
Sie im Internet. NZXT-Webseite: www.nzxt.com Treten Sie
unseren NZXT-Communities bei:
www.nzxt.com/forum
www.facebook.com/nzxtcorp
www.reddit.com/r/nzxt
www.twitter.com/NZXTCorp
Soporte y servicio
Si tiene preguntas o problemas con el producto NZXT que
usted compró, no dure en ponerse en contacto con
service@nzxt.com y suministrar una explicación detallada de
su problema así como su prueba de compra. Puede hacer
consultas sobre piezas de repuesto en www.nzxt.com/support. Para comentarios y sugerencias, escriba un mensaje de
correo electrónico a nuestro equipo de diseño:
designer@nzxt.com. Gracias por comprar un producto NZXT.
Para más información acerca de NZXT, visítenos en línea.
Página web de NZXT: www.nzxt.com Subscríbase a las
comunidades NZXT:
www.nzxt.com/forum
www.facebook.com/nzxtcorp
www.reddit.com/r/nzxt
www.twitter.com/NZXTCorp
サポートおよびサービス
購入されました
、問題の詳細および購入の証明を添えて、ご遠慮なく
service@nzxt.comまでご連絡ください。 交換部品は
www.nzxt.com/support までお尋ねください。ご意見および
ご提案は弊社設計チーム、designer@nzxt.comまでメールを
送信してください。
りがとうございます。
ット上のウェブサイトをご覧ください。
ト: www.nzxt.com NZXTコミュニティへの参加:
www.nzxt.com/forum
www.facebook.com/nzxtcorp
www.reddit.com/r/nzxt
www.twitter.com/NZXTCorp
NZXT
の製品に関するご質問または問題は
NZXT
製品をご購入いただきましてあ
NZXT
に関する詳細は、インターネ
NZXT
ウェブサイ
NZXT WARRANTY
I. Warranty Length
NZXT computer cases, temperature meters, fans, and cables carry a 2 year warranty from the date of purchase for parts and labor.
NZXT HALE90 power supply units receive a 5 year warranty. Any replacement product will be warranted for the remainder of the
warranty period or thirty days, whichever is longer. Proof of purchase is required for warranty service.
II. Who Is Protected
The Warranty covers only NZXT products purchased by the original consumer from authorized NZXT retailers.
III. What Is Covered
Please note that our warranty is not an unconditional guarantee. If the product, in NZXT's opinion, malfunctions within the warranty
period, NZXT will at its discretion repair or replace the product that is equal or greater in value depending on supply. The warranty
does not cover any NZXT product that was damaged due to accident, misuse, abuse, improper installation, usage not in accordance
with product specications and instructions, natural or personal disaster, or unauthorized alterations, repairs or modications.
Our warranty does not cover the following:
Any product or serial number/warranty sticker modication applied without permission from NZXT. Any damage that is not a
manufacturing defect. Damage, deterioration or malfunction resulting from accident, abuse, misuse, neglect, re, water, lightning, or
other acts of nature, unauthorized product modication or failure to follow instructions included with the product. Repair or
attempted repair by anyone not authorized by NZXT. Shipping or transport damage (claims must be made with the carrier) Normal
wear and tear. NZXT does not warrant that this product will meet your requirements. It is your responsibility to determine the
suitability of this product for your purpose. Removal or installation charges. Shipping charges. Any incidental charges.
IV. Exclusion Of Damages (Disclaimer)
NZXT's sole obligation and liability under this warranty is limited to the repair or replacement of a defective product at our option.
NZXT shall not, in any event, be liable for any incidental or consequential damage, including but not limited to damages resulting
from interruption of service and loss of data, business, or for liability in tort relating to this product or resulting from its use or
possession. V. Limitations Of Implied Warranties There are no other warranties, expressed or implied, including but not limited to
those of merchantability or tness for a particular purpose. The duration of implied warranties is limited to the warranty length
specied in Paragraph I.
VI. Local Law And Your Warranty
This warranty gives you specic legal rights. You may also have other rights granted under local law. These rights may vary.
VII. To Obtain Technical Support.
If you have already referenced your product owner's manual and still need help, please visit www.nzxt.com/support for details and
contact information.
VIII. For Warranty Service.
In the event that warranty repair or replacement is necessary, NZXT will request and you must provide proof of purchase (store
receipt or invoice) in order to receive warranty service. For
North American Customers:
Within the rst 60 days after purchase, please return your product (or for power supplies installed within our enclosures, just the
failed power supply) to your dealer or reseller for a replacement. If the product is still within warranty and you can no longer return
it to your dealer, please contact NZXT Customer Support (www.nzxt.com/support) for assistance and instructions. NZXT will not
accept returns without prior approval and an RMA number.
In Europe:
Within the rst year after purchase, please return your product (or for power supplies installed within our enclosures, just the failed
power supply) to your dealer or reseller for a replacement. If the product is still within warranty and you can no longer return it to your
dealer, please contact NZXT Customer Support for assistance and instructions. NZXT will not accept returns without prior approval.
Global Customers (Outside North America and Europe):
If your product needs to be returned or repair within the warranty period, please do so through the retailer or distributor from whom
you purchased the product. If you can no longer return the product to your dealer, please contact NZXT Customer Support for
assistance. Please note, proof of purchase from an authorized NZXT retailer is required for ALL warranty servicing.
Visit store.nzxt.com/returns.asp for information on warranty coverage and service
Informationen zu Geltungsbereich und Service der Garantie nden Sie unter store.nzxt.com/returns.asp
Visite el sitio Web store.nzxt.com/returns.asp para obtener información sobre la cobertura y el servicio de la garantía.
Visitez store.nzxt.com/returns.asp pour les informations de la couverture de la garantie et du service.
Visite store.nzxt.com/returns.asp para obter informações sobre a cobertura da garantia e assistência
Подробную информацию об условиях гарантийного обслуживания см. на веб-сайте store.nzxt.com/returns.asp
请造访 store.nzxt.com/returns.asp 了解保修范围和服务的信息
保証範囲およびサービスに関する情報については、store.nzxt.com/returns.aspにアクセスしてください。
Warranty terms for all NZXT products sold to Australia.
Our goods come with guarantees that cannot be excluded under the Australian Consumer Law. You are entitled to a replacement or
refund for a major failure and or compensation for any other reasonably foreseeable loss or damage. You are also entitled to have the
goods repaired or replaced if the goods fail to be of acceptable quality and the failure does not amount to a major failure' (NZXT
Corporation, 13164 E. Temple Ave., City of Industry, CA 91746, USA TEL: +1-800-228-9395) Please contact the shop you purchased
from to receive prompt service. If the dealer refuses to offer the service, please contact us at directly at www.nzxt.com/support
26
 Loading...