

Page 1

DT-ENG-17S-D7-V1 / 201807
2 WIRE INTERCOM SYSTEM
DT17S-D7
7" COLOR TFT MONITOR
• Please read this manual carefully before using the product you purchase,and keep it well for future use.
• Please note that images and sketch maps in this manual may be different from the actual product.
Page 2

CONTENTS
1. Part And Functions
2. Mounting
3. Main Menu
........................................................................................................... 3
....................................................................................................... 3
.......................................................................................... 1
4. Basic Door Release Operation
5. Intercom Function
6. Opening Staircase Light
7. Memory
8. Divert Call
............................................................................................................. 6
......................................................................................................... 7
9. Basic Setup Instructions
............................................................................................ 4
.................................................................................. 6
.................................................................................. 8
10. Monitor Parameter Setting
11. Basic Connection
12. Specication
13. Precautions
........................................................................................... 14
................................................................................................... 15
.................................................................................................... 15
........................................................................ 4
.......................................................................... 10
Page 3
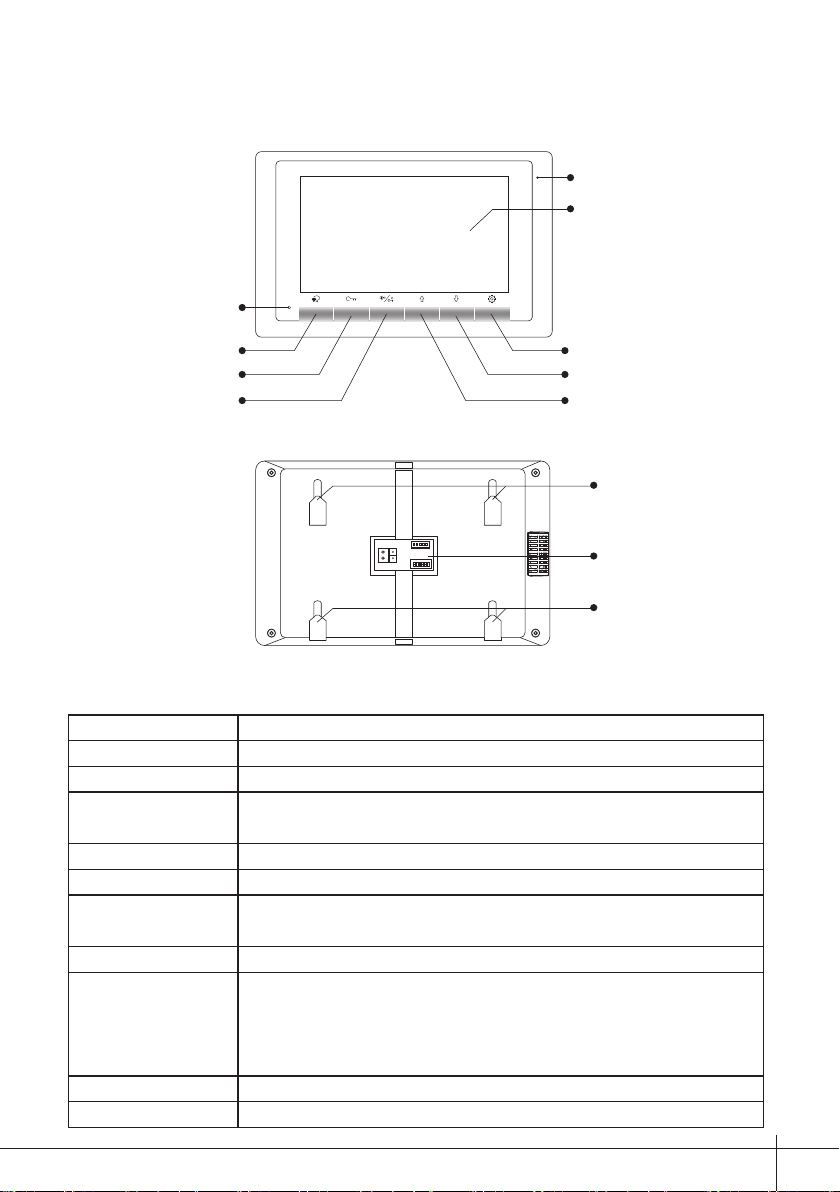
1. Parts and Functions
Speaker
Microphone
LCD Screen
Talk/Mon Button
Unlock Button
Call Button/
Unlock 2nd Button
L2L1
SW-
SW+
GND
RING
ON
DIP
1 2 3 4 5 6
Key functions
Microphone Receive voice from the user.
LCD screen Display the visitors' image.
Setup button Press to select the setting item you want.
Down/Decrease
button
Up/Increase button Press to increase the value.
Speaker Send out vioce from the visitor.
Talk/Mon button
Unlock button Press to release the door
Call button/Unlock
2nd button
Mounting hook Use to hang up the monitor.
Connection port Bus terminal.
Press to decrease the value.
Press to communicate hands free with visitor;
Press to view the outdoor condition in standby mode.
In standby mode, pick up handset, then press Call button to
activate the inner call;
During calling/talking state, press Unlock 2nd button to release
the second door.
Setup Button
Down/Decrease Button
Up/Increase Button
Mounting Hook
Connection Port
Mounting Hook
-1-
Page 4
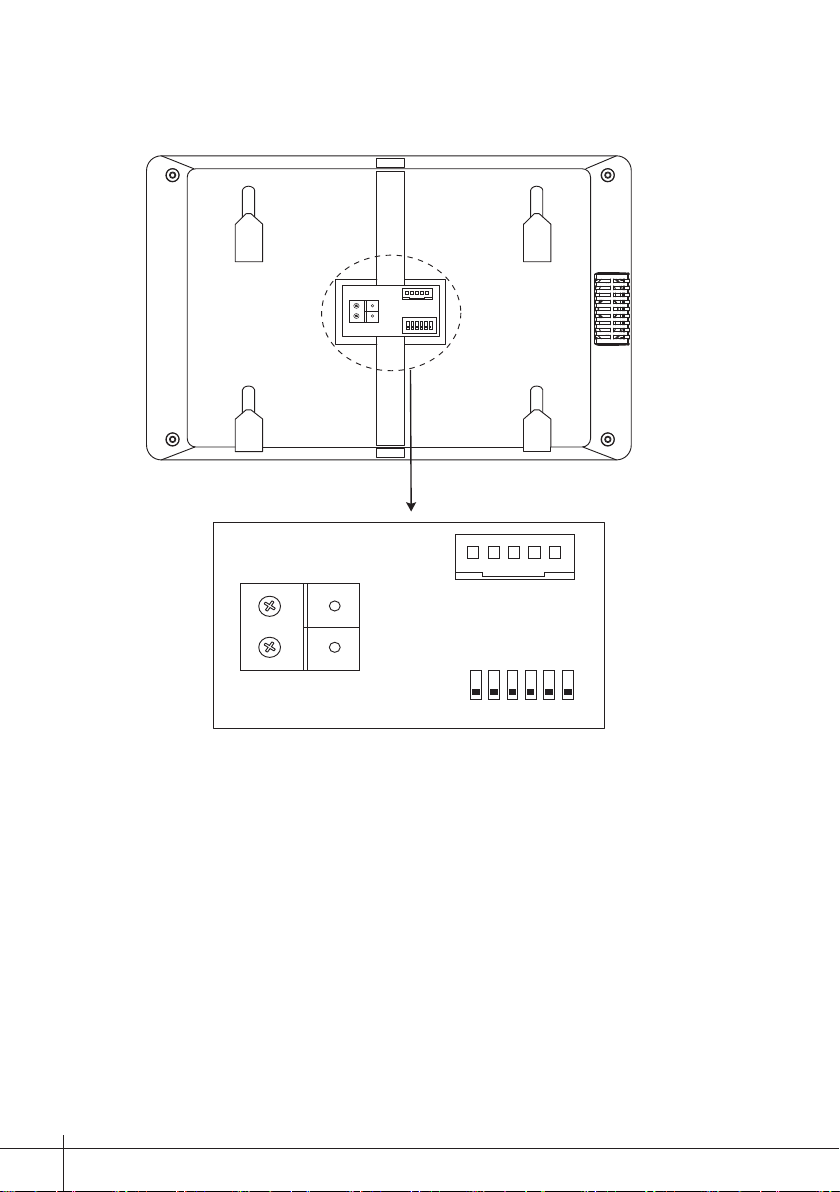
Terminal Description
L2L1
L2L1
SW-
SW+
GND
RING
ON
DIP
1 2 3 4 5 6
SW-
RING
SW+
GND
SW+,SW-: Extra door bell call button connection port.
RING,GND: Extra buzzer connection port.
L1,L2: Bus terminal.
DIP switches: Total 6 bits can be congured.
Bit1~Bit5:
Bit6:
-2-
Used to User Code setting.
Video impedance matching switch
.
ON
1 2 3 4 5 6
DIP
Page 5
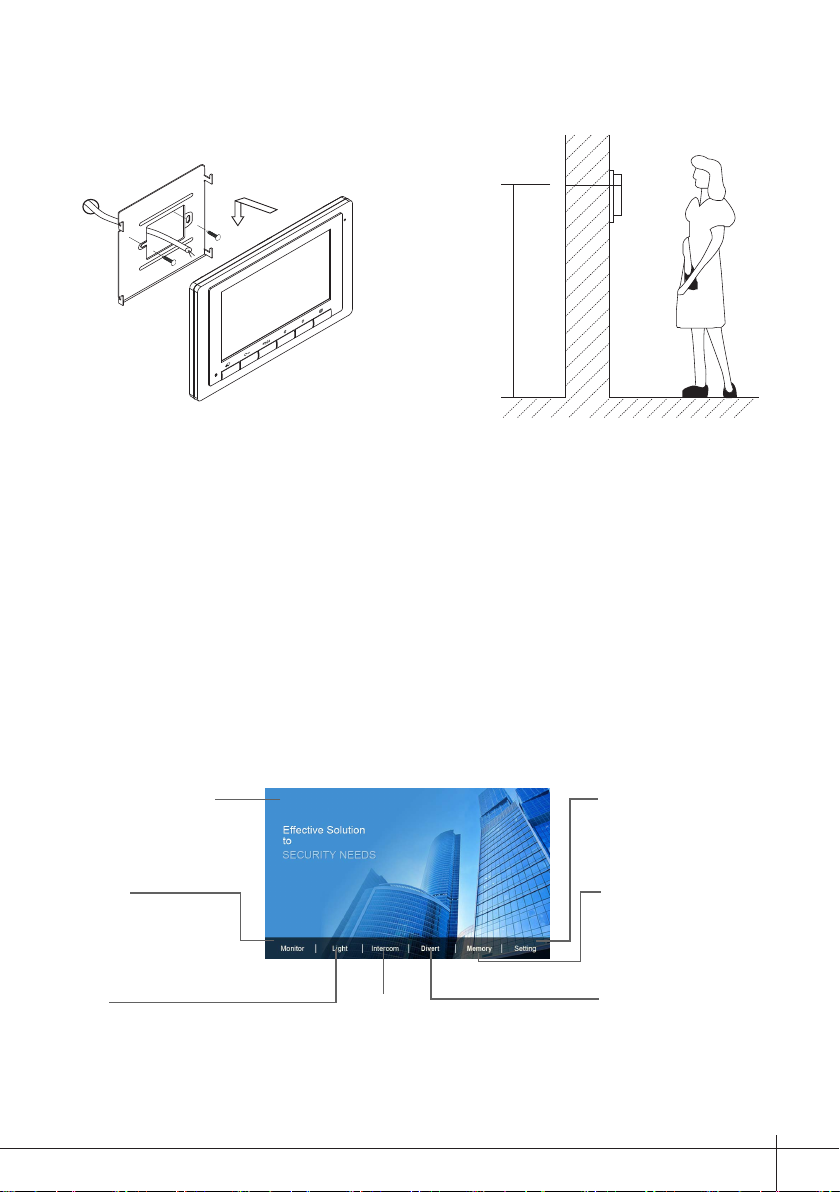
2. Mounting
57-63 in
Use the screws to fix the Mounting Bracket on the mounting box.(fitting accesories
includes a Bracket (Two pieces of 4X25 screws are needed for fastening the Mounting
Bracket), Special 2 wire connectors to connect with Monitor)
Wire the system correctly(see the later connection chapter) then hang the Monitor on the
Mounting Bracket rmly.
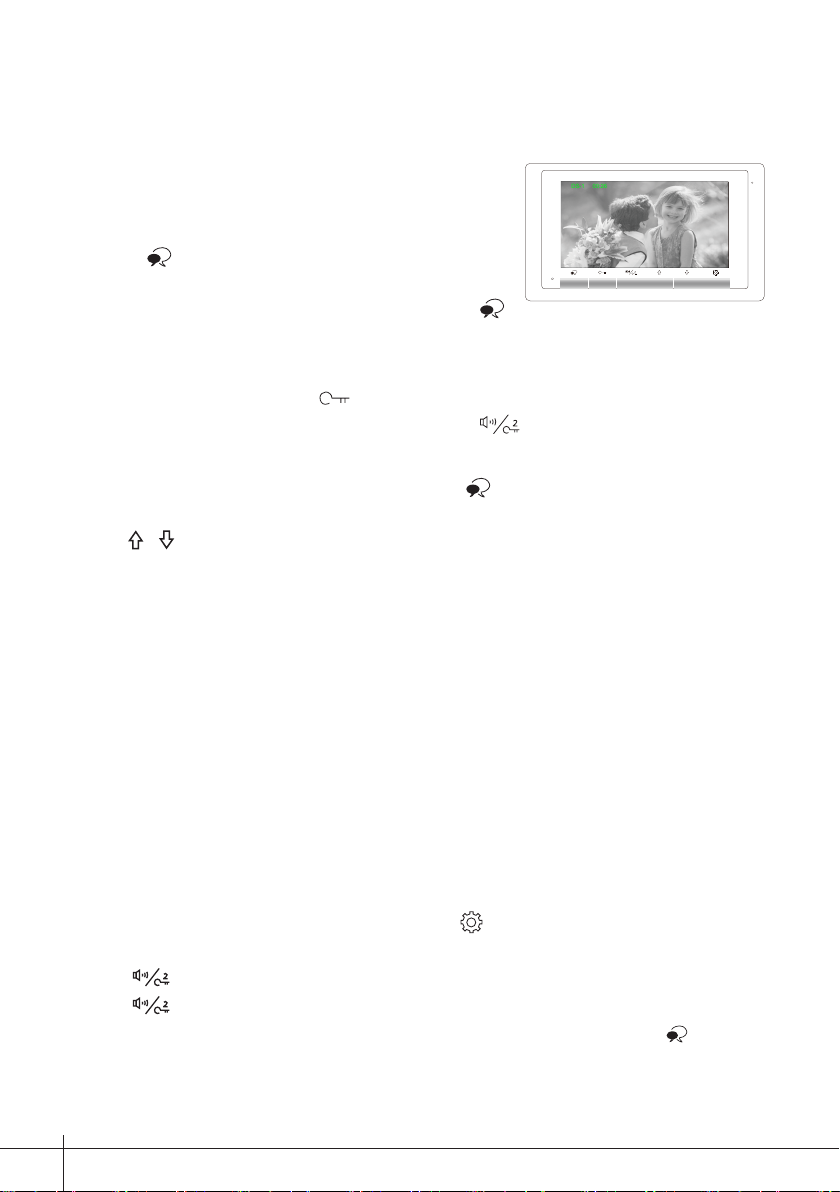
3. Main Menu
The Main menu is your starting point for using all the applications on your monitor.
Press Setup button, or Down button, or Up button in standby mode, the Main menu will
appear as follow:
Current date and time.
Monitor
Press it to view outdoor
condition.
Light
Press it to light up the
staircase light via RLC.
* 1. If you want to activate Divert and Memory, DT-IPG should be connected to the system.
2. Current date and time: You can also synchronize the system time via clock server. Please refer to the
related manual for detailed instructions.
10:50 AM 02/09/2017 Sat.
Intercom
Press it to enter intercom
selections.
Setting
Press it to enter setup page.
Memory
Press it to play recorded
images or videos from door
stations.
Divert
Press it to activate the
Divert function.
-3-
Page 6
4. Basic Door Release Operation
00:26
DS-1
1. Press Call button on outdoor station, the Monitor
rings, at the same time, the screen displays the
visitors' image.
2. Press Talk/Mon button on monitor, you can
communicate hands free with the visitor for 90
seconds. After nishing communication, press
Talk/Mon button again to end the communication. If nobody answers the phone,
the screen will be turned off automatically after 40 seconds.
3. During talking state, Press Unlock button to open the door for the visitor.(if
two locks are connected to door camera, press Unlock 2nd button to release
the second lock )
4. When the monitor is in standby mode, press Talk/Mon button, the screen can
display the view of outside. At this time, if multi door stations are installed, you can
use / button to switch the door station or CCTV camera you want.
5. Intercom Function
It is available to call between monitors in the same room or in the same system,or call
the Guard Monitor. Follow the steps to activate the functions:r
Calling other monitors in the same systemt intercom page in shortcut.
Please note this Intercom Call can be activated by inputting code 9015, or be
deactivated by inputting code 9016, see page 10-11.
(1)When the monitor is in standby mode, press Setting button to enter main menu
*
page.
(2)Press Call button/Unlock 2nd button to enter Intercom page.
(3)Press Call button/Unlock 2nd button again to enter Intercom Call page.
(4)Select the building number and room number you want, and then press Talk/Mon
button to call the corresponding user.
(5)Intercom calling. If the call is answered,conversation is activated.
-4-
m page in shortcut.
Page 7

(1) (2) (3) (4) (5)
1
12
3
Close Redial
*Note:
1. Press Call button/Unlock 2nd button on panel in standby mode to enter Intercom page in shortcut.
2. If the DT-IPG connected to the system, the system support 8-digit input, 4-digit building number, 4-digit
room number, each can be individually changed. If not, you can only input 2-digit room number, the range is
01~32, otherwise the system will prompt error.
3. The system will automatically displays the last dial number when enter the dial-up interface.
4. The mode of building/room number must be 4-digit(such as 5678) or 2-digit(such as 89), do not allow the
middle space(such as 12 3), otherwise the system will prompt error.
Calling monitors in the same room
ercom page in shortcut.
(1)When the monitor is in standby mode, press Setting button to enter main menu
*
page.
(2)Press Call button/Unlock 2nd button to enter Intercom page.
(3)Press Up button to activate Inner Call.
(4)Inner calling. all other monitors in the same room will ring at the same time,whichever
monitor answers the call, conversation is started, other monitors will stop ringing at once.
(Calling ends automatically after 30 seconds if nobody answers the call)
ct intercom page in shortcut.
(1) (2) (3) (4)
Close Redial
Calling the guard monitor
ntercom page in shortcut.
A Monitor can be assigned as Guard Unit Monitor.
(1)When the monitor is in standby mode, press Setting button to enter main menu
*
page.
(2)Press Call button/Unlock 2nd button to enter Intercom page.
(3)Press Down button to activate Guard Unit.
-5-
Page 8

(4)Guard unit calling. when the Guard Unit Monitor answers the call, conversation with
the guard person is started.
(1) (2) (3) (4)
Close Redial
6. Opening Staircase Light
The staircase light should be connected on the system, and this function should be supported
Note:
by RLC. Please refer to RLC user instruction in detail.
Press
Unlock
turned o automatically after 60 seconds.
(1) (2)
*Press Unlock button again to turn off the light.
button on main menu page to open the staircase light, the staircase light will be
7. Memory
The recorded images/videos can be playback on monitor. please note that this function
should be supported by the unit of IPG.
You can also delete the images/videos. Follow the steps:
(1)When the monitor is in standby mode, press Setting button to enter main menu
*
page.
(2)Press Down button to enter Memory page.
(3)Press Talk/Mon button to activate Delete item, and it will show "?" on the screen.
(4)Press Talk/Mon button again to delete this image/video.
(5)Delete this image/video nally.
(1) (2) (3) (4)
ct intercom page in shortcut.
-6-
159xxxx6893
2/9
123456
?
159xxxx6893
2/9
123456
?
(5)
159xxxx6893
2/8
123456
Page 9

8. Divert Call
The calling from door station can be diverted to your phone. please note that this function
should be supported by the unit of IPG.
Three modes can be selected.
1. No Divert: Calls from outdoor station will not be diverted.
2. Divert, If No Answer: If nobody answers the call in 30s when receives call from door
station, diverts the call to the phone.
At this mode, the monitor will shut off the screen after diverting successfully, but you
can still use it in normal.
3. Divert, Simultaneously: When receives call from door station, diverts the call to the
phone immediately.
At this mode,the monitor will always open the screen and show image from door station
during diverted, if the monitor answers the call at this time,diverted will conclude at
once.
Follow the steps to activate this function:
(1)When the monitor is in standby mode, press Setting button to enter main menu
*
page.
(2)Press Up button to enter Divert page.
(3)Follow the instructions to select the item you want.
(4)After the call mode is selected, it returns to the last menu.
(1) (2) (3) (4)
Note:
* The status bar on main menu page will show " " icon.
* The time limited with the phone is 90s.
-7-
Page 10

If you want to know the divert account information, follow the steps:
(1) (2) (3) (4)
Info
Function status
SIP server connection active and congured
SIP server connection disabled
SIP server connection active and not connected
9. Basic Setup Instructions
Door station call tone setting
47.91.xx.33
5060
620832312638256
159789
(1)When the monitor is in standby mode, press Setting button to enter main menu page.
(2)Press Setting button again to enter door station call tone setting page.
(3)Use / button to select the tone you want.
(1) (2) (3)
06
Inercom call tone setting
(1)When the monitor is in standby mode, press Setting button to enter main menu page.
(2)Press Setting button twice to enter intercom call tone setting page.
(3)Use / button to select the tone you want.
(1) (2) (3)
07
twice
-8-
*
*
Page 11

Door bell tone setting
(1)When the monitor is in standby mode, press Setting button to enter main menu
*
page.
(2)Press Setting button three times to enter door bell tong setting page.
(3)Use / button to select the tone you want.
(1) (2) (3)
03
Three times
Tone volume setting
(1)When the monitor is in standby mode, press Setting button to enter main menu
*
page.
(2)Press Setting button four times to enter tone volume setting page.
(3)Use / button to select the volume level you want.
(1) (2) (3)
3
Four times
Restore to default
(1)When the monitor is in standby mode, press Setting button to enter main menu
*
page.
(2)Press Setting button ve times to enter restore to default setting page.
(3)Use / button to activate restore to default.
(1) (2) (3)
Five times
-9-
Page 12

DS-1
00:26
DS-1
00:26
Change date & time &Time Zone
(1)When the monitor is in standby mode, press Setting button to enter main menu
*
page.
(2)Press Setting button ve times to enter restore to default setting page.
(3)Press and hold Unlock button for 3s.
(4)Use ,
(1) (2) (3) (4)
,
, button to change the value you want.
Five times
2017-12-03
00:29:50
UTC+08
Screen and volume adjustment
During monitoring or talking state, press Setup Button, the Adjust page will be
displayed.
The Scene mode selection: Total 4 screen modes can be selected in sequence.
Select the item you want to set.
(1) (2) (3)
10. Monitor Parameter Setting
How to enter the installation setting page
(1) (2) (3) (4)
01.00
00.01.01
AUTO
Six times
1.Press Setting
button in standby
mode.
2.Press Setting
button six times.
3.Press and hold
Unlock button
for 3s.
4.Use / button to increase
/ decrease the value; use
button to select next digital.
*Note: Press and hold Setting button for 3s on panel in standby mode to enter the installation setting page
in shortcut.
-10-
[0000]
Page 13
How to know the machine code
When you want to set the monitor parameter, you must to know the setting code.
2419: Restore To Default
[0000]
2424: RM Parameter Set
3006-3600: Monitor Time
8008-8009: Date Mode
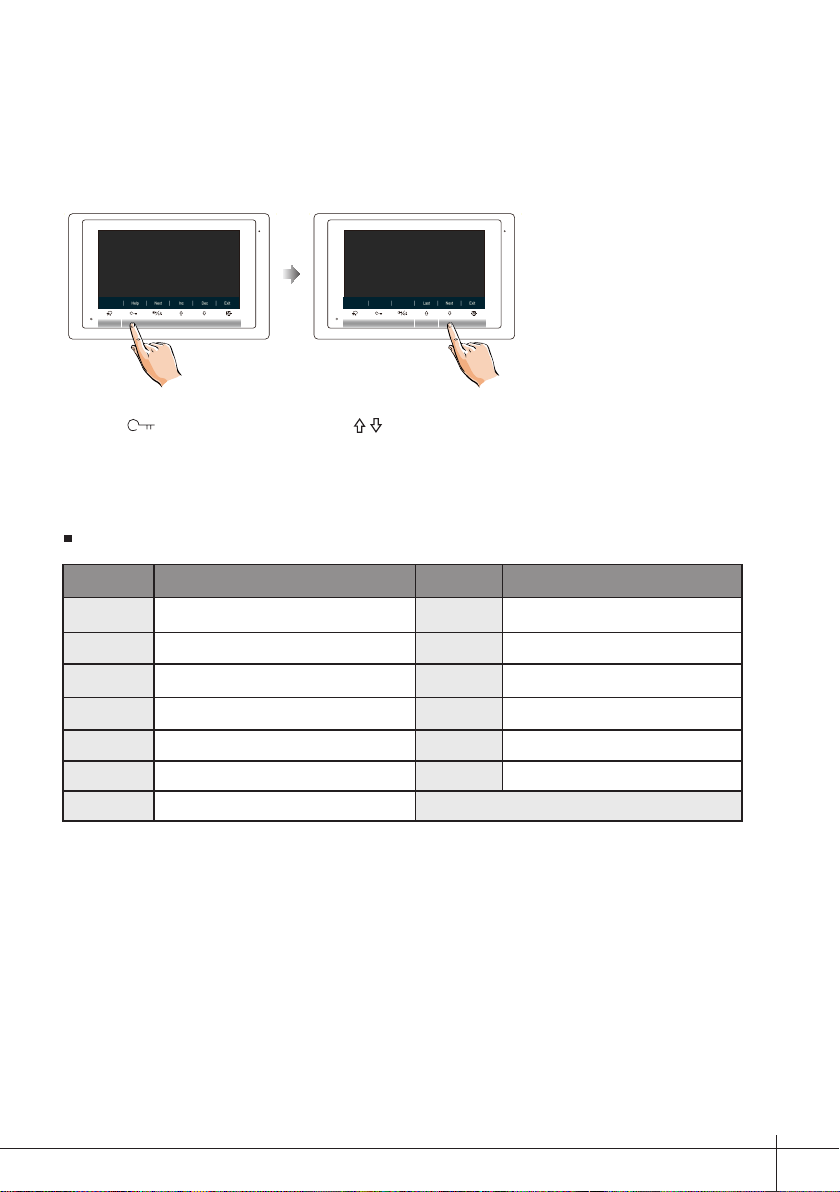
1.Press Unlock(Help)
button in installation setting
page.
4.Use / button to search the
code you want.
The setting items and codes are as followings
Code Setting Item Code Setting Item
2419 Reset To Default 8018-8020 Video Format
2414 RM Parameter Set 8401-8499 Unlock Time
3006-3600 Monitor Time 9015-9016 Intercom On/Off
8008-8009 Date Mode 9017-9018 Memory On/Off
8010-8011 Unlock Mode:Close/Open 9101-9104 DS Quantity
8012-8013 Time Mode 9200-9216 Cam Quantity
8016-8017 Bypass Setting
How to set the slave monitor address
Maximum 4 monitors can be connected in one apartment,one master monitor together
with 3 slave monitors, so you should set the address correctly.(note:must have one
monitor to be set as master monitor)
The code of 8000 is used to set the master monitor.
The code of 8001 is used to set the rst slave monitor .
The code of 8002 is used to set the second slave monitor .
The code of 8003 is used to set the third slave monitor .
-11-
Page 14

How to set date and time format
The system offers two methods of date and time.
The code number of 8008 is used to set the date format as month/date/year
The code number of 8009 is used to set the date format as date/month/year
The code number of 8012 is used to set the time format as 12 hour system
The code number of 8013 is used to set the time format as 24 hour system
How to set the monitor panel on
In default mode,when receive a calling,the master and slave monitors will ring at the
same time,and just the master monitor can display the image while the slave monitors
can not.But the settings can be changed,you can set the master monitor and all the slave
monitors to panel on at the same time when receiving a call, just input the code number
of 8006 on each slave monitor.
Press call button
on door station
When reveiving calling,all monitors can display the image at the same time
Master monitor #1st slave monitor #2nd slave monitor #3rd slave monitor
How to set the unlock parameter
Unlock mode:
There are two unlock modes: 1.power-on- to-unlock type:unlock mode=0(by default)
2.power-off-to-unlock:unlock mode=1.
The code number of 8010 is used to set the unlock mode to 0
The code number of 8011 is used to set the unlock mode to 1
Unlock time:
The unlock time can be changed by yourself at any time. it can be set from 1 to 99
seconds.
The code number from 8401 to 8499 are used to set the unlock time to 1~ 99 seconds.
-12-
Page 15

Entering address form page
With a tool to Toggle one of the DIP(1-5) to open Address Setting page.
Refer to the followings:
ON DIP
1 2 3 4 5 6
01.00
How to set the user code for the monitor
In the DT system,every apartment must have a unique identification called User Code.
The DIP swiches are used to configure the User Code for each Monitor.
•
Bit-1 to Bit-5 are used to User Code setting. The value is from 1 to 32, which have 32
different codes for 32 apartments.
When multi Monitors are installed in one apartment, these Monitors have to use the same
•
User Code setting, and the Master/Slave mode should be set on the Monitor.
Bit-6 is line terminal switch, which have to be set to ON if the Monitor is in the end of the
•
line(bus), otherwise set to OFF. The end of the line is terminal that no other section will
start from it.
Bit-6 line terminal setting:
ON
1 2 3 4 5 6
ON
ON(1)
=
OFF(0)
ON
Bit state Setting Bit state Setting
=
ON
1 2 3 4 5 6
Monitor not at
the end of the
line.
ON
1 2 3 4 5 6
Monitor at
the end of
the line.
-13-
Page 16

Switch
•
• When multi Monitors are installed in one apartment, these Monitors have to use the same
User Code setting, and the Master/Slave mode should be set on the Monitor.
•
ON(1)
=
OFF(0)
=
ON
ON
ON
1 2 3 4 5 6
Bit state User Code Bit state User Code Bit state User Code
1 2 3 4 5 6
1 2 3 4 5 6
1 2 3 4 5 6
1 2 3 4 5 6
1 2 3 4 5 6
1 2 3 4 5 6
1 2 3 4 5 6
1 2 3 4 5 6
1 2 3 4 5 6
1 2 3 4 5 6
1 2 3 4 5 6
Bit-6 line terminal setting:
Bit state Setting Bit state Setting
1 2 3 4 5 6
ON
Monitor not at
the end of the
line.
1 2 3 4 5 6
ON
Monitor at
the end of
the line.
In the DT system,every apartment must have a unique identification called User Code.
The DIP swiches are used to configure the User Code for each Monitor.
Bit-1 to Bit-5 are used to User Code setting. The value is from 1 to 32, which have 32
different codes for 32 apartments.
Bit-6 is line terminal switch, which have to be set to ON if the Monitor is in the end of the
line(bus), otherwise set to OFF. The end of the line is terminal that no other section will
start from it.
ON
1 2 3 4 5 6
ON
1 2 3 4 5 6
ON
1 2 3 4 5 6
ON
1 2 3 4 5 6
ON
1 2 3 4 5 6
ON
1 2 3 4 5 6
ON
1 2 3 4 5 6
ON
Code=1
Code=2
Code=3
Code=4
Code=5
Code=6
Code=7
Code=8
ON
1 2 3 4 5 6
ON
1 2 3 4 5 6
ON
1 2 3 4 5 6
ON
1 2 3 4 5 6
ON
1 2 3 4 5 6
ON
ON
1 2 3 4 5 6
ON
Code=12
Code=13
Code=14
Code=15
Code=16
Code=17
Code=18
Code=19
ON
1 2 3 4 5 6
ON
ON
1 2 3 4 5 6
ON
ON
1 2 3 4 5 6
ON
ON
1 2 3 4 5 6
ON
Code=23
Code=24
Code=25
Code=26
Code=27
Code=28
Code=29
Code=30
-14-
ON
ON
ON
1 2 3 4 5 6
Code=9
Code=10
Code=11
11. Basic Connection
door
station
ON
1 2 3 4 5 6
ON
ON
1 2 3 4 5 6
-
+
Code=20
Code=21
ON
1 2 3 4 5 6
ON
Code=31
Code=32
Code=22
DPSDR-30-24
Doorbell Button
L2L1
SW-
SW+
GND
RING
ON DIP
1 2 3 4 5 6
Page 17

12. Specication
●Power supply for indoor monitor: DC 20~28V
●Power consumption: Standby 6.6mA; Working 240mA
●Monitor screen: 7 Inch digital color LCD
●Display Resolutions: 800*3(R, G, B) x 480 pixels
●Video signal: 1Vp-p, 75Ω, CCIR standard
●Wiring: 2 wires, non-polarity
●Dimension: 5.51(H)×8.66(W)×0.69(D) inch
13. Precautions
1) All components should be protected from violence vibration. And not allow to be
impacted, knocked and dropped.
2) Please do the cleanness with soft cotton cloth, please do not use the organic
impregnant or chemical clean agent. If necessary, please use a little pure water or dilute
soap water to clean the dust.
3) Image distortion may occur if the video monitor is mounted too close to magnetic eld
e. g. Microwaves, TV, computer etc.
4) Please keep away the monitor from wet, high temperature, dust, caustic and oxidation
gas in order to avoid any unpredictable damage.
5) Must use the right adaptor which is supplied by the manufacturer or approved
by the manufacturer.
6) Pay attention to the high voltage inside the products, please refer service only to a
trained and qualied professional.
-15-
Page 18

Note
-16-
Page 19

Note
-17-
Page 20

DT-ENG-17S/D7-V1
The design and specifications can be changed without notice to the user. Right to
interpret and copyright of this manual are preserved.
 Loading...