


Thank you for your purchase of this Nyrius product. Please read this instruction manual carefully
before using product to ensure proper use. Keep this manual in a safe place for future reference.
Merci d’avoir fait l’achat de cet appareil Nyrius. Veuillez lire le présent guide attentivement avant
de faire fonctionner l’appareil pour vous assurer de l’utiliser correctement. Conservez le présent
guide dans un endroit sûr an de pouvoir vous y référer au besoin.
USER’S GUIDE
GUIDE DE L’UTILISATEUR
Portable Theatre System - for iPhone with 7” LCD Screen
Système Home Cinéma Portable - pour iPhone avec écran LCD 7po
NIPV800

- 2 -
TABLE OF CONTENTS
WHAT’S INCLUDED
• iPod/iPhone Media Player
• AC Adapter
• Car Charger
• Player Adapters
• RCA Cable
• Users Manual
What’s Included ....................................................................................... 2
Compatibility ............................................................................................. 2
Buttons and Connections ........................................................................ 3
Installing iPod/iPhone .............................................................................. 3
On Screen Settings ................................................................................. 4
Player Operation ...................................................................................... 4
TV Connection ......................................................................................... 4
Power Supply .......................................................................................... 5
Specications .......................................................................................... 5
Nyrius Warranty ....................................................................................... 6
• iPod Touch
• iPod Touch 2G
• iPod Touch 3G
• iPod Touch 4G
• iPod Classic
• iPod Video
• iPod Nano 3G
• iPod Nano 4G
• iPod Nano 5G
• iPod Nano 6G
• iPhone
• iPhone 3G
• iPhone 3GS
• iPhone 4
COMPATIBILITY
- 3 -
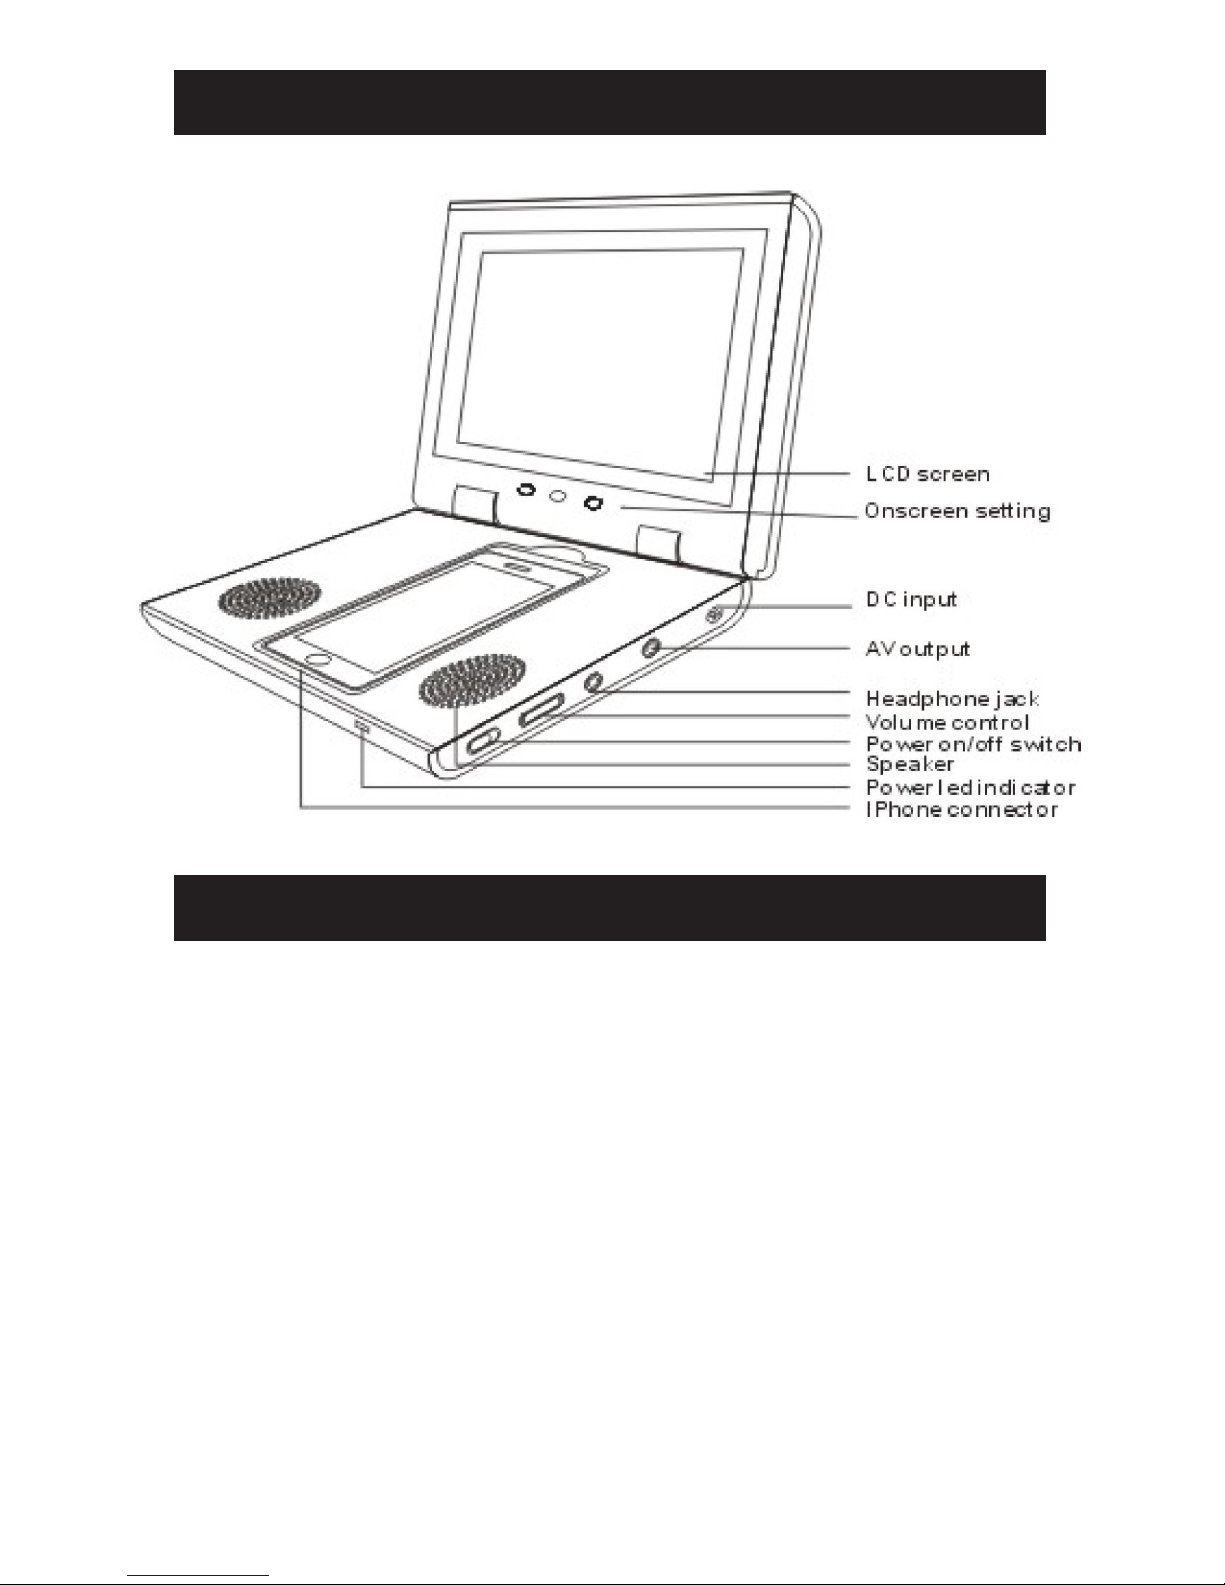
BUTTONS AND CONNECTIONS
INSTALLING iPod/iPhone
1. Pull the iPod/iPhone connector out of the unit.
2. Place the proper player adapter in the player.
3. Place your iPod/iPhone in the player.
4. Push the iPod/iPhone connector back into place so it connects with the
jack on the bottom of the iPod/iPhone.
Note:
To remove the iPod/iPhone, do not lift out while still connected, pull on the
iPod/iPhone connector with your thumb to detach the iPod/iPhone from the
player, and then lift out. Otherwise the connection on the bottom of the iPod/
iPhone could be damaged.

- 4 -
DOCK OPERATION
When connected to an AC power outlet the player will charge your iPod or
iPhone, your iPod/iPhone will also charge if you are running on the unit’s
internal battery.
1. Plug the included AC adapter into the DC input on the right side of the
player.
2. Plug the other end of the AC adapter into a 120V wall outlet.
3. Slide the power switch on the right side of the player to the ON position.
4. Install the correct player adapter according to your type of iPod/iPhone.
5. Install your iPod or iPhone into the players iPod/iPhone connector.
6. Using the controls on your iPod or iPhone, select which song or movie
you would like to play.
7. You can adjust the volume using the thumbwheel on the right side of the
player.
8. You can also listen to the media with headphones (not included) plug the
end of the headphones into the headphone jack on the right side of the
player.
Note: When music operation is chosen there will be no picture or video shown
on the player’s screen
TV CONNECTION
1. Connect the single end of the included RCA cable to the AV out jack on
the right side of the player.
2. Connect the three audio and video connections to the AV inputs on the
back of your TV.
3. Ensure that you are following the correct color coding on the AV plugs
for the player to function properly.
ON SCREEN SETTINGS
Using the on screen display setting buttons you can adjust the look of the
picture on the screen by adjusting the brightness, contrast, color, and tint; you
can also set the player back to its default settings.
1. Press the menu button located below the player’s screen to select and
adjust the brightness, contrast, color, tint or reset.
2. To adjust the chosen setting, press the “+“ and “-“ buttons located below
the player’s screen.
3. The player will go back to regular operation on its own after a few moments
when buttons are no longer being pressed.

- 5 -
POWER SUPPLY
When connected to an AC power outlet the player will charge your iPod or
iPhone, your player will not be charged if you are running on the internal
battery.
• During recharge, the power LED indicator is red
• Once the iPod/iPhone is fully charged the LED indicator will turn off
See table below for player operation and charging options:
AC Power
Player Turned
ON/OFF
Charge
Player
Play Movies
Charge iPod/
iPhone
Yes
OFF YES NO NO
ON NO YES YES
No ON NO YES YES
SPECIFICATIONS
Screen Size ........................................................ 7” wide
Resolution ........................................................... 480 x 234
Brightness ........................................................... 200 cd/m
2
Contrast .............................................................. 400:1
Video Output ....................................................... 1.0 Vp-p
Speaker Unit ....................................................... 2 x 1W
Distortion ............................................................ Standard ≤1%, Max. ≤10%
S/N Ratio ............................................................ 65 dB
Seperation .......................................................... 60 dB
Balance ............................................................... ≤1 ~ 2 dB
Power Supply .................................................... 5VDC ~ 2A
Power Consumption ........................................... 10W
Battery Life .......................................................... Charged: approx. 4 hrs
Playback: approx. 2 hrs
Charge iPod/iPhone ........................................... approx. 2.5 hrs

- 6 -
NYRIUS® WARRANTY
Consumer Electronics Products and Home Appliances
Thank you for choosing NYRIUS®!
BlueTronics Group gives the following express warranty to the original consumer purchaser or gift recipient for this NYRIUS
product, when shipped in its original container and sold or distributed in Canada by BlueTronics Group or by an Authorized
NYRIUS Dealer:
BlueTronics Group warrants that this product is free, under normal use and maintenance, from any defects in material and
workmanship. If any such defects should be found in this product within the applicable warranty period, BlueTronics Group
shall, at its option, repair or replace the product as specied herein. Replacement parts furnished in connection with this
warranty shall be warranted for a period equal to the unexpired portion of the original equipment warranty.
This warranty shall not apply to:
a. Any defects caused or repairs required as a result of abusive operation, negligence, accident, improper installation
or inappropriate use as outlined in the owner’s manual.
b. Any NYRIUS product tampered with, modied, adjusted or repaired by any party other than BlueTronics Group or
NYRIUS’s Authorized Service Centres.
c. Damage caused or repairs required as a result of the use with items not specied or approved by BlueTronics Group,
including but not limited to head cleaning tapes and chemical cleaning agents.
d. Any replacement of accessories, glassware, consumable or peripheral items required through normal use of the
product including but not limited to earphones, remote controls, AC adapters, batteries, temperature probe, stylus,
trays, lters, cables, paper, cabinet, cabinet parts, knobs, buttons, baskets, stands, shelves, cookware and cooking
utensils.
e. Any cosmetic damage to the surface or exterior that has been defaced or caused by normal wear and tear.
f. Any damage caused by external or environmental conditions, including but not limited to transmission line/power line
voltage or liquid spillage.
g. Any product received without appropriate model, serial number and CSA /cUL /cULus /cETL /cETLus markings.
h. Any products used for rental or commercial purposes.
i. Any installation, setup and/or programming charges.
Should this NYRIUS product fail to operate during the warranty period, warranty service may be obtained upon delivery of the
NYRIUS product together with proof of purchase and a copy of this LIMITED WARRANTY statement to an Authorized NYRIUS
Service Centre. In-home warranty service may be provided at BlueTronics Group’s discretion on any NYRIUS television with
the screen size of 27” or larger. This warranty constitutes the entire express warranty granted by BlueTronics Group and no
other dealer, service centre or their agent or employee is authorized to extend, enlarge or transfer this warranty on behalf
of BlueTronics Group. To the extent the law permits, BlueTronics Group disclaims any and all liability for direct or indirect
damages or losses or for any incidental, special or consequential damages or loss of prots resulting from a defect in material
or workmanship relating to the product, including damages for the loss of time or use of this NYRIUS product or the loss of
information. The purchaser will be responsible for any removal, reinstallation, transportation and insurance costs incurred.
Correction of defects, in the manner and period of time described herein, constitute complete fulllment of all obligations and
responsibilities of NYRIUS Electronics to the purchaser with respect to the product and shall constitute full satisfaction of all
claims, whether based on contract, negligence, strict liability or otherwise.
CARRY-IN PARTS & LABOUR WARRANTY PERIODS:
• Audio Products: 1 Year (Remote Control, if applicable – 90 Days)
• DVD Products: 1 Year (Remote Control – 90 Days)
• LCD & Plasma Display TV: 1 Year (Remote Control – 90 Days)
• Television Products: 1 Year (Remote Control – 90 Days)
• VCR Products: 1 Year (Remote Control – 90 Days, Video Heads – 6 Months)
• Home Appliances: 1 Year
- Microwave Magnetron parts only additional 3 Years
- Refrigerator / Freezer Compressor parts only, additional 4 years
• Home Ofce: 1 Year
To obtain the name and address of the nearest Authorized NYRIUS Service Centre or for more information on this warranty
• Visit www.NYRIUS.com
• Send an e-mail to support@bluetronics.com
• Mail your inquiry to:
BlueTronics Group
NYRIUS Customer Service
4080 Montrose Road, Niagara Falls, ON L2H 1J9; or
• Call toll free 1-800-663-5954, Monday to Friday 8:00am – 5:00pm Eastern Time
NYRIUS is a registered trade-mark
of Circus World Displays Limited

- 7 -
MATÈRIEL FOURNI
• Lecteur Média iPod/iPhone
• Adaptateur Secteur
• Chargeur Allume Cigare
• Adaptateurs du Lecteur
• Câble RCA
• Manuel d’Utilisateur
Matériel Fourni ......................................................................................... 7
Compatibilité ............................................................................................. 7
Touches et Connexions ........................................................................... 8
Installer un iPod/iPhone ........................................................................... 8
Réglages à l’écran ................................................................................... 9
Utilisation du Lecteur ............................................................................... 9
Connectique TV ....................................................................................... 9
Alimentation électrique ............................................................................ 10
Caractéristiques ....................................................................................... 10
Garantie Nyrius ........................................................................................ 11
TABLE DES MATIÈRES
• iPod Touch
• iPod Touch 2G
• iPod Touch 3G
• iPod Touch 4G
• iPod Classic
• iPod Video
• iPod Nano 3G
• iPod Nano 4G
• iPod Nano 5G
• iPod Nano 6G
• iPhone
• iPhone 3G
• iPhone 3GS
• iPhone 4
COMPATIBILITÉ

- 8 -
TOUCHES ET CONNEXIONS
INSTALLER UN iPod/iPhone
1. Sortir le connecteur iPod/iPhone de l’unité.
2. Placer le bon adaptateur dans le lecteur.
3. Placer votre iPod/iPhone dans le lecteur.
4. Remettre le connecteur iPod/iPhone à sa place pour qu’il soit connecté
avec la prise du dessous de l’iPod/iPhone.
Note:
Pour enlever l’iPod/iPhone, ne pas le retirer s’il est toujours connecté,
pousser le connecteur iPod/iPhone avec votre pouce pour détacher l’iPod/
iPhone du lecteur, puis retirez-le. Sinon, la connexion au-dessous de l’iPod/
iPhone pourrait être endommagée.
Écran LCD
Paramètres de l’écran
Prise d’entrée Secteur
Sortie AV
Sortie Casque
Contrôle du Volume
Interrupteur d’alimentation
Haut-parleur
Indicateur de Puissance
Connecteur d’iPhone

- 9 -
UTILISATION DU DOCK
Lorsqu’il est connecté à une prise secteur le lecteur rechargera votre iPod ou
iPhone, votre iPod/iPhone sera chargé si vous utilisez la batterie interne.
1. Brancher l’adaptateur secteur inclus dans la prise DV située sur le côté
droit du lecteur.
2. Brancher l’autre extrémité de l’adaptateur secteur dans une prise murale
120V.
3. Faire glisser le bouton power sur le côté droit du lecteur sur la position ON.
4. Installer le bon adaptateur selon le type de votre iPod/iPhone.
5. Installer votre iPod ou iPhone sur les connecteurs iPod/iPhone du lecteur.
6. En utilisant les touches de votre iPod ou iPhone, sélectionner la chanson
ou le lm vous souhaitez lire.
7. Vous pouvez ajuster le volume en utilisant la roulette sur le côté droit du
lecteur.
8. Vous pouvez aussi écouter les médias avec les écouteurs (non fournis),
brancher l’extrémité des écouteurs dans la prise écouteurs sur le côté droit
du lecteur.
Note: Lorsque l’utilisation musicale est choisie aucune image ou vidéo ne
s’afchera sur l’écran du lecteur.
CONNECTIQUE TV
1. Connecter l’extrémité simple du câble RCA fourni dans la sortie AV sur
le côté droit du lecteur.
2. Connecter les trois connexions audio et vidéo sur les entrées AV à
l’arrière de votre TV.
3. S’assurer de suivre correctement les indications de couleur des prises
AV pour que le lecteur fonctionne correctement.
En utilisant les touches de réglages à l’écran vous pouvez modier l’aspect
de l’image sur l’écran en ajustant la luminosité, le contraste, la couleur, et la
teinte; vous pouvez aussi remettre le lecteur aux réglages par défaut.
1. Presser la touche menu située sous l’écran du lecteur pour sélectionner
et ajuster la luminosité, le contraste, la teinte ou remettre à zéro.
2. Pour modier les réglages choisis, presser les touches “+“ et “-“ situés
sous l’écran du lecteur.
3. Le lecteur retournera à une utilisation normale automatiquement après
quelques moments si aucune touche n’est pressée.
RÉGLAGES A L’ÉCRAN

- 10 -
Lorsqu’il est connecté à une prise secteur le lecteur rechargera votre iPod
ou iPhone, votre iPod/iPhone ne sera pas chargé si vous utilisez la batterie
interne.
• Pendant la recharge, la LED power est rouge
• Une fois que l’iPod/iPhone est entièrement chargé la LED s’éteindra.
Voir le tableau ci-dessous pour les options d’utilisation et de chargement :
Alimentation
Electrique
Lecture sur
ON/OFF
Charger
Lecture
Lire des
lms
Charger
iPod/iPhone
Oui
NON OUI NON NON
OUI NON OUI OUI
Non OUI NON OUI OUI
CARACTÉRISTIQUES
Taille d’écran........................................................large de 7”
Résolution............................................................480 x 234
Luminosité ...........................................................200 cd/m2
Contraste .............................................................400:1
Sortie Vidéo .........................................................1.0 Vp-p
Unité Haut Parleur ...............................................2 x 1W
Distortion .............................................................Standard ≤1%, Max. ≤10%
Ratio S/N .............................................................65 dB
Séparation ...........................................................60 dB
Balance................................................................≤1 ~ 2 dB
Alimentation Secteur ...........................................5VDC ~ 2A
Consommation Électrique ...................................10W
Durée de vie de la batterie ..................................Chargé: approx. 4 hrs
Lecture: approx. 2 hrs
Charge de l’iPod/iPhone ......................................approx 2.5 hrs
ALIMENTATION ÉLECTRIQUE

- 11 -
GARANTIE NYRIUS®
Appareils électroniques grand public et électroménagers
Merci d’avoir choisi NYRIUS®!
BlueTronics Group accorde la garantie expresse suivante à l’acheteur original de cet appareil NYRIUS ou à la personne qui l’a reçu en
cadeau, pourvu qu’il ait été expédié et vendu ou distribué au Canada par BlueTronics Group ou un détaillant NYRIUS autorisé dans son
emballage original.
BlueTronics Group garantit que cet appareil est exempt de tout défaut de matériau et de fabrication dans des conditions normales
d’utilisation et d’entretien. Advenant le cas où cet appareil s’avèrerait défectueux au cours de la période pendant laquelle il est couvert par
la présente garantie, BlueTronics Group s’engage à le réparer ou, le cas échéant et à son entière discrétion, le remplacer. Les pièces de
rechange utilisées dans l’exécution de la présente sont aussi couvertes par la garantie pendant une période égale à la portion non échue de
la garantie originale sur l’appareil.
La présente garantie ne couvre pas :
a. Les défectuosités ni les réparations résultant d’un usage abusif, d’une négligence, d’un accident ou d’une installation inadéquate ou
un usage inapproprié selon les directives fournies dans le guide d’utilisation accompagnant l’appareil.
b. Les appareils de marque NYRIUS traqués, modiés, réglés, ajustés ou réparés par une entité autre que BlueTronics Group ou un
centre de réparation autorisé par NYRIUS.
c. Les dommages causés ni les réparations requises à l’appareil résultant de son usage avec des composantes ou accessoires non
recommandés ni approuvés par BlueTronics Group, incluant, sans en exclure d’autres, les cassettes et/ou produits chimiques de
nettoyage.
d. Le remplacement d’accessoires ou de pièces de verre, consomptibles ou périphériques requis dans le cadre de l’usage normal de
l’appareil incluant, sans en exclure d’autres, les écouteurs, télécommandes, adaptateurs CA, piles, sondes de température, pointes
de lecture, stylets, plateaux, ltres, câbles, papier, boîtier et composantes de boîtiers, boutons, paniers, supports, tablettes et
accessoires et ustensiles de cuisson.
e. Tout dommage apparent à la surface ou au boîtier extérieur de l’appareil et attribuable à la détérioration ou à l’usure résultant d’un
usage normal.
f. Tout dommage causé par des conditions externes ou environnementales, incluant, sans en exclure d’autres, les lignes de
transmission ou de transport d’énergie ou le renversement de liquide.
g. Tout appareil ne portant pas les identications appropriées quant aux numéros de modèle et de série ni les étiquettes et attestations
de l’ACNOR, de l’ULC, de l’ULI, de l’ETL au Canada et aux États-Unis.
h. Tout appareil utilisé à des ns commerciales ou de location.
i. Tous les frais d’installation, d’ajustement et/ou de programmation.
Si cet appareil de marque NYRIUS devient défectueux au cours de la période de garantie, une réparation peut être obtenue, conformément aux
termes de la présente garantie, en présentant cet appareil NYRIUS avec la preuve d’achat originale et une copie de la présente GARANTIE
LIMITÉE à un centre de service autorisé par NYRIUS. Le service à domicile est effectué, à la discrétion de BlueTronics Group, sur les téléviseurs
de marque NYRIUS dotés d’un écran de 27 pouces et plus. La présente garantie constitue l’intégrale de la garantie expresse accordée par
BlueTronics Group et aucun autre détaillant, centre de service ni leur agent ou employé n’est autorisé à prolonger, étendre ou transférer la
présente garantie au nom de BlueTronics Group. Dans la mesure où la loi le permet, BlueTronics Group décline toute responsabilité pour des
dommages ou pertes directs et indirects, tous dommages accessoires, particuliers ou consécutifs ou perte de prots résultant d’un défaut de
matériau ou de fabrication de cet appareil, incluant les dommages attribuables à la perte de temps ou perte de jouissance de cet appareil NYRIUS
ou de la perte de données. Il incombe à l’acheteur de défrayer les coûts encourus pour l’enlèvement, la réinstallation, le transport et l’assurance
de cet appareil. La correction de toute défectuosité, de la manière et dans les délais indiqués dans la présente, constitue l’exécution intégrale
de tous les engagements et obligations contractés par BlueTronics Group envers l’acheteur à l’égard de cet appareil et représentera la pleine
et entière satisfaction vis-à-vis de toutes les réclamations contractuelles ou attribuables à la négligence, et la responsabilité absolue ou autre.
PÉRIODES DE GARANTIE SUR LES PIÈCES ET LA MAIN-D’ŒUVRE POUR LES APPAREILS RAPPORTÉS AUX CENTRES DE
SERVICE :
• Appareils audio et de communication : 1 an (télécommande, s’il y a lieu – 90 jours)
• Lecteurs DVD : 1 an (télécommande – 90 jours)
• Téléviseurs à écran ACL ou plasma : 1 an (télécommande – 90 jours)
• Téléviseurs : 1 an (télécommande – 90 jours)
• Magnétoscopes : 1 an (télécommande – 90 jours, têtes vidéo – 6 mois)
• Électroménagers : 1 an
- Four à micro-ondes, pièces de magnétron seulement, 3 ans additionnels
- Réfrigérateurs/congélateur, pièces de compresseur seulement, 4 ans additionnels
Pour obtenir le nom et l’adresse du centre de service NYRIUS autorisé le plus près de chez vous ou pour plus de renseignements sur cette
garantie :
• Visitez www.NYRIUS.com
• Contacter support@bluetronics.com
• Postez votre demande à
BlueTronics Group
NYRIUS Customer Service
4080 Montrose Road, Niagara Falls, ON L2H 1J9; or
• Composez le numéro sans frais : 1-800-663-5954, du lundi au vendredi, de 8 h à 17 h, heure de l’Est.
 Loading...