

Thank you for your purchase of this Nyrius product. Please read this instruction manual carefully before
using product to ensure proper use. Keep this manual in a safe place for future reference.
USER GUIDE
ARIES™ Prime
Wireless HD Transmitter
NPCS549
www.NYRIUS.com

- 2 -
• Digital Wireless HD Transmitter
• Digital Wireless HD Receiver
• 2 x 100-240V AC Power Adapter
• 5 ft HDMI® Cable
• Right Angle HDMI® Adapter
• USB Power Cable
• 2 x Screw Anchors
• 2 x Screws
• Instruction Manual
• Quick Start Guide
• 1 Year Warranty
• Lifetime Live Customer Support
Table of Contents ..........................................................................................................................2
What’s Included ...........................................................................................................................2
Features .......................................................................................................................................2
Buttons and Connections .............................................................................................................3
Setup ...........................................................................................................................................5
Troubleshooting .........................................................................................................................15
Specications .............................................................................................................................16
FCC Statement ............................................................................................................................17
Safety Information .....................................................................................................................18
Drilling Template ........................................................................................................................20
Notes ..........................................................................................................................................21
NYRIUS Warranty .......................................................................................................................22
TABLE OF CONTENTS
WHAT’S INCLUDED
• Wirelessly send high denition movies, TV shows, games & music from your PC, Blu-ray™/
DVD player, gaming console or other HDMI® device to an HDTV or projector
• Stream uncompressed, true 1080p video and surround sound audio in real-time with zero
latency; 3D compatible
• Powerful 30ft digital signal eliminates the hassle of installing messy cables
• Easy to install plug ‘n play setup gets you connected fast; no software required
• Compact ash drive design optimized for laptop use; powered by USB or wall adapter
FEATURES
- 3 -
BUTTONS AND CONNECTIONS
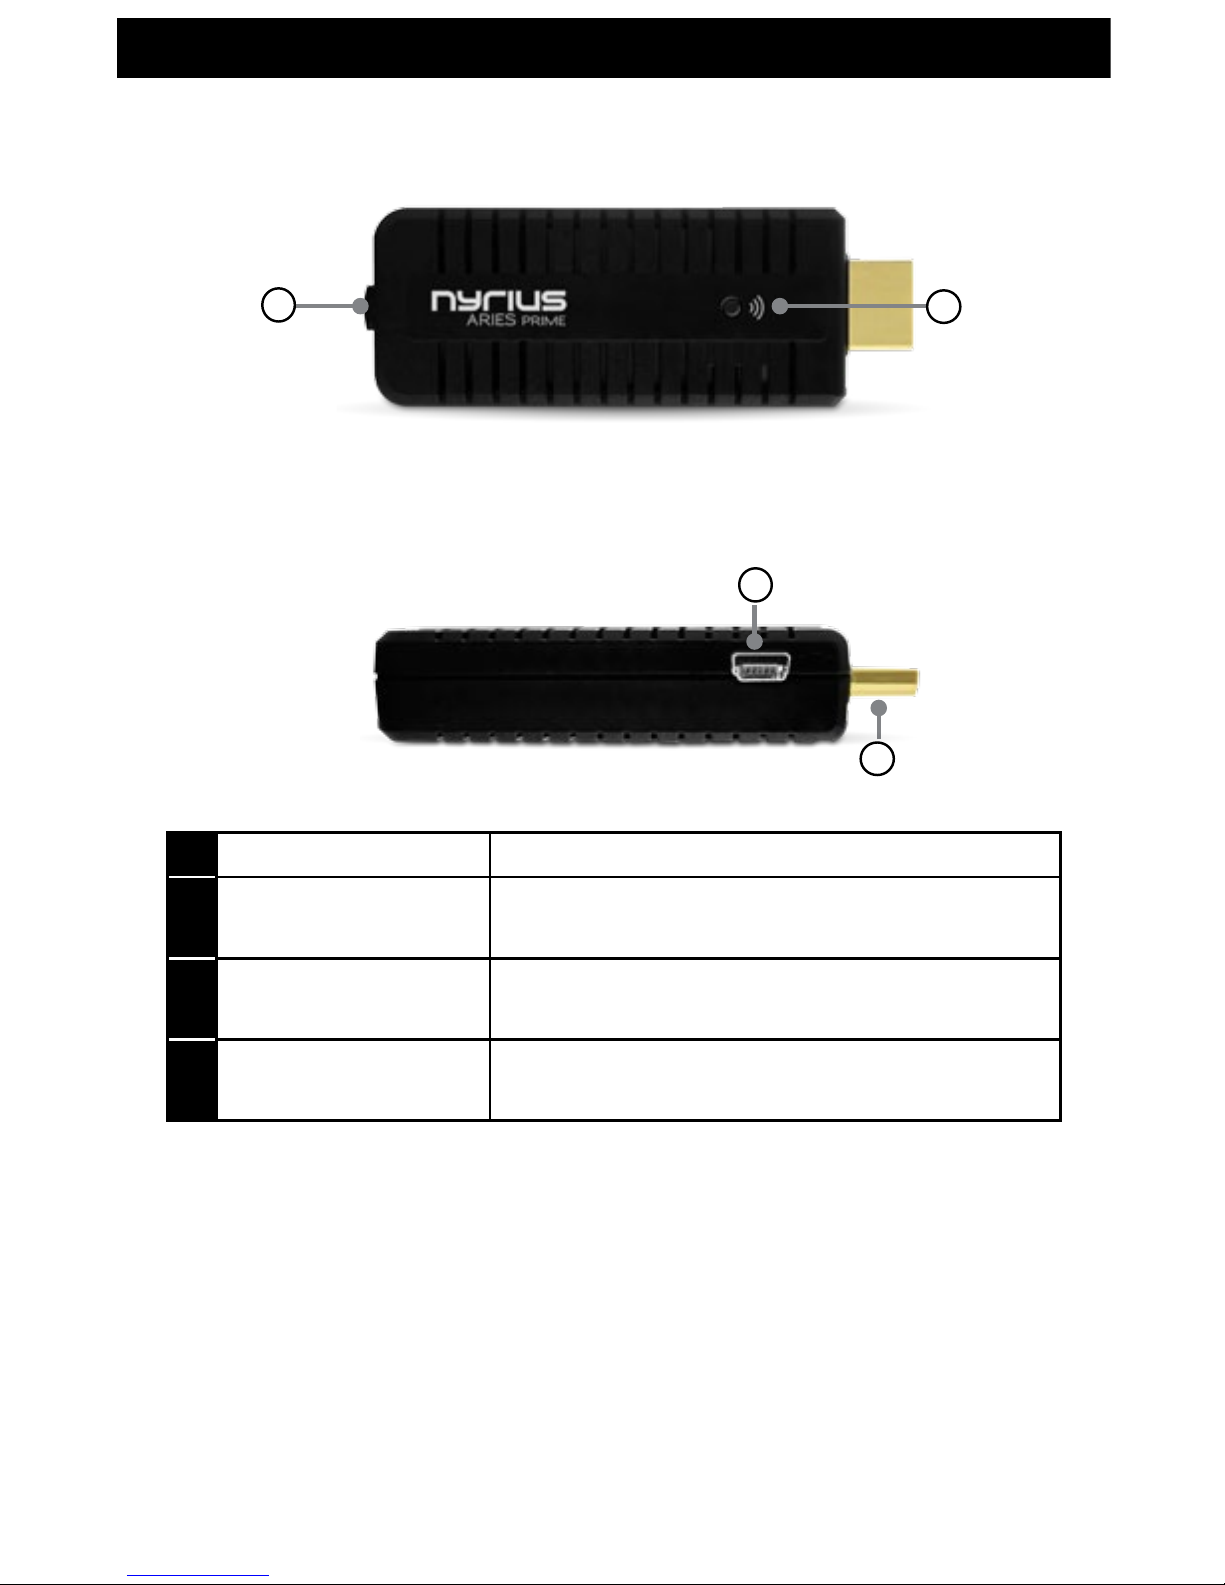
Transmitter - FRONT
Transmitter - SIDE
1
2
4
1 Pairing button To PAIR transmitter & receiver
2 LED Status Indicator
Is a SOLID BLUE colour when the power is ON and has a
successful wireless connection
3 USB Power Input
Connect the transmitter to the desktop or laptop’s USB port
with the provided USB cable
4 HDMI input
Plug in the Transmitter directly to a PC, cable box or any
HDMI device
3
- 4 -
BUTTONS AND CONNECTIONS
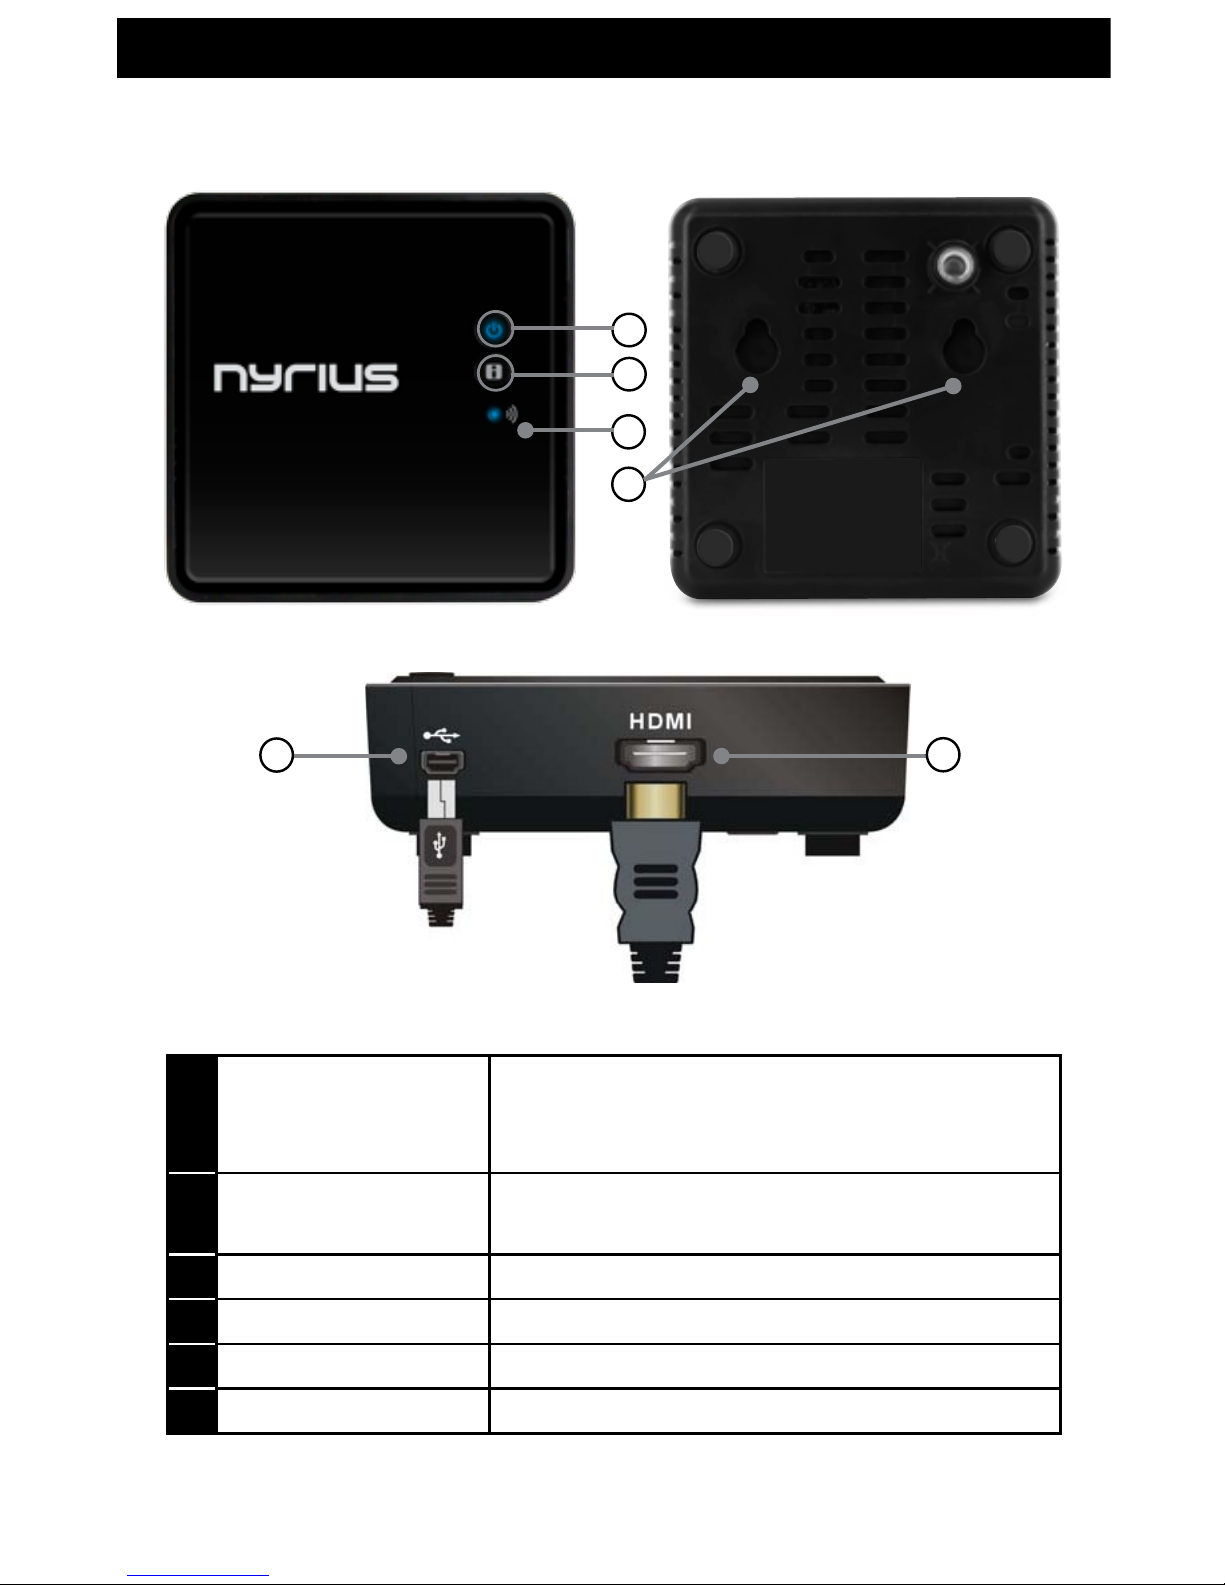
Receiver - TOP
1
2
3
Receiver - SIDE
5
6
1
Power Button with LED
indicator
Press to turn the receiver ON and OFF. The indicator in the
power button lights up in BLUE when the power is ON,
and turns RED in STANDBY MODE.
2 INFO Button
Press this button to display OSD information on the
HDTV screen.
3 Status LED Displays the VIDEO STATUS information.
4 Mounting Holes Allows you to hang the Receiver on the wall.
5 DC Input Connect to receiver’s power adapter.
6 HDMI Output Connect to HDTV via an HDMI cable.
Receiver - BOTTOM
4
- 5 -
SETUP
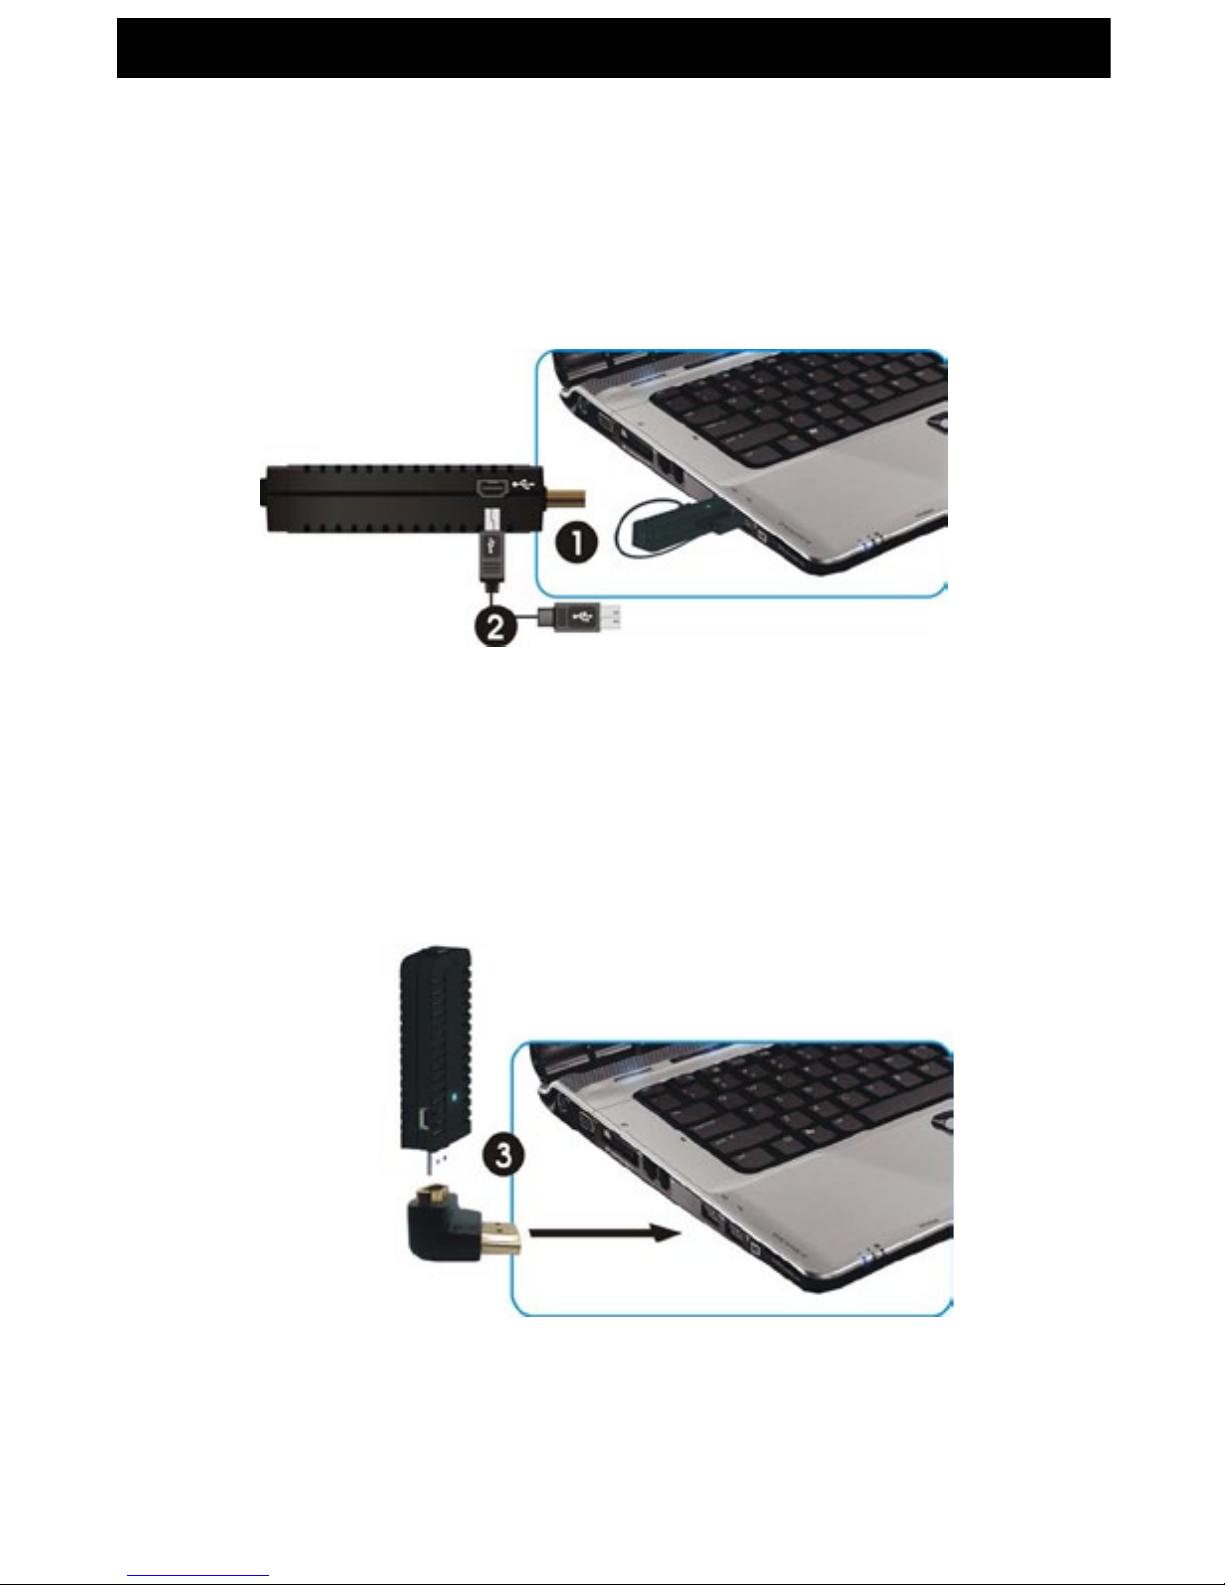
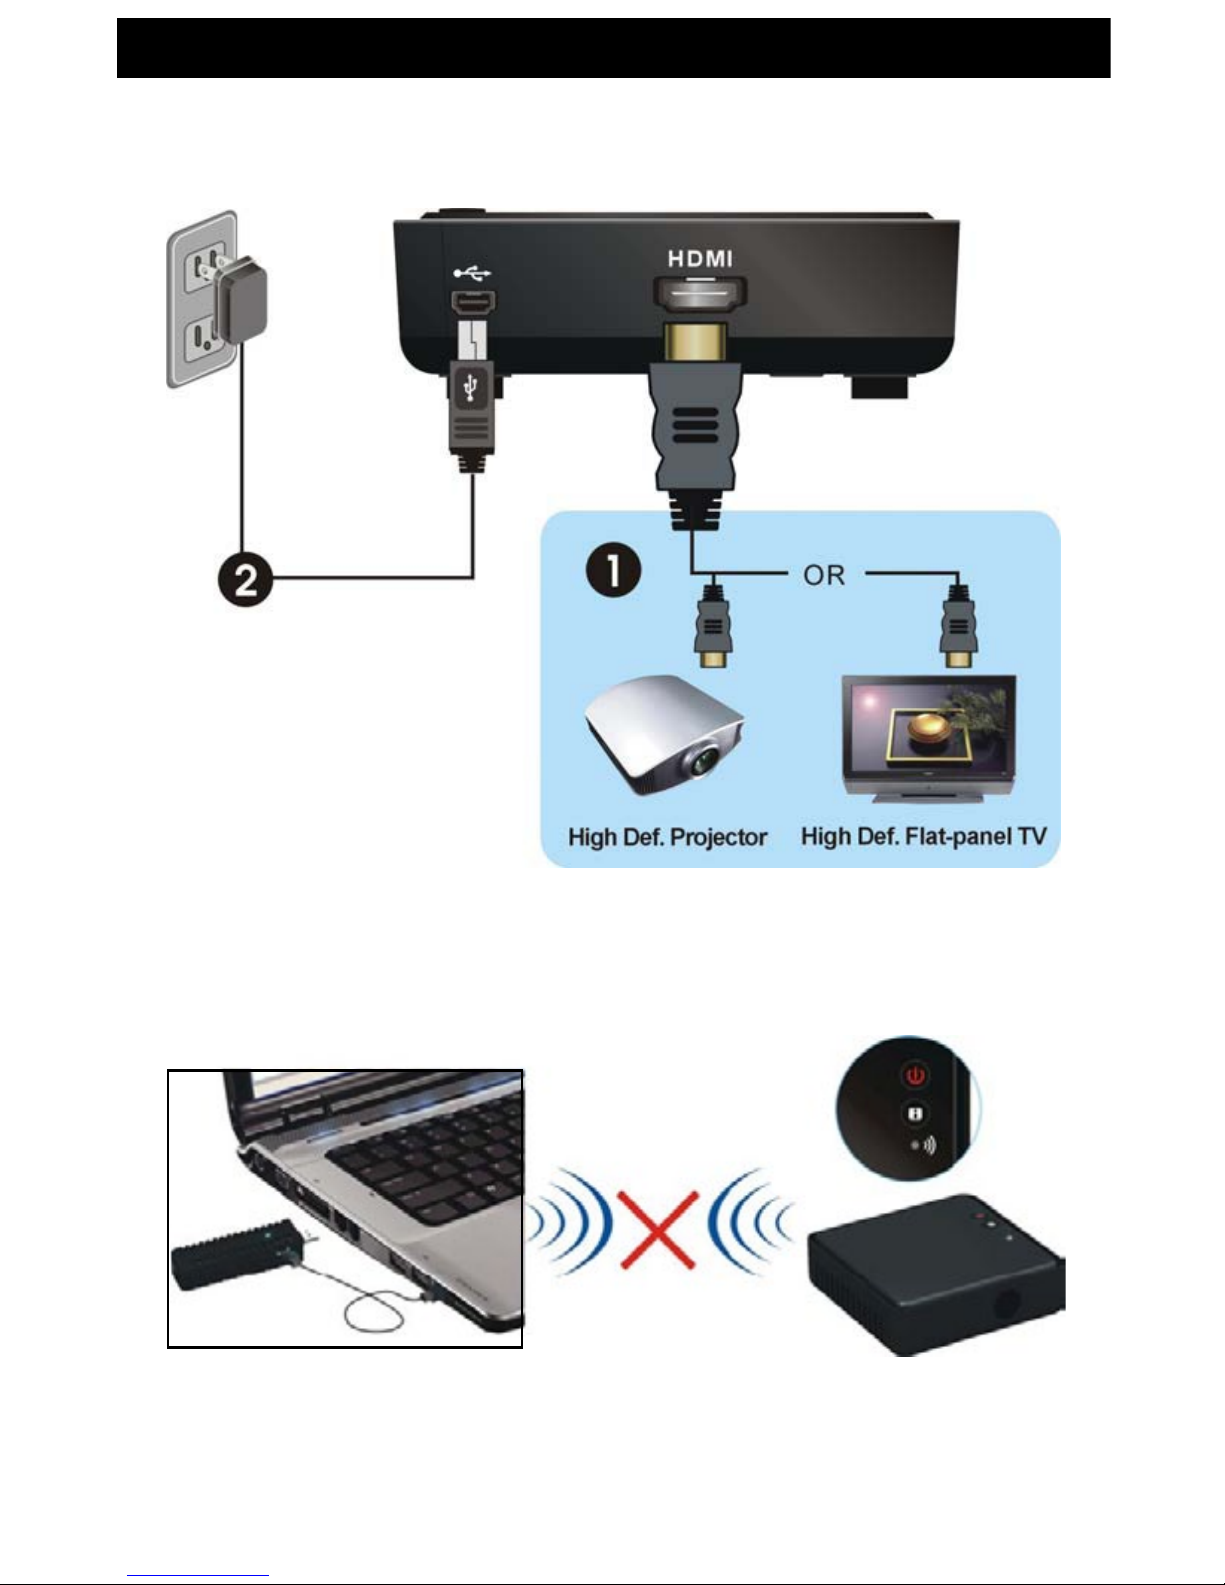
CONNECTING THE TRANSMITTER
1. Connect the Transmitter directly to a PC, cable box or any HDMI device.
2. Connect the Transmitter directly to a PC, cable box or any HDMI device using the USB cable
provided or connect the power adapter to the mini USB port of the transmitter and plug it to
an available wall outlet.
3. You may also connect the Right Angle HDMI® Adapter for easier setup with certain
computers.
• The LED indicator on the POWER BUTTON should light up in BLUE when the Transmitter is
properly connected to the computer via USB.
- 6 -
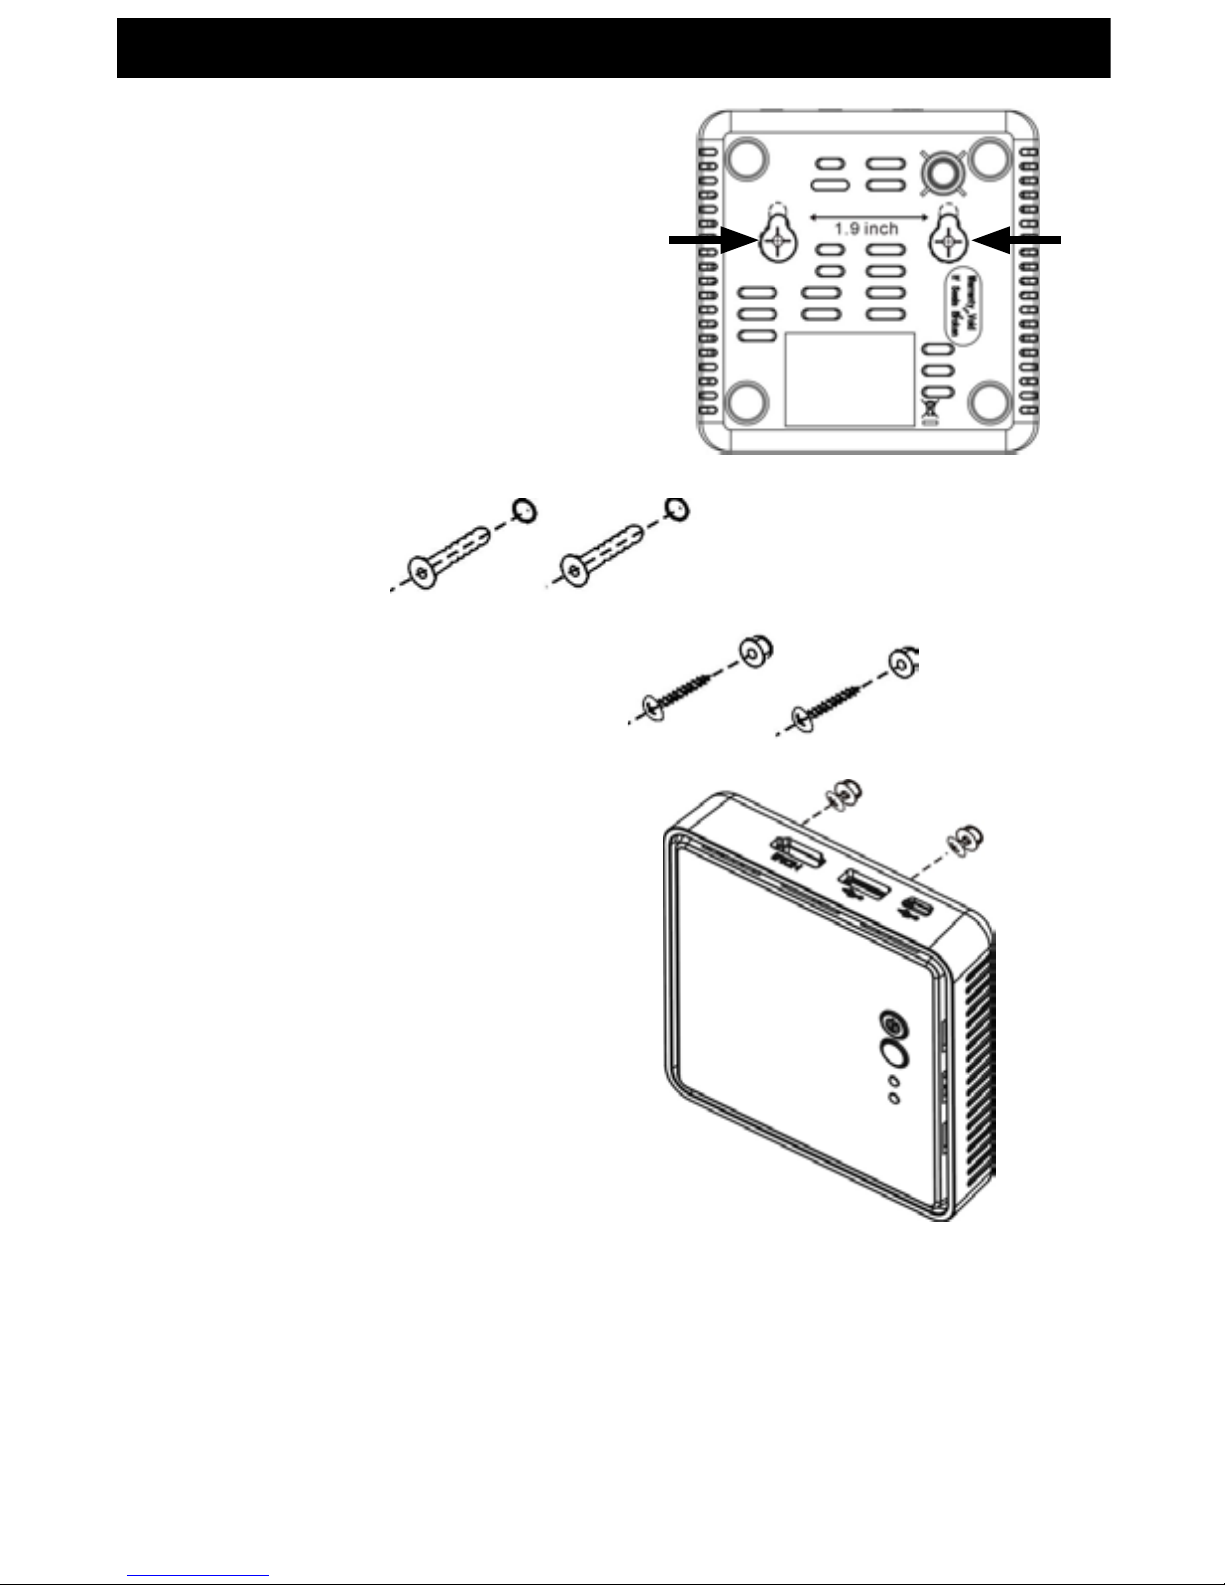
MOUNTING THE RECEIVER
1. Cut out the DRILLING TEMPLATE on page 19
and tape it to the wall in the location that you
would like the Receiver installed.
2. Pre-drill the holes in the marked location.
3. Insert the two supplied Anchors into the
pre-drilled holes.
4. Insert two screws into the anchors and
tighten until the screws only stick out about
an 1/8 inch away from the wall.
5. Locate the wall mounting holes on the back of
the Receiver. Slide the holes over the screws
sticking out of the wall to mount into place.
CONNECTING THE RECEIVER TO HDTV
1. Connect the HDMI cable to the HDMI Output of the receiver and to your HDTV television or HD
projector.
2. Connect the power adapter to the DC Input of the Receiver and into a wall outlet. When the
unit is successfully connected, the Power LED indicator on the POWER button lights up
in BLUE.
SETUP
DRILLING
TEMPLATE
PC / LAPTOP
- 7 -
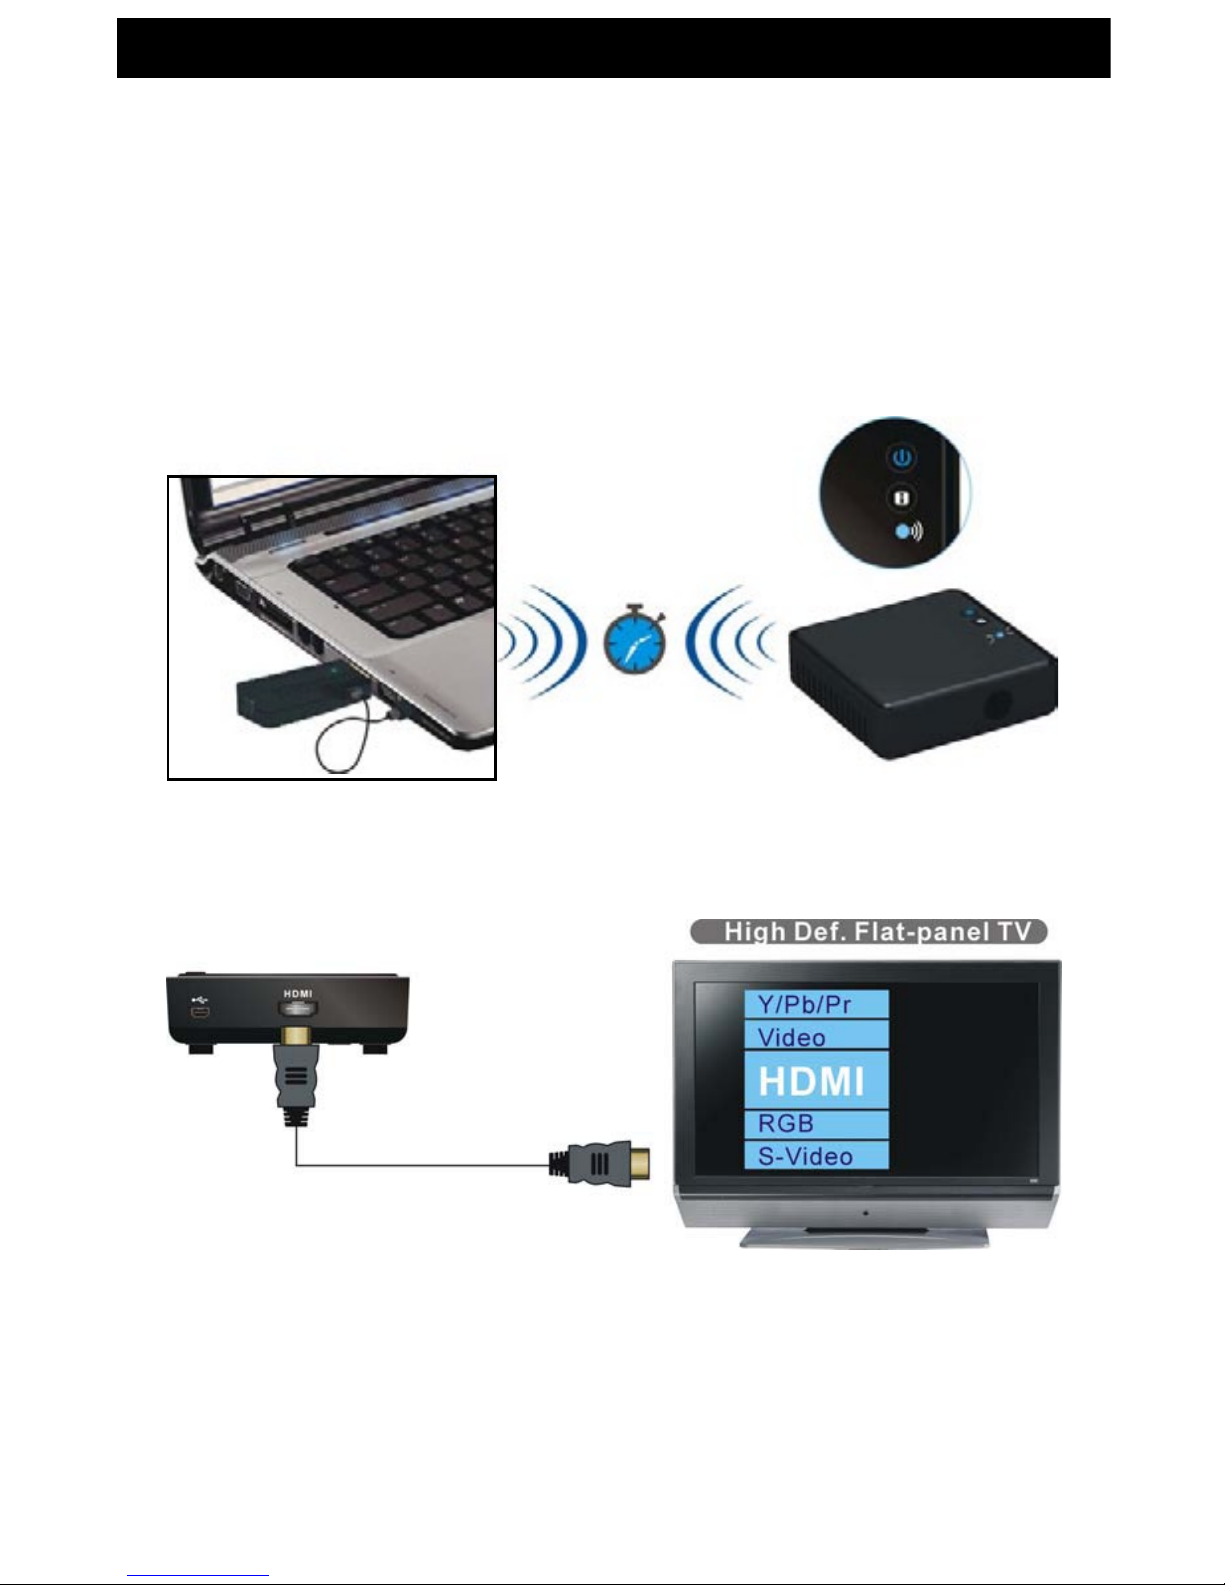
3. Once the Transmitter and Receiver are both connected, they will automatically pair to
each other.
SETUP
4. When you disconnect the transmitter and the link is disconnected over 10 minutes, the
Receiver will enter STANDBY MODE (Power LED of receiver is RED).
- 8 -
5. Connect the power adapter to the DC Input of the Receiver and into a wall outlet. When the
unit is successfully connected, the Power LED indicator on the POWER button lights up in
BLUE.
6. Once the Transmitter and Receiver are both connected, they will automatically pair to
each other.
7. During the warm-up period, the POWER LED will ash while BLUE until the signal between
the Transmitter and the Receiver is established. It will take aproximately 15 ~ 20 seconds to
boot-up and establish a link providing everything is operating normally.
8. Ensure your TV or projector is powered ON and is in"HDMI input" mode.
SETUP
- 9 -
SETUP
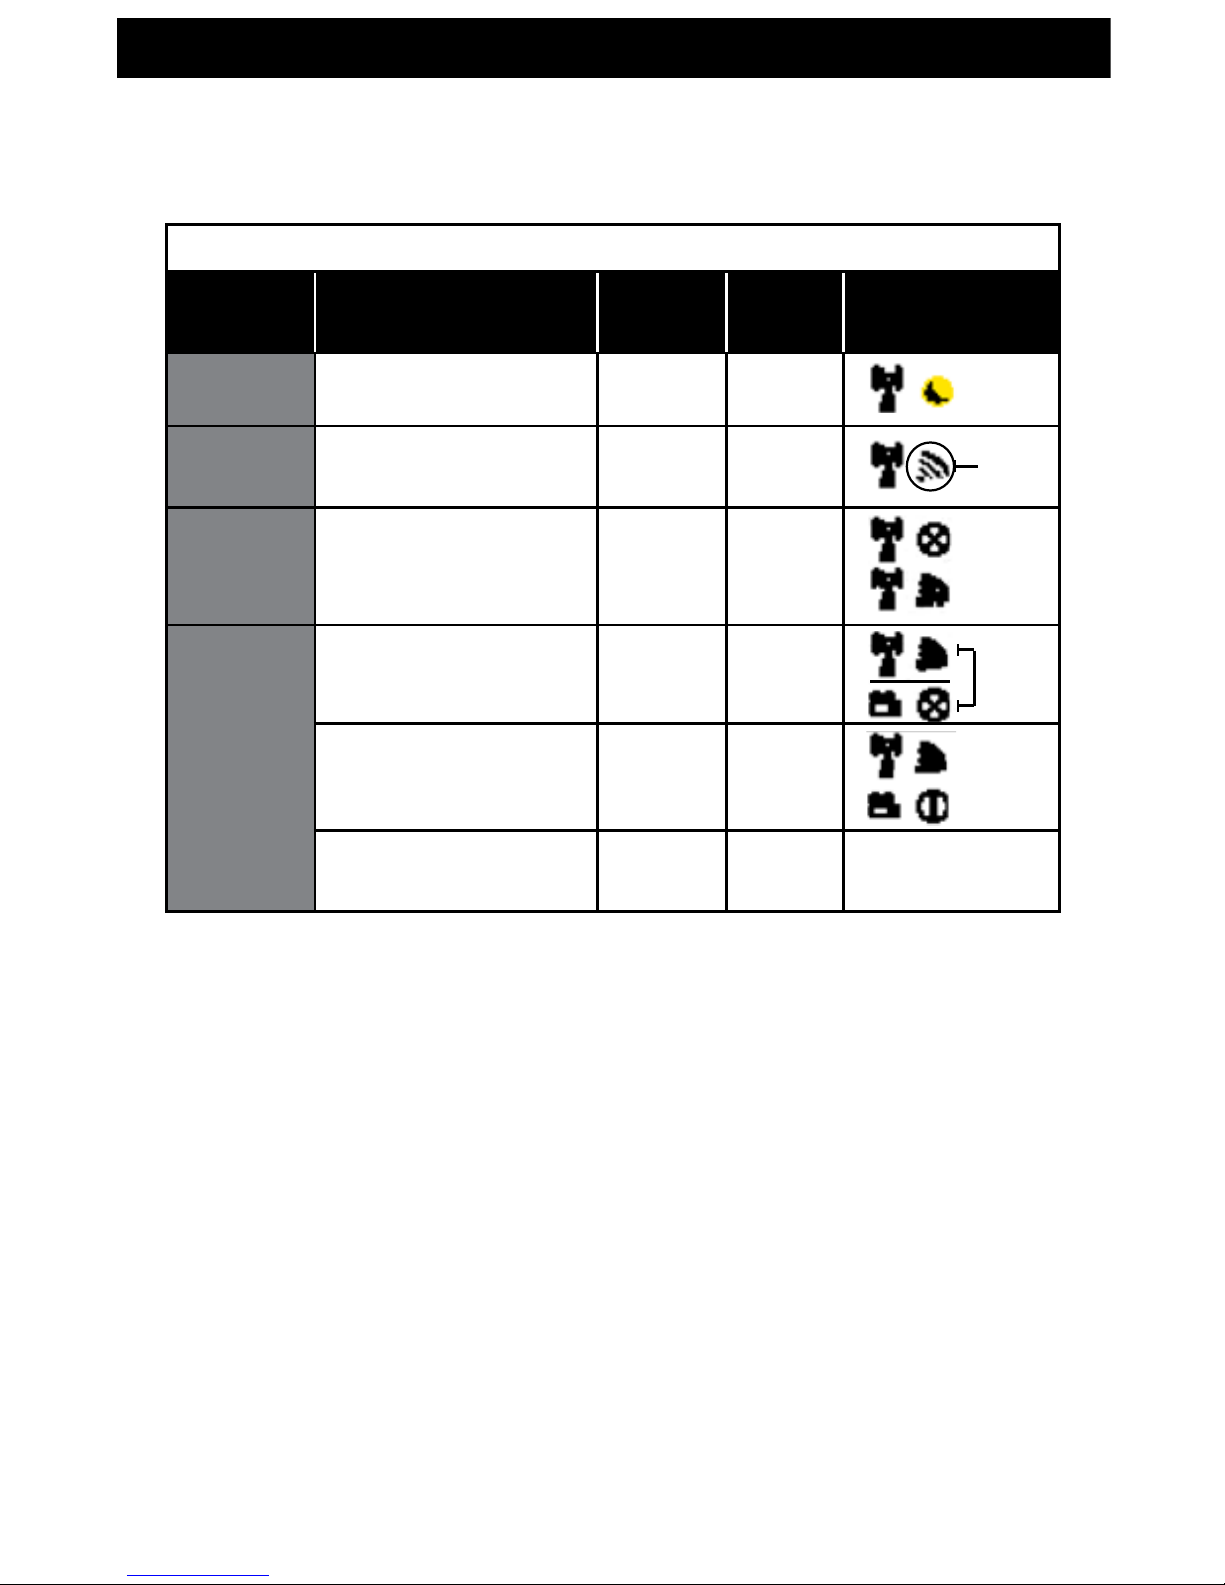
TRANSMITTER
MODE STATUS
POWER
LED
STATUS
LED
OSD DISPLAY
STANDBY Power-save mode Solid RED OFF
WARMUP
During 15-20 second
warm-up
Flashing
BLUE
Flashing
SEARCHING
CHANNELS
System not able to establish
link after 80 seconds (see
Notes A and D)
Flashing
BLUE
Flashing
WIRELESS
MODE
No input from selected
source (See Note B)
Solid BLUE
Flashing
quickly
Video format not
recognized (See Note C)
Solid BLUE
Flashing
slowly
Video format is recognized Solid BLUE
Solid
BLUE
-
Alternates
between
images on
OSD
4 Levels
looping Searching
NOTES
A. If the system is unable to establish a connection within 80 seconds, the connection has
been lost or the Transmitter is out of range. Verify the distance between the Transmitter and
Receiver. The maximum video transmission range for 1080p content is up to 30ft. in line of
sight (LOS). The minimum range is 6.5 ft.
B. Please conrm that the computer is powered ON and that HDMI OUT has been selected; check
that HDMI cable is properly connected.
C. If no video is displayed and OSD message states "NOT SUPPORTED FORMAT", then the video
frame rate from the computer is NOT supported. See " Supported Resolution" section to
change resolutions.
D. If you have more than one pair of each Transmitter/Receiver, each pair should be at least 6.5
feet away from each other. If both pairs of Transmitter/Receiver are in the same room, the
suggested the distance between the two is a minimum distance of 6.5 feet.
9. If all is operating normally, the POWER LED and INFO/CHANNEL LED will be SOLID BLUE.
Please refer to the chart below for detailed LED and OSD alert descriptions:
- 10 -
RECEIVER
BUTTON OSD OSD DISPLAY
POWER
Press the POWER button on TOP of the receiver to go
from " Active mode" to " Active Standby mode".
INFO
Press the INFO button on TOP of the receiver. The
Signal Quality, Source, Channel and Resolution will be
displayed on the OSD for your reference. Press the INFO
button again to exit.
HDMI
CH10
1280x1024
= OFF
SETUP
AUDIO BIT RATE SUPPORT
• Digital Audio from HDMI inputs: Up to 6Mbit/s bit-rate support.
• Support AC3 and DTS.
• 2-Channel PCM audio : 16~24 bits audio sample with 32~48KHz sampling rate
2 CHANNEL
PCM
32KHZ 44.1KHZ 48KHZ 96KHZ
16 Bits
YES YES YES YES
24 bits
YES YES YES YES
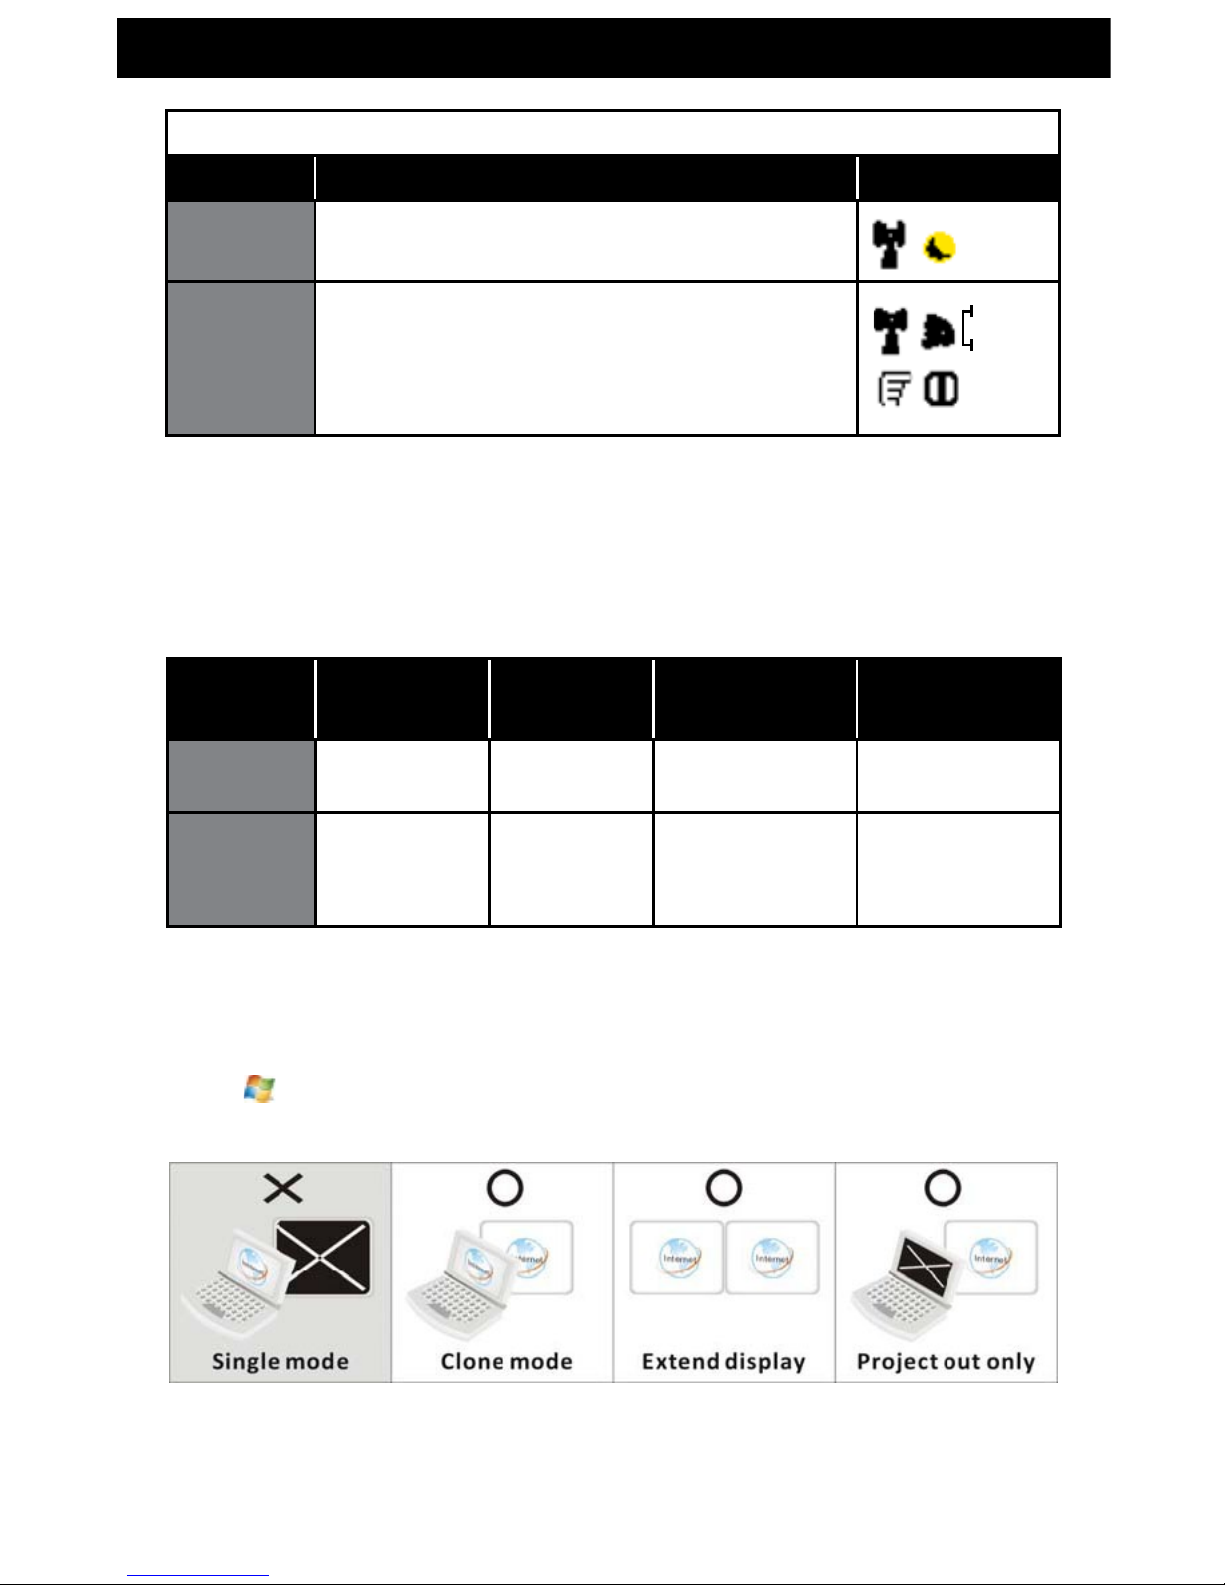
Windows OS Display setting of Laptop for external display:
Windows7 OS:
1. Press
key + P key
2. There is a POP icon displayed on the screen, as seen below :
3. Select Clone mode, Extend Display or Project out only to enable external display.
- 11 -
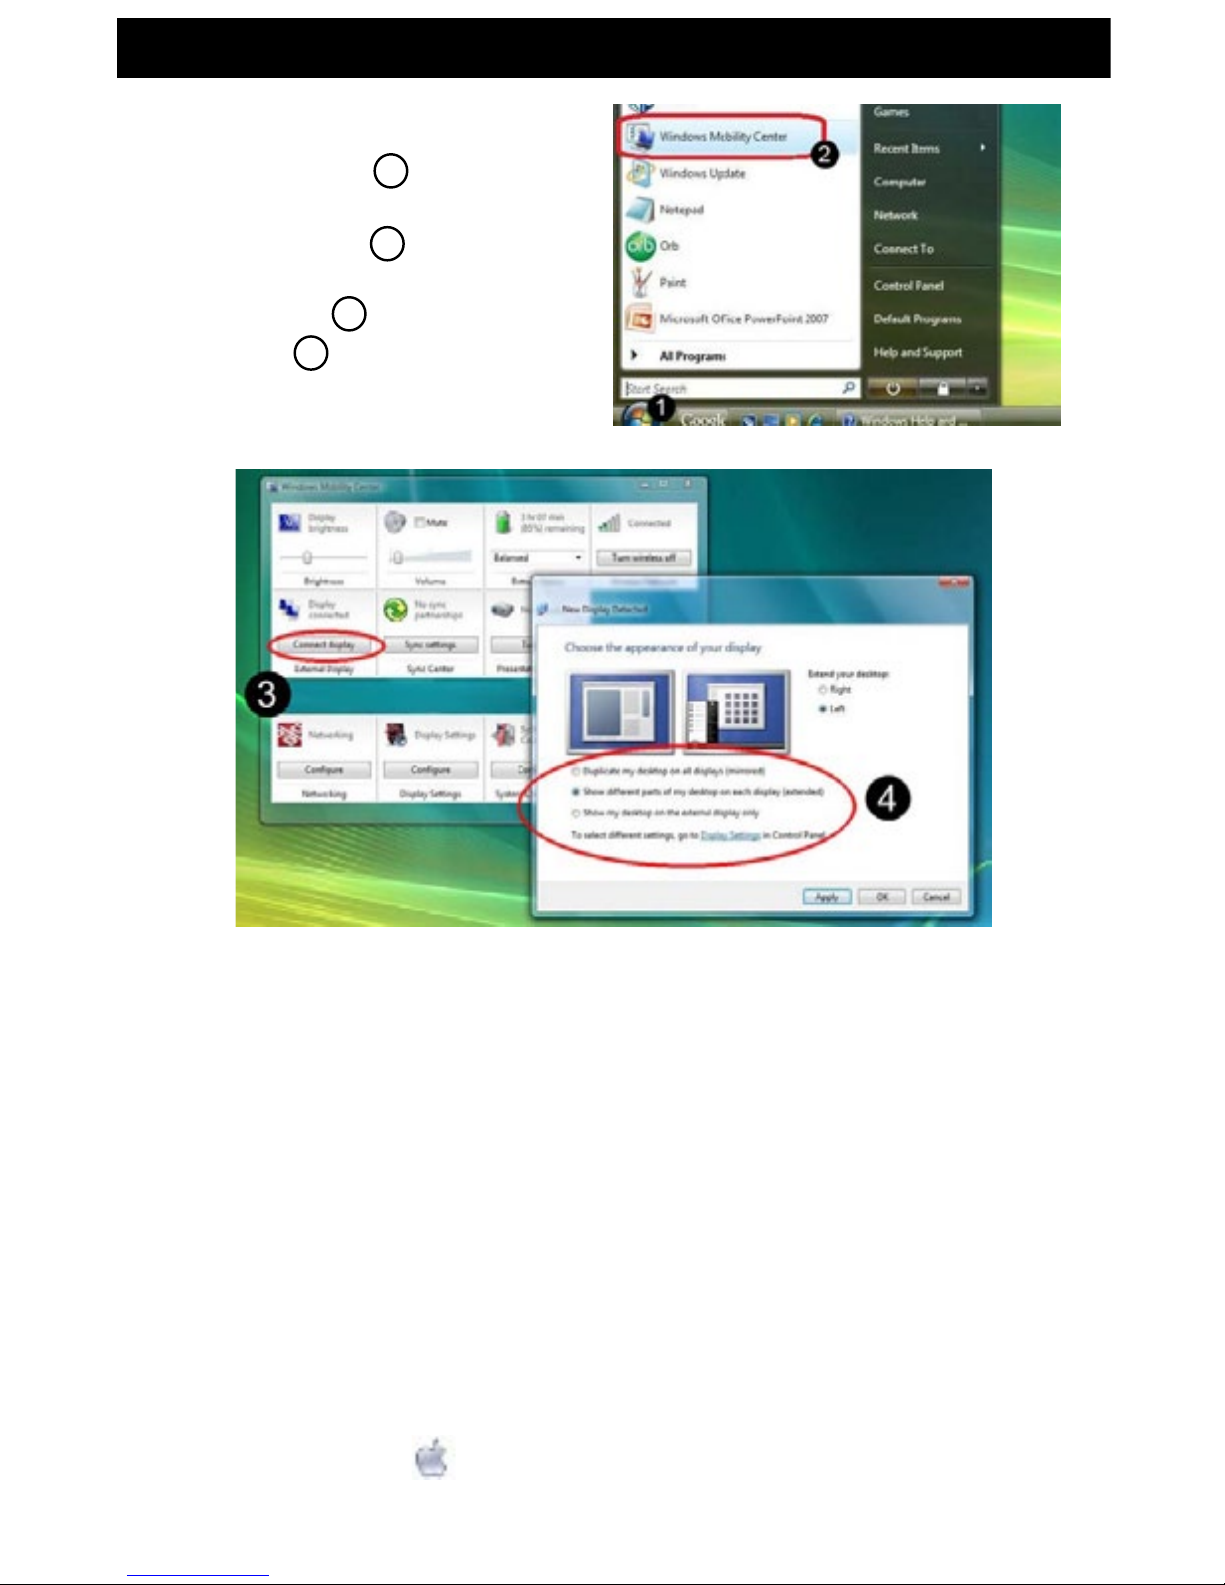
Windows Vista OS:
1. Go to START MENU
1
in bottom left
corner of the screen. Click WINDOWS
MOBILITY CENTER 2 to open.
2. On the EXTERNAL DISPLAY title, click CON
NECT DISPLAY 3 to open NEW DISPLAY
DETECTED 4.
3. Choose MIRRORED or EXTENDED mode to
enable external display.
Windows XP OS:
1. Right click the mouse on your desktop.
2. Click GRAPHIC OPTION / OUTPUT TO.
3. Click CLONE MODE or EXTENDED DISPLAY
NOTE: For more information, please type CHANGE DISPLAY SETTINGS in WINDOWS HELP
AND SUPPORT.
Mac OS Display setting of Laptop for external display:
• MAC OS will detect external display equipment automatically and switch to a better video
resolution when user plugs in the display cable to Apple Mac series.
• Once MAC OS does not detect external display automatically, please check below :
1. Click to open DISPLAYS
/ SYSTEM PERFORMANCE.
2. Click DETECT DISPLAYS to detect the external display.
SETUP
- 12 -
SETUP
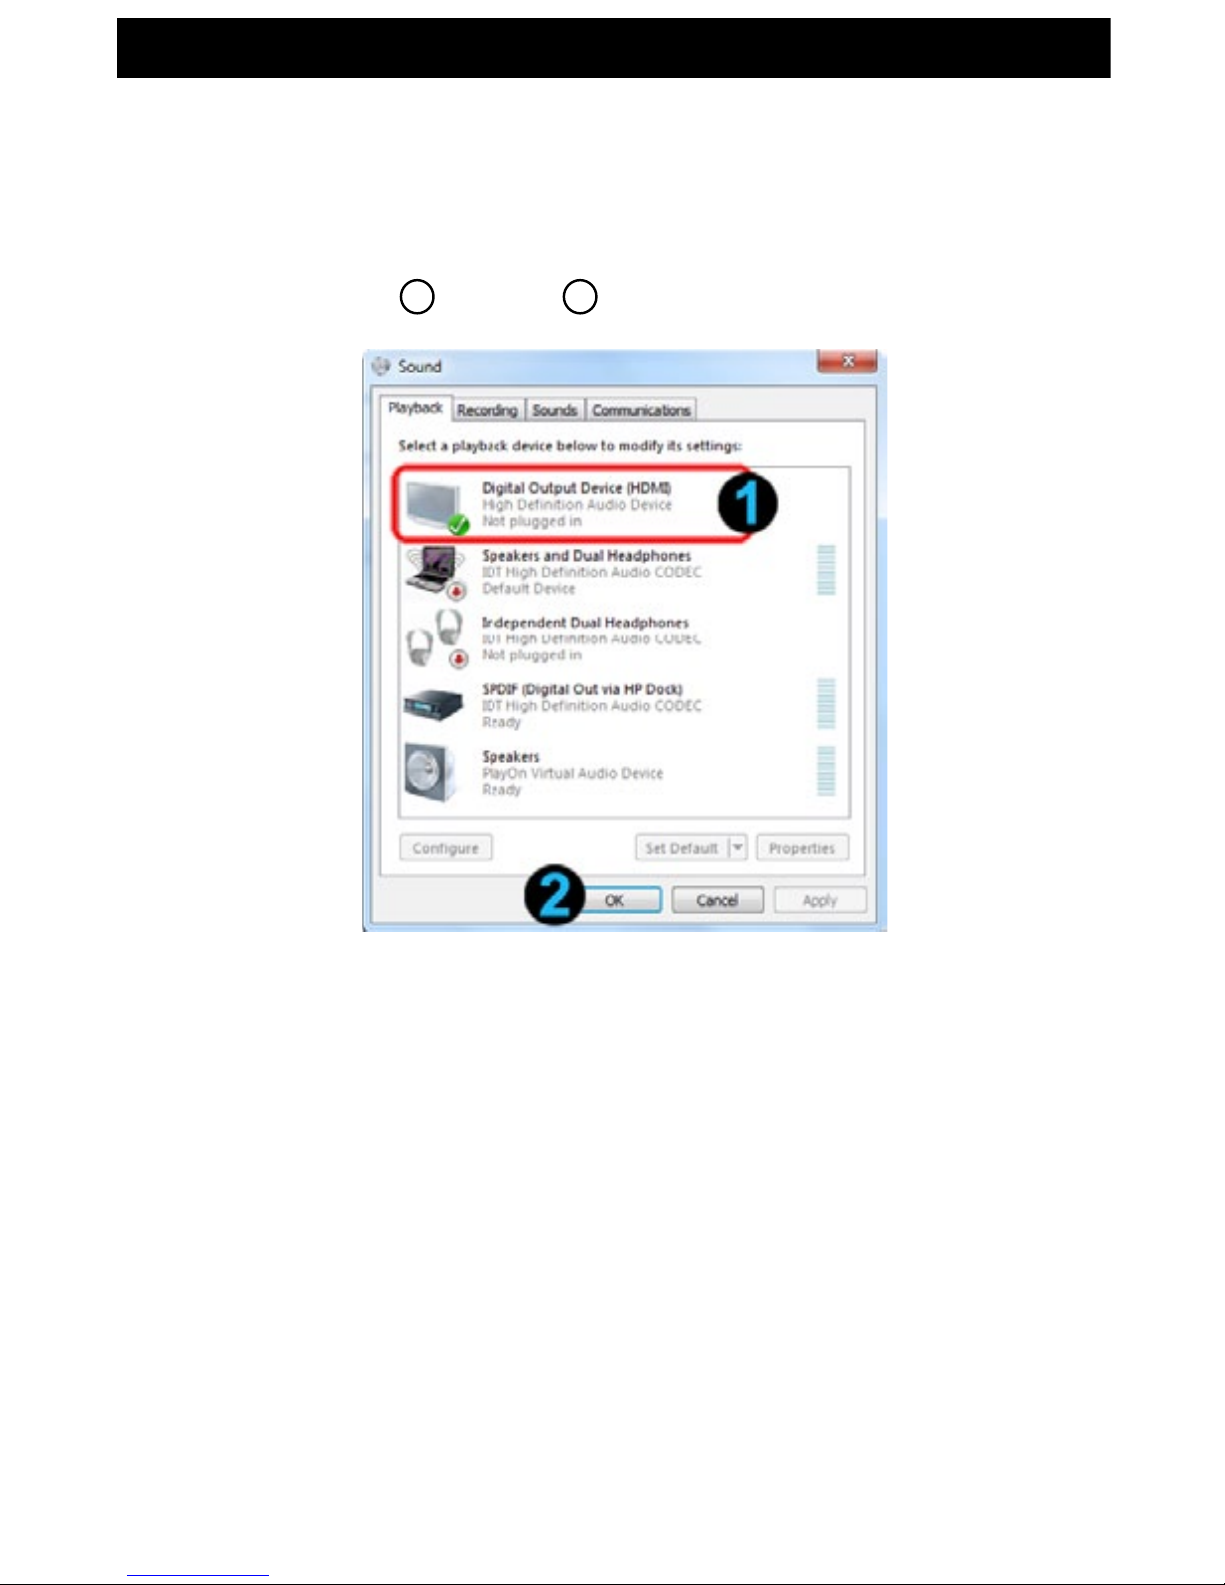
Windows OS Audio setting to switch to HDMI output:
Windows7 OS:
1. Go to START MENU in bottom left corner of the screen. Click CONTROL PANEL to open
AUDIO setting.
2. Select HDMI OUTPUT
1
and Press OK 2.
WindowsXP OS:
1. Go to START MENU in bottom left corner of the screen. Click CONTROL PANEL to open
AUDIO setting.
2. Select HDMI OUTPUT and Press OK.
NOTE: For more information, please type CHANGE AUDIO SETTINGS in WINDOWS HELP
AND SUPPORT.
- 13 -
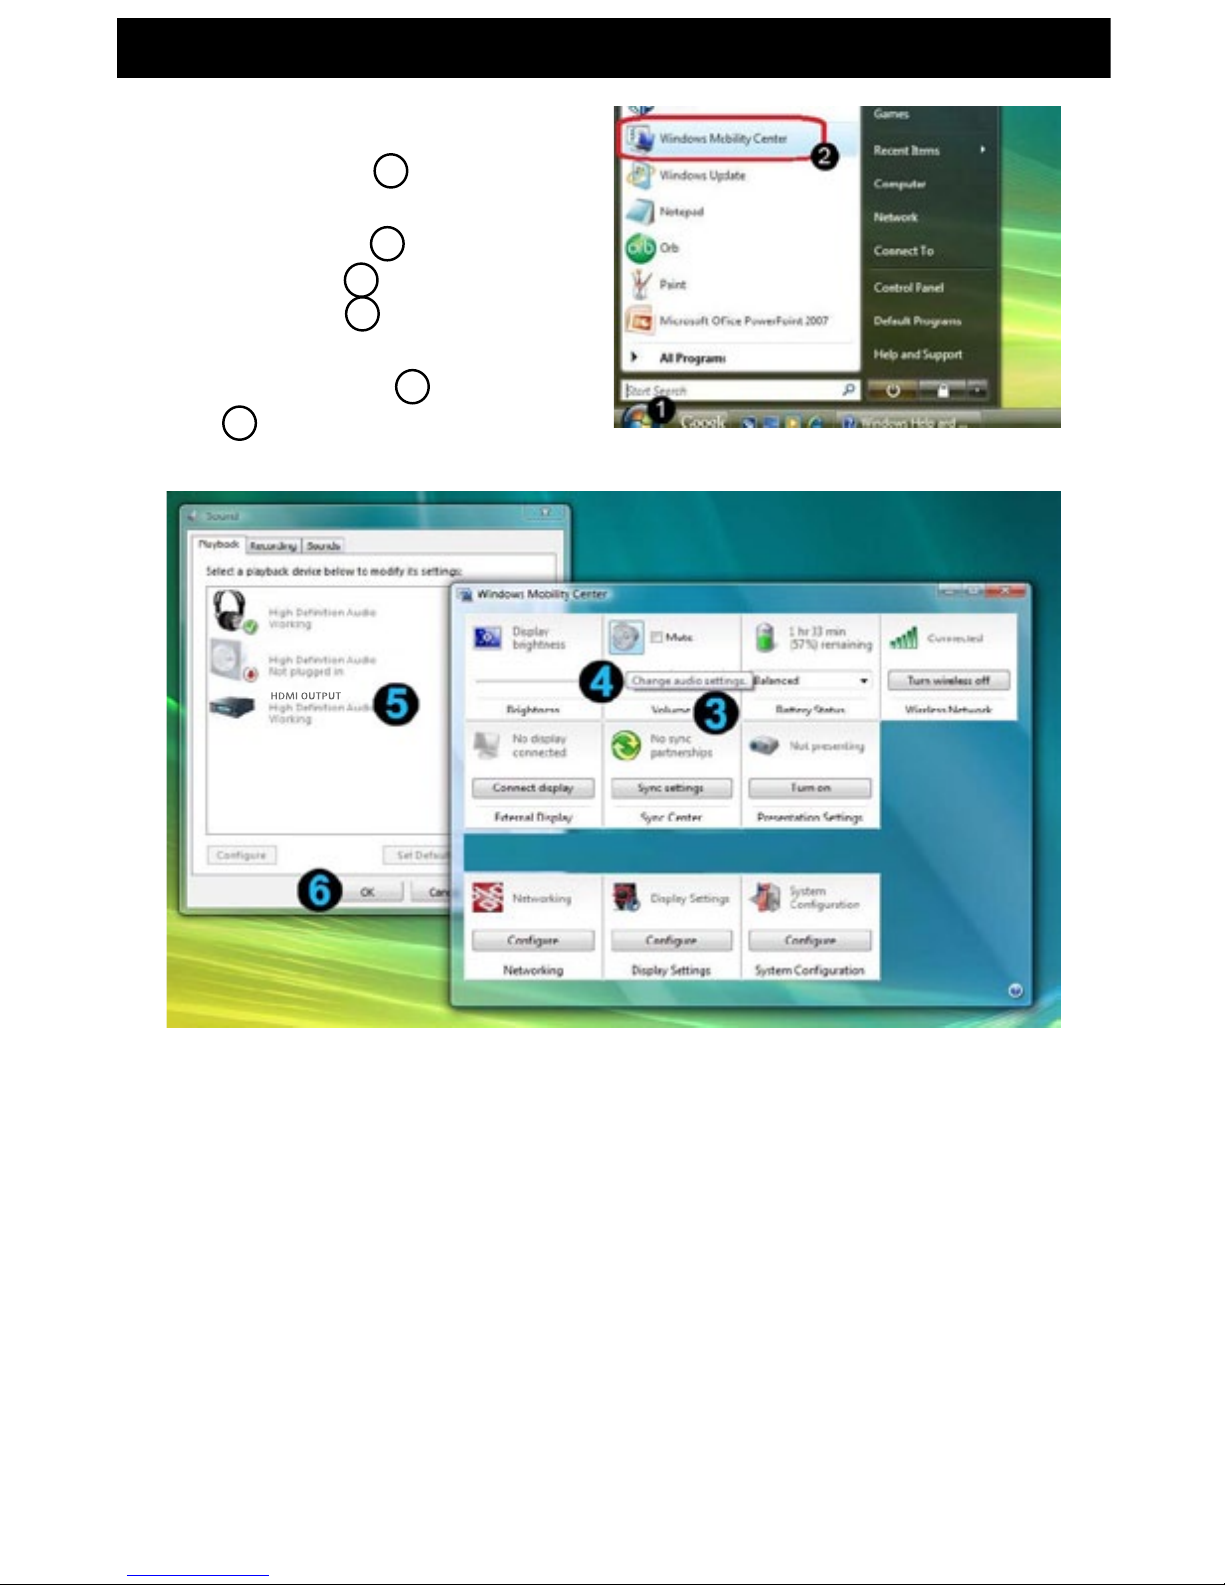
SETUP
Windows Vista OS:
1. Go to START MENU
1
in bottom left
corner of the screen. Click WINDOWS
MOBILITY CENTER 2 to open.
2. On the VOLUME 3 tab, click the CHANGE
AUDIO SETTING 4 icon to open the
SOUND section.
3. Select HDMI OUTPUT 5 and press
OK 6.
- 14 -
SETUP
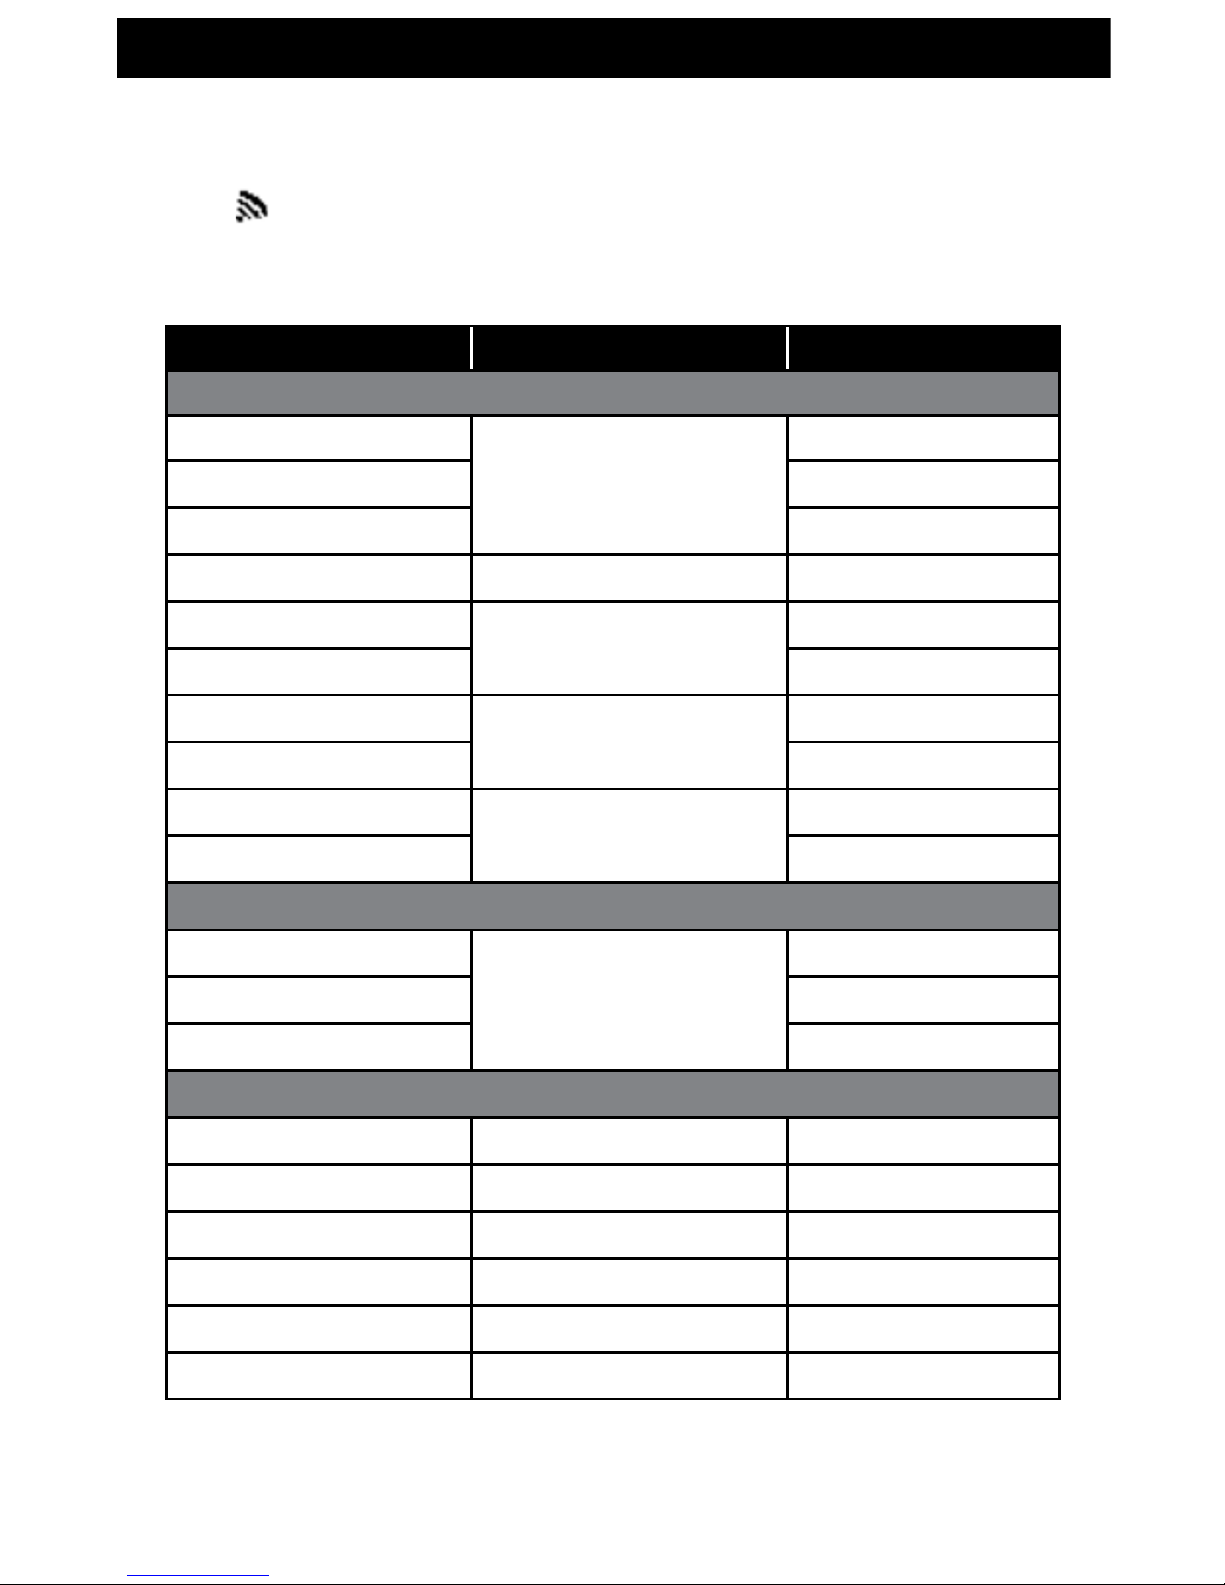
VIDEO FORMAT TIMING RESOLUTION SUPPORTED
PRIMARY CEA VIDEO TIMING
640X480P 59.94 / 60HZ
480P
YES
720X480P 59.94HZ YES
720X480P 60HZ YES
720X576P 50HZ 576p YES
1280X720P 50HZ
720p
YES
1280X720P 59.94 / 60HZ YES
1920X1080I 50HZ
1080i
YES
1920X1080I 59.94 / 60HZ YES
1920X1080P 50HZ
1080p / 60
YES
1920X1080P 59.94 / 60HZ YES
SECONDARY CEA VIDEO TIMING
1920X1080P 23.98 / 24HZ
1080p / 24
YES
1920X1080P 25HZ YES
1920X1080P 29.97 / 30HZ YES
VESA TIMING DVI ONLY
640X480 59.94 / 72.809HZ VGA YES
800X600 60.317 / 72.188HZ SVGA YES
1024X768 60 / 70.069HZ XGA YES
1280X768 60 HZ WXGA YES
1280X1024 60 HZ SXGA YES
1600x1200 @ 60Hz UXGA YES
SUPPORTED RESOLUTIONS
If the SOURCE LED continues to ash BLUE (slower than "NO SIGNAL" mode); the OSD display
shows:
, and there is no video displayed or the video quality is poor, it indicates that the
video frame rate from your A/V source device is not supported. Ensure that the timing of your HD
device is compliant with the standards listed below:

- 15 -
TROUBLESHOOTING
Before following the troubleshooting guide below please make sure that your Transmitter, Receiver
and ANY attached equipment are all properly connected, switched on and not in "Standby Mode".
Red
POWER
LED is not
lighting up
• Make sure the power is connected to the Receiver/Transmitter.
• Check that the power supplies are connected to a working power outlet.
• The POWER LED of the Receiver/Transmitter should be BLUE.
No Video is
displayed
• Check the status of the Link LEDs, and check TV or projector are working normally.
• Check the HDMI cable is undamaged and is plugged into the correct connection.
• Check that the correct HDMI output has been selected from the TV or projector’s
menu and that the HDMI cable is plugged into the correct output connection.
• Make sure that it is the Receiver that is connected to the TV or projector, and the
Transmitter that is connected to a PC, cable box or any HDMI device.
• Verify the Receiver’s POWER LED and INFO LED indicators (see chart on page 9).
• Ensure your video resolution and frame rate is recognized/supported and within
the transmission range.
• Connect the source device to your TV to check and modify the video
format compatibility.
• Check your video resolution with HDMI input from your device is 1080p, 1080i,
720p, 576p, 480p.
• Ensure the display setting for your PC / Laptop has been switched to Clone Mode,
Projector Out Mode or Dual Display Mode to enable external display.
Bad Picture • Make sure the HDMI cable used are undamaged and that you can get a good
picture when the source is connected directly to the display with an HDMI cable.
• Check that your video resolution with HDMI input from your PC / Laptop is either
1080p, 1080i, 720p, 576p, or 480p.
• Ensure the transmission distance is less than 15 feet (LOS).
Bad Audio/
No Audio
• Make sure that the source is outputting supported audio formats.
• Make sure that the TV’s volume is turned UP and not on MUTE.
• Make sure that your PC / Laptop audio volume has been turned UP.
• Make sure that your PC / Laptop audio output has been switched to HDMI out.
• Make sure there is no 5.8GHz wireless phone within 50cm of the Receiver. Some
phones use substandard transmission schemes.
Other • If any other issue occurs or if the above issues persist, try disconnecting both
Transmitter and Receiver and repeating the link setup process
For further questions or inquires, please contact NYRIUS customer support at:
1.866.946.7828 or email support@NYRIUS.com

- 16 -
SPECIFICATIONS
System Requirements
Any laptop or desktop system containing an
HDMI port including popular models from these
manufacturers: Alienware, Lenovo, Dell, HP, Acer,
Apple (Display Port cable not included)
Supported Audio
Formats
Digital
Audio
up to 6 Mbps AC3 and DTS
Supported Video
Resolutions
HDMI Input 1080p, 1080i, 720p, 576p, 480p
Transmission Distance
The maximum video transmission range is 15 feet.
The minimum range is 6 feet; line of sight (LOS)
scenarios
System Latency No latency (<1ms)
Transmission Frequency
4.9~ 5.9GHz (Includes non-DFS and DFS
Frequency Bands)
Antenna High Performance Internal Antennas
Power Supply 100~ 240V AC in, 5V DC out Power Adapter
Operating temperature 0°C to 40 °C
INTERFACES TRANSMITTER RECEIVER
AV
INTERFACES
HDMI Input ONE Type A, Male
HDMI Output ONE Type A, Female
POWER
INTERFACE
POWER Input USB cable or 5V DC input 5V DC Input
SWITCHES
POWER Switch YES One Tack Switch
INFO Switch YES One Tack Switch YES One Tack Switch
LEDs
POWER LED Blue LED or Red LED
STATUS LED Blue LED Blue LED
Signal Quality
Status
OSD displayed
DIMENSIONS
30W X 82.2L X 17.5H MM194.8W X 146.8L X
31H MM

- 17 -
This device complies with part 15 of the FCC rules. Operation is
subject to the following two conditions:
(1) this device may not cause harmful interference, and
(2) this device must accept any interference received, including
interference that may cause undesired operation.
This class B digital apparatus complies with Canadian ICES-003.
WARNING:
This equipment has been tested and is found to comply with the limits for a Class B digital
device, pursuant to Part 15 of the FCC Rules. These limits are designed to provide reasonable
protection against harmful interference in a residential installation. This equipment generates,
uses and can radiate radio frequency energy and, if not installed and used in accordance with
the instructions, may cause harmful interference to radio communications. However, there is
no guarantee that interference will not occur in a particular installation. If this equipment does
cause harmful interference to radio or television reception, which can be determined by turning
the equipment o and on, the user is encouraged to try to correct the interference by one or
more of the following measures:
• Reorient or relocate the receiving antenna
• Increase the separation between the equipment and receiver
• Connect the equipment into an outlet on a circuit dierent from that to which the
receiver is connected
• Consult the dealer or an experienced radio/TV technician for help
WARNING:
Changes or modications not expressly approved by the party responsible for compliance with
the FCC Rules could void the user’s authority to operate this equipment.
FCC STATEMENT

- 18 -
1. Read all instructions.
2. Keep these instructions.
3. Heed all warnings.
4. Follow all instructions.
5. Do not use this apparatus near water.
6. Clean only with a dry cloth.
7. Do not block any ventilation openings. Install in accordance with the manufacturer’s
instructions.
8. Do not install near any heat sources such as radiators, heat registers, stoves, or other
apparatus (including ampliers) that produce heat.
9. Do not defeat the safety purpose of the polarized or grounding-type plug. A polarized plug
has two blades with one wider than the other. A grounding type plug has two blades and
a third grounding prong. The wide blade or the third prong are provided for your safety. If
the provided plug does not t into your outlet, consult an electrician for replacement of the
obsolete outlet.
10. Protect the power cord from being walked on or pinched particularily at plugs, convenience
receptacles, and the point where they exit from the apparatus.
11. Only use attachments/accessories specied by the manufacturer.
12. Unplug this apparatus during lightning storms or when unused for long periods of time.
13. Refer all servicing to qualied service personnel. Servicing is required when the apparatus
has been damaged in any way, such as power-supply cord or plug is damaged. Liquid has
been spilled or objects have fallen into the apparatus, the apparatus has been exposed to
rain or moisture, does not operate normally, or has been dropped.
14. Apparatus shall not be exposed to dripping or splashing, and that no objects lled
with liquids, such as vases, shall be placed on the apparatus.
15. The battery shall not be exposed to excessive heat such as sunshine, re or the like.
16. The direct plug-in adapter is used as disconnect device, the disconnect device shall remain
readily operable.
17. WARNING: To reduce the risk of re or electric shock, do not expose this apparatus to rain or
moisture.
Waste electrical and electronic products should not be disposed of with household
waste. Please recycle where facilities exist. Check with your Local Authority for
recycling advice.
SAFETY INFORMATION

- 19 -
Do not use close to refrigerators, washing machines and metal furniture. Place on a stable
surface and make sure connecting wires are routed to minimize the chance of accidents.
Only use the DC power adaptors supplied, if they must be replaced make sure the replacements
have the same output rating of 5V 3A DC.
Avoid exposing your equipment to harsh conditions such as wet or damp places, high humidity,
strong vibration, extremely high or low temperatures, strong sunlight and places that are very
dusty. Do not cover or place heavy objects on the units. Make sure there is sucient clearance
around the units to allow adequate ventilation.
Never push objects into holes or ventilation slots.
To save power turn OFF the switches on the power adaptor leads or unplug the power adaptors
from the power outlets when you are not using the equipment.
Do not continue to use any part of this equipment if you have spilled liquids on it, damaged it in
any way or does not work normally. Unplug the equipment immediately and get expert advice.
Cleaning: disconnect the main power supply and use only a lightly dampened cloth. Do not use
chemical solvents or strong detergents as these may damage the cosmetic nish.
• To prevent electric shock, do not remove any cover.
• If anything goes wrong, do not try to repair yourself, get a qualied engineer to look at it.
• Do not expose this equipment to dripping or splashing liquids.
• Never allow a naked ame on or near the equipment.
• This product is not a toy. Do not let young children play with the equipment.
SAFETY INFORMATION

- 20 -
DRILLING TEMPLATE

- 21 -
NOTES

NYRIUS® WARRANTY
Thank you for choosing NYRIUS® Consumer Electronics Products!
NYRIUS gives the following express warranty to the original consumer purchaser or gift recipient for this NYRIUS product,
when shipped in its original container and sold or distributed by NYRIUS or by an Authorized NYRIUS Dealer: NYRIUS
warrants that this product is free, under normal use and maintenance, from any defects in material and workmanship. If
any such defects should be found in this product within the applicable warranty period, NYRIUS shall, at its option, repair or
replace the product as specied herein. Replacement parts furnished in connection with this warranty shall be warranted
for a period equal to the unexpired portion of the original equipment warranty.
This warranty shall not apply to:
A. Any defects caused or repairs required as a result of abusive operation, negligence, accident, improper installation
or inappropriate use as outlined in the owner’s manual.
B. Any NYRIUS product tampered with, modied, adjusted or repaired by any party other than NYRIUS or NYRIUS’s
Authorized Service Centres.
C. Damage caused or repairs required as a result of the use with items not specied or approved by NYRIUS including
but not limited to head cleaning tapes and chemical cleaning agents.
D. Any replacement of accessories, glassware, consumable or peripheral items required through normal use of the
product including but not limited to earphones, remote controls, AC adapters, batteries, stylus, trays, lters,
cables, paper, cabinet, cabinet parts, knobs, buttons, baskets, stands and shelves.
E. Any cosmetic damage to the surface or exterior that has been defaced or caused by normal wear and tear.
F. Any damage caused by external or environmental conditions, including but not limited to transmission line/power
line voltage or liquid spillage.
G. Any product received without appropriate model, serial number and CSA /cUL /cULus /cETL /cETLus markings.
H. Any products used for rental or commercial purposes.
I. Any installation, setup and/or programming charges.
Should this NYRIUS product fail to operate during the warranty period, warranty service may be obtained upon delivery
of the NYRIUS product together with proof of purchase and a copy of this LIMITED WARRANTY statement to an Authorized
NYRIUS Service Centre. In-home warranty service may be provided at NYRIUS discretion on any NYRIUS television with
the screen size of 40” or larger. This warranty constitutes the entire express warranty granted by NYRIUS and no other
dealer, service centre or their agent or employee is authorized to extend, enlarge or transfer this warranty on behalf of
NYRIUS. To the extent the law permits, NYRIUS disclaims any and all liability for direct or indirect damages or losses or
for any incidental, special or consequential damages or loss of prots resulting from a defect in material or workmanship
relating to the product, including damages for the loss of time or use of this NYRIUS product or the loss of information.
The purchaser will be responsible for any removal, reinstallation, transportation and insurance costs incurred. Correction
of defects, in the manner and period of time described herein, constitute complete fulllment of all obligations and
responsibilities of NYRIUS Electronics to the purchaser with respect to the product and shall constitute full satisfaction of
all claims, whether based on contract, negligence, strict liability or otherwise.
1 YEAR PARTS & LABOUR WARRANTY PERIODS
TO OBTAIN THE NAME AND ADDRESS OF THE NEAREST AUTHORIZED NYRIUS SERVICE CENTRE OR FOR MORE
INFORMATION ON THIS WARRANTY
• Contact NYRIUS Support by Email: support@NYRIUS.com
• Visit www.NYRIUS.com
• Mail your inquiry to:
NYRIUS Customer Service, 4080 Montrose Road, Niagara Falls, ON L2H 1J9
• Call toll free 1.866.946.7828
NYRIUS is a registered trade-mark of Circus World Displays
07.2012
- 22 -

GARANTIE NYRIUS®
Merci d’avoir choisi un produit électronique grand public NYRIUS!
NYRIUS accorde la garantie expresse suivante à l’acheteur original de cet appareil NYRIUS ou à la personne qui l’a reçu en cadeau,
pourvu qu’il ait été expédié et vendu ou distribué par NYRIUS ou un détaillant NYRIUS autorisé dans son emballage original.
NYRIUS garantit que cet appareil est exempt de tout défaut de matériau et de fabrication dans des conditions d’utilisation et
d’entretien normales. Si un défaut est décelé dans ce produit pendant la période de cette garantie, NYRIUS s’engage à le réparer
ou, le cas échéant et à son entière discrétion, le remplacer. Les pièces de rechange qui sont fournis dans l’exécution de cette garantie
sont aussi couvertes par la garantie pendant une période égale à la portion non échue de la garantie originale de l’appareil.
Cette garantie ne couvre pas :
A. Les défectuosités ni les réparations résultant d’un usage abusif, d’une négligence, d’un accident ou d’une installation
inadéquate ou un usage inapproprié selon les directives fournies dans le guide d’utilisation accompagnant l’appareil.
B. Les appareils de marque NYRIUS traqués, modiés, réglés, ajustés ou réparés par une entité autre que NYRIUS ou un
centre de réparation autorisé par NYRIUS.
C. Les dommages causés ni les réparations requises à l’appareil résultant de son usage avec des composantes ou accessoires
non recommandés ni approuvés par NYRIUS incluant, sans en exclure d’autres, les cassettes et/ou produits chimiques de
nettoyage.
D. Le remplacement d’accessoires ou de pièces de verre, consommables ou des éléments périphériques nécessaires à une
utilisation normale du produit, y compris mais pas limité aux écouteurs, télécommandes, adaptateurs CA, piles, pointes de
lecture, stylets, plateaux, ltres, câbles, papier, boîtier, composantes de boîtiers, boutons, paniers, supports et tablettes.
E. Tout dommage apparent à la surface ou au boîtier extérieur de l’appareil et attribuable à la détérioration ou à l’usure
résultant d’un usage normal.
F. Tout dommage causé par des conditions externes ou environnementales, y compris mais pas limité aux lignes de
transmission ou de transport d’énergie ou le renversement de liquide.
G. Tout appareil ne portant pas les identications appropriées quant aux numéros de modèle et de série ni les étiquettes et
attestations de l’ACNOR, de l’ULC, de l’ULI, de l’ETL au Canada et aux États-Unis.
H. Tout appareil utilisé à des ns commerciales ou de location.
I. Tous les frais d’installation, d’ajustement et/ou de programmation.
Si cet appareil de marque NYRIUS devient défectueux au cours de la période de garantie, une réparation peut être obtenue,
conformément aux termes de cette garantie, en présentant cet appareil NYRIUS avec la preuve d’achat originale et une copie de
cette GARANTIE LIMITÉE à un centre de service autorisé par NYRIUS. Le service à domicile est eectué, à la discrétion de NYRIUS,
aux téléviseurs de marque NYRIUS dotés d’un écran de 40 pouces et plus. Cette garantie constitue la garantie expresse entière
accordée par NYRIUS et aucun autre détaillant, centre de service ni leur agent ou employé est autorisé à prolonger, étendre ou
transférer cette garantie au nom de NYRIUS. Dans la mesure où la loi le permet, NYRIUS désavoue toute responsabilité pour des
dommages ou pertes directs et indirects, tous dommages accessoires, particuliers ou consécutifs ou perte de prots résultant
d’un défaut de matériel ou de fabrication de cet appareil, incluant les dommages attribuables à la perte de temps ou perte
de l’utilisation de cet appareil NYRIUS ou de la perte de données. Il incombe à l’acheteur de défrayer les coûts encourus pour
l’enlèvement, la réinstallation, le transport et l’assurance de cet appareil. La correction de toute défectuosité, de la manière et dans
les délais indiqués dans la présente, constitue l’exécution complète de toutes les obligations et les responsabilités contractés par
NYRIUS envers l’acheteur à l’égard du produit et constituera un acquittement complet de toutes les réclamations contractuelles ou
attribuables à la négligence, et la responsabilité absolue ou autre.
GARANTIE D’UN ANS POUR LES PIÈCES ET LA MAIN D’OEUVRE
POUR OBTENIR LE NOM ET L’ADRESSE DU CENTRE DE SERVICE NYRIUS AUTORISÉ LE PLUS PRÈS DE CHEZ VOUS OU POUR PLUS
DE RENSEIGNEMENTS SUR CETTE GARANTIE :
• Contactez le service de soutient NYRIUS par courriel: support@ NYRIUS.com
• Visitez www.NYRIUS.com
• Postez votre demande à:
Service à la clientèle NYRIUS, 4080 Montrose Road, Niagara Falls, ON L2H 1J9
• Composez le numéro sans frais : 1.866.946.7828
NYRIUS est une marque déposée de Circus World Displays
07.2012
- 23 -- 22 -

- 24 -- 2 -- 21 -
NOTES

- 25 -
GABARIT DE PERÇAGE
- 20 -

- 26 -
N’utilisez pas près de réfrigérateurs, machines à laver et meubles en métal. Placez sur une
surface stable et assurez-vous que les ls de connexion sont acheminés pour minimiser le risque
d’accidents.
Utilisez uniquement les adaptateurs d’alimentation CC fourni, si elles doivent être remplacées,
assurez-vous que les remplacements ont le même classement de sortie 5V CC 3A.
Évitez d’exposer votre équipement à des conditions sévère telles que les lieux humides ou
mouillés, une humidité élevée, de fortes vibrations, des températures extrêmement élevées ou
basses, la lumière directe du soleil et les endroits qui sont très poussiéreux.
Ne pas couvrir ou placer des objets lourds sur les appareils. Assurez-vous qu’il reste assez d’espace
autour des appareils an de permettre une ventilation adéquate.
N’introduisez jamais d’objets dans les trous ou les fentes de ventilation.
Pour économiser de l’énergie, éteignez les interrupteurs sur les câbles d’alimentation ou
débranchez les adaptateurs de la prise électrique lorsque vous n’utilisez pas l’équipement.
Cesser l’utilisation de cet appareil si vous avez renversé des liquides dessus, s’il est endommagé
de quelque façon ou s’il ne fonctionne pas normalement. Débranchez l’appareil et consultez un
spécialiste immédiatement.
Nettoyage : débranchez l’alimentation principale et utilisez seulement un chion légèrement
humide. N’utilisez pas de solvants chimiques ou de détergents puissants car ils peuvent
endommager le ni.
• Pour éviter les chocs électriques, ne retirez pas le couvercle.
• Si quelque chose va mal, n’essayez pas de le réparer vous-même, consultez un technicien
qualié pour pour l’évaluer.
• N’exposez pas cet appareil à des gouttes ou des éclaboussures de liquides.
• Ne permettez jamais une amme nue sur ou près de l’équipement.
• Ce produit n’est pas un jouet. Ne permettez pas aux enfants jouer avec cet appareil.
INFORMATIONS SUR LA SÉCURITÉ
- 19 -

- 27 -
INFORMATIONS SUR LA SÉCURITÉ
1. Lisez ces consignes.
2. Gardez ces consignes.
3. Conformez-vous à tous les avertissements.
4. Suivez toutes les consignes applicables.
5. N’utilisez pas cet appareil près de l’eau.
6. Nettoyez uniquement à I’aide d’un chion sec.
7. N’obstruez jamais les orices d’aération de l’appareil et installez-le en conformité avec les
instructions du fabricant.
8. N’installez pas l’appareil à proximité d’une source de chaleur telle que radiateurs, registres de
chaleur, poêles ou autre appareil (y compris les amplicateurs) qui produisent de la chaleur.
9. N’allez pas à l’encontre de I’objectif de sécurité de la che polarisée ou avec mise à la terre. Une
che polarisée a deux lames, une étant plus large que I’autre. Une che avec mise à la terre a deux
lames et une troisième broche de terre. La lame large ou la troisième broche est destinée à vous
protéger. Si la che fournie ne s’insère pas dans votre prise, contactez un électricien pour faire
remplacer la prise désuète.
10. Empêchez Ie cordon d’être piétiné ou pincé, surtout aux ches, prises de courant, et au point de
leur sortie de I’appareil.
11. Utilisez uniquement les accessoires précisés par Ie fabricant.
12. Débranchez cet appareil durant des orages électriques ou lorsqu’il n’est pas utilisé pendant des
périodes prolongées.
13. Conez toutes réparations de cet appareil à un personnel qualié. Une réparation peut être requise
lorsque l’appareil a éte endommagé de quelque manière que ce soit, tel qu’un cordon ou une che
endommagé, du liquide déversé ou des objets tombés dans I’appareil, I’appareil a été exposé à la
pluie ou à I’humidité, un appareil qui ne fonctionne pas normalement ou qui est tombé.
14. L’appareil ne doit pas être exposé à des égouttements d’eau ou des éclaboussures, et de
plus aucun objet rempli de liquide, tel que des vases, ne doit être placé sur I’appareil.
15. La pile ne doit pas être exposée à la chaleur excessive tel que le soleil, le feu ou de toute
autre source.
16. L’adaptateur est utilisé comme dispositif de déconnexion, le dispositif de déconnexion doit
rester facilement accessible.
17. AVERTISSEMENT: Pour réduire le risque de incendie ou d’électrocution, n’exposez pas cet
appareil à la pluie ou à l’humidité.
Cette marque indique que ce produit ne doit pas être jeté avec les autres
déchets ménagers en Amérique du Nord. Pour prévenir les dommages possibles
à l’environnement ou à la santé humaine par l’élimination non contrôlée de
déchets ou autres matières, recyclez-le de façon responsable an de promouvoir
la réutilisation durable des ressources matérielles. Pour retourner votre appareil
utilisé, s’il vous plaît utiliser les systèmes de reprise et de collecte ou communiquez
avec le détaillant où le produit a été acheté. Ils peuvent prendre ce produit pour le
recyclage sécuritaire pour l’environnement.
- 18 -

- 28 -
Cet appareil numérique de classe B est conforme à la norme Canadienne ICES-003.
AVERTISSEMENT:
Cette unité a été testée et il a été déterminé qu’elle se conforme aux normes stipulées par l’article
15 des règlements de la FCC pour un appareil numérique de catégorie B. Ces normes sont établies
an d’orir une protection raisonnable contre toute possibilité de brouillage préjudiciable
dans une installation résidentielle. Cette unité produit, utilise et peut émettre une énergie
radioélectrique, et si elle n’est pas installée et utilisée conformément aux instructions, pourrait
causer un brouillage préjudiciable à la radiocommunication. Il est toutefois impossible de garantir
qu’il n’y aura pas de brouillage préjudiciable dans une installation donnée. Si cette unité cause un
brouillage préjudiciable à la réception radio ou télévisuelle, ce qui peut être déterminé en activant
ou désactivant l’appareil, l’utilisateur est encouragé à tenter de corriger le brouillage en prenant
l’une ou plusieurs des mesures proposées suivantes :
• Réorienter ou déplacer l’antenne de réception
• Augmenter la distance entre l’appareil et le récepteur
• Branchez l’appareil dans une prise de courant CA diérente de celle utilisée par le récepteur
• Consulter le revendeur ou un technicien spécialisé dans le service des radios/téléviseurs pour
obtenir de l’aide.
AVERTISSEMENT:
Tout changement ou toute modication n’étant pas autorisée de façon explicite par l’organisme
responsable de la conformité aux règles de la FCC est en droit de refuser l’autorisation de
l’utilisateur à utiliser ce produit.
Cet appareil répond aux normes prescrites au chapitre 15 des règles édictées
par la FCC. Son fonctionnement est assujetti aux deux conditions suivantes:
(1) cet appareil ne doit en aucun cas être la source d’interférence
préjudiciable, et
(2) il doit pouvoir fonctionner normalement en dépit de l’interférence
auquel il pourrait être soumis.
DÉCLARATION DE LA FCC
- 17 -

- 29 -
SPÉCIFICATIONS
- 16 -
Exigences du système
Tout système de bureau ou portable conprenant
un port HDMI, y compris les modèles populaires
de ces fabricants: Alienware, Lenovo, Dell, HP,
Acer, Apple (Câble d’achage pas inclus)
Formats audio soutenus
Audio
numérique
Jusqu’à 6 Mbps AC3 et DTS
Formats vidéo soutenus Entrée HDMI 1080p, 1080i, 720p, 576p, 480p
Distance de transmission
La gamme de transmission vidéo maximale est
de 15 pieds. La portée minimale est de 6 pieds;
en visibilité directe (LOS).
Latence du système Aucune latence (<1ms)
Frequence de transmission
4,9~ 5,9GHz (Comprend les bandes de
fréquences non-DFS et DFS)
Antenne Antennes internes à haute performance
Alimentation Adaptateur 100~ 240V entrée CA, sortie 5V CC
Température de fonctionnement 0°C à 40 °C
INTERFACES ÉMETTEUR RÉCEPTEUR
INTERFACES AV
HDMI Input UNE Type A, Mâle
HDMI Output ONE Type A, Female
INTERFACE DE
POUVOIR
Entrée
d’ALIMENTATION
Câble USB ou entrée
5V CC
Entrée 5V CC
INTERRUPTEURS
Bouton
d’ALIMENTATION
OUI Un bouton
Bouton INFO OUI Un bouton OUI Un bouton
DEL
DEL DEL Bleu ou DEL Rouge
DEL D’ÉTAT DEL Bleu DEL Bleu
État et qualité du signal Achage OSD
DIMENSIONS
30L X 82.2L X
17.5H MM
194.8L X 146.8L X
31H MM

- 30 -
DÉPANNAGE
- 15 -
Avant de suivre le guide de dépannage ci-dessous, veuillez vous assurer que votre émetteur, votre
récepteur et tout équipement relié sont tous correctement connectés, allumés et pas en mode
STANDBY (mode de veille).
DEL rouge
d’alimentation ne
s’illumine pas
• Assurez-vous que l’alimentation est connecté à l’émetteur/transmetteur.
• Vérier que les alimentations sont connectées à une prise de courant active.
• La DEL d’alimentation du récepteur / émetteur doit être BLEUE.
Aucune vidéo
s’ache
• Vériez l’état de la DEL, et vériez que le téléviseur ou le projecteur fonctionnent
normalement.
• Vériez que le câble HDMI n’est pas endommagé et qu’il est branché dans la
bonne prise.
• Vériez que la bonne sortie HDMI a été choisie dans le menu de l’appareil HD et
que le câble HDMI est branché dans la bonne prise de sortie.
• Assurez-vous que c’est le récepteur qui est relié au téléviseur ou un projecteur, et
l’émetteur qui est connecté à un PC, boîtier décodeur ou tout appareil HDMI.
• Conrmez les indicateurs DEL d’alimentation et INFO fonctionnent (voir le
tableau à la page 9).
• Assurez-vous que la résolution vidéo et la fréquence d’image est reconnu /
soutenu et dans l’éventail de la gamme de transmission.
• Branchez le périphérique source à votre téléviseur pour vérier et modier la
compatibilité du format vidéo.
• Vériez que la résolution de votre vidéo avec l’entrée HDMI de votre appareil est
1080p, 1080i, 720p, 576p, 480p.
• Assurez-vous que le réglage de l’achage de votre PC / ordinateur portable a
été régléau mode clone, sortie projecteur ou en mode achage double pour
permettre l’achage externe.
Mauvaise image • Assurez-vous que les câbles HDMI utilisés sont en bon état et que vous pouvez
obtenir une bonne image lorsque la source est connectée directement à l’écran
avec un câble HDMI.
• Vériez que la résolution de votre vidéo avec l’entrée HDMI de votre PC /
ordinateur portable est soit 1080p, 1080i, 720p, 576p, ou 480p.
• Vériez que la distance de transmission est inférieure à 15 pieds (LOS).
Son médiocre/
aucun son
• Assurez-vous que la source est d’un format audio soutenu.
• Assurez-vous que le volume du téléviseur est ALLUMÉ et pas sur SOURDINE.
• Assurez-vous que le volume du PC / portable est ALLUMÉ.
• Assurez-vous que la sortie audio du PC / portable est réglé à SORTIE HDMI.
• Assurez-vous qu’il n’y a aucun téléphone sans l de 5,8 GHz à moins de 50cm du
récepteur. Certains téléphones utilisent des systèmes de transmission inférieurs.
Other • Si d’autres questions surviennent ou si les problèmes ci-dessus persistent,
désactivez l’émetteur et le récepteur et répétez le processus de conguration.
Si vous avez d’autres questions ou pour toute demande de renseignements, veuillez contacter le Soutien à
la clientèle NYRIUS au: 1.866.946.7828 ou par courriel à support@NYRIUS.com.

- 31 -
FORMAT VIDÉO RÉSOLUTION SOUTENU
SYNCHRONISATION VIDÉO CEA PRIMAIRE
640X480P 59,94 / 60HZ
480P
OUI
720X480P 59,94HZ OUI
720X480P 60HZ OUI
720X576P 50HZ 576p OUI
1280X720P 50HZ
720p
OUI
1280X720P 59,94 / 60HZ OUI
1920X1080I 50HZ
1080i
OUI
1920X1080I 59,94 / 60HZ OUI
1920X1080P 50HZ
1080p / 60
OUI
1920X1080P 59,94 / 60HZ OUI
SYNCHRONISATION VIDÉO CEA SECONDAIRE
1920X1080P 23,98 / 24HZ
1080p / 24
OUI
1920X1080P 25HZ OUI
1920X1080P 29,97 / 30HZ OUI
SYNCHRONISATION VESA DVI SEULEMENT
640X480 59,94 / 72,809HZ VGA OUI
800X600 60,317 / 72,188HZ SVGA OUI
1024X768 60 / 70,069HZ XGA OUI
1280X768 60 HZ WXGA OUI
1280X1024 60 HZ SXGA OUI
1600x1200 @ 60Hz UXGA OUI
RÉSOLUTIONS SOUTENUS
Si la SOURCE DEL continue à clignoter BLEU (plus lentement qu’en mode "AUCUN SIGNAL");
l’écran OSD ache :
, et il n’y a pas de vidéo achée ou la qualité vidéo est médiocre,ceci
indique que la fréquence d’images de votre source A/V n’est pas supporté. Assurez-vous que le
réglage de votre appareil HD est compatible avec les normes énumérées ci-dessous:
CONFIGURATION
- 14 -

- 32 -
CONFIGURATION
Système d’exploitation Windows Vista :
1. Allez au menu DÉMARRER
1
dans le coin
en bas à gauche de l’écran. Cliquez CENTRE
DE MOBILITÉ WINDOWS
2
pour l’ouvrir.
2. Sur l’onglet VOLUME
3
, cliquez sur
l’icône MODIFIER RÉGLAGES AUDIO
4
pour ouvrir la section SON.
3. 3. Sélectionner SORTIE HDMI
5
ensuite OK
6
.
- 13 -

- 33 -
Réglage audio pour système d’exploitation Windows pour passer à la sortie HDMI :
Système d’exploitation Windows7 :
1. Allez au menu DÉMARRER dans le coin en bas à gauche de l’écran. Cliquez sur PANNEAU DE
CONFIGURATION pour ouvrir les propriétés AUDIO.
2. Sélectionnez SORTIE HDMI
1
ensuite OK
2
.
Système d’exploitation WindowsXP :
1. Allez au menu DÉMARRER dans le coin en bas à gauche de l’écran. Cliquez sur PANNEAU DE
CONFIGURATION pour ouvrir les propriétés AUDIO.
2. Sélectionnez SORTIE HDMI ensuite OK.
NOTE: Pour plus d’informations, veuillez rechercher MODIFIER LES CONFIGURATIONS DE
L’AFFICHAGE au CENTRE D’AIDE ET D’ASSISTANCE WINDOWS.
CONFIGURATION
- 12 -

- 34 -
CONFIGURATION
- 11 -
Système d’exploitation Windows Vista :
1. Allez au menu DÉMARRER
1
dans le
coin en bas à gauche de l’écran. Cliquez sur
CENTRE DE MOBILITÉ WINDOWS
2
pour l’ouvrir.
2. Sur l’écran AFFICHAGE EXTERNE, cliquez
sur CONNEXION ÉCRAN
3
pour ouvrir
NOUVEL ÉCRAN DÉTECTÉ
4
.
3. Choisissez le mode MIROIR ou ÉTENDUE
pour permettre l’achage externe.
Système d’exploitation Windows XP :
1. Faites un clic droit de la souris à l’écran.
2. Cliquez OPTION GRAPHIQUE / SORTIE.
3. Cliquez MODE CLONE ou AFFICHAGE ÉTENDU
NOTE: Pour plus d’informations, veuillez rechercher MODIFIER LES CONFIGURATIONS DE
L’AFFICHAGE au CENTRE D’AIDE ET D’ASSISTANCE WINDOWS.
Réglage de l’achage du portable d’un écran externe pour système d’exploitation Mac :
• Le système d’exploitation Mac détecte automatiquement l’équipement d’achage externe et
passer à une meilleure résolution vidéo lorsque l’utilisateur branche le câble d’écran pour la
série Mac.
• Si le système d’exploitation MAC ne détecte pas automatiquement l’écran externe, suivez les
étapes ci-dessous :
1. Cliquez pour ouvrir ÉCRANS
/ PERFORMANCE DU SYSTÈME.
2. Cliquez DÉTECTEZ ÉCRANS pour reconnaître l’écran externe.

- 35 -
CONFIGURATION
- 10 -
RÉCEPTEUR
BOUTON OSD AFFICHAGE OSD
ALIMENTATION
Appuyez le BOUTON D’ALIMENTATION sur le dessus
du récepteur pour passer du "Mode actif" au "Mode
de veille actif".
INFO
Appuyez le bouton INFO sur le dessus du récepteur. La
qualité du signal, la source, le canal et la résolution
seront aché à l’écran OSD pour votre référence.
Appuyez sur la touche INFO de nouveau pour quitter.
HDMI
CH10
1280x1024
= DÉSACTIVÉ
SOUTIEN POUR DÉBIT BINAIRE AUDIO
• Audio numérique des entrées HDMI: soutien un débit binaire audio jusqu’à 6Mbit/s.
• Soutien AC3 et DTS.
• 2-Canaux audio PCM : 16~24 bits d’échantillonnage audio et fréquence d’échantillonnage
32~48KHz.
2 CANAUX
PCM
32KHZ 44.1KHZ 48KHZ 96KHZ
16 Bits
OUI OUI OUI OUI
24 bits
OUI OUI OUI OUI
Réglage de l’achage du portable avec système d’exploitation Windows pour écran externe :
Système d’exploitation Windows7 :
1. Appuyez la clé
+ la clé P.
2. Un menu contextuel comme celui ci-dessous apparaîtra à l’écran :
3. Choisissez le mode clone, étendre achage ou achage externe seulement pour permettre
l’achage externe.
Mode simple
Étendre l’achage Mode clone Achage externe

- 36 -
CONFIGURATION
- 9 -
ÉMETTEUR
MODE ÉTAT
DEL
D’ALIMENTATION
DEL
D’ÉTAT
AFFICHAGE OSD
MISE EN VEILLE Mode mise en veille ROUGE xe Désactivé
RÉCHAUFFEMENT
Pendant 15 à
20 secondes de
réchauement
BLEU clignotant Clignote
RECHERCHE DE
CANAUX
Système n’établie
pas de lien après
80 secondes (voir
Notes A et D)
BLEU clignotant Clignote
MODE SANS FIL
Aucun infrmation
de la source choisi
(voir Note B)
BLEU xe
Clignote
rapidement
Format vidéo pas
reconnu (voir
Note C)
BLEU xe
Clignote
lentement
Format vidéo est
reconnu
BLEU xe BLEU xe -
Alterne
entre les
images à
l'OSD
4 niveaux
en boucle -
Recherche
NOTES
A. Si le système est incapable d’établir une connexion à moins de 80 secondes, la connexion a été
perdue ou l’émetteur est hors de portée. Vériez la distance entre l’émetteur et le récepteur.
La portée de transmission vidéo maximale pour l’achage 1080p est à 30pi en ligne de vue.
La portée minimale est de 6,5 pi.
B. Veuillez conrmer que l’ordinateur est allumé et que HDMI OUT (sotie HDMI) a été
sélectionné; vériez que le câble HDMI est correctement connecté.
C. Si aucune vidéo n’est achée et le message OSD indique "PAS UN FORMAT SUPPORTÉ", ceci
indique que la fréquence d’image de l’ordinateur N’EST PAS supporté. Veuillez consulter la
section "Résolutions appuyées" pour modier la résolution.
D. Si vous avez plus qu’une paire de chaque émetteur / récepteur, chaque paire doit être au
moins à 6,5 pieds de distance de l’autre. Si les deux paires de transmetteur / récepteur sont
dans la même pièce, la distance entre les deux paires suggéré est de 6,5 pieds.
9. Si tout fonctionne normalement, la DEL d’alimentation et la DEL INFO seront illuminées en
BLEU xe. Veuillez vous référer au tableau ci-dessous pour les descriptions d’alertes DEL et
OSD plus détaillées:

- 37 -
CONFIGURATION
- 8 -
5. Branchez l’adaptateur à l’entrée CC du récepteur et à une prise murale. Lorsque l’appareil est
correctement connecté, l’indicateur d’alimentation sur le bouton d’alimentation s’allume en
BLEU.
6. Une fois que l’émetteur et le récepteur sont connectés, ils seront automatiquement jumelé
l’un à l’autre.
7. Au cours de la période de réchauement, la DEL D’ALIMENTATION clignote en BLEU jusqu’à
ce que le signal entre l’émetteur et le récepteur est établi. Il faudra 15 à 20 secondes pour
démarrer et établir un lien a link prévoyant que tout fonctionne normalement.
8. Assurez-vous que votre téléviseur ou projecteur est alimenté et est réglé en mode "HDMI
input"(entrée HDMI).
Téléviseur à écran plat HD

- 38 -
CONFIGURATION
- 7 -
3. Une fois que l’émetteur et le récepteur sont connectés, ils seront automatiquement jumelé
l’un à l’autre.
4. Lorsque vous déconnectez l’émetteur et le lien est déconnecté pour plus que 10 minutes, le
récepteur passe en MODE DE VEILLE (DEL d’alimentation du récepteur est ROUGE).
OU
Projecteur HD Télévision HD

- 39 -
CONFIGURATION
- 6 -
CONNEXION DU RÉCEPTEUR
1. Découpez le GABARIT DE PERÇAGE à la page
19 et la coller au mur à l’emplacement que vous
voulez que le récepteur soit installé.
2. Percez les avant-trous de xation que vous
avez marqués.
3. Insérez les deux vis d’ancrage fournies dans les
trous pré-percés.
4. Insérez les deux vis fournies dans les vis
d’ancrage et serrez les vis jusqu’à ce qu’elles
dépassent seulement par environ 1/8 de
pouce du mur.
5. Trouvez les trous de montage à l’arrière du
récepteur. Faites glisser les trous sur les vis qui
pour l’accrocher en place.
CONNEXION DU RÉCEPTEUR À LA TVHD
1. Branchez le câble HDMI à la sortie HDMI du récepteur et à votre téléviseur HD ou projecteur.
2. Branchez l’adaptateur à l’entrée CC du récepteur et à une prise murale. Lorsque l’appareil est
correctement connecté, l’indicateur d’alimentation sur le bouton d’alimentation s’allume
en BLEU.
GABARIT DE
PERÇAGE

- 40 -
CONNEXION DE L’ÉMETTEUR
1. Branchez l’émetteur directement à un PC, boîtier décodeur ou tout appareil HDMI.
2. Branchez l’émetteur directement à un PC, boîtier décodeur ou tout appareil HDMI à l’aide du
câble USB fourni ou branchez l’adaptateur à la prise mini USB de l’émetteur le brancher à
une prise murale disponible.
3. Vous pouvez également connecter l’adaptateur HDMI® à angle droit pour faciliter
l’installation avec certains ordinateurs.
• L’indicateur DEL sur le BOUTON D’ALIMENTATION devrait être illuminé en BLEU lorsque
l’émetteur est correctement connecté à l’ordinateur via USB.
CONFIGURATION
- 5 -

- 41 -
1
2
3
Récepteur - CÔTÉ LATÉRAL
5
6
1
Bouton d’alimentation
avec indicateur DEL
Appuyez sur pour ACTIVER/DÉSACTIVER le récepteur.
L’indicateur idans le bouton d’alimentation s’illumine en
BLEU lorsque l’appareil est ALLUMÉ, et devient ROUGE
en MODE VEILLE.
2 Bouton INFO
Appuyez ce bouton pour acher les options du MENU OSD
à l’écran HDTV.
3 Indicateur d’état DEL Ache les INFORMATIONS D'ÉTAT VIDÉO.
4 Trous de montage Vous permet d’accrocher le récepteur au mur.
5 Entrée DC Connexion à l’adaptateur du RÉCEPTEUR.
6 Sortie HDMI Connexion TVHD via un câble HDMI.
Récepteur - DESSOUS
4
TOUCHES ET CONNEXIONS
Récepteur - DESSUS
- 4 -

- 42 -
TOUCHES ET CONNEXIONS
- 3 -
Émetteur - AVANT
Émetteur - CÔTÉ LATÉRAL
1
2
4
1 Bouton de jumelage Pour jumeler l’émetteur et le récepteur
2 Indicateur d’état DEL
Est allumé en BLEU lorsque l’appareil est alimenté et a une
connexion sans l réussi
3 Entrée USB
Connectez l’émetteur au port USB du PC ou portable avec le
câble USB fourni
4 Entrée HDMI
Branchez l’émetteur directement à un PC, boîtier décodeur
ou tout appareil HDMI
3

- 43 -
TABLE DES MATIÈRES
CE QUI EST INCLUS
DISPOSITIFS
Table des matières .......................................................................................................................2
Ce qui est inclus ............................................................................................................................2
Dispositifss ................................................................................................................................... 2
Touches et connexions .................................................................................................................3
Conguration ............................................................................................................................... 5
Dépannage ................................................................................................................................15
Spécications .............................................................................................................................16
Déclaration de la FCC ..................................................................................................................17
Informations sur la sécurité ........................................................................................................18
Gabarit de perçage .....................................................................................................................20
Notes ..........................................................................................................................................21
Garantie NYRIUS ........................................................................................................................22
• Envoyez sans l des lms, des émissions TV, des jeux et la musique en haute dénition de
votre PC, lecteur Blu-ray™/DVD, console de jeu ou autre appareil HDMI® à votre TVHD
ou projecteur.
• Diusez la vidéo décompressée 1080p et le son ambiophonique en temps réel sans latence;
compatibilité 3D.
• Un signal numérique puissant jusqu’à 30pi élimine le souci d’installer des câbles encombrants.
• Conguration facile prêt à l’emploi permets une connexion rapide; aucun logiciel requis.
• Conception genre clé USB optimisé pour une utilisation portable, alimenté par USB ou
par adaptateur.
- 2 -
• Émetteur HD numérique sans l
• Récepteur HD numérique sans l
• 2 x Adaptateur CA 100-240V
• Câble HDMI® de 5pi
• Adaptateur HDMI® à angle droit
• Câble d’alimentation USB
• 2 x Vis d’ancrage
• 2 x Vis
• Manuel d’instruction
• Guide de démarrage rapide
• Garantie d’un an
• Soutien à la clientèle en direct pour la vie

Merci d’avoir fait l’achat de cet appareil Nyrius. Veuillez lire ce manuel attentivement avant d’utiliser
le produit pour vous assurer de l’utiliser correctement. Conservez ce guide dans un endroit sûr an de
pouvoir vous y référer au besoin.
GUIDE DE L’UTILISATEUR
NPCS549
www.NYRIUS.com
Émetteur HD sans fil
ARIES™ Prime
 Loading...