


USER GUIDE
ARIES™ Home+ Wireless HD Transmiter
with 3D Compatibility and IR Remote Extender
NAVS501
Thank you for your purchase of this Nyrius product. Please read this instruction manual carefully before using product to ensure proper use. Keep
this manual in a safe place for future reference.
www.NYRIUS.com

TABLE OF CONTENTS
Table of Contents ............................................................................................................................................. 2
What’s Included .............................................................................................................................................. 2
Features .......................................................................................................................................................... 2
Buttons and Connections ................................................................................................................................ 3
Setup .............................................................................................................................................................. 4
Operation ........................................................................................................................................................ 5
Troubleshooting ............................................................................................................................................... 6
Specications .................................................................................................................................................. 7
FCC Statement ..................................................................................................................................................8
Safety Information ........................................................................................................................................... 9
NYRIUS Warranty .......................................................................................................................................... 10
WHAT’S INCLUDED
• Digital Wireless HD Transmitter
• External IR Remote Extender
• Digital Wireless HD Receiver with Built-in IR Remote Extender
• Remote Control
• Velcro strips
• 2 100-240V AC Power Adapters
• 1 6ft HDMI Cable
• Instruction Manual
• 1 Year Warranty
• Lifetime Live Customer Support
FEATURES
• Transmit high denition video and digital audio signal wirelessly to your TV
• 3D Compatible + Multiple Transmitters
• Supports video resolution 1080p, 1080i, 720p, 720i, 576p, 480p
• Provides long range 100ft signal through walls, ceilings, oors without latency
• Easy plug and play installation without running messy wires
• Control your HD devices from any room in your house with the infrared remote extender
- 2 -
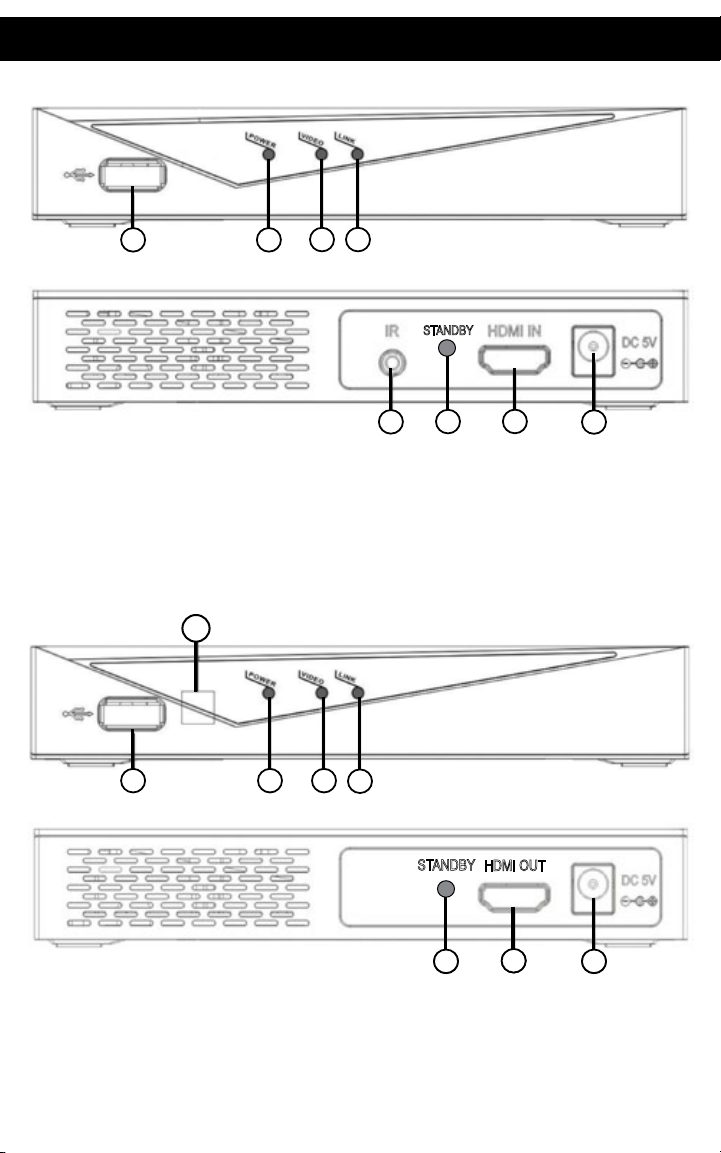
Transmitter - FRONT
BUTTONS AND CONNECTIONS
1 2
Transmitter - BACK
1. USB SOCKET - For software upgrades and
keyboard or mouse connection
2. POWER LED - Indicates power on
3. VIDEO LED - Indicates HDMI connection
4. LINK LED - Indicates wireless connection
Receiver - FRONT
2 3 4
1
Receiver - BACK
3 4
6
5
5. IR 3.5mm SOCKET - Connect external IR
remote extender
6. STANDBY BUTTON - Set unit to standby/pairing
7. HDMI SOCKET - Connect your HDMI device
8. 5V DC POWER SOCKET - Connect to power
supply
5
7
8
1. IR SENSOR WINDOW - Detects IR commands
2. USB SOCKET - For Software upgrades and
keyboard or mouse connection
3. POWER LED - Indicates power on
4. VIDEO LED - Indicates HDMI connection
7867
5. LINK LED - Indicates wireless connection
6. STANDBY BUTTON - Set unit to standby
7. HDMI SOCKET - Connect your HDMI device
8. 5V DC POWER SOCKET - Connect to power
supply
- 3 -
86
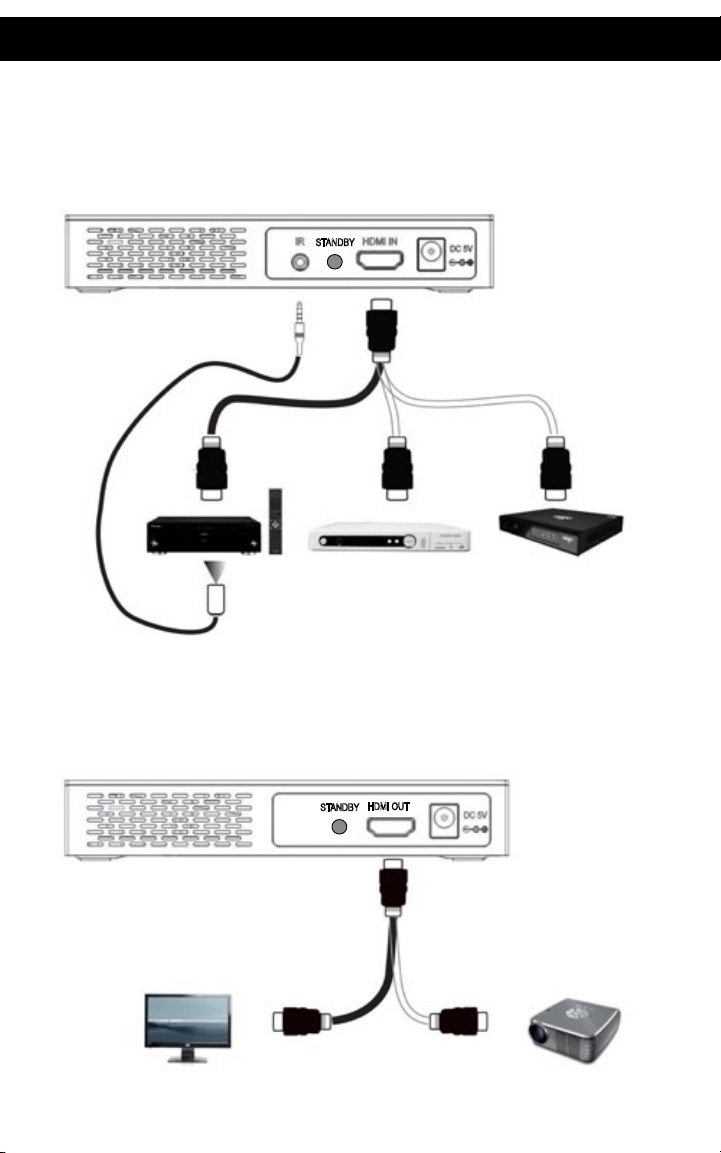
SETUP
Transmitter Connection
1. Connect your HDMI device to the transmitter using the HDMI cord.
2. Plug the external IR remote extender lead into the IR socket on the back of the transmitter and place the
IR remote extender bubble infront of the HD device.
3. Connect the power supply to the DC socket.
Blu-Ray
Player
HD Set Top Box
IR Transmitter
HD Multimedia
Player
Receiver Connection
1. Connect your HD device to the receiver using the HDMI cord.
2. Connect the power supply to the DC socket.
HDTV
WARNING: Do not move the transmitter or receiver from their positions once they are connected.
- 4 -
HD Projector

SETUP
Multicast function means that a receiver can be connected to many transmitters, (up to 8 transmitters) by
using the remote control.
Connecting multiple transmitters with one receiver
1. Press the [MENU] key of the remote control to enter the MAIN MENU, press the directional keys to select
[Add new Video Source] or press the [Add] key to add a video source. Please be sure that the remote
control is pointing to the receiver’s IR sensor.
2. "Please Activate Registration On Transmitter Unit" will appear on the screen. Press the STANDBY
BUTTON on the transmitter for 1 second to activate the Registration then a progress bar will appear.
3. The Registration will be completed within 3 minutes.
4. The Transmitter will be connected automatically and transmit audio and video after the Registration.
5. To add more than one video source, please repeat steps 1-3 after connecting each device.
USB Input
• The USB connection is compatible with a USB keyboard or mouse (only one device at a time).
• Using a USB hub or external harddrive will not work with this device.
Setting Up a Keyboard or Mouse with the USB Input
1. Connect a USB cable from your computer to the transmitter’s USB connection.
2. Connect your keyboard OR mouse to the receiver’s USB connection.
3. On your computer, navigate to Display Properties (or screen properties).
4. Under the Settings tab in Display Properties, choose your HDTV system as either the "Primary Monitor"
or "Monitor 2".
• Works with both PC and MAC systems.
Standby Function
1. On the receiver, press and hold the Standby key for 3 seconds and the receiver will go into Standby (sleep
mode). Press the Standby button once again to switch the receiver to ON mode.
2. On the transmitter, press and hold the Standby key for 3 seconds and the transmitter will go into Standby
(sleep mode).
3. When there is no signal transmission sent from the HD device to the transmitter or receiver for one
minute, they will automatically enter light sleep mode. The link LED and video LED will turn OFF.
• Setting the devices to standby mode reduces power usage by about 2.5W.
Indicates RED LED is lit Indicates GREEN LED is lit
Status
Power
Link
Standby (sleep mode)
Transmitter Receiver
Power Video Link Power Video Link
● ● ●
● ● ● ● ●
- 5 -

TROUBLESHOOTING
Before following the troubleshooting guide below please make sure that your Transmitter, Receiver and
attached equipment (HD source and display) are all properly connected switched on and not in Standby Mode.
No Video • Check the status of the Link LEDs, and check if the HD device is working normally
• Check the HDMI lead is undamaged and is plugged into the correct socket
• Check that the correct HDMI output has been selected from the HD device’s menu
and that the HDMI lead is plugged into the correct output socket
• Check that the correct HDMI input has been selected from the TV menu and that the
HDMI lead is plugged into the input socket selected
• Make sure that it is the Receiver that is connected to the HDTV display, and the
Transmitter that is connected to your HD device
Power LED OFF • Make sure the power is connected, and check the power adaptor output 5V/3A DC
Transmitter Video
LED OFF
Receiver Video
LED is ON
Transmitter /
Receiver Link LED
Flashes
Bad Picture • Make sure the HDMI leads used are undamaged and that you can get a good picture
Bad Audio/No
Audio
Other Issues/
Unresolved Issues
• Check the HD device is powered on
• Make sure the Transmitter is powered on
• Make sure the HD device is on, connected to the HDMI socket and outputting a
supported resolution (1080p, 1080i, 720p, 720i, 576p,480p). The Green LED will
switch OFF if an unsupported video signal is output
• Part of the system is not properly connected or the signal received is not of good
enough quality/strength
• Make sure the HD display is connected, switched ON and set to the right channel/
input (e.g. HDMI channel)
• Check the HDMI lead is undamaged and is plugged into the correct socket
• Make sure the Transmitter and Receiver are not positioned too far apart. Move
them closer together to check minimum eective range. Make sure the HD device is
switched ON and had been connected to Transmitter
when the source is connected directly to the display with an HDMI lead
• Make sure nothing is touching or blocking the signal to the built in antennas
• Move Transmitter and Receiver closer together
• Restart the HD device or reconnect the HDMI lead
• Make sure that the source is outputting supported audio formats
• If the audio signal drops out, Restart the audio source and reconnect the HDMI lead
• Make sure there is no 5.8GHz wireless phone within 50cm of the Receiver. Some
phones use substandard transmission schemes
• If any other issue occurs of if the above issues persist, try switching OFF both
Transmitter and Receiver and repeating the link set-up process
For further questions or inquires, please contact NYRIUS customer support at:
1.866.946.7828 or email support@NYRIUS.com
- 6 -

SPECIFICATIONS
Supported Video Resolutions 1080p, 1080i, 720p, 720i, 576p, 480p
HDMI Interface Supports HDMI 1.4a Video Audio format and HDCP 2.0 with video
encryption
Transmission Distance 100ft (30m) Line of Sight ( LOS )
Operating Frequencies 4.9GHz~ 5.9GHz (with DFS function)
Bandwidth 40MHz
Frequency Stability +/- 4ppm
Transmission Power >=12dBm >=17dBm
Receiving Sensitivity <= -75dBm <= -65dBm
System Latency < 1 ms
Antenna Omni-directional internal antennas.
Supporting link speeds Up to 2.5GBps
Compatible TV Systems NTSC, PAL
Certication FCC, CE, ICES-003
Regulations WHDI 1.0
Power Supplies AC 100~ 240V , 5V 3A DC Power Adaptor
IR Function 3.5mm Jack Plug,
External IR Transmitter Eye
Working temperature 0 °C -50 °C
Dimensions 146(L) x 93(W) x 25mm(H)
Weight 110 g
Built-in Infrared Remote-control
Receiver Module
- 7 -

FCC STATEMENT
This device complies with part 15 of the FCC rules. Operation is
subject to the following two conditions:
(1) this device may not cause harmful interference, and
(2) this device must accept any interference received, including
interference that may cause undesired operation.
This class B digital apparatus complies with Canadian ICES-003.
WARNING:
This equipment has been tested and is found to comply with the limits for a Class B digital
device, pursuant to Part 15 of the FCC Rules. These limits are designed to provide reasonable
protection against harmful interference in a residential installation. This equipment generates,
uses and can radiate radio frequency energy and, if not installed and used in accordance with
the instructions, may cause harmful interference to radio communications. However, there is
no guarantee that interference will not occur in a particular installation. If this equipment does
cause harmful interference to radio or television reception, which can be determined by turning
the equipment o and on, the user is encouraged to try to correct the interference by one or
more of the following measures:
• Reorient or relocate the receiving antenna
• Increase the separation between the equipment and receiver
• Connect the equipment into an outlet on a circuit dierent from that to which the
receiver is connected
• Consult the dealer or an experienced radio/TV technician for help
WARNING:
Changes or modications not expressly approved by the party responsible for compliance with
the FCC Rules could void the user’s authority to operate this equipment.
- 8 -

SAFETY INFORMATION
Do not use close to refrigerators, washing machines and metal furniture. Place on a stable surface and make
sure connecting wires are routed to minimize the chance of accidents.
Only use the DC power adaptors supplied, if they must be replaced make sure the replacements have the same
output rating of 5V 3A DC.
Avoid exposing your equipment to harsh conditions such as wet or damp places, high humidity, strong
vibration, extremely high or low temperatures, strong sunlight and places that are very dusty.
Do not cover or place heavy objects on the units. Make sure there is sucient clearance around the units to
allow adequate ventilation.
Never push objects into holes or ventilation slots.
To save power turn OFF the switches on the power adaptor leads or unplug the power adaptors from the power
sockets when you are not using the equipment.
Don’t continue to use any part of this equipment if you have spilled liquids on it, if it is damaged in any way or
if it does not work normally. Immediately unplug the equipment and get expert advice.
Cleaning: disconnect the main power supply and use only a lightly dampened cloth. Do not use chemical
solvents or strong detergents as these may damage the cosmetic nish.
• To prevent electric shock, do not remove any cover.
• If anything goes wrong, don’t try and x it yourself, get a qualied engineer to look at it.
• Do not expose this equipment to dripping or splashing liquids.
• Never allow a naked ame on or near the equipment.
• This product is not a toy. Do not let young children play with the equipment.
Waste electrical and electronic products should not be disposed of with household waste. Please
recycle where facilities exist. Check with your Local Authority for recycling advice.
- 9 -

NYRIUS® WARRANTY
Thank you for choosing NYRIUS® Consumer Electronics Products!
NYRIUS gives the following express warranty to the original consumer purchaser or gift recipient for this NYRIUS product,
when shipped in its original container and sold or distributed by NYRIUS or by an Authorized NYRIUS Dealer: NYRIUS
warrants that this product is free, under normal use and maintenance, from any defects in material and workmanship. If
any such defects should be found in this product within the applicable warranty period, NYRIUS shall, at its option, repair or
replace the product as specied herein. Replacement parts furnished in connection with this warranty shall be warranted
for a period equal to the unexpired portion of the original equipment warranty.
This warranty shall not apply to:
A. Any defects caused or repairs required as a result of abusive operation, negligence, accident, improper installation
or inappropriate use as outlined in the owner’s manual.
B. Any NYRIUS product tampered with, modied, adjusted or repaired by any party other than NYRIUS or NYRIUS’s
Authorized Service Centres.
C. Damage caused or repairs required as a result of the use with items not specied or approved by NYRIUS including
but not limited to head cleaning tapes and chemical cleaning agents.
D. Any replacement of accessories, glassware, consumable or peripheral items required through normal use of the
product including but not limited to earphones, remote controls, AC adapters, batteries, stylus, trays, lters,
cables, paper, cabinet, cabinet parts, knobs, buttons, baskets, stands and shelves.
E. Any cosmetic damage to the surface or exterior that has been defaced or caused by normal wear and tear.
F. Any damage caused by external or environmental conditions, including but not limited to transmission line/power
line voltage or liquid spillage.
G. Any product received without appropriate model, serial number and CSA /cUL /cULus /cETL /cETLus markings.
H. Any products used for rental or commercial purposes.
I. Any installation, setup and/or programming charges.
Should this NYRIUS product fail to operate during the warranty period, warranty service may be obtained upon delivery
of the NYRIUS product together with proof of purchase and a copy of this LIMITED WARRANTY statement to an Authorized
NYRIUS Service Centre. In-home warranty service may be provided at NYRIUS discretion on any NYRIUS television with
the screen size of 40” or larger. This warranty constitutes the entire express warranty granted by NYRIUS and no other
dealer, service centre or their agent or employee is authorized to extend, enlarge or transfer this warranty on behalf of
NYRIUS. To the extent the law permits, NYRIUS disclaims any and all liability for direct or indirect damages or losses or
for any incidental, special or consequential damages or loss of prots resulting from a defect in material or workmanship
relating to the product, including damages for the loss of time or use of this NYRIUS product or the loss of information.
The purchaser will be responsible for any removal, reinstallation, transportation and insurance costs incurred. Correction
of defects, in the manner and period of time described herein, constitute complete fulllment of all obligations and
responsibilities of NYRIUS Electronics to the purchaser with respect to the product and shall constitute full satisfaction of
all claims, whether based on contract, negligence, strict liability or otherwise.
1 YEAR PARTS & LABOUR WARRANTY PERIODS
TO OBTAIN THE NAME AND ADDRESS OF THE NEAREST AUTHORIZED NYRIUS SERVICE CENTRE OR FOR MORE
INFORMATION ON THIS WARRANTY
• Contact NYRIUS Support by Email: support@NYRIUS.com
• Visit www.NYRIUS.com
• Mail your inquiry to:
NYRIUS Customer Service, 4080 Montrose Road, Niagara Falls, ON L2H 1J9
• Call toll free 1.866.946.7828
NYRIUS is a registered trade-mark of Circus World Displays
07.2012
- 10 -

07.2012
- 11 -- 10 -
NYRIUS est une marque déposée de Circus World D isplays
• Composez le numéro sans frais : 1.866.946.7828
Service à la clientèle NYRIUS, 4080 Montrose Road, Niagara Falls, ON L2H 1J9
• Postez votre demande à:
• Visitez www.NYRIUS.com
• Contactez le service de soutient NYRIUS par courriel: suppor t@ NYRIUS.com
DE RENSEIGNEMENTS SUR CETTE GARANTIE :
POUR OBTENIR LE NOM ET L’ADRESSE DU CENTRE DE SERVICE NYRIUS AUTORISÉ LE PLUS PRÈS DE CHEZ VOUS OU POUR PLUS
GARANTIE D’UN ANS POUR LES PIÈCES ET LA MAIN D’OEUVRE
attribuables à la négligence, et la responsabilité absolue ou autre.
NYRIUS envers l’acheteur à l’égard du produit et constituera un acquittement complet de toutes les réclamations contractuelles ou
les délais indiqués dans la présente, constitue l’exécution complète de toutes les obligations et les responsabilités contractés par
l’enlèvement, la réinstallation, le transport et l’assurance de cet appareil. La correction de toute défectuosité, de la manière et dans
de l’utilisation de cet appareil NYRIUS ou de la perte de données. Il incombe à l’acheteur de défrayer les coûts encourus pour
d’un défaut de matériel ou de fabrication de cet appareil, incluant les dommages attribuables à la perte de temps ou perte
dommages ou pertes directs et indirects, tous dommages accessoires, particuliers ou consécutifs ou perte de prots résultant
transférer cette garantie au nom de NYRIUS. Dans la mesure où la loi le permet, NYRIUS désavoue toute responsabilité pour des
accordée par NYRIUS et aucun autre détaillant, centre de service ni leur agent ou employé est autorisé à prolonger, étendre ou
aux téléviseurs de marque NYRIUS dotés d’un écran de 40 pouces et plus. Cette garantie constitue la garantie expresse entière
cette GARANTIE LIMITÉE à un centre de service autorisé par NYRIUS. Le service à domicile est eectué, à la discrétion de NYRIUS,
conformément aux termes de cette garantie, en présentant cet appareil NYRIUS avec la preuve d’achat originale et une copie de
Si cet appareil de marque NYRIUS devient défectueux au cours de la période de garantie, une réparation peut être obtenue,
I. Tous les frais d’installation, d’ajustement et/ou de programmation.
H. Tout appareil utilisé à des ns commerciales ou de location.
attestations de l’ACNOR, de l’ULC, de l’ULI, de l’ETL au Canada et aux États-Unis.
G. Tout appareil ne portant pas les identications appropriées quant aux numéros de modèle et de série ni les étiquettes et
transmission ou de transport d’énergie ou le renversement de liquide.
F. Tout dommage causé par des conditions externes ou environnementales, y compris mais pas limité aux lignes de
résultant d’un usage normal.
E. Tout dommage apparent à la surface ou au boîtier extérieur de l’appareil et attribuable à la détérioration ou à l’usure
lecture, stylets, plateaux, ltres, câbles, papier, boîtier, composantes de boîtiers, boutons, paniers, supports et tablettes.
utilisation normale du produit, y compris mais pas limité aux écouteurs, télécommandes, adaptateurs CA, piles, pointes de
D. Le remplacement d’accessoires ou de pièces de verre, consommables ou des éléments périphériques nécessaires à une
nettoyage.
non recommandés ni approuvés par NYRIUS incluant, sans en exclure d’autres, les cassettes et/ou produits chimiques de
C. Les dommages causés ni les réparations requises à l’appareil résultant de son usage avec des composantes ou accessoires
centre de réparation autorisé par NYRIUS.
B. Les appareils de marque NYRIUS traqués, modiés, réglés, ajustés ou réparés par une entité autre que NYRIUS ou un
inadéquate ou un usage inapproprié selon les directives fournies dans le guide d’utilisation accompagnant l’appareil.
A. Les défectuosités ni les réparations résultant d’un usage abusif, d’une négligence, d’un accident ou d’une installation
Cette garantie ne couvre pas :
sont aussi couvertes par la garantie pendant une période égale à la portion non échue de la garantie originale de l’appareil.
ou, le cas échéant et à son entière discrétion, le remplacer. Les pièces de rechange qui sont fournis dans l’exécution de cette garantie
d’entretien normales. Si un défaut est décelé dans ce produit pendant la période de cette garantie, NYRIUS s’engage à le réparer
NYRIUS garantit que cet appareil est exempt de tout défaut de matériau et de fabrication dans des conditions d’utilisation et
pourvu qu’il ait été expédié et vendu ou distribué par NYRIUS ou un détaillant NYRIUS autorisé dans son emballage original.
NYRIUS accorde la garantie expresse suivante à l’acheteur original de cet appareil NYRIUS ou à la personne qui l’a reçu en cadeau,
Merci d’avoir choisi un produit électronique grand public NYRIUS!
GARANTIE NYRIUS®

- 12 -
- 9 -
recommandations de vos autorités locales concernant le recyclage ou la récupération adéquate.
autres déchets ménagers. Recyclable là où les installations nécessaires existent. Suivez les
Les déchets d’équipements électriques et électroniques ne doivent pas être jetés avec les
• Ce produit n’est pas un jouet. Ne permettez pas aux enfants jouer avec cet appareil.
• Ne permettez jamais une amme nue sur ou près de l’équipement.
• N’exposez pas cet appareil à des gouttes ou des éclaboussures de liquides.
pour l’évaluer.
• Si quelque chose va mal, n’essayez pas de le réparer vous-même, consultez un technicien qualié pour
• Pour éviter les chocs électriques, ne retirez pas le couvercle.
N’utilisez pas de solvants chimiques ou de détergents puissants car ils peuvent endommager le ni.
Nettoyage : débranchez l’alimentation principale et utilisez seulement un chion légèrement humide.
façon ou s’il ne fonctionne pas normalement. Débranchez l’appareil et consultez un spécialiste immédiatement.
Cesser l’utilisation de cet appareil si vous avez renversé des liquides dessus, s’il est endommagé de quelque
adaptateurs de la prise électrique lorsque vous n’utilisez pas l’équipement.
Pour économiser de l’énergie, éteignez les interrupteurs sur les câbles d’alimentation ou débranchez les
N’introduisez jamais d’objets dans les trous ou les fentes de ventilation.
appareils an de permettre une ventilation adéquate.
Ne pas couvrir ou placer des objets lourds sur les appareils. Assurez-vous qu’il reste assez d’espace autour des
soleil et les endroits qui sont très poussiéreux.
humidité élevée, de fortes vibrations, des températures extrêmement élevées ou basses, la lumière directe du
Évitez d’exposer votre équipement à des conditions sévère telles que les lieux humides ou mouillés, une
que les remplacements ont le même classement de sortie 5V CC 3A.
Utilisez uniquement les adaptateurs d’alimentation CC fourni, si elles doivent être remplacées, assurez-vous
assurez-vous que les ls de connexion sont acheminés pour minimiser le risque d’accidents.
N’utilisez pas près de réfrigérateurs, machines à laver et meubles en métal. Placez sur une surface stable et
INFORMATIONS SUR LA SÉCURITÉ

- 13 -
- 8 -
l’utilisateur à utiliser ce produit.
responsable de la conformité aux règles de la FCC est en droit de refuser l’autorisation de
Tout changement ou toute modication n’étant pas autorisée de façon explicite par l’organisme
AVERTISSEMENT:
obtenir de l’aide.
• Consulter le revendeur ou un technicien spécialisé dans le service des radios/téléviseurs pour
• Branchez l’appareil dans une prise de courant CA diérente de celle utilisée par le récepteur
• Augmenter la distance entre l’appareil et le récepteur
• Réorienter ou déplacer l’antenne de réception
l’une ou plusieurs des mesures proposées suivantes :
ou désactivant l’appareil, l’utilisateur est encouragé à tenter de corriger le brouillage en prenant
brouillage préjudiciable à la réception radio ou télévisuelle, ce qui peut être déterminé en activant
qu’il n’y aura pas de brouillage préjudiciable dans une installation donnée. Si cette unité cause un
causer un brouillage préjudiciable à la radiocommunication. Il est toutefois impossible de garantir
radioélectrique, et si elle n’est pas installée et utilisée conformément aux instructions, pourrait
dans une installation résidentielle. Cette unité produit, utilise et peut émettre une énergie
an d’orir une protection raisonnable contre toute possibilité de brouillage préjudiciable
15 des règlements de la FCC pour un appareil numérique de catégorie B. Ces normes sont établies
Cette unité a été testée et il a été déterminé qu’elle se conforme aux normes stipulées par l’article
AVERTISSEMENT:
Cet appareil numérique de classe B est conforme à la norme Canadienne ICES-003.
auquel il pourrait être soumis.
(2) il doit pouvoir fonctionner normalement en dépit de l’interférence
préjudiciable, et
(1) cet appareil ne doit en aucun cas être la source d’interférence
par la FCC. Son fonctionnement est assujetti aux deux conditions suivantes:
Cet appareil répond aux normes prescrites au chapitre 15 des règles édictées
DÉCLARATION DE LA FCC

- 14 -
- 7 -
Poids 110 g
Dimensions 146(L) x 93(L) x 25mm(H)
Température de fonctionnement 0 °C -50 °C
IR intégrée
Récepteur de télécommande
NTSC, PAL
avec le chirement vidéo
1080p, 1080i, 720p, 720i, 576p, 480p
voyant IR d’émetteur externe
Fonction IR Connecteur mâle 3,5mm,
Alimentations Adaptateurs CA 100~ 240V, 5V 3A CC
Réglementation WHDI 1,0
Certication FCC, CE,ICES-003
compatible
Systèmes de télévision
Soutient de vitesses de liaison Jusqu’à 2,5GBps
Antenne Antennes internes omni-directionnel
Latence du système < 1 ms
Sensibilité de réception <= -75dBm <= -65dBm
Puissance de transmission >=12dBm >=17dBm
Stabilité de fréquence +/- 4ppm
Bande passante 40MHz
Fréquences de fonctionnement 4,9GHz~ 5,9GHz (avec fonction DFS )
Distance de transmission 100pi (30m) Distance à vue ( LOS )
Interface HDMI Prise en charge audio-vidéo HDMI 1,4a et le format HDCP 2,0
charge
Résolutions vidéo prises en
SPÉCIFICATIONS

- 15 -
- 6 -
de conguration.
essayez de désactiver l’émetteur et le récepteur et répétez le processus
• Si d’autres questions surviennent ou si les problèmes ci-dessus persistent,
récepteur. Certains téléphones utilisent des systèmes de transmission inférieurs
• Assurez-vous qu’il n’y a aucun téléphone sans l de 5,8 GHz à moins de 50cm du
• Si le signal audio baisse, redémarrez la source audio et rebranchez le câble HDMI
• Assurez-vous que la source est mise en charge d’un format audio soutenue
• Redémarrez l’appareil HD ou rebranchez le câble HDMI
• Rapprochez l’émetteur et le récepteur
• Vériez qu’il n’y a rien qui touche ou bloque le signal des antennes intégrées
avec un câble HDMI
obtenir une bonne image lorsque la source est connectée directement à l’écran
l’appareil HD est allumé et relié à l’émetteur
Rapprochez-les pour vérier la distance minimale ecace. Assurez-vous que
• Assurez-vous que l’émetteur et le récepteur ne sont pas placés trop loin.
bonne prise
• Vériez que le câble HDMI n’est pas endommagé et qu’il est branché dans la
entrée (par exemple le canal HDMI)
• Assurez-vous que l’écran HD est connecté, allumé et réglé sur le bon canal /
une assez bonne qualité / force
• Une partie du système n’est pas correctement branché ou le signal reçu n’est pas
est sorti
480p). La DEL verte s’éteindra si un signal vidéo si un signal vidéo non soutenu
la sortie est d’une résolution prise en charge (1080p, 1080i, 720p, 720i, 576p,
• Assurez-vous que l‘appareil HD est alimenté, connecté à la prise HDMI et que
• Assurez-vous que l’émetteur est alimenté
• Vériez que l‘appareil HD est alimenté
l’adaptateur CC 5V/3A
• Assurez-vous que l’appareil est connecté, et vériez la puissance de sortie de
est connecté à votre appareil HD
• Assurez-vous que c’est le récepteur qui est relié à l’écran HDTV, et l’émetteur qui
que le câble HDMI est branché à la prise d’entrée choisie
• Vériez que la bonne entrée HDMI a été choisie dans le menu du téléviseur et
que le câble HDMI est branché dans la bonne prise de sortie
• Vériez que la bonne sortie HDMI a été choisie dans le menu de l’appareil HD et
bonne prise
• Vériez que le câble HDMI n’est pas endommagé et qu’il est branché dans la
résolues
/ questions non
Autres problèmes
aucun son
Son médiocre/
Mauvaise image • Assurez-vous que les câbles HDMI utilisés sont en bon état et que vous pouvez
récepteur clignote
l’émetteur/
DEL link de
illuminée
récepteur est
DEL vidéo du
s’illumine pas
l’émetteur ne
DEL vidéo de
ne s’illumine pas
DEL d’alimentation
Aucun vidéo • Vériez l’état de la DEL Link, et vériez si l’appareil HD fonctionne normalement
mode standby (mode de veille).
récepteur et l’équipement ci-joint (source HD et écran) sont tous correctement connectés, allumés et pas en
Avant de suivre le guide de dépannage ci-dessous, s’il vous plaît assurez-vous que votre émetteur, votre
DÉPANNAGE

- 16 -
- 5 -
Standby (mode attente)
● ● ● ● ●
● ● ●
Link
Alimentation
Alimentation Vidéo Link Alimentation Vidéo Link
Émetteur Récepteur
État
Indique que la DEL est allumée en rouge Indique que la DEL est allumée en vert
• Régler les appareils au mode Standby (mode veille) réduit la consommation d’énergie par environ 2,5W.
s’éteindront.
pour une minute, ils entreront automatiquement le mode Standby (mode veille). Les DEL link et vidéo
3. Quand il n’y a pas de transmission de signal envoyée de l’appareil HD à l’émetteur ou au récepteur
entrera dans le mode Standby (mode veille).
2. Sur l’émetteur, appuyez et retenez la touche Standby (mode veille) pendant 3 secondes et l’émetteur
récepteur en mode ON (marche).
entrera dans le mode veille. Appuyez sur la touche Standby (mode veille) une fois de plus mettra le
1. Sur le récepteur, appuyez et retenez la touche Standby (mode veille) pendant 3 secondes et le récepteur
Fonction Standby (mode veille)
• FonctionneaveclessystèmesPCetMac
"moniteur principal" ou "moniteur 2".
4. Sous l’onglet paramètres de la section "propriétés d’achage", choisissez votre système HDTV soit comme
3. Sur votre ordinateur, accédez les "propriétés d’achage"(ou à l’écran des "propriétés").
2. Connectez votre clavier ou la souris à la connexion USB du récepteur.
1. Branchez un câble USB de votre ordinateur à la connexion USB de l’émetteur.
Conguration d’un clavier ou une souris avec l’entrée USB
• Un concentrateur USB ou un disque dur externe ne fonctionnent pas avec cet appareil.
• La connexion USB est compatible avec un clavier USB ou souris (un seul appareil à la fois).
Entrée USB
chaque dispositif.
5. Pour ajouter plus qu’une source vidéo, veuillez répétez les étapes 1 à 3 après la connexion de
4. L’émetteur sera connecté automatiquement et transmettra de l’audio et la vidéo après l’enregistrement.
3. L’enregistrement sera eectué en 3 minutes.
activer l’enregistrement et une barre de progression apparaîtra à l’écran.
l’émetteur ») apparaîtra à l’écran. Appuyez le BOUTON STANDBY sur l’émetteur pour UNE seconde pour
2. "Please Activate Registration On Transmitter Unit"(« Veuillez activer enregistrement sur
ajouter une source vidéo. Veuillez assurer que la télécommande est pointée au capteur IR du récepteur.
touches directionnelles pour sélectionner [Ajouter nouvelle source vidéo] ou sur la touche [ADD] pour
1. Appuyez sur la touche [MENU] de la télécommande pour entrer le menu principal, appuyez sur les
Connexion de plusieurs émetteurs avec un récepteur
émetteurs) à l’aide de la télécommande.
Fonction multidiusion signie qu’un récepteur peut être connecté à plusieurs émetteurs, (jusqu’à 8
OPÉRATION

- 17 -
- 4 -
sont connectés.
ATTENTION: Ne déplacez pas l’émetteur ou le récepteur de leurs positions une fois qu’ils
Projecteur HD
multimédia HD
Lecteur
HDTV
2. Branchez l’alimentation à la prise CC.
1. Connectez votre appareil HDMI au récepteur en utilisant le câble HDMI.
Connexion du récepteur
Émetteur IR
Appareil HD
Blu-Ray
Lecteur
3. Branchez l’alimentation à la prise CC.
bulle de l’extension pour télécommande IR devant l’appareil HD.
2. Branchez l’ extension pour télécommande IR externe dans la prise IR à l’arrière de l’émetteur et placez la
1. Connectez votre appareil HDMI à l’émetteur en utilisant le câble HDMI.
Connexion de l’émetteur
CONFIGURATION

86
8
7
7
- 18 -
- 3 -
l’alimentation
8. PRISE D’ALIMENTATION 5V CC - Connexion à
7. PRISE HDMI - Connexion de votre appareil HDMI
l ‘appareil en mode de veille
6. TOUCHE DE STANDBY (mise en veille) - Réglez
5. DEL LINK - Indique la connexion sans l
4. DEL VIDÉO - Indique la connexion HDMI
sous tension
3. DEL D’ALIMENTATION - Indique que l’appareil est
2. FENÊTRE DU CAPTEUR IR - Détecte le signal IR
connexion de clavier ou souris
1. ENTRÉE USB - Pour mises à jour logicielles et
Récepteur - panneau arrière
5
3 4
2
1
Récepteur - panneau avant
l’alimentation
8. PRISE D’ALIMENTATION 5V CC - Connexion à
7. PRISE HDMI - Connexion de votre appareil HDMI
l ‘appareil en mode de veille
6. TOUCHE DE STANDBY (mise en veille) - Réglez
télécommande IR externe
5. PRISE IR 3,5mm - Connexion de l’extension pour
5
6
4. DEL LINK - Indique la connexion sans l
3. DEL VIDÉO - Indique la connexion HDMI
sous tension
2. DEL D’ALIMENTATION - Indique que l’appareil est
connexion de clavier ou souris
1. ENTRÉE USB - Pour mises à jour logicielles et
Émetteur - panneau arrière
3 4
1 2
Émetteur - panneau avant
TOUCHES ET CONNEXIONS

- 19 -
- 2 -
DISPOSITIFS
télécommande IR
• Contrôlez vos appareils HD à par tir de n’importe quelle pièce de votre maison avec l ’extension pour
• Approche prêt à l’emploi facile à installer sans câbles encombrants
sans latence
• Fournit un signal de longue portée jusqu’à 100pi à travers les murs, les plafonds, les planchers
• Prend en charge la résolution vidéo 1080p, 1080i, 720p, 720i, 576p, 480p
• Compatible avec 3D et plusieurs émetteurs
• Transmet la vidéo à haute dénition et un signal audio numérique sans l à votre téléviseur
• Soutien à la clientèle en direct pour la vie
• Garantie d’un an
• Manuel d’instructions
• 1 Câble HDMI de 6pi
• 2 Adaptateurs CA 100-240V
• Bandes de Velcro
• Télécommande
• Récepteur HD numérique sans l avec extension pour télécommande IR intégrée
• Extension pour télécommande IR externe
• Émetteur HD numérique sans l
CE QUI EST INCLUS
Garantie NYRIUS ........................................................................................................................................... 10
Informations sur la sécurité ..............................................................................................................................9
Déclaration de la FCC ........................................................................................................................................ 8
Spécications .................................................................................................................................................. 7
Dépannage ...................................................................................................................................................... 6
Opération ........................................................................................................................................................ 5
Conguration .................................................................................................................................................. 4
Touches et connexions .................................................................................................................................... 3
Dispositifs ....................................................................................................................................................... 2
Ce qui est inclus ............................................................................................................................................... 2
Table des matières .......................................................................................................................................... 2
TABLE DES MATIÈRES

correctement. Conservez ce guide dans un endroit sûr an de pouvoir vous y référer au besoin.
Merci d’avoir fait l’achat de cet appareil Nyrius. Veuillez lire ce manuel attentivement avant d’utiliser le produit pour vous assurer de l’utiliser
www.NYRIUS.com
NAVS501
avec compatibilité 3D et extension pour télécommande IR
Émetteur HD numérique sans l ARIES™ Home+
GUIDE DE L’UTILISATEUR
 Loading...