

Page 1
Digital Weatherstation | 719028
94
USER MANUAL
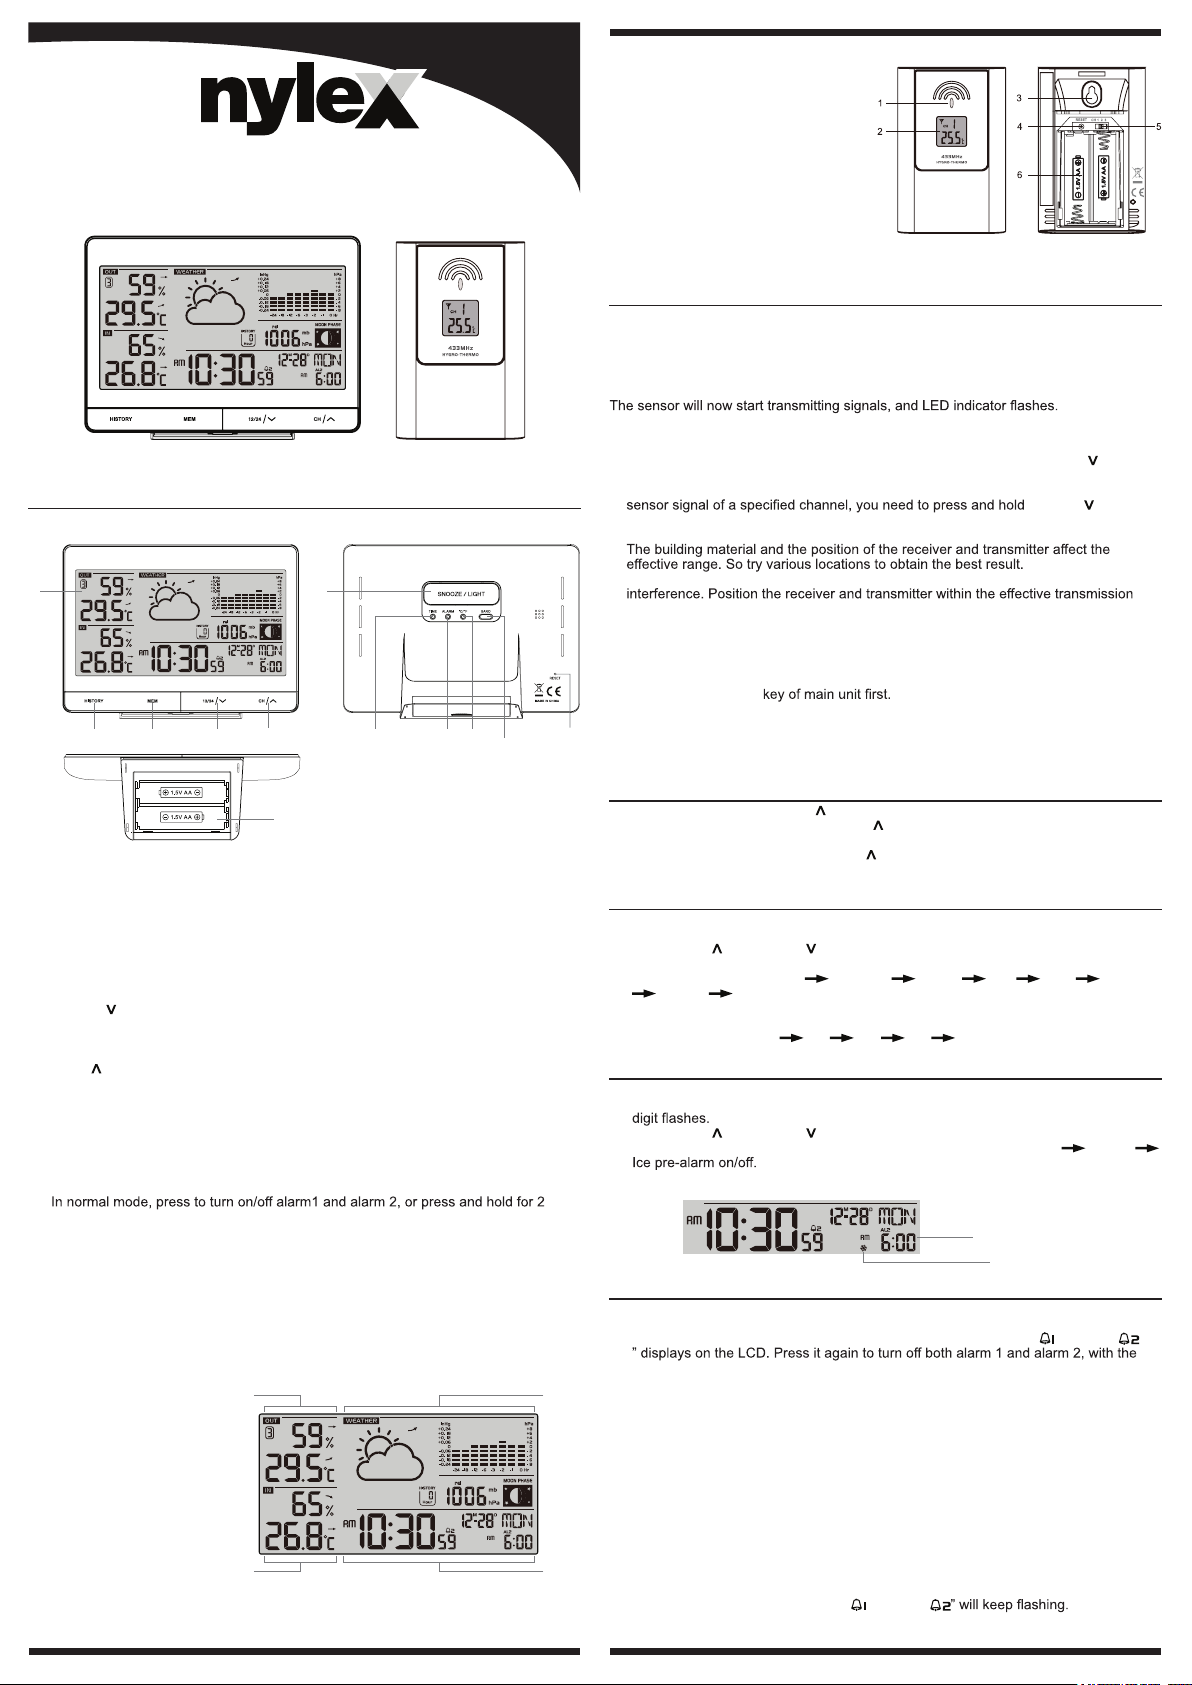
WIRELESS SENSOR
1. LED indicator
- Flashes when the remote unit is
transmitting.
2. LCD display
- to show the detected temperature or
humidity of the sensor.
3. Wall mounting holder
4. [ RESET ] key
- Press to restart the sensor.
5. [ CHANNEL ] slide switch
- Assign the transmitter to Channel
from 1 to 3.
6. Battery compartment
- Accommodates 2 x AA size batteries.
GETTING STARTED
WIRELESS SENSOR
1. Remove the battery door.
2. Insert 2 x AA size batteries into the battery compartment. Make sure you insert
them the right way according to the polarity information marked on the battery
compartment.
3. Replace the battery door.
OVERVIEW
LCD MONITOR
1 2
5 63
12
1. LCD monitor
2. [ SNOOZE / LIGHT ] key
- When alarm is sounding, press to stop the current alarm and enter snooze.
- When alarm is sounding, press and hold for 2 seconds to stop the current alarm, the
clock will sound again in the next day.
3. [ HISTORY ] key
- In normal mode, press to display the past 24 hour pressure records.
4. [ MEM ] key
- In normal mode, press to check maximum and minimum thermo-hygro reading, or
press and hold for 3 seconds to delete both records.
5. [ 12/24 /
- In normal mode, press to switch between 12 or 24 hour format of time display, or
press and hold for 3 seconds to activate wireless sensor pairing mode.
- In setting mode, press to decrease the setting values.
6. [ CH /
- In normal mode, press to switch between CH 1~3 of outdoor sensor’s weather
display, or press and hold for 2 seconds to enter auto-cycle mode.
- In setting mode, press to increase the setting values.
7. [ TIME ] key
- In normal mode, press to switch between alarm 1 and alarm 2, or press and hold for
2 seconds to enter time setting mode.
- In time setting mode, press to step the setting.
8. [ ALARM ] key
seconds to enter alarm setting mode.
- In alarm setting mode, press to step the setting.
9. [ °C / °F ] key
- In normal mode, press to switch between Celsius and Fahrenheit.
10. [ BARO ] key
- In normal mode, press to switch between hPa (mb) and inHg, or press and hold for 3
seconds to enter the “rel” and “abs” switch mode.
11. [ RESET ] key
- In case of malfunction, press to reset the main unit.
12. Battery compartment
LCD MONITOR
1. Ch. 1-3 temperature &
humidity reading
2. Indoor temperature &
humidity reading
3. Weather forecast, Baro
pressure & moon phase
section
4. Time and calendar section
] key
] key
1
2
10 117 8
NOTE:
- Once the channel is assigned to a sensor, you can only change it by removing the
batteries or resetting the sensor, you also need to press and hold [ 12/24 /
3 seconds on main unit to pair this sensor.
- After replacing the batteries of the wireless sensor or the unit fails to receive wireless
seconds on main unit to pair this sensor again.
- Avoid placing the transmitter in direct sunlight, rain or snow.
-
- Place the units away from metal objects and electrical appliances to minimize the
range: 30m in usual circumstances.
LCD MONITOR
1. Remove the battery door and insert 2 x AA batteries into the battery compartment,
according to the polarity mark on the battery compartment.
2. After the batteries are installed, all LCD segment will be shown.
3. Press the [ RESET ]
4. Replace the battery door.
NOTE:
If no display appears on the LCD after installing the batteries, press the [ RESET ] key by
using a metal wire.
VIEW MULTIPLE WIRELESS SENOR CHANNELS
1. In normal mode, press [ CH /
2. In normal mode, press and hold [ CH /
mode, After a “bi” sounds, it will alternately displays the CH 1~3 at 4 second intervals.
3. During auto-cycle mode, press [ CH /
display the current channel.
TIME AND CALENDAR SETTING
1. In normal mode, press and hold [ TIME ] key for 2 seconds to enter date and time
setting mode.
2. Press [ CH /
3. Press [ TIME ] key to enter the next setting.
4. The setting sequence: year
second weekday language.
5. Press [ TIME ] key or leave the unit for 30 seconds to complete the setting and return
to normal mode.
6. Weekday language GB
ALARM TIM E SETTING AND DISPLAY
1. In normal time mode, press [ TIME ] key to select the alarm 1 or alarm 2.
2. In alarm1/alarm2 mode, press and hold [ ALARM ] key for 2 seconds until alarm hour
3. Press [ CH / ] or [ 12/24 / ] key to change the value
4. Repeat the above operations to set the alarm time in this order: Hour
5. Press [ ALARM ] key or leave the unit for 30 seconds to return to normal mode.
USING ALARM AND SNOOZE FUNCTION
1. Set the desired alarm time as described in the previous section.
2. Or press [ ALARM ] key to turn on alarm 1, press it again to turn on alarm 2, press
it thrice to turn on both alarm 1 and alarm 2, with the alarm icons “
icons disappear.
3. When clock reach the alarm time, alarm sound will start.
3
Where it can be stopped by following operation:
a) Auto-stop after 2 minutes alarming if without any operation and the alarm will activate
again in the next day.
b) By pressing [ SNOOZE / LIGHT ] key to enter snooze that the alarm will sound again
after 5 minutes.
c) By pressing and hold [ SNOOZE / LIGHT ] key for 2 seconds to stop the alarm and
will activate again in the next day
d) By pressing [ ALARM ] key to stop the alarm and the alarm will activate again in the
next day.
NOTE:
4
- The alarm function will turn on automatically once you set the alarm time.
- The snooze could be used continuously in 24 hours.
- During the snooze, the alarm icons “
] or [ 12/24 / ] key to adjust the setting.
] key to switch the display between CH 1~3.
] key for 2 seconds to enter auto-cycle
] key again to stop auto-cycle mode and
DM / MD month day hour minute
FR DE ES IT
” and / or “
[ 12/24 / ] key for 3
Time of alarm 2
Ice alert icon
] key for
Minute
” and / or “
Page 2
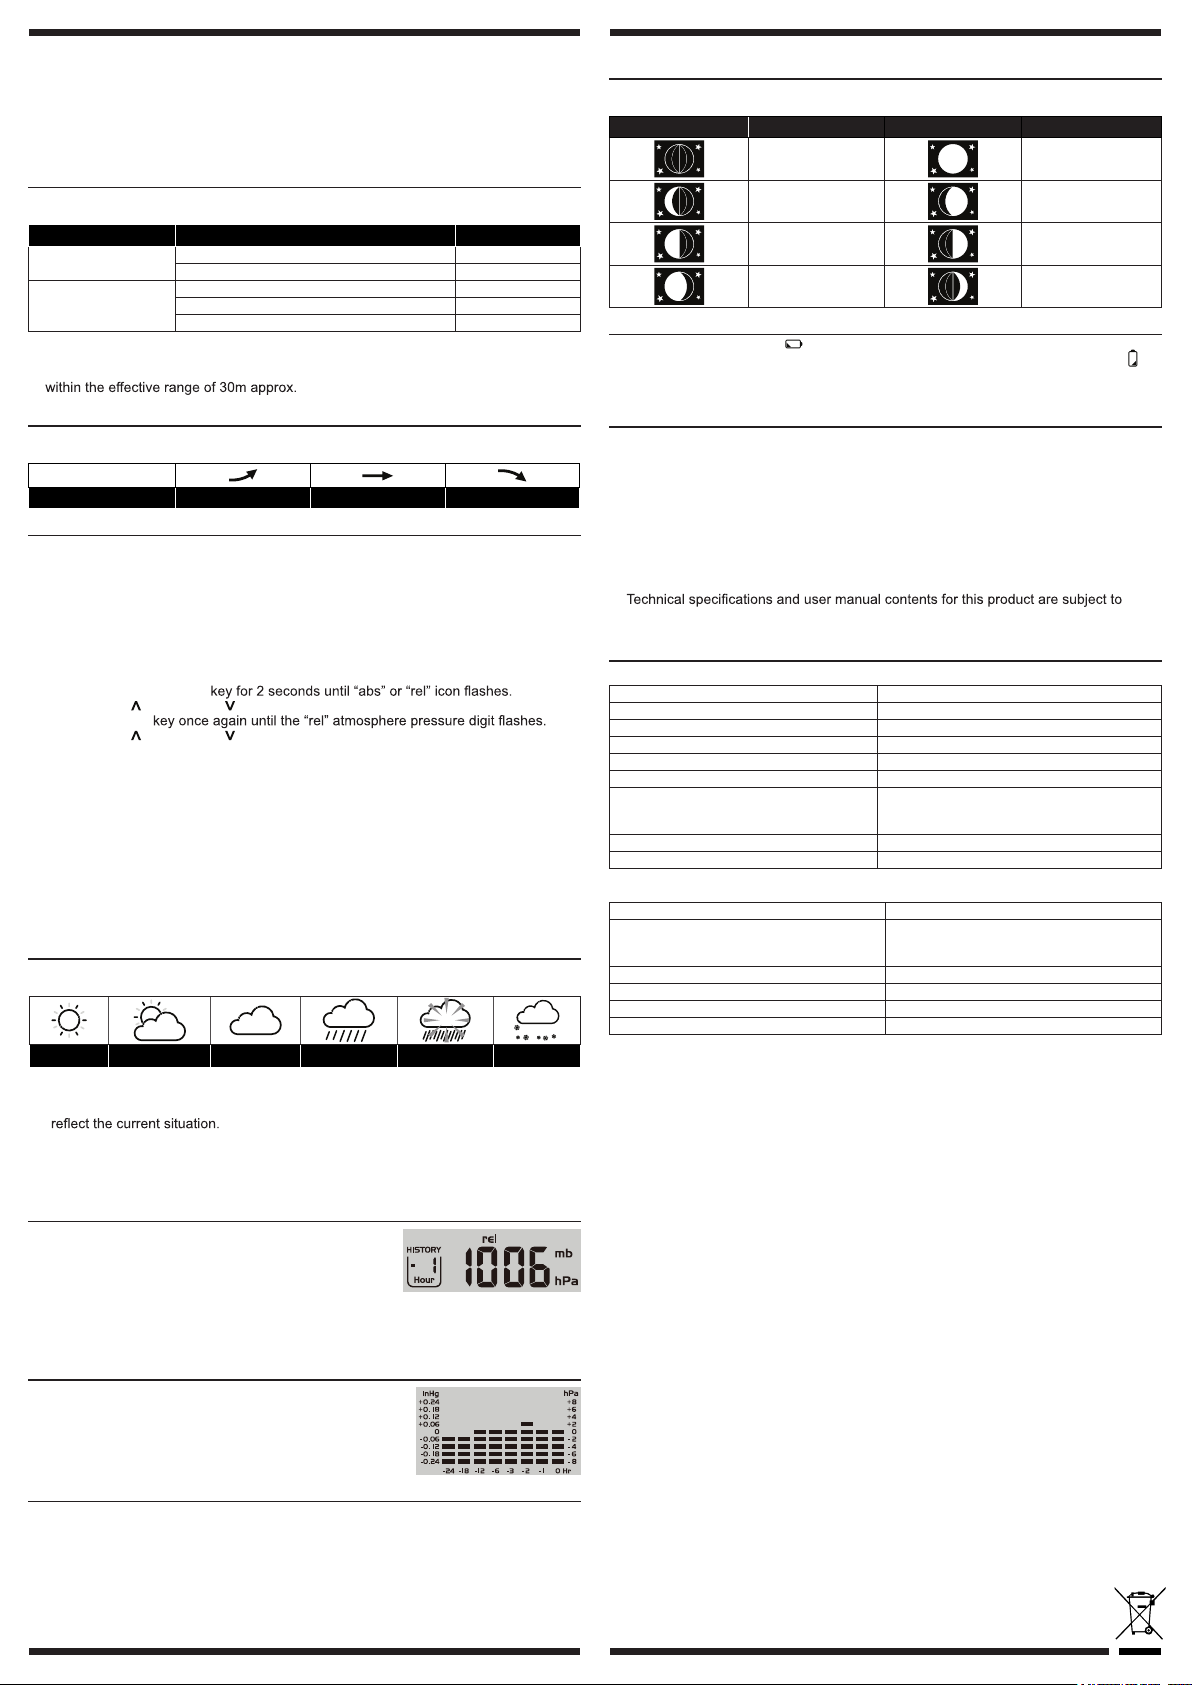
- The ice pre-alarm will be activated when the alarm 1 and / or 2 is on.
- Once the ice pre-alarm activates, the preset alarm will sound 30 minutes earlier if the
outdoor temperature is below -3°C.
- To activate the ice pre-alarm function, pls ensure:
a. Turn on the ice pre-alarm function in the alarm setting mode.
b. Turn on the corresponding alarm.
READING INDOOR/OUTDOOR TEMPERATURE & HUMIDITY FUNCTION
In normal mode, press [ °C / °F ] key to switch between °C /°F temperature unit. The
temperature and humidity will display “Hi / Lo / --” on the conditions in the following chart:
Area Condition Display
Temperature
Temperature < -40°C LO
Temperature > 70°C HI
Humidity < 20% LO
Humidity
Humidity > 90% HI
Temperature < -40°C or > 70°C --
NOTE:
- If no signals are received or the transmission is interfered, “- -” will appear on the LCD.
- Relocated the clock or transmitter in other positions and make sure the transmission is
BARO, TEMPERATURE AND HUMIDITY T REND
The Barometric pressure, temperature and humidity trend indicator shows the trends of
changes in the forthcoming few minutes. Arrows indicate a rising, steady or falling trend.
Arrow indicator
Trend Rising Steady Falling
BAROMETRIC/ATMOSPHE RIC PRESSURE
TO SELECT THE PRESSURE DISPLAY MODE
Press and hold the [ BARO ] key for 2 seconds to enter select model that allow you
select between:
abs --- the absolute atmospheric pressure of your location.
rel --- the relative atmospheric pressure based on the sea.
TO SET RELATIVE ATMOSPHERIC PRESSURE VALUE
1. Get the atmosphere pressure data of the sea level (it is also the relative atmosphere
pressure data of your home area) through the local weather service, internet and
other weather channels.
2. Press and hold [ BARO ]
3. Press [ CH / ] or [ 12/24 / ] key to switch to “rel” mode.
4. Press [ BARO ]
5. Press [ CH / ] or [ 12/24 / ] key to change its value.
6. Press [ BARO ] key to save and exit the setting mode, or let it exit automatically 30
seconds later without pressing any key.
TO SELECT THE MEASUREMENT UNIT FOR THE BAROMETER
Use the [ BARO ] key to change the unit between hPa (mb) / inHg.
NOTE:
- When power up the main unit, it will display the relative pressure reading and default
value is 1013 mb/hPa (29.91 inHg), which refers to the average atmosphere pressure.
- When you change the relative atmosphere pressure value, the weather indicators will
change along with it.
- The relative atmosphere pressure is based on the sea level, but it will change with the
absolute atmosphere pressure changes after operating the clock for 1 hour.
WEATHER FORECAST
The built-in barometer can notice atmosphere pressure changes. Based on the data
collected, it can predict the weather conditions in the forthcoming 24 ~ 72 hours.
Sunny Partly Cloudy Cloudy Rainy Stormy Snowy
NOTE:
1. The accuracy of a general pressure-based weather forecast is about 70% to 75%.
2. The weather forecast is meant for the next 24 ~ 72 hours, it may not necessarily
3. The Snowy weather forecast is not based on the atmospheric pressure, but based
on the temperature of current channel. When the outdoor temperature is below -3°C,
the Snowy weather indicator will be displayed on the 24 HOUR FORECAST display
section.
PAST 24 HOURS HISTO RY PRESSURE RECORD
The current and historical atmosphere is shown near the
24 HOUR FORECAST section.
To check the pressure history in a particular hour during the
past 24 hours, press the [ HISTORY ] key. Each press on
the key will go back by an hour.
Under the pressure history mode, press any key (except
[HISTORY ] key) to go back the normal mode, or let it exit
automatically 30 seconds later without pressing any key.
HISTORY GRAPH
The history graph is under the time section of the LCD
displays that can show the Baro histories in bar chart
format.
MAX / MIN RECORD
The main unit preserves the MAX / MIN weather data records since the last manual
reset.
1. In normal mode, press [ MEM ] key once to show the indoor & current outdoor
channel maximum temperature and humidity records.
2. Press [ MEM ] key repeatedly to show the minimum records.
3. Press [ MEM ] key again to exit.
4. To erase all the MAX / MIN records, press and hold [ MEM ] key for 3 seconds.
MOON PHAS E
The main unit can show the Southern hemisphere moon phase status, below is the table
which illustrate how the moon will appear on the main unit.
Moon Phase Icon
Description
Moon Phase Icon
Description
New Moon Full Moon
Waxing Crescent
Waning Gibbous
First quarter Third quarter
Waxing Gibbous Waning Crescent
LOW BATTERY ICON
When the battery indicator “
dim, replace with 2 new AA size batteries at once; while If the low battery indicator “
appear in the outdoor section, it indicates that the battery power of the transmitter is not
enough, and you should replace with 2 x AA size batteries at once.
” appear on the clock section or the LCD becomes
”
IMPORTANT NOTE
- This main unit is intended to be used only indoors.
- Do not subject the unit to excessive force, shock, dust, temperature or humidity.
- Do not cover the ventilation holes with any items such as newspapers, curtains etc.
- Do not immerse the unit in water. If you spill liquid over it, dry it immediately with a
soft, lint-free cloth.
- Do not clean the unit with abrasive or corrosive materials.
- Do not tamper with the unit’s internal components. This invalidates the warranty.
- Only use fresh batteries. Do not mix new and old batteries.
- Do not dispose old batteries as unsorted municipal waste. Collection of such waste
separately for special treatment is necessary.
- Attention! Please dispose of used unit or batteries in an ecologically safe manner.
change without notice.
SPECIFICATIONS
MAIN UNIT
Dimensions (W x H x D) 140 x 103.5 x 51mm
Main power 2 x AA size 1.5V batteries
Barometer display range 540 to 1100hPa, 15.95 to 32.49inHg
Operating temperature range -5°C to 50°C ( 23°F to 122°F )
Display temperature range (In / Outdoor) -40°C to 70°C (-40°F to 158°F)
Display humidity range (In / Outdoor) RH 20% to 90 %
Resolution of temperature
1 decimal place of °C/°F (above -10°C / °F)
Integer of °C/°F (below -10°C / °F or above
100 °F)
Resolution of humidity 1%
Number of sensors support Up to 3 units
WIRELESS SENSOR
Dimensions (W x H x D) 65 x 100 x 35mm
Main power
2 x AA size 1.5V batteries
(Lithium battery recommended for low
temperature environment)
Operating temperature range -20°C to 60°C ( -4°F to 140°F )
Operating humidity range RH 1% to 99 % (non-condensing)
RF frequency 433MHz
RF transmission range 30 meters
Ames Australasia warrants that this product will be free from defects in workmanship and materials for
2 years. If a defect in material or workmanship becomes evident during that period, Ames Australasia
will, at its option, either; repair the product (or pay for the costs of repair of the product); replace the
product; or refund to the customer the purchase price paid by the customer for the product. In the
event of such a defect, the product should be returned to the place of purchase, together with proof of
purchase for repair, replacement or refund. Any handling and transportation (and other expenses
incurred in claiming under this guarantee) are not covered by this guarantee and will not be borne by
Ames Australasia. The obligation of Ames Australasia under this guarantee is limited to the
circumstances set out about and is subject to; the customer being able to evidence the acquisition of
the product, the purchase price paid for the product and the relevant defect in materials or
workmanship; the product not having been altered, tampered with or otherwise dealt with by any
person in a manner other than as intended in respect of the relevant product; and the product not
having been used or applied in a manner that is contrary to customary usage or application for the
relevant product or contrary to any stated instructions or specification of Ames Australasia. Our goods
come with guarantees that cannot be excluded under the Australian Consumer Law. You are entitled
to a replacement or refund for a major failure and for compensation for any other reasonably
foreseeable loss or damage. You are also entitled to have the goods repaired or replaced if the goods
fail to be of acceptable quality and the failure does not amount to a major failure. The benefits given
by this guarantee are in addition to the other rights and remedies which might be available to the
customer under any law in relation to goods or services to which this guarantee relates.
For further information contact us on
Australia Free Call: 1800 335 019 New Zealand: 09 427 6042
AMES Australasia
ABN 89 169 427 061
Level 1, 660 Doncaster Road, Doncaster,
Victoria 3108. Australia
www.nylex.com.au
 Loading...