

Page 1
Page 2

2
IMPORTANT SAFETY INSTRUCTIONS
1. Read, follow and keep these instructions safely.
2. Heed all warnings.
1. Do not use this apparatus near water.
2. Clean only with dry cloth.
3. Do not block any ventilation openings. Install in accordance with the manufacturer’s
instructions.
4. Do not install near any heat sources such as radiators, heat registers, stoves, or other apparatus
(including amplifiers) that produce heat.
5. The parameter of the using power source should be accordance with that indicated on the rear
panel; otherwise the machine will work improperly and can be damaged.
6. Protect the power cord from being walked on or pinched, particularly at plug points,
convenience receptacles, and the point where they exit from the apparatus.
7. Only use attachments/accessories specified by the manufacturer.
8. To prolong the useful life of this machine, please do not keep pressing buttons for prolonged
periods.
9. Use only those parts specified by the manufacturer, or sold with the apparatus.
10. Unplug this apparatus during lightning storms or when unused for long periods of time.
11. Refer all servicing to qualified service personnel and authorised service centres. Servicing is
required when the apparatus has been damaged in any way, including damage to power-supply
cord or plug is damaged, liquid has been spilled or objects/liquid have fallen into the apparatus,
the apparatus has been exposed to rain or moisture, does not operate normally, or has been
dropped.
12. Warning: This unit should only be serviced by an authorized and properly trained technician or
service centre. Opening the cover or other attempts by the user to service this unit may result
in serious injury or death from electrical shock, and may increase the risk of fire and will void
the warranty.
13. Please switch off the MAINS electricity before disconnecting the device.
14. The signal cable must be earthed to the system.
15. No naked flame sources, such as lighted candles, should be placed on or near the apparatus.
Note: All the on-screen display messages and illustrations in this manual may be somewhat different
from those on the actual apparatus.
WARNING: To reduce the risk of fire or electric shock, do not expose this product to rain or
moisture. Apparatus must not be exposed to dripping or splashing. Ensure that it is not placed
under any objects filled with liquids, such as vases. Refer to the identification/rating label located
on the back panel of your product for its proper operating voltage.
Batteries must not be exposed to excessive heat such as direct sunlight, fire or other heat source.
For applicable power supply details, see information contained in this User Manual.
Page 3
3
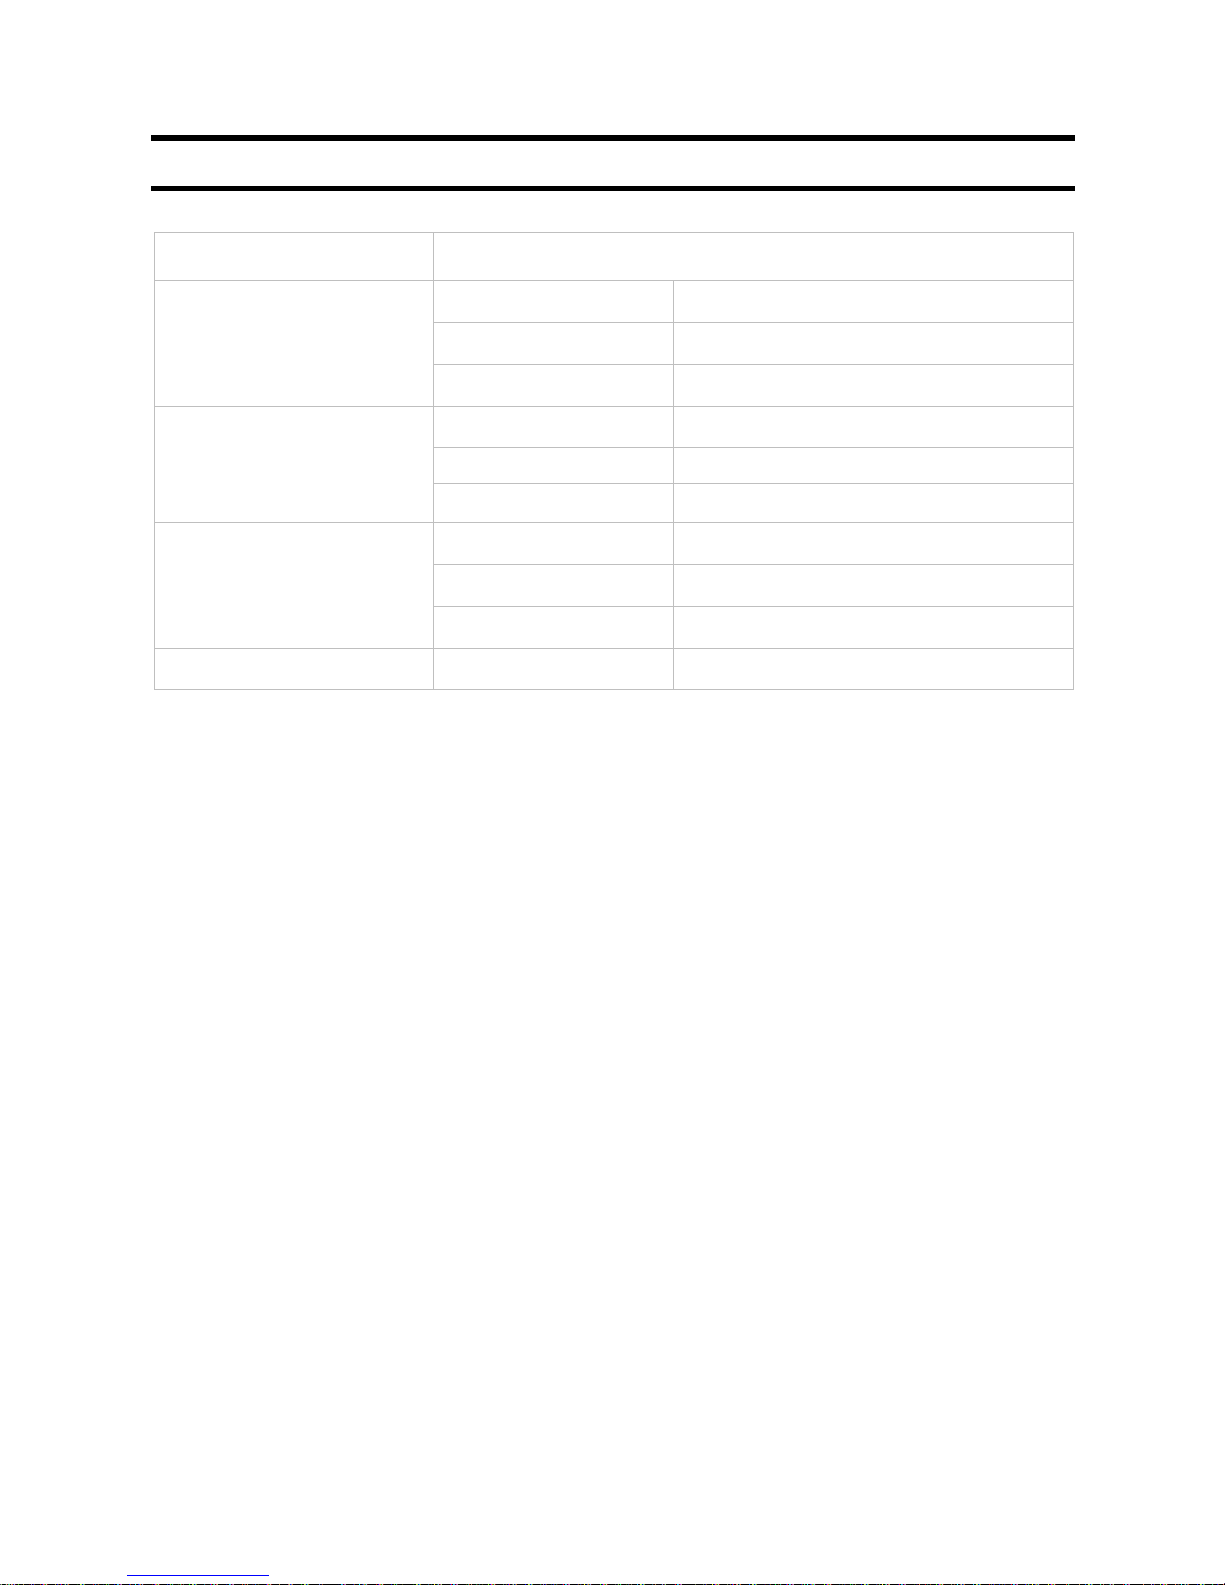
TECHNICAL SPECIFICATIONS
AREA
SPECIFICATION
Tuner
Input Frequency
47 ~ 862 MHz
Input level range
47 ~ 64 dBuV
Input Impedance
75 ohm
Video
CODEC
MPEG-2 MP@ML, H.264
Output system
PAL
Video Resolution
720 x576
Adaptor
Input voltage
90 ~ 270Vac, 47~63Hz
Output voltage
5V DC power supply
Rated output Power
10W
Environment
Temperature
0 ~ 50℃
Page 4
4
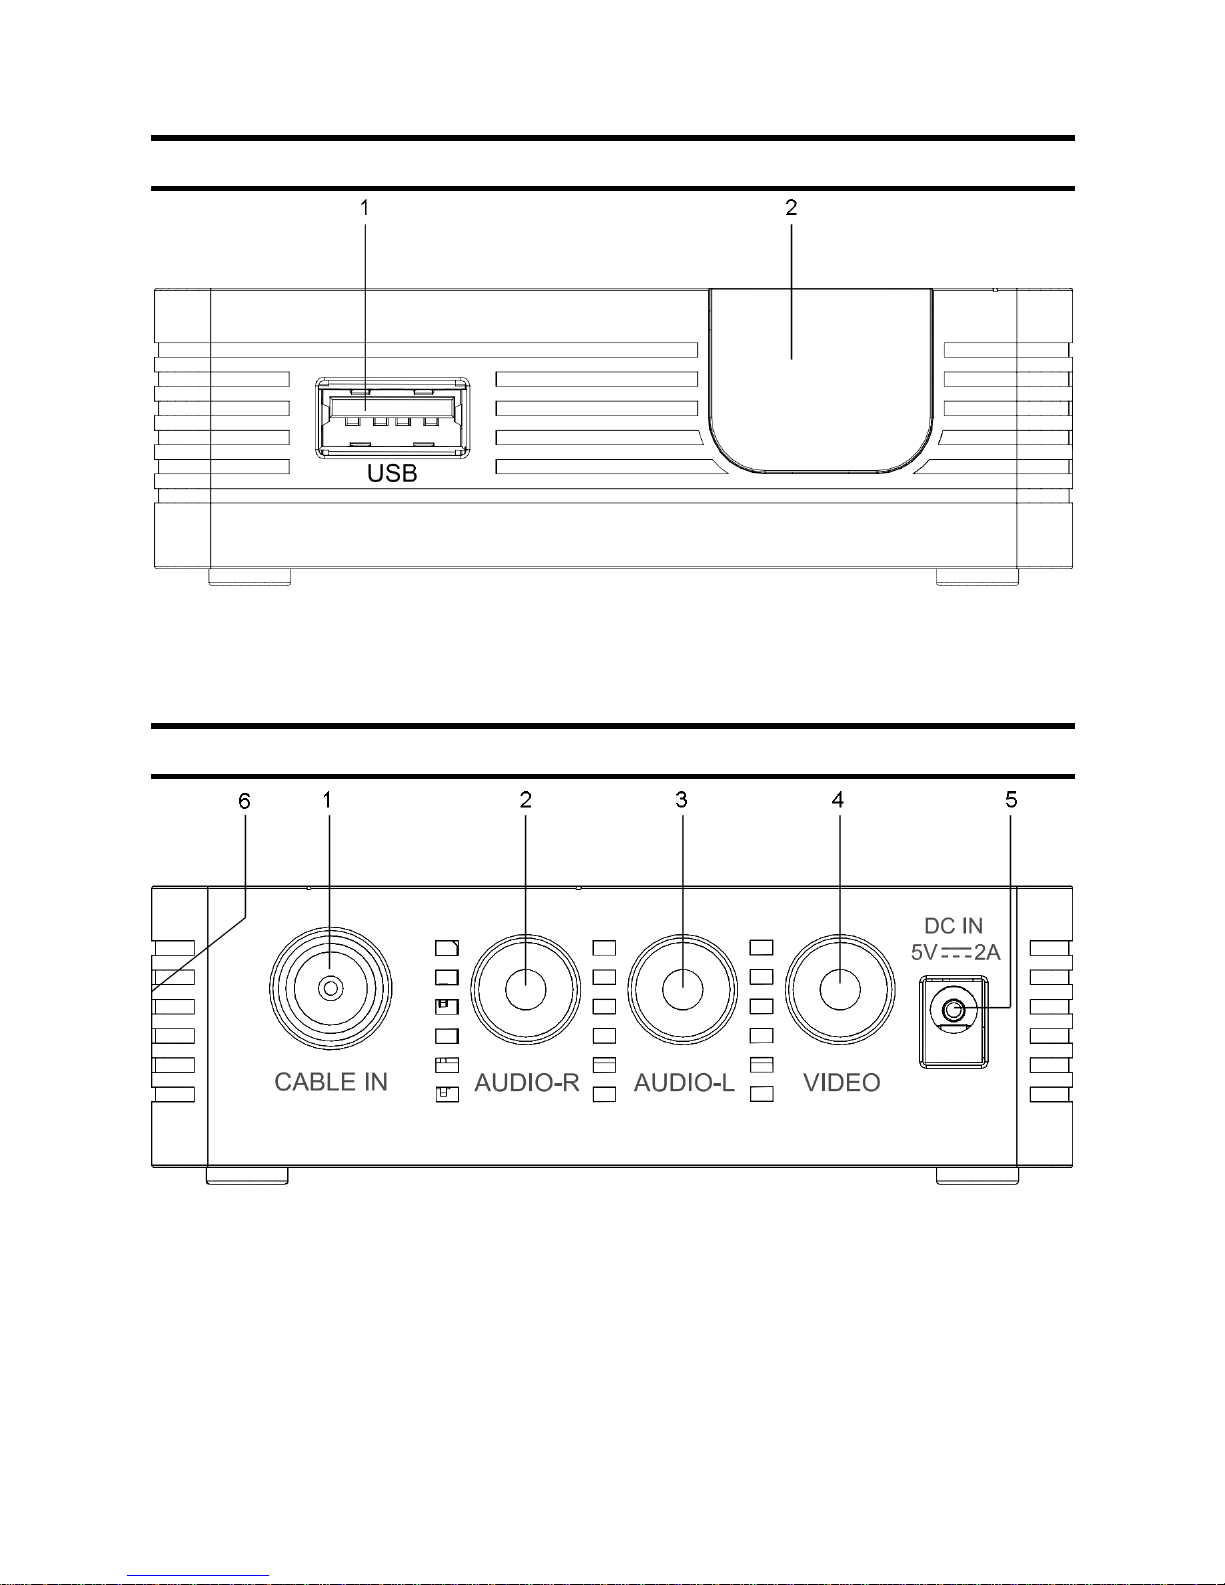
FRONT PANEL
1. USB Interface
2. Remote sensor/ status indicator
REAR PANEL
1. Input, CABLE IN. link with cable
2. 3. Terminals AUDIO. L/R
4. Terminal, VIDEO
5. DC IN for power supply input. DC 5V.
6. RESET button for restoring STB to factory settings
Page 5
5
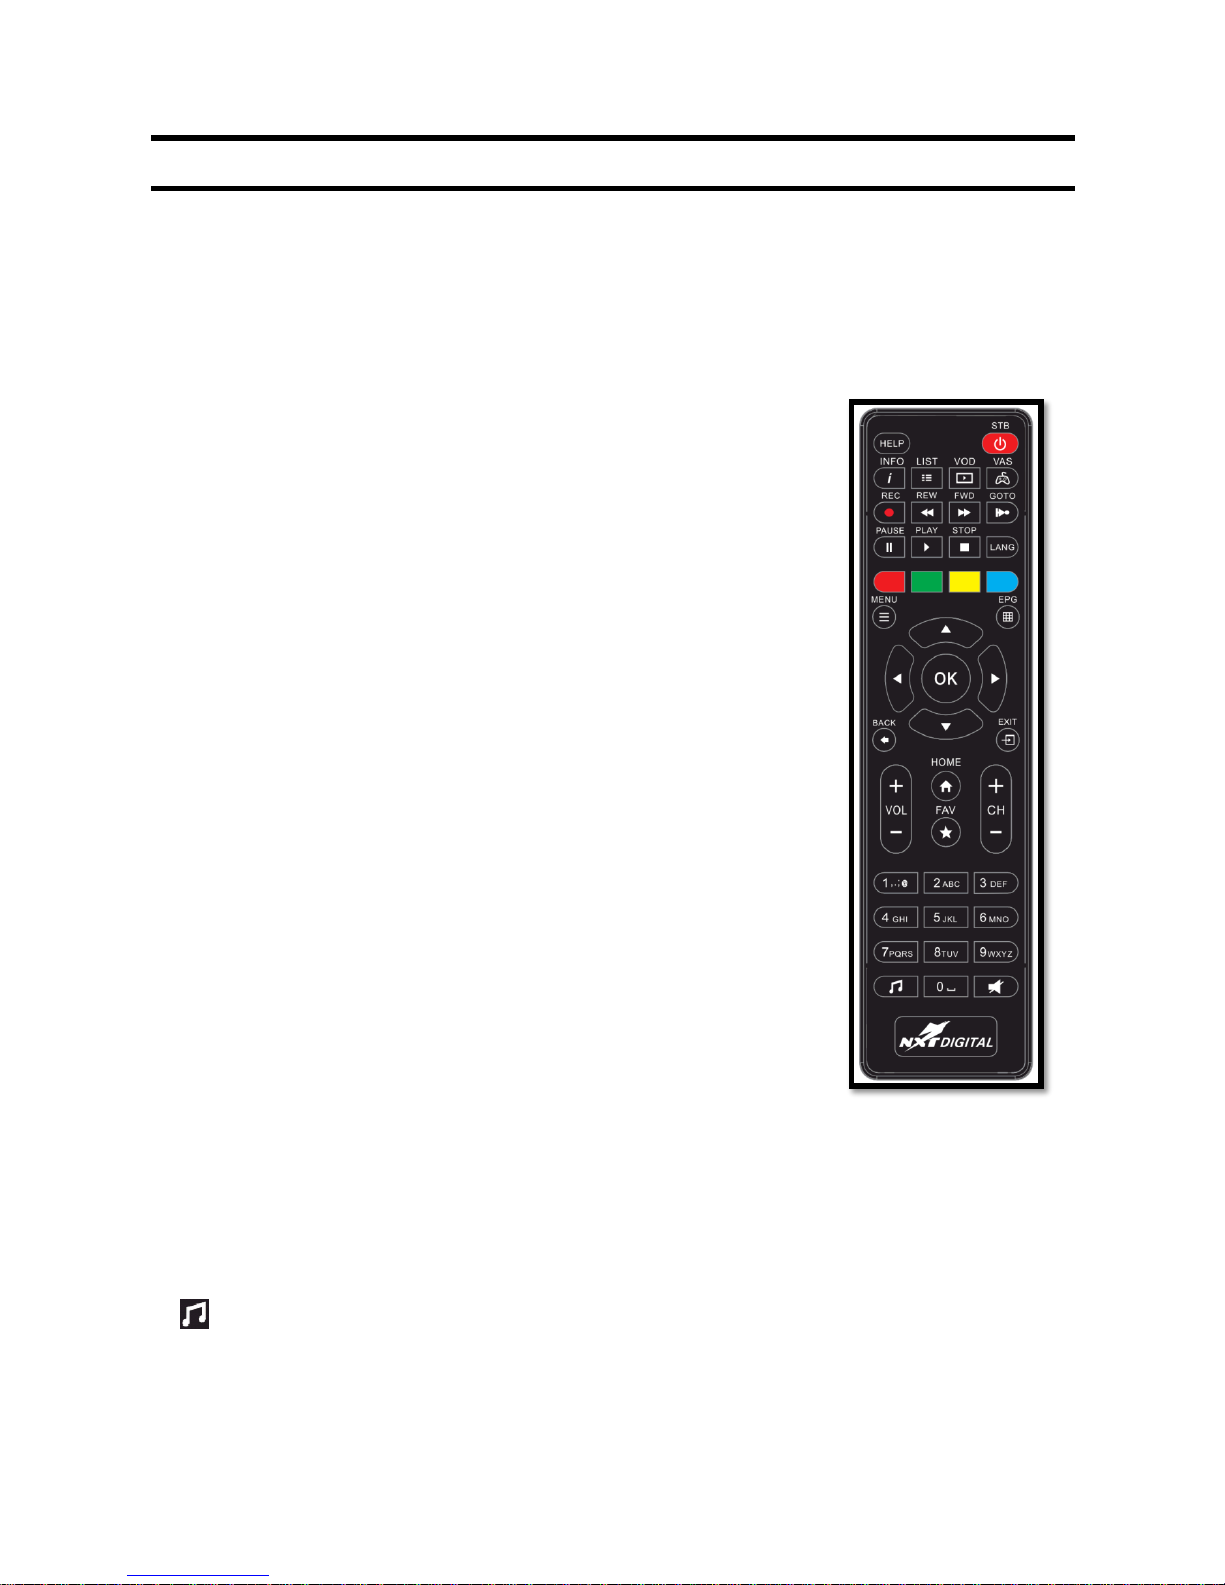
REMOTE CONTROL
STB. Enter Standby mode or program-watching state
HELP. Display help and diagnostic information
INFO. Display program synopsis & information window
LIST. Display channel list
VOD. Video on demand services
VAS. NXT DIGITAL value-added services
REC. Start program recording
REW. Rewind program recorded on the personal video recorder
FWD. Fast forward program recorded on the personal video recorder
GOTO. Seek in personal video recorder mode
PAUSE. Pause viewing or program recorded on personal video recorder
PLAY. Playback program recorded on personal video recorder
STOP. Stop playback of program recorded on the personal video
recorder
LANG. Display audio options to opt for audio channels
Red, green, yellow and blue interactive function buttons.
MENU. Display the Main Menu
Navigation keys. OK. Operation confirmation
EPG. Displays EPG menu
BACK. Return to previous menu or channel
EXIT. Go to watching state or exit any specific menu
VOL+/-. Adjust volume
CH+/-. Surf up/down channel list
HOME. Go to home channel 100
FAV. Displays favourite channels list
0-9. Number pad for selecting channel or entering parameter values
. Switch channel mode between TV and radio
MUTE. Mute the audio
Page 6
6
PREPARATION OF REMOTE CONTROL
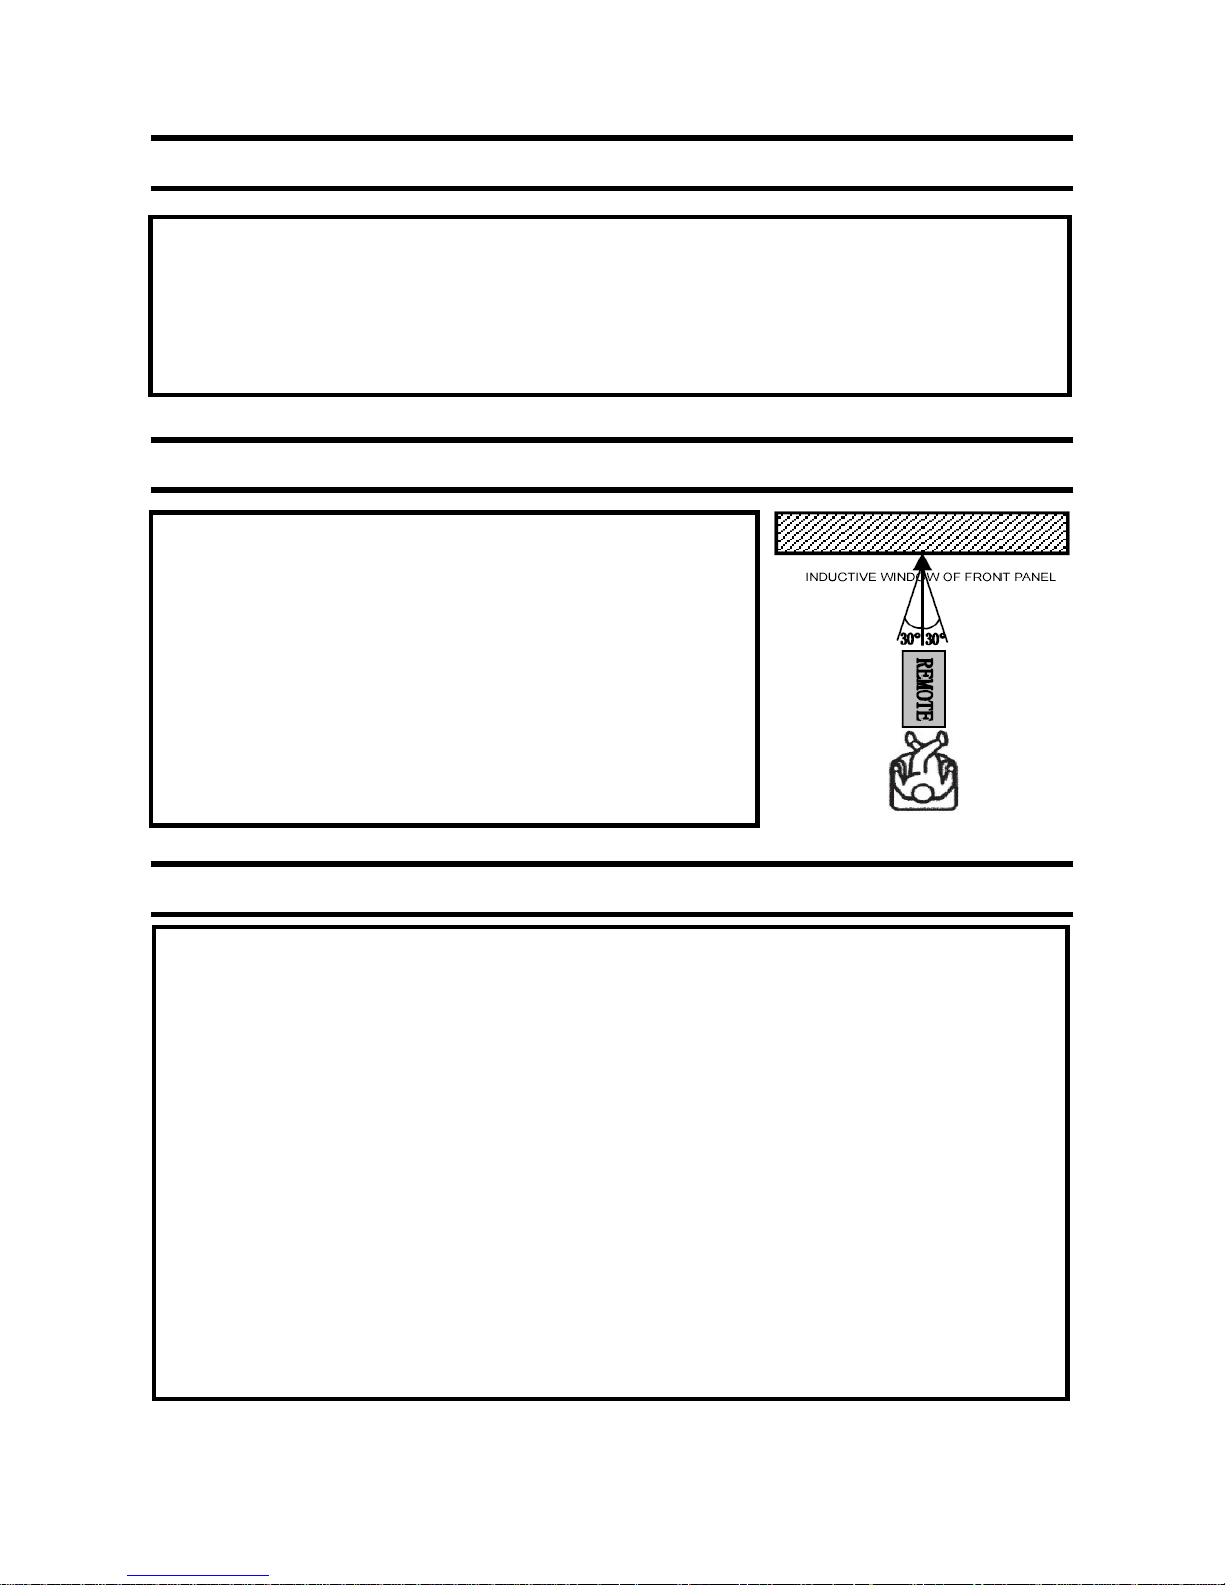
OPERATION SCOPE OF THE REMOTE CONTROL
PRECAUTIONS ABOUT BATTERIES
1. Open the battery cover.
2. Insert the batteries in the correct direction. Please ensure that the anode and cathode ends of the
battery are corresponding to the polarity indicated in the remote control.
3. Replace the battery cover.
Point the remote control towards the Set Top Box in order to
control the apparatus, ensuring that the Set Top Box is not
obstructed in any way.
1. Distance: the remote control will work up to seven meters
from the Set Top Box.
2. Angle: The remote control will work up to 30 degrees right
or left of the Set Top Box panel.
Improper use of batteries may cause corrosion or fluid leakage. Please observe the following
instructions for the safe use of batteries.
1. Insert the batteries taking care to ensure that they are facing the correct way.
2. Never leave dead batteries in the remote control.
3. Remove batteries from the remote controller if it is not going to be used for an extended period
of time
4. Do not attempt to disassemble, short-circuit, heat, recharge or throw the batteries into any fire
source if even if they are not working.
5. Do not use new batteries and old ones together. Use batteries of the same type together.
6. Wipe away any electrolyte fluid that may have leaked into the remote controller before
inserting new batteries.
Page 7
7
SYSTEM CONNECTION
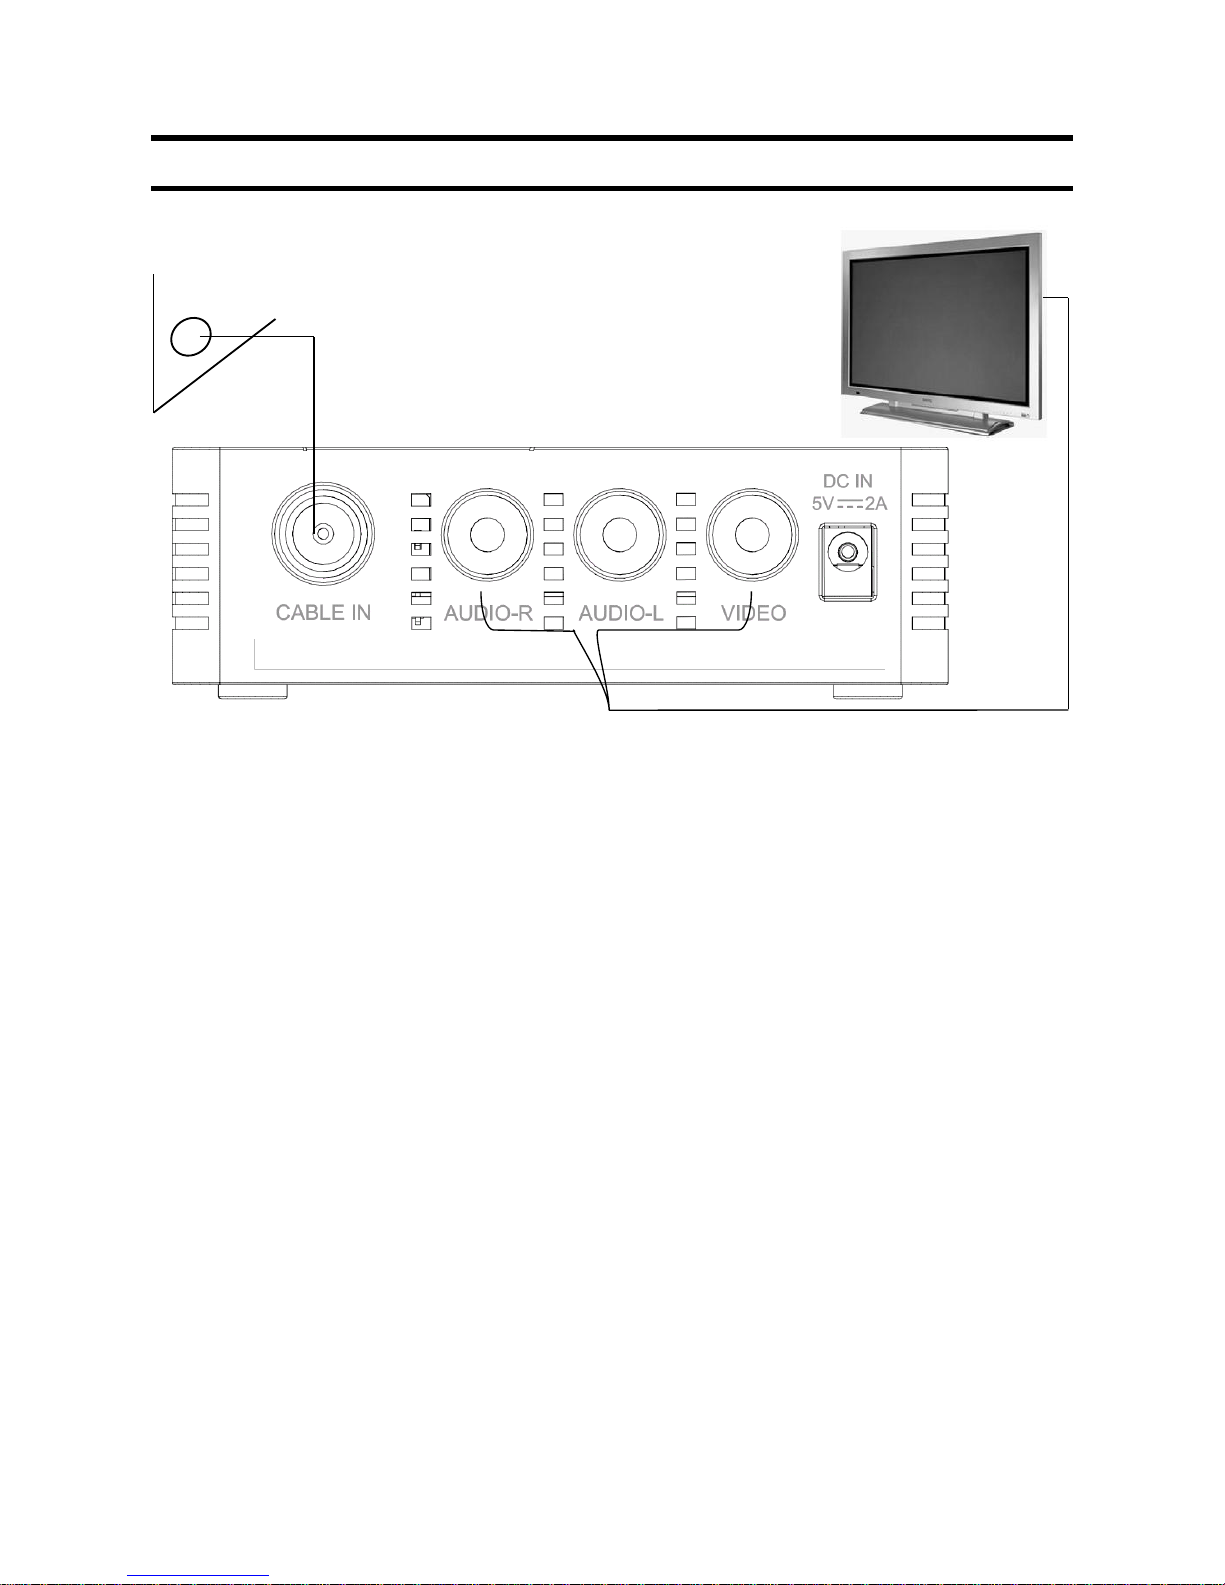
Use the RCA video cable supplied with this apparatus for connecting to the television.
1. Prepare your equipment
Make sure that your TV has VIDEO, AUDIO R, and AUDIO L input connections which are usually
located at the back or side of the television (yellow, red and white connectors).
Ensure that the power leads to both the TV and the Set Top Box are unplugged before you commence
the set up procedure.
2. Connecting Video and Audio
Insert the plug of the RCA cable into the television first.
Video - Connect the yellow plug to the yellow VIDEO input of the TV.
Audio - Connect the red and white plugs to the corresponding colored connectors on your TV.
Connect the same cable into the corresponding colored connectors on your Set Top Box apparatus.
3. Connect the cable
Connect the cable lead to the “CABLE IN” connection on the rear of the Set Top Box.
4. Connect the power
a) Plug the DC5V power adaptor supplied with this apparatus into the DC IN port on the rear panel
of the Set Top Box.
b) Plug the power adaptor into the mains supply and turn it on.
c) Connect the power to your TV and turn it on, you are now ready to get started.
RF Cable Connection
Page 8
8
THE FIRST TIME USING THIS RECEIVER
Scanning Digital Channels… (AUTO INSTALLATION)
When using the Set Top Box for the first time you will be guided through the Channel Scanning process
in order to easily configure the Set Top Box to your personal setup.
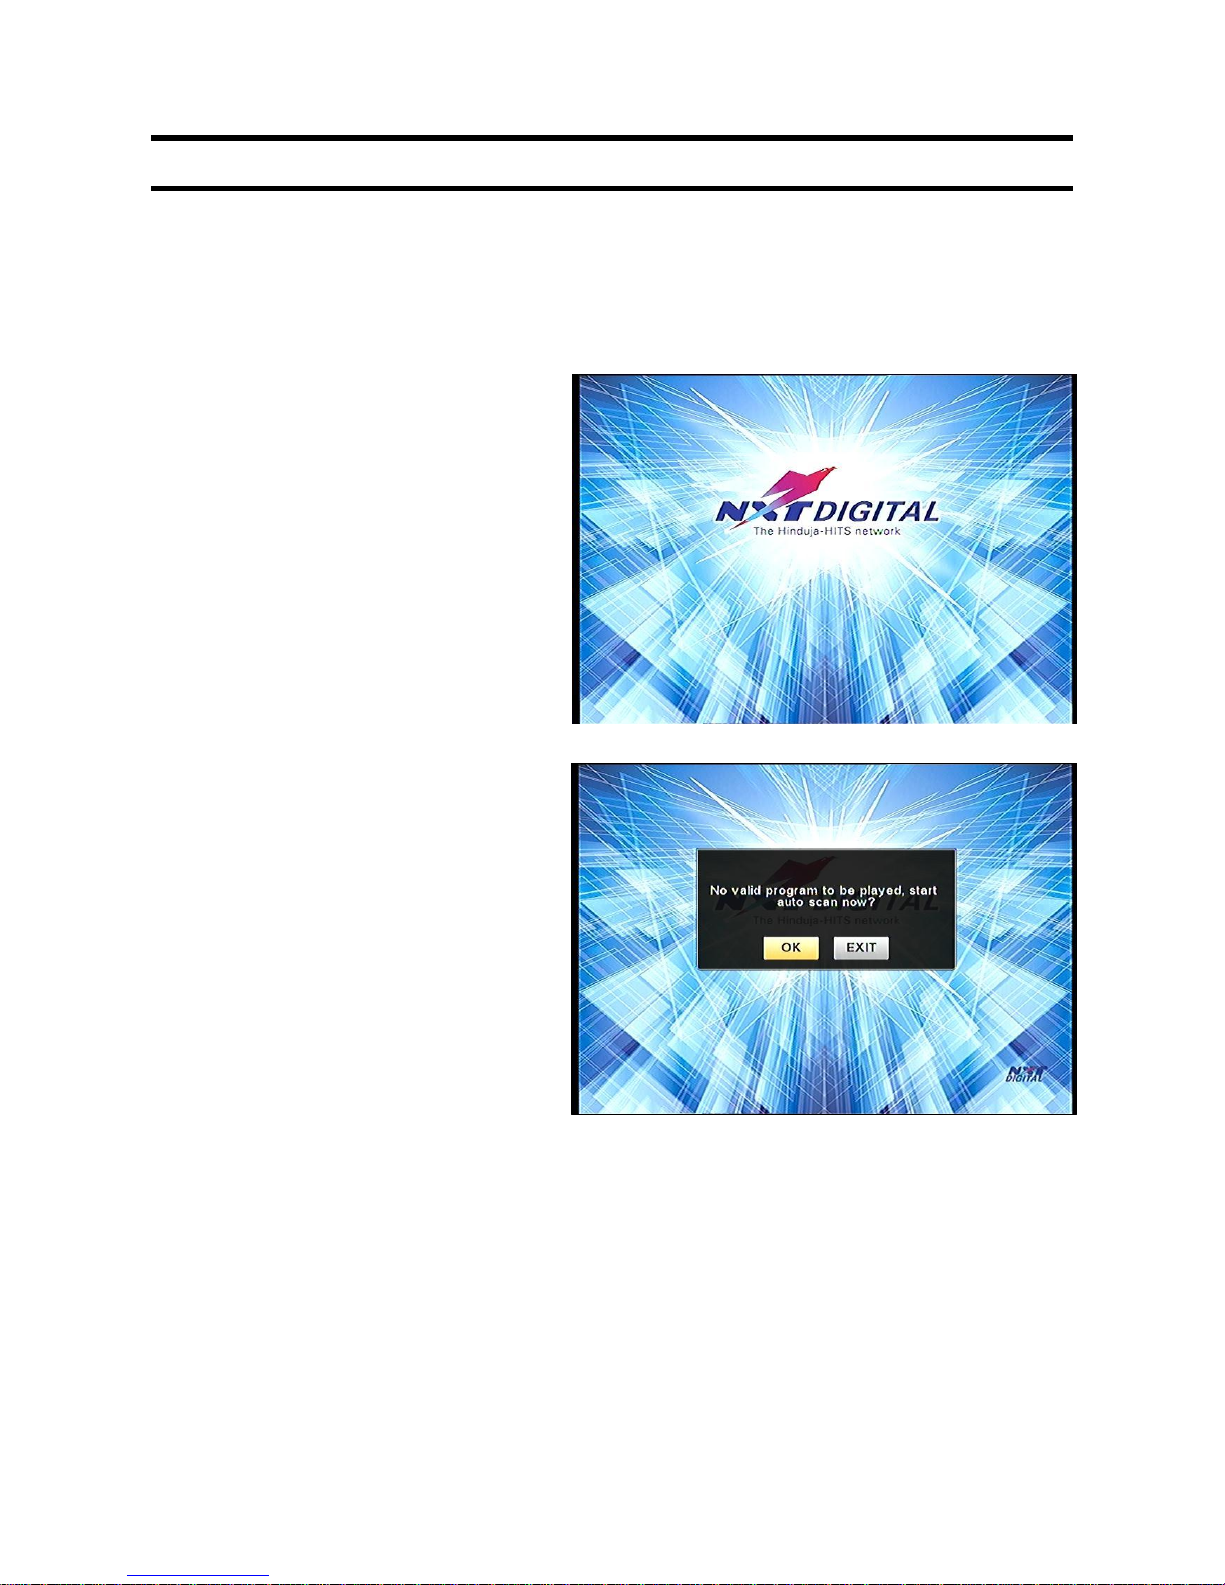
When the STB is powered ON from your
mains electricity supply, it will display the
NXT DIGITAL Splash Screen.
A pop-up will come on the screen after the
Set Top Box has booted up. Check that your
cable is properly connected to the Set Top
Box (see above) and press OK. Your Set
Top Box will automatically start to look for
available channels.
Do not press any button until the Scanning
is completed and a result message appears.
If this fails please check the connection and
try again. If it fails again you may want to
go to menu and use the manual installation
procedure (see next page).
Page 9
9
MANUAL INSTALLATION
If you are facing problems installing channels automatically you can try manual installation of the Set
Top Box (this procedure is reserved for trained engineers or the Service Center).
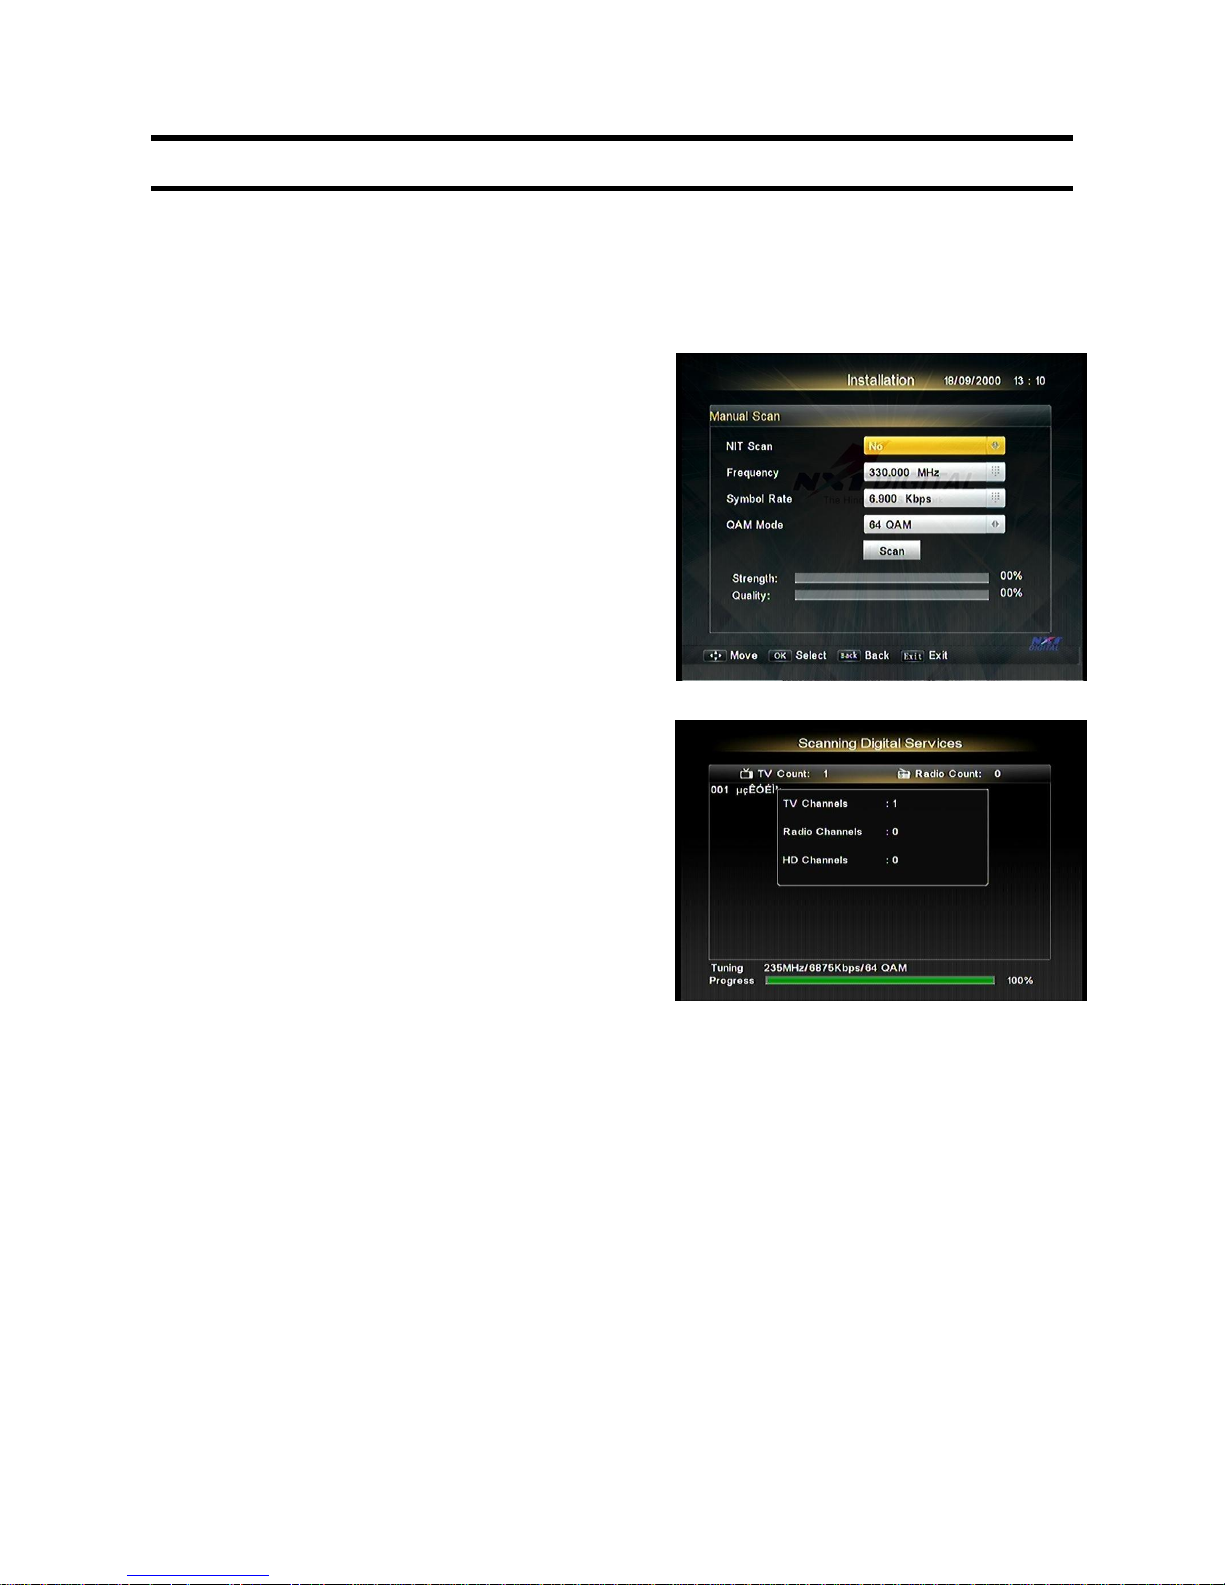
● Navigate to the Main menu (hit “Menu” key on
the remote control)
● At this stage you can use the navigation keys of
the remote control with Up and Down OR Left
and Right arrow to select necessary options.
Once highlighted you can press OK to select the
item. At any point of time press “Exit” button to
go back to previous menu page.
● In the Main menu, navigate to “Installation”
option and press “OK”. The Set Top Box will
open the “Installation” page.
● In this page, navigate to the “Channel Manual
Scan” option and then press “OK”. The Set Top
Box will open the “Channel Manual Scan”
page.
● Enter the manual parameters required to find the channels. The signal strength level and
quality indicator bars can help you to optimize you cable connection. When all options are
green, press OK to proceed and configure the services.
● At this stage you can go back to automatic installation and let your Set Top Box download
and install the complete list of services.
Page 10
10
USING THIS SET TOP BOX RECEIVER
Using your Set Top Box
While watching your favorite TV programs you can press the “Info” button at any time to get
information on the current TV channel. By pressing “Info” twice you can display more details on the
program content.
You can now discover many new functions of your digital Set Top Box to make your TV experience
better:
● CHANNEL SELECTION - Pressing “OK” button on the remote control while watching the
TV will bring up the channel selector menu. Press “OK” to select one channel or exit to exit
this channel selector.
● FAVORITE LISTS - You can create favorite channel lists in order to select only your
preferred channels and simplify the channel selection. Press the “Menu” button on the remote
control. Select “Favorite Lists” and then “Create Favorite List”. Alternatively, channels can
be added to the favorite list by pressing the Green button on your remote control when you
are tuned to that particular channel.
● ELECTRONIC PROGRAM GUIDE (EPG) - To know what television programs are being
shown or will come up in the next hours or days you can press the “EPG” button. This will
bring up the menu showing all the channels available and the current program lineup.
Navigate between different channels by pressing UP/DOWN on the remote control or
different times by pressing LEFT/RIGHT on the remote control. To set a reminder, select the
specific program you want to watch and press “OK” button. The Set Top Box will alert you 5
minutes before this specific program is about
to start.
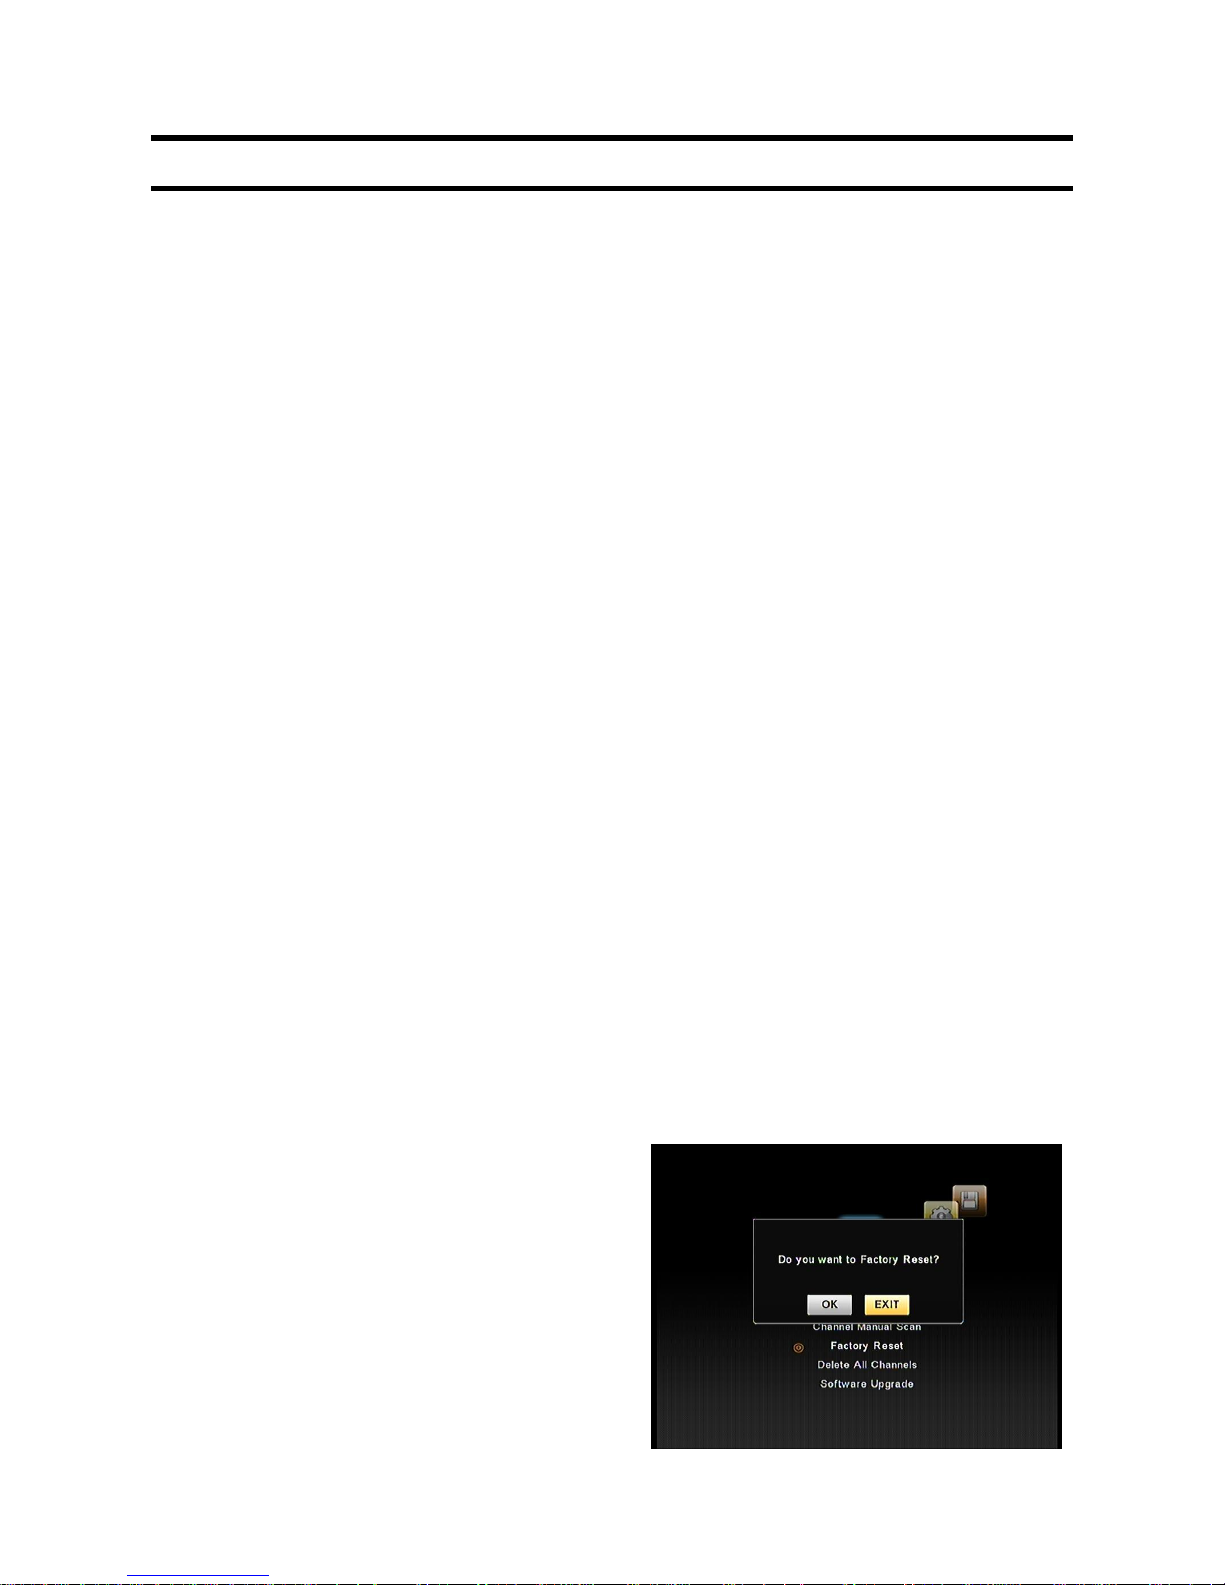
● FACTORY RESET – In order to factory reset
the Set Top Box, navigate to the Installation
Menu and select Factory Reset option by
pressing the OK button. A dialog box will
Page 11
11
appear asking “Do you want to factory reset?”. Press OK button and enter the PIN number
for the Set Top Box. The default PIN number is “0000”.
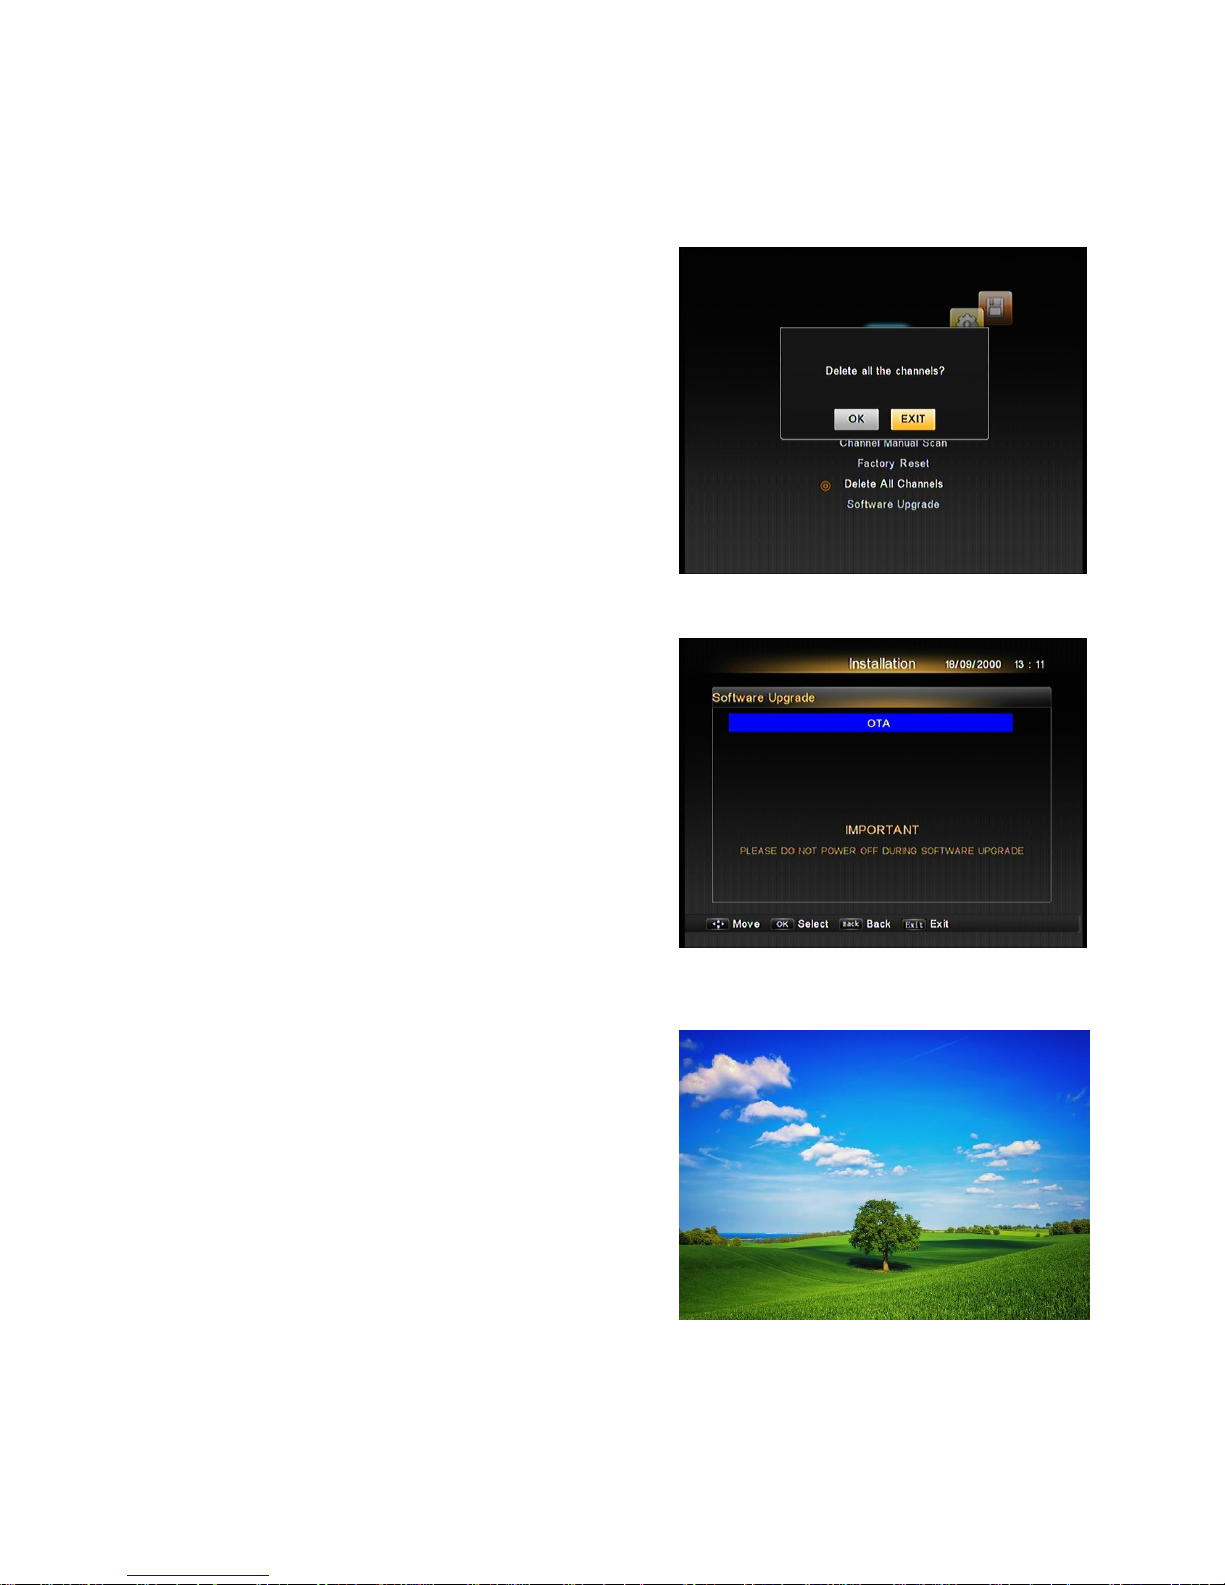
● DELETE ALL CHANNELS – Navigate to the
Installation menu and select “Delete All
Channels” option. Press OK on the remote
control and enter the PIN number. A dialog box
will appear asking “Delete all the channels?”
Select OK on the dialog box and press OK on
the remote control. This will delete and remove
all scanned channels from the apparatus.
● SOFTWARE UPGRADE – Navigate to the
Installation menu and select “Software
Upgrade” option. Press OK on the remote
control to enter its submenu. Select OTA (overthe-air) option on the menu and press OK on the
remote control in order to update the Set Top
Box software. PLEASE DO NOT POWER
OFF THE SET TOP BOX DURING THE
SOFTWARE UPGRADE.
● Use the VOL+/- keys on the remote control to
adjust volume on the television.
● Use the CH +/- keys to move up or down the
channel list.
● Press the MUTE key to mute or unmute the
volume on the television.
Page 12

12
FREQUENTLY ASKED QUESTIONS
Why does my Digital Set Top Box not show the POWER ON indicator?
Check that the 5V DC Adaptor is properly connected to +5V DC Input of your Digital Set Top Box.
Check the mains supply is switched on.
Why am I not able to see Video (Picture) on my Television?
Check for proper connection of cables to your Set Top Box and on the back of the television. Check
that the AV input source is selected on the television.
Why am I not able to see Pay Channels on my TV?
Check with your cable operator about your subscription.
Can I hear Audio from the Set Top Box on my Music System?
Yes. Provided that you have RCA Jacks for Audio at rear panel of your Music System.
Why is my Remote Control not working?
Open the rear panel of remote control. Check if proper batteries (AAA size) are inserted. If the
problem persists, check to see for proper connection of batteries. If the remote control still does not
work, replace the old batteries with new ones. Ensure that there is no obstacle between the STB
remote control and STB unit. We always recommend changing the batteries before they are
completely discharged.
DO’s and DON’Ts
● Do not drop, knock or shake the Set Top Box or the remote. Rough handling can cause
damage to the delicate electronic components.
● Do not allow any unauthorized personnel to attempt to repair or service the Set Top Box or
the remote control. Any such tampering with the devices may result in serious malfunctioning
and will void the warranty.
● Do not use harsh chemicals or detergents to clean the Set Top Box. Wipe it with a soft and
dry cloth.
● Do not throw/ drop your Set Top Box as you might damage it.
Page 13

13
● Do not allow any kind of liquid to come in contact with the Set Top Box.
● Please refer to the troubleshooting tips to resolve any problems with the Set Top Box.
● Only NXT DIGITAL trained personnel are authorized to conduct repairs. Non- compliance
can result in the warranty being null and void.
● Please make sure that the air vents of the box are not covered by anything to avoid
temperature jam in the device. We recommend about 40 cm free space on top of the STB.
In case of problems, contact your local cable operator.
Remember that the Set Top Box is your access to digital entertainment.
Treat it with care!
CERTIFICATE OF WARRANTY
CONDITONS OF WARRANTY
1) Within one year from the date of purchase if any component(s) is found to be defective due to faulty
workmanship or defective material will be made and repairs executed free of charge and defective
part replaced. Parts repaired or replaced are under Warranty throughout the remainder of the original
warranty period only. Repairs under warranty may also be carried only by authorized service centers.
2) This warranty does not cover any form of damage resulting from accident, misuse, and application
of incorrect voltage or any use contrary to the operating instructions supplied along with the equipment.
3) No responsibility will be accepted for damage arising out of unauthorized modification or alterations
of any nature made to the Digital Set Top Box.
4) No responsibility will be accepted for damage or loss incurred during transit of Digital Set Top Box.
5) This warranty is not valid if the serial number of the Digital Set Top Box has been deleted, defaced
or altered.
6) This Certificate of warranty may be required to accompany the Digital Set Top Box if service under
warranty period is required to be carried out at the authorized Service Centers.
Page 14
14
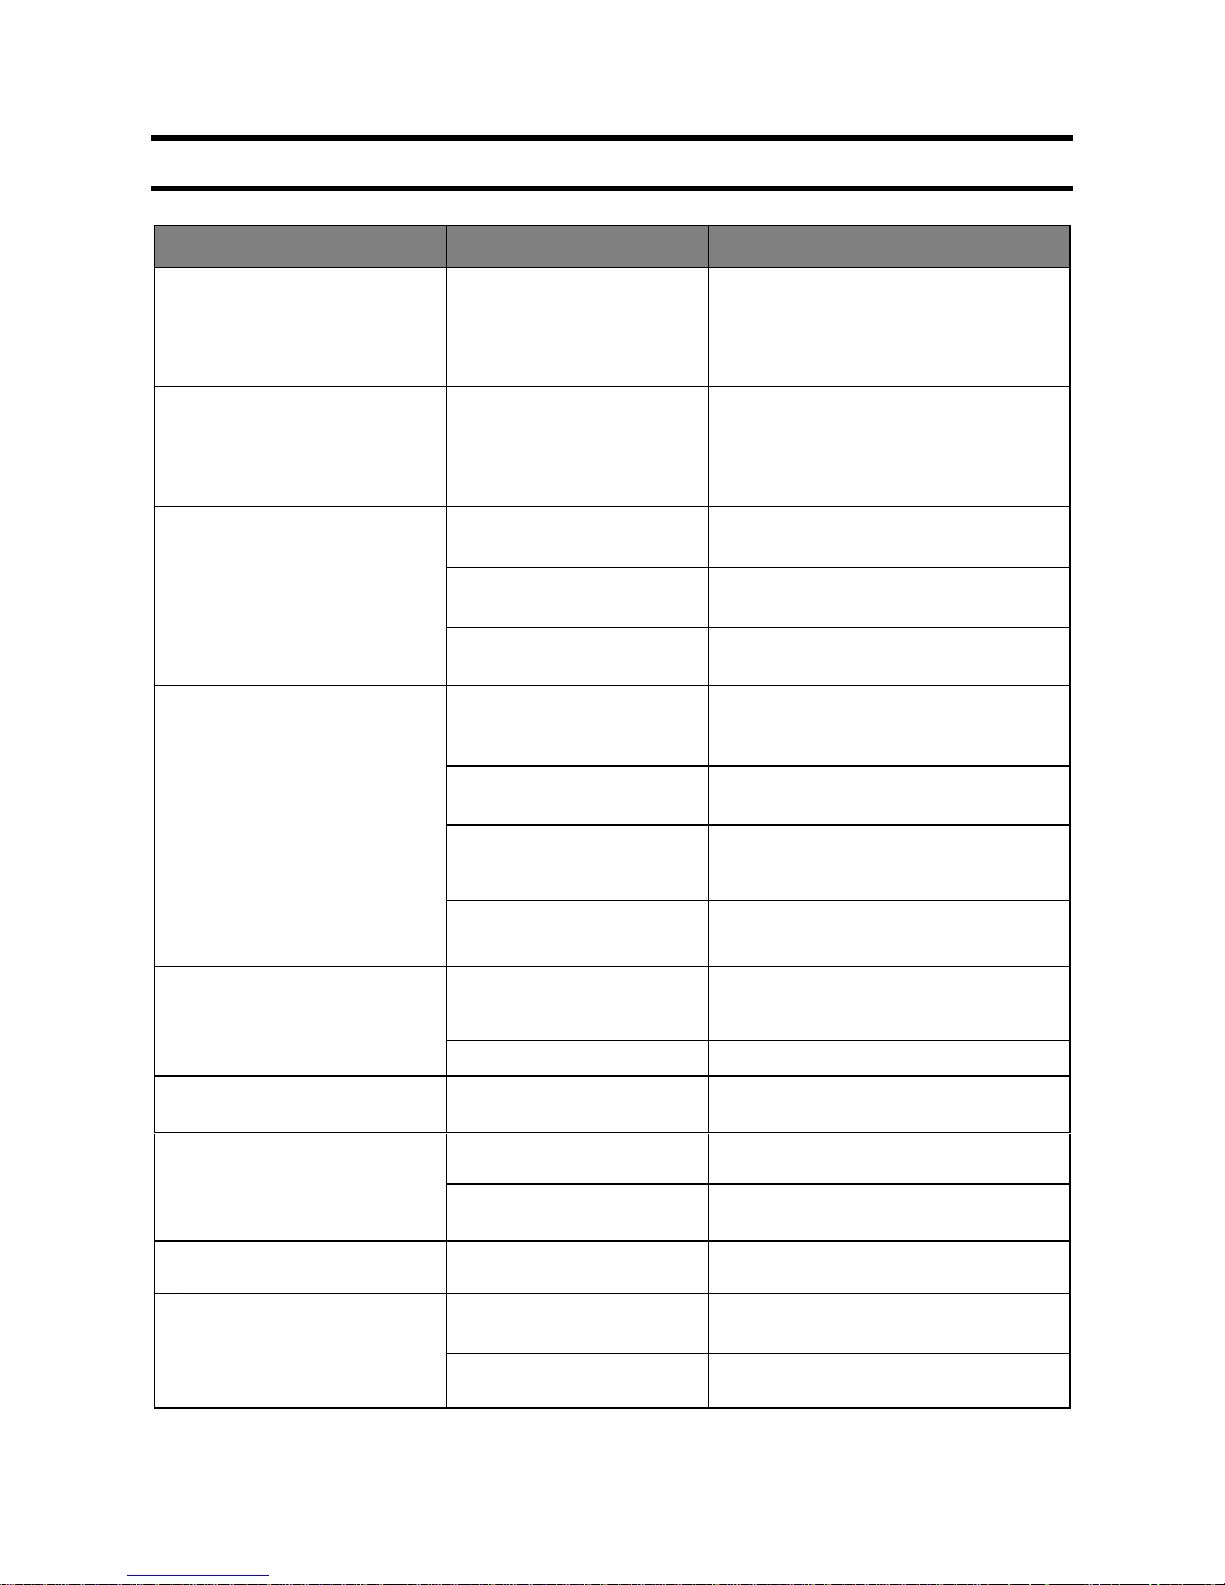
TROUBLE-SHOOTING
Problem
Possible causes
What to do
The indicators on the front
panel do not light up
Power cord is not
connected.
Power adapter may be
faulty.
Check that the power cord is plugged
in to the mains supply.
Check whether the power adapter is
faulty.
No sound and no picture
The receiver is under
standby
Cables are not connected
properly.
Press
Standby
key
on remote
towards the receiver.
Check the cables on the rear of the
apparatus and on the rear of the television.
No signal when selecting
channels
The RF cable from your
cable operator is
Connect the signal cable securely
Program parameters are
set incorrectly
Set correct parameters
No signal
provided
Contact your local cable operator or
the customer service center
Picture only, but no
sound
Audio cable is not
connected securely
Connect it securely. Check both the
rear of the apparatus and the
television
System in MUTE mode
Press MUTE key on the remote to
restore volume
Volume is set to minimum
Increase the volume to suitable level.
Check volume settings on the
television.
Audio setting
parameter
is wrong
Please go to audio setting menu,
select proper audio mode
Sound only, but no
picture
Video cable is not
connected securely
Connect
the
video
cable securely
at the rear of the apparatus and the
rear of the television.
System in radio mode
This is normal operation
Video and audio mismatch
or abnormal sound
Audio channel is not set
correctly
Select proper audio channel
Signal is normal, but
program
cannot
be viewed
Maybe the channel mode
is set as radio
Normal. Switch back to the TV mode
Maybe the TV station is
checking their devices
Call your cable operator.
Picture
is
still
or
mosaic
phenomenon is occurring
Signal is too weak
Check to make sure that the signal
cable is connected tightly.
Remote does not work
Remote not aimed at the
sensor on the front panel
Aim at the sensor on the front panel
Not enough power in the
battery of the remote
Change battery
Page 15

15
 Loading...