

Page 1
ITM. / ART. 924780
Model: P80-02
Wood Burning Pizza Oven Care & Assembly Instructions
IMPORTANT, RETAIN FOR FUTURE REFERENCE: READ CAREFULLY
Warning:
This product is intended for outdoor use only.
Read the manual carefully and completely before use.
Warning: accessible parts may be very hot, keep out of reach of children.
Do not move the device during use.
Not intended to be installed in or on boats.
Keep this manual for future reference.
Never operate this appliance unattended.
Questions, problems, and/or missing parts? Before returning to your retailer,
please send an email to our customer service department: nxrcs@duro-global.com
or prefer to speak to a live agent in the USA; call 001-888-909-8818 (International calling rates will apply)
Monday-Friday 9AM-5PM PST; Languages Spoken: English.
Page 2
2
Table of Contents
Safety Instruction .......................................................................................................................... 3
Pizza Oven Exploded View ..................................................................................................... 4
Pizza Oven Parts list ................................................................................................................... 5
Pizza Oven Packing Information ........................................................................................ 6
Pizza Oven Base Installation (Parts from box 2/2) ............................................... 7-11
Install the Pizza Oven Top to the base (Parts from box 1/2) ......................... 12-14
Start Cooking Pizza ..................................................................................................................... 15-16
Troubleshooting ............................................................................................................................. 17
Ordering Parts.................................................................................................................................. 18
Limited Warranty ........................................................................................................................... 19-20
Thank you for purchasing the NXR wood burning pizza oven.
We appreciate your business and we recommend that you read this entire
owner's manual before operating your new appliance for the first time. Take a
look at our safety instructions prior to use. This manual contains instructions on
how to properly install and set up your new pizza oven, as well as insights into
great features that our product offers. Please keep this manual for future
reference.
Thank you,
Duro Corporation Inc.
TABLE OF CONTENTS
Page 3
SAFETY INSTRUCTIONS
Always check local building codes on governing outdoor appliance
installations before starting. Make sure that the area around the oven is free of
dry vegetation and wood structures are at least 10 feet away from your new
NXR wood burning pizza oven.
Before cleaning, allow 1 hour for your NXR wood burning pizza oven to cool.
Use a dry brush and wet mop to clean; use only soap and water. Never use
solvents.
INSTALLING YOUR NXR WOOD BURNING PIZZA OVEN REQUIRES 2 OR MORE PEOPLE.
NEVER INSTALL HEAVY PRODUCTS BY ONE PERSON; DOING SO CAN CAUSE SERIOUS
INJURY.
NEVER ALLOW CHILDREN TO OPERATE THE PIZZA OVEN.
NEVER LEAVE CHILDREN UNATTENDED WHEN THERE IS A FIRE BURNING.
ACCESSIBLE PARTS MAY BE VERY HOT, KEEP AWAY FROM CHILDREN.
DO NOT MOVE THIS PIZZA OVEN DURING USE.
DO NOT STORE EMPTY, FULL OR SPARE GAS CYLINDERS IN, UNDER OR NEAR THIS
PIZZA OVEN.
NEVER STORE GASOLINE OR HAZARDOUS MATERIALS INSIDE THE PIZZA OVEN BASE.
NEVER USE GASOLINE OR OTHER FLAMABLE VAPOROUS LIQUIDS TO START YOUR
PIZZA OVEN.
PLEASE KEEP ALL FLAMMABLE LIQUIDS AT A SAFE DISTANCE FROM THE OVEN.
USE GOOD QUALITY WOOD TO BURN THE PIZZA OVEN.
PROTECTIVE GLOVES ARE RECOMMENDED WHEN HANDLING PARTICULARLY HOT
COMPONENTS.
MAKE SURE ALL PACKING MATERIALS HAVE BEEN REMOVED FROM THE GRILL.
NEVER LEAVE THE PIZZA OVEN UNATTENDED WHILE COOKING.
NEVER LEAN OVER OR TOUCH THE PIZZA OVEN DOME WHILE THE PIZZA OVEN IS IN
USE.
3
Page 4
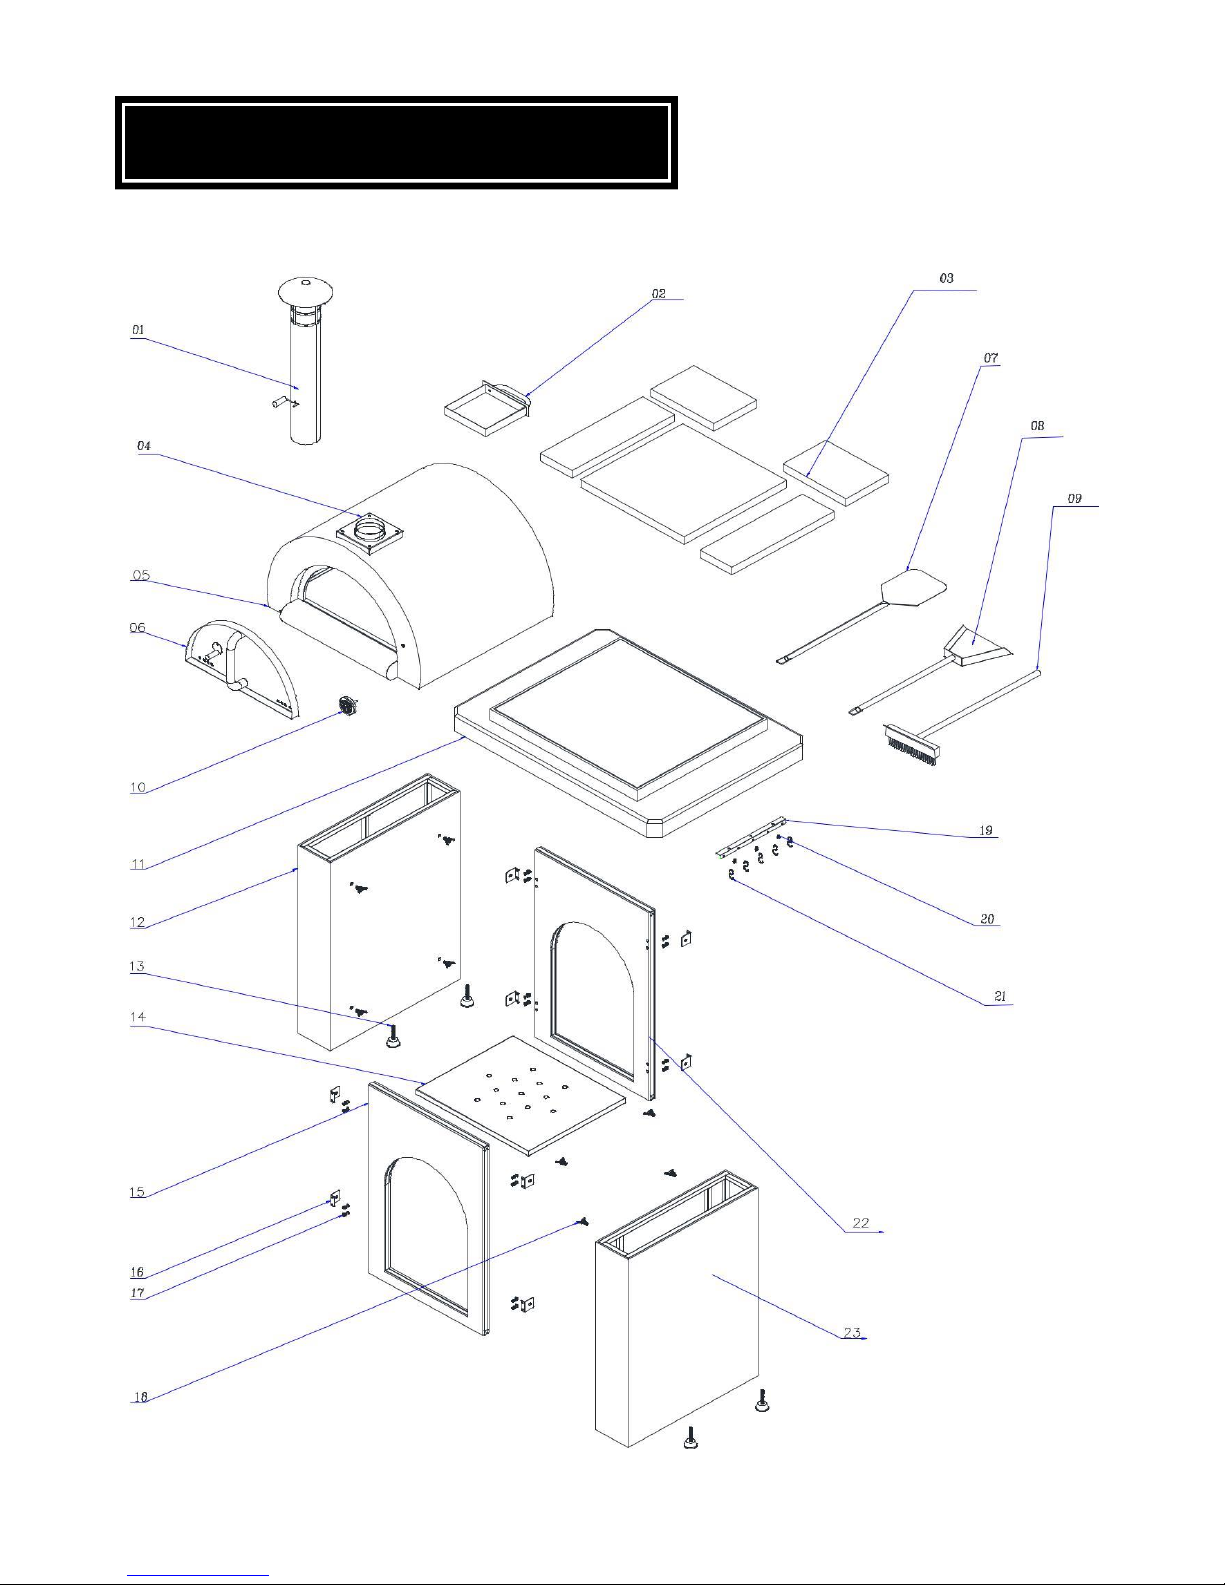
PIZZA OVEN EXPLODED VIEW
4
Page 5
Part
NO.
Part name
Qty
Part
NO.
Part name
Qty
01
Chimney
1
13
Left and right side panel feet
4
02
Dust tray
1
14
Wood holder
1
03
Pizza Stone (Pre-installed)
5
15
Front panel
1
04
Chimney holder (Pre-installed)
1
16
Panel connectors
8
05
Pizza oven dome
1
17
1/4”-20 Philip's head screw
16
06
Pizza oven door
1
18
5/16”-20 Butter fly shape screw
8
07
Pizza peel
1
19
Hooks bracket
1
08
Pizza shovel
1
20
1/4”-12 Philip's head screw
3
09
Pizza oven brush
1
21
Hooks for (pizza peel, shovel, brush)
5
10
Temperature gauge
1
22
Back panel
1
11
Porcelain tile counter top
1
23
Right side panel
1
12
Left side panel
1
Part
NO.
Part name
Qty
Part NO.
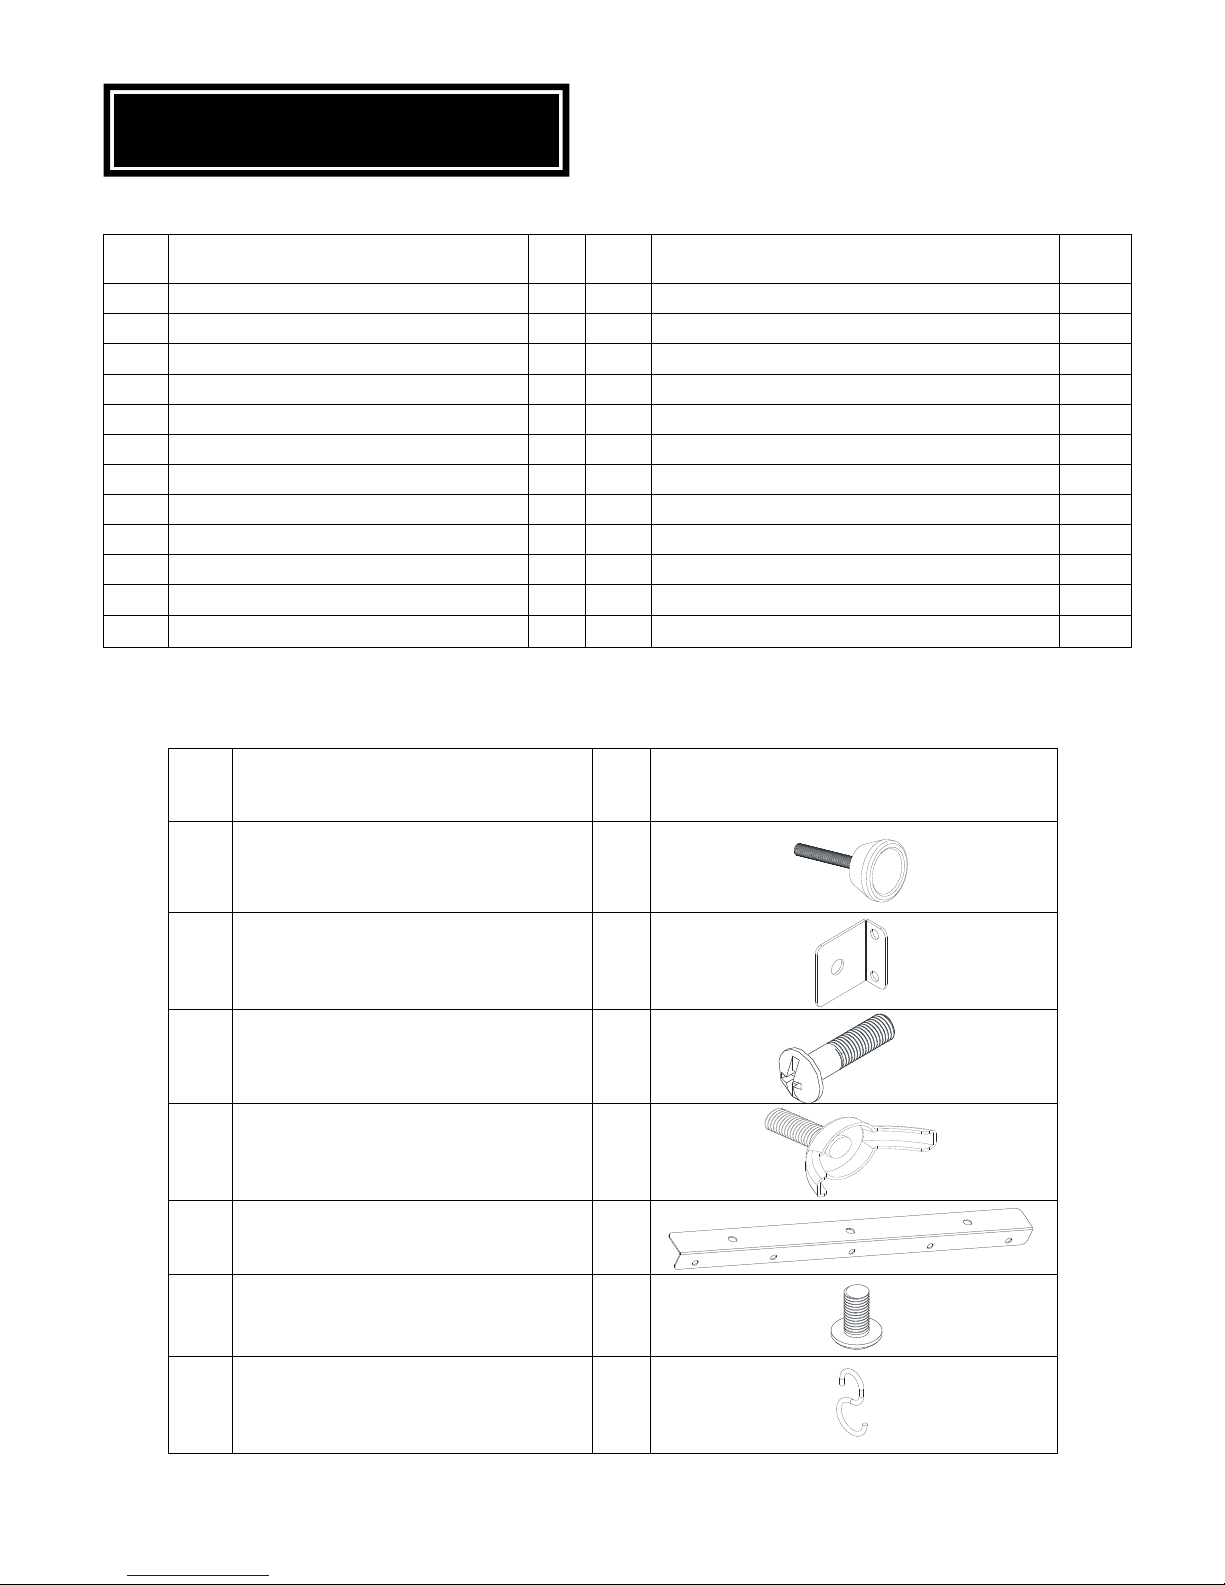
13
Left and right side panel feet
4
16
Panel connectors
8
17
1/4”-20 Philip's head screw
16
18
5/16”-20 Butter fly shape screw
8
19
Hooks bracket
1
20
1/4”-12 Philip's head screw
3
21
Hooks for (pizza peel, shovel,
brush)
5
PIZZA OVEN PARTS LIST
List
Parts in Hardware bag that in the base packing box
5
Page 6

IMPORTANT
Please Note: Your pizza oven will be packed in 2 boxes.
When delivered, please verify you received both boxes.
PIZZA OVEN PACKING INFORMATION
Box 1 of 2: Pizza Oven Dome Box 2 of 2: Pizza Oven Base
6
Page 7

Tool needed: Phillips screwdriver (not included)
Pizza Oven Base Installation (Parts from box 2)
Part 16
Part 17
Part 22
Part 13
Part 12
Step 1: Connect the 4 piece connector (part 16) onto the base Back panel by 8 piece 1/4”-20
Philip's head screw (Part 17).
Step 2: Same as step 1, connect the 4 piece connector (part 16) onto the base Front panel (part 15).
Step 3: Assemble the 2 feet for the left side panel (by hand turning in).
Step 4: Same as step 3, assemble the 2 feet for the right side panel (part 23) by hand turning in.
7
Page 8

Step 5: Connect the back panel to the left pane with 2 of the butterfly shape screws.
Part 18
Part 22
Part 12
Part 22
Part 15
Part 12
Part 18
Step 6: Use the same method as step 5, connect the front panel to the left side panel with 2 of the butter
fly shape screws (by hand turning in).
8
Page 9

Step 7: Connect the right panel with 4 of the butterfly shape screws by hand turning in.
Part 12
Part 23
Part 22
Part 22
Part 18
Part 14
Step 8: Place the wood holder into the pizza oven base.
9
Page 10

Step 9: Install the counter top on the pizza oven base.
The counter top is very heavy and requires at least 2
people to carry and put onto the pizza oven base board.
By adjusting the counter top position, please make sure the 4
blocker on the bottom of the counter top are fully insert into the
left & right side panel holes, and the counter top is horizontal.
Part 11
.
10
Page 11

Step 10: Install the hook bracket onto the side edge of the counter top by 3 screws (part 20)
Tool needed: Phillips screwdriver (not included)
Part 19
Part 20
Part 21
Step 11: Place 5 hooks on the hook bracket, the hooks are for hanging the pizza peel, pizza
shovel, and brush.
11
Page 12

Step 1: Install the pizza oven chimney by hand plug in.
INSTALL THE PIZZA OVEN TOP TO THE BASE (Parts from box 1)
Part 02
Part 01
Part 05
Step 2: To install the ash tray, place the item behind the oven dome.
12
Page 13

Step 3: Install the Pizza Oven Dome on the Base.
Please make sure the pizza oven dome is in the
middle of the counter top.
The pizza oven dome is very heavy and requires two people to carry and
put onto the pizza oven base board.
13
Page 14

Step 4: Place the pizza oven door on the pizza oven dome, and placing pizza peel, shovel,
ASSEMBLY
FINISHED Assembly fin
Part 06
Part 07
Part 09
Part 08
and brush onto the hooks.
14
Page 15

START COOKING PIZZA
Clean the pizza stone with
pizza oven brush.
Build a fire
You must build a small fire. By adding 7-8 pieces of dry kindling wood. Building a small fire can
take 5-10 minutes (WARNING: Do not use any flammable liquids to start a fire).
For a faster way to start a fire you may use a butane torch.
If fire does not spark, you may use a ball of newspaper to ignite the fire.
Make sure the chimney air stopper is open while building a fire.
Once the fire has settled you may add larger pieces of dry firewood (using non-toxic dry wood,
seasoned medium or hardwood is recommended) fire takes longer to burn with larger pieces of
firewood.
Once you have a large fire, allow heating the pizza dome for 30-45 minutes or desired
temperature.
If temperature is reached as per instructions, re-position firewood to the left side with the pizza
peel and use the pizza brush to remove any ash.
You may use an infrared thermometer as a useful accessory for wood-fired oven cooking, as it
can test the temperature in several areas of the oven, identifying the hottest spots in the oven
before you begin cooking your food (thermometer not included).
If using charcoal, it is recommended to use high quality lump charcoal.
Don’t use wax starter logs or other items that contain hazardous chemicals. This may affect the
taste of your food.
For other recipes such as sandwiches, deserts, meats, etc. please see recipe instructions.
Fire your Oven
How long you fire your oven depends on how much
cooking you will be doing, and how long you want your
oven to hold its heat.
Remember that you can only take out heat from the
oven that you put in. If you are going to be cooking a lot
of pizza for a large party, or baking lots of bread or a
large roast, fire your oven longer. If you are making
pizza for the family for a mid-week meal, you can fire
your oven for a shorter time.
Fire-in-the-oven cooking 315°C (600°F) + is used for baking pizza, pizza-like flat breads and
certain types of appetizers, all of which cook in a couple of minutes. Your NXR Pizza Oven can
be pizza-ready in about 45 minutes.
There are two ways to know that the oven is ready to cook Pizza. First, when the oven dome itself
has gone clear, and there is no visible black soot. At this point, you should move the fire to one
side, while continuing to maintain a large fire going with the flame reaching the middle of the oven.
Alternatively, if you are using an infrared thermometer, the floor should read approximately
315°C (600°F) - 371°C (700°F). Pizzas are baked right on the floor next to the fire. Leave the
oven completely open, and add one piece of wood every 15-20 minutes to maintain a large flame.
Build your fire up slowly, adding wood to the back and sides as the fire grows. Continue to add
wood until the oven reaches the desired temperature. Then, move the fire to one side and brush
the oven floor. Only use the copper brush that was provided with your oven, and do not use steel
wire brushes, natural fiber brushes or wet cloths to clean the oven floor.
15
Page 16

Baking the Pizza
Place pizza inside the pizza oven by
using the pizza peel.
After using the pizza oven,
please close the oven door.
After the oven have reached the desired temperature 315°C (600°F) + for cooking pizza,
then clean the stone.
Test to make sure you pizza is not stuck on your peel by moving your pizza peel forward
and backward using short jerks - it should slide easily around.
If it does stick, lift it up on one side using your fingers, and throw a little flour underneath.
Slide your peel back and forth, and that should loosen it up. .
The best way to place your pizza is to push your peel toward your spot, then stop it just
short that spot, allowing the pizza to slide off the peel. Pull the peel backward as the
pizza slides forward. You will know that your oven is hot enough to bake correctly when
the cornicione of the fresh pizza puffs up almost immediately.
After about 60 seconds, slide pizza peel under the pizza and turn it 180 degrees, so that
the side that was furthest from the fire is now facing it.
After another 45-90 seconds, your pizza should be done. You can also try turning your
pizza twice, rotating it in thirds. Experiment, and stick with what works best for you.
Optionally, you can lift your pizza up for the last few seconds with your peel, holding it
closer to the dome. The reflecting heat of the dome will quickly finish baking your pizza if
the top is not quite done.
Don’t forget to keep adding wood to your fire to keep the flame active.
Different pizza toppings vary by cooking time; please refer to your pizza cooking
instructions from the pizza you purchased.
16
Page 17

PROBLEM DESCRIPTION
PROBLEM SOLUTION
The temperature not reaching
315°C (600°F) - 371°C (700°F)
Make sure to put enough wood into the pizza
oven. Close the door for 1-2 minutes to keep
the heat.
Too much smoke
Take out some wood or use better quality
wood.
Caught on Fire
Call local fire department immediately
Inside & around door changes colors after
using.
This is normal, the stainless steel will change
color after burning.
There's an odd smell inside the pizza oven.
The smell is caused by the stone and stainless
steel protective cleaning oil. Heat the oven
once to eliminate smell.
How to turn off the pizza oven?
Take out the wood and let the ash burn off.
Pizza crust is burning as soon as I place the
pizza in the oven.
The pizza oven temperature is too high,
remove some logs and wait for the oven to
cool down.
Warning: Make sure to wear protective gloves
before removing logs.
Door handle is too hot.
Wear protective gloves to open the oven door.
TROUBLESHOOTING
17
Page 18

ORDERING PARTS
HOW TO ORDER REPLACEMENT
PARTS
Make sure you obtain the correct
replacement part(s) for your pizza
oven, please refer to the parts list
The following information is
required to assure getting the
correct part.
Model number (see the manual and
the packing box).
Part number of replacement part
needed.
Description of replacement part
needed.
Quantity of parts needed.
To obtain replacement parts,
contact NXR Customer
Relations. Please send email to
our customer service
department:
nxrcs@duro-global.com
IMPORTANT
Use only factory authorized parts. The
use of any part that is not factory
authorized can be dangerous. This
will also void your warranty.
Keep this assembly and operating
instruction manual for convenient
referral and for ordering replacement
parts.
If you prefer to speak to a live agent in the USA;
call 001-888-909-8818 (International calling rates will apply)
Monday-Friday 9AM-5PM PST; Languages Spoken: English
18
Page 19

LIMITED WARRANTY
DURO warrants to the original consumer-purchaser only that this product (Model #P80-02) shall
be free from defects in workmanship and materials after correct assembly and under normal and
reasonable home use for the periods indicated below, beginning on the date of purchase. The
manufacturer reserves the right to require photographic evidence of damage for review and
examination that defective parts be returned, or for postage. Freight is pre-paid by the consumer.
Pizza oven dome: 2 year warranty.
Pizza oven counter top: 2 year LIMITED warranty; does not cover dropping, chipping,
scratching, or surface damage.
Pizza oven stucco base: 2 Year LIMITED warranty; does not cover dropping, chipping,
scratching, or surface damage.
Pizza peel, shovel: 1 Year LIMITED warranty against perforation; does not cover cosmetic
issues like surface corrosion, scratches and rust.
All other parts: 1 Year LIMITED warranty (Includes, but not limited to, chimney, pizza stone,
temperature gauge); does not cover chipping, scratching, cracking surface corrosion, scratches
or rust.
Upon consumer supplying proof of purchase as provided herein, Manufacturer will repair or
replace the parts which are proven defective during the applicable warranty period. Parts
required to complete such repair or replacement shall be free of charge to you except for
shipping costs, as long as the purchaser is within the warranty period from the original date of
purchase. The original consumer-purchaser will be responsible for all shipping charges of parts
replaced under the terms of this limited warranty. This limited warranty is applicable in the United
Kingdom only, is only available to the original owner of the product and is not transferable.
Manufacturer requires reasonable proof of your date of purchase. Therefore, you should retain
your sales receipt and/or invoice. If the unit was received as a gift, please ask the gift-giver to
send in the receipt on your behalf, to the address below. Defective or missing parts subject to
this limited warranty will not be replaced without registration or proof of purchase. This limited
warranty applies to the functionality of the product ONLY and does not cover cosmetic issues
such as scratches, dents, corrosion or discoloring by heat, abrasive and chemical cleaners or
any tools used in the assembly or installation of the appliance, surface rust, or the discoloration
of stainless steel surfaces. Surface rust, corrosion, or powder paint chipping on metal parts that
does not affect the structural integrity of the product is not considered a defect in workmanship or
material and is not covered by this warranty. This limited warranty will not reimburse you for the
cost of any inconvenience, food, personal injury or property damage. If an original replacement
part is not available, a comparable replacement part will be sent. You will be responsible for all
shipping charges of parts replaced under the terms of this limited warranty.
ITEMS MANUFACTURER WILL NOT PAY FOR:
Service calls to your home.
Repairs when your product is used for abnormal, single-family household or residential
use.
Damage resulting from accident, alteration, misuse, lack of maintenance/cleaning, abuse,
fire, flood, acts of God, improper installation, and installation not in accordance with
electrical or plumbing codes or use of products not approved by the manufacturer.
Any food loss due to product failures.
Replacement parts or repair labor costs for units operated outside the United States or
Canada.
19
Page 20

Pickup and delivery of your product.
Postage fees or photo processing fees for photos sent in as documentation.
Repairs to parts or systems resulting from unauthorized modifications made to the
product.
The removal and/or re-installation of your product.
Shipping cost, standard or expedited, for warranty/non warranty and replacement parts.
DISCLAIMER OF IMPLIED WARRANTIES; LIMITATION OF REMEDIES
Repair or replacement of defective parts is your exclusive remedy under the terms of this
limited warranty. Manufacturer will not be responsible for any consequential or incidental
damages arising from the breach of either this limited warranty or any applicable implied
warranty, or for failure or damage resulting from acts of God, improper care and
maintenance, grease fire, accident, alteration, replacement of parts by anyone other than
Manufacturer, misuse, transportation, commercial use, abuse, hostile environments
(inclement weather, acts of nature, animal tampering), improper installation or installation not
in accordance with local codes or printed manufacturer instructions.
THIS LIMITED WARRANTY IS THE SOLE EXPRESS WARRANTY GIVEN BY THE
MANUFACTURER. NO PRODUCT PERFORMANCE SPECIFICATION OR DESCRIPTION
WHEREVER APPEARING IS WARRANTED BY MANUFACTURER EXCEPT TO THE
EXTENT SET FORTH IN THIS LIMITED WARRANTY. ANY IMPLIED WARRANTY
PROTECTION ARISING UNDER THE LAWS OF ANY STATE, INCLUDING IMPLIED
WARRANTY OF MERCHANTABILITY OR FITNESS FOR A PARTICULAR PURPOSE OR
USE, IS HEREBY LIMITED IN DURATION TO THE DURATION OF THIS LIMITED
WARRANTY.
Neither dealers nor the retail establishment selling this product has any authority to make any
additional warranties or to promise remedies in addition to or inconsistent with those stated
above. Manufacturer’s maximum liability, in any event, shall not exceed the documented
purchase price of the product paid by the original consumer. This warranty only applies to
units purchased from an authorized retailer and or re-seller. NOTE: Some states do not allow
an exclusion or limitation of incidental or consequential damages, so
some of the above limitations or exclusions may not apply to you; this limited warranty gives
you specific legal rights as set for herein. You may also have other rights which vary from
region. If you wish to obtain performance of any obligation under this limited warranty, you
should write to:
DURO CORPORATION
17018 Evergreen Place
City of Industry, CA 91745
USA
All consumer returns, parts orders, general questions, and troubleshooting assistance can
be acquired by sending email to our customer service department: nxrcs@duro-global.com
If you prefer to speak to a live agent in the USA;
call 001-888-909-8818 (International calling rates will apply)
Monday-Friday 9AM-5PM PST; Languages Spoken: English
AUSTRALIA: Our goods come with guarantees that cannot be excluded under the
Australian Consumer Law. You are entitled to a replacement or refund for a major failure
and for compensation for any other reasonably foreseeable loss or damage. You are
also entitled to have the goods repaired or replaced if the goods fail to be of acceptable
quality and the failure does not amount to a major failure
20
Page 21

NOTES
21
 Loading...