

Page 1

Freescale Semiconductor
User Guide
Document Number: P4080DSUG
Rev. 0, 07/2010
P4080 Development System User’s Guide
by Networking and Multimedia Group
Freescale Semiconductor, Inc.
Austin, TX
1Overview
The P4080 development system (DS) is a high-performance
computing, evaluation, and development platform
supporting the P4080 Power Architecture® processor. The
P4080 development system’s official designation is
P4080DS, and may be ordered using this part number.
The P4080DS is designed to the ATX form-factor standard,
allowing it to be used in 2U rack-mount chassis, as well as in
a standard ATX chassis. The system is lead-free and
RoHS-compliant.
Contents
1. Overview . . . . . . . . . . . . . . . . . . . . . . . . . . . . . . . . . . . 1
2. Features Summary . . . . . . . . . . . . . . . . . . . . . . . . . . . 2
3. Block Diagram and Placement . . . . . . . . . . . . . . . . . . 4
4. Evaluation Support . . . . . . . . . . . . . . . . . . . . . . . . . . . 6
5. Architecture . . . . . . . . . . . . . . . . . . . . . . . . . . . . . . . . 8
6. Configuration . . . . . . . . . . . . . . . . . . . . . . . . . . . . . . 40
7. Programming Model . . . . . . . . . . . . . . . . . . . . . . . . . 45
8. Revision History . . . . . . . . . . . . . . . . . . . . . . . . . . . . 58
A. References . . . . . . . . . . . . . . . . . . . . . . . . . . . . . . . . 58
© 2011 Freescale Semiconductor, Inc. All rights reserved.
Page 2

Features Summary
2 Features Summary
The features of the P4080DS development board are as follows:
• Support for the P4080 processor
— Core processors
– Eight e500mc cores
– 45 nm SOI process technology
— High-speed serial port (SerDes)
– Eighteen lanes, dividable into many combinations
– Five controllers support five add-in card slots.
– Supports PCI Express, SGMII, Nexus/Aurora debug, XAUI, and Serial RapidIO®.
— Dual DDR memory controllers
– Designe d for DDR3 support
– One-per-channel 240-pin sockets that support standard JEDEC DIMMs
— Triple-speed Ethernet/ USB controller
– One 10/100/1G port uses on-board VSC8244 PHY in RGMII mode.
– One USB ULPI
– Combo USB/RJ45 stack
— Local bus
– 128-Mbyte NOR Flash (fast boot)
– PromJet debug port
— eSDHC
– Connects to SDMedia card slot for boot code or mass storage
—SPI
– 16-Mbyte EEPROM device for boot code and storage
—I2C
– Three contr ollers
2
C-based, real-time clock and battery-backed SRAM
–I
– EEP ROM storage for boot-sequencer, SystemID, ngPIXIS(FPGA) processor code, and so
on
— UART
– Two serial ports at up to 115200 Kbps
— Debug features
– Both Legacy COP/JTAG and Aurora/Nexus debug support
– EVT support
— Package
– 1295-pin, 1 mm pitch BGA
– Socket and solder attach can be supported.
P4080 Development System User’s Guide, Rev. 0
2 Freescale Semiconductor
Page 3

Features Summary
• System Logic ngPIXIS(FPGA)
— Manages system reset sequencing
— Manages system and SerDes clock speed selections
— Implements registers for system control and monitoring
— Manages boot and RCW source selection
— Internal 8-bit MCU allows independent VCore/temperature monitoring and reconfiguration.
•Clocks
— System clock
– SYSCLK switch settable to one of eight common settings in the interval 66 MHz–133 MHz.
– S oftware settable in 1-MHz increments from 1–200 MHz.
— SerDes clock
– S upports three domains
– 100-MHz, 125-MHz and 156.25-MHz configurations to support PCI Express, SGMII and
XAUI
• Power supplies
— Three dedicated programmable regulators supplying two cores and platform power pools
— PMBus control
— GVDD (DDR power) and VTT/VREF adjustable for DDR3
— 2.5-V power for Ethernet PHY
P4080 Development System User’s Guide, Rev. 0
Freescale Semiconductor 3
Page 4
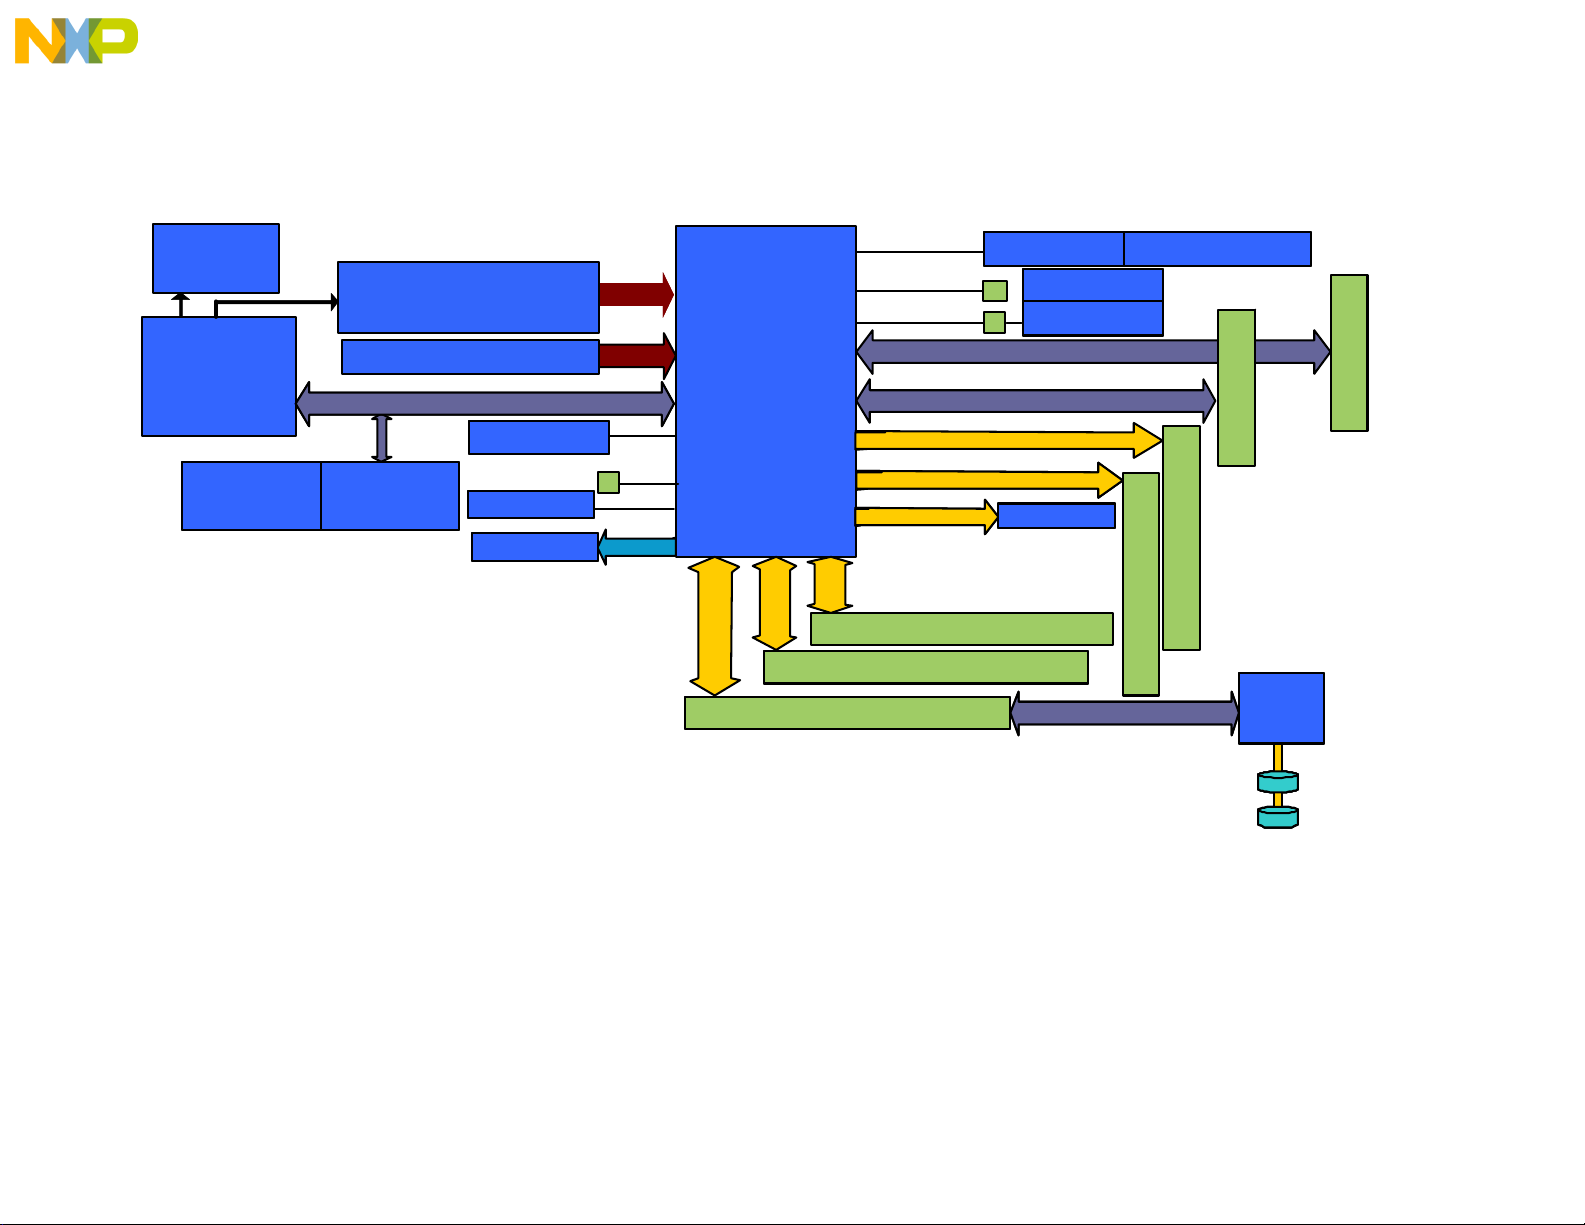
3 Block Diagram and Placement
P4080
ULI
,
SATA
Add-in
Card
SATA
Add-in
Card
USB
1
CPU B DDR2
DUART
2
I2C
3
JTAG
Plug-INPlug-IN
CPU 0:3
CPU 4:7
Platform/Serdes
DDR3Regulator
RCW
NOR FLASH
RCW
NOR FLASH
DDR3 1
DDR3 DIMM
DDR3 2
DDR3 DIMM
x2
x2
PCI Exp 2.0 Video slotPCI Exp 2.0 Video slot
PCI Exp 2.0 slot/ SRIO/ SGMII
x4
System
Control /PM
Logic FPGA
Local BusLocal Bus
Emulator
PromJet
Emulator
PromJet
SYS/PEX
Clocks
SGMII/XAUI Riser Slot
SPI
4- bit S D/MM C4- bit S D/MM C Each riser
supports 1 XAUI
OR 4 SGMII
using x4 lanes
Three power pools supported by three
independent programmable regulators
SGMII/XAUI Riser Slot
FlashFlash
(OCTAL CORE)
Regulators
AB CD E-H
Bank3 A-D
Bank1
FLASH/RCWFLASH/RCW
X2X2
Auror a DEBUGAuror a DEBUG
IJ
RTC/BATRTC/BAT
COP Legac y connCOP Legac y conn R un Control/Trace connRun Control/Trace conn
PCI Exp 2.0 Video slotPCI Exp 2.0 Video slot
TSE C x1
10/100/1G RGMII10/100/1G RGMII
X4X4
X4
Bank2 A-D
This figure shows the major functions of the P4080DS.
Figure 1. Block Diagram
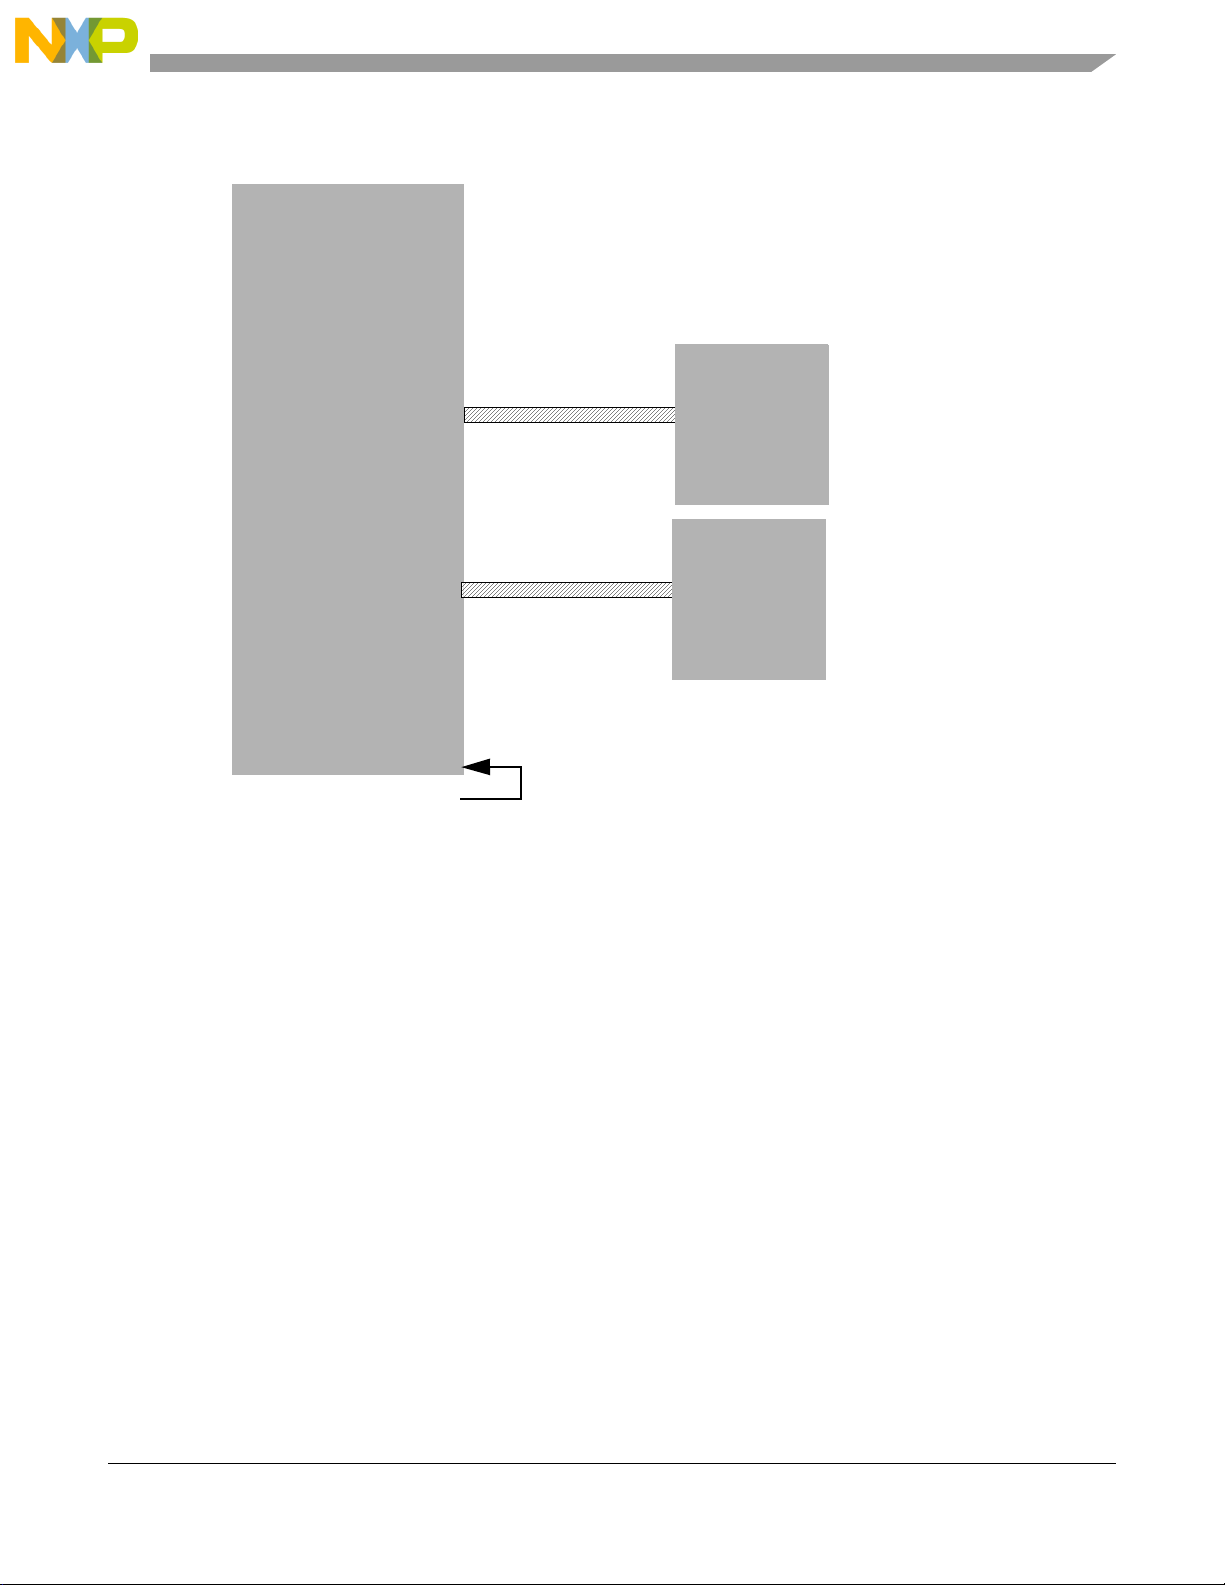
Page 5
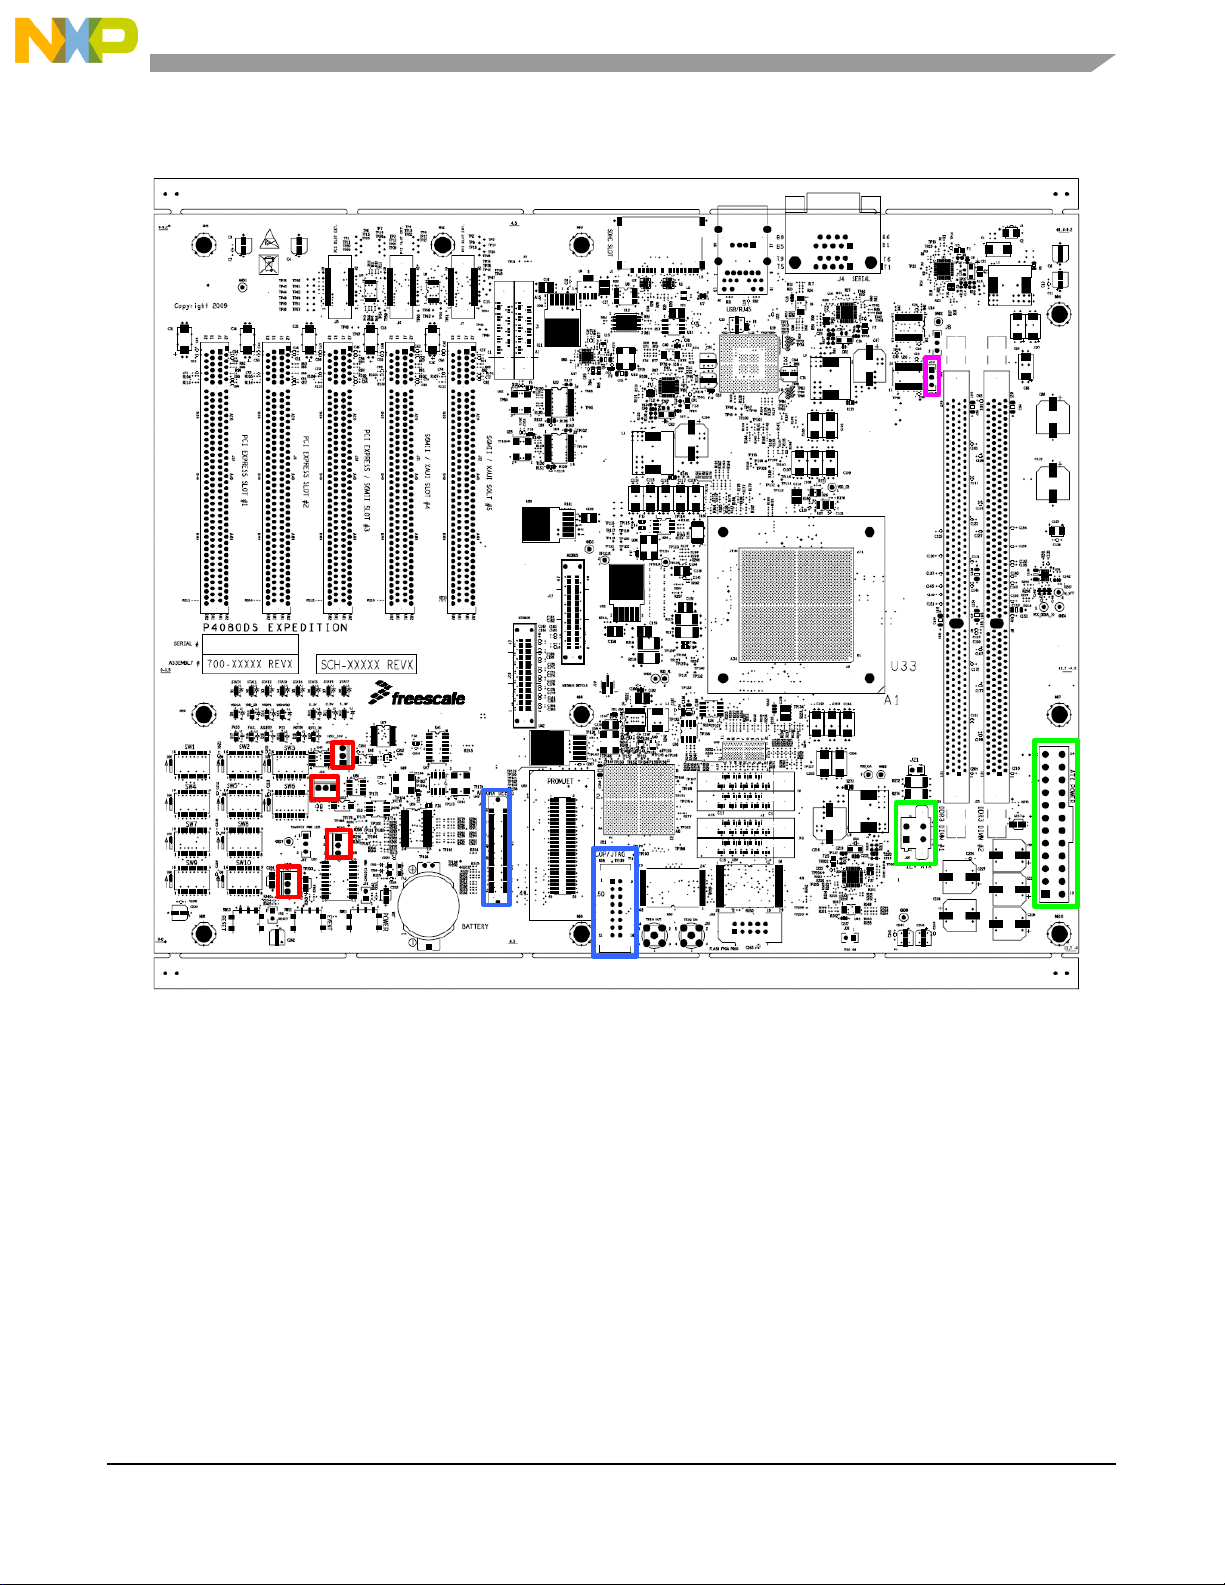
This figure highlights more difficult-to-find connections that are commonly used.
Notes:
I2C HEADERS
AURORA and LEGACY COP CONNECTORS
ATX POWER CONNECTORS
CPU FAN HEADER
Block Diagram and Placement
Freescale Semiconductor 5
Figure 2. Expedition Top View
P4080 Development System User’s Guide, Rev. 0
Page 6

Evaluation Support
4 Evaluation Support
The P4080DS is intended to evaluate as many features of the P4080 as are reasonable within a limited
amount of board space and cost limitations. This table shows an evaluation of the P4080DS.
Table 1. P4080DS Evaluation Summary
P4080 Feature Evaluation Support/Methods
SerDes • Connects to PCI Express slots for use with graphics or other PEX cards
• Testable via PCI Express card (typically graphics) or Catalyst
• Traffic monitoring via Tek/Agilent passive mid-point probing
Memory Controller
DDR3
eSDHC Supports SDMedia cards and MMC cards
SPI Supports standard and x4 devices
Local Bus • 1 bank of 16-bit, 8-Mbyte–1-Gbyte Flash (64 Mbytes by default)
Serial • UART supports two 4-wire serial ports.
2
I
CI
Clocking • Digitally settable SYSCLK and DDRCLK clock generator
• Combined GVDD (VIO), VTT and MVREF supplies
• Debugging uses Tek/NextWave analyzer breakout cards.
• No special MECC/debug tap
• Option for PromJet access
• System controller (ngPIXIS) registers implementing the following: board ID, VDD control, frequency reset,
self-reset reset, and so on
2
C bus #1 for the following:
• Boot initialization code
• System EEPROM (MAC address storage, serial number, and so on)
• PMBus power regulator control
2
•I
C bus #2 for the following:
• DDR bus DIMM module SPD EEPROMs
• PCI/PCI Express slots (as “SMBus”)
• ngPIXIS access
• Switch-selectable coarse settings
• Software-selectable fine settings
TM
PCI Express control/monitoring card
• SerDes reference clocks to SerDes on P4080, NVidia, and slots
• Reference clock
GPIO • All GPIO attached to test 0.1” header
• Some GPIO have predefined board functions that can be eliminated.
DMA Controlled and executable by ngPIXIS logic.
IRQs EVENT switch normally asserts IRQ* but can drive SRESET0, and/or SRESET1 via software setting.
Power • VDD (VCORE+VDD) VID switch-settable
• ngPIXIS software-monitored/controlled voltages
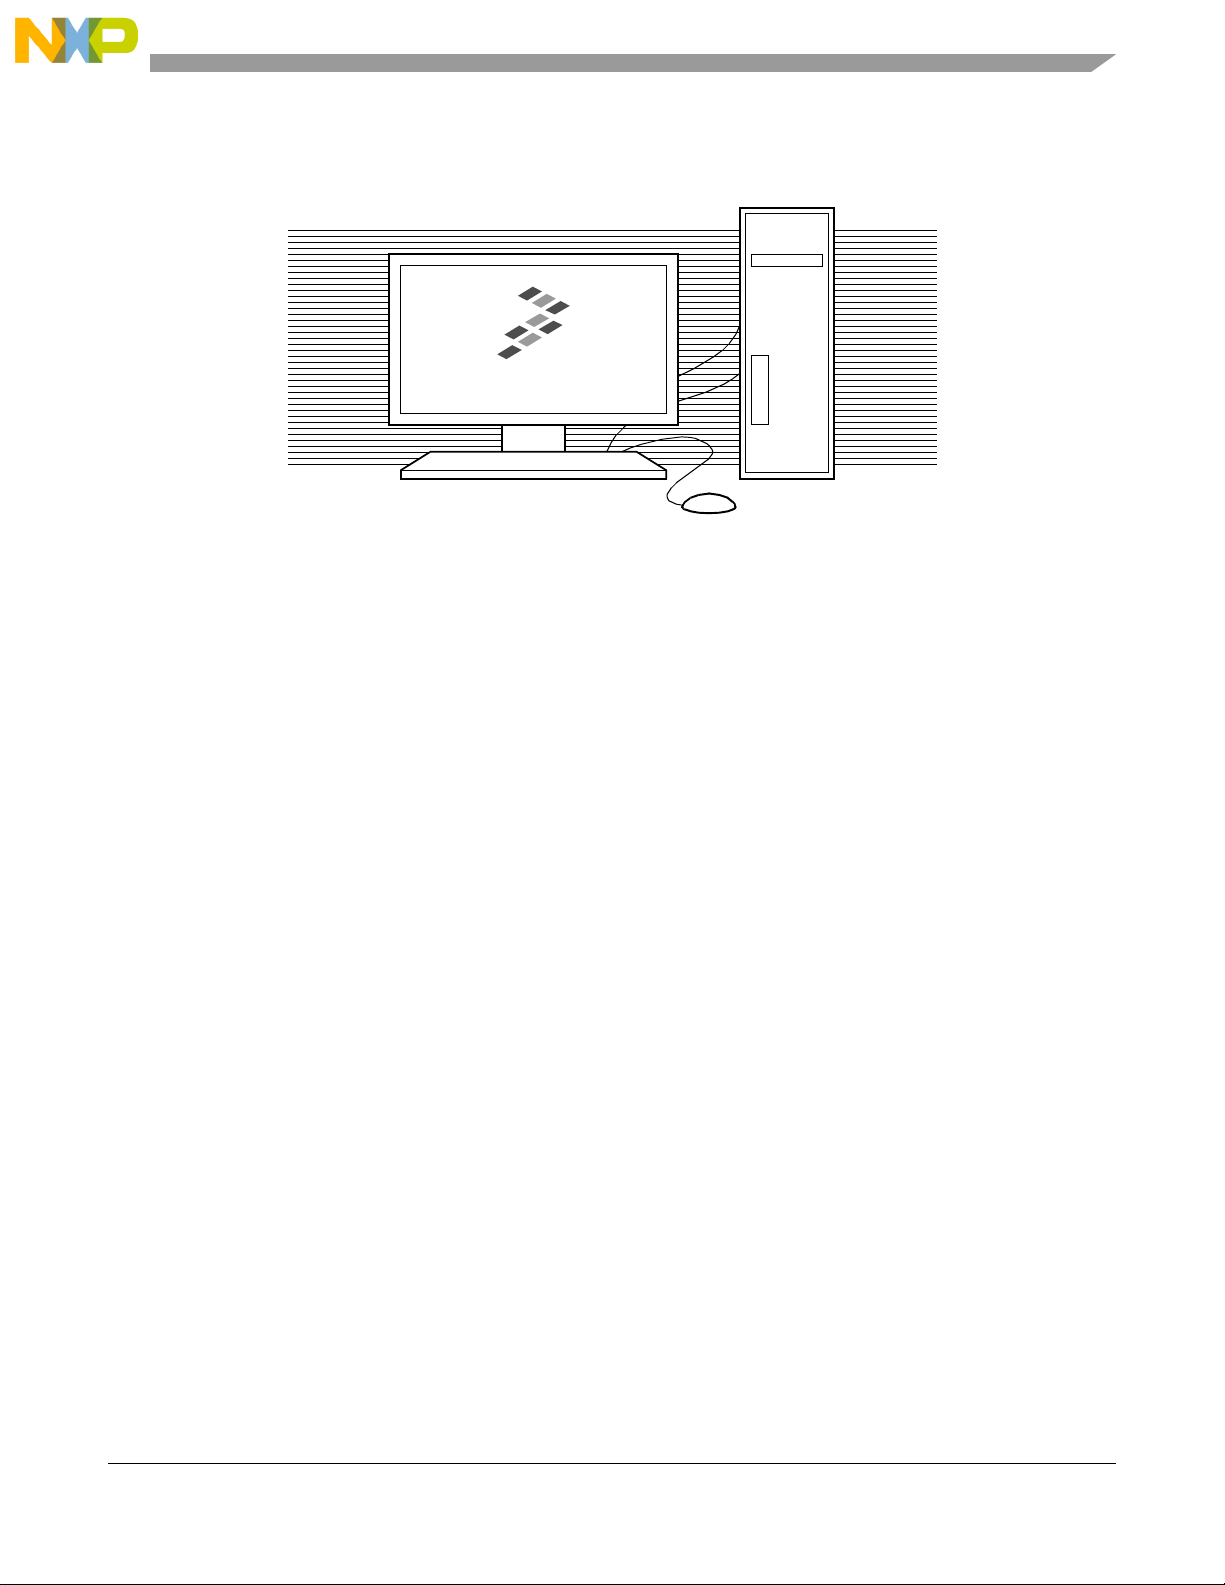
4.1 Development System Use
For general hardware and/or software development and evaluation purposes, the P4080DS can be used just
like an ordinary desktop computer. In the absence of special hardware or software configuration, the
P4080DS operates identically to a development/evaluation system such as ArgoNavis(8641DS) or other
P4080 Development System User’s Guide, Rev. 0
6 Freescale Semiconductor
Page 7
Evaluation Support
P4080DS
members the HPC family. This figure shows an example of the P4080DS system in a desktop
configuration.
Figure 3. P4080DS Desktop Configuration
4.2 Rackmount Server Use
For use in a rackmount chassis, the P4080DS requires the following modifications:
• Low-profile heatsink
• Non-socketed board
Otherwise, it is similar to the desktop case.
4.3 Embedded Use
For general embedded hardware and/or software development and evaluation purposes, the P4080DS can
be used just like an ordinary desktop computer. Perpiherals and embedded storage can be connected to the
PromJet superset connector .
The ngPIXIS FPGA is used to provide startup configuration information for DINK, UBOOT or Linux and
other advanced features are used or ignored.
4.4 AVP-Controlled Evaluation
For many test situations, it is desirable to download a test vector program and run the results. The P4080DS
can do this by using a PCI-based control card, such as the DataBlizzard, or a PCI Expres s-based control
P4080 Development System User’s Guide, Rev. 0
Freescale Semiconductor 7
Page 8
Architecture
card, such as Freescale’s Komodo card, either stand-alone or in coordination with the ngPIXIS. This table
lists an overview example of the steps required to accomplish this.
Table 2. AVP Execution Steps
Step Details
Assert Target Reset Set target reset Control card asserts “flying lead” reset line; alternately, the
ngPIXIS register bit PX_RST[RSTL] is set to ‘0’.
Target processor (not the system) is reset.
Setup New Target Environment Set target core VDD VCTL[VCORE]=1
VCORE=xxxxxxxx
Set requested SYSCLK VCTL[SYSCLK]=1
VSPEED[SYS]=xxx
Restart Target Set target reconfiguration VCTL[GO]=1
System is reconfigured, target processor remains in reset. This may take several milliseconds.
Download Target Download to target execution space. Presumably the DDR and PCIExpress resources were
configured by the I
test code to system memory via PCI->DDR path.
Release Target Reset Release target reset Control card deasserted “flying lead” reset line; alternately
Target processor executes code.
Collect Results Results can be extracted from system DDR, PCI Express graphics memory (used as a buffer),
or other memory (SDMedia, Flash, PromJet).
2
C sequencer. If so, a PCIMaster such as the DataBlizzard can simply write
the ngPIXIS register bit PX_RST[RSTL] is set to ‘1’.
5 Architecture
The P4080DS architecture is primarily determined by the P4080 processor, and by the need to provide
“typical,” OS-dependent resources (disk, Ethernet, and so on).
5.1 Processor
This table lists the major pin groupings of the P4080.
Table 3. P4080 Pin Groupings Summary
Signal Group Details
Memory Controllers Section 5.1.1, “DDR”
SerDes x18 Section 5.1.2, “SerDes x18”
Ethernet Section 5.1.3, “Ethernet (EC)”
IEEE 1588 Section 5.1.4, “Support for IEEE Std 1588
Local Bus Section 5.1.5, “Local Bus”
eSDHC Section 5.1.6, “eSDHC”
SPI Section 5.1.7, “SPI Interface”
USB Section 5.1.8, “USB Interface”
DMA Section 5.1.9, “DMA Controller”
P4080 Development System User’s Guide, Rev. 0
8 Freescale Semiconductor
™
Protocol”
Page 9
Architecture
Table 3. P4080 Pin Groupings Summary (continued)
Signal Group Details
eOpenPIC Section 5.1.10, “eOpenPIC Interrupt Controller”
GPIO Section 5.1.11, “GPIO Controller Port”
System Control Section 5.1.12, “Control Group”
UART Section 5.1.13, “UART Serial Ports”
I2C Section 5.1.14, “I
EM1 and EM2 Management Section 5.1.15, “EM1 and EM2 Management Busses”
Debug/Power Management Section 5.1.16, “Debug and Power Management”
Clock Section 5.1.17, “Clock”
Thermal Section 5.1.18, “Temperature”
Power Section 5.1.19, “Power”
2
C”
5.1.1 DDR
The P4080 supports DDR2 and DDR3 devices; however, the P4080DS supports only DDR3 , using
industry-standard JEDEC DDR3 2-rank and 4-rank DIMM modules. However, the system is shipped and
supported by software to support UDIMM 2-rank modules for targeted vendors. The type and vendor may
change as memory availability varies. The memory interface includes all the necessary termination and
I/O power, and is routed so as to achieve maximum performance on the memory bus.
P4080 Development System User’s Guide, Rev. 0
Freescale Semiconductor 9
Page 10
Architecture
P4080
DDR3 DIMM
MRAS
RAS
CAS
WE
CKE[1:0]
A[15:0]
DQ[63:0]
DQS/DQS
DM[8:0]
CB[7:0]
MCAS
MWE
MCKE[1:0]
MCS[3:0]
MA[15:0]
MBA[2:0]
MDQS[8:0]/MDQS[8:0]
MDM[8:0]
MDQ[63:0]
MCK[0:2]
MCK[0:2]
MVREF
I2C_SDA
I2C_SCK
S[3:0]
BA[2:0]
MECC[7:0]
CK[0:1]
CK[0:1]#
RESET#
SDA
SCL
VREF
DDR3 Power
VTT
MEM_RST
GVDD
VDD
This figure shows the general DDR memory architecture per controller.
Note that the P4080DS does not directly support the use of the MECC pins to access internal debug
information, because the P4080DS does not provide the special multiplexer , and thus has a simpler routing
and signal integrity status. On the other hand, the P4080DS does not interfere with this path, so access to
debug information on the MECC pins is possible with the use of a NextWave (or equivalent) DDR logic
analyzer connector and the use of non-ECC DDR modules.
32-bit DDR3 interface mode is supported; from the viewpoint of the P4080DS board, the unused lower
MDQ/MDS/MDM signals are simply inactive.
The DDR3 power supplies the following interface voltages:
Figure 4. P4080DS Memory Architecture per controller
• VDD_IO up to 20 W (10 A at 1.5 V nominal)
• VDDQ+VTT up to 2 A
• MVREF up to 10 mA
P4080 Development System User’s Guide, Rev. 0
10 Freescale Semiconductor
Page 11

Architecture
5.1.1.1 Compatible DDR-3 Modules
The DDR interface of the P4080DS and the P4080 works with any JEDEC-compliant, 240-pin, DDR3
DIMM module. This table shows several DIMM modules that are believed to be compatible.
Table 4. DDR-3 Modules
Mfg. Part Number Size Ranks ECC Data Rate Verified? Notes
Elpida EBJ21EE8BAFA-DJ-E 2 Gbytes 2 Y 1333 TBD Or later revisions
5.1.2 SerDes x18
The SerDes block provides high-speed serial communications inter fac es f or several internal devic es. The
SerDes block provides 18 serial lanes that may be partitioned as shown in this table.
Table 5. SerDes Lane Multiplexing/Configuration
Bank 1 Bank 2 Bank 3
ABCD E F G H I J ABCDABCD
0123 4567891011121314141617
SLOT 1 SLOT 2 SLOT 3
PCIe1
(5/2.5G)
PCIe1
(5/2.5G)
PCIe1
(5/2.5G)
PCIe1
(2.5G)
PCIe1
(5/2.5G)
PCIe1
(5/2.5G)
PCIe1
(5/2.5G)
PCIe3
(5/2.5G)
PCIe3
(5/2.5G)
PCIe3
(5/2.5G)
PCIe3
(2.5G)
PCIe3
(5/2.5G)
PCIe3
(5/2.5G)
PCIe3
(5/2.5G)
PCIe2
(5/2.5G)
PCIe2
(5/2.5G)
PCIe2
(5/2.5G)
4× SGMII FM2 Debug
—sRIO2
(2.5G)
—sRIO2
(2.5G)
—sRIO2
(2.5G)
—sRIO1
(2.5G)
—sRIO1
(2.5G)
—sRIO1
(2.5G)
Aurora
Conn.
Debug
(5/2.5G)
Debug
(5/2.5G)
Debug
(5/2.5G)
(2.5G)
Debug
(5/2.5G)
Debug
(5/2.5G)
Debug
(5/2.5G)
SLOT 4 SLOT 5
4× SGMII FM2 4× SGMII FM1
XAUI FM2 4× SGMII FM1
XAUI FM2 XAUI FM1
XAUI FM2 4× SGMII FM1
4× SGMII FM2 4× SGMII FM1
XAUI FM2 4× SGMII FM1
XAUI FM2 XAUI FM1
Note that the term ‘lane’ is used to describe the minimum number of signals needed to create a
bidirectional communications channel; in the case of PCI Expr ess or Serial RapidIO, a lane consists of two
differential pairs, one for receive and one for transmit, or four in all.
Table 5, top down, shows three clocking banks: 1, 2, and 3. For Bank1, lanes A–B go to slot 1, C–D to slot
2, E–H go to slot 3, and I–J to the Aurora debug connector. For Bank 2, lanes A–D go to slot 4. For Bank
3, lanes A–D got to slot 5.
This figure shows an overview of Bank1.
P4080 Development System User’s Guide, Rev. 0
Freescale Semiconductor 11
Page 12

Architecture
P4080
SD_TX/RX[0:1](p,n)
Mid-bus probe
PEX Slot 1
TX/RX[0:1](p,n)
REFCLK_SD1(p,n)
100 MHz
Mid-bus probe
PEX Slot 2
TX/RX[0:1](p,n)
Mid-bus probe
PEX Slot 3
TX/RX[0:3](p,n)
Mid-bus probe
Aurora Conn
TX/RX[1:0](p,n)
SD_TX/RX[2:3](p,n)
SD_TX/RX[4:7](p,n)
SD_TX/RX[8;9](p,n)
PCI Express Cards
Only
PCI Express Cards
Only
PCI Express and SGMII
Cards Only
Figure 5. SerDes Bank1 Configuration
Note that a Mid-bus probe can be used with a logic analyzer to analyze bus activity.
12 Freescale Semiconductor
P4080 Development System User’s Guide, Rev. 0
Page 13
This figure shows an overview of SerDes bank 2 and 3.
P4080
REFCLK_SD2/3(p,n)
125 MHz
PEX Slot 4
TX/RX[0:3](p,n)
PEX Slot 5
TX/RX[0:3](p,n)
SD_TX/RX[10:13](p,n)
SD_TX/RX[14:17](p,n)
SGMII and XAUI
Cards Only
SGMII and XAUI
Cards Only
Architecture
Figure 6. SerDes Bank 2 and 3 Configuration.
Note that the Mid-bus probes are not on the development system, but are available on the SGMII and
XAUI riser cards. The SD2 and SD3 clocking domains are separate clock generators.
Freescale Semiconductor 13
P4080 Development System User’s Guide, Rev. 0
Page 14

Architecture
P4080
MI
CLKBUF
EC #2
EC #1
VSC8244
0
1
2
3
GTXCLK
Por t #1
USB Ports
125 MHz
To U S B
5.1.3 Ethernet (EC)
The P4080 supports up to two 10/100/1000baseT triple-speed Ethernet controllers (EC). The P4080DS
uses one of these, which is channel EC2, and is connected to the on-board Vitesse VSC8244 PHY (the
remaining ports are unused) using the RGMII protocol. Alternately, both ECs may be independently
connected to a ULPI USB interface; for the P4080DS, EC1 routes via ULPI to a USB PHY. See
Section 5.1.8, “USB Interface,” for more information.
This table summarizes connections and routing.
Table 6. Ethernet Port Locations
P4080 EC # Connection Port PHY Address Location Notes
2 EC 0 Top port of stack —
1 USB na Bottom port of stack —
This figure shows the general organization of the Ethernet system.
Figure 7. Ethernet Architecture
The P4080DS uses the ICS8304AMLF to drive the Ethernet GTX clocks with the correct edge rate at
2.5 V.
See the Vitesse website for programming information for the VSC8244 PHY.
14 Freescale Semiconductor
P4080 Development System User’s Guide, Rev. 0
Page 15
Architecture
TX >
P4080
STMP_TX/RX[1:2]
CLKIN
XTALOSC
125.000 MHz
±25 ppm
1588
CLKOUT
TRIGIN[1:2]
ALARMOUT[1:2]
P6880
Debug Header
PULSEOUT[1:2]
5.1.4 Support for IEEE Std 1588™Protocol
The P4080 includes support for the IEEE 1588 precision time protocol (PTP). This facility works in
tandem with the Ethernet controller to time-stamp incoming packets.
This figure shows an overview of the IEEE 1588 block.
Figure 8. IEEE-1588 Interface Overview
Freescale Semiconductor 15
P4080 Development System User’s Guide, Rev. 0
Page 16
Architecture
ngPIXIS FPGA
LALE
LBCTL
LBCS[0:2]_B
LBWE0_B
LBCLK
LBGPL
LA[16:31]
PJOE_B
cfg_lbmap(0:3)
P4080
LAD[0:15]
latch16buffer16
NORXOR
NORCS_B
PJCS_B
PJWE_B
NORWE_B
NOROE_B
LocalBus Debug Header
NorFlash
256MB
PromJET
256MB
PIXIS- FPGA
64B
74ALVCH32973
VBANK pins
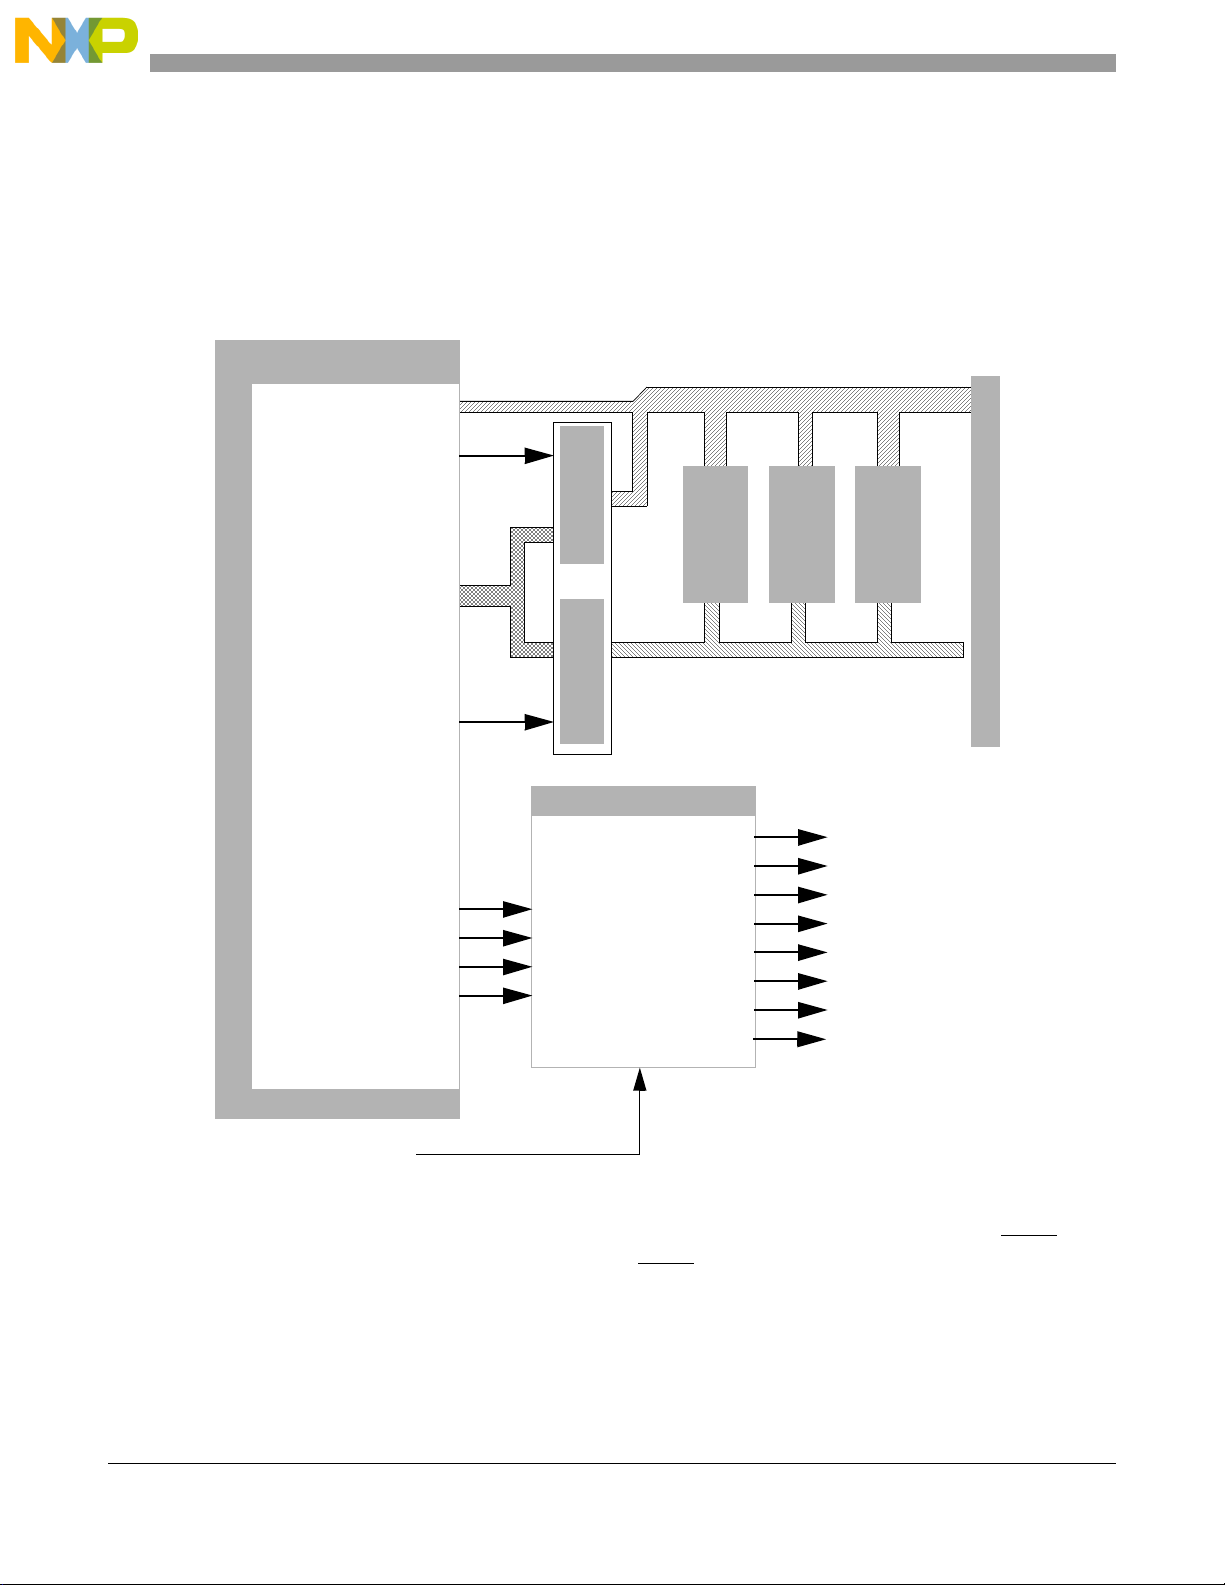
5.1.5 Local Bus
For the P4080DS, the enhanced local bus controller (eLBC) connects to various Flash devices and the
ngPIXIS FPGA internal register space. The P4080 only supports 16-bit devices, so the eLBC interface is
comparatively simpler than past development sys tems. In particular , a single 16-bit latch/buf fer is used to
both latch the portion of the address that is not already provided by the latched address pins and to buffer
the data. This figure shows an overview of the eLBC.
Figure 9. Local Bus Overview
The P4080 can redirect boot fetches to the eLBC, where it is routed to the device attached to LCS0. To
support greater flexibility , the ngPIXIS can re-route the LCS0 pin to other devices, allowing the P4 080DS
to boot from the following devices:
• NORFlash
• NORFlash with MSB[0:1] address lines XOR’d (virtual bank swapping)
P4080 Development System User’s Guide, Rev. 0
16 Freescale Semiconductor
Page 17

Architecture
•PromJet
Local bus chip select routing is summarized in this table. The “cfg_lbmap” column is used to rearrange
the internal addresses of NOR Flash devices, based on user configuration options. Simplistically , no matter
what state the switches are in, the end-user toggling the switch results in toggling the halves or quarters of
the NOR Flash and toggling the CS lines of the NAND Flash. If different program images are stored
therein, upon reset, different startup code is executed. NAND Flash is not currently supported on the
system board. The current hardware implementation is not correct, but the future system board re-spin may
incorporate a correct and supported implementation.
Table 7. Local Bus Chip Select Mapping
Flash
Selection
cfg_lbmap
(0:3)
0000 LCS0 LCS1 LCS[2,4:6] Boot from NOR Flash region #0
0001 LCS0 LCS1 LCS[2,4:6] Boot from NOR Flash region #1
0010 LCS0 LCS1 LCS[2,4:6] Boot from NOR Flash region #2
0011 LCS0 LCS1 LCS[2,4:6] LCS3 Boot from NOR Flash region #3
NOR
Flash
PromJet NAND Flash ngPIXIS Description
0100 LCS0 LCS1 LCS[2,4:6] Boot from NOR Flash region #4
0101 LCS0 LCS1 LCS[2,4:6] Boot from NOR Flash region #5
0110 LCS0 LCS1 LCS[2,4:6] Boot from NOR Flash region #6
0111 LCS0 LCS1 LCS[2,4:6] Boot from NOR Flash region #7
1000 LCS1 LCS0 LCS[2,4:6] — Boot from PromJet, NOR Flash unbanked.
1001 LCS2 LCS1 LCS[0,4:6] — Boot from NAND Flash NOR Flash unbanked.
1010–1111 Not valid
P4080 Development System User’s Guide, Rev. 0
Freescale Semiconductor 17
Page 18
Architecture
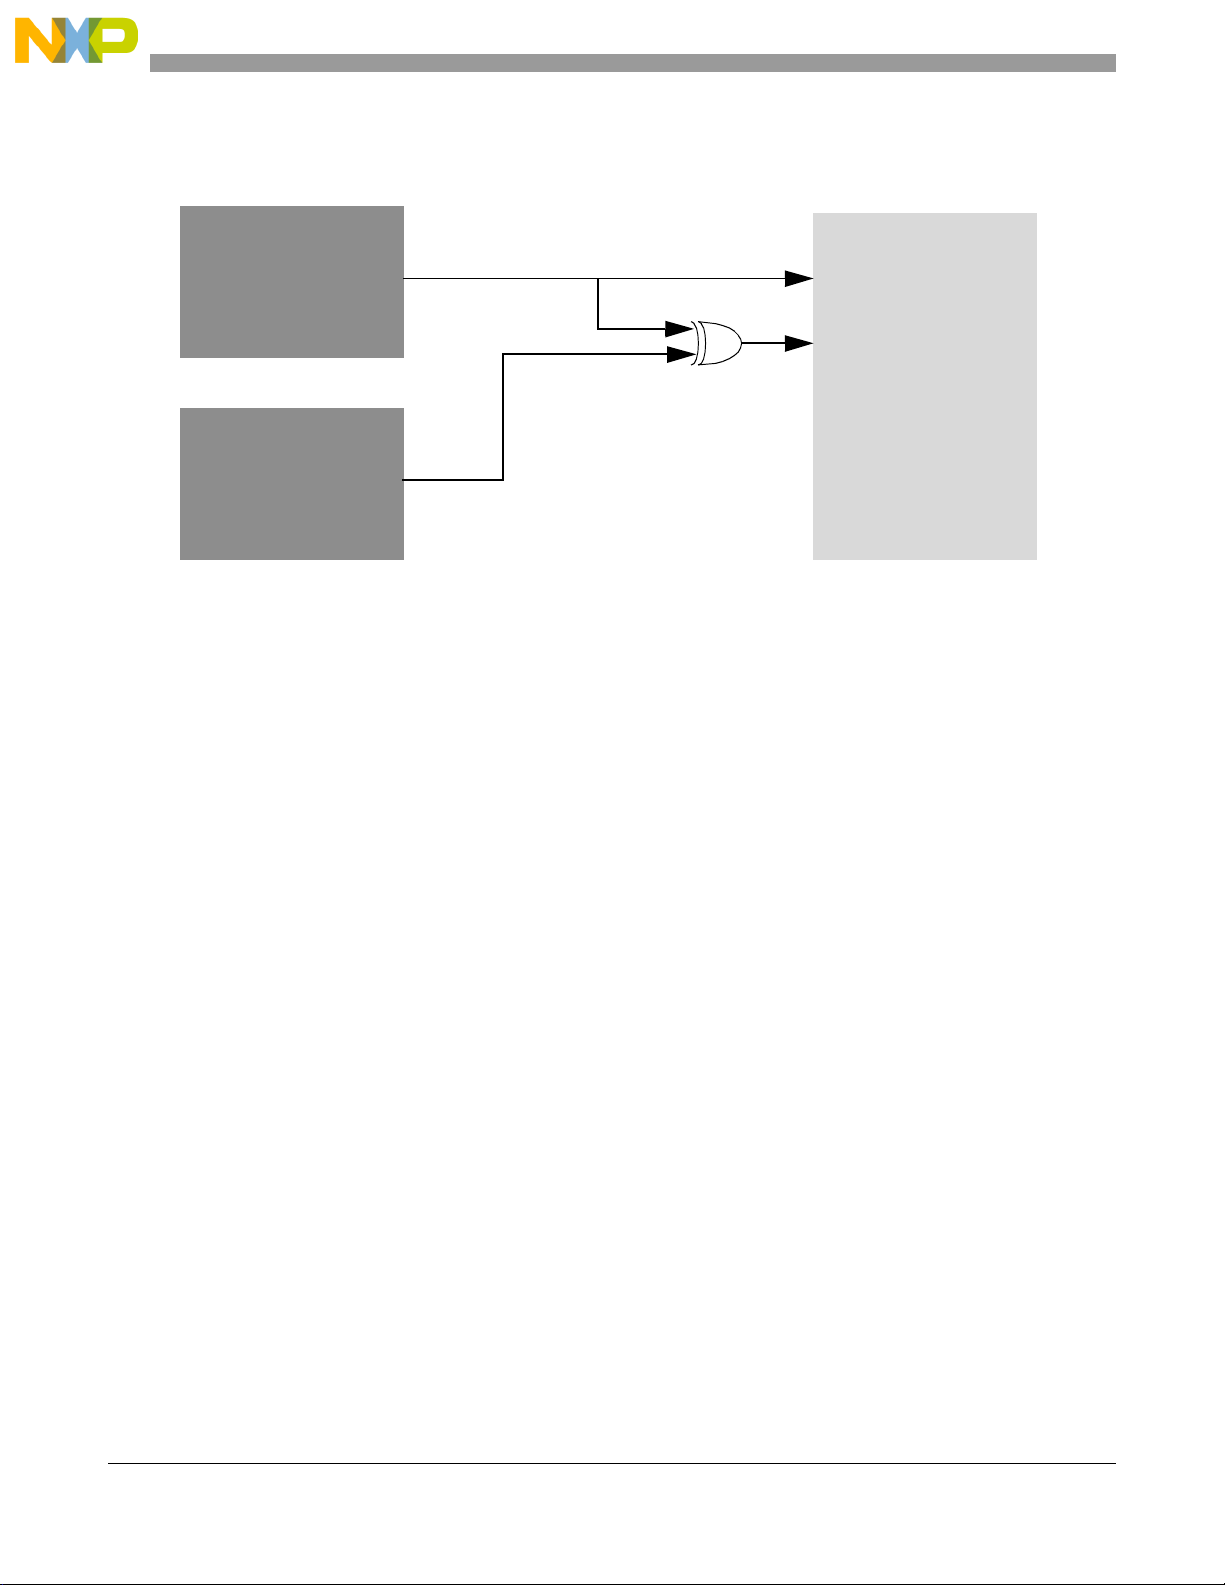
NORFlash
P4080
A-Latched
A[23:25]
A[0:22]
A[7:5]
ngPIXIS
LBMAP(0:3)
A[30:8]
via vbank pins
The “address toggle” feature mentioned in Table 7 is implemented as multistaged XOR gate in-line with
the most significant addresses of the Flash, as shown in this figure.
Figure 10. Flash Address Toggle
When LBMAP encoded bits A23–A25 of the Flash address are altered (toggled), as shown in Table 7, the
Flash behaves normally or is s wapped around as virtual banks. Thus, the boot bank can be swapped around
to support up to eight boot images with or without RCW.
18 Freescale Semiconductor
P4080 Development System User’s Guide, Rev. 0
Page 19

Architecture
SDMedia Slot
P4080
SDHC_CMD
DAT[0:3]
CMD
SDHC_DAT[0:3]
SDHC_CLK
CLK
CD_B
SDHC_CD
SDHC_WP
WP_B
SDHC_CD_B
SDHC_WP_B
S
D
DAT[4:7]SDHC_DAT[4:7]
CFG_SDX8MUX
5.1.6 eSDHC
The P4080 has an enhanced secure digital host controller (eSHDC). The P4080DS connects the eSDHC
to an SDMedia card slot and uses GPIO signals for sideband signals, such as write-protect-detect and
card-detect. Both x4 and x8 cards are supported, the latter using the SPI_CS_B[0:3] signals, which can be
reassigned as eSHDC_D[4:7]. This figure shows the overall connections of the eSDHC block.
Figure 11. eSDHC Architecture
The SDHC_DAT[4:7] signals are shared with the SPI CS pins; software may select the routing of those
pins to either the SDHC devices or the SPI devices, but both cannot be used simultaneously.
P4080 Development System User’s Guide, Rev. 0
Freescale Semiconductor 19
Page 20

Architecture
P4080
SPI_MOSI
sw_FLASHWP_B
SPI_CLK
SPI_CS0_B
EEPROM
16 Mbytes
SPI_MISO
SPI_CS1_B
SPI_CS2_B
cfg_SDX8MUX
SPI_CS3_B
5.1.7 SPI Interface
The P4080 has a serial peripheral interface (SPI), which is used to communicate with various peripherals.
The P4080DS connects a conventional 16-Mbyte serial EEPROM to one chip-select. The remaining three
chip-selects are unused. This figure shows the overall connections of the SPI portion.
Figure 12. SPI Architecture
P4080 Development System User’s Guide, Rev. 0
20 Freescale Semiconductor
Page 21

Architecture
SMSC USB3315
USB_D[0:7]
DATA[0:7]
USB_NXT
USB_DIR
USB_STP
USB
CLKOUTUSB_CLK
DP
IRQ5
Por t
MIC2076
USBPWR
DIR
STP
NXT
CPEN
(overcurrent)
P4080
DM
VBUS
EXTVBUS
ID
5.1.8 USB Interface
The P4080 has a USB 2.0 port that uses the UTMI+ protocol to connect to an external USB PHY, and may
be configured for host or device modes. This figure shows the overall connections of the USB portion.
Figure 13. USB Architecture
The USB port connector is a female “Type A,” the standard connector for a host to communicate with
keyboards, mice, memory sticks, and so on. To support evaluating peripheral mode, the ID pin of the
USB3300 can be controlled with ngPIXIS using the “On-The-Go” mode to switch to peripheral mode.
This requires a special adapter, because a host expects the target device to be either a male “T ype A” or a
female “T ype B.”
5.1.9 DMA Controller
The P4080 DMA controllers have internal and external controls to initiate and monitor DMA activity . The
P4080DS does not incorporate any specific devices that make use of the external pin-controlled DMA.
The DMA ports are connected to test points to allow external hardware control as needed.
P4080 Development System User’s Guide, Rev. 0
Freescale Semiconductor 21
Page 22

Architecture
5.1.10 eOpenPIC Interrupt Controller
The P4080DS contains numerous interrupt connections. This table shows the P4080 eOpenPIC
connections.
Table 8. Interrupt Connections
Signal Names Connections
IRQ0_B SLOT3 Sideband connector (SGMII riser does not connect, must use in-band irq)
IRQ1_B DS3232 Realtime CLOCK and NVRAM
IRQ2_B Four ZL2006 VCORE alert outputs
IRQ3_B VSC8244 PHY interrupts 0–2 (wire-ORed)
IRQ4_B SLOT4 Sideband connector (SGMII riser does not connect, XAUI riser can use or inband)
IRQ5_B MIC2076 USB Power FLAG for over current at USB connector
IRQ6_B SLOT6 Sideband connector (SGMII riser does not connect, XAUI riser can use or inband)
IRQ7_B Not Connected
IRQ8_B ngPIXIS FPGA
IRQ9_B ngPIXIS FPGA
IRQ10_B ADT7461 Thermal Diode ALERT PIN
IRQ11_B ADT7461 Thermal Diode THERM PIN
IRQ_OUT_B Not used as Interrupt, but as an EVT pin
5.1.11 GPIO Controller Port
Several pins of the P4080 can be used for customer-specific applications. Some of these pins have alternate
P4080-defined purposes to which they may also be used. All unused GPIO signals are connected to test
points on the P4080DS board; for those that have additional functions, there are additional connections as
noted. In general, additional functions are used so as not to interfere with use as GPIO unless otherwise
noted. This table summarizes the dedicated GPIO signals.
Table 9. Dedicated GPIO Connections
Signal Names System Function
GPIO[0:1] EM1 management bus mux control.
GPIO[2:3] EM2 management bus mux control.
GPIO[4:7] Spares connected to test points.
P4080 Development System User’s Guide, Rev. 0
22 Freescale Semiconductor
Page 23

Architecture
P4080
HRESET_REQ_B
ngPIXIS
PORESET_B
MUX
CKSTP_OUT_B
COP_HRST_B
HRESET_B
COP_PORST_B
COP_TRST_B
Legacy COP
AURORA
COP_LEG_SRST_B
COP_LEG_HRST_B
COP_LEG_TRST_B
AURORA_HRST_B
AURORA_PORST_B
AURORA_TRST_B
TRST_B
5.1.12 Control Group
The P4080 control group signals are principally related to halting or restarting execution. This figure
shows an overview of the connections.
The resets from the legacy COP and Aurora connectors are multiplexed to the ngPIXIS FPGA. The
ngPIXIS FPGA can inject system-level resets along with the legacy COP or Aurora resets. Note that the
Legacy COP HRST is mapped to the P4080 PORESET and the Legacy COP SRST is mapped to the P4080
HRESET. The P4080 HRESET is bi-directional open drain signal, but is not monitored by the ngPIXIS
FPGA. Basic system reset is mapped to the P4080 PORESET for both cold and warm reset conditions.
5.1.13 UART Serial Ports
The P4080DS connects both 4-wire serial ports to serial level transceivers, and from there to a stacked dual
DB9 male connector placed in the ATX I/O gasket area. The default mode is 4-wire, so RTS/CTS flow
control is supported on these connectors.
Freescale Semiconductor 23
P4080 Development System User’s Guide, Rev. 0
Figure 14. Control Architecture
Page 24

Architecture
UART 1
LT1331
Por t #1
Por t #0
P4080
UART 0
LT1331
Top p o rt
Bottom port
MUX
ngPIXIS
+3.3 V
HOT +3.3 V
Figure 15. Serial Architecture
The UAR T programming model is a standard PC16550-compatible register set. Baud rate calculations for
the divisor latch registers (DLL and DML) are typically done by reading the ngPIXIS PX_CLK register
to determine the P4080 SYSCLK clock input (typically 133 MHz) frequency, but possibly any value. The
baud rate divisors can then be calculated using the formula described in the P4080 QorIQ Integrated
Communications Processor Family Reference Manual.
NOTE: Programming Note
If the dynamic reconfiguration capabilities of ngPIXIS are used to set the
SYSCLK input to an arbitrary value, the 3 bits in the PX_CLK register are
not valid. In this case, the PX_AUX register is, by convention, set to the
value of SYSCLK in MHz, which is used in lieu of PX_CLK.
Note that the primary serial port is powered from the 3.3-V hot power rail, and thus may be used even when
the system is powered down. This facility is used by the ngPIXIS processor to run programs and interact
with the user, allowing reconfiguration of the board when sealed in the chassis.
5.1.14 I2C
The P4080 has four separate I2C/SMB buses; however, the P4080DS uses three of them. I2C1 is also
electrically isolated before power-up of the P4080 so as to allow ngPIXIS access to eeprom resources.
Those resources can be accessed by P4080 after power up. This figure shows the I2C block.
24 Freescale Semiconductor
P4080 Development System User’s Guide, Rev. 0
Page 25

Figure 16. I2C Architecture
P4080
I2C1
EEPROM
I2C2
Power
ngPIXIS
I2C1_MON
I2C2_MON
RTC
Thermal
SPDs EEPROM
ISO
EEPROM
I2C4
SD1 CLK
This table summarizes the I2C bus device addresses.
Table 10. I2C Bus Device Map
Architecture
I2C Bus
2
C
I
Address
1 0x21 VCORE PMBus
ZL2006 regulator
1 0x22 VCORE PMBus
ZL2006 regulator
1 0x23 VCORE PMBus
ZL2006 regulator
1 0x24 DDR PMBus
ZL2006 regulator
1 0x50 4KiB EEPROM
Atmel AT24C64A or equivalent.
1 0x55 4KiB EEPROM
Atmel AT24C64A or equivalent.
1 0x56 4KiB EEPROM
Atmel AT24C64A or equivalent.
1 0x57 256B SYSTEM ID EEPROM
Atmel AT24C02A or equivalent.
1 n/a ngPIXIS I2C port Used for bus reset, monitoring, and master-only data collection.
Device Notes
Controls rail VDD_CA
Controls rail VDD_CB
Controls rail VDD_PL
Controls rail VDD_GVDD
Stores RCW and PBLOADER data.
Write protectable.
Stores ngPIXIS accessed configuration data.
Accessible while board is powered off.
Write protectable.
Stores ngPIXIS GMSA program code.
Accessible while board is powered off.
Write protectable.
Stores board specific data, including MAC addresses, serial
number/errata, and so on.
Write protectable.
1 n/a I2C Access Header For remote programming of boot sequencer startup code (if
needed) or Zilker Lab PMBus programmer.
Freescale Semiconductor 25
P4080 Development System User’s Guide, Rev. 0
Page 26

Architecture
I2C Bus
2
C
I
Address
Table 10. I2C Bus Device Map (continued)
Device Notes
2 0x4C Processor Thermal Monitor
Analog ADT7461A or equivalent
2 0x51 DDR3 DIMM Socket 1
Atmel AT24C02, Microchip
MCP98242. or equivalent
2 0x52 DDR3 DIMM Socket 2
Atmel AT24C02, Microchip
MCP98242. or equivalent
2 0x68 Real-time clock
DS3232
2 n/a ngPIXIS I2C port Used for bus reset, monitoring, and master-only data collection.
2 n/a I2C Access Header For remote programming of boot sequencer startup code (if
3 0x6E SerDes clock generator
ICS9FG108
3 n/a I2C Access Header For remote programming (if needed).
Note: These addresses do not include the position of the LSB of the transmitted address (the read/write bit).
SPD EEPROM
Type of device depends on the DIMM vendor; the default Elpida
device supplies an MCP98242.
SPD EEPROM
Type of device depends on the DIMM vendor; the default Elpida
device supplies an MCP98242.
Optional
needed).
—
—
5.1.15 EM1 and EM2 Management Busses
The P4080 has two types buses: one for SGMII and RGMII PHY management, and one for XAUI PHY
management. Because one set of busses must span across multiple devices in the P4080DS system,
multiplexers are used to route from the P4080 to each PHY. GPIOs are used to control the multiplexers.
These tables summarize the management bus control.
Table 11. PHY Management Bus Map for EMI1
Bus GPIO[0:1] Device
EMI1 00 On board Vitesse RGMII
EMI1 01 Slot 4 SGMII
EMI1 10 Slot 3 SGMII
EMI1 11 Slot 5 SGMII
Table 12. PHY Management Bus Map for EMI2
Bus GPIO[2:3] Device
EMI2 00 No Device
EMI2 01 Slot 4 XAUI
P4080 Development System User’s Guide, Rev. 0
26 Freescale Semiconductor
Page 27

Table 12. PHY Management Bus Map for EMI2 (continued)
Bus GPIO[2:3] Device
EMI2 10 No DeviceI
EMI2 11 Slot 5 XAUI
5.1.16 Debug and Power Management
This table summarizes the debug and power management signals.
Table 13. Debug and Power Management Connections
Signal Names Connections
EVT[2,3,7,8] P6880 Debug header
MSRCID[0:2] P6880 Debug header
MDVAL P6880 Debug header
CLK_OUT Test point w/adjacent ground.
ASLEEP ngPIXIS
LED
Architecture
5.1.17 Clock
This table summarizes the clocks for the P4080. Further details on the clock architecture are covered in
Section 5.4, “Clocks .”
Table 14. P4080 Clock Connections
Pin Count Signal Names Connections
1 SYSCLK ICS307 System clock synthesizer
1 RTC Arbitrary timebase frequency
11 Total pins in this group
NOTE
The SerDes and Ethernet clocks are included in their respective sections.
5.1.18 Temperature
The P4080 has two pins connected to a thermal body diode on the die, allowing direct temperature
measurement. These pins are connected to the ADT7461 thermal monitor, which allows direct reading of
the temperature of the die and is accurate to ±1 °C. This figure shows the thermal management scheme for
the P4080DS.
P4080 Development System User’s Guide, Rev. 0
Freescale Semiconductor 27
Page 28

Architecture
Thermal Sensor
(ADT7461)
THERM
ALERT/THERM2
DXN
DXP
THERM ALARM
P4080
INTR10
TEMP_CATHODE
TEMP_ANODE
I2C Bus SCL
SDA
OVER ALARM
INTR11
GPIOs
PMBus Controlled
Power Regulator
Complex
P4080
Figure 17. Functional Block Diagram of P4080DS Thermal Management Scheme
5.1.19 Power
The power requirements of the P4080 are estimated at this time, based on historical precedents and
estimated power requirements. These figures show the power architecture for the P4080 as implemented
on the P4080DS.
28 Freescale Semiconductor
Figure 18. P4080DS Power Architecture for P4080 Part 1 of 3
P4080 Development System User’s Guide, Rev. 0
Page 29

Architecture
P4080
P4080
Figure 19. P4080DS Power Architecture for P4080 Part 2of 3
Figure 20. P4080DS Power Architecture for P4080 Part 3 of 3
P4080 Development System User’s Guide, Rev. 0
Freescale Semiconductor 29
Page 30

Architecture
Note that this is the power for the P4080 only as implemented on the P4080DS; it does not include external
devices, memory, and so on. Because these are estimates, and because alpha silicon tends to be “hot, ” the
VDD rail must have an excess capacity of approximately 20%.
Note also that the P4080 supports more than these voltage levels, but they are the voltage levels supported
by the P4080DS.
Because of the high-current transients present on the VDD power pins, careful attention should be paid to
properly bypass these power pins and to provide a good connection between the BGA pads and the power
and ground planes. In particular, the SMD capacitors should have pads directly attached to the via ring (or
within it, if the PCB costs are not prohibitive).
5.2 System Control Logic
The P4080DS contains an FPGA, the ngPIXIS, which implements the following functions:
• Reset sequencing/timing combined with COP/JT AG connections.
• Map/re-map P4080 local bus chip selects to Flash, compact Flash, and so on.
• Transfer switch settings to processor/board configuration signals.
• Load configuration data from RAM (registers) or EEPROM to overr ide configuration f or self-tes t.
• Miscellaneous system logic
— COP reset merging
— DMA trigger/monitor registers
—I2C timeout reset
The FPGA is powered by standby power supplies and an independent clock. This allows the FPGA to
control all aspects of board bringup, including power, clocking, and reset.
P4080 Development System User’s Guide, Rev. 0
30 Freescale Semiconductor
Page 31

Architecture
PSU_PWR_GOOD
RESET
LOCAL
BUS
CONFIG
DRIVE
RESET
REG
RESETS
COP
IO
REGISTERS
LBUS
CPU
VELA
COP
CONFIG
CONFIG
RESET SW
SEQ
I2C
I2C EEPROM
IO
OCM
GMSA
SERIAL
The ngPIXIS is implemented in an Actel A3P600 in a 484-256-pad micro-BGA. This figure shows the
overall ngPIXIS architecture.
Figure 21. ngPIXIS Overview
The principal portions of ngPIXIS are as follows:
COP Handles merging COP header re s e ts with on-board resets in a transparent manne r
RESETSEQ Collects various reset/power-good signals and starts the global reset sequencer
REGRESETS Drives resets from the sequencer, from register-based software control, or from
VELA
REGISTERS A multi-ported register file containing status and configuration data
LOCALBUS Interface between processor and REGFILE
CONFIG Monitors and/or sets selected configuration signals
Freescale Semiconductor 31
P4080 Development System User’s Guide, Rev. 0
Page 32

Architecture
VELA VELA is a simple machine to monitor requested changes in board configuration
and when detected, perform a power-on-reset/re-configuration of the target
system.
OCM Offline configuration manager—a machin e that initializ es the ngPIXIS registers,
including those used for P4080 initialization, from external I2C EEPROMs. The
OCM can talk to the user or another computer using the serial port while the
system is powered down.
GMSA General microprocessor/stack architecture—a stack-based microprocessor that
loads executes before and during power-down/-up events. It can query I2C devices
and collect data during normal system operation, as well as allow setting
configuration switches without opening the chassis.
5.2.1 COP
COP handles merg ing COP header resets with on-board resets in a transparent manner. It is critical that the
COP HRST* input resets the entire system except for the COP JTAG controller (that is, TRST* must not
be asserted). With COP not attached, it is critical that reset does indeed assert TR ST*. Th e COP core
manages these modal operations.
5.2.2 RESETSEQ
RESETSEQ collects various reset/power-good signals and starts the global reset sequencer.
Note that ASLEEP indicates that the processors(s) have exited the reset state. It does not cause a reset,
because the processor can sleep for any number of reasons after hard reset is completed.
Note also that during power-down, all I/O and output drivers must be tristated. After power up, drivers
may be driven. Normal operation and/or use of the VELA engine may cause some I/Os to be tristated.
5.2.3 REGRESETS
REGRESETS copies reset signals from the sequencer, but also allows register-based software to
individually asserted reset to the local bus, memory , and/or compact Flash interfaces.
5.2.4 REGFILE
REGFILE is a dual-ported register file containing several types of registers.
Note that REGFILE must be able to accept (or arbitrate for) concurrent writes to the same register, though
this is not a statistically likely occurrence.
5.2.5 LOCALBUS
LOCALBUS is the interface between proc ess or and REGFILE . Bec ause access to the internal register s
may be blocked, asynchronous (not ready) signalling is used.
P4080 Development System User’s Guide, Rev. 0
32 Freescale Semiconductor
Page 33

Architecture
bootloader
Private
GMSA
I2C
Controller
IPL
EEPROM
IOPort
Regs
Shared
256-byte
SRAM
8-Kbyte SRAM
Host
Processor
5.2.6 CONFIG
CONFIG monitors and/or sets selected configuration signals.
In some instances, CONFIG maps switch settings into direct configuration outputs, while in others (such
as SYSCLK), it maps a 3-pos ition switch into a 16-bit regi ster initialization pattern, which is s ubsequently
used to initialize the clock generator.
5.2.7 VELA
VELA is a simple microsequenc er us ed to monitor sequence in requested changes in board configuration
upon a signal (generally a register write from PCI). When detected, bits in a PX_EN[1:8] register allow a
corresponding PX_SW[1:8] register to be driven onto configuration pins during a system restart.
5.2.8 OCM
The off-line configuration manager (OCM), is a small microprocessor (GMSA) that contains an embedded
CPU core, 8-Kbyte SRAM and I/O peripherals (UART, I2C, GPIO and timers). The standard OCM
software performs the following functions:
• Monitors PX_VCTL[GO] to avoid interfering with self-shmoo
• Loads ngPIXIS SW/EN registers from external I2C EEPRO M
• Modifies ngPIXIS misc registers from external I2C EEPROM
• Modifies VCORE output voltage based on SW_VCORE(0:1) settings
• User interaction to allow programming I2C EEPROM (even with power off)
• Background data collection on VCORE, ICORE, TEMP, and so on
• Other system control functions (reset, power cycle, and so on)
This figure shows the block diagram of the OCM component.
Figure 22. OCM GMSA Implementation
P4080 Development System User’s Guide, Rev. 0
Freescale Semiconductor 33
Page 34

Architecture
A great portion of the OCM is defined by the software. Because this can be changed by the end-user or
updated with new functions at any time, see the OCM documentation for definitive details.
5.2.9 Power
Power for ngPIXIS is supplied from dedicated VCC_HOT_3.3 and VCC_HOT_1.5-V power supplies
based upon the ATX power supply +5-V standby power, VCC5STDBY.
5.2.10 Register Summary
ngPIXIS contains several registers. For further details, see Section 7. 1, “ngPIXIS Registers.”
5.3 System Power
The 12-V, 5-V, and 3.3-V power requirements are met by the attached A TX-12V compatible power supply
unit (PSU). 5 V and 3.3 V are connected to individual power planes in the P4080DS PCB stackup. The
12-V power from the standard A TX header is treated as separate from the A TX-12V power, which supplies
a large amount of current and is referred to as “VCC_12V_BULK”. The latter is used solely for the
VDD_CA, VDD_CB, and VDD_PL power supply rails, while the former is used for miscellaneous
purposes, such as fan power and PCI slots.
Note that to support ngPIXIS standby operation, video cards, or other high-power-dissipation cards in the
PCIExpress slot, the PSU should support the following minimum specifications:
• Minimum 450 W overall, 500 W recommended
• One PCIE 12-V connector
• PCIE 12 V supports a minimum of 150 W
• Minimum 5-V, 2-A standby current
All other power sources are derived from the ATX PSU. Figure 23 shows the principal system power
connections in relationship to FPGA control. For more detail as to P4080 power scheme as implemented
by this system, see Sectio n 5.2.9, “Po w er.”
P4080 Development System User’s Guide, Rev. 0
34 Freescale Semiconductor
Page 35

Architecture
SPS
ATX PSU
+5 V
+3.3 V
+12 V
+5VSTB
+3.3VHOT
LDO
+1.5VHOT
ngPIXIS
ZL2006
VDD_CB
LDO
EN
GD
GD
POVDD
EN
+12V_BULK
LDO
+1.8VHOT
PWRGD
Select
PWRON
Batt.
GVDD/
ZL2006
GD
EN
VTT
LDO
+2.5 V
LDO
+1.8 V
LDO
+1.2 V
VSTANDBY
+3.3 V HOT
ZL2006 VDD_PL
EN
GD
ZL2006 VDD_
EN
GD
ZL2006 VDD_CA
EN
GD
Figure 23. Expedition Power Architecture
5.3.1 Core and Platform Power
The P4080DS uses the Zilker Labs ZL2006 switching power controller. The P4080DS uses this device as
a single-phase controller for up to 22 A of power at a nominal 1.0- to 1.10-V output. Four switchable
values are available for experimentation see Section 6.1.2, “Configuration Switches.” Of particular
interest is the PMBus capabilities of the ZL2006; the P4080DS uses hardware configuration pins to set the
nominal voltage to 1.10 V, but using PMBus commands, nearly any parameter of the design can be
adjusted by software, including the following:
• Output voltage
• Current limit
•Slew rate
• Power-up delay
• Droop compensation
• Margining
Freescale Semiconductor 35
P4080 Development System User’s Guide, Rev. 0
Page 36

Architecture
In addition, the SNAPSHOT command allows collection of data, including paired voltage and current
measurements. See the ZL2006 data sheet and the PMBus association specifications for further details.
5.3.2 GVDD/VTT DDR Power
The P4080DS uses the Zilker Labs ZL2006 switching power controller as a single-phase controller for up
to 22 A of power at a nominal 1.5-V output. As with the Core and Platform power regulators, the PMBus
may be used; however, there are no switchable values. This device supplies both GVDD, while an LDO,
it supplies half of this voltage as VTT (termination power), and MVREF (s witching reference voltage) for
the DDR DIMM and the P4080 DDR interface.
5.3.3 XVDD/SVDD SerDes Power
XVDD is a filtered copy of the DDR power GVDD. There is a backup LDO as an alternative source of
XVDD. Filtering is the primary choice, while the LDO is for experimentation. SVDD is a filtered copy of
Platfom power VDD_PL.
5.4 Clocks
This table summarizes the clock requirements of the P4080DS. Note that the DDR clocks are not included,
because they are provided by the P4080.
Table 15. P4080DS Clock Requirements
Clock Destination
SYSCLK P4080 SYSCLK 33–200 MHz t
BCLK P4080 RTCCLK 14.318 MHz none LVTTL —
P4080 SD1_REFCLK(p,n) 100.00 MHz
SD1 REFCLK SLOT1 REFCLK(p,n) — — — —
SLOT2 REFCLK(p,n) — — — —
SLOT3 REFCLK(p,n) — — — —
SD2 REFCLK P4080 SD2_REFCLK(p,n) 156.25 MHz
SLOT4 REFCLK(p,n) — — — —
SD3 REFCLK P4080 SD3_REFCLK(p,n) 156.25 MHz
Clock
Frequency
or
125.00 MHz
or
125.00 MHz
or
125.00 MHz
Specs Type Notes
<= 1ns
R
t
<= 1ns
F
<= 60% duty
<= 150 ps jitter
jitter: 80–100 ps
skew: 330 ps
—— —
—— —
LVTTL 133.33 nominal
closed loop jitter bandwidth
should be <500 kHz at
20 dB.
LVDS 100.00 MHz
100 ps jitter
SLOT5 REFCLK(p,n) — — — —
P4080 Development System User’s Guide, Rev. 0
36 Freescale Semiconductor
Page 37

Table 15. P4080DS Clock Requirements (continued)
Architecture
Clock Destination
GTXCLK P4080 EC_GTX_CLK125
Clock
Frequency
Specs Type Notes
125 MHz — — —
VSC8244 XTAL1
UPHYCLK USB PHY clock 26.000 MHz — LVTTL —
P4080 Development System User’s Guide, Rev. 0
Freescale Semiconductor 37
Page 38

Architecture
SD1 CLK
PEX Slot 1
PEX 1
tap
CLK14M
ICS9FG108
100 MHz
XOSC
VSC8244
ngPIXIS
PEX Slot 2
14.318 MHz
125 MHz
MPC94551
ICS8304
P4080
RTC
GTXCLK
SD2 CLK
“hot”
XOSC
33 MHz
“hot”
XOSC
33 MHz
XOSC
14.318MHz
“hot”
ICS307
1588CLK
XOSC
125 MHz
PEX/SGMII Slot 3
SYSCLK
SD3 CLK
SGMII/XAUI Slot 5
SGMII//XAUI Slot 4
ICS841664
ICS841664
MPC94551
This figure shows the principal clock connections (DDR and miscellaneous clocks are not shown).
Figure 24. P4080DS Clock Architecture
38 Freescale Semiconductor
P4080 Development System User’s Guide, Rev. 0
Page 39

Architecture
5.4.1 SYSCLK
Much of the timing within the P4080 is derived from the SYSCLK input. On the P4080DS, this pin is
controlled by an IDT ICS307-02 frequency synthesizer . This device is serially configured by 20 found bits
of data by the ngPIXIS as part of the reset/power-up sequence. These 24 bits can be controlled to set the
SYSCLK speed to fine increments using the dynamic (re)configuration facilities of remote access
ngPIXIS. To make configuration easy, ngPIXIS pre-loads the 24-bit configuration pattern using one of
eight popular values by sampling three switches located on the motherboard. This table summarizes the
switch-selectable clock generation possibilities.
Table 16. SYSCLK Frequency Options
cfg_sysclk Selected SYSCLK Actual SYSCLK Error ICS307 Control Word Notes
0 0 0 66.666 MHz 66.6660 MHz 0 ppm 0x270501 —
0 0 1 75.000 MHz 74.999 MHz 10 ppm 0x230984 —
0 1 0 83.333 MHz 83.3325 MHz 6 ppm 0x230381 —
0 1 1 90.000 MHz 89.999 MHz 10 ppm 0x230983 —
1 0 0 100.000 MHz 99.9990 MHz 10 ppm 0x230501 —
1 0 1 111.000 MHz 111.110 MHz 9 ppm 0x260381 —
1 1 0 125.000 MHz 124.998 MHz 10 ppm 0x210382 —
1 1 1 133.333 MHz 133.332 MHz 7.5 ppm 0x210201 —
Table 16 is based upon a 33.333-MHz reference clock input. The “Control Word” field is the data sent to
the ICS307 upon startup, or when commanded to by the VELA controller. This value can be calculated
from the ICS307 data sheet examples, or using the convenient online calculator IDT provides. In the cases
above, whenever different values are calculated for frequency accuracy vs. lowest-jitter, the lowest-jitter
parameter was chosen.
5.5 System Reset
The P4080DS ngPIXIS contains a reset sequencer used to properly manage the orderly bring-up of the
system (this is not the s a me as t he power sequenc e r, which is similar, but not specifically rela ted to reset).
Once the system has transitioned to having fully stable power supplies, the reset sequencer waits for all
reset conditions to clear, configures and releases the processor from reset, then idles waiting for further
reset conditions to occur. This table summarizes reset conditions and actions.
Table 17. Reset Terms
Term Type Description Notes
HOT_RST_B External HOT power stable Restarts all ngPIXIS internal state machines and registers
PWRGD External ATX power stable Causesfull system reset unless the system is in S3 (power
down) state.
COP_HRST_B External COP tool reset request Triggers reset, but must never cause CPU_TRST_B to be
asserted
P4080 Development System User’s Guide, Rev. 0
Freescale Semiconductor 39
Page 40

Configuration
P4080
CONFIG_PIN
ngPIXIS
ENx.y
SWx.y
where needed
OVDD
CFGDRV
SW1
EN1
SW2
EN2
...
EEPROM
Table 17. Reset Terms (continued)
Term Type Description Notes
RESET_REQ_B External CPU requests reset Full reset
tgtrst_b Internal Reset request from OCM software Causes full reset always
rstall Internal PX_RST register write Full reset
go Internal ngPIXIS shmoo logic restart request Causes full reset except:
PX_AUX registers are not changed.
wdtrst_b Internal Watchdog timer expired Causes full restart including shmoo changes, if any
6 Configuration
The configuration options are categorized by the following:
• Requiring software configuration to support evaluation
• Expected to be easily and often changed by the end-user/developer
• Should rarely or never be changed
The first two options are implemented with “DIP switches” and/or software-settable options, while the
latter set are usually implemented by resistors that must be added or removed by competent technicians.
This figure shows the configuration logic for those signals configured using switches.
Figure 25. Configuration Logic
The default action is for the ngPIXIS to transfer the switch setting to the processor configuration pin during
the HRESET assertion interval.
In addition, software running on the P4080 can ini tialize internal registers (such as SWx and ENx) to allow
a board to configure itself for the next restart (te rmed “se lf-shmoo” or “se lf-char act er izat ion”) .
A third option allows the ngPIXIS to copy configuration data from an external I2C EEPROM upon reset,
and apply those values to the SWx/ENx registers (ignoring the external hardware switches). This allows
dispensing with the expensive DIP switches and their corresponding difficulties with set-up and
configuration preservation.
40 Freescale Semiconductor
P4080 Development System User’s Guide, Rev. 0
Page 41

Configuration
6.1 Configuration Options
The P4080DS uses the OCM function in the ngPIXIS to control how the board is configured as part of the
normal power-up sequence. The OCM monitors a two-position switch, which allows selecting one of the
configuration modes shown in this table.
Table 18. P4080DS Configuration Options
SW_CFGOPT(0:1)
00 Bypass Switch settings control all system configurations.
01 n/a —
10 Memory If VCTL=1 (self-shmoo is in process), no changes are made; otherwise, Pixis SW/EN
11 Interactive Same as “Memory” mode, except that during startup, the OCM pauses and allows the user
Configuration
Mode
No software in the OCM is executed. The following functions are NOT available:
• Real-time PVT data collection
• VCORE voltage changes
registers are loaded from external EEPROM, and for every bit in a control all system
settings, For every bit in an enable register that is set to one, the corresponding bit in a
switch register is driven onto the board during HRESET.
to alter and optionally re-write the memory with new configuration settings with a UART
connected to COM1.
If no IO is received within 20 seconds, IO is stopped and “Memory” mode is used.
6.1.1 Configuration Modes
This section describes the various configuration modes.
6.1.1.1 Bypass
Description
In bypass configuration mode, the GMSA processor is kept in reset, so no OCM software runs. No switch
settings can be changed; whatever is selected on the configuration switches is used during the
HRESETconf iguration sampling interval.
It is also possible for the system to change its own configuration registers and initiate a software-controlled
restart (“self-shmooing”), just as with previous platforms.
This mode is backwards-compatible with previous generation platforms.
6.1.1.2 Memory
In memory configurati on mode, the ngPI XIS registers are initialized as in Section 6.1.1.1, “Bypass.” If the
system is not in self-shmoo mode, the OCM loads values from the SW(1:8) and EN(1:8) r egisters from the
2
C-based EEPROM storage at device address 0x55. This device is isolated and powered from the standby
I
power supply and is available even before the system has been powered up.
P4080 Development System User’s Guide, Rev. 0
Freescale Semiconductor 41
Page 42

Configuration
The OCM transfers data from the EEPROM into the ngPIXIS SW/EN registers, as shown in this table.
Table 19. OCM Configuration Data Format
I2C EEPROM
Description
Source Addresses Destination Address
0x00 – 0x03 EEPROM header —
0x08 Set Selection
bit 3=1: Use VCORE value
bit 3=1: Do not use VCORE
bit 0(lsb)=0: Use Set A
bit 0(lsb)=1: Use Set B
0x20..0x3F Set A:
SW1, EN1
SW2, EN2
SW3, EN3
SW4, EN4
SW5, EN5
SW6, EN6
SW7, EN7
SW8, EN8
0x40..0x5F Set B:
SW1, EN1
SW2, EN2
SW3, EN3
SW4, EN4
SW5, EN5
SW6, EN6
SW7, EN7
SW8, EN8
ngPIXIS Register
—
SW(x) EN(x)
20 21
22 23
24 25
26 27
28 29
2A 2B
2C 2D
2E 2F
SW(x) EN(x)
40 41
42 43
44 45
46 47
48 49
4A 4B
4C 4D
4E 4F
0x70, 0x71 VCORE output code (if enabled) PMBus output code (MSB first)
0xA0, 0xA1 ngPIXIS register edits.
Ends on values of 0x00 or 0xFF
Address, then Data
The OCM examines the LSB of byte 0x08, and transfers either “Set A” (LSB = 0) or “Set B” (LSB = 1).
In all cases, when the registers have been loaded during reset configuration, wherever an EN register has
a bit set to “1”, the corresponding bit in a “SW” register is used to replace the s elected switch setting. For
example, if all EN(1:8) registers are set to all ones, no external switch settings is used, so the system is
purely EEPROM-configured. T his allows a s ys tem c os t reduction by eliminating all but one of the (fairly
expensive) DIP switches. Conversely, if all EN(1:8) registers are set to all zeros, the register settings are
unchanged and the external switch settings are used.
During memory configuration mode, the OCM is still running code. The target system may communicate
with it via message passing; see Section 5.2.8, “OCM,” for details.
6.1.1.3 Interactive
In interactive configuration mode, the OCM prints a message to the COM1 serial port (1 15200, 8/N/1) and
waits up to 20 seconds for a keypress. During this time, if the system is powered up, it pauses until this
P4080 Development System User’s Guide, Rev. 0
42 Freescale Semiconductor
Page 43

Configuration
delay has completed. If no character is received, the OCM mode falls back to memory configuration mode.
Otherwise, while the system is still prevented from powering up, commands are accepted over the serial
port, allowing SW/EN registers to be edited in memory. When the user has completed any configuration
commands, the “GO” command allows the normal power-up sequence to proceed.
6.1.2 Configuration Switches
The SW registers are formatted as shown in this table.
Table 20. Configuration Switches Format
DIP Switch Label12345678
ngPIXIS Register Bit
(Power Arch. “big endian” format)
01234567
Switch names exactly match the name on the schematics and on the printed-circuit board in most cases,
except where a spare has been newly assigned and only an FPGA has changed. See the P4080DS
Configuration Sheet, which helps configure the system to a default configuation and has more detail as to
the functionality of the thes e switches . I t is als o the mos t up-to- da te doc umen t f or a ny addition or change
in features before Appendix A, “ References,” is updated. This table summarizes the switches.
Table 21. Configuration Switches
Group Switches Configuration Signals Class
SW1 (1–5) cfg_rcw_src[0:4] Dynamic
(6) cfg_dram_type
(7) cfg_rsp_dis
(8) cfg_elbc_ecc
SW2 1 cfg_eng_use[0] Dynamic
2 cfg_eng_use[1]
3 cfg_eng_use[2]
4 cfg_eng_use[3]
5 cfg_eng_use[4]
6 cfg_eng_use[5]
7 cfg_eng_use[6]
8 cfg_eng_use[7]
SW3 1 sd1_refspread Static
2 sd1_refclksel
3 sd2_refclksel
4 sd3_refclksel
5n/a —
(6–8) sysclk[0:2] Static
P4080 Development System User’s Guide, Rev. 0
Freescale Semiconductor 43
Page 44

Configuration
Table 21. Configuration Switches (continued)
Group Switches Configuration Signals Class
SW4 1 cfg_gpinput0 Dynamic
2 cfg_gpinput1
(3–5) cfg_svr[0:1]+cfg_testsel_b
6n/a —
7n/a —
8 i2c1_proc_iso Static
SW5 (1–8) spares —
SW6 (1–2) vdd_pl[0:1] Static
(3–4) vdd_ca[0:1]
(5–6) vdd_cb[0:1]
7 vdd_cb_en
8 vdd_povdd_en
SW7 (1–4) lbmap[0:3] Static
5spare6 —
6spare7 —
7spare8 —
8 rstreq_en Static
SW8 1 spare1 —
2 i2c_rcw_wp Static
3 flash_wp_b
4 id_wp
5 aurora_clk_en
6 povdd_cntl
7 rstreq_mode Static
8 legacy_pod_b —
SW9 1 cfg_pixisopt[0] Static
2 cfg_pixisopt[1]
3iplwp
4cfgwp
5rp_cntrl
6spare5 —
(7–8) cfg_cfgopt[0:1] Static
P4080 Development System User’s Guide, Rev. 0
44 Freescale Semiconductor
Page 45

Programming Model
Table 21. Configuration Switches (continued)
Group Switches Configuration Signals Class
SW10 (1–2) zl_ca_v_sel[1:0] Static
(3–4) zl_cb_v_sel[1:0]
(5–6) zl_pl_v_sel[1:0]
7n/a —
8n/a —
“Dynamic” are those configuration pins that are only asserted during HRESET (these are also
processor-only configuration pins), while “Static” configuration pins remain constant as long as the system
power is operational.
7 Programming Model
This section covers general programming information to help guide the writing of board support packages.
7.1 ngPIXIS Registers
The ngPIXIS device contains several software accessible registers that are accessed from the base address
programmed for LCS3 (see Section 5.1.5, “Local Bus”). This table shows the register map of the ngPIXIS
device.
Table 22. ngPIXIS Register Map
Base Address Offset Register Access Reset Section/Page
0x00 PX_ID—System ID register R 0x17 7.1.1/46
0x01 PX_ARCH—System architecture version register R 0x01 7.1.2/46
0x02 PX_SCVER—ngPIXIS version register R 0x02 7.1.3/47
0x03 PX_CSR—General control/status register R/W All zeros 7.1.4/48
0x04 PX_RST—Reset control register R/W All zeros 7.1.5/48
0x05 Reserved — — —
0x06 PX_AUX—Auxiliary register R/W All zeros 7.1.6/49
0x07 PX_SPD—Speed register R All zeros 7.1.7/50
0x08 PX_BRDCFG0—Board Configuration register 0 R/W 0x11 7.1.8/50
0x0A PX_ADDR—SRAM Address Register R/W All zeros 7.1.9/51
0x0B–0x0C Reserved — — —
0x0D PX_DATA—SRAM Data Register R/W Undefined 7.1.10/51
0x0E PX_LED—LED Data Register R/W All zeros 7.1.11/52
0x0F Reserved — — —
0x10 PX_VCTL—VELA Control Register R/W All zeros 7.1.12/52
P4080 Development System User’s Guide, Rev. 0
Freescale Semiconductor 45
Page 46

Programming Model
Table 22. ngPIXIS Register Map (continued)
Base Address Offset Register Access Reset Section/Page
0x11 PX_VSTAT—VELA Status Register R All zeros 7.1.13/53
0x13 Reserved — — —
0x14 PX_OCMCSR—OCMCSR Register R/W All zeros 7.1.14/53
0x15 PX_OCMMSG—OCMMSG Register R/W All zeros 7.1.15/54
0x16 PX_GMDBG—GMDBG Register R/W All zeros 7.1.16/55
0x17–0x18 Reserved — — —
0x19 PX_SCLK0—SCLK0 Register R/W varies 7.1.17/55
0x1A PX_SCLK1—SCLK1 Register R/W Varies 7.1.17/55
0x1B PX_SCLK2—SCLK2 Register R/W Varies 7.1.17/55
0x1F PX_WATCH—WATCH Register R/W 0x7F 7.1.18/55
0x20, 0x22, ... PX_SW(1:8)—SW(1:8) Registers R/W All zeros 7.1.19/57
0x21, 0x23, ... PX_EN(1:8)—EN(1:8) Registers R/W All zeros 7.1.20/57
7.1.1 ID Register (PX_ID)
The ID register (PX_ID) contains a unique classif ica tion number; this ID number is used by software to
uniquely identify development boards. The ID number does not change for any P4080DS revision.
Offset 23 (0x17) Access: Read only
0 7
R ID
W
Reset All zeros
Figure 26. ID Register (PX_ID)
Table 23. PX_ID Field Descriptions
Bits Name Description
0–7 ID Board identification
7.1.2 Architectural Version Register (PX_ARCH)
The architectural version register (PX_ARCH) contains the architectural revision of the P4080DS board.
This register only changes when significant (that is, software-visible and softwa re-impacting) changes to
the board have occurred; examples are replacing a component with a slot or eliminating a “backup” device.
Conversely , changing Flash manufacturers, for example, would not be considered an architectural change,
because a CFI-compliant Flash programmer should be able to handle such a change.
P4080 Development System User’s Guide, Rev. 0
46 Freescale Semiconductor
Page 47

Programming Model
Offset 0x00 Access: Read only
0 7
R VER
W
Reset All zeros
Figure 27. Architectural Version Register (PX_ARCH)
Table 24. PX_ARCH Field Descriptions
Bits Name Description
0–7 VER Version number:
%00000001 : Version 1
%00000010 : Version 2
And so on
7.1.3 System Control FPGA Version Register (PX_SCVER)
The system control FPGA version register (PX_SCVER) contains the major and minor revision
information of the ngPIXIS system controller FPGA.
This register changes as features are added/updated within the FPGA, and is incremented as FPGA images
are distributed. Because the FPGA image is (generally) designed to work on one or more board versions,
there is no correlation between the two.
Offset 0x01 Access: Read only
0 7
R VER
W
Reset00000010
Figure 28. Version Register (PX_SCVER)
Table 25. PX_SCVER Field Descriptions
Bits Name Description
0–7 VER Version number:
%00000001 : Version 1
%00000010 : Version 2
And so on
P4080 Development System User’s Guide, Rev. 0
Freescale Semiconductor 47
Page 48

Programming Model
7.1.4 General Control/Status Register (PX_CSR)
The general control/status register (PX_CSR) contains various control and status fields, as described
below.
Offset 0x03 Access: Read/Write
023567
R
W
Reset 0
Bits Name Description
EVESRC EVEDEST LED FAIL
nnn
0000
Figure 29. General Control/Status Register (PX_CSR)
Table 26. PX_CSR Field Descriptions
0–2 EVESRC Selects one of several inputs for mapping to internal signal
special outputs (see PIX_CSR[EVEDEST]).
000 esig <- event_b
001 esig <- trig_out
010 esig <- evt_b(2)
011 esig <- evt_b(3)
111 esig <- chkstpi_b
3–5 EVEDEST Selects the output pin to which the internal signal
001 esig -> trig_in
010 esig -> evt_b(7)
011 esig -> evt_b(8)
100 esig -> evt_b(9)
6 LED If set, the diagnostic LEDs are driven by the value in the PX_LED register; otherwise, the LEDs
default to activity monitors
7 FAIL If set, the external LED labeled “FAIL” is turned on and the one labeled “PASS” is off; otherwise, if
cleared, the opposite is true.
esig
esig
, which in turn may be connected to
is driven (see PIX_CSR[EVESRC] for details).
7.1.5 Reset Control Register (PX_RST)
The reset control register (PX_RST) may be used to reset the system, or portions of it.
Offset 0x04 Access: Read/Write
01 34567
R
W
Reset All ones
ALL — SXSLOT PHY — GEN
Figure 30. Reset Control Register (PX_RST)
P4080 Development System User’s Guide, Rev. 0
48 Freescale Semiconductor
Page 49

Programming Model
Table 27. PX_RST Field Descriptions
Bits Name Description
0 ALL Allows the entire system to be reset.
0 A full system reset is initiated.
1 Normal operation.
1–3 — Reserved
4 SXSLOT Allows reset of any board installed in the SGMII/XAUI riser card slot.
0 SXSLOT_RST_B is asserted.
1 SXSLOT_RST_B is deasserted.
5 PHY Allows reset of the 10/100/1G Ethernet PHY.
0 PHY_RST_B is asserted.
1 PHY_RST_B is deasserted
6—Reserved
7 GEN Allows reset of miscellaneous board features (refer to schematics or documentation for details).
0 GEN_RST_B is asserted.
1 GEN_RST_B is deasserted
NOTE
PX_RST register bits are not self-resetting. PX_RST[ALL] is reset only as
a side effect of triggering a full system reset. The other bits must be cleared
with software.
NOTE
These register-based resets are merged with others internal resets , such as
those of the VELA sequencer. Setting these bits while a VELA
configuration cycle is active may have unpredictable results.
7.1.6 Auxiliary Register (PX_AUX)
The auxiliary register (PX_AUX) is a general-purpose read/write register. It reset upon initial power
activation, or by chassis reset sources; PX_AUX preserves its value between Aurora-, COP- or
watchdog-initiated resets.
Offset 0x06 Access: Read/Write
0 7
R
W
Reset All zeros
Figure 31. Auxiliary Register (PX_AUX)
Table 28. PX_AUX Field Descriptions
Bits Name Description
USER
0–7 USER User-defined
P4080 Development System User’s Guide, Rev. 0
Freescale Semiconductor 49
Page 50

Programming Model
7.1.7 Speed Status Register (PX_SPD)
The speed status register (PX_SPD) is used to communicate the current switch-selectable settings for the
SYSCLK clock generator, one of eight preset values. This register is typically needed for software to be
able to accurately initialize timing-dependent parameters, such as those for local bus, DDR memory, I2C
clock rates, and more.
Offset 0x07 Access: Read only
0457
R
W
Reset00000
—
Figure 32. Speed Status Register (PX_SPD)
Table 29. PX_SPD Field Descriptions
Bits Name Description
0–4 — Reserved
5–7 SYSCLK Reflects switch settings as described in Table 16.
nnn
SYSCLK
7.1.8 Board Configuration Register (PX_BRDCFG0)
The board configuration register (PX_BRDCFG0) controls the board configuration. Unlike other
configuration settings, those controlled by this register may be changed at any time.
Offset 0x08 Access: Read/Write
01234567
R
W
Reset00010001
Figure 33. Board Configuration Register 0 (PX_BRDCFG0)
Bits Name Description
0–1 — Reserved
2 NGI2C_ACC Controls the whether the system may access the private I
0 The system cannot access those devices.
1 The system may access those devices.
3—Reserved
4 PJWP_B Controls whether the PromJET may be written to or not.
0 The PromJet cannot be written to.
1 The PromJet may be written to.
NGI2C_ACC PJWP_B — SD8X
Table 30. PX_BRDCFG0 Field Descriptions
2
C devices owned by the ngPIXIS device.
P4080 Development System User’s Guide, Rev. 0
50 Freescale Semiconductor
Page 51

Programming Model
Table 30. PX_BRDCFG0 Field Descriptions (continued)
Bits Name Description
5–6 — Reserved
7 SD8X 0 P4080 SPI_CS(0:3)_B pins are used as SDHC data bits 4:7 for SDHC-8bit mode. SPI CS_B pins are
pulled high.
1 P4080 SPI_CS(0:3)_B pins are used with the SPI controller. SDHC data bits 4:7 are pulled high and
only SDHC 4-bit mode is used.
7.1.9 SRAM Address Register (PX_ADDR)
The SRAM address register (PX_ADDR) is a general-purpose register that is used to index an internal
256-byte SRAM array . Though reset upon init ial power activation or by chassis reset sources, PX_ADDR
preserves its value between COP- or watchdog-initiated resets.
Offset 0x0A Access: Read/Write
0 7
R
W
Reset All zeros
ADDR
Figure 34. SRAM Address Register (PX_ADDR)
Table 31. PX_ADDR Field Descriptions
Bits Name Description
0–7 ADDR Address of SRAM array to which PX_DATA reads/writes.
NOTE
Writing PX_ADDR and reading/write PX_DATA is non-atomic. Care
should be exercised when sharing SRAM between processors and/or the
ngPIXIS GMSA core.
7.1.10 Data Register (PX_DATA)
The data register (PX_DATA) is a general-purpose register that is used to read or write to an internal
256-byte SRAM array . Though reset upon initial power activation or by chassis reset sources, PX_DA TA
preserves its value between COP- or watchdog-initiated resets.
Offset 0x0D Access: Read/Write
0 7
R
W
Reset All zeros
DATA
Figure 35. Data Register (PX_DATA)
P4080 Development System User’s Guide, Rev. 0
Freescale Semiconductor 51
Page 52

Programming Model
Table 32. PX_DATA Field Descriptions
Bits Name Description
0–7 DATA Contents of SRAM array as indexed by PX_ADDR
7.1.11 LED Data Register (PX_LED)
The LED data register (PX_LED) can be used to directly control the monitoring LEDs (for software
message purposes, as an example). Direct control of the LEDs is possible only when PX_CSR[LED] is set
to 1.
Offset 0x0E Access: Read/Write
0 7
R
W
Reset All zeros
Figure 36. LED Data Register (PX_LED)
Table 33. PX_LED Field Descriptions
LED
Bits Name Description
0–7 LED Corresponding values for monitoring LEDs L0–L7.
0 Does not illuminate the LED
1 Illuminates the LED
7.1.12 VELA Control Register (PX_VCTL)
The VELA control register (PX_VCTL) may be used to start and control the configuration reset sequencer
as well as other configuration/test-related features.
Offset 0x10 Access: Read/Write
0 34567
R
W
Reset All zeros
Bits Name Description
0–3 — Reserved
— WDEN — PWROFF GO
Figure 37. VELA Control Register (PX_VCTL)
Table 34. PX_VCTL Field Descriptions
4 WDEN Watchdog enable
0 Watchdog disabled
1 Watchdog enabled. If not disabled with 2^29 clock cycles (> 5 minutes at 30-ns clock), the system is
reset.
Note: This is not a highly secure watchdog; software can reset this bit at any time, disabling the
watchdog.
P4080 Development System User’s Guide, Rev. 0
52 Freescale Semiconductor
Page 53

Programming Model
Table 34. PX_VCTL Field Descriptions (continued)
Bits Name Description
5—Reserved
6 PWROFF Power off
0 Power is controlled as normal (by NVidia or by switch).
1 Power is forced off.
Note: Hardware must restore power; software cannot force power on.
Note: Note that the default value of PWROFF is zero, so that normal operations do not interfere with
the power switches. Setting PWROFF to 1 overrides any user- or APM-initiated power switch event.
7GOGo
0 The VELA sequencer remains idle.
1 The VELA sequencer starts.
Note: The sequencer halts after running until software resets GO to 0.
7.1.13 VELA Status Register (PX_VSTAT)
The VELA status register (PX_VSTAT ) may be used to monitor the configuration sequencer activity.
Offset 0x11 Access: Read only
0 67
R
W
Reset All zeros
—
BUSY
Figure 38. VELA Status Register (PX_VSTAT)
Table 35. PX_VSTAT Field Descriptions
Bits Name Description
0–6 — Reserved
7 BUSY 0 The VELA sequencer is idle.
1 The VELA sequencer is busy.
7.1.14 OCM Control/Status Register (PX_OCMCSR)
The OCM control/status register (PX_OCMCSR) is a general-purpose register used to communicate
between the P4080 and the FPGA GMSA processor.
Offset 0x14 Access: Read/Write
012 567
R
ACK U0 DBGSEL U1 MSG
W
Reset All zeros
Figure 39. OCM Control/Status Register (PX_OCMCSR)
P4080 Development System User’s Guide, Rev. 0
Freescale Semiconductor 53
Page 54

Programming Model
Table 36. PX_OCMCSR Field Descriptions
Bits Name Description
0 ACK 0 No acknowledgement is present.
1 OCM software signals that a message has been processed.
1 U0 Unassigned values
2–5 DBGSEL Selects information to provide in the GMDBG register.
6 U1 Unassigned values
7 MSG 0 No message is present.
1 Signals OCM software that a message is present.
Note: Field descriptions are enforced by software; it is possible to redefine the meanings by using different software in the
GMSA processor.
7.1.15 OCM Message Register (PX_OCMMSG)
The OCM message register (PX_OCMMSG) is a general-purpose register used to communicate between
the P4080 and the FPGA GMSA processor.
Offset 0x15 Access: Read/Write
0 7
R
W
Reset All zeros
MSGADDR
Figure 40. OCM Message Register (PX_OCMMSG)
Table 37. PX_OCMMSG Field Descriptions
Bits Name Description
0–7 ADDR Address within shared SRAM of a message to process
Note: The above definitions are enforced by software; it is possible to redefine the meanings by using different software
in the GMSA processor.
Note: The above definitions are enforced by software; it is possible to redefine the meanings by using
different software in the GMSA processor.
P4080 Development System User’s Guide, Rev. 0
54 Freescale Semiconductor
Page 55

Programming Model
7.1.16 GMSA Debug Register (PX_GMDBG)
The GMSA debug register (PX_GMDBG) allows access to information regarding the GMSA processor in
the ngPIXIS.
Offset 0x16 Access: Read/Write
0 7
R
W
Reset All zeros
Figure 41. GMSA Debug Register (PX_GMDBG)
Table 38. PX_GMDBG Field Descriptions
Bits Name Description
0–7 DATA Requested data, as selected by PX_OCMCSR[2:5]
0001 PC[7:0]
0010 PC[11:0]
0011 opcode
0100 status
0101 TOS
Other values are undefined.
DATA
7.1.17 SCLK[0:2] Registers (PX_SCLK[0:2])
The PX_SCLK[0:2] registers control the 24-bit configuration word of the ICS307 system clock generator.
Offset 0x19 (MSB)
0x1A (midbyte)
0x1B (LSB)
0 7
W
Reset
R
nnnnnnnn
WORD
Figure 42. SCLK[0:2] Register (PX_SCLK[0:2])
Table 39. PX_SCLK[0:2] Field Descriptions
Bits Name Description
0–7 WORD Read: Returns the current programmed values
Write: Values written to WORD are driven into the ICS307 during reset sequencing if
PX_VCFGEN0[SCLK]=1; otherwise, the encoded value of CFG_SYSCLK(0:2) is used.
Access: Read/Write
7.1.18 Watchdog Register (PX_WATCH)
The watchdog register (PX_WATCH) selects the appropriate watchdog timer event for the
VELA-controlled sequencer. Note that this watchdog works independently of any other watchdog timers,
such as those within the P4080.
P4080 Development System User’s Guide, Rev. 0
Freescale Semiconductor 55
Page 56

Programming Model
Offset 0x1F Access: Read/Write
0 7
R
W
Reset All ones
WVAL
Figure 43. Watchdog Register (PX_WATCH)
Table 40. PX_WATCH Field Descriptions
Bits Name Description
0–7 WVAL Read: Returns the current programmed values.
Write: Sets watchdog timer.
NOTE
The PX_WATCH register represents the 8 most significant bits of an
internal 34-bit watchdog timer. Any new value must be written before the
PX_VCTL[WDEN] bit is set to 1, and must be written after every reset of
this register (that is, it resets just like any other general register).
If the watchdog times out or any other reset/restart condition occurs (except
the PX_VCTL[GO] bit), then repeat the procudure.
Time formulae:
The base of the timer = 26 bits x 30 ns interval = 2.01326592 seconds.
Where the upper 8 bits represent (seconds) [(decimal value of the 8-bit field) x (2.01326592sec)] +
2.01326592sec
Some examples values for PX_W ATCH register values are shown in Table 41.
Table 41. Watchdog Timer Values
Timeout Value
Timeout
Binary Hex
11111111 0xFF 0.59 min
01111111 0x7F 4.29 min
00111111 0x3F 2.15min
00011111 0x1F 1.07 min
00001111 0x0F 32.1 sec
00000111 0x07 16.1 sec
00000011 0x03 8.05 sec
00000001 0x01 4.027 sec
00000000 0x00 2.013 sec
P4080 Development System User’s Guide, Rev. 0
56 Freescale Semiconductor
Page 57

Programming Model
7.1.19 Switch Registers (PX_SWx)
The switch registers (PX_SWx) are used to define configuration switch overrides. Each bit in each
PX_SWx register corresponds to a similarly named switch on the board. If a bit is 1, the switch is 1 and
vice-versa, provided the matching ENx bit is set.
Offset 0x20, 0x22, 0x24, ... Access: Read/Write
01234567
R
SWx #1 SWx #2 SWx #3 SWx #4 SWx #5 SWx #6 SWx #7 SWx #8
W
Reset All zeros
Figure 44. Switch Registers (PX_SWx)
x
Table 42. PX_SW
Bits Name Description
0–7 SWx #b Value to replace for switch SWx #b.
Note that SW registers do NOT reflect the contents of the physical switches.
Field Descriptions
7.1.20 Switch Enable Registers (PX_ENx)
The switch enable register (PX_ENx) control whether the corresponding bits of the corresponding
PX_SWx register are used or ignored.
Offset 0x21, 0x23, 0x25, ... Access: Read/Write
01234567
R
ENx #1 ENx #2 ENx #3 ENx #4 ENx #5 ENx #6 ENx #7 ENx #8
W
Reset All zeros
Figure 45. Switch Enable Register (PX_ENx)
x
Table 43. PX _ EN
Bits Name Description
0–7 ENx #b 0 External switch SWx #b controls the corresponding configuration pin; the system controller does
not affect the value.
1 Internal register SWx #b controls the corresponding configuration pin; the external switches do not
affect the value.
Field Descriptions
7.2 EEPROM Data
The SystemID EEPROM stores important data about the Expedition system, including the following:
• Board ID
• Errata level (as shipped)
• Manufacturing date
P4080 Development System User’s Guide, Rev. 0
Freescale Semiconductor 57
Page 58

Revision History
• Ethernet MAC address
This device is programmed at the factory and is write-protected. The contents of the data are described in
detail in application note The SystemID Format for Power Architecture® Development Systems (AN3638)
available at the freescale.com websit e.
8 Revision History
This table provides a revision history for this document.
Table 44. Document Revision History
Rev.
Number
0 07/2011 Initial public release
Date Substantive Change(s)
Appendix A References
This table lists useful reference documents.
Table A-1. Useful References
Topic Reference
System design
SoC programming
Switch configuration P4080DS Configuration Sheet
SystemID format
PromJet PromJet modules are flash memory emulators available from Emutec (www.emutec.com). Expedition
P4080 QorIQ Integrated Processor Hardware Specifications
P4080 QorIQ Integrated Multicore Communication Processor Family Reference Manual
The SystemID Format for Power Architecture™ Development Systems
uses the 16-bit wide devices (size is user-dependent). The “low-voltage” option for use on the 3.3 V local
bus.
(P4080EC)
(P4080RM)
(AN3638)
P4080 Development System User’s Guide, Rev. 0
58 Freescale Semiconductor
Page 59

How to Reach Us:
Home Page:
www.freescale.com
Web Support:
http://www.freescale.com/support
USA/Europe or Locations Not Listed:
Freescale Semiconductor, Inc.
Technical Information Center, EL516
2100 East Elliot Road
Tempe, Arizona 85284
1-800-521-6274 or
+1-480-768-2130
www.freescale.com/support
Europe, Middle East, and Africa:
Freescale Halbleiter Deutschland GmbH
Technical Information Center
Schatzbogen 7
81829 Muenchen, Germany
+44 1296 380 456 (English)
+46 8 52200080 (English)
+49 89 92103 559 (German)
+33 1 69 35 48 48 (French)
www.freescale.com/support
Japan:
Freescale Semiconductor Japan Ltd.
Headquarters
ARCO Tower 15F
1-8-1, Shimo-Meguro, Meguro-ku
Tokyo 153-0064
Japan
0120 191014 or
+81 3 5437 9125
support.japan@freescale.com
Asia/Pacific:
Freescale Semiconductor China Ltd.
Exchange Building 23F
No. 118 Jianguo Road
Chaoyang District
Beijing 100022
China
+86 10 5879 8000
support.asia@freescale.com
For Literature Requests Only:
Freescale Semiconductor
Literature Distr ibution Center
1-800 441-2447 or
+1-303-675-2140
Fax: +1-303-675-2150
LDCForFreescaleSemiconductor
@hibbertgroup.com
Information in this document is provided solely to enable system and software
implementers to use Freescale Semiconductor products. There are no express or
implied copyright licenses granted hereunder to design or fabricate any integrated
circuits or integrated circuits based on the information in this document.
Freescale Semiconductor reserves the right to make changes without further notice to
any products herein. Freescale Semiconductor makes no warranty, representation or
guarantee regarding the suitability of its products for any part icular purpose, nor does
Freescale Semiconductor assume any liability arising out of the application or use of
any product or circuit, and specifically disclaims any and all liability, including without
limitation consequential or incidental damages. “Typical” parameters which may be
provided in Freescale Semiconductor data sheets and/or specifications can and do
vary in different applications and actual performance may vary over time. All operating
parameters, including “Typicals” must be validated for each customer application by
customer’s technical experts. Freescale Semiconductor does not convey any license
under its patent rights nor the rights of others. Freescale Semiconductor products are
not designed, intended, or authorized for use as components in systems intended for
surgical implant into the body, or other applications intended to support or sustain life,
or for any other application in which the failure o f the Freescale Se miconductor product
could create a situation where personal injury or death may occur. Should Buyer
purchase or use Freescale Semiconductor products for any such unintended or
unauthorized application, Buyer shall indemnify and hold Freescale Semiconductor
and its officers, employees, subsidiaries, affiliates, and distributors harmless against all
claims, costs, damages, and expenses, and reasonable attor ney fees arising out of,
directly or indirectly, any claim of personal injury or death associated with such
unintended or unauthorized use, even if such claim alleges that Freescale
Semiconductor was negligent regarding the design or manufacture of the part.
Freescale, the Freescale logo, CodeWarrior, ColdFire, PowerQUICC,
QorIQ, StarCore, and Symphony are trademarks of Freescale
Semiconductor, Inc., Reg. U.S. Pat. & Tm. Off. CoreNet, QorIQ Qonverge,
QUICC Engine, and VortiQa are trademarks of Freescale Semiconductor,
Inc. All other product or service names are the property of their respective
owners. The Power Architecture and Power.org word marks and the Power
and Power.org logos and related marks are trademarks and service marks
licensed by Power.org.
© 2011 Freescale Semiconductor, Inc.
Document Number: P4080DSUG
Rev. 0
07/2010
Page 60

Mouser Electronics
Authorized Distributor
Click to View Pricing, Inventory, Delivery & Lifecycle Information:
NXP:
P4080DS-PC
 Loading...