

Page 1
AN12020
MPC574xR Clock Calculator Guide
How to use MPC574xR tool to easily calculate device frequency domains
Rev. 5 — October 2018
by: NXP Semiconductors
Contents
1 Introduction
NXP’s MPC574xR is a dual-core 32-bit microcontroller intended for scalable
engine control and powertrain applications. This application note will refer to
any device in the MPC574xR family, MPC5743R, MPC5745R, and MPC5746R,
as simply “MPC5746R.”
The MPC5746R supports an 8-40 MHz external oscillator (XOSC), a 16 MHz
internal RC oscillator (IRCOSC), and two phase locked loops (PLL) for a
maximum operating frequency of 200 MHz. The IRCOSC is selected out of
reset so increasing the operating frequency from 16 MHz requires additional
configuration. The MPC574xR Clock Calculator is meant to complement the
reference manual. It seeks to simplify the clock configuration process by providing a graphical, interactive tool to help the user
find the correct register settings in order to achieve the desired clock frequencies.
Accompanying this application note is the clock calculator. You can download it from MPC574xR_Clock_Calculator.
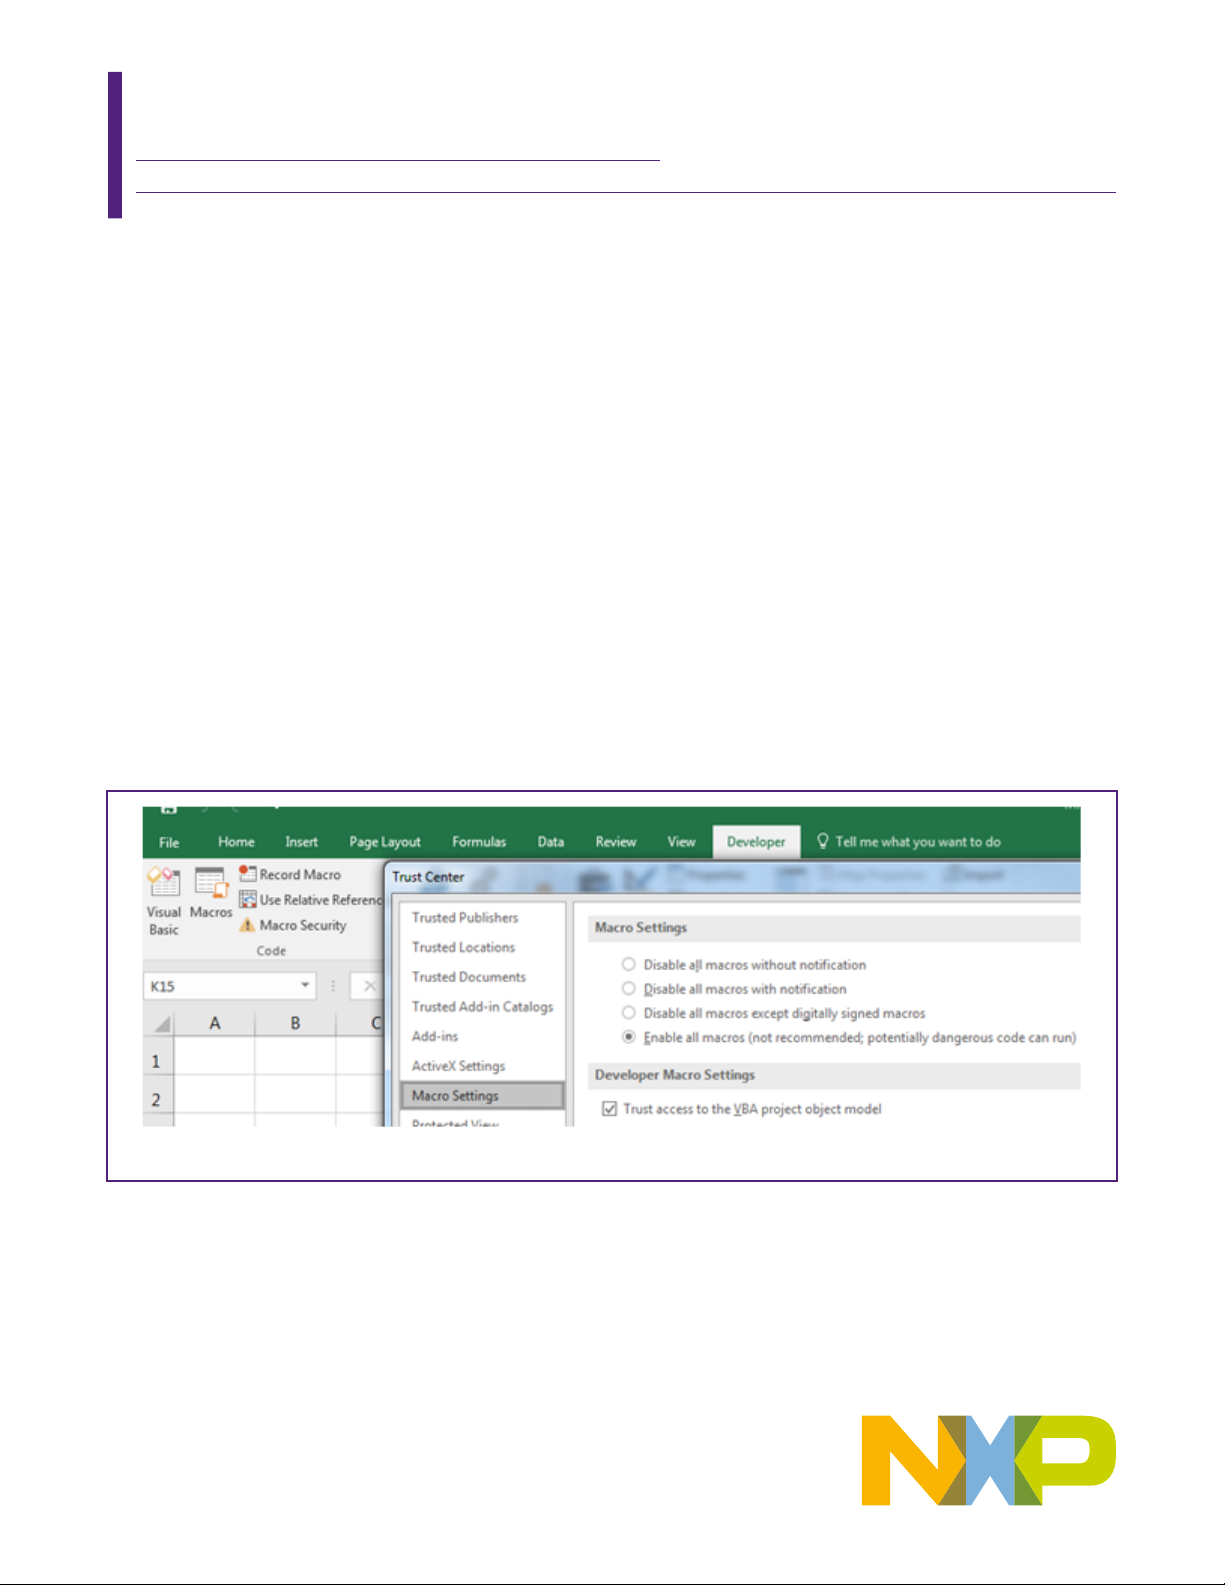
The clock calculator makes use of macros to perform functions like resetting the spreadsheet to initial values, configuring all clock
frequencies to the maximum allowable settings, and copying generated code. Macros must be enabled in the user’s MS Excel to
access these features. If macros are turned off, however, the tool will still be able to calculate clock frequencies, but the
aforementioned features will be disabled. To turn on macros in MS Excel 2016, go to the Developer tab on the top toolbar and
click on Macro Security. A popup window will appear, select Enable all macros.
1 Introduction..........................................1
2 Clock calculator design...................... 1
3 Clock tool example use sase:
Configure FlexCAN to XOSC at
40 MHz protocol clock and PLL0
50 MHz BIU/Module clock............... 14
4 Conclusion......................................... 26
5 Revision history.................................26
Application Note
Figure 1. Enable macros
2 Clock calculator design
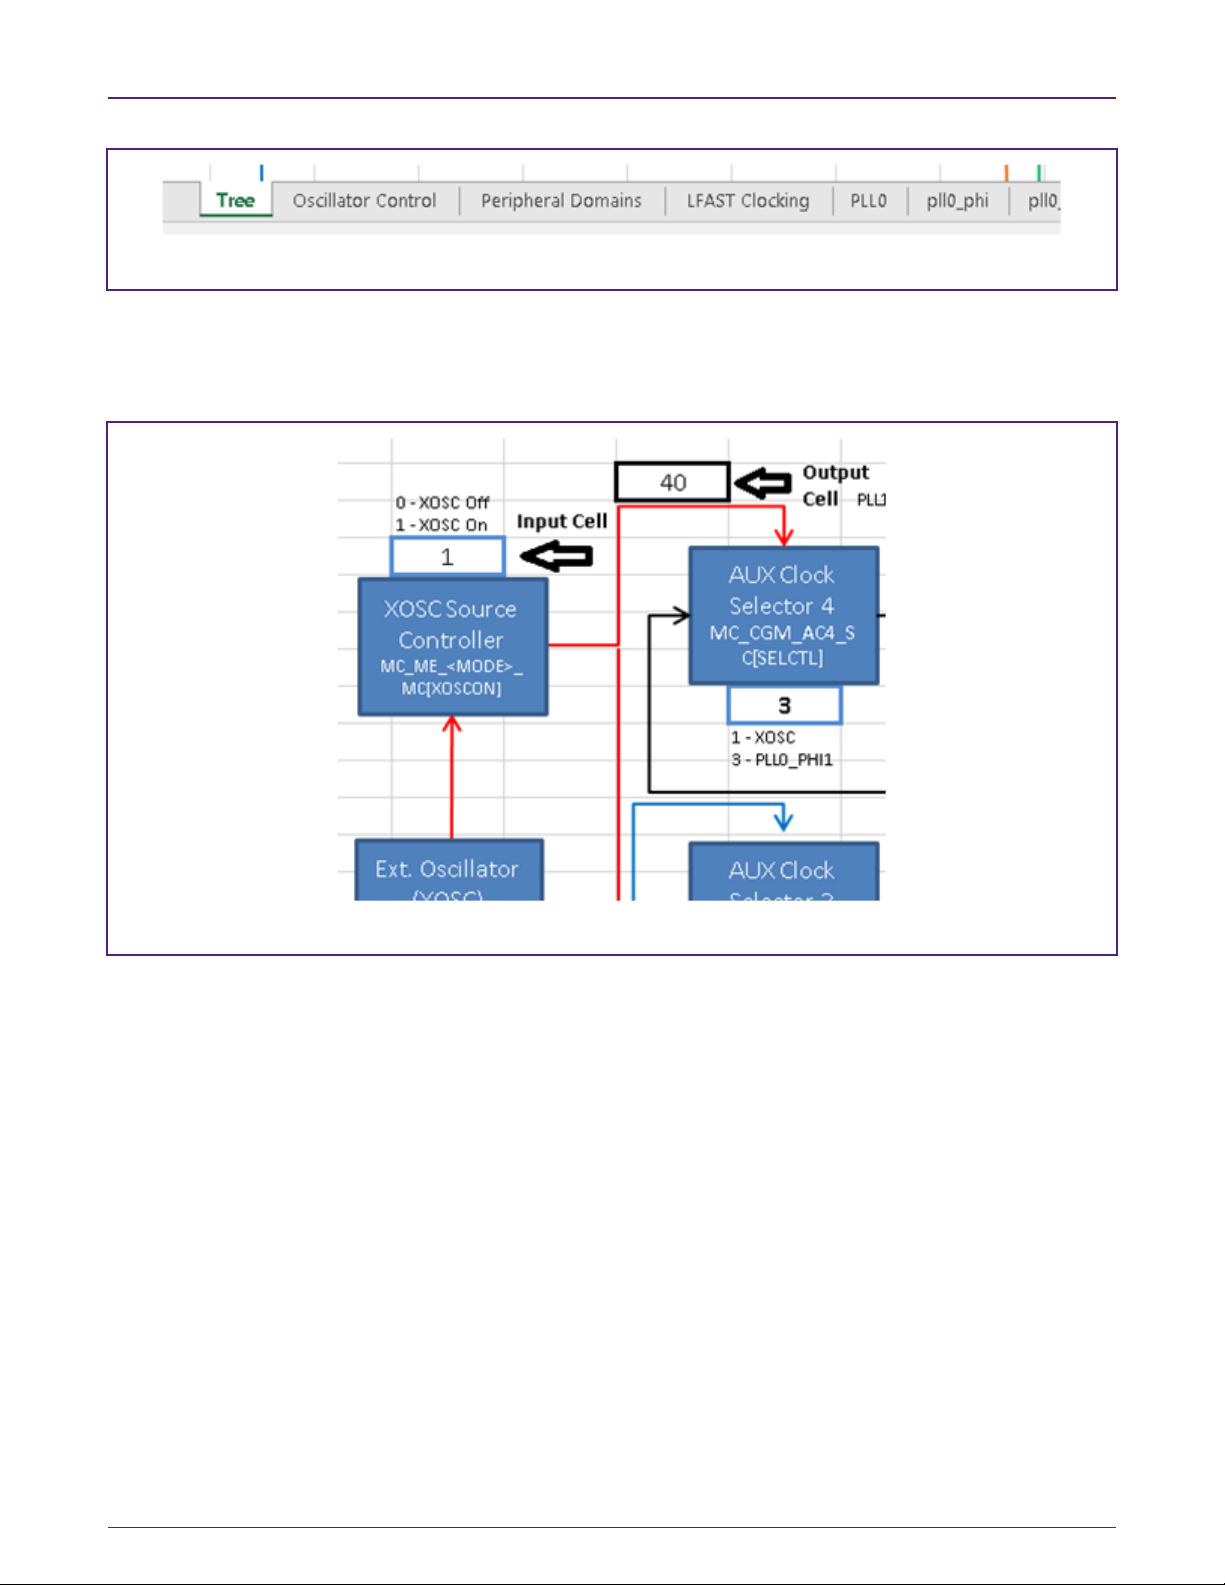
The MPC574xR clock calculator takes the form of an interactive Microsoft Excel spreadsheet organized into multiple tabs as shown
in the following figure.
Page 2
NXP Semiconductors
Clock calculator design
Figure 2. MPC574xR Clock calculator setup
Clock sources (e.g. oscillators and PLLs) propagate to the various clock domains from which the MCU modules take their clocks.
Most cells representing clock domain frequencies are not to be modified manually. The user is meant to enter frequencies to the
few select clock sources and all clock domain frequencies derive from these sources. Several clock domain inputs are meant to
be modified manually as they represent external clocks that are driven into a pin. There are also input cells that set muxes and
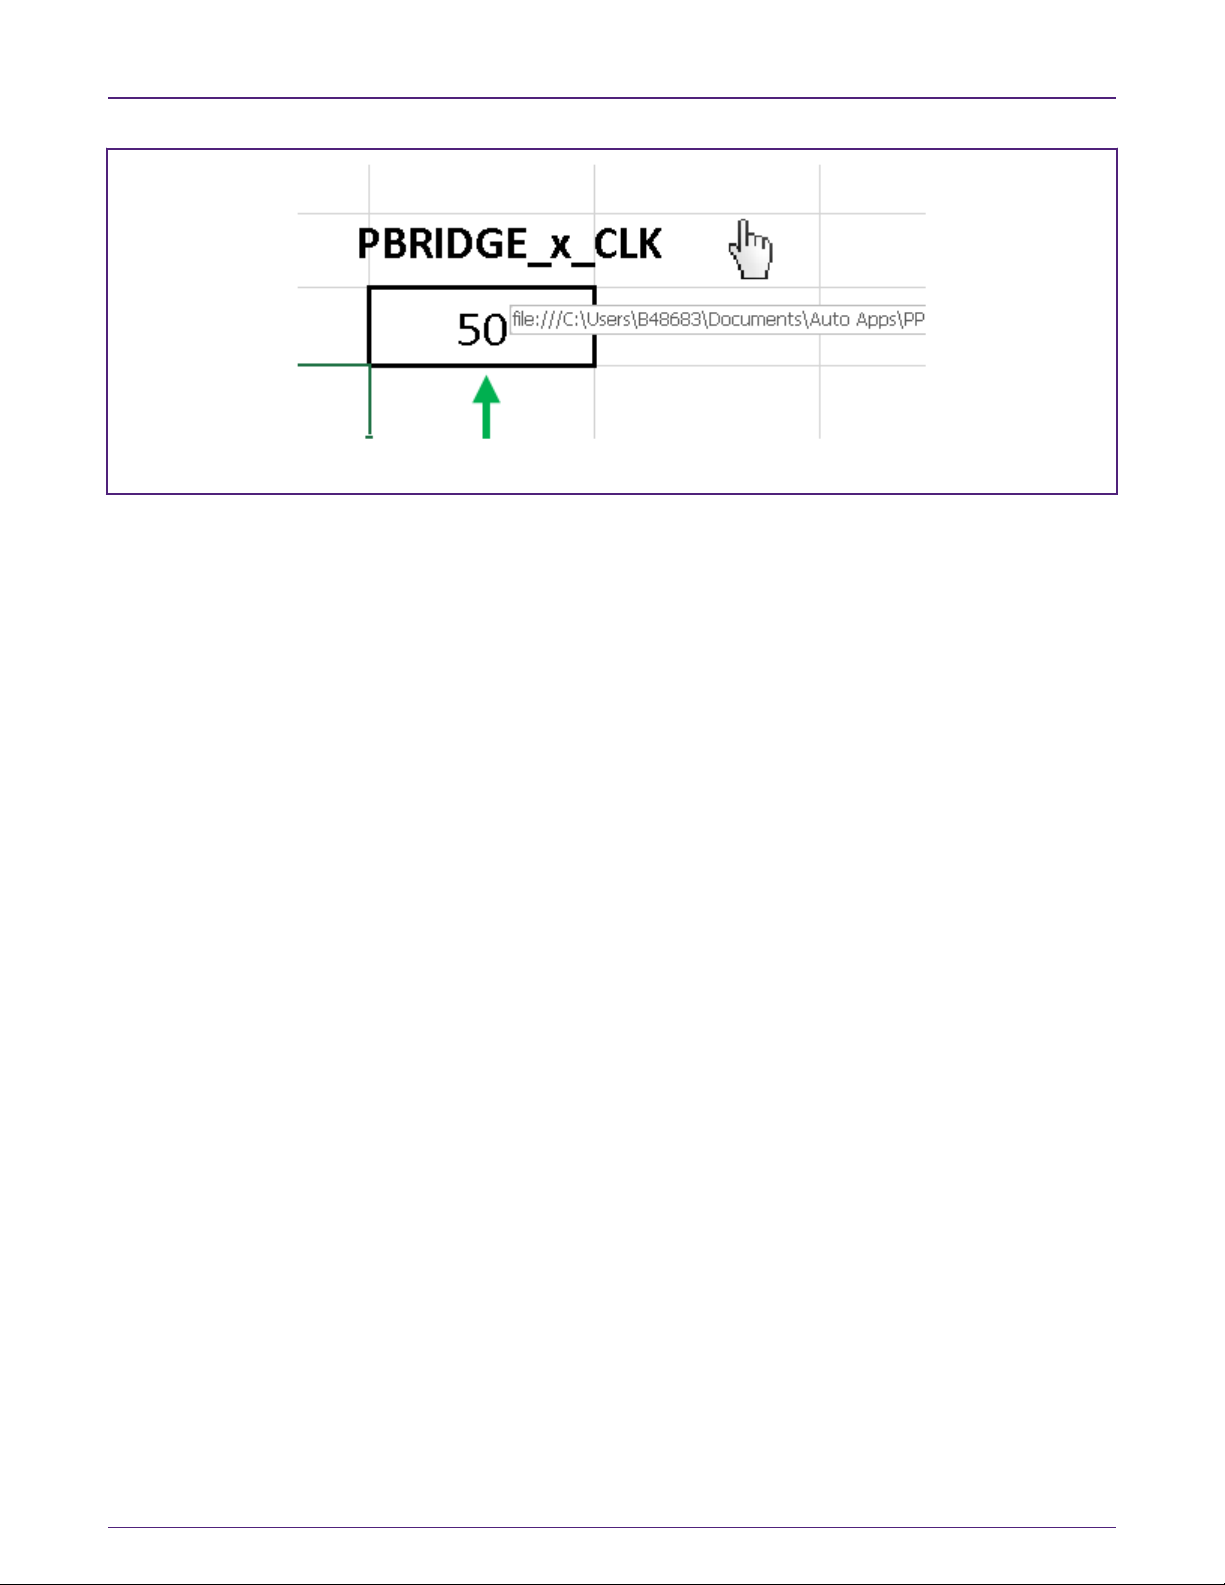
clock dividers. All cells that take entries have blue borders instead of black, as shown in the figure below.
Figure 3. Input cells vs. Output cells
There are limits to what frequencies can be entered to the input frequency cells. Values that are out of range will be rejected and
the user will receive an error message. Invalid clock domain frequencies that arise from valid input values and legal, but improper,
dividers will be shaded in red, as will be explained in greater depth later in this application note.
Frequency values are linked across tabs, so PER_CLK in the Tree tab will always be the same as PER_CLK in the Peripheral
Domains tab. Hyperlinks are provided to duplicate domain names to link back to their points of origin. For example, PER_CLK
originates in Tree. So clicking the PER_CLK textbox in Peripheral Domains will take the user to PER_CLK in Tree. Textboxes that
are links, when hovered over, will cause the mouse cursor to turn into a hand icon and a pop-up to appear, showing the address
of the destination, as shown in the following figure.
Application Note
MPC574xR Clock Calculator Guide, Rev. 5, October 2018
2 / 28
Page 3
NXP Semiconductors
Clock calculator design
Figure 4. Clicking on a link
The following subsections will explain in depth the purpose of each tab.
2.1
Tree
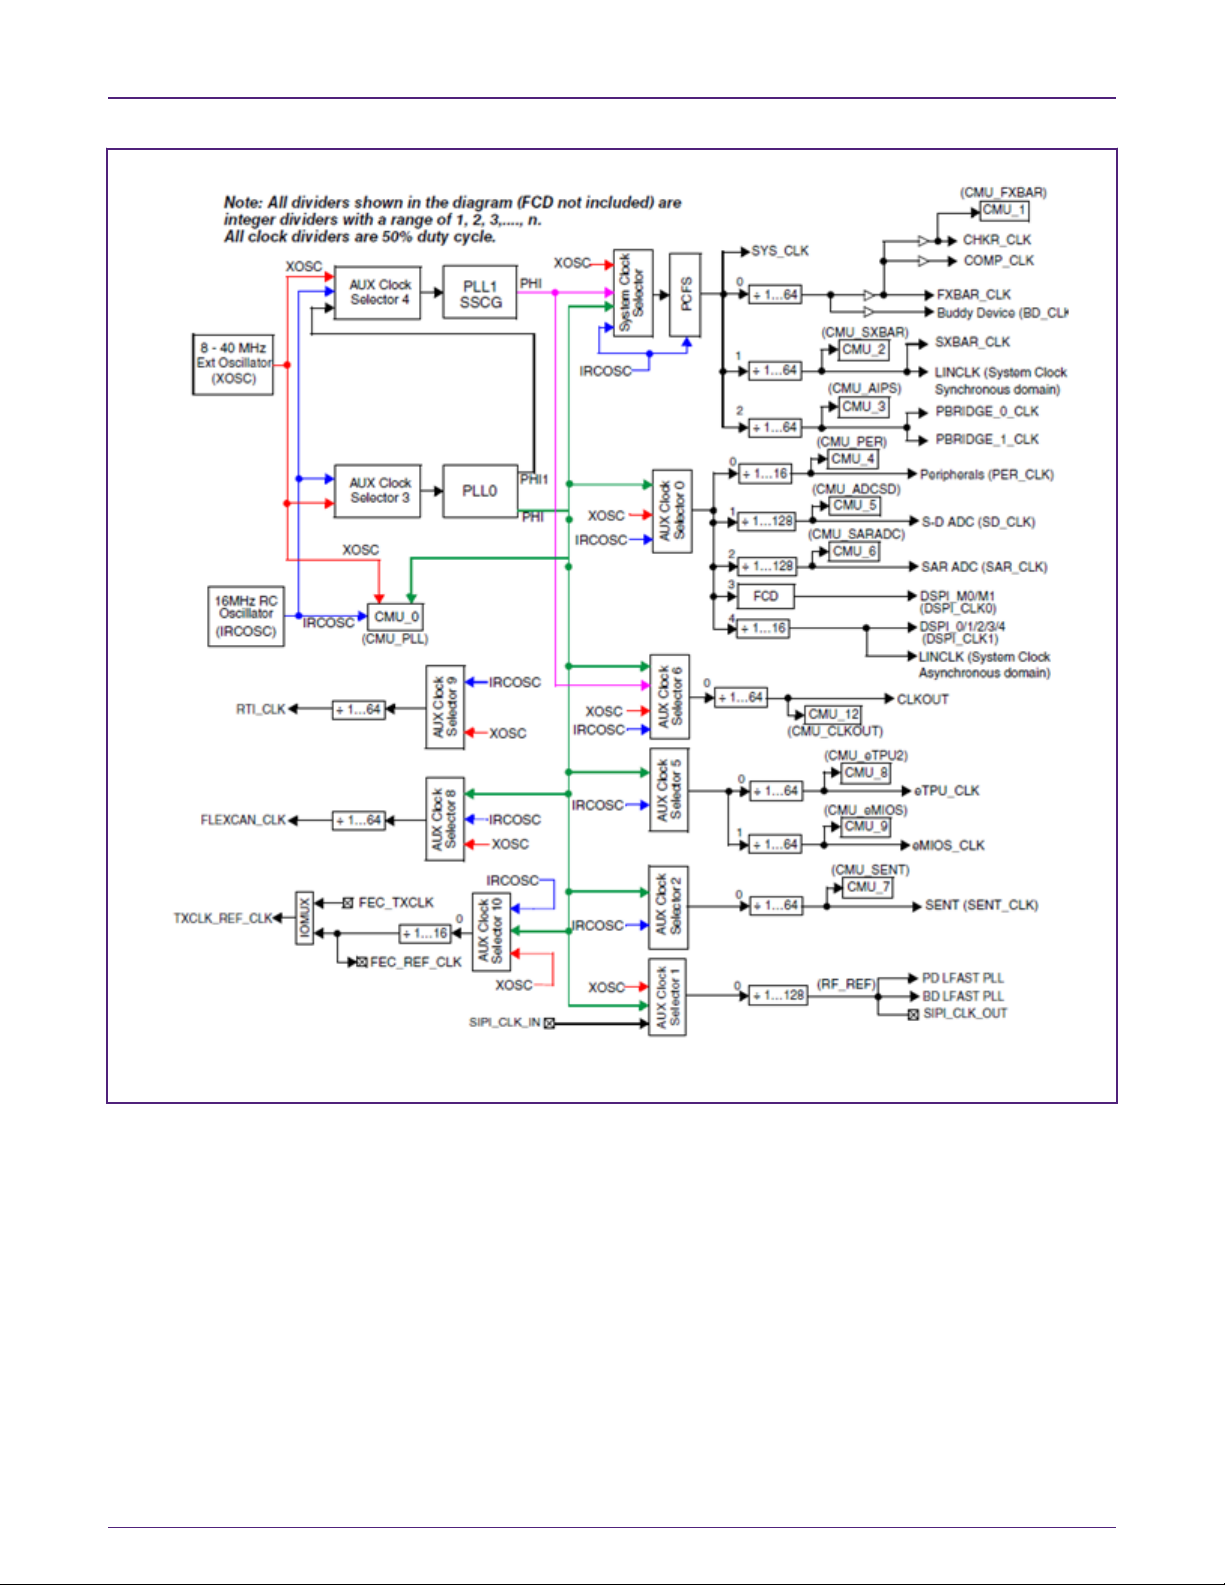
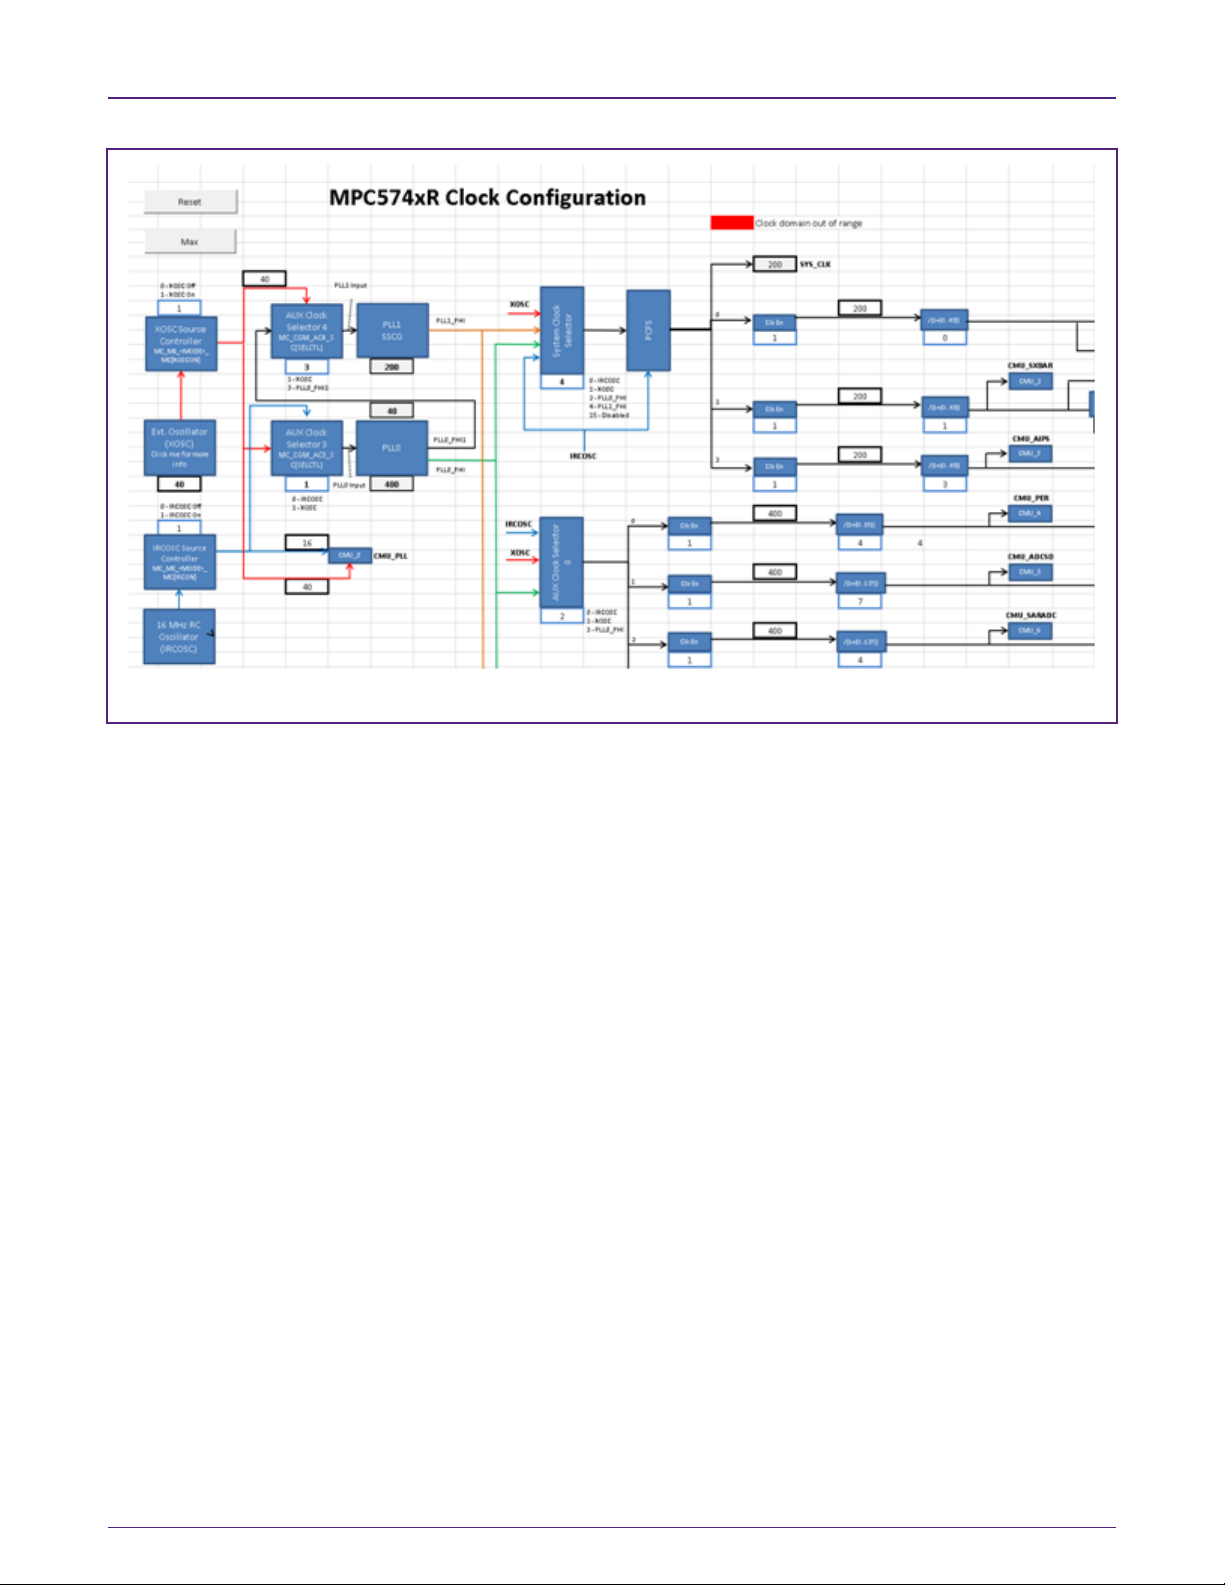
is the centerpiece of the tool. This tab is the starting point for all clock frequency calculations. It is organized to resemble the
Tree
MPC5746R clock tree as presented in the following figure.
Application Note
MPC574xR Clock Calculator Guide, Rev. 5, October 2018
3 / 28
Page 4
NXP Semiconductors
Clock calculator design
Figure 5. MPC5746R reference manual clock tree
The following figure shows, in part, the diagram’s clock tool counterpart. The difference between the two is that the latter is
interactive.
MPC574xR Clock Calculator Guide, Rev. 5, October 2018
Application Note
4 / 28
Page 5
NXP Semiconductors
Clock calculator design
Figure 6. Clock calculator tree
The flow of the diagram generally goes from left to right. On the left are the MPC5746R clock sources and on the right are the
clock domains. MCU modules run on one or more of these clock domains.
Clock domain frequency values are displayed in the outlined cells next to their labels. Most cells are not meant to be written to;
their values are dependent on the frequencies of preceding steps in the clock tree. Take PER_CLK, for example: its value is
sourced from either the IRCOSC, XOSC, or PLL0_PHI. Now look at the IRCOSC block. IRCOSC is at 16 MHz, but the frequency
that propagates depends on the next block, IRCOSC Source Controller. Therefore, the actual input frequency received by blocks
that take IRCOSC as a source is the IRCOSC frequency of 16 MHz, filtered by the IRCOSC controller block. The same goes for
XOSC. PLL0_PHI is configured in the PLL0 tab. PER_CLK selects from these three clock sources by selecting the value of the
AUX Clock Selector 0 block. Then finally the selected signal is divided by the PER_CLK prescaler value.
It is important to note, though, that the user input for the divider field is not the desired divider, but the bitfield value that one would
have to enter to achieve the desired divider. That is why the divider block says “/(1+(0…63))” rather than simply “/1…64”. The user
provides a value between 0 and 63, to which the hardware automatically adds 1 to calculate a divider that is between 1 and 64.
Each auxiliary clock and the system clock can feed into multiple domains that each have their own dividers. The number to the
left of the prescaler shows the number of the divider that is associated with that clock. In the case of PER_CLK, the number “0”
is shown next to the PER_CLK enable. This means that PER_CLK is configured by Divider 0 of Auxiliary Clock 0.
Application Note
MPC574xR Clock Calculator Guide, Rev. 5, October 2018
5 / 28
Page 6
NXP Semiconductors
Figure 7. Buttons
Clock calculator design
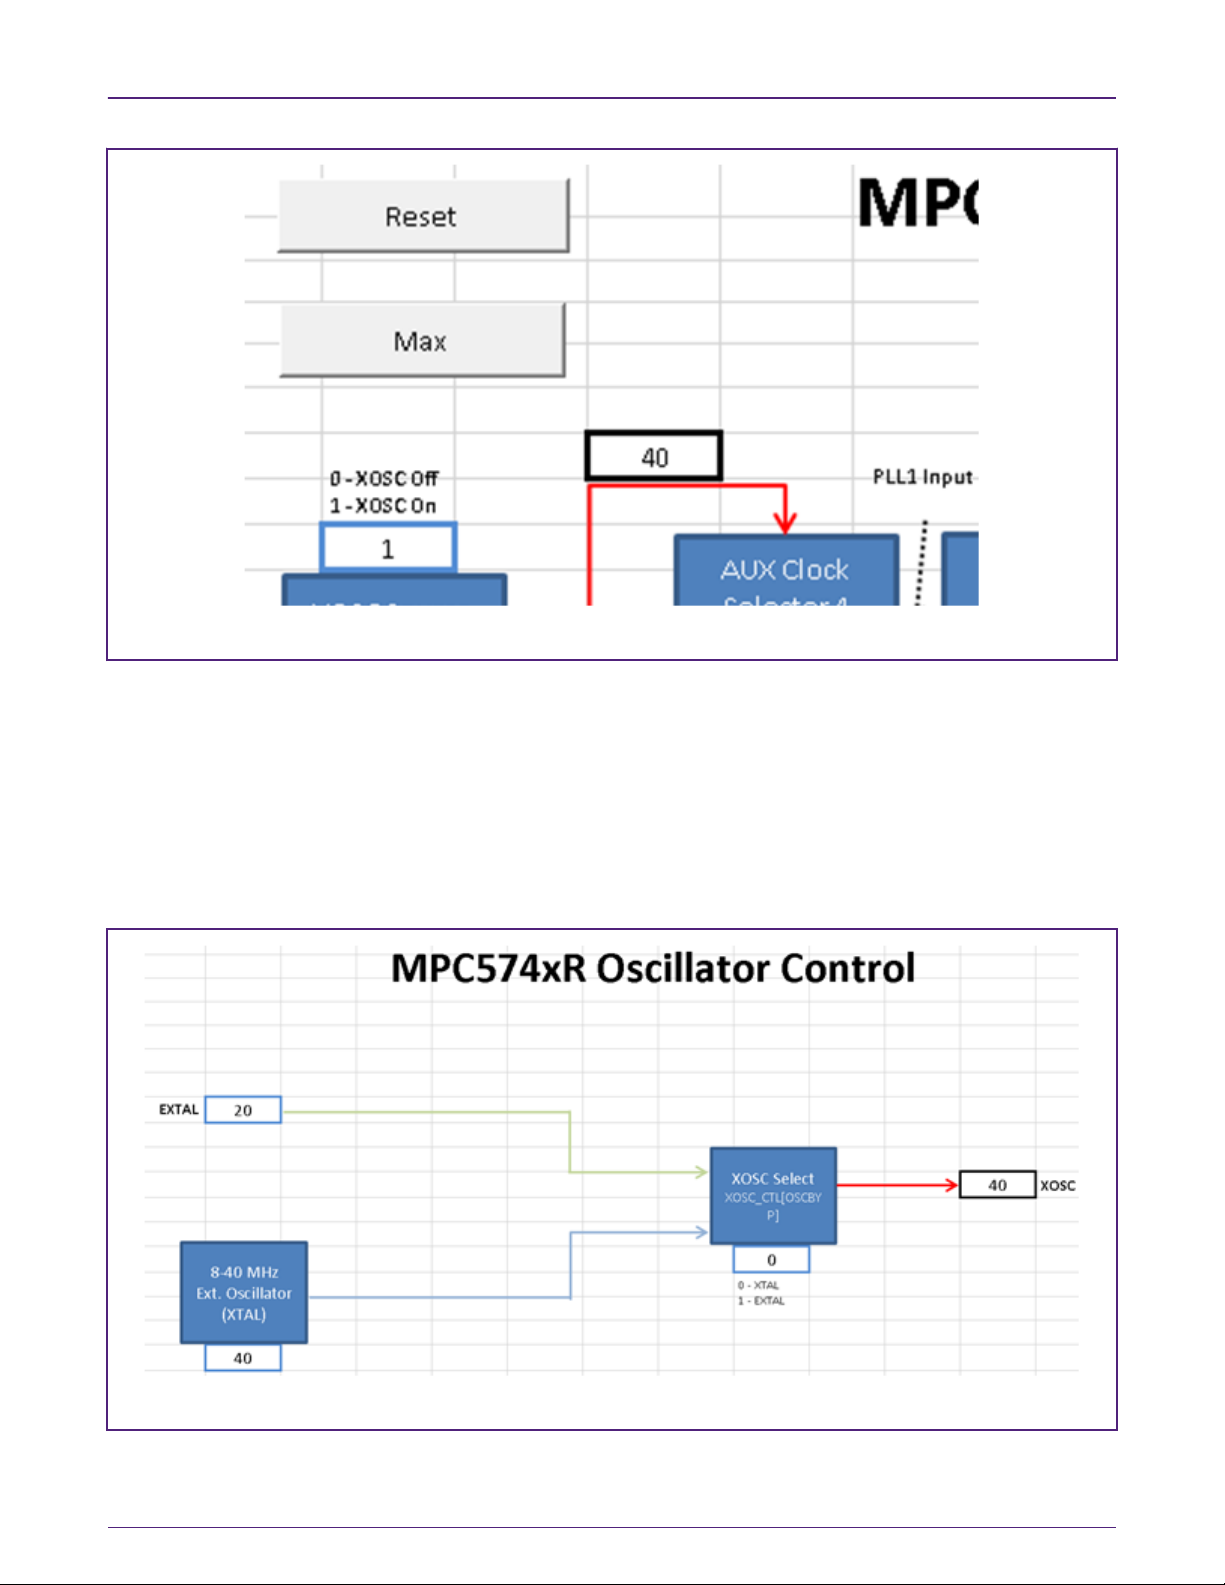
2.2 Oscillator control
Oscillator Control controls the generation of the external oscillator (XOSC) frequency. MPC5746R supports two ways of XOSC
generation. The chip has two external oscillator pins, XTAL and EXTAL. An 8-40 MHz external oscillator can be connected to both
pins. This external oscillator is also referred to simply as XTAL. If the XOSC Select block selects XTAL, XOSC will derive its
frequency from the external oscillator (XTAL) block. Alternatively, a waveform can be driven directly to the EXTAL pin. This signal
is also referred to simply as EXTAL. When the XOSC Select block selects EXTAL, XOSC will derive its frequency from the EXTAL
pin. Shown below is a screenshot.
Figure 8. Oscillator control
Application Note
MPC574xR Clock Calculator Guide, Rev. 5, October 2018
6 / 28
Page 7
NXP Semiconductors
Clock calculator design
2.3 Peripheral domains
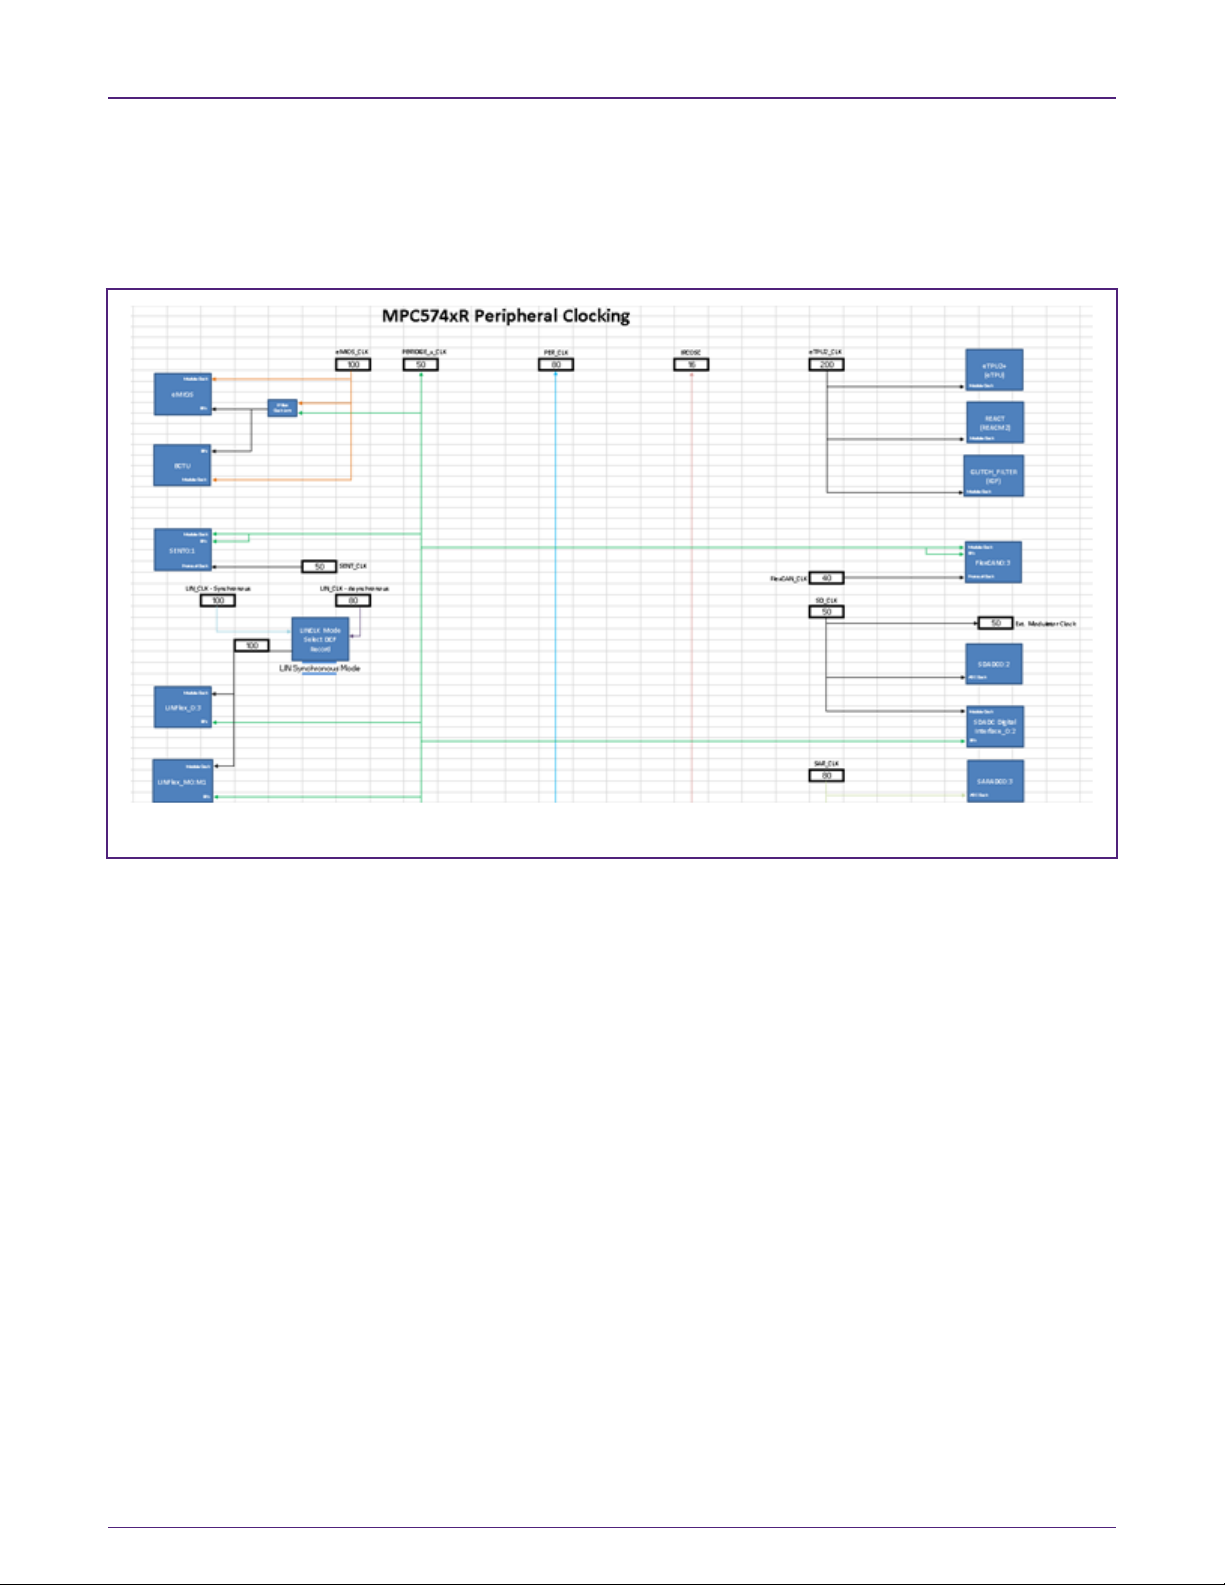
Peripheral Domains is an in-depth diagram of MPC5746R modules. Where Tree leaves off at the clock domain level, Peripheral
Domains picks up and progresses to the module level, shown below.
Figure 9. Peripheral domains
The clock domains are color-coded. Black lines are reserved for clock domains that only a few modules use. For example, the
FlexCAN module takes both PBRIDGE_x_CLK and CAN_CLK. CAN_CLK is black because only the FlexCAN uses that clock. As
a rule of thumb, clock domains are represented with black lines if all modules using it can fit within a single window without having
to scroll. The frequencies on this tab are not meant to be modified and are dependent on frequency values in the Tree tab.
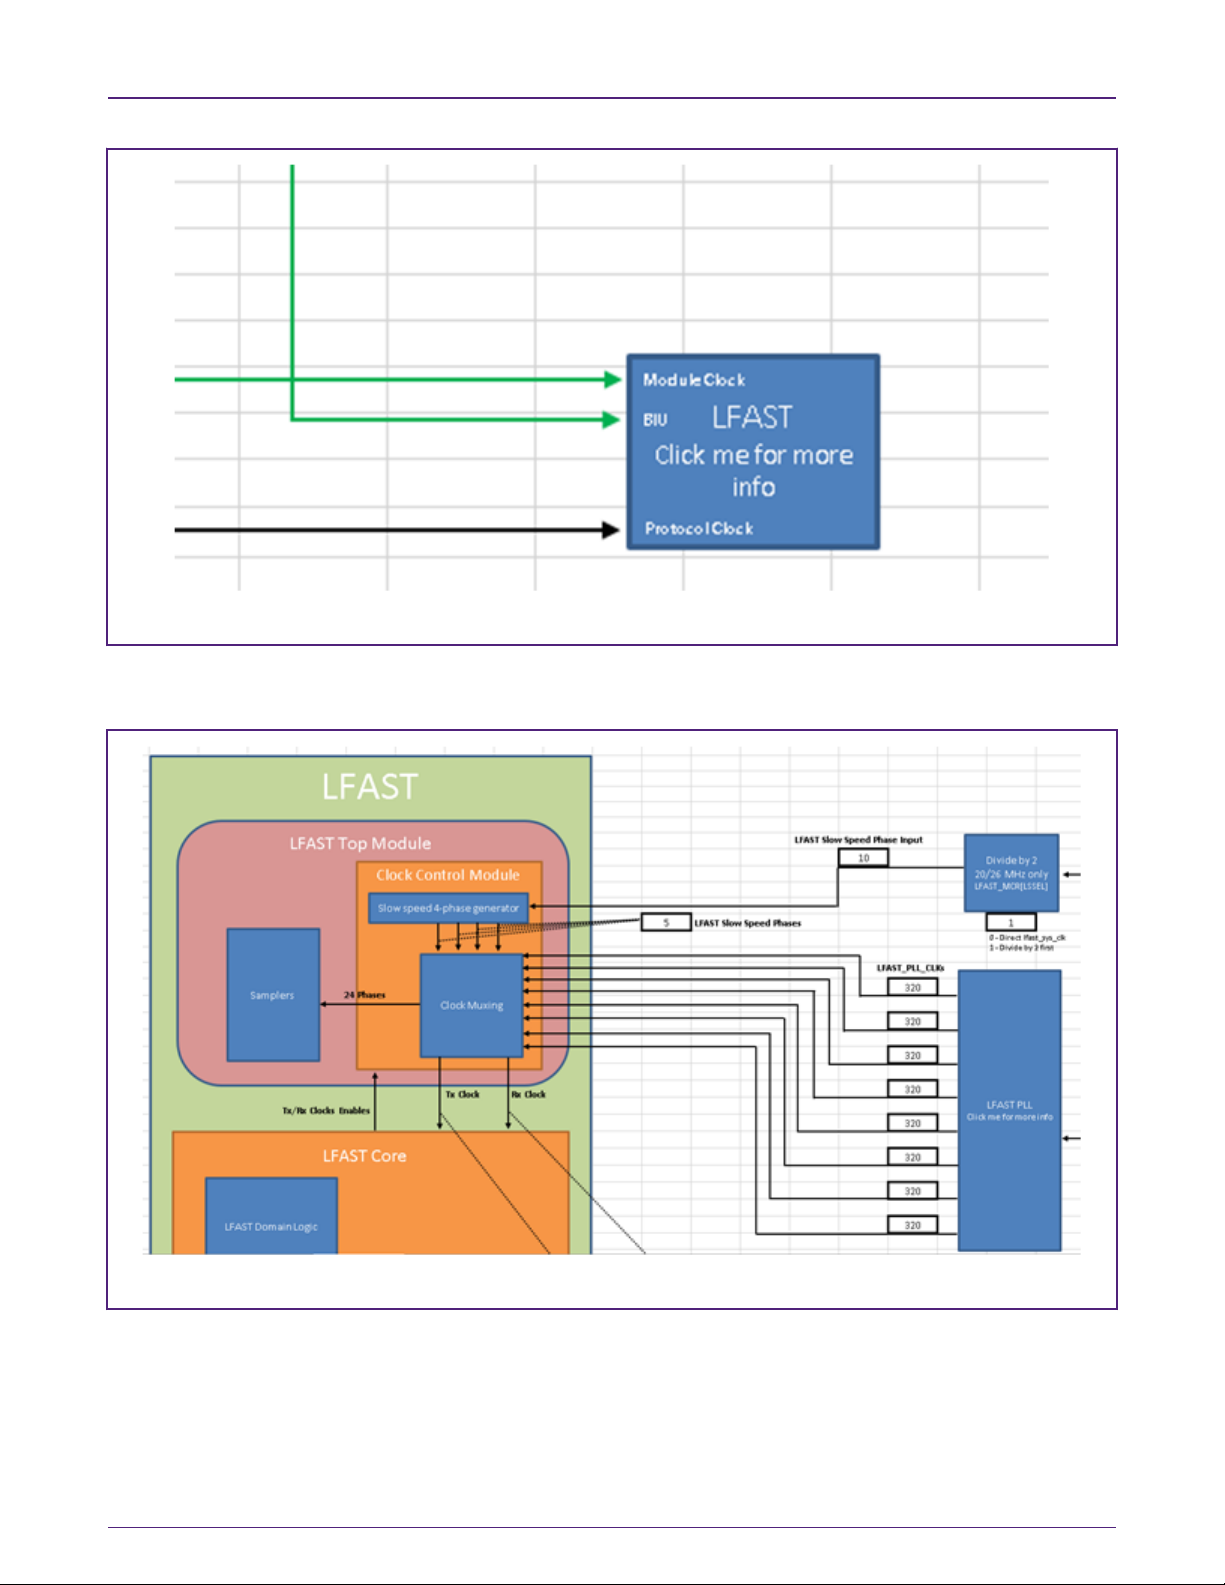
LFAST clocking
2.4
The LFAST is a versatile, but intricate module. It supports its own PLL which generates multiple phases and generates a signal
within specification only if its inputs are certain frequencies. These intricacies make it necessary to give LFAST its own dedicated
tab. Peripheral Domains still hosts an LFAST clock that shows its input clocks and is hyperlinked to LFAST Clocking, as shown
in the following figure.
Application Note
MPC574xR Clock Calculator Guide, Rev. 5, October 2018
7 / 28
Page 8
NXP Semiconductors
Figure 10. LFAST in peripheral domains
Clock calculator design
LFAST Clocking presents a block diagram of the module with various clocks going into it. It also supports LFAST_PLL
configuration to increase the LFAST frequency up to 320 MHz. The LFAST also supports a low-speed mode as well as a highspeed mode. This tool allows the user to select between the two modes. Below is a screenshot of the sheet.
Figure 11. LFAST block diagram
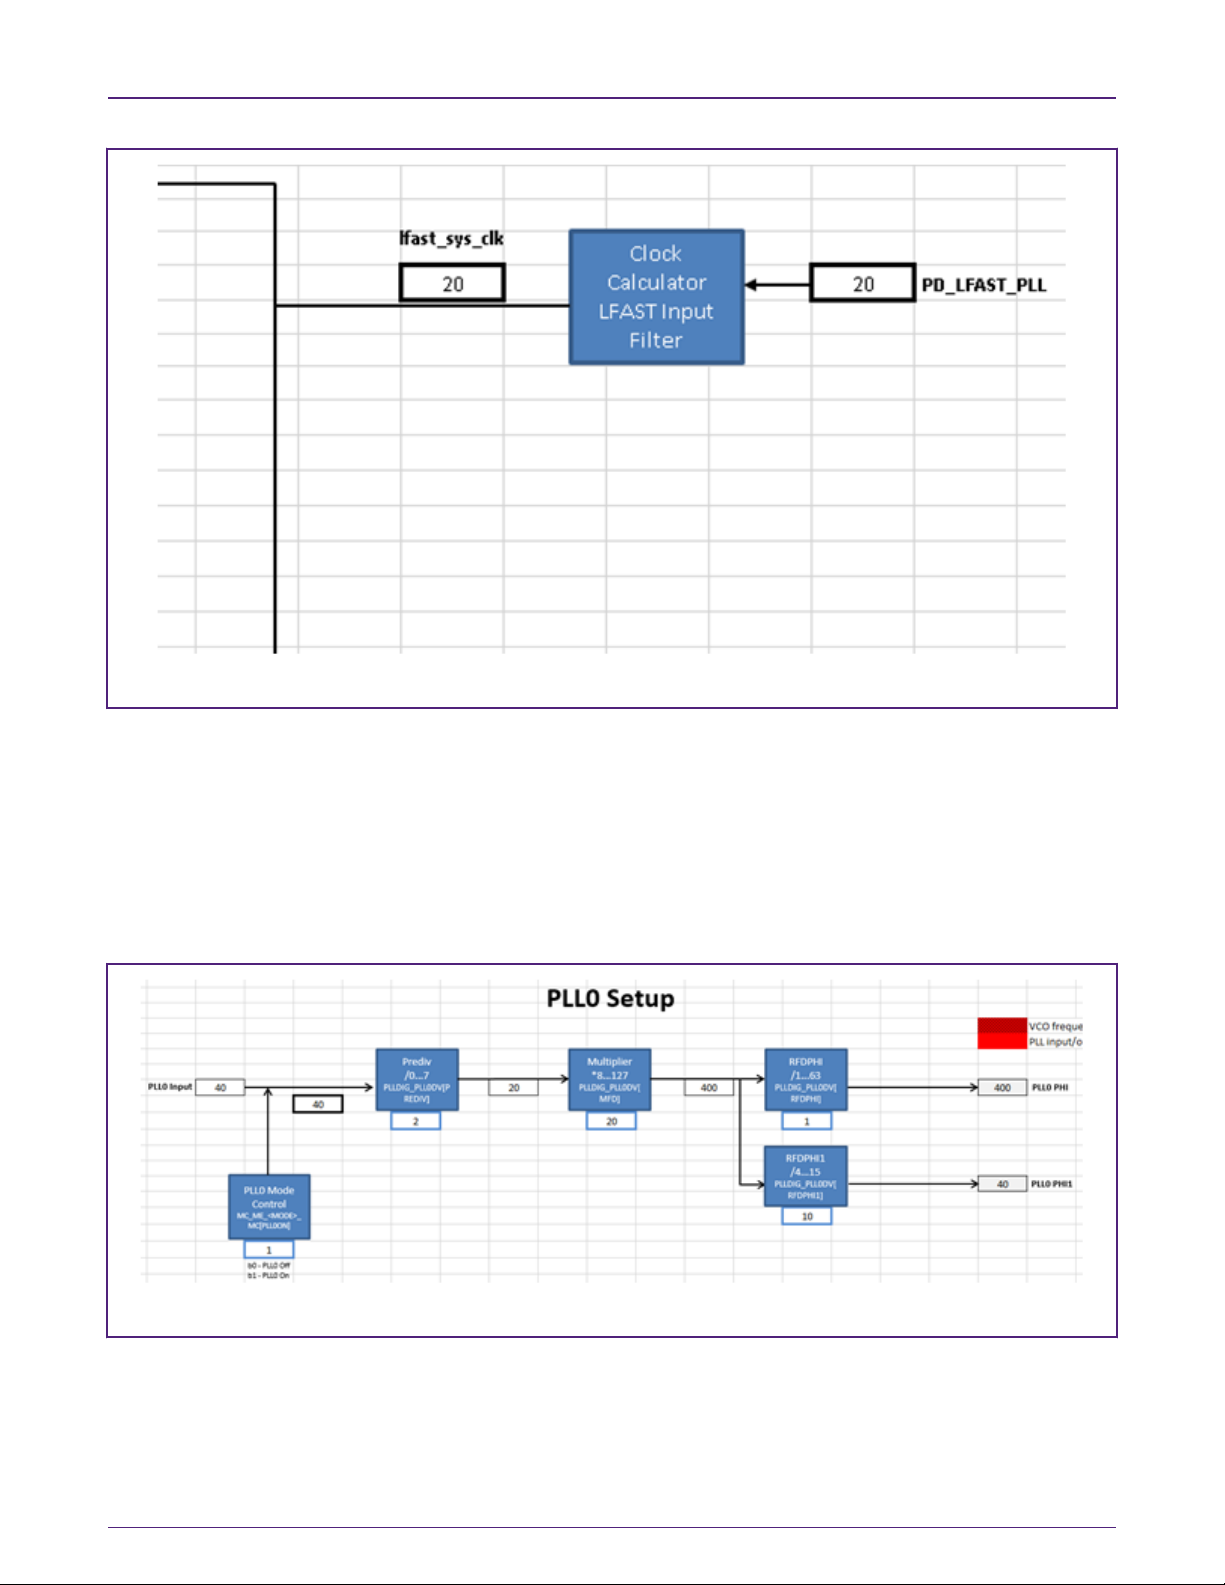
Since the LFAST signal must be generated from an input clock of 10, 13, 20, or 26 MHz, this tool blocks any input from the signal
RF_REF other than these four values. RF_REF can technically be set to any value, but the signal goes through the clock
calculator’s LFAST Input Filter block to become lfast_sys_clk, which in turn is the signal that gets fed into the LFAST PLL and
phase generators, as shown in the following figure.
MPC574xR Clock Calculator Guide, Rev. 5, October 2018
Application Note
8 / 28
Page 9
NXP Semiconductors
Clock calculator design
Figure 12. LFAST clocking input filter
If RF_REF is 10, 13, 20, or 26 MHz, lfast_sys_clk is the same; otherwise, lfast_sys_clk is 0. MPC5746R does not actually filter
RF_REF the way this tool does. The purpose of the LFAST Input Filter block is to simulate how the user can technically set
RF_REF to any value, but the resulting LFAST output would be unusable. Therefore if a user were to enter an invalid input frequency
(i.e. not 10, 13, 20, or 26 MHz), all subsequent frequencies would be 0, and the user would know to change the input.
PLLx
2.5
PLL0 and PLL1 are visual abstractions of the PLL digital interface, as in the next figure.
Figure 13. PLL0 control
The input source of PLL0 and PLL1 are selected by the auxiliary clock selectors AUX Clock Selector 3 and AUX Clock Selector
4 in the Tree tab,respectively. Then, from the source, the dividers and multipliers located in the PLL0 and PLL1 tabs are set in
order to achieve the PLL output frequencies. The PLL output frequencies are in turn propagated to the PLLx_PHIn clock domains
in the Tree tab.
MPC574xR Clock Calculator Guide, Rev. 5, October 2018
Application Note
9 / 28
Page 10

NXP Semiconductors
Clock calculator design
2.6 Reference tables (pll0_phi, pll0_phi1, and pll1_phi)
The three tabs pll0_phi, pll0_phi1, and pll1_phi are reference tables for the user to find the appropriate PLL dividers and multipliers
to achieve the desired PLL frequency. There is a tab for each PLL output because input frequencies and the range of acceptable
divider/multiplier values differ between each other. However, they all follow the same setup. Note that Columns A, B, and C of
these tabs are frozen so if the table looks cut off, just scroll left or right.
PLL frequencies are calculated from a reference frequency, a reference divider (RFD), a multiplier (MFD), and in PLL0, a prescaler
(PREDIV). The PLL reference is not manually configurable because there is a finite number of input values the PLL can take. For
example, PLL0 can only reference either the 16 MHz IRCOSC or the 8-40 MHz XOSC. PLL reference therefore comes from the
Tree tab. Configure AUX Clock Selector 3 and AUX Clock Selector 4 in Tree for PLL0 and PLL1, respectively. Once the PLL
reference frequency is configured, enter the desired PLL output frequency. Also, enter the PREDIV value when using PLL0_PHI
or PLL0_PHI1. The reference table will then calculate the output frequency for each MFD and RFD setting. Like in the other
sections, frequencies are color-coded to define which values are valid and which are not. Shading will change automatically once
the output PLL frequencies are calculated. MFD and RFD settings that achieve the exact desired frequency will be shaded in
green; values that exceed the desired frequency, but are within MPC5746R hardware specifications are marked in yellow; and
frequencies that exceed the MPC5746R hardware specification are colored red. Below is a screenshot of the reference table for
PLL0_PHI.
Figure 14. PLL0_PHI reference table
2.7 Summary
Almost all blocks populating this clock calculator represent real register fields in silicon. The Summary tab collates all the
information from the rest of the clock calculator into a list of register values, a screenshot of which is shown in Register summary
table. The values in the register summary are interactive, updating automatically when the associated block is changed. Registers
listed within Summary are only the ones whose values are affected by clock configuration, not every single register available in
the SoC.
MPC574xR Clock Calculator Guide, Rev. 5, October 2018
Application Note
10 / 28
Page 11

NXP Semiconductors
Clock calculator design
Figure 15. Register summary table
The register values are displayed in either hexadecimal or binary format, where a “0x” prefix represents hexadecimal and “0b”
denotes binary. A capital “X” represents a “don’t care” bit/half-byte. These bits do not affect the clock frequency, so users can set
these values to whatever suits their purposes. Users can best utilize Summary by setting the configuration they want in the clock
calculator and then copying the resulting register value into code. For example, taking from the figure above, the register
MC_ME_DRUN_MC (among the MC_ME_<MODE>_MC registers) should be set to 0xX0XX00F4. Assuming the instances of
“X” are “0”, the resulting S32DS C code would be: “MC_ME.DRUN_MC.R = 0x000000F4;”.
Summary also includes an overview of the clock domain frequencies. Since this tool consists of multiple interdependent
spreadsheets, it might be cumbersome for users to weave through them all to find a clock domain. This table provides a place
where all of them can be found. The table is organized by module, followed by the clock type (i.e. BIU clock, peripheral clock,
protocol clock, etc.), and finally the frequency, as currently configured. Below is a screenshot.
Application Note
MPC574xR Clock Calculator Guide, Rev. 5, October 2018
11 / 28
Page 12

NXP Semiconductors
Clock calculator design
Figure 16. Clock summary table
This tool also supports a degree of code generation. Summary provides two sample clock initialization functions, Sysclk_Init for
configuring oscillators and PLLs and InitPeriClkGen for providing sources/dividers to auxiliary clocks. The dynamic C code in
these functions depend on tool settings just like the register summary. These functions can be copied and pasted to a source file
via Ctrl+C/Ctrl+V or by clicking on the associated Copy Code button, if macros are enabled. The following figure shows Sysclk_Init
and its Copy Code button.
Application Note
MPC574xR Clock Calculator Guide, Rev. 5, October 2018
12 / 28
Page 13

NXP Semiconductors
Clock calculator design
Figure 17. Sample initialization code
2.8 Limits
Limits is the reference tab for all the color-coding rules. The values in its tables are based on the MPC5746R’s datasheet and
reference manual and therefore should not be modified by the user. The following figure is a screenshot of the Limits tab.
Application Note
MPC574xR Clock Calculator Guide, Rev. 5, October 2018
13 / 28
Page 14

NXP Semiconductors
Clock tool example use sase: Configure FlexCAN to XOSC at 40 MHz protocol clock and PLL0 50 MHz BIU/Module clock
Figure 18. MPC5746R frequency limits
3 Clock tool example use sase: Configure FlexCAN to XOSC at 40 MHz
protocol clock and PLL0 50 MHz BIU/Module clock
The following sections will present an example application of the MPC574xR Clock Calculator. This application note’s example
will configure the FlexCAN protocol clock to 40 MHz XOSC and the FlexCAN BIU and module clock to 50 MHz PLL. The example
will not only show the correct configurations but also how the tool responds if improper configurations are attempted.
When configuring clocks for a module, start at Peripheral Domains. As shown in the figure below, FlexCAN follows two clock
domains, PBRIDGE_x_CLK for the bus interface unit and module clock, and CAN_CLK for the actual communication, protocol
clock.
Application Note
MPC574xR Clock Calculator Guide, Rev. 5, October 2018
14 / 28
Page 15

NXP Semiconductors
Clock tool example use sase: Configure FlexCAN to XOSC at 40 MHz protocol clock and PLL0 50 MHz BIU/Module clock
Figure 19. FlexCAN clocks.
PBRIDGE_x_CLK and CAN_CLK are currently 16 MHz and 0 MHz, respectively. Configuring the clock calculator can be done in
any order; this example will start with PBRIDGE_x_CLK.
Configure PBRIDGE_x_CLK
3.1
Click on PBRIDGE_x_CLK to forward to the PBRIDGE_x_CLK cell of Tree, as shown in the figure below.
Figure 20. PBRIDGE_x_CLK, Tree tab
Trace PBRIDGE_x_CLK all the way back to its point of origin. As shown in the above figure, PBRIDGE_x_CLK is enabled and
sourced from System Clock Selector, whose current value is 0. The cell is a drop-down menu and the textbox explains what each
available value represents. As shown in the figure, PBRIDGE_x_CLK is currently enabled and sourced from the 16 MHz IRCOSC,
divided by 1, for a final frequency of 16 MHz.
Since the only way to achieve 50 MHz is through the PLL, one of the PLLs must be configured. This example will choose PLL0.
Trace PLL0_PHI back to its own sources. PLL0 selects from either IRCOSC or XOSC via AUX Clock Selector 3. These oscillators
are the point of origin for all clock domains. The figure below shows the PBRIDGE_x_CLK being traced back to PLL0 and then
finally to the oscillators.
Application Note
MPC574xR Clock Calculator Guide, Rev. 5, October 2018
15 / 28
Page 16

NXP Semiconductors
Clock tool example use sase: Configure FlexCAN to XOSC at 40 MHz protocol clock and PLL0 50 MHz BIU/Module clock
Figure 21. PBRIDGE_x_CLK to oscillators
3.1.1 Configure the oscillator
Now start going downstream, configuring from the oscillator down to PBRIDGE_x_CLK. The external oscillator frequency is
application-dependent and can be any value between 8 MHz and 40 MHz. This tool has a safeguard to prevent invalid values
from being entered. The figure below shows an attempt to enter 7 MHz to the XOSC frequency cell. A dialog box appears notifying
the user that the value is not accepted when he/she tries to click away from the cell.
Figure 22. Invalid frequency input
Set the XOSC frequency back to 40 MHz. Set the value of the XOSC Select block to 0 to select XTAL, the external oscillator, as
shown in the following figure.
MPC574xR Clock Calculator Guide, Rev. 5, October 2018
Application Note
16 / 28
Page 17

NXP Semiconductors
Clock tool example use sase: Configure FlexCAN to XOSC at 40 MHz protocol clock and PLL0 50 MHz BIU/Module clock
Figure 23. Oscillator configuration
Return to Tree.Trace forward from the XOSC block to XOSC Source Controller. The value of XOSC Source Controller is 0, meaning
that the XOSC is turned off. The figure below circles the blocks that represent the XOSC crystal, the XOSC controller, and the
effective frequency as sensed by AUX Clock Selector 4 and CMU_0.
Figure 24. Actual XOSC frequency with source turned off
MPC574xR Clock Calculator Guide, Rev. 5, October 2018
Application Note
17 / 28
Page 18

NXP Semiconductors
Clock tool example use sase: Configure FlexCAN to XOSC at 40 MHz protocol clock and PLL0 50 MHz BIU/Module clock
Switch the XOSC Source Controller value to 1 to turn on the XOSC. The output XOSC frequency is now 40 MHz, as show in the
following figure.
Figure 25. Actual XOSC frequency with source turned on
3.1.2 Configure PLL0
Follow the XOSC path to AUX Clock Selector 3. Change the AUX Clock Selector 3 value to 1, so that PLL0 sources from XOSC,
as shown in the figure below.
Application Note
MPC574xR Clock Calculator Guide, Rev. 5, October 2018
18 / 28
Page 19

NXP Semiconductors
Clock tool example use sase: Configure FlexCAN to XOSC at 40 MHz protocol clock and PLL0 50 MHz BIU/Module clock
Figure 26. PLL0 source to XOSC
Next, configure PLL0. Click on the PLL0 block to forward automatically to the PLL0 tab. This is the tab that sets up the PLL0_PHI
frequency. The PLL0 Input block of the figure below shows that PLL0 detects the 40 MHz XOSC as its source frequency.
Figure 27. PLL0 calculator
Configure the dividers to achieve 200 MHz. The correct configuration can be achieved by trial and error, but the MPC574xR Clock
Calculator provides a lookup table in the pll0_phi tab, as shown in the following figure.
Application Note
MPC574xR Clock Calculator Guide, Rev. 5, October 2018
19 / 28
Page 20

NXP Semiconductors
Clock tool example use sase: Configure FlexCAN to XOSC at 40 MHz protocol clock and PLL0 50 MHz BIU/Module clock
Figure 28. PLL0_PHI reference table
The PLL0 reference field is the frequency of the PLL0 input, in this case the 40 MHz XOSC. Set the target frequency and PREDIV
values. This example will target 200 MHz and change PREDIV to 2. The values and shading in the lookup table will automatically
change to fit these new settings. In the figure below, the table has changed and circled are the modified settings.
Figure 29. PLL0_PHI table with new settings
The cells shaded green means there are two divider combinations that can achieve exactly 200 MHz given an input frequency of
40 MHz and a PREDIV of 2. This example will use a MFD of 20 and a RFD of 2, but before configuring the PLL0 tab, it is worth
noting what happens if the output PLL frequency is out of range.
In the following figure, the PLL has been configured so that the output frequency is 5.08 GHz. This obviously exceeds the maximum
hardware spec of 400 MHz. The associated voltage controlled oscillator (VCO) frequency, which can be back-calculated from
PLL0_PHI also exceeds the maximum VCO spec of 1250 MHz. Therefore, the output is crosshatched and shaded red.
MPC574xR Clock Calculator Guide, Rev. 5, October 2018
Application Note
20 / 28
Page 21

NXP Semiconductors
Clock tool example use sase: Configure FlexCAN to XOSC at 40 MHz protocol clock and PLL0 50 MHz BIU/Module clock
Figure 30. When PLL0_PHI exceeds VCO and PLL spec
Now let’s configure the PLL correctly. Turn on the PLL in the PLL0 tab by setting the PLL0 Mode Control block to 1, set Prediv to
2, Multiplier to 20, and RFDPHI to 2. As shown in the next figure, the output PLL0_PHI is 200 MHz and the cell remains unshaded,
meaning the configuration fits within spec.
Figure 31. PLL0_PHI configured to 200 MHz
Go back to Tree to observe that the PLL0_PHI frequency is now 200 MHz.
MPC574xR Clock Calculator Guide, Rev. 5, October 2018
Application Note
21 / 28
Page 22

NXP Semiconductors
Clock tool example use sase: Configure FlexCAN to XOSC at 40 MHz protocol clock and PLL0 50 MHz BIU/Module clock
Figure 32. PLL0_PHI propagated to Tree
3.1.3 Finish Setting PBRIDGE_x_CLK
Next, follow the PLL0_PHI signal down to System Clock Selector. IRCOSC is the current source of SYS_CLK,
PBRIDGE_x_CLK, and other system clock domains. Change the value of System Clock Selector to 2 to follow PLL0_PHI. See
the following figure.
Figure 33. System clock following PLL0_PHI
The PCFS block stands for Progressive Clock Frequency Switch. This is a feature supported in the MPC5746R to smooth the
transition of the system clock from one clock source to another. The block here is just a visual representation for the user to know
that the system clock filters through the progressive clock switch before propagating to the various system clock domains. PCFS
takes IRCOSC in this diagram because its logic is organized in terms of IRCOSC cycles. You can find more information on the
progressive clock switch in the application note AN5304. The linked application note explains how to configure the MPC574xP,
but its general principle can be extrapolated to the MPC5746R.
After this, make sure the associated Clk En block is 1 and set the PBRIDGE_x_CLK divider, if necessary. The small number to
the left of the divider block shows the divider number associated with that clock. Since a “2” is present next to the PBRIDGE_x_CLK
MPC574xR Clock Calculator Guide, Rev. 5, October 2018
Application Note
22 / 28
Page 23

NXP Semiconductors
Clock tool example use sase: Configure FlexCAN to XOSC at 40 MHz protocol clock and PLL0 50 MHz BIU/Module clock
enable, PBRIDGE_x_CLK is configured by Divider 2 of the system clock. As mentioned before, the user input for the divider field
is not the desired divider, but the bitfield value that one would have to enter to achieve the desired divider. Set the divider value
to 3 so that PBRIDGE_x_CLK is 200 MHz divided by 4, resulting in a PBRIDGE_x_CLK of 50 MHz. See the following figure.
Figure 34. PBRIDGE_x_CLK at 50 MHz PLL0
If, for example, the PBRIDGE_x_CLK divider is 1, ADC_CLK would be 200 MHz, which would exceed the maximum allowable
PBRIDGE_x_CLK frequency of 50 MHz. The tool will highlight the PBRIDGE_x_CLK cell red to signify that such a frequency is
not allowed, as shown in the following figure.
Figure 35. PBRIDGE_x_CLK when frequency exceeds spec
3.2 Configure FlexCAN protocol clock to 40 MHz XOSC
The FlexCAN’s BIU and module clocks have been configured, but the FlexCAN uses CAN_CLK for its protocol clock. Configure
CAN_CLK to use the 40 MHz XOSC. Circled in the next figure is the location of CAN_CLK in Tree.
Application Note
MPC574xR Clock Calculator Guide, Rev. 5, October 2018
23 / 28
Page 24

NXP Semiconductors
Clock tool example use sase: Configure FlexCAN to XOSC at 40 MHz protocol clock and PLL0 50 MHz BIU/Module clock
Figure 36. CAN_CLK in Tree
XOSC and PLL0_PHI are already configured from the previous section, so there is no need to repeat those steps. CAN_CLK
traces back to AUX Clock Selector 8, which currently follows the IRCOSC. Change AUX Clock Selector 8 to follow XOSC.
Figure 37. CAN_CLK changed to follow XOSC
Next, enable CAN_CLK block and set the PBRIDGEx_CLK divider. Set the associated Clk En block to 1 and the CAN_CLK divider
to 0: 40 MHz/(0+1) = 40 MHz. So, in closing, this example has achieved its goal: a 40 MHz XOSC driving a PLL that produces
an output of 200 MHz, and from there the PLL running PBRIDGE_x_CLK at 50 MHz and the CAN_CLK at 40 MHz, sourced from
the XOSC. Finally, the PBRIDGE_x_CLK and CAN_CLK drive the FlexCAN module.
Application Note
MPC574xR Clock Calculator Guide, Rev. 5, October 2018
24 / 28
Page 25

NXP Semiconductors
Clock tool example use sase: Configure FlexCAN to XOSC at 40 MHz protocol clock and PLL0 50 MHz BIU/Module clock
3.3 Observe the registers
The final register summary table, as displayed in Summary, is shown in the following figure. Note that most of these registers
would not have to be written in code to achieve the setup that this example just configured. For example, the register
MC_CGM_AC0_DC0 would not have to be included, since Auxiliary Clock 0 was untouched. Registers that would have to be
written would be ones like PLLDIG_PLL0DV and MC_CGM_AC8_SC.
Figure 38. Register summary after configuration
3.4 Copy the code
Sysclk_Init and InitPeriClkGen provide dynamic clock generation C code. The code will configure the clocks to the settings as
configured in this clock calculator. It can be copied and pasted to a source file. The following figure shows Sysclk_Init as configured
by this example. The solid-bordered highlight around the function means that the code has been copied with the Copy Code
button; a regular Ctrl+C causes a dashed-bordered highlight. In both cases, the code can be pasted into a source with a regular
Ctrl+V.
MPC574xR Clock Calculator Guide, Rev. 5, October 2018
Application Note
25 / 28
Page 26

NXP Semiconductors
Conclusion
Figure 39. Sysclk_Init after example
To summarize, this example has achieved its goal: a FlexCAN whose bus interface and module clocks are driven by a PLL-sourced
PBRIDGE_x_CLK at 50 MHz. The 50 MHz PBRIDGE_x_CLK is divided down from a 200 MHz PLL output; and the PLL output
in turn is driven by the 40 MHz external oscillator. And finally, the FlexCAN’s protocol clock is driven by a 40 MHz XOSC-sourced
CAN_CLK.
Conclusion
4
This application note gives an overview of the MPC5746R interactive clock calculator. It seeks to simplify clock configurations in
the form of a graphical tool so that a user can more easily visualize the device’s clock signals’ propagation. There are similar clock
calculators for other NXP products, including the MPC574xG and S32K14x. Visit the nxp.com to find more of these tools.
Revision history
5
Rev. No. Date Substantive Change(s)
0 July 2017 Initial version
Table
continues
on the next
page...
Application Note
MPC574xR Clock Calculator Guide, Rev. 5, October 2018
26 / 28
Page 27

NXP Semiconductors
Table
continued
from the
previous
page...
Rev. No. Date Substantive Change(s)
1 November 2017 Updated the associated MPC574xR_Clock_Calculator file.
2 December 2017 Updated the associated AN12020SW.
3 January 2018 Editorial updates.
4 February 2018 Updated the associated AN12020SW.
5 October 2018 Updated the associated AN12020SW.
Revision history
Application Note
MPC574xR Clock Calculator Guide, Rev. 5, October 2018
27 / 28
Page 28

How To Reach Us
Home Page:
nxp.com
Web Support:
nxp.com/support
Information in this document is provided solely to enable system and software implementers to
use NXP products. There are no express or implied copyright licenses granted hereunder to
design or fabricate any integrated circuits based on the information in this document. NXP
reserves the right to make changes without further notice to any products herein.
NXP makes no warranty, representation, or guarantee regarding the suitability of its products for
any particular purpose, nor does NXP assume any liability arising out of the application or use
of any product or circuit, and specifically disclaims any and all liability, including without limitation
consequential or incidental damages. “Typical” parameters that may be provided in NXP data
sheets and/or specifications can and do vary in different applications, and actual performance
may vary over time. All operating parameters, including “typicals,” must be validated for each
customer application by customer's technical experts. NXP does not convey any license under
its patent rights nor the rights of others. NXP sells products pursuant to standard terms and
conditions of sale, which can be found at the following address: nxp.com/
SalesTermsandConditions.
NXP, the NXP logo, NXP SECURE CONNECTIONS FOR A SMARTER WORLD, COOLFLUX,
EMBRACE, GREENCHIP, HITAG, I2C BUS, ICODE, JCOP, LIFE VIBES, MIFARE, MIFARE
CLASSIC, MIFARE DESFire, MIFARE PLUS, MIFARE FLEX, MANTIS, MIFARE ULTRALIGHT,
MIFARE4MOBILE, MIGLO, NTAG, ROADLINK, SMARTLX, SMARTMX, STARPLUG, TOPFET,
TRENCHMOS, UCODE, Freescale, the Freescale logo, AltiVec, C‑5, CodeTEST, CodeWarrior,
ColdFire, ColdFire+, C‑Ware, the Energy Efficient Solutions logo, Kinetis, Layerscape, MagniV,
mobileGT, PEG, PowerQUICC, Processor Expert, QorIQ, QorIQ Qonverge, Ready Play,
SafeAssure, the SafeAssure logo, StarCore, Symphony, VortiQa, Vybrid, Airfast, BeeKit,
BeeStack, CoreNet, Flexis, MXC, Platform in a Package, QUICC Engine, SMARTMOS, Tower,
TurboLink, and UMEMS are trademarks of NXP B.V. All other product or service names are the
property of their respective owners. ARM, AMBA, ARM Powered, Artisan, Cortex, Jazelle, Keil,
SecurCore, Thumb, TrustZone, and μVision are registered trademarks of ARM Limited (or its
subsidiaries) in the EU and/or elsewhere. ARM7, ARM9, ARM11, big.LITTLE, CoreLink,
CoreSight, DesignStart, Mali, mbed, NEON, POP, Sensinode, Socrates, ULINK and Versatile are
trademarks of ARM Limited (or its subsidiaries) in the EU and/or elsewhere. All rights reserved.
Oracle and Java are registered trademarks of Oracle and/or its affiliates. The Power Architecture
and Power.org word marks and the Power and Power.org logos and related marks are trademarks
and service marks licensed by Power.org.
Ⓒ 2018 NXP B.V.
©
NXP B.V. 2018. All rights reserved.
For more information, please visit: http://www.nxp.com
For sales office addresses, please send an email to: salesaddresses@nxp.com
Date of release: October 2018
Document identifier: AN12020
 Loading...