

Page 1

AN12979
KW38 - Integrating the OTAP Client Service into a Bluetooth LE
Peripheral Device
Rev. 0 — 11/2020
Contents
1 Introduction
The Over The Air Programming (OTAP) NXP’s custom Bluetooth LE service
provides the developers a solution to upgrade the software that the MCU
contains. It removes the need of cables between the device to be upgraded
(OTAP client) and the device that contains the new software (OTAP server).
The best way to take advantage of the OTAP service is to integrate it into the
Bluetooth LE application. In that way, you can reprogram the device as many
times as required.
This document is intended for developers who want to be familiar with the
OTAP software.
2 OTAP client software
OTAP memory management during the update process describes the actual
implementation of the OTAP client software included in the SDK package
for FRDM-KW38. Advantages of the OTAP service integration explains the
importance of integrating OTAP client software into your application and the
expected results.
2.1 OTAP memory management during the update process
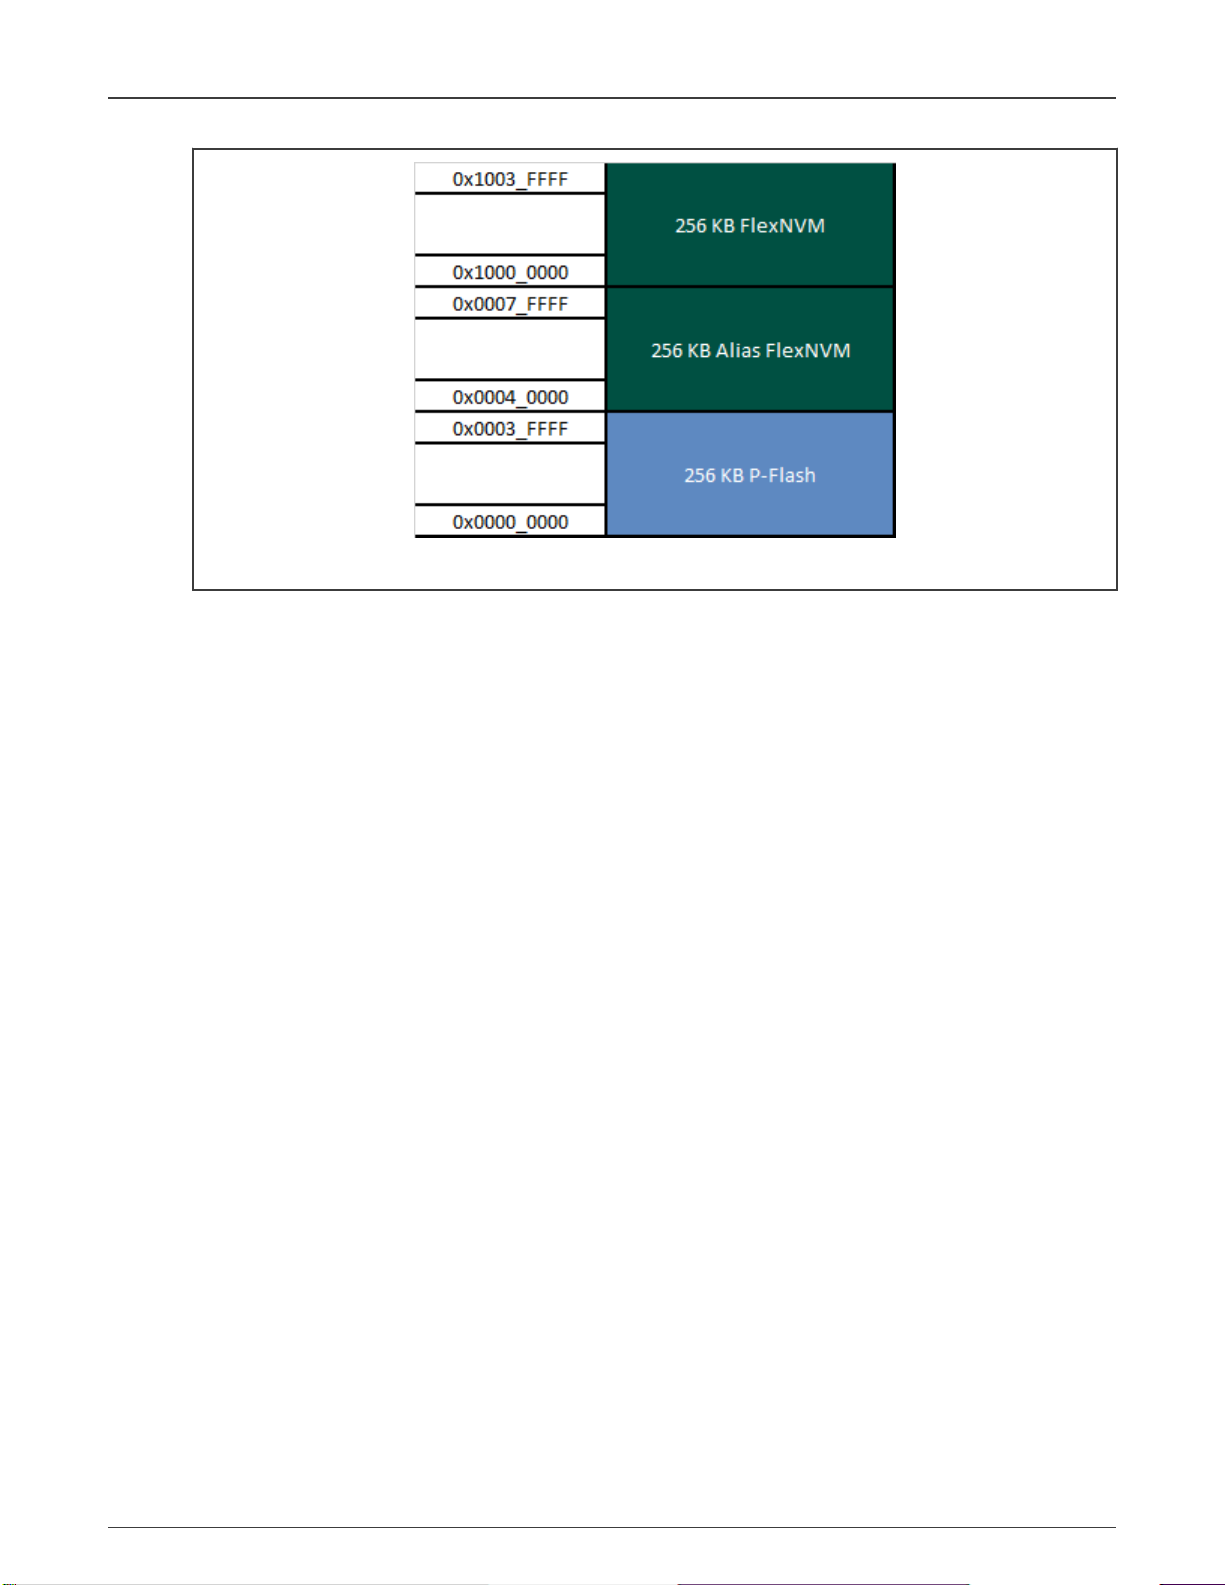
1. By default, the KW38 flash memory is partitioned in three main regions:
• One 256 KB Program Flash array (P-Flash) divided into 2
KB sectors with a flash address range from 0x0000_0000 to
0x0003_FFFF.
1 Introduction......................................1
2 OTAP client software.......................1
2.1 OTAP memory management
during the update process........... 1
2.2 Advantages of the OTAP service
integration.................................... 6
3 Prerequisites................................... 7
3.1 Downloading and installing the
software development kit............. 7
4 Customizing a based Bluetooth LE
demo to integrate the OTAP service
........................................................ 9
4.1 Importing the OTAP Bluetooth LE
service and framework software
into the HRS project.....................9
4.2 Main modifications in the source
files.............................................16
4.3 Modifications in project settings
and storage configurations........ 26
5 Testing the HRS-OTAP demo.......27
5.1 Preparing the OTAP client SDK
software..................................... 27
5.2 Creating an HRS-OTAP S-record
image to update the software.... 31
5.3 Creating an HRS S-record image to
update the software................... 33
5.4 Testing the HRS-OTAP software
...................................................36
Application Note
• One 256 KB FlexNVM array divided in 2 KB sectors with address range from 0x1000_0000 to 0x1003_FFFF.
• Alias memory with address range from 0x0004_0000 to 0x0007_FFFF. Writing or reading at the Alias range address
modifies or returns the FlexNVM content respectively.
Page 2
NXP Semiconductors
OTAP client software
Figure 1. MCU on-chip memory
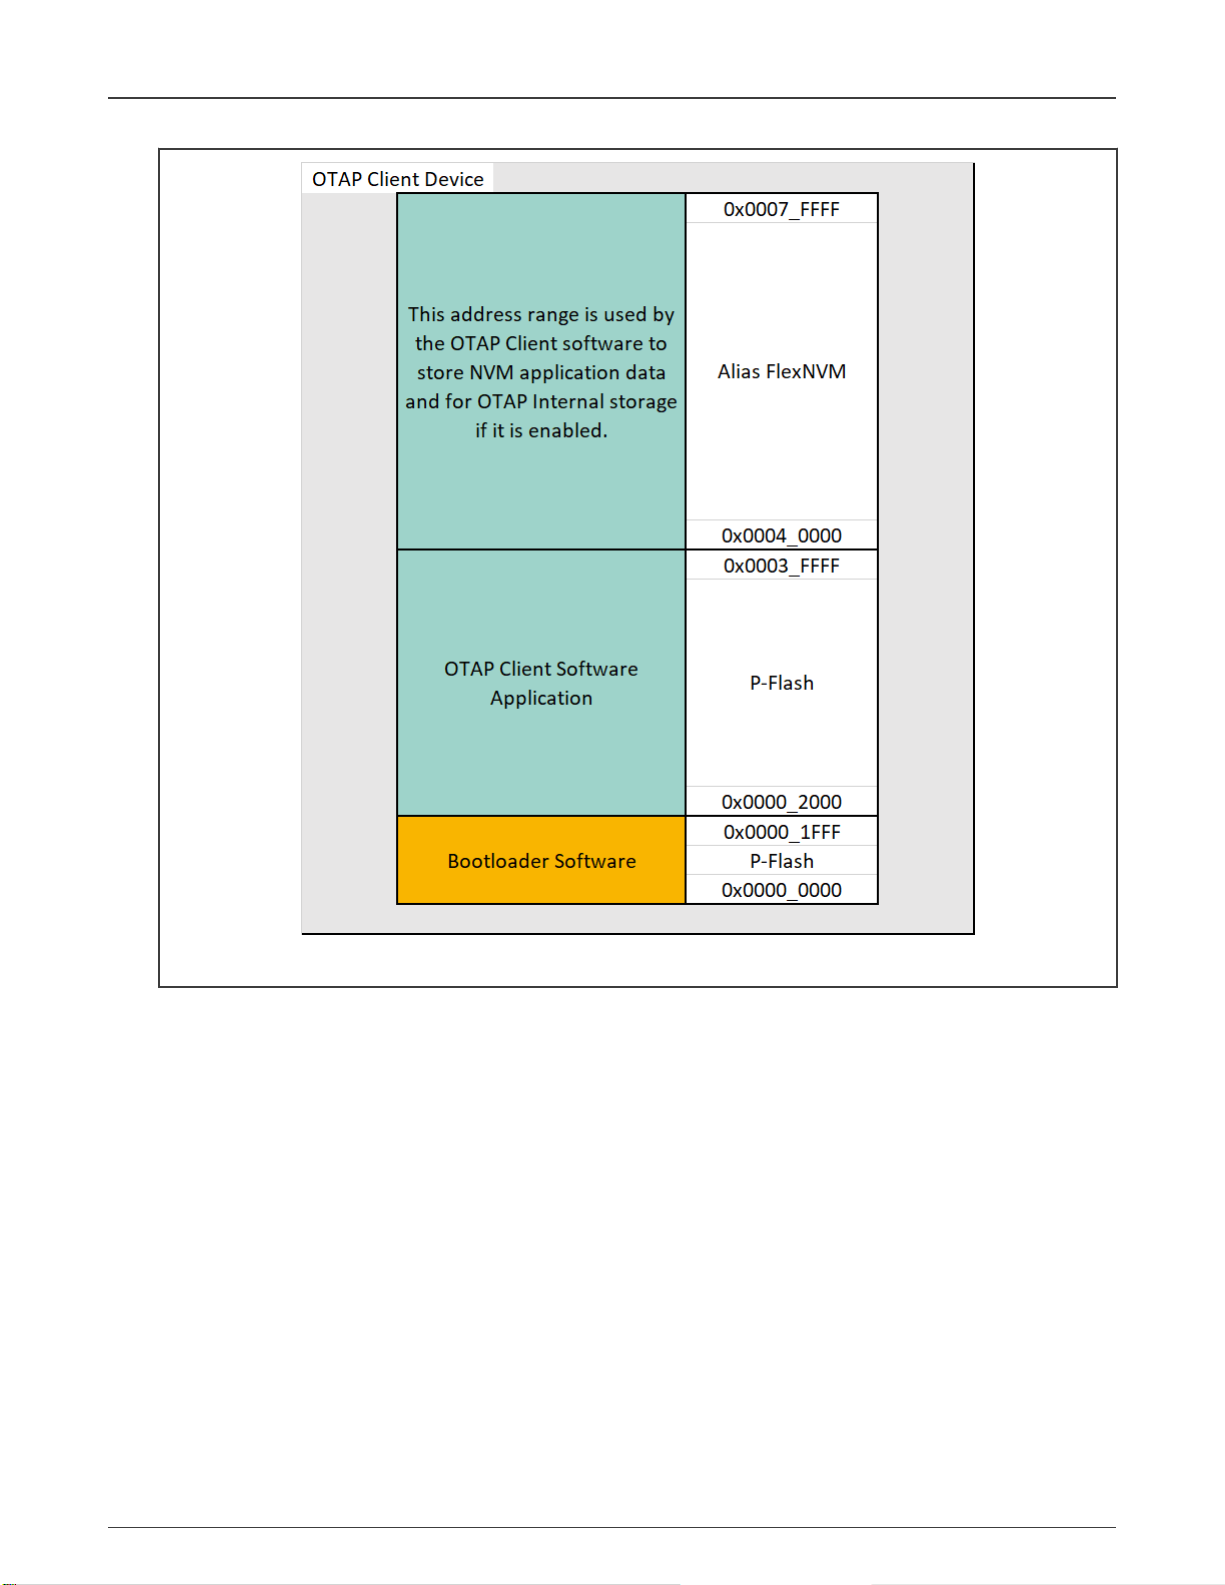
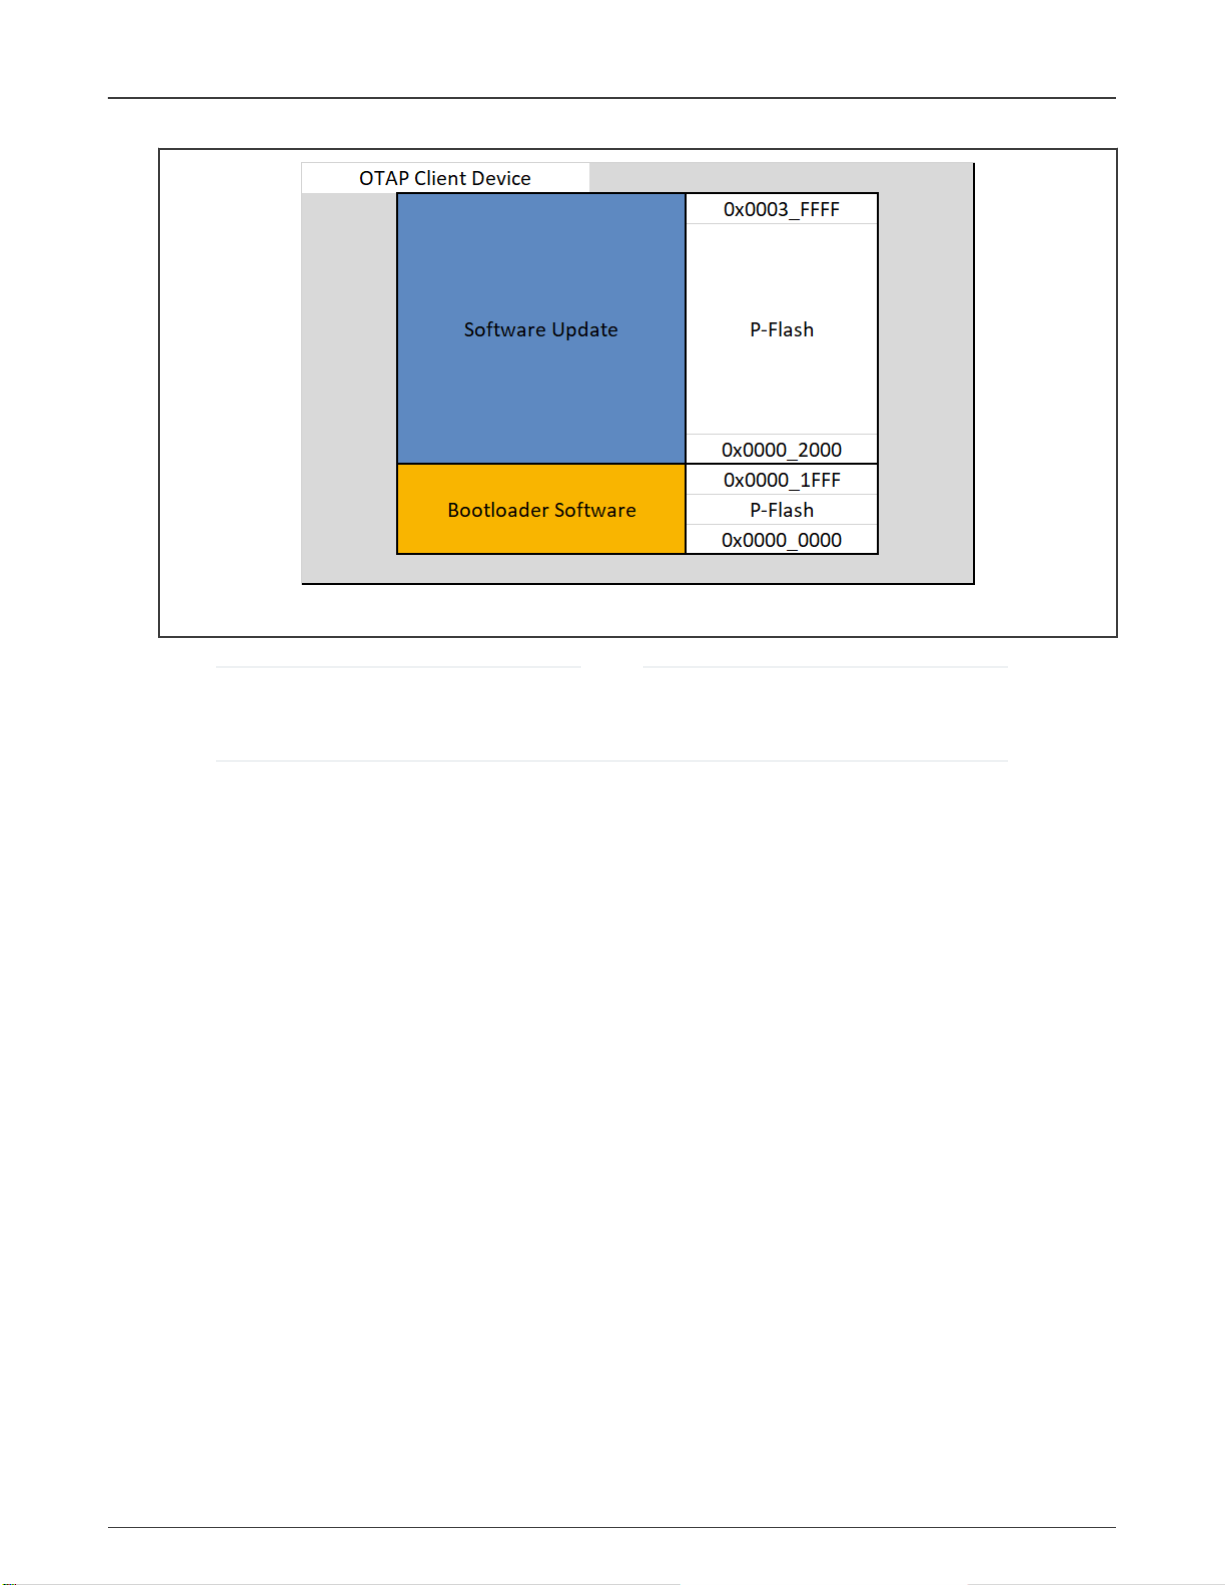
2. The OTAP application splits the P-Flash into two independent parts, the OTAP bootloader and the OTAP client.
• The OTAP bootloader verifies if there is a new image available in the OTAP client to reprogram the device.
• The OTAP client software provides the Bluetooth LE custom service needed to communicate the OTAP client
device with the OTAP server that contains the new image file.
Therefore, the OTAP client device needs to be programmed twice, first with the OTAP bootloader, and then with the
Bluetooth LE application supporting OTAP client. The mechanism is created to have two different software coexisting in the
same device and store each one in different memory regions. This is implemented by the linker file. In the KW38 device,
the bootloader application has reserved an 8 KB slot of memory from 0x0000_0000 to 0x0000_1FFF, thus the rest of the
memory is reserved, among other things, by the OTAP client application.
KW38 - Integrating the OTAP Client Service into a Bluetooth LE Peripheral Device, Rev. 0, 11/2020
Application Note 2 / 42
Page 3
NXP Semiconductors
OTAP client software
Figure 2. OTAP client software
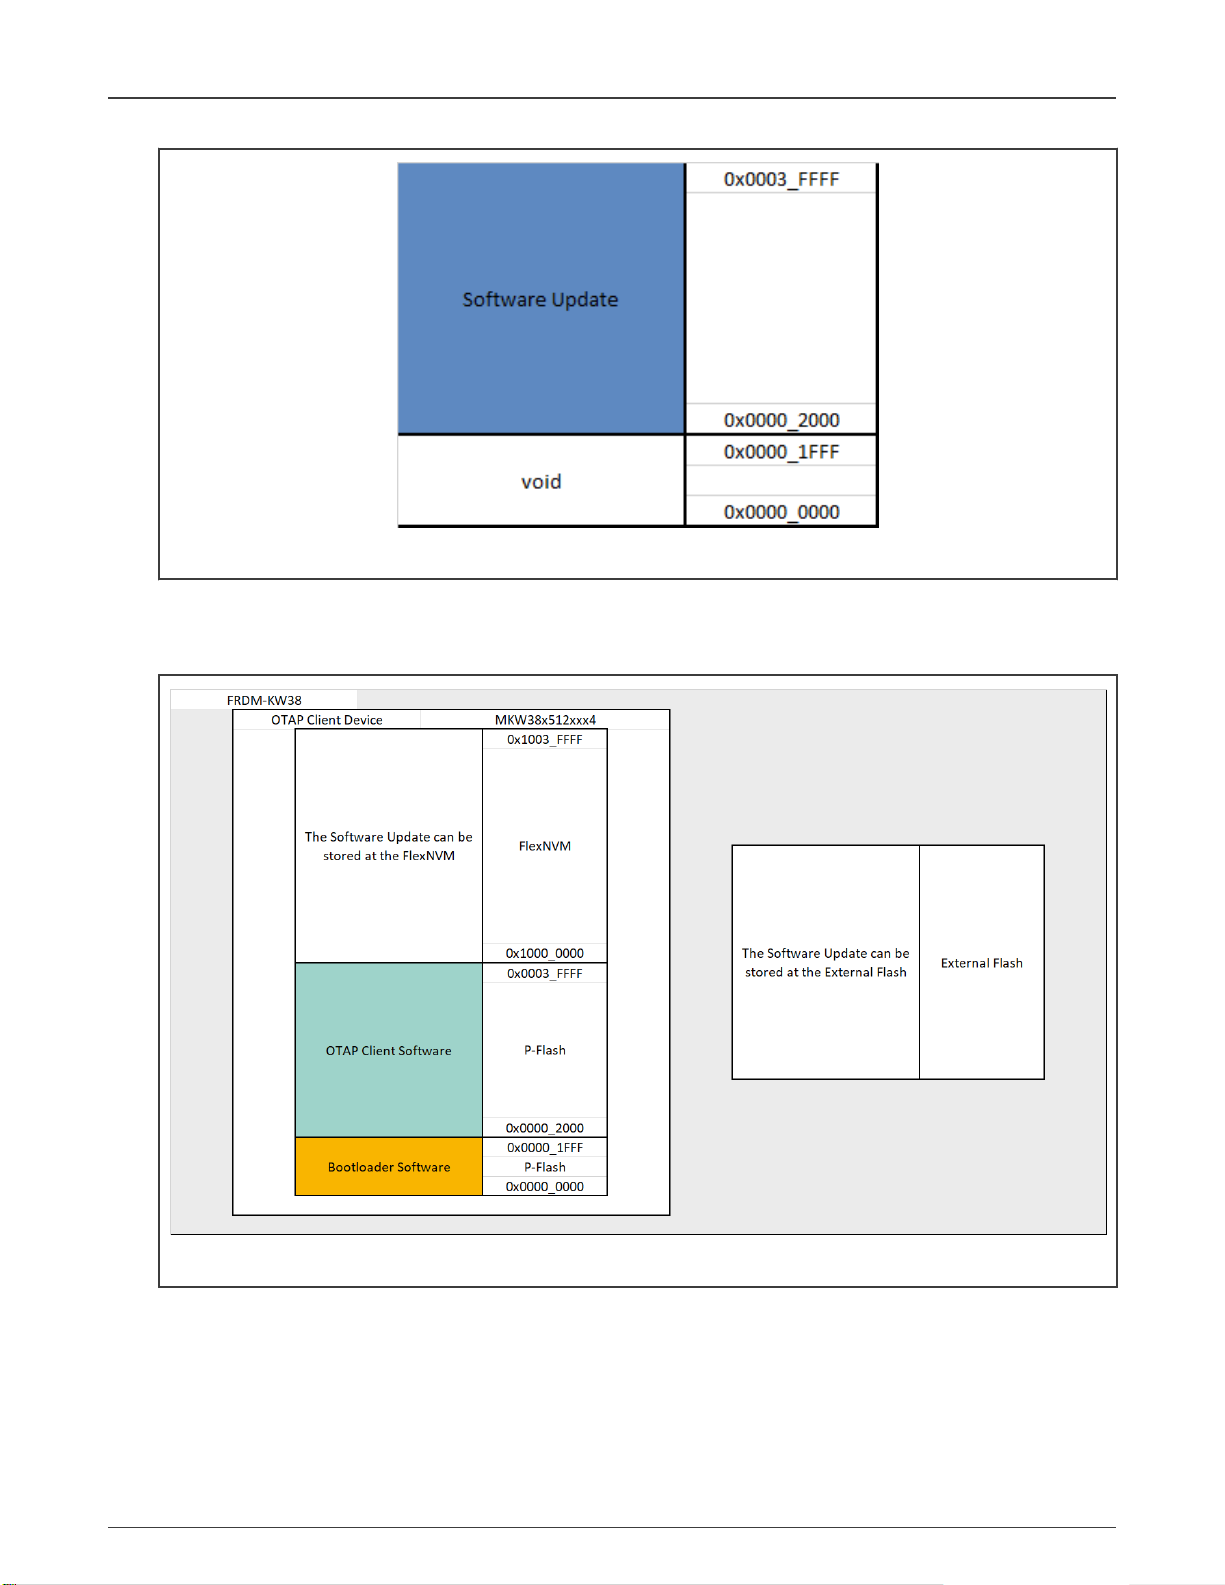
3. When generating a new image file for the OTAP client device, the developer needs to specify that the code will be stored
with an offset of 8 KB since the first addresses must be reserved for the bootloader, making use of the linker script. The
new application should contain the Bootloader Flags at the corresponding address to work properly.
KW38 - Integrating the OTAP Client Service into a Bluetooth LE Peripheral Device, Rev. 0, 11/2020
Application Note 3 / 42
Page 4
NXP Semiconductors
OTAP client software
Figure 3. Software update
4. At the connection state, the OTAP server sends the image packets, known as chunks, to the OTAP client via Bluetooth LE.
The OTAP client can store these chunks in the external SPI flash (only available on FRDM-KW38 board), or in the on-chip
FlexNVM region. The destination of the code is selectable in the OTAP client software.
Figure 4. Storage of the software update
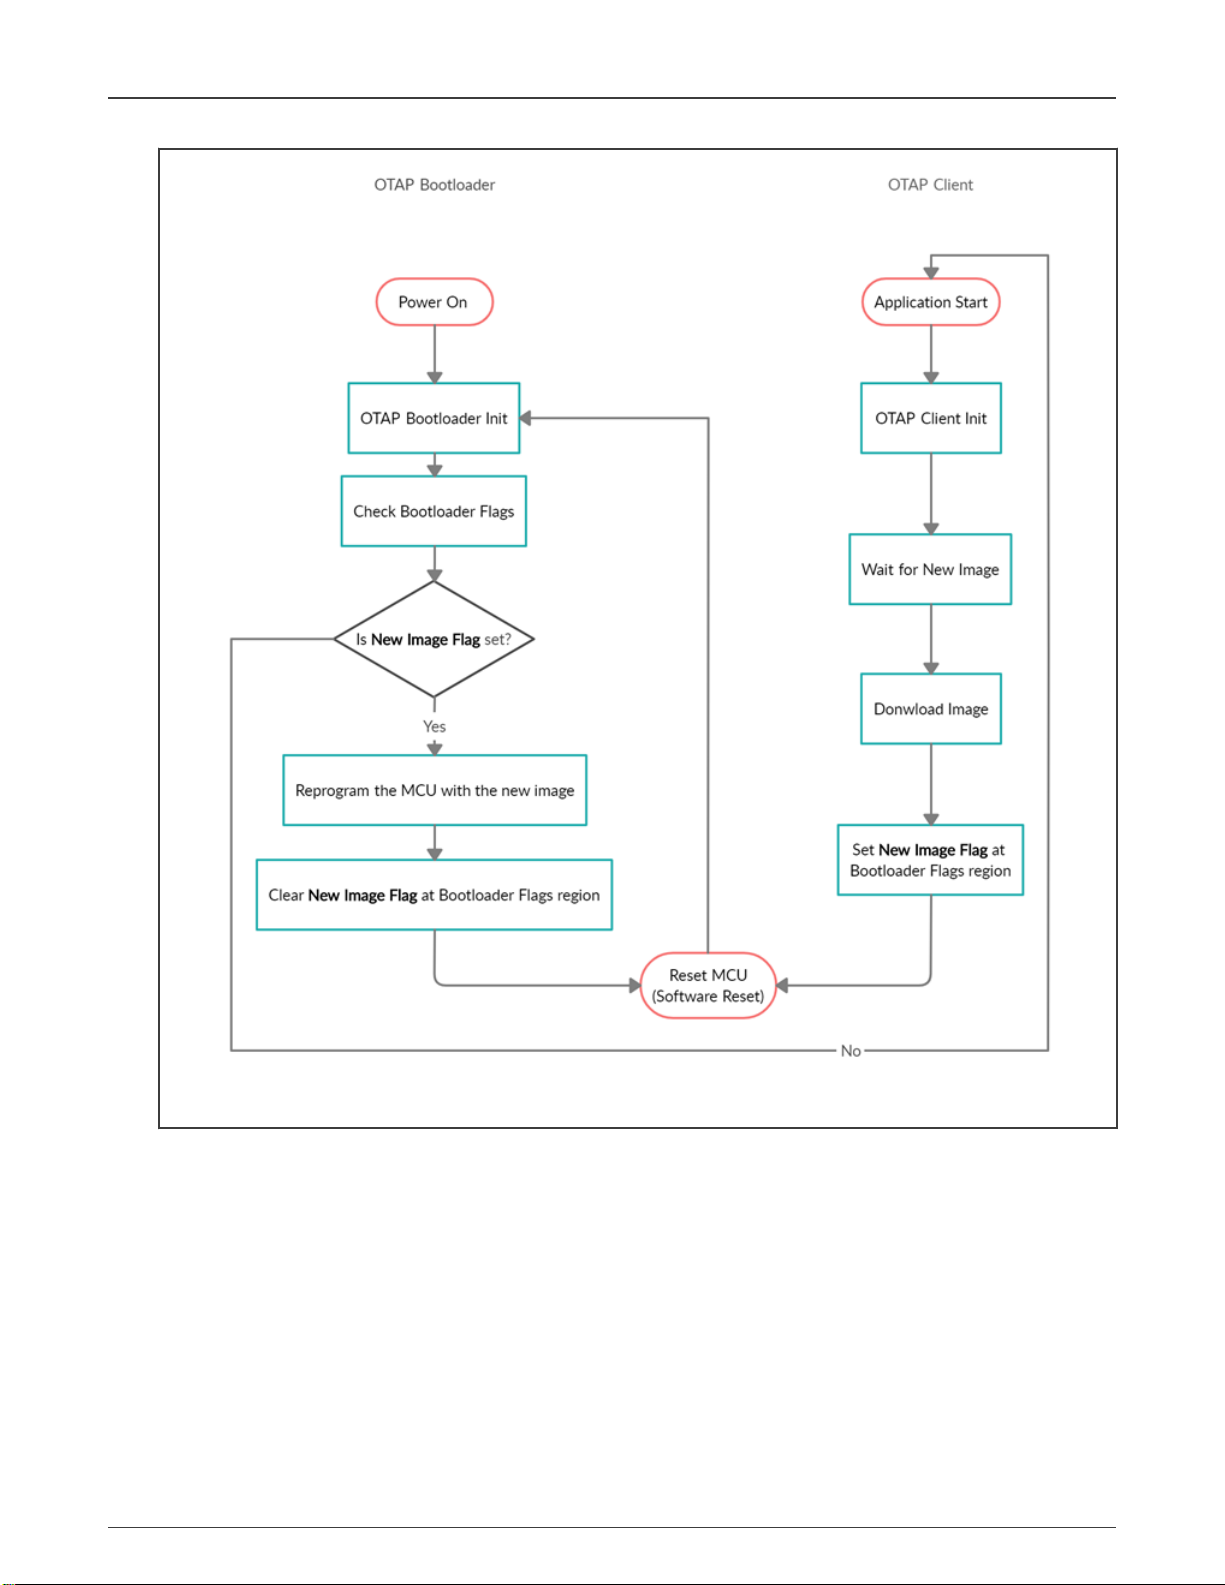
5. When the transfer of the image has finished and all chunks were sent from the OTAP server to the OTAP client, the
OTAP client software writes information, such as the source of the image update, external flash or FlexNVM, in a portion
of memory known as Bootloader Flags, and then resets the MCU to execute the OTAP bootloader code. The OTAP
bootloader reads the Bootloader Flags to get the information needed to program the device and triggers a command to
reprogram the MCU with the new application. This is shown in the figure below.
KW38 - Integrating the OTAP Client Service into a Bluetooth LE Peripheral Device, Rev. 0, 11/2020
Application Note 4 / 42
Page 5
NXP Semiconductors
OTAP client software
Figure 5. Simplified flow diagram of OTAP software
6. As the new application was built with an offset of 8 KB, the OTAP bootloader programs the device starting from the
0x0000_2000 address and the OTAP client application is overwritten by the new image. Then the OTAP bootloader triggers
a command to start the execution of the new image. If the new image does not contain the OTAP service included, the
device is not able to be programmed again due to the lack of OTAP functionality. For more description, see Advantages of
the OTAP service integration.
KW38 - Integrating the OTAP Client Service into a Bluetooth LE Peripheral Device, Rev. 0, 11/2020
Application Note 5 / 42
Page 6
NXP Semiconductors
Figure 6. Memory content at the end of the software update process
OTAP client software
NOTE
In practice, the boundary created between the OTAP client software and the software update addresses when the
internal storage is enabled, is not placed exactly in the boundary of the P-Flash and FlexNVM memory regions.
These values might change with linker settings. You can inspect the effective memory addresses in your project.
2.2 Advantages of the OTAP service integration
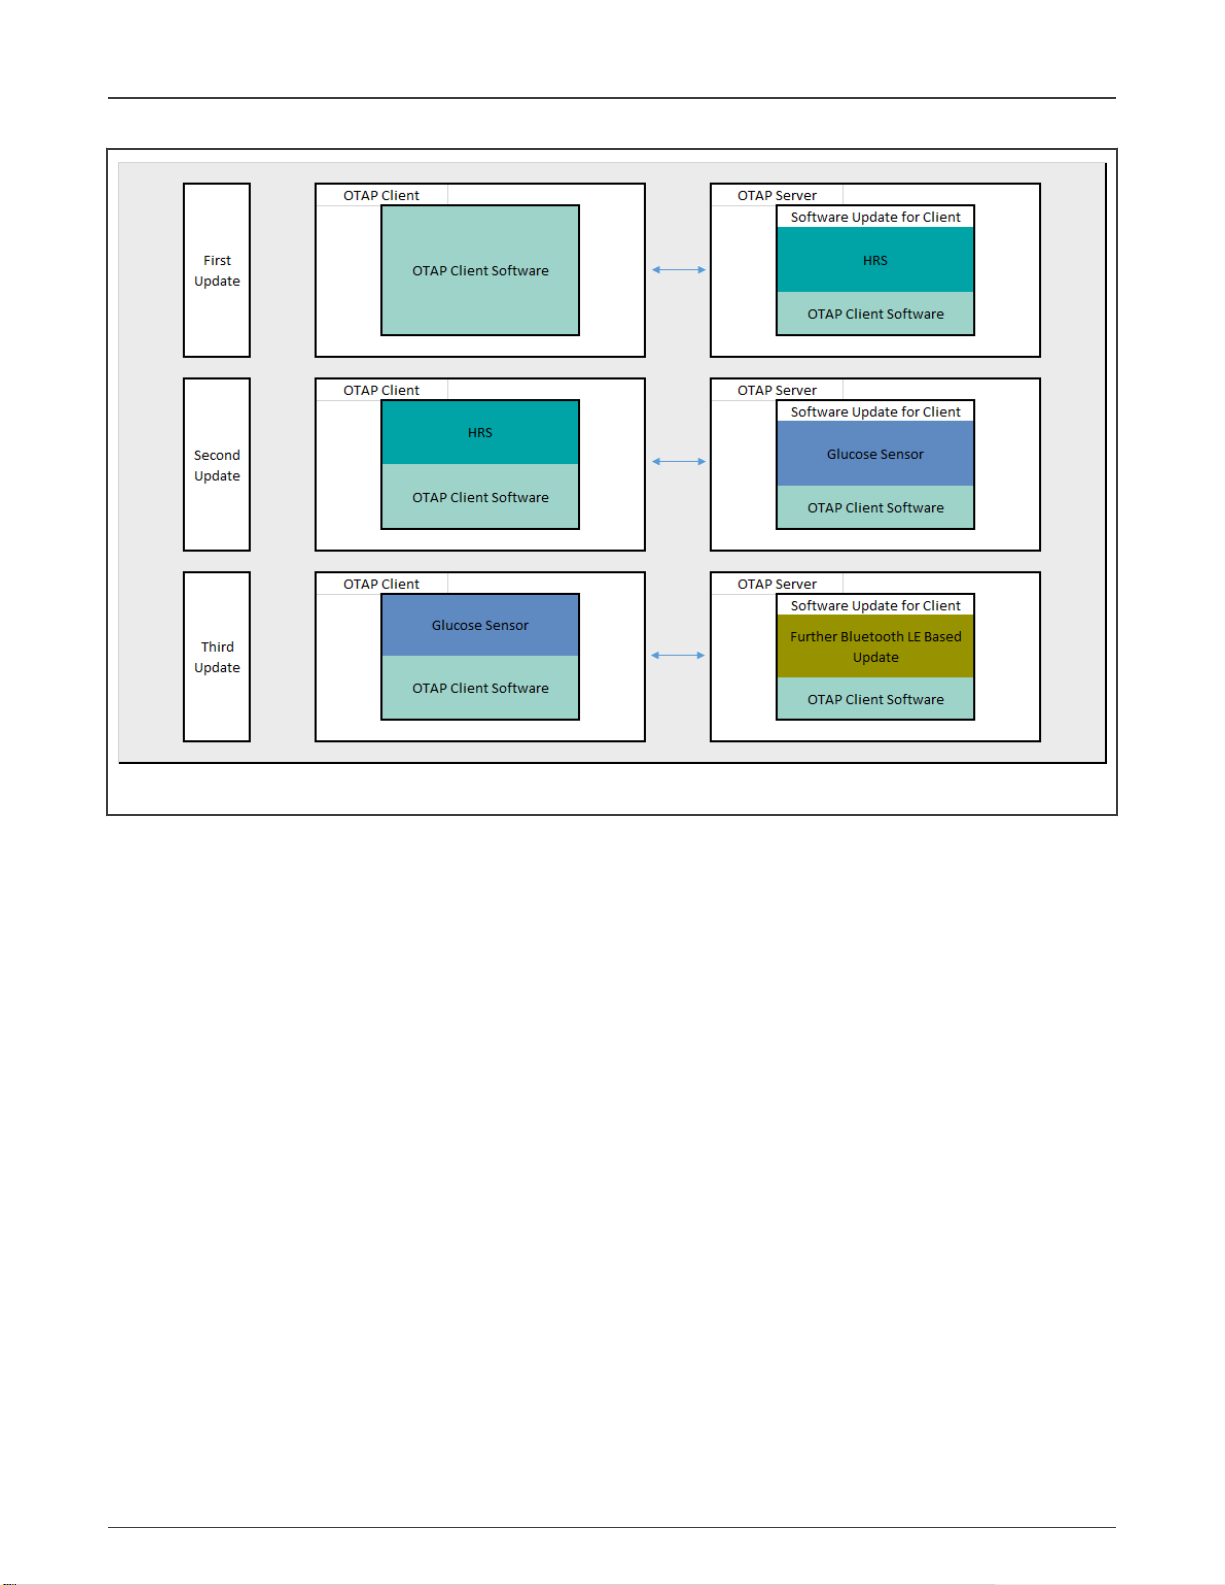
As explained in OTAP memory management during the update process, the OTAP client software can reprogram the device only
once, because it is overwritten by the new application.
Suppose that an OTAP client device is programmed with the OTAP client software and this device requests an update, for
example, a Heart Rate Sensor (HRS). The image that the OTAP server sends to the OTAP client must be the HRS. After
the reprogramming process, the device that was the OTAP client, now, has turned into an HRS. The HRS does not have the
capabilities to communicate with the OTAP server and request for another update. But if the HRS image had included the OTAP
client service as well, the device would have the possibility to request another software update, for example, a modified Glucose
Sensor with OTAP Service.
As the Glucose Sensor software includes the OTAP client, the device can request another software update from the OTAP server.
That way, the developer can continue upgrading the software as many times as needed. In other words, to be able to upgrade the
software on the OTAP client device in the future, the application sent over the air should include OTAP service support.
KW38 - Integrating the OTAP Client Service into a Bluetooth LE Peripheral Device, Rev. 0, 11/2020
Application Note 6 / 42
Page 7
NXP Semiconductors
Prerequisites
Figure 7. OTAP integration functionality example
This application note is intended as guidance to add the OTAP service to a Bluetooth LE application.
3 Prerequisites
This document is provided together with a functional demo of the OTAP service integration. The example is based on the HRS
project, available in the FRDM-KW38 SDK package and developed on the MCUXpresso IDE platform. The following are required
to complete the implementation of the HRS-OTAP integration demo:
• MCUXpresso IDE v11.0.0 or later
• FRDM-KW38 SDK
• HRS – OTAP demo package
• FRDM-KW38 board
• A smartphone with IoT Toolbox NXP app, available for Android and iOS.
3.1 Downloading and installing the software development kit
This chapter provides all the steps needed to download the SDK for the FRDM-KW38 used as a starting point.
1. Navigate to the MCUXpresso website.
2. Click Select Development Board. Log in with your registered account.
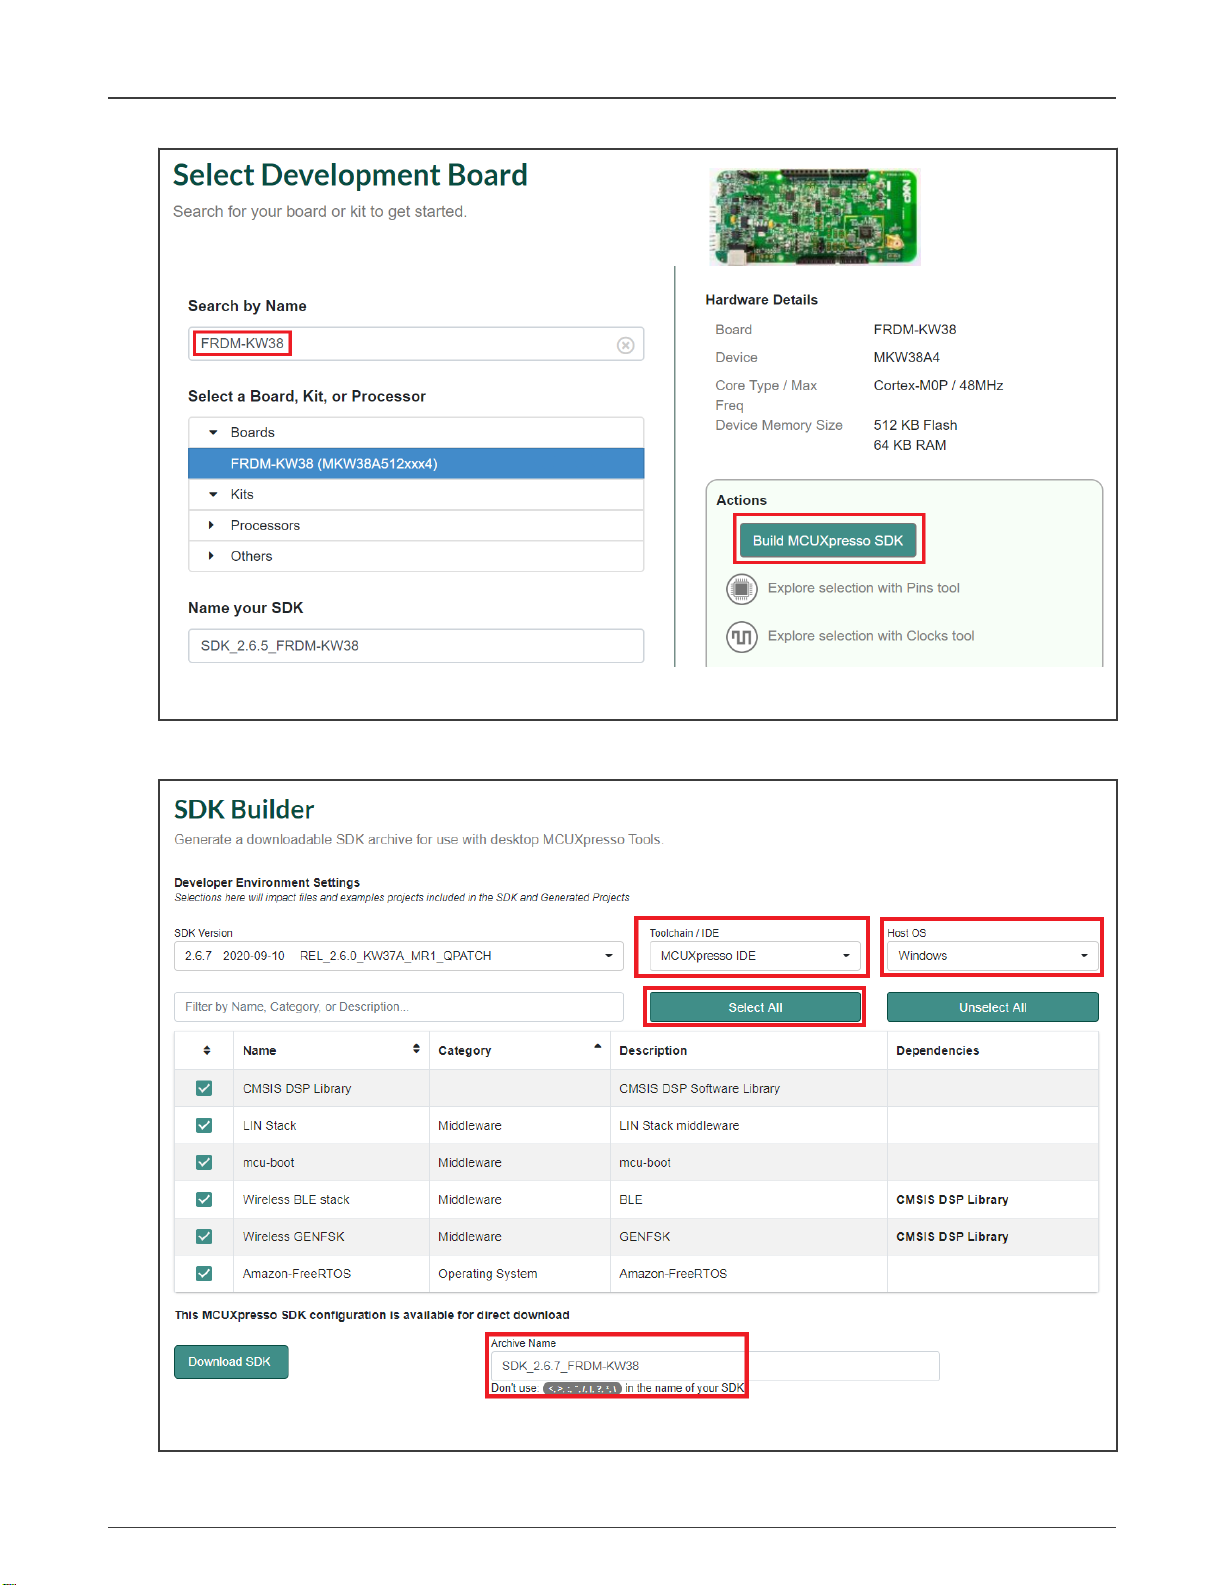
3. In the Search by Name field, search for FRDM-KW38. Then click the suggested board and click Build MCUXpresso
SDK.
KW38 - Integrating the OTAP Client Service into a Bluetooth LE Peripheral Device, Rev. 0, 11/2020
Application Note 7 / 42
Page 8
NXP Semiconductors
Prerequisites
Figure 8. Building the FRDM-KW38 SDK package
4. Select MCUXpresso IDE in the Toolchain/IDE combo box. Select the supported OS and provide the name to identify the
package in your MCUXpresso Dashboard.
Figure 9. Customizing the installation settings
KW38 - Integrating the OTAP Client Service into a Bluetooth LE Peripheral Device, Rev. 0, 11/2020
Application Note 8 / 42
Page 9
NXP Semiconductors
Customizing a based Bluetooth LE demo to integrate the OTAP service
5. Click Download SDK and it will take a few minutes until the system gets the package into your account on the
MCUXpresso web page. Read and accept the license agreement. The SDK download starts automatically on your PC.
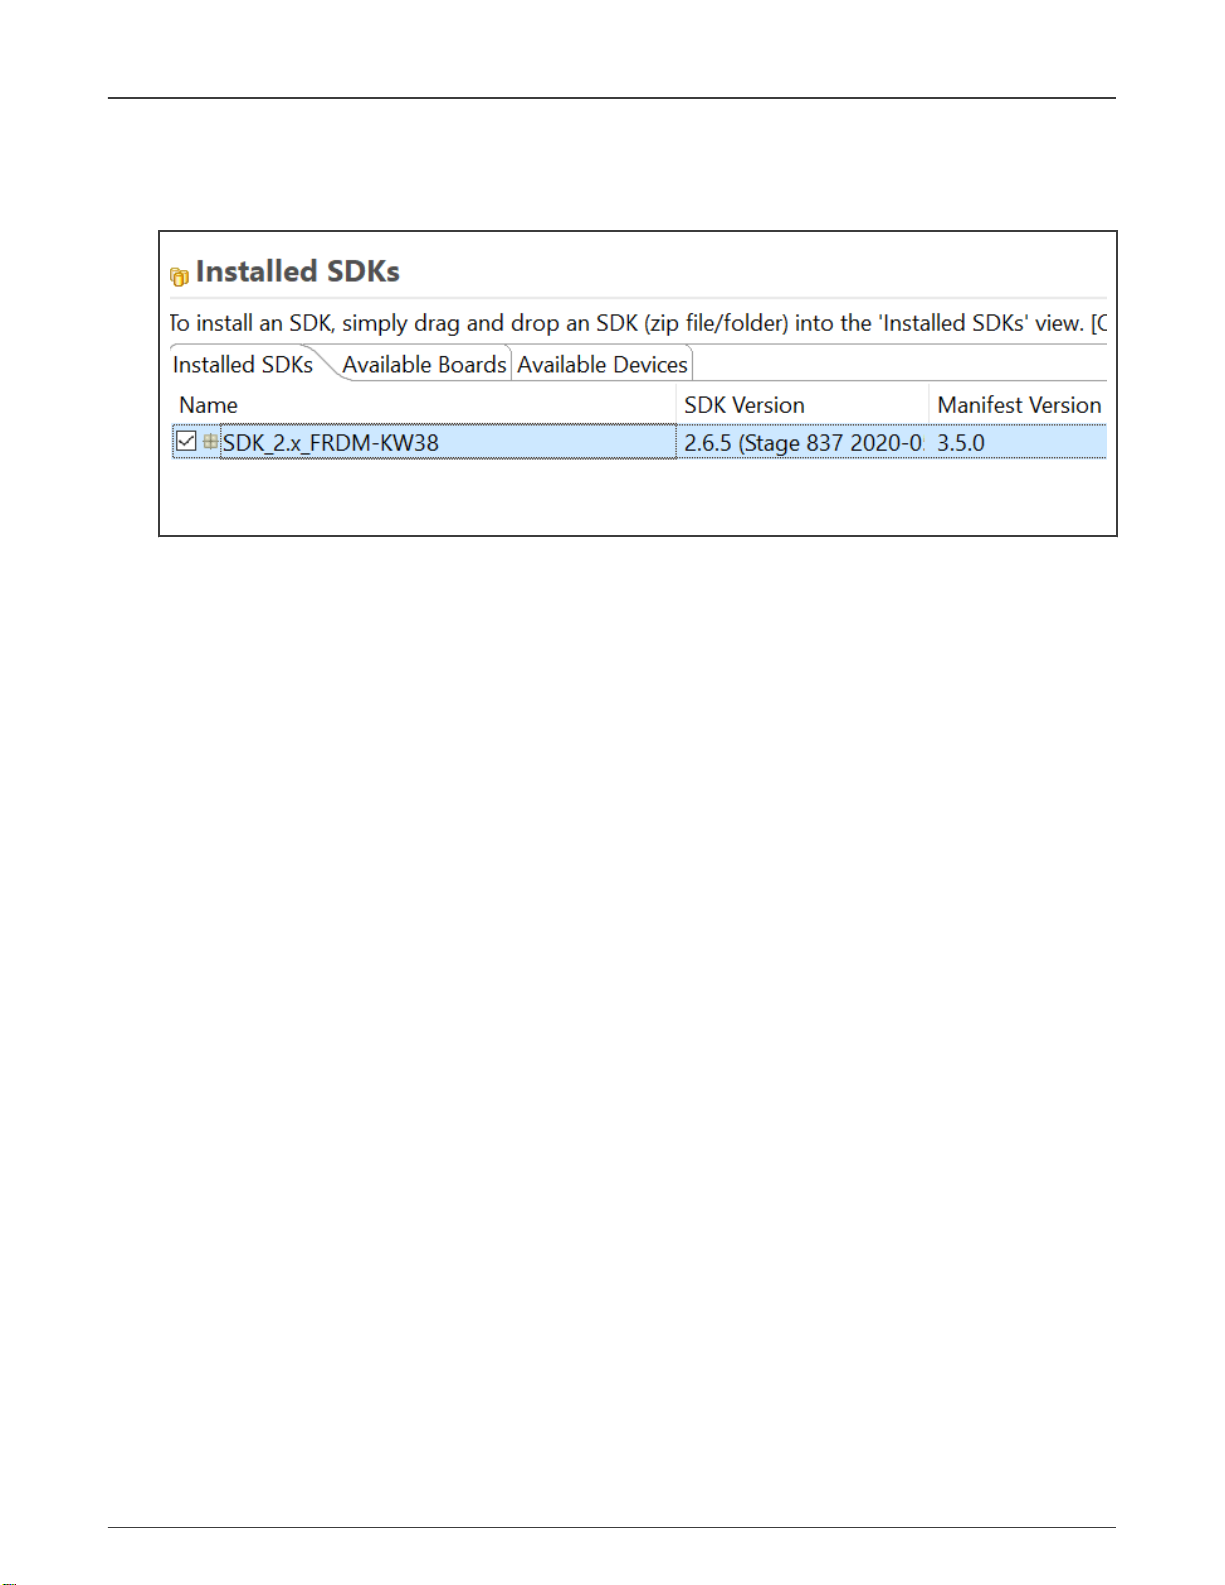
6. Open MCUXpresso IDE. Drag and drop the FRDM-KW36 SDK zip in the Installed SDK’s list.
Figure 10. Importing SDK package to MCUXpresso IDE
Now, you have downloaded and installed the SDK package for the FRDM-KW38 board.
4 Customizing a based Bluetooth LE demo to integrate the OTAP service
The following steps describe the process of customizing a Bluetooth LE demo imported from the SDK to integrate the OTAP
service. This guide uses a Heart Rate Sensor project (HRS) as a starting point, so some steps may differ for another Bluetooth
LE SDK example.
4.1 Importing the OTAP Bluetooth LE service and framework software into the HRS project
To integrate the OTAP client service in your application, you will need to import additional software that is not included in other
SDK examples by default. Hence, the first step consists in to make a comparison between your project and the OTAP client SDK
project to locate which files you will need to merge in your project to support this service in your application. A comparison between
the HRS (left) and the OTAP client (right) is shown in Figure 11. Files and folders highlighted in red are part of the OTAP client
software, but not in the HRS. Consequently, we need to incorporate these files in our HRS example to add the OTAP feature in
this project. If you are interested in adding OTAP to other Bluetooth LE SDK projects or in your custom Bluetooth LE project, you
need to look for the missing files and incorporate them following the same methodology described in this example.
KW38 - Integrating the OTAP Client Service into a Bluetooth LE Peripheral Device, Rev. 0, 11/2020
Application Note 9 / 42
Page 10

NXP Semiconductors
Customizing a based Bluetooth LE demo to integrate the OTAP service
Figure 11. Source tree comparison
KW38 - Integrating the OTAP Client Service into a Bluetooth LE Peripheral Device, Rev. 0, 11/2020
Application Note 10 / 42
Page 11

NXP Semiconductors
Customizing a based Bluetooth LE demo to integrate the OTAP service
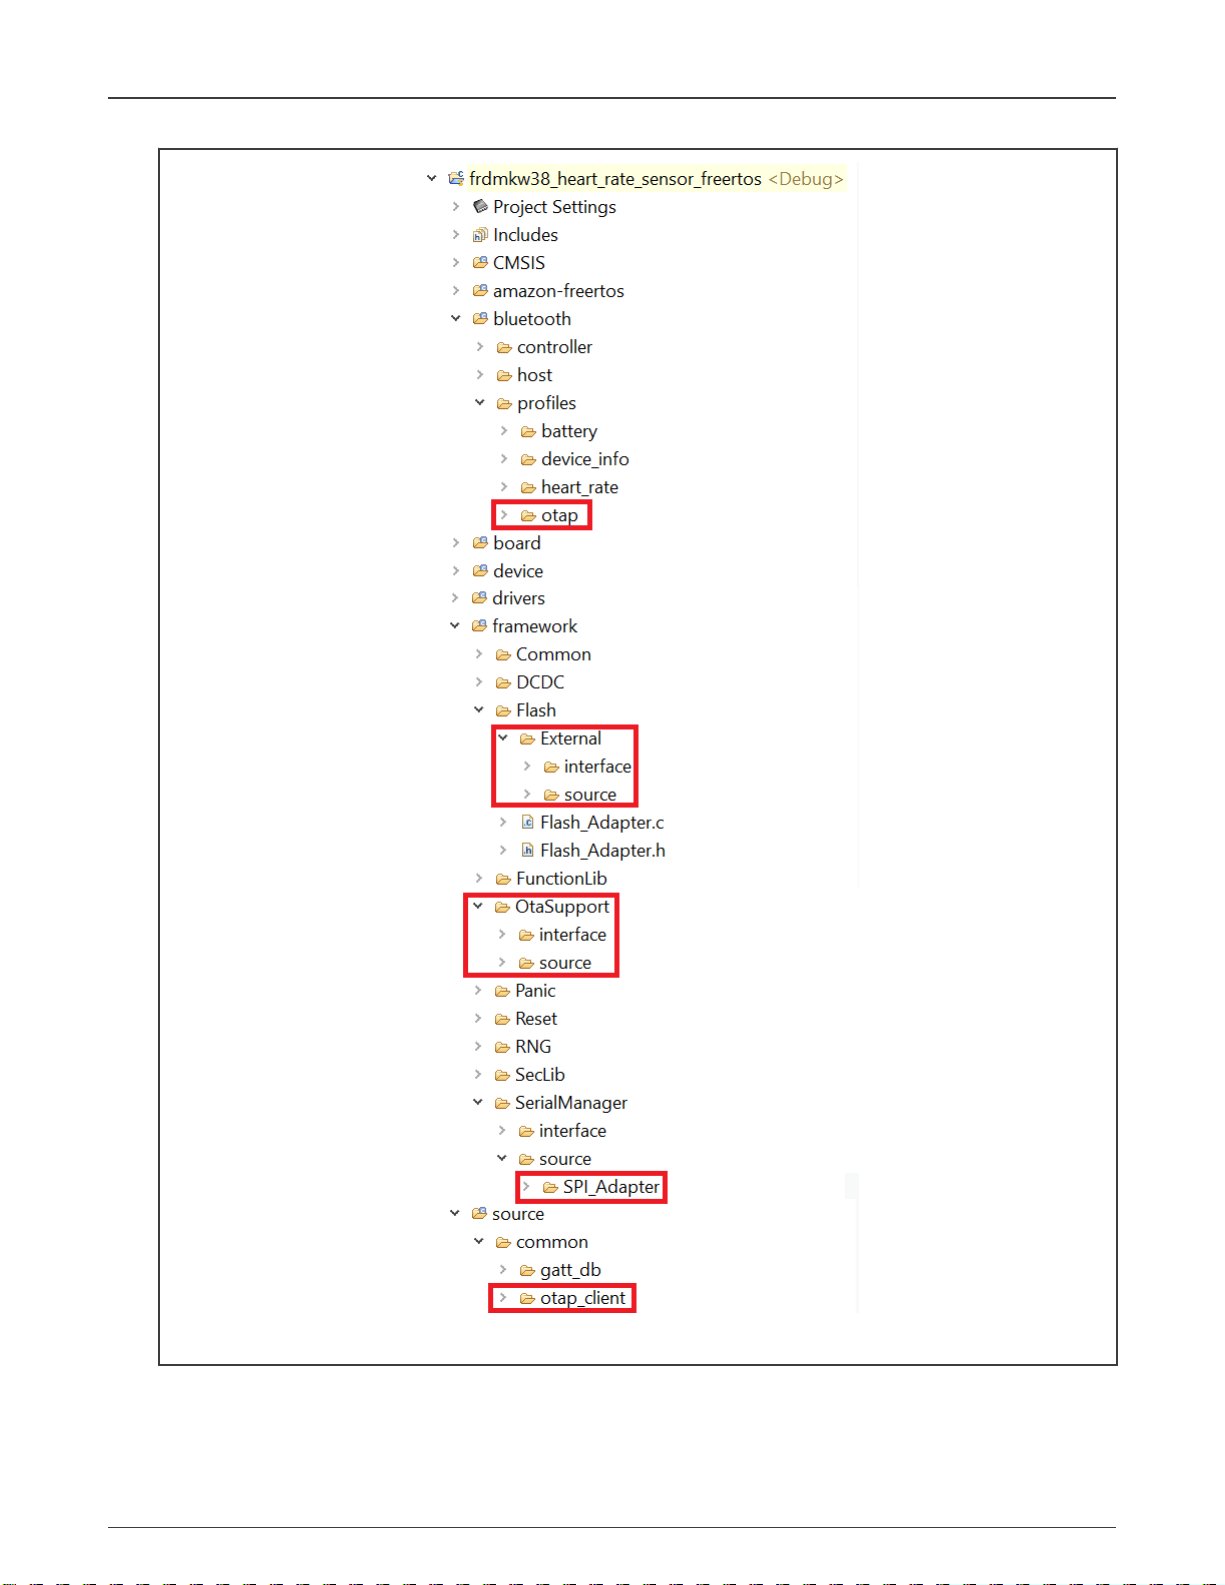
The folders and files that are in OTAP but not in HRS, must be imported in your HRS project. For instance, in Figure 11, the
followings are required to be imported:
• bluetooth -> profiles -> otap
• framework -> Flash -> External
• framework ->OtaSupport
• framework ->SerialManager ->source ->SPI_Adapter
• source -> common -> otap_client
• linkscripts -> main_text_section.ldt
To include these folders and source files in your project, perform the following steps.
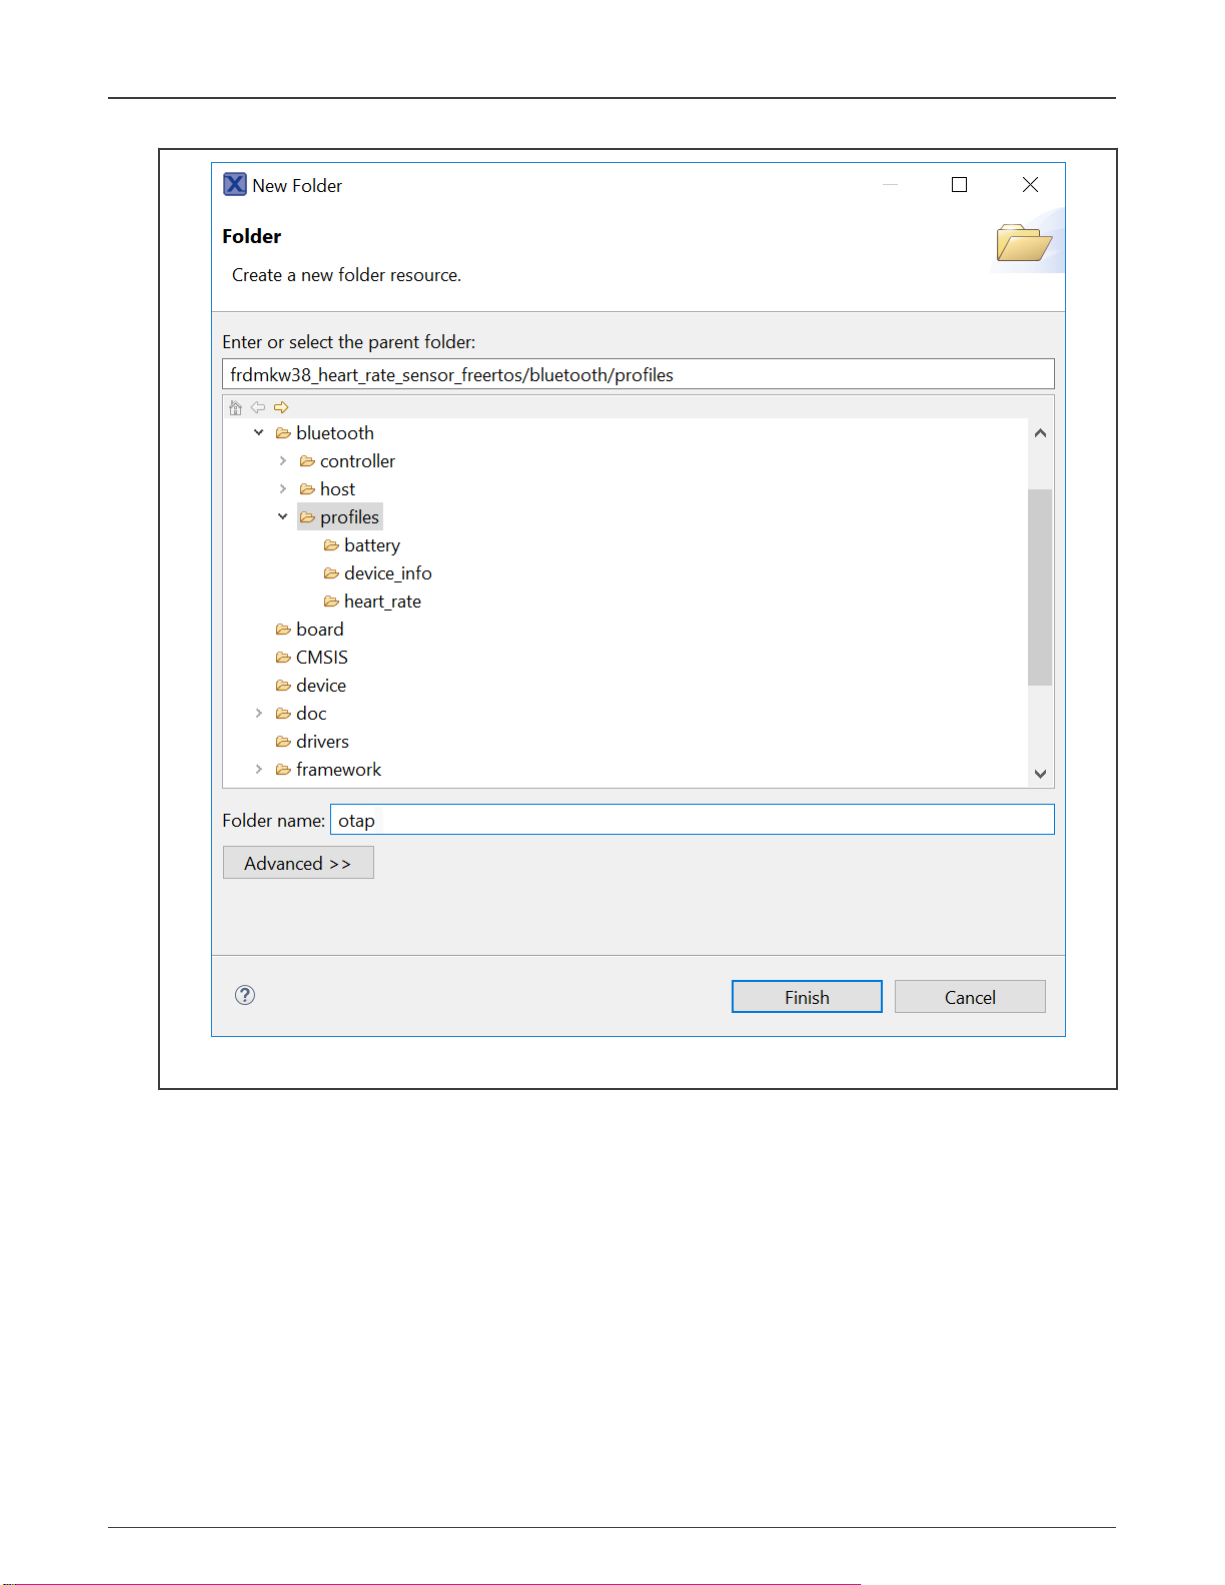
1. Expand the bluetooth and framework folders in your workspace. Select the folder needed for updates and click the right
mouse button. Select New -> Folder. The Folder window appears to provide the same name as the missing folder in the
source directory, as shown in Figure 12.
KW38 - Integrating the OTAP Client Service into a Bluetooth LE Peripheral Device, Rev. 0, 11/2020
Application Note 11 / 42
Page 12
NXP Semiconductors
Customizing a based Bluetooth LE demo to integrate the OTAP service
Figure 12. Creating the Bluetooth and Framework folders
2. Repeat Step 1 for the left folders. The result look similar as Figure 13.
KW38 - Integrating the OTAP Client Service into a Bluetooth LE Peripheral Device, Rev. 0, 11/2020
Application Note 12 / 42
Page 13
NXP Semiconductors
Customizing a based Bluetooth LE demo to integrate the OTAP service
Figure 13. HRS directory updated
3. Copy the files inside all the recently created folders from the OTAP client and save it into your project. Ensure that all the
files are in the same folder from the HRS side. For this example, these files are listed as below.
• otap_interface.h and otap_service.c in the bluetooth -> profiles -> otap folder.
KW38 - Integrating the OTAP Client Service into a Bluetooth LE Peripheral Device, Rev. 0, 11/2020
Application Note 13 / 42
Page 14

NXP Semiconductors
• Eeprom.h in the framework -> Flash -> External -> Interface folder.
• Eeprom source files in the framework -> Flash -> External -> Source folder.
• OtaSupport.h in the framework -> OtaSupport -> Interface folder.
• OtaSupport.c in the framework -> OtaSupport -> Source folder.
• SPI_Serial_Adapter.h and SPI_Serial_Adapter.c in the framework -> SerialManager -> source-> ;SPI_Adapter
folder.
• main_text_section.ldt in linkscripts folder.
• otap_client.h and otap_client.c in the source -> common -> otap_client folder.
Customizing a based Bluetooth LE demo to integrate the OTAP service
Figure 14. OTAP files integrated into the HRS project
4. Navigate to Project -> Properties in MCUXpresso IDE. Go to C/C++ Build -> Settings -> Tool Settings -> MCU C Compiler
-> Includes. Click the icon next to the Include paths textbox, as shown in Figure 15. In the new window that appears, click
the Workspace button.
KW38 - Integrating the OTAP Client Service into a Bluetooth LE Peripheral Device, Rev. 0, 11/2020
Application Note 14 / 42
Page 15

NXP Semiconductors
Customizing a based Bluetooth LE demo to integrate the OTAP service
Figure 15. Include paths perspective
5. Deploy your directory tree in the folder selection window. Select the following folders and click OK to save the changes.
• bluetooth -> profiles -> otap
• framework -> Flash -> External -> Interface
• framework -> OtaSupport -> Interface
• framework -> SerialManager -> source -> SPI_Adapter
• source -> common -> otap_client
Ensure that these paths were imported onto the Include paths view.
KW38 - Integrating the OTAP Client Service into a Bluetooth LE Peripheral Device, Rev. 0, 11/2020
Application Note 15 / 42
Page 16

NXP Semiconductors
Customizing a based Bluetooth LE demo to integrate the OTAP service
Figure 16. Including the OTAP folders in the project paths
At this point, you have included the OTAP client Bluetooth and Framework services in the HRS project.
4.2 Main modifications in the source files
Once you have included the OTAP client folders and files in your custom project, the next step is to inspect the differences between
the source files of the OTAP client and your Bluetooth LE application and add the code needed to integrate the OTAP Service.
The following sections explain the main aspects that you should focus on.
4.2.1 pin_mux.h and pin_mux.c
These files contain the pin initialization routines. You can find
the OTAP Client makes use of the SPI protocol to download the software update on the external flash, when the external storage
method is selected, you must add the following codes, which are the initialization of the pins for this module.
• pin_mux.h
void BOARD_InitSPI(void);
KW38 - Integrating the OTAP Client Service into a Bluetooth LE Peripheral Device, Rev. 0, 11/2020
Application Note 16 / 42
pin_mux.c
and
pin_mux.h
files at the board folder in your project. As
Page 17

NXP Semiconductors
Customizing a based Bluetooth LE demo to integrate the OTAP service
• pin_mux.c
void BOARD_InitSPI(void)
{
/* Port C Clock Gate Control: Clock enabled */
CLOCK_EnableClock(kCLOCK_PortC);
/* PORTC16 (pin 45) is configured as SPI0_SCK */
PORT_SetPinMux(PORTC, 16U, kPORT_MuxAlt2);
/* PORTC17 (pin 46) is configured as SPI0_SOUT */
PORT_SetPinMux(PORTC, 17U, kPORT_MuxAlt2);
/* PORTC18 (pin 47) is configured as SPI0_SIN */
PORT_SetPinMux(PORTC, 18U, kPORT_MuxAlt2);
/* PORTC19 (pin 48) is configured as SPI0_PCS0 */
PORT_SetPinMux(PORTC, 19U, kPORT_MuxAlt2);
}
4.2.2 app_preinclude.h
The
app_preinclude.h
power enablement, DCDC configuration, Bluetooth LE security definitions, and the hardware configuration macros. The OTAP
client software requires some definitions that are not included for other Bluetooth LE SDK projects. The following definitions must
be included in your software update.
file contains many preprocessor directives that configure some functionalities of the project, such as low
• gEepromType_d
• gEepromParams_WriteAlignment_c
• gOtapClientAtt_d
The OTAP HRS demo, sets the following values:
1. gEepromType_d: Defines the storage method between the AT45DB041E external flash on the FRDM-KW38 board (default
value) or the FlexNVM on-chip memory. You can also select among other memory devices for custom boards, by referring
to the list of EEPROM devices in the
/* Specifies the type of EEPROM available on the target board */
#define gEepromType_d gEepromDevice_AT45DB041E_c
Eeprom.h
header file at
framework/Flash/External/Interface
).
2. gEepromParams_WriteAlignment: Defines the offset of the software update for programming. Do not modify the
default value.
/* Eeprom Write alignment for Bootloader flags. */
#define gEepromParams_WriteAlignment_c 8
3. gOtapClientAtt_d: It sets the ATT transference method for OTA updates. It must be set to 1 for own purpose.
#define gOtapClientAtt_d 1
4.2.3 app_config.c
The
app_config.c
source file contains some structures that configure the advertising and scanning parameters and data. It also
contains the access security requirements for each service in the device.
The advertising data announces the list of services that the Bluetooth LE advertiser device (HRS – OTAP) contains. This
information is used by the Bluetooth LE scanner, to filter out the advertiser devices that do not contain the services required.
Hence, you must include the OTAP client service in the advertising data, to announce to the OTAP server, the availability of
this service.
KW38 - Integrating the OTAP Client Service into a Bluetooth LE Peripheral Device, Rev. 0, 11/2020
Application Note 17 / 42
Page 18

NXP Semiconductors
Customizing a based Bluetooth LE demo to integrate the OTAP service
This is done at the scan response data as shown in the code below.
static const gapAdStructure_t scanResponseStruct[1] = {
{
.length = NumberOfElements(uuid_service_otap) + 1,
.adType = gAdIncomplete128bitServiceList_c,
.aData = (uint8_t *)uuid_service_otap
}
};
gapScanResponseData_t gAppScanRspData =
{
NumberOfElements(scanResponseStruct),
(void *)scanResponseStruct
};
NOTE
As the OTAP client service is announced in the scan response, you must ensure that the OTAP server device is
configured to perform active scanning. This is already done by the IoT Toolbox App, but the OTAP sever SDK
example does not. You can change the scanning settings of the OTAP server SDK example at the
file in the gScanParams struct.
app_config.c
Additionally, you need to include the access security requirements for the OTAP service. This is done at the
gapServiceSecurityRequirements_t struct. You can customize these parameters for your purpose. The HRS – OTAP demo
sets the following parameters, focus on the OTAP service handle:
static const gapServiceSecurityRequirements_t serviceSecurity[4] = {
{
.requirements = {
.securityModeLevel = gSecurityMode_1_Level_3_c,
.authorization = FALSE,
.minimumEncryptionKeySize = gDefaultEncryptionKeySize_d
},
.serviceHandle = service_heart_rate
},
{
.requirements = {
.securityModeLevel = gSecurityMode_1_Level_3_c,
.authorization = FALSE,
.minimumEncryptionKeySize = gDefaultEncryptionKeySize_d
},
.serviceHandle = service_otap
},
{
.requirements = {
.securityModeLevel = gSecurityMode_1_Level_3_c,
.authorization = FALSE,
.minimumEncryptionKeySize = gDefaultEncryptionKeySize_d
},
.serviceHandle = service_battery
},
{
.requirements = {
.securityModeLevel = gSecurityMode_1_Level_3_c,
.authorization = FALSE,
.minimumEncryptionKeySize = gDefaultEncryptionKeySize_d
},
.serviceHandle = service_device_info
KW38 - Integrating the OTAP Client Service into a Bluetooth LE Peripheral Device, Rev. 0, 11/2020
Application Note 18 / 42
Page 19

NXP Semiconductors
Customizing a based Bluetooth LE demo to integrate the OTAP service
}
};
Last modification requires as well, to increase the index of the number of services in the deviceSecurityRequirements struct.
gapDeviceSecurityRequirements_t deviceSecurityRequirements = {
.pMasterSecurityRequirements = (void*)&masterSecurity,
.cNumServices = 4,
.aServiceSecurityRequirements = (void*)serviceSecurity
};
4.2.4 gatt_db.h and gatt_uuid128.h
The
gatt_db.h
device). The most important step of this guide is to include the list of the OTAP client attributes into the device’s database. It is
recommended to open the OTAP client SDK example, and your Bluetooth LE demo in order to compare both GATT databases.
Figure 17 shows the OTAP client portion of the database that defines the OTAP client service.
header file contains the list of attributes that, together, shapes the profile of the GATT server (HRS-OTAP client
Figure 17. OTAP client service
The profile built within the
gatt_db.h
database for the HRS – OTAP demo has the architecture depicted in Figure 18.
KW38 - Integrating the OTAP Client Service into a Bluetooth LE Peripheral Device, Rev. 0, 11/2020
Application Note 19 / 42
Page 20

NXP Semiconductors
Customizing a based Bluetooth LE demo to integrate the OTAP service
Figure 18. HRS – OTAP profile
The
gatt_uuid128.h
header file contains all the custom UUID definitions and its assignation. The
gatt_uuid128.h
does not contain
definitions in the original HRS SDK project because the heart rate and the battery services are adopted by the Bluetooth SIG.
However, the OTAP service and its characteristics need to be specified by the developer as a 128 – UUID. Figure 19 shows how
to implement the 128 – UUID assignation for the OTAP service.
Figure 19. HRS – OTAP 128 – UUID definitions
4.2.5 heart_rate_sensor.c
The
heart_rate_sensor.c
performs, before, during and after to create a connection. The following steps are the main changes to integrate the OTAP service.
1. Merge the missing #include preprocessor directives to reference the OTAP files on your project, except
Figure 20 shows a comparison between HRS (left) and OTAP client (right) application files. This step will depend on your
Application Note 20 / 42
is the main source file at the application level. Here are managed all the procedures that the device
otap_client_att.h
KW38 - Integrating the OTAP Client Service into a Bluetooth LE Peripheral Device, Rev. 0, 11/2020
.
Page 21

NXP Semiconductors
Customizing a based Bluetooth LE demo to integrate the OTAP service
software since it might share different files than this example. The results are similar as depicted in Figure 21, before (HRS
left), after (HRS-OTAP right).
Figure 20. Comparison between HRS (left) and OTAP (right) includes
KW38 - Integrating the OTAP Client Service into a Bluetooth LE Peripheral Device, Rev. 0, 11/2020
Application Note 21 / 42
Page 22

NXP Semiconductors
Customizing a based Bluetooth LE demo to integrate the OTAP service
Figure 21. Merging the OTAP files into the project, before (HRS left) and after (HRS-OTAP right)
2. Add the function prototypes and global variables that are used by the OTAP client software. See the comparison in Figure
22 between HRS (left) and OTAP (right). As mentioned in the last step, this might depend on your application. For this
example, you can skip merging the appTimerId variable in your Temperature Collector project, since this is used in the
OTAP client to create an instance of a timer that will not implement in this example. The results should be similar as depicted
in Figure 23.
KW38 - Integrating the OTAP Client Service into a Bluetooth LE Peripheral Device, Rev. 0, 11/2020
Application Note 22 / 42
Page 23

NXP Semiconductors
Figure 22. Comparison between HRS (left) and OTAP (right) prototypes
Customizing a based Bluetooth LE demo to integrate the OTAP service
Figure 23. Merging the OTAP prototypes into the project, before (HRS left) and after (HRS-OTAP right)
3. Locate the
BleApp_Config
function. The
BleApp_Config
function configures the GAP role of the device (HRS – OTAP is
a peripheral device), registers the notifiable attributes, prepares the services built on the database and allocates some
application timers. Add the
OtapClient_Config
and
Dis_Start
functions to initialize these services. See the following portion
of the code.
/* Start services */
hrsServiceConfig.sensorContactDetected = mContactStatus;
#if gHrs_EnableRRIntervalMeasurements_d
hrsServiceConfig.pUserData->pStoredRrIntervals = MEM_BufferAlloc(sizeof(uint16_t) *
gHrs_NumOfRRIntervalsRecorded_c);
#endif
Hrs_Start(&hrsServiceConfig);
basServiceConfig.batteryLevel = BOARD_GetBatteryLevel();
Bas_Start(&basServiceConfig);
KW38 - Integrating the OTAP Client Service into a Bluetooth LE Peripheral Device, Rev. 0, 11/2020
Application Note 23 / 42
Page 24

NXP Semiconductors
Customizing a based Bluetooth LE demo to integrate the OTAP service
(void)Dis_Start(&disServiceConfig);
if (OtapClient_Config() == FALSE)
{
/* An error occured in configuring the OTAP Client */
panic(0,0,0,0);
}
4. Locate the BleApp_ConnectionCallback. The connection callback is triggered whenever a connection event happens,
such as a connection or disconnection.
a. Go to the connection case. Include the
OtapCS_Subscribe
and
OtapClient_HandleConnectionEvent
is implemented in the following portion of the code.
case gConnEvtConnected_c:
{
/* Subscribe client*/
Bas_Subscribe(&basServiceConfig, peerDeviceId);
Hrs_Subscribe(peerDeviceId);
(void)OtapCS_Subscribe(peerDeviceId);
mPeerDeviceId = peerDeviceId;
/* Stop Advertising Timer*/
mAdvState.advOn = FALSE;
TMR_StopTimer(mAdvTimerId);
/* Start measurements */
TMR_StartLowPowerTimer(mMeasurementTimerId, gTmrLowPowerIntervalMillisTimer_c,
TmrSeconds(mHeartRateReportInterval_c), TimerMeasurementCallback, NULL);
/* Start battery measurements */
TMR_StartLowPowerTimer(mBatteryMeasurementTimerId,
gTmrLowPowerIntervalMillisTimer_c,
TmrSeconds(mBatteryLevelReportInterval_c), BatteryMeasurementTimerCallback, NULL);
/* Handle OTAP connection event */
OtapClient_HandleConnectionEvent (peerDeviceId);
#if (cPWR_UsePowerDownMode)
#ifdef MULTICORE_APPLICATION_CORE
#if gErpcLowPowerApiServiceIncluded_c
PWR_ChangeBlackBoxDeepSleepMode(gAppDeepSleepMode_c);
PWR_AllowBlackBoxToSleep();
#endif
#else
PWR_ChangeDeepSleepMode(gAppDeepSleepMode_c);
PWR_AllowDeviceToSleep();
#endif
#else
/* UI */
LED_StopFlashingAllLeds();
Led1On();
#endif
}
break;
functions. This
b. Go to the disconnection case. Include the
OtapCS_Unsubscribe
and
OtapClient_HandleDisconnectionEvent
functions. The implementation is shown in the following portion of the code.
case gConnEvtDisconnected_c:
{
/* Unsubscribe client */
Bas_Unsubscribe(&basServiceConfig, peerDeviceId);
Hrs_Unsubscribe();
(void)OtapCS_Unsubscribe();
mPeerDeviceId = gInvalidDeviceId_c;
KW38 - Integrating the OTAP Client Service into a Bluetooth LE Peripheral Device, Rev. 0, 11/2020
Application Note 24 / 42
Page 25

NXP Semiconductors
/* Stop Timers*/
TMR_StopTimer(mMeasurementTimerId);
TMR_StopTimer(mBatteryMeasurementTimerId);
OtapClient_HandleDisconnectionEvent(peerDeviceId);
#if (cPWR_UsePowerDownMode)
/* UI */
Led1Off();
/* Go to sleep */
#ifdef MULTICORE_APPLICATION_CORE
#if gErpcLowPowerApiServiceIncluded_c
PWR_ChangeBlackBoxDeepSleepMode(cPWR_DeepSleepMode);
#endif
#else
PWR_ChangeDeepSleepMode(cPWR_DeepSleepMode);
#endif
#else
/* Restart advertising */
BleApp_Start();
#endif
}
break;
Customizing a based Bluetooth LE demo to integrate the OTAP service
5. Locate the BleApp_GattServerCallback. It manages all the incoming communications from the client devices. Add
the GATT events that need to be handled by the OTAP client software, gEvtAttributeWritten_c, gEvtMtuChanged,
gEvtCharacteristicCccdWritten_c, gEvtAttributeWrittenWithoutResponse_c, gEvtHandleValueConfirmation_c,
and gEvtError. Your Bluetooth LE project might share some common GATT events. If it is the case, you will need to add a
conditional structure per each attribute handle. Focus on the gEvtAttributeWritten_c case and observe the conditional
structure that was included for the HRS control point and the OTAP control point handling.
case gEvtAttributeWritten_c:
{
handle = pServerEvent->eventData.attributeWrittenEvent.handle;
status = gAttErrCodeNoError_c;
if (handle == value_hr_ctrl_point)
{
status = Hrs_ControlPointHandler(&hrsUserData,
pServerEvent->eventData.attributeWrittenEvent.aValue[0]);
GattServer_SendAttributeWrittenStatus(deviceId, handle, status);
}
else
{
OtapClient_AttributeWritten (deviceId,
pServerEvent->eventData.attributeWrittenEvent.handle,
pServerEvent->eventData.attributeWrittenEvent.cValueLength,
pServerEvent->eventData.attributeWrittenEvent.aValue);
}
}
break;
case gEvtMtuChanged_c:
{
OtapClient_AttMtuChanged (deviceId,
pServerEvent->eventData.mtuChangedEvent.newMtu);
}
break;
case gEvtCharacteristicCccdWritten_c:
{
OtapClient_CccdWritten (deviceId,
pServerEvent->eventData.charCccdWrittenEvent.handle,
KW38 - Integrating the OTAP Client Service into a Bluetooth LE Peripheral Device, Rev. 0, 11/2020
Application Note 25 / 42
Page 26

NXP Semiconductors
pServerEvent->eventData.charCccdWrittenEvent.newCccd);
}
break;
case gEvtAttributeWrittenWithoutResponse_c:
{
OtapClient_AttributeWrittenWithoutResponse (deviceId,
pServerEvent->eventData.attributeWrittenEvent.handle,
pServerEvent->eventData.attributeWrittenEvent.cValueLength,
pServerEvent->eventData.attributeWrittenEvent.aValue);
}
break;
case gEvtHandleValueConfirmation_c:
{
OtapClient_HandleValueConfirmation (deviceId);
}
break;
case gEvtError_c:
{
attErrorCode_t attError = (attErrorCode_t) (pServerEvent->eventData.procedureError.error &
0xFF);
if (attError == gAttErrCodeInsufficientEncryption_c ||
attError == gAttErrCodeInsufficientAuthorization_c ||
attError == gAttErrCodeInsufficientAuthentication_c)
{
#if gAppUsePairing_d
#if gAppUseBonding_d
bool_t isBonded = FALSE;
/* Check if the devices are bonded and if this is true than the bond may have
* been lost on the peer device or the security properties may not be sufficient.
* In this case try to restart pairing and bonding. */
if (gBleSuccess_c == Gap_CheckIfBonded(deviceId, &isBonded) && TRUE == isBonded)
#endif /* gAppUseBonding_d */
{
(void)Gap_SendSlaveSecurityRequest(deviceId, &gPairingParameters);
}
#endif /* gAppUsePairing_d */
}
}
break;
default:
break;
Customizing a based Bluetooth LE demo to integrate the OTAP service
Now, you have integrated the OTAP Client code into the HRS.
4.3 Modifications in project settings and storage configurations
The OTAP client software included in the SDK package contains some linker configurations to generate the application offset
needed for the OTAP Bootloader software and split the flash memory in accord of the storage method desired. Such configurations
are not part of the HRS demo, so it should be included to integrate the OTAP on the application. Follow the next steps to set the
project settings and the storage configurations.
1. Open the
• If you want to configure the software for external flash storage method, set the gEepromType defination to
• If you decided use the internal flash storage method instead, set the gEepromType defination to
For more details about storage methods, see OTAP memory management during the update process.
Application Note 26 / 42
app_preinclude.h
gEepromDevice_AT45DB041E_c.
gEepromDevice_InternalFlash_c.
KW38 - Integrating the OTAP Client Service into a Bluetooth LE Peripheral Device, Rev. 0, 11/2020
file located in the source folder of the project.
Page 27

NXP Semiconductors
Figure 24. Configuring the storage method at the preinclude file
2. Click on the HRS-OTAP demo in the MCUXpresso workspace.
3. Navigate to Project -> Properties in MCUXpresso IDE. Go to C/C++ Build -> MCU settings.
a. To select external flash storage method, as shown in Figure 25, configure the fields in the Memory details pane. This
is the default stoarage method in the attached HRS-OTAP software.
Figure 25. Configuring external storage method
b. To select internal flash storage method, as shwon in Figure 26, configure the fields in the Memory details pane.
Testing the HRS-OTAP demo
Figure 26. Configuring internal storage method
4. Clean and build the project.
Now, you have finally integrated the OTAP service on the Bluetooth LE based application.
5 Testing the HRS-OTAP demo
The test case example, designed to demonstrate the OTAP integration in Testing the HRS-OTAP software, makes use of the
listed software:
• OTAP Client SDK software, programmed in the FRDM-KW38 board.
• An SREC software update of the HRS-OTAP example.
• An SREC software update of the HRS SDK example.
The following sections explain how to build the software required for the testing case proposed by this document.
5.1 Preparing the OTAP client SDK software
1. Attach your FRDM-KW38 board on the PC.
2. Open MCUXpresso IDE. In the Quickstart Panel view, click Import SDK example(s).
KW38 - Integrating the OTAP Client Service into a Bluetooth LE Peripheral Device, Rev. 0, 11/2020
Application Note 27 / 42
Page 28

NXP Semiconductors
Figure 27. Quickstart panel perspective
3. Click twice on the frdmkw38 icon.
Testing the HRS-OTAP demo
Figure 28. Device selection perspective
4. In the Examples textbox, type bootloader_otap. Select the suggested project by wireless_examples -> framework ->
bootloader_otap -> bm. Click Finish.
5. Flash the bootloader_otap project, OTAP Bootloader project, in your FRDM-KW38 board.
KW38 - Integrating the OTAP Client Service into a Bluetooth LE Peripheral Device, Rev. 0, 11/2020
Application Note 28 / 42
Page 29

NXP Semiconductors
Testing the HRS-OTAP demo
Figure 29. Importing the OTAP Bootloader project on the workspace
6. Repeat 2 to 4 to import the otac_att project. It is located in wireless_examples -> bluetooth -> otac_att -> freertos.
KW38 - Integrating the OTAP Client Service into a Bluetooth LE Peripheral Device, Rev. 0, 11/2020
Application Note 29 / 42
Page 30

NXP Semiconductors
Testing the HRS-OTAP demo
Figure 30. Importing the OTAP client project on the workspace
7. Set the storage configurations on the OTAP Client software:
a. Open the
app_preinclude.h
file located in the source folder of the project.
• To configure the software for external flash storage method, set the gEepromType defination to
gEepromDevice_AT45DB041E_c.
• To use the internal flash storage method, set the gEepromType defination to
gEepromDevice_InternalFlash_c.
For more details about storage methods, see OTAP memory management during the update process
Figure 31. Configuring the storage method at the preinclude file
b. Navigate to Project -> Properties in MCUXpresso IDE. Go to C/C++ Build -> MCU settings -> Memory
details perspective.
KW38 - Integrating the OTAP Client Service into a Bluetooth LE Peripheral Device, Rev. 0, 11/2020
Application Note 30 / 42
Page 31

NXP Semiconductors
Testing the HRS-OTAP demo
• To select external flash storage method, configure the fields in the Memory details pane, as shown in Figure 32.
Figure 32. Configuring external storage method
• To select internal flash storage method, configure the fields in the Memory details pane, as shown in Figure 33.
Figure 33. Configuring internal storage method
8. Clean and build the project. Flash the OTAP Client the project on the FRDM-KW38 board previously programmed with
the OTAP Bootloader.
Now, you have programming and configuring the OTAP client software on your board. You can communicate to a server and
request for a software update.
5.2 Creating an HRS-OTAP S-record image to update the software
1. Install the HRS-OTAP demo provided with this document in your MCUXpresso IDE. You can drag and drop the project from
your installation path to the MCUXpresso workspace. A warning message appears, as shown in Figure 34, click the Copy
button to clone the original example.
Figure 34. Importing the HRS-OTAP demo on the MCUXpresso workspace
2. Open the end_text.ldt linker script located at the linkscripts folder in the workspace. Locate the section placement and
remove the FILL and BYTE statements, as shown in Figure 35. This step is needed only to build the SREC image file to
reprogram the device.
KW38 - Integrating the OTAP Client Service into a Bluetooth LE Peripheral Device, Rev. 0, 11/2020
Application Note 31 / 42
Page 32

NXP Semiconductors
Figure 35. Preparing the linker file
3. Clean and build the project.
Testing the HRS-OTAP demo
4. Deploy the Binaries icon in the workspace. Click the right mouse button on the
S-Record. The S-Record file will be saved at the Debug folder in the workspace with
.axf
file and select Binary Utilities -> Create
.s19
extension.
KW38 - Integrating the OTAP Client Service into a Bluetooth LE Peripheral Device, Rev. 0, 11/2020
Application Note 32 / 42
Page 33

NXP Semiconductors
Testing the HRS-OTAP demo
Figure 36. Creating the SREC file
5. Save this file in a known location on your smartphone.
5.3 Creating an HRS S-record image to update the software
1. Open MCUXpresso IDE. In the Quickstart Panel view. click the Import SDK example(s), and the device selection
perspective will appear. Click twice on the frdmkw38 icon.
2. In the Examples textbox, type hrs and select the freertos project at wireless_examples -> bluetooth -> hrs -> freertos.
Click Finish.
KW38 - Integrating the OTAP Client Service into a Bluetooth LE Peripheral Device, Rev. 0, 11/2020
Application Note 33 / 42
Page 34

NXP Semiconductors
Testing the HRS-OTAP demo
Figure 37. Importing the HRS project on the workspace
3. Open the
cPWR_UsePowerDownMode macro and change its value to zero. This step is not mandatory, but it is useful at running
app_preinclude.h
file under the source folder at the MCUXpresso workspace. Locate the
time to confirm whenever the software update has been successfully programmed by the OTAP bootloader.
/* Enable/Disable PowerDown functionality in PwrLib */
#define cPWR_UsePowerDownMode 0
4. Define gEepromType_d as internal flash storage in the Board Configuration section of the
app_preinclude.h
file. This is a
dummy definition needed to place the Bootloader Flags in the proper address, so this will not affect the storage method
chosen when you programmed previously the OTAP Client software in the MCU.
/* Specifies the type of EEPROM available on the target board */
#define gEepromType_d gEepromDevice_InternalFlash_c
5. Navigate to Project -> Properties -> C/C++ Build -> MCU settings. Configure the following fields and save the changes.
KW38 - Integrating the OTAP Client Service into a Bluetooth LE Peripheral Device, Rev. 0, 11/2020
Application Note 34 / 42
Page 35

NXP Semiconductors
Testing the HRS-OTAP demo
Figure 38. Configuring the memory layout
6. Navigate to the workspace. Locate the linkscripts folder and include into it the main_text_section.ldt linker script. You
can copy and paste from the OTAP client SDK example.
Figure 39. Importing linker scripts
7. Open the end_text.ldt linker script located at the linkscripts folder in the workspace. Locate the section placement and
remove the FILL and BYTE statements, as shown in Figure 40.
Figure 40. Preparing the linker file
8. Include the
OtaSupport
folder and its files in the
framework
folder. Include the
External
folder and its files in the
framework -> Flash folder. This step can be done in the same way as explained in Importing the OTAP Bluetooth LE
service and framework software into the HRS project.
9. Clean and build the project.
10. Deploy the Binaries icon in the workspace. Click the right mouse button on the
Create S-Record. The S-Record file will be saved at the
Debug
folder in the workspace with
.axf
file and select Binary Utilities ->
.s19
extension.
11. Save this file in a known location on your smartphone.
KW38 - Integrating the OTAP Client Service into a Bluetooth LE Peripheral Device, Rev. 0, 11/2020
Application Note 35 / 42
Page 36

NXP Semiconductors
Testing the HRS-OTAP demo
5.4 Testing the HRS-OTAP software
Figure 41 exemplifies the testing case of this section. The FRDM-KW38 contains the OTAP client software. The OTAP client
will request a software update from the OTAP server (the smartphone). This software image is the HRS-OTAP demo. The
FRDM-KW38 at this point has been updated and can handle all the incoming communication from an HR central or the OTAP
server. To demonstrate that you can continue updating the software of the KW38 device, you can connect the HRS-OTAP to an
OTAP server and request a software update that only contains the HRS example. From this point, you cannot continue updating
the software since the OTAP service was not included in the last software upgrade. This example was designed to understand the
key points of the OTAP integration. However, the main purpose of this application note is to create software updates that include
the OTAP service and continue upgrading and improving the KW38 device.
Figure 41. Proposed test
1. Open the IoT Toolbox App and select the OTAP demo. Click the SCAN button to start scanning for a suitable advertiser.
KW38 - Integrating the OTAP Client Service into a Bluetooth LE Peripheral Device, Rev. 0, 11/2020
Application Note 36 / 42
Page 37

NXP Semiconductors
Testing the HRS-OTAP demo
Figure 42. IoT Toolbox interface
KW38 - Integrating the OTAP Client Service into a Bluetooth LE Peripheral Device, Rev. 0, 11/2020
Application Note 37 / 42
Page 38

NXP Semiconductors
Testing the HRS-OTAP demo
2. Press the ADV button, SW2, on the FRDM-KW38 board to start advertising.
3. Create a connection with the NXP_OTAA device. Then, the OTAP interface will be displayed on your smartphone.
Figure 43. Connecting the OTAP client and the OTAP server
4. Click the Open button and search for the HRS-OTAP SREC file.
5. Click the Upload to start the transfer. Wait until the confirmation message is displayed.
KW38 - Integrating the OTAP Client Service into a Bluetooth LE Peripheral Device, Rev. 0, 11/2020
Application Note 38 / 42
Page 39

NXP Semiconductors
Testing the HRS-OTAP demo
Figure 44. Updating the OTAP client to HRS-OTAP
KW38 - Integrating the OTAP Client Service into a Bluetooth LE Peripheral Device, Rev. 0, 11/2020
Application Note 39 / 42
Page 40

NXP Semiconductors
Testing the HRS-OTAP demo
6. Wait few seconds until the OTAP bootloader has finished programming the new image. The HRS-OTAP application will
start automatically, with the RGB LED blinking.
7. Press the ADV button, SW2, on the FRDM-KW38 board to start advertising. Verify that the device can be detected by both,
HRS and OTAP applications of the IoT Toolbox. The device is named as NXP_HRS_OTAP. You can create a connection
and interact with both demos.
Figure 45. HRS-OTAP device detected by both applications
8. Connect the HRS-OTAP device with the OTAP smartphone application. Update the software using the
HRS
SREC file.
9. Confirm that the device has been updated to a simple HRS, making use of the HRS-OTAP demo. Press the ADV button,
SW2, on the FRDM-KW38 board to start advertising. Now the device’s name is NXP_HRS. Connect the device with the
HRS IoT Toolbox app and verify that it works as expected.
KW38 - Integrating the OTAP Client Service into a Bluetooth LE Peripheral Device, Rev. 0, 11/2020
Application Note 40 / 42
Page 41

NXP Semiconductors
Testing the HRS-OTAP demo
Figure 46. HRS-OTAP device detected by both applications
KW38 - Integrating the OTAP Client Service into a Bluetooth LE Peripheral Device, Rev. 0, 11/2020
Application Note 41 / 42
Page 42

How To Reach Us
Home Page:
nxp.com
Web Support:
nxp.com/support
Information in this document is provided solely to enable system and software implementers
to use NXP products. There are no express or implied copyright licenses granted hereunder
to design or fabricate any integrated circuits based on the information in this document. NXP
reserves the right to make changes without further notice to any products herein.
NXP makes no warranty, representation, or guarantee regarding the suitability of its products
for any particular purpose, nor does NXP assume any liability arising out of the application
or use of any product or circuit, and specifically disclaims any and all liability, including
without limitation consequential or incidental damages. “Typical” parameters that may be
provided in NXP data sheets and/or specifications can and do vary in different applications,
and actual performance may vary over time. All operating parameters, including “typicals,”
must be validated for each customer application by customer's technical experts. NXP does
not convey any license under its patent rights nor the rights of others. NXP sells products
pursuant to standard terms and conditions of sale, which can be found at the following address:
nxp.com/SalesTermsandConditions.
Security — Customer understands that all NXP products may be subject to unidentified
or documented vulnerabilities. Customer is responsible for the design and operation of its
applications and products throughout their lifecycles to reduce the effect of these vulnerabilities
on customer’s applications and products. Customer’s responsibility also extends to other open
and/or proprietary technologies supported by NXP products for use in customer’s applications.
NXP accepts no liability for any vulnerability. Customer should regularly check security updates
from NXP and follow up appropriately. Customer shall select products with security features
that best meet rules, regulations, and standards of the intended application and make the
ultimate design decisions regarding its products and is solely responsible for compliance with
all legal, regulatory, and security related requirements concerning its products, regardless of
any information or support that may be provided by NXP. NXP has a Product Security Incident
Response Team (PSIRT) (reachable at PSIRT@nxp.com) that manages the investigation,
reporting, and solution release to security vulnerabilities of NXP products.
NXP, the NXP logo, NXP SECURE CONNECTIONS FOR A SMARTER WORLD, Freescale,
the Freescale logo, CodeWarrior, Kinetis, Layerscape, and QorIQ are trademarks of NXP B.V.
All other product or service names are the property of their respective owners. AMBA, Arm,
Arm7, Arm9, Arm11, Artisan, Cortex, are trademarks or registered trademarks of Arm Limited
(or its subsidiaries) in the US and/or elsewhere. The related technology may be protected by
any or all of patents, copyrights, designs and trade secrets. All rights reserved. Oracle and
Java are registered trademarks of Oracle and/or its affiliates.
©
NXP B.V. 2020. All rights reserved.
For more information, please visit: http://www.nxp.com
For sales office addresses, please send an email to: salesaddresses@nxp.com
Date of release: 11/2020
Document identifier: AN12979
 Loading...