

Page 1

PDK User’s Guide
Preface
Personal Media Device
ADVANCE INFORMATION - Subject to Change
PROVIDED UNDER NDA
DU-03452-001_v01
Page 2

Preface PDK User’s Guide
This page left blank intentionally.
PROPRIETARY INFORMATION
ii DU-03452-001_v01
NVIDIA CONFIDENTIAL 9/4/07
Page 3

Preface PDK User’s Guide Provided Under NDA
Advance Information – Subject to Change
Contents
Section 1. Introduction................................................................................ 1
1.1 Abstract ....................................................................................................... 1
1.2 Functional Overview ..................................................................................... 1
1.2.1 Features and Benefits............................................................................ 1
1.2.2 Hardware Resources.............................................................................. 2
1.2.3 Supported Functions ............................................................................. 2
1.2.4 Human Interface Functions and Driver Support..................................... 3
1.2.5 Supported Third-Party Gadgets.............................................................. 3
1.2.6 PDK Overview ........................................................................................ 3
1.3 Product Development Kit Contents .............................................................. 4
1.3.1 Contents – All Kits ................................................................................ 4
1.3.2 Contents – Individual Kits ..................................................................... 4
1.4 Interchangeable Preface Modules ................................................................. 7
1.5 Bluetooth Support ........................................................................................ 8
1.5.1 Preface Module 1 .................................................................................. 9
1.5.2 Preface Module 2 ................................................................................ 10
Section 2. Getting Started – PDK2/3 Only??............................................. 12
2.1 Powering up the Board............................................................................... 12
2.2 Understanding the Baseboard Keypad Switches ......................................... 13
2.3 Identifying Jumpers and Connectors .......................................................... 14
2.4 Establishing UART Connectivity.................................................................. 15
2.5 Transferring Files Using USB ...................................................................... 16
2.5.1 Mass Storage Class Mode.................................................................... 16
2.5.2 Media Transport Protocol Mode .......................................................... 17
Section 3. Using the Skype Gadget .......................................................... 18
3.1 Introduction ............................................................................................... 18
3.2 About Skype............................................................................................... 18
3.3 Getting Started........................................................................................... 19
3.4 Skype Gadget Functions............................................................................. 20
Appendix A. Preface Part Numbers .............................................................. 27
Appendix B. Power Consumption ................................................................. 29
B.1 PM1 Power Consumption ........................................................................... 29
B.2 PM2 Power Consumption ........................................................................... 30
NVIDIA Proprietary and Confidential iii
Page 4

Advance Information – Subject to Change
Provided Under NDA
Appendix C. Environmental Recommendations............................................ 31
iv NVIDIA Proprietary and Confidential
Page 5

Preface PDK User’s Guide Provided Under NDA
Advance Information – Subject to Change
Figures
Figure 1: Hardware Platform for PDK1 ................................................................ 5
Figure 2: Hardware Platform for PDK2/3............................................................. 6
Figure 3: PM1 Module Block Diagram ................................................................. 9
Figure 4: PM2 Module Block Diagram ............................................................... 11
Figure 5: Screen Display After Powering Up...................................................... 12
Figure 6: Baseboard Keypad Switches ............................................................... 13
Figure 7: UART Connections ............................................................................. 15
Figure 8: Using Mass Storage Class Mode......................................................... 16
Figure 9: Synchronize Songs in Windows Media Player ..................................... 17
Figure 10: Windows SideShow Splash Screen and Home Screen.......................... 19
Figure 11: Skype Gadget Menu ........................................................................... 20
Figure 12: Contacts Menu and Contact Pop-up .................................................. 21
Figure 13: Contact Details and Abort Connection ............................................... 21
Figure 14: Phone Call Status Menu – Connected................................................. 22
Figure 15: Phone Call Status Menu – Disconnected ............................................ 22
Figure 16: Receiving Calls and Text Messages.................................................... 23
Figure 17: Dialer Menu ...................................................................................... 24
Figure 18: Main Menu ........................................................................................ 24
Figure 19: Music Player Icon ............................................................................... 25
Figure 20: Context Menu .................................................................................... 25
NVIDIA Proprietary and Confidential v
Page 6

Advance Information – Subject to Change
Provided Under NDA
vi NVIDIA Proprietary and Confidential
Page 7

Preface PDK User’s Guide Provided Under NDA
Section 1. Introduction
1.1 Abstract
The NVIDIA® Preface Personal Media Display (PMD) product suite adds new capabilities to
notebook and desktop computers and range of other applications, including appliances,
picture frames, luggage, and wearable displays. The design employs an NVIDIA system-onchip (SoC) controller with AS3514 integrated audio codec, and low-drop-out switching
regulators supplying power to a dual, symmetric ARM7-based, core. The design
incorporates product and firmware development environment, signal validation, lot
testing, and manufacturing considerations.
The NVIDIA® Preface™ product suite provides the premier platform for Windows Vista
Sideshow, containing the NVIDIA CPU, memory, flash, USB and Bluetooth components
needed to implement Microsoft VISTA-compatible devices.
Preface is a fully qualified and certified solution on a small 1-inch x1.2-inch PCB.
Advance Information – Subject to Change
y
p
This Guide describes the Product Development Kits (PDKs) that facilitate the design and
integration of PMD systems into target systems.
o
C
w
v
i
e
1.2 Functional Overview
This Guide describes three PDKs used to integrate Preface PMDs into target systems. These
kits include hardware and firmware targeted to various development activities. (For a
complete list of PDK contents, see Section 1.3 on page 4.) The hardware provides an
integrated platform for developing digital audio/video players. Firmware is available for a
variety of development activities and applications.
The PMD hardware is powered by the host computer’s battery, and therefore does not
require a separate power cable for the PMD, enabling the PMD to continue to access the
data in the host computer long after the battery stops powering the primary operating
system and/or displaying the primary LCD.
1.2.1 Features and Benefits
I
e
t
The Preface PMD platform enables quick startup to access data in the host computer using
n
the low-power PMD display instead of the notebook’s primary display, thereby saving
power while cutting time to boot the main operating system. Data transfer from the
notebook is through USB.
r
a
n
l
D
r
f
a
t
R
e
The Preface PMD platform offers the following benefits:
• Always on display and user interface
• Instant access to applications, gadget data and media content
• Hundreds of hours of battery life for music playback on notebooks
•Customer visible product differentiation
• Microsoft SideShow gadget technologies and built-in multimedia capability. For details
see Section 1.2.5 on page 3 and the following Web page:
www.microsoft.com/windowsvista/features/foreveryone/sideshow.mspx
• Alarm function
NVIDIA Proprietary and Confidential Introduction 1
Page 8

Advance Information – Subject to Change
Provided Under NDA Introduction
• SMBus connectivity with the controller embedded in the host computer that supports
the following operations:
• Retrieval of notebook system state information
• Notification of system software (BIOS and/or OS) about PMD related events
For more information, see the Personal Media Display and Notebook Embedded
Controller Interface Specification. Not an easy document to find.
1.2.2 Hardware Resources
The Preface PMD platform supports the following:
• LCD display operating at 2.9 V with 15 V built-in backlight support (for details see
Section 1.2.4)
• Seven-key keypad (for details see Section 1.2.4)
• NAND flash operating at 3.3 V
• Mobile SDRAM operating at 1.8 V
• 64-KB EEPROM for booting
• USB 2.0 interface
• UART connectors (For details see Section 2.4, “Establishing UART Connectivity”, on
page 15.)
• 20-pin JTAG scan connector for debugging and in-circuit emulation
• DC power input connector
• Built-in DC regulator supply for 1.2V, 1.8V, 3.3V, 2.9V, and 15V
• Li polymer battery (optional)
Pads for RS232 external DB9 connector module STRIKE??
•
• Connectors and solder pads for other I/O buses and signals (list all??)
Hardware resources depend on the Preface Module (PM). For details, see Section 1.4 on
page 7.
l
D
r
a
f
t
e
R
v
i
e
w
o
C
y
p
a
1.2.3 Supported Functions
The PMD development platform supports the following:
t
• High-speed USB 2.0 Enhanced Host Controller Interface (EHCI) device mode
n
I
• Communication through USB with the host computer for data transfer
• Serial communication for infrared for remote control function
•I
• Alarms and alerts functions
• SMBus messaging support (BIOS Interface)
• Universal Remote Interface for Windows SideShow navigation keys
• Bluetooth:
• HID support on Bluetooth
• Expanded Universal Remote Interface to propagate signals to all keys
• Power on/off switch
•Reset switch
n
r
e
2
S and I2C capability
• Bluetooth certified, with Bluetooth ID and serial numbers
• Multiprofile support
• Class 1 support (range up to 300 feet)
2 Introduction NVIDIA Proprietary and Confidential
Page 9

Preface PDK User’s Guide Provided Under NDA
1.2.4 Human Interface Functions and Driver Support
• Keypad support
• Touchscreen support: 7-button, region-sensitive only
• Toppoly display drivers for 2.5-inch and 3.5-inch support
• Innolux display driver for 2.5-inch display
• TopSun display driver for 2.8-inch display
• Audio connector for headphone/audio out
• Fingerprint authentication
1.2.5 Supported Third-Party Gadgets
The Preface Gadget Bridge supports the following gadgets:
• CompanionLink:
• RSS Viewer
• Traffic Cameras
•Security Cameras
•Web Pictures
• Countdown timer
•Alarms & Alerts
• Application Launcher
• System Monitor
•Lagotek
• Lighting/Scene Control
• Music & Entertainment
•Security Cameras
a
f
t
•Dr. Neil
• Route Planner
In all, Preface supports:
a
l
• 608 Windows Live Gadgets
• 3,604 Yahoo! Widgets
• 2,621 Google Gadgets
1.2.6 PDK Overview
t
n
I
The PDKs are customized for specific development activities and target applications. The
PDKs and their primary use are as follows:
• PDK1: Prototyping or gadget development
• PDK2: Hardware development and testing
• PDK3: Hardware and firmware development
e
r
n
r
D
Advance Information – Subject to Change
p
o
C
w
e
i
v
e
R
y
The PDKs are described in more detail in Section 1.3 on page 4.
NVIDIA Proprietary and Confidential Introduction 3
Page 10

Advance Information – Subject to Change
Provided Under NDA Introduction
1.3 Product Development Kit Contents
1.3.1 Contents – All Kits
This section describes the standard contents for Product Development Kits (PDKs).
Documentation
• Application porting guide
•Quick Start Guide
•Welcome note
• Regional contact list
•NDA form
Hardware
• Baseboard containing either Preface Module 1 or Preface Module 2. (For module
details, see Section 1.4 on page 7.)
• An LCD, either of the following:
• 2.5-inch QVGA
• 3.5-inch QVGA with touch screen
• Lithium polymer battery: In a finished product, the PMD can derive its power from the
host computer’s battery; therefore, a dedicated PMD battery is optional. The
baseboard contains such a battery. If needed, the SoC can support a charge out.
PLEASE CHECK!!
• USB input connector and cable
a
f
t
• Connectors and solder pads for other I/O buses and signals
• Power on/off switch??
a
l
Software
• FTP key to all common downloadables
e
r
n
• Gadgets and gadget bridge
• NVIDIA/CompanionLink gadget demo suite
t
• Standard embedded firmware
n
I
1.3.2 Contents – Individual Kits
r
D
R
e
v
i
e
w
C
o
y
p
In addition to the standard contents described above, the PDKs contain the specialized
components described in this section.
PDK1
This PDK is primarily for prototyping or gadget development. It contains the following
components:
• 724_A01 baseboard with PM1 or PM2
• External seven-key keypad
•FTP1 key
4 Introduction NVIDIA Proprietary and Confidential
Page 11
Preface PDK User’s Guide Provided Under NDA
PDK2
This PDK is primarily for hardware development and testing. It contains the following
components:
• 723_A03 baseboard with PM1 or PM2
• Built-in seven-key keypad
• Reset switch (in addition to power on/off switch)
• DC power input adapter
• 2 UART connectors
• JTAG connector
• FTP keys to all of the following:
•FTP2
• Software Development Kit (SDK)
PDK3
Advance Information – Subject to Change
This PDK is primarily for hardware and firmware development. It contains the following
components:
• 723_A03 baseboard with PM1 or PM2
• Built-in seven-key keypad
• Reset switch (in addition to power on/off switch)
• DC power input adapter
• 2 UART connectors
• JTAG connector
• FTP keys to all of the following:
•PDKs 2 and 3
• Firmware Development Kit (FDK)
• Software Development Kit (SDK)
• Firmware library with Windows SideShow
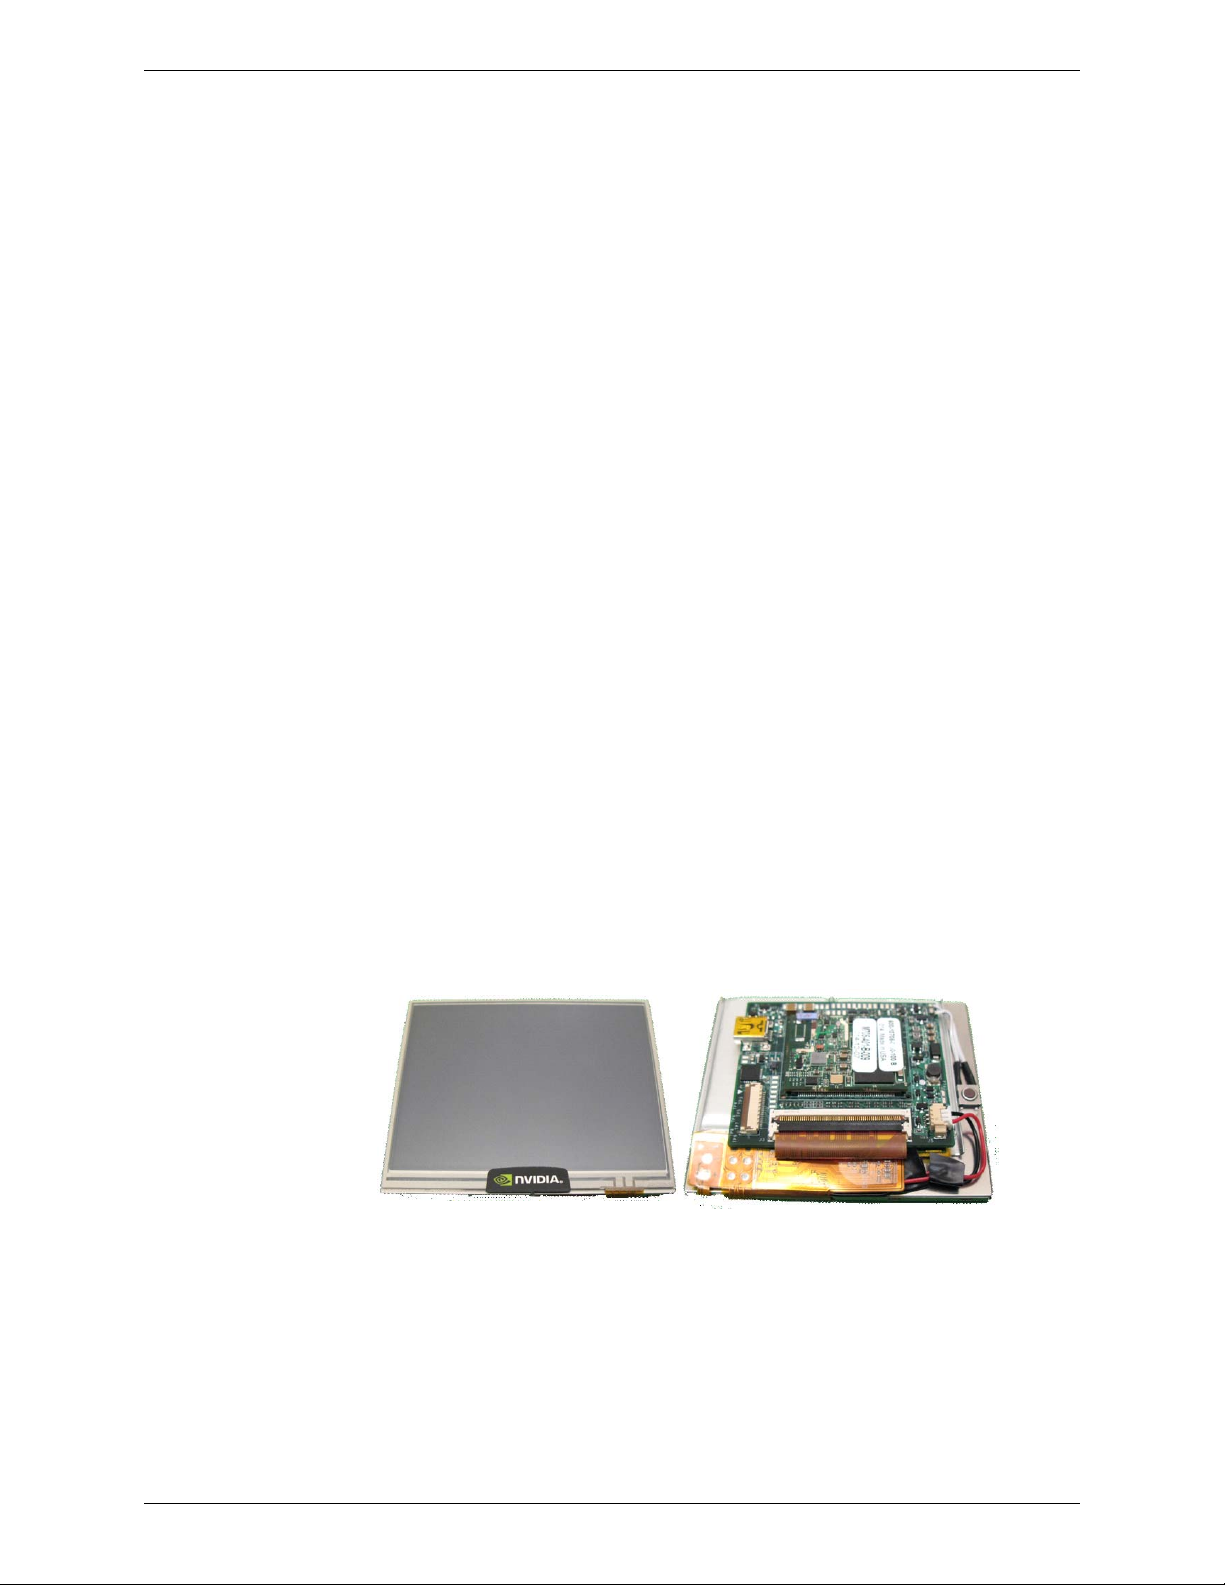
Figure 1 shows the top and bottom view of the hardware platform provided with PDK1.
a
n
r
e
t
n
I
D
l
Figure 1: Hardware Platform for PDK1
r
a
f
t
R
v
e
i
w
e
C
p
o
y
NVIDIA Proprietary and Confidential Introduction 5
Page 12

Advance Information – Subject to Change
Provided Under NDA Introduction
Figure 3 shows the top view only of the hardware platform provided with PDK2 and PDK3.
Figure 2: Hardware Platform for PDK2/3
I
n
t
e
r
n
a
l
LCD
What are these??
r
a
D
R
Keypad switches
t
f
Power switch
v
e
Power connector
w
e
i
Keypad lock switch
o
C
JTAG Connector
y
p
6 Introduction NVIDIA Proprietary and Confidential
Page 13

Preface PDK User’s Guide Provided Under NDA
1.4 Interchangeable Preface Modules
Each PDK is available with either of the following Preface Modules (PMs):
• “Preface Module 1”
• “Preface Module 2” on page 10
Table 1 compares the features of PM1 and PM2.
Table 1: Feature Comparison – PM1 & PM2
Feature PM1 PM2
1
SDRAM
r
2
n
1
4
a
l
D
r
a
f
t
Flash Memory
LCD Panel Support Yes Yes
Audio In No Yes
Audio Out
Battery Optional
Battery charger Optional
Bluetooth Class 1
Keypad Yes Yes
Serial IR Interface Yes Yes
Touchscreen Yes Yes
UART Yes Yes
USB 2.0 Yes Yes
Vista Compliant Yes Yes
1. The PMs are available with a choice of memory sizes, which may be offered with different SKUs,
depending on customer demand.
2. Audio output requires headphones (not included).
3. Optional configurations may involve increased lead times to market due to component availability and testing.
4. Bluetooth configurations require a Bluetooth dongle (not included) that supports Microsoft Bluetooth drivers.
e
t
n
I
Advance Information – Subject to Change
32 MB or 64 MB 32 MB or 64 MB
4- or 8-MB NOR 256-MB or 1-GB NAND
Yes
Yes
Yes
y
p
No Yes
3
3
Optional
3
C
o
w
e
i
v
e
R
NVIDIA Proprietary and Confidential Introduction 7
Page 14

Advance Information – Subject to Change
Provided Under NDA Introduction
1.5 Bluetooth Support
The functionality of your Preface implementation will depend on whether the PM you
choose supports Bluetooth, in addition to USB. Bluetooth support changes how SideShow
protocol is supported, and adds functions that are not supported with USB alone. Table 2
shows how Bluetooth support affects Preface functionality.
Table 2: Bluetooth Support
Functionality
Music Transfer Protocol (MTP)
for music, photograph and
video formats
SideShow Protocol and
Gadgets
Human Interface Device (HID)
protocol
Headset/handsfree with
microphone
Stereo headpone through
Advanced Audio Distribution
Profile (A2DP)
n
r
e
t
n
I
a
l
D
PM without Bluetooth PM witt Bluetooth
Supported? Interface Supported? Interface
Yes USB Yes USB
Yes USB Yes Bluetooth
No – Yes Bluetooth
p
No – Yes Bluetooth
No – Yes Bluetooth
o
C
w
e
i
v
e
R
t
f
a
r
y
8 Introduction NVIDIA Proprietary and Confidential
Page 15

Preface PDK User’s Guide Provided Under NDA
1.5.1 Preface Module 1
This section describes the Preface Module 1 (PM1) target applications, and hardware and
software components.
PM1 Target Applications
• Desktop computers, keyboard companion
• Remote control
PM1 Hardware Components
PM1 has the following hardware components and options:
• PP5022 SoC/SiP
• 32-MB SDRAM (3.3V) with optional upgrade to 64 MB
•4-MB NOR flash, with optional upgrade to 8 MB
• EEPROM
• USB connectivity
• Bluetooth Class 1 (Optional)
• Power management: optional on-board
PM1 Software Components
PM1 comes with the following software components and options:
• Hardware drivers
• Preface framework
• Bluetooth drivers (optional)
•Preface GUI
Figure 3 contains a block diagram of PM1.
l
r
D
Figure 3: PM1 Module Block Diagram
a
f
t
Advance Information – Subject to Change
p
o
C
w
e
i
v
e
R
y
a
n
r
External
Components
I
n
t
e
PM1
Connector
Display
Keypad buttons
Keypad IO
2
Buffered I
GPIOs (8)
UART
Power
USB
Soft Serial IR
Battery
Audio IO
JTAG
NVIDIA Proprietary and Confidential Introduction 9
C
PP5022
NOR Flash
Power Circuit &
Battery Charger
(Optional)
Bluetooth (optional)
QVGA LCD
Touchscreen
7-Key Keypad
Bluetooth
(Optional)
Power Circuit &
Battery Charger
Page 16

Advance Information – Subject to Change
Provided Under NDA Introduction
1.5.2 Preface Module 2
This section describes Preface Module 2 (PM2) target applications, and hardware and
software components.
PM2 Target Applications
• Notebook computers, in-lid companion, Sideshow devices
PM2 Hardware Components
PM2 has the following hardware components and options:
• PP5024 SoC/SiP processor
• 32-MB SDRAM (3.3 V) with optional upgrade to 64 MB
• 256-MB NAND flash, with optional upgrade to 1GB
• EEPROM
• USB connectivity
• Bluetooth Class 1
• Battery, Lithium polymer
• Battery charger
• Audio output, either of the following:
• Stereo with headphone profile
• Headset with mono hands-free profile
• On-chip power management
v
i
e
w
C
o
y
p
e
f
t
R
PM2 Software Components
PM2 comes with the following software components and options:
• Hardware drivers
• Preface framework
• Bluetooth drivers
• Bluetooth audio
•Preface GUI
• Photo viewer
e
•SideShow
t
•Music Player
n
I
•Skype Dialer
• NVIDIA Endpoints
• NVIDIA/CompanionLink gadget demo suite
• NVIDIA Gadget Bridge
r
a
n
l
D
r
a
10 Introduction NVIDIA Proprietary and Confidential
Page 17

Preface PDK User’s Guide Provided Under NDA
Figure 4 contains a block diagram of PM2.
Figure 4: PM2 Module Block Diagram
Advance Information – Subject to Change
I
n
t
e
r
n
PM2
Connector:
Display
Keypad buttons
Keypad I/O
Buffered I
GPIOs (8)
UART
Power
USB 2.0
Soft Serial IR
Battery
Audio I/O
JTAG
l
a
2
C
D
r
a
NAND Flash
Audio Controller
Power Circuit &
Battery Charger
t
f
PP5024
SDRAM
Bluetooth
R
e
v
i
e
External
Components
QVGA LCD
Touchscreen
7-Key Keypad
Bluetooth
w
y
p
o
C
NVIDIA Proprietary and Confidential Introduction 11
Page 18

Advance Information – Subject to Change
Provided Under NDA Getting Started – PDK2/3 Only??
Section 2. Getting Started – PDK2/3 Only??
Note: For instructions on PDK1, refer to...
2.1 Powering up the Board
1. To power up the board, do either of the following:
• Turn on your computer and plug in the supplied USB cable. (The board powers up
on its own.)
• Plug in the supplied DC adapter, turn on the power switch (move SW1 down) and
press the power on/off switch (SW11). For details on the switches, see Table 3 on
page 13.
2. Open the computer’s Device Manager and verify that the Preface PMD is recognized by
the system. The PMD should be listed under Windows SideShow.
The computer may search for and install a driver automatically.
3. Open the SideShow Control Panel and click the Preface PMD icon.
4.
5. Test your connection to the PC by verifying whether the gadgets on the PC are
downloaded to the Preface PMD.
6.
v
i
e
w
o
C
y
p
e
R
f
t
A typical?? display after booting is shown in Figure 5.
Figure 5: Screen Display After Powering Up
D
l
r
a
a
n
r
e
t
n
I
Use the baseboard button switches, or the touch-sensitive LCD, to access the various menu
options, as described in Section 2.2 on page 13.
12 Getting Started – PDK2/3 Only?? NVIDIA Proprietary and Confidential
Page 19

Preface PDK User’s Guide Provided Under NDA
2.2 Understanding the Baseboard Keypad Switches
This section describes the baseboard keypad switches shown in Figure 6. For details on
how to use the switches, see the NVIDIA® Preface™ Software Development Kit Built-in
Applications Users’ Guide. Does this document really exist??
Figure 6: Baseboard Keypad Switches
Advance Information – Subject to Change
y
p
o
C
w
e
The switches in Figure 6 are described in Table 3.
i
v
Table 3: Baseboard Keypad Switches
t
f
PDK1
Reference
Description
DC Power On/Off SW1 Powers the board on or off when
l
D
Designator
a
r
a
e
r
n
SW3 On the Play screen, skips to
System Reset SW2 Press once to reset system
Keypad PREVIOUS/
t
LEFT
n
I
Keypad UP SW4 Scrolls up any list window. In the
Keypad SELECT SW5 Selects a highlighted choice. Plays
e
R
Reference
Designator
PDK2/3
Comments
the DC power input is connected.
Off=Switch is up; On=Switch is
down
previous song. During manual
SideShow player operation, returns
to the previous slide. On other
screens, returns to the previous
menu.
Music Player Play screen, increases
the volume.
selected media from the playlist. In
the Music Player during playback,
toggles pause on and off.
NVIDIA Proprietary and Confidential Getting Started – PDK2/3 Only?? 13
Page 20
Advance Information – Subject to Change
Provided Under NDA Getting Started – PDK2/3 Only??
Table 3: Baseboard Keypad Switches (Cont.)
Reference
Description
Keypad RIGHT/NEXT SW6 On the Play screen, skips to next
Keypad DOWN SW7 Scrolls down any list window. In the
Keypad MENU SW8 Displays a Context menu with
Keypad BACK SW9 Returns to the previous menu in
N/A SW10 Not stuffed??
System On/Off SW11 SW11 On=Press once; Off=Press and hold
Keypad Lock SW12 SW12 Unlock=Switch is up; Lock=Switch
1. I added this because otherwise it looks like an omission..
2.3 Identifying Jumpers and Connectors
l
D
The baseboard switches in Figure 6 are described in Table 4.
a
n
r
Description
e
t
n
Battery connector J2 –
I
UART connector J5 –
Toppoly 2.5-inch LCD connector J13 –
Toppoly 3.5-inch LCD connector J14 –
Samsung 3.5-inch LCD connector J16 –
JTAG connector J18 –
Battery switch bypass J19 PM1: To set, install jumper on pins 2 and 3.
TS_BUSY* signal select J20 To set, install jumper on pins 2 and 3.
USB_VBUS signal select J21 To set, install jumper on pins 2 and 3.
Designator
PDK1
t
f
a
r
Table 4: Connectors and Jumpers
Reference
Designator
Reference
Designator
PDK2/3
song. During manual SideShow
player operation, advances to the
next slide SIDESHOW OR
SLIDESHOW. Has no effect on HOME
and PLAY screens. On screens other
than Home and Play, has the same
effect as the SELECT key.
Music Player Play screen, decreases
the volume.
various options.
most screens. Cancels any Context
menu.
w
e
for 10 seconds
i
v
e
is down
R
PM2: To set, install jumper on pins 1and 2.
Comments
o
C
1
Comments
y
p
14 Getting Started – PDK2/3 Only?? NVIDIA Proprietary and Confidential
Page 21

Preface PDK User’s Guide Provided Under NDA
2.4 Establishing UART Connectivity
The UART connectivity can be established on the baseboard to use the serial port message
capture terminal for application debug messages. To do this, attach the DC power input
and connect a UART module with a DB9 connector, as described below:
• Connect UART (J5) pin VCC to R56, right side. (Where is R56 physically on the board?? I
think it is too small for a label.. Are you sure customers can do this??)
• Connect UART (J5) TX pin to B2B connector (J1) pin 15.
• Connect UART (J5) RX pin to B2B connector (J1) pin 16.
• Connect UART (J5) GND pin to B2B connector (J1) pin 20.
Note: DC power input is required for UART connectivity.
Figure 7 shows the UART connector.
Advance Information – Subject to Change
I
n
t
e
r
n
a
l
D
Figure 7: UART Connections
w
e
i
v
e
R
t
f
a
r
C
y
p
o
NVIDIA Proprietary and Confidential Getting Started – PDK2/3 Only?? 15
Page 22

Advance Information – Subject to Change
Provided Under NDA Getting Started – PDK2/3 Only??
2.5 Transferring Files Using USB
Files can be transferred on the baseboard using the USB in the following modes:
• “Mass Storage Class Mode” in Section 2.5.1
• “Media Transport Protocol Mode” in Section 2.5.2
2.5.1 Mass Storage Class Mode
Use the Mass Storage Class (MSC) mode for transferring files using USB to upgrade the
firmware. Follow these instructions:
1. To see the primary boot loader menu options, reset the board by simultaneously
pressing the reset switch and the SELECT key (SW5).
2. Select the PREVIOUS key (SW7) for Upgrade Firmware option.
3. Connect the USB cable, if not already done.
4. A removable disk of 16-MB displays in Windows Explorer (see Figure 8 on page 16).
5. Transfer (copy) the secondary boot loader and the firmware image (
6. Safely remove the hardware from the PC by clicking the Safely Remove Hardware icon
in the system tray and following the instructions in the operating system instructions.
The device upgrades the firmware, resets automatically, and boots with the upgraded
image. Don’t see the need for this--can we strike it??
Figure 8: Using Mass Storage Class Mode
v
i
e
w
*.mi4) file.
o
C
y
p
e
R
t
f
a
r
D
l
a
n
r
e
t
n
I
16 Getting Started – PDK2/3 Only?? NVIDIA Proprietary and Confidential
Page 23

Preface PDK User’s Guide Provided Under NDA
2.5.2 Media Transport Protocol Mode
To synchronize files using Media Transport Protocol (MTP) mode, follow these instructions:
1. Open Microsoft® Windows Media® Player and click the Sync Tab.
2. Connect a USB cable from the baseboard to the PC.
A window displays with automatic and manual options.
3. Choose the automatic option to synchronize all media on your PC, or choose the
manual option to drag and drop songs of your choice.
4. For the manual option, drag and drop songs to the Sync List on the left pane as shown
in Figure 9 on page 17, and click Start Sync.
Synchronization of the songs starts, and the songs are displaying in the right pane.
Note: While transferring songs, playback is stopped. You may resume playback with the
new content after the transfer is complete.
Advance Information – Subject to Change
y
Figure 9: Synchronize Songs in Windows Media Player
p
o
C
w
e
i
v
e
R
t
f
a
r
D
l
a
n
r
e
t
n
I
Note: You can also add content through Windows Explorer to the MTP device. However,
the content will not be displayed by Windows Media Player.
Note: Only content supported on the MTP device can be added to the baseboard using
Windows Media Player.
NVIDIA Proprietary and Confidential Getting Started – PDK2/3 Only?? 17
Page 24

Advance Information – Subject to Change
Provided Under NDA Using the Skype Gadget
Section 3. Using the Skype Gadget
The Preface™ Skype gadget enhances notebook computer, in-lid, PMD applications. The
Skype gadget integrates the Voice-over-Internet Protocol (VoIP) capability with Windows
Vista SideShow, enabling users to make and receive calls through Skype. The gadget uses
USB to interface between the PMD and the notebook computer.
3.1 Introduction
This Preface™ Skype phone gadget interfaces with the notebook computer’s Skype
application, enabling feature-rich access to Windows Vista Sideshow and the following
Skype functions:
• Access and browse the contacts list, including all details.
• View incoming call and caller information.
• Receive and make calls.
• Receive (but not send) instant messages or text messages.
• View call status, including connect time.
C
o
y
p
w
3.2 About Skype
Skype provides peer-to-peer Internet telephony networking and application software to
broadband customers who want to integrate computer-based and phone-based
communications. Skype offers instant messaging, file transfer, and voice and video
conferencing.
l
D
r
a
f
t
R
e
v
i
e
a
n
r
e
t
n
I
18 Using the Skype Gadget NVIDIA Proprietary and Confidential
Page 25

Preface PDK User’s Guide Provided Under NDA
3.3 Getting Started
When you start up the PMD, it displays the Windows SideShow splash screen, shown in
Figure 10 (left), and then enters the Home screen, shown in Figure 10 (right). The Home
screen contains icons for built-in applications and gadgets.
Figure 10: Windows SideShow Splash Screen and Home Screen
Advance Information – Subject to Change
y
p
o
C
i
w
e
Understanding the Baseboard Keypad Switches
The switches are defined in Figure 6 and Table 3 on page 13. These switches are referred
to by name throughout the remainder of Section 3.
v
e
R
f
t
Using the Home Screen
Use UP and DOWN to highlight the desired gadget icon. The icon is magnified and its name
appears, followed by application-specific information. For example, Figure 10 (right) shows
the Skype gadget icon, VoIP Phone, highlighted.
Note: Figure 10 (right) shows Skype gadget glance data shows that Skype is offline,
e
t
Using the Context Menu
n
I
Pressing MENU displays the Context menu, which differs from screen to screen based on
the context of the screen already displayed when MENU is pressed. When the Context menu
is displayed, use UP and DOWN to highlight the desired command. Press SELECT to execute
the command.
a
which means the notebook computer’s Skype application is not activated. Skype
n
must be online for the gadget to work.
r
l
D
r
a
NVIDIA Proprietary and Confidential Using the Skype Gadget 19
Page 26

Advance Information – Subject to Change
Provided Under NDA Using the Skype Gadget
3.4 Skype Gadget Functions
This section describes the following gadget functions:
• “To Activate a Skype Gadget” on page 20
• “To Browse Contacts” on page 20
• “To Make Calls Using Contacts” on page 21
• “To End a Call” on page 22
• “To Receive a Call” on page 23
• “To Receive a Text Message” on page 23
• “To Make a Call Using the Dialer” on page 24
• “To Show Phone Status” on page 24
• “To Lock or Unlock Keypad Buttons” on page 25
• “To Delete Cached Data” on page 25
To Activate a Skype Gadget
In the Home screen, use PREVIOUS or NEXT to highlight the Skype gadget icon, as shown in
Figure 11 (left), then press SELECT. The Skype gadget menu is displayed, as shown in
Figure 11 (right).
Figure 11: Skype Gadget Menu
o
C
y
p
w
e
i
v
e
R
t
f
a
r
D
l
a
n
r
e
t
To Br o wse C ont a cts
n
I
In the Skype gadget menu, use UP and DOWN to highlight My Contacts, then press SELECT.
The Contact list menu appears, as shown in Figure 12 (left).
20 Using the Skype Gadget NVIDIA Proprietary and Confidential
Page 27

Preface PDK User’s Guide Provided Under NDA
Alternatively, press MENU, highlight View Contacts, and press SELECT. For more on
contacts and making calls, see “To Make Calls Using Contacts” on page 21.
Figure 12: Contacts Menu and Contact Pop-up
Advance Information – Subject to Change
y
p
The Contact list displays the following types of contact status, as shown in when you press
MENU??:
Graphic needed??
•Contact online
• Contact offline
• Phone redirect contact available
v
i
e
w
o
C
e
Figure 13: Contact Details and Abort Connection
a
Place Contact Details here.
l
r
D
f
t
R
a
n
r
e
t
n
I
To Make Calls Using Contacts
Use UP and DOWN to highlight a contact in the Contacts menu, shown in Figure 12 (left),
then press SELECT. A pop-up menu appears, as shown in Figure 12 (right). Highlight Dial
Contact and press SELECT.
If there already is a connection when you select the contact, the message Abort current
connection? is displayed, as shown in Figure 13 (right). Select Yes to drop the current
connection and initiate the new call. Select No to do nothing and return to the contact list.
NVIDIA Proprietary and Confidential Using the Skype Gadget 21
Page 28

Advance Information – Subject to Change
Provided Under NDA Using the Skype Gadget
When the call is initiated, the following information is displayed on the status screen, as
shown in Figure 14 (left):
• Caller ID: Contact name
• Call Status: Dialing, Connected, etc.
• Call Duration
• If previous contact is connected, it will pop out message with “Abort current
connection?” if you press “Yes”, it will drop current connection and initial the new
contact dialing. No, do nothing, back to contact list.
Figure 14: Phone Call Status Menu – Connected
y
p
o
C
w
e
i
To Adjust the Call Volume
Press MENU and select Volume, as shown in Figure 14 (right). The volume control on the PC
side is activated.
a
To En d a Ca l l
Any time you are in a call, press MENU and select End Call, as shown in Figure 15 (left). The
display changes, as shown in Figure 15 (right).
n
r
e
t
n
I
l
a
Figure 15: Phone Call Status Menu – Disconnected
r
D
f
t
R
v
e
22 Using the Skype Gadget NVIDIA Proprietary and Confidential
Page 29

Preface PDK User’s Guide Provided Under NDA
To Receive a Call
When a call arrives, a pop-up showing the contact’s name or caller ID is displayed, as
shown in Figure 16 (left). Highlight Yes to answer the call or No to decline it, then press
SELECT.
Figure 16: Receiving Calls and Text Messages
Advance Information – Subject to Change
y
p
o
C
Note: When receiving an incoming call, music playback stops. If you want to continue
listening to music after you respond to the call, either by answering or declining
the call, you need to manually restart music playback.
i
e
w
v
To Receive a Text Message
When a text message arrives, a pop-up containing the contact’s name or caller ID and
message is displayed, as shown in Figure 16 (right). You can read the message, but you
cannot respond to the sender using text—you can call sender.
D
l
r
a
f
t
e
R
a
n
r
e
t
n
I
NVIDIA Proprietary and Confidential Using the Skype Gadget 23
Page 30

Advance Information – Subject to Change
Provided Under NDA Using the Skype Gadget
To Make a Call Using the Dialer
1. In the Main menu, use UP and DOWN to select Dialer, then press SELECT. The Dialer
menu appears, as shown in Figure 17 (left).
2. Use UP, DOWN, LEFT, and RIGHT to highlight the desired numbers and press SELECT.
The selected number is displayed above the dial pad.
3. When done, highlight the Dial key and press SELECT.
If you make a mistake, use press MENU and select Clear, shown in Figure 17 (right) to start
over.
Figure 17: Dialer Menu
y
p
o
C
w
e
i
v
e
f
t
R
To Show Phone Status
In the Main menu, use UP and DOWN to highlight PC Status, then press SELECT, as shown
in Figure 18 (left). Current phone connection status is displayed, including:
• Caller ID: Contact name
• Call status: Disconnected / Connecting / Connected
r
a
n
• Call Duration: Total duration of previous connection, or incremental counting for
connected calls.
e
t
n
I
l
D
a
r
Figure 18: Main Menu
Add PC status screen
Information contained on the PC status screen are... as shown in Figure 18 (right):
24 Using the Skype Gadget NVIDIA Proprietary and Confidential
Page 31

Preface PDK User’s Guide Provided Under NDA
To activate the Music Player
On the Home screen, press PREVIOUS or NEXT to highlight Music Player as shown in
Figure 19, then press SELECT. The screen changes, as shown in Figure 19 (right)
Figure 19: Music Player Icon
Change this
to Music player
TBD
Advance Information – Subject to Change
Show Music player menu
y
p
o
To Lock or Unlock Keypad Buttons
i
w
e
From the Icon menu, press MENU. Use UP and DOWN to highlight Lock Device as shown in
Figure 20 (left), then press SELECT.
C
v
I
n
t
e
r
n
a
l
D
Figure 20: Context Menu
t
f
a
r
e
R
Place Delete
Data here.
An icon on the status bar shows that the keypad is locked. If you press a button while the
device is locked, a message is displayed. To unlock the buttons, press the SELECT key.
To Delete Cached Data
From the Icon menu, press MENU. Use UP and DOWN to highlight Delete Data as shown in
Figure 20 (right), then press SELECT. The message Are you sure....? is displayed. Highlight
Yes and press SELECT to clear all the cached data associated with the gadget.
NVIDIA Proprietary and Confidential Using the Skype Gadget 25
Page 32

Advance Information – Subject to Change
Provided Under NDA Using the Skype Gadget
y
p
o
C
w
e
i
v
e
R
t
f
a
r
D
l
a
n
r
e
t
n
I
26 Using the Skype Gadget NVIDIA Proprietary and Confidential
Page 33

Preface PDK User’s Guide Provided Under NDA
Advance Information – Subject to Change
Appendix A. Preface Part Numbers
Table 5 lists the part numbers for the PDKs and PMs.
Table 5: Preface Numbers
Description Part Number
PDK1 940-10724-0002-000
PDK2 940-10723-0002-300
PDK3 940-10723-0003-300
PM1 600-10722-0001-100
PM2 600-10705-0000-200
PM1 controller chip PP5022
PM2 controller chip PP5024
Baseboard for PDK1 600-10724-0000-100
External keypad for PDK1 PP7020
Baseboard for PDK2/3 600-10723-0000-100
1. I added this. please check it.
1
Would it be helpful to add the schematic part numbers from the HW guide to this table??
NVIDIA Proprietary and Confidential Preface Part Numbers 27
Page 34

Advance Information – Subject to Change
Provided Under NDA Preface Part Numbers
28 Preface Part Numbers NVIDIA Proprietary and Confidential
Page 35

Preface PDK User’s Guide Provided Under NDA
Advance Information – Subject to Change
Appendix B. Power Consumption
For these values, the UUT was a PM1 mounted on a 723_A01 baseboard. The resulting
values contained here match or exceed expected values for most user applications.
B.1 PM1 Power Consumption
Table 6: Power Consumption While Plugged Into USB
Measured
Conditions
Current
(mA)
System Standby
System Idle, display off 151.6 5.07 768.6 688.0
Normal operation with activity on the
4
keypad
1. Conditions: PM1 + Baseboard
2. Conditions: LCD and baseboard control circuits removed.
3. Standby not available in USB mode because PM1 uses no battery.
4. This condition represents a high-drain application.
3
N/AN/AN/AN/A
246.8 5.07 1251.3 670.4
Measured
Voltage
(V)
System Power
Consumed
1
(mW)
Module Power
Consumed
(mW)
Table 7: Power Consumption While Drawing From DC Input
Measured
Conditions
Current
(mA)
System Standby 15.8 5.1 80.6 6.7 (max)
System Idle, display off 195.6 5.1 997.6 416.7
Normal operation with activity on the
3
keypad
1. Conditions: PM2 + Baseboard
2. Conditions: LCD and baseboard control circuits removed.
3. This condition represents a high-drain application.
241.6 5.1 1232.2 651.3
Measured
Voltage
(V)
System Power
Consumed
1
(mW)
Module Power
Consumed
(mW)
2
2
NVIDIA Proprietary and Confidential Power Consumption 29
Page 36

Advance Information – Subject to Change
Provided Under NDA Power Consumption
B.2 PM2 Power Consumption
In this section, the following applies to all values:
• Music was stored in WMA format on a 8-Gb (1-GB) on-board NAND device and played
using Creative SBS16-powered PC speakers.
• Some variance in measured current occurs due to the level of battery charge at the
time of measurement. The more deeply discharged the battery, the more current is
drawn to recharge it; therefore, overall current draw can fluctuate even though usage
current remains unchanged.
Table 8: Power Consumption While Plugged Into USB
Measured
Conditions
Current
(mA)
System Standby 73.73 4.93 363.49 348.58
System Idle 199.4 4.8 957.12 381.70
Playing music from NAND flash +
speaker out
Charging empty battery + playing
music from NAND + controlling the PC
to play music through Bluetooth +
SideShow
1. Conditions: PM2 + Baseboard
2. Conditions: LCD and baseboard control circuits removed.
3. This condition represents a high-drain application.
3
220.4 4.79 1055.72 479.11
430.3 4.55 1407.73 1407.73
Measured
Voltage
(V)
System Power
Consumed
1
(mW)
Module Power
Consumed
(mW)
Table 9: Power Consumption While Drawing From Battery
Measured
Conditions
Current
(mA)
System Standby 8.71 3.827 33.33 20.85
System Idle (no Bluetooth) 156.8 3.975 623.28 138.21
System Idle (Bluetooth connected) 171.3 3.86 661.22 188.83
Playing music from NAND flash +
speaker out (no Bluetooth)
Play music from NAND flash + speaker
out (Bluetooth connected)
Bluetooth connected in searching
mode + playing music from NAND +
speaker out
1. Conditions: PM2 + Baseboard
2. Conditions: LCD and baseboard control circuits removed.
3. This condition represents a high-drain application.
3
194.1 3.785 734.67 270.91
215.3 3.82 822.45 354.83
245.7 3.9 958.23 481.79
Measured
Voltage
(V)
System Power
Consumed
1
(mW)
Module Power
Consumed
(mW)
2
2
30 Power Consumption NVIDIA Proprietary and Confidential
Page 37

Preface PDK User’s Guide Provided Under NDA
Advance Information – Subject to Change
Appendix C. Environmental Recommendations
Table 10 lists the recommended temperatures for Preface PDK hardware.
Table 10: Recommended Temperatures
Parameter Description Specified Range Units
Operating Temperature Baseboard with PM 0 to 55 C
Operating Temperature Baseboard with PM and battery 0 to 45 C
Storage Temperature PM only –40 to 85 C
Storage Temperature Baseboard only, no battery –25 to 80 C
Storage Temperature Baseboard only, with battery –10 to 45 C
Other environmental specifications are TBD.
NVIDIA Proprietary and Confidential Environmental Recommendations 31
Page 38

Advance Information – Subject to Change
Provided Under NDA Environmental Recommendations
32 Environmental Recommendations NVIDIA Proprietary and Confidential
Page 39

Notice
ALL NVIDIA DESIGN SPECIFICATIONS, REFERENCE BOARDS, FILES, DRAWINGS, DIAGNOSTICS, LISTS, AND OTHER DOCUMENTS (TOGETHER AND SEPARATELY, "MATERIALS") ARE
BEING PROVIDED "AS IS." NVIDIA MAKES NO WARRANTIES, EXPRESSED, IMPLIED, STATUTORY, OR OTHERWISE WITH RESPECT TO THE MA TERIALS, AND EXPRESSL Y DISCLAIMS ALL
IMPLIED WARRANTIES OF NONINFRINGEMENT, MERCHANTABILITY, AND FITNESS FOR A
PARTICULAR PURPOSE.
Information furnished is believed to be accurate and reliable. However, NVIDIA Corporation
assumes no responsibility for the consequences of use of such information or for any infringement of patents or other rights of third parties that may result from its use. No license is granted by implication or otherwise under any patent or patent rights of NVIDIA Corporation.
Specifications mentioned in this publication are subject to change without notice. This publication supersedes and replaces all information previously supplied. NVIDIA Corporation products are not authorized for use as critical components in life support devices or systems
without express written approval of NVIDIA Corporation.
NVIDIA and its licensors retain all intellectual property and proprietary rights in and to the
Materials provided herein. Any use, reproduction, disclosure or distribution of the Materials
without an express license agreement from NVIDIA, or without NVIDIA's prior written consent, is strictly prohibited
IN NO EVENT SHALL NVIDIA BE LIABLE FOR ANY SPECIAL, INDIRECT, INCIDENT AL, OR CONSEQUENTIAL DAMAGES, OR ANY DAMAGES WHATSOEVER RESULTING FROM LOSS OF USE,
DATA OR PROFITS, WHETHER IN AN ACTION OF CONTRACT, NEGLIGENCE OR OTHER TORTIOUS ACTION, ARISING OUT OF OR IN CONNECTION WITH THE USE OR PERFORMANCE
OF THE MATERIALS PROVIDED HEREIN.
Trademarks
NVIDIA, the NVIDIA logo, PP5022, PP5024, and GoForce 6100 are trademarks or registered
trademarks of NVIDIA Corporation. Other company and product names may be trademarks of
the respective companies with which they are associated.
Skype, SkypeIn, SkypeOut, Skype Me, the Skype Logo and the S logo and other marks indicated on our site are trademarks of Skype Limited or other related companies. Skype is registered in the United States Patent and Trademark Office, and with the Trademark Offices of
the countries of Australia, Finland, Benelux, Hong Kong, Israel, Japan, Liechtenstein, New
Zealand, South Korea, Switzerland, and Taiwan.
Copyright
© 2007 by NVIDIA Corporation. All rights reserved
 Loading...