

Page 1

DA_09403_003 | January 7, 2020
User Guide
JETSON AGX XAVIER
DEVELOPER KIT
Page 2
DOCUMENT CHANGE HISTORY
DA_09403_003
Version Date Authors Description of Change
1.0 September 7, 2018 plawrence Initial release
2.0 July 1, 2019 plawrence
3.0 January 7, 2020 ssheshadri Reference to new VPI documentation.
Includes SDK Manager and related
updates.
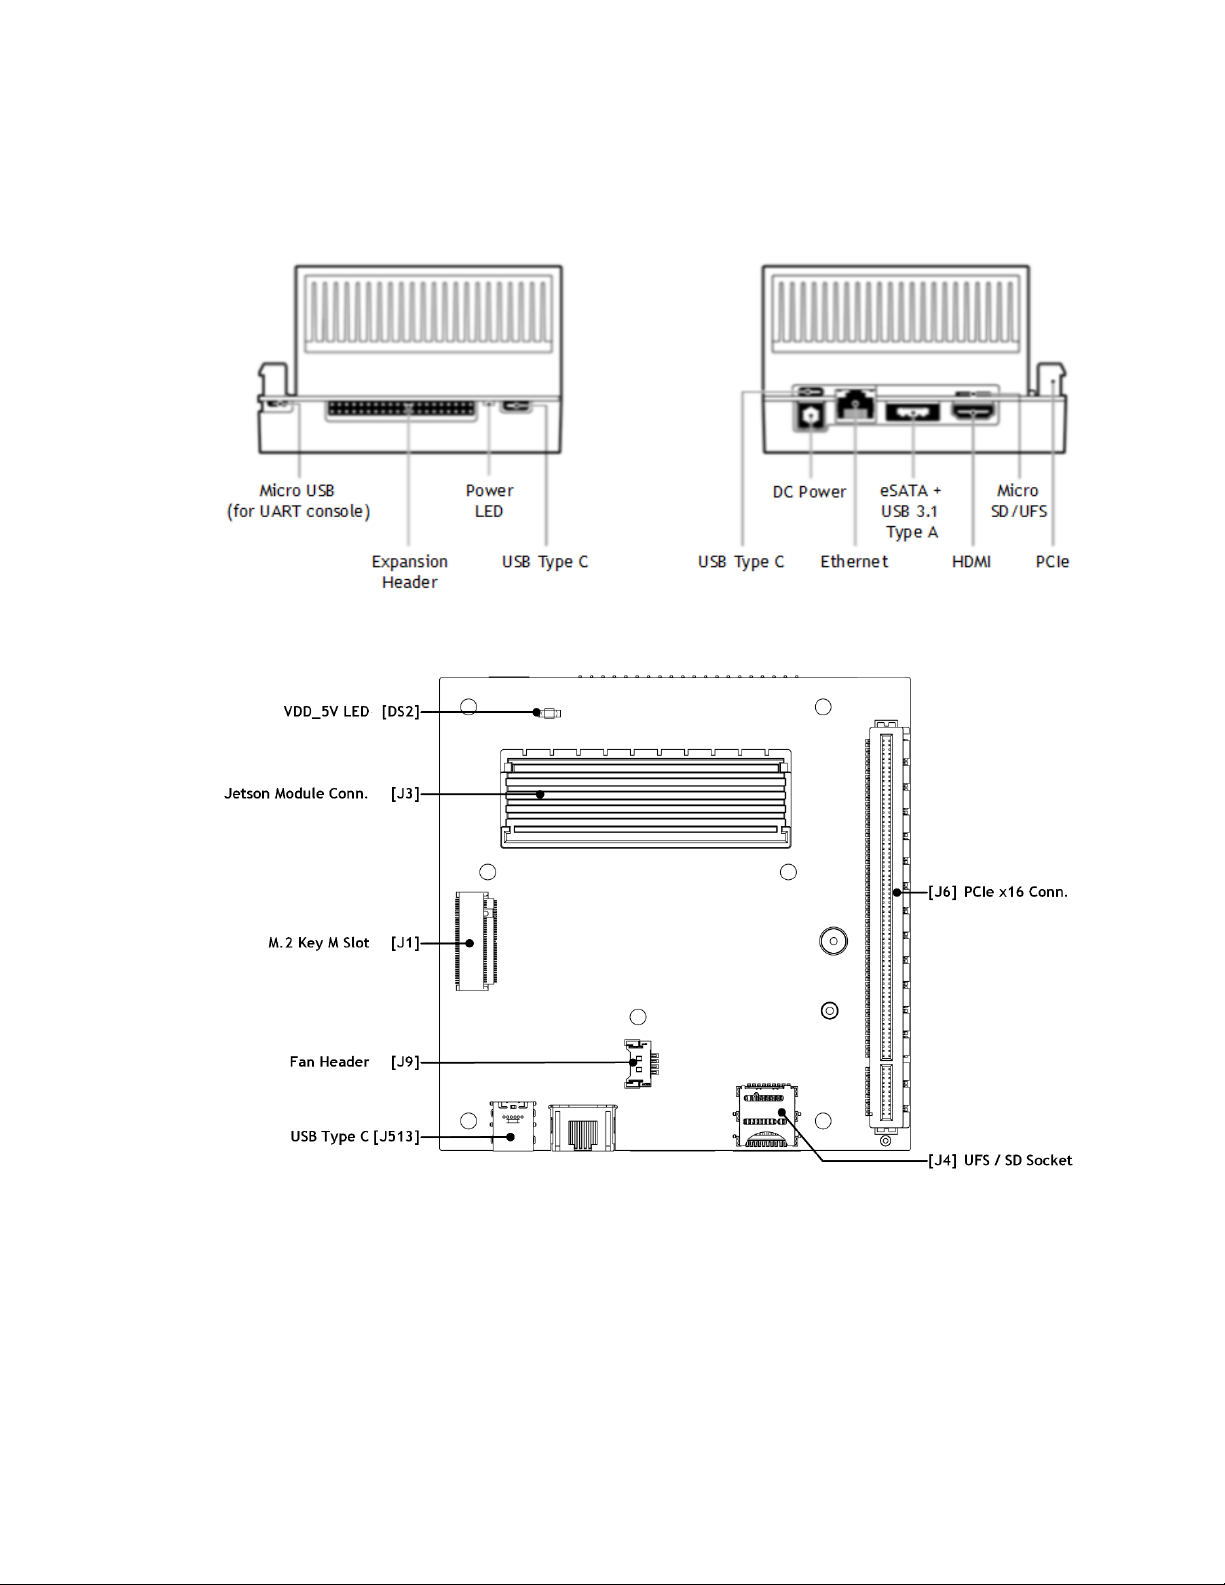
Welcome to the NVIDIA Jetson platform! There are two key things you should do
right away:
0. Sign up for the NVIDIA Developer Program
– this enables you to ask
questions and contribute on the NVIDIA Jetson Forums, gives access to all
documentation and collateral on the Jetson Download Center, and more.
1. Read this User Guide! After that, check out these important links:
• Jetson FAQ
– Please read the FAQ.
• Support Resources – This web page links to important resources,
including the Jetson Forum and the Jetson Ecosystem page.
• NVIDIA Jetson Linux Driver Package Release Notes –Jetson Linux
Driver Package is a key component of the Jetson platform, and
provides the sample filesystem for your developer kit. Please read the
latest release notes.
Thanks,
The NVIDIA Jetson team
Jetson AGX Xavier Developer Kit DA_09403_003 | ii
Page 3

TABLE OF CONTENTS
NOTE ....................................................... Error! Bookmark not defined.
Getting Started .............................................................................. 1
Included in the box ............................................................................. 1
Developer Kit Interfaces ....................................................................... 2
Interface Details ............................................................................. 3
Physical Configuration Instructions ........................................................... 4
JetPack ....................................................................................... 5
Summary of JetPack Components ............................................................ 5
OS Image ...................................................................................... 5
Libraries and APIs ............................................................................ 5
Sample applications ............................................................................ 6
Developer Tools ................................................................................. 6
Documentation .................................................................................. 7
How to Install Jetpack ......................................................................... 7
Install SDK Manager on the Linux Host Computer ....................................... 7
Connect Developer Kit to the Linux Host Computer .................................... 8
Put Developer Kit into Force Recovery Mode ............................................ 8
Run SDK Manager ............................................................................. 8
Working with Jetson Linux Driver Package ........................................... 9
Compliance Information ................................................................ 10
Jetson AGX Xavier Developer Kit DA_09403_003 | iii
Page 4

GETTING STARTED
The NVIDIA® Jetson AGX Xavier™ Developer Kit provides a full-featured development
platform designed to get you up and running quickly. The included carrier board
exposes many standard hardware interfaces, enabling a highly flexible and extensible
platform for rapid prototyping.
NVIDIA JetPack™ SDK supports both your developer kit and host development
platform. It includes:
Sample Linux filesystem with NVIDIA drivers
AI and Computer Vision libraries and APIs
Developer tools
Documentation and sample code
Before using your developer kit, you must install JetPack. A Linux host computer is
required; for details, see How to Install JetPack
Minimum system requirements for the host computer are:
Ubuntu Linux x64 v16.04 or v18.04
A valid Internet connection
At least 23GB of disk space
, below.
INCLUDED IN THE BOX
The Jetson AGX Xavier Developer Kit includes:
Jetson
Reference carrier board (P2822)
Power supply with AC cord
Type C to Type A cable (USB 3.1 Gen2)
Type C to Type A adapter (USB 3.1 Gen 1)
®
AGX Xavier™ module (P2888) with thermal solution
Jetson AGX Xavier Developer Kit DA_09403_003 | 1
Page 5
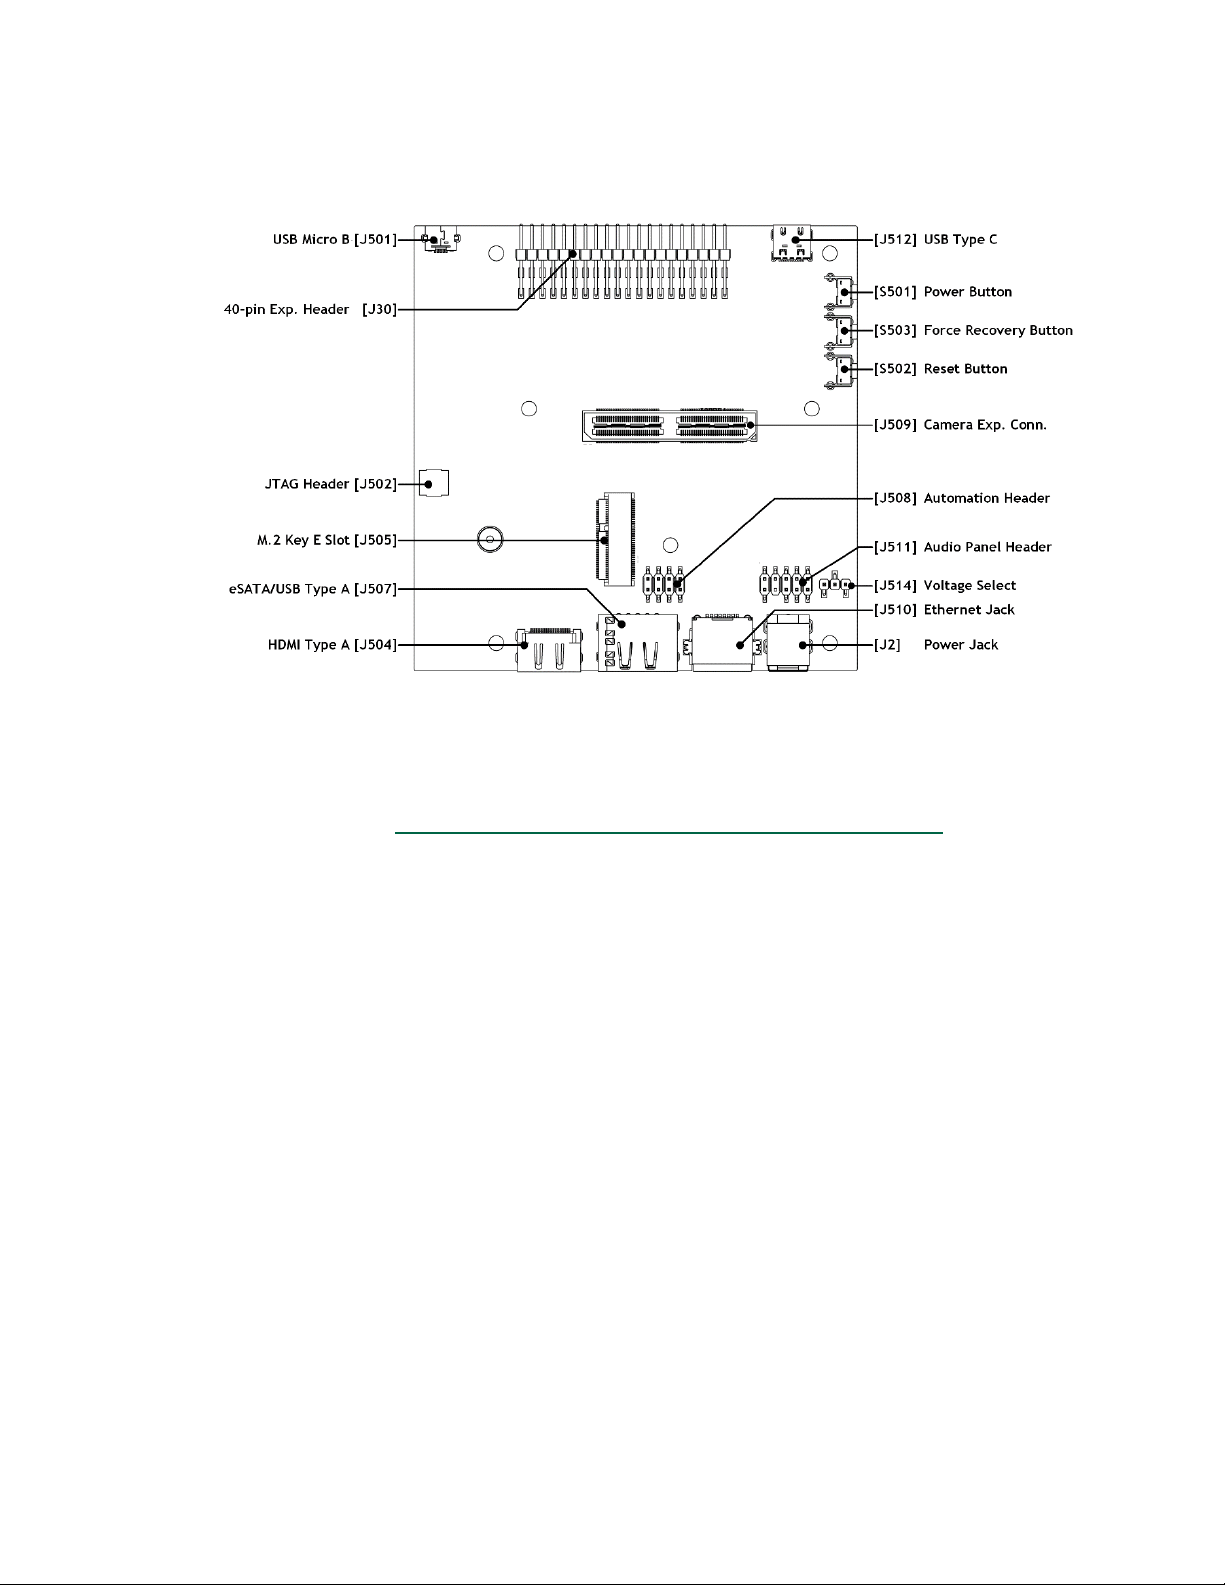
DEVELOPER KIT INTERFACES
Front view (left) and rear view (right)
Top view of developer kit carrier board
Getting Started
Jetson AGX Xavier Developer Kit DA_09403_003 | 2
Page 6
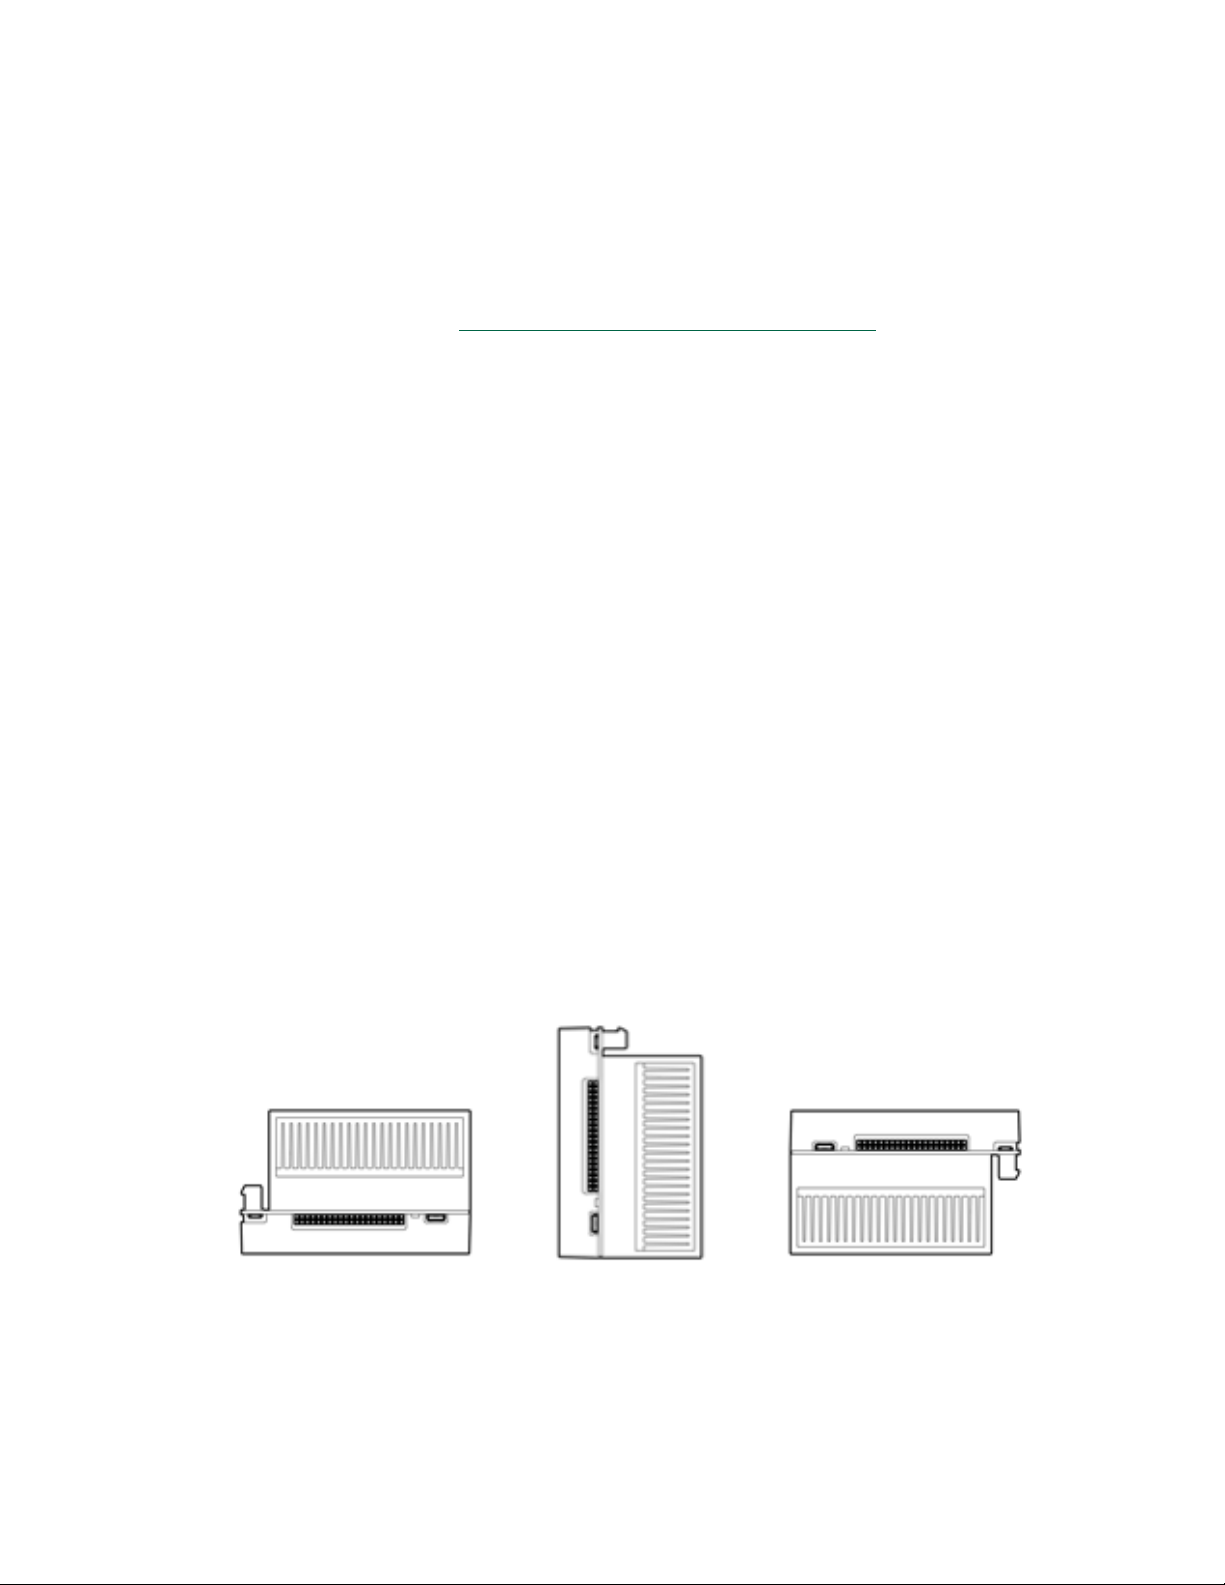
Bottom view of developer kit carrier board
Getting Started
Interface Details
This list highlights some of the Jetson AGX Xavier Developer Kit carrier board
interfaces. See the Jetson AGX Xavier Developer Kit Carrier Board Specification
comprehensive information:
[J1] M.2 Key M connector for high speed NVMe storage.
• To reach it, you must detach the combined module and thermal solution.
[J2] Power available for peripherals is limited to power supply capability (65W from
included power supply) minus developer kit system power usage (maximum of 30W
in default configuration).
[J4] Slot accepts either an SD Card or a UFS card.
[J6] PCIe x16 connector routes to a x8 PCIe 4.0 controller.
[J6] This connector is also where the lanes are connected for SLVS cameras.
[J501] Micro-USB connector provides access to the UART console.
• For example, you can access the serial console of the developer kit from a
terminal emulator on a computer connected to this micro-USB port.
for
[J504] HDMI 2.0.
[J505] M.2 Key E connector can be used for wireless networking cards, and includes
interfaces for PCIe (x1), USB 2.0, UART, I2S & I2C.
[J507] Hybrid connector can be used for either eSATA or USB3 Type-A. The eSATA
connector can supply 5V.
Jetson AGX Xavier Developer Kit DA_09403_003 | 3
Page 7
Getting Started
[J509] Camera connector supports up to six directly connected cameras via CSI-2, or
up to 16 cameras via the virtual channel feature of CSI-2.
[J512, J513] USB Type-C connectors.
• J512 can be used to flash the developer kit.
• Either connector can be used to power the developer kit from USB Type-C power
supplies listed in Jetson AGX Xavier Supported Component List
.
• Both connectors support DisplayPort, so you can run three displays at once by
using these plus the HDMI adapter.
PHYSICAL CONFIGURATION INSTRUCTIONS
To prepare your Jetson AGX Xavier Developer Kit for use, connect it as follows:
Connect an external HDMI display to the carrier board’s HDMI port.
Connect a USB keyboard and mouse.
• Connect directly to the hybrid USB Type-A/eSATA port and use the included
USB Type-C to Type-A adapter to connect to the rear USB Type-C port. (Leave
the front USB Type-C port available; it will be needed to flash the developer kit.)
Connect the developer kit to your local network via Ethernet cable to the carrier
board's Ethernet port.
Connect the included AC adapter to the carrier board's power jack. Plug the AC
adapter into an appropriately rated electrical outlet.
• Use only the supplied AC adapter, as it is appropriately rated for your device.
Note that the Jetson AGX Xavier Developer Kit may be run upside down or resting on
the non-vented side, allowing easy access to the camera connector and headers on the
bottom of the carrier board. Any of these orientations are OK:
Jetson AGX Xavier Developer Kit DA_09403_003 | 4
Page 8

JETPACK
NVIDIA JetPack SDK is the most comprehensive solution for building AI applications. It
includes the latest OS images for Jetson products, along with libraries and APIs,
samples, developer tools, samples, and documentation.
Before using your Jetson AGX Xavier Developer Kit, you will need to install JetPack.
SUMMARY OF JETPACK COMPONENTS
This section briefly describes each component of JetPack. For additional details about
these components, see the online documentation for JetPack at:
https://docs.nvidia.com/jetson/jetpack/index.html
OS Image
JetPack includes a sample file system derived from Ubuntu.
Libraries and APIs
JetPack includes the following libraries:
TensorRT and cuDNN for high performance deep learning applications
CUDA for GPU accelerated applications across multiple domains
NVIDIA Container Runtime for containerized GPU accelerated applications
Multimedia API package for camera applications and sensor driver development
VisionWorks, OpenCV, and VPI (Developer Preview) for visual computing
applications
Jetson AGX Xavier Developer Kit DA_09403_003 | 5
Page 9

JetPack
Sample applications
SAMPLE APPLICATIONS
JetPack includes several samples which demonstrate the use of JetPack components.
These are stored in the reference filesystem and can be compiled on the developer kit.
JetPack component Sample locations on reference filesystem
TensorRT /usr/src/tensorrt/samples/
cuDNN /usr/src/cudnn_samples_<version>/
CUDA /usr/local/cuda-<version>/samples/
Multimedia API /usr/src/tegra_multimedia_api/
/usr/share/visionworks/sources/samples/
VisionWorks
/usr/share/visionworks-tracking/sources/samples/
/usr/share/visionworks-sfm/sources/samples/
OpenCV /usr/share/OpenCV/samples/
VPI /opt/nvidia/vpi/vpi-0.0/samples
DEVELOPER TOOLS
JetPack includes the following developer tools. Some are used directly on a Jetson
system, and others run on a Linux host computer connected to a Jetson system.
Tools for application development and debugging:
• Nsight Eclipse Edition
on Linux host computer. Supports all Jetson products.
• CUDA-GDB for application debugging: Runs on the Jetson system or the Linux
host computer. Supports all Jetson products.
• CUDA-MEMCHECK for debugging application memory errors: Runs on the
Jetson system. Supports all Jetson products.
Tools for application profiling and optimization:
• Nsight Systems
for application profiling across GPU and CPU: Runs on the
Linux host computer. Supports all Jetson products.
• nvprof for application profiling across GPU and CPU: Runs on the Jetson system.
Supports all Jetson products.
• Nsight Graphics for graphics application debugging and profiling: Runs on the
Linux host computer. Supports all Jetson products.
for development of GPU accelerated applications: Runs
Jetson AGX Xavier Developer Kit DA_09403_003 | 6
Page 10

JetPack
• JetPack Documentation
OpenCV Documentation
• VisionWorks Documentation
Note
• Nsight Compute for interactive CUDA kernel profiling: Runs on the Linux host
computer. Supports Jetson AGX Xavier.
• Nsight Compute CLI for CUDA kernel profiling: Runs on the Jetson system or
the Linux host computer. Supports Jetson AGX Xavier.
Visual Profiler is deprecated for Jetson AGX Xavier. Developers are
encouraged to use Nsight Systems and Nsight Compute instead.
DOCUMENTATION
Documents that are relevant to developers using JetPack include:
• NVIDIA Jetson Linux Driver Package
Developer Guide
• NVIDIA Jetson Linux Support
Package Release Notes
• TensorRT Documentation
• cuDNN Documentation
• CUDA Toolkit
• NVIDIA Container Runtime
• Multimedia API Reference
•
• Nsight Eclipse Edition Documentation
• CUDA-GDB Documentation
• CUDA-MEMCHECK Documentation
• Nsight Systems
• nvprof
• Nsight Graphics
• Nsight Compute
• Nsight Compute CLI
• VPI–Vision Programming Interface
HOW TO INSTALL JETPACK
Installing JetPack to your developer kit requires you to perform these steps, detailed in
the sections below:
1. Download and install NVIDIA SDK Manager on the Linux host computer.
2. Connect your developer kit to the Linux host computer.
3. Put your developer kit into Force Recovery Mode.
4. Use SDK Manager to select and install desired components.
Install SDK Manager on the Linux Host Computer
You must have a Linux host computer with a working Internet connection to run SDK
Manager and flash the developer kit. Supported host operating systems are:
Ubuntu Linux x64 Version 18.04 or 16.04
Follow these instructions
to download and install NVIDIA SDK Manager.
Jetson AGX Xavier Developer Kit DA_09403_003 | 7
Page 11

JetPack
Connect Developer Kit to the Linux Host Computer
Prepare your Jetson AGX Xavier Developer Kit for setup as follows. For “headless”
setup, skip the first step.
Connect a display, keyboard, and mouse to the developer kit (see Physical
Configuration Instructions, above).
Use the included USB cable to connect the Linux host computer to the front USB
Type-C connector on the developer kit.
During setup, SDK Manager will provide your developer kit with an Internet
connection via this USB connection.
Connect the included AC adapter to the developer kit’s DC jack and plug it in to a
source of AC power.
Put Developer Kit into Force Recovery Mode
The developer kit must be in Force Recovery Mode (RCM) to enable the installer to
transfer system software to the Jetson module.
1. Connect the developer kit as described above. It must be powered off.
2. Press and hold down the Force Recovery button.
3. Press and hold down the Power button.
4. Release both buttons.
Run SDK Manager
NVIDIA SDK Manager enables installation of software to the Jetson module and/or your
Linux host computer. For full instructions, see the SDK Manager documentation
Note: After the Jetson module is flashed with the OS, it reboots and prompts you
for initial configuration information like keyboard layout, username and
password, etc.
If no display is attached to the developer kit during this first boot, the initial
configuration is “headless.” That is, you must communicate with the
developer kit through a serial application on the host computer (e.g., puTTY)
connected via a host serial port and the developer kit’s Micro-USB port.
.
Jetson AGX Xavier Developer Kit DA_09403_003 | 8
Page 12

WORKING WITH JETSON LINUX DRIVER PACKAGE
NVIDIA® Jetson™ Linux Driver Support Package provides the OS for your NVIDIA®
Jetson AGX Xavier™ Developer Kit, including a Linux kernel, Bootloader, Jetson Board
Support Package (BSP), and sample filesystem. SDK Manager can install Jetson Linux
Driver Support Package along with all of the other JetPack components to get your
developer kit up and running quickly.
Jetson Linux Driver Support Package is also available for download directly from the
main L4T page
Jetson Linux Driver Package Developer Guide for flashing instructions.
The “Platform Adaptation and Bring-Up” topic in the Developer Guide describes how to
port the Jetson BSP and bootloader from your developer kit to a new hardware platform
incorporating the Jetson module. Porting L4T to a new device enables use of the other
JetPack components on that device, along with the software you’ve created using the
developer kit.
on the Jetson Developer Site. See the “Quick Start Guide” section of the
Jetson AGX Xavier Developer Kit DA_09403_003 | 9
Page 13

COMPLIANCE INFORMATION
The NVIDIA Jetson AGX Xavier Developer Kit is compliant with the regulations listed
in this section.
UNITED STATES
Federal Communications Commission (FCC)
This device complies with part 15 of the FCC Rules. Operation is subject to the following
two conditions: (1) this device may not cause harmful interference, and (2) this device
must accept any interference received, including any interference that may cause
undesired operation of the device.
This equipment has been tested and found to comply with the limits for a Class B digital
device, pursuant to Part 15 of the FCC Rules. These limits are designed to provide
reasonable protection against harmful interference in a residential installation. This
equipment generates uses and can radiate radio frequency energy and, if not installed
and used in accordance with the instructions, may cause harmful interference to radio
communications. However, there is no guarantee that interference will not occur in a
particular installation.
If this equipment does cause harmful interference to radio or television reception, which
can be determined by turning the equipment off and on, the user is encouraged to try to
correct the interference by one or more of the following measures:
Jetson AGX Xavier Developer Kit DA_09403_003 | 10
Page 14

Compliance Information
Reorient or relocate the receiving antenna.
Increase the separation between the equipment and receiver.
Connect the equipment into an outlet on a circuit different from that to which
the receiver is connected.
Consult the dealer or an experienced radio/TV technician for help.
FCC Warning: The FCC requires that you be notified that any changes or modifications
to this device not expressly approved by the manufacturer could void the user’s
authority to operate the equipment.
Underwriters Laboratories (UL)
UL listed Product Logo for Jetson AGX Xavier Developer Kit, model name P2972.
UL Recognized Component Logo for Embedded System Module, model number P2888
for Jetson AGX Xavier.
Canada
Industry Canada (IC)
CAN ICES-3(B)/NMB-3(B)
This device complies with Industry Canada license-exempt RSS standard(s). Operation
is subject to the following two conditions: (1) this device may not cause interference, and
(2) this device must accept any interference, including interference that may cause
undesired operation of the device.
Le présent appareil est conforme aux CNR d'Industrie Canada applicables aux appareils
radio exempts de licence. L'exploitation est autorisée aux deux conditions suivantes : (1)
l'appareil ne doit pas produire de brouillage, et (2) l'utilisateur de l'appareil doit accepter
tout brouillage radioélectrique subi, même si le brouillage est susceptible d'en
compromettre le fonctionnement.
Jetson AGX Xavier Developer Kit DA_09403_003 | 11
Page 15

Compliance Information
European Union
European Conformity; Conformité Européenne (CE)
This device bears the CE mark accordance with following directives:
Electromagnetic Compatibility Directive 2014/30/EU
Low Voltage Directive 2014/35/EU
RoHS Directive 2011/65/EU
A copy of the Declaration of Conformity to the essential requirements may be obtained
directly from NVIDIA GmbH (Floessergasse 2, 81369 Munich, Germany).
Japan
Voluntary Control Council for Interference (VCCI)
Japan RoHS Material Content Declaration
日本工業規格JIS C 0950:2008により、2006年7月1日以降に販売される特定分野の電気および電子機器
について、製造者による含有物質の表示が義務付けられます。
機器名称: Jetson AGX Xavier 開発者コンポーネント
主な分類 特定化学物質記号
Jetson AGX Xavier Developer Kit DA_09403_003 | 12
Page 16

Compliance Information
Pb Hg Cd Cr(VI) PBB PBDE
PCBボード
パッシブ電子部品
アクティブ電子部品
コネクター / ケーブル
プロセッサー
メモリ
機械部品
カメラ (オプション)
はんだ付け材料
0 0 0 0 0 0
除外項目
除外項目
除外項目
0 0 0 0 0
0 0 0 0 0
0 0 0 0 0
0 0 0 0 0 0
0 0 0 0 0 0
除外項目
除外項目
0 0 0 0 0
0 0 0 0 0
0 0 0 0 0 0
フラックス、クリーム
はんだ、ラベル、その
0 0 0 0 0 0
他消耗品
注:
1.「0」は、特定化学物質の含有率が日本工業規格JIS C 0950:2008に記載されている含有率基準値より
低いことを示します。
2.「除外項目」は、特定化学物質が含有マークの除外項目に該当するため、特定化学物質について、日
本工業規格JIS C 0950:2008に基づく含有マークの表示が不要であることを示します。
3.「0.1wt%超」または「0.01wt%超」は、特定化学物質の含有率が日本工業規格JIS C 0950:2008
に記載されている含有率基準値を超えていることを示します。
A Japanese regulatory requirement, defined by specification JIS C 0950: 2008, mandates that
manufacturers provide Material Content Declarations for certain categories of electronic products
offered for sale after July 1, 2006.
Product Model Number: Jetson AGX Xavier Developer Kit
Symbols of Specified Chemical Substance
Major Classification
Pb Hg Cd Cr(VI) PBB PBDE
PCB 0 0 0 0 0 0
Passive components Exempt 0 0 0 0 0
Jetson AGX Xavier Developer Kit DA_09403_003 | 13
Page 17

Compliance Information
Flux, Solder Paste, label
materials
Active components Exempt 0 0 0 0 0
Connectors/Cables Exempt 0 0 0 0 0
Processor 0 0 0 0 0 0
Memory 0 0 0 0 0 0
Mechanicals Exempt 0 0 0 0 0
Camera (optional) Exempt 0 0 0 0 0
Soldering material 0 0 0 0 0 0
and other consumable
Notes:
1. “0” indicates that the level of the specified chemical substance is less than the threshold level
specified in the standard, JIS C 0950: 2008.
2. “Exempt” indicates that the specified chemical substance is exempt from marking and it is not
required to display the marking for that specified chemical substance per the standard, JIS C 0950:
2008.
3. “Exceeding 0.1wt%” or “Exceeding 0.01wt%” is entered in the table if the level of the specified
chemical substance exceeds the threshold level specified in the standard, JIS C 0950: 2008.
0 0 0 0 0 0
South Korea
Radio Research Agency (RRA)
R-R-NVA-P2972 R-R-NVA-P2888
기기는 가정용(B급) 전자파적합기기로서 주
B급 기기
Jetson AGX Xavier Developer Kit DA_09403_003 | 14
이
로 가정에서 사용하는 것을 목적으로 하며, 모
든 지역에서 사용할 수 있습니다.
Page 18

Compliance Information
110181-
3
120-
06711
511, 2101호 (
,
)
:
.
Korea RoHS Material Content Declaration
확인 및 평가 양식은 제품에 포함 된 유해 물질의 허용 기준의 준수에 관한
앤비디아홍콩홀딩즈리미티드( 영
상호 :
법인등록번호
003637
업소)
문
준비
대표자성명 카렌테레사번즈
서울특별시
강남구 영동대로
사업자등록번
84-
호:
삼성동
주소
코엑스무역타워)
제품 내용
제품의 종류
해당없음 제품명(규격
해당없음
세부모델명(번
해당없음 제품출시일 해당없음
호):
제품의 중량 해당없음 제조, 수입업자 앤비디아
엔비디아의 그래픽 카드제품은 전기 전자제품 및 자동차의 자원순환에 관한 법률
시행령 제 11조 제 1항에 의거한 법 시행행규칙 제 3조에에따른 유해물질함유 기준을
확인 및 평가한 결과, 이를 준수하였음을 공표합니다.
구비서류
없음
작성방법
① 제품의 종류는 "전기.전자제품 및 자동차의 자원순환에관한 법률 시행령" 제 8조 제
1항 및 제 2항에 따른 품목별로 구분하여 기재합니다.
② 전기 전자 제품의 경우 모델명 (번호), 자동차의 경우, 제원관리번호를 기재합니다.
③ 해당제품의 제조업자 또는 수입업자를 기재합니다
Jetson AGX Xavier Developer Kit DA_09403_003 | 15
Page 19

Compliance Information
Jetson AGX Xavier Developer Kit
Equipment Name: Jetson AGX Xavier Developer Kit
Australia and New Zealand
Australian Communications and Media Authority
This product meets the applicable EMC requirements for Class B, I.T.E equipment and applicable
radio equipment requirements
Russia/Kazakhstan/Belarus
Customs Union Technical Regulations (CU TR)
This device complies with the technical regulations of the Customs Union (CU TR)
This device complies with the rules set forth by Federal Agency of Communications and the
Ministry of Communications and Mass Media
Federal Security Service notification has been filed.
Taiwan
Bureau of Standards, Metrology & Inspection (BSMI)
The linked image cannot be displayed. The file may have been moved, renamed, or deleted. Verify that the link points to the correct file and location.
This device complies with CNS 13438 (2006) Class B.
Product Name: Jetson AGX Xavier Developer Kit開發者組件
Taiwan RoHS Material Content Declaration
限用物質含有情况標示聲明書
Declaration of the presence condition of the Restricted Substances Marking
設備名稱:
Jetson AGX Xavier Developer Kit DA_09403_003 | 16
Page 20

Compliance Information
Restricted substances and its chemical symbols
(Pb )
(Hg)
(Cd)
(Cr(VI))
(PBB)
(PBDE)
PCB
Processor
Active components
Passive components
Memory
Mechanicals
Connectors/Cable
Camera (optional)
Soldering material
consumable materials
備考
備考
as required by Management Methods for Restricted Use of Hazardous Substances in Electrical
印刷電路板
處理器
主動電子零件
被動電子零件
存儲設備
機械部件
連接器/線材
攝像頭 (選配)
焊接金屬
單元
Parts
限用物質及其化學符號
铅
O O O O O O
O O O O O O
-
-
O O O O O O
-
-
-
O O O O O O
汞
O O O O O
O O O O O
O O O O O
O O O O O
O O O O O
镉
六價铬
多溴聯苯
多溴二苯醚
助焊劑,錫膏,標籤及耗材
Flux, Solder Paste, label and other
1:O:系指該限用物質未超出百分比含量基準值
Note 1: O:indicates that the percentage content of the restricted substance does not exceed the percentage of
reference value of presence.
2: -:系指該项限用物質为排外项目。
Note 2:-:indicates that the restricted substance corresponds to the exemption.
此表中所有名稱中含 “-” 的部件均符合歐盟 RoHS 立法。
All parts named in this table with an “-” are in compliance with the European Union’s RoHS Legislation.
注:環保使用期限的參考標識取决與產品正常工作的温度和濕度等條件
Note: The referenced Environmental Protection Use Period Marking was determined according to normal operating use
conditions of the product such as temperature and humidity.
O O O O O O
China
China RoHS Material Content Declaration
产品中有害物质的名称及含量
The Table of Hazardous Substances and their Content
根据中国《电器电子产品有害物质限制使用管理办法》
and Electronic Products
Jetson AGX Xavier Developer Kit DA_09403_003 | 17
Page 21

Compliance Information
部件名称
Parts
印刷电路板
PCB
处理器
Processor
主动电子零件
Active components
被动电子零件
Passive components
存储设备
Memory
机械部件
Mechanicals
有害物质
Hazardous Substances
铅
(Pb)
O O O O O O
O O O O O O
X O O O O O
X O O O O O
O O O O O O
X O O O O O
汞
(Hg)
镉
(Cd)
六价铬
(Cr(VI))
多溴联苯
(PBB)
多溴二苯醚
(PBDE)
连接器/线材
Connectors / Cable
摄像头 (选配)
Camera (optional)
焊接金属
Soldering material
助焊剂,锡膏,标签及耗材
Flux, Solder Paste, label and
other consumable materials
X O O O O O
X O O O O O
O O O O O O
O O O O O O
本表格依据SJ/T 11364-2014 的规定编制
The table according to SJ/T 11364-2014
O:表示该有害物质在该部件所有均质材料中的含量均在GB/T 26572-2011 标准规定的限
量要求以下。
O: Indicates that this hazardous substance contained in all of the homogeneous materials for
this
part is below the limit requirement in GB/T 26572-2011.
Jetson AGX Xavier Developer Kit DA_09403_003 | 18
Page 22

Compliance Information
X:表示该有害物质至少在该部件的某一均质材料中的含量超出GB/T 26572-2011 标准规
定的限量要求。
X: Indicates that this hazardous substance contained in at least one of the homogeneous
materials used for this part is above the limit requirement in GB/T 26572-2011.
此表中所有名称中含 “X” 的部件均符合欧盟 RoHS 立法。
All parts named in this table with an “X” are in compliance with the European Union’s
RoHS Legislation.
注:环保使用期限的参考标识取决于产品正常工作的温度和湿度等条件
Note: The referenced Environmental Protection Use Period Marking was determined
according to normal operating use conditions of the product such as temperature and
humidity.
India
India RoHS Compliance Statement
This product, as well as its related consumables and spares, complies with the reduction
in hazardous substances provisions of the “India E-waste (Management and Handling)
Rule 2016”. It does not contain lead, mercury, hexavalent chromium, polybrominated
biphenyls or polybrominated diphenyl ethers in concentrations exceeding 0.1 weight %
and 0.01 weight % for cadmium, except for where allowed pursuant to the exemptions
set in Schedule 2 of the Rule.
India RoHS Self-Declaration Form
(as per E-Waste (Management) Rules, 2016)
Product Category
& Code (as Per
Sr.
Schedule I of E-
No.
Waste (M) Rules,
2016
i. ITEW2
Product
name
Jetson AGX
Xavier
Developer
Kit
RoHS
Model
No.
P2972 N/A n/a Yes Yes China
Product
Weight
(g)
Date of
placing
on
market
Compliance
with RoHS
Yes/No
information
provided on
product
info booklet
Yes/No
In case Product is
imported from
other country, name
of the country
manufactured
Jetson AGX Xavier Developer Kit DA_09403_003 | 19
Page 23

Notice
ALL NVIDIA DESIGN SPECIFICATIONS, REFERENCE BOARDS, FILES, DRAWINGS, DIAGNOSTICS, LISTS, AND OTHER
DOCUMENTS (TOGETHER AND SEPARATELY, "MATERIALS") ARE BEING PROVIDED "AS IS." NVIDIA MAKES NO
WARRANTIES, EXPRESS, IMPLIED, STATUTORY, OR OTHERWISE WITH RESPECT TO THE MATERIALS, AND ALL
EXPRESS OR IMPLIED CONDITIONS, REPRESENTATIONS AND WARRANTIES, INCLUDING ANY IMPLIED WARRANTY
OR CONDITION OF TITLE, MERCHANTABILITY, SATISFACTORY QUALITY, FITNESS FOR A PARTICULAR PURPOSE
AND NON-INFRINGEMENT, ARE HEREBY EXCLUDED TO THE MAXIMUM EXTENT PERMITTED BY LAW.
Information furnished is believed to be accurate and reliable. However, NVIDIA Corporation assumes no
responsibility for the consequences of use of such information or for any infringement of patents or other rights
of third parties that may result from its use. No license is granted by impl ication or otherwise under any patent
or patent r ights of NVIDIA Corporatio n. Specifications mentioned in this publication are subject to change
without notice. This publication su persedes and replaces all information previously supplied. NVIDIA
Corporation products are not authorized for use as critical components in life support devices or systems
without express written approval of NVIDIA Corporation.
Trademarks
NVIDIA, the NVIDIA logo, Jetson AGX Xavier, Jetson AGX Xavier Developer Kit, JetPack, and Jetson are
trademarks or registered trademarks of NVIDIA Corporation in the United States and other countries. Other
company and product names may be trade marks of the r espective companies with which they are associated.
The Bluetooth
marks by NVIDIA is under license.
®
word mark and logos are registered trademarks owned by Bluetooth SIG, Inc. Any use of such
Copyright
© 2017-2019 NVIDIA Corporation. All rights reserved.
www.nvidia.com
 Loading...