

Page 1

NVIDIA
GeForce4
MX420/440/460
SP7100M4A3X064DV ; SP7100M4A3X064TV
SP7100M4A3X064PU ; SP7100M4A3V128DV
SP7100M4A3V128TV ; SP7100M4A3V128PU
3D GRAPHIC
ACCELERATOR
MANUAL
SPARKLE COMPUTER CO., LTD.
Page 2

1
1.0
Page 3

2
NVIDIA GeForce4 MX420/440/460 User’s Manual
TABLE OF CONTENTS
TABLE OF CONTENTS.....................................................................................................2
1. NVIDIA GeForce4 MX420/440/460 Features ...............................................................3
2. Hardware installation...................................................................................................4
3. Resolutions and colors supported:..............................................................................5
4. Smart Installation..........................................................................................................5
5. Manually install Windows XP drivers...........................................................................8
5.1 Installation and Setup..........................................................................................8
5.2 How to Change Color Depth and Resolution in Windows XP.............................8
5.3 How to Change Refresh Rate in Windows XP.................................................10
5.4 NVIDIA Utility in Windows System....................................................................12
5.4.1 GeForce4 MX (NVIDIA)...........................................................................12
5.4.2 nView .....................................................................................................13
5.4.2.1 Standard mode:............................................................................14
5.4.2.2 Color correction… ........................................................................15
5.4.2.3 Screen Adjustment… ...................................................................16
5.4.2.4 nView enable mode......................................................................17
6. Manually install Windows 98 and Windows ME drivers............................................18
6.1 Installation and Setup........................................................................................18
6.2 How to Change Color Depth and Resolution.....................................................18
6.3 How to Change Refresh Rate...........................................................................20
7. Manually install Windows 2000 drivers.....................................................................20
FCC Statement...............................................................................................................22
Warning:..................................................................................................................22
Trademark Acknowledgments.......................................................................................23
Page 4

3
1. NVIDIA GeForce4 MX420/440/460 Features
GeForce4 MX420 AGP bus, with 64MB or 128MB SDRAM on Board
Graphics core 256-BIT
Fill rate (AA samples/sec.) 1 BILLION
Triangles/sec 31 MILLION
Memory bandwidth 2.7 GB/SEC
GeForce4 MX440 AGP bus, with 64MB DDR SDRAM on Board
Graphics core 256-BIT
Fill rate (AA samples/sec.) 1.1 BILLION
Triangles/sec 34 MILLION
Memory bandwidth 6.4 GB/SEC
GeForce4 MX460 AGP bus, with 64MB DDR SDRAM on Board
Graphics core 256-BIT
Fill rate (AA samples/sec.) 1.2 BILLION
Triangles/sec 38 MILLION
Memory bandwidth 8.8 GB/SEC
nView Display Technology
Provides unprecedented flexibility and control for using multiple displays. nView boosts
productivity by enabling the user to have two simultaneous displays for every GPU.
Multiple graphics cards can be used if more than two displays are required.
Lightspeed Memory Architecture (LMA) II Technology
LMA II boosts effective memory bandwidth by up to 300% Radical new technologies –
including Z occlusion culling, fast Z clear, and auto precharge – effectively multiplies
the memory bandwidth to ensure fluid frame rates for the latest 3D and 2D games and
applications
MX Memory Crossbar
Dual memory controllers allow more efficient utilization of memory bandwidth
Integrated Dual 350MHz DACs
Drivers two independent CRT display with crisp and clear image quality at 2048x1536
resolution @ 75Hz (2 CRT output is optional function)
Integrated TV Encoder supporting 1024x768 Resolution
Provides best-in-class TV-out functionality (optional)
Accuview Antialiasing
Delivers unprecedented AA performance and quality to the mainstream market and
enables high resolution, high frame rate, full-scene antialiasing for the first time ever in
this market segment
Video Processing Engine (VPE)
Enables the highest quality, full-frame rate, full-screen HDTV and DVD without requiring
a high performance CPU
AGP 4X/2X with AGP Texturing and Fast Writes
AGP 4X is the highest performance connection between the CPU and graphics
processor. Taking advantage of new methods for transferring information more
efficiently allows content developers to use high-quality 32-bit color textures and
high-polygon count scenes.
Other Features
Page 5

4
2 dual-rendering pipelines
4 texels per clock cycle
Cube environment mapping
64M high-speed 128-bit DDR RAM memory
High-performance 2D rendering engine
AGP 4X with Fast Writes
NVIDIA Shading Rasterizer
AGP 4X/2X and AGP Texturing Support
Integrated hardware transform engine
Integrated hardware lighting engine
True-color hardware cursor
High-quality HDTV/DVD playback
True, reflective bump mapping
Multibuffering (double, triple, quad) for smooth animation and video playback
Operating systems support
Windows XP, Windows 2000, Windows Me, Windows 98, Linux Compatible
API Support
OpenGL 1.3 and lower
DirectX 8.1 and lower
2. Hardware installation
2.1 Package Contents
1. NVIDIA GeForce4 MX 3D Accelerator card
2. CD title or Software diskettes
3. This manual
2.2 Installing the card
1. Turn off your computer
2. Remove the cover of the computer per the owner’s manual
3. Install the card in the AGP bus slots
4. Replace the cover.
Page 6

5
3. Resolutions and colors supported:
GeForce4 MX420/440/460
B.P.P. Refresh Rates (HZ)
8
60/70/72/75/85/100/120/140/144/150/170/200/240
640*480 16
60/70/72/75/85/100/120/140/144/150/170/200/240
32
60/70/72/75/85/100/120/140/144/150/170/200/240
8 60/70/72/75/85/100/120/140/144/170/200/240
800*600 16 60/70/72/75/85/100/120/140/144/170/200/240
32 60/70/72/75/85/100/120/140/144/170/200/240
8
60/70/72/75/85/100/120/140/144/150/170/200/240
1024*768
16
60/70/72/75/85/100/120/140/144/150/170/200/240
32 60/70/72/75/85/100/120/140/144/150/170/200
8 60/70/72/75/85/100/120/140/144/150/170/200
1152*864
16 60/70/72/75/85/100/120/140/144/150/170/200
32 60/70/72/75/85/100/120/140/144/150
8 60/70/72/75/85/100/120/140/144/150/170
1280*960
16 60/70/72/75/85/100/120/140/144/150/170
32 60/70/72/75/85/100/120/140/144/150
8 60/70/72/75/85/100/120/140/144/150/170
1280*1024
16 60/70/72/75/85/100/120/140/144/150/170
32 60/70/72/75/85/100/120/140/144/150
8 60/70/72/75/85/100/120/140/144/150
1600*900
16 60/70/72/75/85/100/120/140/144/150
32 60/70/72/75/85/100/120
8 60/70/72/75/85
1600*1200
16 60/70/72/75/85
32 60/70/72/75/85
Different driver version or different windows platform may have different support table.
4. Smart Installation
For Windows XP, Windows 2000, Windows 98, Windows ME
4.1 Put the DRIVERS CD in your CD-ROM
Page 7

6
4.2 Click Driver installation
4.3 If everything fine, screen will show Confirm Installation window.
Then Select OK
Page 8

7
4.4 Now appears the Driver Confirmation window
Select Install
If the drivers is very new may not certified by Microsoft, if so, system will prompt you the
drivers do not have “digital signature”, still you can force to install.
4.5 Then restart your computer.
Page 9

8
5. Manually install Windows XP drivers
5.1 Installation and Setup
The Windows setup program installs and modifies all of the necessary files. Follow these
steps to install the Windows XP drivers.
1. Insert the DISC (CD Title Driver).
2. Select Control Panel from Start menu
3. Select the Display icon
4. Double-click on the Display icon in the Control Panel folder. You can also click the
right mouse button anywhere on the desktop and select the Properties option form
the pop-out menu.
5. Click Settings, and then Advanced
6. Now shows [Plug And Play Monitor and NVIDIA… ] window
Select Adapter
7. Then show Standard PCI Graphics… (or NVIDIA GeForce… )
Select Properties
8. Then show Adapter Properties …
Select Driver and click Update driver…
9. Then show Hardware Update Wizard
Select Install from a list or specific location (Advanced) – recommended for
saving installation time
Then select Next.
10. Default setting will select Search for the best driver in these locations
Please check Include this location in the search – recommended for saving
installation time
Select Browse
11. Then show Browse for Folder
Select E:\drivers\ NVIDIA\7100\winXP (If 7100 not exist, use 7X00 instead)
Note: “E:”-> CD Drive, “NVIDIA”-> VGA chip brand name, “7100”-> VGA model name
Then select OK and then click Next
12. If no problem occur, system will start to install the driver
13. Then show Completing the Hardware Update Wizard
Select Finish
14. Close the Adapter Properties window
15. Then show System Settings Change
Select OK, System will restart automatically.
5.2 How to Change Color Depth and Resolution in Windows XP
Make sure that you have installed Windows Driver.
1. Select Control Panel from Start menu
2. Select the Display icon
3. Double-click on the Display icon in the Control Panel folder. You can also click the
right mouse button anywhere on the desktop and select the Properties option form
the pop-out menu.
Click Settings
Page 10

9
Click on the pull-down arrow from the Color palette area to select color depth or adjust the
sliding bar to either Less or More from the Desktop area
Select OK to restart System and new color depth or the new resolution takes effect.
Page 11

10
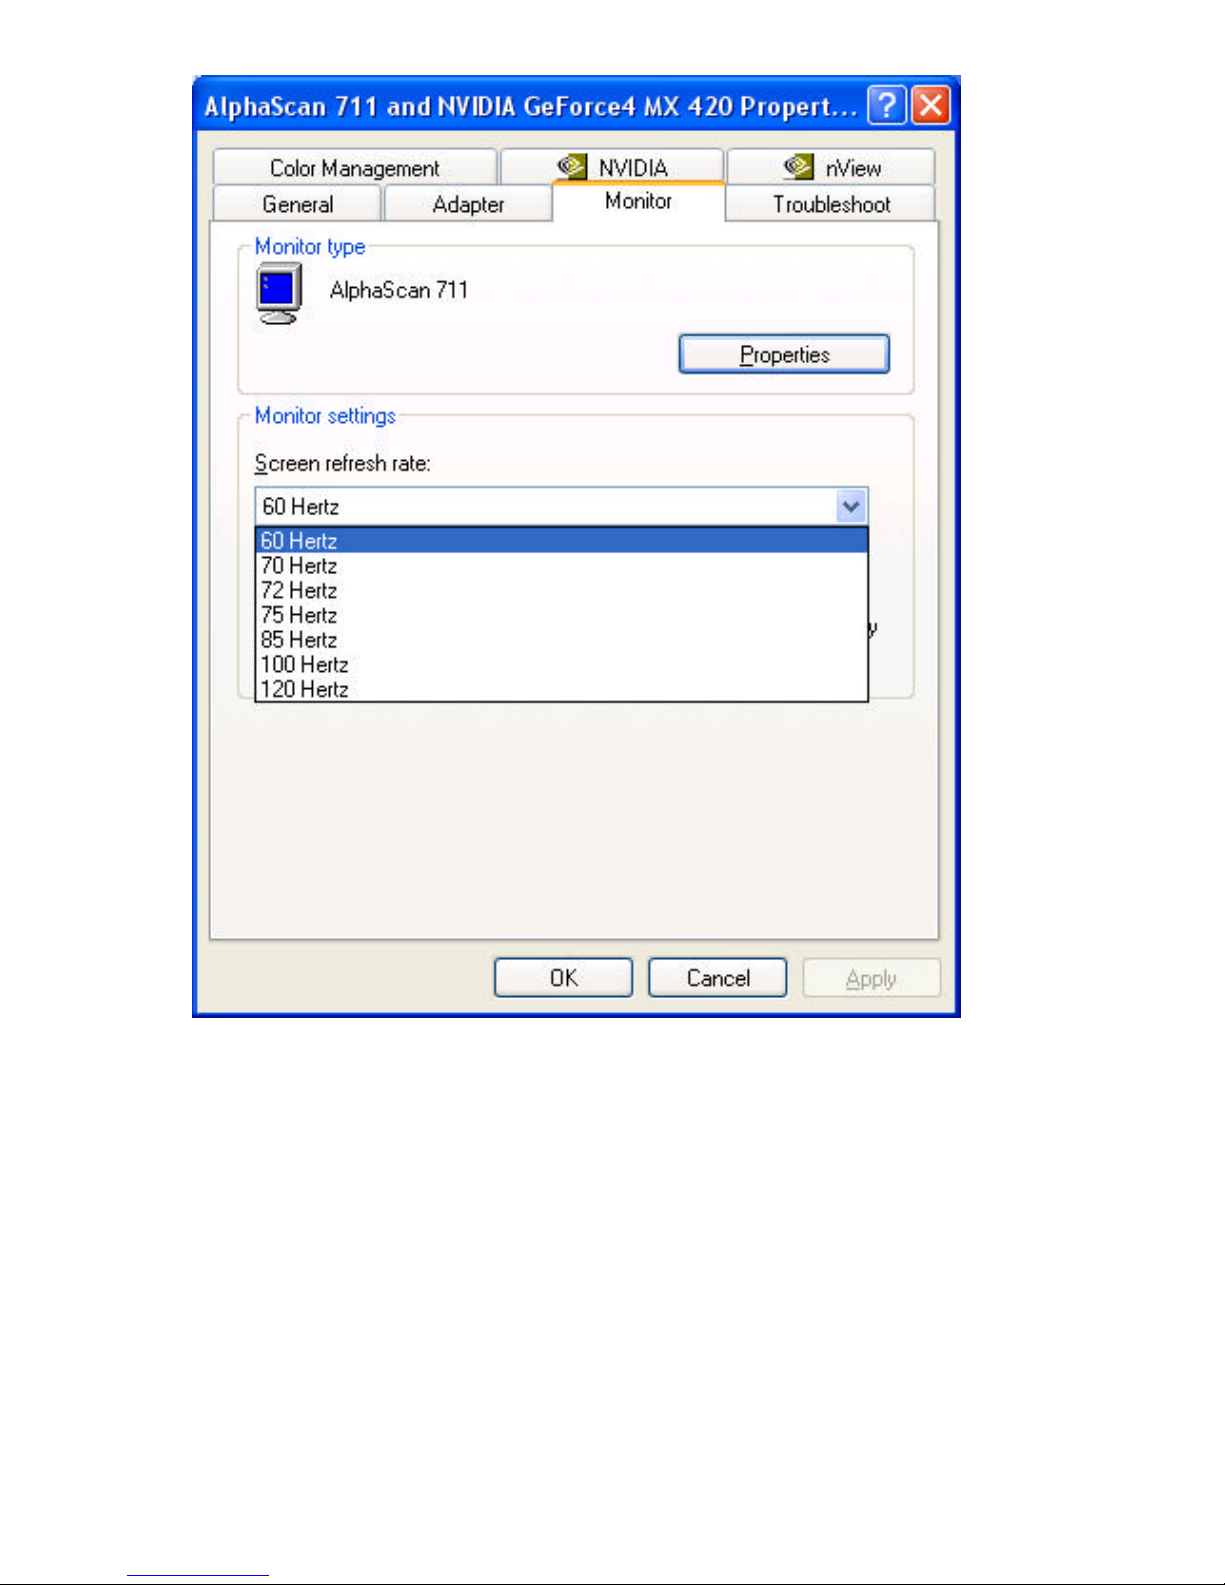
5.3 How to Change Refresh Rate in Windows XP
1. Make sure that you have installed windows XP Driver. Click on the Start box in the
lower left corner and proceed to Setting, Control Panel
2. Inside the Control panel group , click on Display icon to open the Display
Properties folder and choose Settings click the Advance Settings choose
Monitor
3. Click on the Refresh Rate sub window to change refresh rate
4. Select OK and new refresh rate takes effect
5. Refresh Rate default is Optimal.
6. If you change Refresh Rate from Optimal to another, you maybe need to restart
Windows System for functional.
Note: If your monitor is not Branded or Plug&Play, you will only see Adapter default and
optimal. Please contact your monitor supplier to get right or compatible drivers for your
monitor. Otherwise you can not select the refresh rate you wanted.
Page 12
11
Page 13
12
5.4 NVIDIA Utility in Windows System
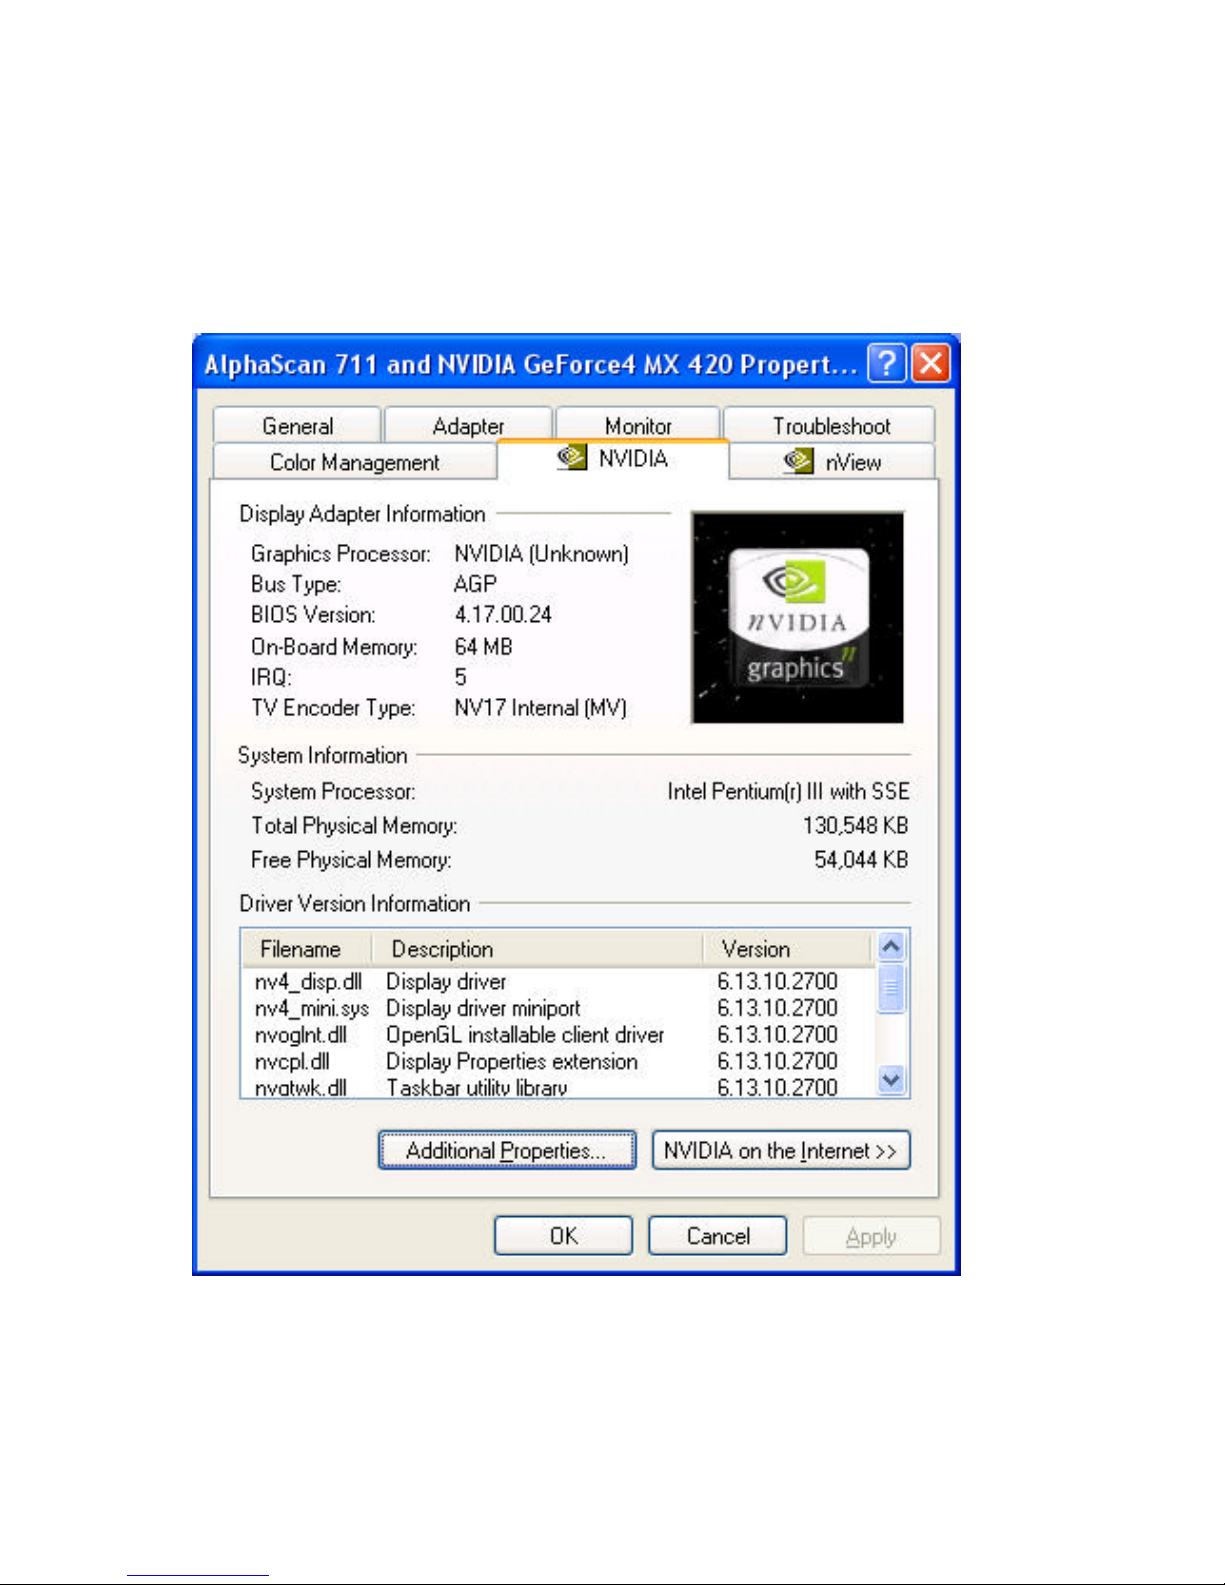
5.4.1 GeForce4 MX (NVIDIA)
Display Adapter Information Table, you can tell the BIOS and Drivers version, NVIDIA Chip
model name, IRQ setting and many useful information.
Additional properties is for advance user to setting OpenGL, Direct3D, Overlay control,
Desktop Utilities and 3D antialiasing settings.
NVIDIA on the Internet can reach NVIDIA official web site for more NVIDIA news.
Page 14
13
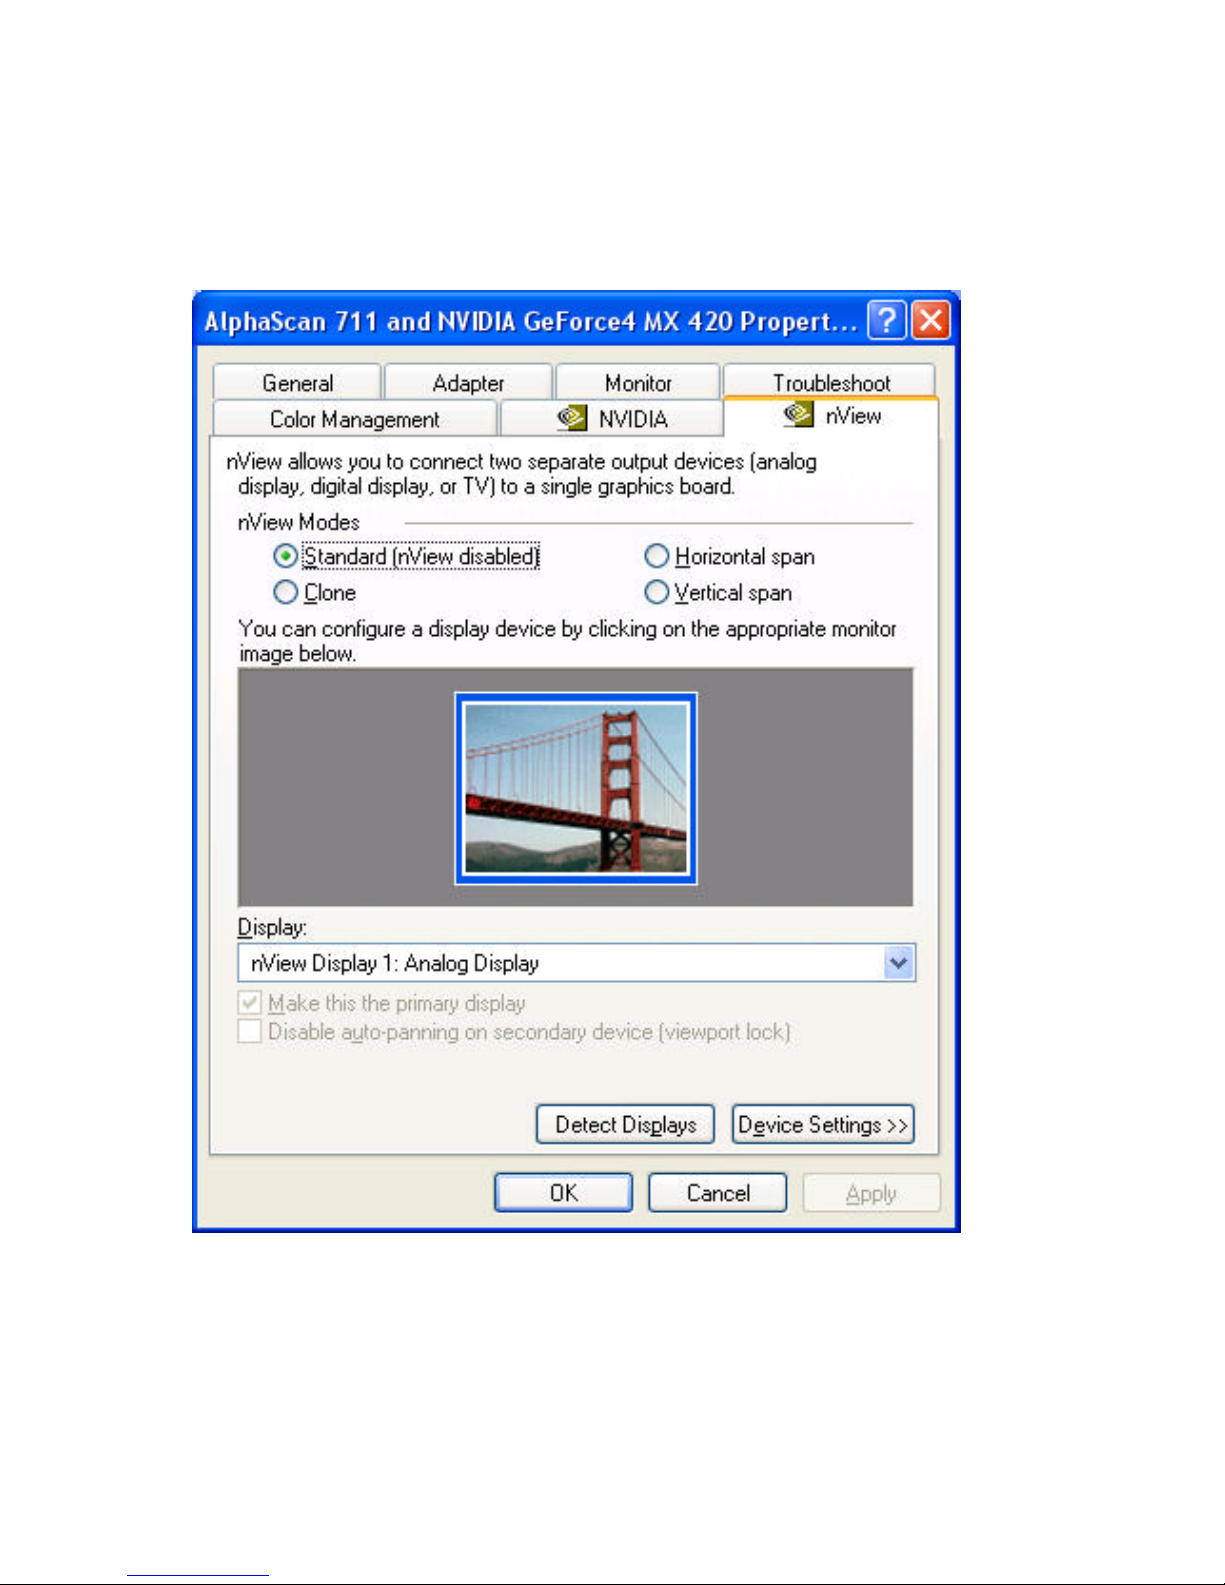
5.4.2 nView
nView have 4 modes : Standard, Clone, Horizontal span and Vertical span. If the optional
connector is connected, you will be able to choose one as Windows default display
device. Only the device is plugged and functional, You will be able to check the selection
box. If you plug the connector after window boot up, click Detect Displays to enable the
plugged output device.
Page 15
14
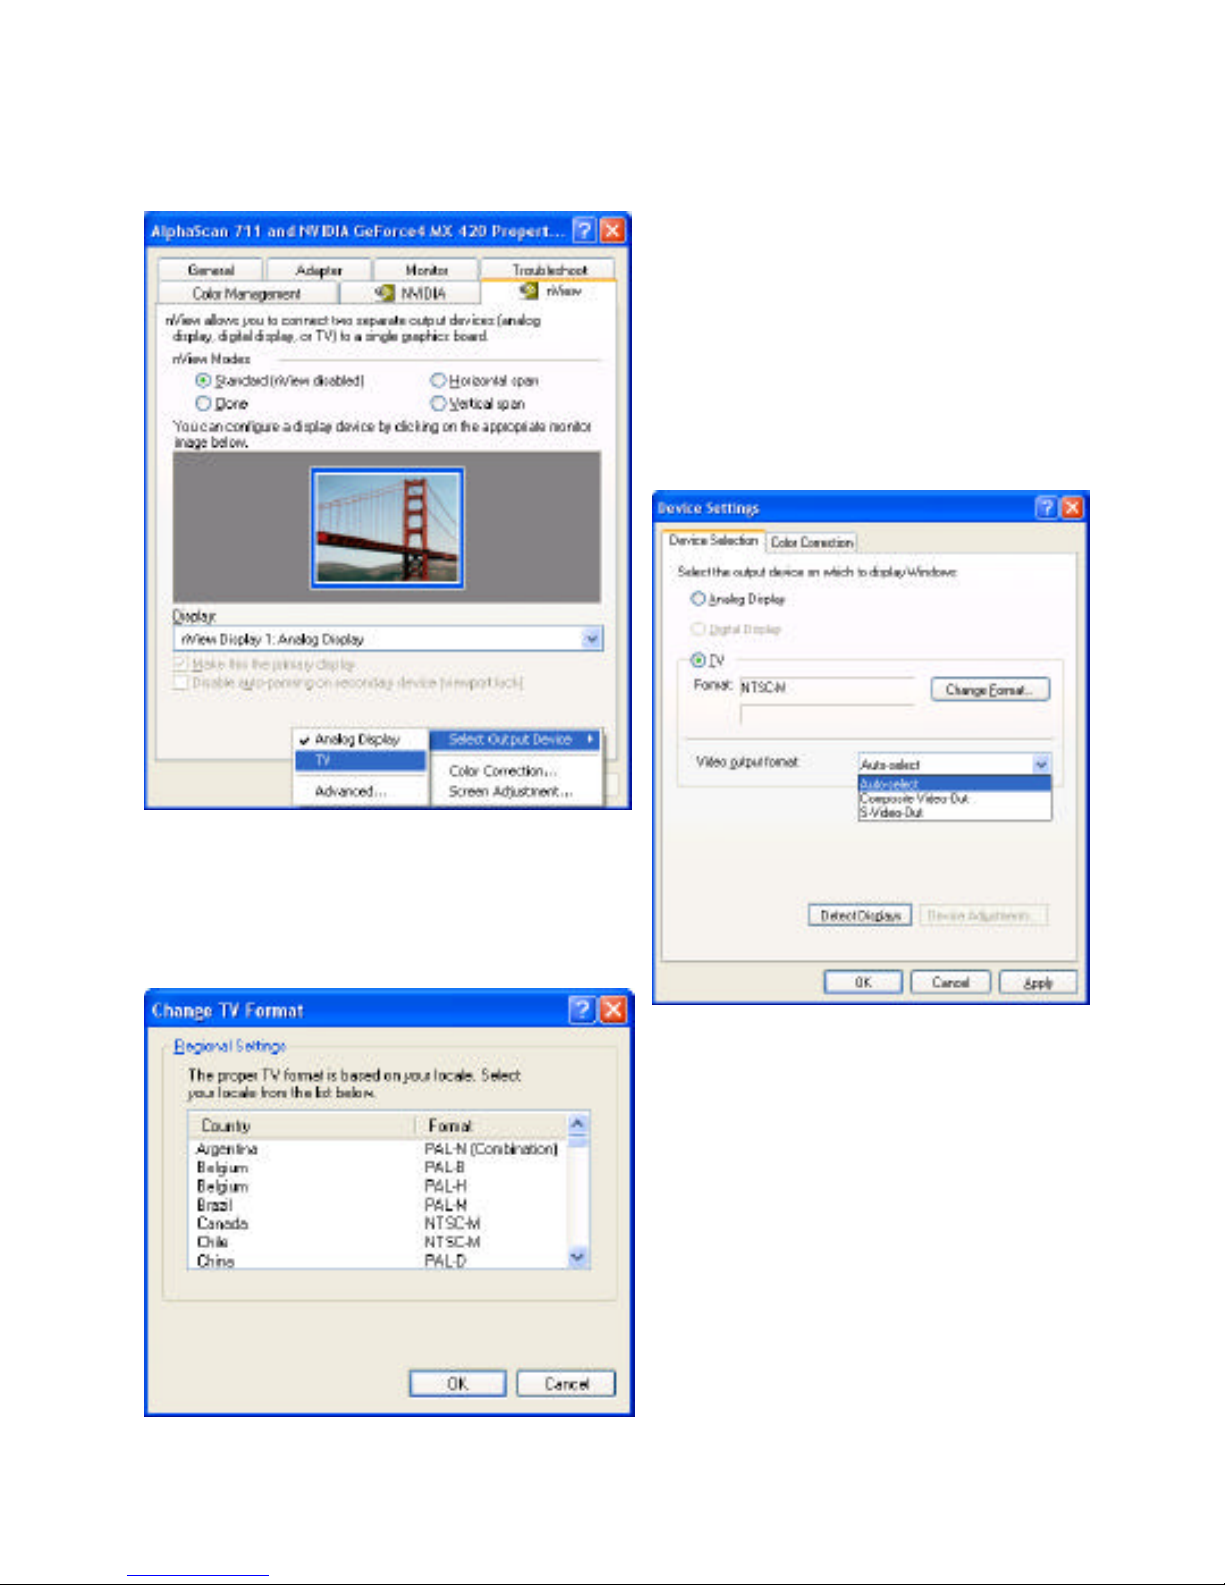
5.4.2.1 Standard mode:
nView disabled, only one monitor will work. Click Device Settings >> , you can select
output device – CRT or TV. Or you can select Advanced … and select output device.
Click Video output format bar to select
S-Video or RCA (optional) output, default
is auto select.
Click Change Format to select your country
and TV system – NTSC or PAL, no SECAM.
Note:
If you can not switch from PAL back to
NTSC, please set resolution to 640x480
and try again
Page 16
15
5.4.2.2 Color correction…
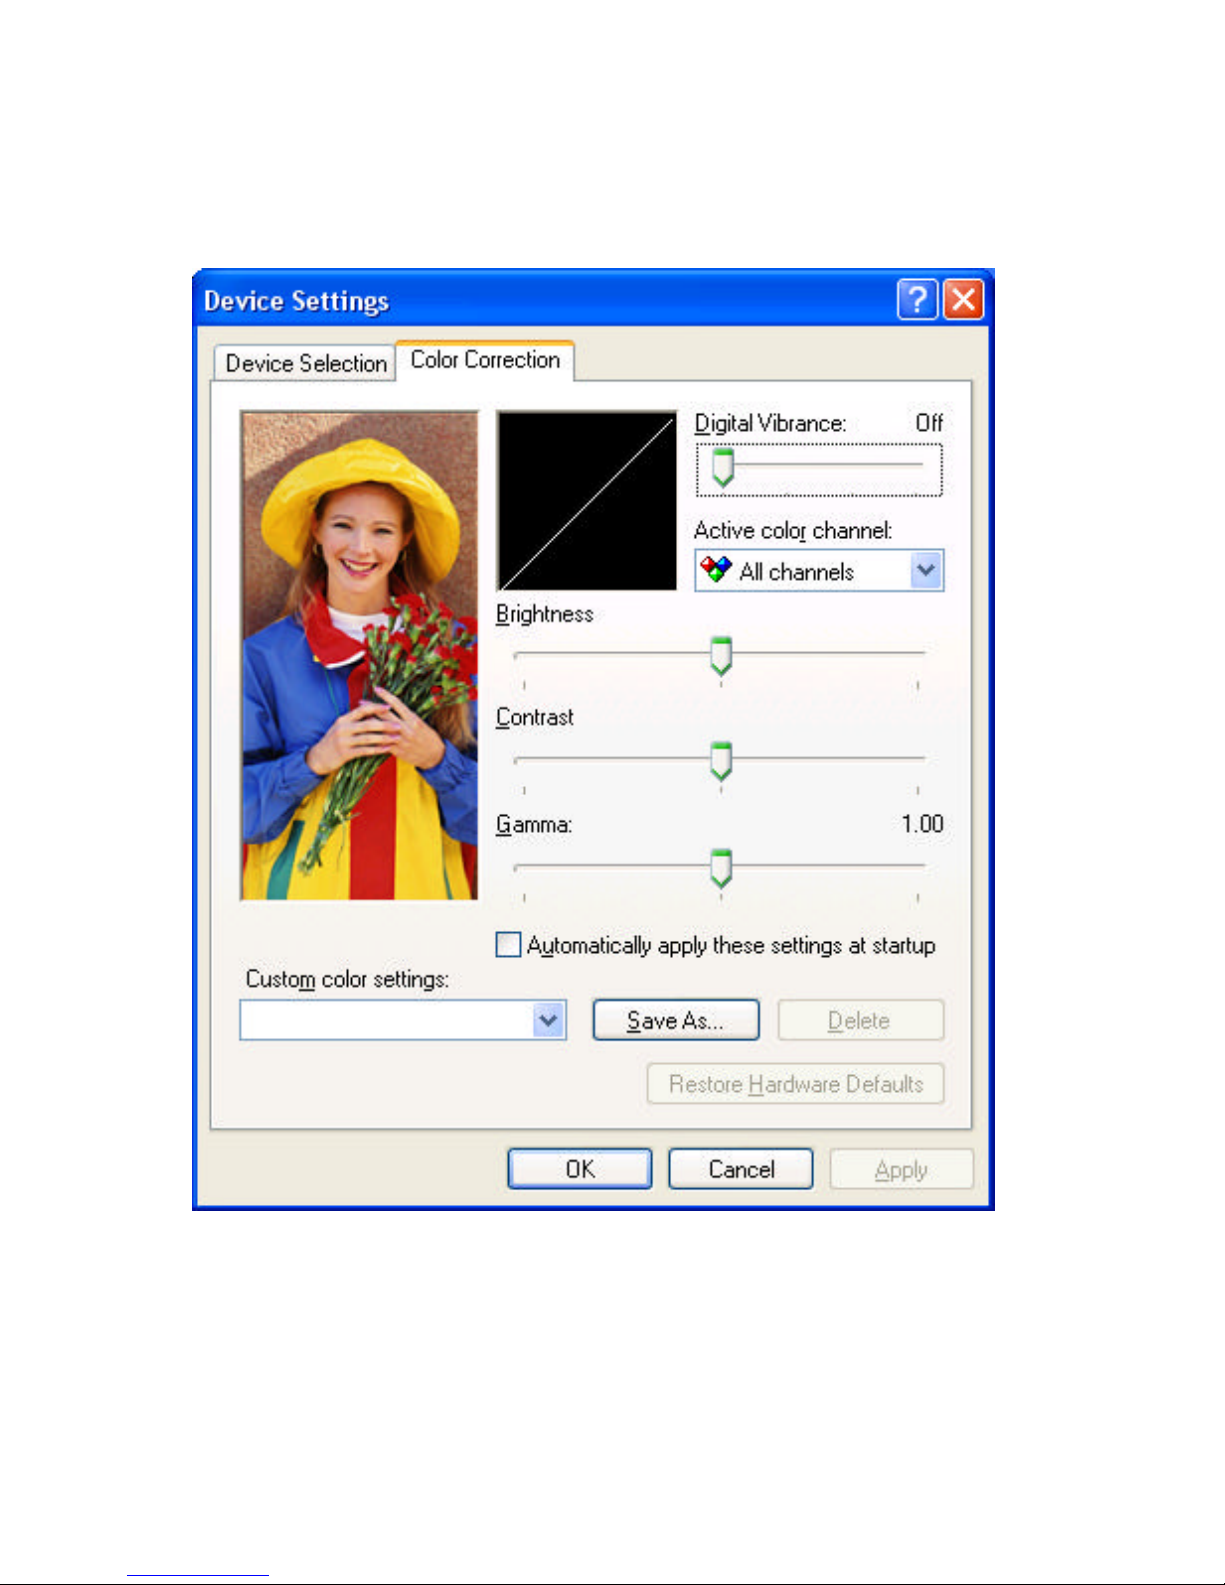
Click Device Settings >>, select Color Correction… . This Window shows NVIDIA
Digital Vibrance is functional and you can adjust Brightness, Contrast, Gamma and save
it as your favorite setting. If you don’t like your adjustments, you can also check
Automatically apply these settings at startup to change it back.
Page 17
16
5.4.2.3 Screen Adjustment…
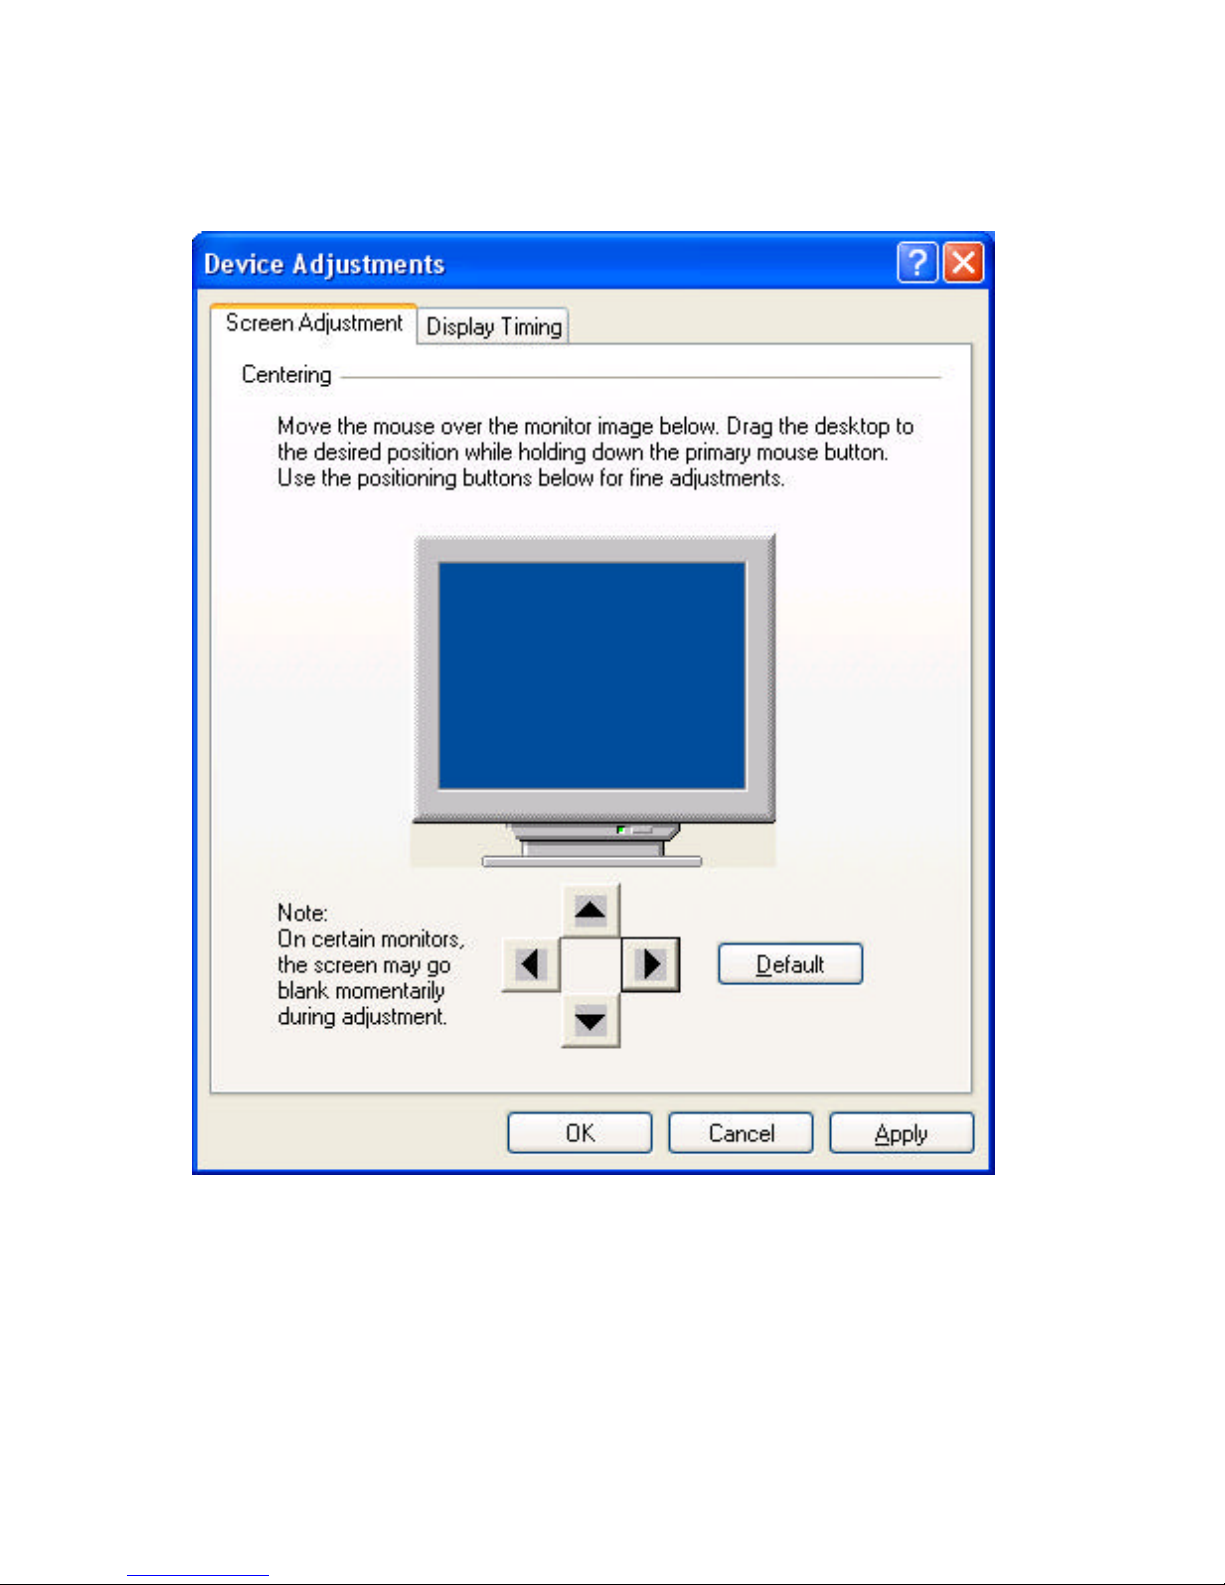
Click Device Settings >>, select Screen Adjustment…
You can adjust screen position.
Display Timing can let you set your computer timing.
Page 18
17
5.4.2.4 nView enable mode
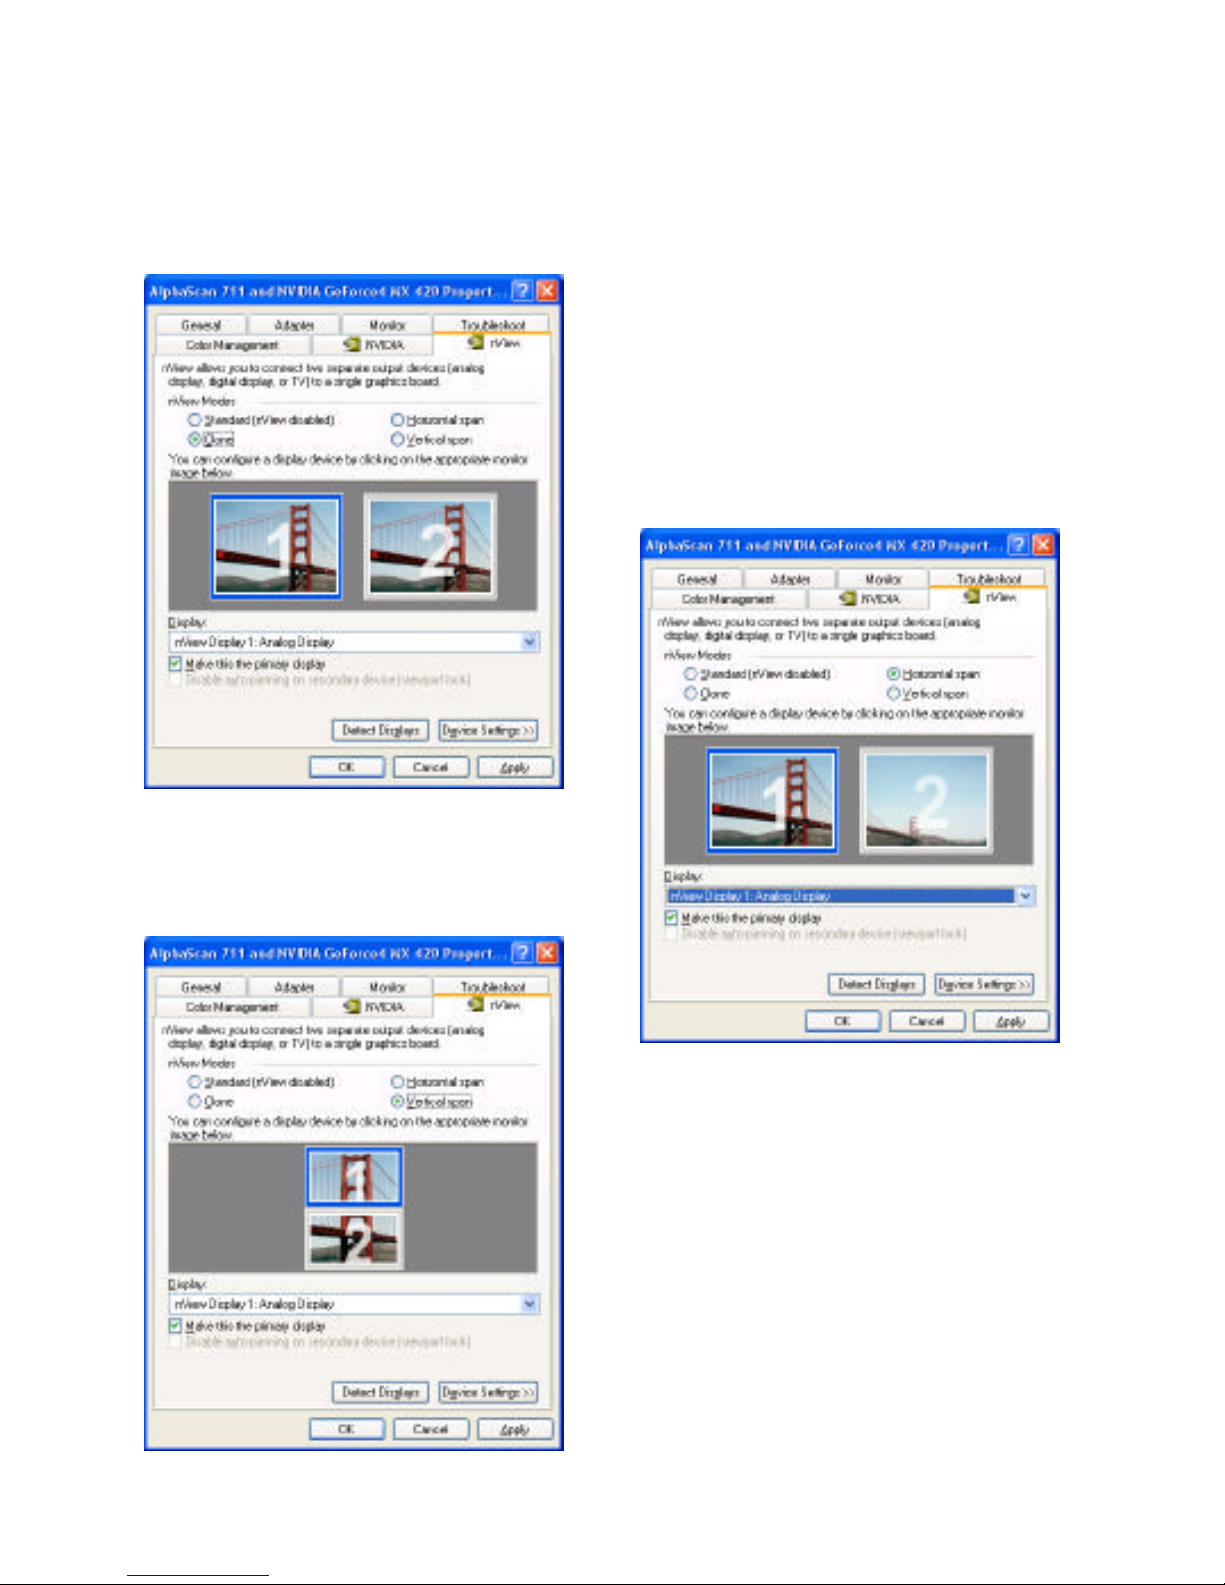
You need two monitors, one analog monitor(CRT) and one TV or DVI (Optional). All
connected well and functional.
Clone mode:
2 monitors show the same picture,
Select Clone and Click Apply to active.
Horizontal span mode:
Picture span horizontally on 2 monitors.
Select Horizontal span, Click Apply to active.
Vertical span mode:
Picture span vertically on 2 monitors
Select Vertical span, Click Apply to
active.
Monitor with blue frame is active. Right click on
it will show the configuration menu. Or you can
click Device Settings>> to set all the functions
like “Standard mode”.
Page 19

18
6. Manually install Windows 98 and Windows ME drivers
6.1 Installation and Setup
The Windows setup program installs and modifies all of the necessary files. Follow these
steps to install the Windows 98/ME drivers.
1. Insert the DISC (CD Title Driver).
2. Select Control Panel from My Computer group.
3. Select the Display icon
4. Double-click on the Display icon in the Setting -> Control Panel folder. You can
also click the right mouse button anywhere on the desktop and select the Properties
option form the pop-out menu.
5. Click the Settings tab.
6. Then show [Unknown Device.] Properties tab
Select Adapter
7. Then show Standard PCI Graphics… tab
Select Change
8. Then show Update Device … tab
Select Next
9. Then show Update Device … tab
Select Search for a better…
Then select Next.
10. Then show Update Device … tab
If the Specify a location is wrong
Please select Brows
11. Then show Browse for Folder tab
Select E:\drivers\ NVIDIA\7100\Win9X or \Winme (If 7100 not exist, use 7X00 instead)
Note: “E:”-> CD Drive, “NVIDIA”-> VGA chip brand name, “7100”-> VGA model name
Then select OK
12. Then show Update Device Driver Wizard tab
Select CD-ROM driver
Click the Specify a locator, if right
Then select Next
13. Then show Update Device Driver Wizard tab
Select Next
14. Then show Update Device Driver Wizard tab
Select Finish
15. Then show System Settings Change tab
Select OK
6.2 How to Change Color Depth and Resolution
Make sure that you have installed windows98/ME Driver.
Click on the Start box in the lower left corner and proceed to Control Panel.
Inside the Control panel group , click on Display icon to open the Display Properties
folder and select the Setting table
Page 20

19
Click on the pull-down arrow from the Color palette area to select color depth or adjust
the sliding bar to either Less or More from the Desktop area
Select OK to restart Windows System and new color depth or the new resolution takes
effect.
Page 21

20
6.3 How to Change Refresh Rate
1. Make sure that you have installed windows 98/ME Driver. Click on the Start box in
the lower left corner and proceed to Setting, Control Panel
2. Inside the Control panel group , click on Display icon to open the Display
Properties folder and choose Settings click the Advance Settings choose
Adapter
3. Click on the Refresh Rate sub window to change refresh rate
4. Select OK and new refresh rate takes effect
5. Refresh Rate default is Optimal.
6. If you change Refresh Rate from Optimal to another, you maybe need to restart
Windows System for functional.
Note: If your monitor is not Branded or Plug&Play, you will only see Adapter default and
optimal. Please contact your monitor supplier to get right or compatible drivers for your
monitor. Otherwise you can not select the refresh rate you wanted.
Windows ME/98 nView setting please see GF4MX_nViewMEen.doc for detail.
7. Manually install Windows 2000 drivers
First time install drivers under windows2000
1. When system boot up, system will prompt find new device. Suppose the device is
VGA, now system will find the default drivers for you.
2. If you want to install our drivers along with the GeForce4 MX pack. Please put the
drivers CD in your CDROM drive. If now shows SmartInstall window, please click
EXIT button to quit.
3. Drivers for windows2000 are located at \drivers\NVIDIA\7100\win2000 (If 7100
not exist, use 7X00 instead)
4. If the drivers is very new may not certified by Microsoft, if so, system will prompt
you the drivers do not have “digital signature”, still you can force to install.
5. Follow on screen instructions will finish the installation.
The following steps describe how to update Windows2000 display drivers
1. Place the Disc (CD Title) into CDROM Drive. If now shows SmartInstall window,
please click EXIT button to quit
2. Right click mouse button on Desktop Area, now shows a sub menu window.
Please select Properties.
3. Now come up Display Properties window, please select Settings on the top.
4. Select Advanced
5. Select Adapter.
6. Select Change
7. Now comes up a update drivers wizard window. Please follow the on screen
instruction.
8. Please specify the drivers location at your CDROM letter:
\drivers\NVIDIA\7100\win2000 (If 7100 not exist, use 7X00 instead) or the
directory where you put your drivers
Page 22

21
9. Select Install and click “YES” when the Installing Driver dialog box appears. If the
drivers is very new may not certified by Microsoft, if so, system will prompt you the
drivers do not have “digital signature”, still you can force to install.
A message appears stating that drivers were successfully installed. Click OK. Another
message appears stating that the driver could not be restarted dynamically. Restart
Windows2000 to run the new driver. Click OK.
Page 23

22
FCC Statement
This device complies with part 15 of the FCC Rules. Operation is subject to the following
two condition.(1).this device may not cause harmful interference. (2).this device must
accept any interference received, including interference that may cause undesired
operation
Warning:
Note: This equipment has been tested and found to comply with the limits for a Class B
digital device, pursuant to Part 15 of FCC Rules. These limits are designed to provide
reasonable protection against harmful interference in a residential installation. This
equipment generates, used and can radiate radio frequency energy and, if not installed
and used in accordance with the instructions, may cause harmful interference in to
radiate communications. However, there is no guarantee that interference will not occur
in a particular installation. If this equipment does cause harmful interference to radio or
television reception, which can be determined by turning the equipment off and on, the
user is encouraged to try to correct the interference by one or more of the following
measures:
l Reorient or relocate the receiving antenna
l Increase the separation between the equipment and receiver.
l Connect the equipment into an outlet on a circuit different form that to which the
receiver in connected.
l Consult the dealer or an experienced radio/TV technician for help.
Notice:
(1) An Unshielded-type power cord is required in order to meet FCC emission limits and
also to prevent interference to the nearby radio and television reception. It is essential that
only the supplied power cord by used.
(2) Use only shielded cables to connect I/O devices to this equipment.3
(3) Changes or modifications not expressly approved by the party responsible for
compliance could void the use’s authority to operate the equipment.
Page 24

23
Trademark Acknowledgments
All brand names and trademarks are the property of their owners.
 Loading...