

Page 1
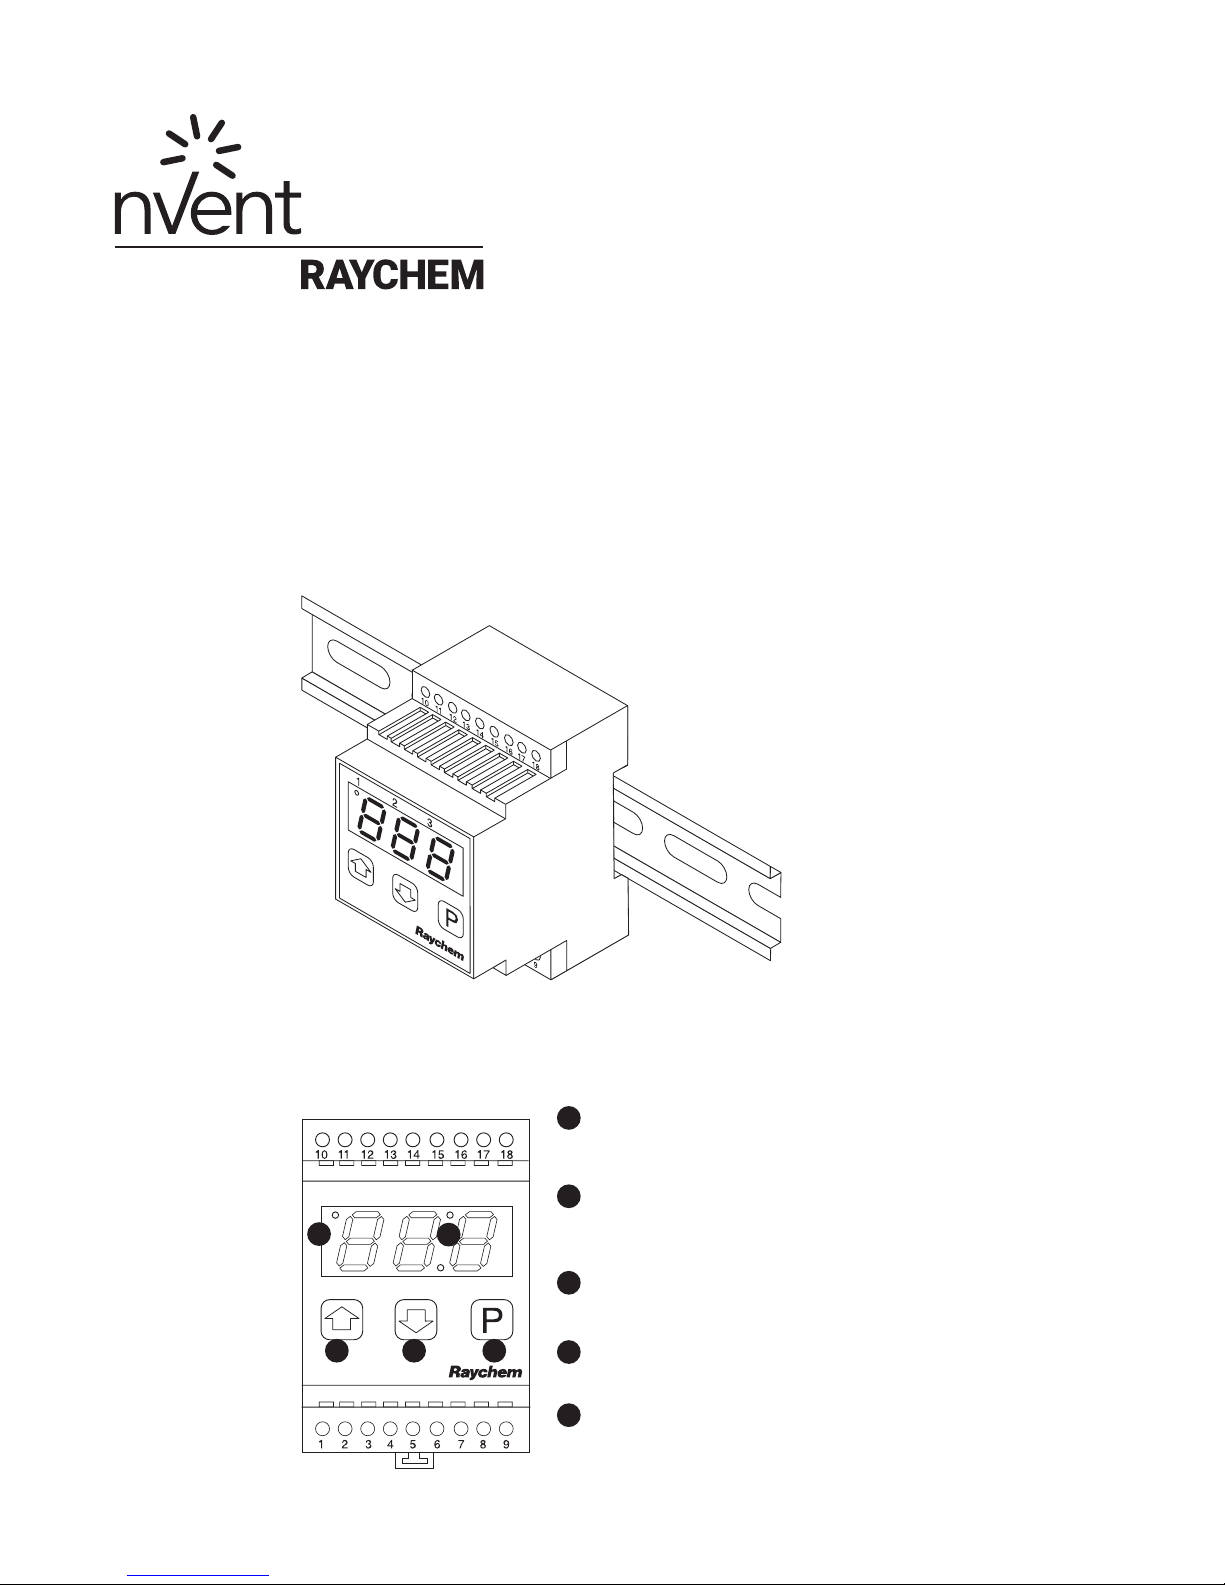
Raystat-Control-11-DIN
Temperaturregler Régulateur de température
Temperature Controller Термостат
1
3 4 5
ein/on
1
Steuerrelais EIN
Heater Relay ON
Chauffage ON
Реле обогревателя ВКЛЮЧЕНО
ein/on=
2
Alarmrelais aktiviert (=abgefallen)
2
Alarm relay activated (= switched OFF)
Relais d‘alarme activé (= déclenchement)
Сигнальное реле активировано (= выключено)
Erhöhen von Werten
3
Increase values
Augmenter la valeur
Увеличить значения
Verringern von Werten
4
Decrease values
Diminuer la valeur
Уменьшить значения
Programmiertaste
5
Programming mode
Touche programmation
Режим программирования
Page 2

DEUTSCH
Allgemein
Temperaturregler für Heizanwendungen
mit zusätzlichem Alarmrelais, Bauform
für Schienenmontage. Der Thermostat
wird mit Pt 100-Sensor in 3- Leitertechnik
geliefert.
Funktionsbeschreibung
Unterschreitet der Ist-Wert (P01) den
eingestellten Sollwert (P02 abz. Hysterese
P03), so schaltet das Steuerrelais die
Heizleitung ein.
Das integrierte Alarmrelais ermöglicht
über einen Wechselkontakt
Fehlermeldungen bei Untertemperatur,
Sensor-Unterbrechung oder SensorKurzschluss. Bei Sensorfehlern schaltet
das Steuerrelais, abhängig von der
Konfiguration des Reglers, die Heizleitung
aus bzw. ein.
Bedienung
Einfache Sollwerteinstellung während der
Istwert angezeigt wird:
• „⇑“ oder „⇓“ drücken
Display zeigt aktuellen Sollwert und
blinkt
• „⇑/⇓“ neuen Sollwert einstellen
• 3 Sekunden warten Neuer Wert wird
gespeichert, Display zeigt wieder die
aktuelle Temperatur.
Alle weiteren Parameter besitzen eine
Nummer (z.b. P03),
siehe nächste Seite.
Parameter verändern
• „P“ Par.Nr. erscheint
• „⇑/⇓“ Par.Nr. auswählen
• „P“ Wert wird sichtbar
• „⇑/⇓“ Wert verändern
• „P“ Neuer Wert gespeichert,
zurück zur Par.Nr.
Autoscrolling
Mit Halten der ‘⇑/⇓’-Tasten laufen die
Werte automatisch weiter.
Parameter verriegeln
Die Parameter P03...P07 können gegen
versehentliche Bedienung geschützt
werden:
• “P” drücken
• ⇑/⇓ P09 wählen,
• „P“ erneut,
• ⇑ CodeNr. (11) einstellen.
• “P” erneut, Par.Nr. erscheint wieder.
• Dann P08 auf “1” setzen. Damit sind
P03...P07 verriegelt.
Wurde ca. 1 Minute lang keine
Taste gedrückt, muss der Code neu
eingegeben werden.
Fehlermeldungen
Bei einem Fehler zeigt das Display einen
Fehlercode. Sensorfehler werden
ca. 5 Sek. verzögert angezeigt.
Fehlercodes
E01 Fühlerkurzschluss oder
Temperatur <=-19,5°C
E02 Fühlerunterbrechung oder
Temperatur >=99,5°C
E03 Temperaturfühler, 3. Leiter fehlt
oder R >=7,8 Ohm
E04 Untertemperaturalarm
Gerätetyp feststellen
Halten der Taste „P“ für mehr als 2
Sek.: Gerätetyp (C11) und danach die
Softwareversion (r03) wird angezeigt.
Rücksetzen auf Werkseinstellungen
• P09 auf „-07“ setzen
• Taste „P“ so lange drücken bis „C11“
und danach „deF“ angezeigt werden.
Damit sind die Werkseinstellungen
wiederhergestellt.
2 | nVent.com
ENGLISH
Product Description
Temperature controller for heating
applications with additional alarm relay
for rail mounting. Will be delivered with a
3-wire Pt100 temperature sensor.
Functional Description
If the actual temperature (P01) falls below
the control setpoint (P02 minus hysteresis
P03), the control relays switches the
heating pipeline ON. The integrated
alarm relay (SPDT contact) allows to
forward error messages with occuring
undertemperature, sensor break or short
circuit. While probe malfunctions, the
control relay switches continuously on or
off, depending on configuration.
Operation
Easy setpoint setting while the actual
temperature is displayed:
• Press „⇑“ or „⇓“
Display shows current setpoint and
flashes
• Set new setpoint by „⇑/⇓“
• Wait 3 seconds
New value will be stored, display
jump back to the actual temperature.
All selectable parameters hold a
parameter number (e.g. P03),
see next page.
Calling up Parameters
• „P“ Par.No. appears
• „⇑/⇓“ Select Par.No.
• „P“ Value visible
• „⇑/⇓“ Change value
• „P“ New value is stored, back to
Par.No.
Auto scrolling
Hold ‘⇑/⇓’-keys to scroll values
automatically.
Parameter Lock
If you want to protect parameters P03...
P07 against operation by mistake, do the
following:
• Press “P”
• select P09 by ⇑/⇓
• Press “P” once more
• select CodeNo. (11) by ⇑
• Press “P” again, Par.No. appears
• Then set P08 to “1”
Now P03...P07 cannot be changed.
If you don´t press any key for about one
minute, the access code is canceled.
Error Messages
With an occuring error, the display shows
an error code after a 5 sec. delay.
Error Codes
E01 Sensor short circuit or temperature
<=-19,5°C
E02 Sensor broken or temperature
>=99,5°C
E03 Sensor 3rd wire broken or
R >= 7,8 Ohm
E04 Temperature Low Alarm
Check of device type
Hold key „P“ for more than 2 sec., then
type (C11) and software version (r03) will
be displayed.
Set Device to Default Settings
• Set P09 to „-07“
• Press „P“ as long as first „C11“ and
then „deF“ is displayed.
Now the device is resetted.
FRANÇAIS
Applications
Thermostat électronique pour les
applications de chauffage avec relais
d‘alarme, montage rail DIN. Le thermostat
travaille avec une sonde PT100 avec
technique 3 fils.
Fonctionnement
Lorsque la mesure (P01) est inférieure
à la consigne (P02) - (l‘hystérésis P03),
le relais commande la mise en route du
chauffage.
Le relais d‘alarme inverseur annonce une
température basse, une coupure ou courtcircuit de sonde.
En cas de défaut de sonde, le relais de
régulation commute selon la configuration
réglée en P06.
Utilisation
Changer facilement la consigne lorsque la
mesure s‘affiche:
• Appuyer „⇑“ ou „⇓“
L‘afficheur indique la consigne
actuelle et clignote
• Régler la nouvelle consigne „⇑/⇓“
• Attendre 3 sec.
La nouvelle valeur est mémorisée,
l‘afficheur affiche de nouveau
la mesure actuelle.
Tous les paramètres possèdent un
numéro (ex. P03), voir la liste.
Changer un paramètre
• „P“ N° par. apparaît
• „⇑/⇓“ Selection du N°
• „P“ Visualisation de la valeur
• „⇑/⇓“ Modification de la valeur
• „P“ La nouvelle valeur est
mémorisée, retour au
numéro du paramètre.
Défilement rapide
Maintenir ‘⇑/⇓’, les valeurs défile
rapidement.
Code de déverrouillage
Les paramètres P03...P07 sont protégés
par code :
• Appuyer sur „P“
• Choisir P09 avec „⇑/⇓“
• Réappuyer sur „P“,
• „⇑“ Entrer le code (11)
• Réappuyer sur „P“ Le n° du
paramètre réapparaît.
• Régler P08 sur „1“.
Maintenant P03...P07 sont barré.
Si aucune touche n’est appuyée
pendant 1 min., l’appareil se
reverrouille.
Annonce de défaut
En cas de défaut, l‘afficheur indique un
code au bout de 5 secondes.
Code des défauts
E01 Court-circuit sonde ou température
<=-19,5°C
E02 Coupure sonde ou température
>=99,5°C
E03 Le 3ème fils de la sonde manque
ou R >=7,8 Ohm
E04 Alarme température basse
Vérifier le type du régulateur
Appuyer sur touche „P“ plus de 2
secondes, le n° du type apparaît (C11) et la
version logiciel (r03) s‘affiche.
Remettre les valeurs d‘usine
• Régler P09 sur „-07“
• Appuyer „P“ jusqu‘à affichage de
„C11“ puis „deF“.
Reset effectué.
PУCCKИЙ
Описание
Термостат для систем обогрева с
дополнительным сигнальным реле для
монтажа на планке. Поставляется с
трехпроводным датчиком температуры
Pt100.
Описание принципа действия:
При падении фактической температуры
(P01) ниже заданного значения (P02
минус гистерезис P03) управляющее
реле включает греющий трубопровод.
Встроенное сигнальное реле
(однополюсный контакт SPDT)
обеспечивает передачу сообщения
об ошибке при падении температуры,
обрыве датчика или коротком
замыкании. При сбое датчика
управляющее реле непрерывно
включается или выключается в
зависимости от конфигурации.
Управление
Простая настройка заданного
значения с отображением фактической
температуры:
• Нажмите „⇑“ или „⇓“
На дисплее появится мигающее
текущее заданное значение
• Задайте новое значение с
помощью
• Подождите 3 секунды
Новое значение сохранится,
дисплей вернется к отображению
фактической температуры.
Все выбираемые параметры имеют
номер (например: P03); см. на
следующей странице.
Вызов параметров
• „P“ появится номер параметра
• „⇑/⇓“ выбор номера параметра
• „P“ появится значение
• „⇑/⇓“ изменение значения
• „P“ новое значение сохранено,
возврат к номеру
Автоматический просмотр
Удерживайте нажатыми кнопки ‘⇑/⇓’,
для автоматического просмотра
значений.
Блокировка параметра
Для защиты параметров P03...P07 от
ошибочного изменения:
• Нажмите „P“
• Выберите P09 с помощью „⇑/⇓“
• Нажмите „P“ еще раз
• Выберите номер кода (11) с
помощью „⇑“
• Нажмите еще раз «P», появится
номер параметра
• Затем установите P08 на „1“.
Теперь P03...P07 нельзя изменить
Если в течение примерно одной
минуты вы не нажмете никакую
кнопку, код доступа будет отменен.
Сообщения об ошибках
В случае возникновения ошибки на
дисплее через 5 секунд появляется код
ошибки.
Коды ошибок
E01 короткое замыкание датчика или
температура <=-19,5°C
E02 обрыв сенсора или температура
>=99,5°C
E03 обрыв третьего провода датчика
или R >= 7,8 Ом
E04 сигнализация низкой
температуры
Проверка типа прибора
Удерживайте кнопку «P» нажатой в
течение более 2 секунд, затем введите
(C11), и на дисплее появится версия
программного обеспечения (r03).
Установка прибора на настройки по
умолчанию
• Установите P09 на „-07“
Нажимайте „P“, пока сначала на
•
дисплее не появится „C11“ и затем
„deF“.
• Теперь установки прибора сброшены.
„⇑“ или „⇓“
параметра
Page 3

DEUTSCH
Parameter und deren Bedeutung
P01 Istwert am Temperatursensor
(°C, nur Anz.)
P02 Regelsollwert
Wirkt auf Relais 1,
Bereich P04...P05, [5°C]
P03 Schalthysterese von P02
Bereich 1...5K, [1K]
P04 Größter einstellbarer Sollwert
Bereich 0..+63°C, [+10°C]
P05 Kleinster einstellbarer Sollwert
Bereich 0°C...P04, [2°C]
P06 Heizleitung im Fehlerfall
0 = Relais schaltet bei
Sensorfehler aus
[1] = Relais schaltet bei
Sensorfehler ein
P07 Untertemperaturalarm
-15...(P02-P03)°C, [0°C]
Kann deaktiviert werden: Wert
auf -15 stellen, „⇓“ drücken,
Display zeigt „oFF“
*P08 Parameter Verriegelung
[0] = Parameter P03...P07
einstellbar
1 = Parameter P03...P07
verriegelt
P09 Code zum entriegeln von P08
(11).
Werte in Klammern [..] sind Werkseinstellungen.
*Zur Bedienung ist ein Code notwendig.
Technische Daten
Betriebsspannung 230V AC, 50-60 Hz
Leistungsaufnahme max. 5 VA
Nennstrom bei 250V~
Relais K1 16A res., 6A ind., 80A
(20ms)
(Type RT33K,
Schrack)
Relais K2 8A res., 3A ind.
Betriebstemperatur -10...+55°C
Lagertemperatur -20...+60°C
Anzeigebereich -19,5...+99,5°C
Auflösung 0,5 K
Genauigkeit ± 1K, ± 2 Digits
(0..50°C)
Display LED, rot, 13mm
Relaisanzeige 1,2 mm, rot
Anschlussklemmen 2,5mm²
(geschraubt)
Schutzart IP 30 (Klemmen: IP 20)
Installation
ENGLISH
Parameter Explanation
P01 Actual sensor temp. °C (disp.only)
P02 Control Setpoint
Affects to relay 1, range P04...P05,
[5°C]
P03 Switching hysteresis of P02 range
1..5K [1K]
P04 Highest adjustable Control
Setpoint
Range 0...+63°C [+10°C]
P05 Lowest adjustable Control
Setpoint
Range 0°C...P04. [2°C]
P06 Fail Safe mode
0 = Relay OFF at probe fault
[1] = Relay ON at probe fault
P07 Low Temp. Alarm Threshold
-15...(P02-P03)°C, [0°C]
Can be de-activated: Set value to
-15, press „⇓“, display shows
„oFF“
*P08 Parameter Lock
[0] = Parameter P03...P07
unlocked
1 = Parameter P03...P07 locked
P09 Access Code to unlock P08 (11).
Values in brackets [..] are factory set.
* Code necessary for operation.
Technical Data
Supply Voltage 230V AC, 50-60 Hz
Power consumption max. 5 VA
Relay Rating at 250V~
Relay K1 16A res., 6A ind., 80A
(20ms)
(Type RT33K,
Schrack)
Relay K2 8A res., 3A ind.
Temp. Range -10...+55°C
working
Storage -20...+60°C
Display Range -19,5...+99,5°C
Resolution 0,5K
Accuracy ± 1K, ± 2 Digits
(0..50°C)
Display LED red 1/2”
Relay position 1,2 mm red
indicator
Screw terminals 2,5mm²
Ingress Protection IP 30 (Terminals: IP 20 )
Installation
FRANÇAIS
Paramètres et description
P01 Mesure de sonde en °C (juste aff.)
P02 Consigne de régulation
agit sur le relais K1,
plage P04...P05, [5°C]
P03 Hystérésis de régulation de P02
Plage 1...5K [1K]
P04 Seuil haut consigne
Plage 0..+63°C [+10°C]
P05 Seuil bas consigne
Plage 0°C...P04 [+2°C],
P06 Mode en cas de défaut ........
0 = Relay OFF en cas de défaut de
sonde
[1] = Relay ON en cas de défaut de
sonde
P07 Alarme basse température
-15...(P02-P03)°C, [0°C]
Neutraliser le fonction:
ajuster -15, appuyer „⇓“,
l‘afficheur indique „oFF“
*P08 Blocage des paramètres
[0] = Parametres P03...P07
débloqués
1 = Parametres P03...P07 bloqués
P09 Code de déverrouillage de P08 (11)
[..] sont les valeurs réglées en usine.
Les paramètres précédés du signe “ * “
nécessite un code pour être modifié.
Données techniques
Alimentation 230VAC, 50-60 Hz
Consommation max. 5 VA
Puissance relais
Relais K1 16A res., 6A ind., 80A
(20ms)
(Type RT33K,
Schrack)
Relais K2 8A res., 3A ind.
T°c fonctionnement -10...+55°C
T°c stockage -20...+60°C
Plage d‘affichage -19,5...+99,5°C
Résolution 0,5 K
Précision d‘afficheur ± 1K, ± 2 Digits
(0..50°C)
Afficheur LED, rouge, 13mm
Affichage état 1,2 mm, rouge
Connexions bornier à vis 2,5mm²
Protection IP 30 (Bornier: IP 20)
Installation
PУCCKИЙ
Объяснение параметров
P01 датчик факт. темп. °C
(только на дисплее)
P02 заданное значение
Воздействует на реле 1,
диапазон P04...P05, [5°C]
P03 гистерезис переключения P02
Диапазон: 1..5K [1K]
P04 максимально регулируемое
заданное значение
Диапазон: 0...+63°C [+10°C]
P05 минимально регулируемое
заданное значение
Диапазон: 0°C...P04. [2°C]
P06 безопасный режим
0 = при сбое датчика реле ВЫКЛ.
[1] = при сбое датчика реле ВКЛ.
P07 Порог сигнализации низкой
темп.
-15...(P02-P03)°C, [0°C]
Может быть отключено:
Установить значение на -15,
нажать «⇓», на дисплее
появится «oFF»
*P08 Блокировка параметра
[0] = Параметр P03...P07
разблокирован
1 = Параметр P03...P07
заблокирован
P09 Код доступа для разблокировки
P08 (11).
Значения в скобках [..] – заводские
настройки.
“*” Код, необходимый для управления.
Технические данные
Напряжение 230 В переменного
питания тока, 50-60 Гц
Потребляемая макс. 5 ВА
Номинал реле при 250 В ~
Реле K1 16 А ост., 6 А инд.,
Реле K2 8 А ост., 3 А инд.
Диапазон рабочей темп. – минус 10...
плюс 55°C
Темп. хранения минус 20...плюс
60°C
Диапазон дисплея
Разрешение 0,5K
Точность ± 1K, ± 2 знака
(0..50°C)
Дисплей светодиодный,
красный, 1/2”
Индикатор 1,2 мм, красный
положения реле
Винтовые клеммы 2,5 мм
Класс защиты IP 30 (клеммы: IP 20)
Сертификация:
Монтаж
мощность
80 А (20 мс)
(тип RT33K, Schrack)
минус 19,5...плюс
99,5°C
2
Achtung !
• Elektrischer Anschluss und Inbetrieb-
nahme muss durch eine Elektrofachkraft
durchgeführt werden.
• Die einschlägigen örtlichen
Sicherheitsvorschriften sind zu
beachten.
• Anschlußwerte gemäß Typenschild
beachten.
Die Fühlerleitungen müssen bei
Verlängerung abgeschirmt sein, die
Abschirmung ist einseitig nahe des
Reglers zu erden. Die Leitung darf nicht
parallel zu netzspannungsführenden
Leitungen verlegt werden. Der
Leitungswiderstand darf in der Summe
7,5 Ohm nicht überschreiten. Nach
Einschalten des Reglers zeigt das Display
den gemessenen Istwert.
• Electrical installation and putting into
service must be done from authorized
personnel.
• Please note the local safety instructions!
• Please note the maximum ratings !
If you have to lengthen the sensor cables,
use a shielded type with one end of the
shield connected to a ground terminal
near the controller. Don‘t install the cable
in parallel to mains voltage wires. The sum
of the wire restance may not increase 7,5
Ohms. After the power has been switched
on, the controller will display the actual
sensor temperature.
Precautions !
Precautions !
• Les raccordements électriques doivent
s’effectuer par un spécialiste
• Vérifier les consignes générales de
sécurité du pays où l’appareil est
installé.
• Vérifier les limites de fonctionnement !
Si le câble de sonde est rallongé, il est
préférable d’utiliser un câble blindé. Le
blindage doit être raccorder d’un seul
côté à la terre. Ne pas placer le câble en
parallèle avec des câbles haute tension.
La résistance du câble doit être inférieure
à 7,5 Ohms. A la mise sous tension,
l’appareil indique la mesure actuelle.
Внимание !
• Электромонтажные работы и ввод в
эксплуатацию должен проводиться
квалифицированным персоналом.
• Соблюдайте местные инструкции по
технике безопасности!
• Соблюдайте максимальную нагрузку!
При необходимости удлинить кабели
датчика используйте экранированные
кабели с одним концом экрана,
соединенным с клеммой заземления
рядом с термостатом. Не монтируйте
кабель параллельно электропроводам.
Сумма сопротивлений проводов не
должна превышать 7,5 Ом. После
отключения питания термостат
отображает фактическую температуру.
nVent.com | 3
Page 4
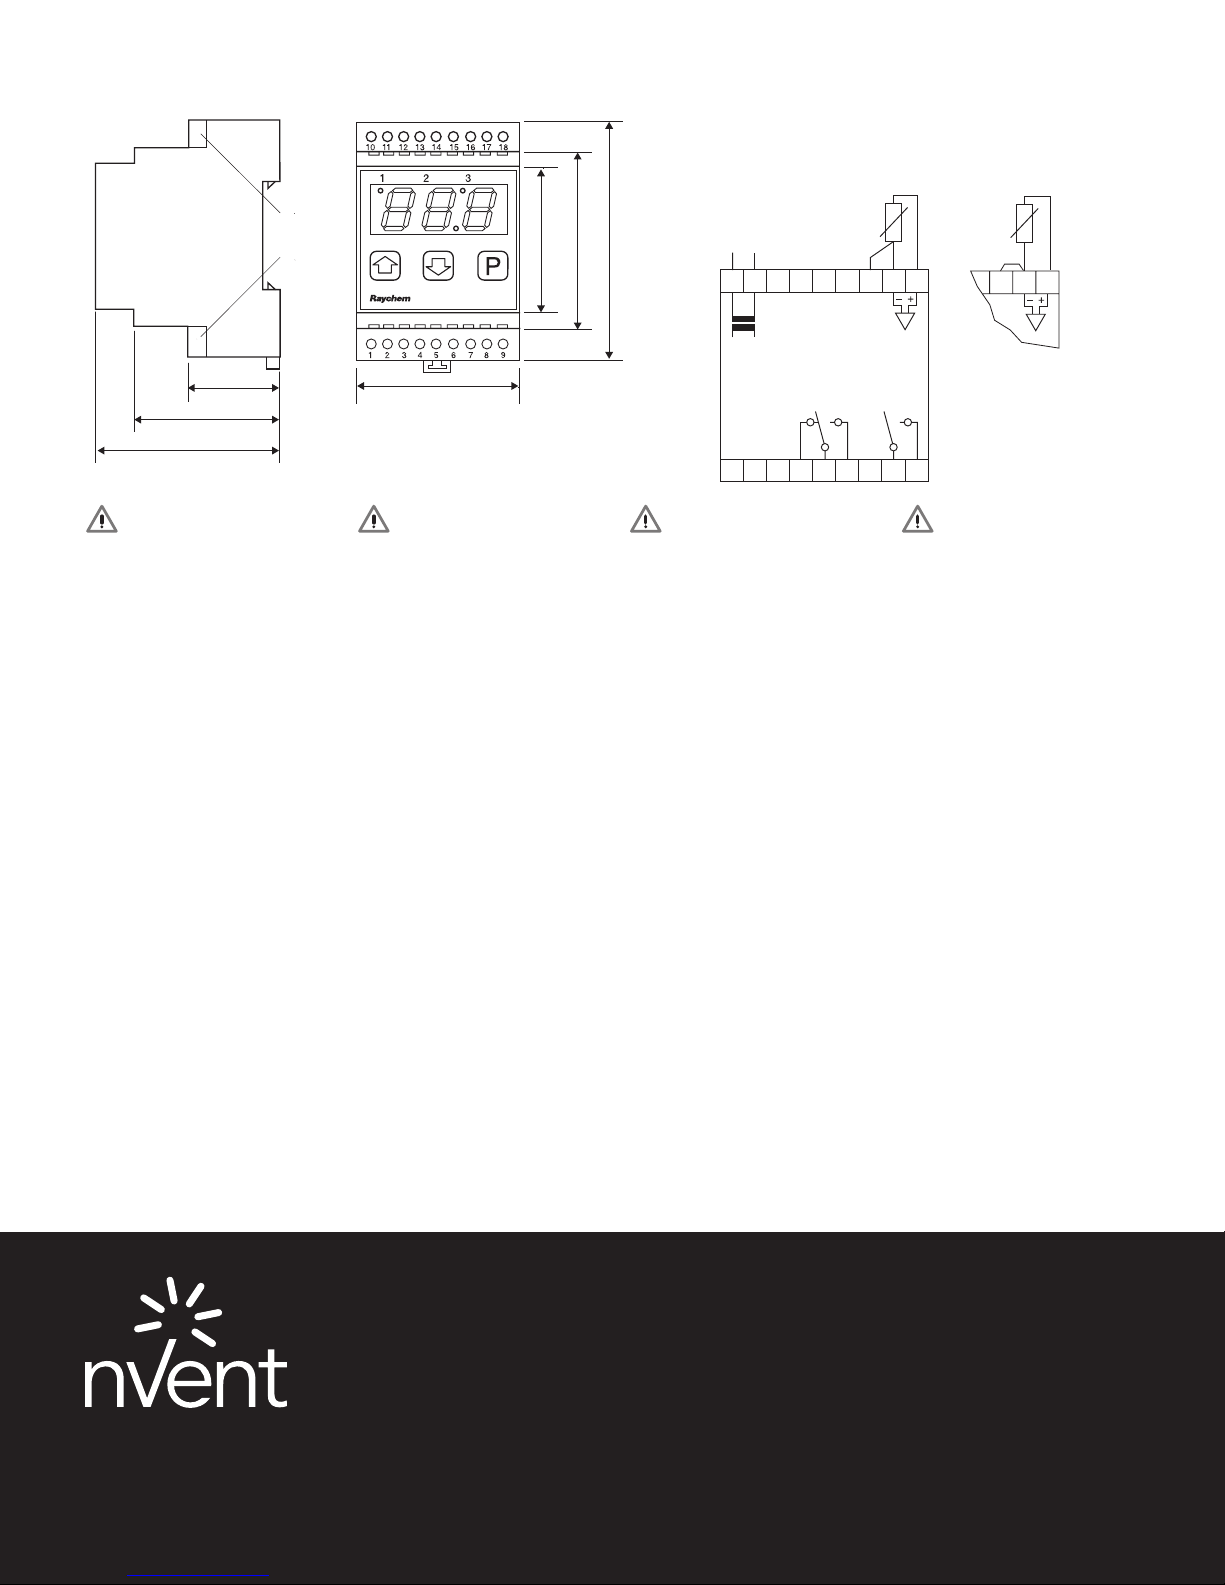
Abmessungen / Dimensions / Размеры
8
7
.5
(3
.
4
5
)
4
6
.5
(
1
.
8
3
)
6
0
(
2
.3
6
)
51.5 (2.02)
Raystat-Control-11-DIN
abnehmbar
removable
cнимается
30 (1.18)
46 (1.81)
58 (2.28)
Raystat-Control-11-DIN
51.5 (2.02)
3-Leiter-Technik
3-wire technolgie
Technique 3 fils
)
3
8
.
1
(
.5
6
4
)
5
)
4
6
.
.3
(3
2
(
.5
0
7
6
8
Трехпроводная технология
L N
(AC 230V)
10 11 16 17 18
K1
Netz
mains
Сеть
питания
K2
Alarm
Сигнализация
heating
cable
Греющая
линия
16 17 18
2-Leiter-Technik
2-wire technologie
Technique 2 fils
Двухпроводная технология
4567 8 9
Bitte Sicherheitshinweise
beachten!
Vor Inbetriebnahme Betriebsanleitung
sorgfältig lesen! Entstehen durch
Nichtbeachtung Schäden, erlöschen die
Garantieansprüche.
Diese Dokumen-tation würde mit größter
Sorgfalt erstellt, dennoch können wir für
die vollständige Richtigkeit keine Garantie
übernehmen.
Europe, Middle East,
Africa (Emea)
Tel +32 16 213 511
Fax +32 16 213 603
[email protected]
België / Belgique
Tel +32 16 21 35 02
Fax +32 16 21 36 04
[email protected]
Bulgaria
Tel +359 5686 6886
Fax +359 5686 6886
[email protected]
Česká Republika
Tel +420 602 232 969
[email protected]
Denmark
Tel +45 70 11 04 00
[email protected]
Deutschland
Tel 0800 1818205
Fax 0800 1818204
[email protected]
Please Note Safety Instructions!
Please read this manual carefully before
using the product. The guarantee will
lapse in case of damage caused by
failure to comply with these operating
instructions! This documentation was
compiled with utmost care, however,
we cannot guarantee for its correctnesss
in every respect.
España
Tel +34 911 59 30 60
Fax +34 900 98 32 64
[email protected]
France
Tél 0800 906045
Fax 0800 906003
[email protected]
Hrvatska
Tel +385 1 605 01 88
Fax +385 1 605 01 88
[email protected]
Italia
Tel +39 02 577 61 51
Fax +39 02 577 61 55 28
[email protected]
Lietuva/Latvija/Eesti
Tel +370 5 2136633
Fax +370 5 2330084
[email protected]
Magyarország
Tel +36 1 253 4617
Fax +36 1 253 7618
[email protected]
Lire les consigne de sécurité !
Avant la mise en route, lire attentivement
la notice technique ! Tout dommage
dû au non-respect de cette notice
annulera la garantie. Cette documentation
a été réalisée avec notre plus grand soin,
cependant nous ne pouvons exclure toute
erreur et ne prenons aucune garantie.
Nederland
Tel 0800 0224978
Fax 0800 0224993
[email protected]
Norge
Tel +47 66 81 79 90
[email protected]
Österreich
Tel +43 (2236) 860077
Fax +43 (2236) 860077-5
[email protected]
Polska
Tel +48 22 331 29 50
Fax +48 22 331 29 51
[email protected]
Republic of Kazakhstan
Tel +7 495 926 1885
Fax +7 495 926 18 86
[email protected]
Россия
Тел +7 495 926 18 85
Факс +7 495 926 18 86
Соблюдайте инструкции по
технике безопасности !
Перед использованием данного
продукта внимательно прочтите
инструкцию. Гарантия аннулируется
в случае повреждения, вызванного
невыполнением данных инструкций по
эксплуатации! Данный документ был
составлен максимально тщательно,
однако мы не можем гарантировать
его точность во всех отношениях.
Serbia and Montenegro
Tel +381 230 401 770
Fax +381 230 401 770
[email protected]
Schweiz / Suisse
Tel 0800 551 308
Fax 0800 551 309
[email protected]
Suomi
Puh 0800 11 67 99
[email protected]
Sverige
Tel +46 31 335 58 00
[email protected]
Türkiye
Tel +90 560 977 6467
Fax +32 16 21 36 04
[email protected]
United Kingdom
Tel 0800 969 013
Fax 0800 968 624
[email protected]
©2018 nVent. All nVent marks and logos are owned or licensed by nVent Services GmbH or its aliates. All other trademarks are the property of their respective owners.
nVent reserves the right to change specications without notice.
Raychem-IM-INST286-RaystatControl11DIN-ML-1805
nVent.com
nVent.com | 4
 Loading...