

Page 1
WARNING:
CAUTION:
FTC-P
XL-Trace, RaySol, and IceStop Power Connection Kit with
End Seal Installation Instructions
XL-Trace
APPROVALS
718K Pipe Heating Cable or 877Z De-Icing and
Snow- Melting Equipment or
9J86 Radiant Heating Cable
Certified with XL-Trace, IceStop
and RaySol heating cables
-WS
For 12XL2-CT,
-CR only
-WS
With XL-Trace and IceStop heating cables only
For Class I, Div. 2, Groups A, B, C, D
hazardous locations-GM-1XT and GM-2XT only
RaySol
IceStop
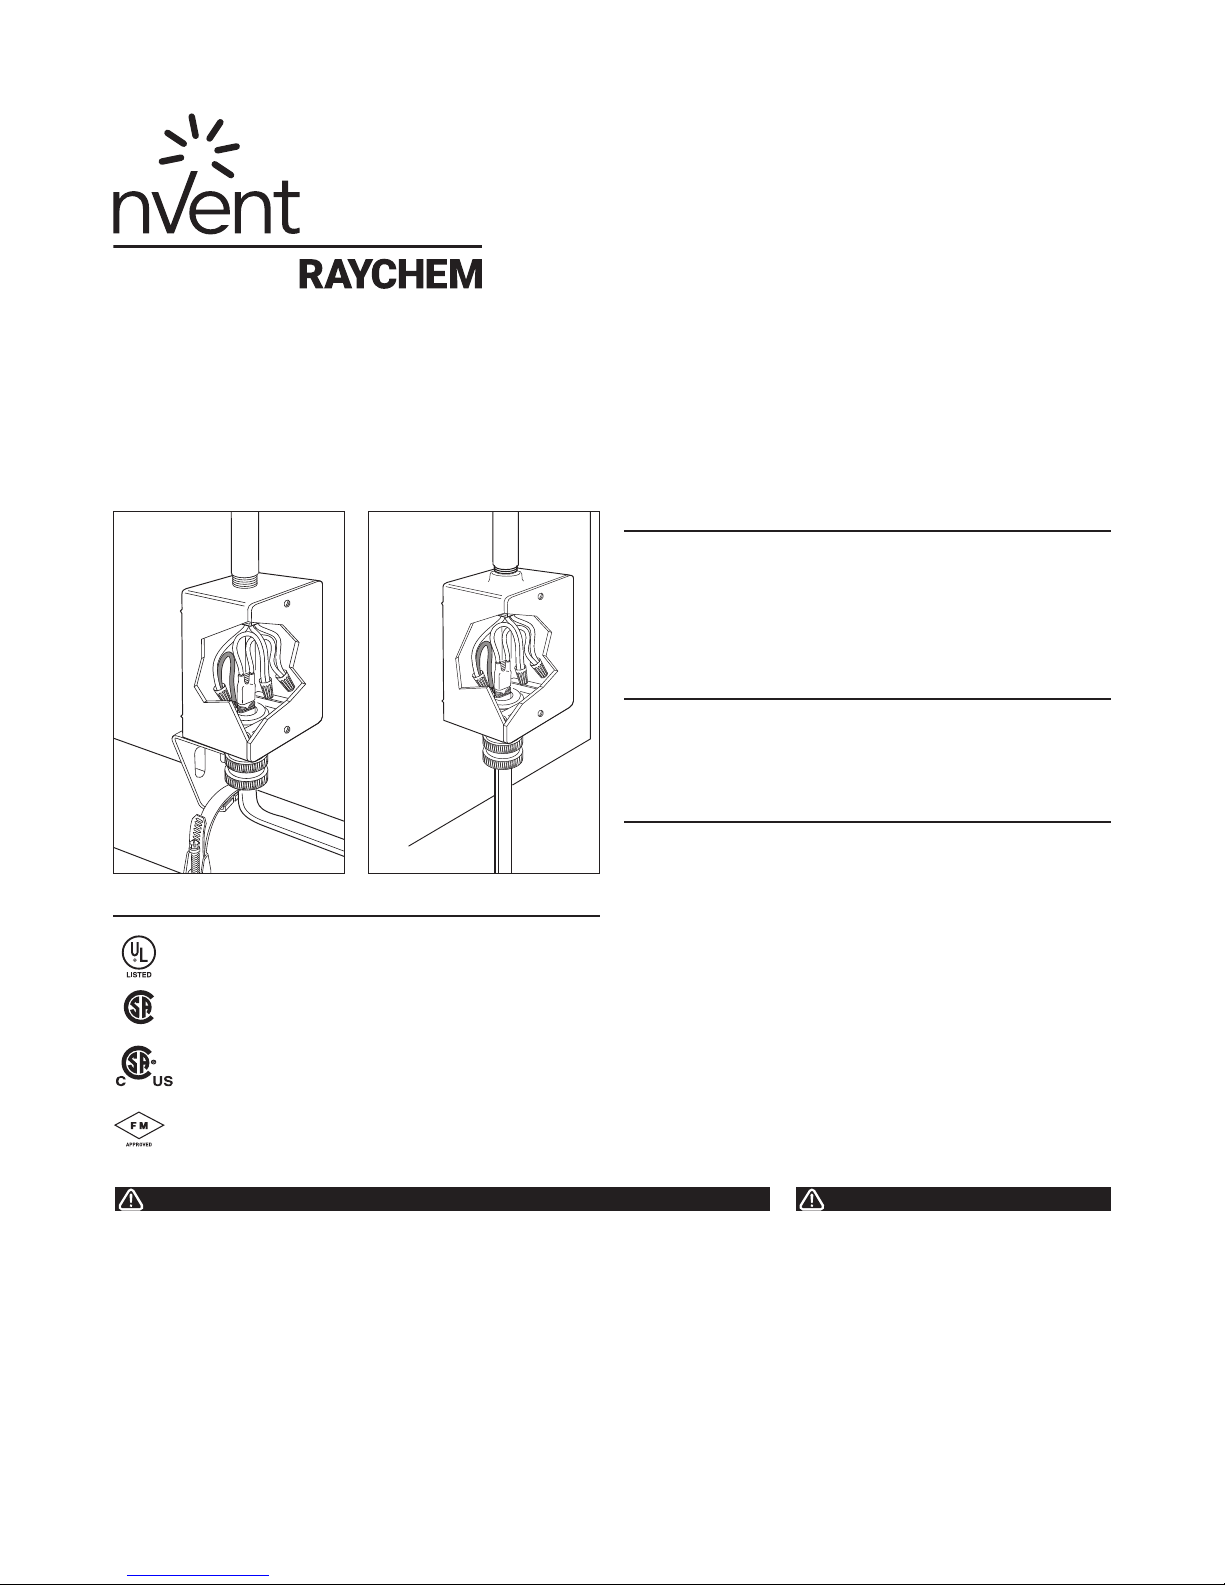
DESCRIPTION
The nVent RAYCHEM FTC-P Power Connection and End Seal Kit is
for use with XL-Trace, RaySol and IceStop heating cables. Materials
for one power connection and one end seal are included in this kit.
These installation instructions should be used in conjunction with
the XL-Trace, RaySol and IceStop System Installation and Operation
Manuals. For technical support contact your nVent representative
or call nVent at 800-545-6258.
TOOLS REQUIRED
• Screw driver • Pen
• Needle-nose pliers • Diagonal cutters
• Utility knife • Heat gun or propane torch
ADDITIONAL MATERIALS REQUIRED
(NOT PROVIDED IN THIS KIT)
• UL Listed or CSA Certified junction box suitable for the location,
with a clearance hole or threaded hub for 1⁄2-inch NPT. For
RaySol applications, the power connection and end seal may be
terminated in the same box.
This component is an electrical device that must be
installed correctly to ensure proper operation and to
prevent shock or fire. Read these important warnings
and carefully follow all the installation instructions.
• To minimize the danger of fire from sustained
electrical arcing if the heating cable is damaged
or improperly installed, and to comply with the
requirements of nVent, agency certifications,
and national electrical codes, ground-fault
equipment protection must be used. Arcing may
not be stopped by conventional circuit breakers.
• Bus wires will short if they contact each other.
Keep bus wires separated.
• Keep components and heating cable ends dry
before and during installation.
• The black heating cable core is conductive
and can short. It must be properly insulated
and kept dry.
• Component approvals and performance are
based on the use of nVent– specified parts
only. Do not use substitute parts or vinyl
electrical tape.
• Leave these instructions with end user for
reference and future use.
HEALTH HAZARD: Overheating heatshrinkable tubes will produce fumes that may
cause irritation. Use adequate ventilation and
avoid charring or burning. Consult MSDS RAY3122
for further information.
CHEMTREC 24-hour emergency telephone:
(800) 424-9300
Non-emergency health and safety information:
(800) 545-6258.
Page 2
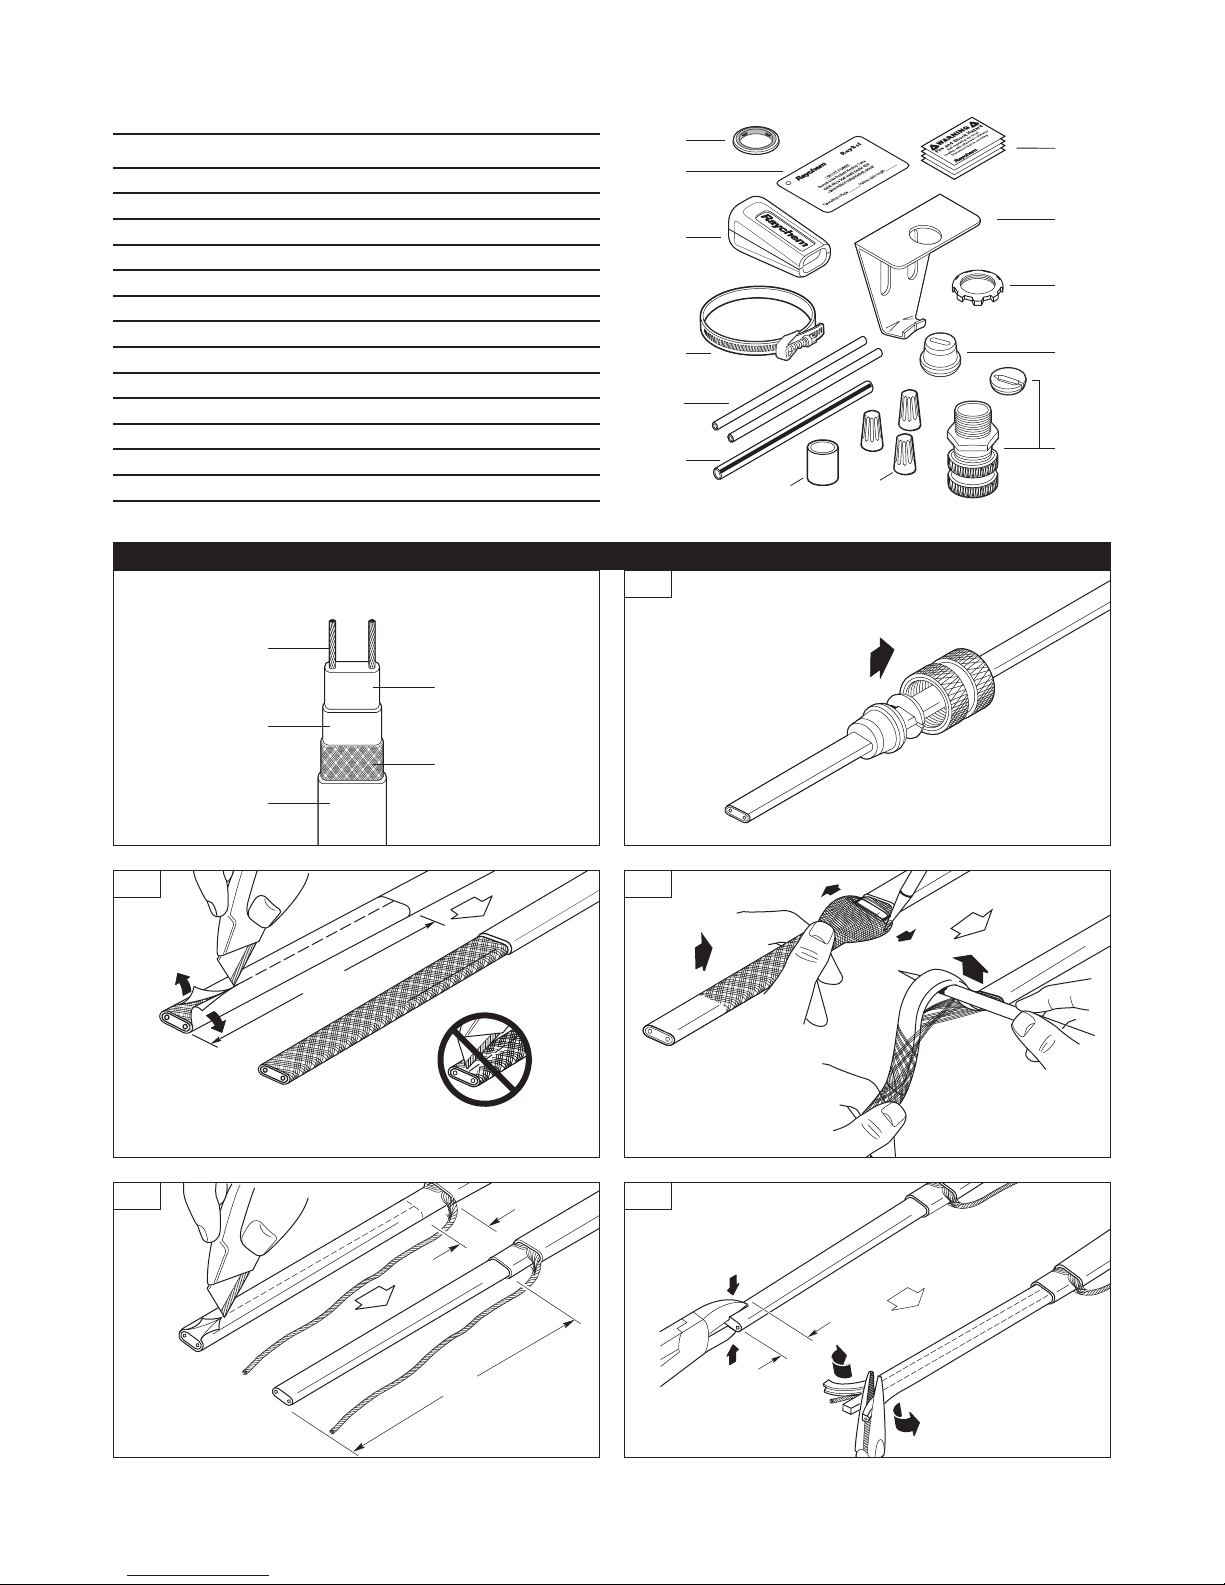
KIT CONTENTS
Item Qty Description
A 4 Warning labels
B 1 Pipe mounting bracket
C 1 Lock nut
D 1 Blue grommet
E 1 Sealing fitting
F 3 Wire nuts
G 1 Black heat-shrinkable tube (1⁄2 in x 11⁄2 in)
H 1 Green/yellow heat-shrinkable tube (1⁄4 in x 51⁄2 in)
I 2 Black heat-shrinkable tubes (1⁄8 in x 51⁄2 in)
J 1 #3 pipe strap
K 1 Gel-filled end seal (FTC-E)
L 1 RaySol circuit tag
M 1 Sealing gasket
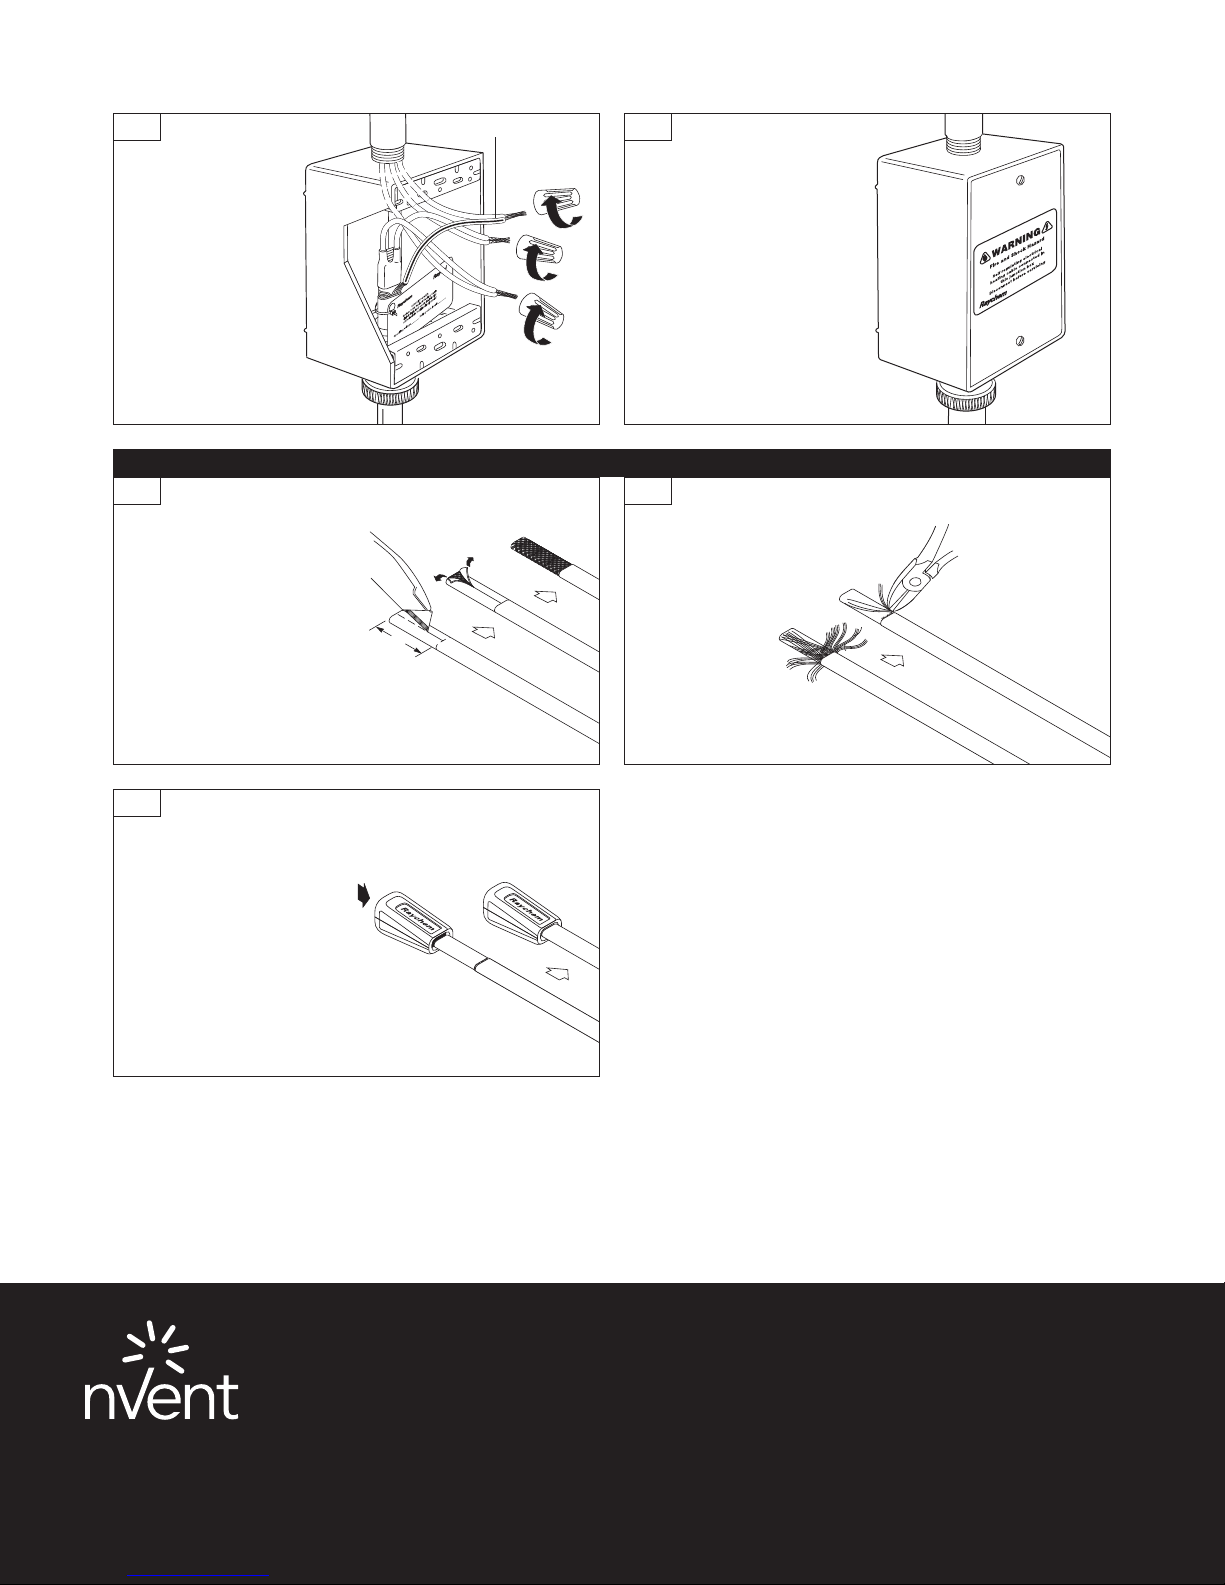
POWER CONNECTION INSTALLATION
XL-Trace-CR and -CT, RaySol, and IceStop
Bus wires
Conductive core
M
L
K
J
I
H
G
1
• Discard black grommet and
use blue grommet.
A
B
C
D
E
F
Inner jacket
Braid
Outer jacket
2
6 1/2 in
3
Do not cut through braid
or inner jacket.
4
1/2 in
5
2 | nVent.com
1/2 in
6 in
Page 3

Lock nut
Sealing
gasket
6
7
• Slide heat-shrinkable
tubes over end
of cable.
• Starting from the
center of the tube,
move the heat source
continuously from
side to side.
CAUTION: Health Hazard. Consult
Do not cut through
material safety data sheet RAY3122.
bus wires.
8
1/2 in
10
• Slip green/yellow tube
over braid and shrink.
1/2 in
5 1/2 in
• Starting at center of tube,
move heat source continuously
from side to side.
9
• While tube is still hot, pinch
with pliers between bus wires
to seal; hold for 10 seconds.
11
12
Note: Pipe mounting
bracket and strap not
used with RaySol and
IceStop.
Note: For junction box
with clearance hole,
use lock nut.
13
Note: Pipe mounting
bracket and strap not
used with RaySol and
IceStop.
nVent.com | 3
Page 4
14
• Attach circuit tag
to heating cable
(RaySol only).
Ground wire
15
• Apply appropriate
warning label to
junction box cover:
IceStop = Yellow
RaySol = Orange
XL-Trace = Orange
END SEAL INSTALLATION FOR XL-TRACE-CR AND -CT, RAYSOL, AND ICESTOP HEATING CABLES
1
2
• Score down and around
outer jacket 1 inch from
the end.
• Remove the outer jacket.
• Do not cut or damage inner
jacket. If damaged, remove
damaged section and
repeat step 1.
3
• Push end seal completely
onto heating cable.
Note: The end seal is
designed to be installed
only once; it cannot be
removed from the heating
cable once installed. Do
not use until ready for final
installation.
• Remove exposed braid.
1 in
North America
Tel +1.800.545.6258
Fax +1.800.527.5703
thermal.info@nvent.com
©2018 nVent. All nVen t marks and logos a re owned or licens ed by nVent Servic es GmbH or its aff iliates. All other t rademarks are th e property of t heir respectiv e owners.
nVent reser ves the right to chan ge specificat ions without not ice.
Raychem- IM-H53514-FTCP-EN-1805
Europe, Middle East, Africa
Tel +32.16.213.511
Fax +32.16.213.604
thermal.info@nvent.com
Asia Pacific
Tel +86.21.2412.1688
Fax +86.21.5426.3167
cn.thermal.info@nvent.com
Latin America
Tel +1.713.868.4800
Fax +1.713.868.2333
thermal.info@nvent.com
nVent.com
PN 401685-000
 Loading...