

Page 1
TIPS AND TROUBLESHOOTING
POWER FAILURE
Your Gateway will reset itself automatically in the event of an
interruption to the power supply due to severe weather or power
outages. However, it may take several minutes for the Gateway
to complete the reset as it downloads programming data.
If you experience a power outage, check each of your television
sets to make sure the TV is set to the appropriate channel
(stream). Each TV must be set to the specific channel (stream)
it was set up with during installation as this is the channel
stream) to which all of the programming is delivered. Use the
channel buttons on your TV to change the channel.
PLUGGING THE GATEWAY INTO YOUR POWER OUTLET
The Residential Gateway should not be plugged into an outlet
controlled by a wall switch. If you plug the Gateway into a power
strip, be sure that the power strip is in the “ON” position at all
times.
TV1
(STREAM 1)
TV2
(STREAM 2)
TV3
(STREAM 3)
Location
TV Channel
Remote ID
Northern Valley Communications
2211 8th Ave NE, Suite 1101
Aberdeen, SD 57401
(605) 725-1000 1-888-919-8945
www.nvc.net
REMOTE
REMOTE
CONTROL
CONTROL
USER’S
USER’S
GUIDE
GUIDE
725-1000
www.nvc.net
Page 2
1
5
2
3
6
10
8
11
7
12
9
4
13
14
15
16
17
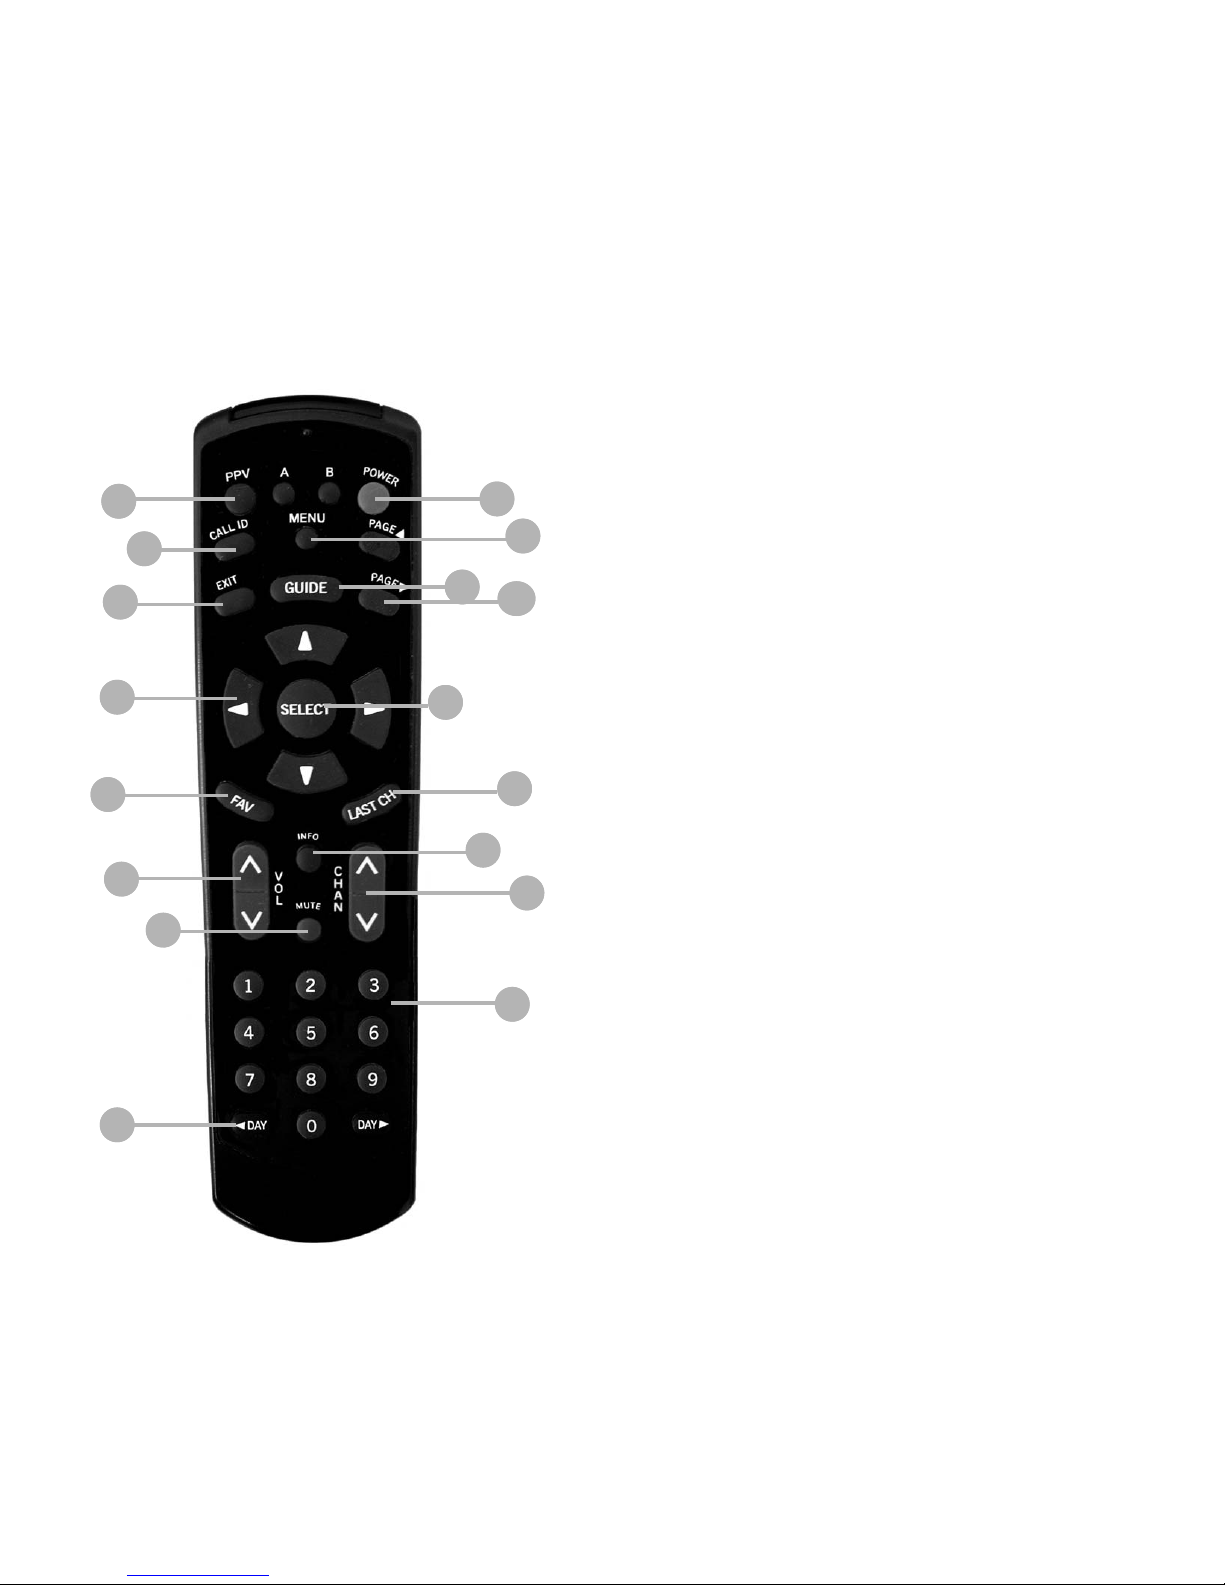
REMOTE CONTROL QUICK REFERENCE
2
15
PROGRAMMING YOUR REMOTE
If you purchase a new TV or a new remote or your remote is not
working correctly, you may need to program the remote to work with
the gateway. Simply follow these instructions:
Step 1: Finding the Gateway ID.
• Press the WRENCH (setup) button on the gateway cable box and
a gray screen will appear.
• Using the arrows on the gateway move down to REMOTE
CONTROL SETUP and press SELECT (the circle with a ‘√’ in it)
on the gateway. Another gray screen will appear.
• Press the PPV button on the remote.
• Write down the 3-digit Gateway ID __________. (If there are fewer
than 3 digits add zeros to the beginning - e.g. 8 becomes 008).
• Press EXIT (the square with an ‘x’ in it).
Step 2: Programming the Gateway ID.
• Press and hold the ‘B’ button until the red light flashes.
• Press 7-8-9.
• Enter the 3-digit Gateway ID (the red light will flash and go off).
Step 3: Programming the Remote Control ID.
• Press and hold the ‘A’ button until the red light flashes.
• Press 7-8-9.
• Enter the correct number from below
• 1 for TV1 (TV that is set to Channel 4)
• 2 for TV2 (TV that is set to Channel 7)
• 3 for TV3 (TV that is set to Channel 13)
Step 4: Programming the TV Code.
• Press and hold the MUTE button until the red light flashes.
• Press the green POWER button.
• Pointing at the TV continue to press and release the UP ARROW
slowly until the TV powers off. The system is searching for the
correct TV code.
• Once the TV powers off press the SELECT button.
NOTE: If you press the UP ARROW too quickly you may pass the
code before you press select. If this happens repeat Step 4, but press
the UP ARROW slowly until the TV powers off.
Page 3

14
VCR RECORDING GUIDE
To immediately record a show on a VCR that is not hooked up
directly to the gateway with an IR blaster (using Stream 2 or
3):
(You need the gateway remote for Stream 2 or Stream 3 plus the TV
remote and VCR remote.)
1. Turn on TV using the gateway remote marked for Stream 2 or 3.
2. Press Guide on the gateway remote. Find the program you want to
record and press Select.
3. Use left arrow key to highlight Tune. Press Select. The TV screen
will show the picture you are recording.
4. Turn on the VCR using VCR remote or power button on VCR.
5. Insert VCR tape. Using the VCR remote, set VCR to Channel 7 or 13
(Stream 2 or 3), whatever Stream you are recording from.
6. Press Record on VCR remote or on front of VCR. VCR will begin to
record.
To delay record a show on a VCR that is not hooked up directly to the gateway with an IR blaster (using Stream 2 or 3):
(You need the gateway remote for Stream 2 or Stream 3 plus the TV remote and VCR remote.)
1. Turn on TV using the gateway remote marked for Stream 2 or 3.
2. Press Guide on the gateway remote. Find the program you want to
record and press Select.
3. Use right arrow key to highlight Actions on the screen, press Select.
4. Use down arrow key to highlight Schedule Automatic Tune. Press
Select. Highlight One Time and press Select. A message displays
indicating Autotune Request Accepted.
5. Press Exit three times.
6. Turn on the VCR using VCR remote or power button on VCR.
7. Insert VCR tape. Using the VCR remote, set VCR to Channel 7 or 13
(Stream 2 or 3), whatever Stream you are recording from.
8. Program your VCR (instructions should be found in your VCR’s
manual) to start recording when the show you want to record begins.
CAUTION: If you turn off your TV with the gateway
remote, this will affect your recording. To turn off your TV,
use the TV remote or the power button on TV.
3
1. POWER
Turns the power to each device controlled by your remote on or off.
2. INFO
Press to view a detailed description of a selected item.
3. GUIDE
Press to view the on-screen Interactive Program Guide.
4. ARROW BUTTONS
Press to move the highlight in the Interactive Program Guide or to
highlight an option in the menu.
5. SELECT
Press to tune to a channel that is highlighted in the Interactive Program
Guide or to choose a highlighted option in the menu.
6. CHAN
Press to move through the available channels.
7. MENU
Press to activate the list of options on the MAIN MENU.
8. NUMERIC BUTTONS
Use to enter an exact channel number to tune to that channel.
9. MUTE
Press MUTE to turn the audio signal off.
10. VOL
Press to adjust the volume level.
11. EXIT
Press to exit a menu or screen display.
12. DAY
Use to jump to the schedule for a different day.
13. PPV
Use to go directly to the Pay Per View listings.
14. CALL ID
Press to go directly to the Caller ID options.
15. FAV
Use to take you to your next favorite channel.
16. LAST CH
Press to return to the previous channel you were watching.
17. PAGE
Press to see the next or previous page of listings.
Page 4
>
<
4
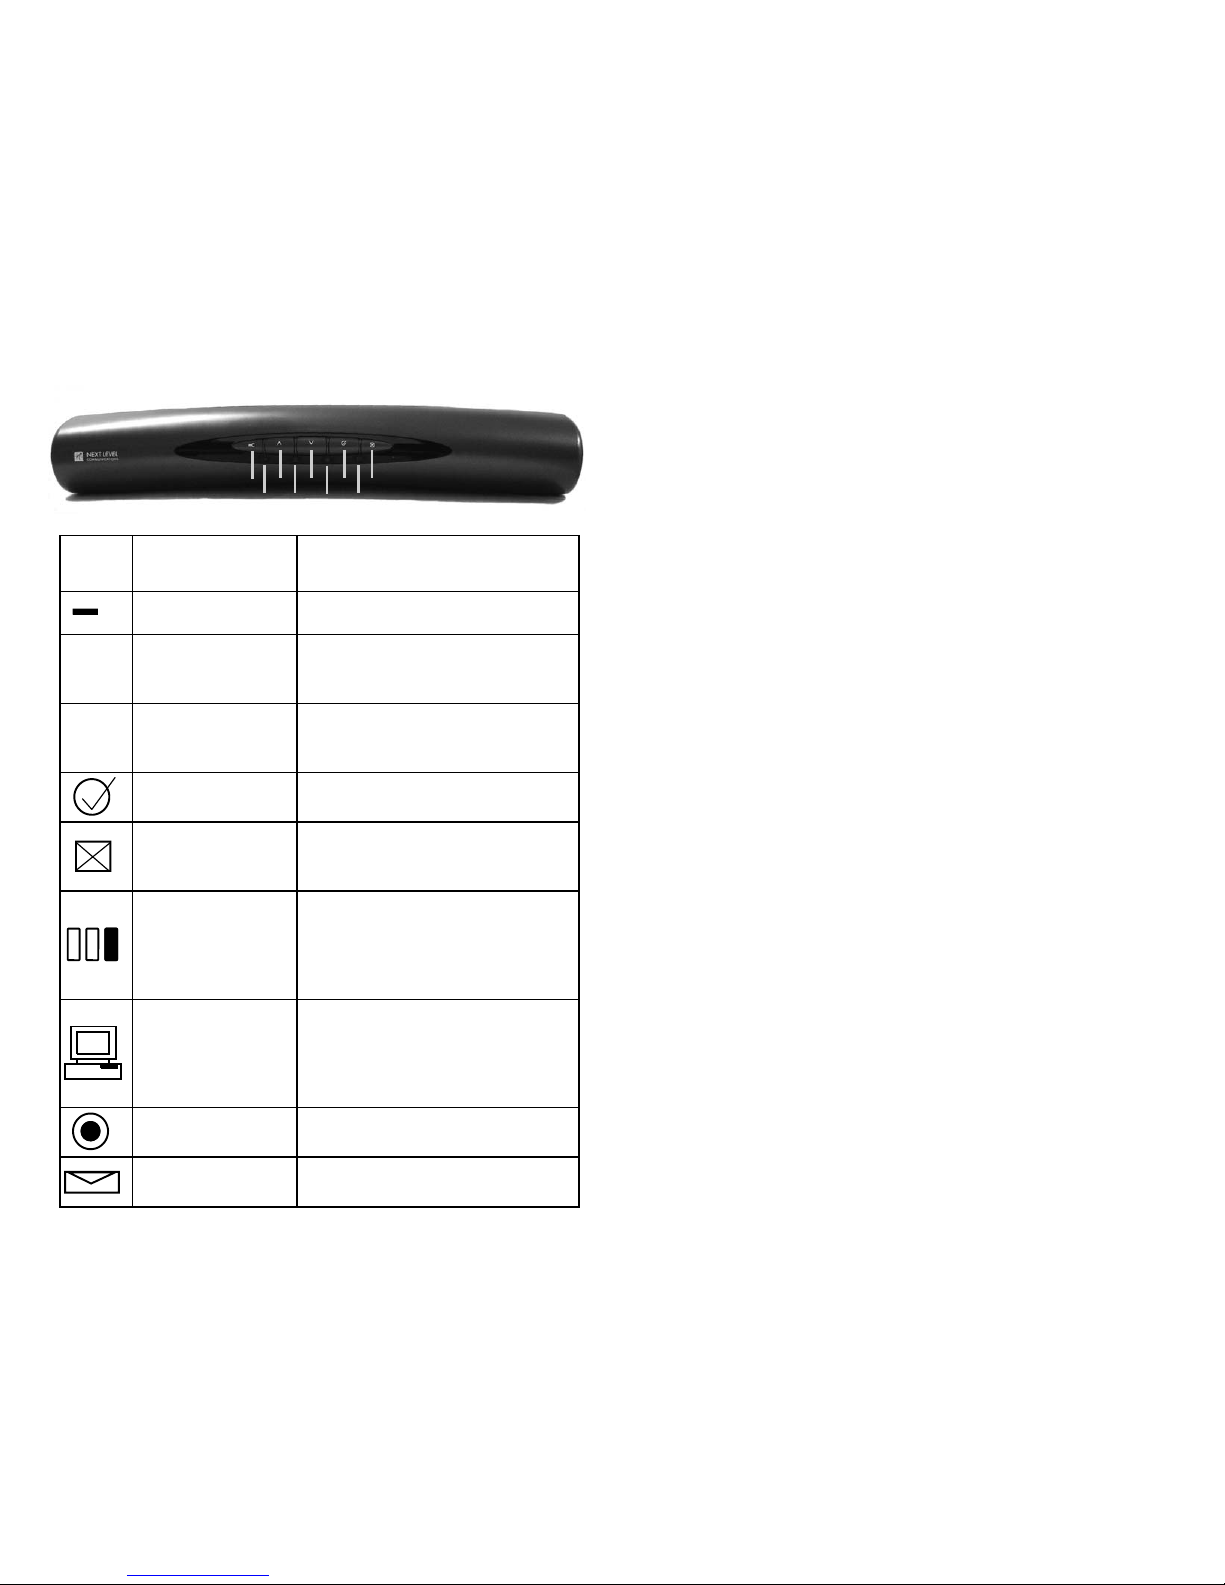
RESIDENTIAL GATEWAY
Symbol Name Description
1. SETUP (WRENCH)
Displays the Gateway Menu
2. UP ARROW
Increases the channel number and
moves the highlight up and down
on the Program Guide or Menu
3. DOWN ARROW
Decreases the channel number and
moves the highlight up and down
on the Program Guide or Menu
4. SELECT
Selects the highlighted choice while
in the Program Guide or Menu.
5. EXIT
Exits the current menu. Reboots
(restarts) the Gateway if pressed
and held for 5 seconds or more.
6. STATUS
No light = no power
Blinking red / amber LED = gateway
is establishing communication link
Blinking green LED = not ready yet
Solid green LED = ready to use
7. ONLINE
No light = no computer detected
Amber LED = computer not yet
ready to use
Solid green LED = computer ready
to use
8. RECORD
A red LED indicates a program is
being recorded.
9. MESSAGE
A green LED indicates voice mail
messages are present.
C
1 2 3 4 5
6 7 8 9
VCR RECORDING GUIDE
3. Turn on the TV using the gateway remote marked for Stream 1.
Make sure the TV is tuned to Channel 4.
4. Press Guide on the gateway remote. Find the program you want
to record and press Select.
5. Use the right arrow key to highlight Actions on the TV screen,
and press Select.
6. Use the down arrow key to highlight Record this Show, press
Select, then highlight One Time; Every Mon-Fri; or Once a
Week. Press Select. A message box indicating Recording
Request Accepted will display.
7. Press Exit three times. On the on-screen guide, a red dot will
appear next to the program to be recorded.
8. Important: Make sure VCR is off!
9. Turn TV off using the gateway remote.
OTHER RECORDING
To watch a program on your main TV and record a different
show at the same time:
(You need an IR Blaster on TV1, Stream 1. You’ll need the gateway
remotes for Stream 1 and Stream 2, the TV remote and VCR remote.)
1. Insert VCR tape in VCR. Make sure VCR is turned off.
2. Turn on the TV using the gateway remote marked for Stream 1.
Make sure the TV is tuned to Channel 4 using the TV remote or
the channel buttons on the TV.
3. Press Guide on the gateway remote. Find the program you want
to record and press Select.
4. Use the right arrow key to highlight Actions on the TV screen,
and press Select.
5. Use the down arrow key to highlight Record this Show, press
Select, then highlight One Time. Press Select. A message
indicating Recording Request Accepted will display followed by
Starting To Record and the TV changes to the channel you are
recording.
6. VCR automatically turns on. Use the TV remote and change TV
channel to Channel 7 which is Stream 2. You can now tune to any
channel using the gateway remote for Stream 2.
7. To stop watching the program on the TV before the recording is
complete, turn the TV off using the gateway remote.
13
Page 5
12
VCR RECORDING GUIDE
The IR Blaster provided with your installation makes VCR
recording easier than ever before! The IR Blaster uses advanced
technology to enable your VCR to work with the gateway. The
Blaster should be placed next to the VCR and TV 1, your main TV.
BASIC RECORDING
Immediate Recording
(You need an IR Blaster on Stream 1. Your VCR should be next to
the gateway.)
1. Insert VCR tape in VCR.
2. Make sure VCR is turned off. The gateway and IR Blaster will
automatically turn on the VCR and tune to the selected program
when recording is scheduled to begin.
3. Turn on the TV using the gateway remote marked for Stream 1.
Make sure the TV is tuned to Channel 4.
4. Press Guide on the gateway remote. Find the program you
want to record and press Select.
5. Use the right arrow key to highlight Actions on the TV screen,
and press Select.
6. Use the down arrow key to highlight Record this Show, press
Select, then highlight One Time; Every Mon-Fri; or Once a
Week. Press Select. A message box indicating Recording
Request Accepted will display, followed by the message
Starting To Record along with the name of the program.
7. Leave VCR on. Turn TV off using the TV remote.
Delayed Recording
(You need an IR Blaster on Stream 1. Your VCR should be next to
the gateway.)
1. Insert VCR tape in VCR.
2. Make sure VCR is turned off. The gateway and IR Blaster will
automatically turn on the VCR and tune to the selected program
when recording is scheduled to begin.
To play a tape: Turn on your VCR and use the TV remote to tune
the TV to the VCR’s output channel (3 or 4). Insert tape in VCR
and hit play. Return the TV to its normal channel when finished.
5
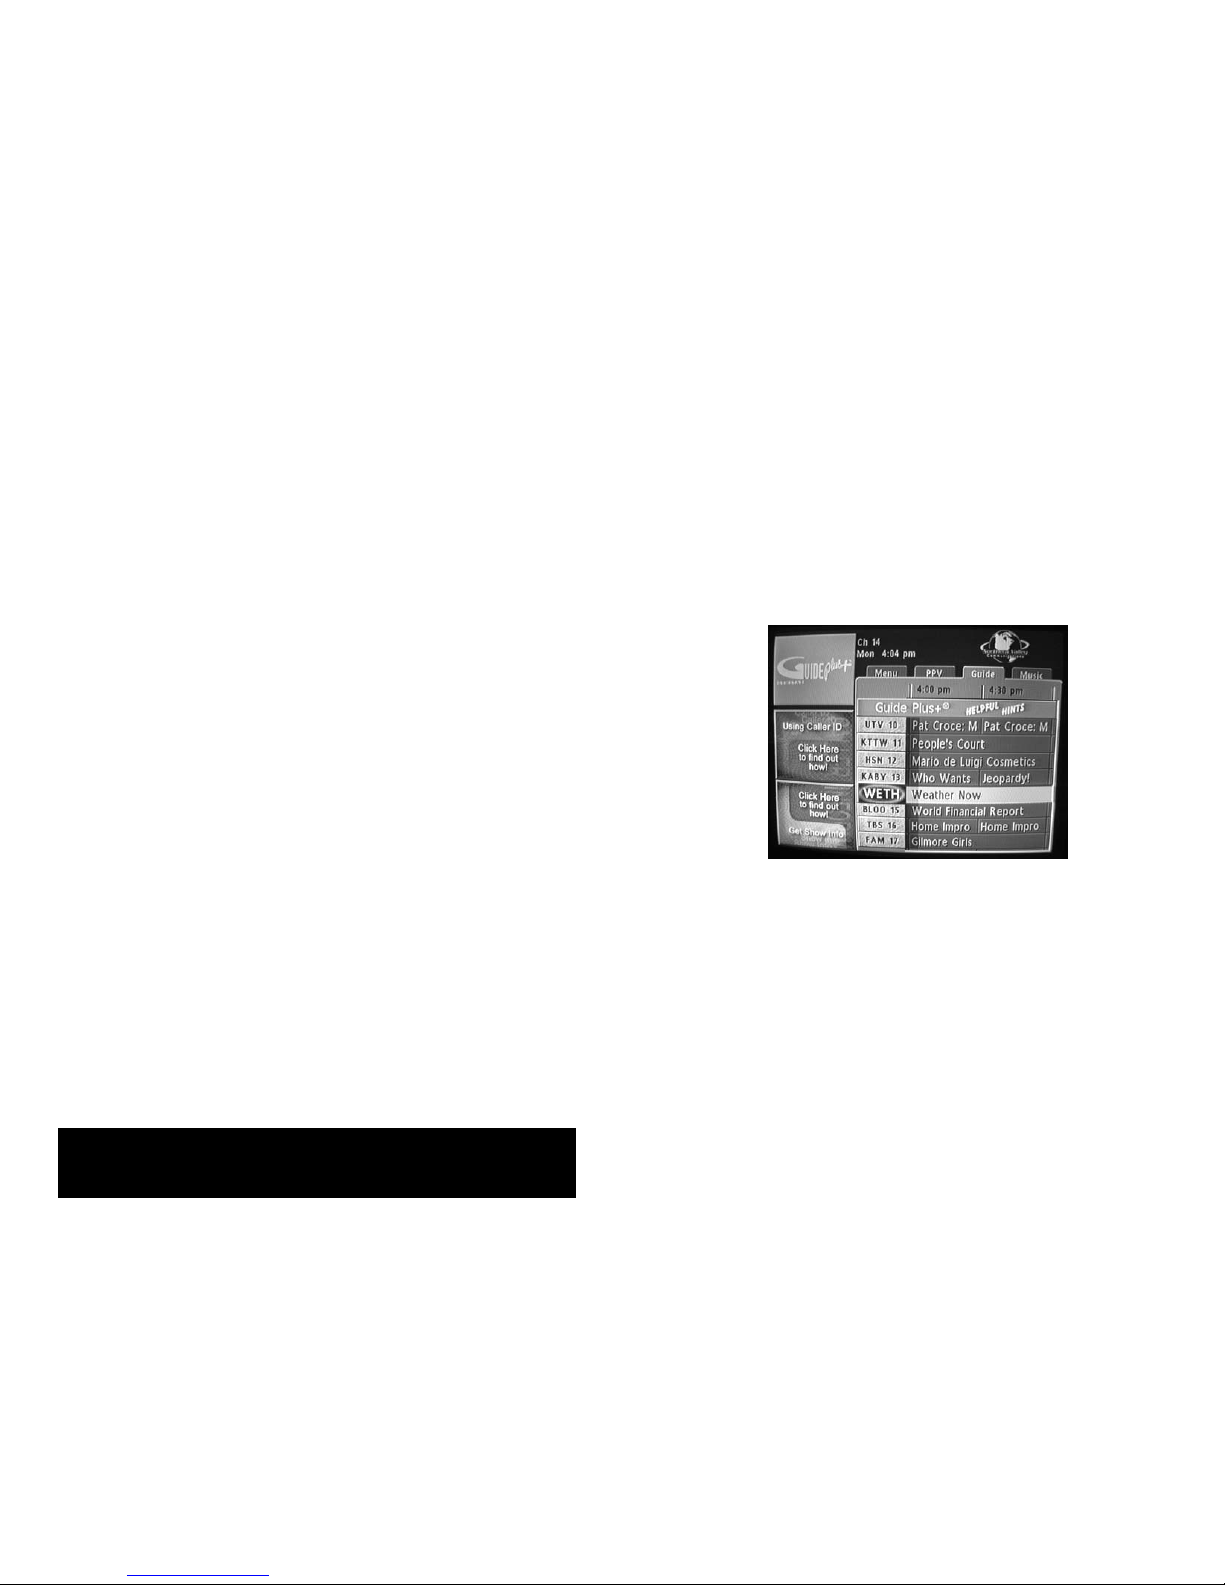
INTERACTIVE PROGRAM GUIDE
The Interactive Program Guide displays a program grid similar to
those found in newspapers right on your TV screen. You control
what shows up on the guide by using your remote control.
When you find the program you are interested in watching, just
highlight it, press SELECT on your remote control, arrow over to
TUNE, press SELECT, and the program will be displayed.
To view the Interactive Program Guide while watching TV:
1. Press the GUIDE button on your remote.
2. Press the EXIT button to exit the Interactive Program Guide
and return to watching TV.
To view program information, just move the highlight that
appears on the grid:
1. Press the ARROW buttons on your remote to scroll through
the listings. Press the left or right ARROW buttons to change
the time of day. Press the up or down ARROW buttons to
change the channels that show on the screen.
2. Press the PAGE buttons to see the previous or next page of
listings.
3. Press the DAY buttons to jump to the schedule for a different
day. The current day of the week is indicated in the upper
portion of the grid.
Page 6
6
INTERACTIVE PROGRAM GUIDE
To exit the Interactive Program Guide and watch your
selected channel:
1. Use the ARROW buttons to highlight the program you wish
to view.
2. Press SELECT button.
3. Use the ARROW buttons to highlight TUNE.
4. Press SELECT button.
OR
1. Use the numeric buttons in the bottom section of your remote
control to enter the channel number you wish to watch.
2. Press SELECT button.
To return to watching the TV channel you were watching
prior to entering the Interactive Program Guide, just press
the EXIT button.
SPECIAL INTERACTIVE PROGRAM GUIDE ICONS
Several special icons may appear next to certain channels on
your Interactive Program Guide:
A PADLOCK icon indicates a locked channel.
A DOLLAR SIGN icon indicates a purchased
Pay-Per-View program or event.
A STAR icon indicates a channel that you have
designated as one of your “Favorite Channels”.
$
11
INTERACTIVE PROGRAM GUIDE
FAVORITE CHANNELS
To further customize your TV viewing, use the remote control to
create a list of your favorite channels to be displayed in your
personal Favorite Channels Guide. This list can include as many
channels as you want.
Your Favorite Channels Guide will show you the schedule information on just the channels you have listed as your “favorites.” Favorite Channels are designated with a star icon on the Interactive Program Guide.
To set up your Favorite Channels:
1. Press the MENU button to bring up the MAIN MENU.
2. Use ARROW buttons to highlight SETUP THE CHANNELS.
Press SELECT.
3. Use the ARROW buttons to highlight FAVORITE CHANNELS.
Press SELECT.
4. Use the ARROW buttons to highlight the channel you would like
to add to your list of favorites. Press SELECT. A star will now
appear next to this channel.
5. Repeat step 4 to add additional channels to your favorites list.
6. Press EXIT to return to normal viewing.
To remove a channel from your Favorite Channels:
1. Press the MENU button to bring up the MAIN MENU.
2. Use ARROW buttons to highlight SETUP THE CHANNELS.
Press SELECT.
3. Use the ARROW buttons to highlight FAVORITE CHANNELS.
Press SELECT.
4. Use the ARROW buttons to highlight the channel you would like
to remove from your list of favorites. Press SELECT. The star
will now be removed from this channel.
5. Repeat step 4 to remove additional channels to your list of
favorite channels.
6. Press EXIT to return to normal viewing.
To change to the next channel on your Favorite Channels
list while watching TV, just press the FAV button.
Page 7

10
INTERACTIVE PROGRAM GUIDE
To lock a specific channel:
1. Press the MENU button to view the MAIN MENU.
2. Use the ARROW buttons to highlight PARENTAL CONTROL.
Press the SELECT button.
3. Use the ARROW buttons to highlight PARENTAL CONTROL
LOCK and press the SELECT button.
4. Enter your 4-digit Parental Control Number using the numeric
buttons on your remote.
5. Use the ARROW buttons to highlight LOCK BY CHANNEL and
press the SELECT button.
6. Use the ARROW buttons to highlight the channel you wish to
lock. Press the SELECT button. The padlock icon will now
appear next to that channel.
7. Repeat step 6 to lock additional channels.
To unlock a specific channel:
1. Press the MENU button to view the MAIN MENU.
2. Use the ARROW buttons to highlight PARENTAL CONTROL.
Press the SELECT button.
3. Use the ARROW buttons to highlight PARENTAL CONTROL
LOCK and press the SELECT button.
4. Enter your 4-digit Parental Control Number using the numeric
buttons on your remote.
5. Use the ARROW buttons to highlight LOCK BY CHANNEL and
press the SELECT button.
6. Use the ARROW buttons to highlight the channel you wish to
unlock. Press the SELECT button. The padlock icon will now
be removed.
7. Repeat step 6 to unlock additional channels.
You can also lock programs based on content or based
on the time they are on. Follow the steps above except
during step 5, select LOCK BY MOVIE RATINGS,
LOCK BY TV RATINGS, or LOCK BY TIME.
7
INTERACTIVE PROGRAM GUIDE
PROGRAM OVERVIEWS
With your Residential Gateway you can see exactly what you are
tuned into by reading on-screen program descriptions while
watching TV or when viewing the Interactive Program Guide.
To view a program overview while watching TV:
1. Press the INFO button on your remote control.
2. To clear the information, press INFO again.
To view a program overview from the Interactive Program
Guide:
1. Use the ARROW buttons to highlight the program.
2. Press the INFO button.
3. Press INFO again to clear the information screen and return
Page 8

8
INTERACTIVE PROGRAM GUIDE
PAY-PER-VIEW PROGRAMS
You can use your remote control and Residential Gateway to
purchase any Pay-Per-View event or movie. You can even purchase
an event in progress until its purchase window closes. The purchase
window generally closes 15 minutes after the start of a movie.
To purchase an event in progress:
1. Press the GUIDE button to view the Interactive Program Guide.
2. Use the ARROW buttons to highlight the event in progress that
you wish to purchase.
3. Press the SELECT button.
4. Use the ARROW buttons to highlight BUY and press the
SELECT button.
5. To complete the purchase, press the SELECT button again.
To purchase a future event:
1. Press the GUIDE button to view the Interactive Program Guide.
2. Use the ARROW buttons to highlight the event you wish to
purchase.
3. Press the SELECT button.
4. Use the ARROW buttons to highlight BUY and press the
SELECT button.
5. To complete the purchase, press the SELECT button again.
To cancel an event that has been ordered in advance:
1. Press the MENU button to view the MAIN MENU.
2. Use the ARROW buttons to highlight the SCHEDULED EVENTS
LIST option.
3. Press the SELECT button.
4. Use the ARROW buttons to highlight the event you wish to
cancel.
5. Press the SELECT button.
6. Highlight ACTIONS button and press SELECT.
7. Arrow down to CANCEL PURCHASE option and press SELECT.
8. Press SELECT button again to confirm cancellation.
* Cancellations must be made within 15 minutes of the start of
the movie.
The Dollar Sign icon will be displayed on the Interactive
Program Guide next to any event you have purchased.
9
INTERACTIVE PROGRAM GUIDE
PARENTAL CONTROL
Parental Control options allow you to lock and unlock channels to
regulate what your children watch. A 4 digit Parental Control
Number that is set up by you must be entered before any locked
channel can be viewed.
* Please make note of your Parental Control Number. We do
not have access to the number you have chosen.
To set up your Parental Control Number:
1. Press the MENU button on your remote to bring up the MAIN
MENU.
2. Use the ARROW buttons to highlight PARENTAL CONTROL.
3. Press SELECT.
4. Use the ARROW buttons to highlight SET UP PASSWORDS.
5. Highlight CREATE PURCHASE PASSWORD and press
SELECT to set up a password that will need to be entered any
time a pay-per-view event is purchased.
6. Highlight CREATE PARENTAL P ASSW ORD and press
SELECT to set up a password that controls what channels or
programs your children watch.
7. Enter any four digit number using the numeric buttons.
Once you have successfully created a password, the SET UP
PASSWORDS menu changes to include the option to change or
remove a password you have created.
 Loading...