

Page 1

NÜVE SANAYİ MALZEMELERİ İMALAT VE TİCARET A.Ş.
OT 020
BENCH TOP STEAM STERILIZER
USER’S MANUAL
Page 2

NÜVE
SANAYİ MALZEMELERİ
İMALAT VE TİCARET A.Ş.
Esenboğa Yolu 22 km
Akyurt - ANKARA / TURKEY
Tel : (00 90 312) 399 28 30 ( 3 lines )
Fax : (00 90 312) 399 21 97
e-mail:
WARRANTY CERTIFICATE
Nüve warrants that the equipment delivered is free from defects in material and
workmanship. This warranty is provided for a period of two years. The warranty
period starts from the delivery date.
Warranty does not apply to parts normally consumed in operation, current
maintenance and the adjustments described in the operating instructions provided
with the equipment.
Nüve does not accept any liability in the case where the goods are not used in
accordance with their proper intent.
The warranty may not be claimed for damages incurred during the shipment, for
damages resulting from improper handling or use, the defects in maintenance,
negligence, bad functioning of auxiliary equipment, in the case of force majeure or
accident and incorrect power supply.
In the event of failure, Nüve shall be under no liability for any injury, or any loss or
damage as the result of the failure other than the guarantee conditions.
BEFORE OPERATING THE INSTRUMENT THIS MANUAL SHOULD BE READ
CAREFULLY.
INFORMATION CONTAINED IN THIS DOCUMENT IS THE PROPERTY OF NÜVE.
IT MAY NOT BE DUPLICATED OR DISTRIBUTED WITHOUT HIS PERMISSION.
THE VALIDITY OF THE GUARANTEE IS SUBJECT TO THE OBSERVATION OF
THE INSTRUCTIONS AND PRECAUTIONS DESCRIBED IN THIS MANUAL.
2
Page 3

CONTENTS
Page
SECTION 1 USE AND FUNCTION
SECTION 2 TECHNICAL SPECIFICATIONS
2.1. Technical Specifications Table 4
2.2. General View 5
SECTION 3 INSTALLATION PROCEDURE
3.1. Lifting and Transport 6
3.2. Contents of the Package 6
3.3. Mains Supply 6
3.4. Environmental Conditions 6
3.5. Positioning
3.6. Preparation to Sterilization
3.6.1 Filling in Distilled Water
SECTION 4 OPERATION
4.1. Operation 8
4.2. Control Panel
4.3. Programming
4.4. Microprocessor Set and Operation Cycles Explanations
SECTION 5 CLEANING AND PERIODICAL MAINTENANCE
5.2. Cleaning
5.1. Periodical Maintenance
SECTION 6 TROUBLESHOOTING
Explanations of Error Codes 12
SECTION 7 ELECTRICAL CIRCUIT DIAGRAM
4
6
7
7
8
11
11
11
12
13
3
Page 4

1. USE AND FUNCTION
OT 020 steam sterilizer is designed for the sterilization of unwrapped medical or
dental instruments and materials used in laboratories with pressurized steam.
The OT 020 steam sterilizer heats up to the temperatures between 110°C and 140°C
and generates pressurised steam at the same temperatures according to the
Pressurized Vessel Principle. The pressurised steam is used to sterilize the
samples.
Homogeneous temperature distribution is ensured by means of stainless steel pipe
heater in the chamber.
All parts which are exposed to steam and water are made of stainless materials.
Apart from the safety features of the programmable microprocessor control system
such as over-pressure and over-temperature control, there are safety thermostat and
safety valve to ensure safe working conditions.
Do not operate the steam sterilizer for purposes other than main purpose.
Do not operate the steam sterilizer for purposes other than main purpose. The
steam sterilizer is only to be used by authorized people after the user’s manual
has been read carefully. Only technical personnel can handle the product in
case of any failure.
2. TECHNICAL SPECIFICATIONS
2.1. Technical Specifications Table
TECHNICAL SPECIFICATIONS OT 020
Temperature Range 110 ° C / 140 ° C
Temperature Sensor Fe-Const
Control System Programmable Microprocessor
Temperature Set and Reading Sensitivity 1° C
Sterilization Timer 1-99 minutes
Safety System 3 Kg/cm² safety valve
Power Supply 230 V, 50 Hz
Power Consumption 1500 W
Useful Volume 20 lt
Number of Shelves (standard/maximum) 2/5
Internal Material Stainless Steel
External Material Epoxy-polyester Painted Steel
Internal Dimensions (Ø x D )mm 265 x 355
External Dimensions (W x D x H) mm 535 x 615 x 500
Packing Dimensions (WxDxH) mm 635 x 635 x 565
Net / Packing Weight kg 60 / 70 Kg
4
Page 5
1
2
3 4
5
6
7
8
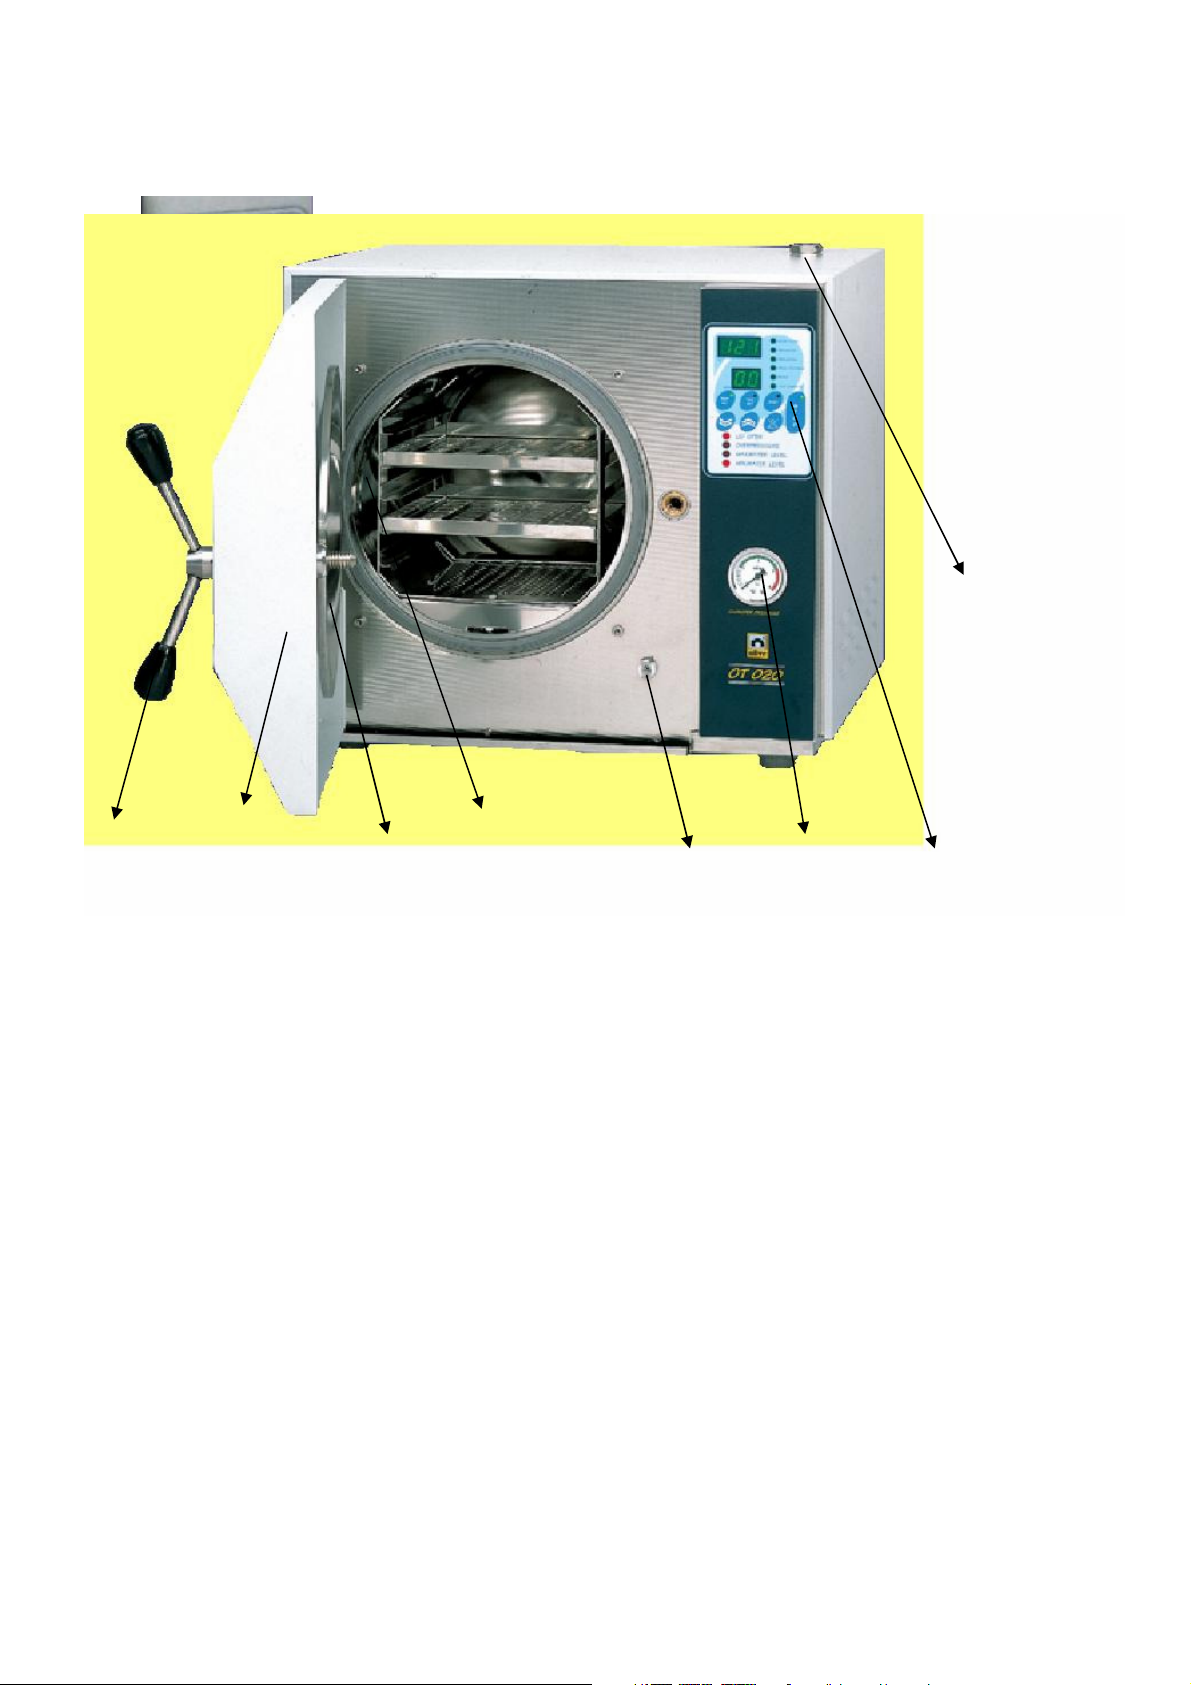
2.2. General View
Figure 1
5
Page 6

9
10 11
1. Lid locking arms
2. Lid
3. Sterilization chamber lid
4. Shelf carrier
5. Water tank discharge tap
6. Manometer
7. Control panel
8. Distilled water filling line
9. Safety valve
Figure 2
10. Power supply inlet with fuse
11. On/Off switch Fuses
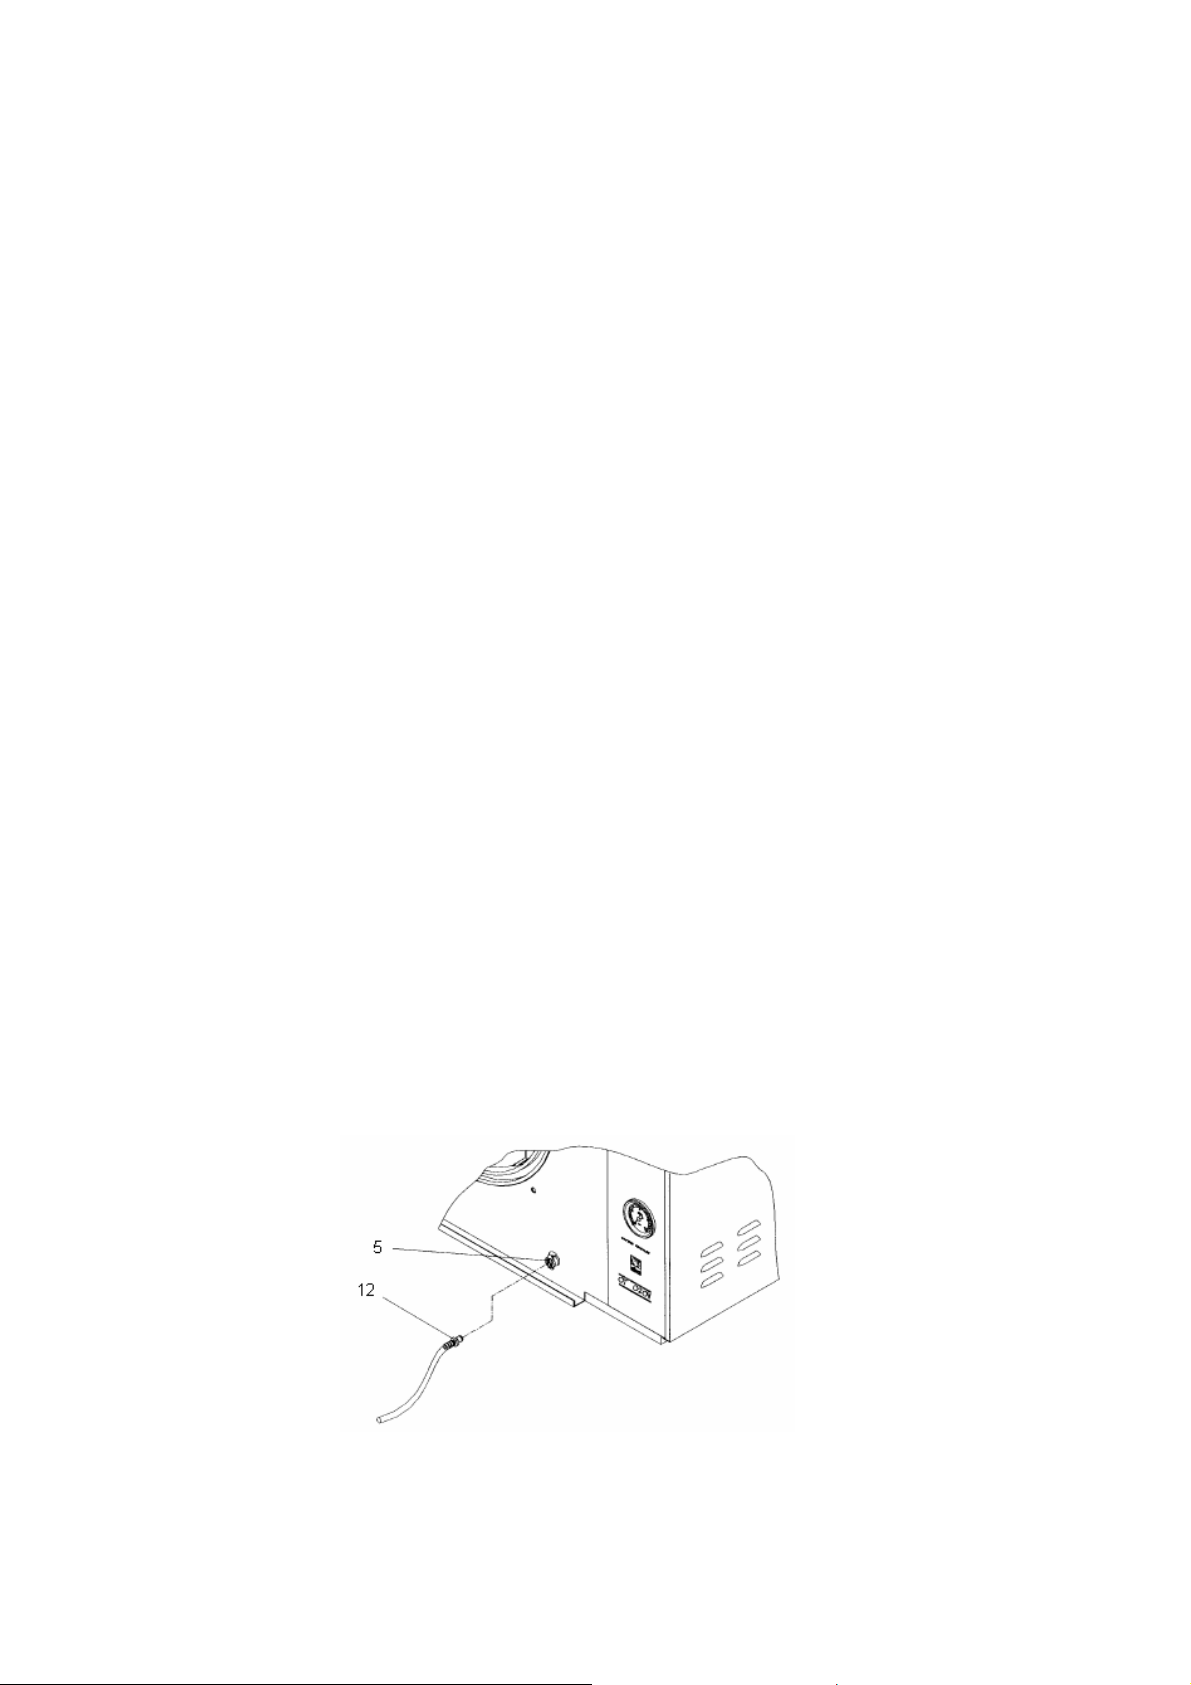
12. Water discharge hose with connector (Figure 5)
3. INSTALLATION PROCEDURE
3.1. Lifting And Transport
Because of the heavy weight of the instrument, all lifting and transport must be
carried out by using proper handling equipment. The instrument must be supported
from underneath and never be turned over.
3.2. Contents Of The Package
The package includes :
• 1 piece of user’s manual
• 1 piece of power cable
• 1 piece of water discharge hose with connector
• 2 pieces of shelves
• 2 pieces of flywheel arms
3.3. Mains Supply
The steam sterilizer requires 230 V, 50 Hz.
Please make sure that the supplied mains matches the required power ratings. If not,
please provide an extra line to support.
Always plug-in the steam sterilizer to correctly grounded sockets.
6
Page 7

A supply fitted with a circuit breaker should be used for protection against
Figure 3
short-circuit in case of a isolation fault.
3.4. Environmental Conditions
This steam sterilizer is designed to operate safely under the following conditions:
• Indoor use only
• Ambient temperature; 5°C to 40°C.
• Maximum relative humidity of 80% for temperature up to 22°C.
• Maximum altitude; 2000 m.
• Temperature for maximum performance; 15ºC / 25ºC
3.5. Positioning
• Check that no damage has occurred during transport.
• Check that the positioning is suitable for users.
• Lift the steam sterilizer (use proper handling equipment if necessary) and carry it
to its place. Check that the steam sterilizer is stable on its four pads.
• Check that the user is enable to follow up the sterilization even he deals with
something else.
• Leave enough free space on each side of the steam sterilizer.
• Make sure that the sterilizer does not do harm to nearby equipment.
• Open the lid and check that no substance has been left in the sterilization
chamber.
3.6. Preparation to Sterilization
3.6.1 Filling In Distilled Water
• Switch on the steam sterilizer.
• If the low water warning led is on fill in some water (the volume of the water tank
is 5 liters) until the MAX WATER LEVEL led turns on. Fill the water with the help
of a funnel. (See Figure 3)
• Please use only DISTILLED WATER, never use tap water. Any type of water
except distilled water may cause expensive and sometimes irreversible damages
on the heaters and this case is granted as the failure of proper use.
• Do not continue filling in water after the MAX WATER LEVEL has turned on.
7
Page 8

4. OPERATION
4.1. Operating the Steam Sterilizer
• Switch on the steam sterilizer.
• See that the control panel activates.
• Add water if MIN WATER LEVEL led is on. See section 3.6.
• Open the lid by turning the flywheel arms on the counter-clockwise direction and
remove the substances left in the chamber, if any exist.
• Load your samples with appropriate sterilization containers obeying the loading
conditions, close the lid and tighten it on the clockwise direction until the LID
OPEN led turns off.
• Do not load samples which can overflow or get deformed during the sterilization.
• Be sure that the safety valve is closed (turn it on the counter-clockwise direction
and hear the closing click).
• Make the program (see section 4.3) and start it.
• Use sterilization indicator for validation of the sterilization.
4.2. Control Panel
8
Page 9
9
Page 10

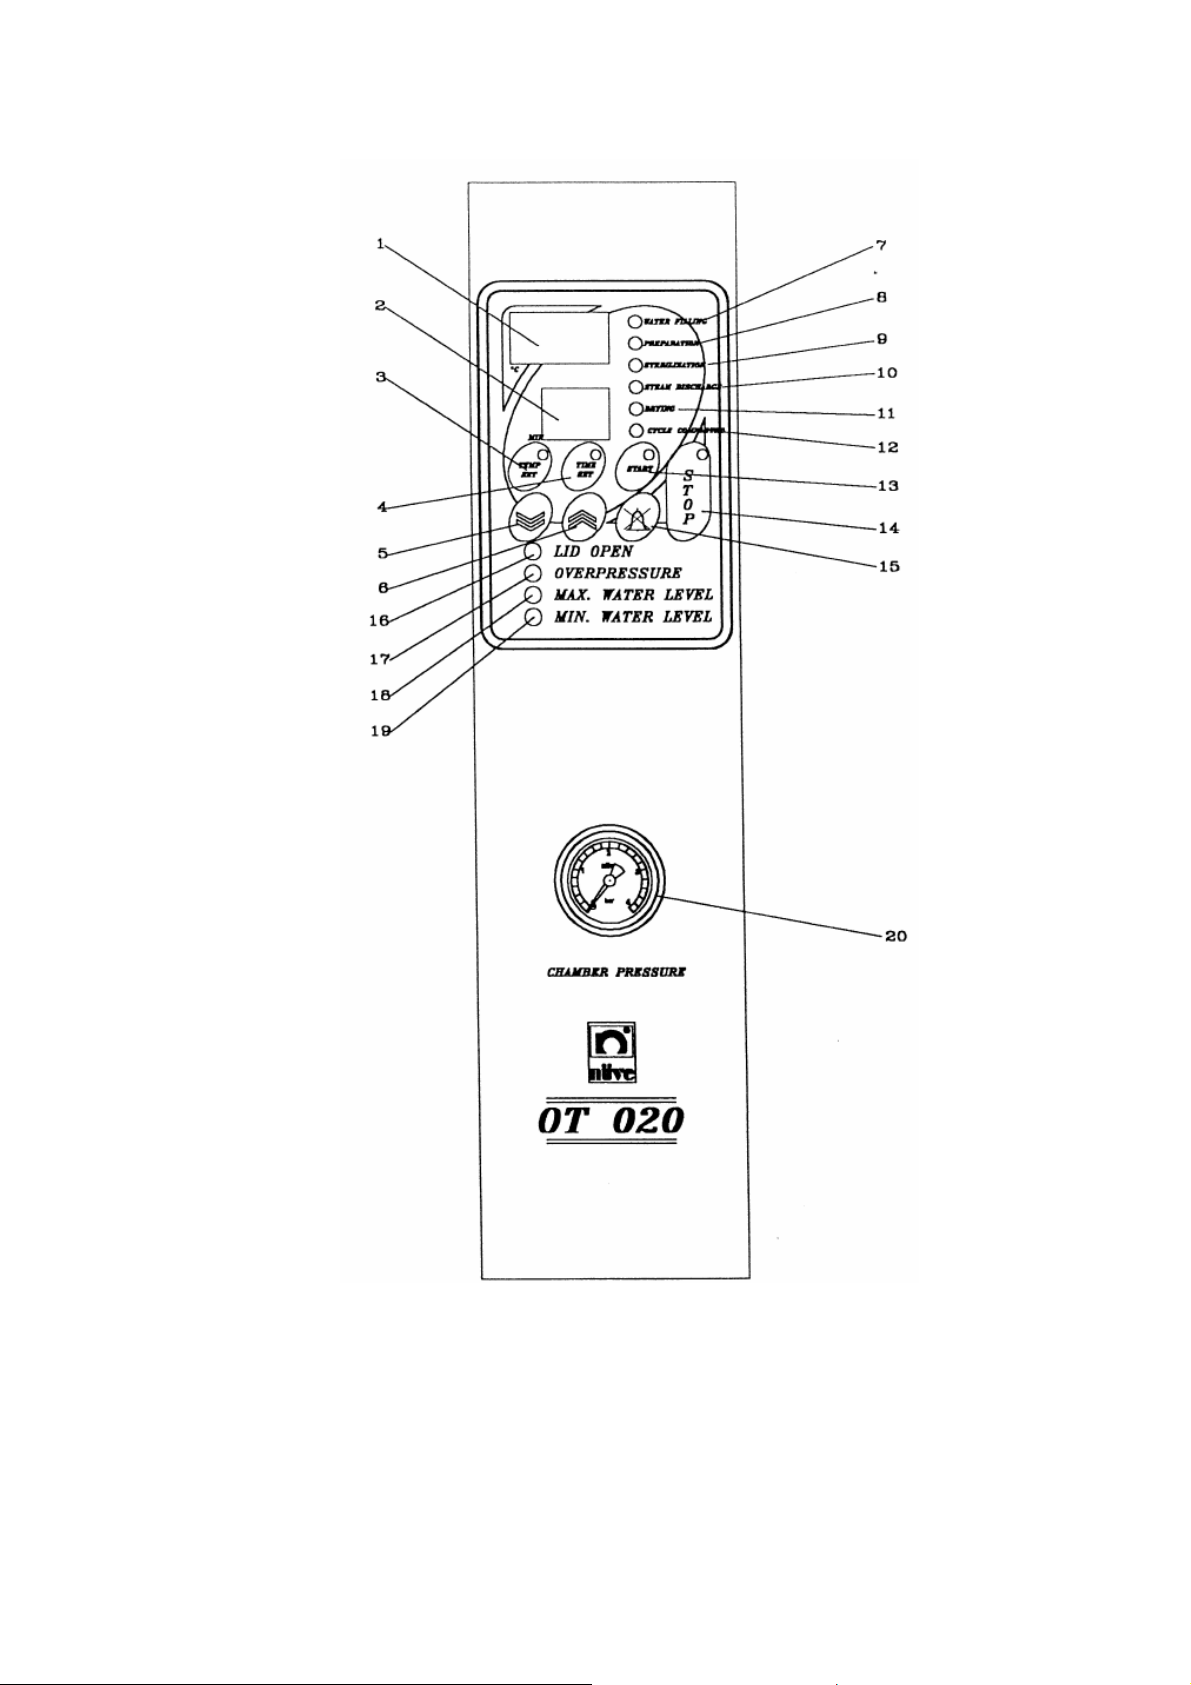
01. Temperature Display (°C): This is the display where the sterilization chamber
temperature and the temperature set values are shown on. It displays the set
value during programming and the sterilization chamber temperature any time
during the run.
02. Time Display : This is the display where the sterilization time is counted down
after the set temperature has been reached. It also displays the set value during
programming.
03. Temperature Set Key : This key is used to set the sterilization temperature. It is
also used to check the set value of temperature during the operation.
04. Time Set Key : The key is used to set the sterilization time. It is also used to
check the set value of time during the operation.
05. Value Decrease Key : This key is pushed to decrease the programming values.
06. Value Increase Key : This key is pushed to increase the programming values.
07. Water Filling Led : This led is on while the chamber is being filled with water
autmatically.
08. Preparation Led : This led is on until the set temperature is reached. The
sterilization does not start while this led is on.
09. Sterilization Led : This led is on while sterilization phase is being carried out.
The led turns off automatically as the sterilization phase ends according to
programmed sterilization time.
10. Steam Discharge Led : This led turns on when the steam in the sterilization
chamber starts to be discharged. The drying led accompanies this led for the last
three minutes of the discharge cycle.
11. Drying Led : This led turns on while the drying cycle is being carried out.
12. Cycle Ended Led : This led turns on to show that the cycle is completed.
13. Start Key and Led : This button is pushed to start the program.
14. Stop Key and Led : This button is pushed to stop the program manually.
15. Audible Alarm Mute Button : This button is pushed,
• to mute the audible alarms and to cancel the alarm codes,
• to turn off “Cycle Ended” led
• to turn back the sterilizer to the stand-by position from OFF position which occurs
after the power cut.
16. Lid Open Led : This led is on when the sterilization chamber lid is open or if it is
not closed properly. The program doesn’t start until the lid is properly closed.
10
Page 11

17. Overpressure Led : This led is on when the sterilization chamber pressure
exceeds the safety limits. The heating is stopped immediately. Please contact to
an authorized technical assistance of Nuve.
18. MAX WATER LEVEL led : This led is on when the water level in the tank is at
the maximum level. At that time the filling should be stopped. Please do not
continue filling in water after this led has turned on.
19. MIN WATER LEVEL Led: This led is on when the water in the tank is not
sufficient to carry out sterilization.
If this led is on before the program starts the instrument does not operate until the
tank is filled with enough distilled water, if it is on after the program starts the
instrument continues to operate but the water in the tank is not enough for the
next sterilization.
See 3.6.1 for detailed water filling information.
20. Sterilization Chamber Manometer : This manometer shows the pressure in the
sterilization chamber.
4.3. Programming
To set the temperature:
• Push TEMP SET key and see that the green led on the key turns on.
• Set the sterilization temperature by pushing VALUE INCREASE or VALUE
DECREASE keys.
• Push TEMP.SET key again to save the set value.
To set the time:
• Push TIME.SET key and see the green led on the button turns on.
• Set the sterilization temperature by pushing VALUE INCREASE or VALUE
DECREASE keys.
• Push TIME.SET keys again to save the set value.
Make sure that you have entered correct set points before you start the sterilizer.
4.4. Operation of the Sterilization Cycle
A sterilization cycle consists of the following phases in theOT020 steam sterilizer:
Water Filling : Distilled water in the water tank is pumped into the sterilization
chamber.
Preparation : The distilled water taken from the water tank is heated up to the set
temperature. The unsaturated steam (the mixture which includes water and steam
together) which is generated during heating goes back to the water tank in the form
of water periodically.
11
Page 12
Sterilization : The sterilization chamber temperature is kept at the set temperature.
Unsaturated steam is discharged to the water tank periodically during this cycle.
Steam Discharge : The steam in the chamber is discharged automatically when the
sterilization time is over and continues until the chamber pressure drops to zero.
Drying : This phase starts last three minutes of discharge cycle. This cycle ensures
that the samples are taken out dry after the sterilization operation.
Cycle Ended : The “Cycle Ended” led turns on and the lid lock is released at the end
of the sterilization cycle. Turn the flywheel to the counter clock wise direction, open
the lid and take your samples out.
PLEASE SEE THAT THE STERILIZATION CHAMBER MANOMETER SHOWS
ZERO (NO PRESSURE) BEFORE YOU ATTEMPT TO OPEN THE LID. IF THE
MANOMETER SHOWS A VALUE OTHER THAN ZERO, OPEN THE SAFETY
VALVE AND DISCHARGE THE STEAM INSIDE THE STERILIZATION CHAMBER
AND THEN OPEN THE LID.
5. CLEANING AND PERIODICAL MAINTENANCE
5.1. Periodical Maintenance
• Replace the sterilization chamber lid gasket once a year. Please contact to the
authorized technical service of Nuve for this replacement.
• Change the distilled water in the water tank once a week. (See the figure below)
5.2 . Cleaning
• Daily cleaning process is required. Wipe the sterilization chamber gasket and
inner surface with a damp cloth. You may use soft liquid soap against difficult dirt
and dust.
• Check the chamber before every use. Make the necessary cleaning, if needed.
• Be aware of the adverse effects of the chemicals cleaners and be careful while
using them.
Figure 5
6. TROUBLESHOOTING
12
Page 13

The steam sterilizer fails to operate, check that,
• the on/off switch is on,
• the mains supply is present,
• the plug is plugged-in properly,
• the plug is not defective,
• the fuse of the installation on which the plug is mounted is not defective
• the fuses of the instrument are sound.
The steam sterilizer does not heat, check the followings,
• The sterilization temperature is set,
• The program is started.
If the pressure does not rise check that,
• the safety valve is not open.
Error Codes
H01: Thermocouple endings are broken.
H02: There is an electronic fault.
H03: Sterilization chamber temperature has exceeded 141 ° C.
H04: Thermocouple endings are connected in reverse.
H06: Water can not be filled into the sterilization chamber.
H07: The temperature does not rise.
OFF: In case of a power cut during the run this error message is displayed, the
program is cancelled, the instrument passes to the discharging process since the
sterilization cycle is interrupted and the sterilization is invalid.
Please contact to an authorized NUVE service in any case of error!
13
Page 14
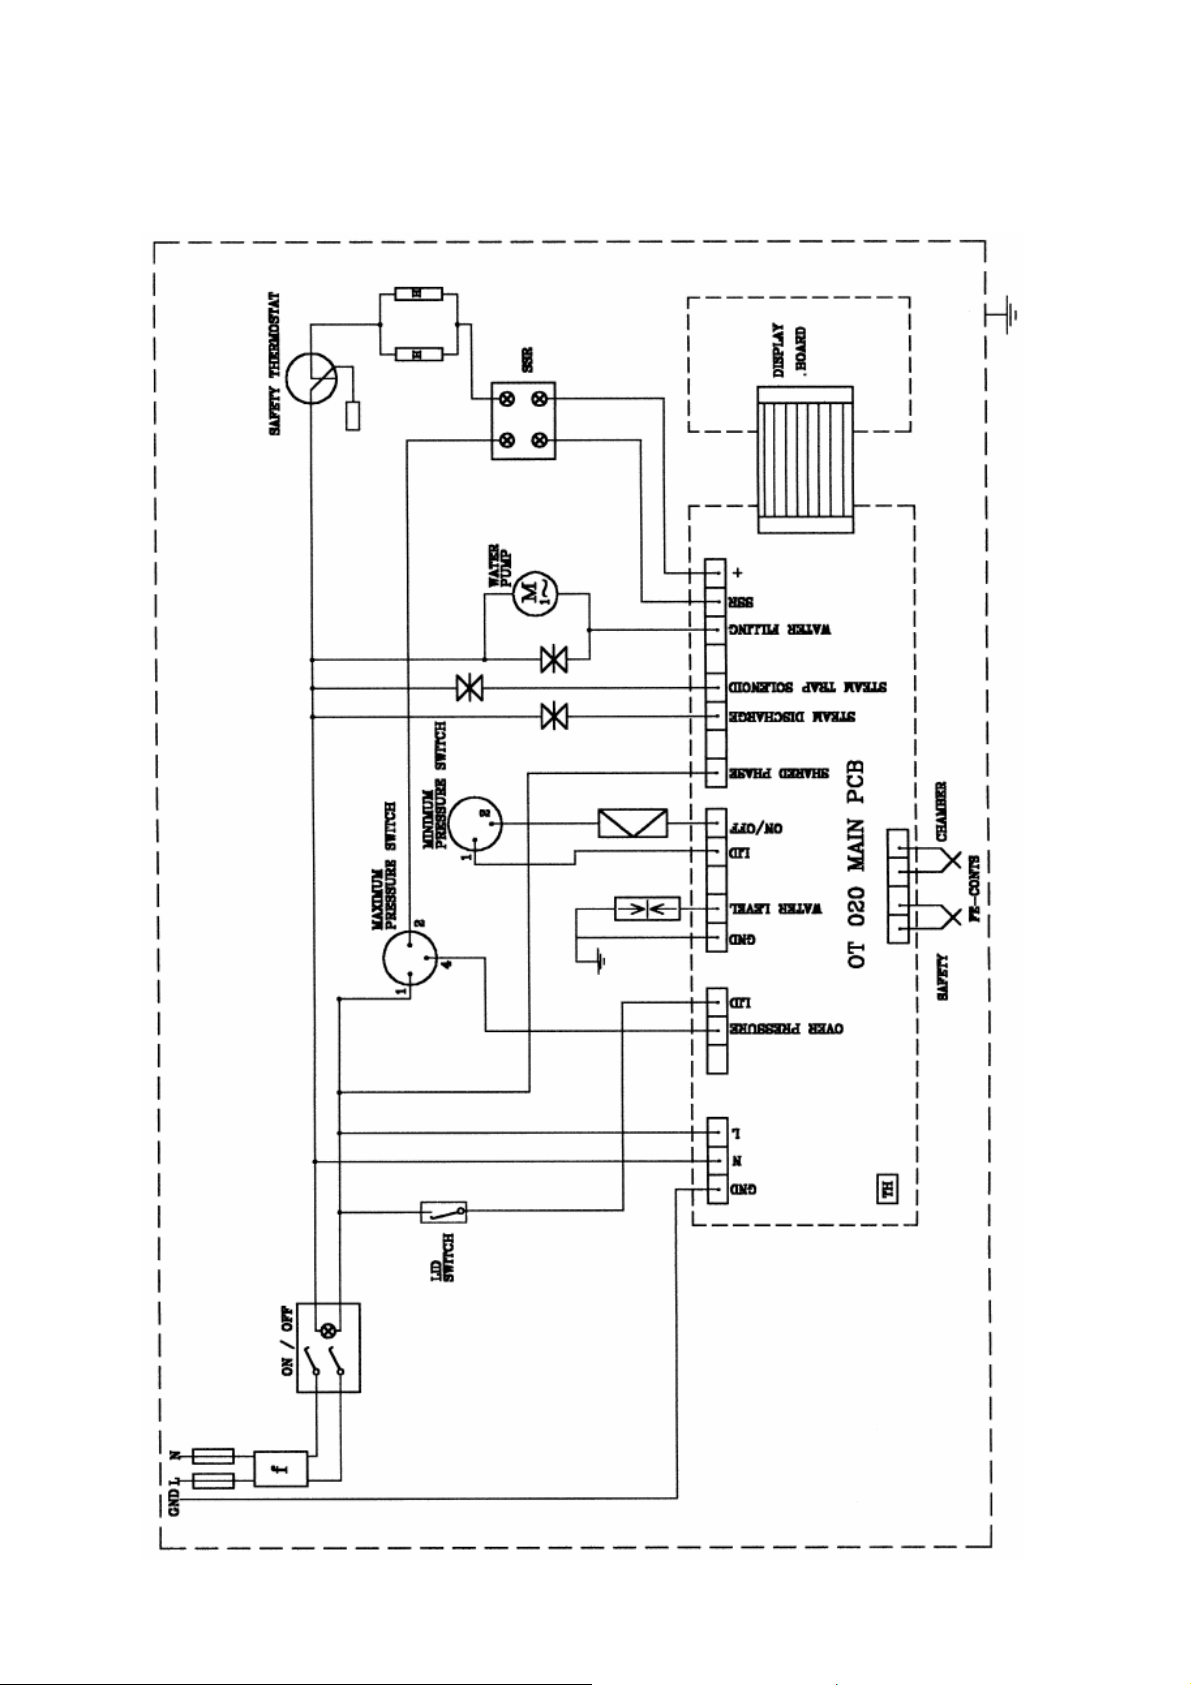
7. ELECTRICAL CIRCUIT DIAGRAM
14
 Loading...