

Page 1

T400 Manual
1
TT440000 UUSSEERR MMAANNUUAALL
& SAFETY INFORMATION 3
RECOMMENDATION 3
SAR 4
& GETTING START 5
INSTALLING THE SIM CARD 5
SWITCHING THE PHONE ON AND OFF 5
MAKING A CALL 6
ANSWERING AND REJECTING A CALL 6
EMERGENCY CALLS 6
KEYPAD LOCK 7
& STANDBY MODE 11
& LIST OF MENU FUNCTIONS 12
PHONEBOOK (MENU 1) 12
MESSAGES (MENU 2) 13
CALL HISTORY (MENU 3) 14
Page 2

T400 Manual
2
SETTINGS (MENU 4) 15
MULTIMEDIA (MENU 5) 16
FILE MANAGER (MENU 6) 16
FUN & GAMES (MENU 7) 16
USER PROFILES (MENU 8) 17
ORGANIZER (MENU 9) 17
SERVICES (MENU 10) 17
EXTRA (MENU 11) 17
SHORTCUTS (MENU 12 ) 17
& MENU FUNCTIONS 18
PHONEBOOK (MENU 1) 18
MESSAGES (MENU 2) 22
CALL HISTORY (MENU 3) 28
SETTINGS (MENU 4) 30
MULTIMEDIA (MENU 5) 36
FILE MANAGER (MENU 6) 44
FUN & GAMES (MENU 7) 44
USER PROFILES (MENU 8) 45
ORGANIZER (MENU 9) 47
SERVICES (MENU 10) 48
EXTRA (MENU 11) 49
SHORTCUTS (MENU 12 ) 50
Page 3

T400 Manual
3
& SAFETY INFORMATION
Please read information before using your wireless mobile phone.
n Recommendation
§ Check the law and regulations on the use of wireless telephones in the
areas where you drive. Always obey them. Observe the following
guideline when using your phone while driving.
- Give all attention to driving.
- Use hands-free phone operation, if available.
- Pull off the road and park before making or answering a call if
driving conditions so require.
§ Do not expose your product to extreme high or low temperatures.
Keep away from humidity.
§ Do not expose your product to open flames or hit tobacco
products.
§ Do not use your product near medical equipment without
requesting permission.
§ Do not use your product when in, or around aircraft, or areas
posted “turn off two-way radio”.
§ Do not use your product in an area where a potentially explosive
atmosphere exists, e.g. in a petrol station.
§ Only authorized personnel should perform service.
§ Only use authorized accessories.
§ It is possible to make emergency calls without inserting a SIM card.
Page 4

T400 Manual
4
§ To minimize electromagnetic interference, please ensure that the
phonies used appropriately.
§ For body worn operation, this phone has been tested and meets
FCC RF exposure guidelines when used with an accessory that
contains no metal and that positions the handset a minimum of
2.5cm from the body. Use of other accessories may not ensure
compliance with FCC RF exposure guidelines.
n SAR
This mobile phone meets government requirements for exposure to
radio waves. Your mobile phone is a radio transmitter and receiver. It
is designed and manufactured not to exceed limits for exposure to
radio frequency (RF) energy. These limits are part of comprehensive
guidelines and establish permitted levels of RF energy for the
population. The guidelines were developed and confirmed by
independent scientific organizations through periodic and thorough
evaluation of scientific studies. The limits include a substantial
safety margin designed to assure the safety of all persons, regardless
of age and health. The exposure standard for mobile phones employs
a unit of measurement known as the Specific Absorption Rate, or
SAR. Under the guidelines for your phone model, the SAR limit is
1.6W/kg. The SAR value for this mobile phone is 0.594W/kg, which
meets international standard.
Page 5

5
& GETTING START
n Installing the SIM Card
§ Keep all SIM cards out of the reach of small children.
§ Before installing or removing the SIM card, always ensure that the
phone is switched off.
§ Remove the battery, and then insert the SIM card into the SIM
card holder. Ensure that the SIM card is properly inserted and that
the golden contact area on the card is facing downwards.
n Switching the Phone On and Off
T400 Manual
§ To switching the phone on and off, press and hold the power key.
§ The PIN (Personal Identification Number) code protects your SIM
card against unauthorized use. The PIN code is usually supplied
with the SIM card. Set the phone to request the PIN code each
time the phone is switched on.
§ If you key in an incorrect PIN code three times in succession, the
phone will be blocked and you need to enter the PUK code.
Page 6

T400 Manual
6
n Making a Call
§ Key in the phone number, including the area code. If you key in an
incorrect character, press C to delete it.
To call the number, press
§
call attempt, press
§ Making a call using contacts - Search for a name or phone
number that you have saved in Contacts, and to call the number,
press
. To end the call or to cancel the
n Answering and Rejecting a Call
§ To answer an incoming call, press
§ To reject and end a call, press
n Emergency calls
Important: Please don’t rely solely on any wireless device for
essential communications like medical emergencies. Wireless
phones, including this device, operate using radio signals, wireless
networks, landline networks, and user-programmed functions.
Therefore, the connections in all conditions cannot be guaranteed.
Page 7

7
n Keypad lock
§ The Keypad lock disables your keypad to prevent accidental key
presses.
§ To lock the keypad in standby mode, press and
§ To unlock the keypad, press and
T400 Manual
Page 8
8
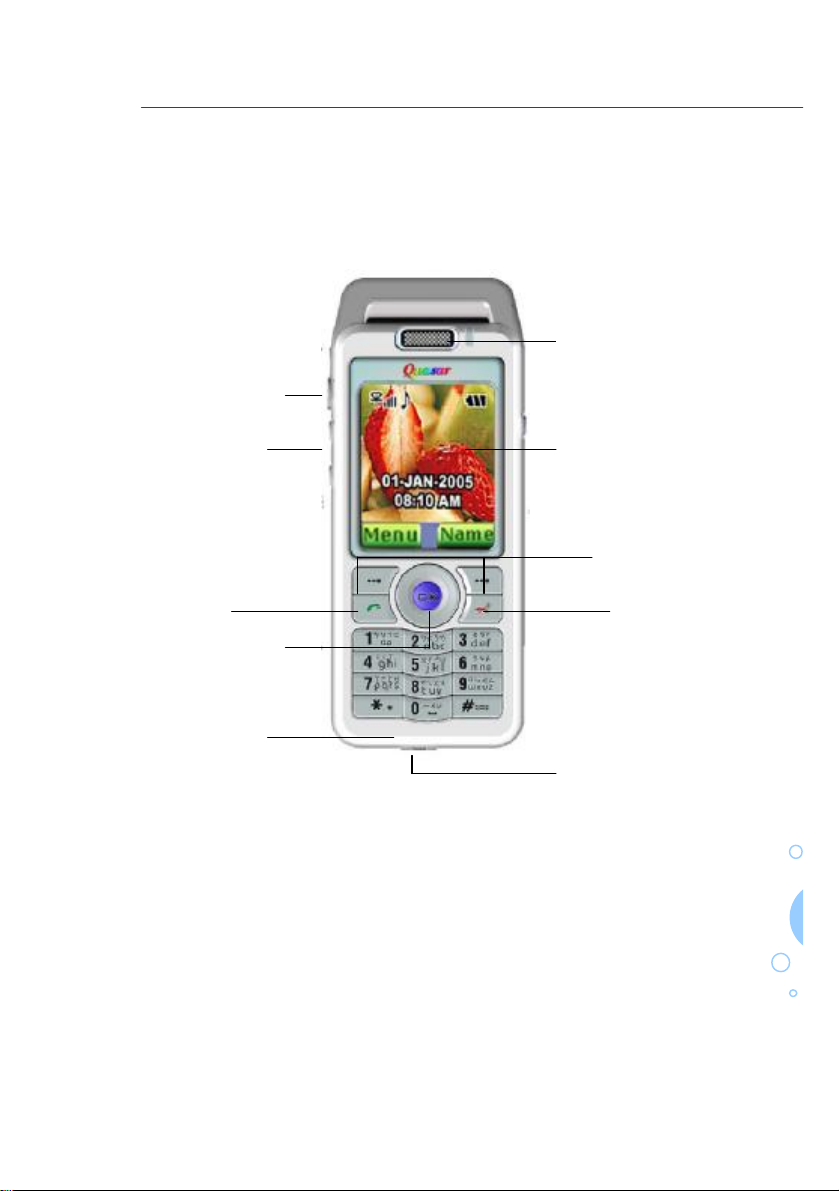
& INTRODUCTION TO THE PHONE
T400 Manual
F
C
Microphone
Receiver
E
LCD
Display
B
A D
Mini USB/ Earphone Jack
Page 9
T400 Manual
9
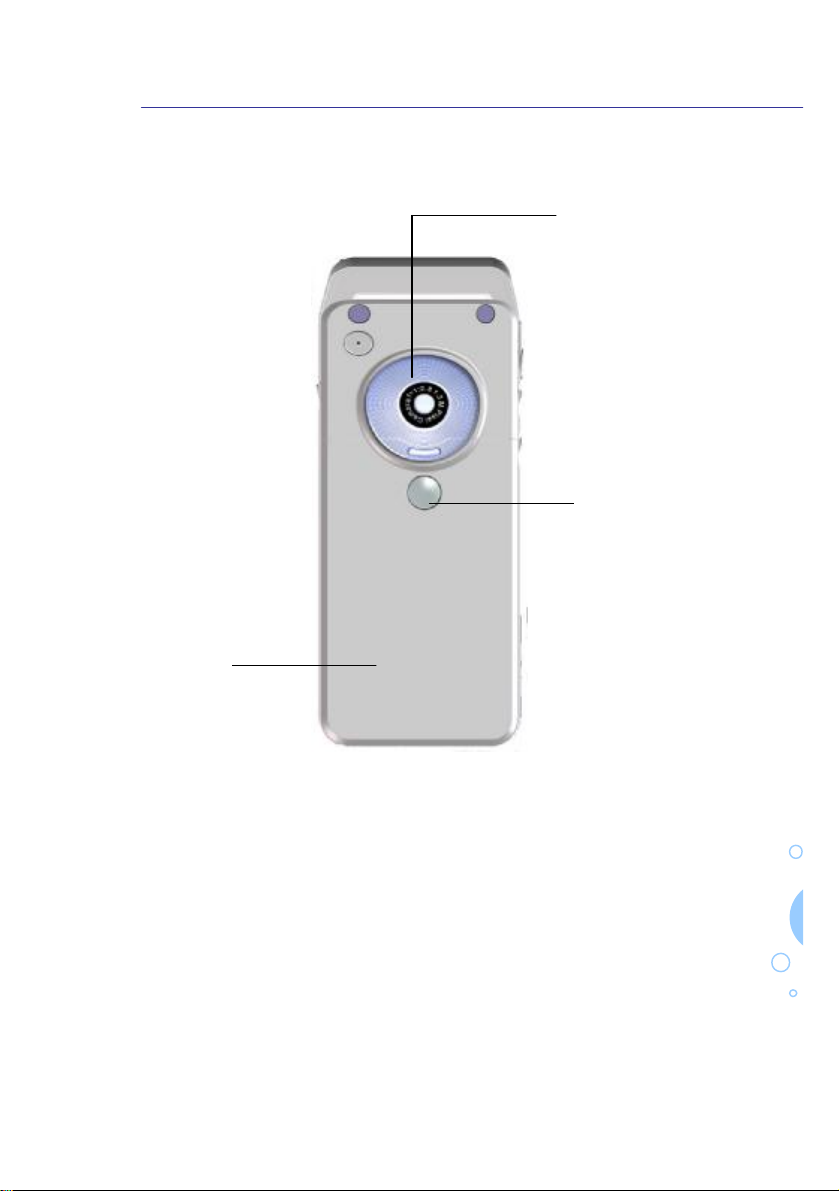
Battery Cover
Camera
Self-portrait
Mirror
Page 10

10
A. Power/Ends an active call. Press and hold to exit
from any function.
B. Selection keys. The function of these keys depends
on the guiding text shown on the display above the keys.
C. 5-way scroll keys. In Menu Mode, scroll through the menu
options. The Left key enters the Calendar menu, the Right key enters the
Audio Player menu and the Down key enters the Phone Book menu. The
Up key enters the Inbox menu.
D. Dials a phone number, and answers a call.
E. To activate the camera. Press to take a picture.
F. Volume keys to adjust the volume of the earpiece
or the loudspeaker.
0-9 keys, to enter numbers and characters. is also used to
T400 Manual
insert symbol or punctuation
Page 11

11
& STANDBY MODE
You can set your phone to display a background picture, wallpaper,
when the phone is in standby mode.
You can set the phone to activate a screen saver separately for the
display, see Settings (menu 4)
the signal strength of the cellular network
the battery charge level.
The phone’s keypad is locked
Ring
Vibration
Vibration and ring
Vibration then ring
The alarm clock is set to On.
You have received one or several text or picture
messages
T400 Manual
Voice mail(s)
Missing call(s)
Roaming
A GPRS connection is established
All incoming calls are diverted to another number
Page 12

12
& LIST OF MENU FUNCTIONS
n PhoneBook (Menu 1)
1. Quick Search
2. Search Entry
3. Add New Entry
To SIM
To Phone
4. Copy All
From SIM
From Phone
5. Delete All
6. Caller Group
Friends
Family
VIP
Business
Others
7. Extra Number
Owner Number
Service Dial Number
SOS numbers
8. Settings
Memory Status
Preferred Storage
Fields
My vCard
T400 Manual
Page 13

13
n Messages (Menu 2)
1. SMS
Inbox
Outbox
Write Message
Template
Message Setting
2. MMS
Write Message
Inbox
Outbox
Drafts
Templates
Message Settings
3. Chat
Chat Room 1
Chat Room 2
4. Email
Send and Receive
Write Email
Inbox
Unsent
Sent
Drafts
Delete all Folders
Email Profile
5. Voice Mail Server
T400 Manual
6. Broadcast Message
Receive Mode
Read Message
Languages
Channel Setting
Page 14

14
n Call History (Menu 3)
1. Missed Calls
2. Dialed Calls
3. Received Calls
4. Delete Call Log
5. Call Time
Last Call Time
Total Sent
Total Received
Reset All Time
6. Call Costs
Last Call Cost
Total cost
Reset Counter
Max. Cost
Price per Unit
7. SMS Counter
Sent
Received
8. GPRS Counter
Last Sent
Last Received
All Sent
All Received
Reset Counter
T400 Manual
Page 15

15
n Settings (Menu 4)
1. Phone Setup
Time and Date
Schedule Power On/Off
Language
Preferred Input
Default Encoding Type
Display Characteristic
Greeting Text
Speed Dial
Dedicated key
Auto Update of Date and Time
2. Call Setup
Caller ID
Call Waiting
Call Divert
Call Barring
Line Switching
Call Time Reminder
Call Time Display
Auto Redial
Closed User Group
3. Network Setup
Network Selection
Preferred Network
Band Selection
GPRS Connection
4. Security Setup
SIM Lock
Phone Lock
Auto Keypad Lock
Fixed Dial
Barred Dial
T400 Manual
Page 16

16
Change Passwords
5. Restore Factory Settings
n Multimedia (Menu 5)
1. Camera
2. Image Viewer
3. Video Recorder
4. Video Player
5. Audio Player
6. Sound Recorder
7. Melody Composer
n File Manager (Menu 6)
C:\ (for internal memory)
E:\ (for external memory)
n Fun & Games (Menu 7)
1. Games
Puzzle
Panda
Frog
2. Themes
Blue
Green
Apricot
3. Game Setting
Game Audio
Game Vibration
T400 Manual
Page 17

17
n User Profiles (Menu 8)
1. General
2. Meeting
3. Outdoor
4. Indoor
5. Headset
n Organizer (Menu 9)
1. Calendar
2. To Do List
3. Alarm
4. World Clock
n Services (Menu 10)
1. WAP
2. Data Account
n Extra (Menu 11)
T400 Manual
1. Calculator
2. Units Converter
Weight
Length
3. Currency Converter
4. Health
BMI
Menstrual
n Shortcuts (Menu 12 )
Page 18

18
& MENU FUNCTIONS
n PhoneBook (Menu 1)
§ Quick Search
- All the names saved in SIM card or phone memory are listed
alphabetically.
- Select PhoneBook à Quick Searchà Option and scroll to the
desired function:
▫ Press Detail to view name, phone number, Associate Picture,
Associate Sound and Caller Group. If this entry is saved in
SIM card memory, you can only see 2 entries: name and
phone number.
T400 Manual
▫ Press Edit to Edit name, phone number, Associate Picture,
Associate Sound and Caller Group. You can leave blanks in
all spaces except for the name space.
▫ Press Delete to erase the name and its details in Phonebook.
▫ Press Copy to make a copy of an entry. If the entry is saved in
SIM card memory, it is copied to phone memory, and the other
way round.
▫ Press Move to shift names and phone numbers saved in SIM
card memory to phone memory, and the other way round
▫ Press Duplicate to make a copy of names and to the same
Page 19

19
memory space.
▫ Press Send vCard to send your card by SMS, MMS, or IrDa, or
save it to the file.
§ Search Entry
- Select PhoneBook à Search EntryàOK. Key in the first letters
to search for phone numbers saved previously. Scroll up or down
to find the name.
- Press Option to view, edit, delete, copy, move or duplicate names
and numbers.
§ Add New Entry
- You can store names and numbers in 2 different places: SIM card
memory and phone memory.
- Save phone numbers to SIM
T400 Manual
▫ Select PhoneBookàAdd New EntryàOK and press To SIM.
To edit names and numbers, press Edit and key in characters.
▫ The memory storage is up to 200 name entries. Only one
phone number can be saved for one name in SIM storage.
- Save phone numbers to Phone
▫ Select PhoneBookà Add New EntryàOK and press To Phone.
To edit names, numbers, associate picture, associate sound and
caller group, press Edit and key in characters.
Page 20

T400 Manual
20
▫ The memory storage is up to 300 name entries. The entries of
names, numbers, associate picture, associate sound and caller
group are activated in phone memory.
§ Copy All
Select PhoneBook à Copy AllàOK. You can copy all names and
entries from SIM or the other way round. If you want to stop copying,
press Abort in the middle of the process.
§ Delete All
- Select PhoneBook à Delete AllàOK. You can delete all names
and entries from SIM or the other way round by selecting From
SIM or From Phone.
- If you want to cancel the action, press NO as a popup shows
“Delete SIM?” or “Delete Phone.”
§ Caller Group
- Select PhoneBook à Caller GroupàOK. 5 groups are available
for you to customize as your own caller groups. See also Quick
Search on page 19 for details of assigning a caller group to
names and phone numbers.
- To edit caller groups, press OK to enter the mode of Caller Group
Detail.
▫ To rename group names, press Edit and key in a new name.
Page 21

21
▫ To assign ring tones, select MidiTone and scroll left and
right of to select different ring tones. Press Done to
assign a desired ring tone to the caller group.
▫ To change Caller ID picture, select None and scroll left and
right of to select pictures. You can preview the picture
by pressing View. Press Done and then Yes to save your
setting.
§ Extra Number
- Select PhoneBook à Extra NumbersàOK
▫ Owner Number: To edit owner number, select Owner
NumberàOKàOption. Press Edit or Erase to modify the
owner’s name/nickname and number. To display your
name/nickname in the idle screen, go back to Menu 4
T400 Manual
-Settings, select Phone Setupà Display Characteristicà
Show Owner NumberàOn
▫ Service Dial No.: Only ISPs (Information Service Provider)
have access to the service dial number.
▫ SOS Numbers: To edit SOS number, select SOS
NumbersàOKàEdit. You can save up to 10 SOS
numbers.
§ Settings
- Select Phone Book à SettingsàOK
Page 22

22
▫ Memory Status: You can check the current memory status
of your phone book in SIM card and Phone memory.
▫ Pref. Storage: You can choose to store names and phone
numbers in SIM card or Phone memory.
▫ Fields: To switch off the functions of Associate Pictures,
Associate sound and Caller Group, press Off to deactivate
the function.
▫ My vCard: To edit owner’s information and send it
as a name card by SMS, MMS or save to file.
n Messages (Menu 2)
§ SMS
§ Inbox
- To view messages, select Messageà SMSà InboxàOK, and use
T400 Manual
to select the message you want to read and press OK. à
read message, à unread message.
- To edit messages, select Messagesà SMS
àInboxàOKàOption. You can reply, edit, forward, delete the
message. Other functions are as follows
▫ Delete All: Delete all messages in Inbox.
▫ Use Number: Select Use Number and press Option, and
you can dial this phone number or save it to PhoneBook.
▫ Save Objects: The smileys, pictures, animations and
melodies used in a message can be saved in folders of My
Page 23

23
Picture, My Animation or My Melody.
- àthe format of the message is not supported. àunable
to open the message.
§ Outbox
- To view messages that were sent out to other phone numbers,
select Messagesà SMSà OutboxàOK.
- To edit a sent message, press Option. You can edit, forward,
delete the message. By pressing Delete All, all of the messages
in Outbox can be deleted.
- àsent message. à not yet delivered.
§ Create
- To create a new message, select Messagesà SMSà CreateàOK.
T400 Manual
Press Option to enter advanced editing functions as follows:
▫ Done: The message can be sent with or without saving in
Outbox. By pressing Send to Group, you are able to select
a group as a receiver. If you want to edit the message later
without sending it out, press Save.
▫ Preset Message: You can load prepared sentences
(templates) from preset messages. See Template on Page
24.
▫ Insert Object: Select and insert desired picture, animation,
melody or sound.
Page 24

24
▫ Format Text: When editing a message, you can select
different text size, style and alignment. To start another
paragraph, select New Paragraph and scroll to the desired
alignment.
▫ Input Method: You can select an input method
from the menu. Or press Insert Symbols to add
desired symbols.
§ Template
- You can edit and save frequently-used messages as templates.
When creating or replying messages, you can insert the
templates into messages.
- Press Messages à Preset MessageàSMSàOKà
Option to edit or erase templates.
T400 Manual
§ Message Setting
- Profile Setting: This function is to set profiles for messages sent
from different message centers. According to delivering sources,
received messages can be processed by pre-defined setting.
▫ Profile Name: You can change the default name to the one
you preferred.
▫ Service Center No. : The field is to set the message deliver
center; in most cases, it is already defined by your ISP.
▫ Duration: If you want to delete messages in the service
Page 25

T400 Manual
25
center after a period of time, press left key and right key of
to set the duration.
▫ Massage Format: The default setting is “Text.” You can
select delivering messages to receiver’s FAX machine,
pager or e-mail box if your ISP provides corresponding
services.
- Common Setting: This function applies to all messages sending
out from this model of mobile phone.
▫ Delivery Report: You can choose if you want to receive the
delivery report of each sent message. This service is
offered by your ISP.
▫ Reply Path: By switching on this function, you can define
delivery reports to be sent via the same service center.
- Memory Status: Check the usage of SIM card and phone
memory storage.
- Pref. Storage: You can choose to store messages in SIM card or
Phone memory.
- Voice Mail: The service is offered by your ISP, and the service
number is defined by ISP as well. In standby mode, you can
press and hold to access your voice mail box.
Page 26

26
§ MMS
A multimedia message can contain text, sound and a picture. The
phone supports multimedia messages that are up to 40KB in size.
If the message contains a picture, the phone scales it down to fit
the display area. The wireless network may limit the size of
MMS messages. If the inserted picture exceeds this limit, the
device may make it smaller so that it can be sent by MMS.
Multimedia messaging supports the following formats:
ú Picture: JPEG, GIF, BMP
ú Sound: MIDI, MP3, AMR/WAV audio
Note that you are not able to receive any multimedia messages if
you have a call in progress. Because delivery of multimedia
messages can fail for a variety of reasons, do not reply solely
upon them for essential communications.
T400 Manual
- Write Message
To:_____ (Press Option to add number or E-mail address to
the receiver.)
Cc:_____ (Press Option to add number or E-mail address to
the receiver.)
Bcc:____ (Press Option to add number or E-mail address to
the receiver.)
Subject: _____ (Press Edit to input characters in the content.)
Edit content: ____ (Press Edit to write text, or attach image,
audio or other files to the MMS message.)
Page 27

27
- Inbox
Please refer to SMS à Inbox section.
- Outbox
Please refer to SMS à Outbox section.
- Drafts
- Templates
Please refer to SMS à Templates section.
- Message Settings
§ Chat
You can join a Chat Room discussion to exchange information such
as opinion, comments, and thoughts. To start chatting, insert your
nickname and the friend’s number in Chat Room Info; then click
Start Now.
T400 Manual
§ Email
You can use your phone to send or receive email messages. Please
note that you need a subscription that supports data transmission. For
more information, consult your service provider.
§ Voice Mail Server
The voice mailbox is a network service. For more information and
for your mailbox number, contact your ISP.
Page 28

28
§ Broadcast Message
This function is for ISP to broadcast messages to mobile handsets
within an assigned area.
- Receive Mode: You can choose to receive broadcast messages
or not. If you choose not to receive the broadcast message, all
channels are switched off.
-Message List: To view messages, select the message and press
OK.
-Channel Setting: You can select, add, edit and delete channels.
-Languages: Select the language displayed in broadcast
messages.
n Call History (Menu 3)
T400 Manual
§ Missed Calls
- To view missed calls in standby mode, select Call Historyà
Missed Callsà OK. Press Option to delete or edit the message.
- If you want to save the sender’s phone number, press
OptionàSave to Phone Book. To reply the phone call, press
Option àDial.
§ Dialed Calls
- To view dialed calls in standby mode, select Call Historyà
Missed Callsà OK. Press Option to delete or edit the message.
Page 29

T400 Manual
29
- If you want to save the sender’s phone number, press
OptionàSave to Phone Book. To reply the phone call, press
Optionà Dial.
§ Received Calls
- To view received calls in standby mode, you can select Call
Historyà Missed Callsà OK. Press Option to delete or edit
the message.
- If you want to save the sender’s phone number, press
OptionàSave to Phone Book. To reply the phone call, press
Option àDial.
§ Delete Call Log
If you want to delete call history in Missed Calls, Received Calls and
Dialed Calls, scroll to the folder and press OKà YES. To delete call
history in all folders, select Delete All and press OKà YES.
§ Call Time
This mobile phone records talk times of all phone calls, categorizing
into four records as follows.
- Last Call Time
- Total Sent
- Total Received
- Reset All Time
Page 30

30
§ Call Costs
- Key in PIN 2 code before modifying the following Call Costs
settings:
ú Last Call Cost
ú Total cost
ú Reset cost r
ú Price Per Unit
ú Price per Uint
§ SMS Counter
Key in PIN 2 code before modifying the SMS (Short Message
Service) costs settings.
§ GPRS Counter
T400 Manual
Key in PIN 2 code before modifying the GPRS costs settings.
n Settings (Menu 4)
§ Phone Setup
- Time and Date: Set up the local time and date.
ú Set Home City: To search for the desired city, key in the
first letter or scroll down and up.
Page 31

31
ú Set Time/Date: Key in time with the format <hh:mm>. Key
in date with the format <yyyy/mm/dd>
ú Set Format: To set time format, press to select 12 hour
am/pm or 24 hour format. Scroll to Date Format to select
desired format from different choices.
-Schedule Power On/Off
To set the phone to automatically power on/off in your
assigned time, press Phone Setupà Schedule Power on/offà
OK, and make the time and status settings.
- Language: English / Traditional Chinese
-Preferred Input Methods
ú To assign one Preferred Input Method while writing text,
T400 Manual
scroll down and up to select one input method from the
following options:
Multitap ABC
Multitap abc
Numeric
Smart ABC
Smart abc
-Display Characteristic
ú Wallpaper: To set wallpaper, press Idle Screenà Wallpaper
à System/Downloadà à OK. 10 default wallpapers to
be selected in System folder. You can also download
Page 32

T400 Manual
32
wallpaper in JPEG, GIF, BMP and PNG format.
ú Screen Saver: Screen Saver appears after the phone idling
for a moment. You can change the time waiting for screen
saver or switch it off. You can choose a screen saver by
pressing Idle Screenà Screen Saver à Selectà à OK.
ú Show Date/Time: If you want to see date and time in
standby mode, switch on the function.
ú Show Owner No.: If you want to see owner number in
standby mode, switch on the function.
- Greeting Text: You can write a note that is shown briefly when
the phone is switched on.
- Speed Dial:
ú To switch on the speed dial function, select Phone Setupà
Speed DialàEnable Speed Dial, press ON or Off.
ú To assign a number key to a phone number, select Phone
Setup à Speed Dialà Set NumberàOK. Then select a
number from 2 to 9, pressing Enter, and select a name to
correspond to the number.
- Auto update of date and time
Press ON or Off to activate or inactivate this function.
§ Call Setup
- Caller ID: You can send or hide the phone number as you
Page 33

T400 Manual
33
make a phone call, or following the setup of ISP (Information
Service Provider).
- Call Waiting: If this function is activated, you can answer
another phone call while talking on the mobile phone. To make
sure whether this function is activated, press Query Status and
read the popup.
- Call Divert: This function enables you to divert incoming calls.
You can divert incoming calls under following conditions:
ú Divert All Voice Calls
ú Divert If Unreachable
ú Divert If No answer
ú Divert If Busy
ú Cancel All Divert
- Call Barring: To activate this function, you need to acquire a
password from your ISP. You can bar all incoming or outgoing
calls, limit making international calls, and limit phone calls
when roaming.
- Line Switching: Press Change to switch to Line 1 or Line 2. To
acquire the second line, you need to apply for it from your ISP.
You can receive phone calls from both lines, but only one line
is used to dial phone calls.
- Call Time Reminder: Set an alert to remind you of the call time
as you talk on the phone.
Page 34

34
ú Single: Set time of reminder up to 3,000 seconds. Alert
once.
ú Periodic: Set time of reminder from 30-60 seconds to alert
repeatedly.
- Call Time Display: Press On/Off to select if the call time is
displayed once you finish a phone call.
- Auto Redial: If the function is activated, this phone will redial
the phone number that is not connected to recipient’s mobile
phone.
- Closed User Group: You can use this function to screen calls
made from a certain group. Ask your ISP for details.
§ Network Setup
T400 Manual
- Network Selection Mode: You can choose network service
manually or automatically. When roaming, a list of available
networks will be shown in manual mode.
- Pref. Network: Select desired network service.
- Band Selection: Select E-GSM 900, DCS 1800 band Dual
band, or PCS 1900. Tip: Be sure to activate PCS 1900
selection while using or roaming your device in network
1900MHz area, such as North America.
-GPRS Connection: If GPRS is selected as the data bearer, the
Page 35

35
indicator is shown on the top left of the display. You can
choose to connect GPRS Always or When Needed.
§ Security Setup
- SIM Lock: If you activate PIN Lock, passwords are required as
the mobile phone is switched on. To activate this PIN lock,
contact your ISP for a set of default password before setting
your own password.
- Phone Lock: If you activate Phone Lock, passwords are
required as the mobile phone is switched on. To activate this
Phone lock, key in default password “1122” before setting your
own password.
- Auto Kepady Lock: This function is to avoid pressing keypad
unintentionally. You can set the phone to automatically lock the
T400 Manual
keypad if the phone is not used for a certain length of time
To lock the keypad in standby mode, press and
- Fixed Dial: You can restrict your outgoing calls to selected
phone numbers, if allowed by your SIM card. You are required
to key in PIN 2 code before editing this function. PIN 2 code is
offer by your ISP.
- Barred Dial: With this network service you can restrict the
calls that are made and received with your phone. You are
required to key in PIN 2 code before editing this function. PIN
Page 36

36
2 code is offer by your ISP.
- Change Passwords: Modify PIN, PIN 2 and Phone Lock code.
Key in old passwords prior to any change.
§ Restore Factory Settings
Enter passwords to restore the phone to original factory settings.
n Multimedia (Menu 5)
§ Camera
To take pictures, press the shutter key on the left side of the
mobile. After taking a picture, select Save to save the picture or
Clear to delete it. The Mirror beside the Camera could help you
adjust the position while taking a self-portrait.
Select Option in preview mode, you can access the following
T400 Manual
functions:
- To ImageViewer (Menu à Multimedia à ImageViewer)
Select Option to edit photos as follows:
ú View
ú Forward
ú Rename
ú Delete
ú Delete All Files
ú Sort
ú Storage
- Camera Setting
ú White Balance
Page 37

37
To adjust white balance, select light sources as follows:
Auto
Daylight
Tungsten
Fluorescent
Cloud
Incandescence
ú LED Highlight
You can select on/off the function of LED Highlight.
ú Shutter Sound
You can activate, deactivate or choose the shutter sound:
Sound 1
Sound 2
Sound 3
Off
ú EV (Exposure Value)
You can define the exposure effects for taking pictures,the
exposure value is from -4~+4.
ú Night Mode
You can select on/off the function of Night Mode
T400 Manual
ú Banding
Please adjust the refreshing rate according to your lighting
system, or you may see ripples on the screen. For example,
the refreshing rate of fluorescent light is 50Hz in China,
60Hz in Taiwan。
- Image Setting
You can define the size and quality of pictures. Higher quality
of pictures takes more space of memory.
ú Image Size
128X160 (in this size, you can set up your picture as
wallpaper or idle screen directly)
160X120
320X240
Page 38

38
640X480
1280X1024
ú Image Quality
Normal
High
Fine
Low
-Effect Setting
Set one of the 3 Custom FXs or select Normal, Grayscale,
Sepia, Sepia Green, Sepia Blue, Color invert, Gray Invert,
Blackboard, Whiteboard, Copper Carving, Blue Carving,
Embossment, Contrast, Jean, Sketch, Oil.
- Cont Shot
You can have up to 4 consecutive shots.
ú Off
ú 1 Shot
ú 3 Shot
ú 5 Shot
- Delay Timer
This function is defined to add some seconds before the shutter
activated to take pictures.
ú Off
ú 5 sec
ú 10 sec
ú 15 sec
- Storage
T400 Manual
Select the memory space for saving pictures.
ú Phone
ú Memory Card
- Restore Default
Restore all of the settings back to the status while you purchase
this mobile phone.
Page 39

39
§ Image Viewer
View all of the saved photos here. Select Option to edit photos as
follows:
- View
- Forward
- Rename
- Delete
- Delete All Files
- Sort
- Storage
§ Video Recorder
- When the camera turns on, press to start recording
- Press the key to pause or resume recording
- Press the key to stop recording. The file will be
automatically saved.
Select Option in preview mode, you can access the following
T400 Manual
functions:
- To Player (Menu à Multimedia à Video Player)
Select Option to edit photos as follows:
ú View
ú Forward
ú Rename
ú Delete
ú Delete All Files
ú Sort
ú Storage
- CamCoder Setting
ú White Balance
Page 40

40
To adjust white balance, select light sources as follows:
Auto
Daylight
Tungsten
Fluorescent
Cloud
Incandescence
ú EV (Exposure Value)
You can define the exposure effects for taking pictures,the
exposure value is from -4~+4.
ú Night Mode
You can select on/off the function of Night Mode
ú Banding
Please adjust the refreshing rate according to your lighting
system, or you may see ripples on the screen. For example,
the refreshing rate of fluorescent light is 50Hz in China,
60Hz in Taiwan。
- Vedio Setting
You can define the size and quality of pictures. Higher quality
of video takes more space of memory.
ú Video Quality
Normal
High
Fine
Low
ú File Size Limit
No Limit
200K
50K
25K
ú Record Time Limit
No Limit
60 sec
T400 Manual
Page 41

41
30sec
15sec
ú Record Audio: on/off
ú Encode Format
MPEG4
H.263
-Effect Setting
Set one of the 3 Custom FXs or select Normal, Grayscale,
Sepia, Sepia Green, Sepia Blue, Color invert, Gray Invert,
Blackboard, Whiteboard, Copper Carving, Blue Carving,
Embossment, Contrast, Jean, Sketch, Oil.
- Storage
Select the memory space for saving pictures.
ú Phone
ú Memory Card
- Restore Default
Restore all of the settings back to the status while you purchase
this mobile phone.
T400 Manual
§ Video Player
- When you access this menu, the still images of the videos you
recorded display.
- To play back a video:
1. Press the up and down key to scroll to the Video you
want to view.
2. Press the or OK to use the following options:
Play, Forward, Rename, Delete, Delete all Files, Sort,
Page 42

42
Storage
§ Audio Player
- Make sure you have saved .mp3 format songs to the mobile
phone before using Audio Player.
To download *.mp3 songs from a computer, link mini USB
data cable from the computer to the mobile phone. When the
connection is detected, an additional drive appears on the PC
screen. Use the phone as a USB pen drive. Copy *.mp3 songs
from file folder to the phone memory.
Another way to input *.mp3 songs in the phone is the
TransFlash memory card. The socket next to the SIM card
socket supports TransFlash memory card. Users can save
*.mp3 files in the card.
- Scroll to Audio Player and press OK. You can see the skin of
T400 Manual
music player.
- Press List and scroll to the title of the song you desire play.
Press Option and Play.
- On the skin of music player, select play/stop/pause/next
song/previous song using the 5-way key.
4 = play ; = pause
< = stop 7/8= previous song / next song
§ Sound Recorder
- Scroll to Sound Recorder and press OK.
Page 43

43
- Press Option and select (2)Setting. You can choose the desired
memory and file format.
Use left and right key to choose storing files in phone or
TransFlash card memory. Press OK.
Use left and right key to select audio file format from *.amr and
*.wav. WAV format is less compressed but the quality is closer
to the original. Press OK and you can see the available time for
sound recording in the chosen format.
- Press Option and select (1)Record to start sound recording.
Press Pause to suspend recording, Cont to resume. As pressing
Stop, you are required to insert a file name to save the sound
clip. After typing the file name, press Option to save the file or
select a desired input method.
§ Melody Composer
T400 Manual
To open a new melody file, select Fun & Game àMelody Composer
àOKàAddàOK. You can see a blank music score.
- Key in the notes. For example, press for note f.
- shortens or lengthens (+) the note. makes the
note sharp or flat (not available for notes e and b). Press Clear
to delete a note or rest to the left.
- Press up key of to set the octave or effects of vibration
and light. Press down key of to lower the octave or
cancel the effects of vibration and light.
- When the tone is complete, press Options and select Play, Save
Page 44

T400 Manual
44
(to add the tone to ProfileàGeneralàCustomizeàTone
Setup), Play Speed and Instrument.
n File Manager (Menu 6)
Under this menu, File Manager, you can see the partitions of memory.
Partition D is built in factory setting. If a Transflash card is inserted
into the socket, an additional partition will be created. The pie
chart shows the total storage space and free space. Press Option to
access following functions:
- Open : Open the partition and access all files and folders. Press
Option to open, create folder, rename, delete and sort the
folders and files.
- Create Folder: Create new folders and give it a new name.
Format: Press Formatà OK to format the desired partition.
- Be aware of this action: all of the files will disappear after
formatting the memory.
n Fun & Games (Menu 7)
§ Games
The phone offers 3 games: Puzzle, Panda, Frog. Press Game Help
for instructions.
§ Themes
To select a theme for the mobile phone, select Fun & Game
àThemesàOKàOptionàOK. 3 themes are available:
Page 45

45
- Blue
- Green
- Apricot
§ Game Setting
You can turn on or off the effects of sound and vibration in games.
n User Profiles (Menu 8)
This menu function enables users to select desired mode under
different circumstances. 5 profiles are available in this model of
mobile phone:
- General
- Meeting
- Outdoor
- Indoor
- Headset
T400 Manual
§ Changing the settings of a profile
1. Select the profile whose settings you want to change.
2. Select Customize.
3. Select one of the following settings and change it to your liking.
- Tone Setup: You can select the tone that rings when you
receive a call.
- Volume: You can select the volume level for the ringing tones
and keypad tones.
- Alert Type: You can select the way of showing incoming calls.
Page 46

46
For example, if you select Vibration Only, the phone vibrates
silently when you receive a call.
- Ring Type: You can select the phone rings once or repeatedly
as you receive a call; you can also select ascent to make the
volume increase gradually.
- Extra Tone: You can switch on/off the following alerts:
ú Warning
ú Error
ú Camp on
ú Connect
- Answer Mode: You can activate the function of answering
phone calls by pressing any key. Tip: In Headset profile, you
can set the waiting time before answering phone calls
automatically.
-LCD Backlight: Select the time of switching off the LCD
backlight when the phone is idling.
You can choose
ú 5 sec
ú 15 sec
ú 30 sec
ú 45 sec
T400 Manual
Page 47

T400 Manual
47
Organizer (Menu 9)
§ Calendar
To add a task, select Organizer and scroll to the date you want to
assign the task and press Optionà View Tasksà OKàAdd; then edit
the date, time, note and alarm. Press Done to save and exit.
§ To Do List
You can view all of the tasks. To edit a task, scroll to it and press
Option.
§ Alarm
To set an alarm, select OrganizeràAlarmàOkàEdit. You can set
the alarm to repeat at the same day every week.
§ World Clock
Press scroll left and right of to select the desired location and
the local time and date are displayed automatically.
Page 48

48
n Services (Menu 10)
For availability of and subscription to data services, contact your
network operator or service provider. The default setting of the
multimedia message service is generally on. The appearance of a
multimedia message may vary depending on the receiving device.
- Procedure of Making a GPRS Connection
GPRS (general packet radio service) is a network service that
allows mobile phones to send and receive data over an
IP-based network. GPRS is a data bearer that enables wireless
access to data networks, such as the mobile Internet.
- To use GPRS technology, you must first do the following:
ú Contact your service provider for availability and
subscription.
ú Save the GPRS settings for each of the applications used.
T400 Manual
- To define GPRS connection settings, select Menuà Settings
àNetwork SetupàOKàGPRS Connectionà When Needed
- Basic Steps for Web Access
1. Select Menu à Service
2. Select your service provider and press OK. Links appear on
the screen. Select Homepage.
3. To open another link, scroll to the link and select OK.
4. To disconnect from the browser service and to quit
browsing, keep pressing Back & Quit until returning to
Standby page.
Page 49

49
5. On top of the screen, the red letter disappears as the
GPRS connection disabled.
n Extra (Menu 11)
§ Calculator
- Press to to insert a digit. Press to insert a
decimal point.
- Use to select +, -, *, /. Press Clear to delete digits. Press
OK for the total.
§ Units Converter
- Weight: You can convert the weight unit of kilogram to pound
or vise versa.
- Length: You can convert the following length units:
Kilometer ßà Mile
T400 Manual
Meter ßà Yard
Meter ßà Foot
Centimeter ßà Inch
§ Currency Converter
Key in the current exchange rate and press OK. The first field shows
Local : Foreign exchange rate. You can use right and left key of
to change to Foreign : Local exchange rate. Key in the amount in the
Local field for the exchange value.
Page 50

50
§ Health
- BMI— You can calculate Body Mass Index by entering the
gender, height and Weight, then OK. The index between 18 to
23 is normal.
- Menstrual—Fill the Last Menses Date and Average Period and
press OK. In the calendar, you can read the dates of menses
period. Select a date and press OK to check the Pregnant
Probabilities (P.P).
n Shortcuts (Menu 12 )
- You can set up 10 shortcuts.
- To set a shortcut, select Shortcuts and scroll to the desired field.
Press Edit to select from a list of 38 functions.
T400 Manual
- In standby mode, press up key of to access shortcuts.
 Loading...