

Page 1
Digital Video Recorder
Quick Start Guide
UD.6L0202B1705A02
Page 2

Quick Start Guide of Digital Video Recorder
1
TABLE OF CONTENTS
DVR Pre-Installation ............................................................................................................................... 4
DVR Installation .............................................................................................................................................. 4
Hard Disk Installation ..................................................................................................................................... 4
Front Panels ...................................................................................................................................................... 7
Rear Panels ..................................................................................................................................................... 12
Wiring of Alarm Input ........................................................................................................................... 13
Wiring of Alarm Output ........................................................................................................................ 14
Alarm Connection .................................................................................................................................... 14
RS-485 and Controller Connection .......................................................................................................... 14
Termination Switch Operation ................................................................................................................. 15
Specifications .................................................................................................................................................. 17
Table 1 Specification for TVI-D1xxx ....................................................................................................... 17
Table 2 Specification for TVI-D2xxx ....................................................................................................... 18
Table 3 Specification for TVI-D14xx ....................................................................................................... 19
Table 4 Specification for TVI-D24xx ....................................................................................................... 21
HDD Storage Calculation Chart ................................................................................................................... 22
Accessing by Web Browser ............................................................................................................................ 23
Logging In ................................................................................................................................................ 23
Live View ................................................................................................................................................. 23
Recording ................................................................................................................................................. 24
Playback ................................................................................................................................................... 25
Log 26
Menu Operation ............................................................................................................................................. 27
Menu Structure ......................................................................................................................................... 27
Startup and Shutdown .............................................................................................................................. 27
Live View ................................................................................................................................................. 28
Adding IP Cameras .................................................................................................................................. 28
Record ...................................................................................................................................................... 30
Instant Recording ............................................................................................................................. 30
All-day Recording ............................................................................................................................ 30
Playback ................................................................................................................................................... 31
Backup ..................................................................................................................................................... 32
VCA Alarm .............................................................................................................................................. 33
Access by Cloud P2P ............................................................................................................................... 34
Page 3
Quick Start Guide of Digital Video Recorder
2
Regulatory information
FCC information
FCC compliance: This equipment has been tested and found to comply with the limits for a digital device, pursuant
to part 15 of the FCC Rules. These limits are designed to provide reasonable protection against harmful
interference when the equipment is operated in a commercial environment. This equipment generates, uses, and
can radiate radio frequency energy and, if not installed and used in accordance with the instruction manual, may
cause harmful interference to radio communications. Operation of this equipment in a residential area is likely to
cause harmful interference in which case the user will be required to correct the interference at his own expense.
FCC conditions
This device complies with part 15 of the FCC Rules. Operation is subject to the following two conditions:
1. This device may not cause harmful interference.
2. This device must accept any interference received, including interference that may cause undesired operation.
EU Conformity Statement
This product and - if applicable - the supplied accessories too are marked with "CE" and comply therefore with the
applicable harmonized European standards listed under the Low Voltage Directive 2006/95/EC, the EMC
Directive 2004/108/EC, the RoHS Directive 2011/65/EU.
2012/19/EU (WEEE directive): Products marked with this symbol cannot be disposed of as unsorted municipal
waste in the European Union. For proper recycling, return this product to your local supplier upon the purchase of
equivalent new equipment, or dispose of it at designated collection points. For more information see:
www.recyclethis.info.
2006/66/EC (battery directive): This product contains a battery that cannot be disposed of as unsorted municipal
waste in the European Union. See the product documentation for specific battery information. The battery is
marked with this symbol, which may include lettering to indicate cadmium (Cd), lead (Pb), or mercury (Hg). For
proper recycling, return the battery to your supplier or to a designated collection point. For more information see:
www.recyclethis.info.
Page 4

Quick Start Guide of Digital Video Recorder
3
Trademarks and Registered Trademarks
Windows and Windows mark are trademarks or registered trademarks of Microsoft Corporation in the United
States and/or other countries.
HDMI, HDMI mark and High-Definition Multimedia Interface are trademarks or registered trademarks of
HDMI Licensing LLC.
The products contained in this manual are authorized by HDMI Licensing LLC with the use right of the HDMI
technology.
VGA is the trademark of IBM.
UPnPTM is a certification mark of the UPnPTM Implementers Corporation.
Other names of companies and product contained in this manual may be trademarks or registered trademarks
of their respective owners.
Page 5
Quick Start Guide of Digital Video Recorder
4
Thank you for purchasing our product. If there is any question or request, please do not hesitate to contact dealer.
This manual is applicable to the models listed in the following table.
Series
Model
Type
TVI-D1xxx
TVI-D1104
TVI-D1108
TVI-D1216
Network DVR
TVI-D2xxx
TVI-D2104
TVI-D2208
Network DVR
TVI-D14xx
TVI-D1404
TVI-D1408
TVI-D1416
Network DVR
TVI-D24xx
TVI-D2404
TVI-D2408
TVI-D2416
Network DVR
DVR Pre-Installation
The HD-TVI series DVR is highly advanced surveillance equipment that should be installed carefully. Please take
into consideration the following precautionary steps before installation of the DVR.
1. Keep all liquids away from the DVR.
2. Install the DVR in a well-ventilated and dust-free area.
3. Ensure environmental conditions meet factory specifications.
4. Install a manufacturer recommended HDD.
DVR Installation
During the installation of the DVR:
1. Use brackets for rack mounting.
2. Ensure there is ample room for audio and video cables.
3. When installing cables, ensure that the bend radius of the cables are no less than five times than its diameter.
4. Connect both the alarm and RS-485 cable.
5. Allow at least 2cm (≈0.75-inch) of space between racks mounted devices.
6. Ensure the DVR is grounded.
7. Environmental temperature should be within the range of -10 ºC ~ 55 ºC , 14ºF ~ 131ºF.
8. Environmental humidity should be within the range of 10% ~ 90%.
Hard Disk Installation
Before you start:
Before installing a hard disk drive (HDD), please make sure the power is disconnected from the DVR. A factory
recommended HDD should be used for this installation.
Up to 8 SATA hard disks can be installed on your DVR.
Tools Required: Screwdriver.
As the installation steps of HDD are similar among different models, here we take the steps of the TVI-D1xxx
and TVI-D24xx as the examples.
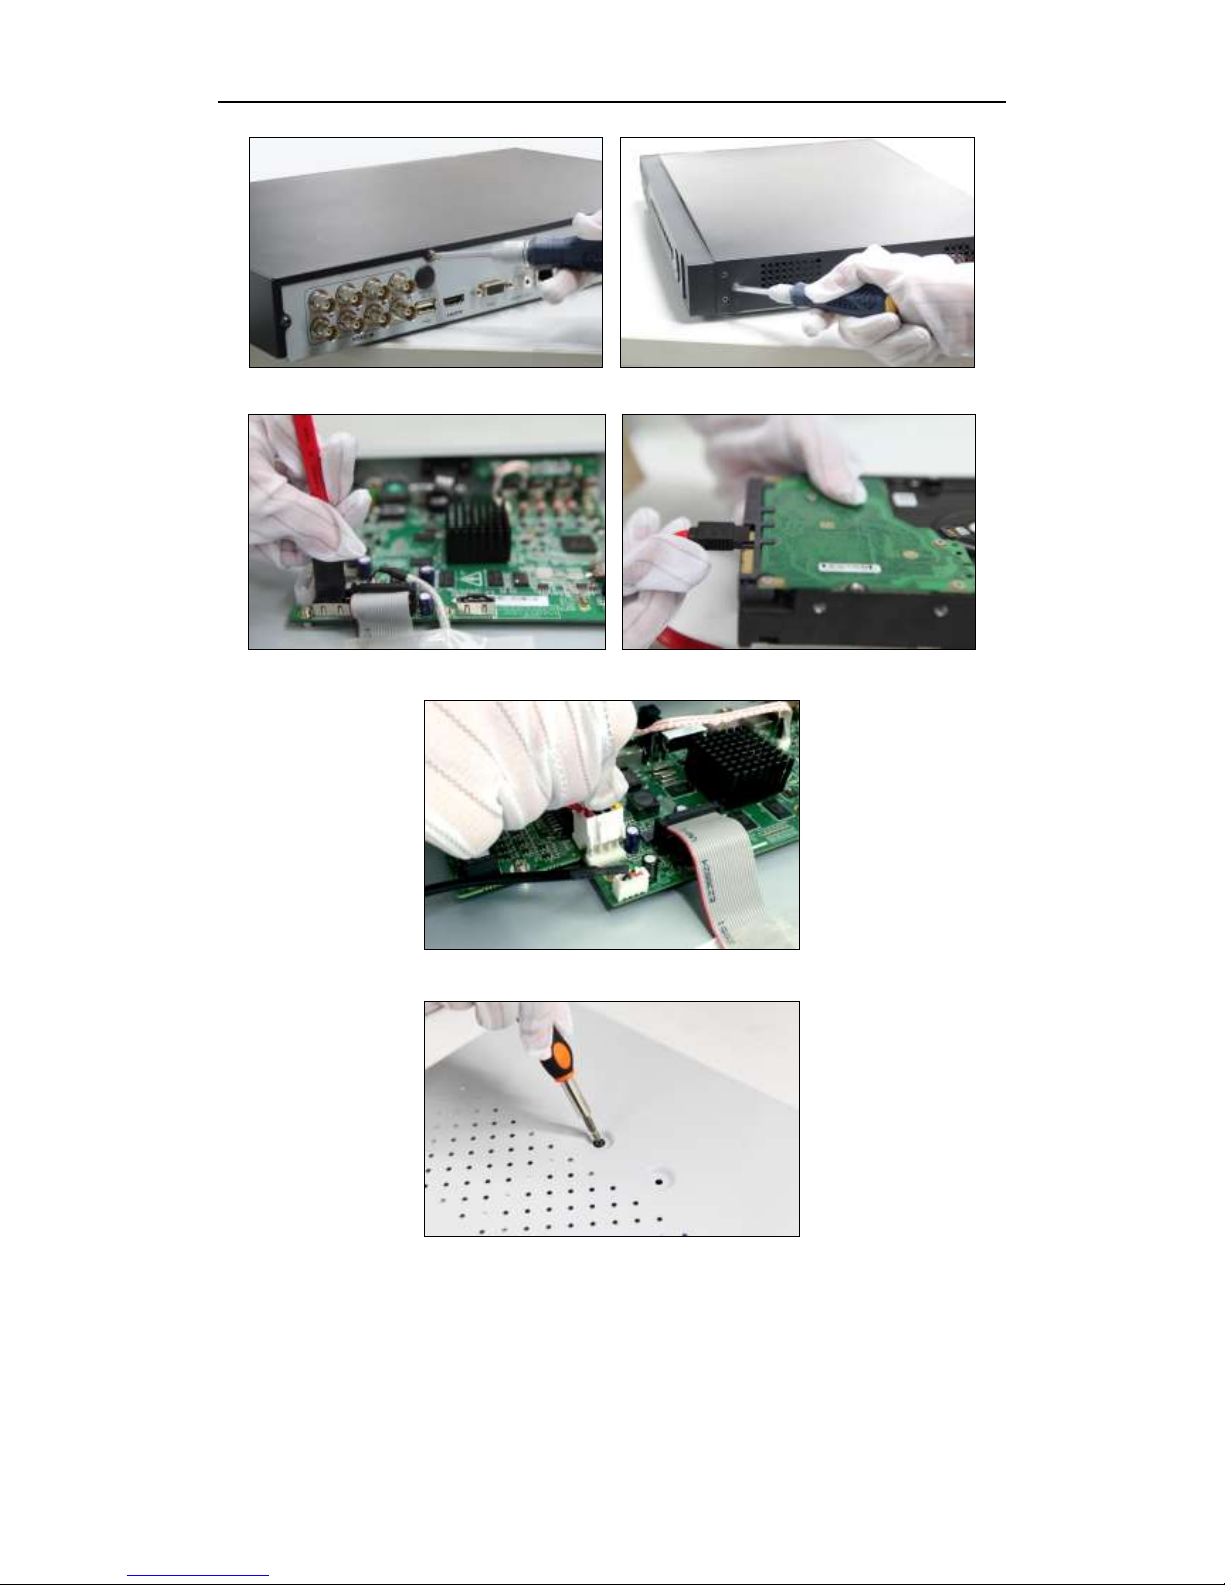
HDD Installation (A)
Steps:
1. Remove the cover from the DVR by unfastening the screws on the back and side.
Page 6
Quick Start Guide of Digital Video Recorder
5
2. Connect one end of the data cable to the motherboard of DVR and the other end to the HDD.
3. Connect the power cable to the HDD.
4. Place the HDD on the bottom of the device and then fasten the screws on the bottom to fix the HDD.
5. Re-install the cover of the DVR and fasten screws.
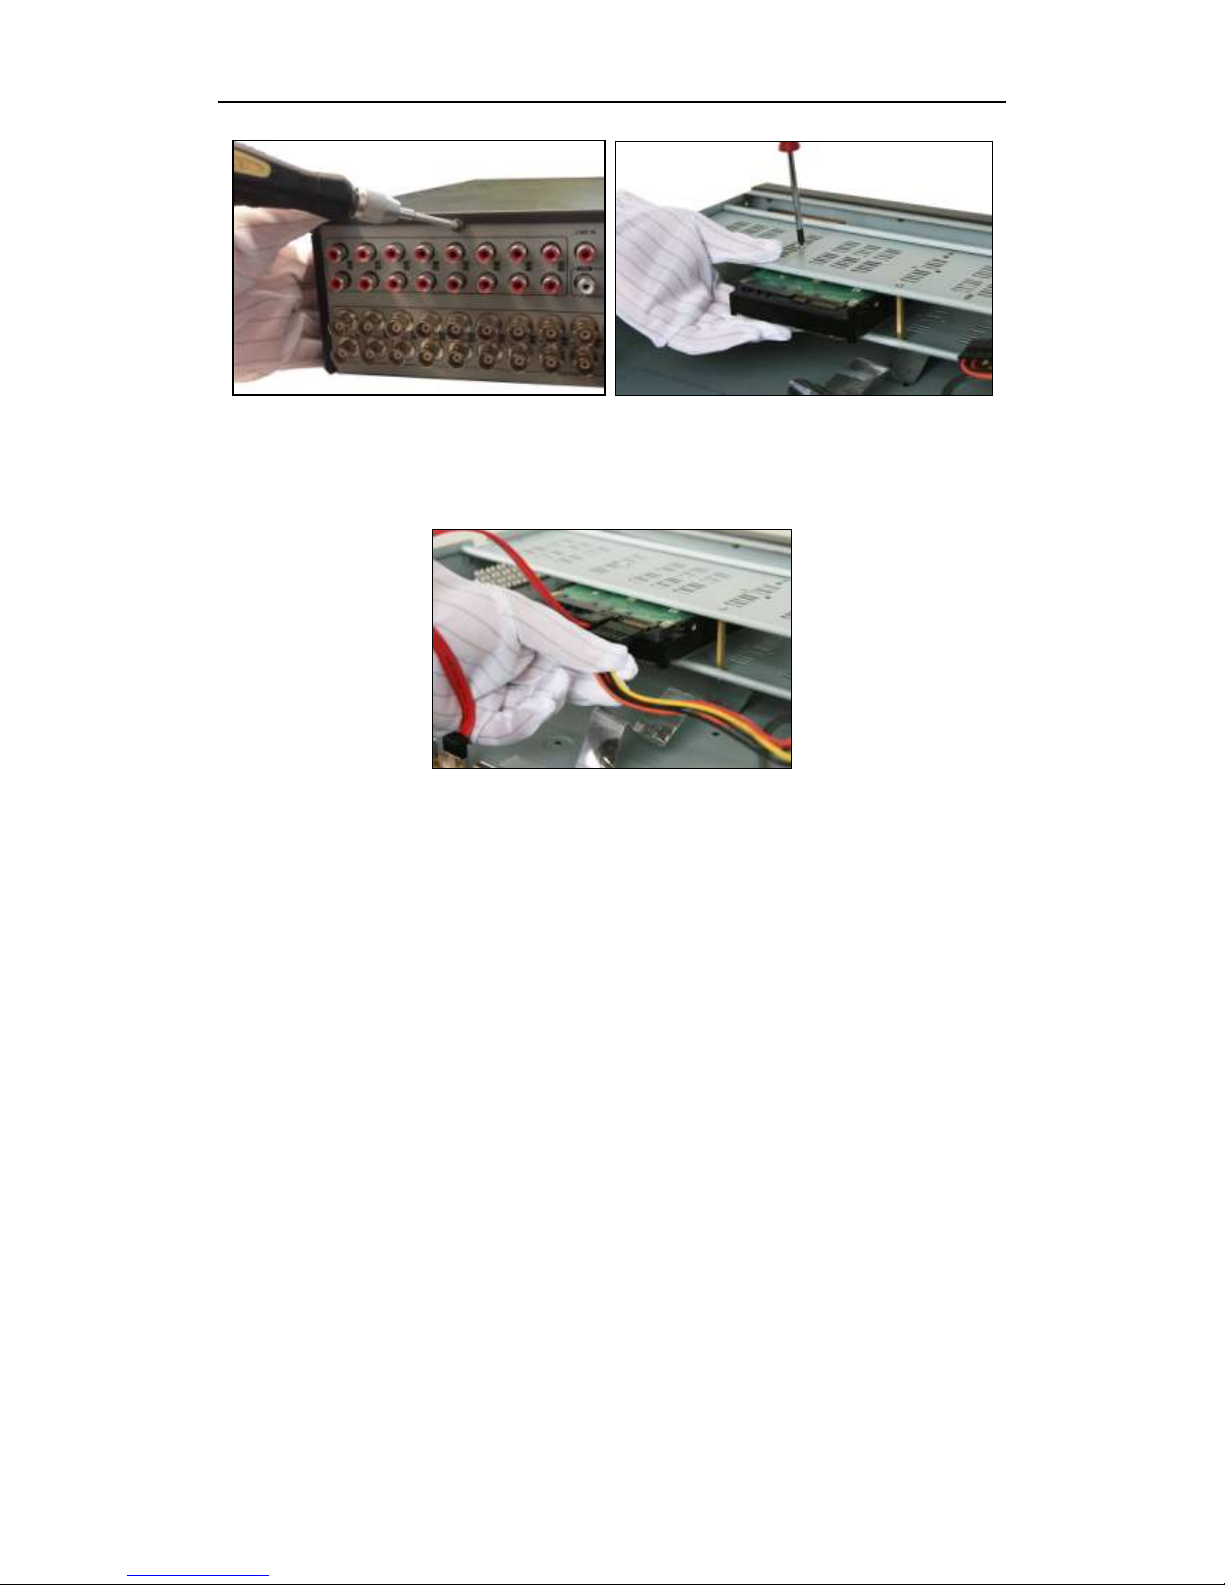
HDD Installation (B)
Steps:
1. Remove the cover from the DVR by unfastening the screws on the back and side.
2. Install the HDD to the HDD rack using the provided screws, and then fasten the
screws to fix the HDD.
Page 7
Quick Start Guide of Digital Video Recorder
6
3. Connect one end of the data cable to the motherboard of DVR and the other end to the
HDD.
4. Connect the power cable to the HDD.
5. Re-install the cover of the DVR and fasten screws.
Page 8
Quick Start Guide of Digital Video Recorder
7
Front Panels
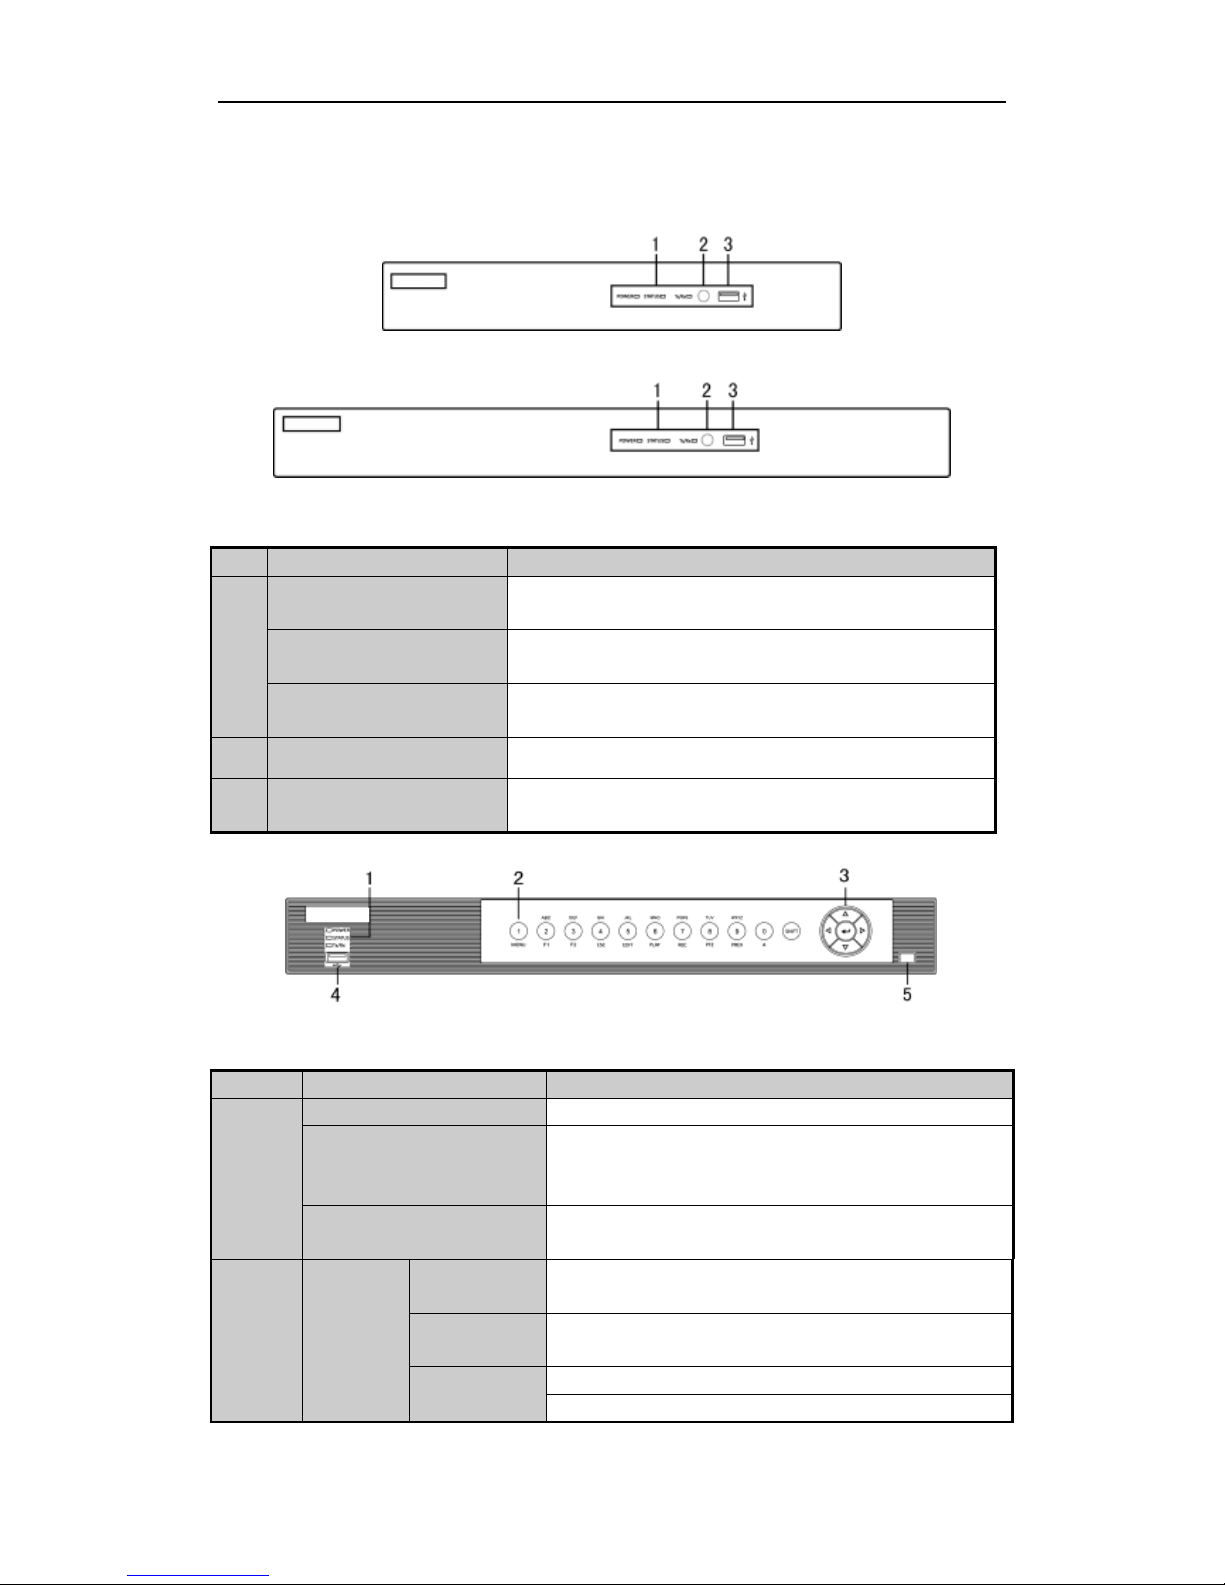
Front Panel of TVI-D1104&TVI-D1108
Front Panel of TVI-D1216
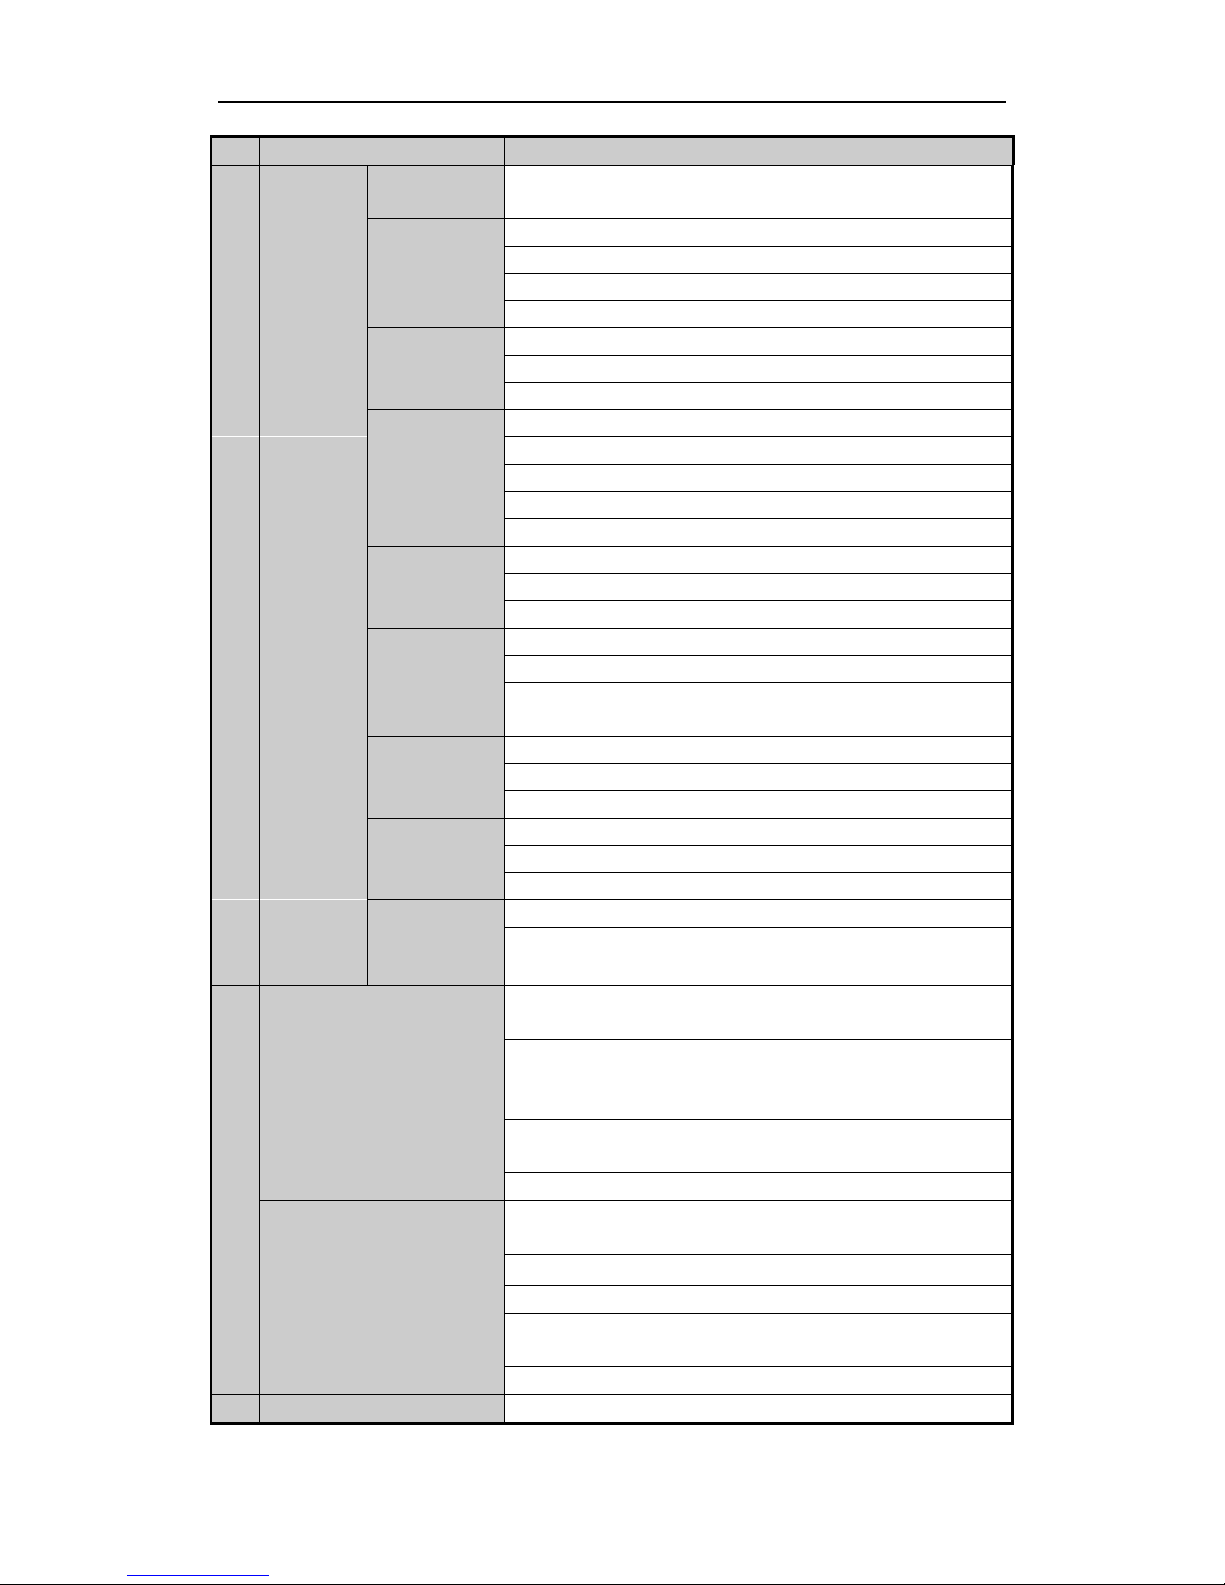
Description of Front Panel
No.
Name
Function Description
1
POWER
Power indicator turns yellow when the power switch on the real
panel is turned on.
STATUS
Status indicator blinks red when data is being read from or written to
HDD.
Tx/Rx
Tx/Rx indictor blinks yellow when network connection is
functioning properly.
2
IR Receiver
Receiver for IR remote controller.
3
USB Interfaces
Universal Serial Bus (USB) ports for additional devices such as
USB mouse and USB Hard Disk Drive (HDD).
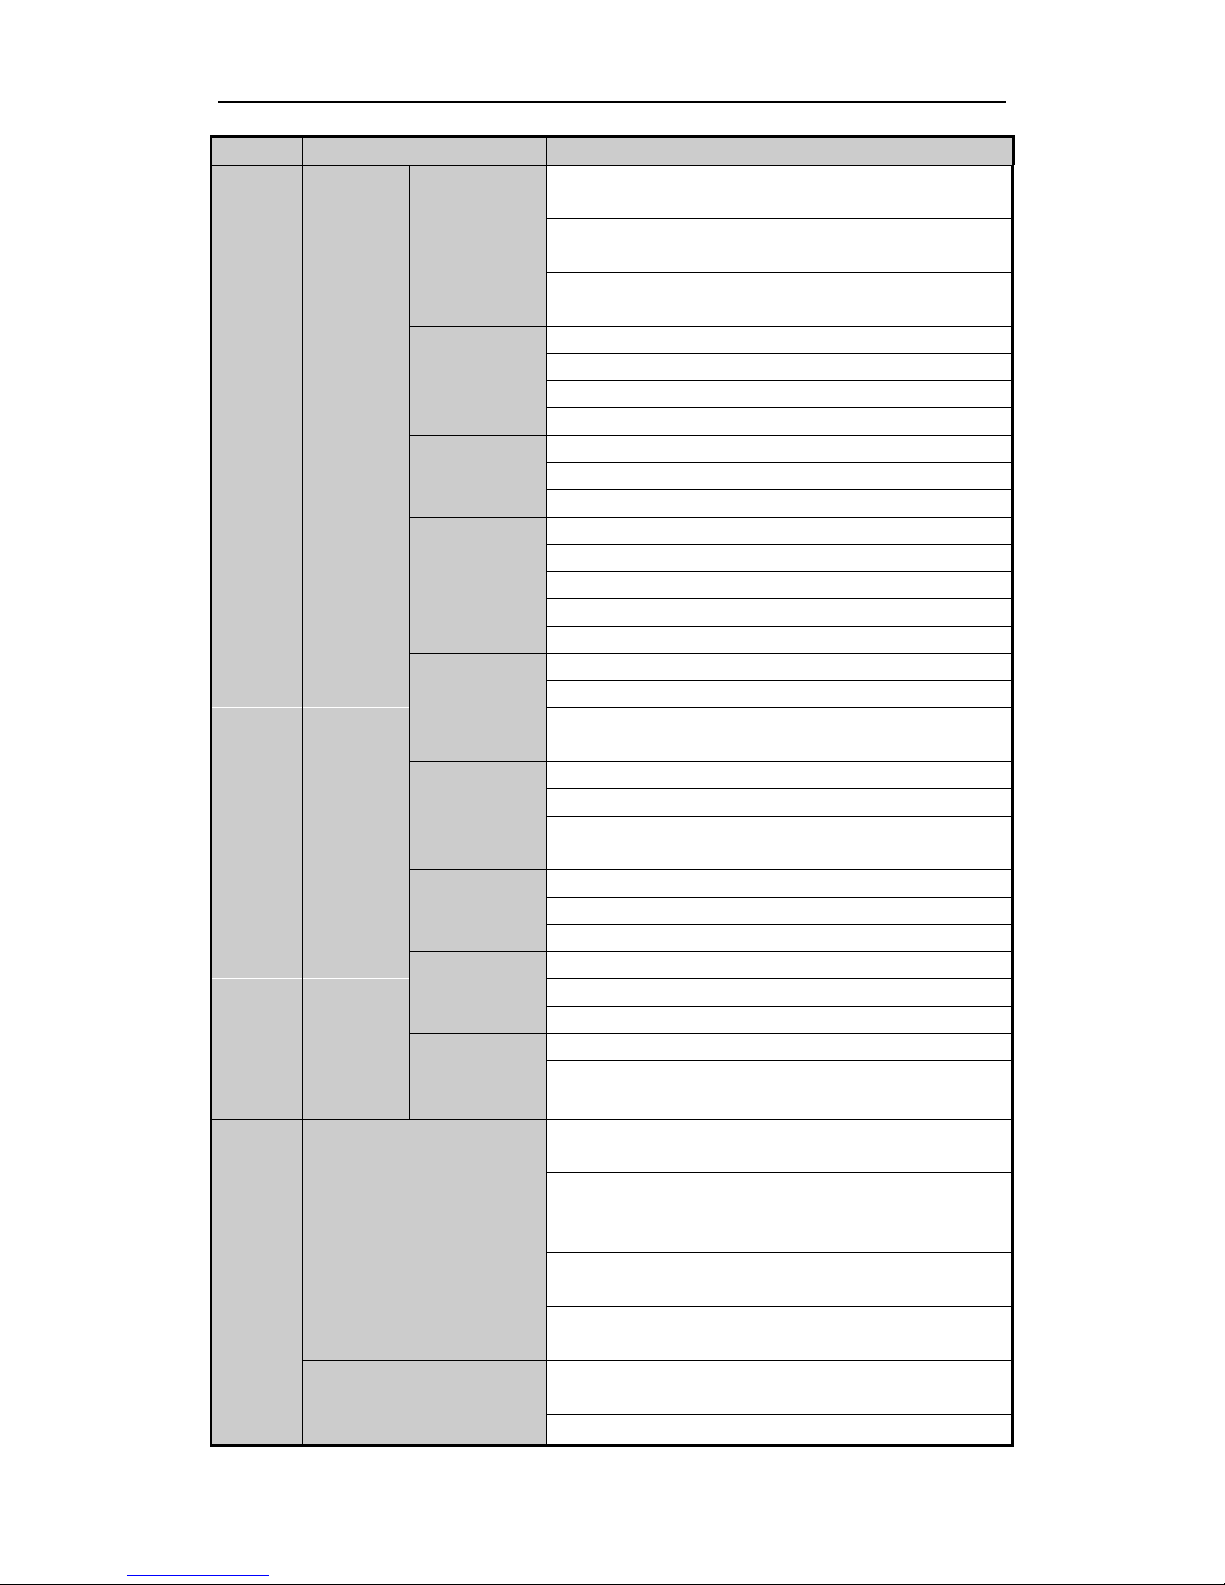
Front Panel of TVI-D2104&TVI-D2208
Description of Front Panel
No.
Name
Function Description
1
POWER
Power indicator turns yellow when the device s running.
STATUS
Status indicator blinks red when data is being read from or
written to HDD, and turns yellow when the SHIFT function is
realized.
Tx/Rx
Tx/Rx indictor blinks yellow when network connection is
functioning properly.
2
Composite
Keys
SHIFT
Switch between the numeric or letter input and functions of the
composite keys.
1/MENU
Enter numeral “1”;
Access the main menu interface.
2/ABC/F1
Enter numeral “2”;
Enter letters “ABC”;
Page 9
Quick Start Guide of Digital Video Recorder
8
No.
Name
Function Description
The F1 button when used in a list field will select all items in the
list.
In PTZ Control mode, it will turn on/off PTZ light and when the
image is zoomed in, the key is used to zoom out.
In live view or playback mode, the F1 button can be used to
switch between main and spot video output.
3/DEF/F2
Enter numeral “3”;
Enter letters “DEF”;
The F2 button is used to change the tab pages.
In PTZ control mode, it zooms in the image.
4/GHI/ESC
Enter numeral “4”;
Enter letters “GHI”;
Exit and back to the previous menu.
5/JKL/EDIT
Enter numeral “5”;
Enter letters “JKL”;
Delete characters before cursor;
Check the checkbox and select the ON/OFF switch;
Start/stop record clipping in playback.
6/MNO/PLAY
Enter numeral “6”;
Enter letters “MNO”;
In Playback mode, it is used for direct access to playback
interface.
7/PQRS/REC
Enter numeral “7”;
Enter letters “PQRS”;
Manual record, for direct access to manual record interface;
manually enable/disable record.
8/TUV/PTZ
Enter numeral “8”;
Enter letters “TUV”;
Access PTZ control interface.
9/WXYZ/PREV
Enter numeral “9”;
Enter letters “WXYZ”;
Multi-channel display in live view.
0/A
Enter numeral “0”;
Shift the input methods in the editing text field. (Upper and
lowercase, alphabet, symbols or numeric input).
3
DIRECTION
The DIRECTION buttons are used to navigate between different
fields and items in menus.
In the Playback mode, the Up and Down button is used to speed
up and slow down recorded video. The Left and Right button will
select the next and previous record files.
In Live View mode, these buttons can be used to cycle through
channels.
In PTZ control mode, it can control the movement of the PTZ
camera.
ENTER
The ENTER button is used to confirm selection in any of the
menu modes.
It can also be used to tick checkbox fields.
Page 10
Quick Start Guide of Digital Video Recorder
9
No.
Name
Function Description
In Playback mode, it can be used to play or pause the video.
In single-frame Playback mode, pressing the button will advance
the video by a single frame.
In Auto-switch mode, it can be used to stop /start auto switch.
4
USB Interface
Universal Serial Bus (USB) ports for additional devices such as
USB mouse and USB Hard Disk Drive (HDD).
5
IR Receiver
Receiver for IR remote control.
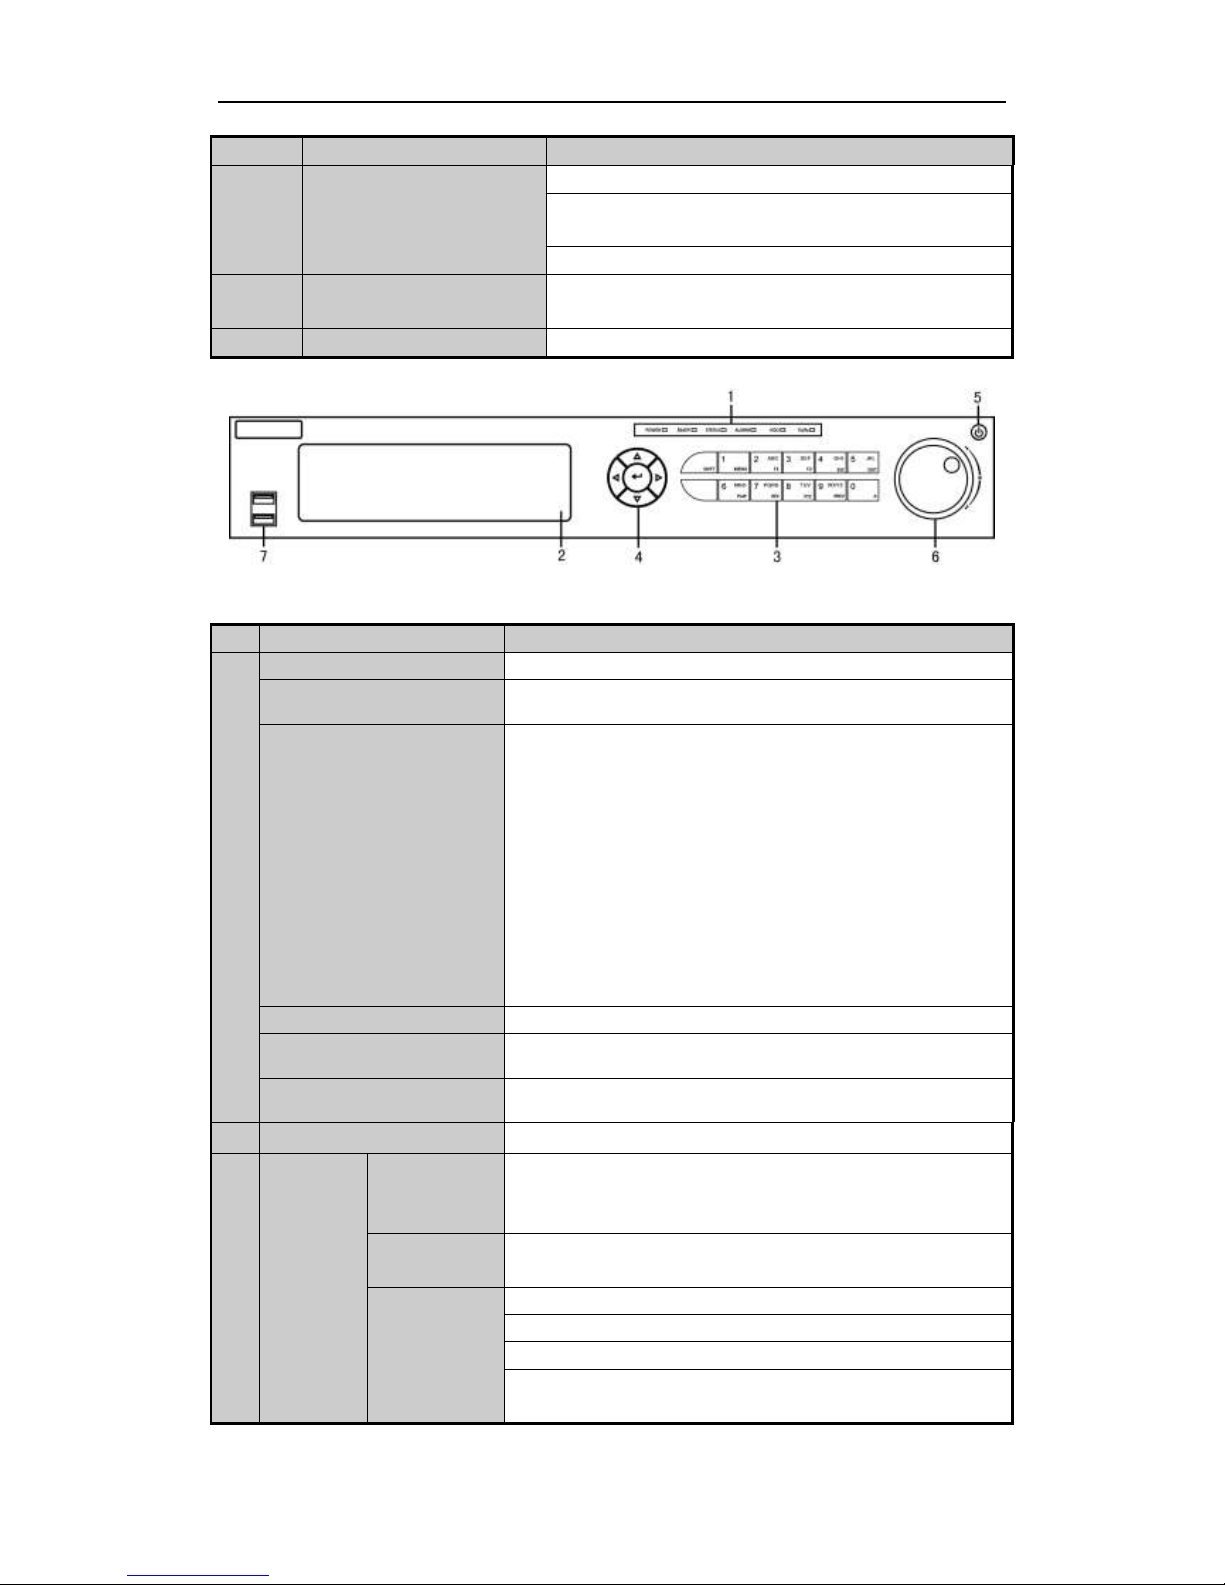
Front Panel of TVI-D14xx and TVI-D24xx
Description of Front Panel
No.
Name
Function Description
1
POWER
Power indicator lights in green when DVR is powered up.
READY
Ready indicator is normally green, indicating that the DVR is
functioning properly.
STATUS
Indicator turns green when DVR is controlled by an IR remote control
with the address from 1~254;
Indicator turns red when the SHIFT button is used;
Indicator does not light when the DVR is controlled by a keyboard or
by the IR remote control with the address of 255;
Indicator turns green when the DVR is controlled by IR remote control
(with the address from 1~254) and keyboard at the same time , and the
SHIFT button is not used;
Indicator turns orange : (a) when the DVR is controlled by IR remote
control (with the address from 1~254) and keyboard at the same time
and the SHIFT button is used as well; (b) when the DVR is controlled
by IR remote control (with the address from 1~254) and the SHIFT
button is used.
ALARM
Alarm indicator turns red when a sensor alarm is detected.
HDD
HDD indicator blinks in red when data is being read from or written to
HDD.
Tx/Rx
Tx/Rx indictor blinks in green when network connection is functioning
properly.
2
DVD-R/W
Slot for DVD-R/W.
3
Composite
Keys
SHIFT
Switch between the numeric or letter input and functions of the
composite keys. (Input letter or numbers when the light is out; Realize
functions when the light is red.)
1/MENU
Enter numeral “1”;
Access the main menu interface.
2/ABC/F1
Enter numeral “2”;
Enter letters “ABC”;
The F1 button when used in a list field will select all items in the list.
In PTZ Control mode, it will turn on/off PTZ light and when the image
is zoomed in, the key is used to zoom out.
Page 11
Quick Start Guide of Digital Video Recorder
10
No.
Name
Function Description
In live view or playback mode, the F1 button can be used to switch
between main and spot video output.
3/DEF/F2
Enter numeral “3”;
Enter letters “DEF”;
The F2 button is used to change the tab pages.
In PTZ control mode, it zooms in the image.
4/GHI/ESC
Enter numeral “4”;
Enter letters “GHI”;
Exit and back to the previous menu.
5/JKL/EDIT
Enter numeral “5”;
Enter letters “JKL”;
Delete characters before cursor;
Check the checkbox and select the ON/OFF switch;
Start/stop record clipping in playback.
6/MNO/PLAY
Enter numeral “6”;
Enter letters “MNO”;
In Playback mode, it is used for direct access to playback interface.
7/PQRS/REC
Enter numeral “7”;
Enter letters “PQRS”;
Manual record, for direct access to manual record interface; manually
enable/disable record.
8/TUV/PTZ
Enter numeral “8”;
Enter letters “TUV”;
Access PTZ control interface.
9/WXYZ/PREV
Enter numeral “9”;
Enter letters “WXYZ”;
Multi-channel display in live view.
0/A
Enter numeral “0”;
Shift the input methods in the editing text field. (Upper and lowercase,
alphabet, symbols or numeric input).
4
DIRECTION
The DIRECTION buttons are used to navigate between different fields
and items in menus.
In the Playback mode, the Up and Down button is used to speed up and
slow down recorded video. The Left and Right button will select the
next and previous record files.
In Live View mode, these buttons can be used to cycle through
channels.
In PTZ control mode, it can control the movement of the PTZ camera.
ENTER
The ENTER button is used to confirm selection in any of the menu
modes.
It can also be used to tick checkbox fields.
In Playback mode, it can be used to play or pause the video.
In single-frame Playback mode, pressing the button will advance the
video by a single frame.
In Auto-switch mode, it can be used to stop /start auto switch.
5
POWER
Power on/off switch.
Page 12
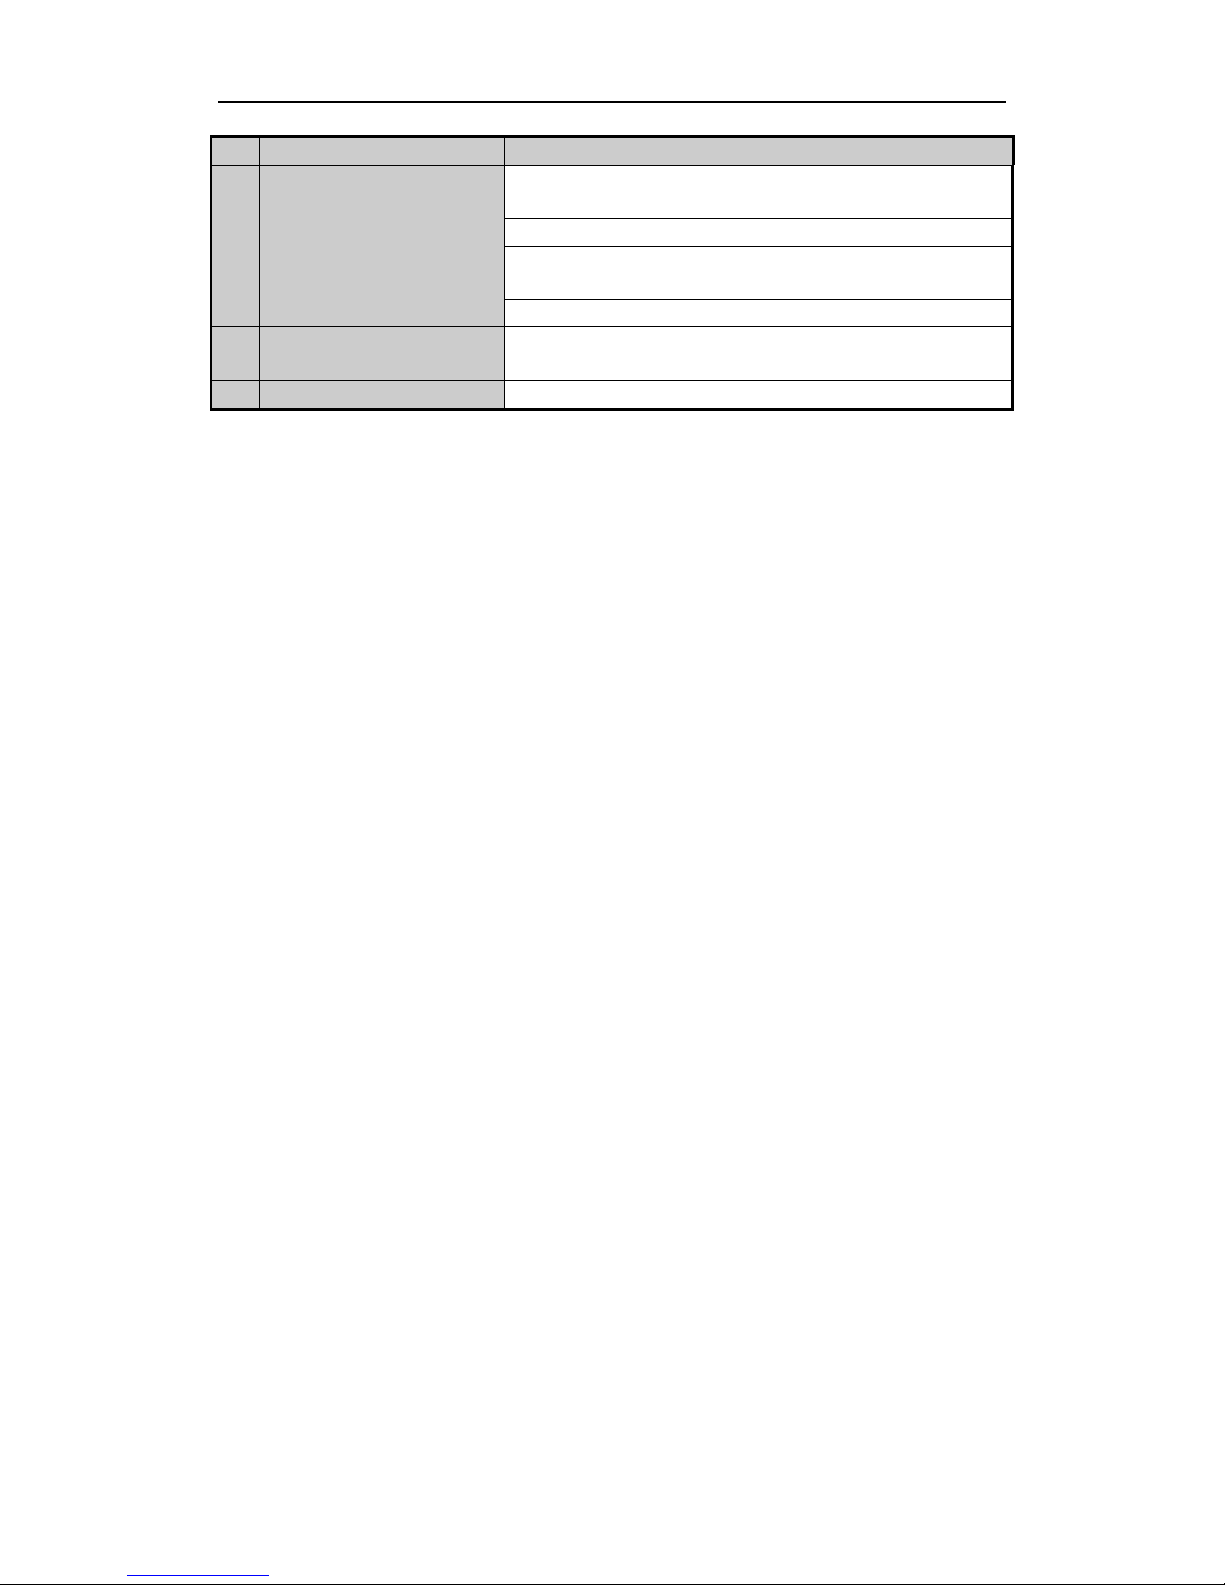
Quick Start Guide of Digital Video Recorder
11
No.
Name
Function Description
6
JOG SHUTTLE Control
Move the active selection in a menu. It will move the selection up and
down.
In Live View mode, it can be used to cycle through different channels.
In the Playback mode, it can be used to jump 30s forward/backward in
video files.
In PTZ control mode, it can control the movement of the PTZ camera.
7
USB Interface
Universal Serial Bus (USB) ports for additional devices such as USB
mouse and USB Hard Disk Drive (HDD).
8
IR Receiver
Receiver for IR remote control.
Page 13
Quick Start Guide of Digital Video Recorder
12
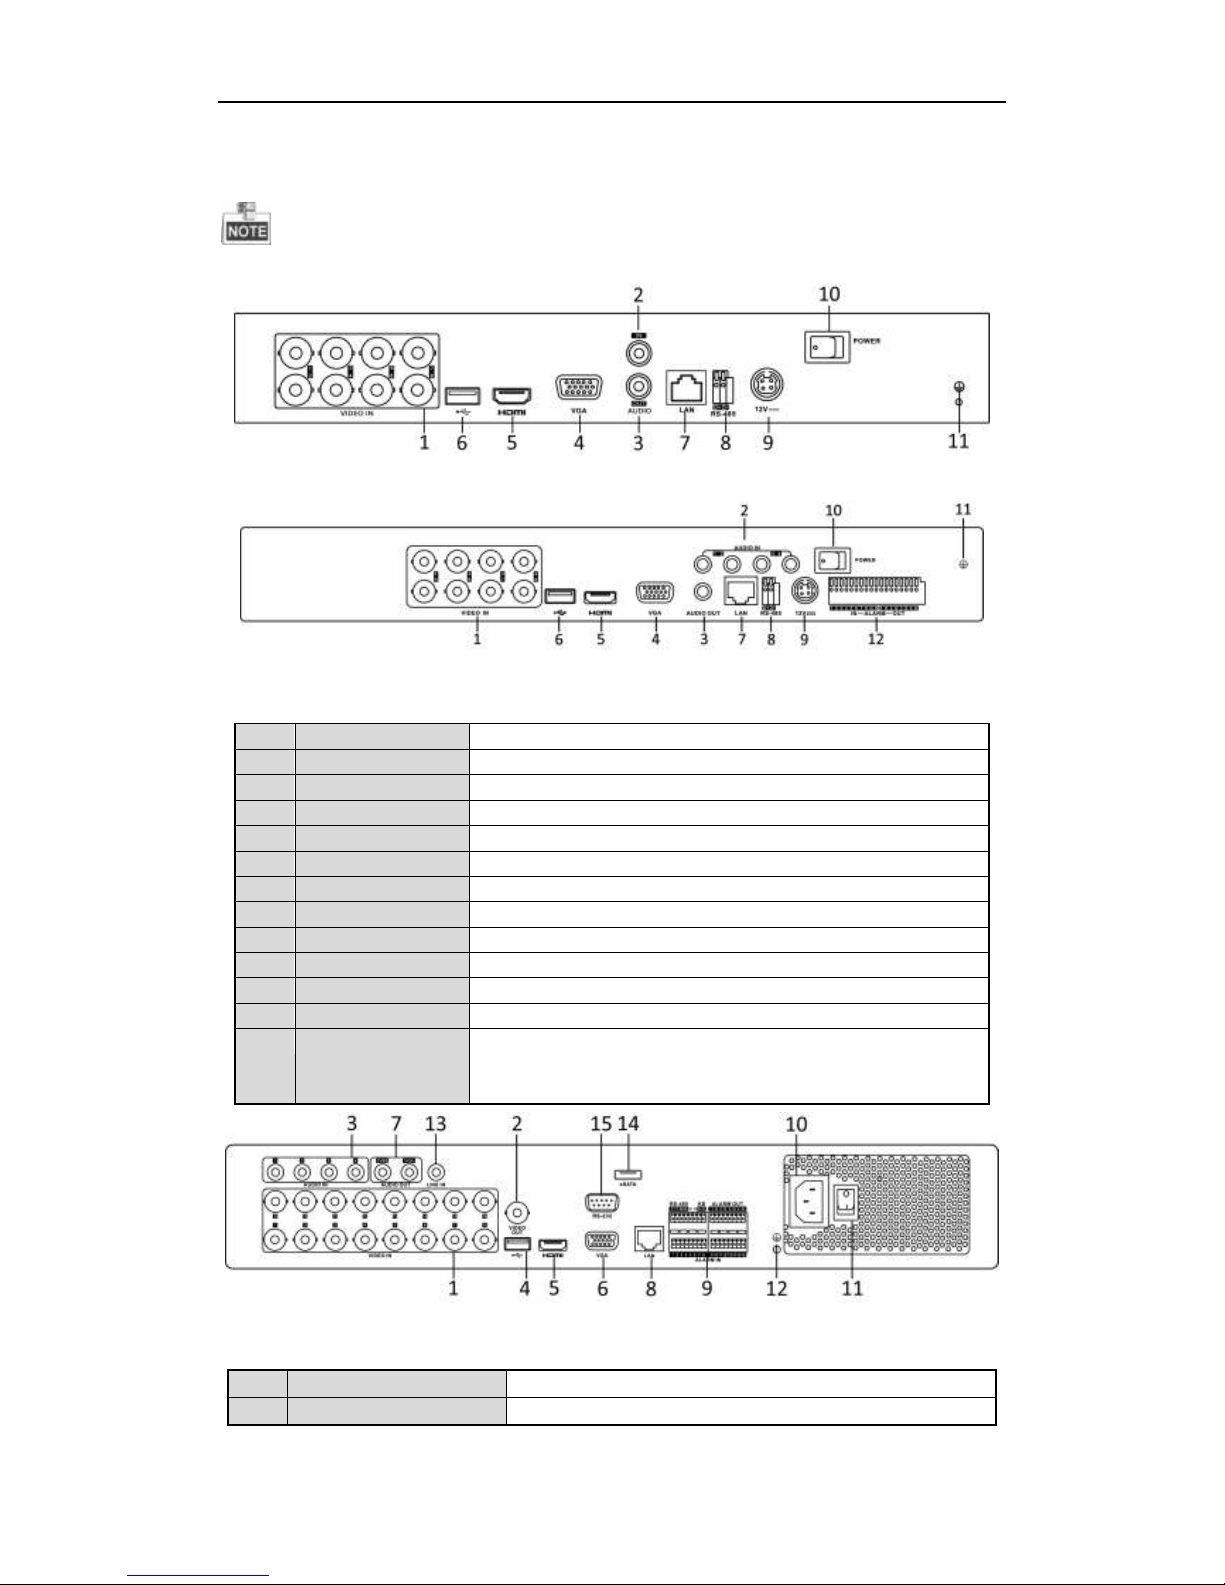
Rear Panels
The rear panel vaires according to different models.
TVI-D1xxx
TVI-D2xxx
Description of Rear Panel
No.
Item
Description
1
VIDEO IN
BNC interface for TVI and analog video input.
2
AUDIO IN
RCA connector
3
AUDIO OUT
RCA connector
4
VGA
DB15 connector for VGA output. Display local video output and menu.
5
HDMI
HDMI video output connector.
6
USB Port
Universal Serial Bus (USB) port for additional devices.
7
Network Interface
Connector for network
8
RS-485 Interface
Connector for RS-485 devices.
9
Power Supply
12V DC power supply.
10
Power Switch
Switch for turning on/off the device.
11
GND
Ground
12
Alarm In/Out (for
TVI-D2104 &
TVI-D2208)
Connectors for alarm inputs and alarm outputs.
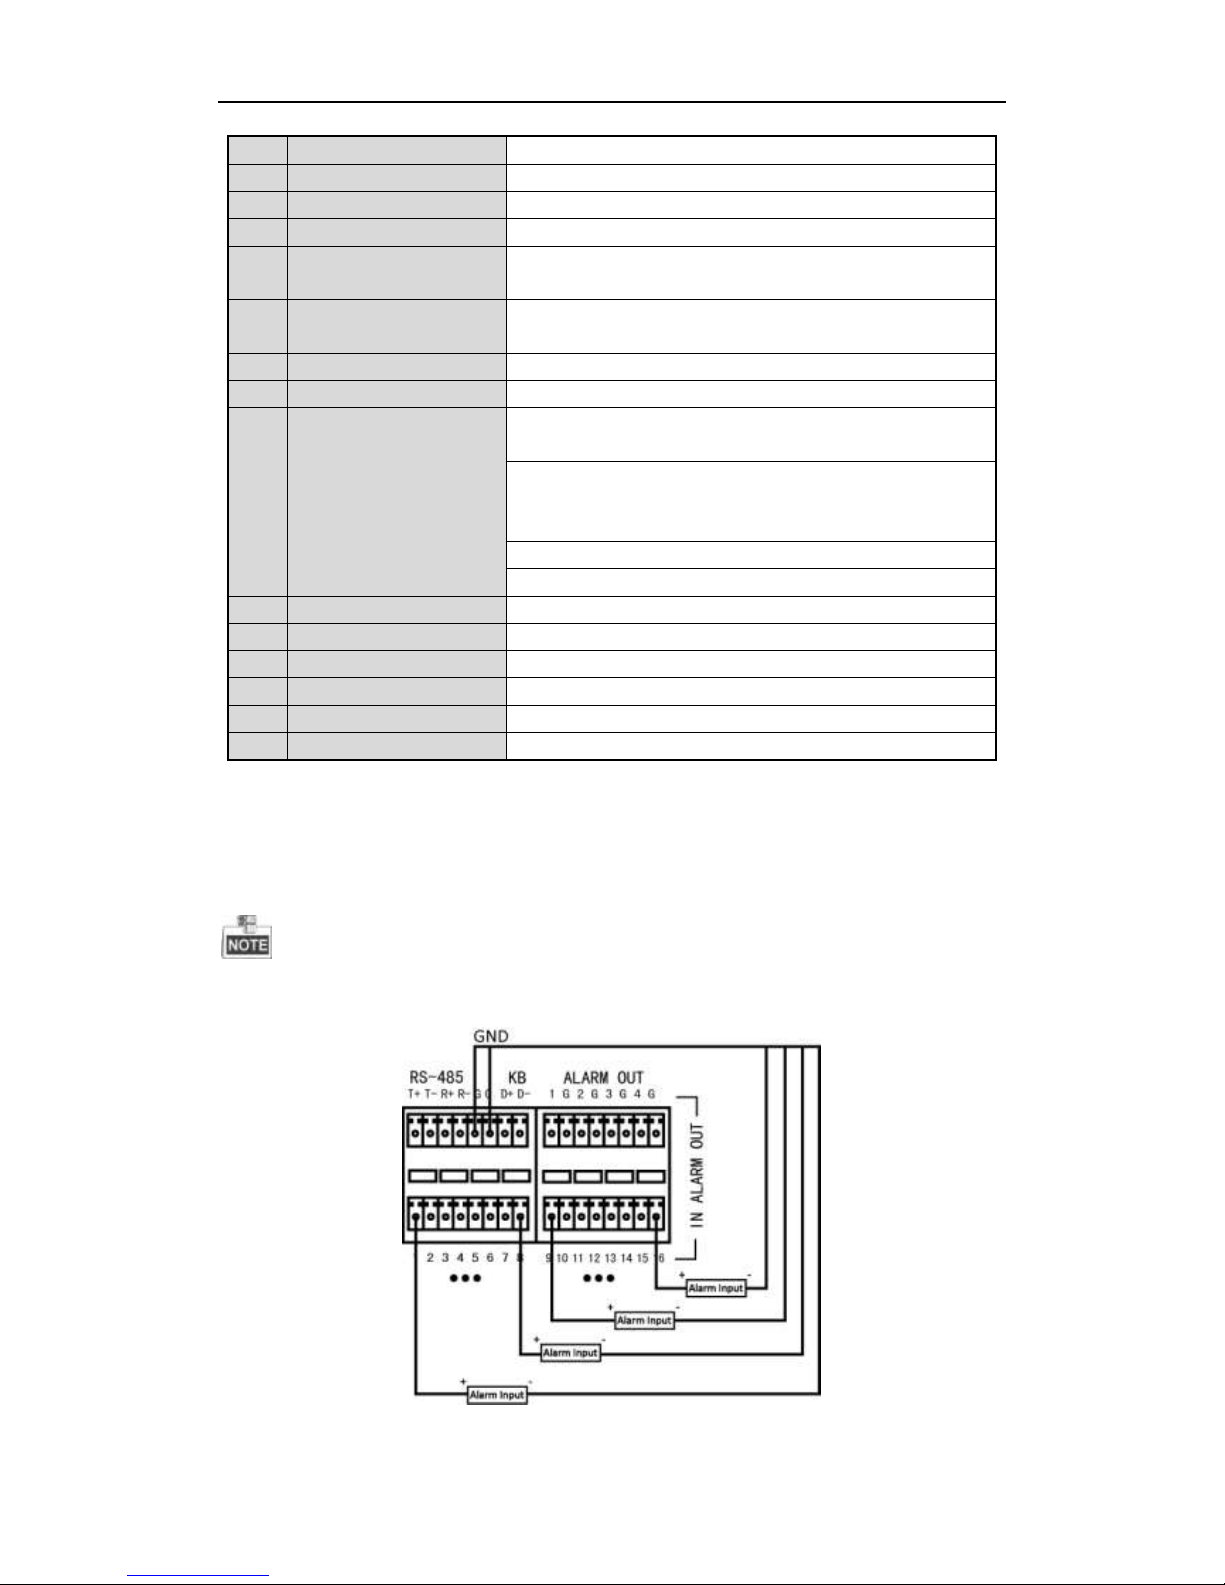
TVI-D1416 and TVI-D2416
Description of Rear Panel
No.
Item
Description
1
VIDEO IN
BNC interface for TVI and analog video input.
Page 14
Quick Start Guide of Digital Video Recorder
13
No.
Item
Description
2
VIDEO OUT
BNC connector for video output.
3
AUDIO IN
RCA connector
4
USB Port
Universal Serial Bus (USB) port for additional devices.
5
HDMI
HDMI video output connector.
DS-8124/8132HGHI-SH provides HDMI1 and HDMI2 interfaces.
6
VGA
DB15 connector for VGA output. Display local video output and
menu.
7
AUDIO OUT
RCA connector
8
Network Interface
Connector for network
9
RS-485 Interface
Connector for RS-485 devices. T+ and T- pins connect to R+ and Rpins of PTZ receiver respectively.
D+, D- pin connects to Ta, Tb pin of controller. For cascading
devices, the first DVR’s D+, D- pin should be connected with the
D+, D- pin of the next DVR.
Connector for alarm input.
Connector for alarm output.
10
Power Supply
100 ~ 240V AC power supply.
11
Power Switch
Switch for turning on/off the device.
12
GND
Ground
13
LINE IN
BNC connector for audio input.
14
eSATA
Connects external SATA HDD, CD/DVD-RW.
15
RS-232 Interface
Connector for RS-232 devices.
Peripheral Connections
Wiring of Alarm Input
The alarm input is an open/closed relay. To connect the alarm input to the device, use the following diagram.
If the alarm input is not an open/close relay, please connect an external relay between the alarm input and the
device.
Page 15
Quick Start Guide of Digital Video Recorder
14
Wiring of Alarm Output
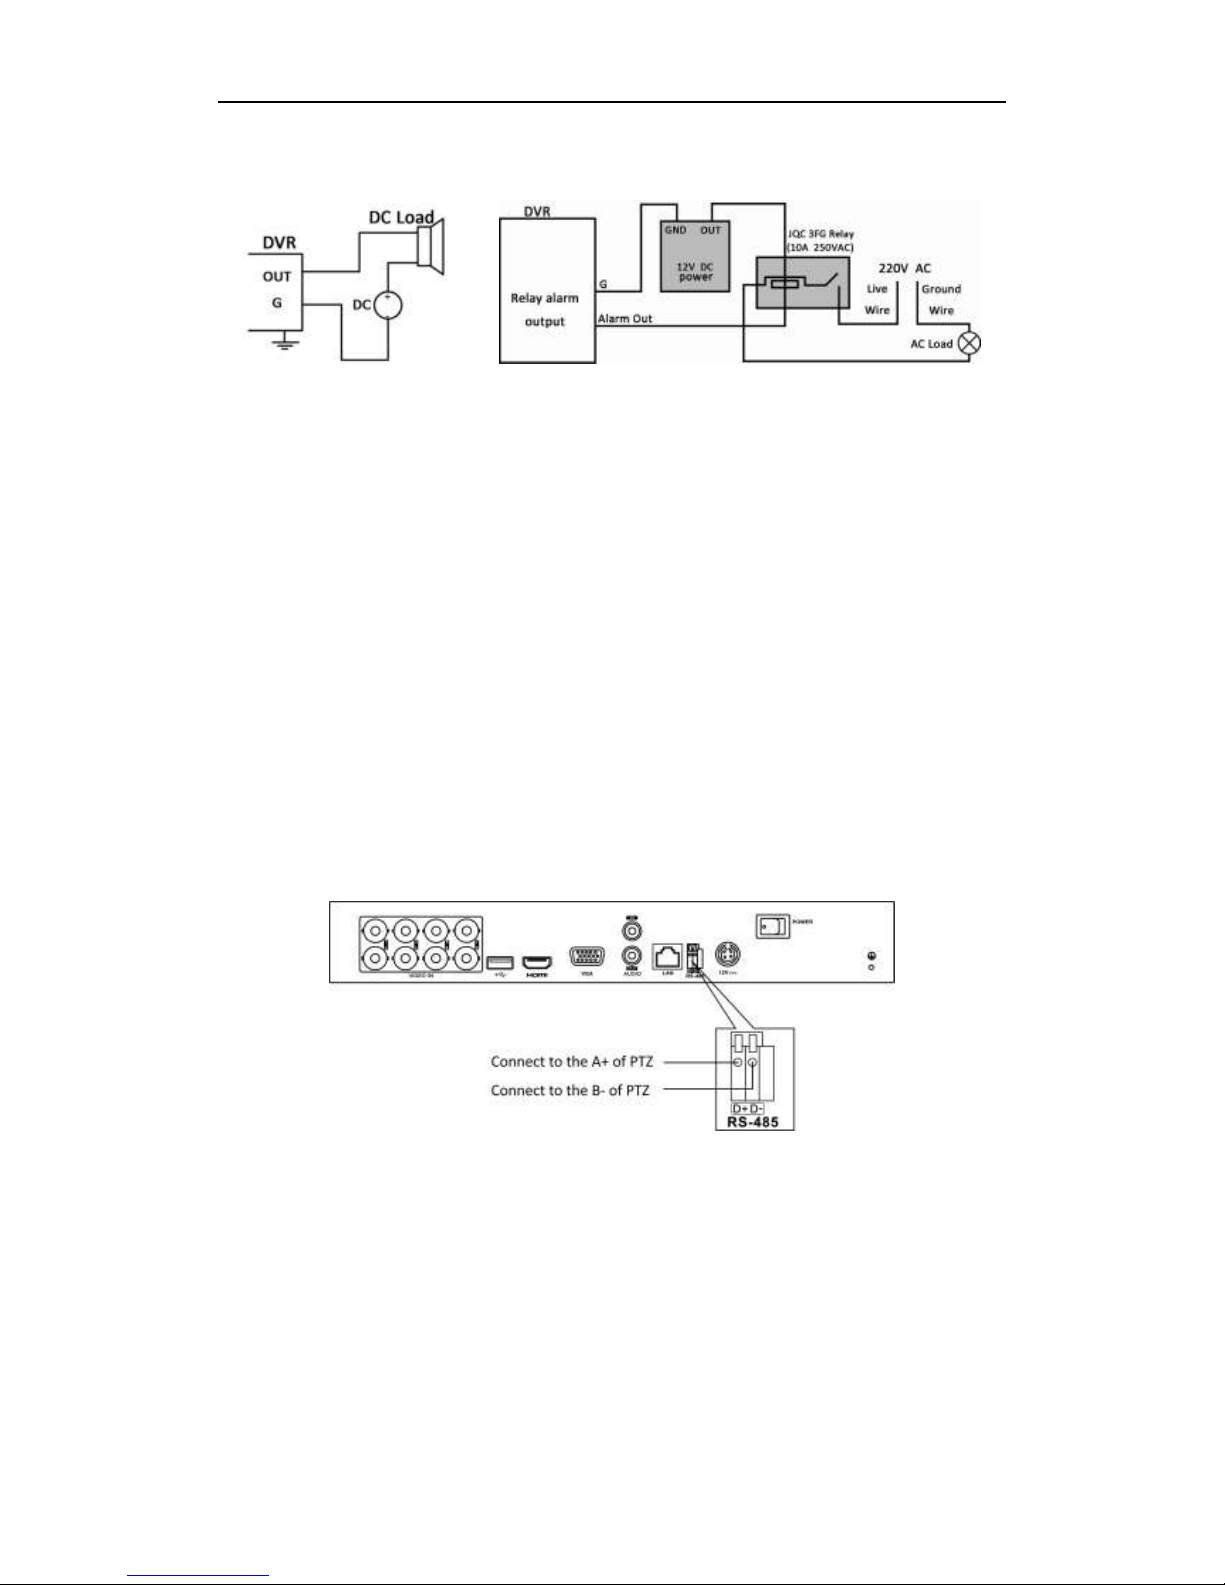
To connect to an alarm output (AC or DC load), use the following diagram:
DC Load Connection Diagram AC Load Connection Diagram
For DC load, the jumpers can be used within the limit of 12V/1A safely.
To connect an AC load, jumpers should be left open (you must remove the jumper on the motherboard in the
DVR). Use an external relay for safety (as shown in the figure above).
There are 4 jumpers (JP1, JP2, JP3, and JP4) on the motherboard, each corresponding with one alarm output. By
default, jumpers are connected. To connect an AC load, jumpers should be removed.
Example:
If you connect an AC load to the alarm output 3 of the DVR, then you must remove the JP 3.
Alarm Connection
To connect alarm devices to the DVR:
1. Disconnect pluggable block from the ALARM IN /ALARM OUT terminal block.
2. Press and hold the orange part of the pluggable block; insert signal cables into slots and release the orange part.
Ensure signal cables are in tight.
3. Connect pluggable block back into terminal block.
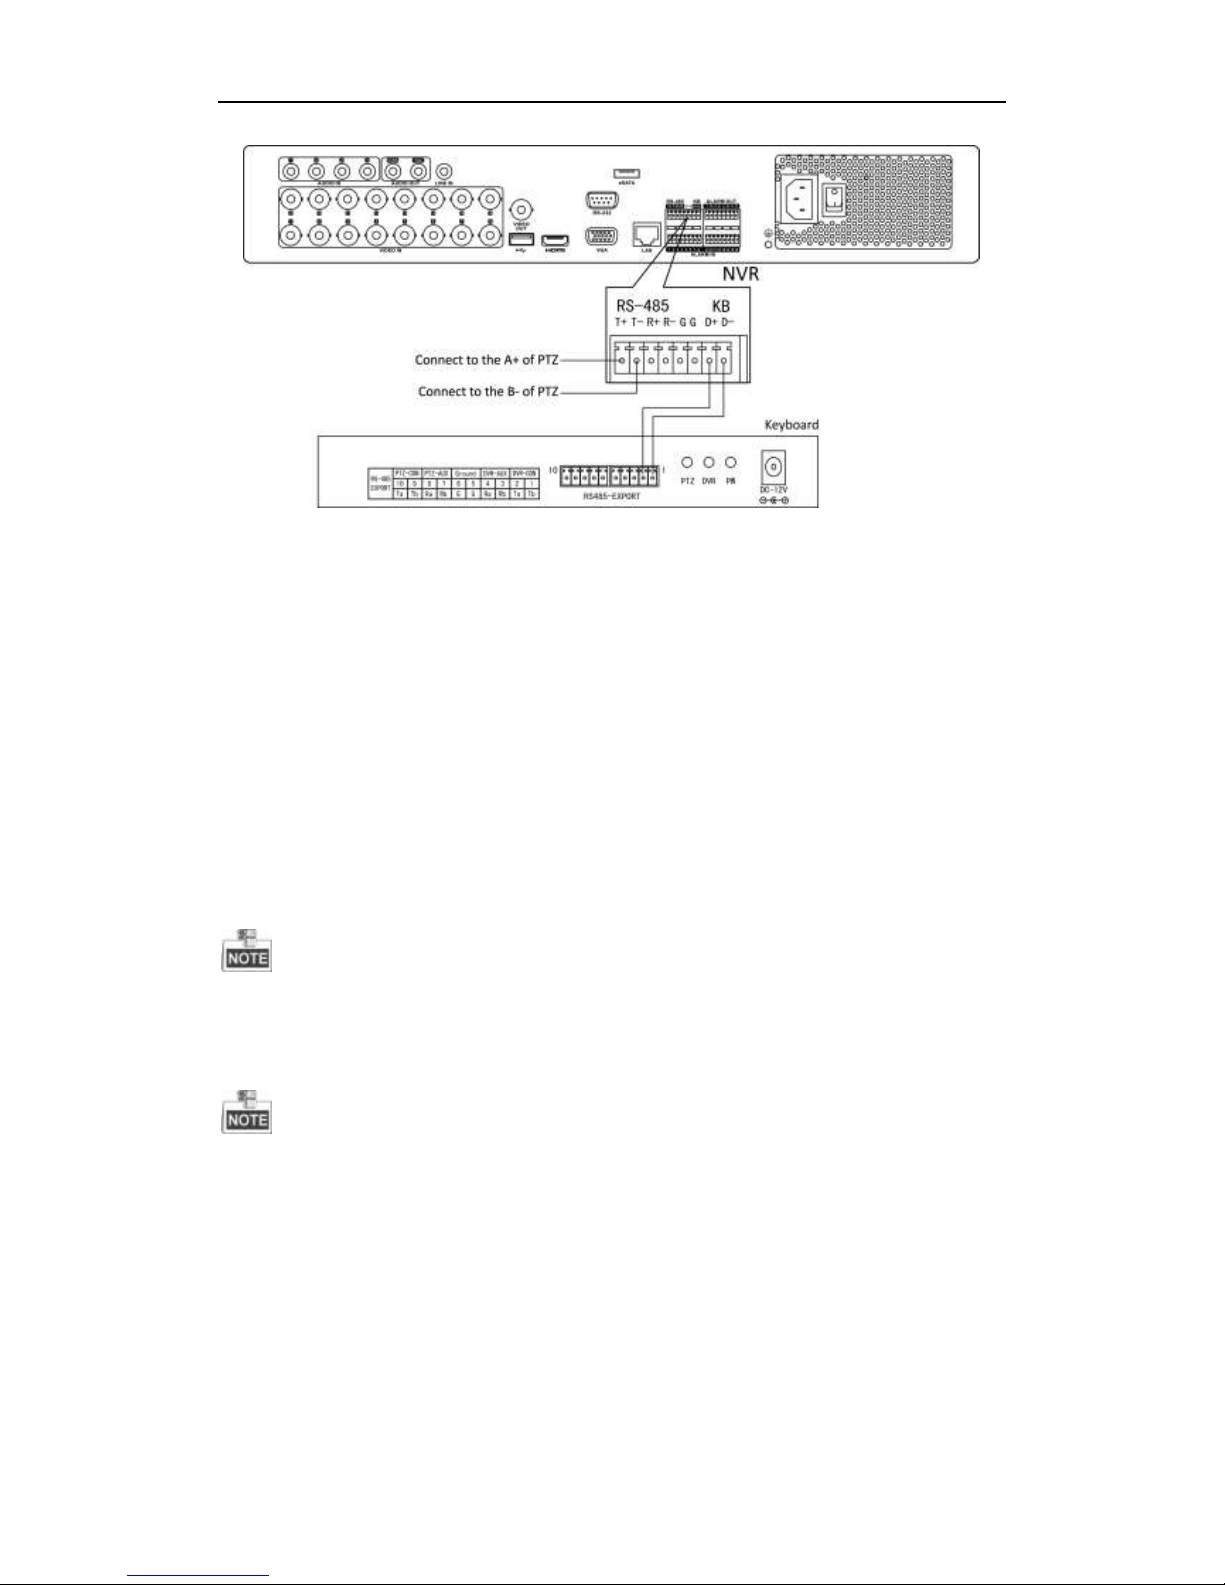
RS-485 and Controller Connection
For TVI-D1xxx and TVI-D2xxx
To connect PTZ to the DVR:
1. Disconnect pluggable block from the RS-485 terminal block.
2. Press and hold the orange part of the pluggable block; insert signal cables into slots and release the orange
part. Ensure signal cables are in tight.
3. Connect A+ on PTZ to D+ on terminal block and B- on controller to D- on terminal block. Fasten stop
screws.
4. Connect pluggable block back into terminal block.
For TVI-D14xx & TVI-Dx4xx
Page 16
Quick Start Guide of Digital Video Recorder
15
To connect PTZ to the DVR:
1. Disconnect pluggable block from the RS-485 terminal block.
2. Press and hold the orange part of the pluggable block; insert signal cables into slots and release the orange
part. Ensure signal cables are in tight.
3. Connect A+ on PTZ to T+ on terminal block and B- on controller to T- on terminal block. Fasten stop
screws.
4. Connect pluggable block back into terminal block.
To connect a controller to the DVR:
1. Disconnect pluggable block from the KB terminal block.
2. Press and hold the orange part of the pluggable block; insert signal cables into slots and release the orange
part. Ensure signal cables are in tight.
3. Connect Ta on controller to D+ on terminal block and Tb on controller to D- on terminal block. Fasten stop
screws.
4. Connect pluggable block back into terminal block.
Make sure both the controller and DVR are grounded.
Termination Switch Operation
This function is applicable to the TVI-D14xx and TVI-D24xx series DVR.
The termination switch is placed on the mainboard instead of the rear panel. Open the upper cover and turn
on/off the SW switch if needed.
Purpose:
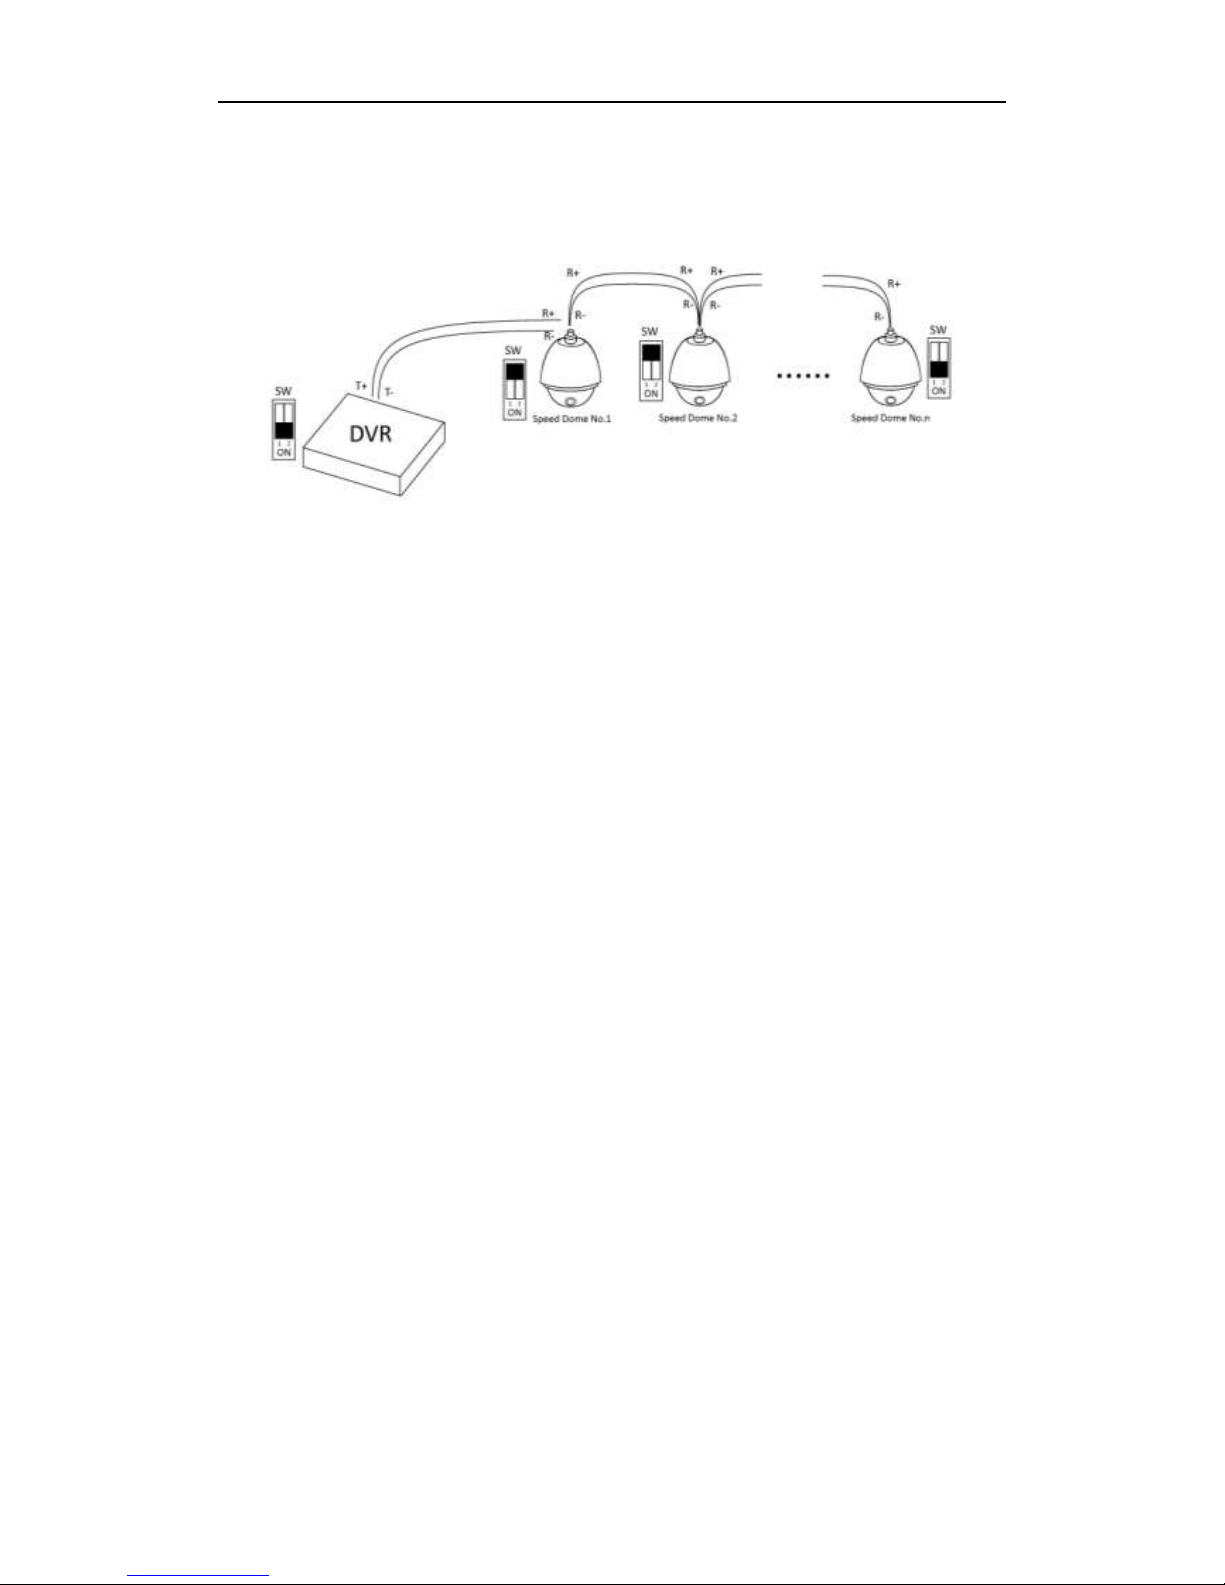
To connect the DVR with several speed domes, the bus topology can be adopted, which means the speed domes
are connected with each other via the R+ and R- of RS-485 serial interface. But due to the impedance of 485 wire,
the longer the wire is, the greater the impedance gets.
To avoid the signal reduction caused by the great impedance of long distance transmission, please connect two
120Ω resistors in the circuit: one resistor between the DVR and the nearest speed dome, and the other one after the
furthest speed dome.
Page 17
Quick Start Guide of Digital Video Recorder
16
Steps:
1. Turn on the SW switches on the DVR and the furthest speed dome.
2. Keep other SW switches off.
The connection diagram and status of each SW switch are shown in the following figure.
Page 18
Quick Start Guide of Digital Video Recorder
17
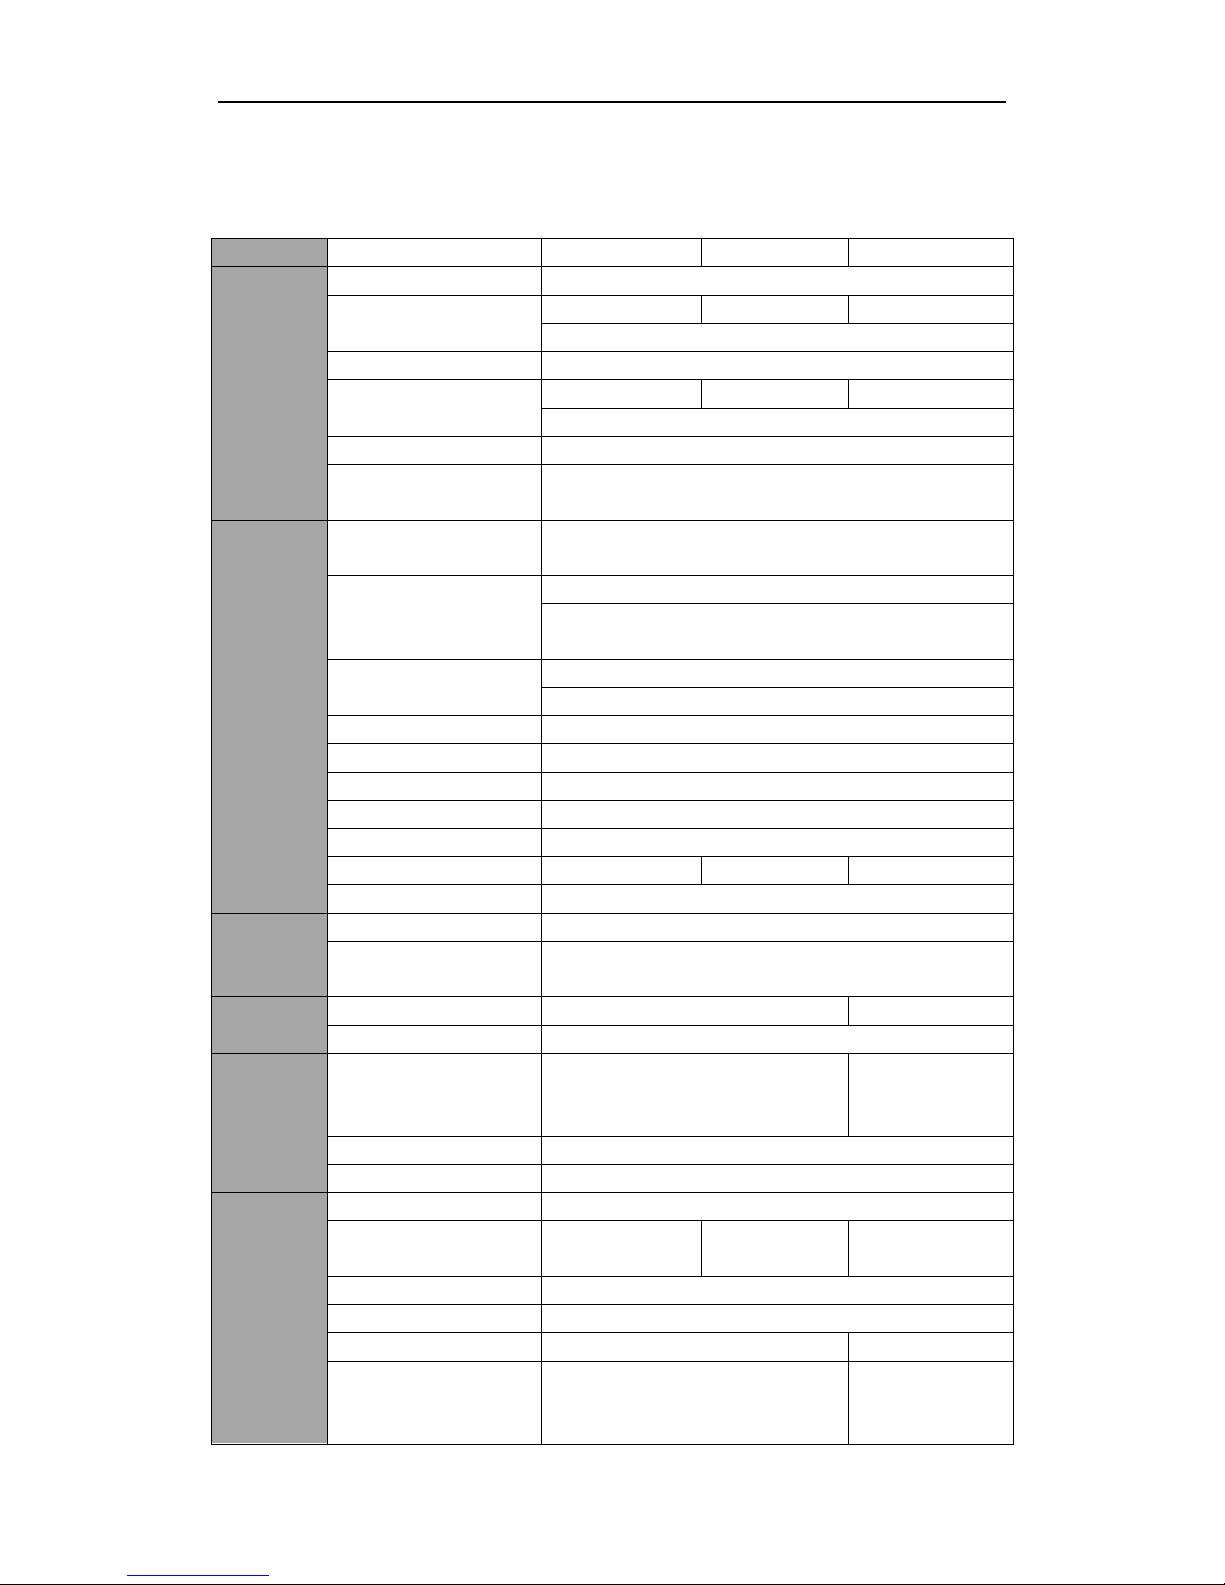
Specifications
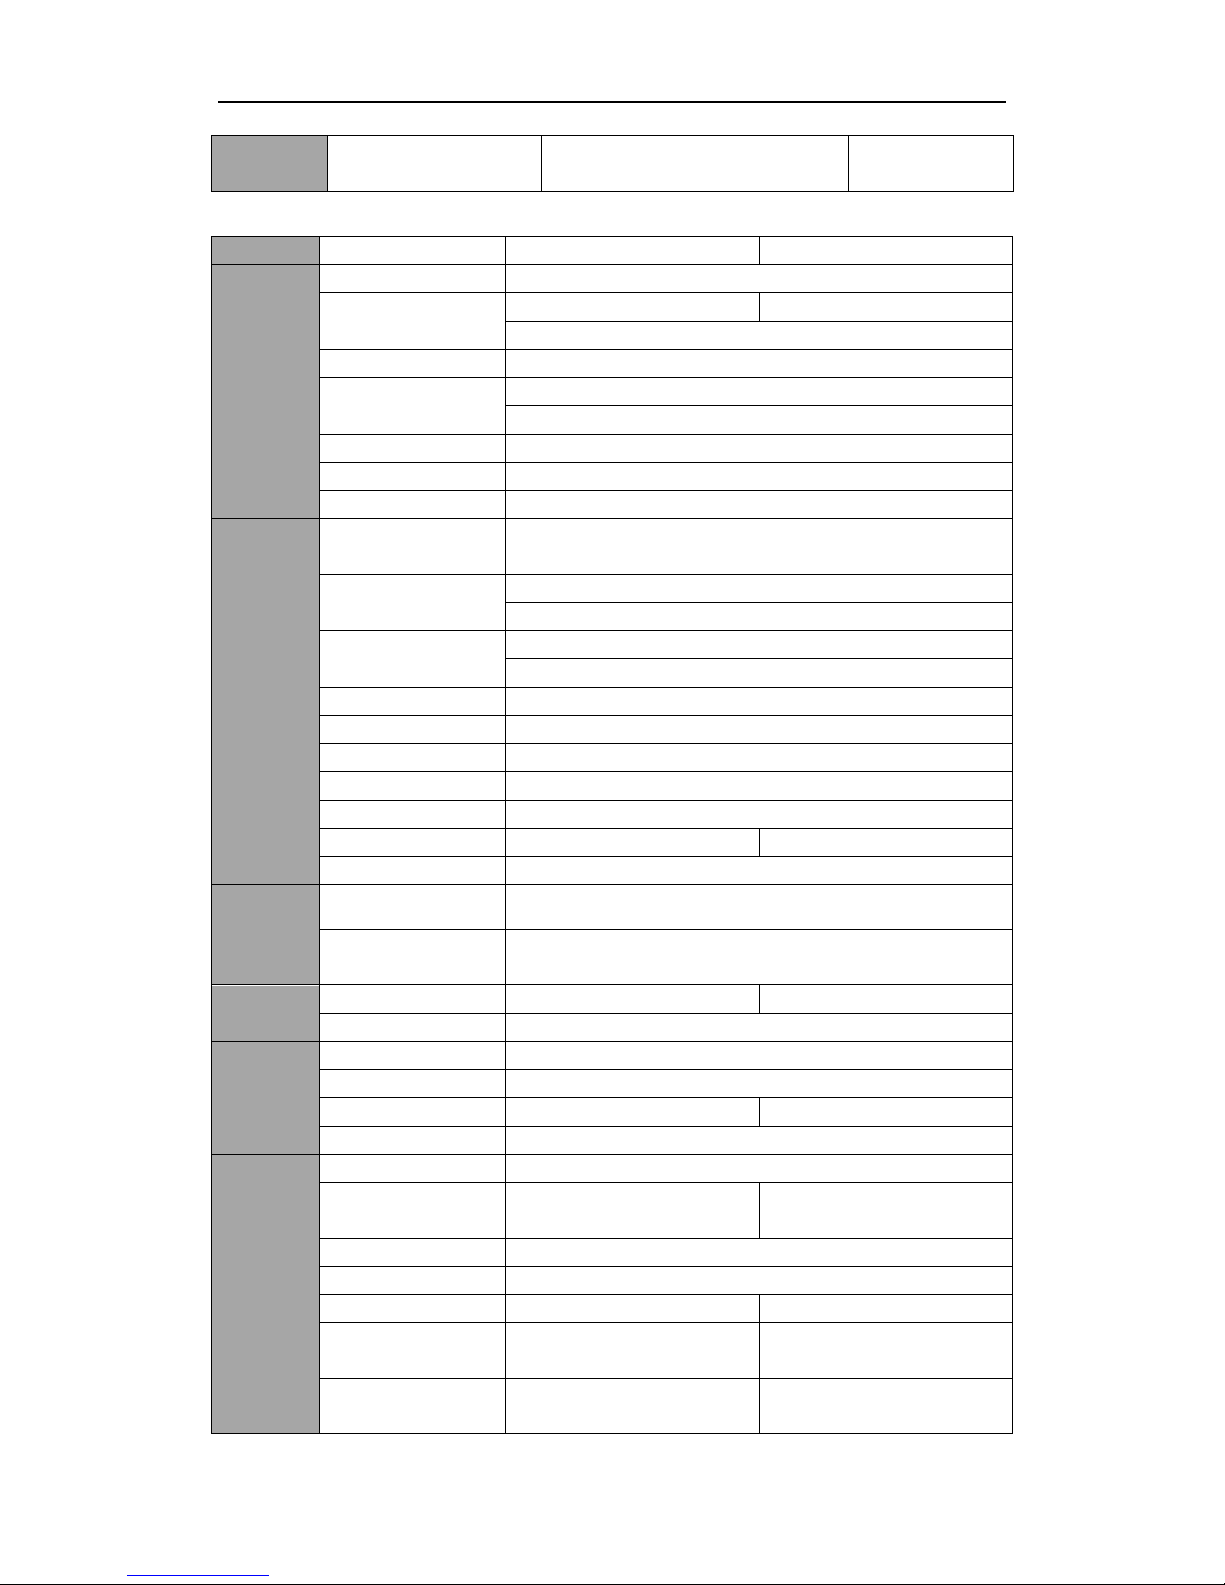
Table 1 Specification for TVI-D1xxx
Model
TVI-D1104
TVI-D1108
TVI-D1216
Video/Audio
input
Video compression
H.264
Analog and HD-TVI video
input
4-ch
8-ch
16-ch
BNC interface (1.0Vp-p, 75 Ω)
Supported camera types
720P/25, 720P/30, 720P/50, 720P/60, 1080P/25, 1080P/30, CVBS
IP video input
1-ch
2-ch
2-ch
Up to 2.0MP resolution
Audio compression
G.711u
Audio input / Two-way audio
in
1-ch, RCA (2.0 Vp-p, 1 KΩ)
Video/Audio
output
HDMI / VGA output
1920 × 1080 / 60 Hz,1280 × 1024 / 60 Hz, 1280 × 720 / 60 Hz, 1024 ×
768 / 60 Hz
Encoding resolution
Main stream: 1080P(non-real-time) / 720P / VGA / WD1 / 4CIF / CIF
Sub-stream: WD1(non-real-time) / 4CIF(non-real-time) / CIF / QCIF /
QVGA
Frame rate
Main stream: 1/16 fps ~ Real time frame rate
Sub-stream: 1/16 fps ~ Real time frame rate
Video bitrate
32 Kbps-6 Mbps
Audio output
1-ch, RCA (Linear, 1KΩ)
Audio bitrate
64 Kbps
Dual-stream
Support
Stream type
Video, Video & Audio
Synchronous playback
4-ch
8-ch
16-ch
Playback resolution
1080P / 720P / VGA / WD1 / 4CIF / CIF / QVGA / QCIF
Network
management
Remote connections
128
Network protocols
TCP/IP, PPPoE, DHCP, Cloud P2P, DNS, DDNS, NTP, SADP, SMTP,
SNMP, NFS, iSCSI, UPnP™, HTTPS
Hard disk
SATA
1 SATA interface
2 SATA interfaces
Capacity
Up to 4 TB capacity for each disk
External
interface
Network interface
1; 10M / 100M self-adaptive Ethernet
interface
1; 10M / 100M /
1000M self-adaptive
Ethernet interface
Serial interface
1; standard RS-485 serial interface, half-duplex
USB port
2 × USB2.0
General
Power supply
12V DC
Consumption
(without hard disks)
≤ 15W
≤ 20W
≤ 30W
Working temperature
-10 ºC ~+55 ºC (14 ºF ~ 131 ºF)
Working humidity
10% ~ 90%
Chassis
1U chassis
380mm 1U chassis
Dimensions
(W × D × H)
315 × 242 × 45mm (12.4 × 9.5 × 1.8 inch)
380 × 290 × 48mm
(15.0 × 11.4 × 1.9
inch)
Page 19
Quick Start Guide of Digital Video Recorder
18
Weight
(without hard disks)
≤ 1.5Kg (3.3lb)
≤ 2Kg (4.4lb)
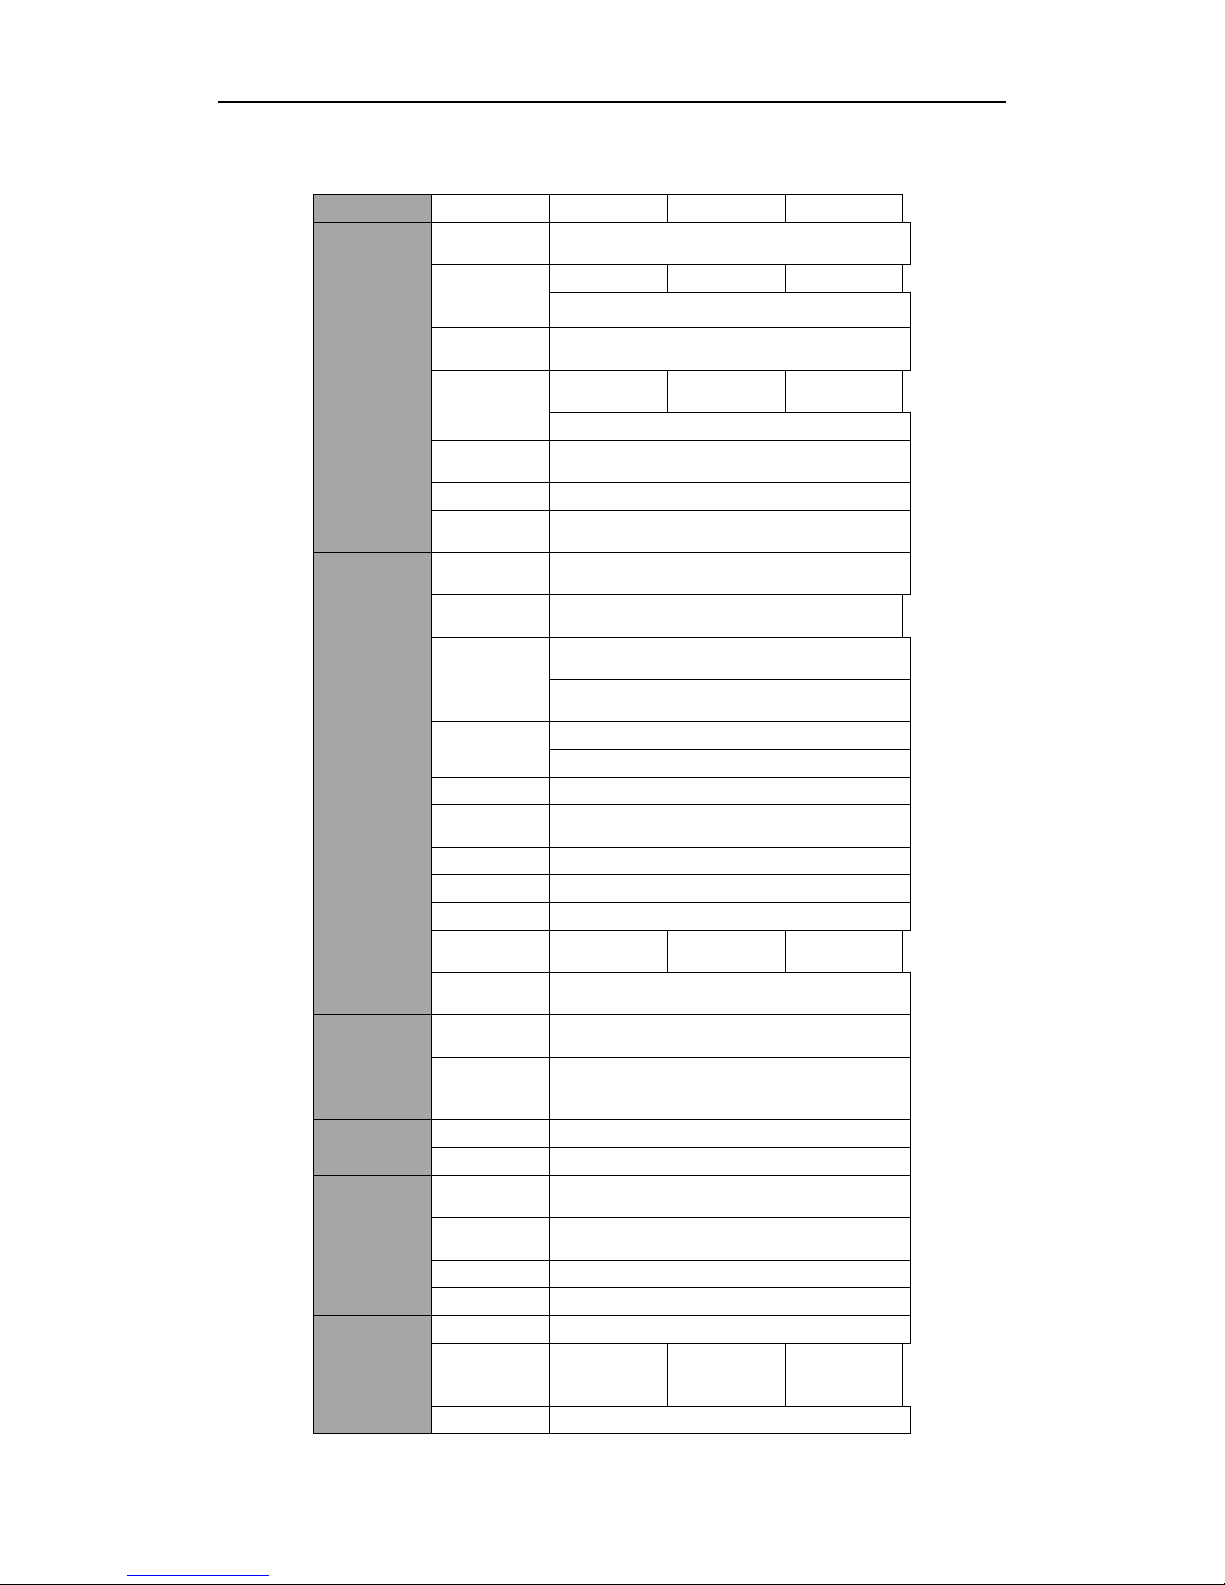
Table 2 Specification for TVI-D2xxx
Model
TVI-D2104
TVI-D2208
Video/Audio
input
Video compression
H.264
Analog and HD-TVI
video input
4-ch
8-ch
BNC interface (1.0Vp-p, 75 Ω)
Supported camera types
720P/25, 720P/30, 720P/50, 720P/60, 1080P/25, 1080P/30, CVBS
IP video input
2-ch
Up to 2.0MP resolution
Audio compression
G.711u
Audio input
4-ch, RCA (2.0 Vp-p, 1 KΩ)
Two-way audio in
1-ch, RCA (2.0 Vp-p, 1 KΩ) (using the 1st channel of audio input)
Video/Audio
output
HDMI / VGA output
1920 × 1080 / 60 Hz,1280 × 1024 / 60 Hz, 1280 × 720 / 60 Hz, 1024 × 768 / 60
Hz
Encoding resolution
Main stream: 1080P / 720P / VGA / WD1 / 4CIF / CIF
Sub-stream: WD1(non-real-time) / 4CIF(non-real-time) / CIF / QCIF / QVGA
Frame rate
Main stream: 1/16 fps ~ Real time frame rate
Sub-stream: 1/16 fps ~ Real time frame rate
Video bitrate
32 Kbps-10 Mbps
Audio output
1-ch, RCA (Linear, 1KΩ)
Audio bitrate
64 Kbps
Dual-stream
Support
Stream type
Video, Video & Audio
Synchronous playback
4-ch
8-ch
Playback resolution
1080P / 720P / VGA / WD1 / 4CIF / CIF / QVGA / QCIF
Network
management
Remote connections
128
Network protocols
TCP/IP, PPPoE, DHCP, Cloud P2P, DNS, DDNS, NTP, SADP, SMTP, SNMP,
NFS, iSCSI, UPnP™, HTTPS
Hard disk
SATA
1 SATA interface
2 SATA interfaces
Capacity
Up to 4 TB capacity for each disk
External
interface
Network interface
1; 10M / 100M / 1000M self-adaptive Ethernet interface
Serial interface
1; standard RS-485 serial interface, half-duplex
Alarm in/out
4/1
8/4
USB port
2 × USB2.0
General
Power supply
12V DC
Consumption
(without hard disks)
≤ 15W
≤ 30W
Working temperature
-10 ºC ~+55 ºC (14 ºF ~ 131 ºF)
Working humidity
10% ~ 90%
Chassis
1U chassis
380mm 1U chassis
Dimensions
(W × D × H)
315 × 242 × 45mm
(12.4 × 9.5 × 1.8 inch)
380 × 290 × 48mm
(15.0 × 11.4 × 1.9 inch)
Weight
(without hard disks)
≤ 1.5Kg (3.3lb)
≤ 2Kg (4.4lb)
Page 20
Quick Start Guide of Digital Video Recorder
19
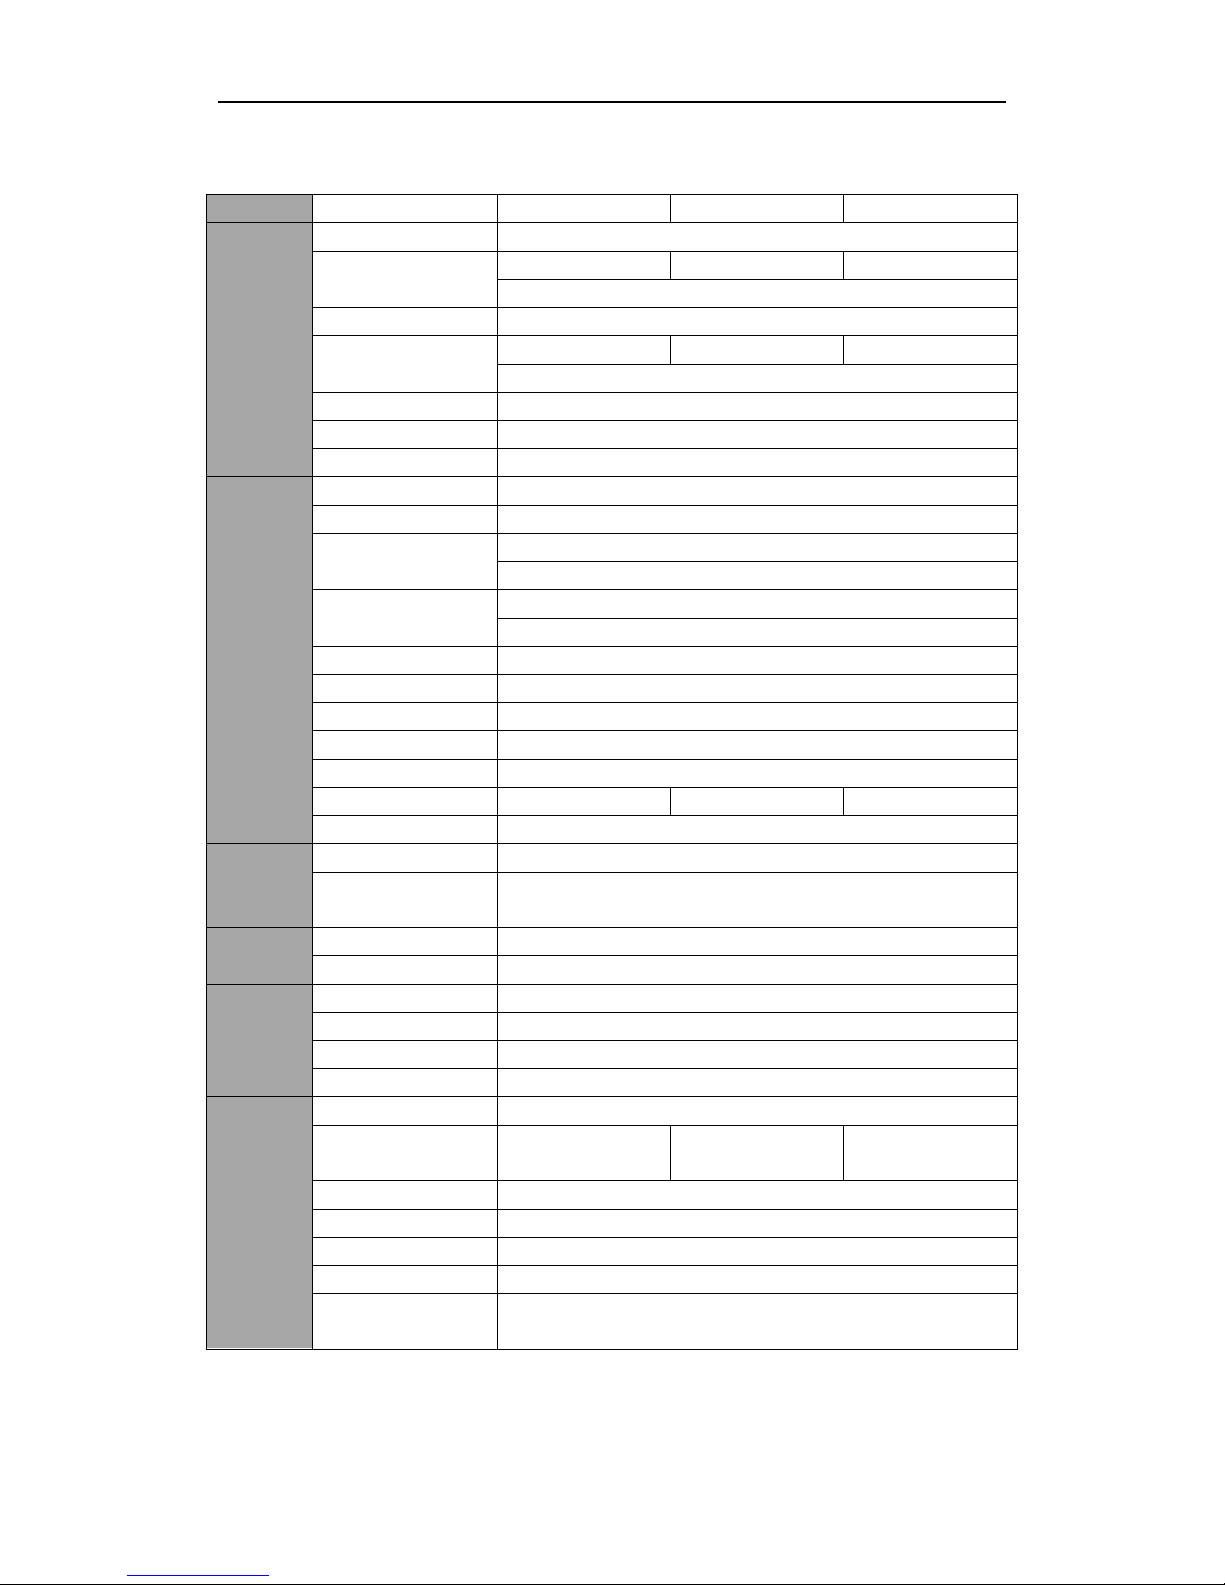
Table 3 Specification for TVI-D14xx
Model
TVI-D1404
TVI-D1408
TVI-D1416
Video/
Audio input
Video
compression
H.264
Analog and
HD-TVI video
input
4-ch
8-ch
16-ch
BNC interface (1.0Vp-p, 75 Ω)
Supported
camera types
720P/25, 720P/30, 720P/50, 720P/60, 1080P/25,
1080P/30, CVBS
IP video input
1-ch
(up to 5-ch)
2-ch
(up to 10-ch)
2-ch
(up to 18-ch)
Up to 2MP resolution
Audio
compression
G.711u
Audio input
4-ch, RCA (2.0 Vp-p, 1 KΩ)
Two-way
audio in
1-ch, RCA (2.0 Vp-p, 1 KΩ)
Video/
Audio output
HDMI / VGA
output
1920 × 1080/60 Hz ,1280 × 1024/60 Hz, 1280 × 720/60
Hz, 1024 × 768/60 Hz
CVBS output
1-ch, BNC (1.0 Vp-p, 75 Ω), resolution: PAL: 704 ×
576, NTSC: 704 × 480
Encoding
resolution
Main stream: 1080P (non-real-time) / 720P / WD1 /
VGA / 4CIF / CIF
Sub-stream: WD1 (non-real-time)/ 4CIF(non-real-time)
/ CIF / QCIF / QVGA
Frame rate
Main stream: 1/16 fps ~ Real time frame rate
Sub-stream: 1/16 fps ~ Real time frame rate
Video bitrate
32 Kbps-6 Mbps
Audio output
2-ch, RCA (Linear, 1KΩ, for VGA output and CVBS
output respectively)
Audio bitrate
64 Kbps
Dual-stream
Support
Stream type
Video, Video & Audio
Synchronous
playback
4-ch
8-ch
16-ch
Playback
resolution
1080P / 720P / VGA / WD1 / 4CIF / CIF / QVGA /
QCIF
Network
management
Remote
connection
128
Network
protocols
TCP/IP, PPPoE, DHCP, Cloud P2P, DNS, DDNS, NTP,
SADP, SMTP, SNMP, NFS, iSCSI, UPnP™, HTTPS,
ONVIF
Hard disk
Type
4 SATA interfaces for 4 HDDs; 1 eSATA interface
Capacity
Up to 4 TB capacity for each disk
External
interface
Network
interface
1; 10M / 100M / 1000M self-adaptive Ethernet
interface
Serial
interface
RS-232, RS-485, Keyboard
USB port
3 × USB2.0
Alarm in / out
16 / 4
General
Power supply
100 ~ 240VAC, 47 ~ 63HZ
Consumption
(without hard
disks)
≤ 30W
≤ 40W
≤ 55W
Working
-10 ºC ~+55 ºC (14 ºF ~ 131 ºF)
Page 21

Quick Start Guide of Digital Video Recorder
20
temperature
Working
humidity
10% ~ 90%
Chassis
19-inch rack-mounted 1.5U chassis
Dimensions
(W × D × H)
445 × 390 × 70 mm (17.5 × 15.3 × 2.7 inch)
Weight
(without hard
disks)
≤5Kg (11.0lb)
Page 22
Quick Start Guide of Digital Video Recorder
21
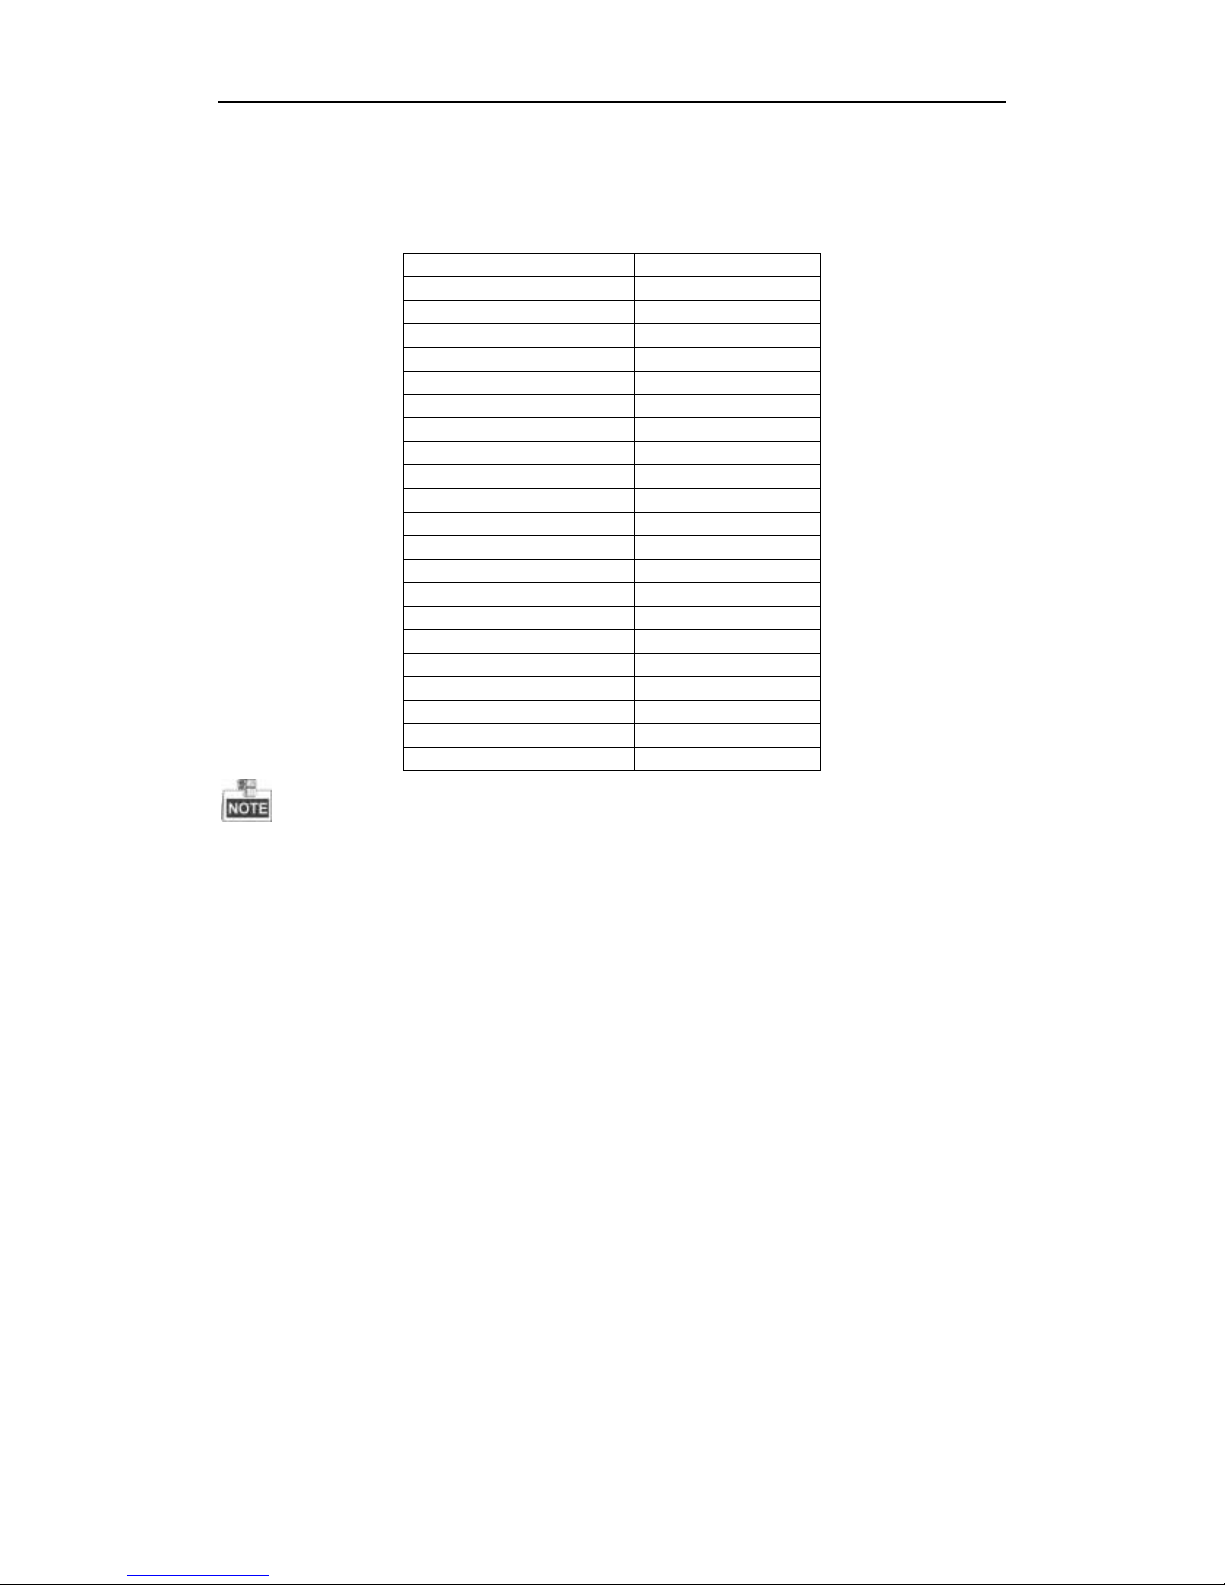
Table 4 Specification for TVI-D24xx
Model
TVI-D2404
TVI-D2408
TVI-D2416
Video/Audio
input
Video compression
H.264
Analog and HD-TVI
video input
4-ch
8-ch
16-ch
BNC interface (1.0Vp-p, 75 Ω)
Supported camera types
720P/25, 720P/30, 720P/50, 720P/60, 1080P/25, 1080P/30, CVBS
IP video input
2-ch ( up to 6-ch)
2-ch ( up to 10-ch)
2-ch ( up to 18-ch)
Up to 2MP resolution
Audio compression
G.711u
Audio input
4-ch, RCA (2.0 Vp-p, 1 KΩ)
Two-way audio in
1-ch, RCA (2.0 Vp-p, 1 KΩ)
Video/Audio
output
HDMI / VGA output
1920 × 1080/60 Hz ,1280 × 1024/60 Hz, 1280 × 720/60 Hz, 1024 × 768/60 Hz
CVBS output
1-ch, BNC (1.0 Vp-p, 75 Ω), resolution: PAL: 704 × 576, NTSC: 704 × 480
Encoding resolution
Main stream: 1080P / 720P / VGA / 4CIF / CIF
Sub-stream: WD1 (non-real-time)/ 4CIF(non-real-time) / CIF / QCIF / QVGA
Frame rate
Main stream: 1/16 fps ~ Real time frame rate
Sub-stream: 1/16 fps ~ Real time frame rate
Video bitrate
32 Kbps-10 Mbps
Audio output
2-ch, RCA (Linear, 1KΩ, for VGA output and CVBS output respectively)
Audio bitrate
64 Kbps
Dual-stream
Support
Stream type
Video, Video & Audio
Synchronous playback
4-ch
8-ch
16-ch
Playback resolution
1080P / 720P / VGA / WD1 / 4CIF / CIF / QVGA / QCIF
Network
management
Remote connection
128
Network protocols
TCP/IP, PPPoE, DHCP, Cloud P2P, DNS, DDNS, NTP, SADP, SMTP, SNMP,
NFS, iSCSI, UPnP™, HTTPS, ONVIF
Hard disk
Type
4 SATA interfaces for 4 HDDs; 1 eSATA interface
Capacity
Up to 4 TB capacity for each disk
External
interface
Network interface
1; 10M / 100M / 1000M self-adaptive Ethernet interface
Serial interface
RS-232, RS-485, Keyboard
USB port
3 × USB2.0
Alarm in / out
16 / 4
General
Power supply
100 ~ 240VAC, 47 ~ 63HZ
Consumption
(without hard disks)
≤ 30W
≤ 40W
≤ 55W
Working temperature
-10 ºC ~+55 ºC (14 ºF ~ 131 ºF)
Working humidity
10% ~ 90%
Chassis
19-inch rack-mounted 1.5U chassis
Dimensions (W × D × H)
445 × 390 × 70 mm (17.5 × 15.3 × 2.7 inch)
Weight
(without hard disks)
≤5Kg (11.0lb)
Page 23
Quick Start Guide of Digital Video Recorder
22
HDD Storage Calculation Chart
The following chart shows an estimation of storage space used based on recording at one channel for an hour at a
fixed bit rate.
Bit Rate
Storage Used
96K
42M
128K
56M
160K
70M
192K
84M
224K
98M
256K
112M
320K
140M
384K
168M
448K
196M
512K
225M
640K
281M
768K
337M
896K
393M
1024K
450M
1280K
562M
1536K
675M
1792K
787M
2048K
900M
4096K
1800M
8192K
3600M
16384K
7200M
Please note that supplied values for storage space used are just for reference. Storage space used is estimated by
formulas and may have some deviation from actual value.
Page 24
Quick Start Guide of Digital Video Recorder
23
Accessing by Web Browser
Logging In
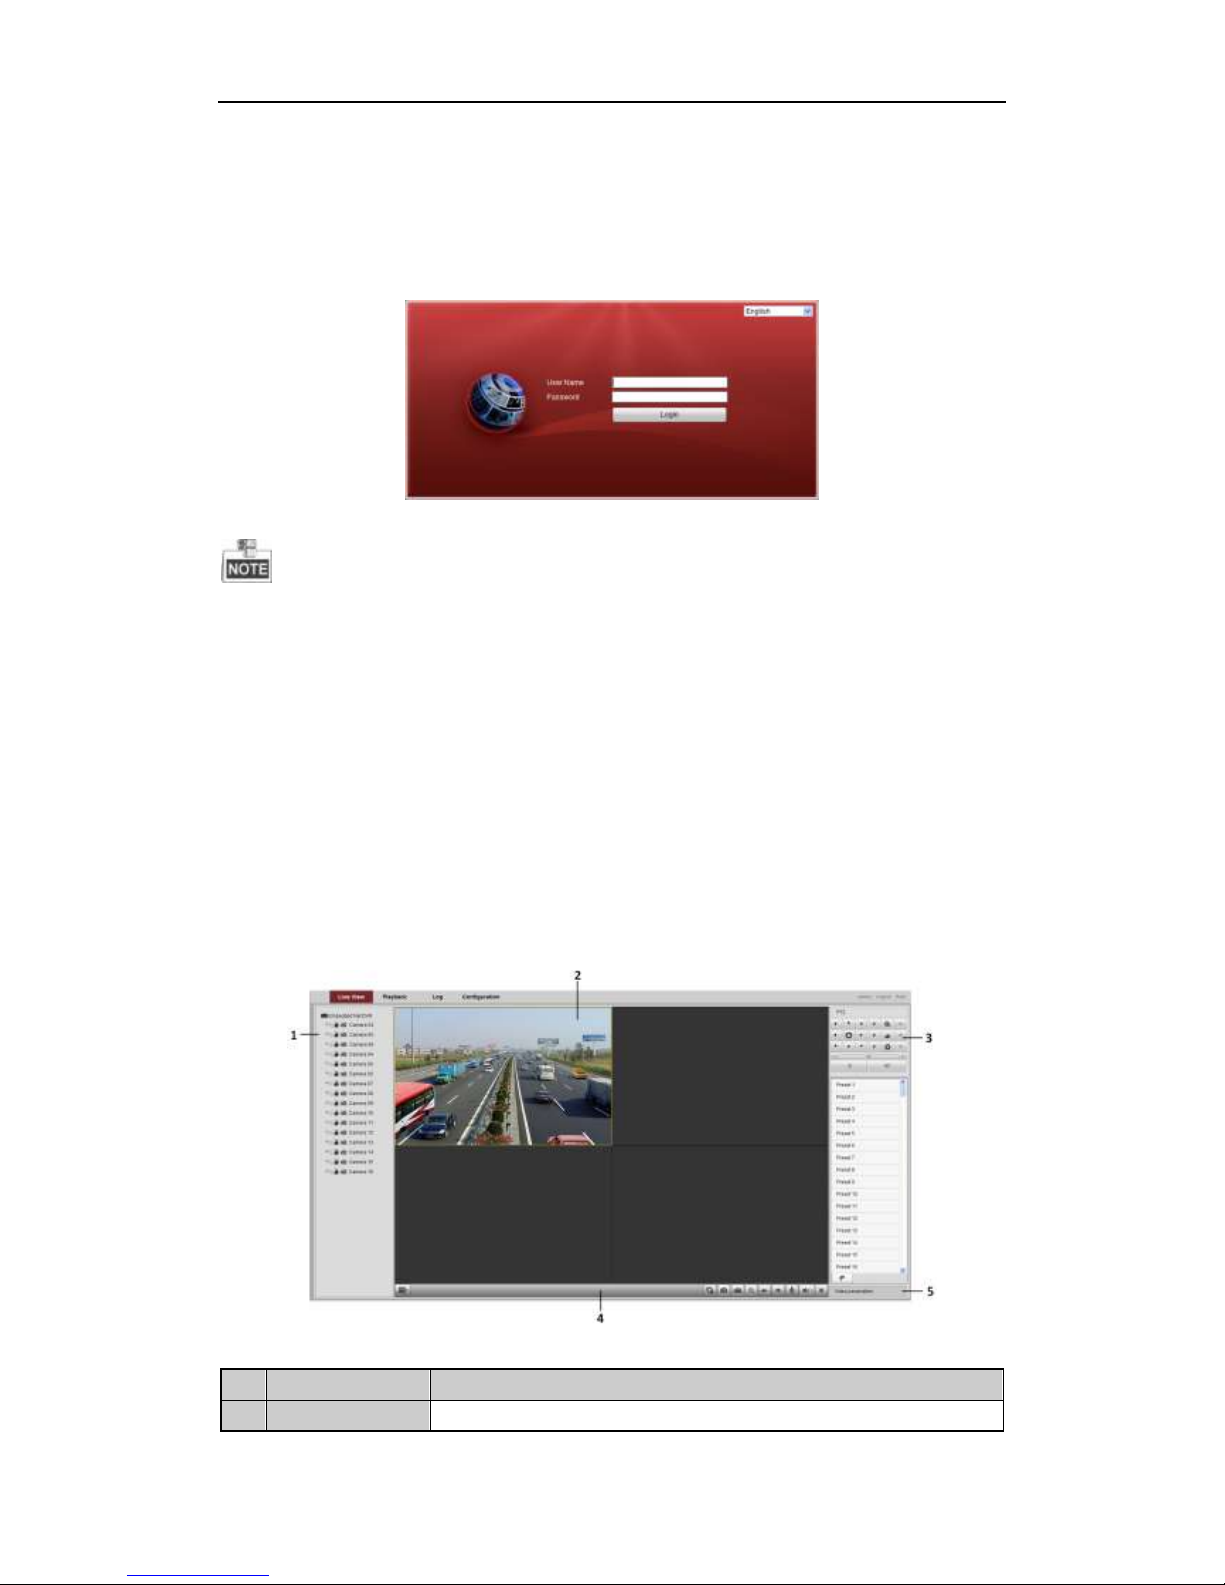
You can get access to the device via web browser. Open web browser, input the IP address of the device and then
press Enter. The login interface appears.
Input the user name and password, and click the Login button.
You may use one of the following listed web browsers: Internet Explorer 6.0, Internet Explorer 7.0, Internet
Explorer 8.0, Internet Explorer 9.0, Internet Explorer 10.0, Apple Safari, Mozilla Firefox, and Google
Chrome.
The supported resolutions include 1024*768 and above.
The default IP address is 192.0.0.64.
The default user name is admin, and password is 12345.
You are highly recommended to change the default password right after the first login to avoid safety
problem.
When you log in for the first time, the system will remind you to install the Plug-in control. After the installation,
you can configure and manage the device remotely.
Live View
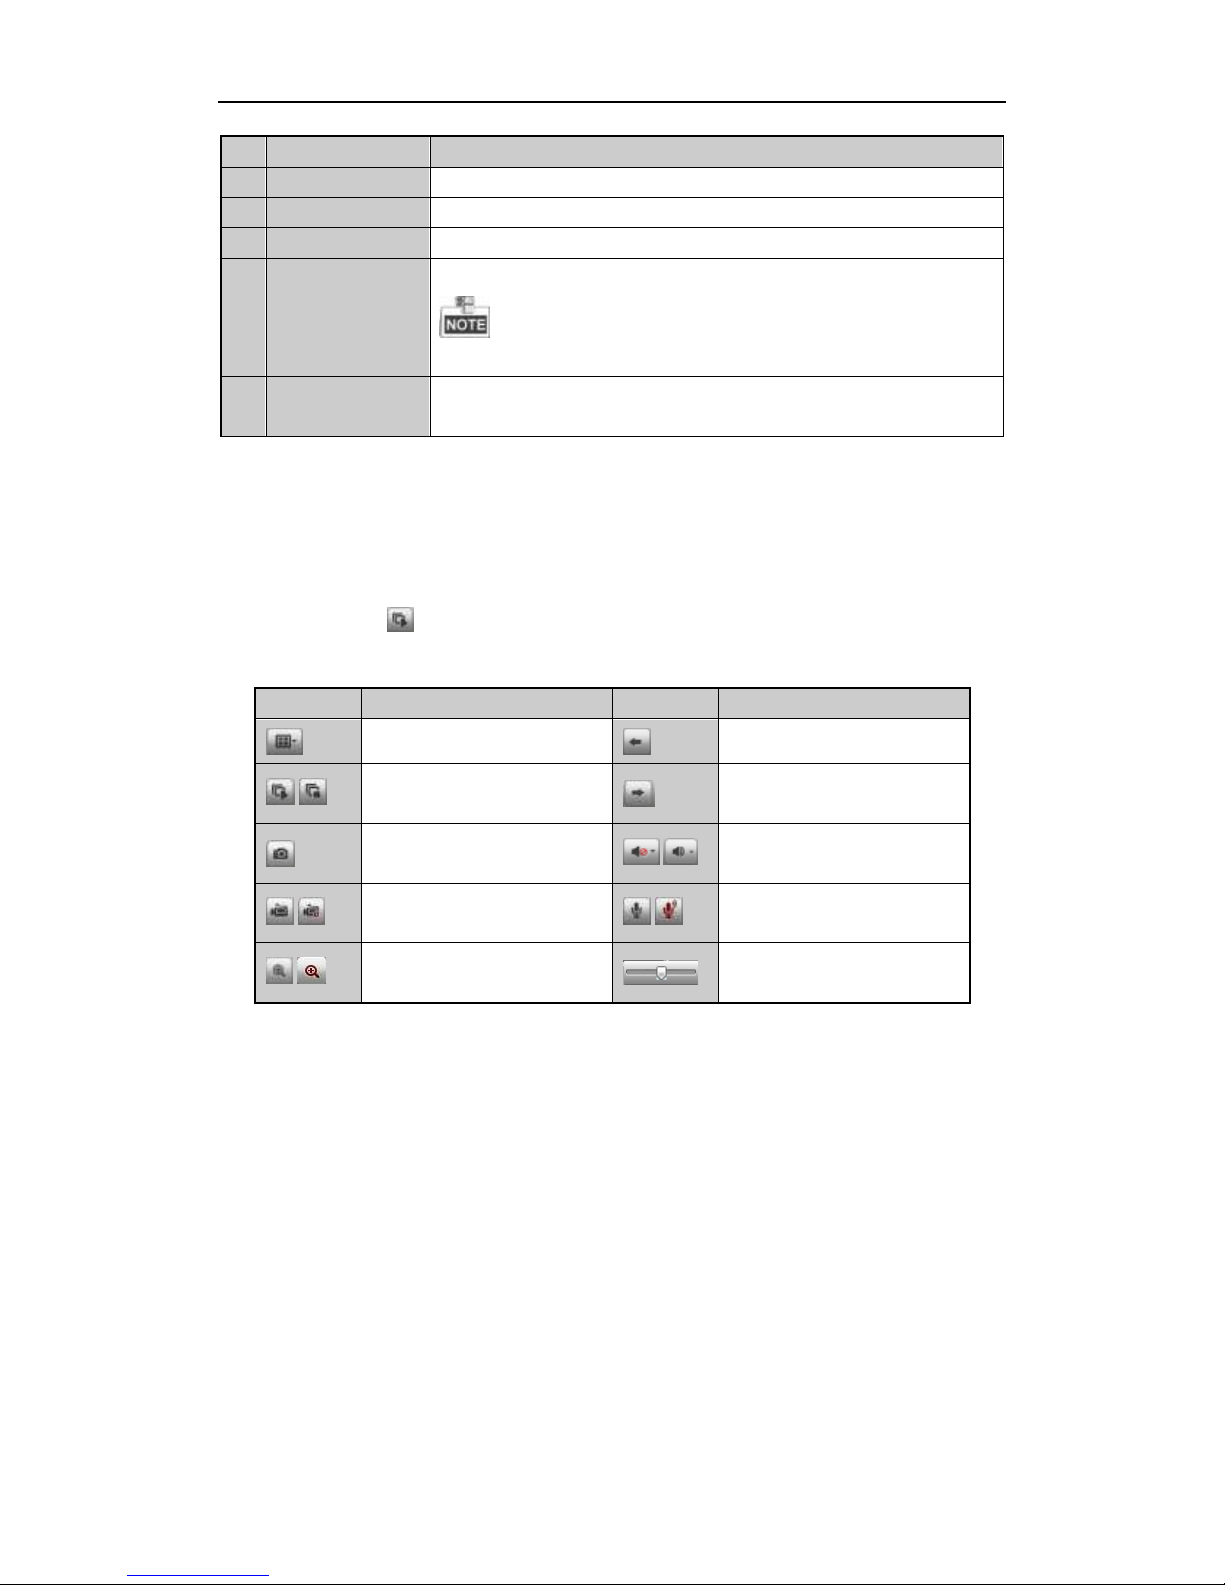
The live view interface appears by default when you log in the device.
Interface Introduction
No.
Name
Description
1
Channel List
Displays the list of channels and the playing and recording status of each
Page 25
Quick Start Guide of Digital Video Recorder
24
No.
Name
Description
channel.
2
Live View Window
Displays the image of channel, and multi-window division is supported.
3
Play Control Bar
Play control operations are supported.
4
PTZ Control
Pan, tilt, zoom operations are supported, as well as preset editing and calling.
PTZ function can only be realized if the connected camera supports PTZ control.
5
Video Parameters
Configuration
Brightness, contrast, saturation and hue of the image can be edited.
Start Live View
Steps:
1. In the live view window, select a playing window by clicking the mouse.
2. Double click a camera from the device list to start the live view.
3. You can click the button on the toolbar to start the live view of all cameras on the device list.
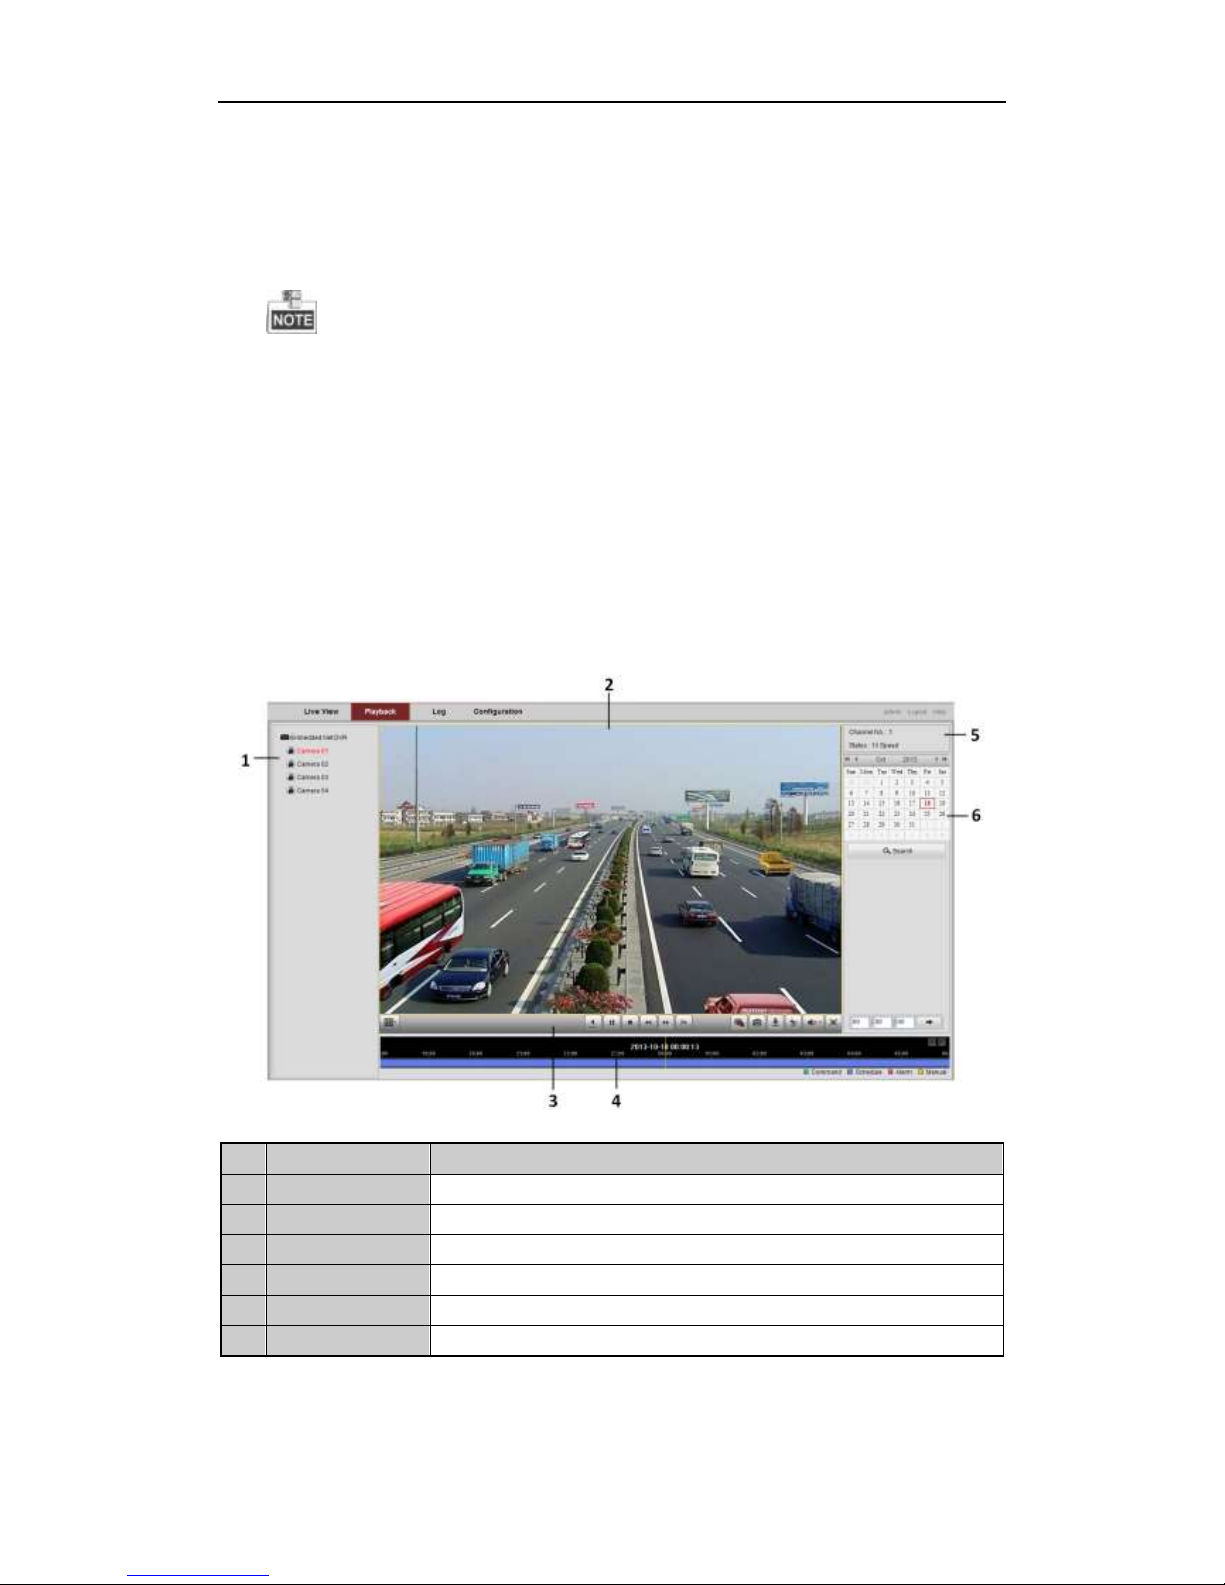
Refer to the following table for the description of buttons on the live view window:
Icon
Description
Icon
Description
Select the window-division mode
Previous page
/
Start/Stop all live view
Next page
Capture pictures in the live view
mode
/
Open/Close audio
/
Start/Stop all recording
/
Start/Stop two-way Audio
/
Enable/Disable digital zoom
Adjust volume
Recording
Before you start
Make sure the device is connected with HDD or network disk, and the HDD or network disk has been initialized
for the first time to use.
Two recording types can be configured: Manual and Scheduled. The following section introduces the
configuration of scheduled recording.
Steps:
1. Click Remote Configuration> Camera Settings> Record Schedule to enter Record Schedule settings
interface.
2. Select the camera to configure the record schedule.
3. Check the checkbox of Enable Record Schedule to enable recording schedule.
4. Click Edit to edit record schedule.
5. Choose the day in a week to configure scheduled recording.
Page 26
Quick Start Guide of Digital Video Recorder
25
1) Configure All Day or Customize Record:
If you want to configure the all-day recording, please check the All Day checkbox.
If you want to record in different time sections, check the Customize checkbox. Set the Start Time
and End Time.
The time of each segment cannot be overlapped. Up to 8 segments can be configured.
2) Select a Record Type. The record type can be Continuous, Motion, Alarm, Motion & Alarm, and
Motion | Alarm.
3) Check the checkbox of Select All and click Copy to copy settings of this day to the whole week. You
can also check any of the checkboxes before the date and click Copy.
4) Click OK to save the settings and exit the Edit Schedule interface.
6. Click Advanced to configure advanced record parameters.
7. Click Save to validate the above settings.
Playback
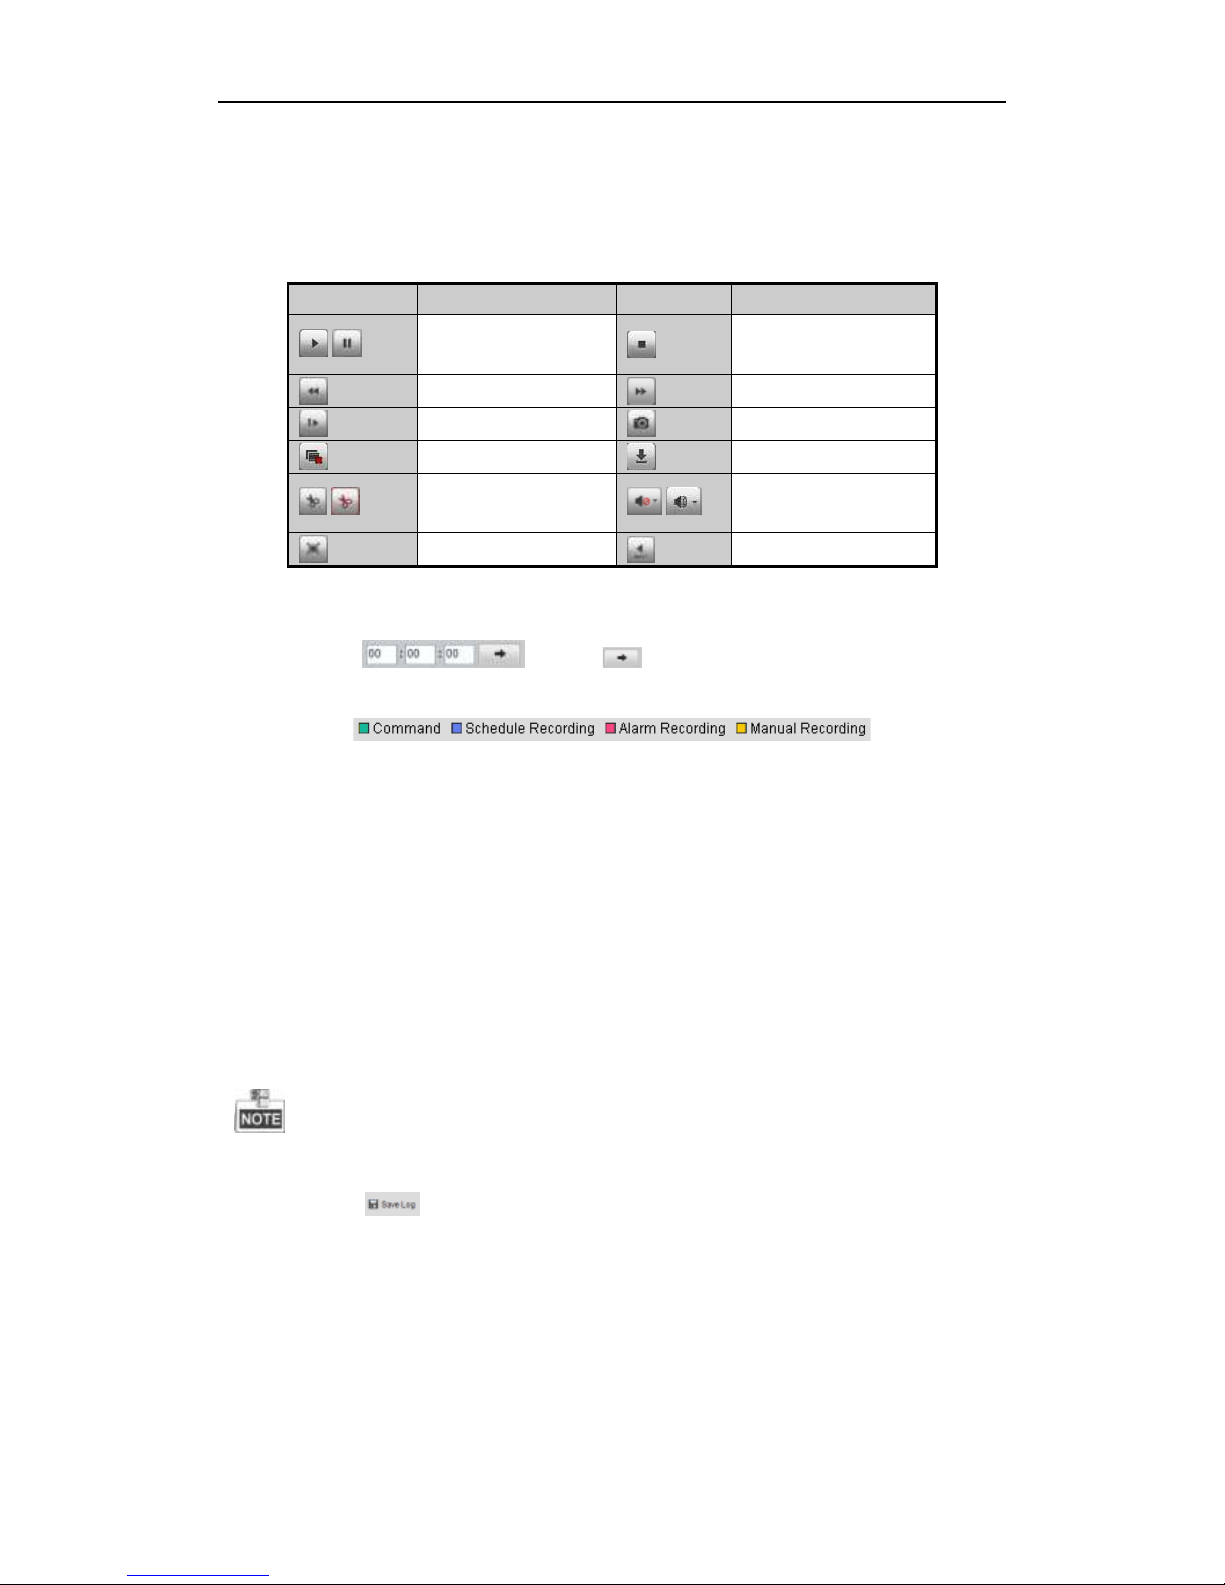
Interface Introduction
No.
Name
Description
1
Channel List
Displays the list of channels and the playing status of each channel.
2
Playback Window
Displays the image of channel.
3
Play Control Bar:
Play control operations are supported.
4
Time Line
Displays the time bar and the records marked with different colors.
5
Playback Status
Displays the playback status, including channel number and playback speed.
6
Calendar
You can select the date to play.
Start Playback
Steps:
Page 27
Quick Start Guide of Digital Video Recorder
26
1. Click Playback on the menu bar to enter playback interface.
2. Click the camera from the device list for playback.
3. Select the date from the calendar and click Search.
4. Click the Play button to play the video file searched on the current date.
5. Use the buttons on the toolbar to operate in playback mode.
Button
Description
Button
Description
/
Play/Pause
Stop
Slow down
Speed up
Play by single frame
Capture
Stop all playback
Download
/
Video clip
/
Open/Close audio
Full Screen
Reverse play
6. You can drag the progress bar with the mouse to locate the exact playback point. You can also input the time
in the textbox and click button to locate the playback point.
The color of the video on the progress bar stands for the different video types.
Log
You can view and export the log files at any time, including operation, alarm, exception and information of device.
Before you start
The Log function can be realized only when the device is connected with HDD or network disk. And make sure
the HDD or network disk has been initialized for the first time to use.
Steps:
1. Click Log on the menu bar to enter the Log interface.
2. Set the log search conditions to refine your search, including the Major Type, Minor Type, Start Time and
End Time.
3. Click the Search button to start searching log files.
4. The matched log files will be displayed on the list shown below.
Up to 100 log files can be displayed on each page.
You can click the button to save the searched log files to local directory.
Page 28
Quick Start Guide of Digital Video Recorder
27
Menu Operation
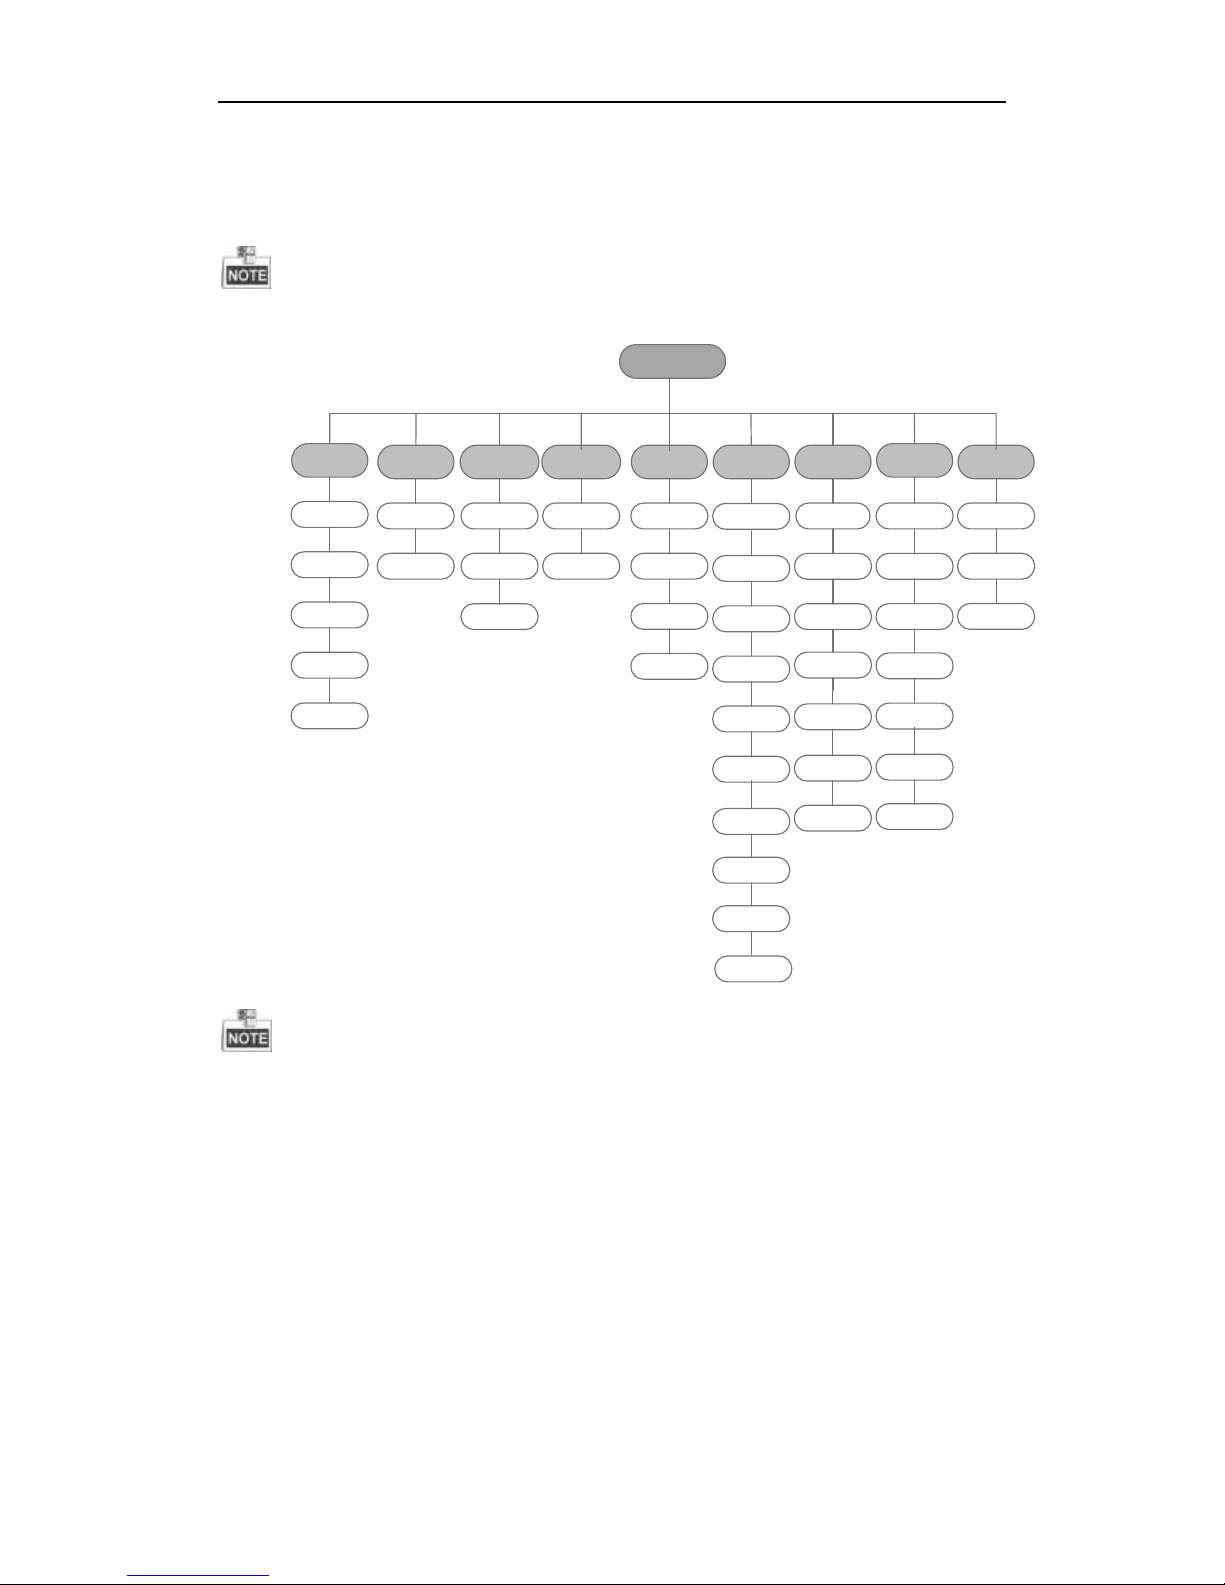
Menu Structure
The menu structure varies according to different models.
Menu
Export Manual HDD Camera
Maintenance
ShutdownRecord
Configuration
Playback
Normal Record General Schedule General
System Info
Logout
Event Advanced Encoding
OSD
Network
Log
Information
ShutdownAlarm
Advanced
Import/
Export
Reboot
Holiday
PTZ
Upgrade
Motion
Live View
Default
Privacy
Mask
Exceptions
Net Detect
Video
Tampering
User
Video Loss
HDD Detect
Image
VQD
Manual
VQD
Alarm
RS-232
Camera
VCA
Normal
Event
Tag
Smart
External File
The TVI-D1xxx does not support RS-232 and Alarm functions.
Startup and Shutdown
Proper startup and shutdown procedures are crucial to expand the service time of the DVR.
To start the DVR:
Check the power supply is plugged into an electrical outlet. It is HIGHLY recommended that an Uninterruptible
Power Supply (UPS) be used in conjunction with the device. Turn on the power switch on the rear panel; the
Power indicator LED on the front panel should be yellow.
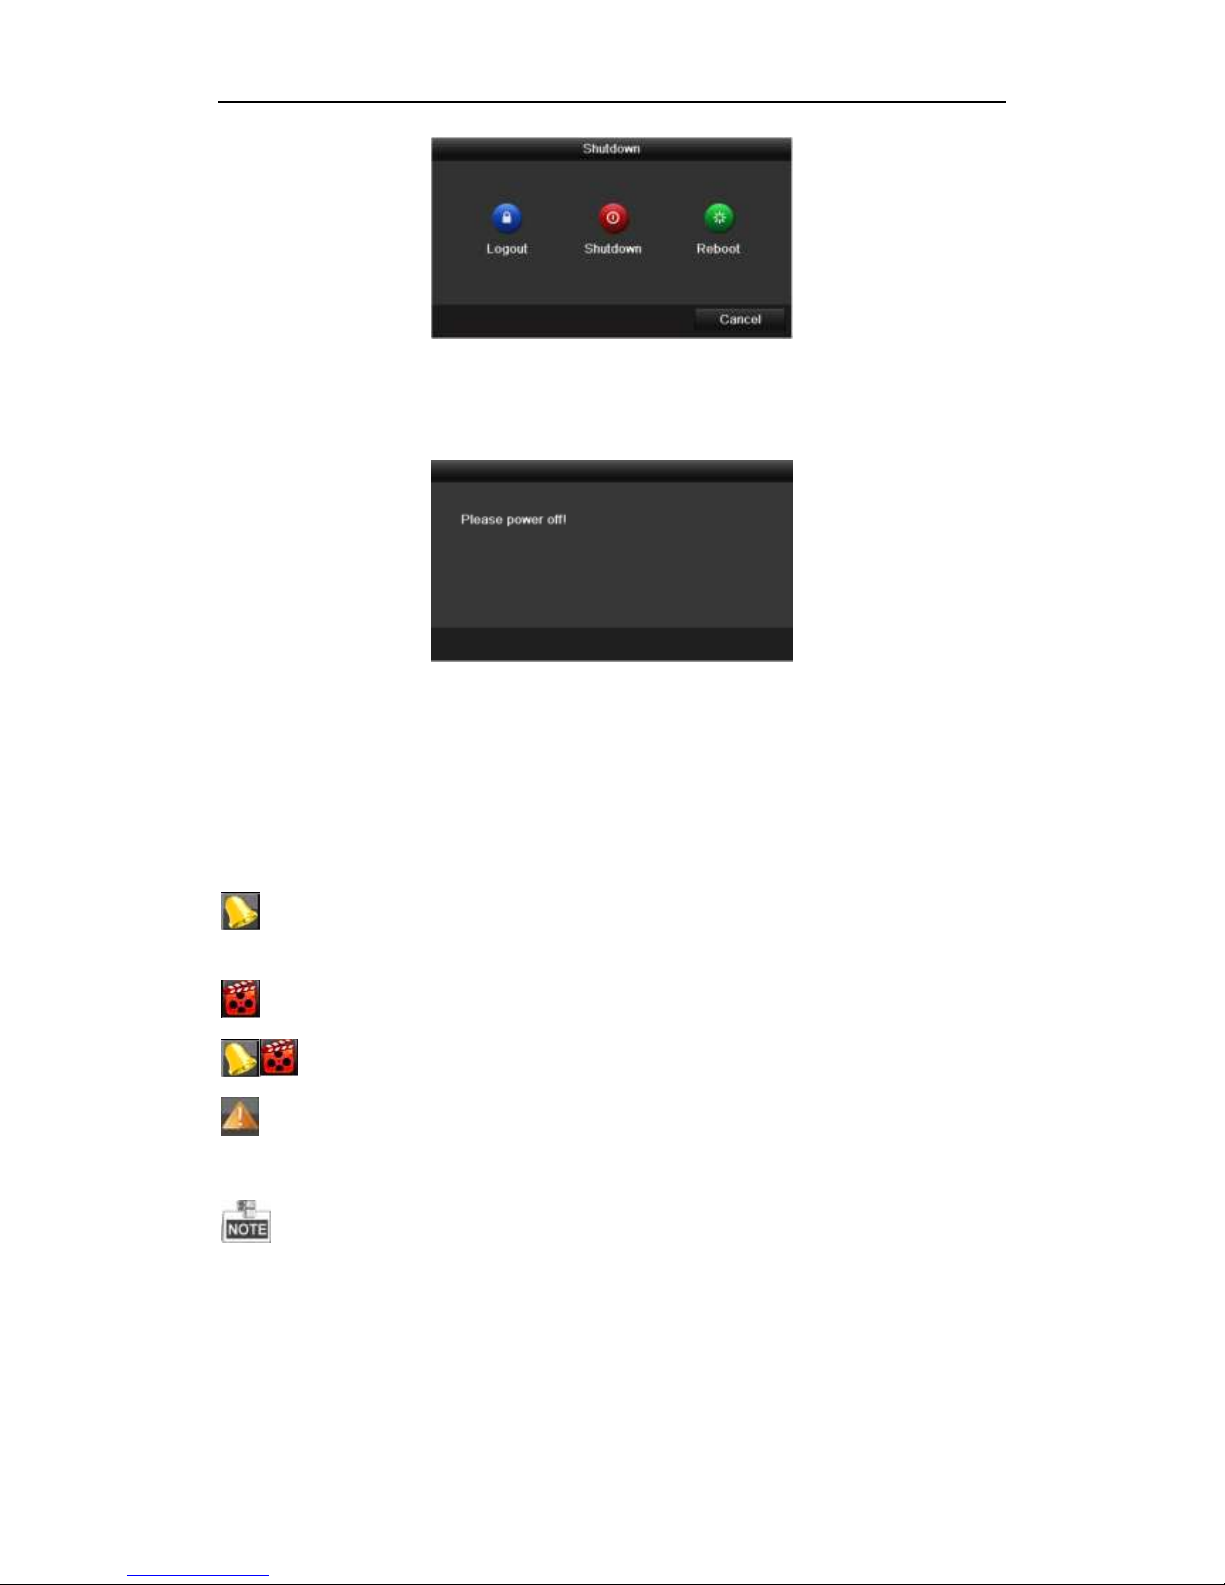
To shut down the DVR:
Steps:
1. Enter the Shutdown menu.
Menu > Shutdown
Page 29
Quick Start Guide of Digital Video Recorder
28
2. Select the Shutdown button.
3. Click the Yes button.
4. Turn off the power switch on the rear panel when the note appears (supported by TVI-D1xxx and
TVI-D2xxx series DVR).
After the device starting up, the wizard will guide you through the basic settings, including edting password, date
and time settings, network settings, HDD initializing, and recording.
Live View
Some icons are provided on screen in Live View mode to indicate different camera status. These icons include:
Live View Icons
In the live view mode, there are icons at the right top of the screen for each channel, showing the status of the
record and alarm in the channel, so that you can find problems as soon as possible.
Indicating that there is an alarm or are alarms. Alarm includes video loss, tampering, motion detection or
sensor alarm, etc.
Recording (manual record, continuous record, motion detection or alarm triggered record)
Alarm & Recording
Event/Exception (event and exception information, appears at the lower-left corner of the screen.)
Adding IP Cameras
Please refer to the Specifications for the number of connectable cameras to different models.
Steps:
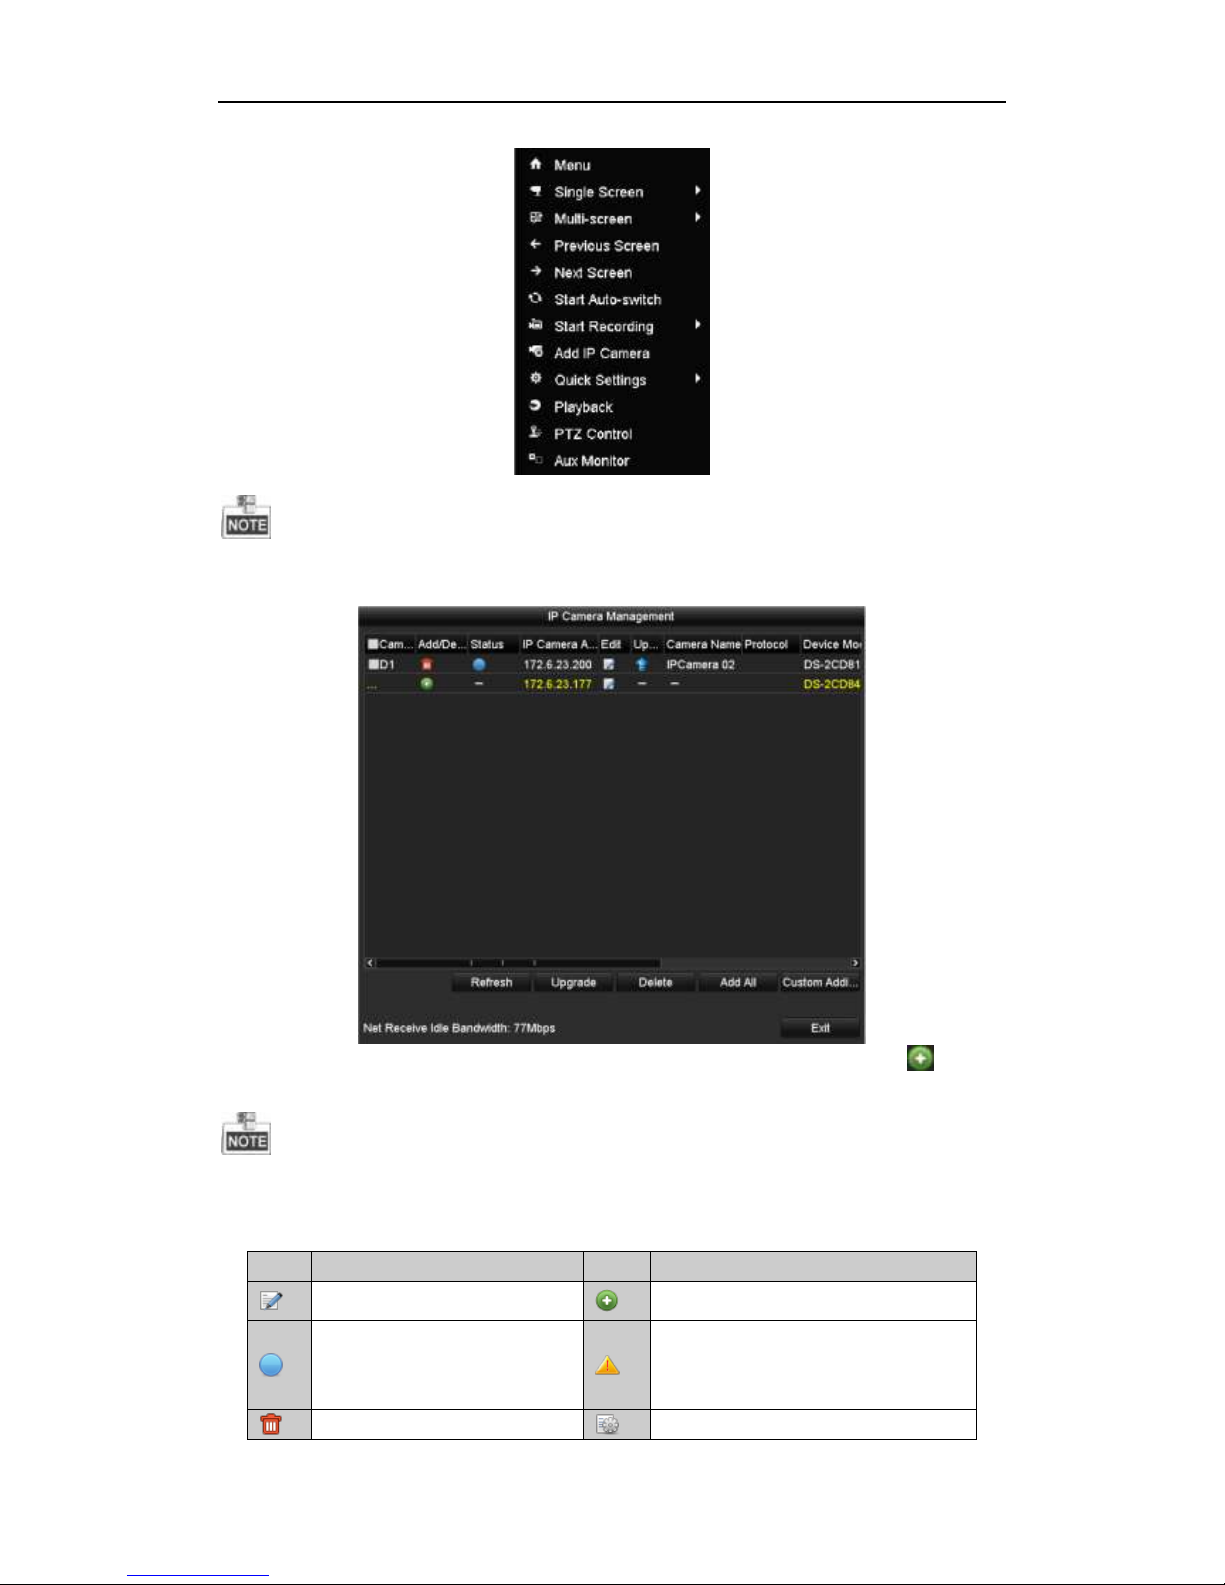
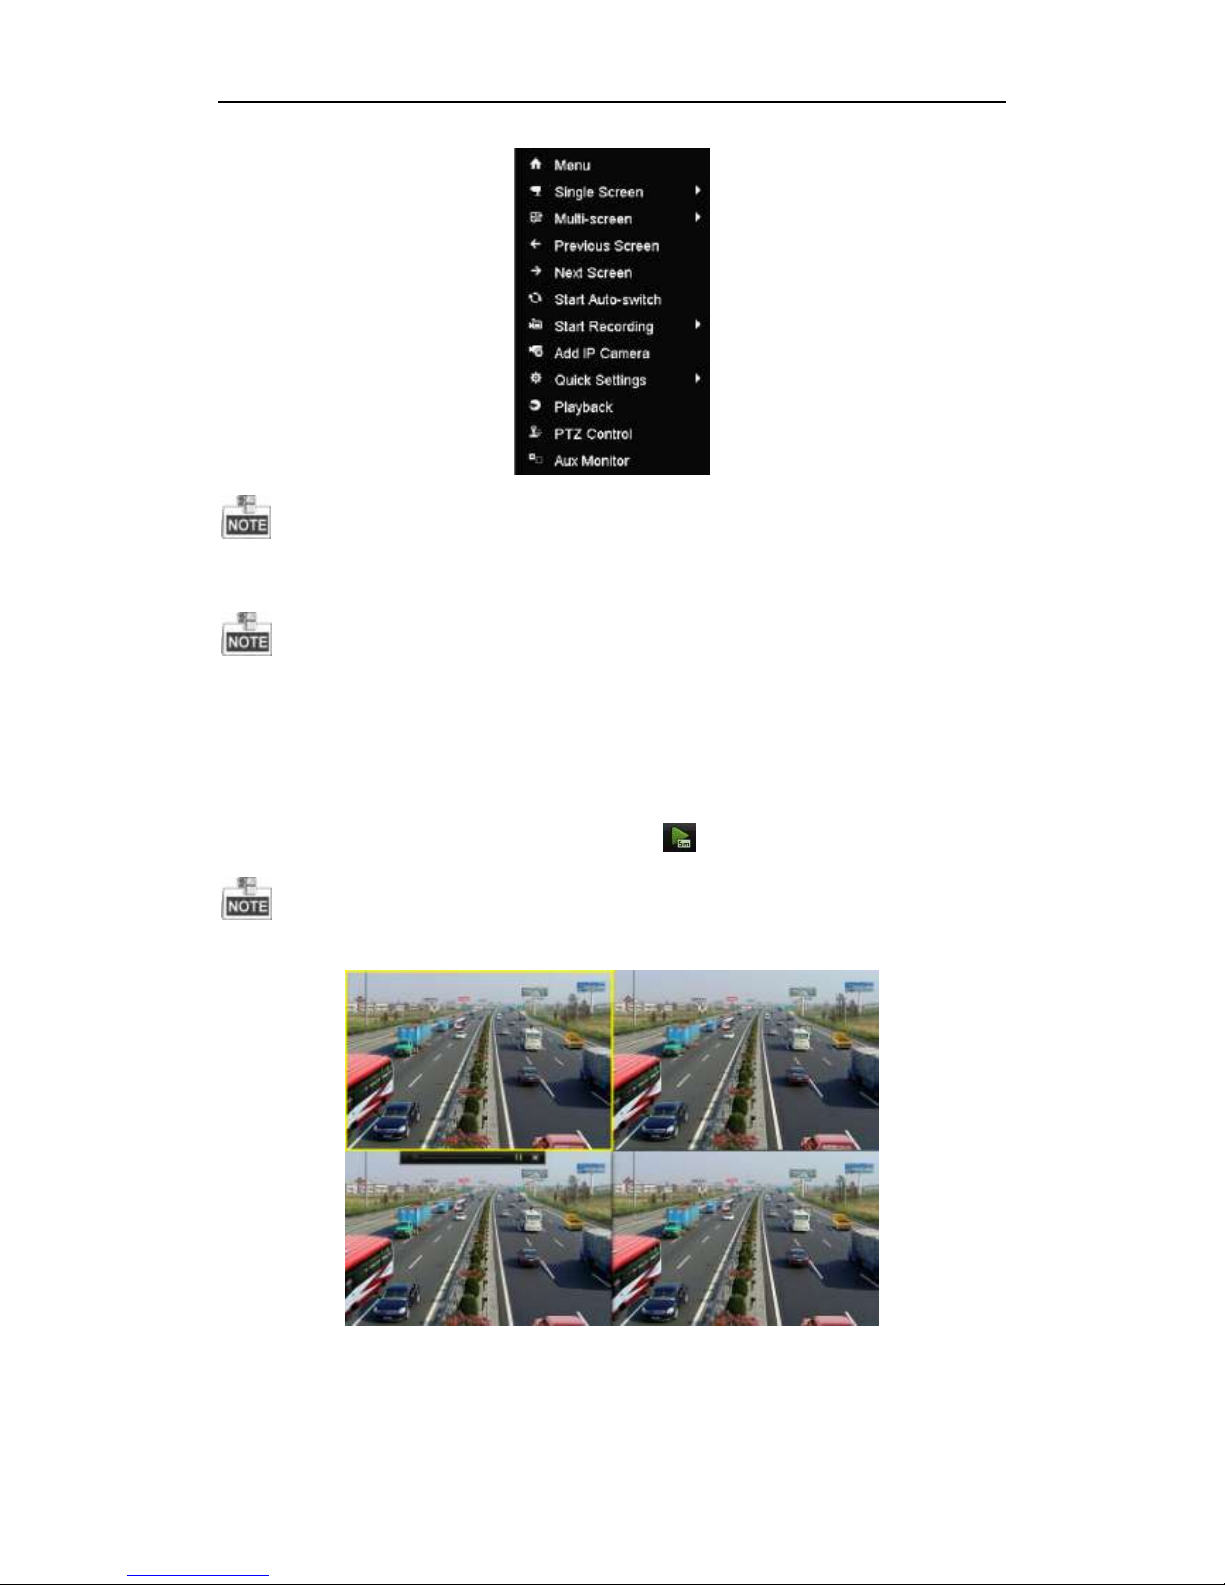
1. Right-click the mouse in the live view mode to show the right-click menu.
Page 30
Quick Start Guide of Digital Video Recorder
29
The TVI-D1xxx and TVI-D2xxx provide no Aux Monitor option.
2. Select Add IP Camera in the pop-up menu to enter the IP Camera Management interface.
3. The online cameras with same network segment will be displayed in the camera list. Click the button to
add the camera.
The added camera is marked in white while the camera not added is marked in yellow.
Explanation of the icons
Icon
Explanation
Icon
Explanation
Edit basic parameters of the camera
Add the detected IP camera.
The camera is connected.
The camera is disconnected; you can click
the icon to get the exception information of
camera.
Delete the IP camera.
Advanced settings of the camera.
Page 31
Quick Start Guide of Digital Video Recorder
30
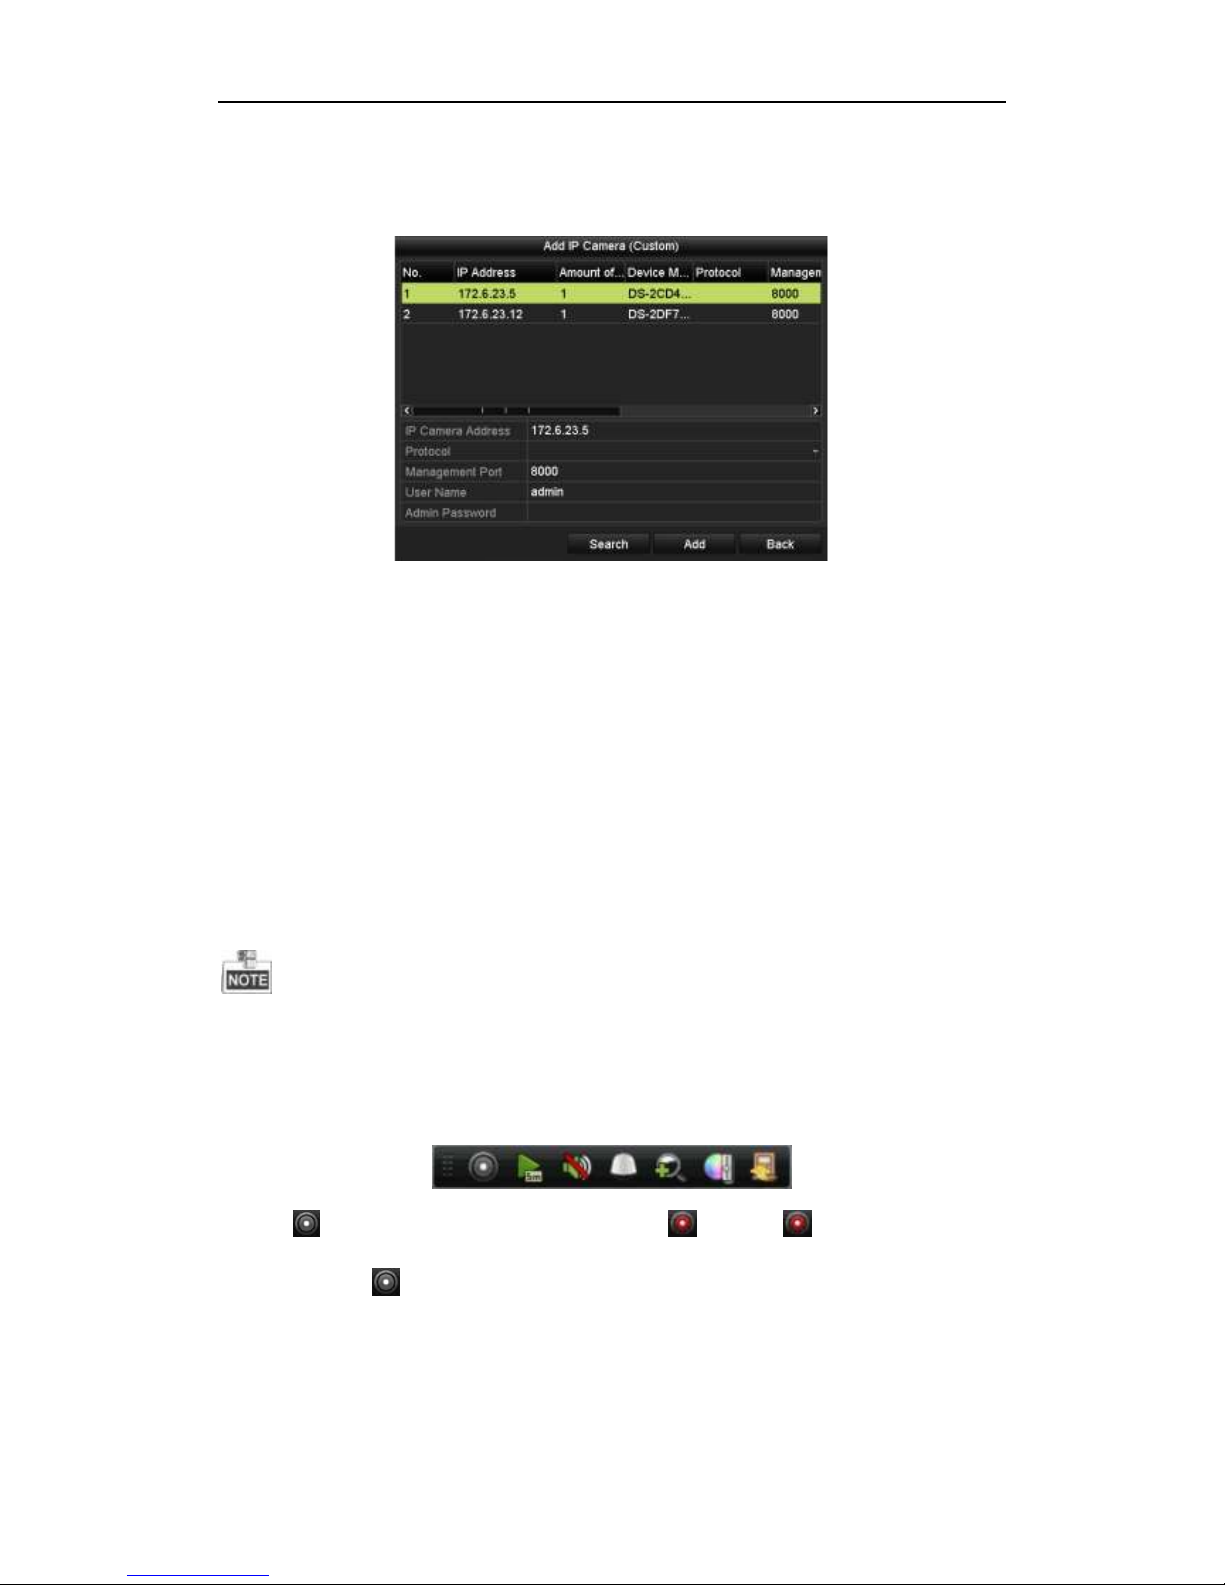
4. To add other IP cameras:
1) Click the Custom Adding button to pop up the Add IP Camera (Custom) interface.
2) You can edit the IP address, protocol, management port, and other information of the IP camera to be
added.
3) Click Add to add the camera.
4) (For the encoders with multiple channels only) check the checkbox of Channel No. in the pop-up window,
as shown in the following figure, and click OK to finish adding.
Record
Before you start:
Make sure that the HDD has already been installed. If not, please install a HDD and initialize it. You may refer to
the user manual for detailed information.
Purpose:
Two kinds of record types are introduced in the following section, including Instant Record and All-day Record.
And for other record types, you may refer to the user manual for detailed information.
After rebooting all the manual records enabled are canceled.
Instant Recording
On the live view window of each channel, there is a quick setting toolbar which shows on the bottom of the
window when you click on it.
Click the icon to enable the record, and the icon turns to . And click icon to disable the record,
then the icon turns to .
All-day Recording
Perform the following steps to set the all-day recording.
On the live view window, right lick the window and move the cursor to the Start Recording option, and select
Continuous Record or Motion Detection Record on your demand.
Page 32
Quick Start Guide of Digital Video Recorder
31
And click the Yes button in the popup Attention message box to confirm the settings. Then all the channels will
start to record in the selected mode.
The TVI-D1xxx and TVI-D2xxx provide no Aux Monitor option.
Playback
Play back the record files of a specific channel in the live view menu.
OPTION 1:
Choose a channel under live view using the mouse and click the button in the shortcut operation menu.
Only record files recorded during the last five minutes on this channel will be played back.
OPTION 2:
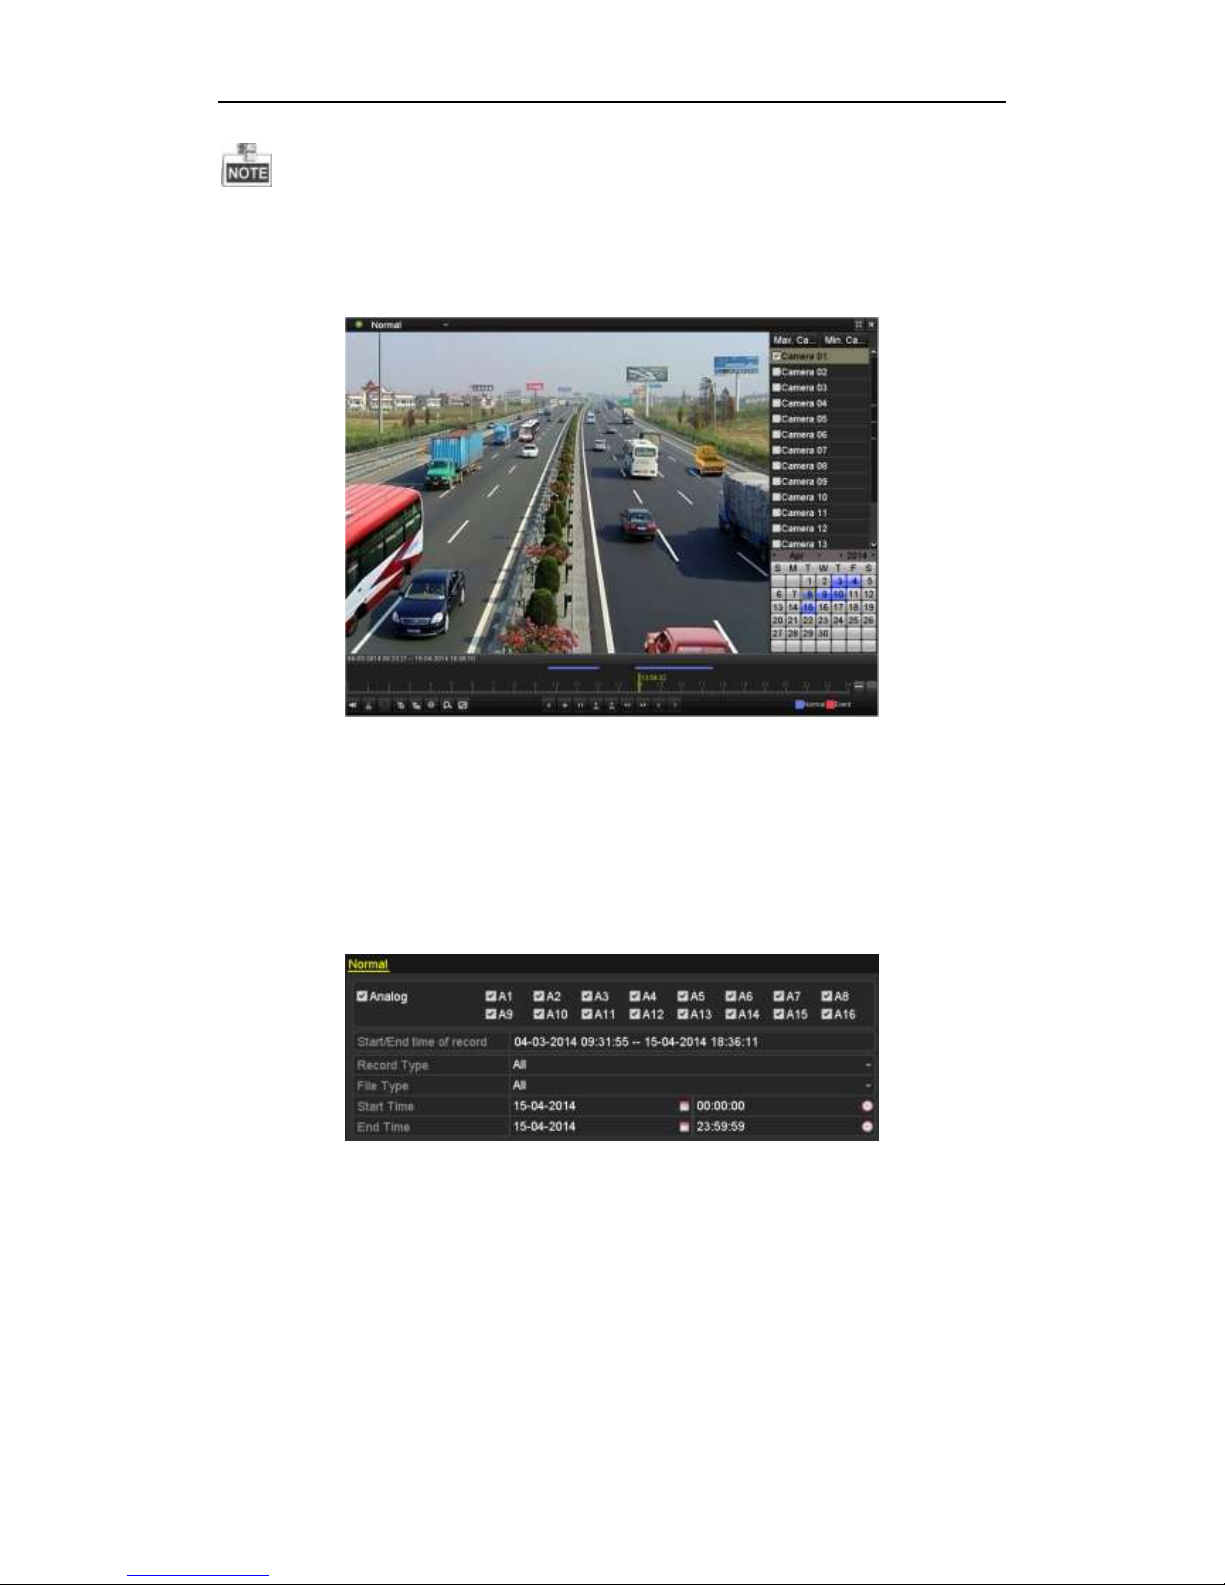
1. Enter the Playback menu.
Right click a channel in live view mode and select Playback from the menu.
Page 33
Quick Start Guide of Digital Video Recorder
32
To the TVI-D2104 & TVI-D2208, TVI-D14xx & TVI-D24xx series DVR, pressing numerical buttons on the front
panel will switch playback to related channels during playback process.
2. Playback management.
The toolbar in the bottom part of Playback interface can be used to control playing process.
Just check the channel or channels if you want to switch playback to another channel or execute simultaneous
playback of multiple channels.
Backup
Recorded files can be backed up to various devices, such as USB flash drives, USB HDDs or USB DVD writers.
To export recorded files:
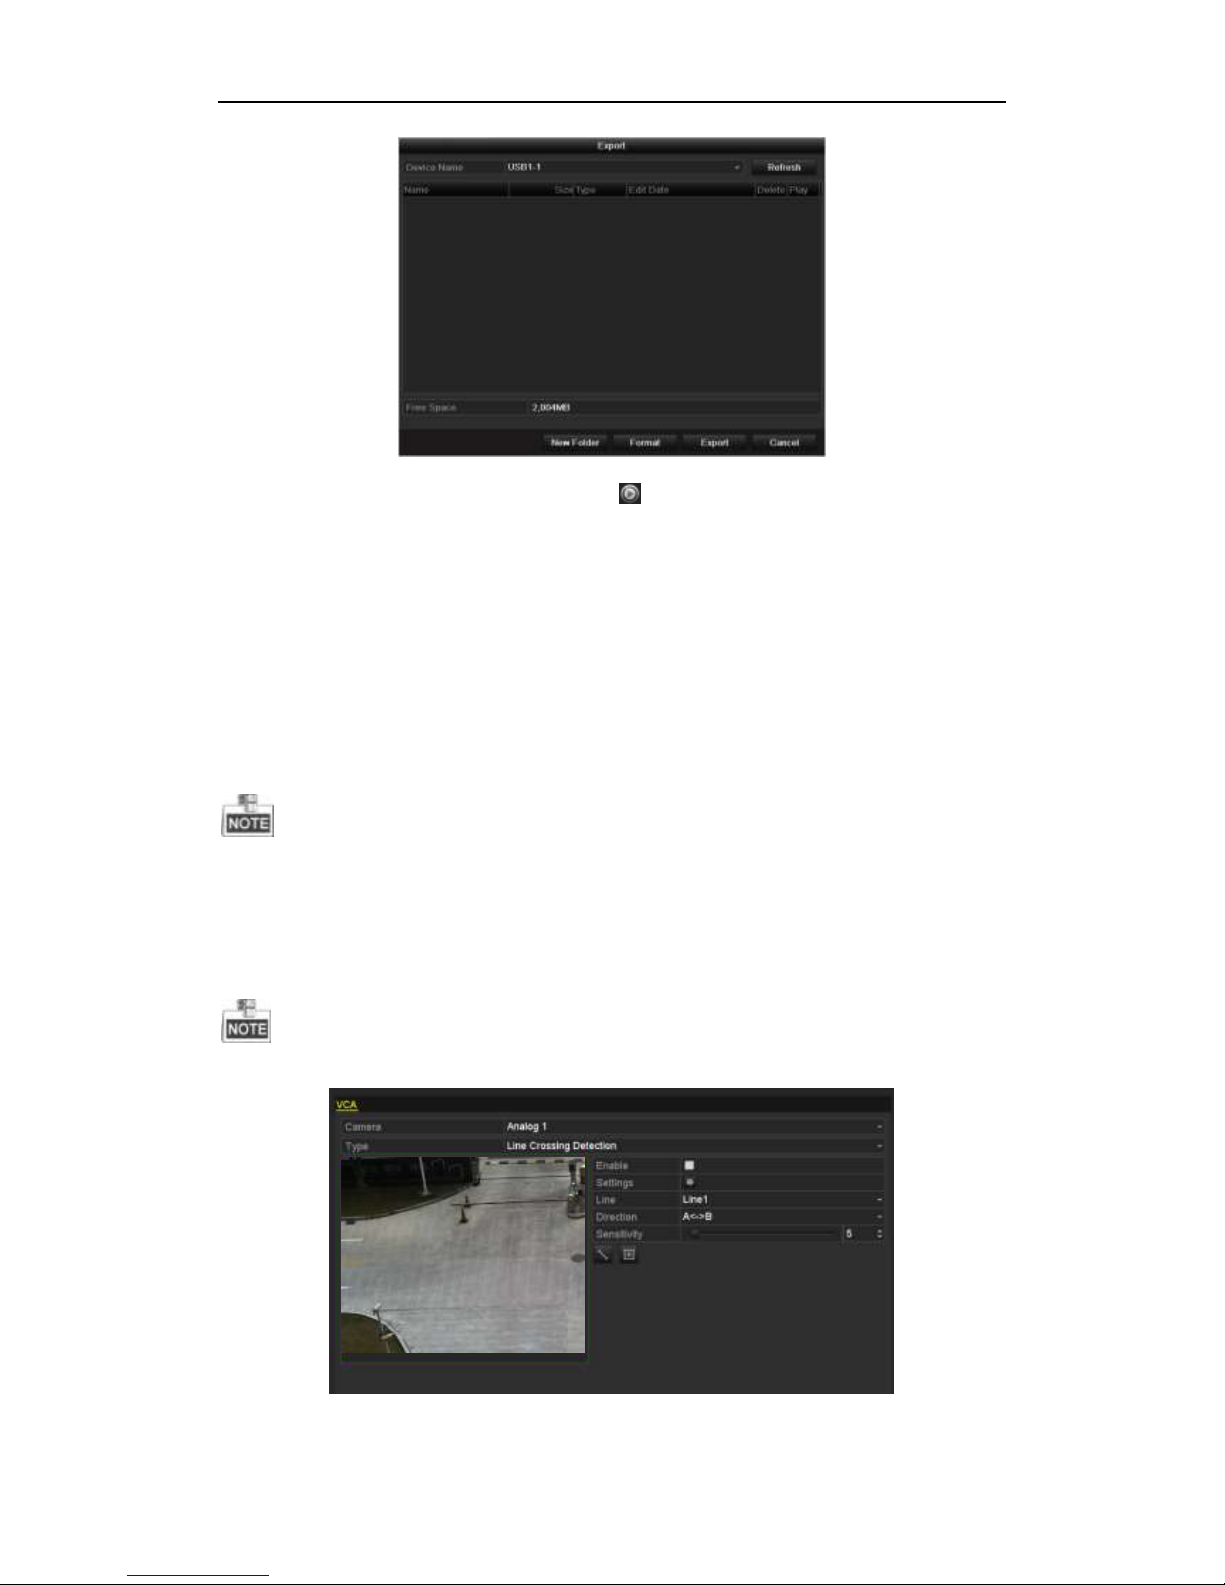
1. Enter Video Export interface.
Choose the channel(s) you want to back up and click the Quick Export button.
2. Enter Export interface, choose backup device and click the Export button to start exporting.
Page 34
Quick Start Guide of Digital Video Recorder
33
3. Check backup result.
Choose the record file in Export interface and click button to check it.
VCA Alarm
Purpose:
The TVI-D1xxx, TVI-D2xxx, TVI-D14xx, TVI-D24xx series DVR can receive the VCA alarm sent by analog
camera, and the VCA detection must be enabled and configured on the camera settings interface first.
Perform the steps below to set the VCA configuration. The device can provide VCA capability of enabling linkage
actions when detecting exceptional event, such as people, vehicles and objects cross a virtual line or intrude a
pre-defined region.
The VCA settings is supported by 1 analog camera for TVI-D1xxx & TVI-D14xx models and 2 analog camers for
TVI-D2xxx & TVI-D24xx models.
Steps:
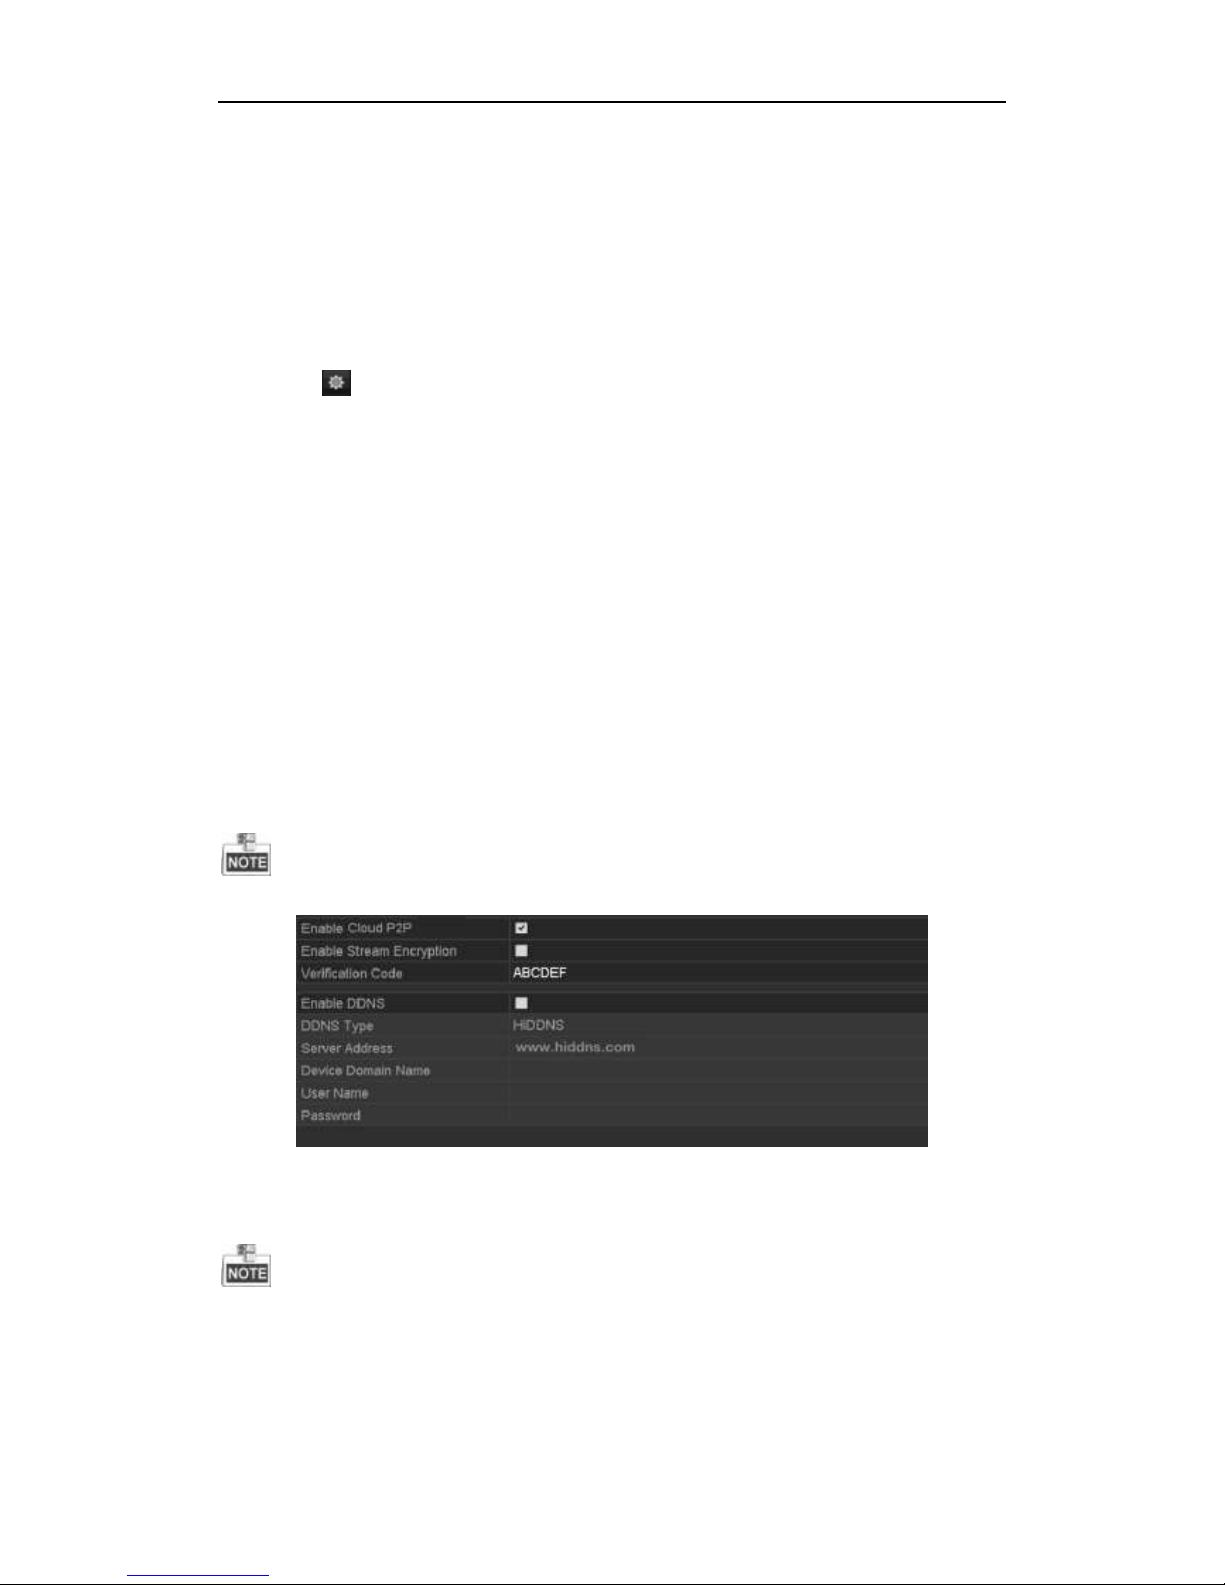
1. Enter VCA Alarm interface of Camera Management and select a camera you want to detect VCA alarm.
Menu> Camera> VCA
The selected camera must support the VCA function.
2. Select the analog camera to configure the VCA.
Page 35
Quick Start Guide of Digital Video Recorder
34
3. Select the detection type to Line Crossing Detection or Intrusion Detection.
Line Crossing Detection: This function can be used for detecting people, vehicles and objects cross a set
virtual line. The line crossing direction can be set as bidirectional, from left to right or from right to left. And
you can set the duration for the alarm response actions, such as full screen monitoring, audible warning, etc.
Intrusion Detection: This function can be used for detecting whether there are people, vehicles and objects
intruding into the pre-defined region longer than the set duration. And you can set the duration for the alarm
response actions, such as full screen monitoring, audible warning.
4. Check the Enable checkbox to enable the selected VCA detection.
5. Click the to configure the trigger channel, arming schedule and linkage actions.
6. Configure the region and other settings for the selected VCA detection.
7. Click Apply to save the settings.
Access by Cloud P2P
You can choose the access to the DVR by Cloud P2P or by DDNS through the settings on the Extranet Access
menu.
Cloud P2P provides the mobile phone application and as well the service platform page to access and manage your
connected DVR, which enables you to get a convenient remotely access to the surveillance system.
Steps:
1. Enter the Network Settings interface.
Menu > Configuration > Network
2. Select the Extranet Access tab to enter the Cloud P2P Settings interface.
3. Check the Enable Cloud P2P checkbox to activate this feature.
4. If required, check the Enable Stream Encryption checkbox to encrypt the video stream.
5. Enter the verification code of the device.
The verification code consists of 6 capital letters and is located at the bottom of the device.
6. Click the Apply button to save and exit the interface.
After configuration, you can access and manage the DVR by your mobile phone on which the Cloud P2P
application is installed or by the Cloud P2P website (http://www.hicloudcam.com).
For more operation instructions, please refer to the help file on the Cloud P2P official website
(http://www.hicloudcam.com).
03010011027
 Loading...