

Page 1
Page 2

QUICK SETUP GUIDE – OVERVIEW
This manual is intended for initial setup only. T he user should read the entire instructions manual before using this
product. The user instructions manual can be downloaded via NUVICO website.
TABLE OF CONTENTS
QUICK SETUP GUIDE – OVERVIEW .................................................................................................................................... 1
TABLE OF CONTENTS ...................................................................................................................................................... 1
INSTALLATION DIAGRAM ..................................................................................................................................................... 2
EN-U3000 SAMPLE INSTALLATION DIAGRAM ............................................................................................................... 2
HOW TO MOUNT THE HDD TO THE NVR ........................................................................................................................... 3
GETTING STARTED .............................................................................................................................................................. 6
HOW TO START THE NVR ................................................................................................................................................ 6
HOW TO LOG IN TO THE NVR ......................................................................................................................................... 6
MONITOR SETUP .................................................................................................................................................................. 9
CONFIGURE NVR’S MONITO R OUTPUT TO 1920 x 1080 .............................................................................................. 9
IF YOU ARE USING A BNC MONITOR ........................................................................................................................... 11
www.nuvico.com
HOW TO DISABLE MAIN 2 BNC O UTPUT ...................................................................................................................... 12
HOW TO INITIALIZE THE HDD FOR RECORDING ............................................................................................................ 15
HOW TO SET DATE/TIME ................................................................................................................................................... 19
CAMERA SETUP .................................................................................................................................................................. 21
RECORD SETUP .................................................................................................................................................................. 25
NETWORK SETUP ............................................................................................................................................................... 29
VIDEO SEARCH & PLAYBACK............................................................................................................................................ 33
HOW TO COPY VIDEOS INTO CD/DVD/USB ..................................................................................................................... 38
HOW TO VIEW COPIED VIDEO .......................................................................................................................................... 40
EN-U3000 1
Page 3
INSTALLATION DIAGRAM
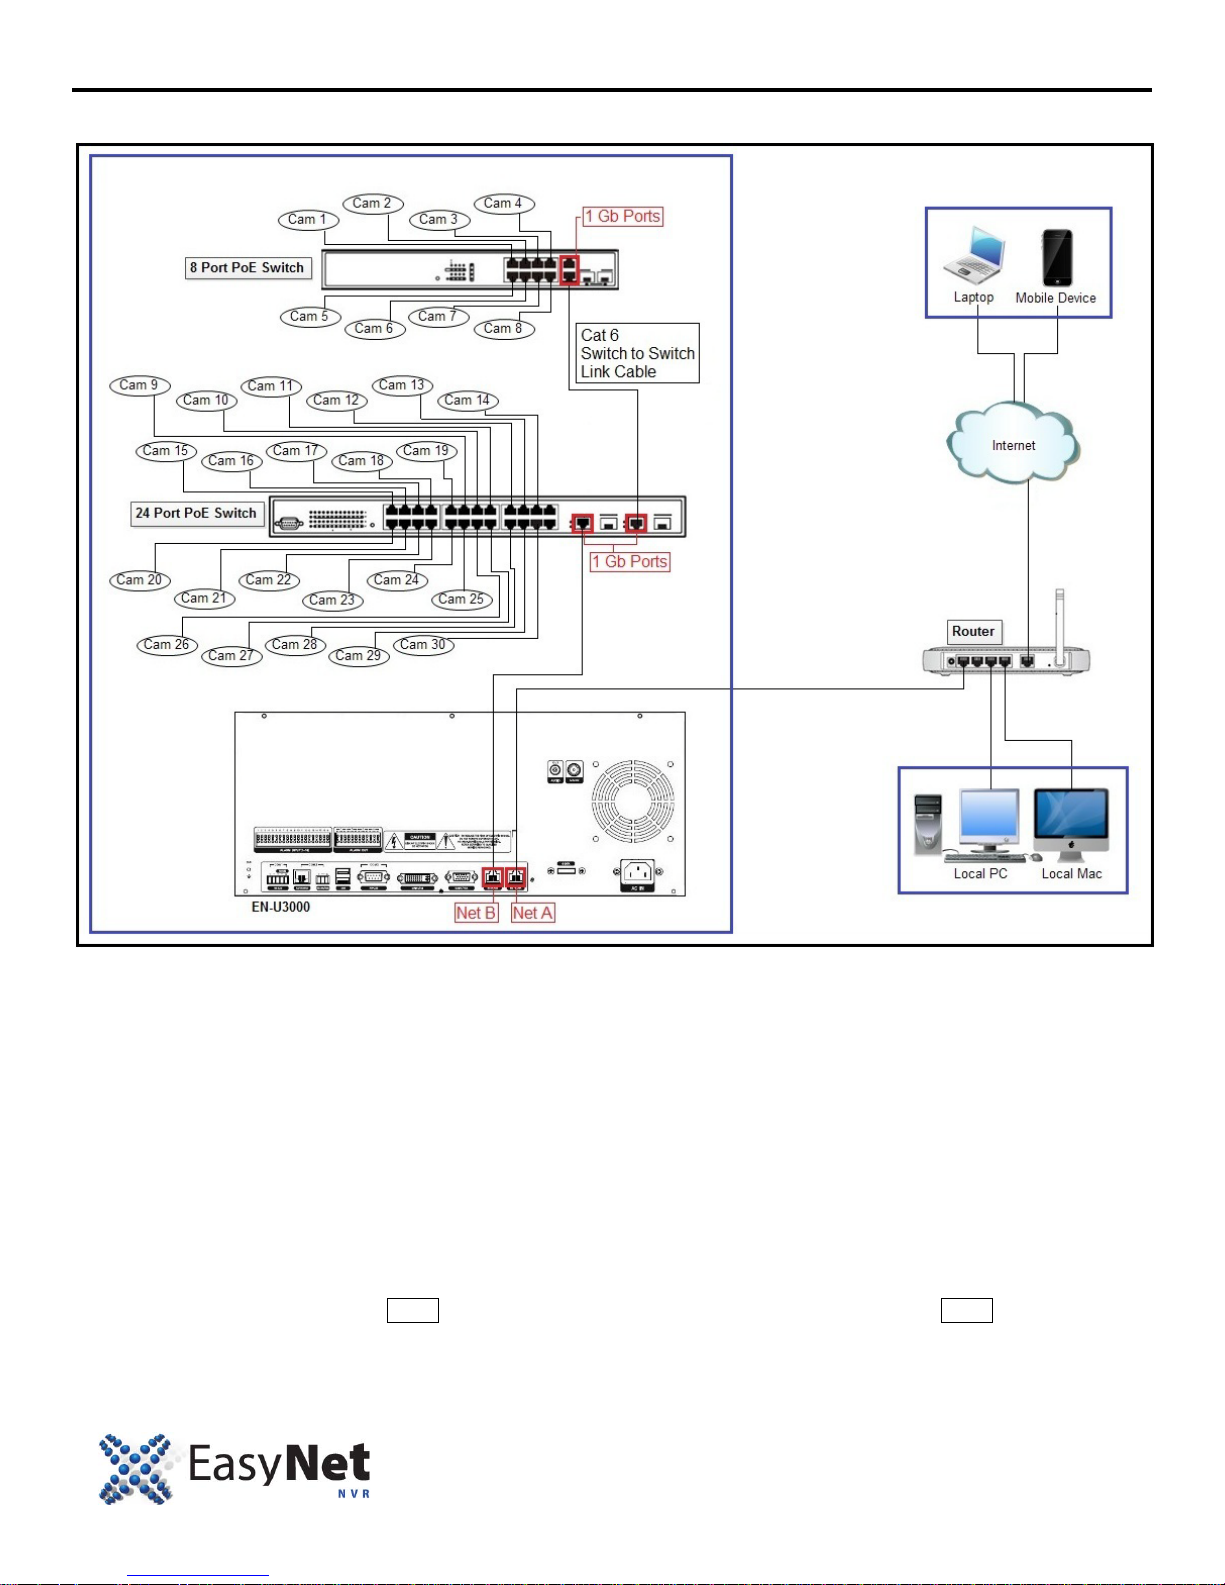
EN-U3000 SAMPLE INSTALLATION DIAGRAM
1. You will notice that the diagram illustrates using 2 P oE Network Switches. 8 Port PoE Switch and 24 Po rt PoE
Switch. That’s because the diagram is illustrat ing 30 EasyNet HD cameras installation since EN-U3000 is a 30channel NVR. It will be difficult to source 48 Port Po E swit ch that outputs true 15.4 watts per port. Ther efore, at
this time, it is recommended that you use 8 Port PoE Switch & 24 Port PoE Switch that truly outputs 15.4 watts
per port.
2. The Make and Model of the PoE Network Switch illust rated in the diagram is:
a. 8 Port: Make: ifs Model: GE-DS-82-POE
b. 24 Port: Make: ifs Model: GE-DSSG-244-POE
3. These network switches have dedicated 2 extra 1 Gbps port that are used for 2 purposes.
• To link the 2 network switches together using faster 1 Gbps port instead of standard 100Mbps PoE
ports.
• To link up to the EN-U3000 Net B network port that is configured for private camera network to
guarantee the reliability and the performance.
Important Note: Make sure that the Net B is connected to the dedicated 1 Gbps on the switch and Net A is connected to
the standard internet router.
2 ENU-3000
Page 4
HOW TO MOUNT THE HDD TO THE NVR
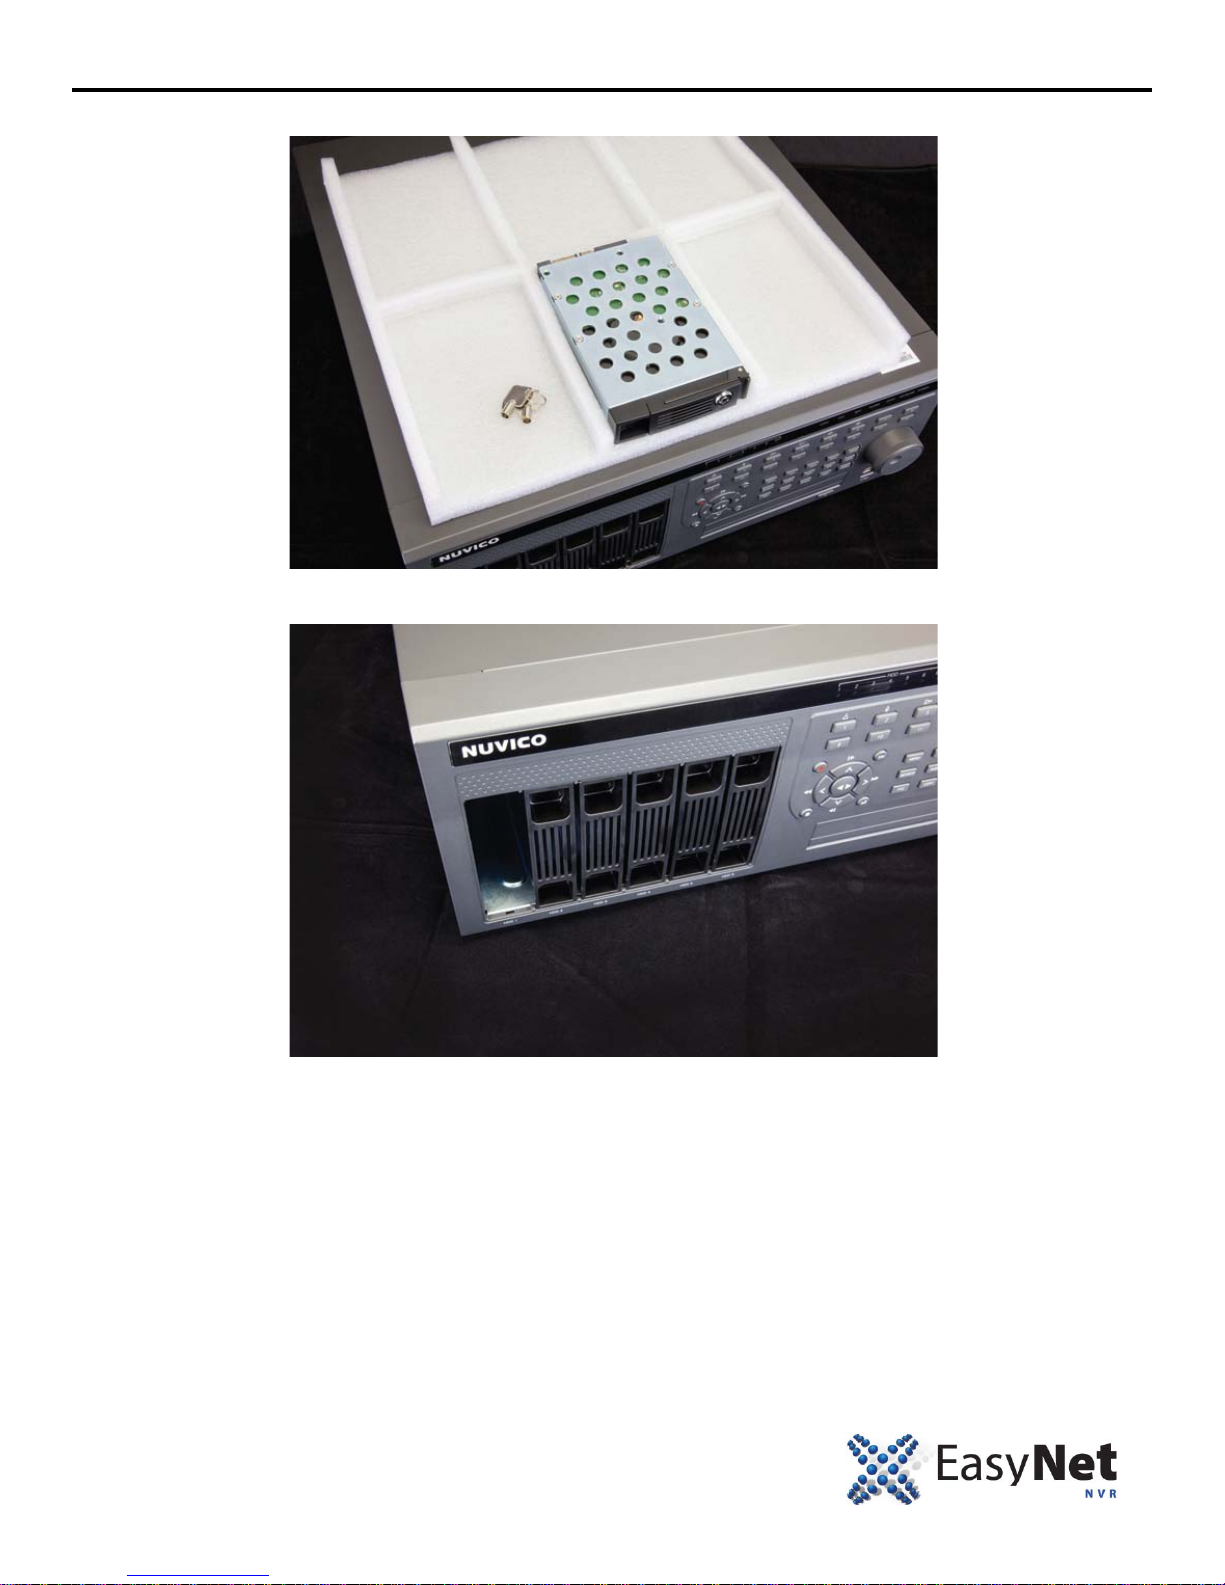
1. When you unpack the NVR box, locate the removable HDD tray, shown below.
2. The removable HDD tray, shown below needs to be inserted into the empty slot of the NVR.
EN-U3000 3
Page 5
HOW TO MOUNT THE HDD TO THE NVR
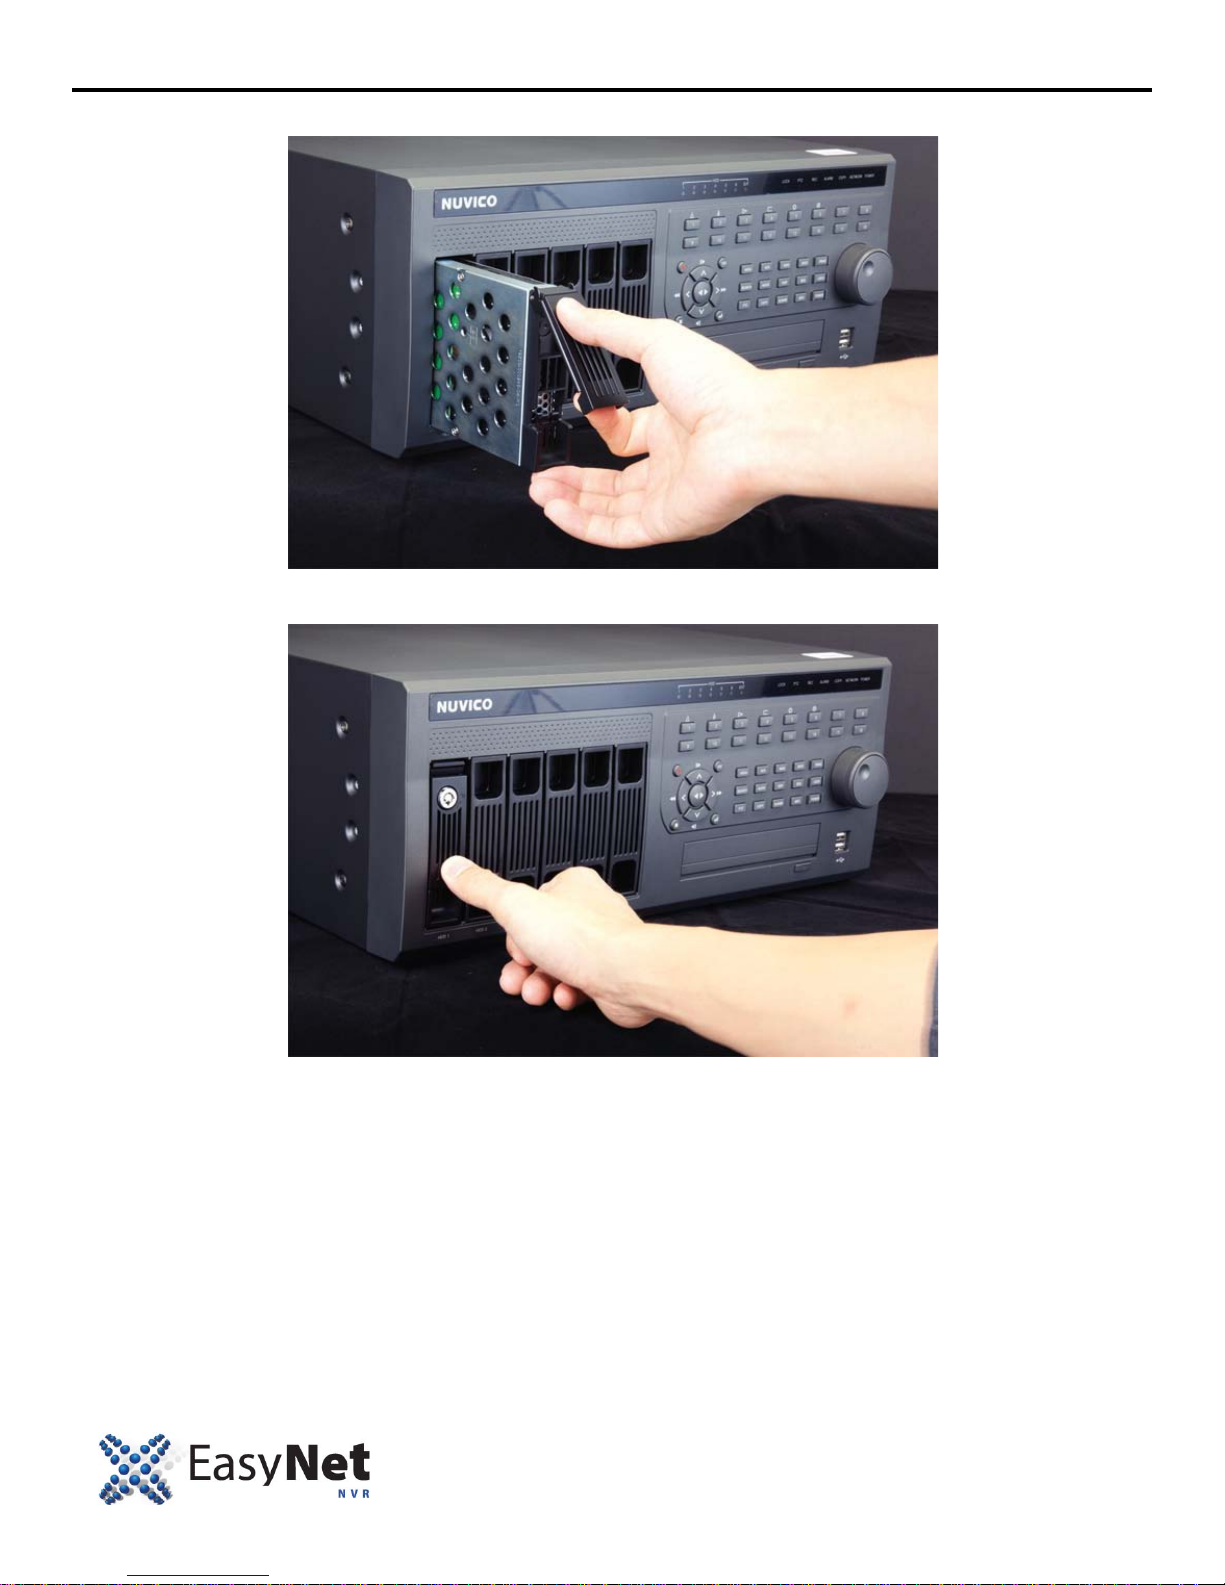
3. With the latch pointing upwards, slide the tray into the slot.
4. Lock the tray in the slot by applying downwa rd pressure to the latch.
4 ENU-3000
Page 6
HOW TO MOUNT THE HDD TO THE NVR
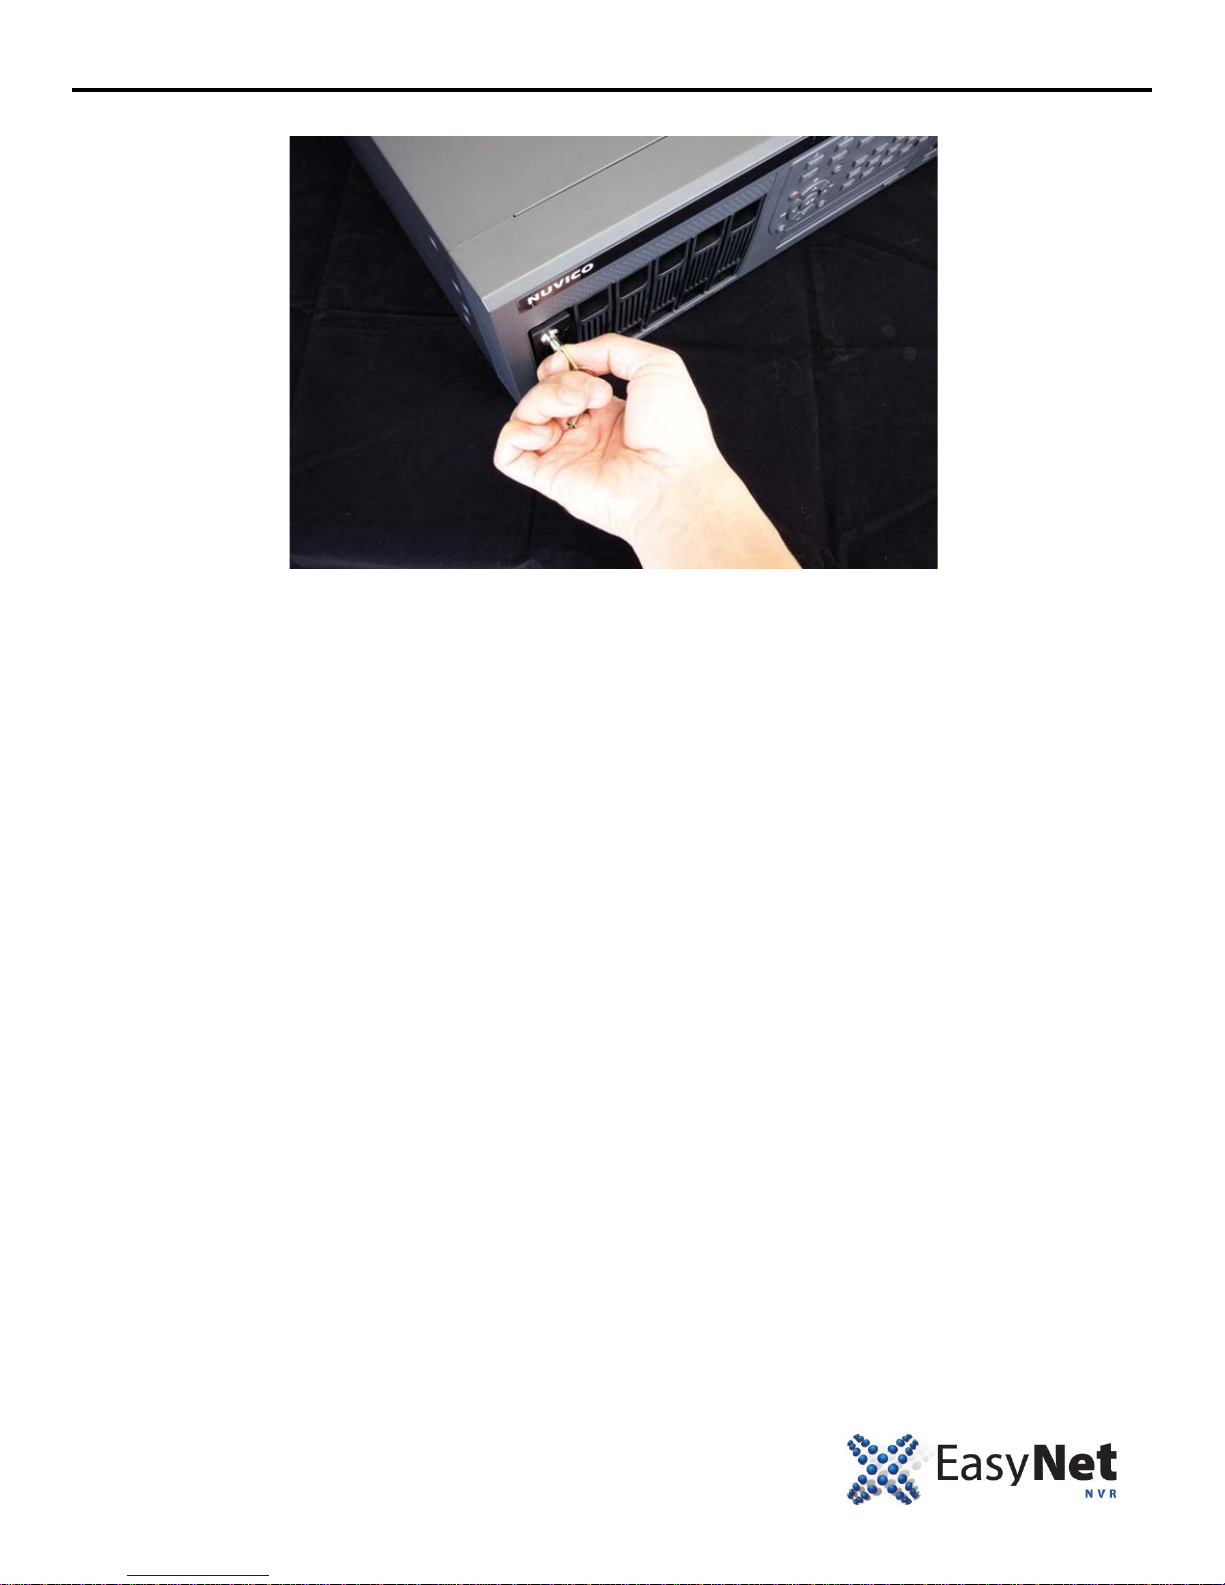
5. Finally, use the supplied tray key to lock the HDD tray into the c hasis to prevent unauthorized removal.
EN-U3000 5
Page 7
GETTING STARTED
IMPORTANT NOTE: Prior to staring the NVR, make sure that the PoE Network Switches are powered on, initialized, and
are providing power to the EasyNet HD Cameras.
HOW TO START THE NVR
1. Connect the supplied USB mouse into any available USB port on the front NVR panel.
2. Connect the power cable from the power sour ce outlet (preferably a UPS) to the back of the NVR.
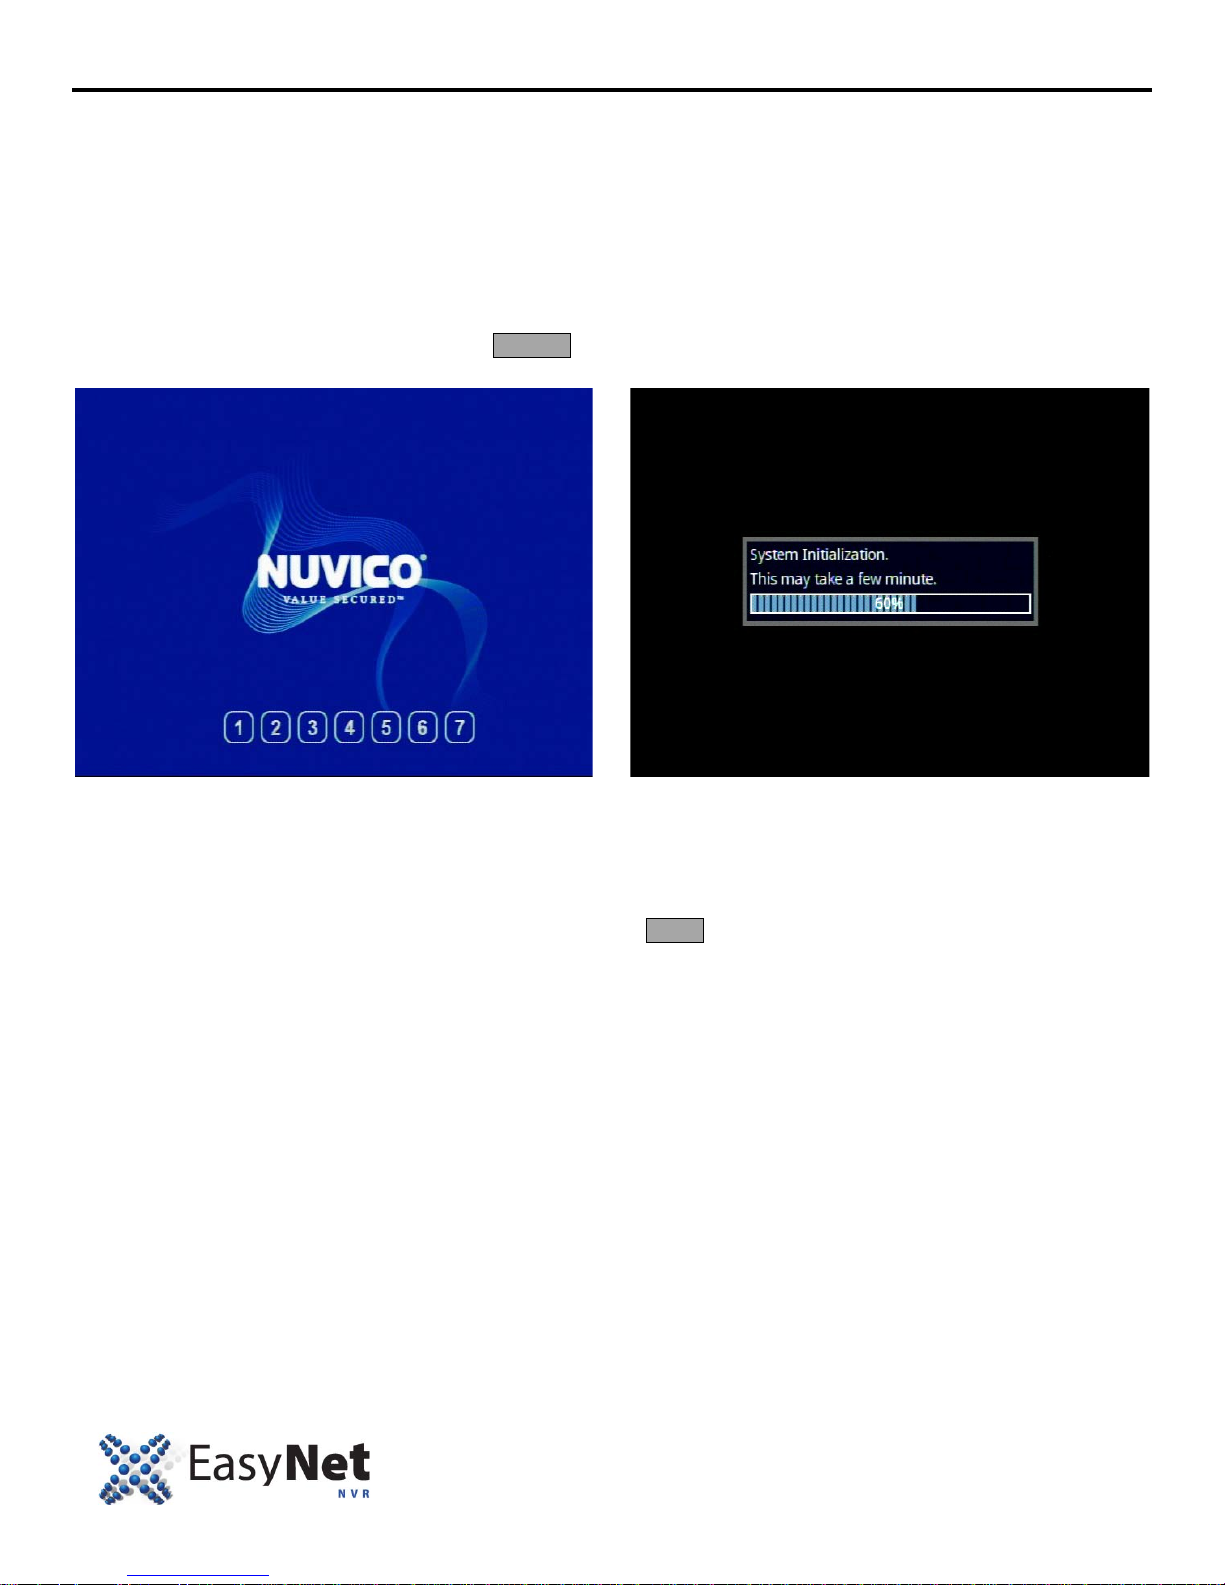
Turn on and start the NVR.
• Using Front Panel/Remote: Press the POWER button for 3 seconds.
• Using Mouse: Not supported
HOW TO LOG IN TO THE NVR
By default, when you turn on the NVR, the NVR automatically starts with “admin” account logged in. This makes it
convenient to the user so that they can st art using the NVR immediately.
However, on instances where user logs out of the NVR, or when LOCK button is pressed, user would manually need to
log in to the NVR. The instructions below illustrate how this can be achieved.
6 ENU-3000
Page 8
GETTING STARTED
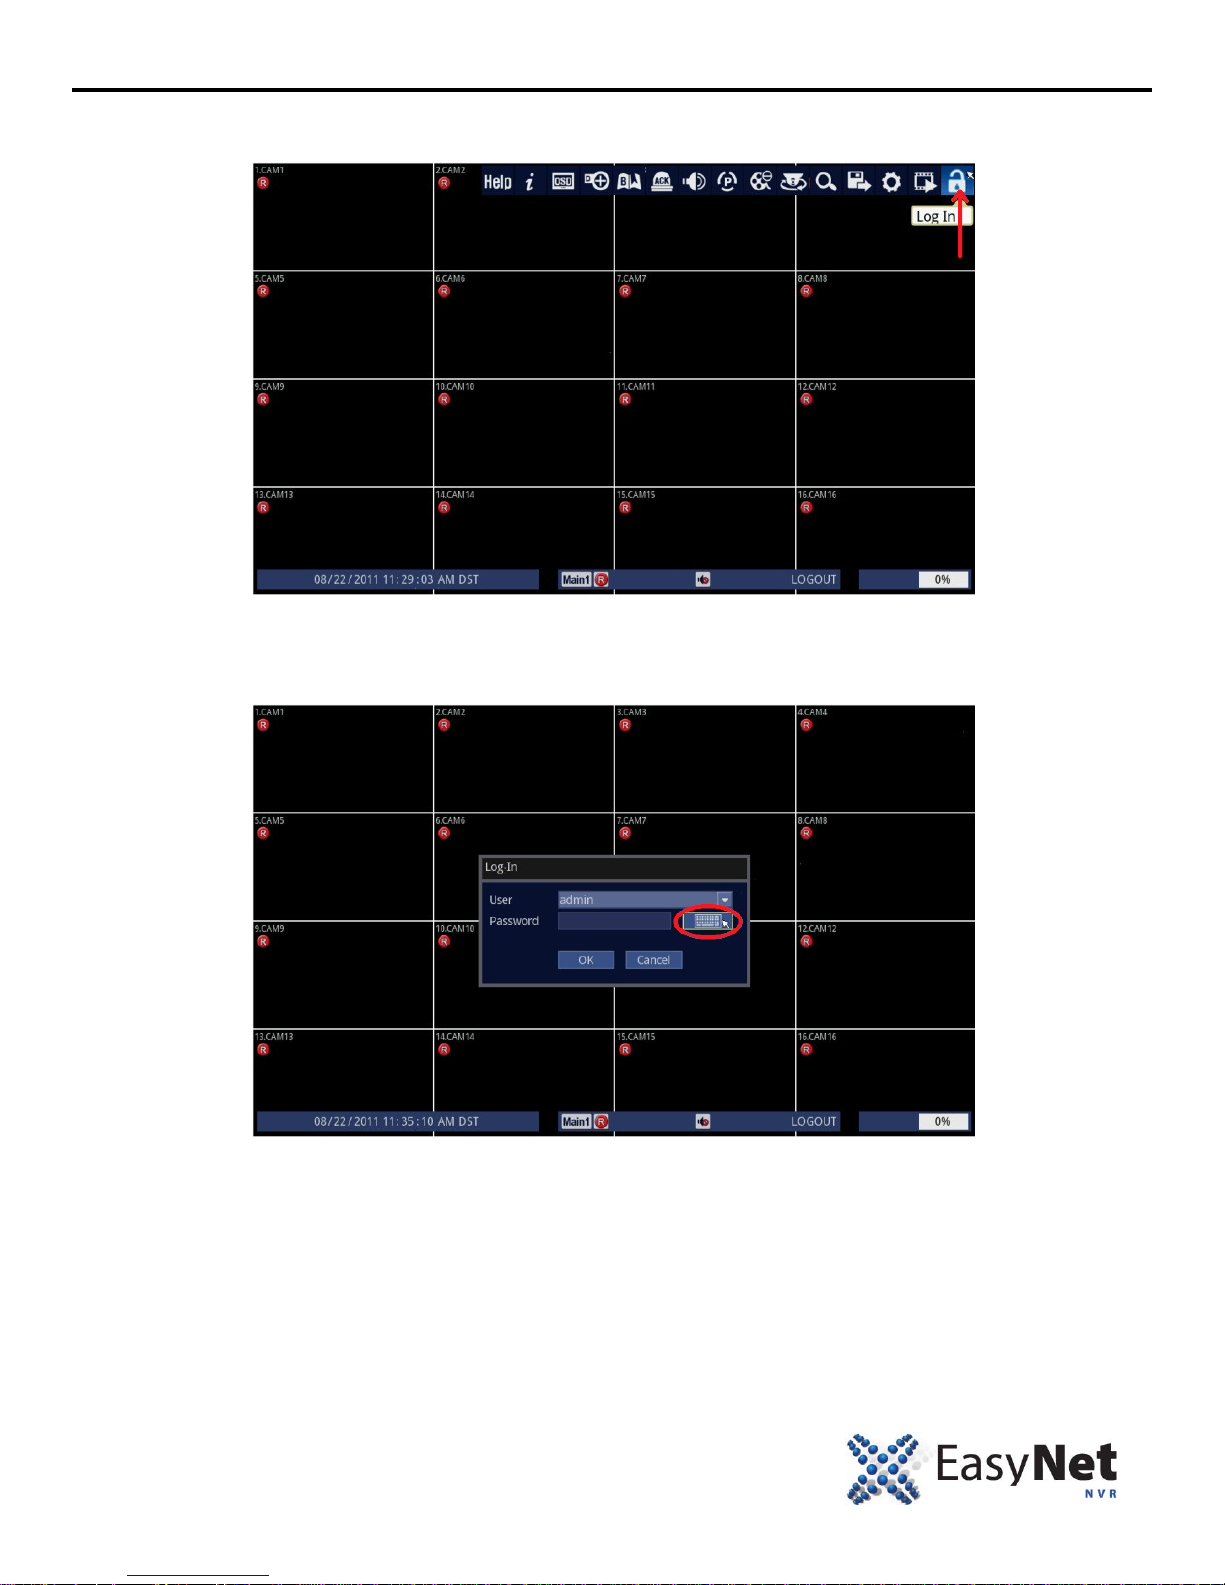
1. Follow the instructions below.
• Using Mouse: Click on the [Log In] icon.
2. You need to input admin password, which is [0 0 0 0 0 0] .
• Using Mouse: Click on the [Keyboard] icon.
EN-U3000 7
Page 9
GETTING STARTED
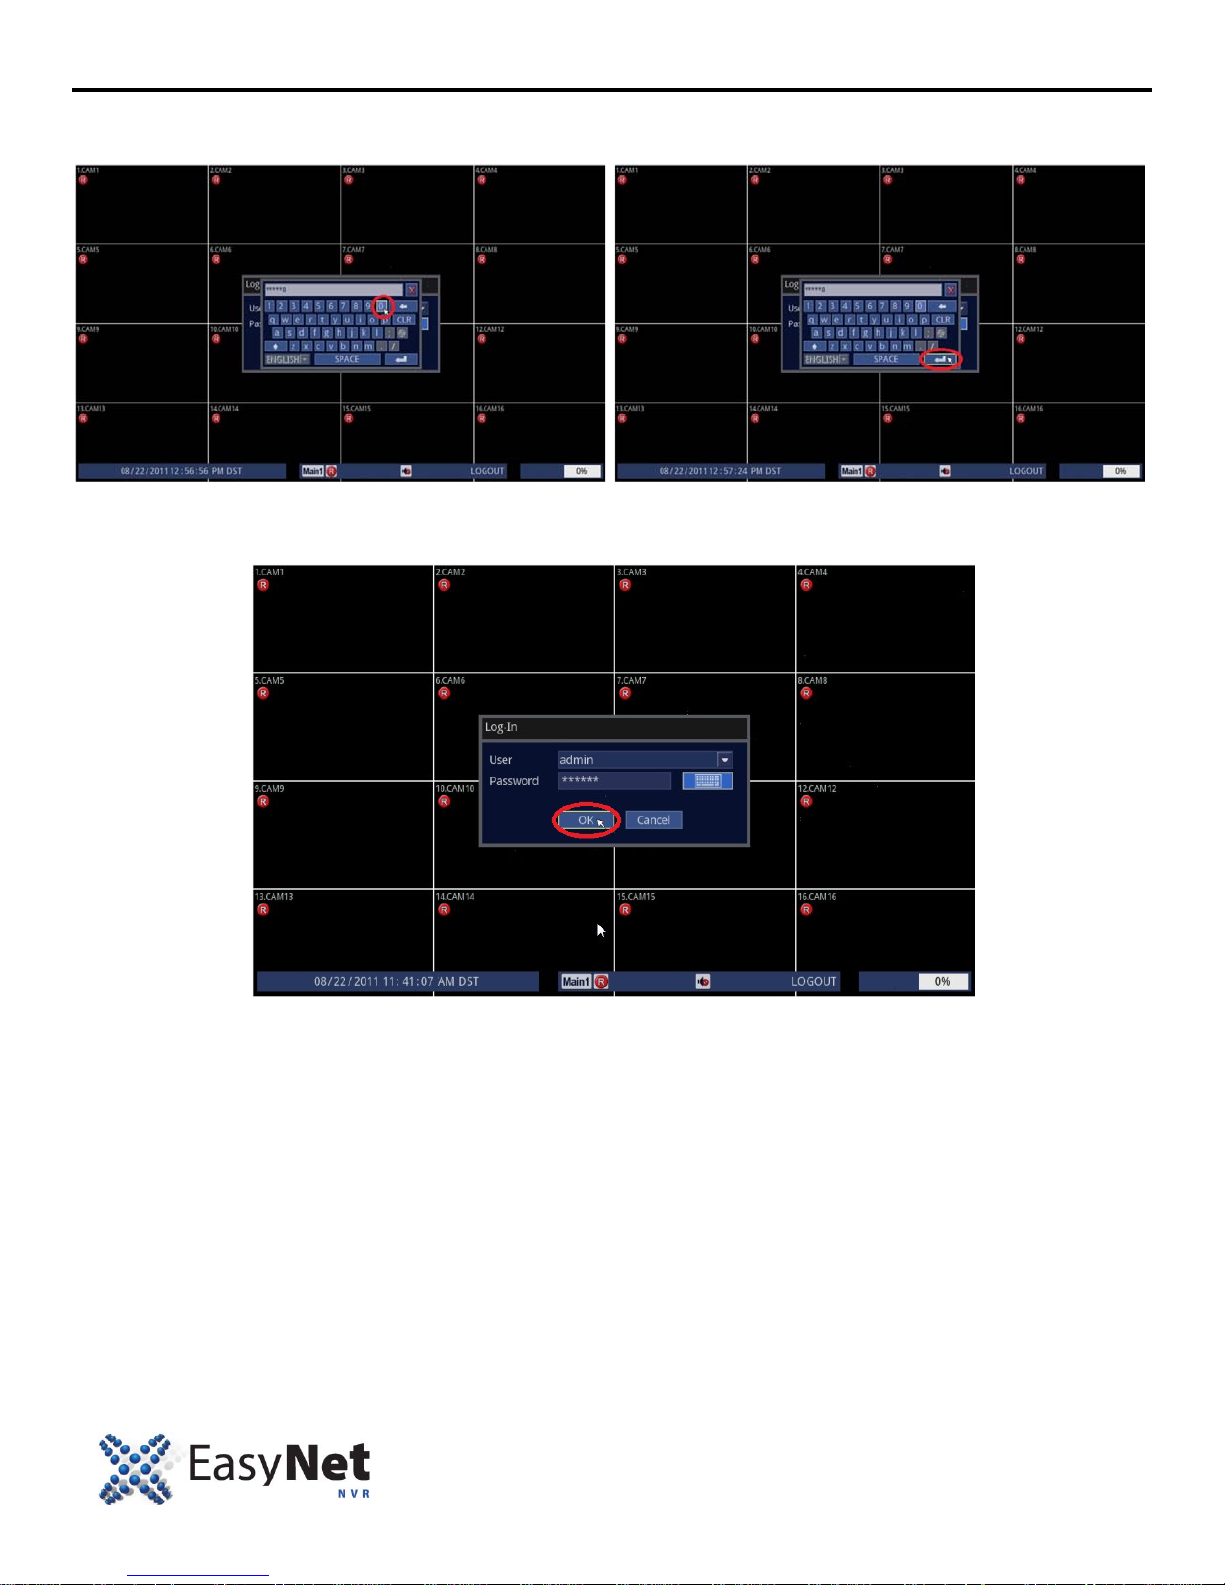
3. On screen keyboard should now appear. The default admin password for the NVR is [0 0 0 0 0 0].
• Using Mouse: Highlight [0] and click six times, then, highlight [↵] and click.
4. Lastly, when you select [OK] you are now logged on as admin.
• Using Mouse: Highlight [OK] and click.
8 ENU-3000
Page 10
MONITOR SETUP
CONFIGURE NVR’S MONITOR OUTPUT TO 1920 x 1080
To take full advantage of the EasyNet NVR, you want to make sure that you have a 1080p capable monitor. Follow the
instructions below.
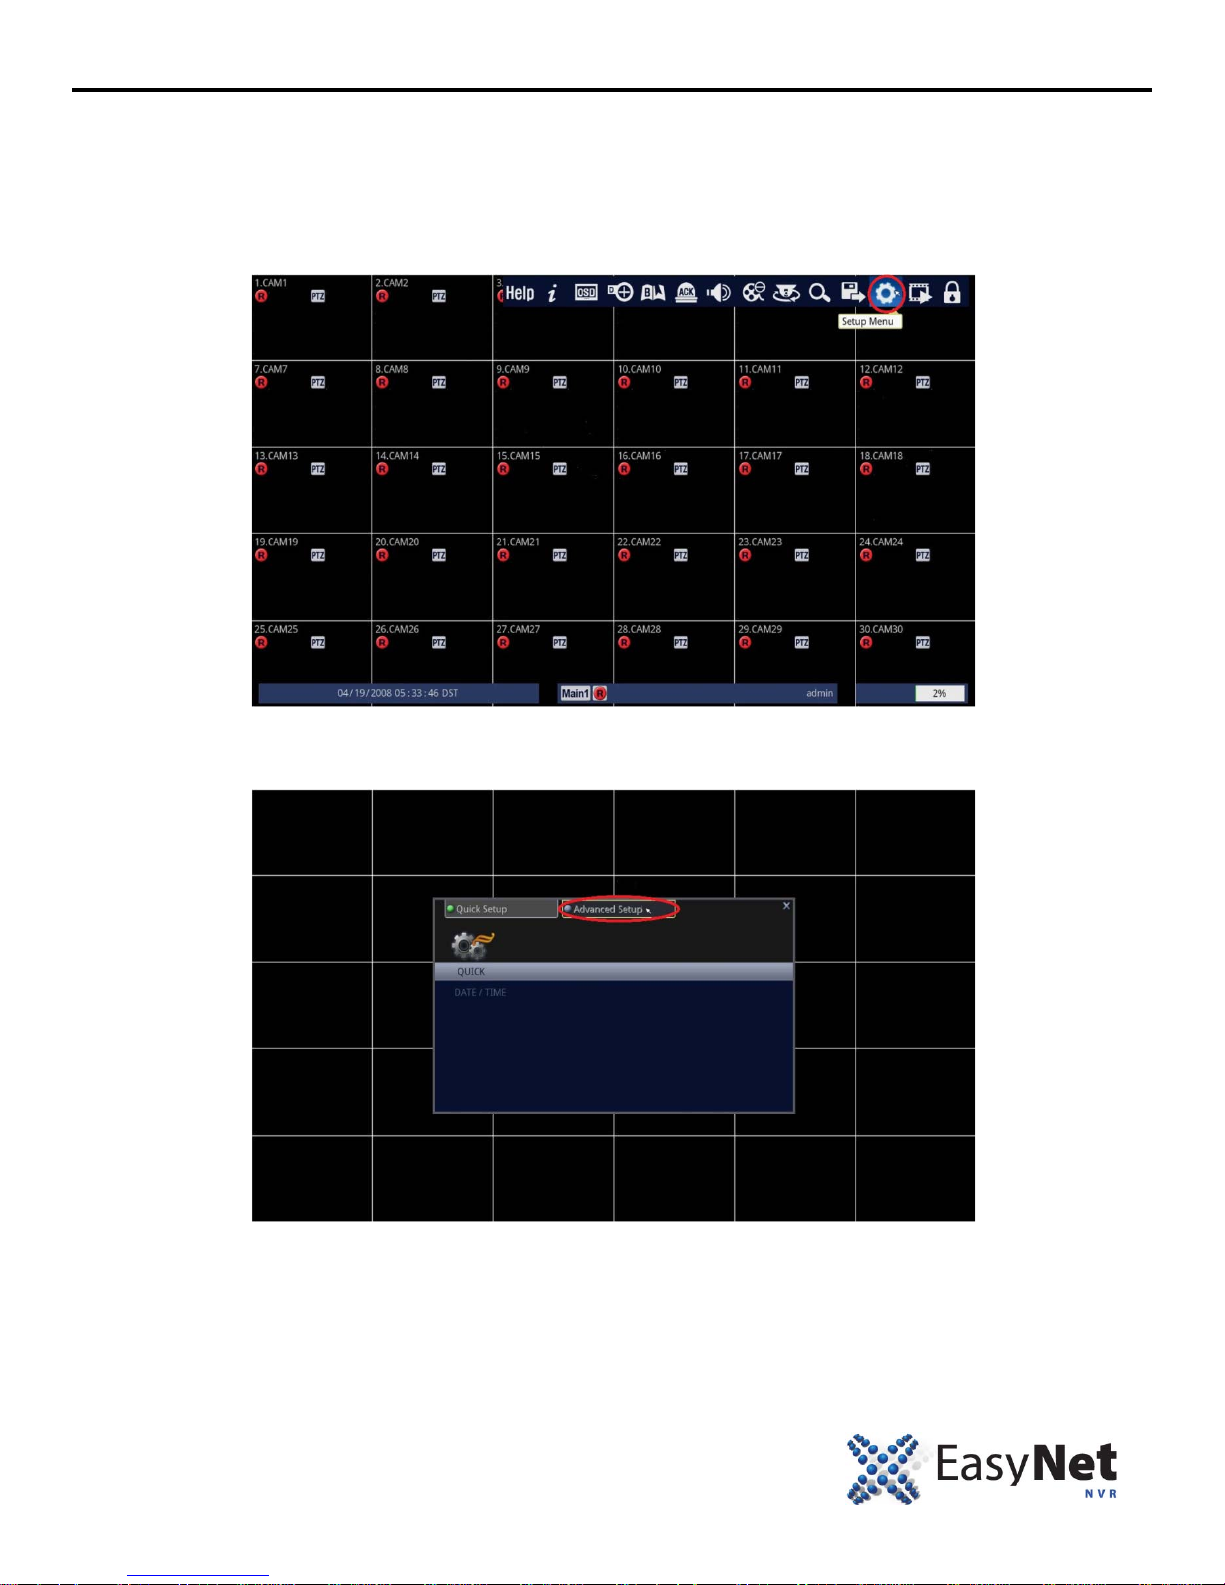
1. Follow the instructions below.
• Using Mouse: Click on the [Setup Menu] icon.
2. Select Advanced Setup.
• Using Mouse: Click on the [Advanced Setup].
EN-U3000 9
Page 11
MONITOR SETUP
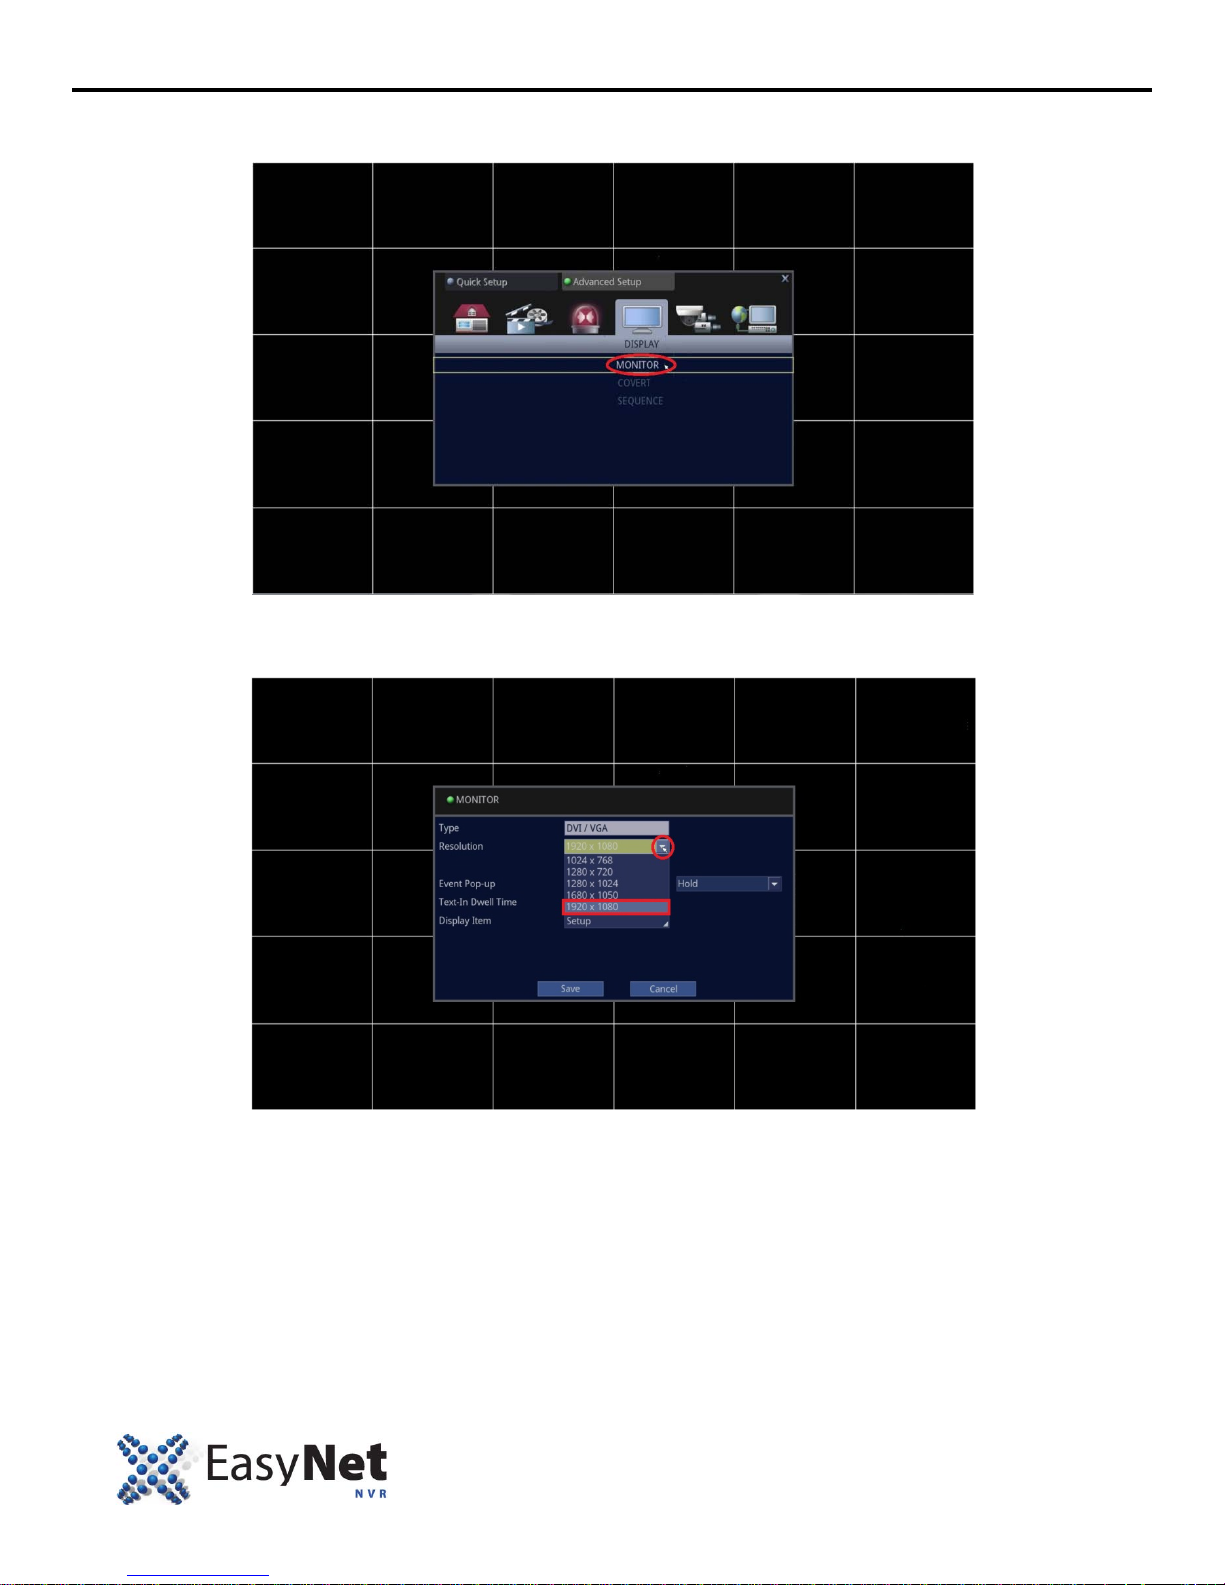
3. Select [MONITOR] under DISPLAY option.
• Using Mouse: Click on the [DISPLAY], then, click on [MONITOR].
4. Select 1920 x 1080 which is true 1080p resolution.
• Using Mouse: Select and click on the 1920 x 1080.
10 ENU-3000
Page 12
MONITOR SETUP
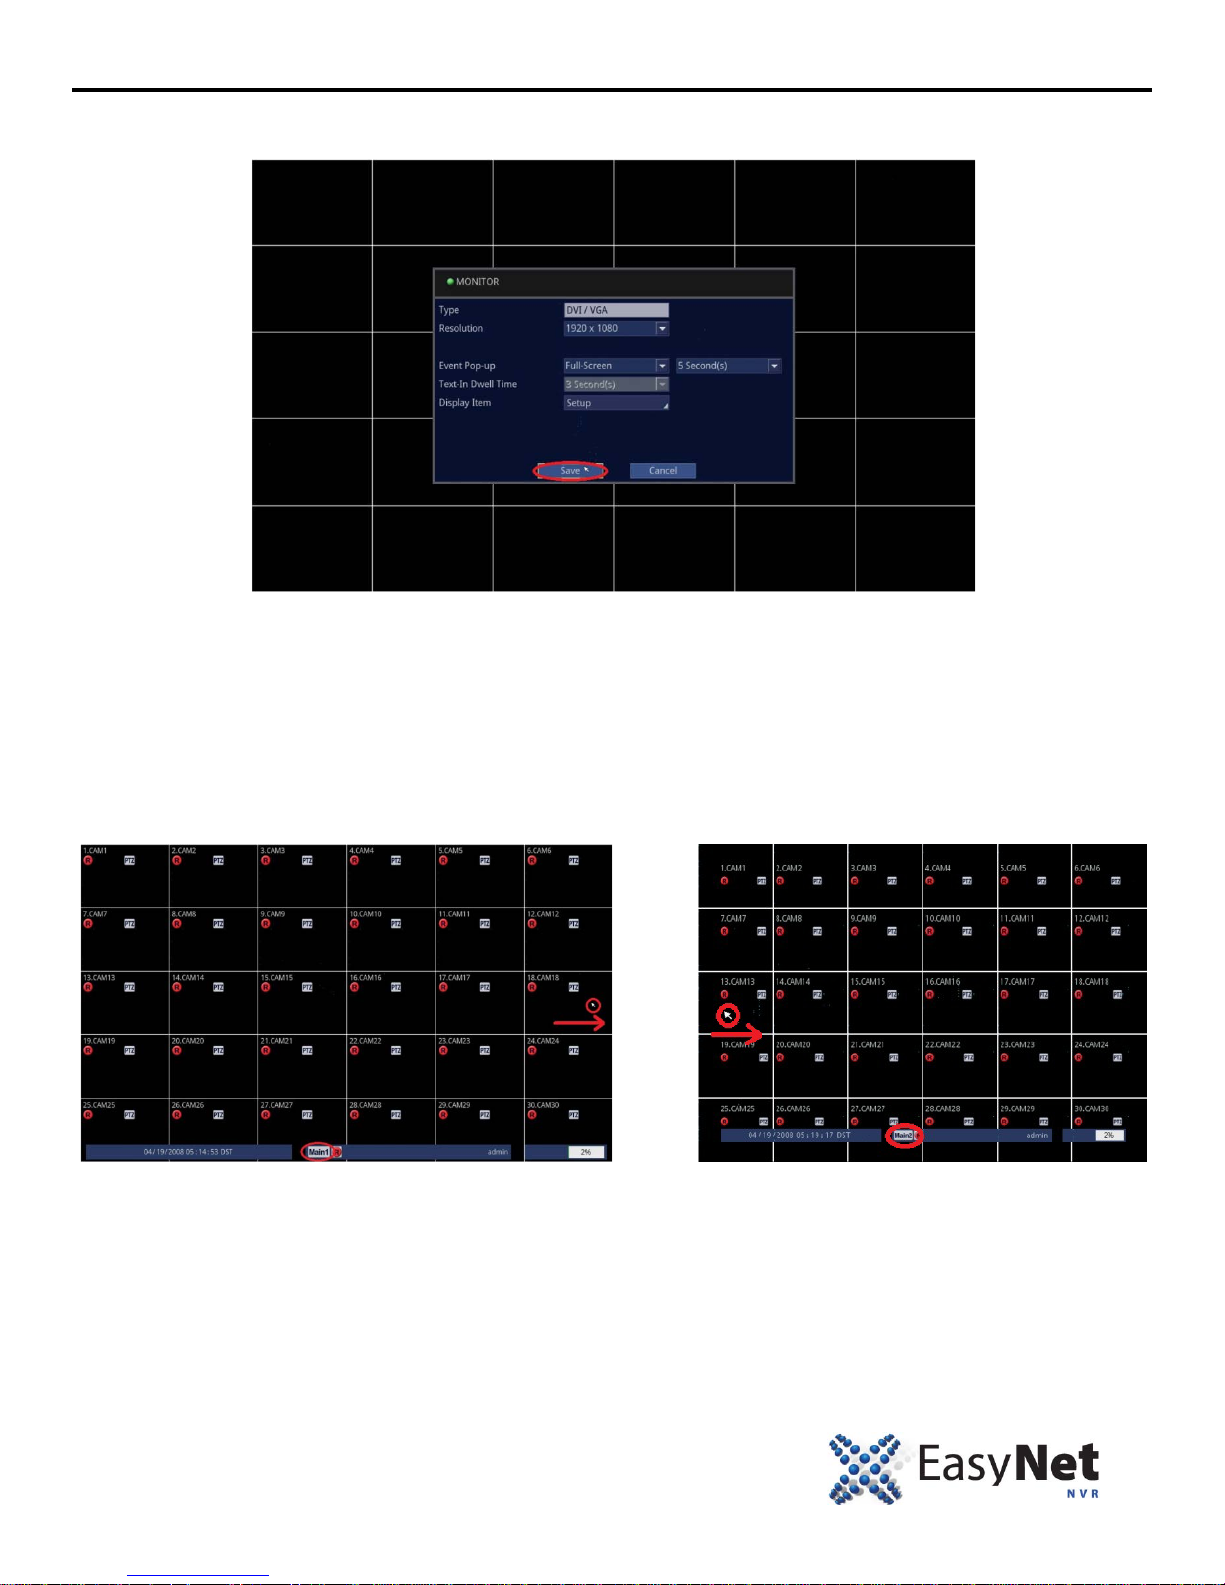
5. Save the changes.
• Using Mouse: Click on [Save] to save.
6. To exit out to the Live screen.
• Using Mouse: Right click on your mouse twice.
IF YOU ARE USING A BNC MONITOR
IMPORTANT NOTE: If you are ONLY using a BNC type m onitor, which is [Main 2] output,
• Using Mouse: On the Main 1, move the mouse curs or towards the right side of the screen and keep movi ng
right until mouse cursor appears on Main 2.
EN-U3000 11
Page 13
MONITOR SETUP
HOW TO DISABLE MAIN 2 BNC OUTPUT
IMPORTANT NOTE: This step is extremely important if you use only 1 monitor such which is connected either
HDMI/DVI or VGA.
The factory default setting for 2
Monitor “Main 2”, follow these instructions.
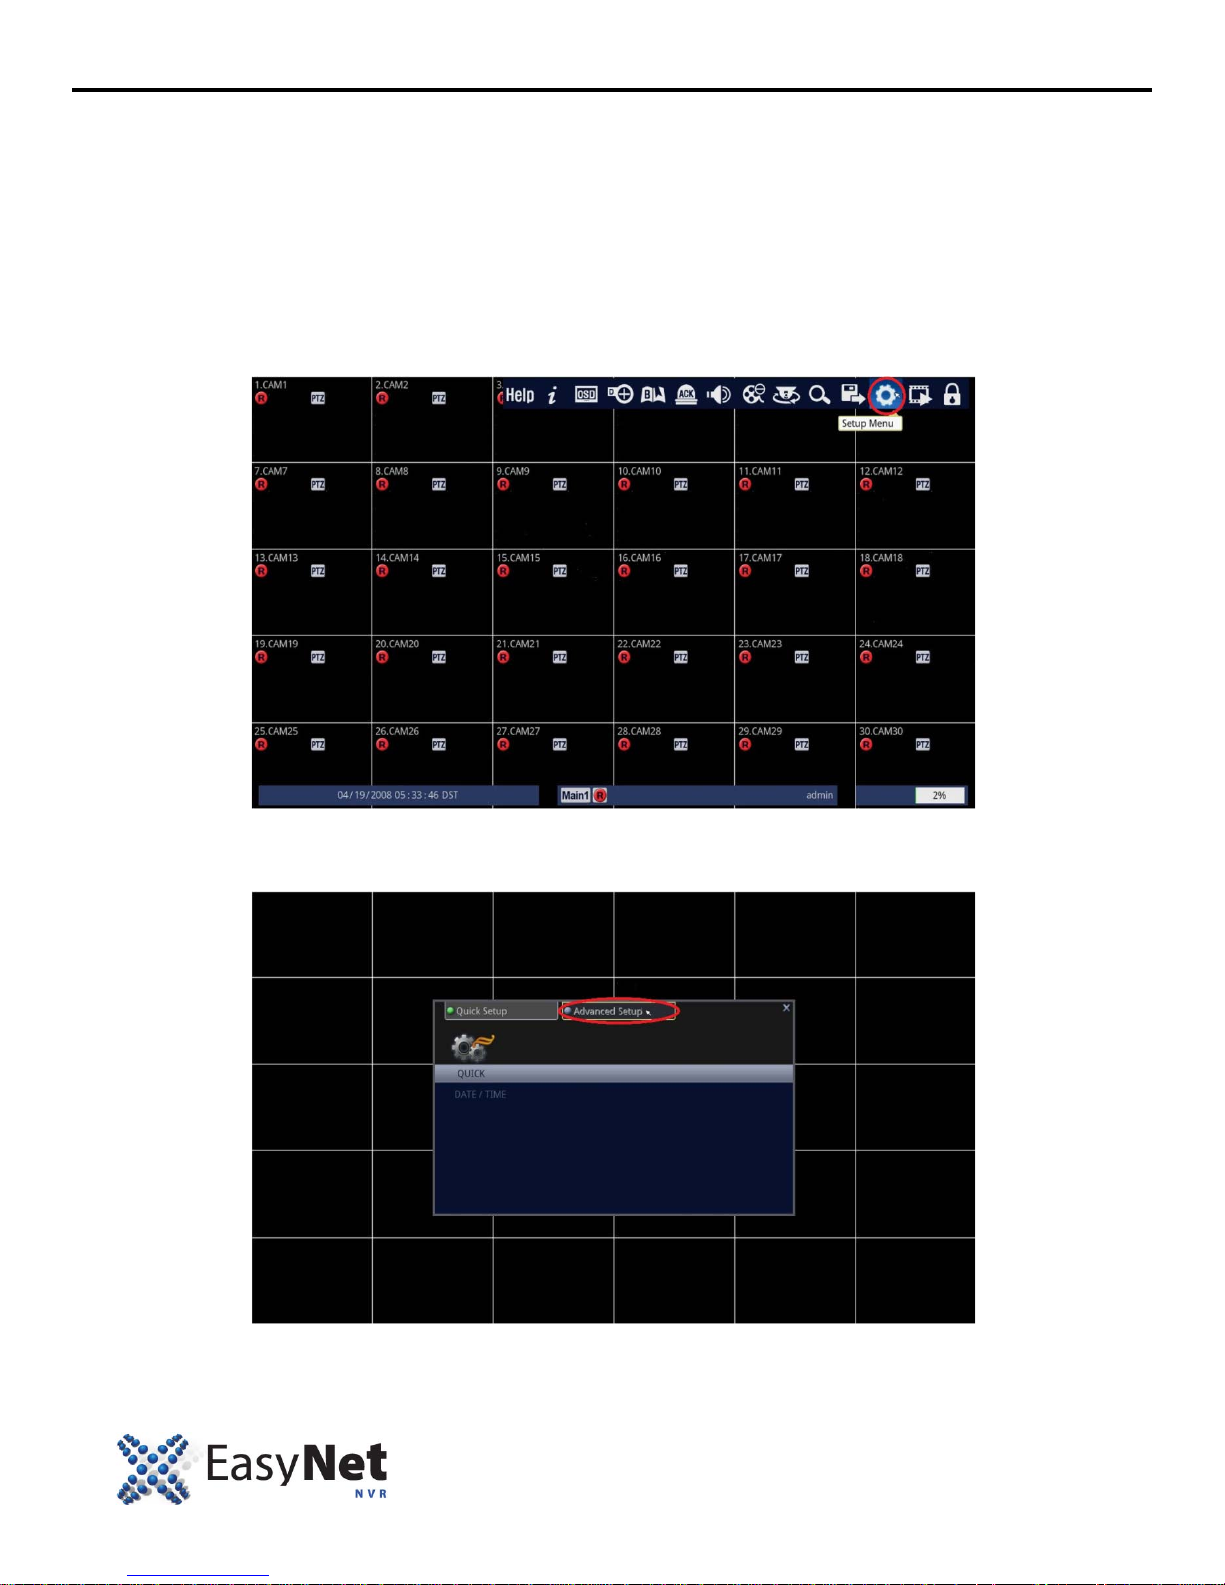
1. Follow the instructions below.
• Using Mouse: Click on the [Setup Menu] icon.
nd
Monitor is turned “On”. However, should you NOT want t o take advantage of the 2nd
2. Select Advanced Setup.
• Using Mouse: Click on the [Advanced Setup].
12 ENU-3000
Page 14
MONITOR SETUP
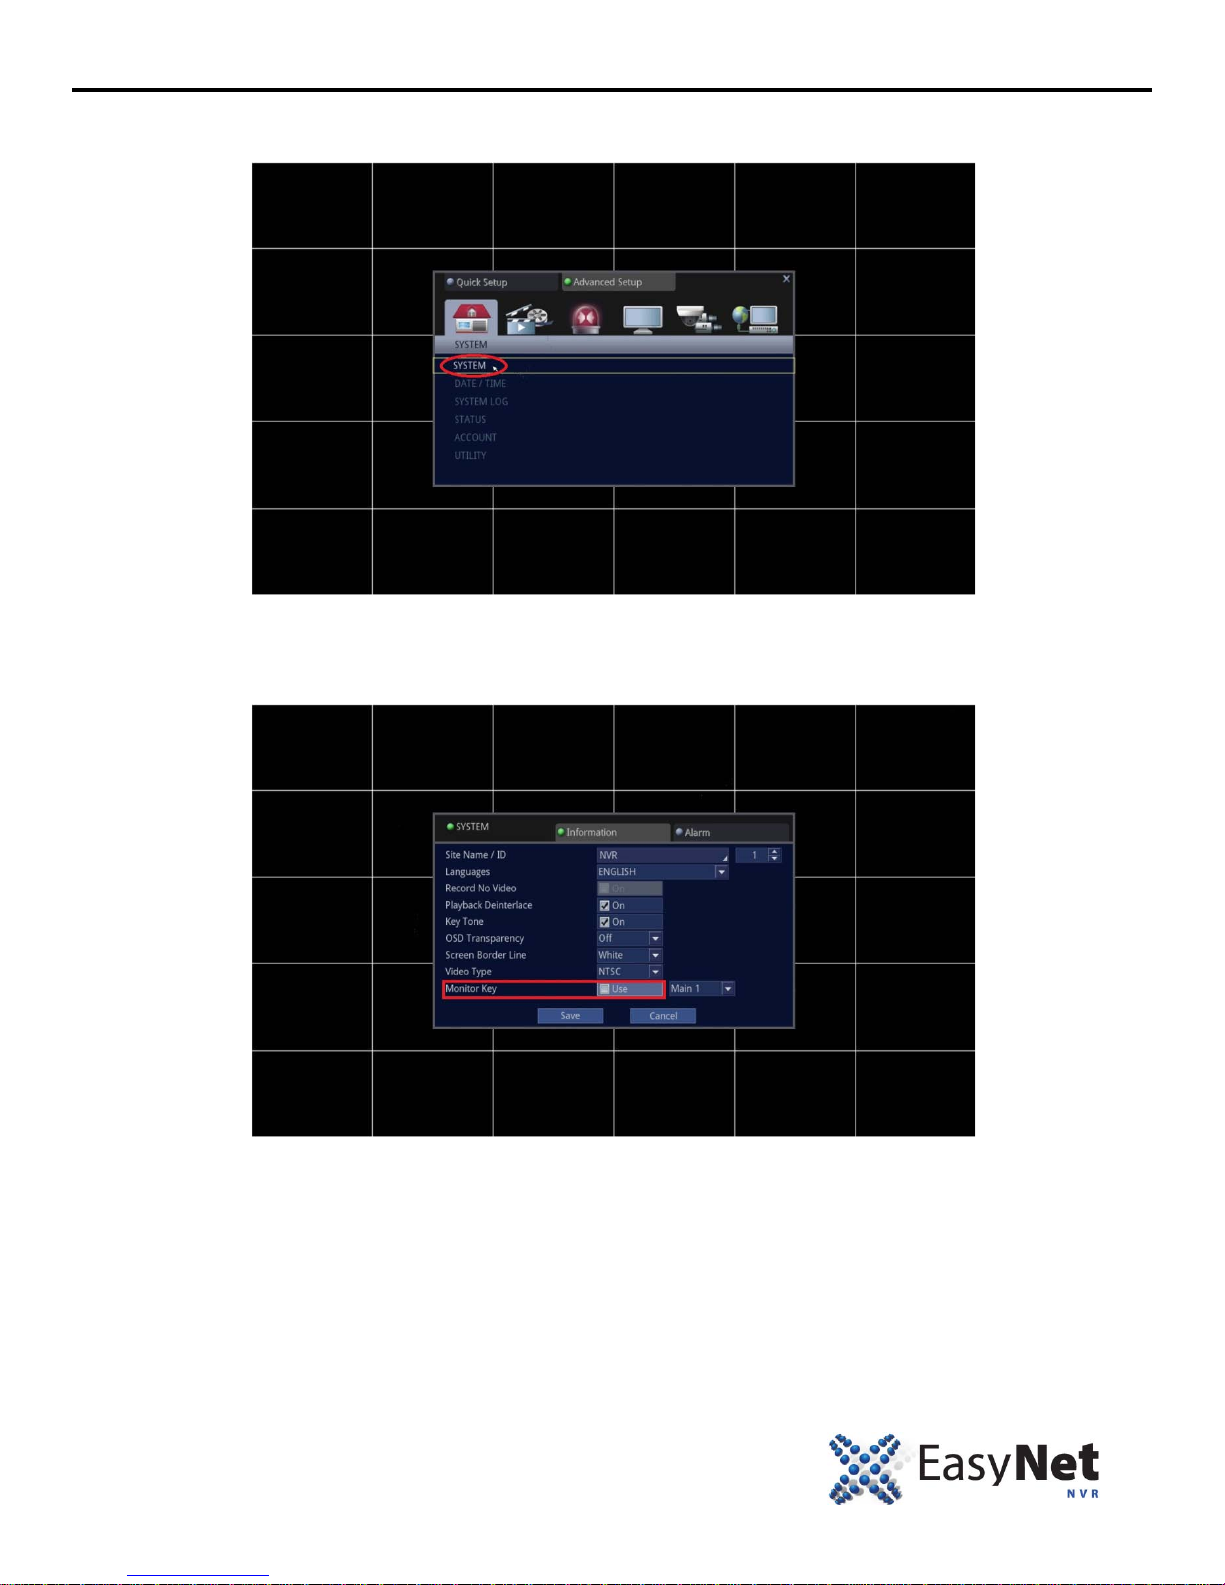
3. Access the sub-menu of SYSTEM.
• Using Mouse: Click on the [SYSTEM].
4. Uncheck to turn off [Monitor Key], and define which monitor you would solely like to use. Since HDMI/VGA is Main 1,
you want to make sure that Main 1 is displayed next to the [Use] checkbox.
• Using Mouse: Click on the [Monitor Key] t o unchec k the selection and define the primary monitor
EN-U3000 13
Page 15
MONITOR SETUP
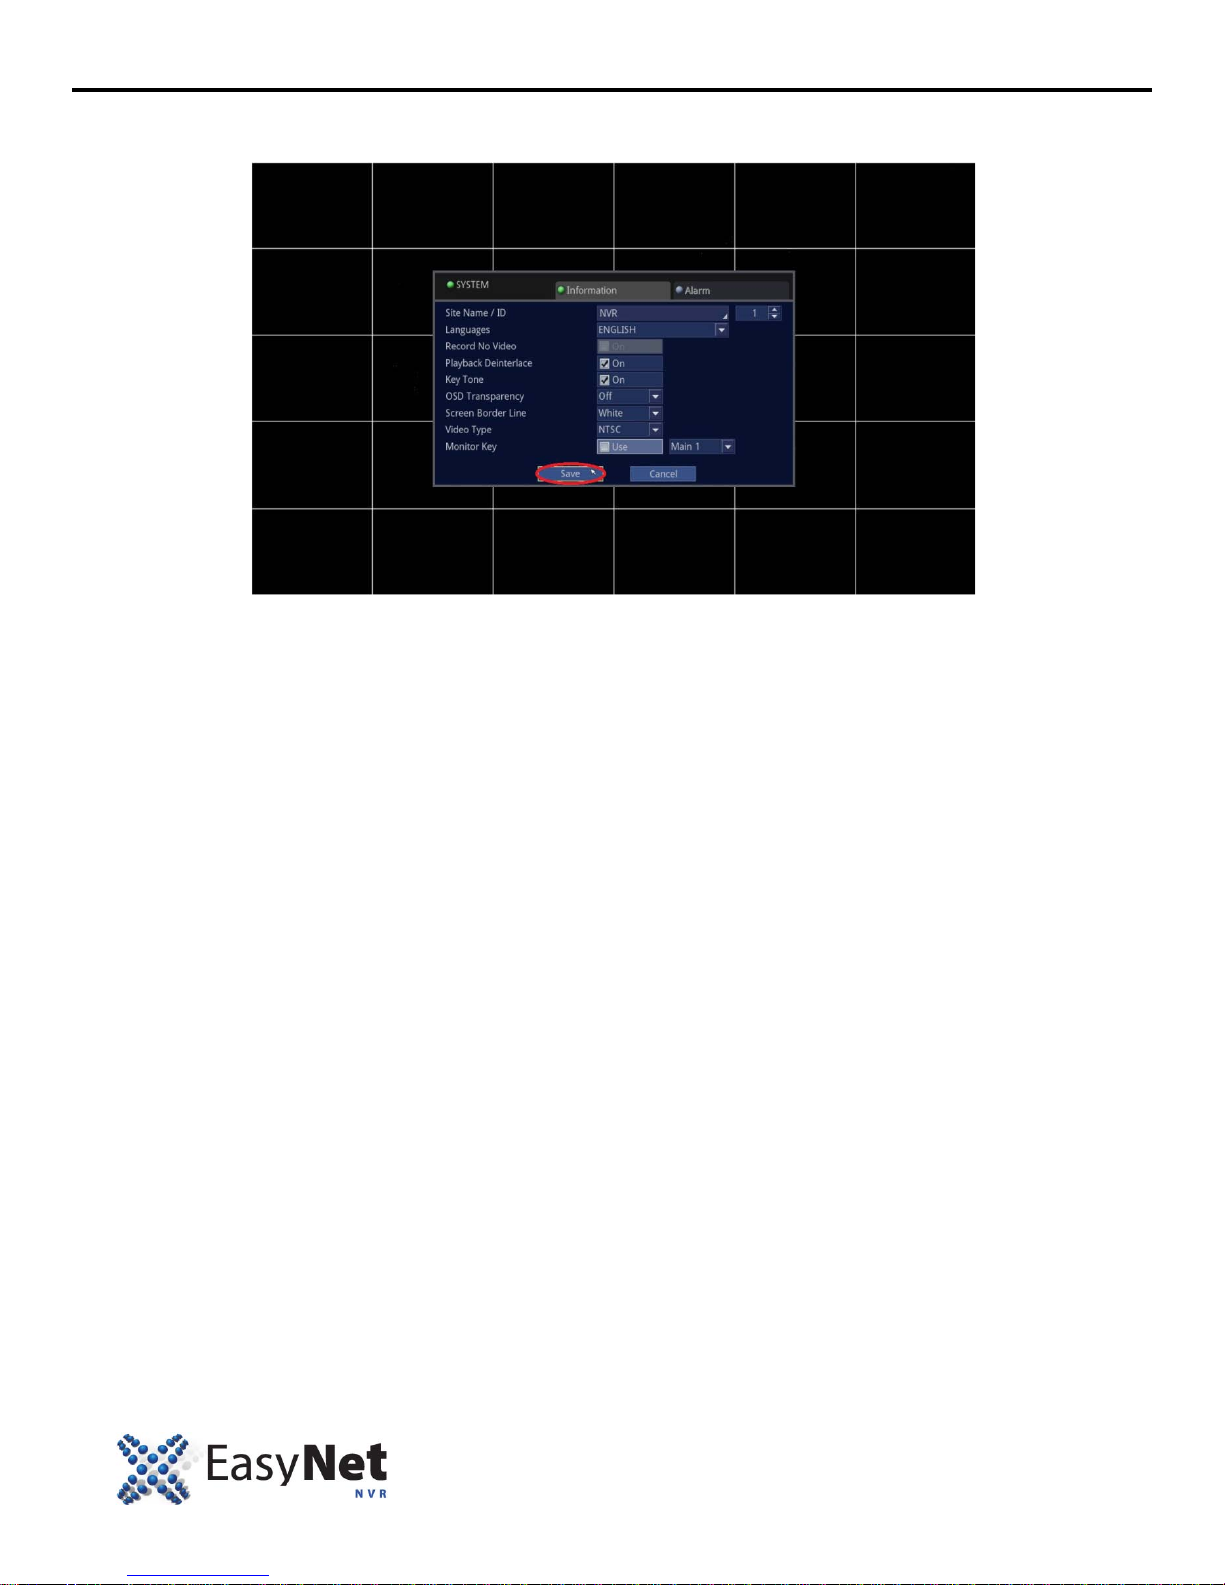
5. Save the changes.
• Using Mouse: Click on [Save] to save.
6. To exit out to the Live screen.
• Using Mouse: Right click on your mouse twice.
14 ENU-3000
Page 16
HOW TO INITIALIZE THE HDD FOR RECORDING
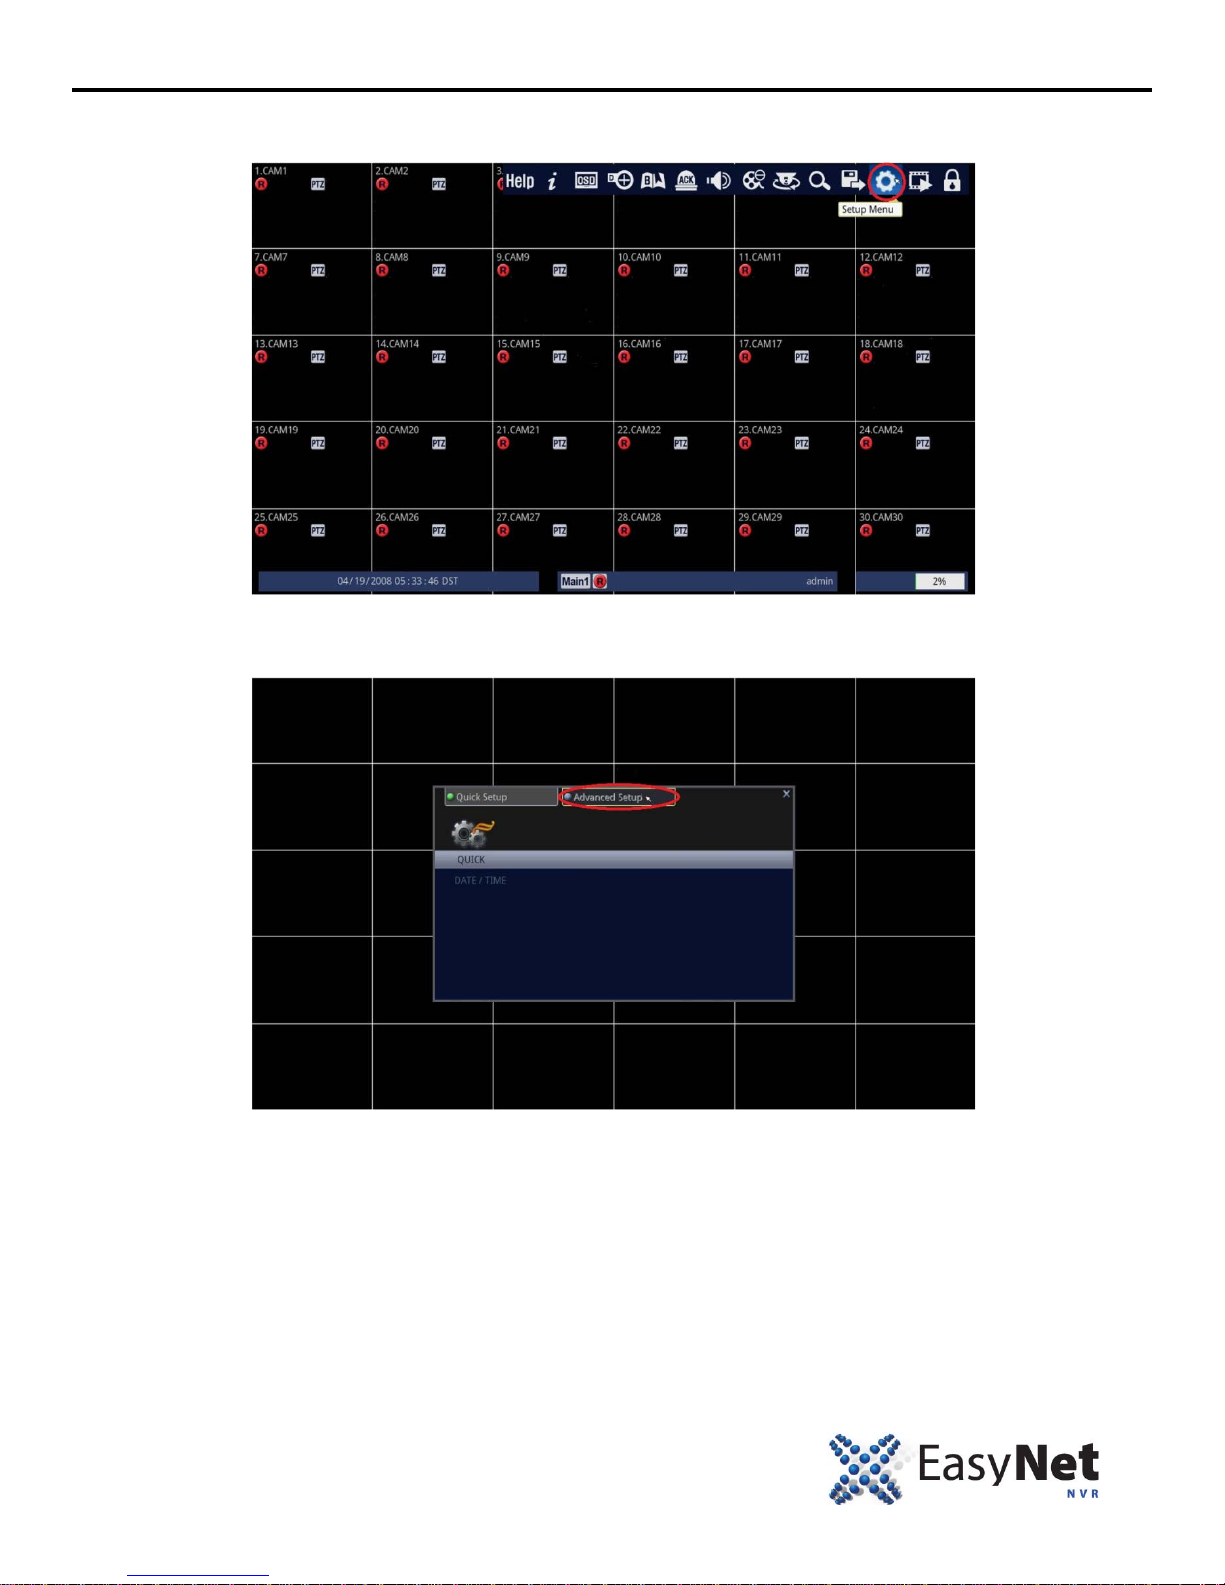
1. Follow the instructions below.
• Using Mouse: Click on the [Setup Menu] icon.
2. Select Advanced Setup.
• Using Mouse: Click on the [Advanced Setup].
EN-U3000 15
Page 17
HOW TO INITIALIZE THE HDD FOR RECORDING
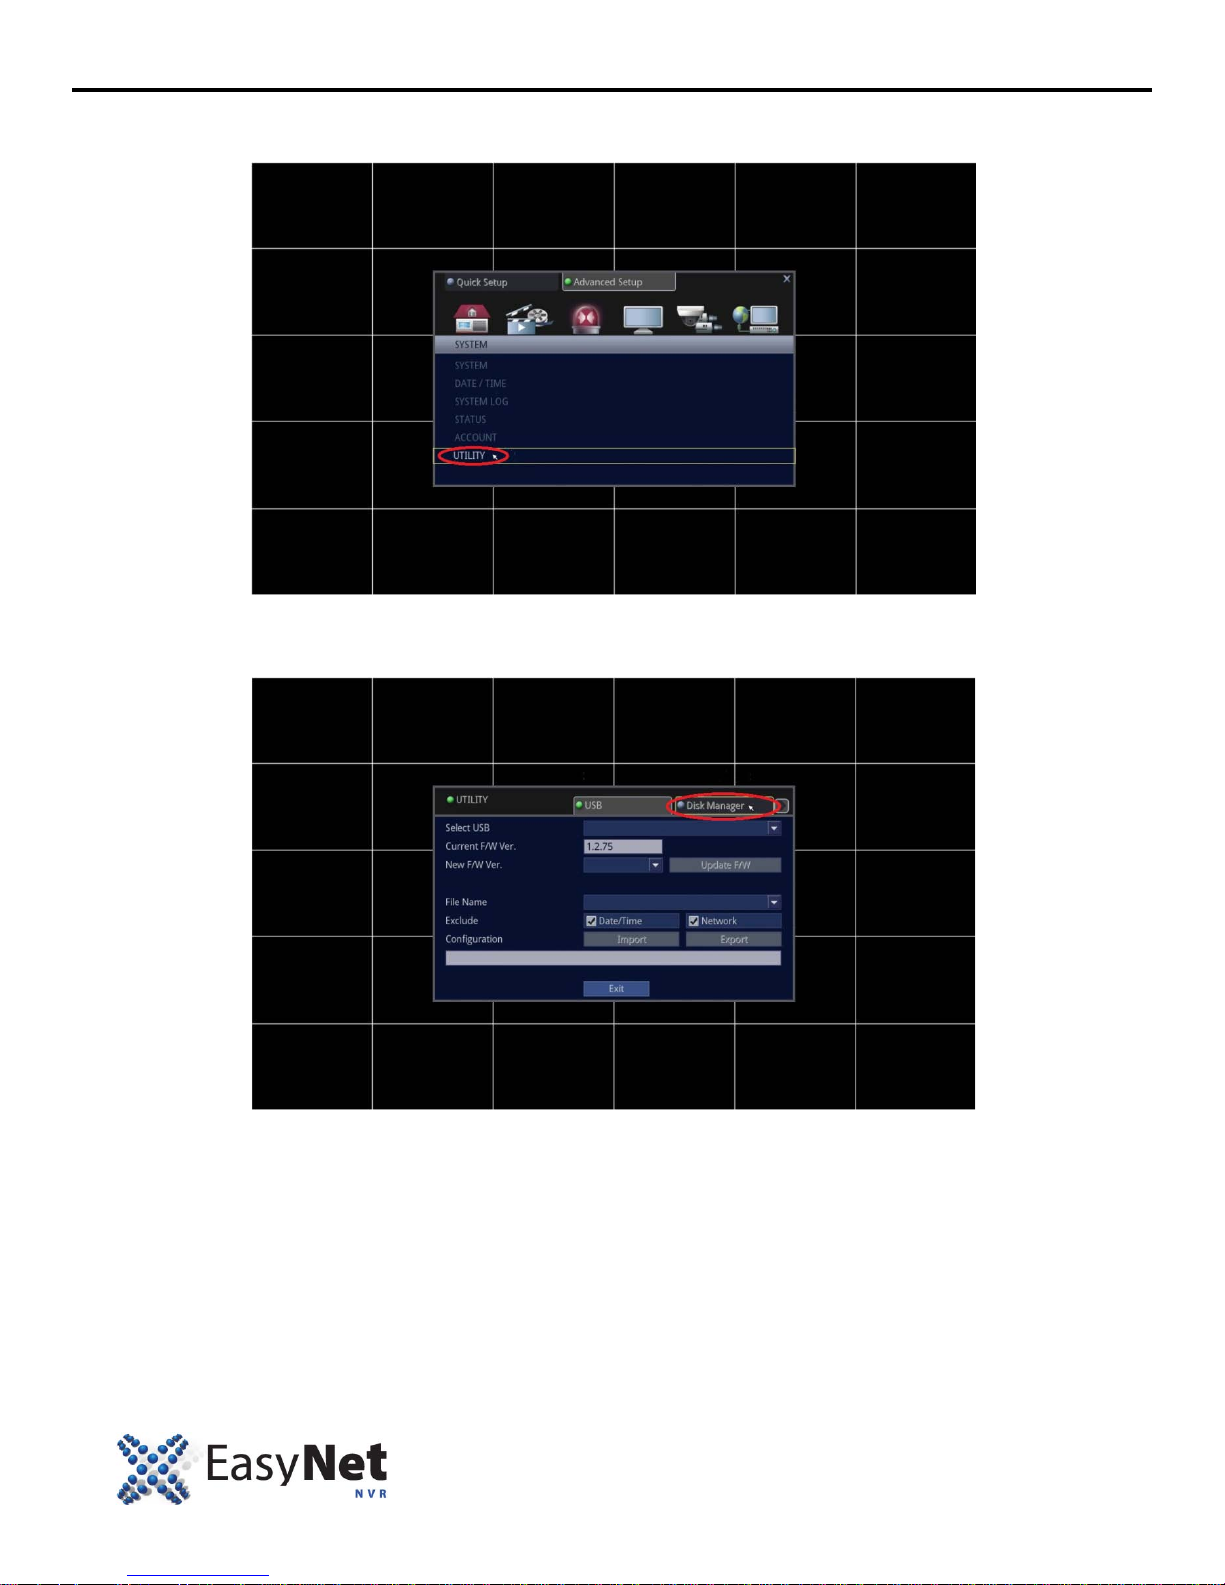
3. Select Utility.
• Using Mouse: Click on the [UTILITY].
4. Select Disk Manager.
• Using Mouse: Click on the [Disk Manager].
16 ENU-3000
Page 18
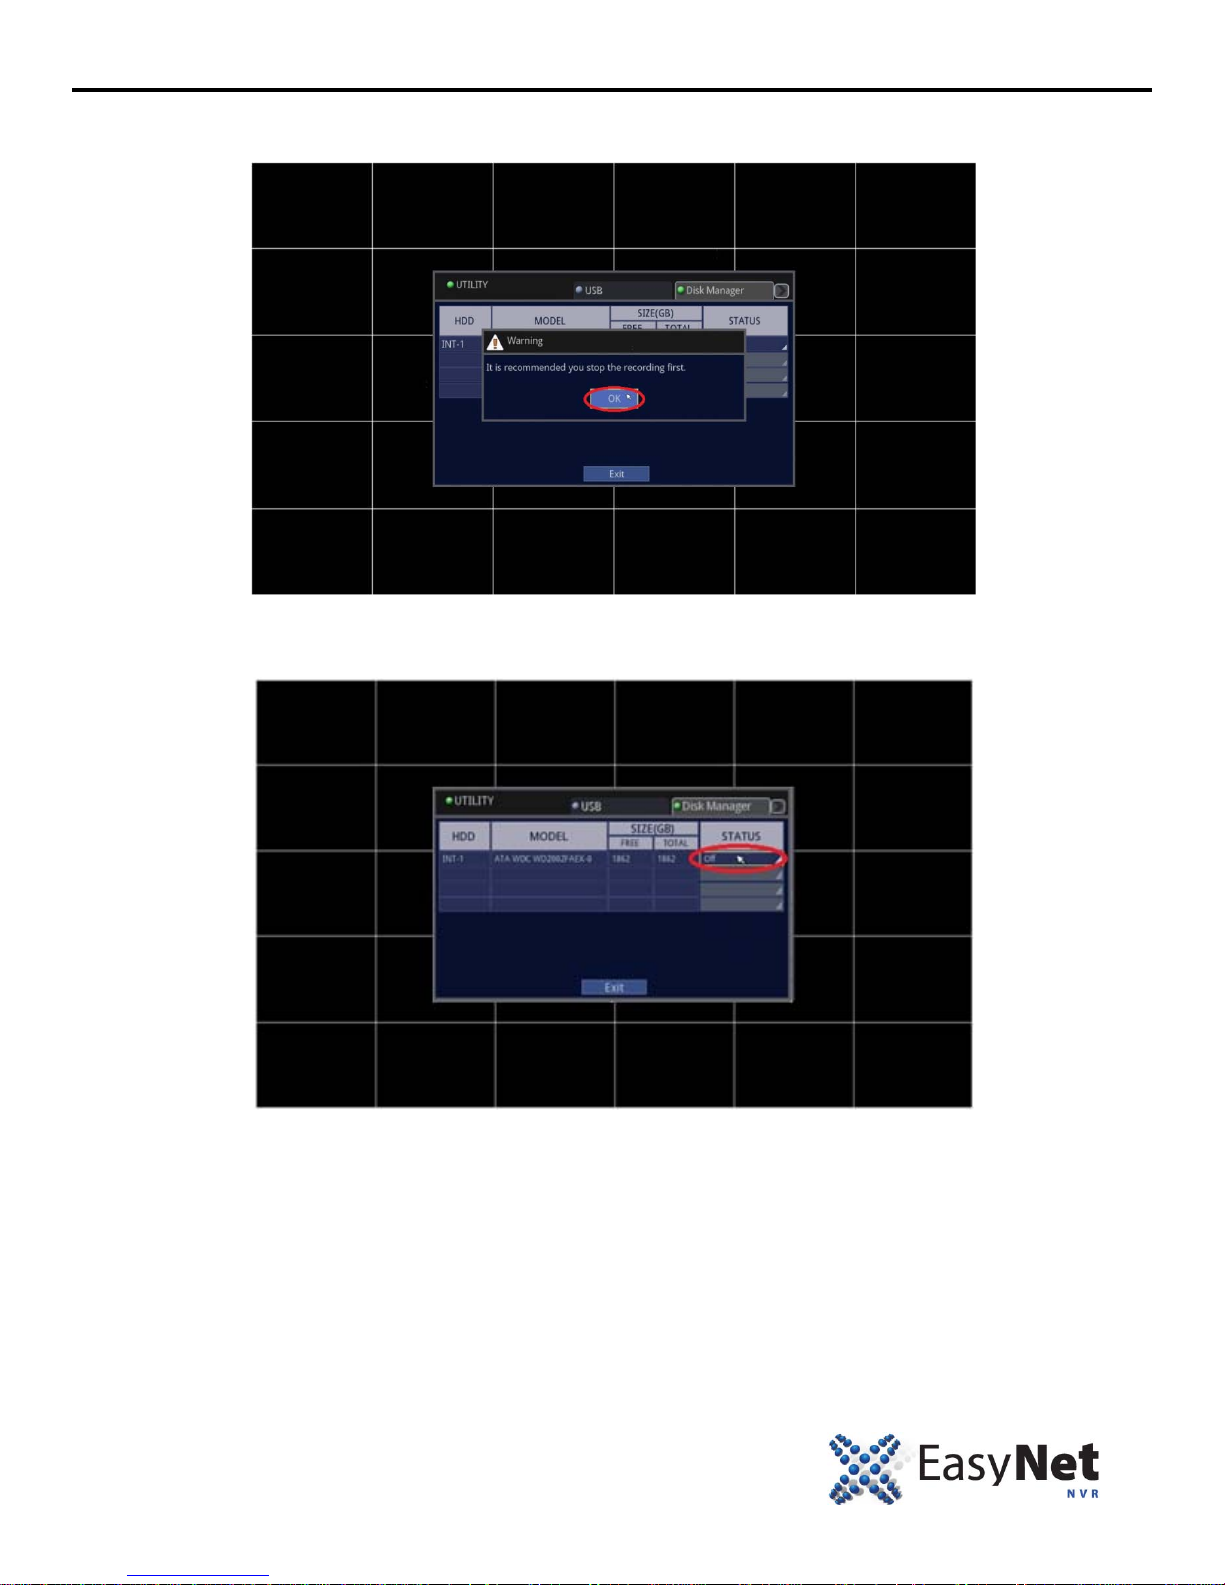
HOW TO INITIALIZE THE HDD FOR RECORDING
6. Disk Manager will alert with caution message.
• Using Mouse: Click on the [OK].
7. Select INT-1 HDD.
• Using Mouse: Click on the [Off] status of the INT-1.
EN-U3000 17
Page 19
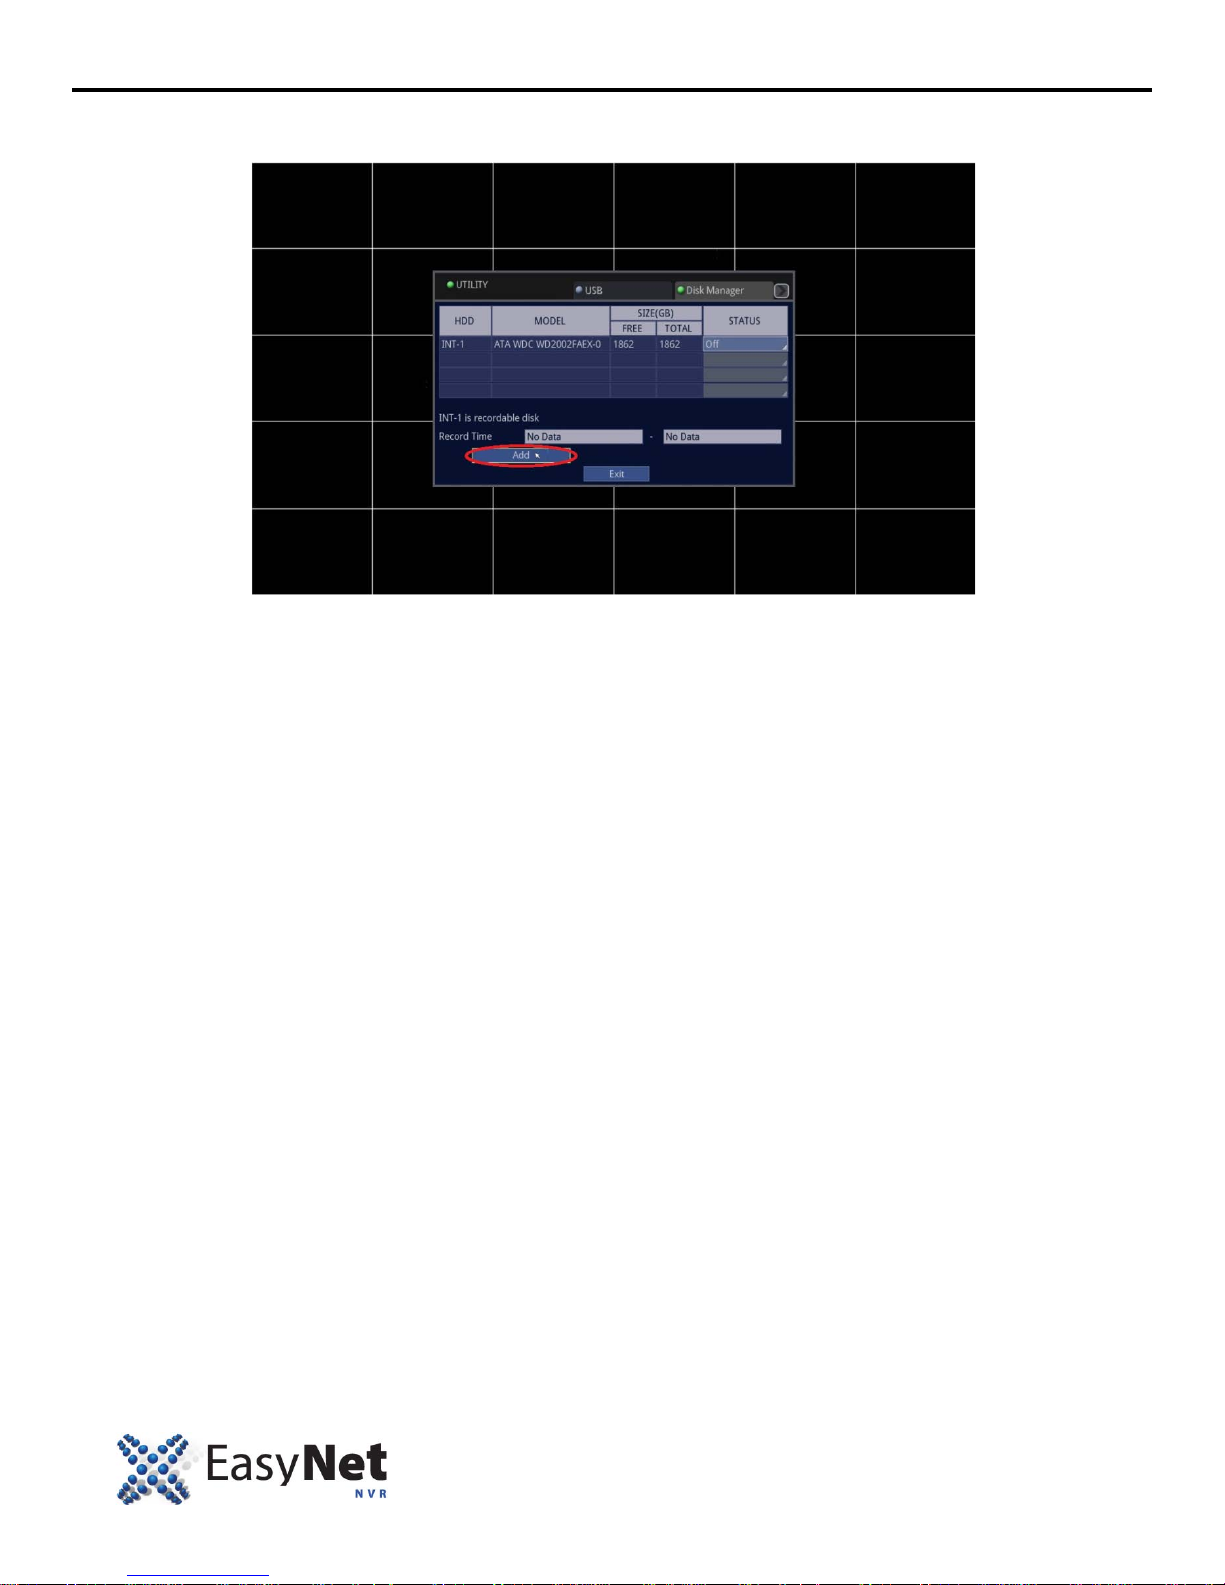
HOW TO INITIALIZE THE HDD FOR RECORDING
8. Select Add
• Using Mouse: Click on the [Add].
9. You are finished. To exit out to the Live screen.
• Using Mouse: Right click on your mouse twice.
18 ENU-3000
Page 20
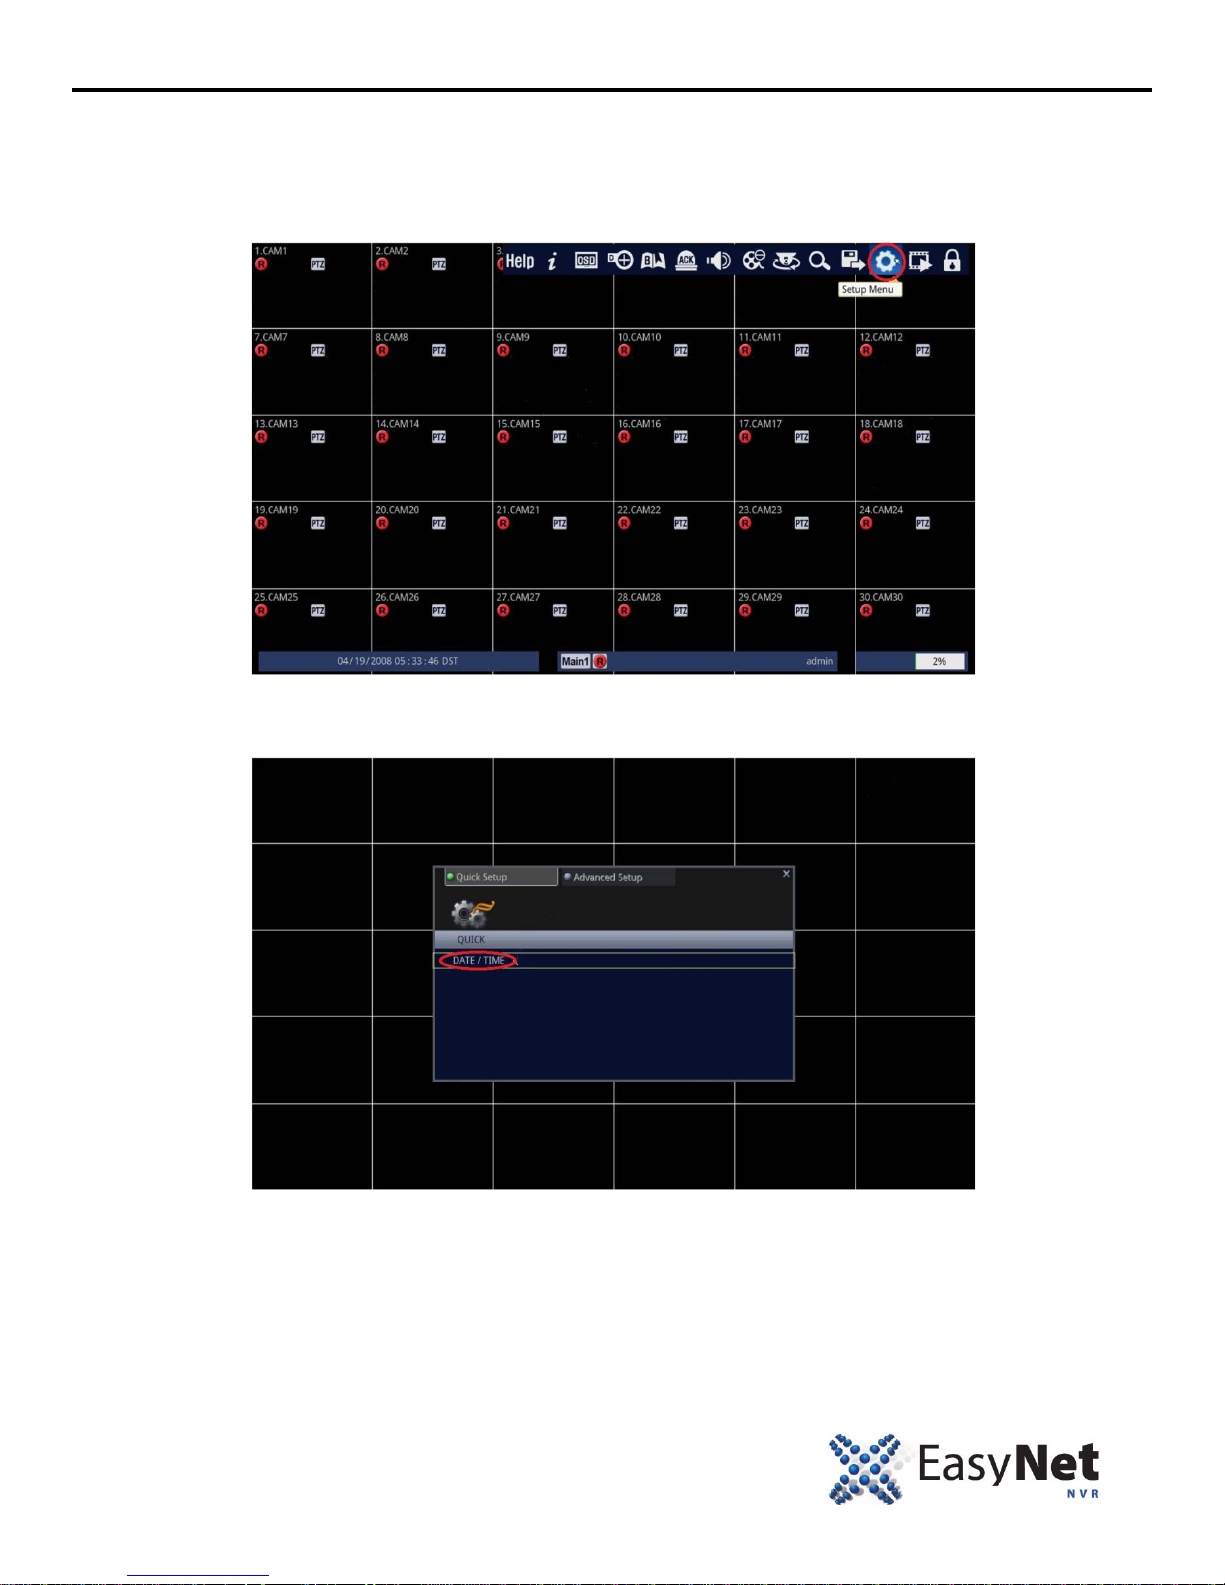
HOW TO SET DATE/TIME
When the NVR is powered on for the very first time, the time and date may be incorrect. Before any other operation of the
NVR is started, it is important to setup the time and the dat e.
1. Follow the instructions below.
• Using Mouse: Click on the [Setup Menu] icon.
2. Access DATE / TIME submenu.
• Using Mouse: Click on the [DATE/TIME] line under the Quick Setup Tab.
EN-U3000 19
Page 21
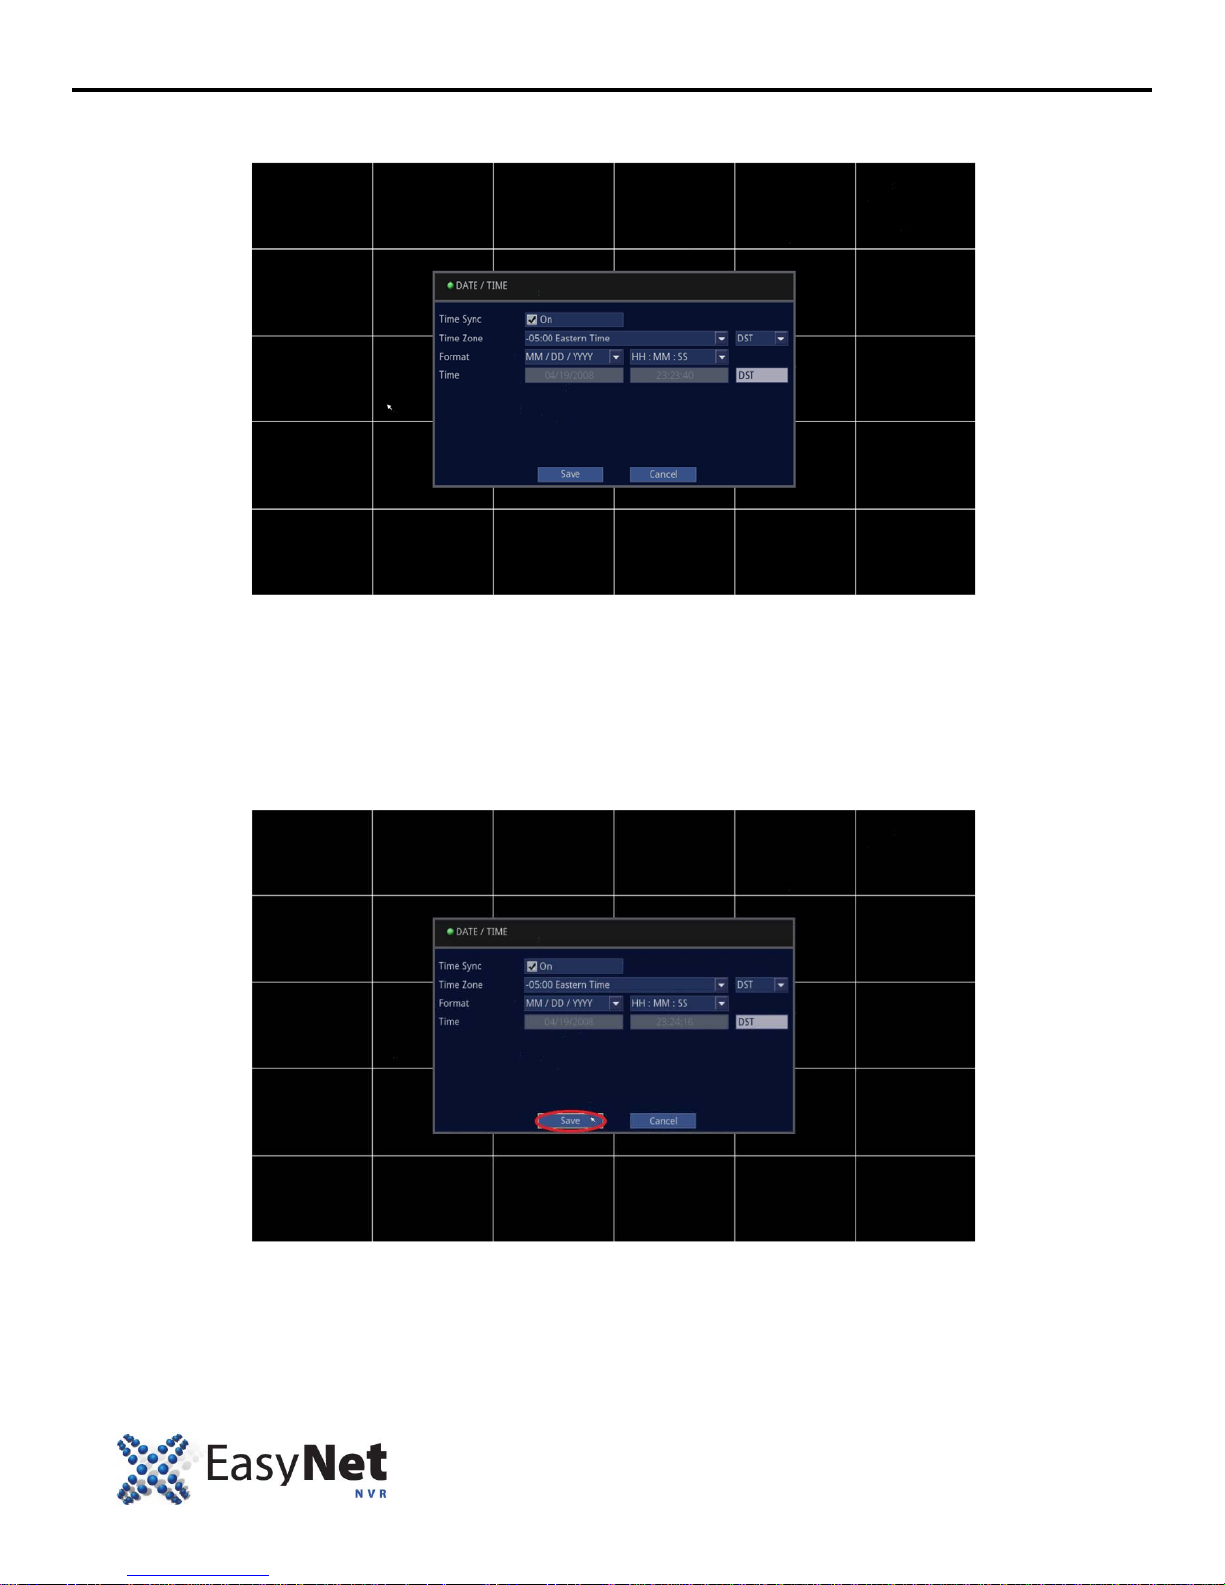
HOW TO SET DATE/TIME
3. Change to the desired value.
• Using Mouse: Click on the desired value and modify.
Time Sync: When checked, it will synchronize the NVR’s time to its regional NTP (Network Tim e Server) if an active
internet connection is maintained.
Time Zone: Select appropriate Time Zone for your location.
Format: Allows the format and display of DATE/ Time to be customized.
Time: Set or modify the Date and Time.
4. Save the changes.
• Using Mouse: Click on [Save] to save.
5. To exit out to the Live screen.
• Using Mouse: Right click on your mouse twice.
20 ENU-3000
Page 22
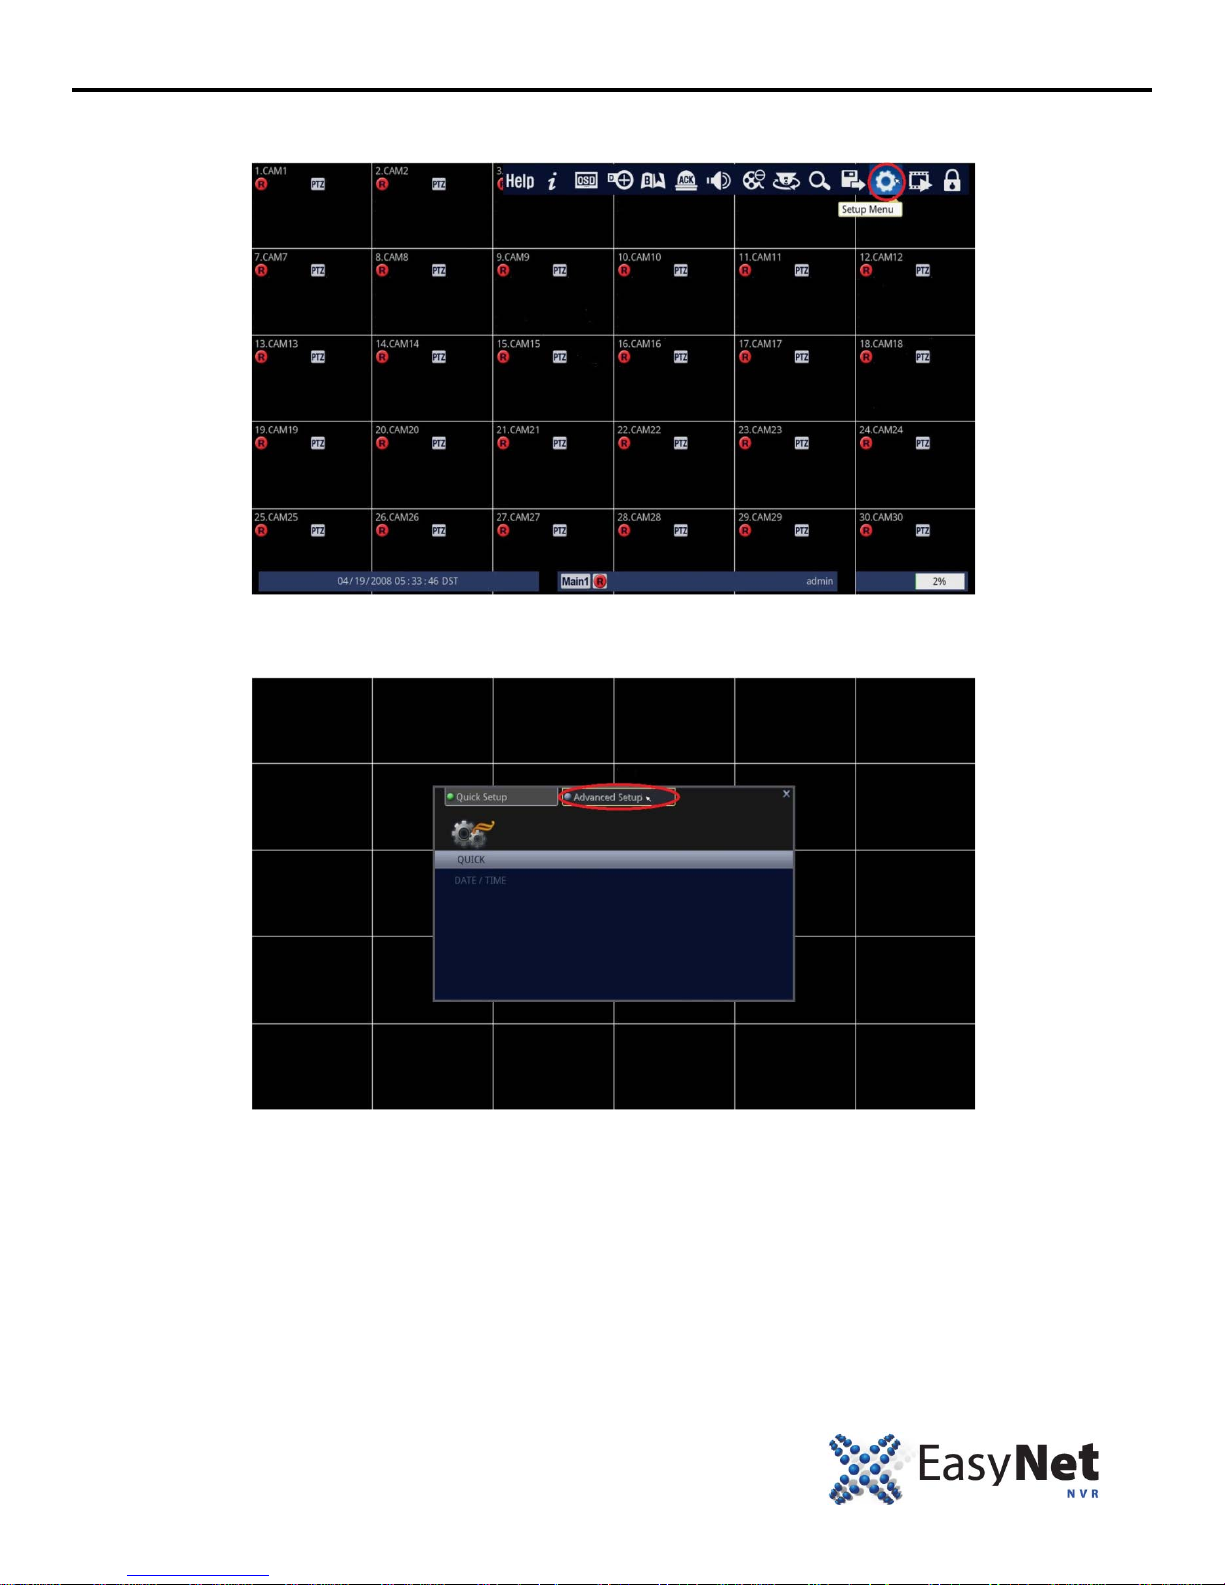
CAMERA SETUP
1. Follow the instructions below.
• Using Mouse: Click on the [Setup Menu] icon.
2. Select Advanced Setup.
• Using Mouse: Click on the [Advanced Setup].
EN-U3000 21
Page 23
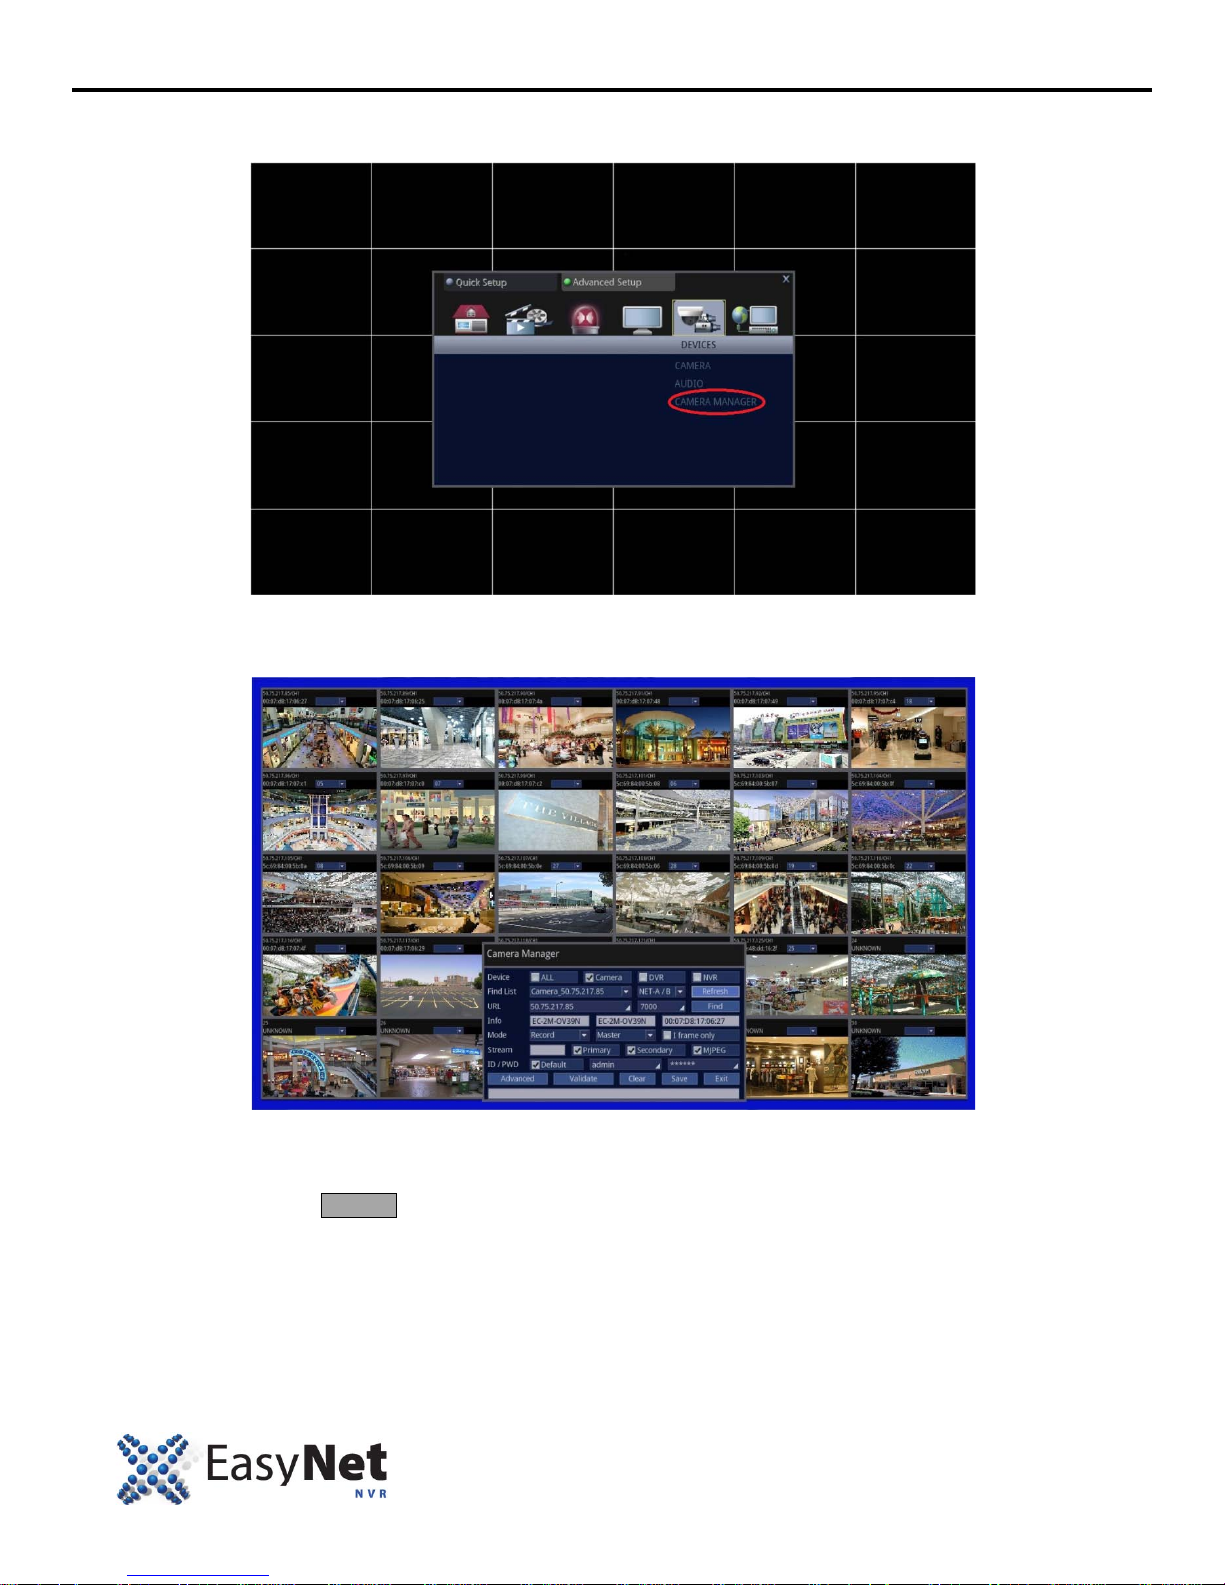
CAMERA SETUP
3. Select Devices.
• Using Mouse: Click on the [CAMERA MANAGER].
4. NVR will automatically discover EasyNet cameras and will display them on this screen. There are no specific orders
since the NVR is broadcasting to the network switch for any available EasyNet cameras.
NOTE: If you do not see all of your cameras being displayed on this screen, try one of the following.
1. Make sure that all of your cameras are connect ed to the PoE switch.
2. Try pressing on the Refresh button and NVR will try to re-discover the EasyNet cameras.
22 ENU-3000
Page 24
CAMERA SETUP
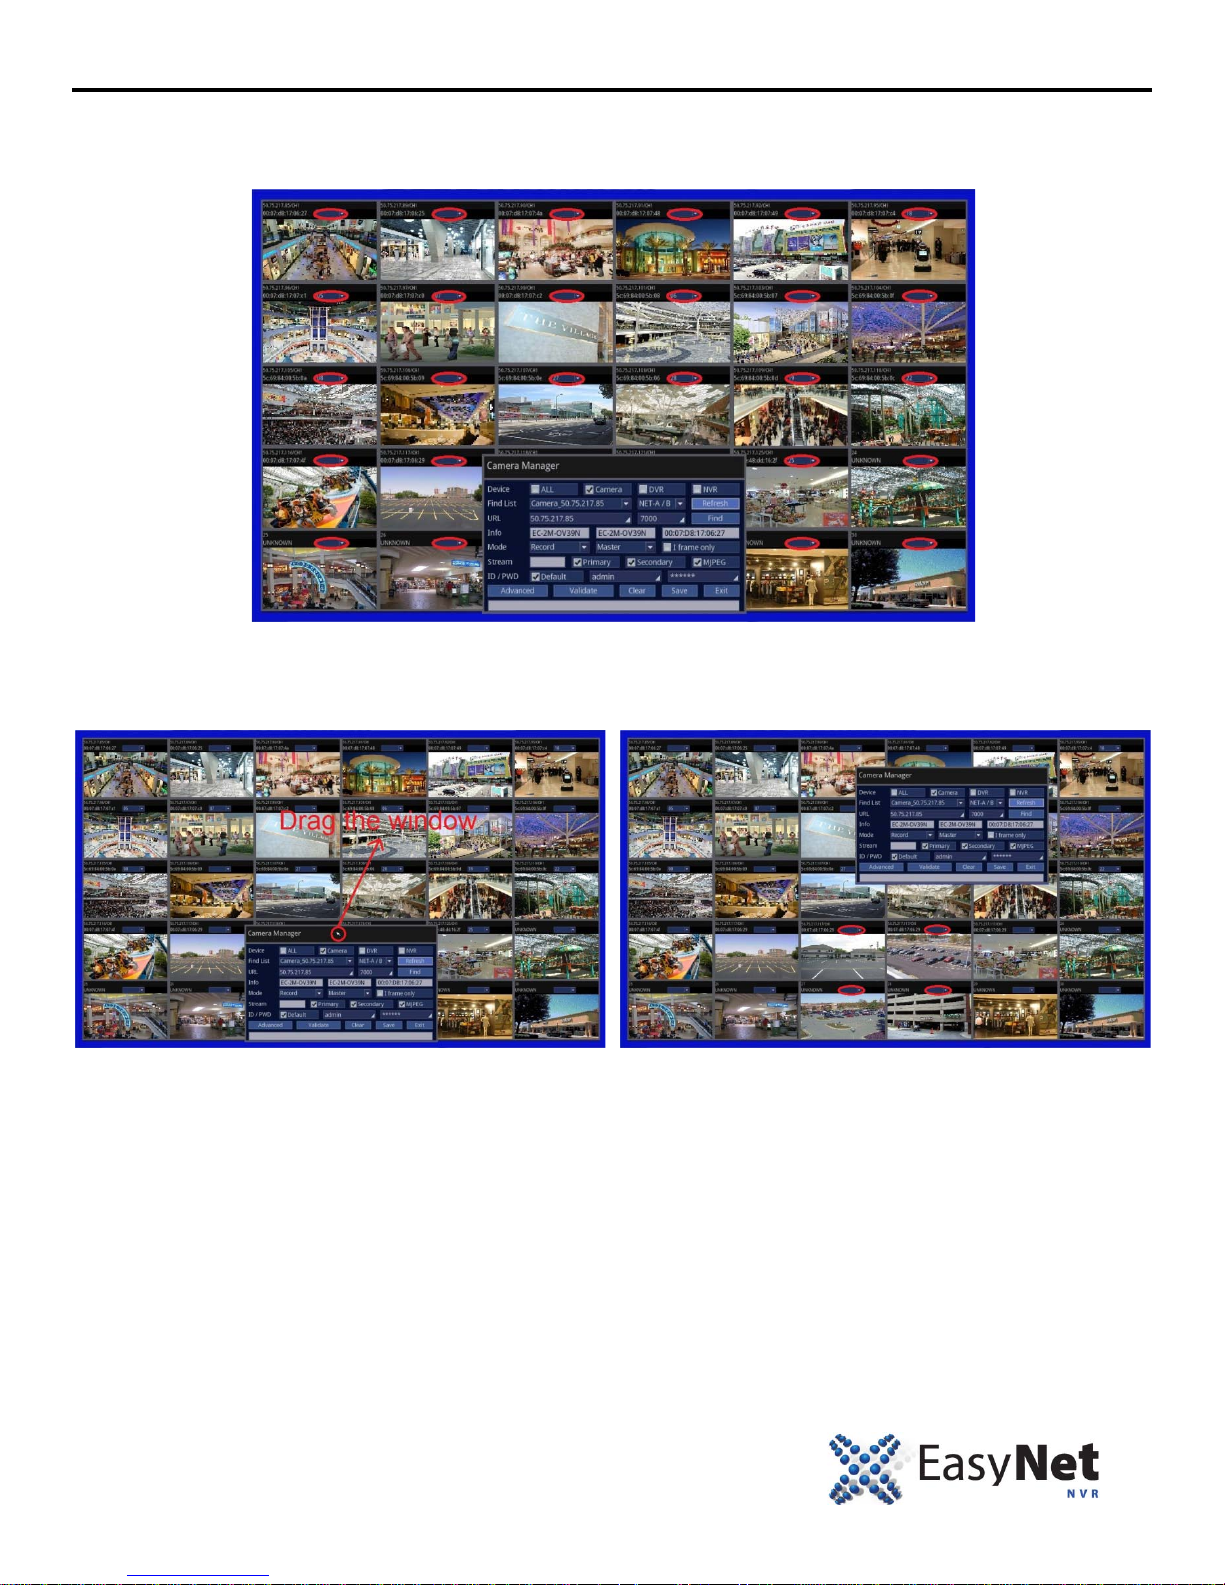
5. Now, since there were no specific orders of the cameras, you would want to start assigning the channel number to the
cameras so that the cameras can be identified with specific channel ID going forward.
• Using Mouse: Click on the channel drop down menu , and choose from 1 through 30.
Tip: It is possible that the Camera Manager Window can block some of the cameras. In this instance, you can simply
place the mouse cursor on the top of the Camera M anager window and drag them to the different parts of t he
screen to expose the hidden cameras.
EN-U3000 23
Page 25
CAMERA SETUP
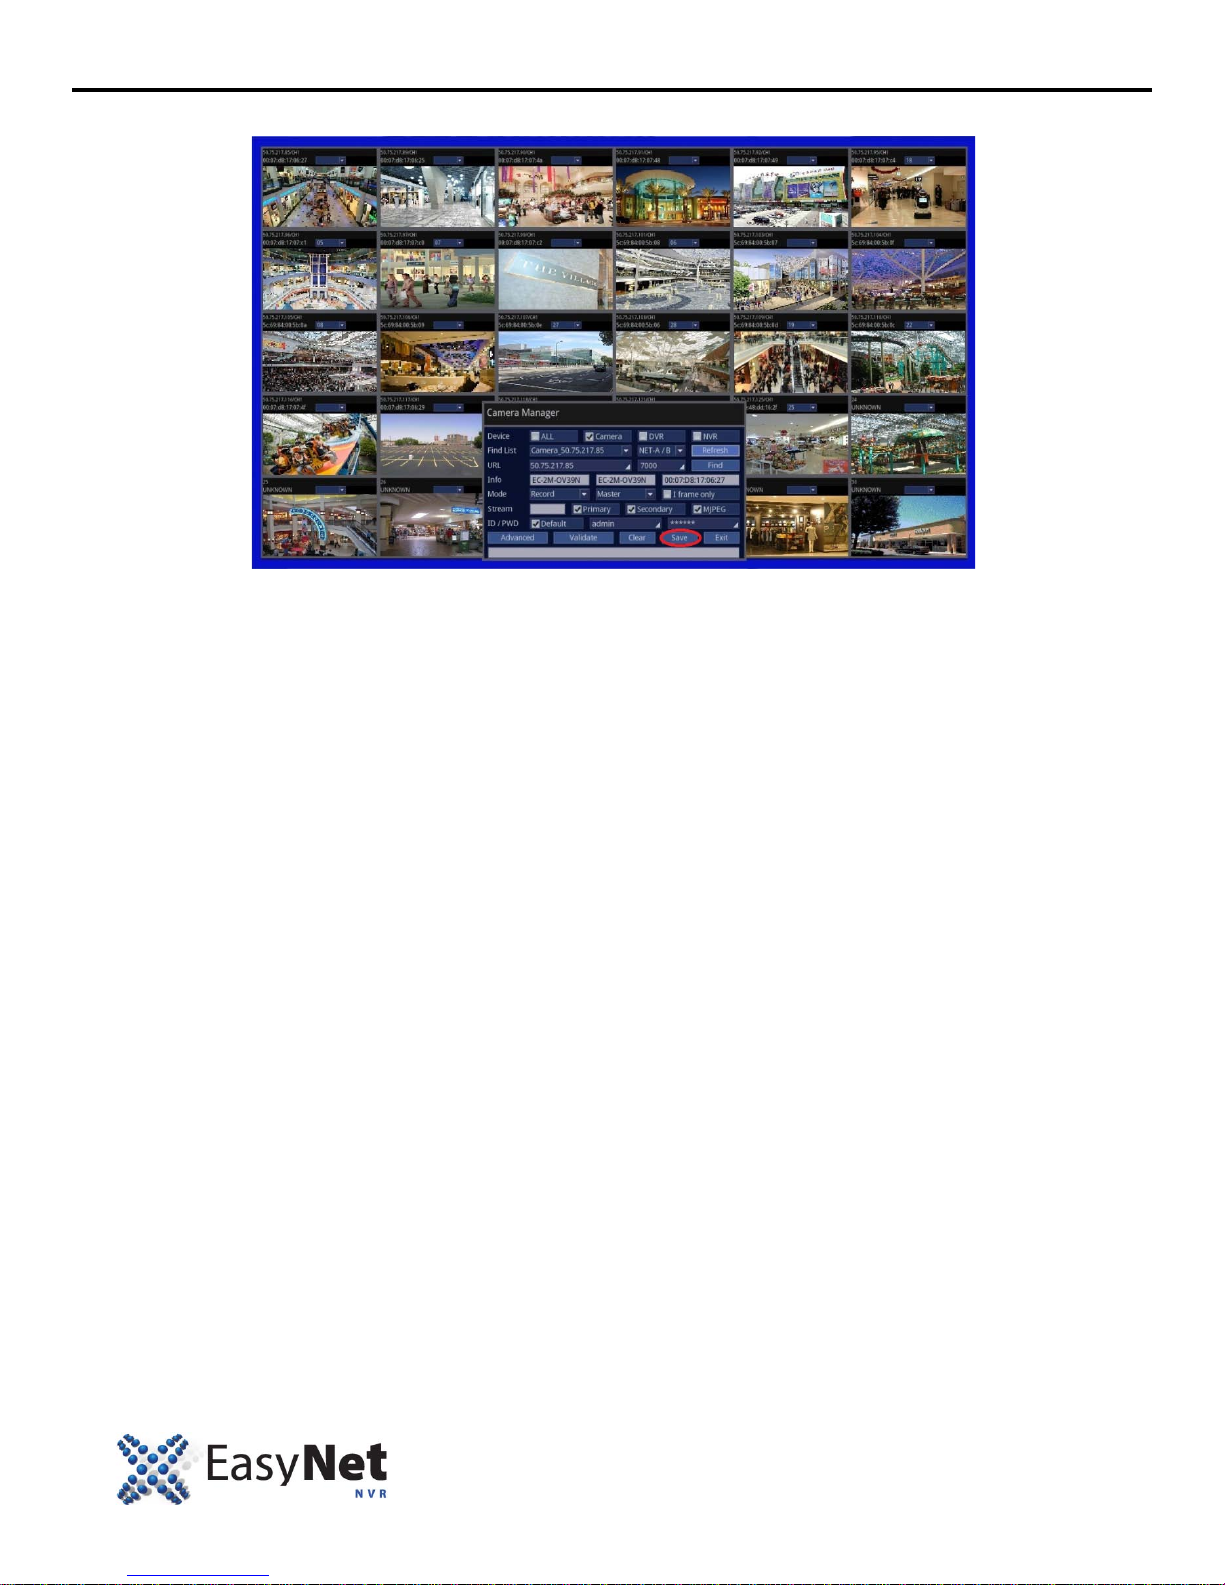
6. If all of your camera’s Channel ID is set, click on “Save” to exit out of this m enu.
24 ENU-3000
Page 26
RECORD SETUP
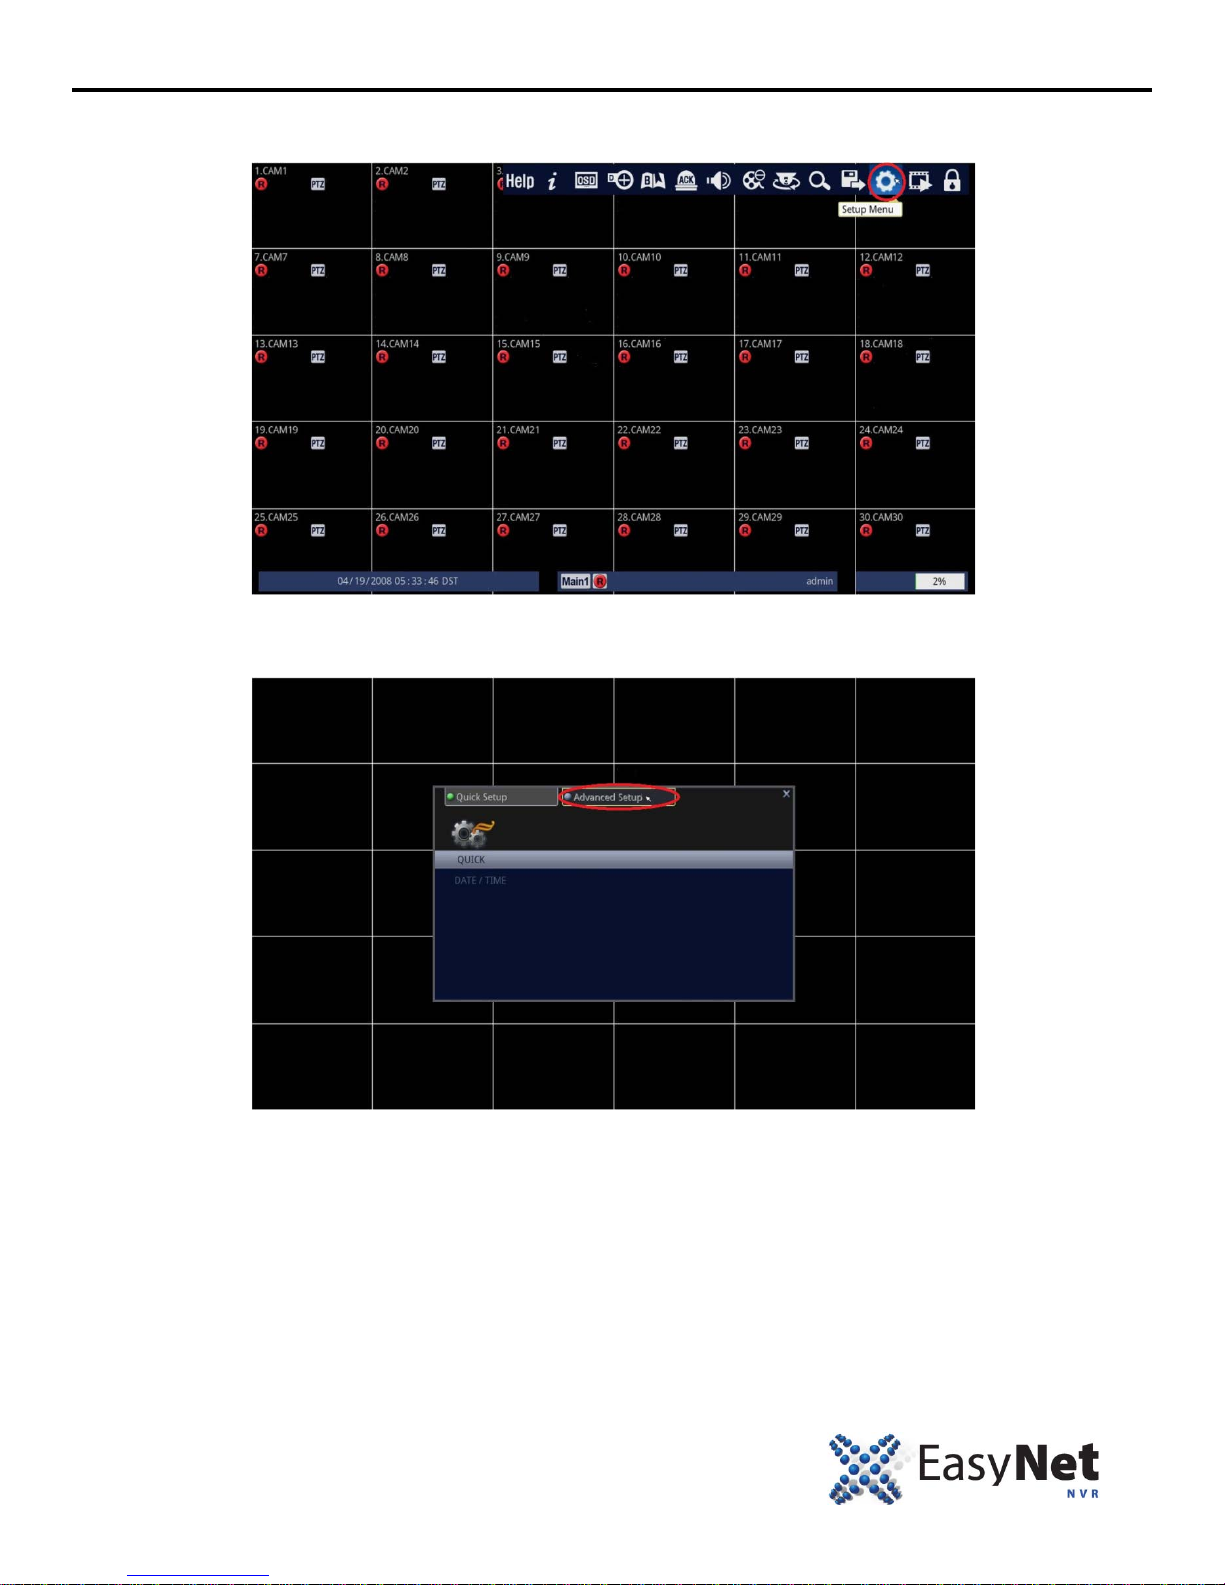
1. Follow the instructions below.
• Using Mouse: Click on the [Setup Menu] icon.
2. Click on the [Advanced Setup]
• Using Mouse: Click on the [Advanced Setup].
EN-U3000 25
Page 27
RECORD SETUP
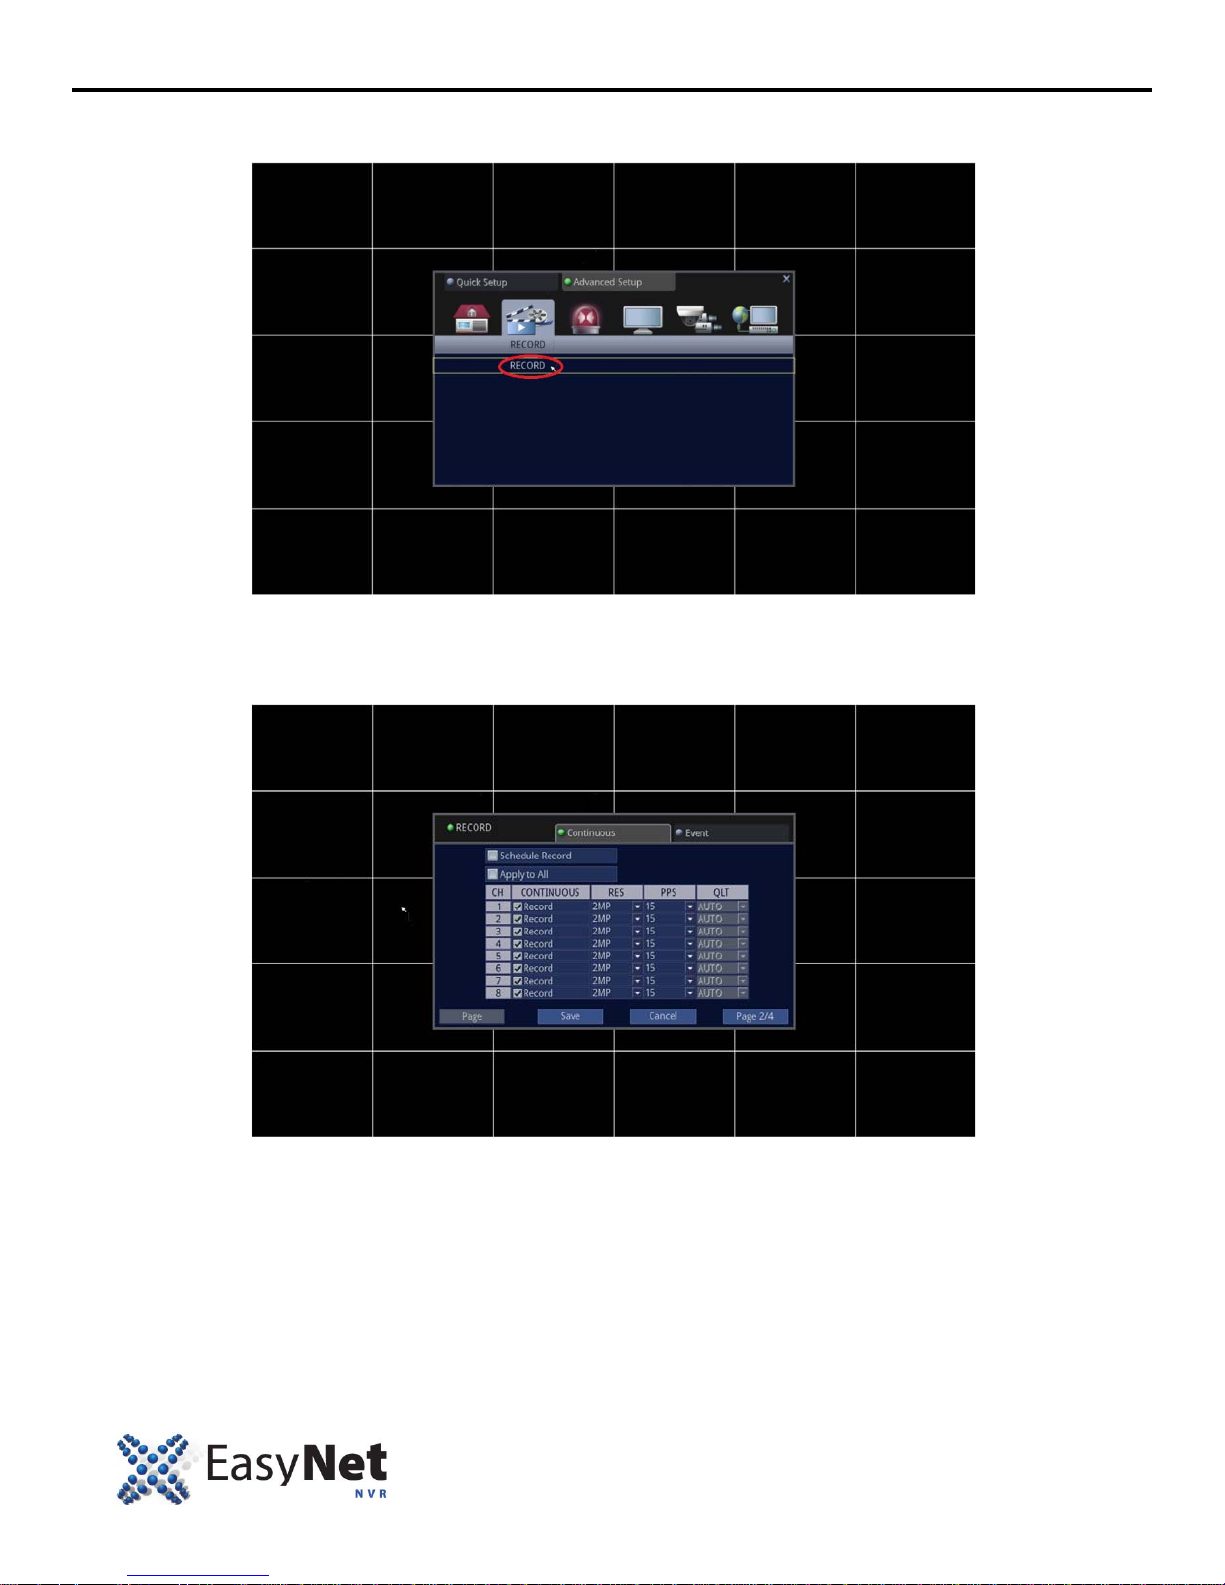
3. Click on the [RECORD]
• Using Mouse: Click on the [RECORD].
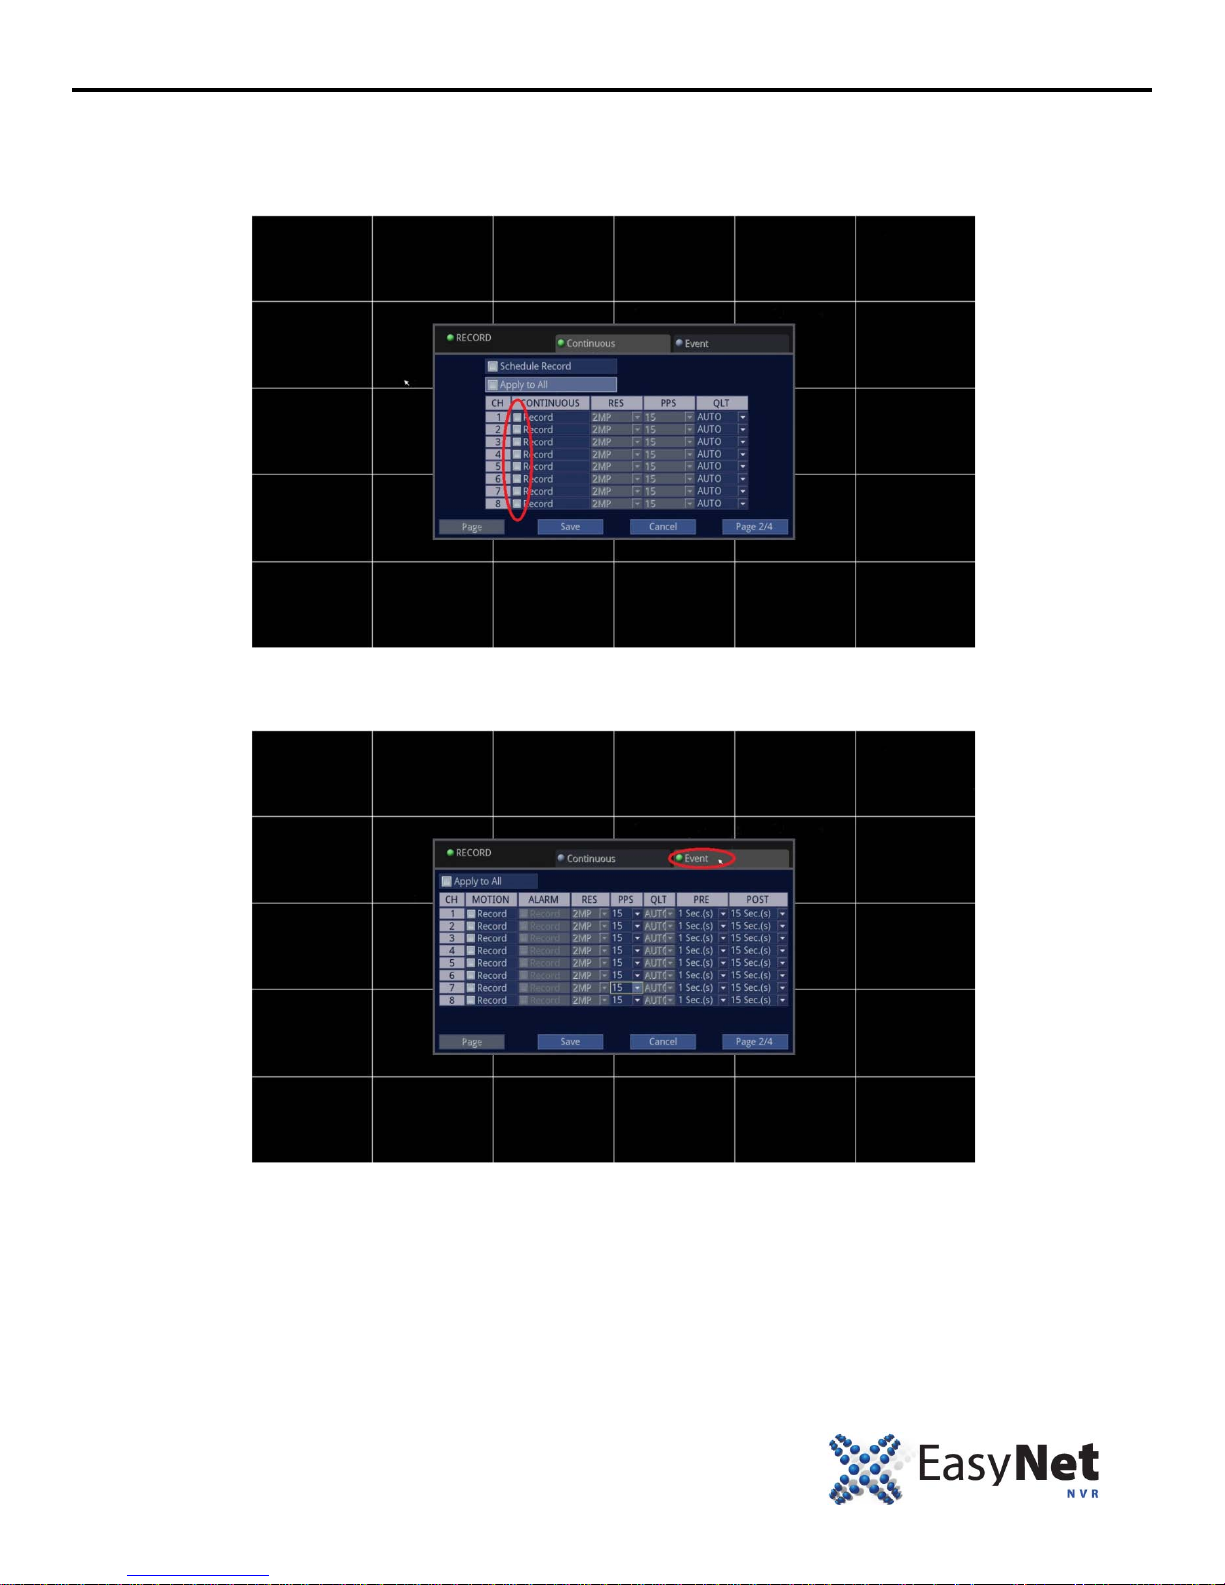
4. For CONTINUOUS Record, change t o the desired value. CONTINUOUS Record means t hat the cameras are
recording 24/7.
• Using Mouse: Click on the desired value and modify. When finished, click on [Save] to exit out of the menu.
CONTINUOUS: On or Off. Refers to Continuous (24/7) recording for all cameras.
RES: Set the resolution of the recorded videos. T here are 2 choices. 4CIF & 2MP. 4CIF refers to 704
x 480 resolution and 2MP is full 1080P resolution of 1920 x 1080.
PPS: 1, 2, 4, 7, 15. Refers to pictures per second for all c ameras. 1 being jerky, and 15 being smooth,
almost a real-time video.
QLT: Detail or sharpness of the recorded videos. T his value cannot be manually defined. The NVR
will automatically adjust its QLT depending on the RES and PPS that is conf i gured from the user.
Tip: Should you wish to apply the same value to the rest of the cameras, you c an utilize [Apply to All] option. For example,
any settings that you've defined on CH 1 can be appl ied to cameras 2 ~ 30 by checking [Apply to All] option.
26 ENU-3000
Page 28
RECORD SETUP
IMPORTANT: Should you wish the NVR to record ONLY when the m otion is detected, follow these further instruction s.
5. Uncheck CONTINUOUS Record option to all of the cameras that you wish to record ONLY on motion.
• Using Mouse: Uncheck CONTINOUS Record on desired cameras.
6. Click on the [Event] option.
• Using Mouse: Click on [Event].
EN-U3000 27
Page 29
RECORD SETUP
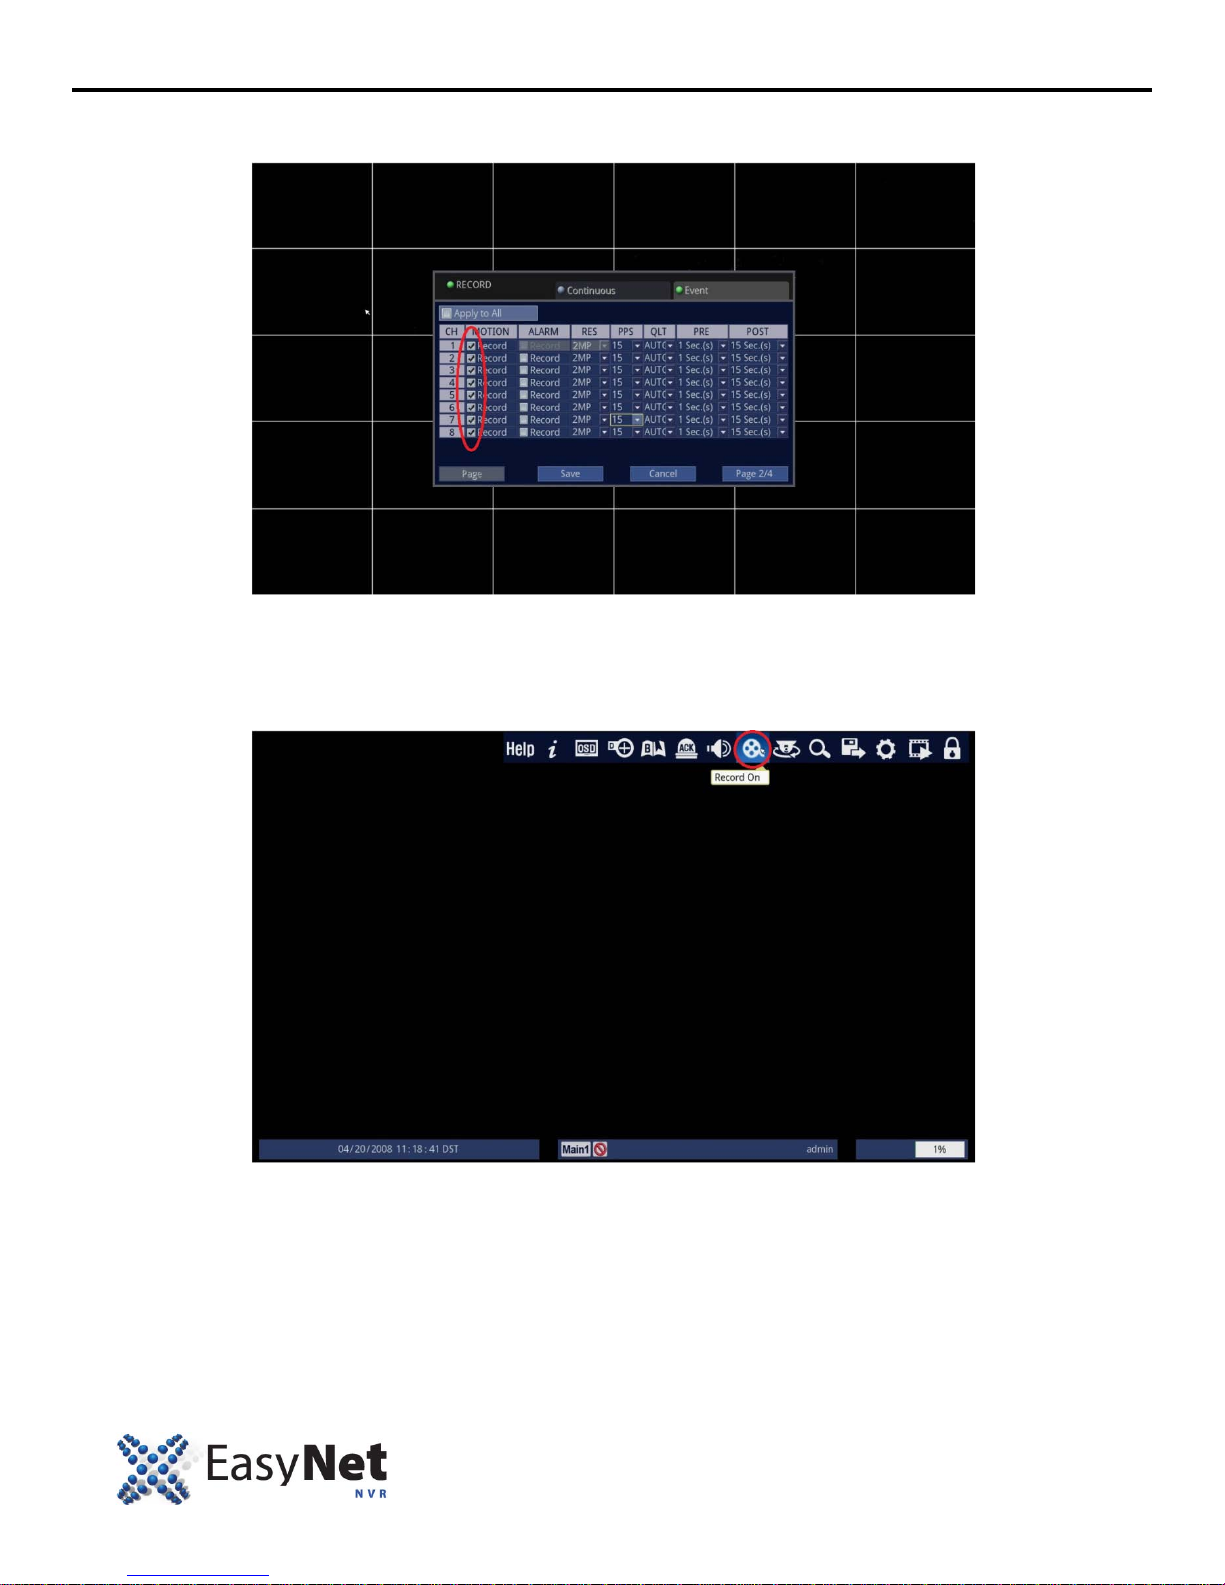
6. Check Record under the MOTION. Again, you can use the [Apply to All] shortcut to apply the setti ng to all cameras.
• Using Mouse: Click on [Record] to activate Motion Recording.
7. Save and exit out to the Live screen.
8.. Begin recording the video.
• Using Mouse: Click on the [Record On].
28 ENU-3000
Page 30
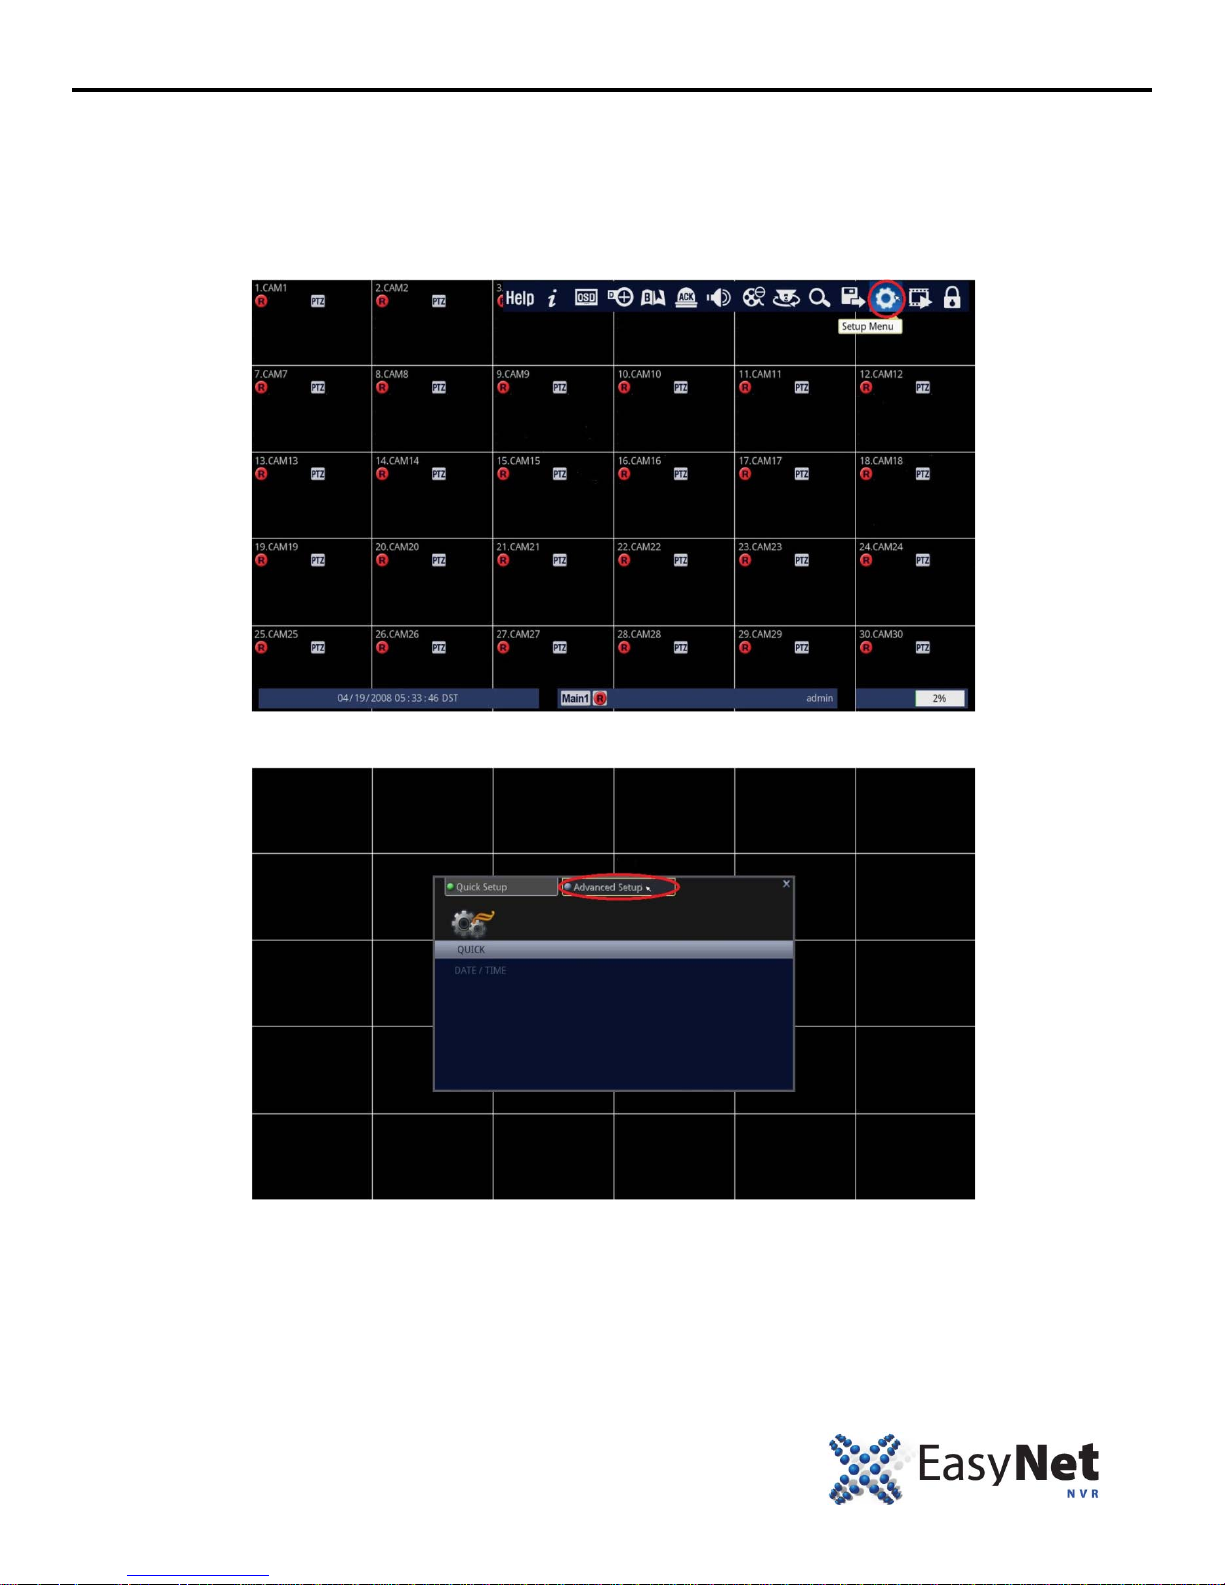
NETWORK SETUP
HOW TO SETUP IP ADDRESS UNDER THE NETWORK SETUP
The network menu allows for adjustment t o the TCP/IP settings for viewing video across a local area network or through
the internet.
1. Follow the instructions below.
• Using Mouse: Click on the [Setup Menu] icon.
2. Select Advanced Setup.
• Using Mouse: Click on the [Advanced Setup].
EN-U3000 29
Page 31
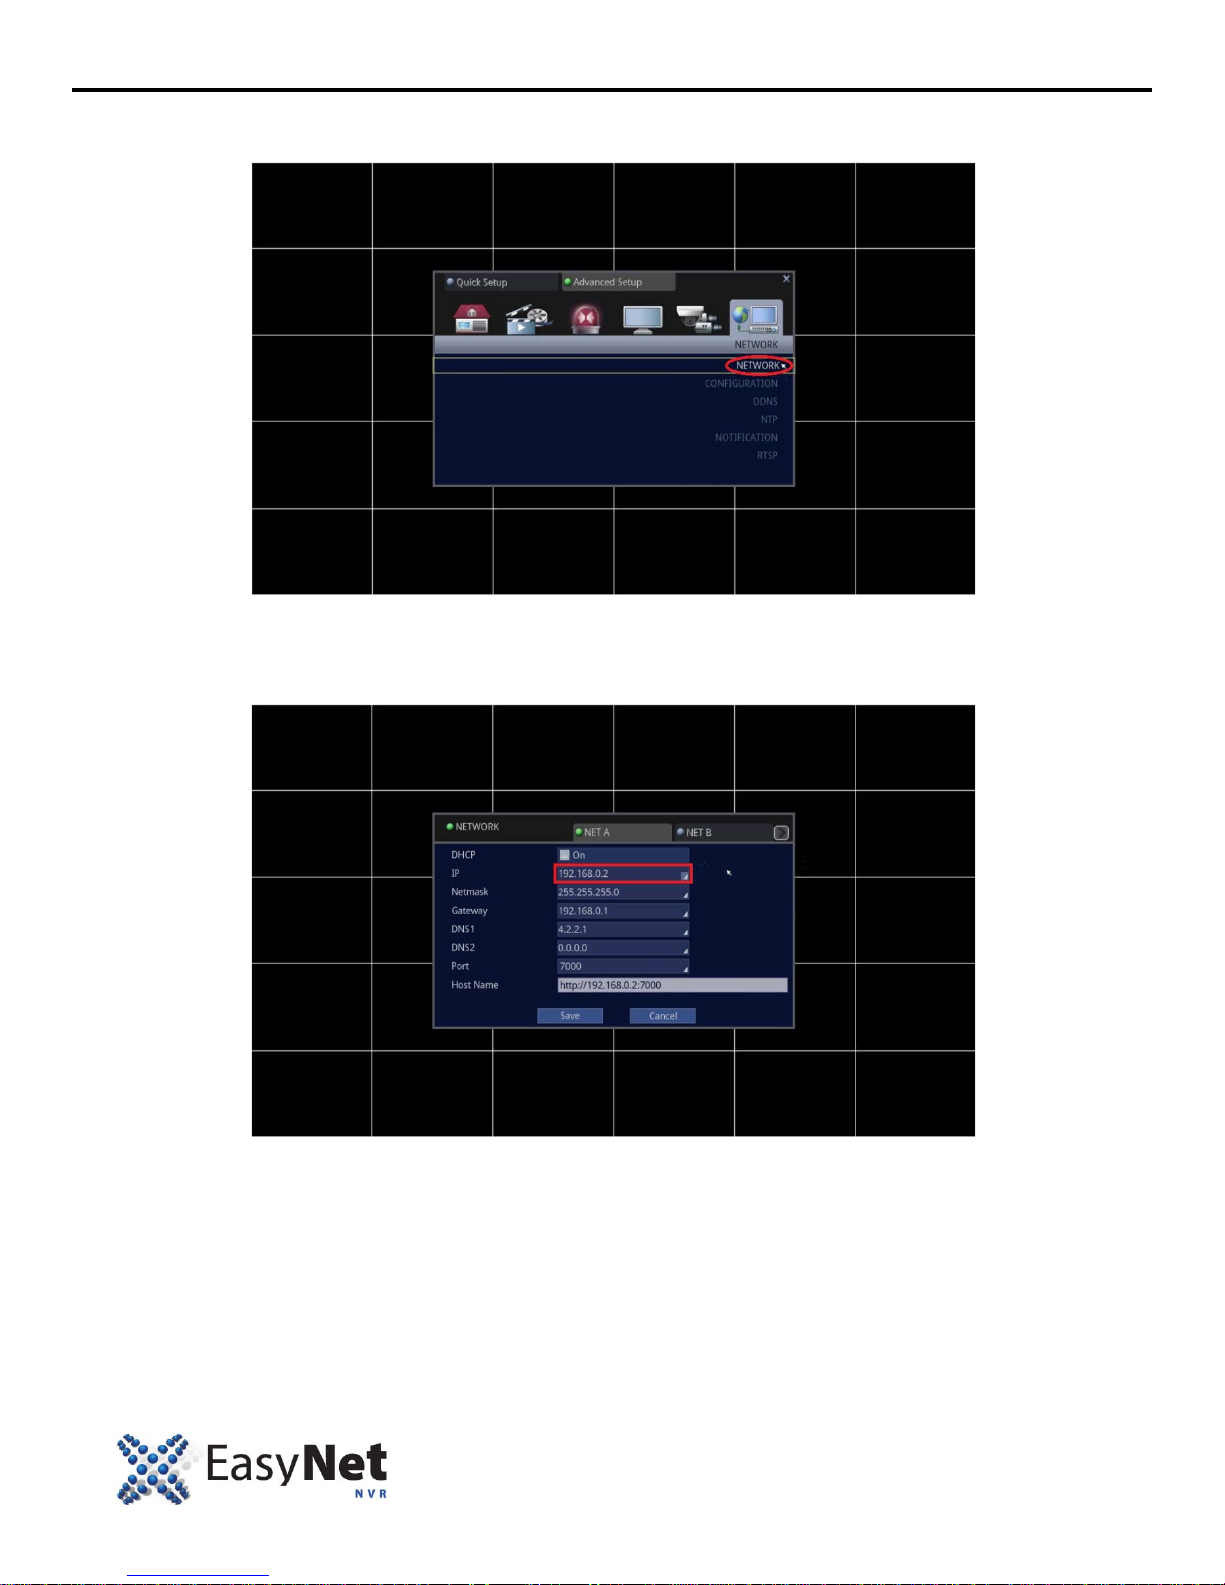
NETWORK SETUP
3. Select Network and access the sub-menu of NETWORK.
• Using Mouse: First, click on the [NETWORK] icon, and then click on the [NETWORK] text.
4. Make necessary changes.
Note: To change the parameters of IP, Netmask, Gateway, DNS1, DNS2, Port, follow the instructions below.
(These parameters are given by your Internet Service Provider or Network Administrator.)
30 ENU-3000
Page 32
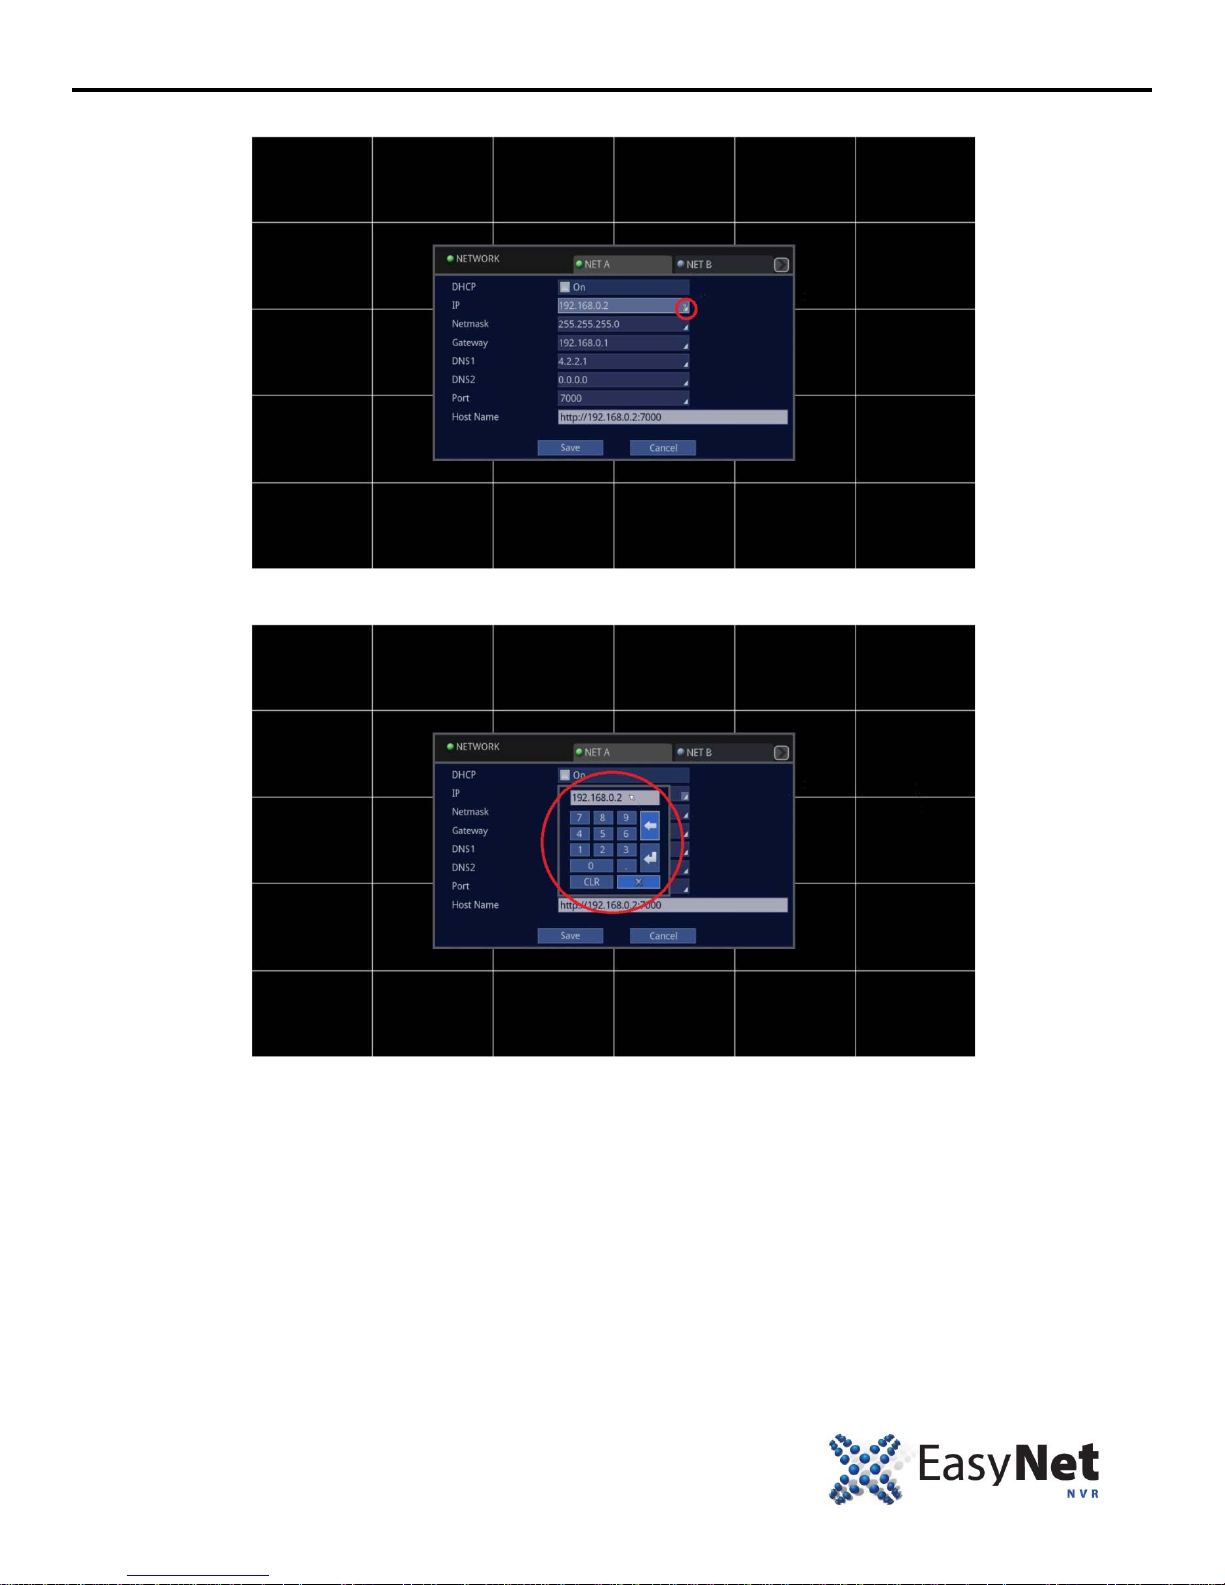
NETWORK SETUP
Highlight and click the IP portion on the screen.
Virtual numeric keypad will pop up on the screen. Us e your mouse to click on the desired value such as 0 ~9, Backspace,
Enter and Clear button to enter your values..
EN-U3000 31
Page 33
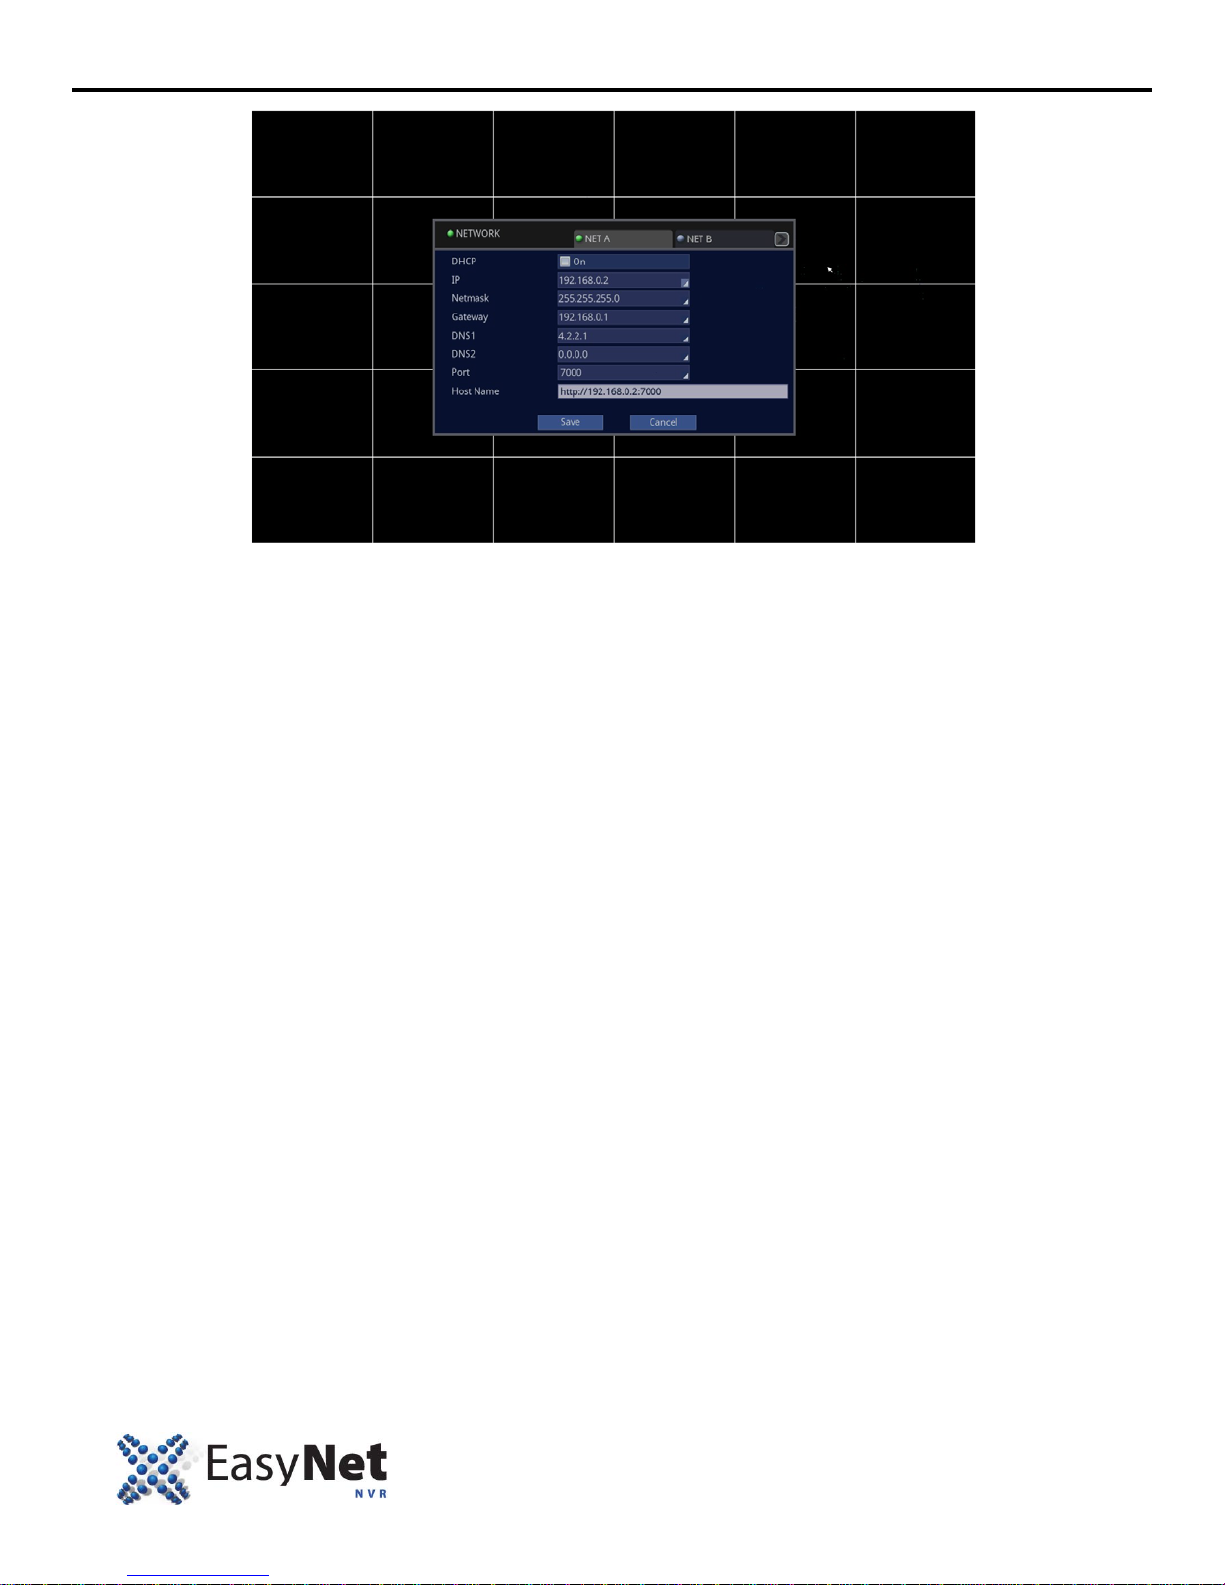
NETWORK SETUP
DHCP: Obtains IP, Netmask, Gateway, DNS1, DNS2 automatically from your internet devi ce or Router. Only
enable this when you know that DHCP is supported by your network.
IP: IP Address
Netmask: Subnet Mask
Gateway: Gateway, usually referred to as IP Address of your router on the network.
DNS1: Primary Domain Name Server Address, given by your I nternet Service Provider or Network Administr ator.
DNS2: Secondary Domain Name Server Address, given by your Int ernet Service Provider or Network
Administrator.
Port: 7000 is the factory default. This port nu m ber is customizable and can be changed.
Host Name: This is the unique ID of the NVR that communicat es to our DDNS server. Type the address that is shown
here to your web browser such as Internet Ex pl orer, Mozilla Firefox, Google Chrome, or Apple Safari.
Tip 1: When the NVR is connected and configured to connect to public internet, it will display unique address such as
http://hostname.nuvicoconnect.com:7000
Tip 2: For example: http://u123432.nuvicoconnect.com:7000 can be typed into any web browser and the user can
view/playback the videos from the NVR via the web browser.
6. Save and exit out to the Live screen.
32 ENU-3000
Page 34
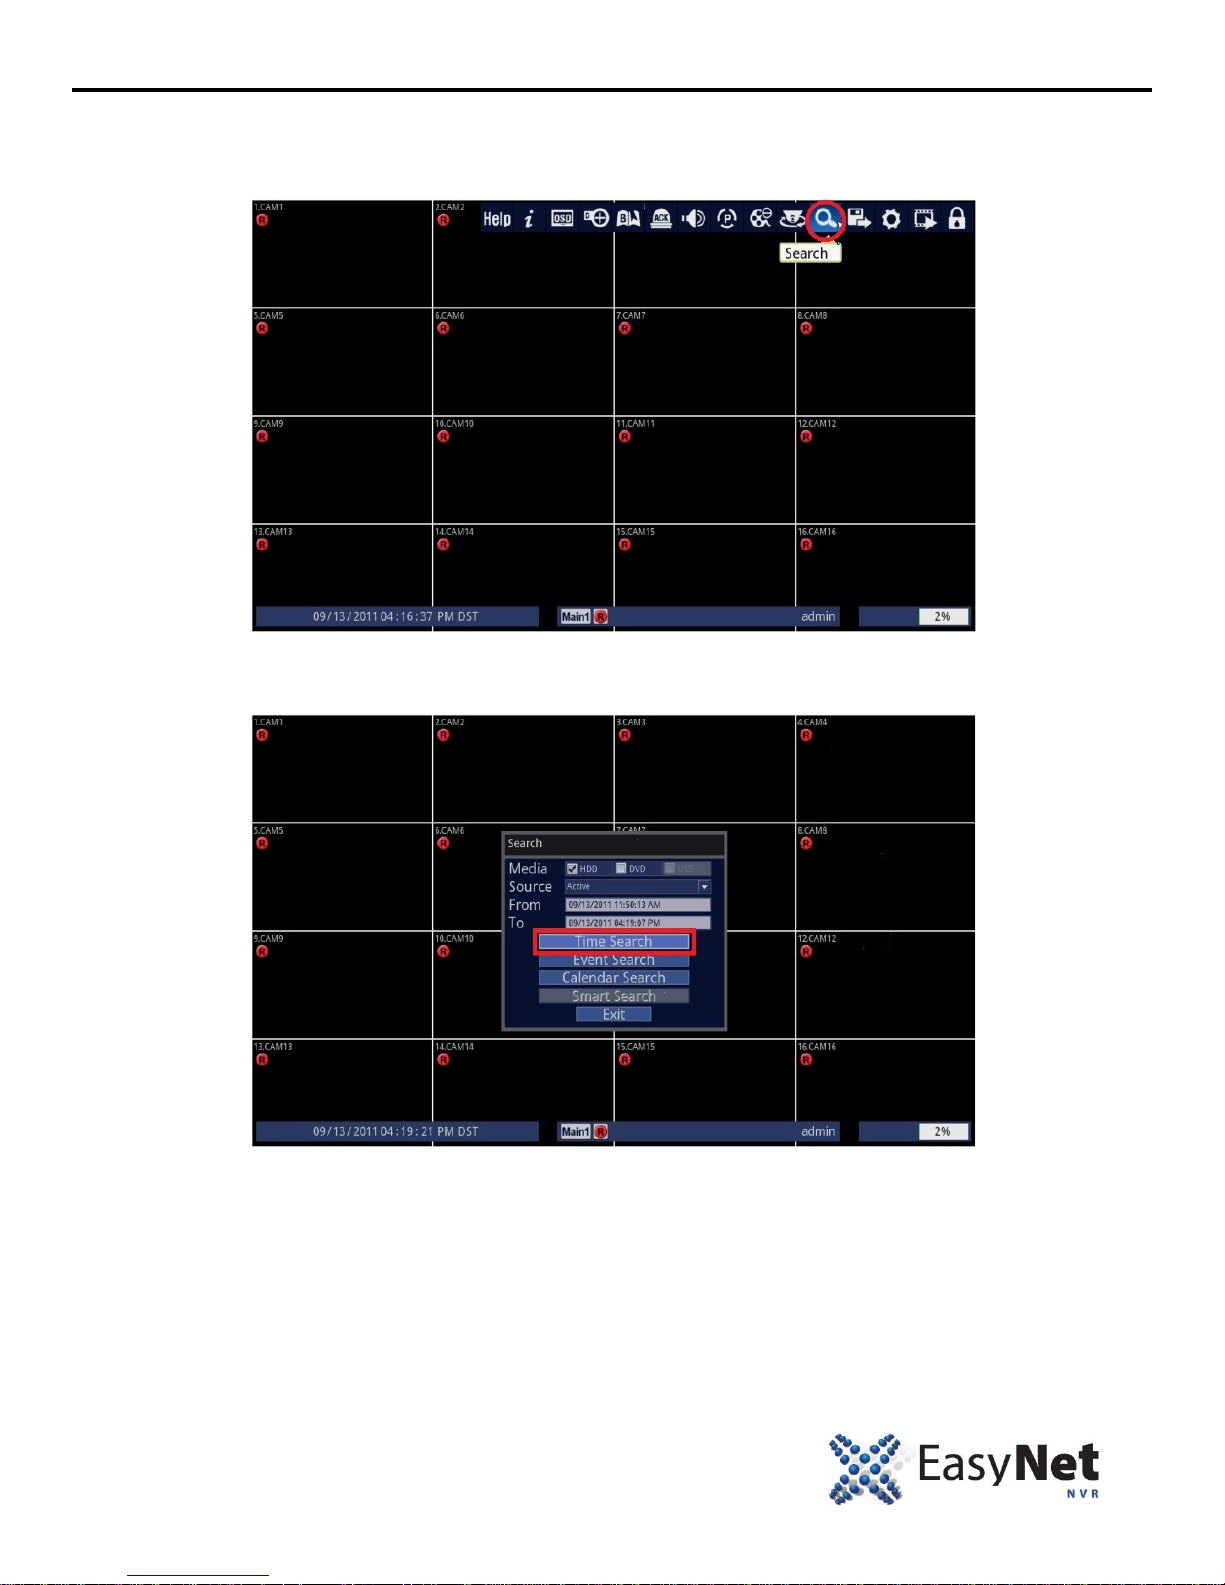
VIDEO SEARCH & PLAYBACK
HOW TO SEARCH FOR VIDEO USING “TIME SEARCH” METHOD
1. Follow the instructions below.
• Using Mouse: Click on the [Search] icon.
2. Select Time Search.
• Using Mouse: Click on the [Time Search] icon.
EN-U3000 33
Page 35
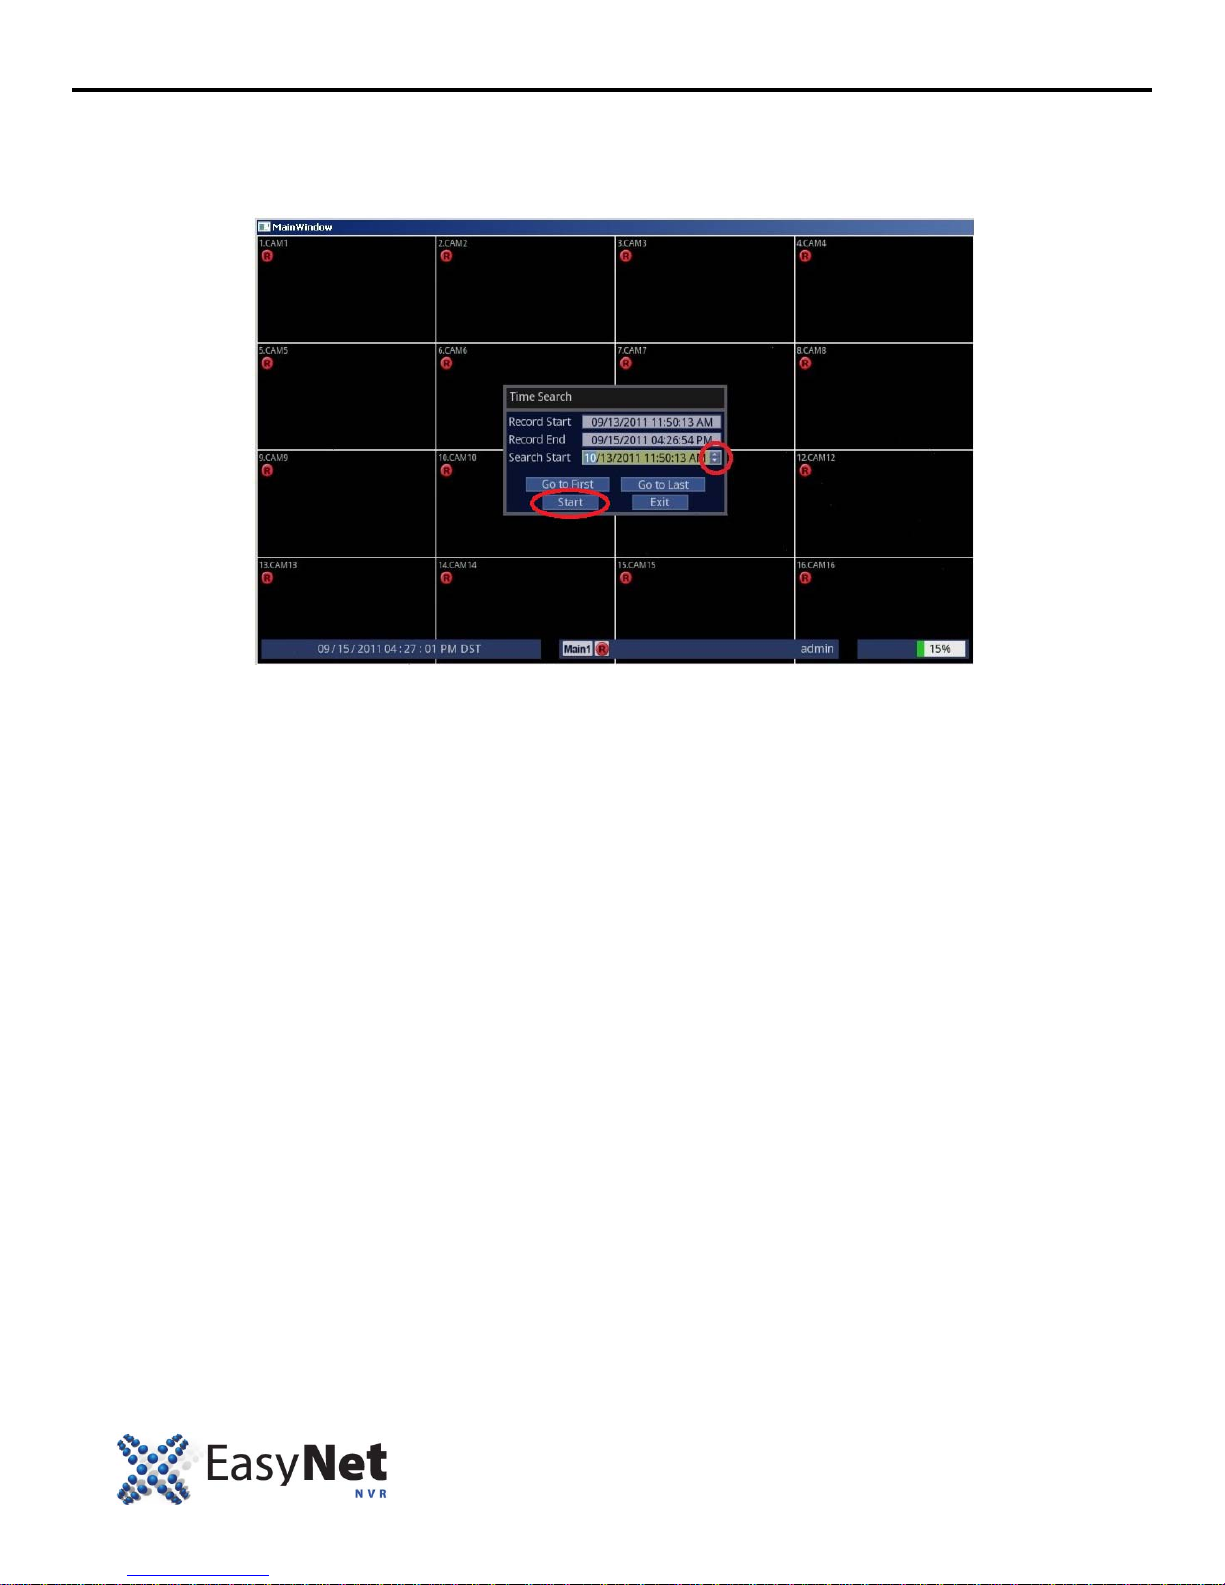
VIDEO SEARCH & PLAYBACK
3. Enter your desired Date and Time.
• Using Mouse: Click on the desired group such as Month/Day/Year/Hour/Minute/Second and clic k on the [] []
part of the screen to change the value. Then, highlight and click on [Start]. Your desired video
will start playing.
4. To exit out to the Live screen.
• Using Mouse: Right click on your mouse twice.
34 ENU-3000
Page 36
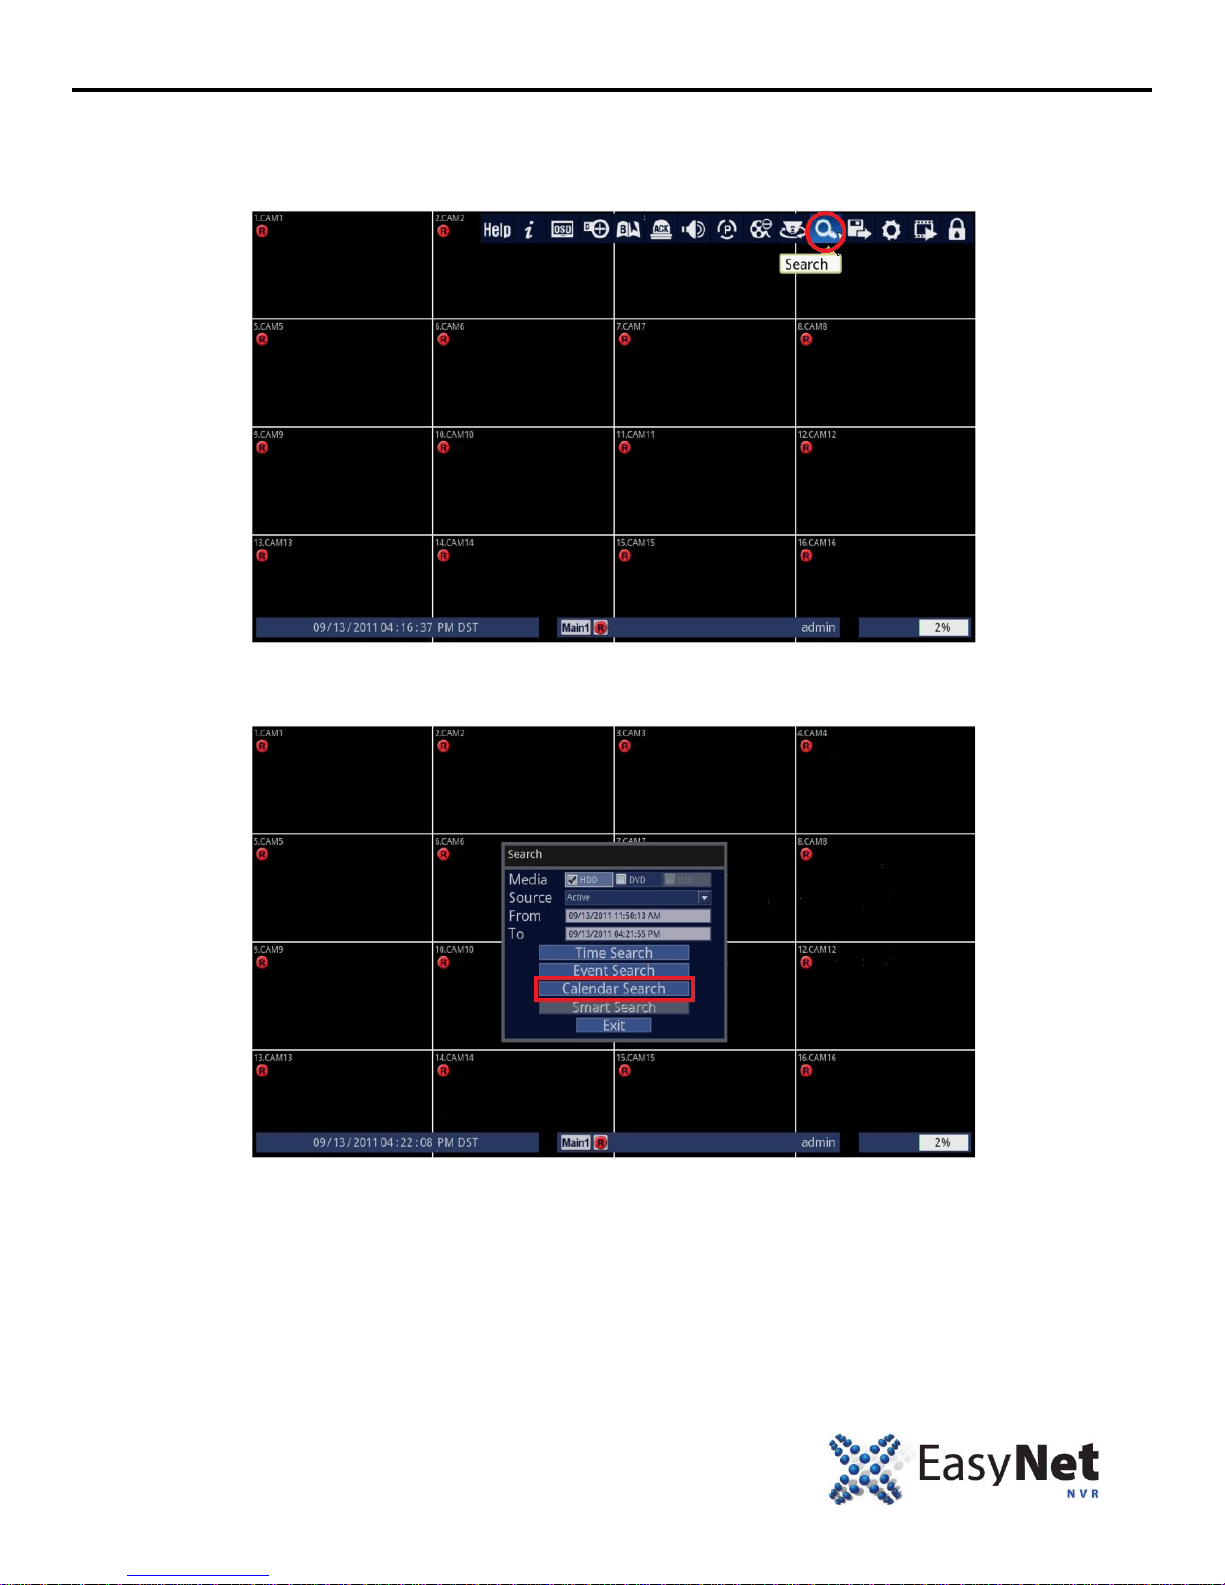
VIDEO SEARCH & PLAYBACK
HOW TO SEARCH FOR VIDEO USING “CALENDAR SEARCH” METHOD
1. Follow the instructions below.
• Using Mouse: Click on the [Search] icon.
2. Select Calendar Search.
• Using Mouse: Click on the [Calendar Search] icon.
EN-U3000 35
Page 37
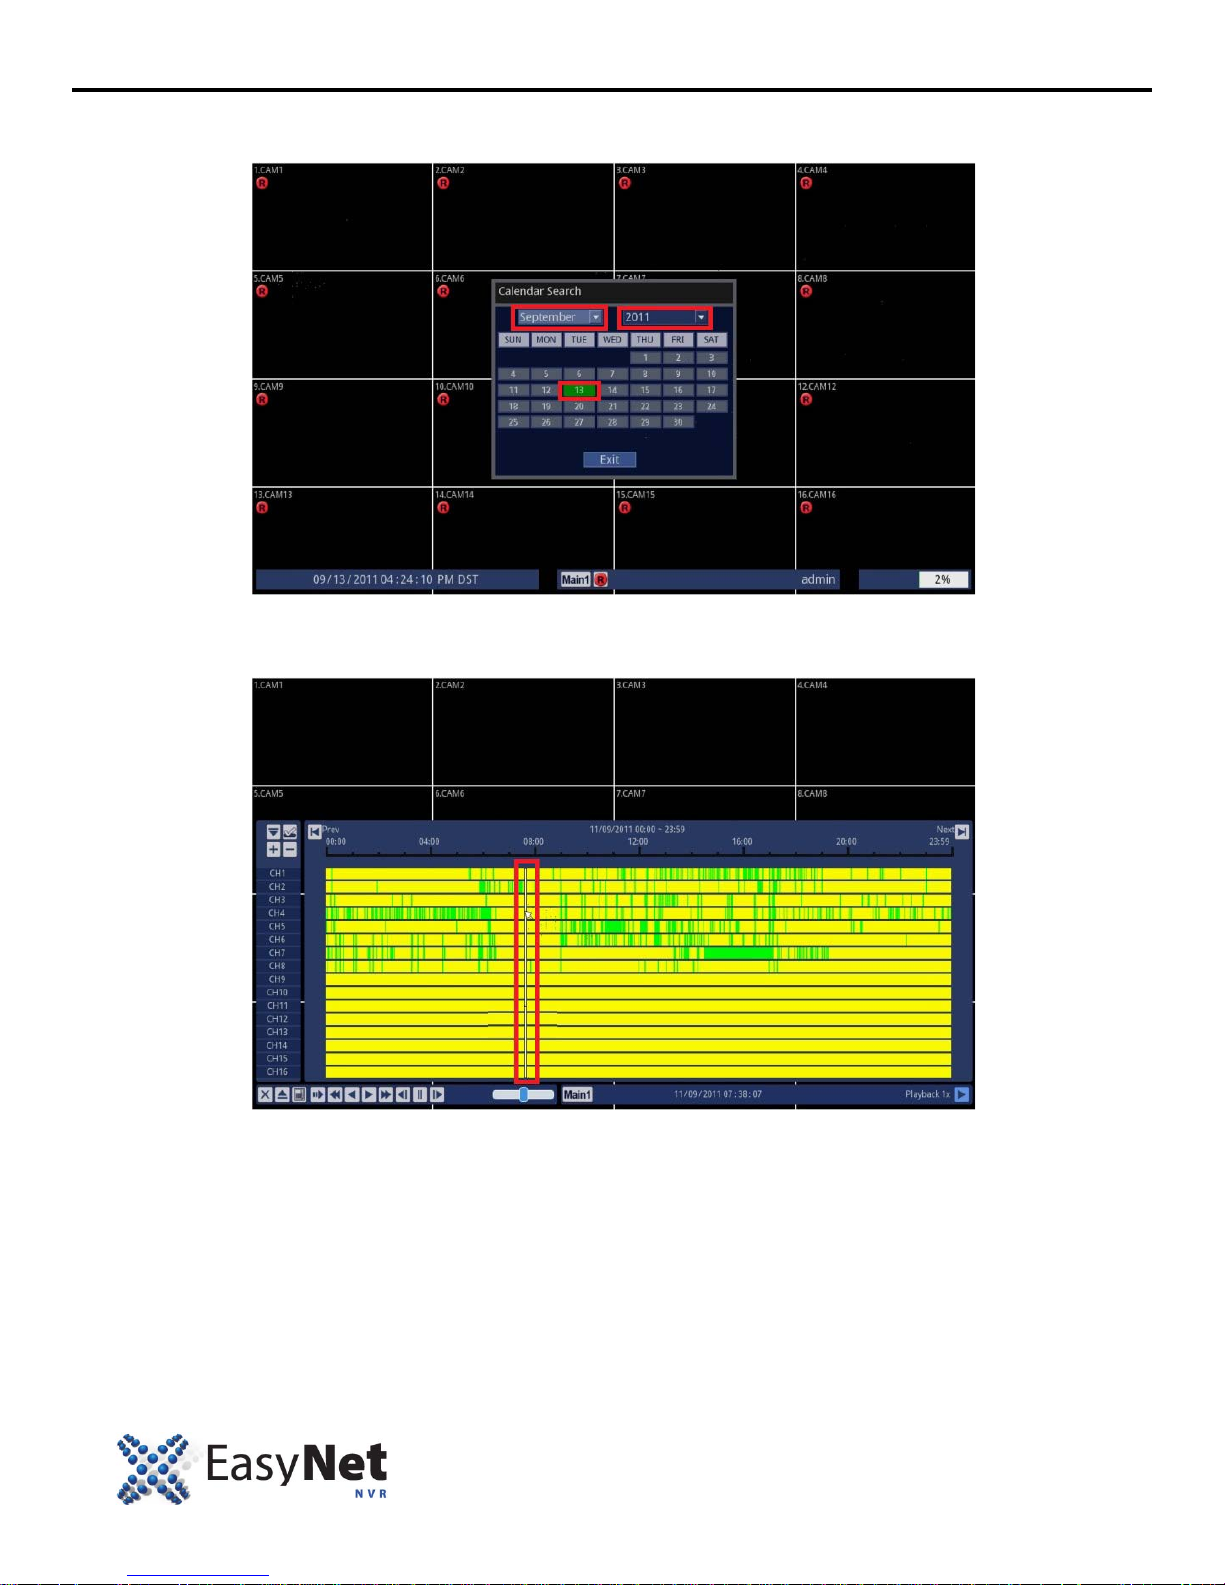
VIDEO SEARCH & PLAYBACK
3.Select Year, then Month, and Finally the day of the month.
• Using Mouse: Click on either the Year/Date or Day and change to the desired value.
4.Select your desired time of the day.
• Using Mouse: Click on the desired time of the day. Your desired video will start playing.
36 ENU-3000
Page 38
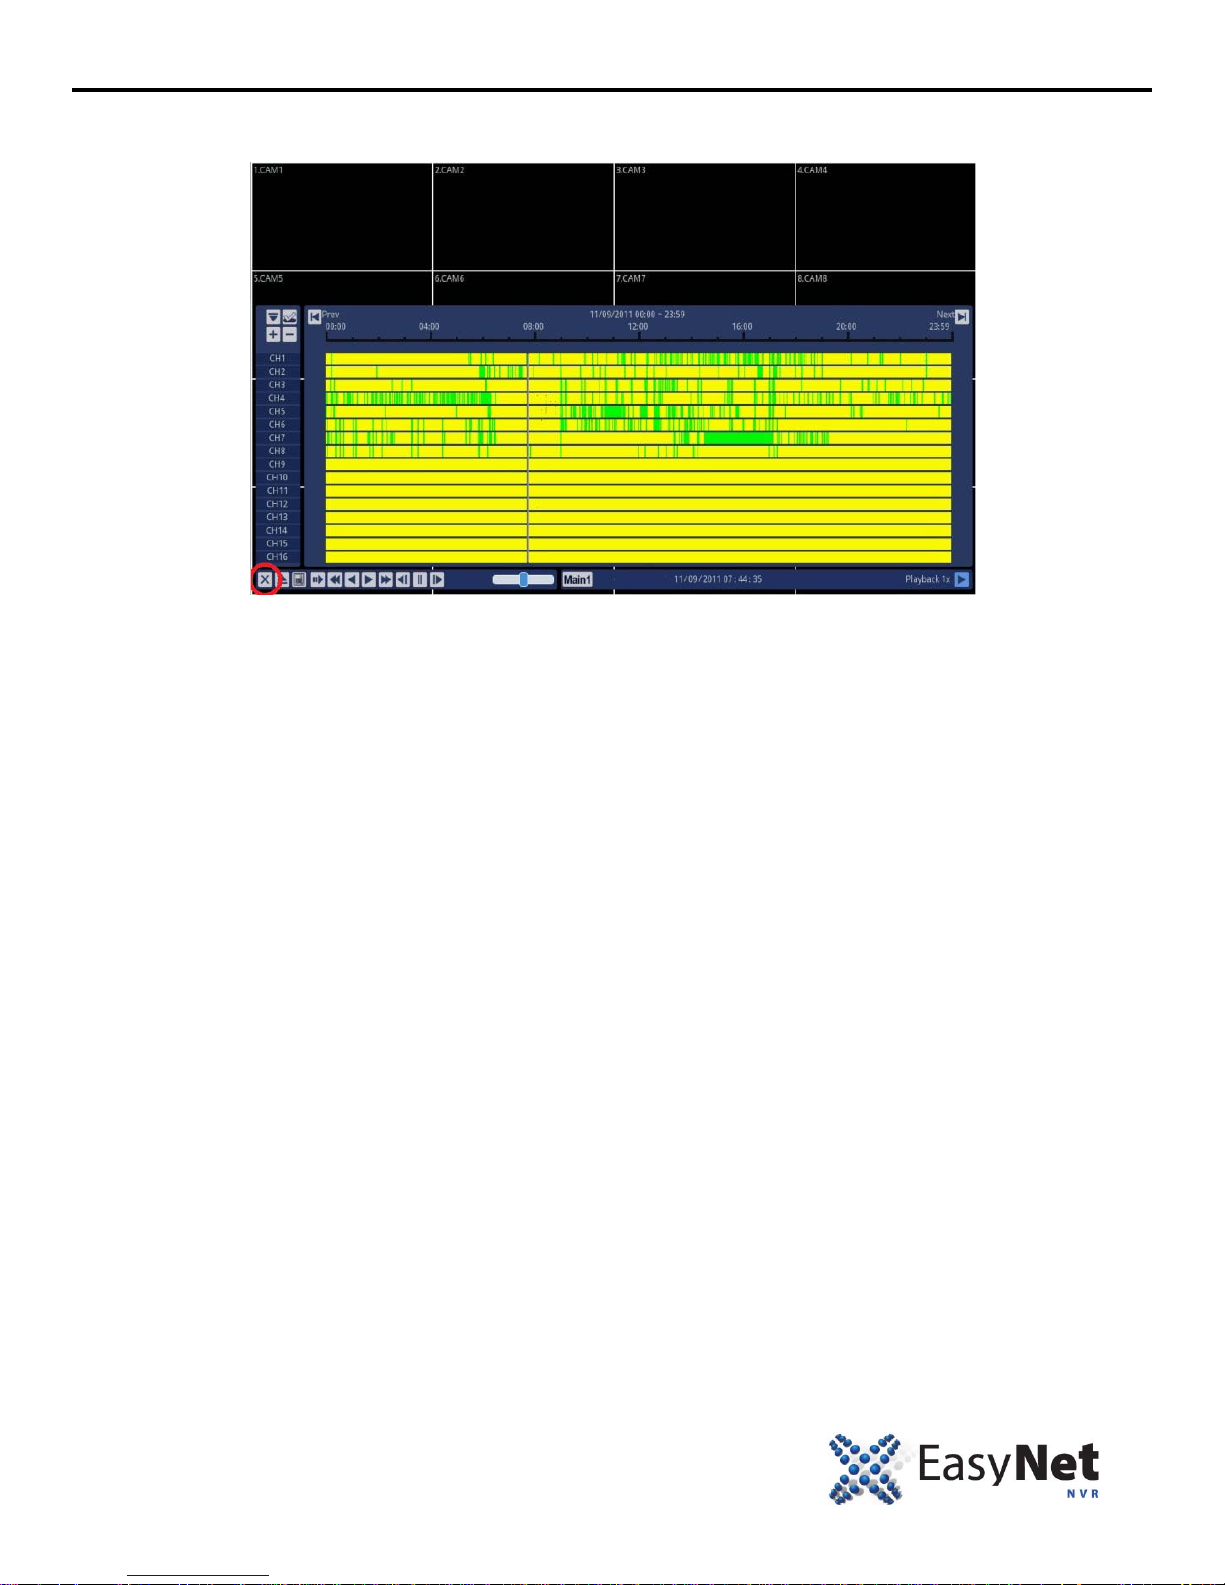
VIDEO SEARCH & PLAYBACK
5. To exit out to the Live screen.
• Using Mouse: Click on the X (Close).
EN-U3000 37
Page 39
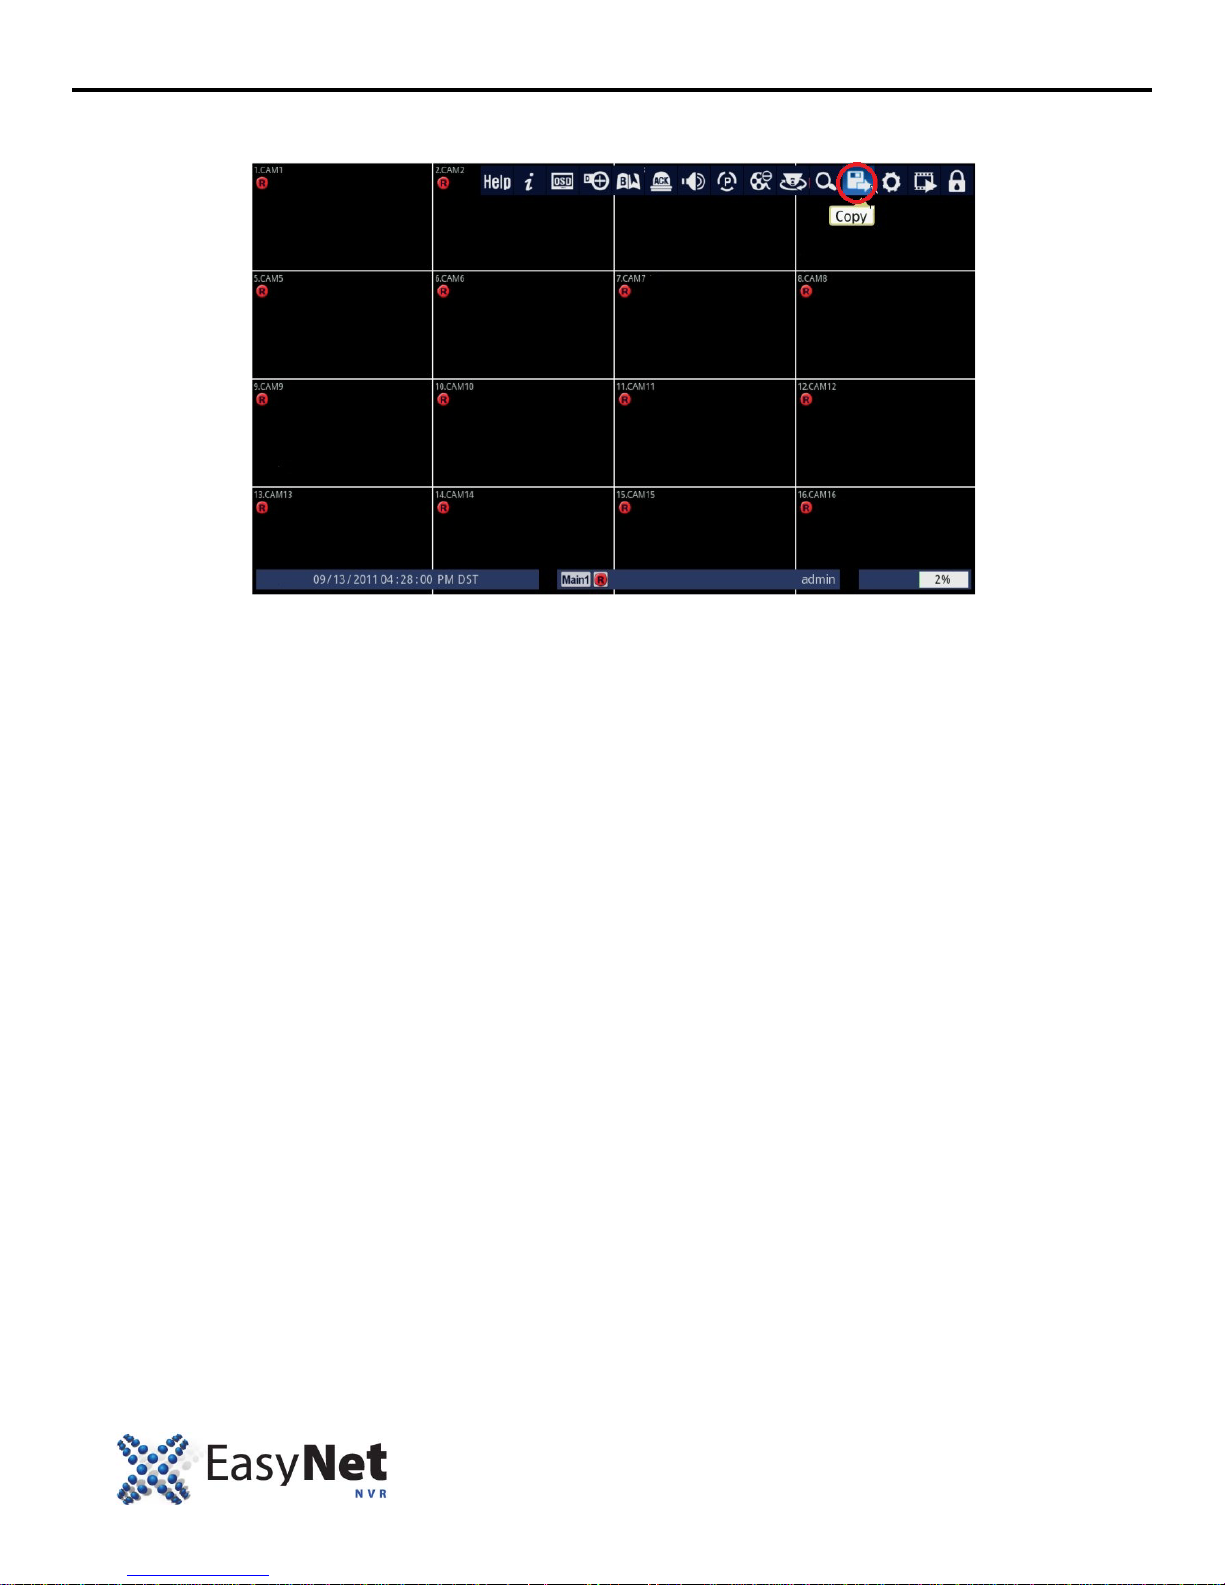
HOW TO COPY VIDEOS INTO CD/DVD/USB
1. Follow the instructions below.
• Using Mouse: Click on the [Copy] icon.
38 ENU-3000
Page 40
HOW TO COPY VIDEOS INTO CD/DVD/USB
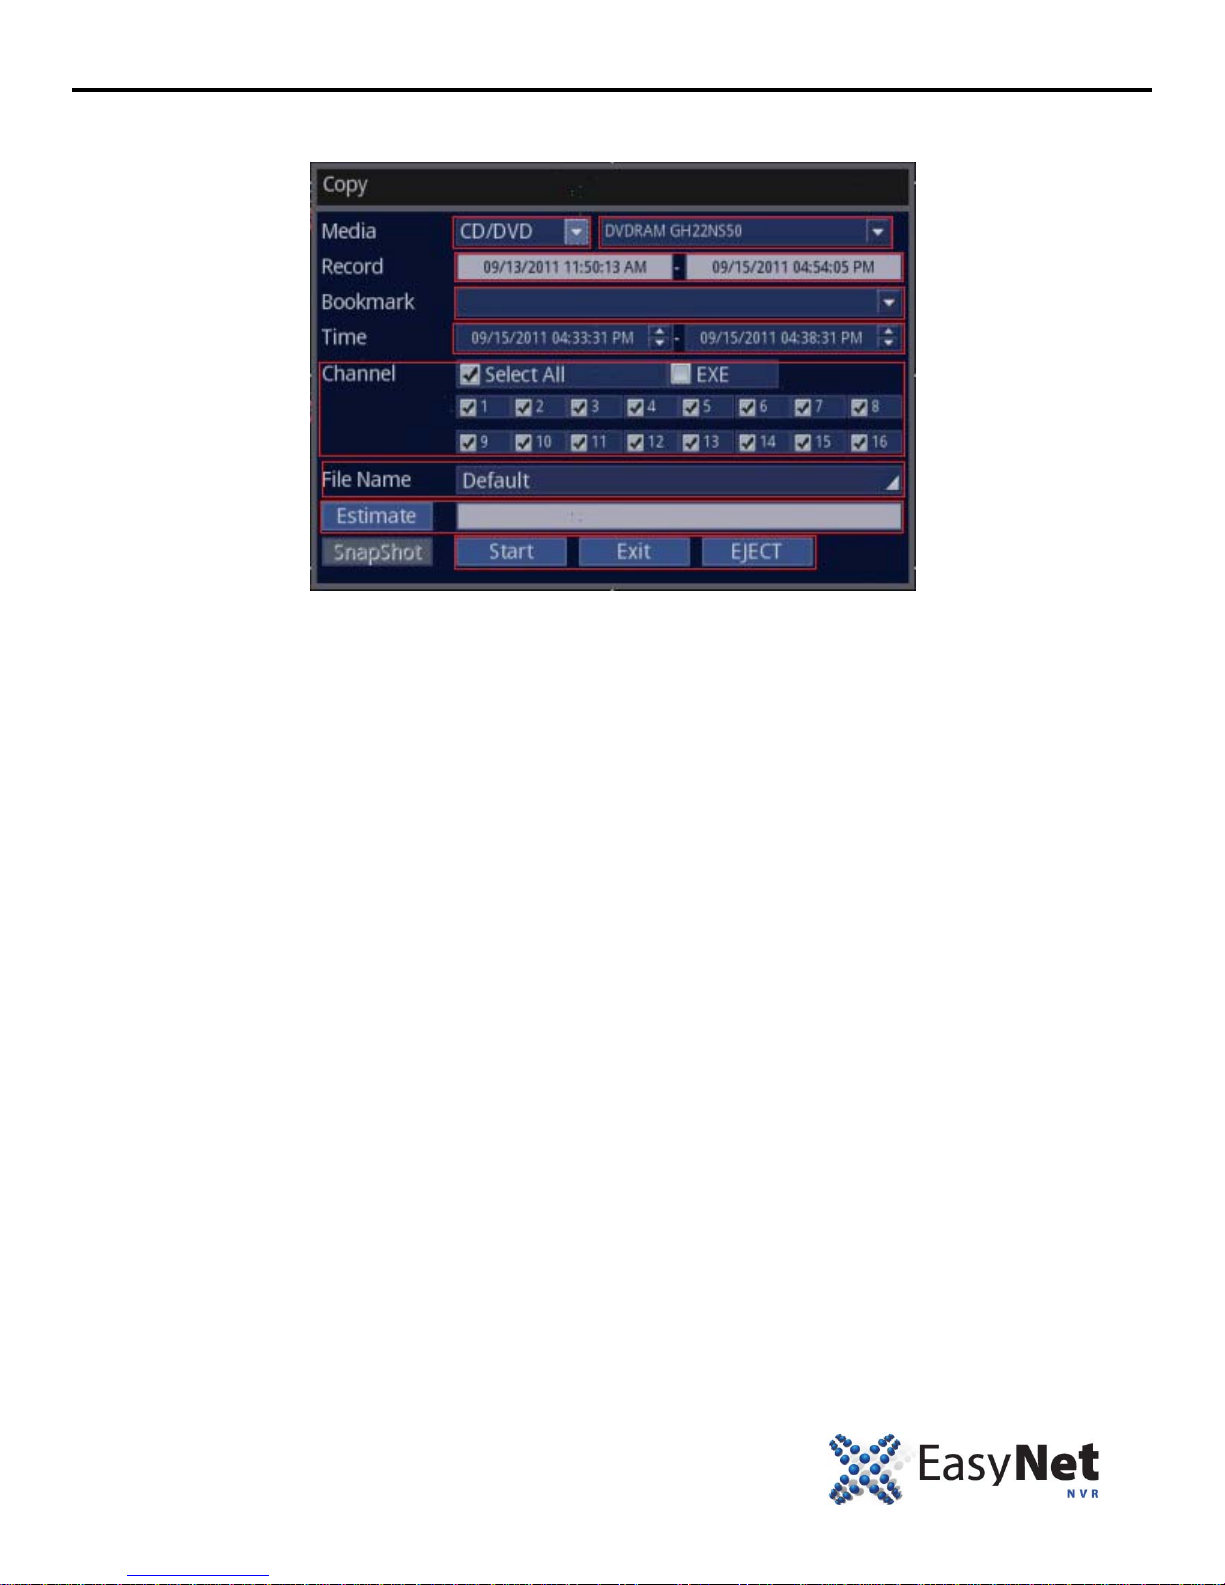
2. Set your desired video copy parameters.
• Using Mouse: Click on the different parameters and click to change the value. Values below can be changed.
Media: CD/DVD or USB or USB(MP4). USB(MP4) is a industry standardized video file where it can be play ed i n
Quick Time or VLC Player. Also, since there can be more than one similar devices connected to the NVR,
you can also choose which device to use, which is located on t he ri ght side of media selection.
Record: Informational purpose only. This section displays the earliest recording date/time to the latest
recording time that are present on the NVR.
Bookmark: During playback of video, user co ul d have bookmarked certain section. If it was bookma rked, the lists will
show up here.
Time: Enter your desired start and the end time of your video to be copied.
Channel: By factory default, “Select All” is checked, therefore, all the channels or cameras will be copied. However,
should you want to copy only the specific camer as, you can unselect “Select All” and check only the
cameras that you desire to be copied.
NOTE: When “EXE” is checked, NVR will make self executable file where it can be played on any PC wit hout the need of
installing NUVICO player software to view the fi l e. Extremely useful if you want to give the copied video to law
enforcement and etc.
File Name: By factory default, the file name will be start date/time of the video. Should you want to customize t he file
name, you can enter it here.
Estimate: If you are unsure about the file size outcome, you can click on “Estimate” and the NVR will estimate the
total size of the copied file for you.
Start/Exit/EJECT: When all the values are entered, you can either Start the cop ying process, Exit the copying process. If
you doing CD/DVD copying, you can choose “EJECT” to open the tray to insert blank media.
IMPORTANT NOTE: CD-R or DVD-R mediums only. No RW or + of any kind.
3. To exit out to the Live screen.
• Using Mouse: Right click on your mouse twice.
EN-U3000 39
Page 41
HOW TO VIEW COPIED VIDEO
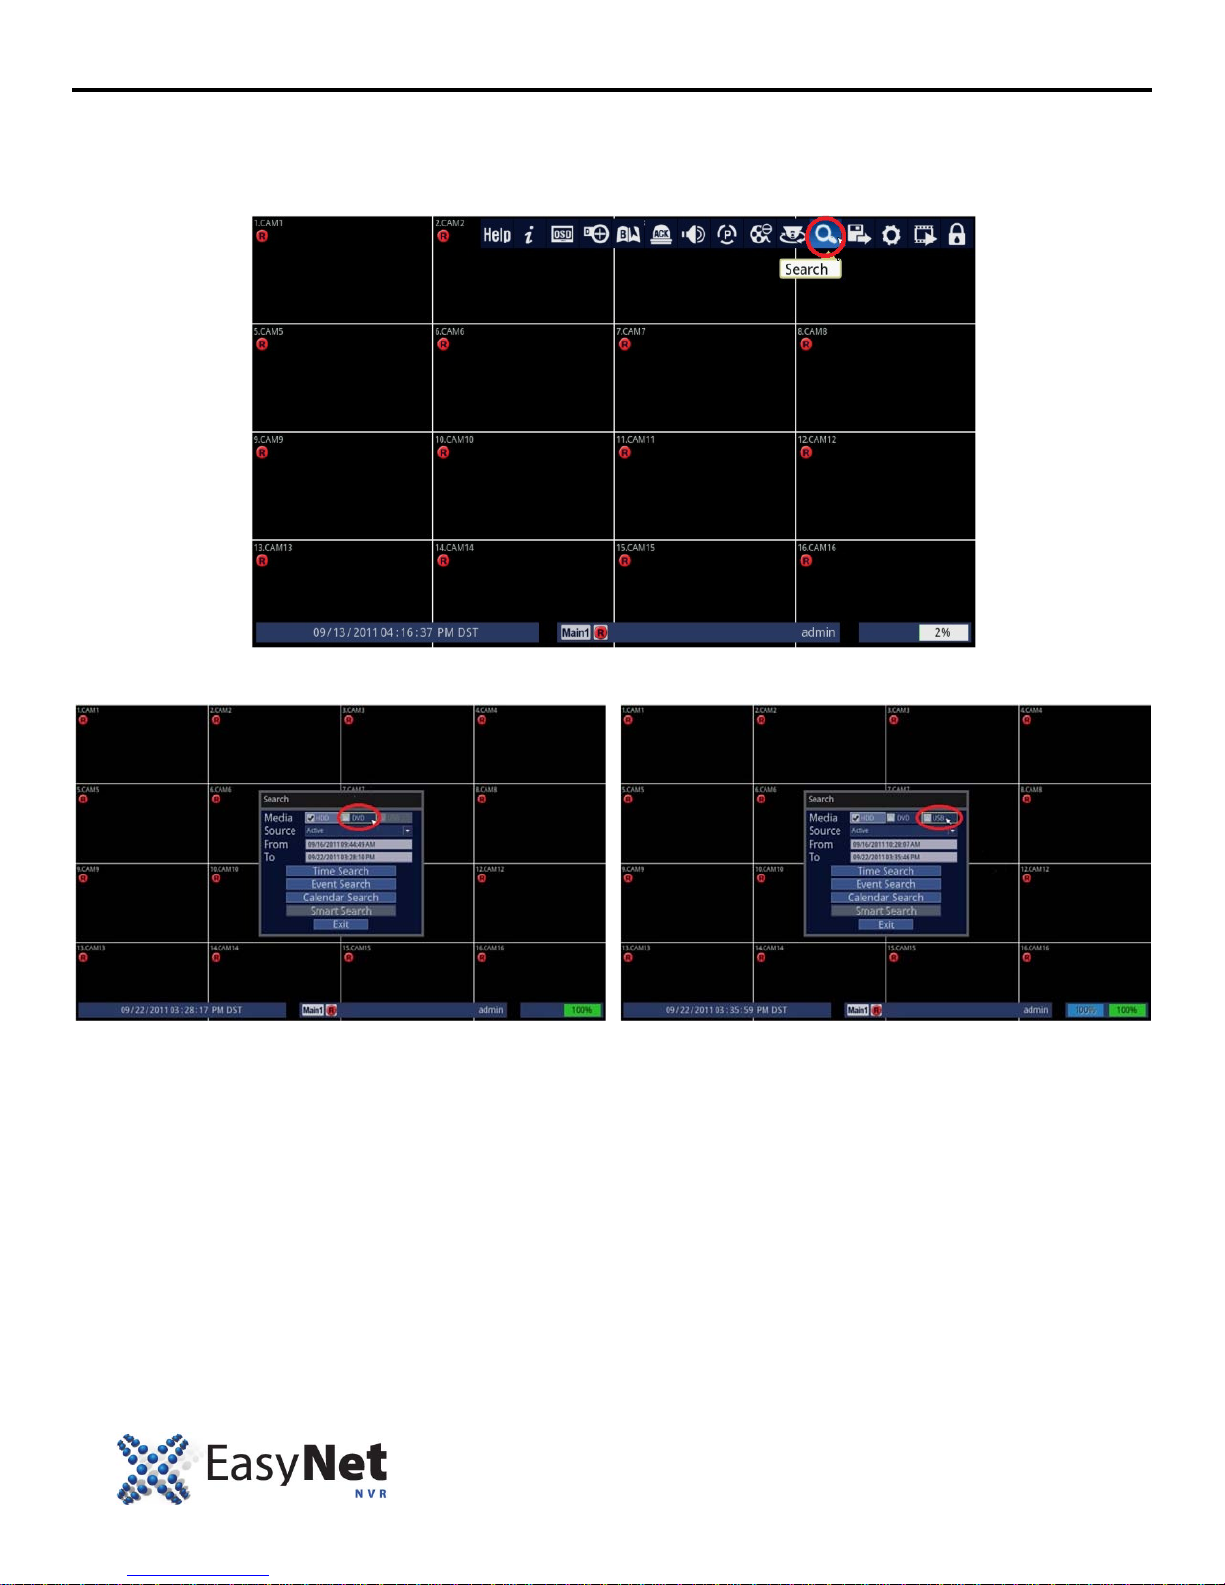
1. Insert the copied medium such CD/DVD or USB Thumbdrive into the NVR.
2. Follow the instructions below.
• Using Mouse: Click on the [Search] icon.
3. Choose your desired medium such as DVD or USB.
• Using Mouse: Click on either DVD or USB.
40 ENU-3000
Page 42
HOW TO VIEW COPIED VIDEO
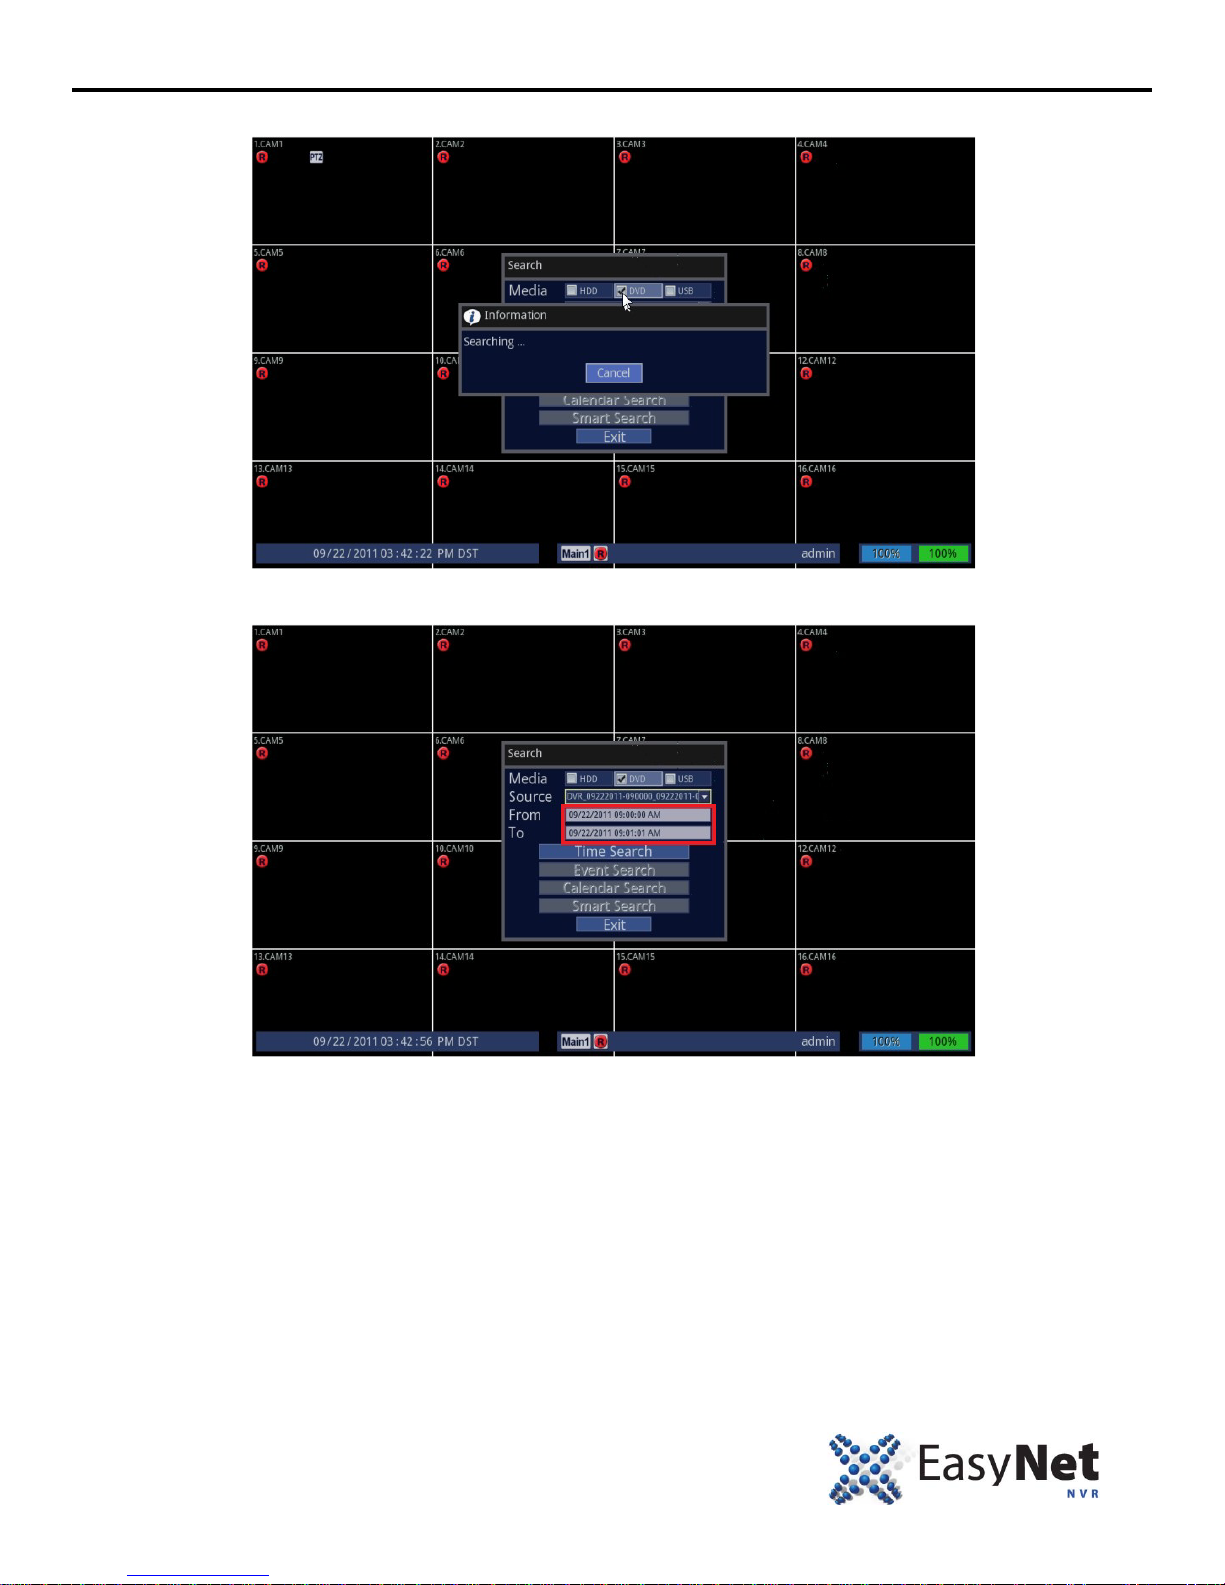
4.NVR will search for video from your desired medium.
5. NVR will display videos that are available on your desired medium.
6. Follow Time Search method that is explaine d on pages above.
EN-U3000 41
Page 43

NOTES
42 ENU-3000
Page 44
 Loading...