

Page 1
Page 2
Page 3
Page 4
Page 5
1. Lens
2. Exposure
3. White Balance
4. Backlight
5. Day&Night
6. Special
7. Exit
22
22, 23
23, 24
24, 25
25, 26
27, 28, 29
29
CD-H21N
CV-H21N
CD-H21N / CV-H21N
CD-H21N / CV-H21N
CD-H21N / CV-H21N
CD-H21N / CV-H21N
CD-H21N / CV-H21N
CD-H21N / CV-H21N
CD-H21N / CV-H21N
Page 6
Page 7
CD-H21N
Page 8
REMINDER
CD-H21N
Page 9
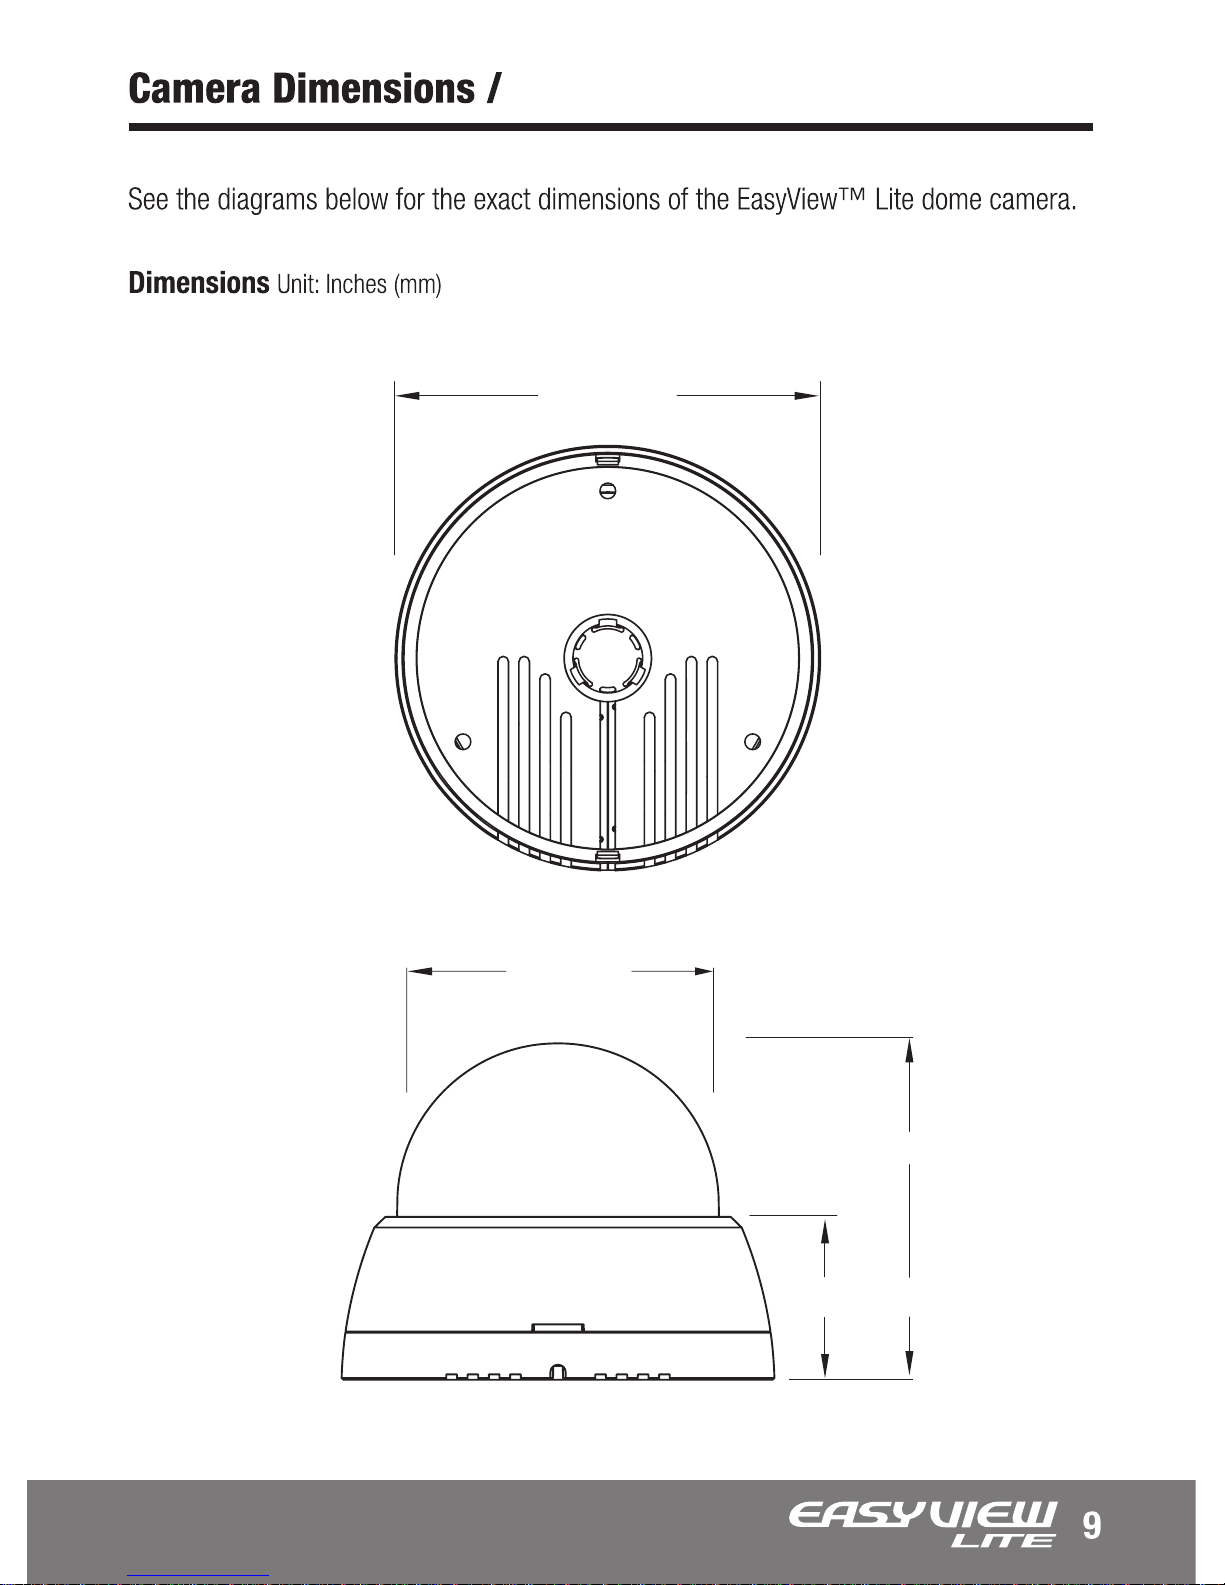
4.80” (122)
3.54” (90)
3.73” (94.8)
1.8” (45.8)
CD-H21N
Page 10
CD-H21N
Page 11
CD-H21N
Page 12
CD-H21N
Page 13
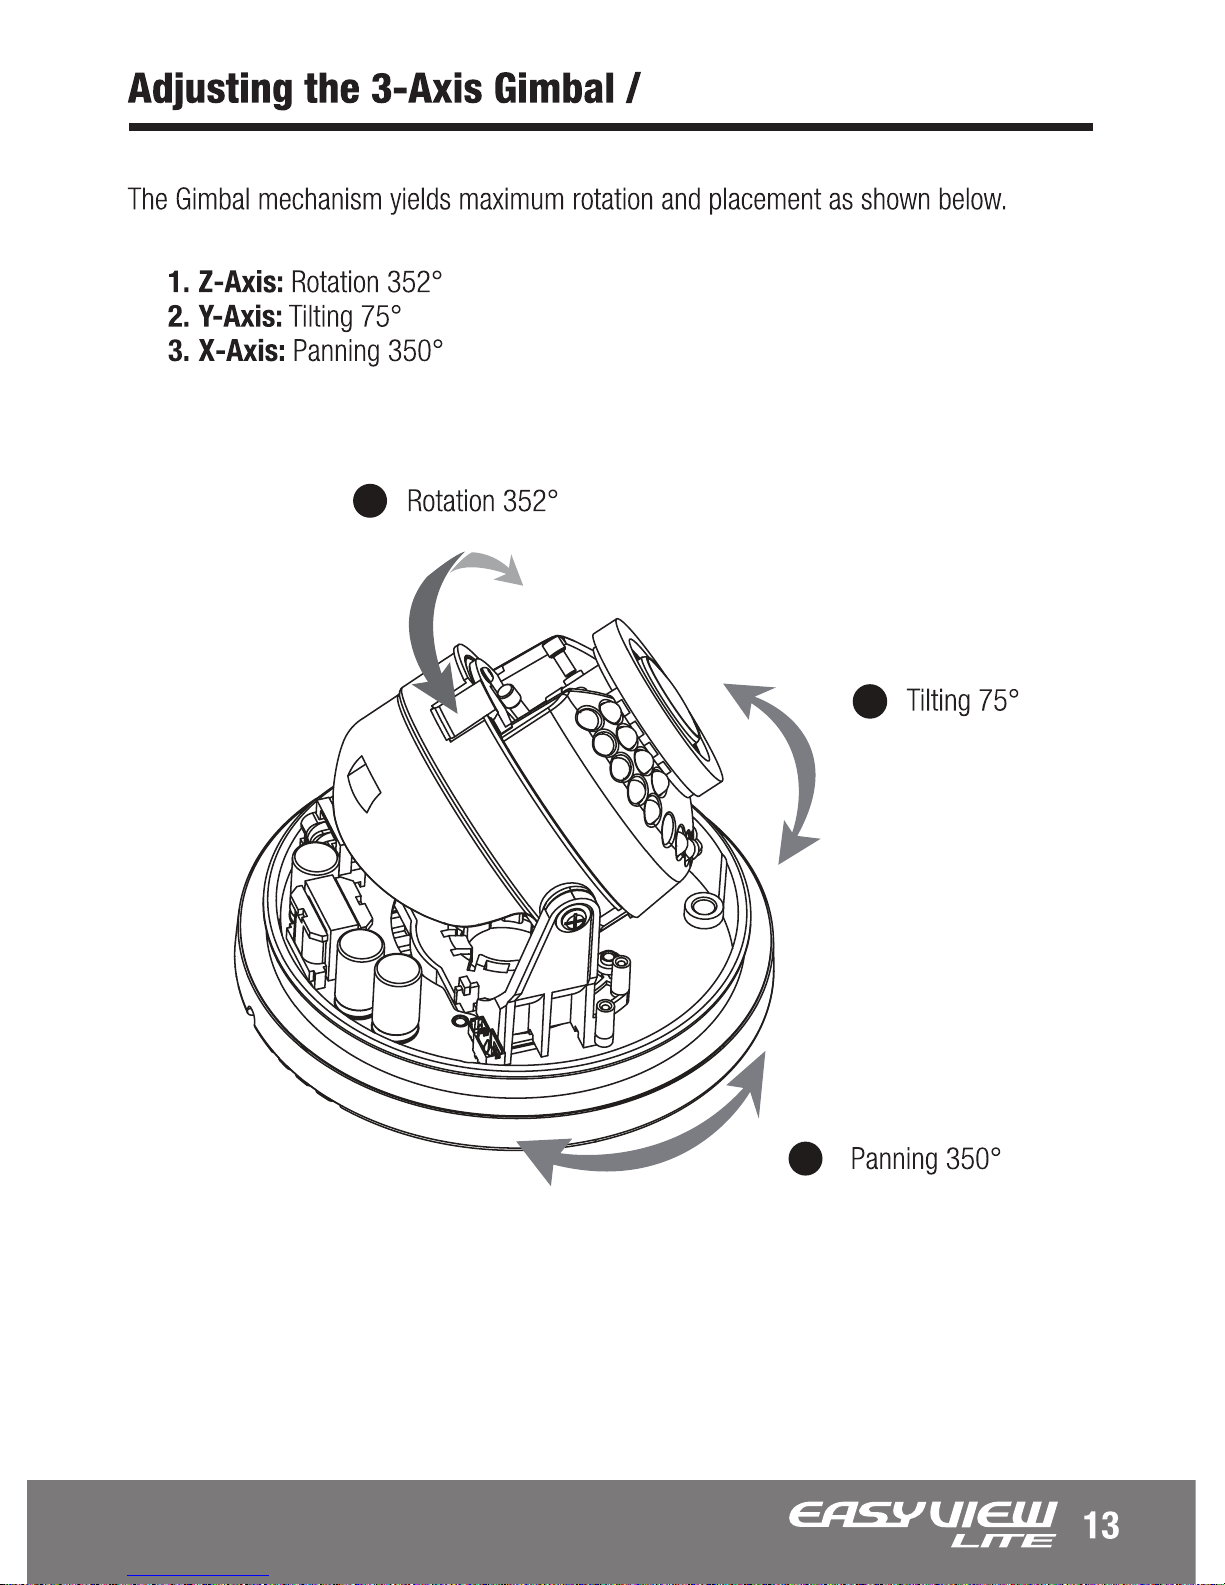
3
1
2
CD-H21N
Page 14
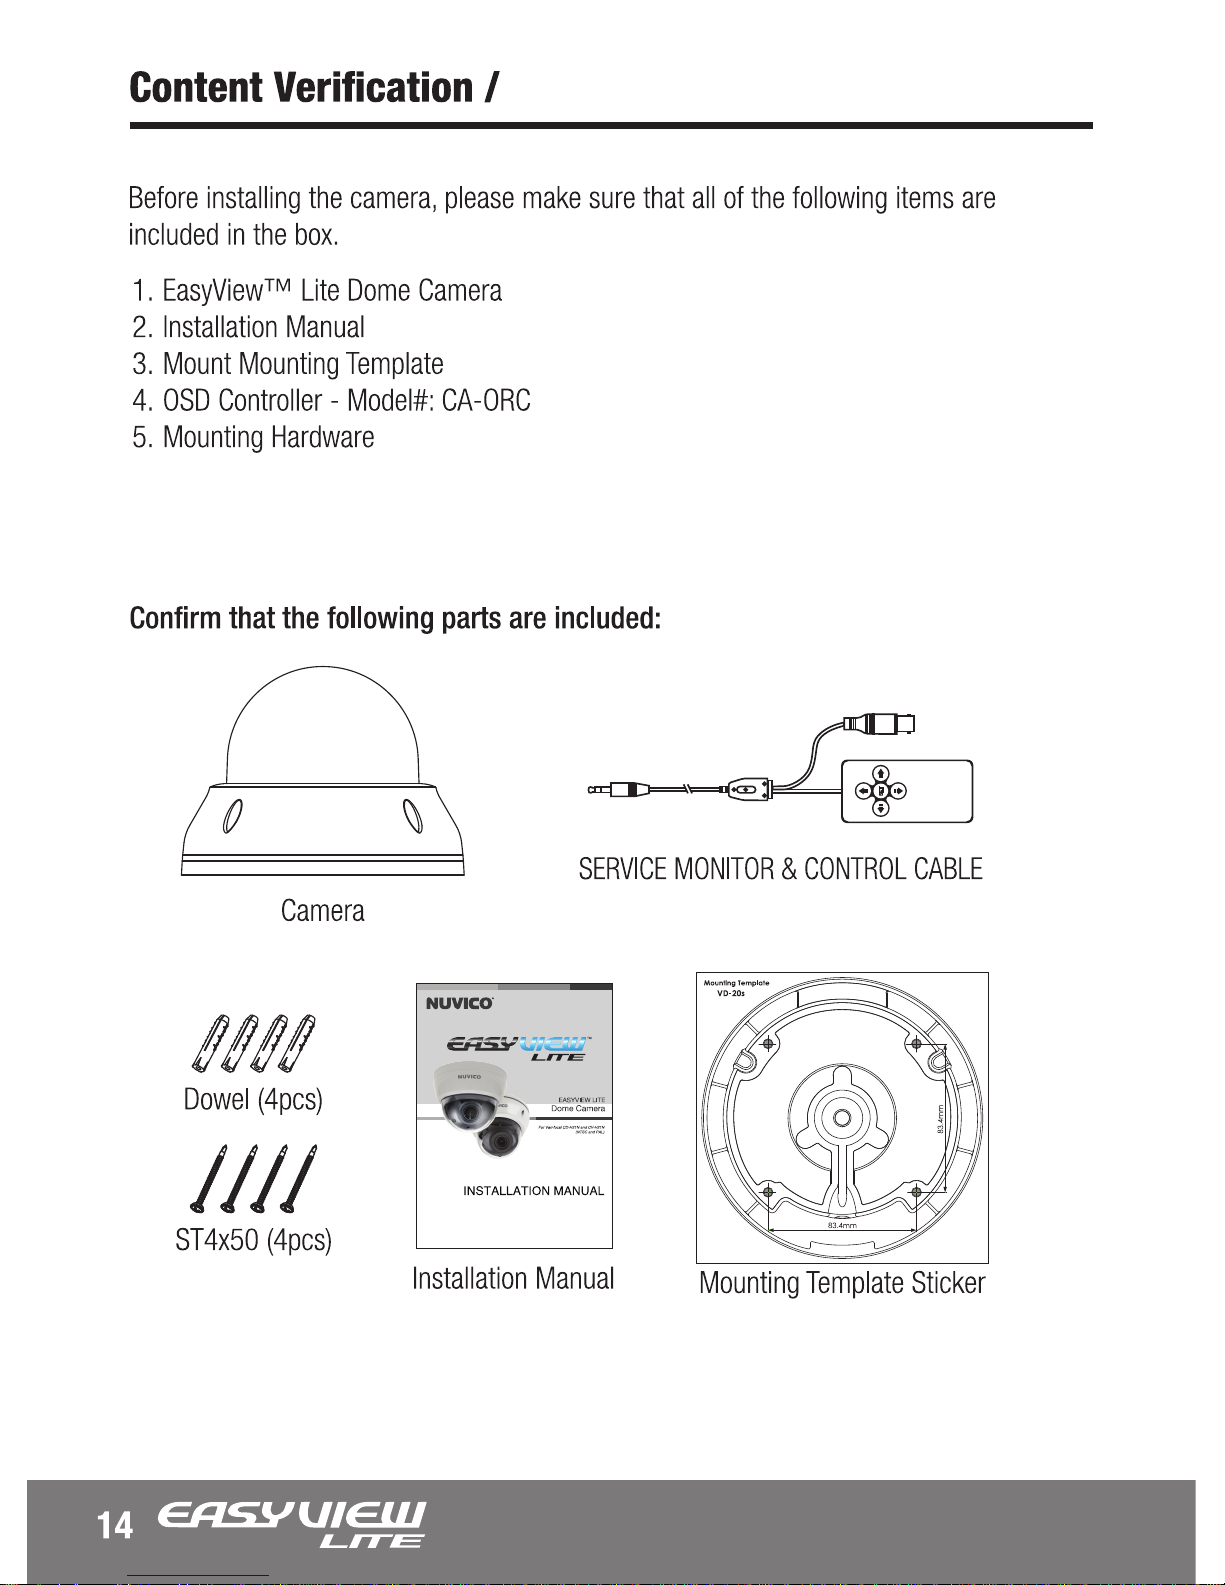
CV-H21N
Page 15
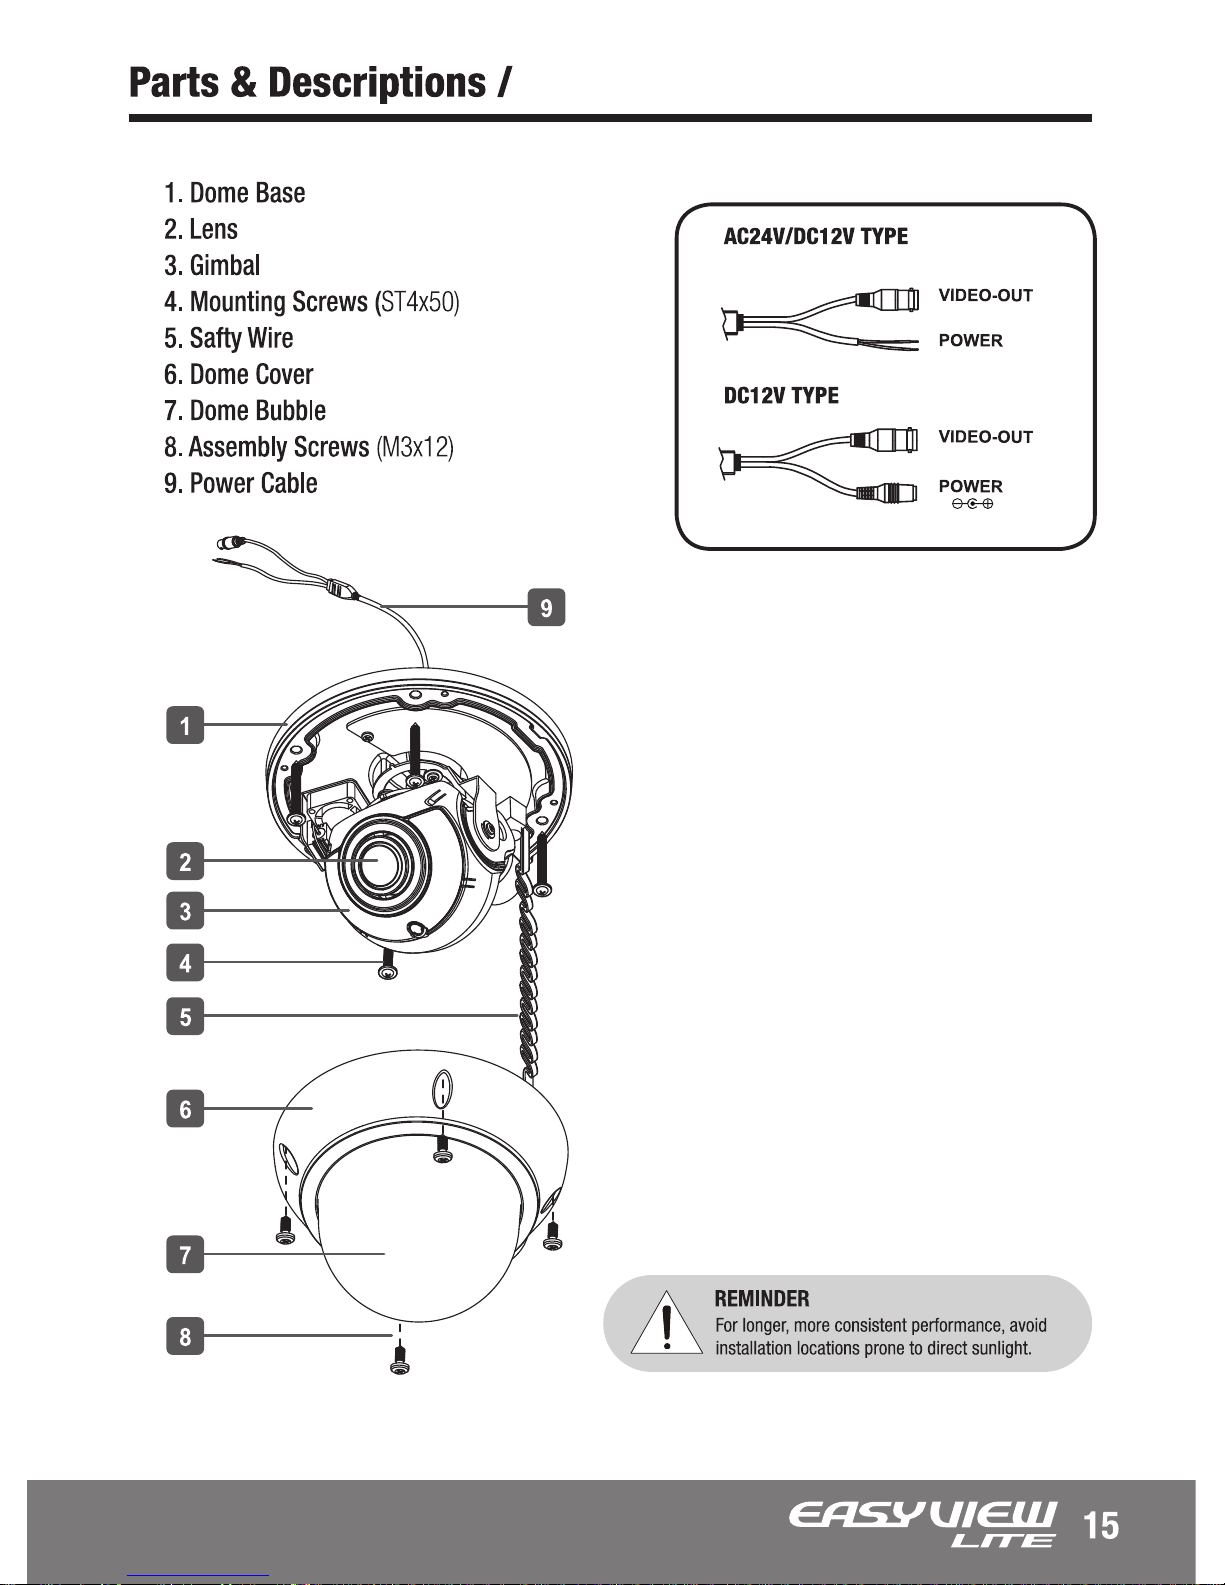
CV-H21N
Page 16
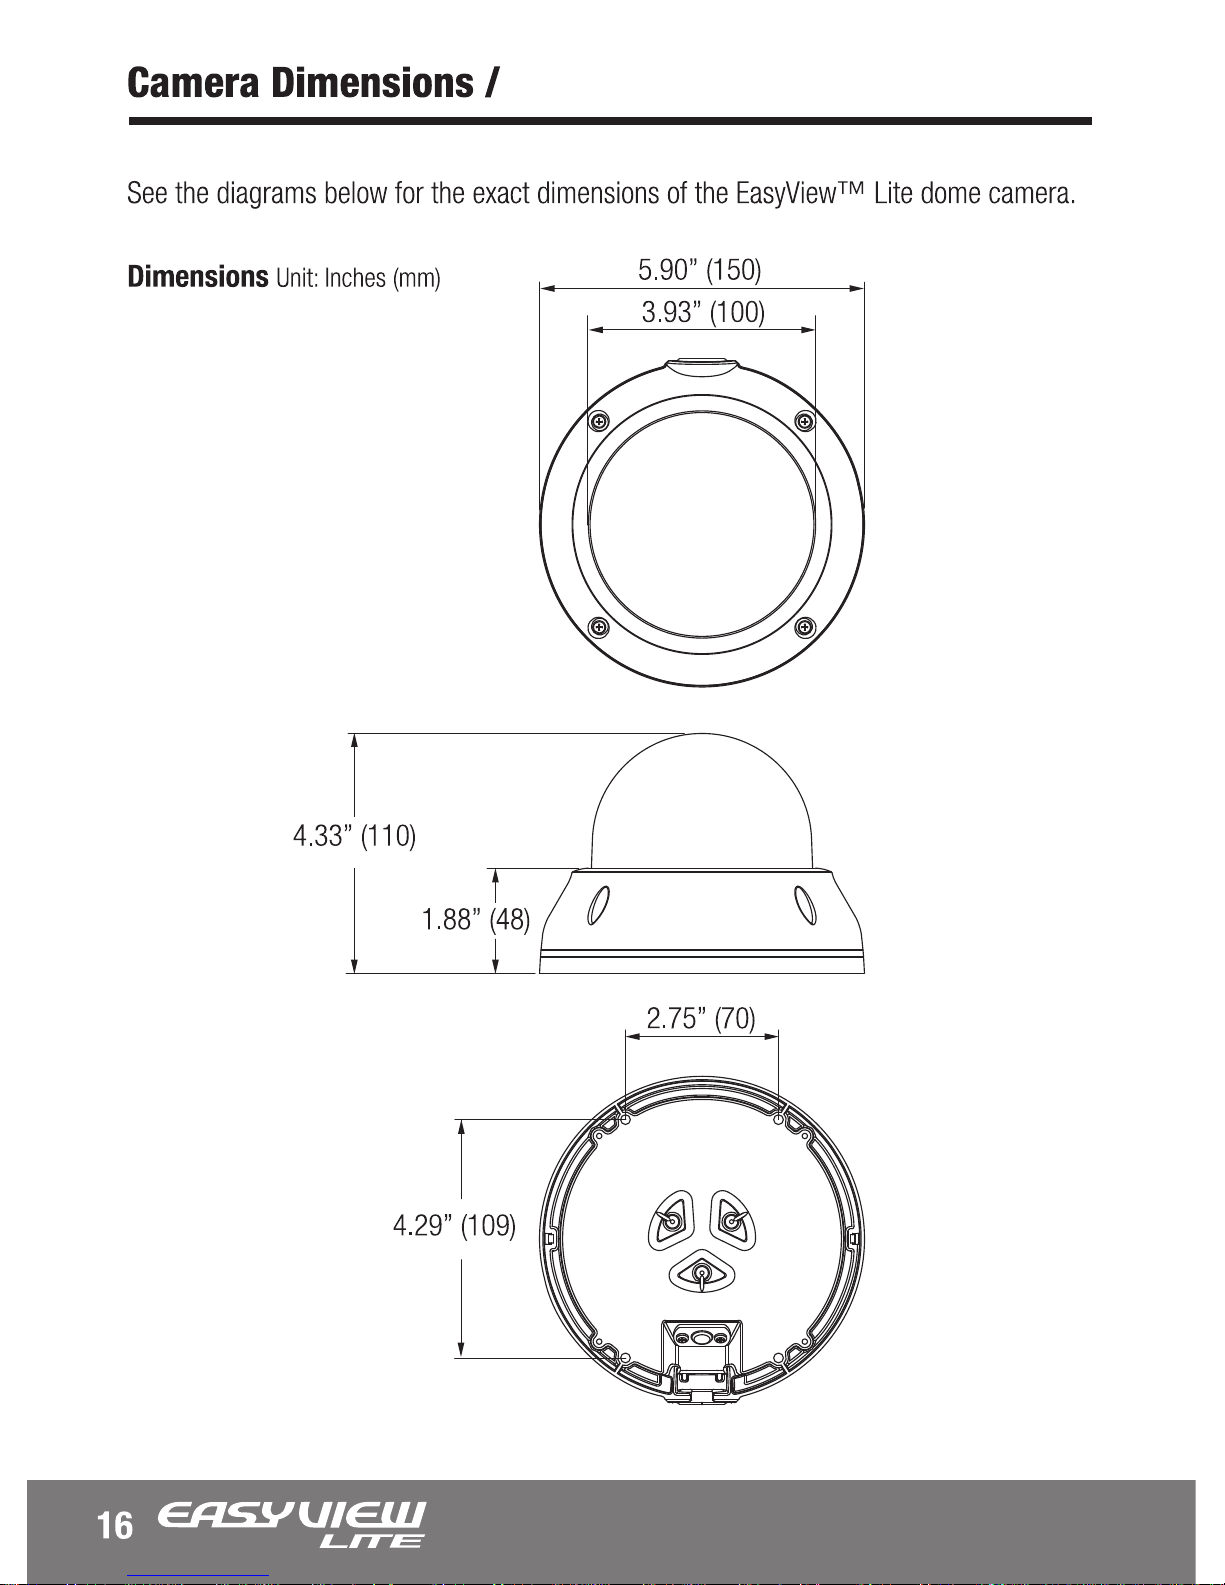
CV-H21N
Page 17
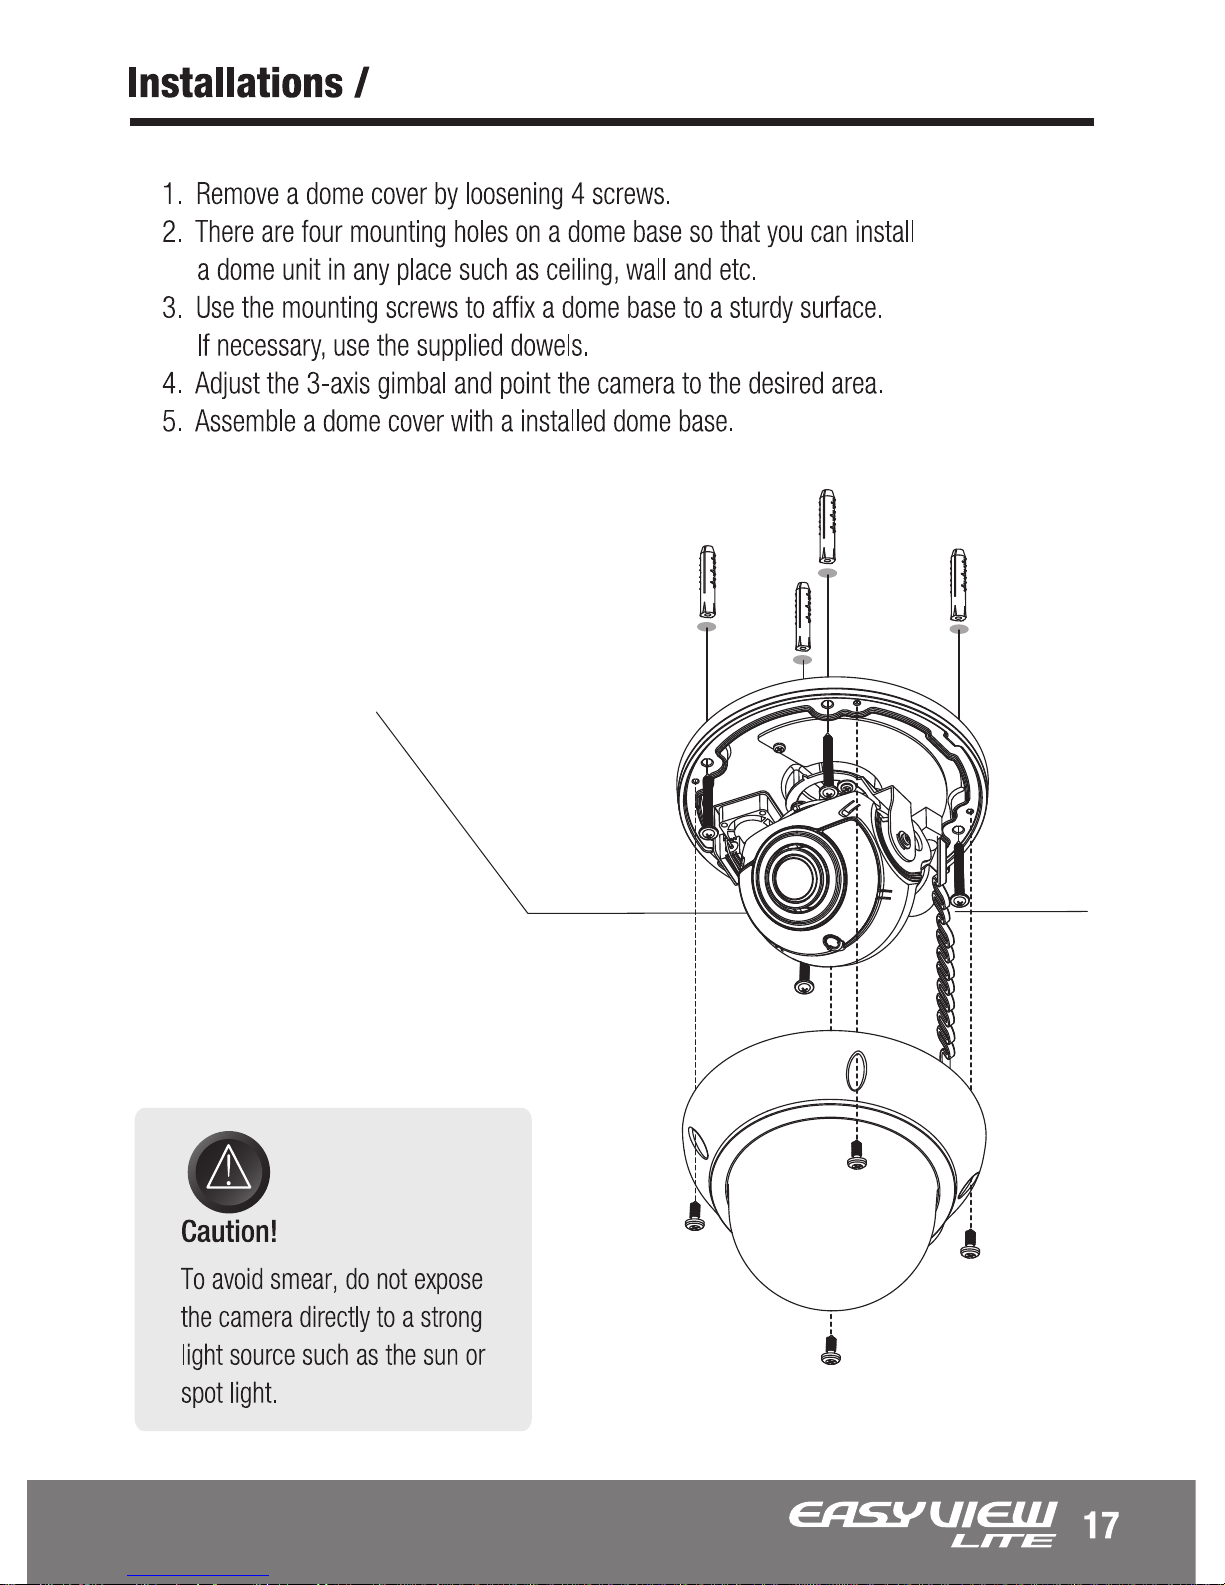
CV-H21N
Page 18
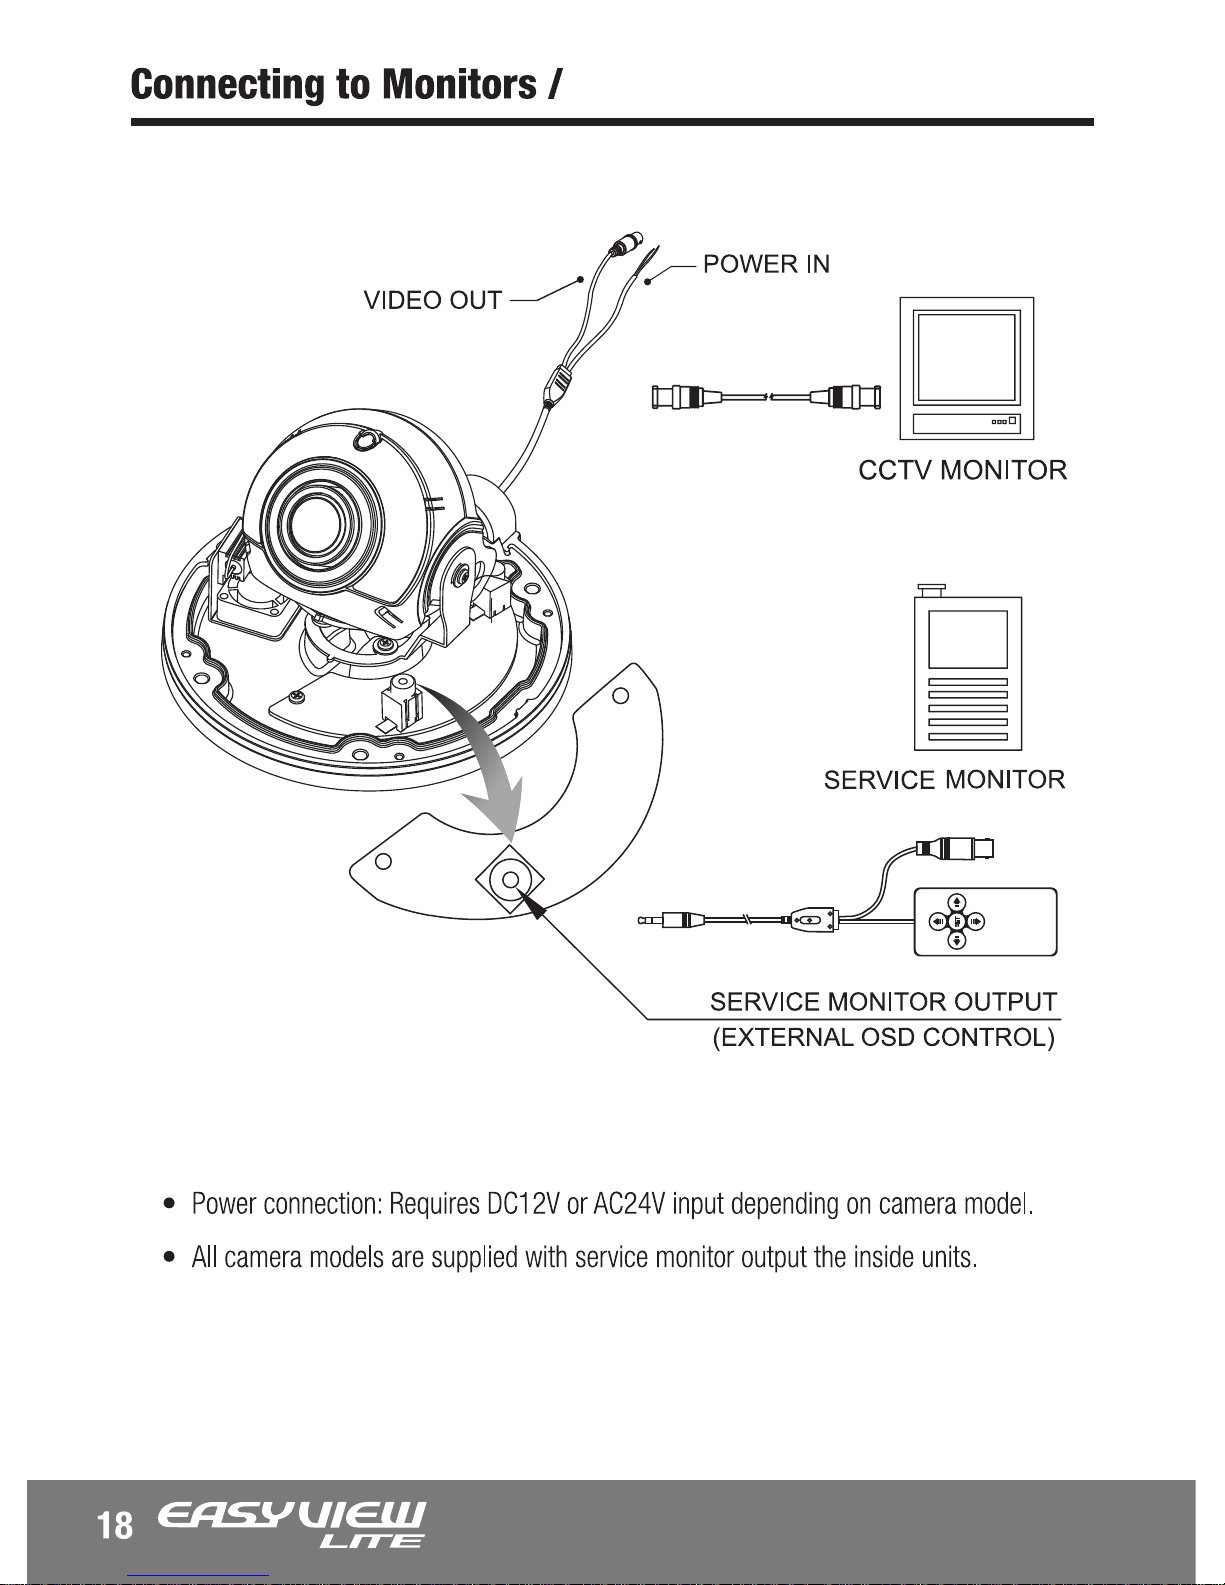
CV-H21N
Page 19
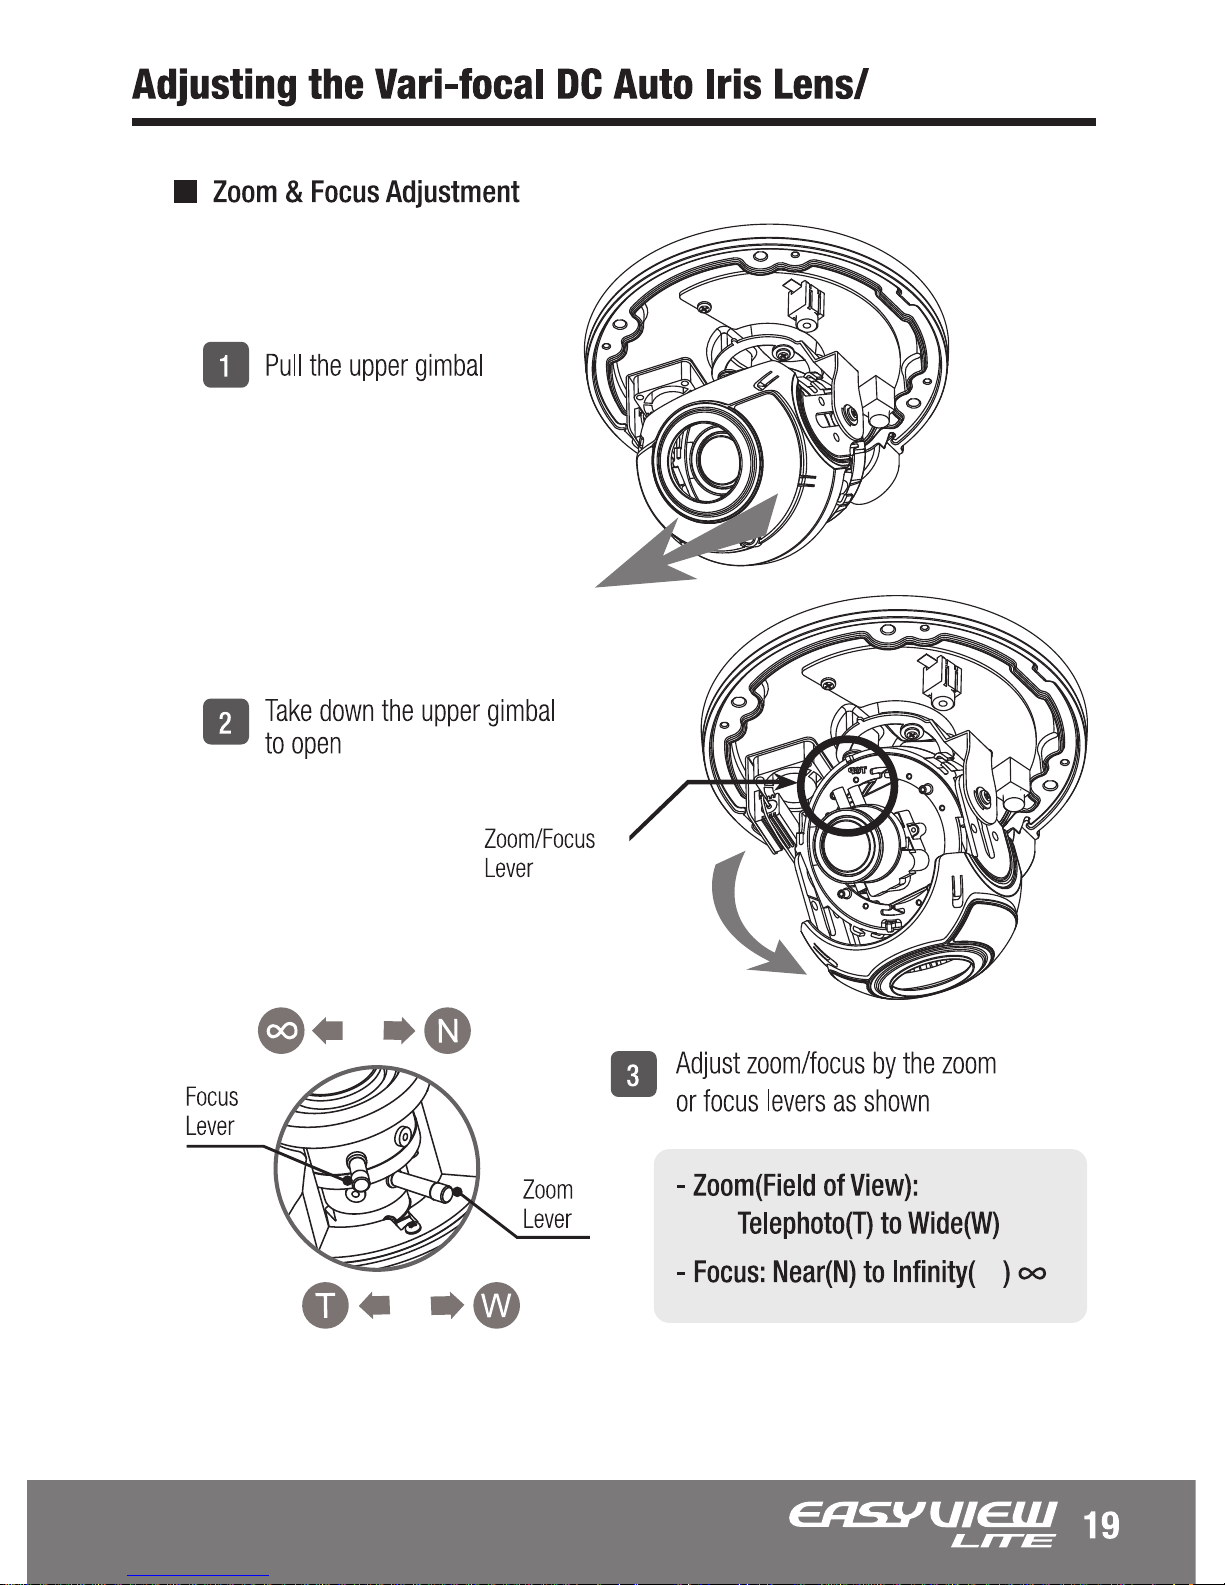
CV-H21N
Page 20
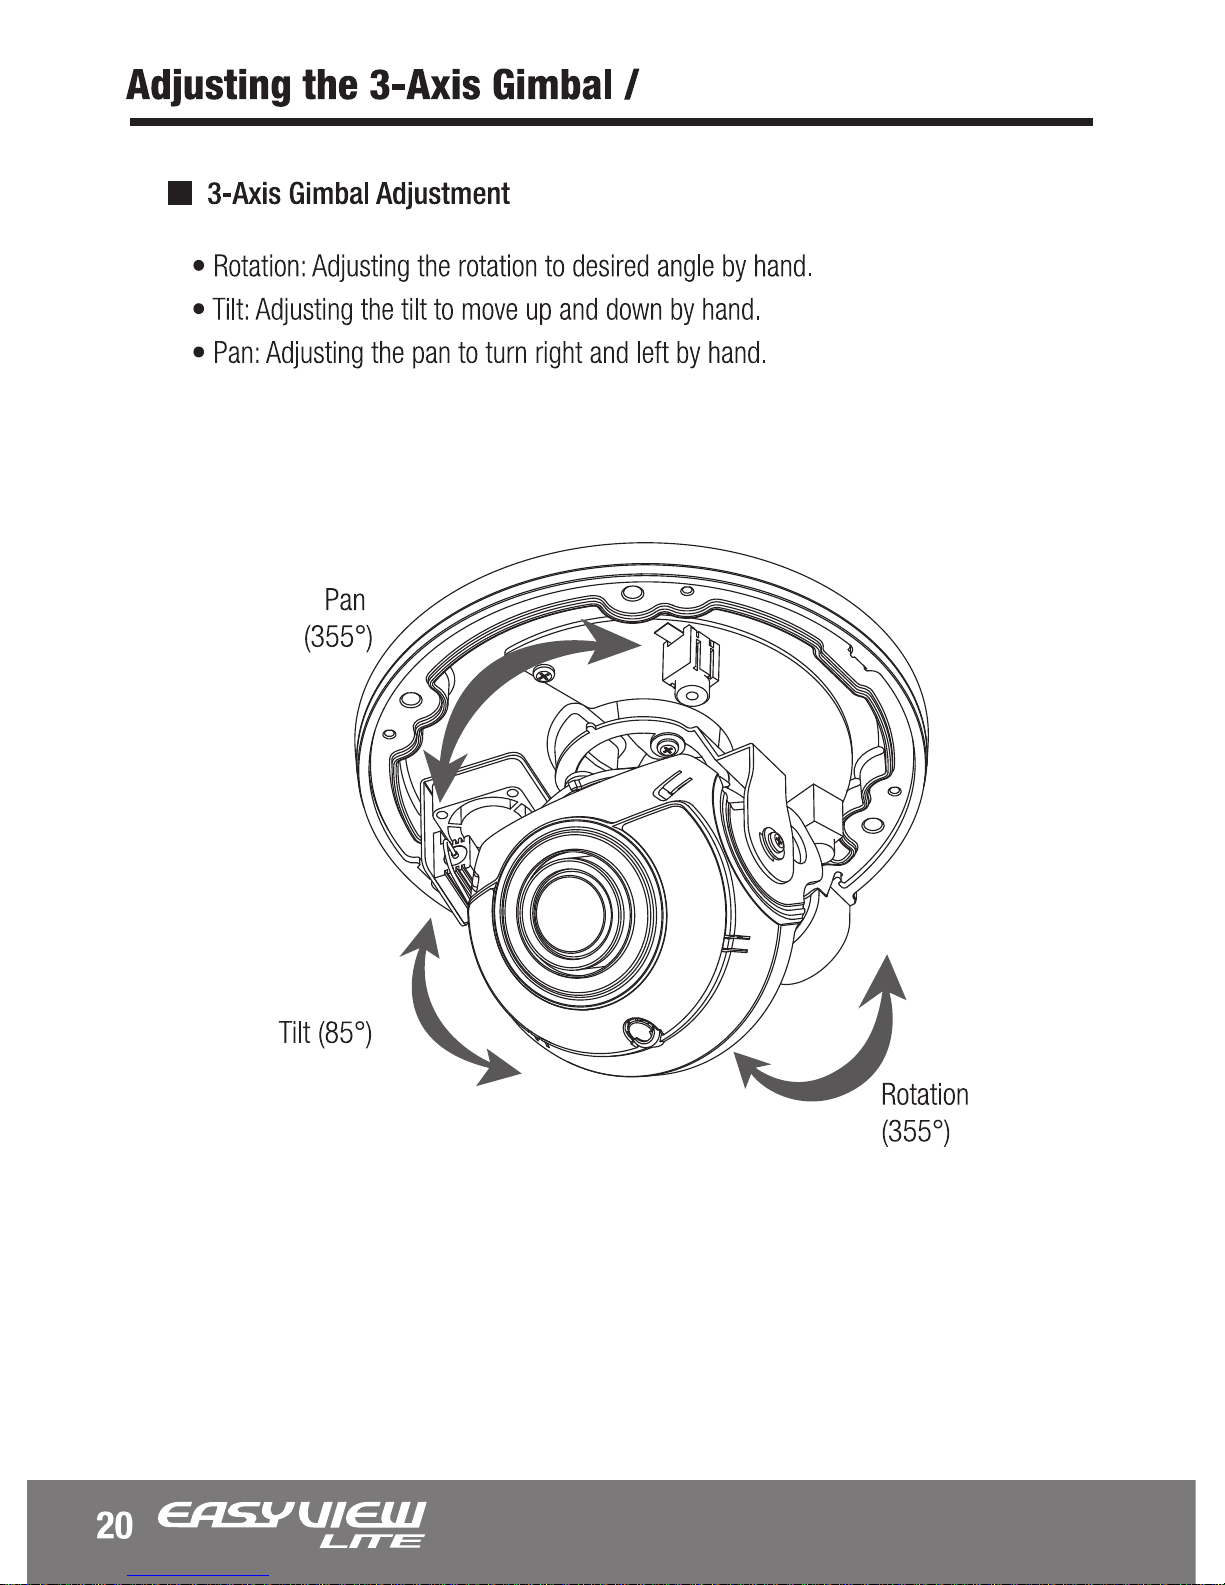
CV-H21N
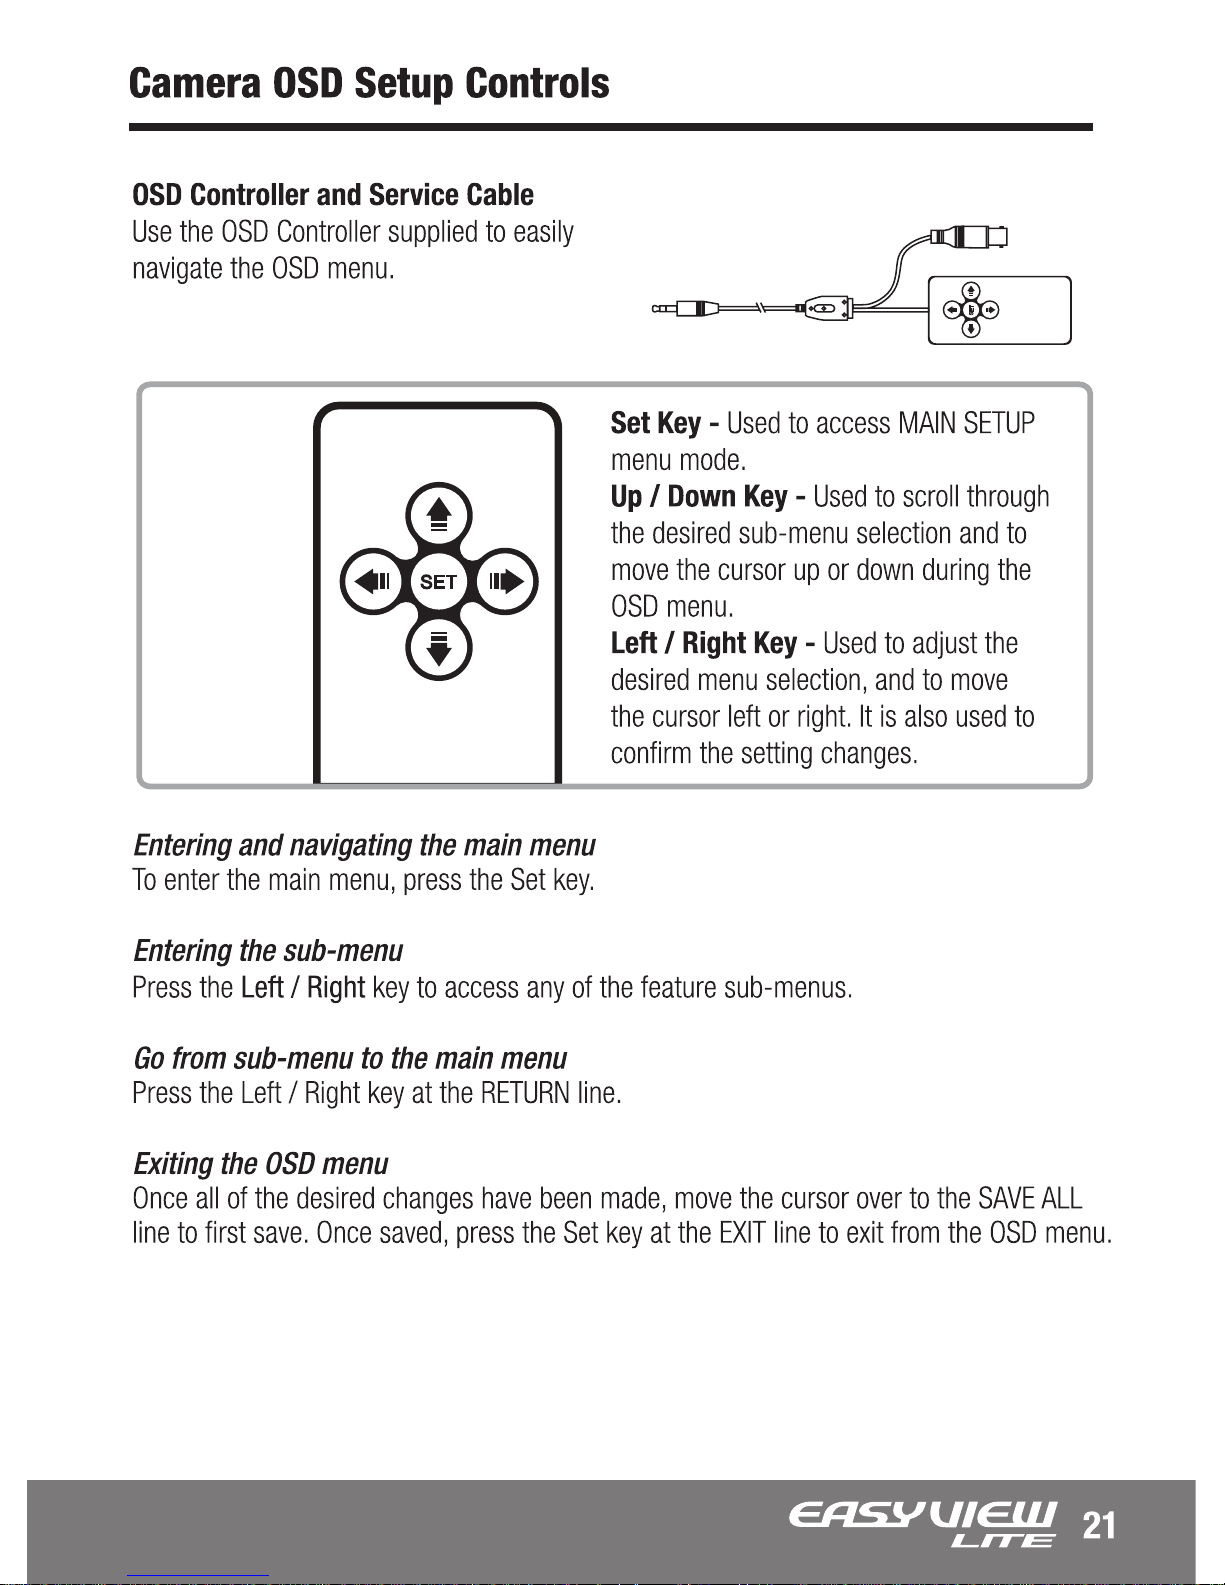
Page 21
Page 22
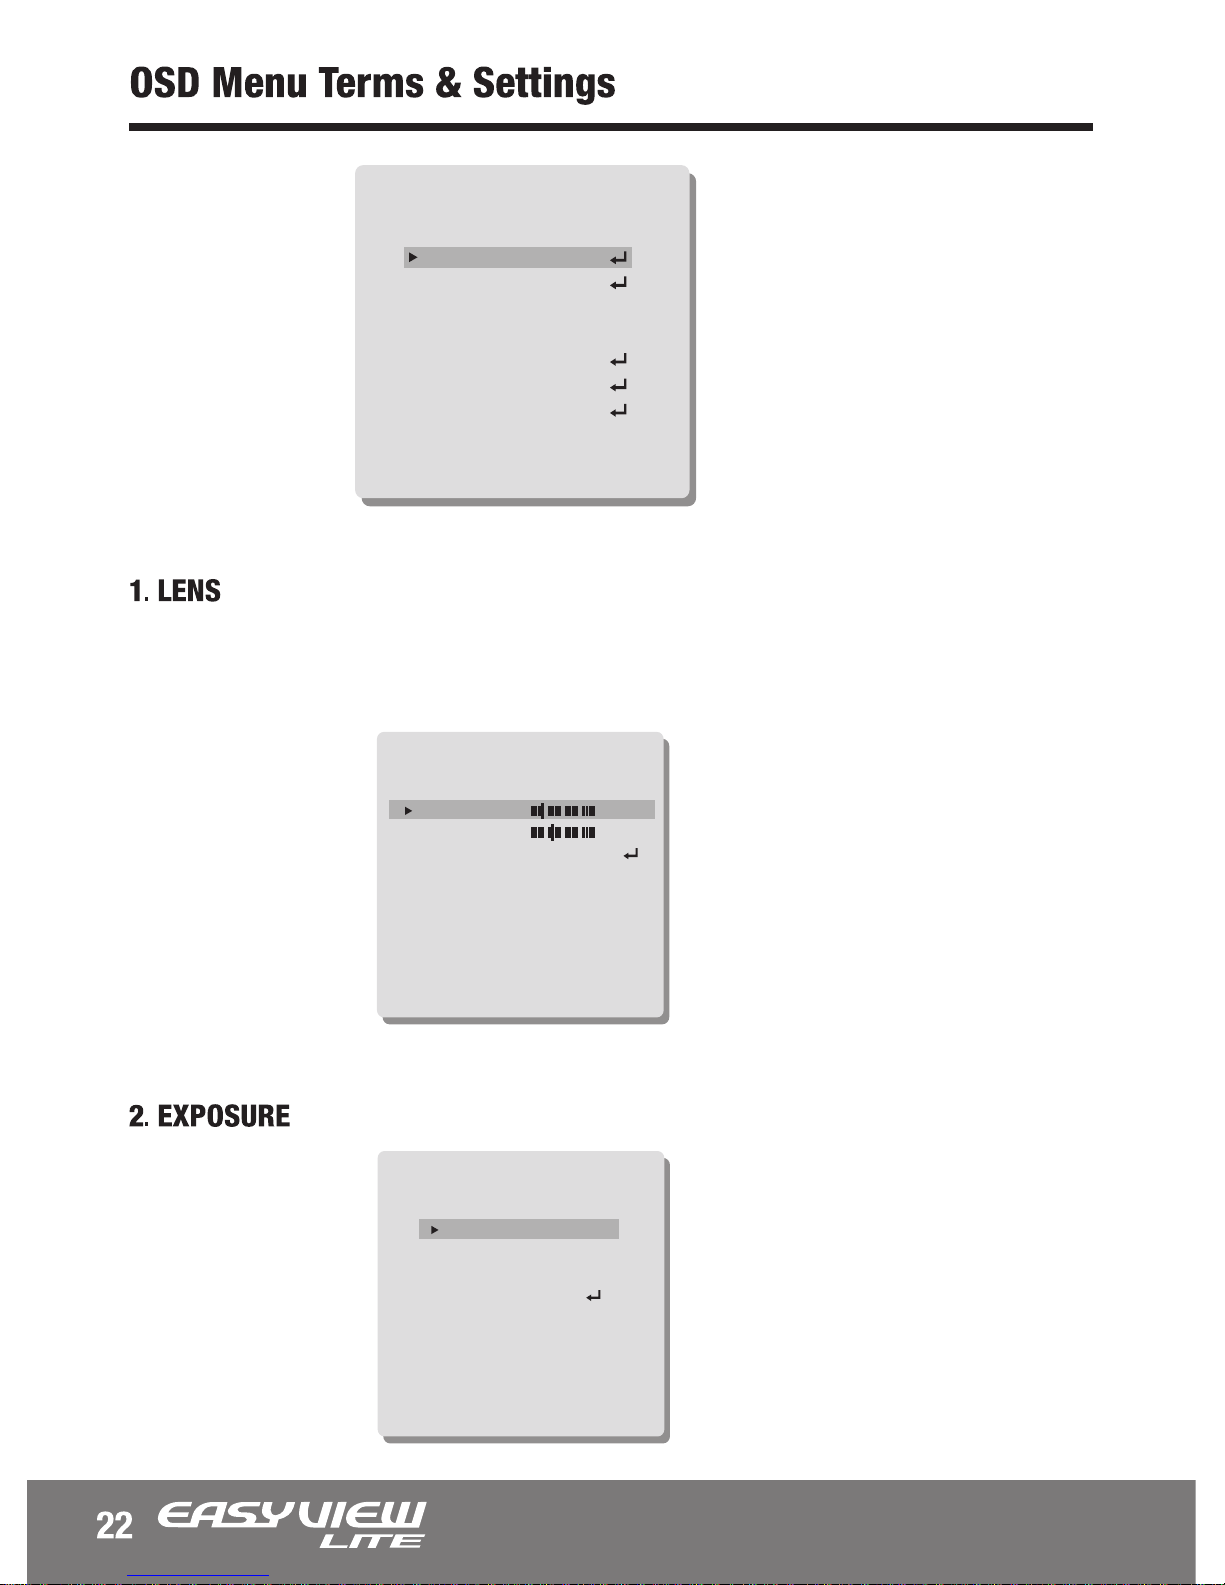
SETUP
LENS
EXPOSURE
WHITE BAL.
BACKLIGHT
DAY&NIGHT
SPECIAL
EXIT
DC
ATW
OFF
AUTO
SAVE
When DC is selected, the brightness and Iris speed control will show up.
Note: DC setting is recommended for best performance and result.
DC LENS
BRIGHTNESS
IRIS SPEED
RETURN
050
005
RET
EXPOSURE
SHUTTHER
AGC
DWDR
RETURN
AUTO
MIDDLE
OFF
RET
Page 23

2.1 SHUTTER: (AUTO, FLK, 1/60(1/50) ~ 1/100,000)
The SHUTTER speed can be selected manually to user preference.
Typically, to track fast moving objects across your screen, a faster shutter
speed is used. The shutter speed of 1/60(NTSC), or 1/50(PAL) seconds are
recommended.
> AUTO: Select the AUTO mode for automatic adjustment of the shutters.
It will slow down or speed up depending on the environment.
> FLK: Select the FLK mode if the screen flickers due to differences in light
and electric frequencies.
This function is used to amplify the video signal when it falls below the set
parameter. As the AGC level increase, the overall screen gets brighter but the
level of noise is increased.
2.4 RETURN: RET, SAVE&END
Selects “RET” to go back to the previous menu or “SAVE&END” to save the
setting and exit the menu.
2.3 DWDR (Digital Wide Dynamic Range): ON, OFF
2.2 AGC (Automatic Gain Control): OFF, LOW, MIDDLE, HIGH
Wide Dynamic Range works to correct excessive light within the frame to
produce a usable image.
It works by calculating the ratio between the brightest and darkest values of
the picture and determines the balanced medium.
3. WHITE BAL.
This function is used to control the while balance under different lighting
conditions. Adjusting this setting calibrate the camera for correct color rendering.
The factory default of ‘ATW’ is recommended for optimal performance.
Page 24

Select the ATW mode to automatically adjust the color temperature according
to its ambient condition. (2,500~9,500K)
3.1 ATW (Auto Tracing White Blance)
4. BACKLIGHT
3.2 AWB (Auto White Blance)
This mode automatically adjust the white balance in the whole color
temperature according to its ambient condition. (2,300~11,000K)
3.3 AWC SET
Use the AWC function to correctly calibrate the white balance of the camera.
While in this mode, press the SET key while placing a white sheet of paper in
front of the camera. Repeat this procedure if there is a change in location or
light source.
3.4 MANUAL: BLUE, RED, RETURN
This function allows the white balance to be adjusted manually with “RED
GAIN” or “BLUE GAIN”.
4.1 BLC (Back Light Compensation)
The BLC divides the frame and calculates each zone according to its exposure level to
counterbalance excessive background light to distinguish the subject in the foreground.
There are 2 white boxes representing the areas affected by BLC and each box can be
individually adjusted to user preference.
4.2 HLC (High Light Compensation):
High light Compensation is a type of BLC that is suitable for extremely strong light. It is
specially suitable for detecting the plate of an incoming car with headlights turned on.
Page 25
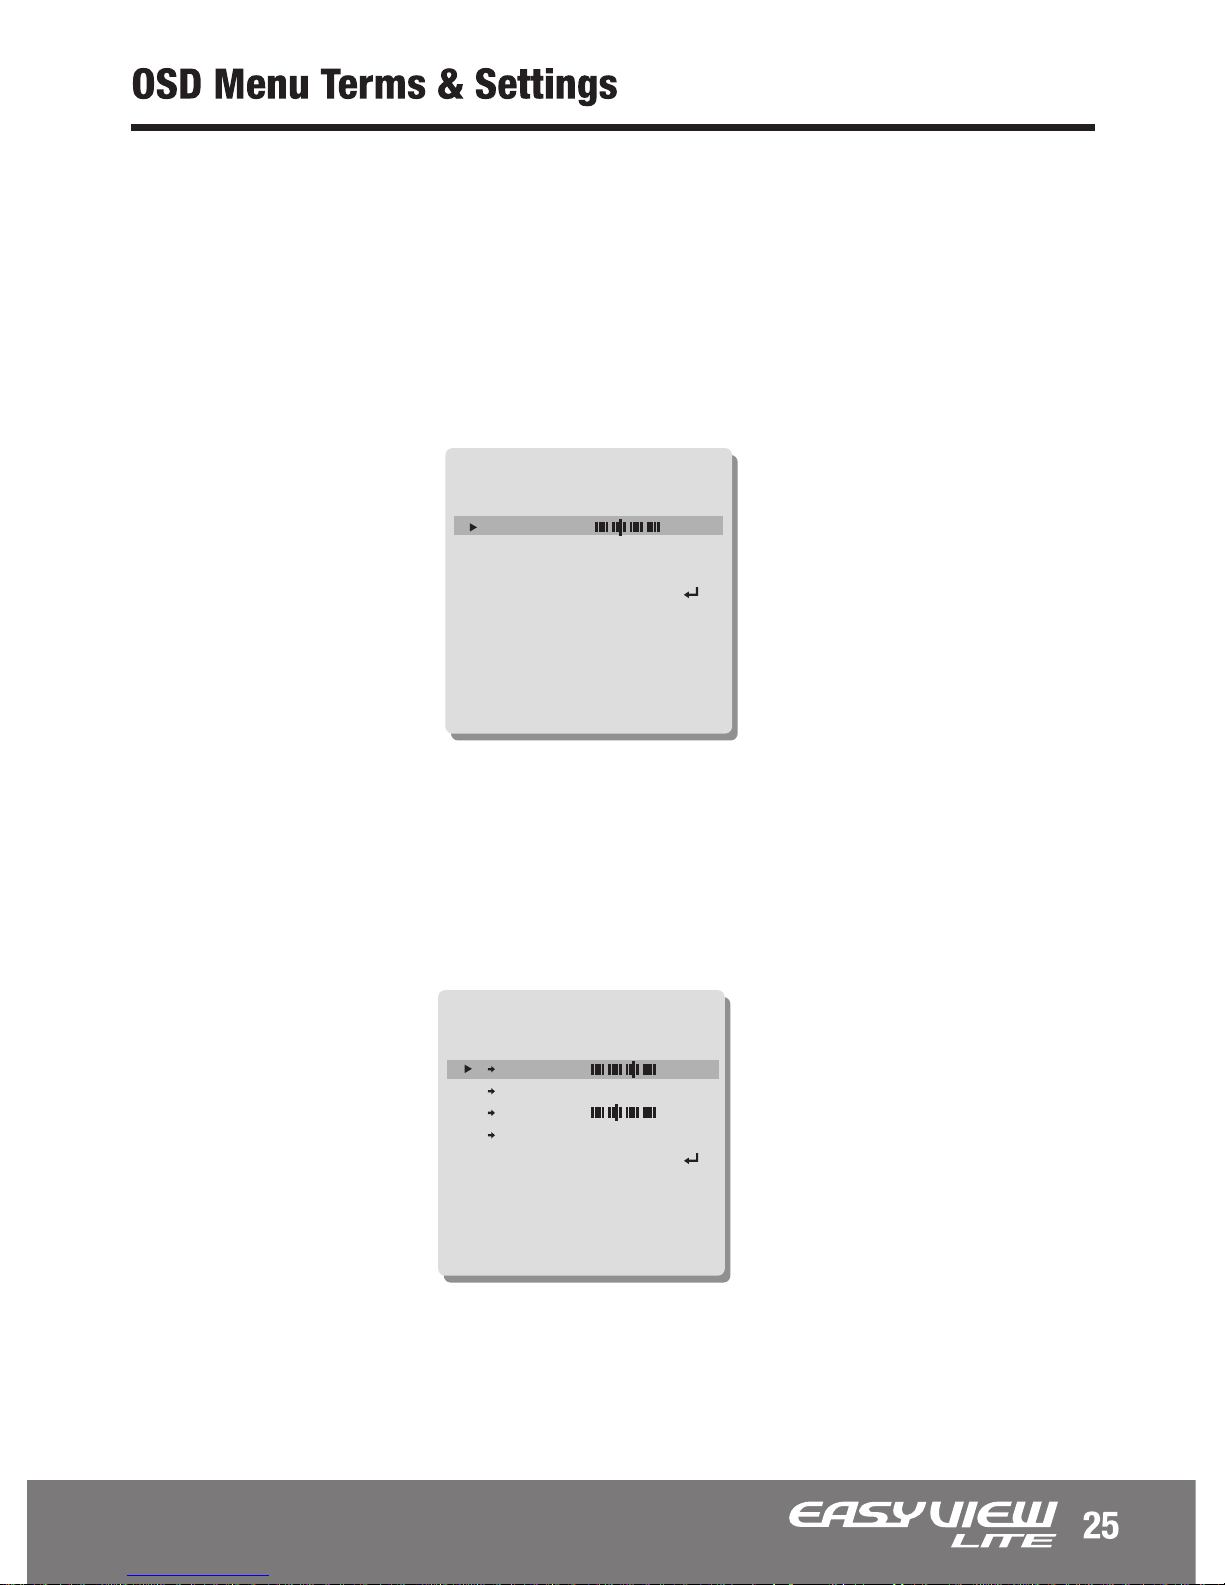
5. DAY&NIGHT
HLC
LEVEL
MODE
MASK SKIP
RETURN
170
NIGHT ONLY
OFF
RET
> MASK SKIP (OFF, ON): If you select ‘ON’, you can set the mask skip area
with HEIGHT, WIDTH, LEFT/RIGHT, TOP/BOTTOM.
> Level:0—255
> Mode: All day, Night Only.
> Mask Skip: See M
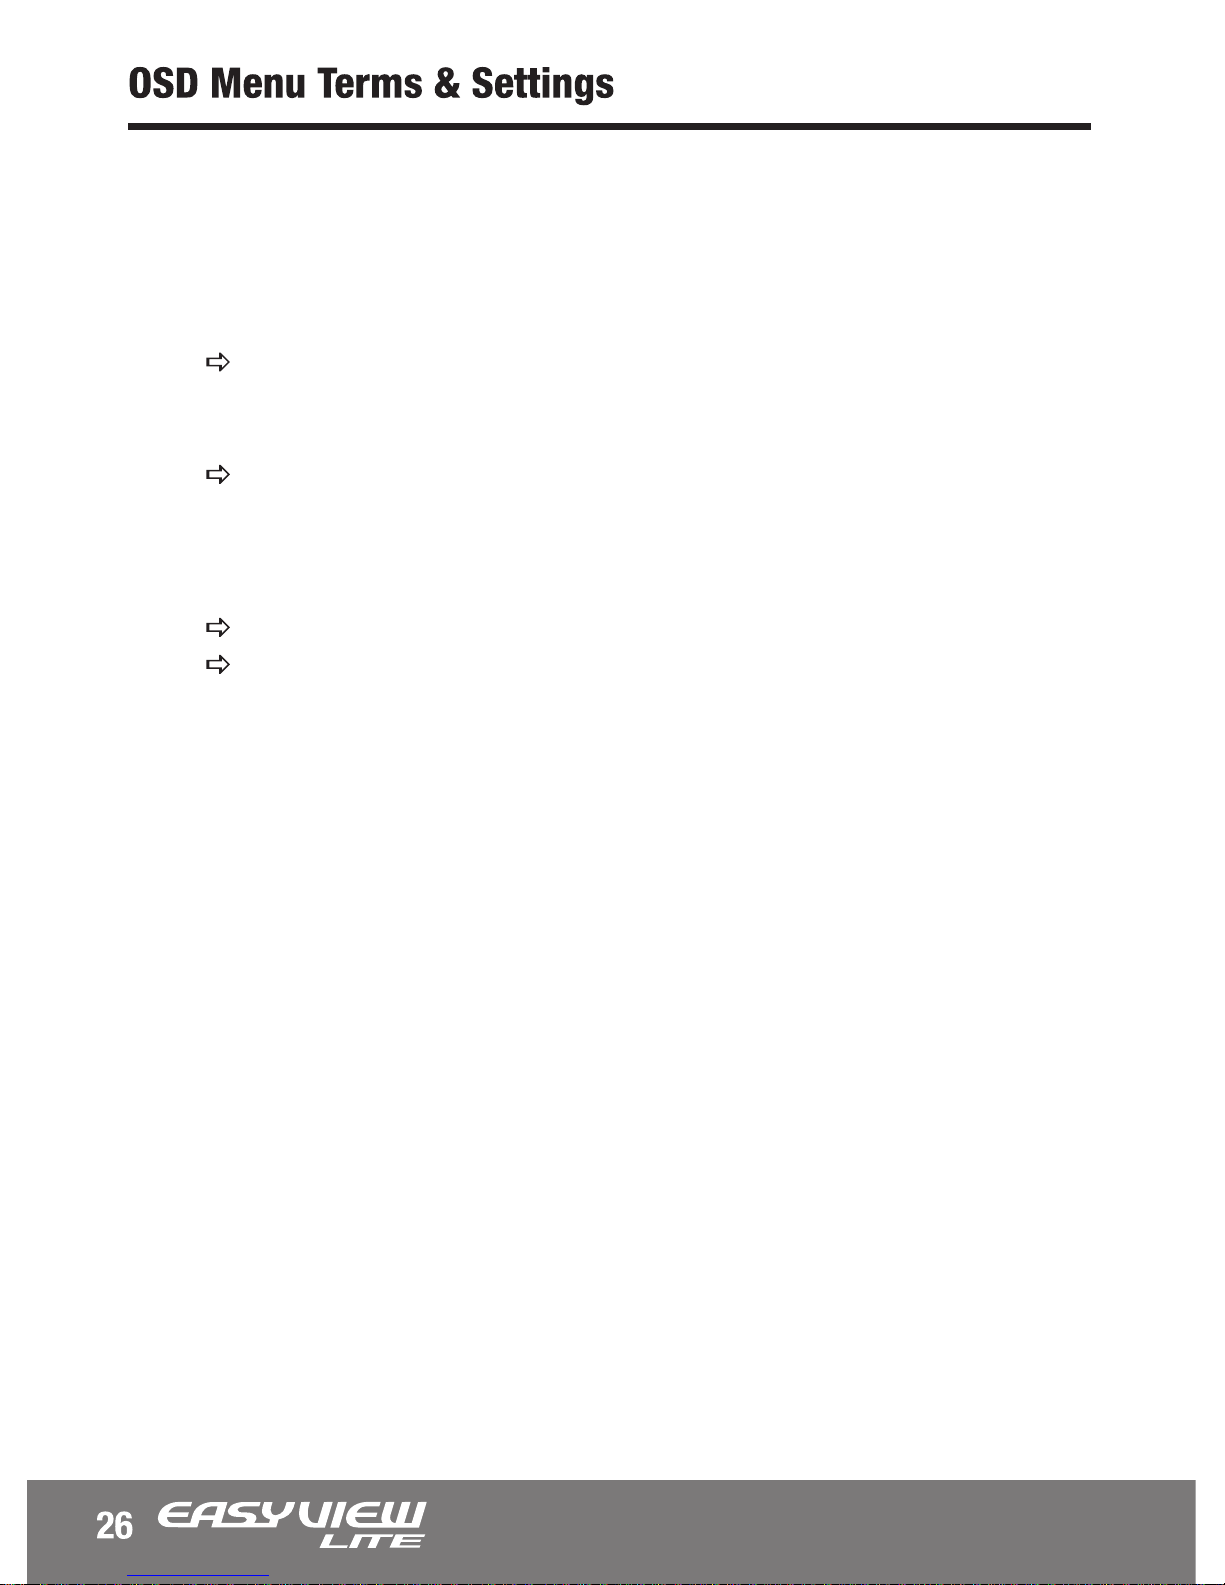
D&N AUTO
D N LEVEL
D N DELAY
N D LEVEL
N D DELAY
RETURN
160
5 SEC
096
5 SEC
RET
Page 26
The Color mode is operated during daytime and automatically converts to
B/W mode in the absence of light during night-time. AGC cannot be modified
in this mode.
5.1 AUTO
5.2 B/W
5.3 COLOR
> D N Level (0~255):
This level determines the level of darkness before switching from Day mode
to Night mode.
> D N Delay (1, 3, 5, 10, 15, 20, 25, 30sec.):
This function is used to set the delay between switching of the modes.
If the delay has been set to ‘3’, the camera will observe darkness for at least
3 seconds before switching to Night mode.
> N D Level (0~255): Opposite of D -> N Level.
> N D Delay (1, 3, 5, 10, 15, 20, 25, 30sec.) : See above D -> N Delay.
The camera is always in B/W mode.
> BURST (OFF, ON):
- OFF: This function smooths out noise in BW mode.
- ON : This function makes the transition between switching of the modes
smoother when Color turns to BW.
> IR SMART (OFF, ON):
This function detects too much IR reflection and automatically compen sates for the over exposure. Specific area can be defined by adjusting the
location and size of the detection grid. If set to ‘ON’, you can adjust the ‘IR
GAIN’ level from 0 to 255 and set the area with HEIGHT, WIDTH, LEFT/
RIGHT, TOP/BOTTOM on your screen.
> IR LEVEL (LOW, HIGH):
This function is used to higher or lower the IR LED intensity.
The camera is always in Color mode.
Page 27
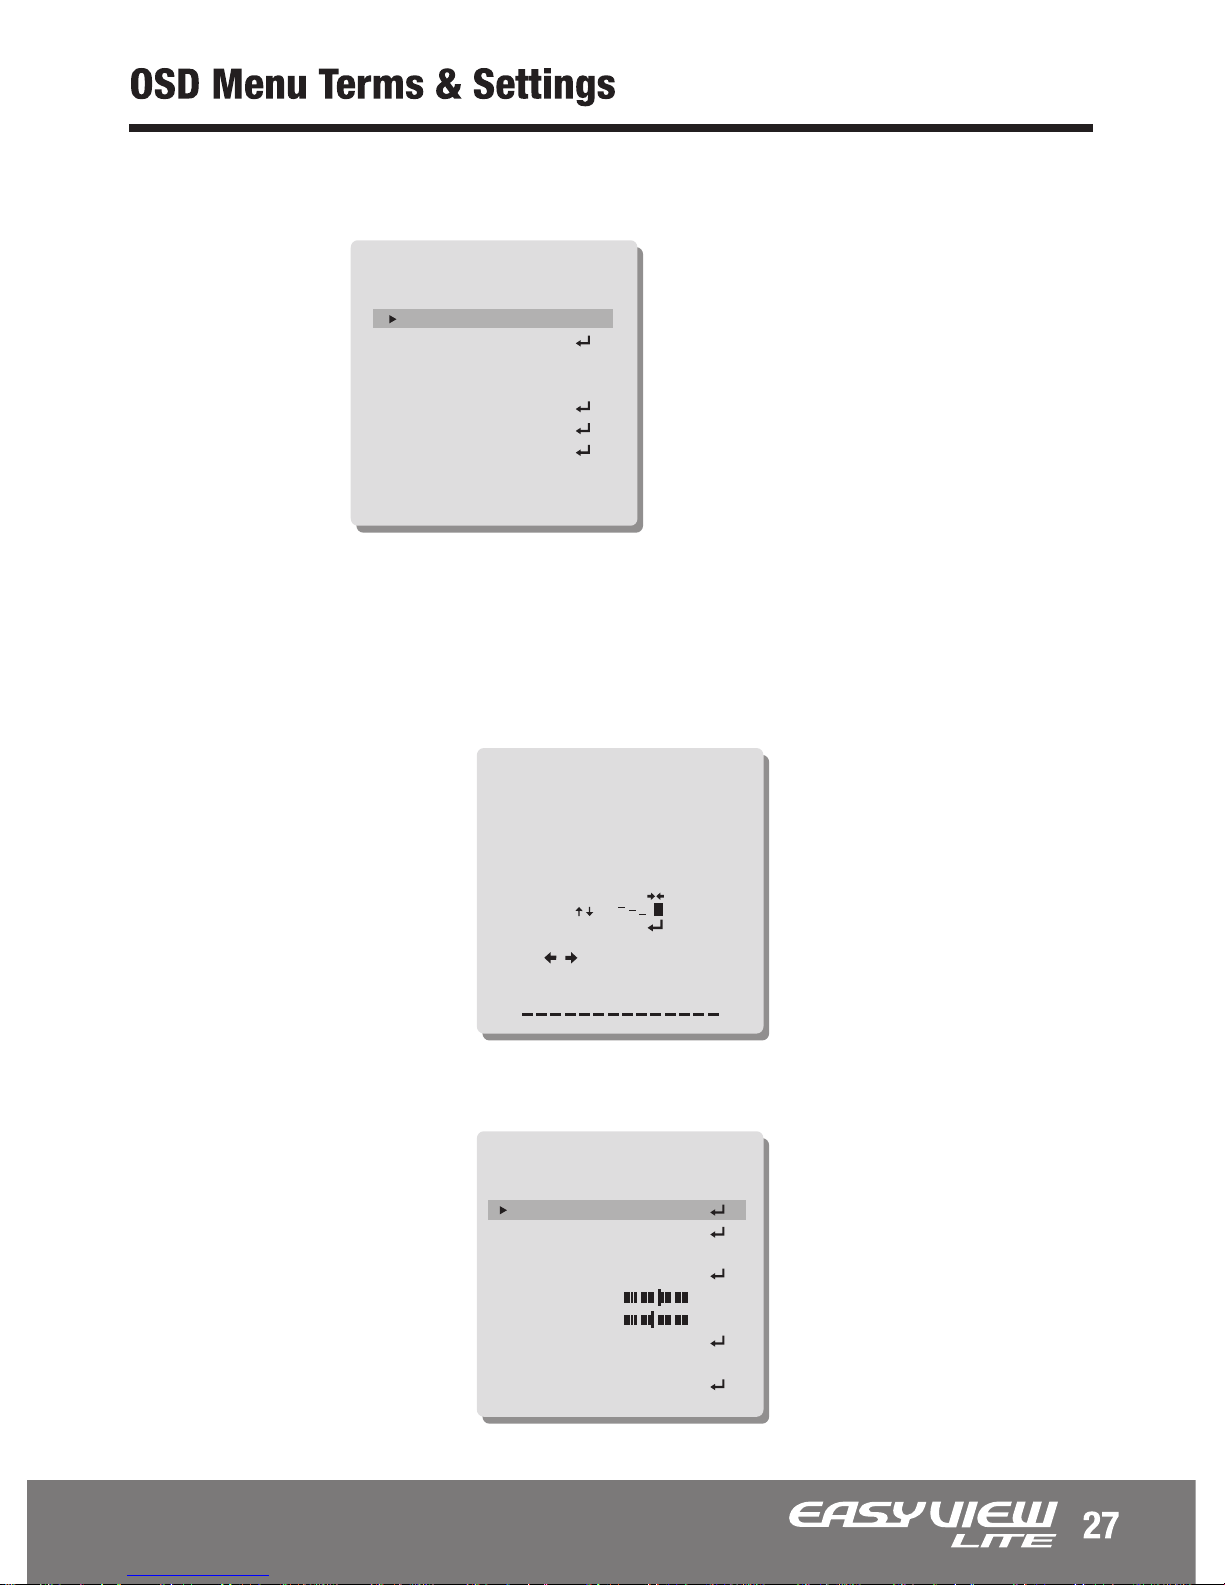
6. SPECIAL
SPECIAL
CAM TITLE
IMAGE ADJ.
MOTION
PRIVACY
DPC
LANGUAGE
RETURN
OFF
OFF
OFF
ENGLISH
RET
6.1 CAM TITLE: ON, OFF
The CAMERA TITLE is used to assign a number or a custom title to easily
identify between the many cameras that may be connected to your DVR.
6.2 IMAGE ADJ.
0123456
789ABCDE
FGHIJKLM
NOPQRSTU
VWXYZ
( )
▶
/ = & : ~ ,.
CLR POS END
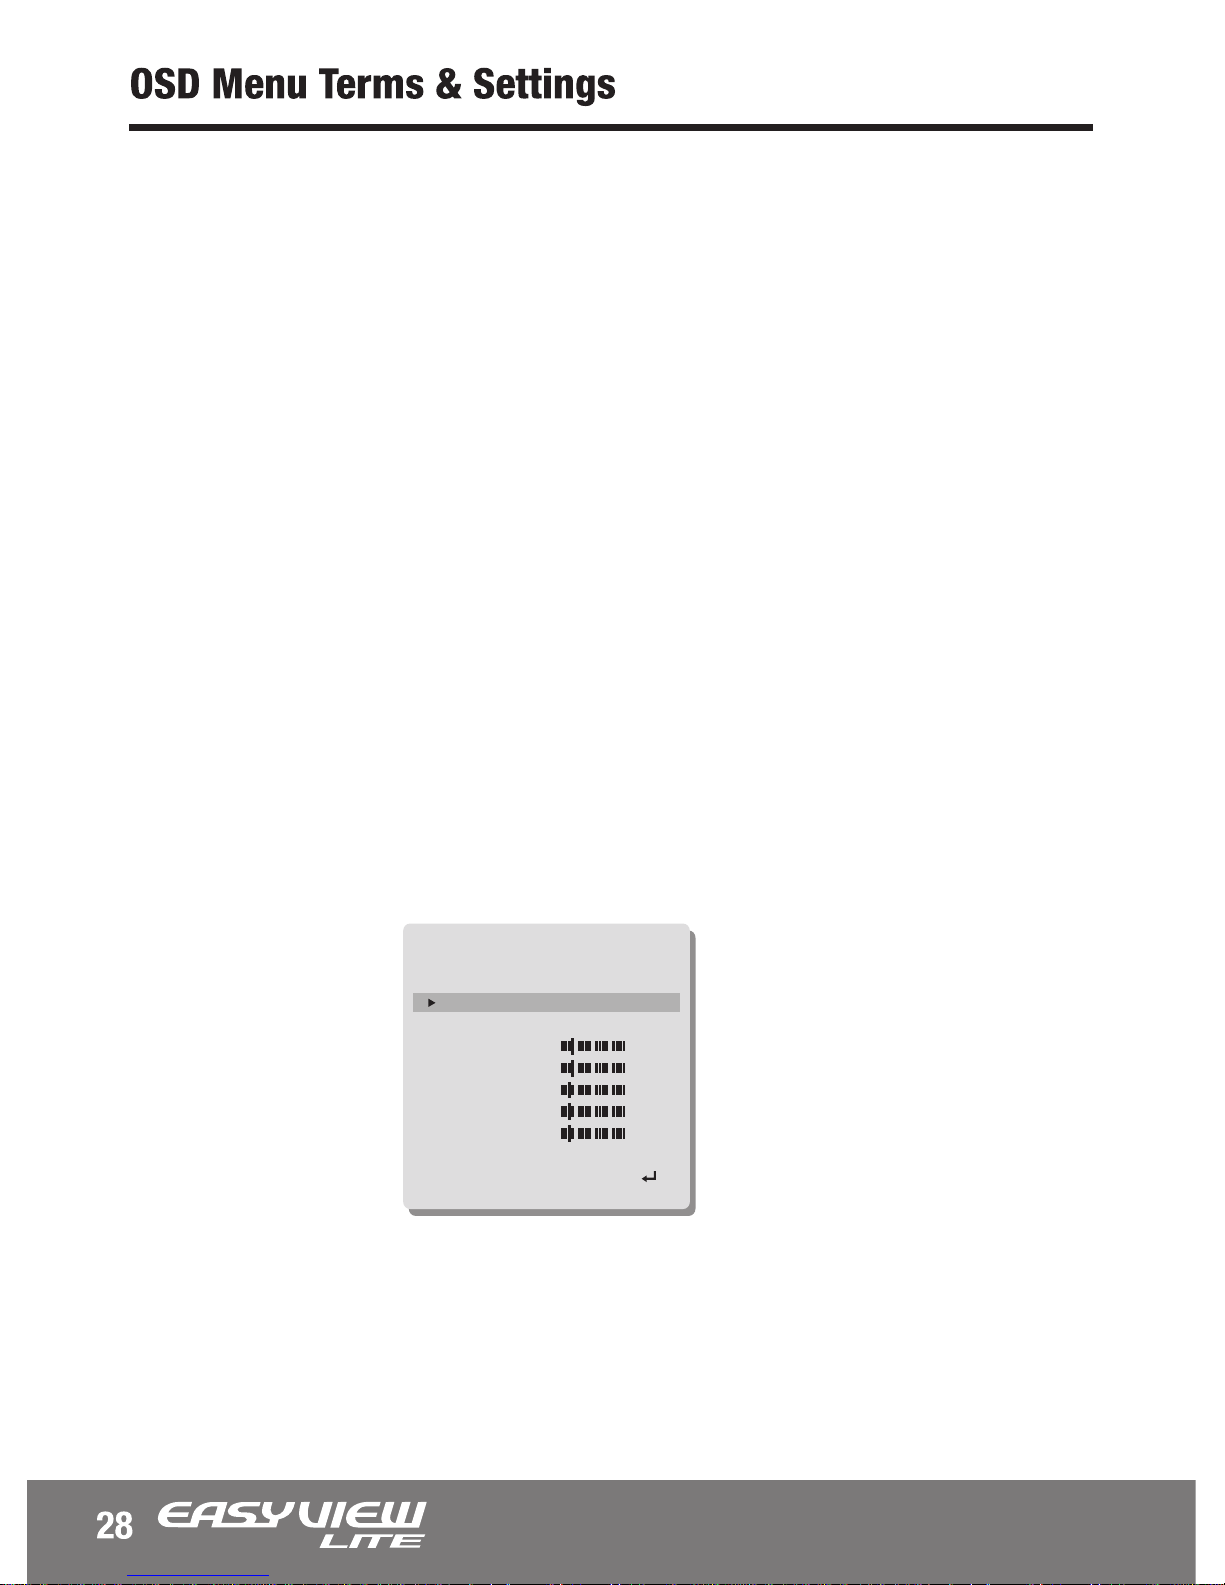
IMAGE ADJ.
LENS SHAD.
2DNR
MIRROR
FONT COLOR
CONTRAST
SHARPNESS
DISPLAY
NEG. IMAGE
RETURN
ON
ON
OFF
140
015
CRT
OFF
RET
Page 28
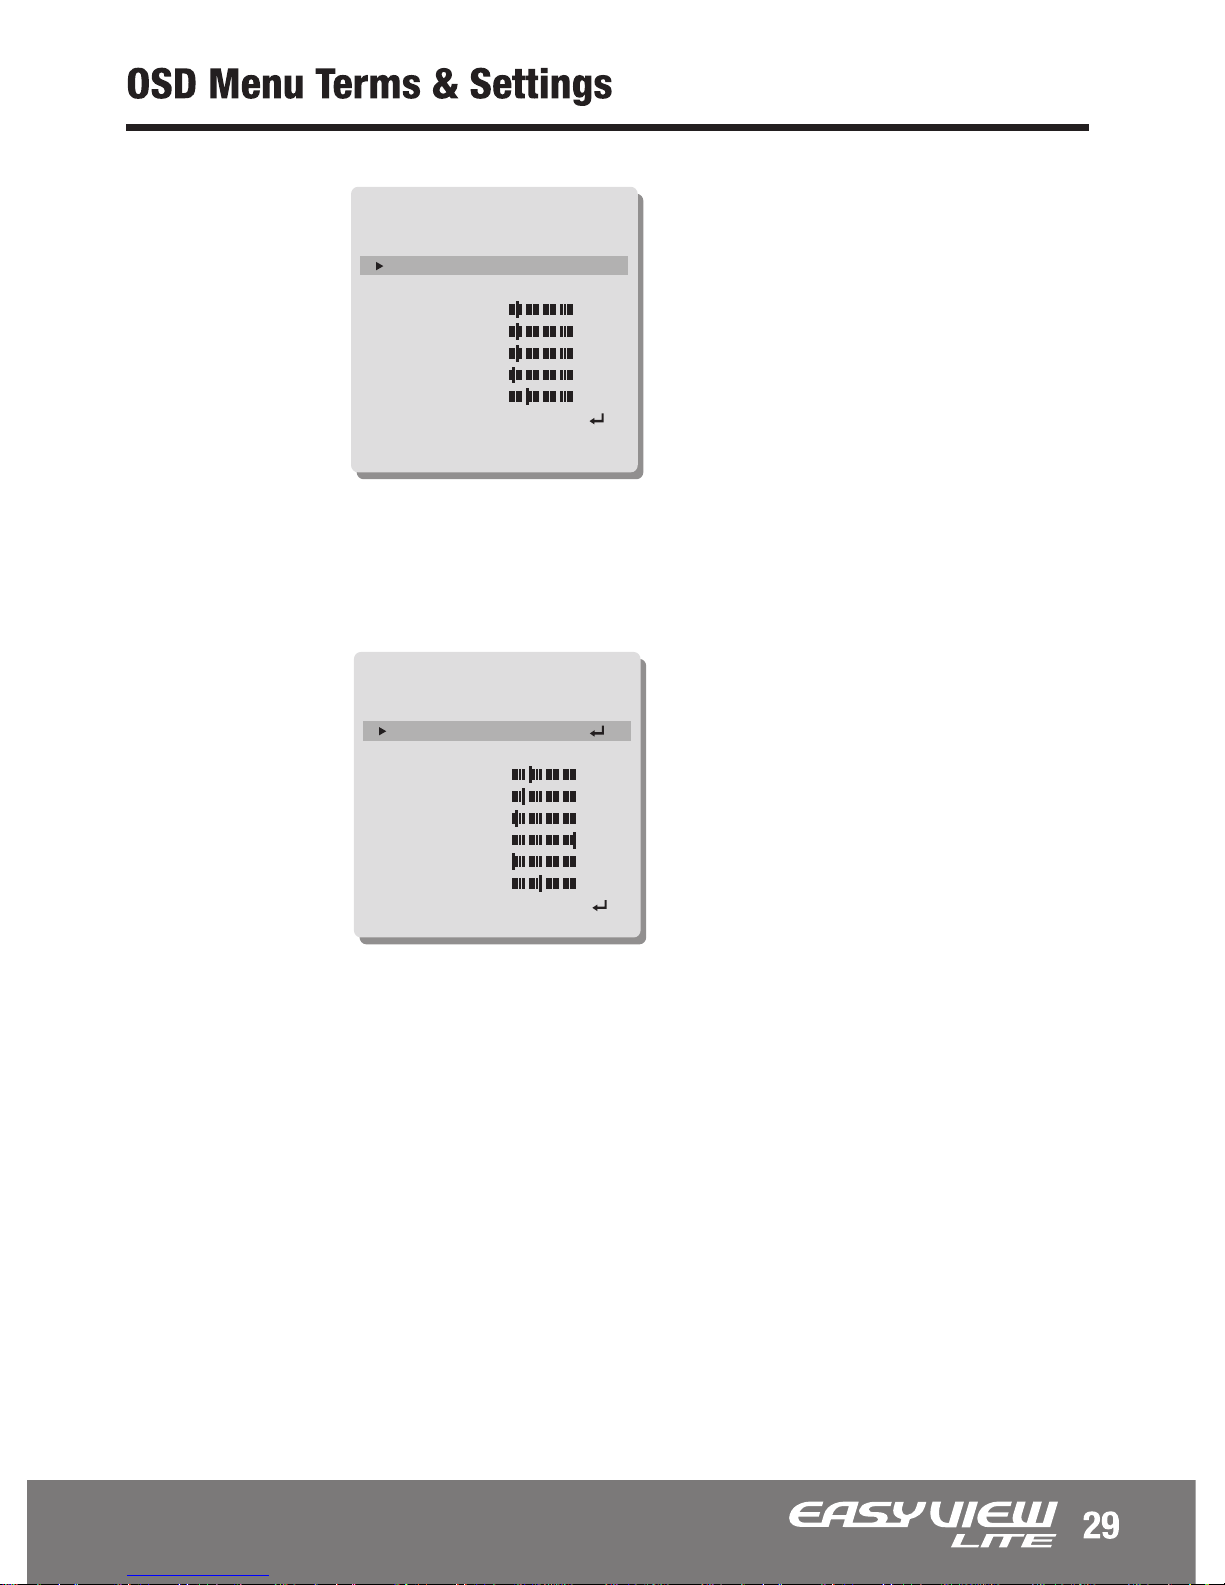
6.3 MOTION : ON, OFF
This function is used to mask specific areas within the frame of the camera
to be concealed. There are total of 8 different colored boxes representing the
masked areas. Each boxes can be individually adjusted to user preference.
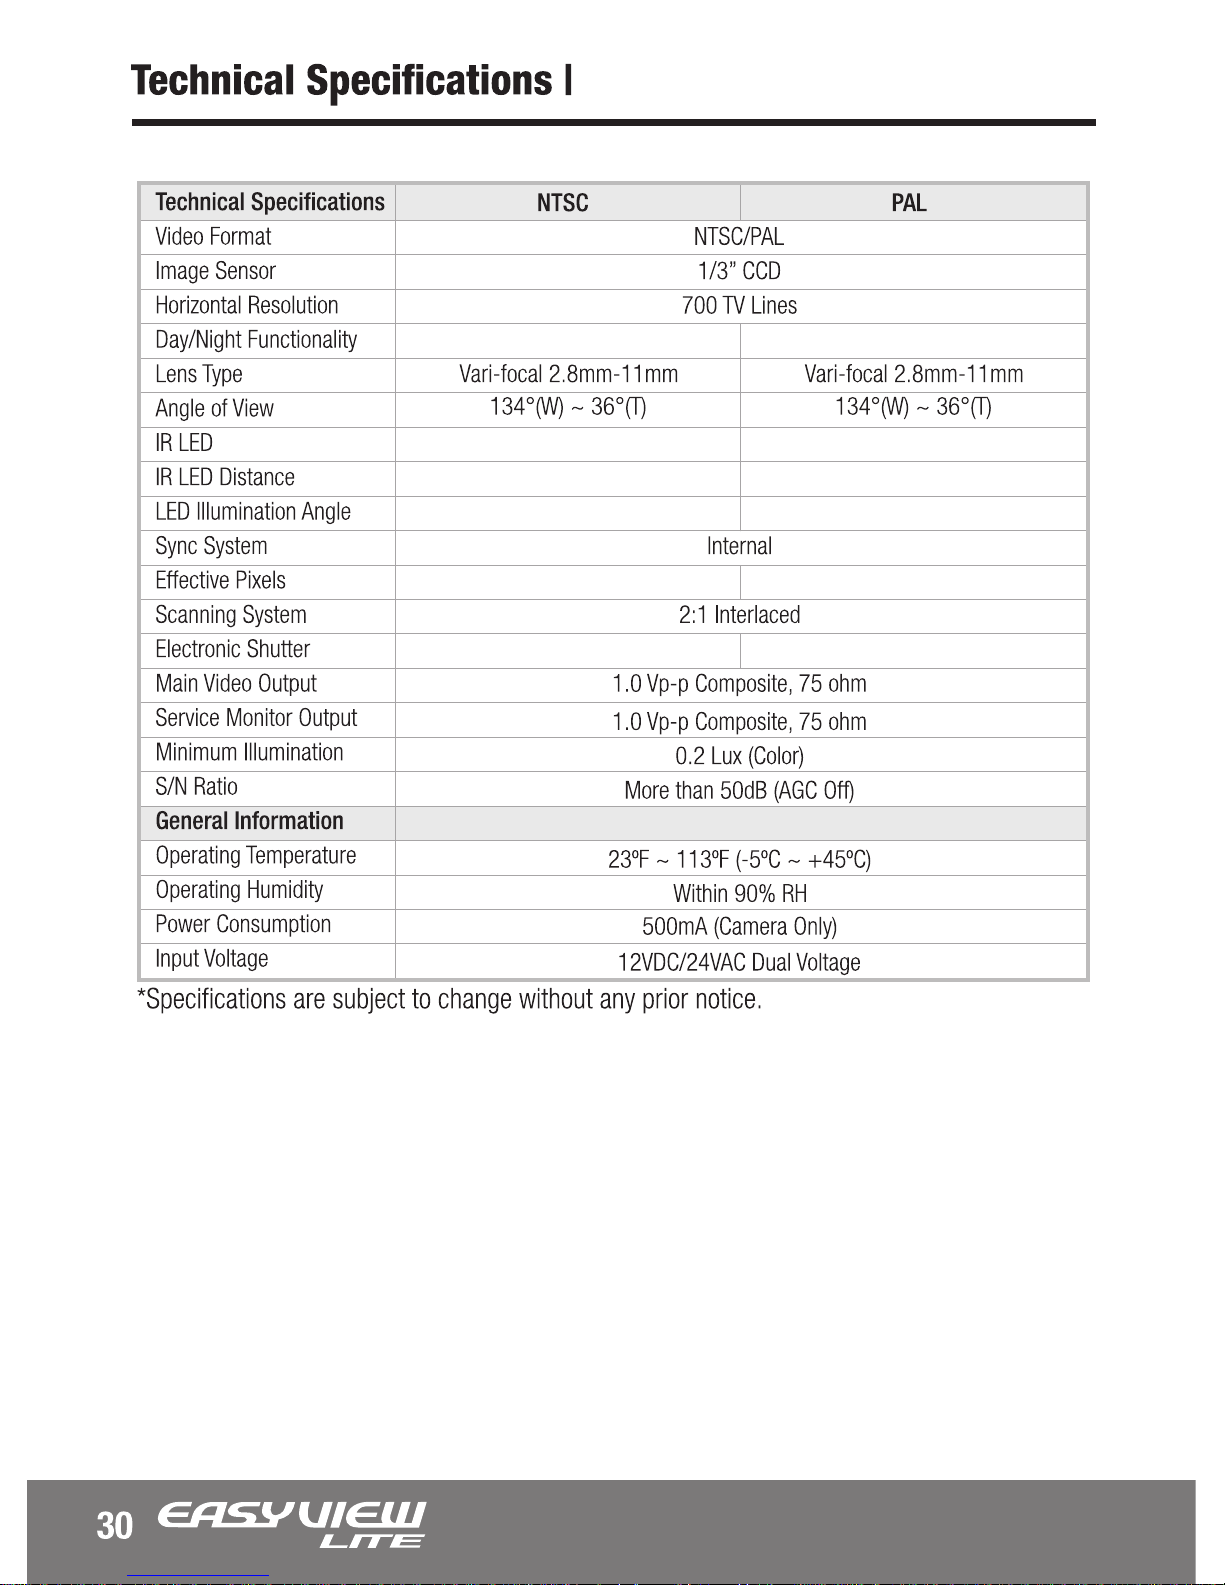
6.4 PRIVACY : ON, OFF
> SHARPNESS (0~31)
> LENS SHAD. (OFF, ON):
Convex shape of the lens causes the light to enter the camera unevenly and
typically makes the center of the screen brighter than the rest. Adjusting this
setting will compensate for this undesirable effect and make the screen more
even. If set to ‘ON’, you can set the LEVEL and CENTER point of shading.
> 2DNR (ON, OFF)
> MIRROR (ON, OFF):
This function is used to inverse the pictures coming from the camera.
> FONT COLOR
> CONTRAST (0~255)
Change the OSD menu front color
> DISPLAY (CRT, LCD, USER):
> NEG. IMAGE (ON, OFF):
This function reverses the pictures to view in inverse. Light to dark and vice versa.
MOTION
AREA SEL.
ARE STATE
HEIGHT
WIDTH
LEFT/RIGHT
TOP/BOTTOM
DEGREE
VIEW
RETURN
AREA1
ON
003
003
002
002
032
ON
RET
Page 29
This function is used to compensate for the dead pixel areas of the screen.
6.5 DPC (Dead Pixel Compensation)
6.6 LANGUAGE: ENG, SPN, RUS, GER, FRA
6.7 RETURN: RET, SAVE&END
7.1 SAVE
7.2 NOT SAVE
7.3 RESET
7. EXIT
Reset all camera settings to the factory default settings.
DPC
START
DPC VIEW
LS VALUE
DIFF.
AREA HS
AREA HE
AREA VS
AREA VE
RETURN
OFF
016
013
027
247
008
114
RET
PRIVACY
AREA SEL.
ARE STATE
HEIGHT
WIDTH
LEFT/RIGHT
TOP/BOTTOM
COLOR
RETURN
AREA1
ON
032
032
032
016
004
RET
Page 30
CD-H21N
NO
N/A
N/A
N/A
976H x 494V (480K Pixels)
1/60sec, FLK, Auto (1/60~1/100,000sec)
NO
N/A
N/A
N/A
1/50sec, FLK, Auto (1/50~1/100,000sec)
976H x 582V (570K Pixels)
Page 31
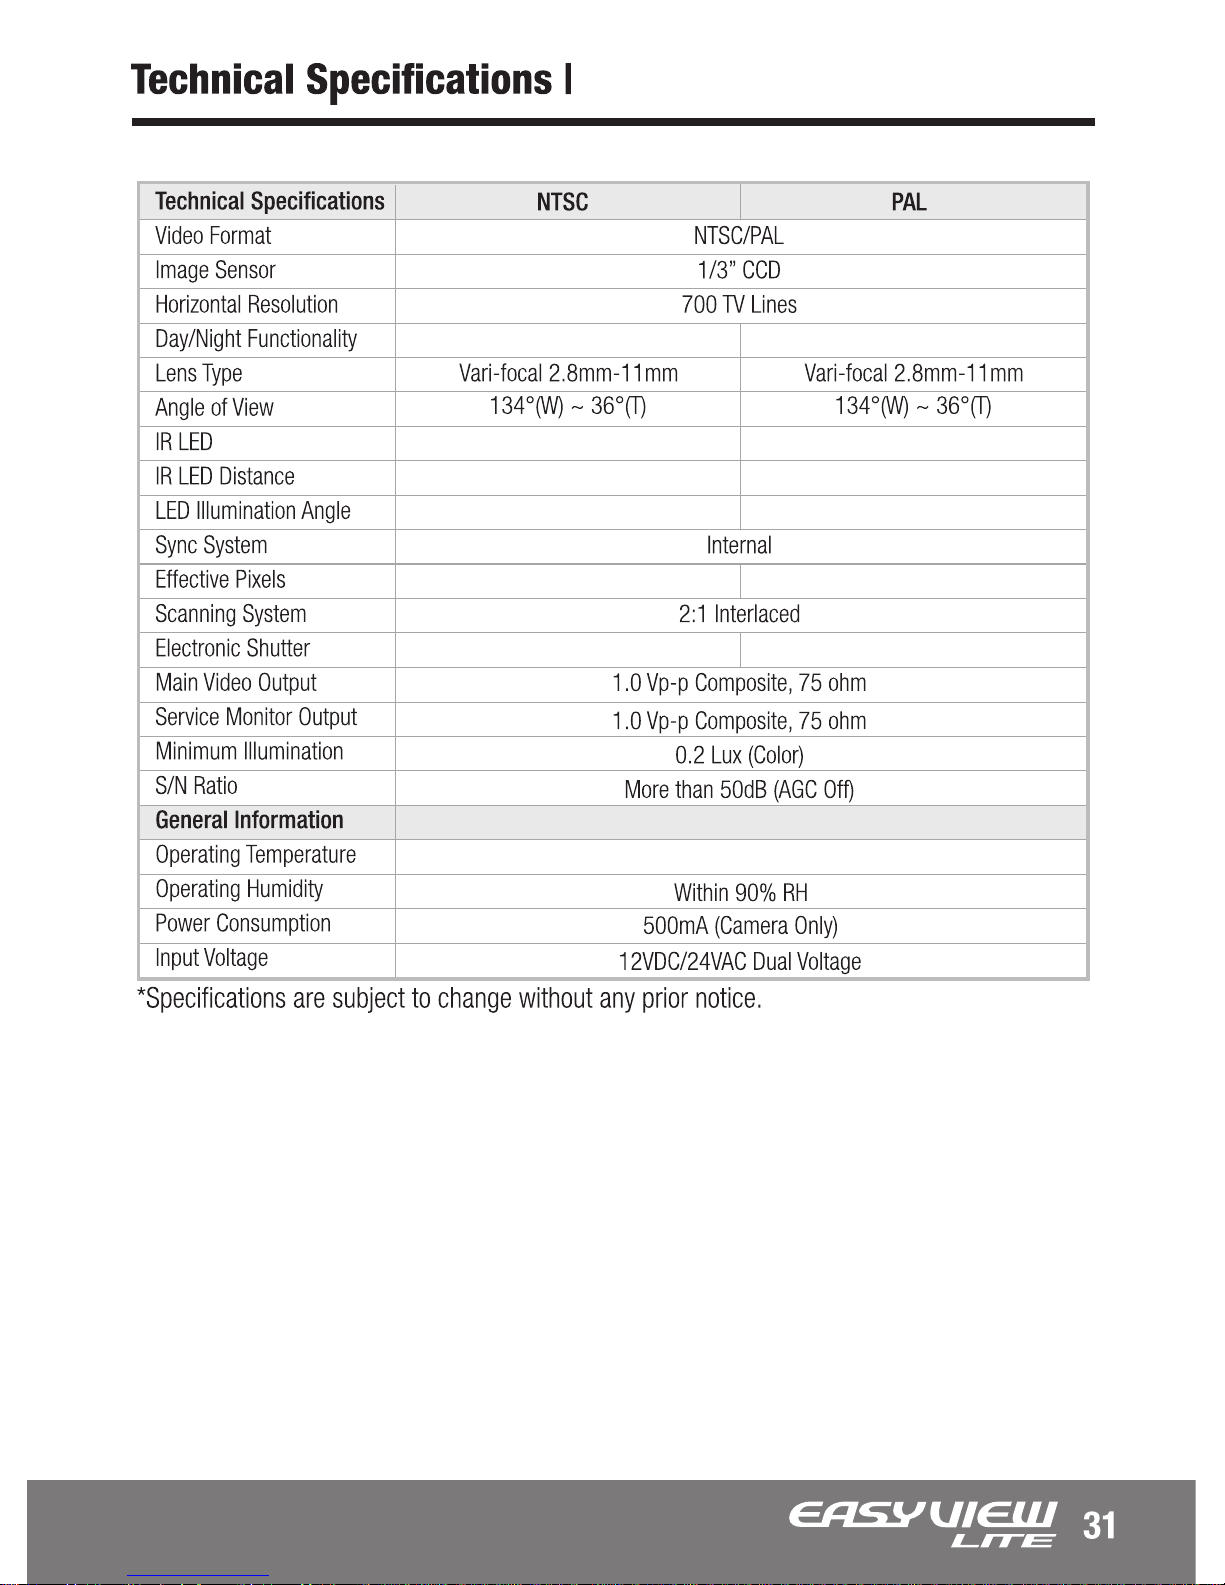
CV-H21N
NO
N/A
N/A
N/A
976H x 494V (480K Pixels)
1/60sec, FLK, Auto (1/60~1/100,000sec)
NO
N/A
N/A
N/A
1/50sec, FLK, Auto (1/50~1/100,000sec)
976H x 582V (570K Pixels)
0ºF ~ 122ºF (-17ºC ~ +50ºC)
Page 32

 Loading...