

Page 1

The Intelligent Surveillance Solution
NVRmini
Quick Start Guide
Page 2

1
Table of Contents
English.............................................................................................................2
Čeština..........................................................................................................25
Deutsch..........................................................................................................49
Français ........................................................................................................74
Italiano ...........................................................................................................98
Español........................................................................................................122
Pусский .......................................................................................................146
日本語..........................................................................................................170
繁體中文.......................................................................................................196
Page 3
2
Step 1: Unpacking the Unit
This package contains the following items:
The unit
Quick Start Guide
Screws for disk drives (1 package)
Power cord
Warranty card
12V DC power transformer (2 bay unit)
CD with Install Wizard, Backup, Live View, and Playback
application, user manual, and quick start guide
Warning
The electronic components within the unit can be damaged by
Electro-Static Discharge (ESD). Please take precautions at all
times when handling the unit or its sub-assemblies.
Important
To configure the unit, you must install the software onto a
desktop/ laptop running Windows Vista, 2003, XP Professional,
or 2000.
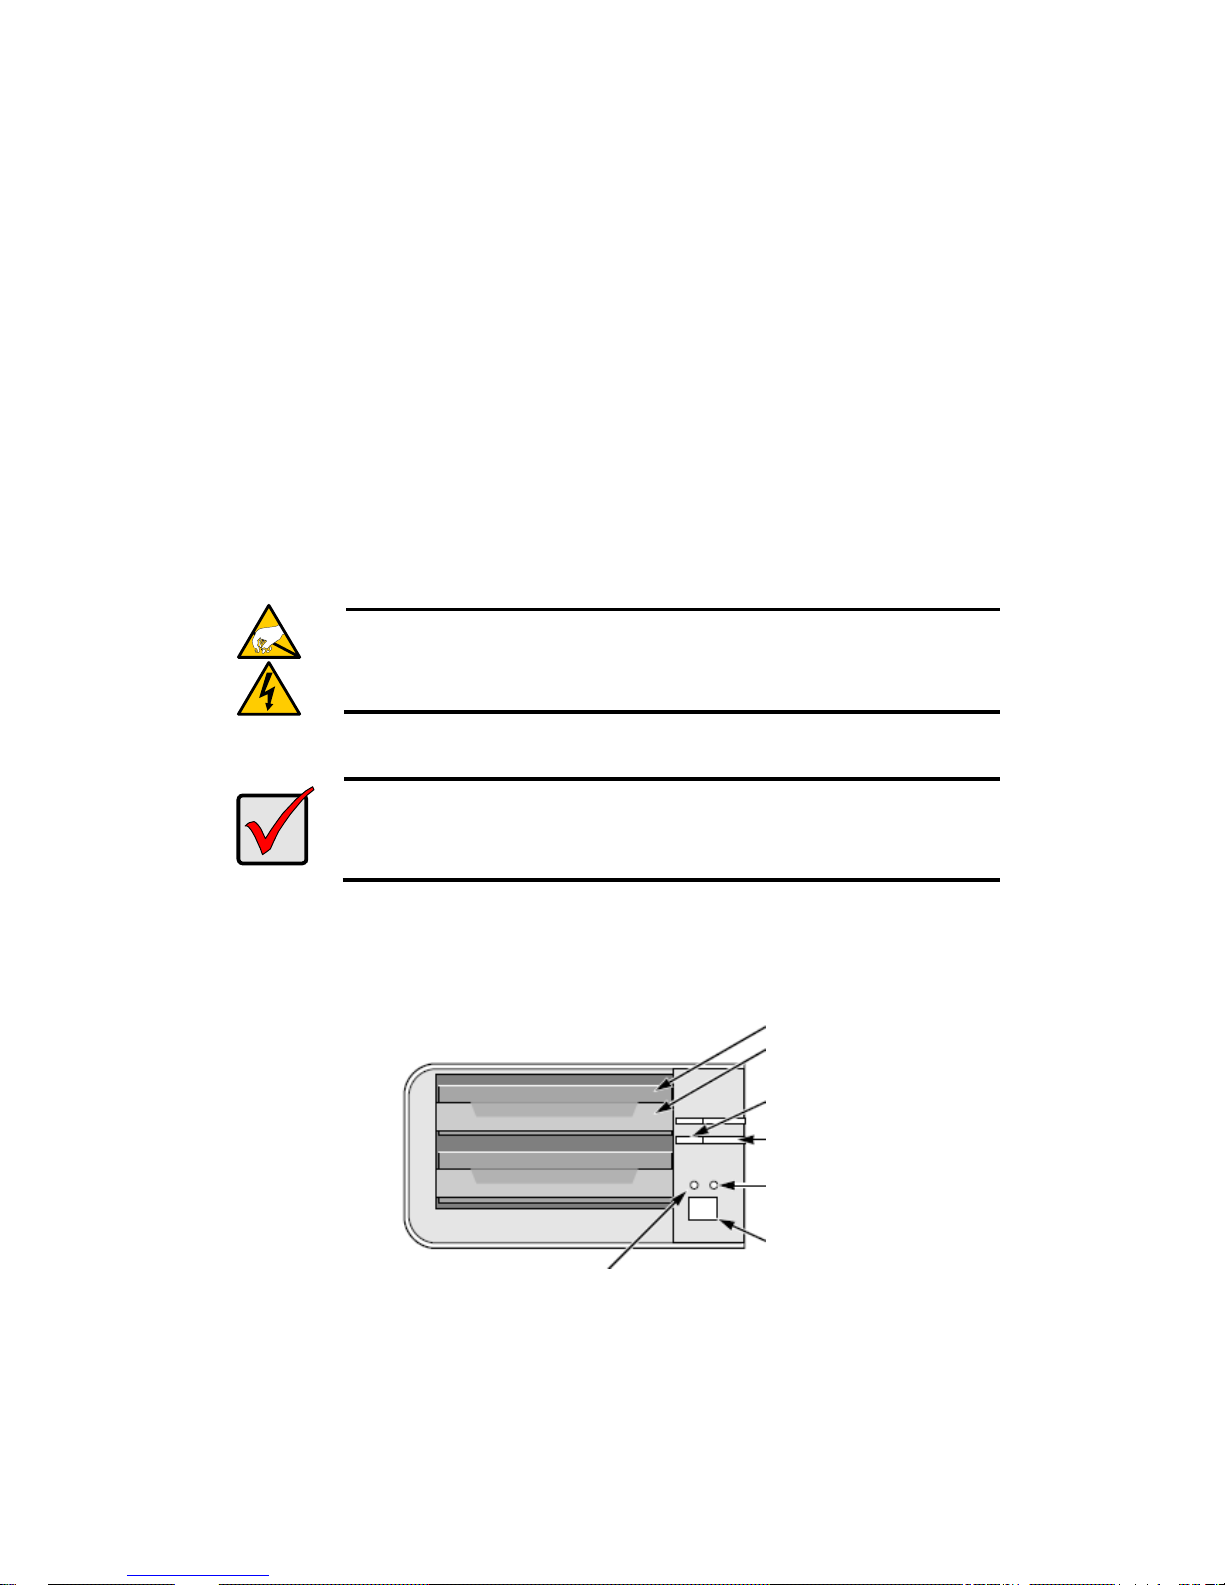
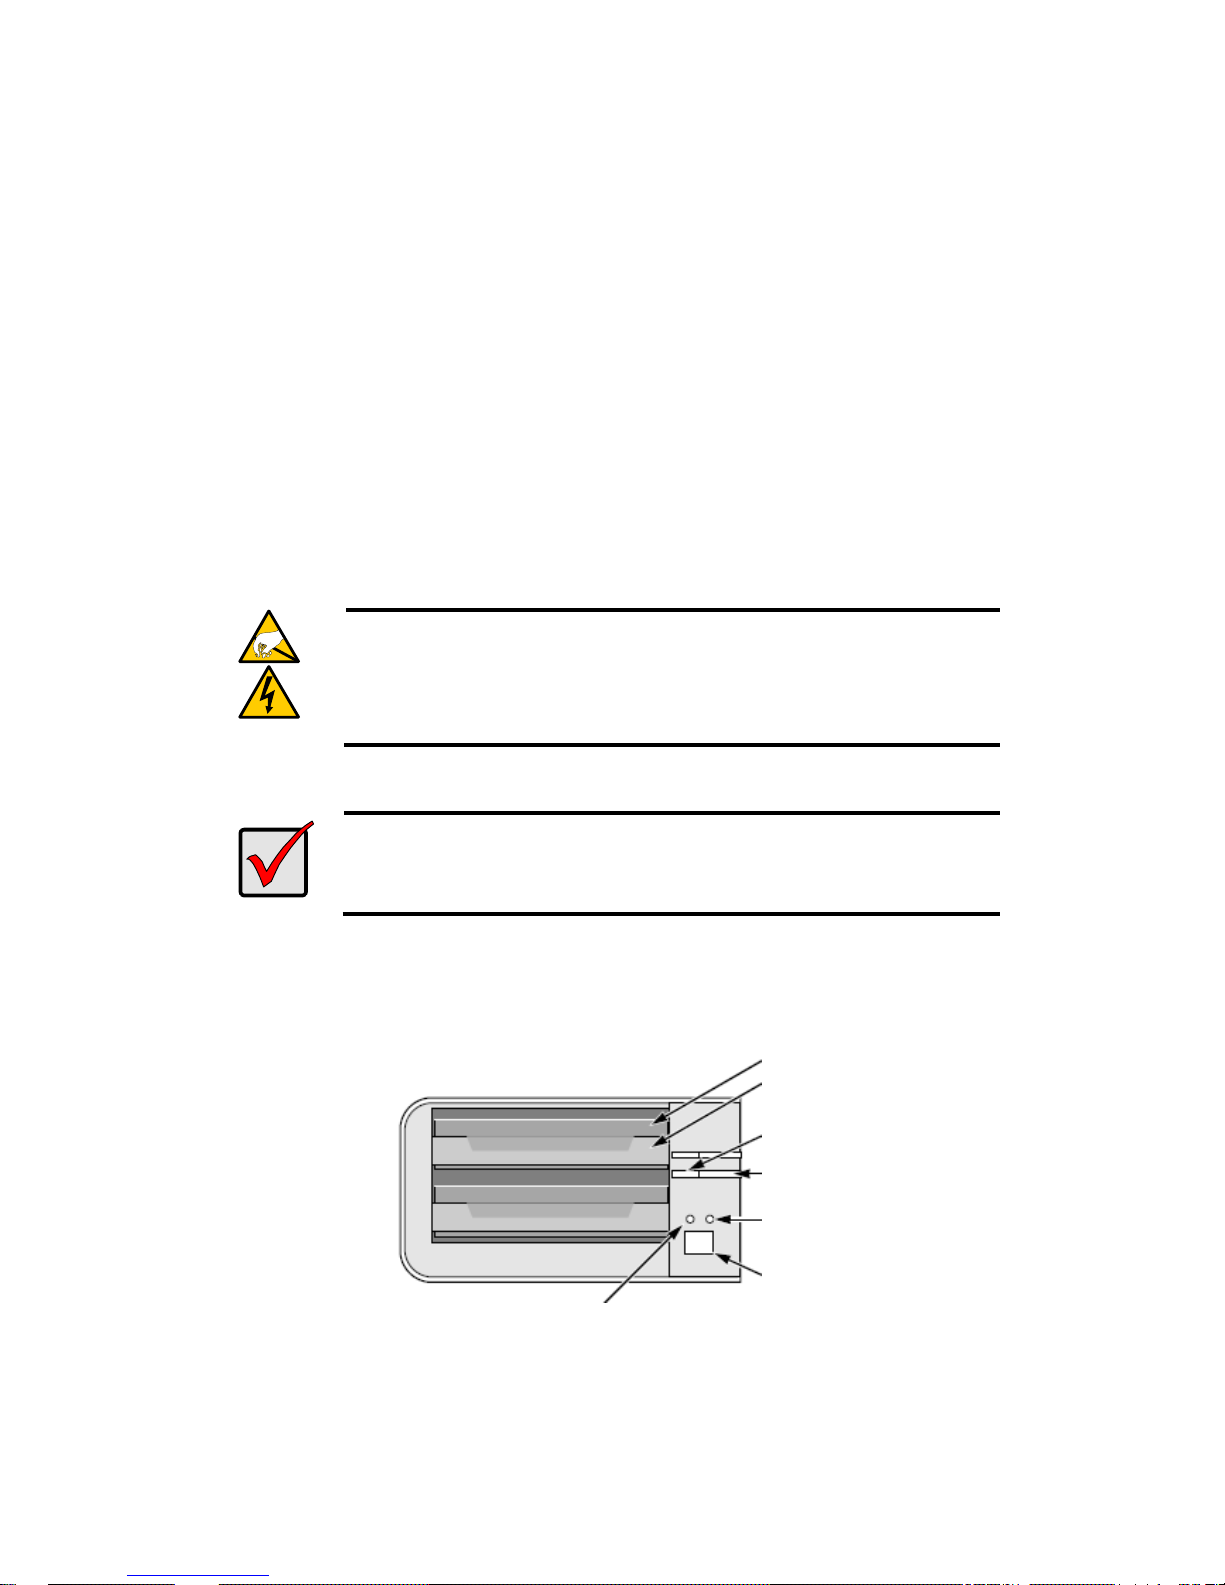
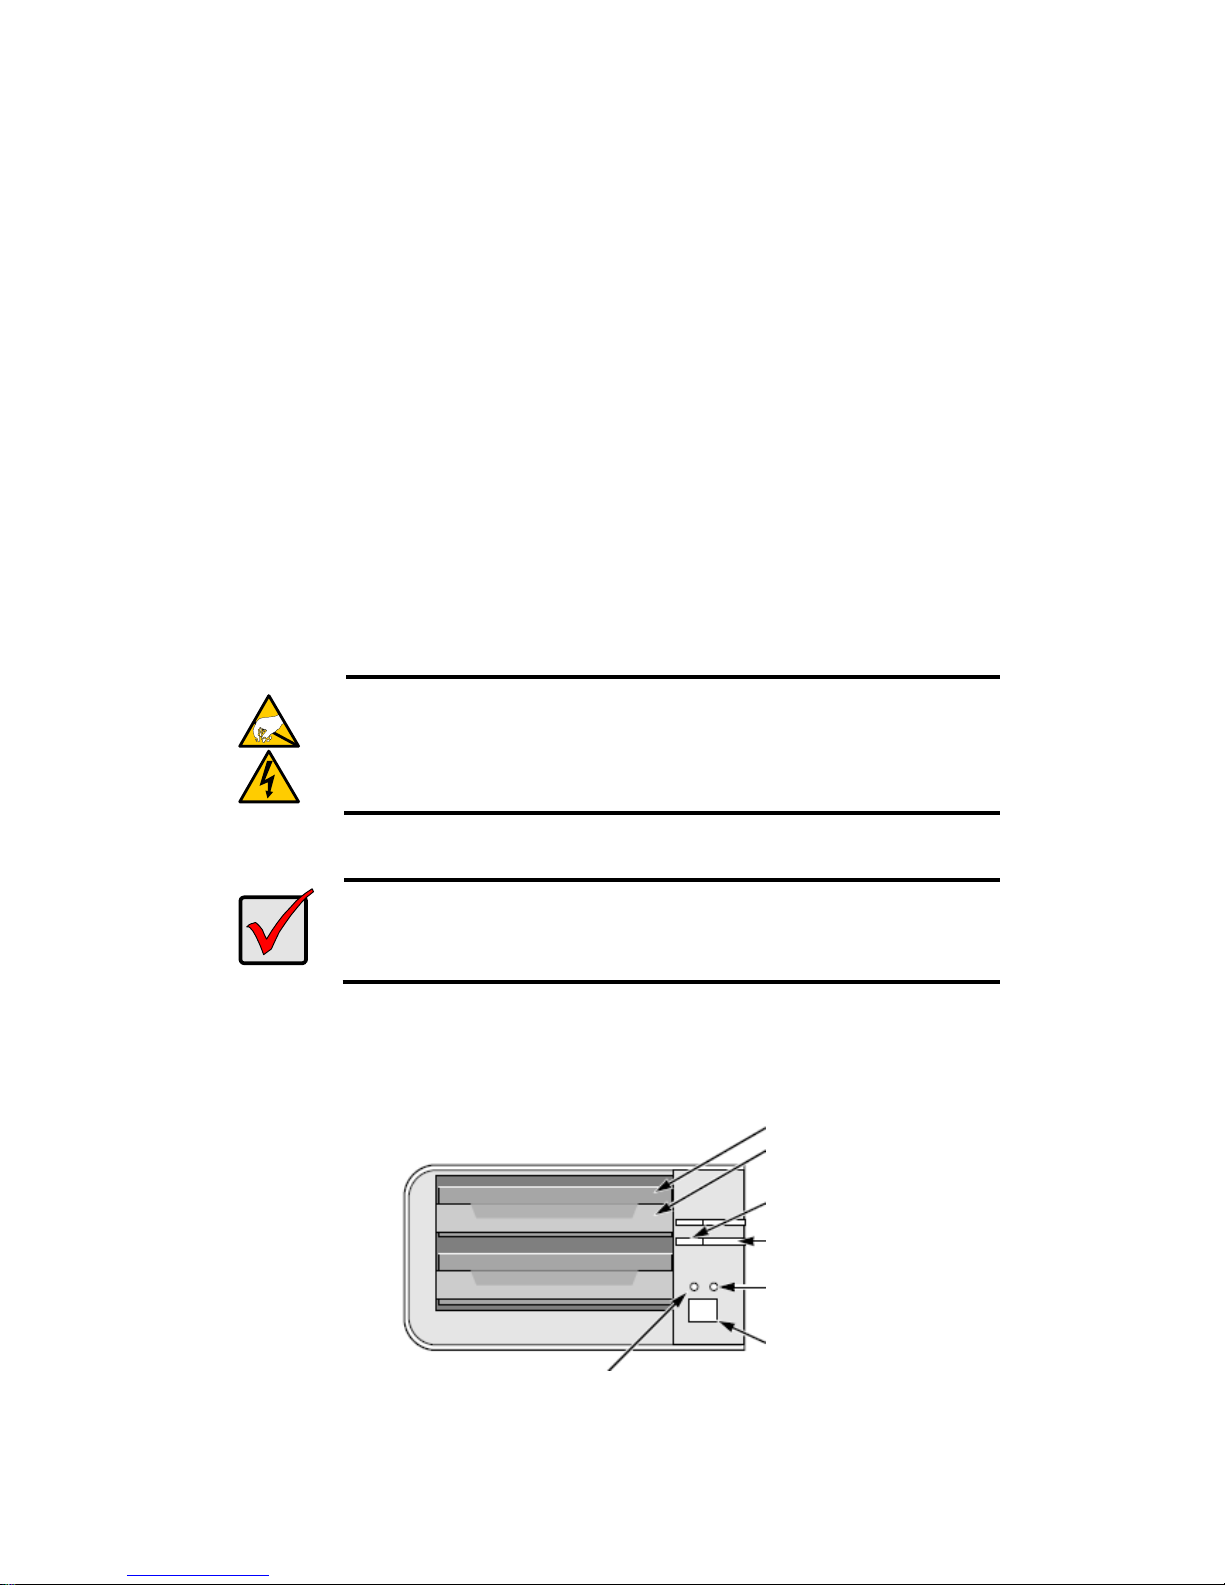
2 bay unit (4 channels) front view
Disk Drive
Drive Carrier
Drive Status LED
Drive Activity LED
Ethernet Activity
LED
Power button
System Status LED
Page 4
3
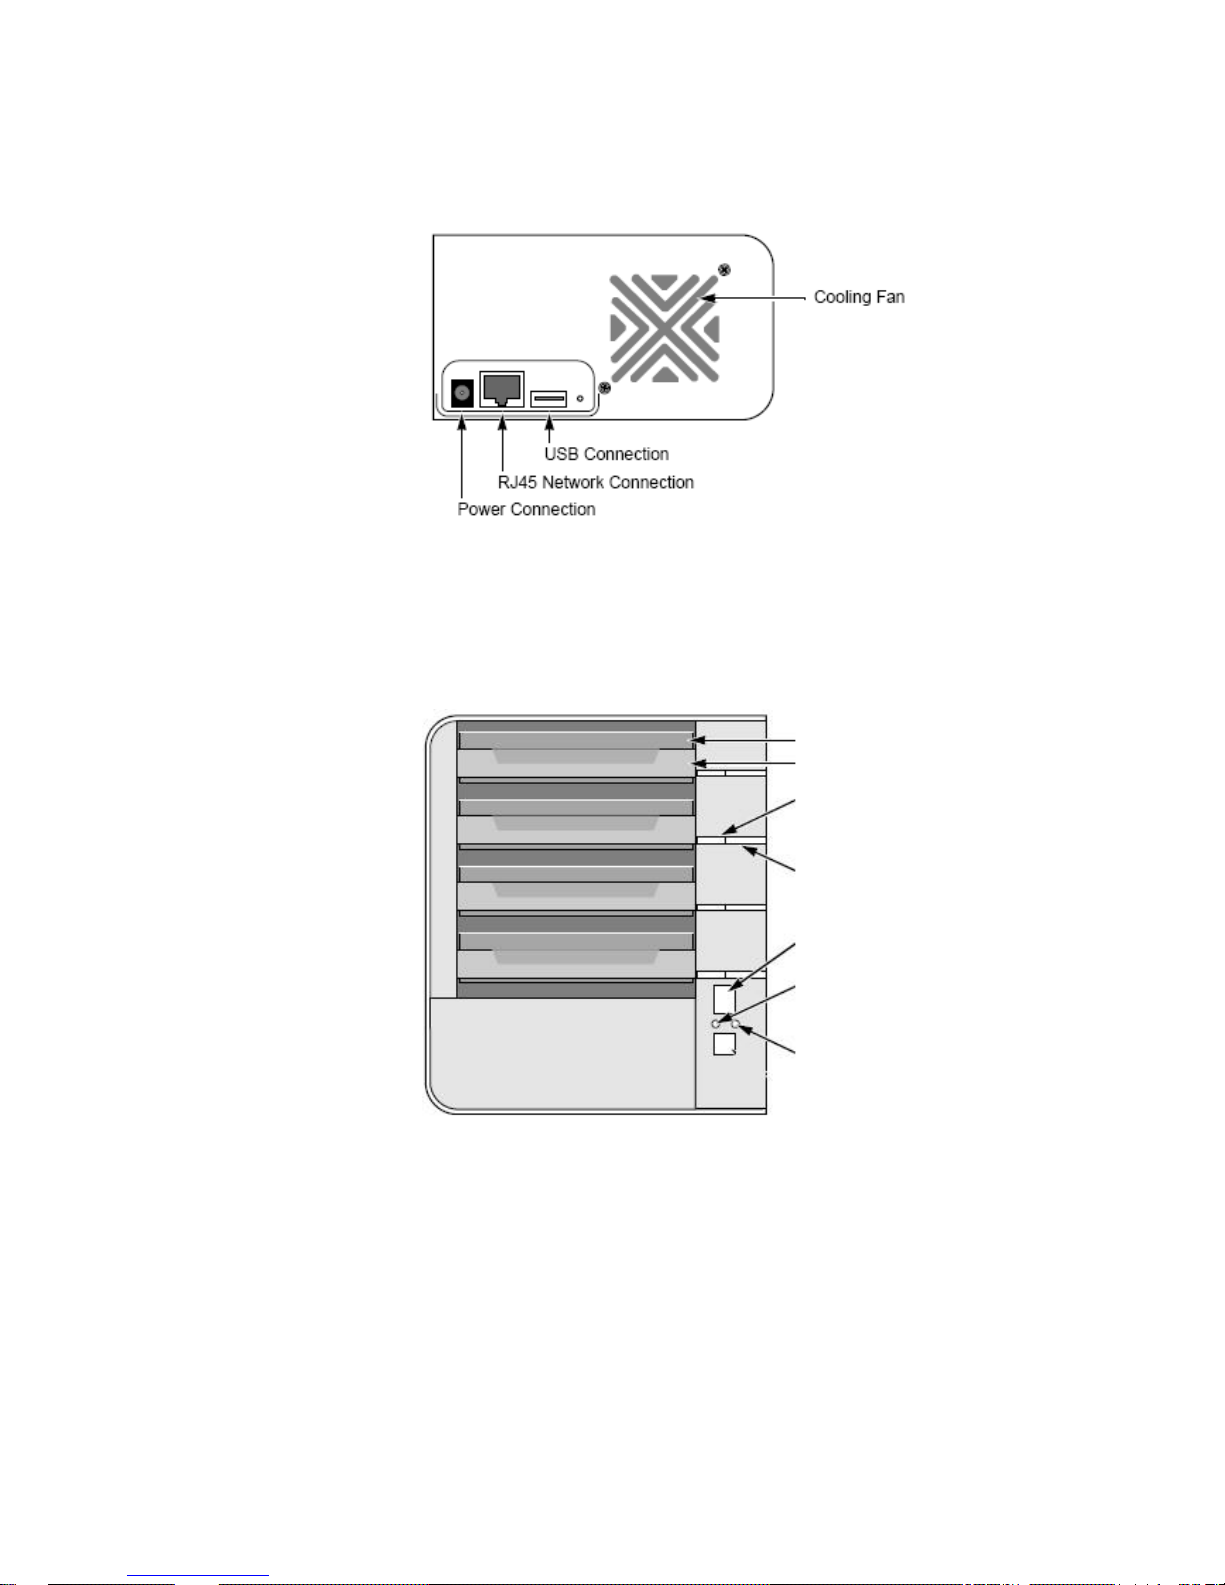
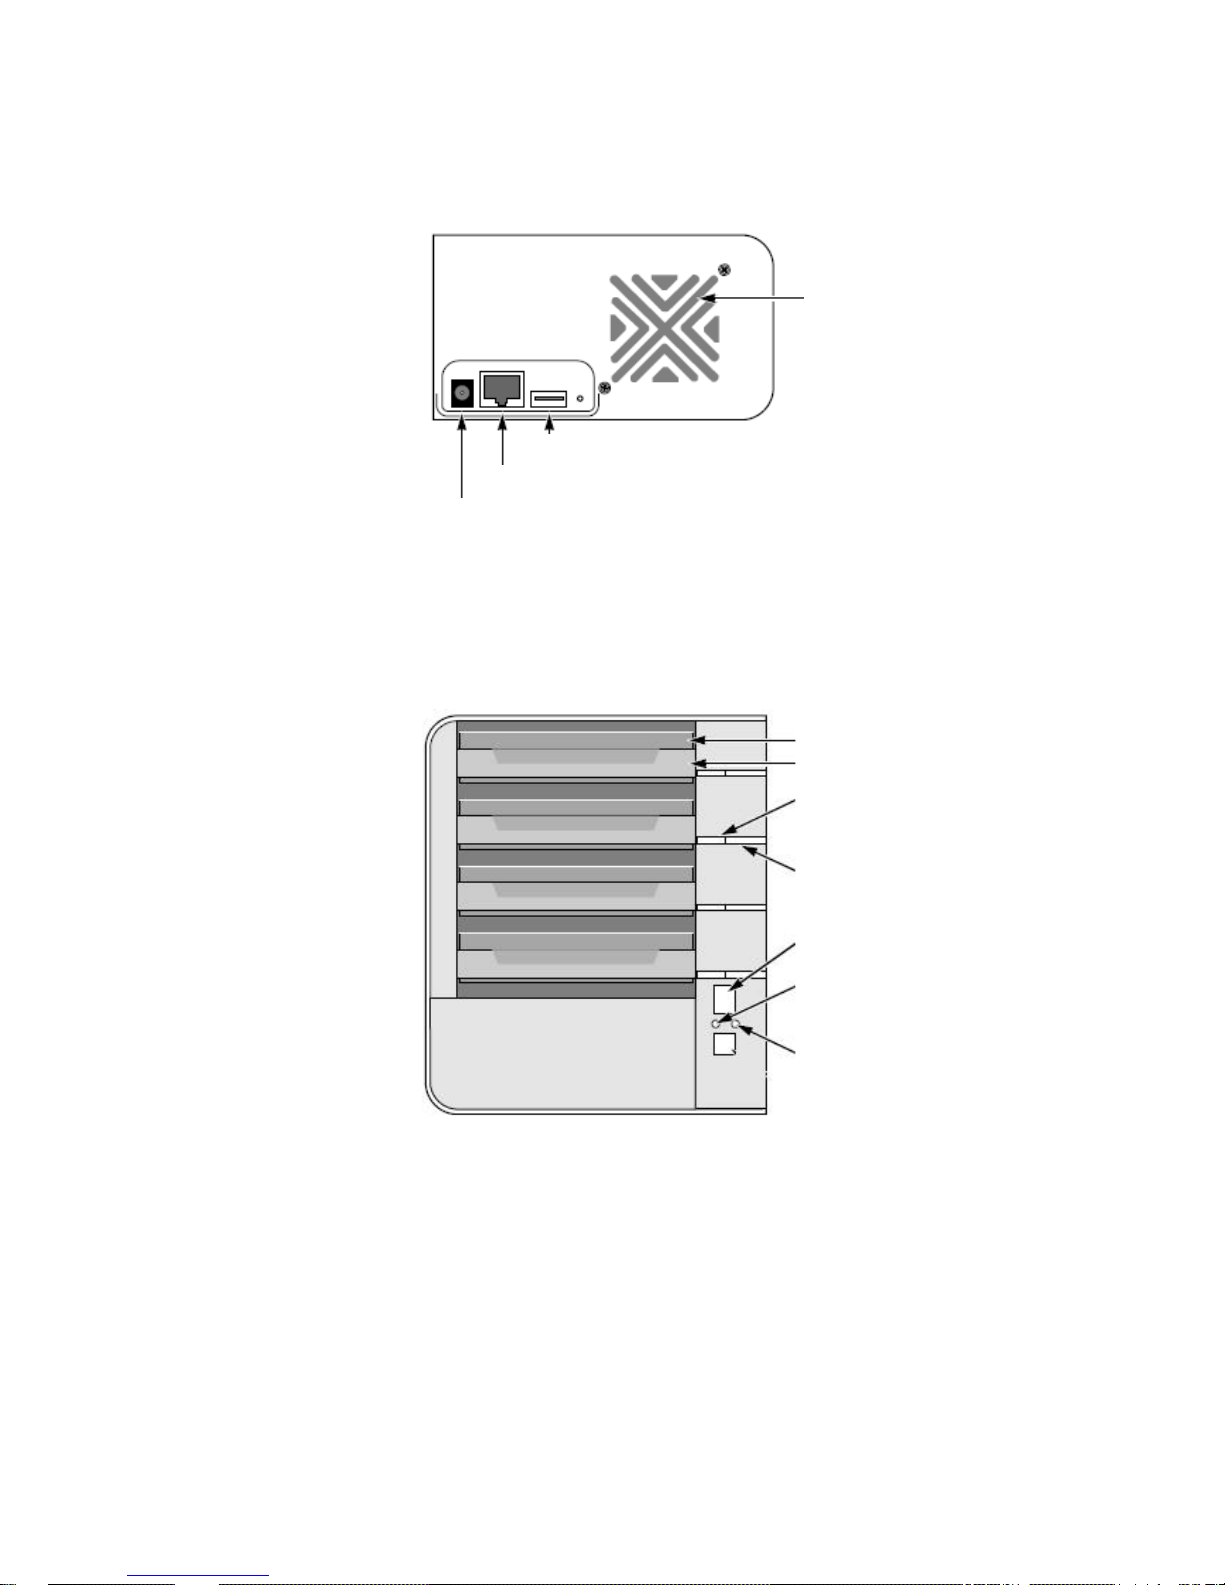
2 bay unit (4 channels) rear view
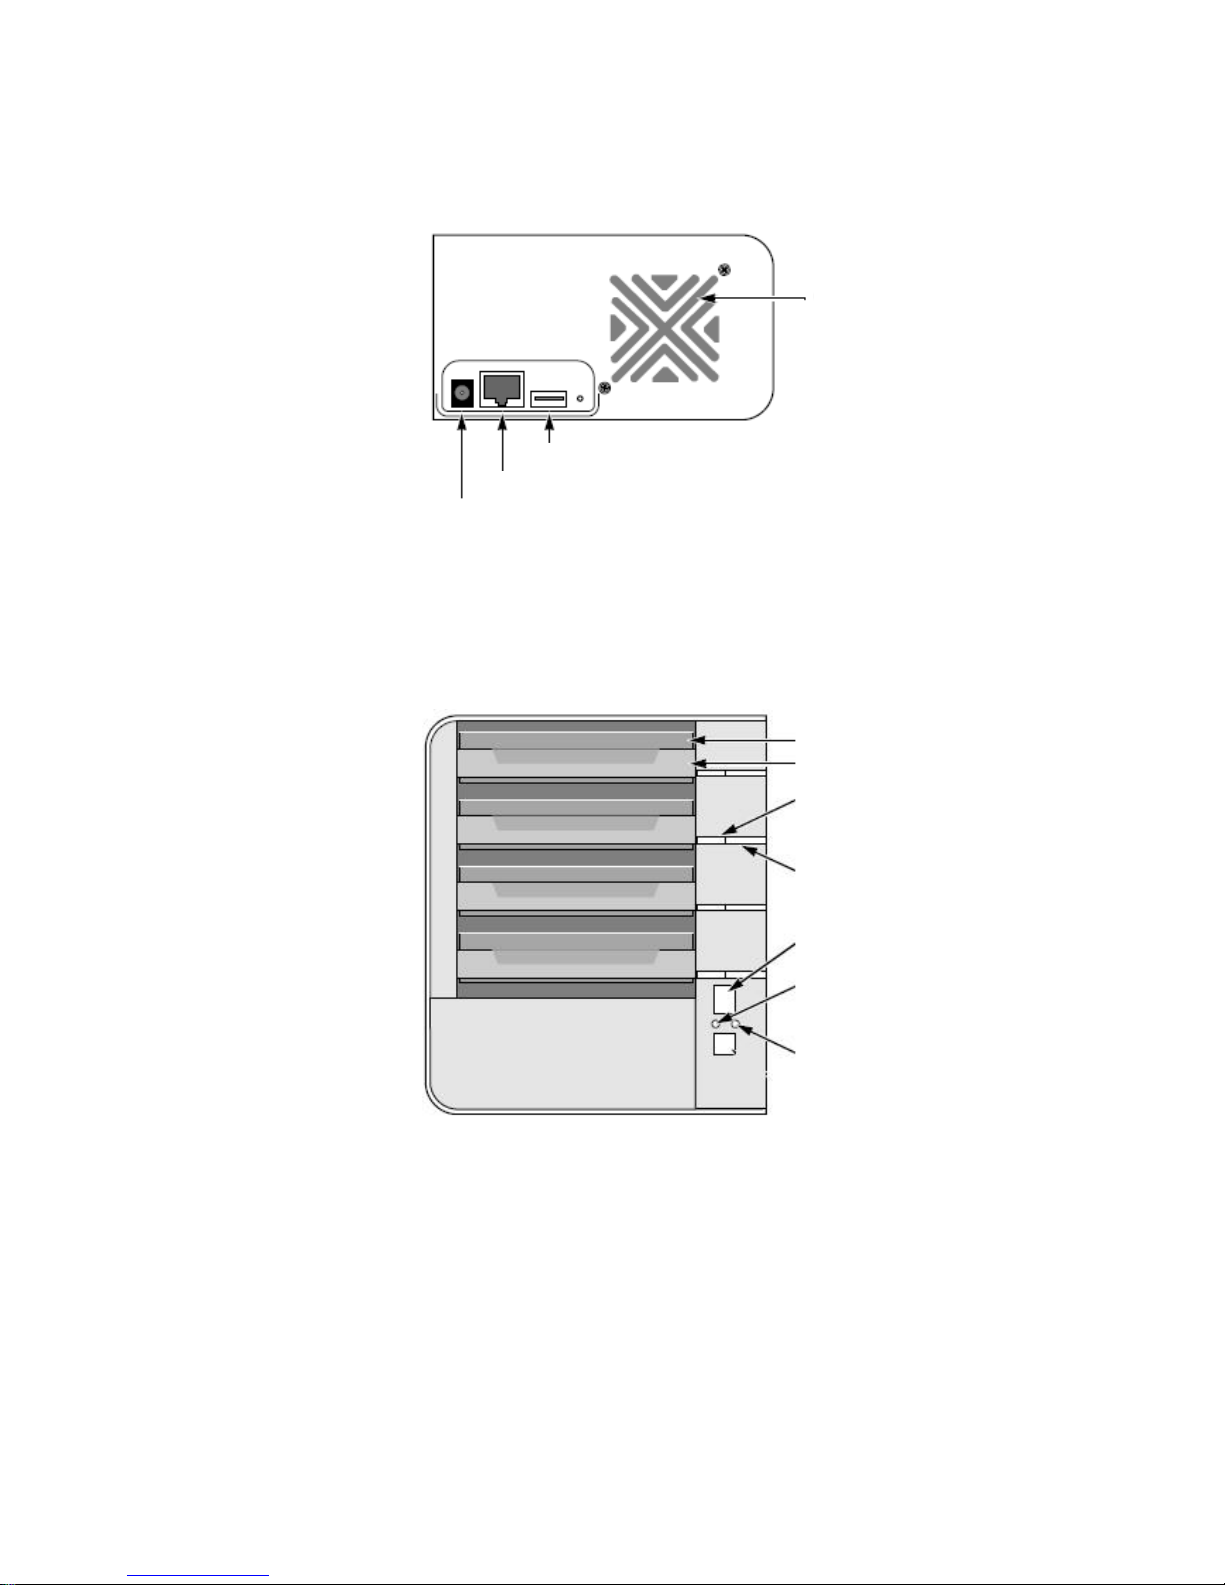
4 bay unit (8 channels) front view
Disk Drive
Drive Carrier
Drive Status LED
Drive Activity LED
Ethernet Activity
LED
Power button
System Status
LED
Page 5
4
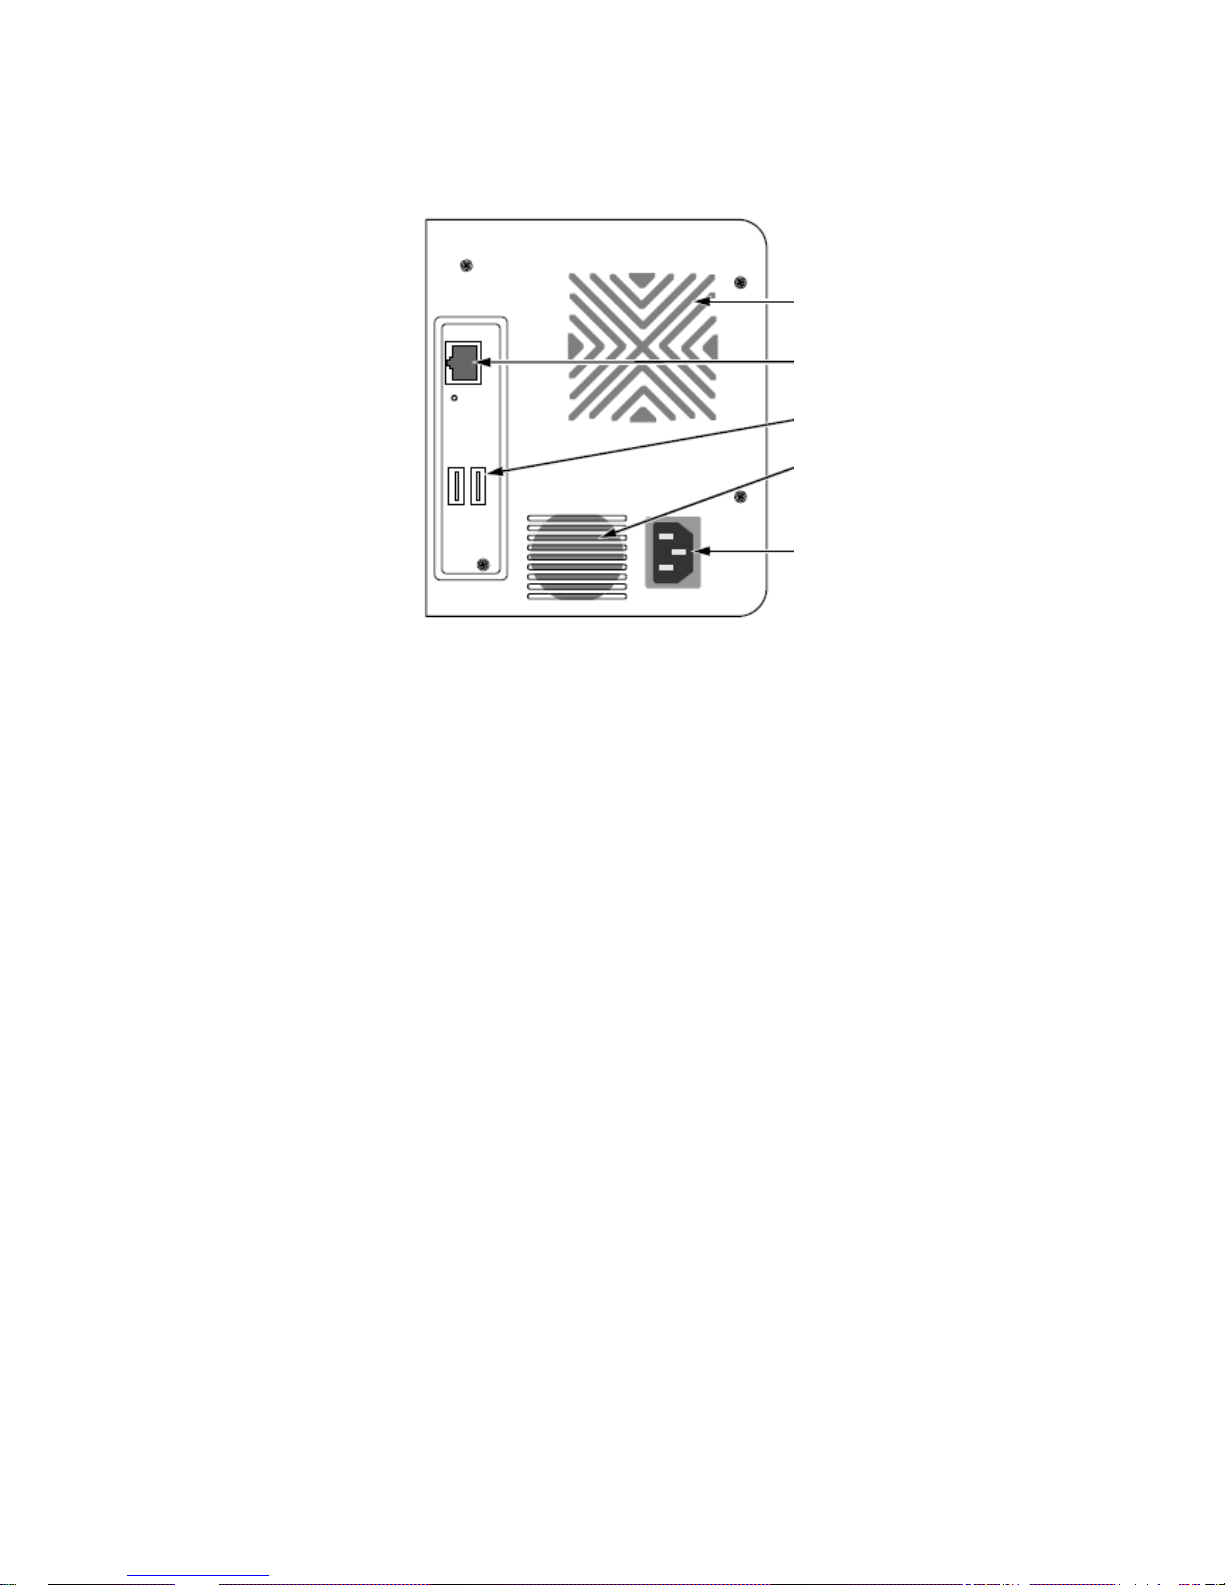
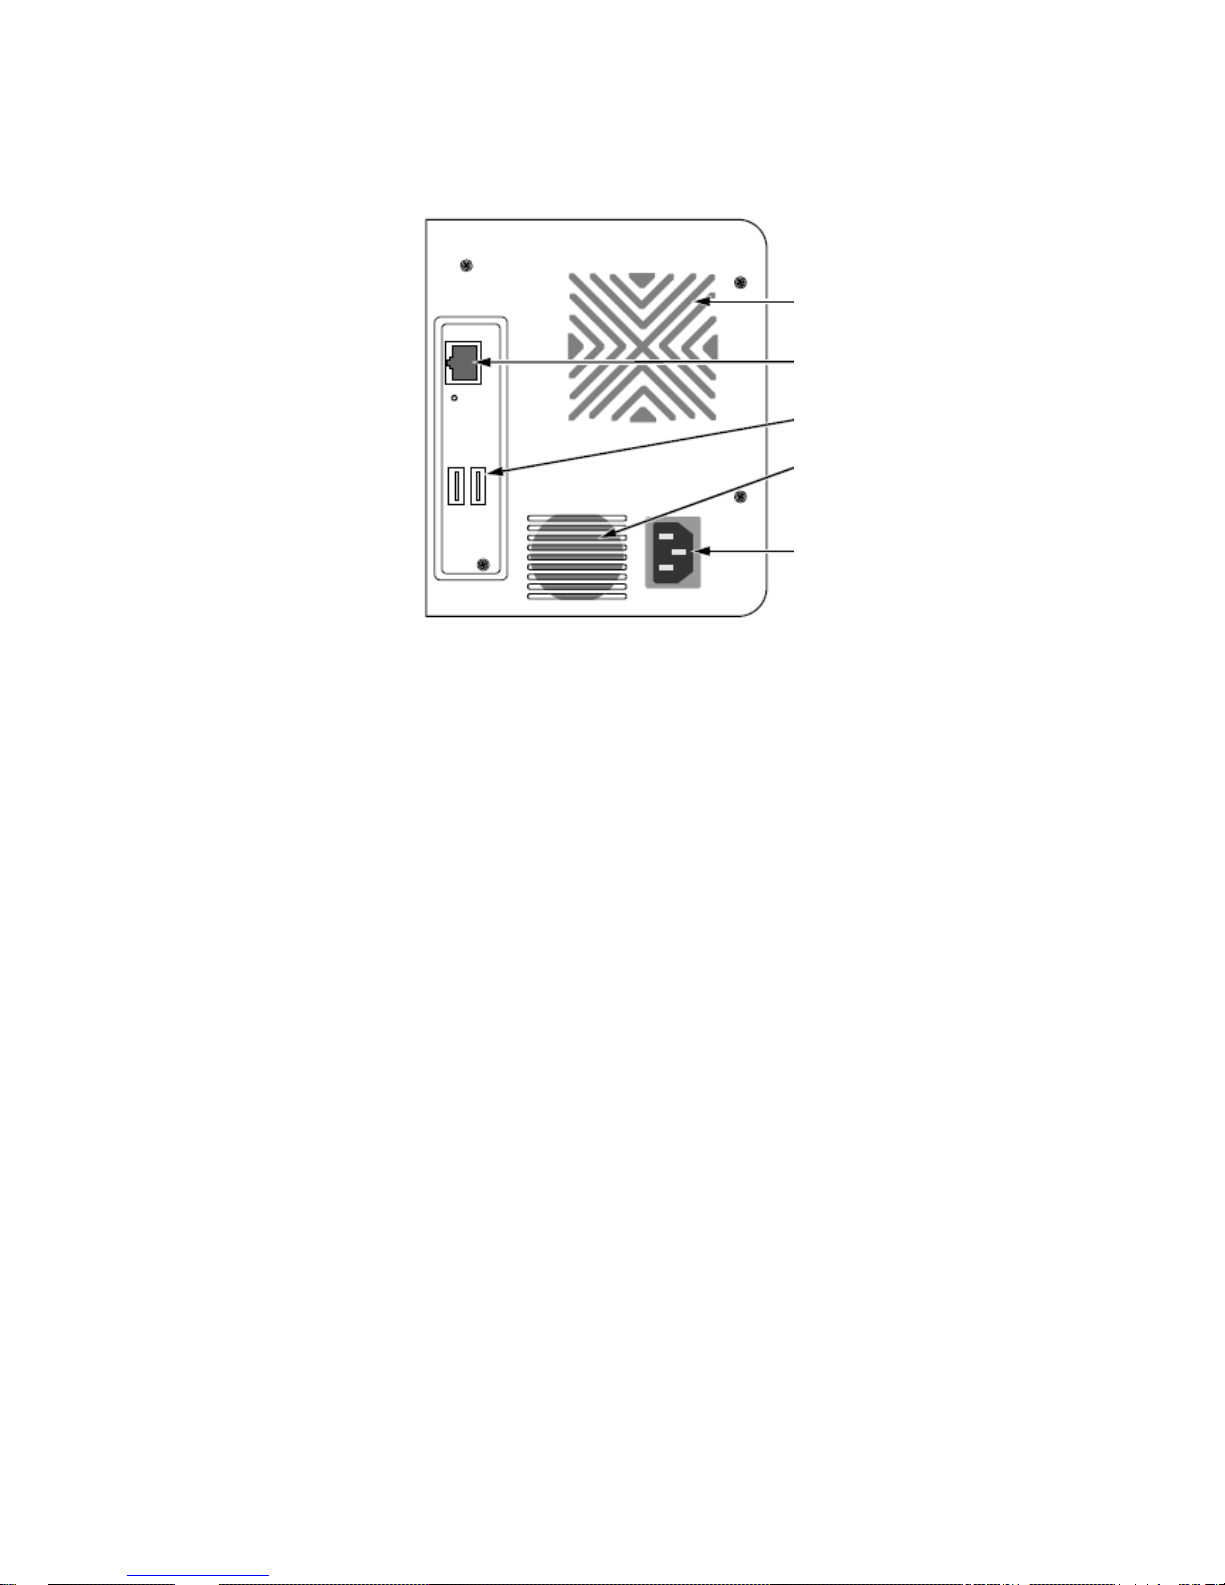
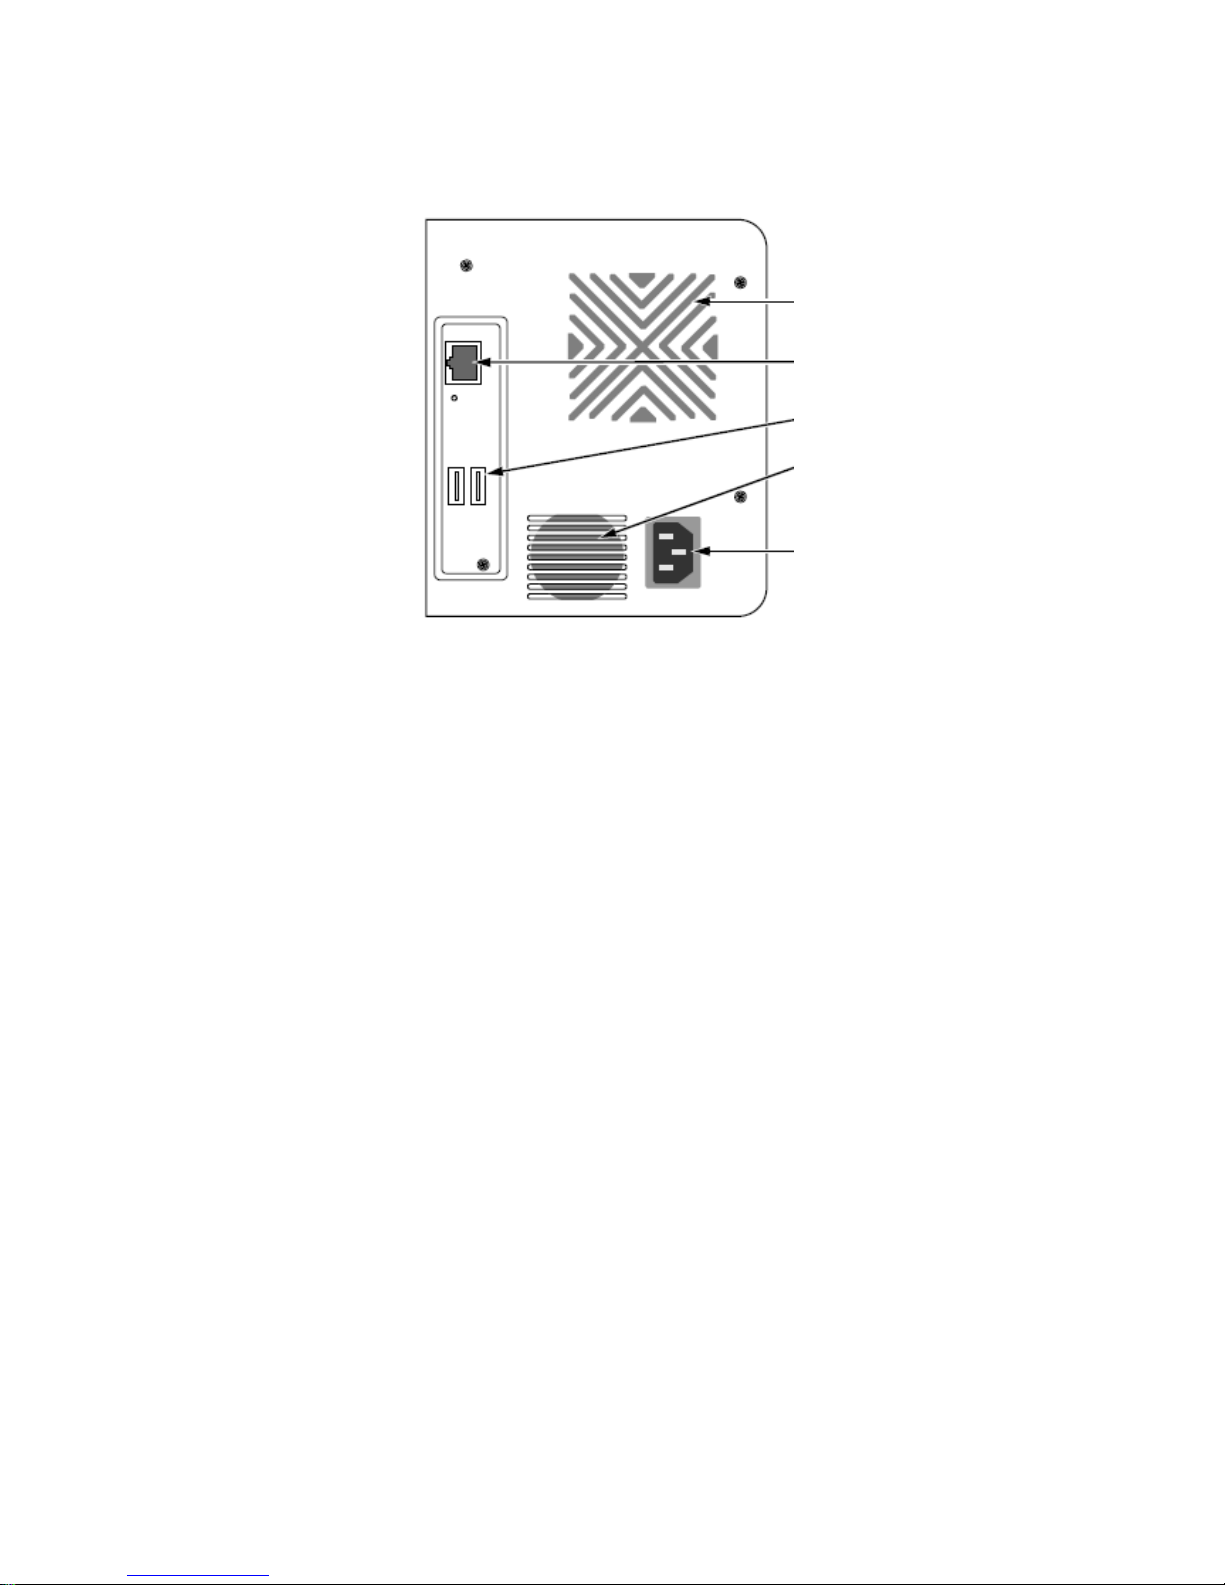
4 bay unit (8 channels) rear view
Step 2: Installing Disk Drives
You can populate this unit with SATA 1.5 Gb/s or 3.0 Gb/s disk drives. For
optimal performance, install disk drives of the same model and capacity.
Your disk drives will become a RAID Volume on this unit.
1. Open the lid on the front of the unit enclosure.
2. Pull a disk drive carrier from the enclosure. See the front view figure.
3. Carefully lay the disk drive into the drive carrier, making sure that the
screw holes on the sides of the carrier align with the screw holes in the
drive.
4. Insert the screws through the holes in the drive carrier and into the sides
of the disk drive.
Install only the counter-sink screws supplied with the unit.
Install four screws per disk drive.
Make sure each screw is securely tightened, but be careful not to
over-tighten.
5. Reinstall the drive carrier into the unit enclosure.
6. Repeat step 2 through 5 for the other disk drives.
7. Close the lid on the front of the unit.
Cooling Fan
RJ45 Network
Connection
USB Connec
tions
Power Supply Fan
Power Connection
Page 6
5
Step 3: Connecting to the Network
1. Attach one end of the network cable to the RJ45 network connection.
See the rear view figure.
2. Attach the other end of the network cable to your Ethernet hub or
switch.
Important
If there are multiple networks at your facility, note the network to
which you connect the unit. You will need this information during
the setup process.
Step 4: Connecting the Power
1. Attach the power cord from the power source to the power adapter.
2. Connect the power adapter to the back of the unit enclosure. See the
rear view figure.
3. On the front of the unit, press the power button. See the front view
figure.
Important
Before pressing the power button, please make sure the two
ends of the network cable are attached to the unit and the
Ethernet router, respectively. Please also enable the DHCP
function within the network, as the unit will retrieve an IP address
through DHCP by default.
It takes about a minute for the unit to fully power up. Once it is powered up:
The System Status LED turns green. See the front view figure.
The buzzer beeps one time.
Step 5: Installing the Software
1. Insert the CD into your CDROM.
2. Double-click Setup.exe to begin installation.
3. Click the Next button to continue with the installation.
Page 7
6
4. Click the “I accept the terms of the license agreement” option, and then
click the Next button.
5. Insert your “User Name” and “Company Name”, and then click the Next
button.
6. Select the setup type, and then click the Next button.
7. Click the Install button to proceed with installation.
8. When the above-mentioned installation processes are finished, a final
installation screen appears. Click the Finish button to close the installer.
Step 6: Setting up the Unit
The software Install Wizard performs the setup procedures on your unit.
After the procedure, you can begin using this unit.
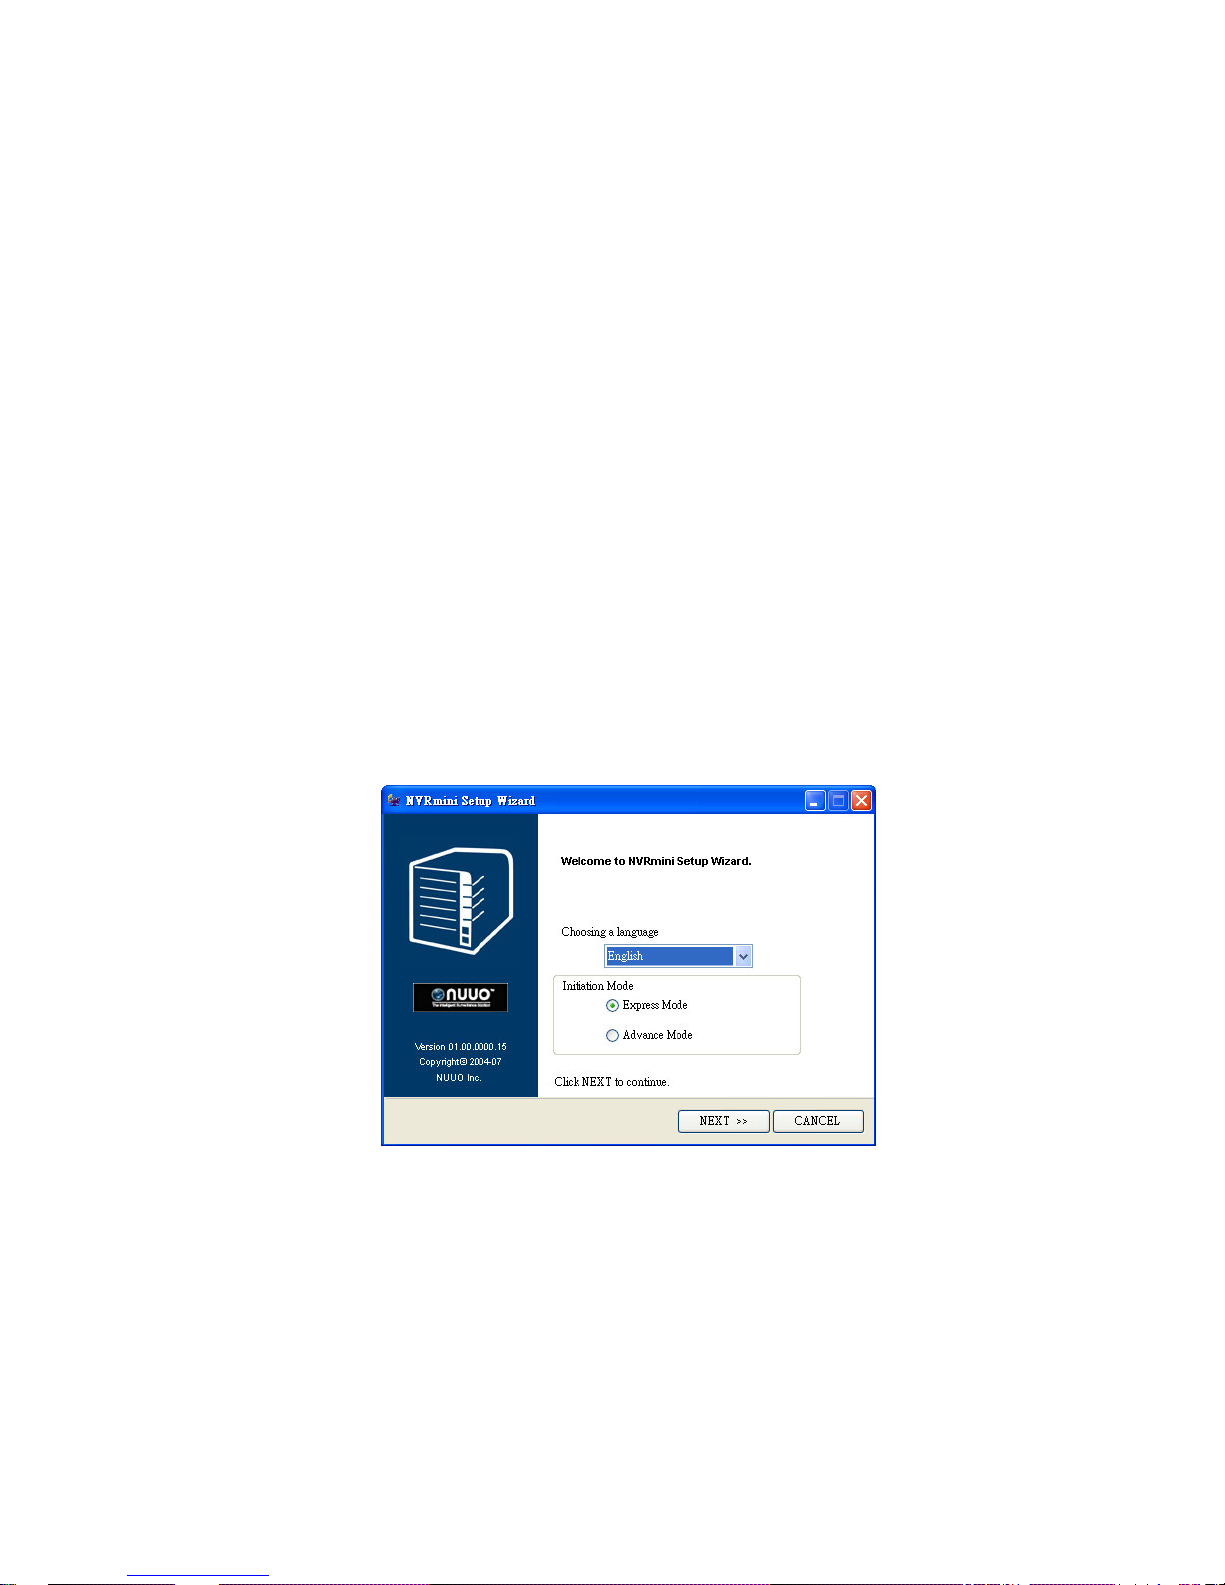
1. Go to Start > NUUO NVRmini > Install Wizard.
2. This program will show the default language setting and initiation mode.
3. Choose your preferred language and initiation mode, and then click the
Next button.
Express Mode: you don’t need to set the date, time, network settings,
and RAID level. (After step 5, jump to step 9 directly.)
Advance Mode: you need to set your specific date, time, and
network settings.
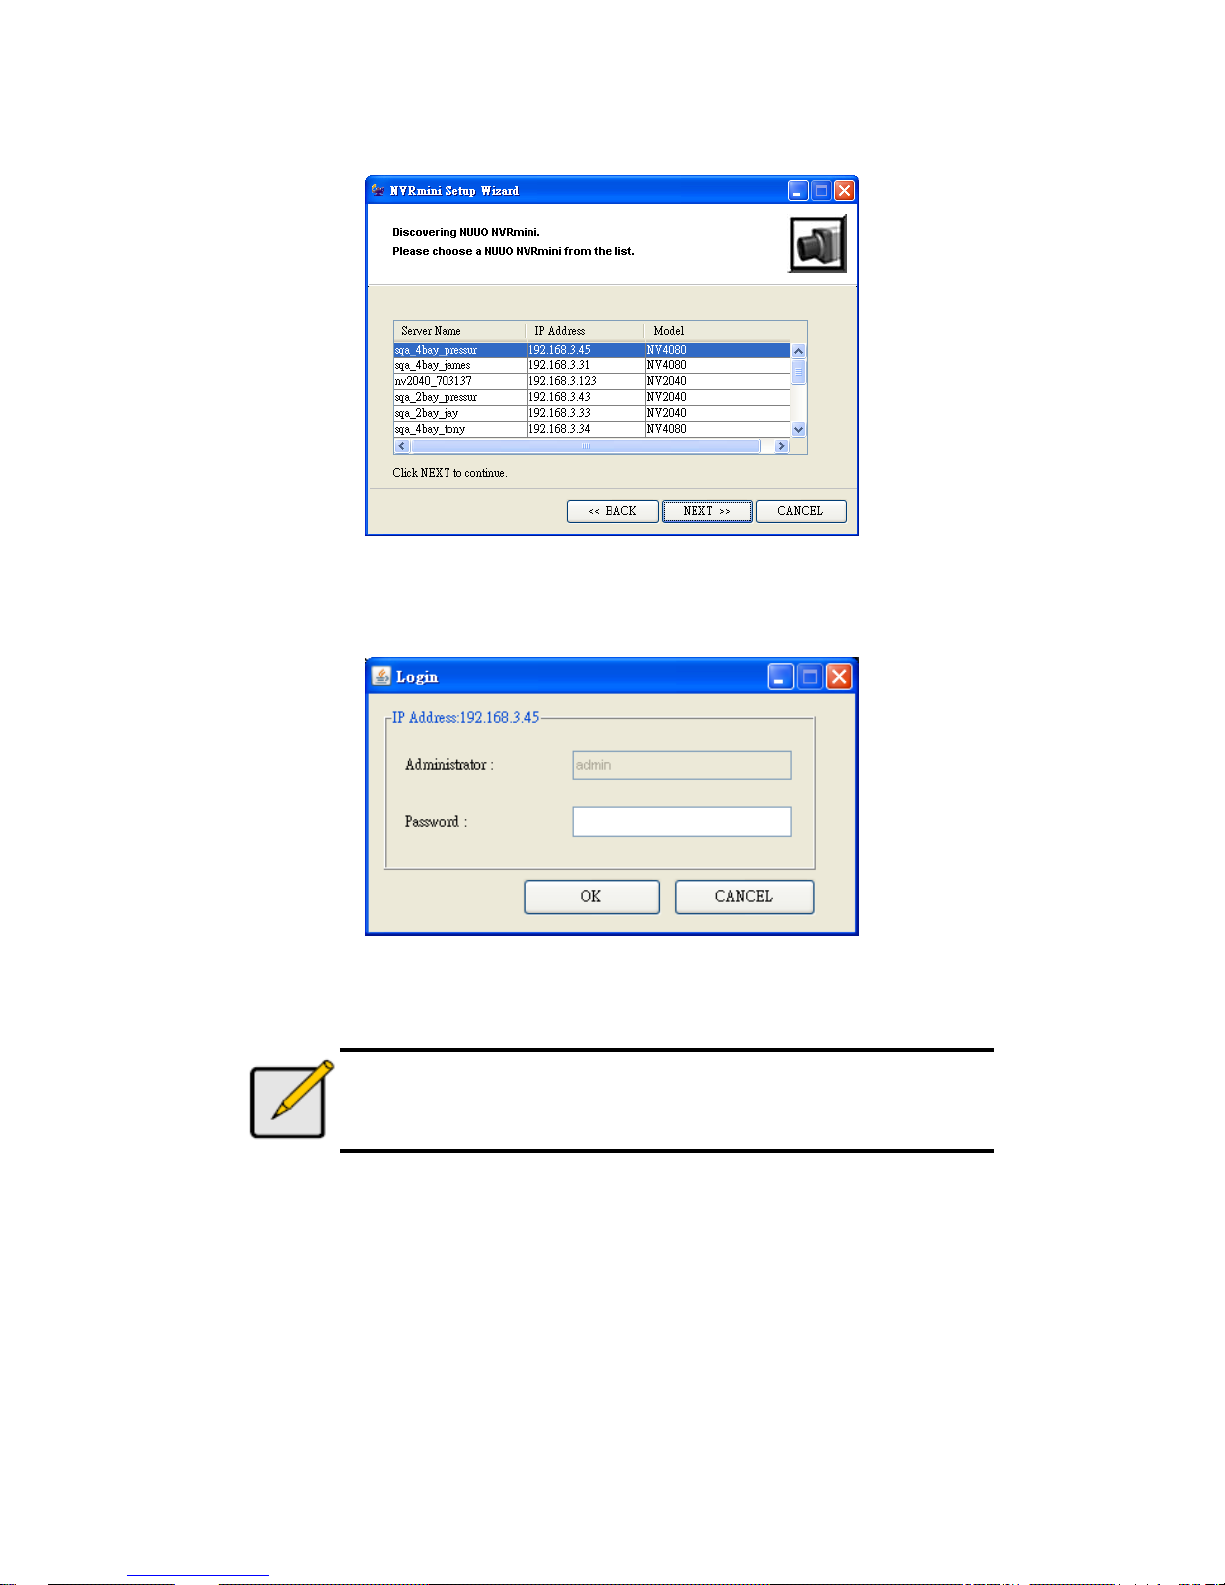
4. The Install Wizard program will search for all the units on the internet
right now. Choose one of them, and then click the Next button.
Page 8
7
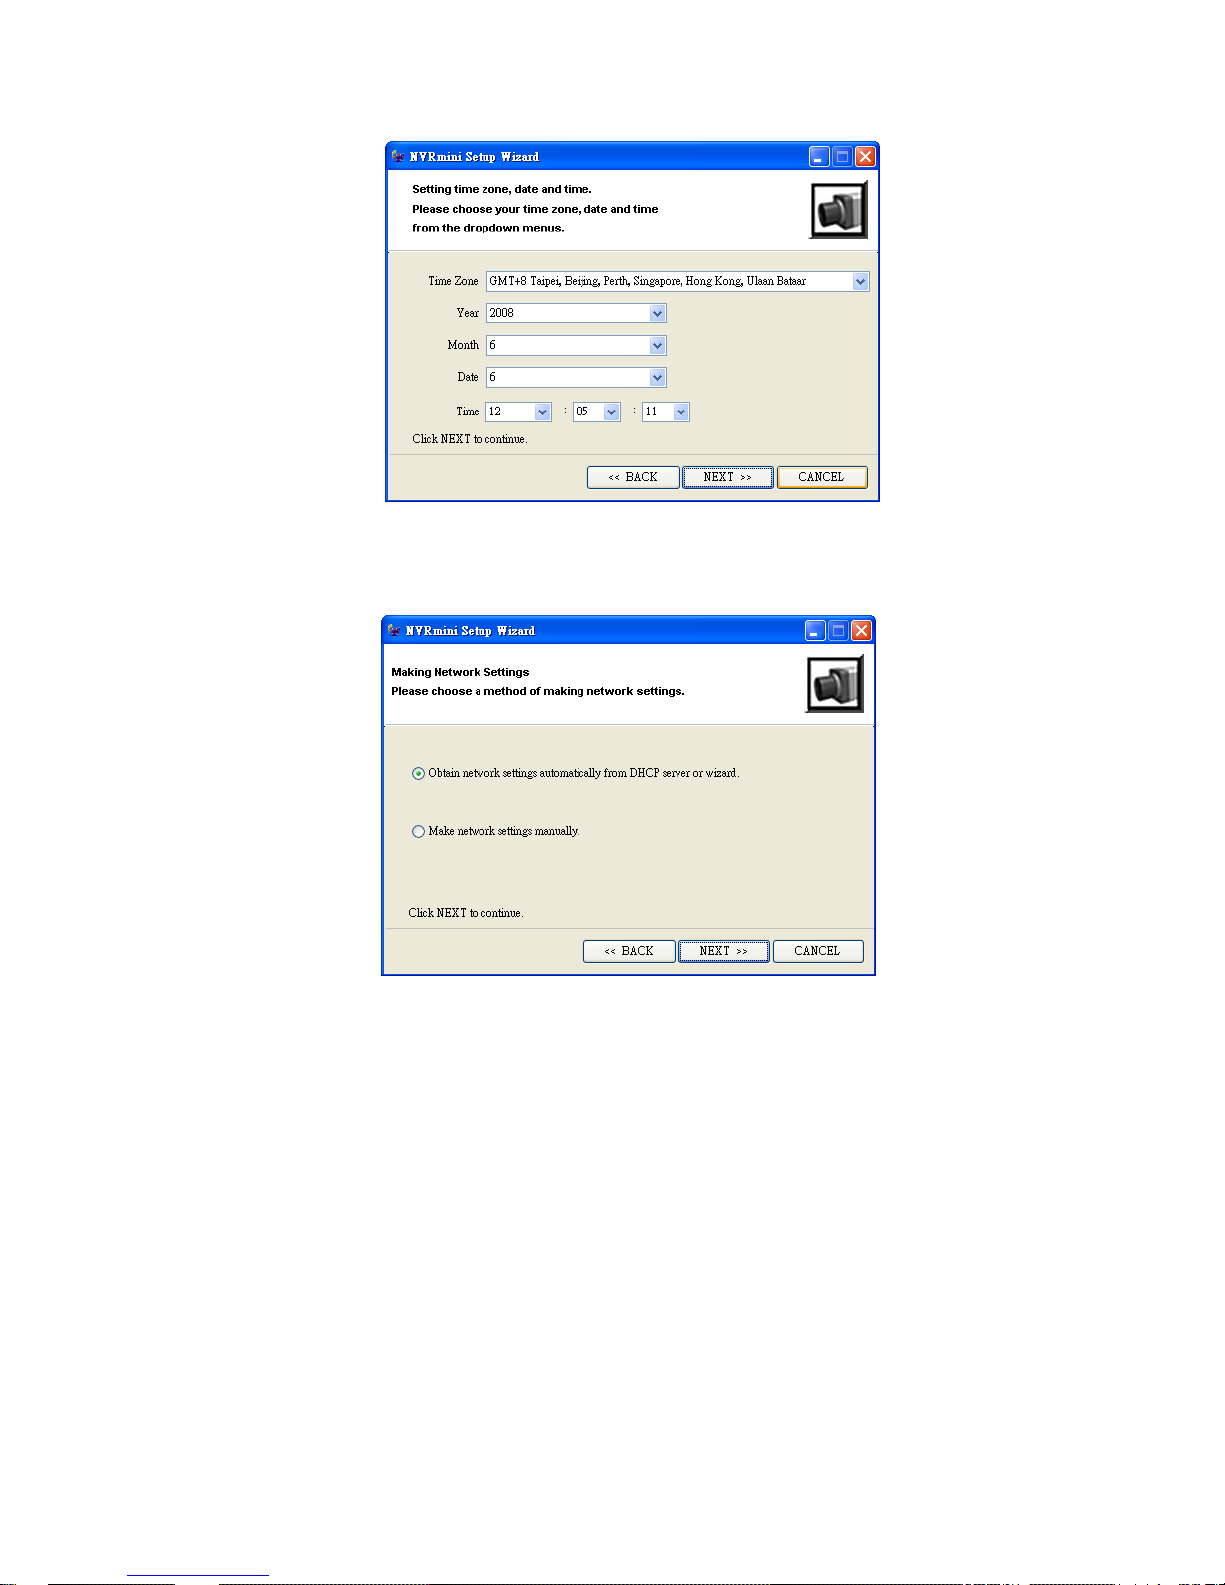
5. Type in the password, and then click the OK button.
Note
The default Administrator password is “admin”.
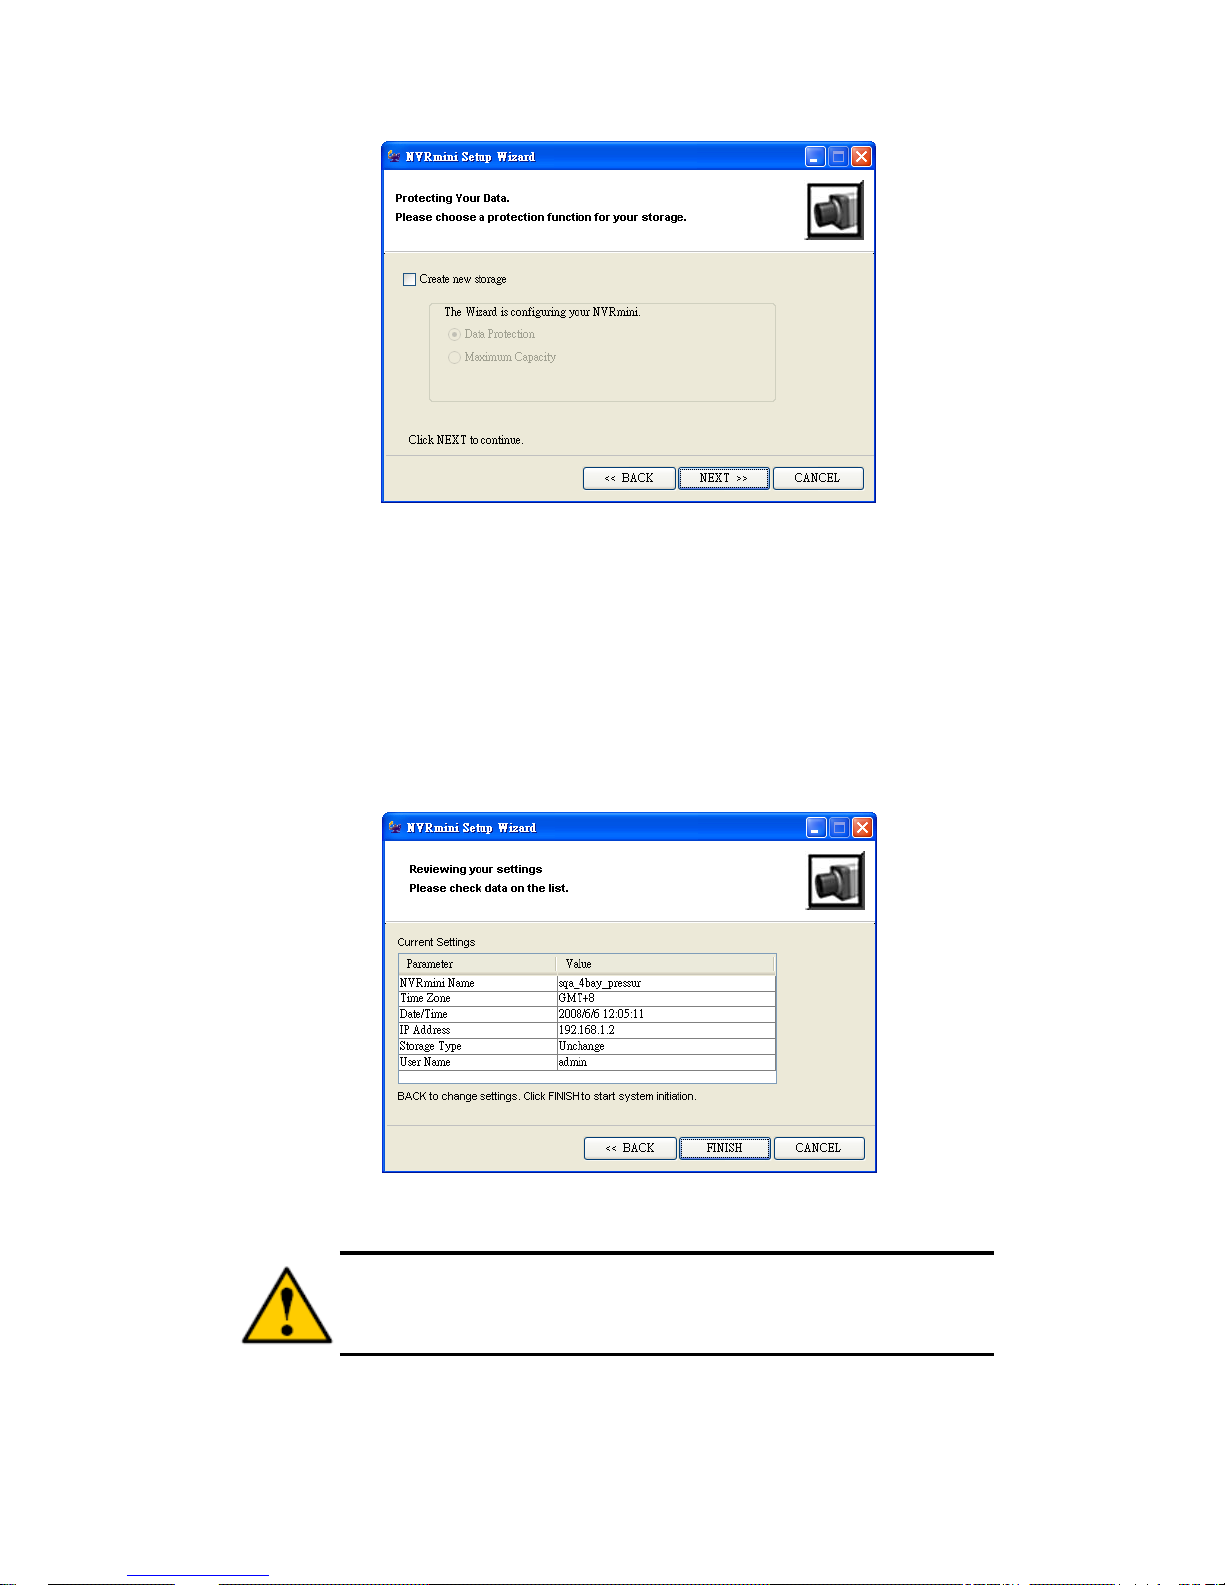
6. Set the time zone, date, and time, and then click the Next button.
Page 9
8
7. Select the network settings, and then click the Next button.
Obtain network settings automatically from DHCP server or
wizard: apply all settings which are automatically generated by the
DHCP server, such as IP, netmask, gateway, and DNS.
Make network settings manually: select your preferred settings one
by one.
8. If you need to set a new disk(s), check the “Create new storage” option.
After checking, click the Next button.
Page 10
9
Data Protection: set the RAID level to RAID 1 (2 bay). Set the RAID
level to RAID 5 (4 bay).
Maximum Capacity: set the RAID level to RAID 0 (2 bay). Set the
RAID level to RAID 0 (4 bay).
9. Review your settings. If the settings are correct, click the Finish button
to exit the settings procedure and activate the system.
Caution
Once the “Finish” button is clicked, the unit will start working. In
order to ensure the stability of your unit, never pull any disks out
when the system is running.
Page 11
10
Step 7: Adding Cameras
Add UPnP Cameras
1. Open Internet Explorer and log in to the unit.
2. Click IP Camera/ Camera Settings.
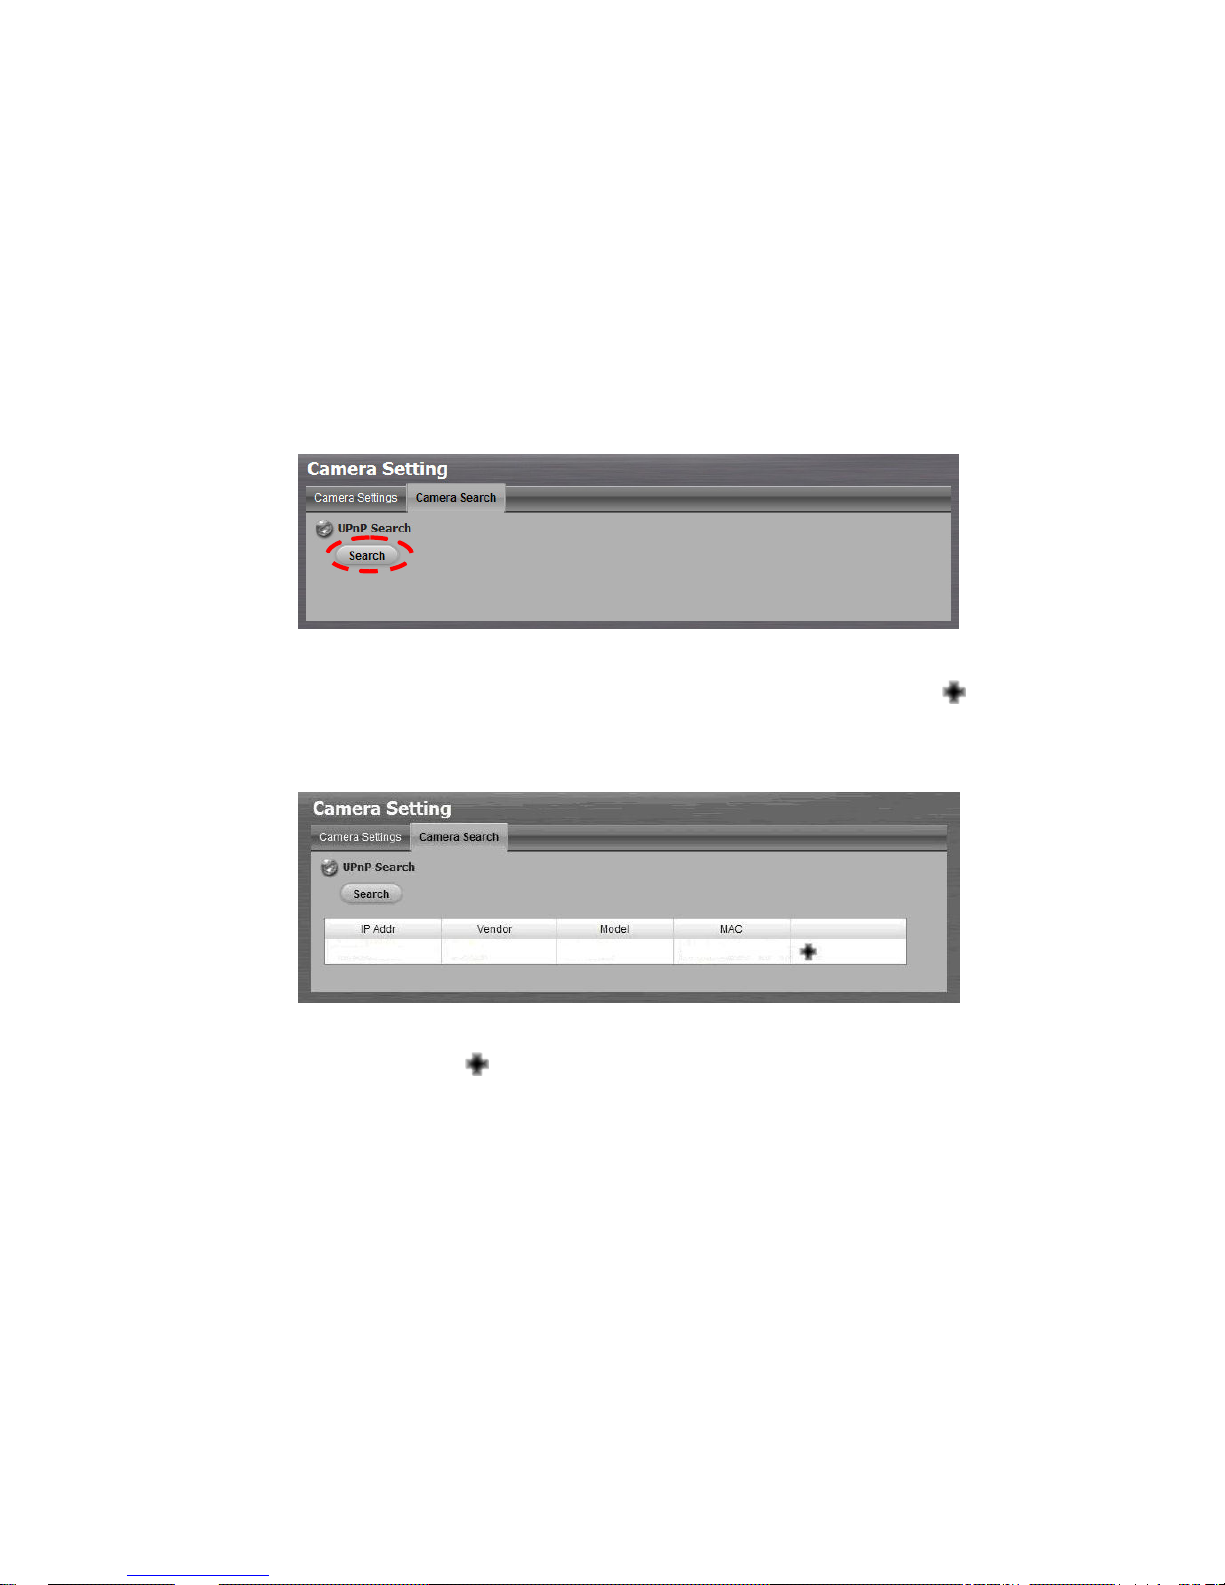
3. Click the Camera Search tab.
4. Click the Search button to search for UPnP cameras.
5. The system will list all the cameras it can currently find. Click the
icon to add a camera into your camera list.
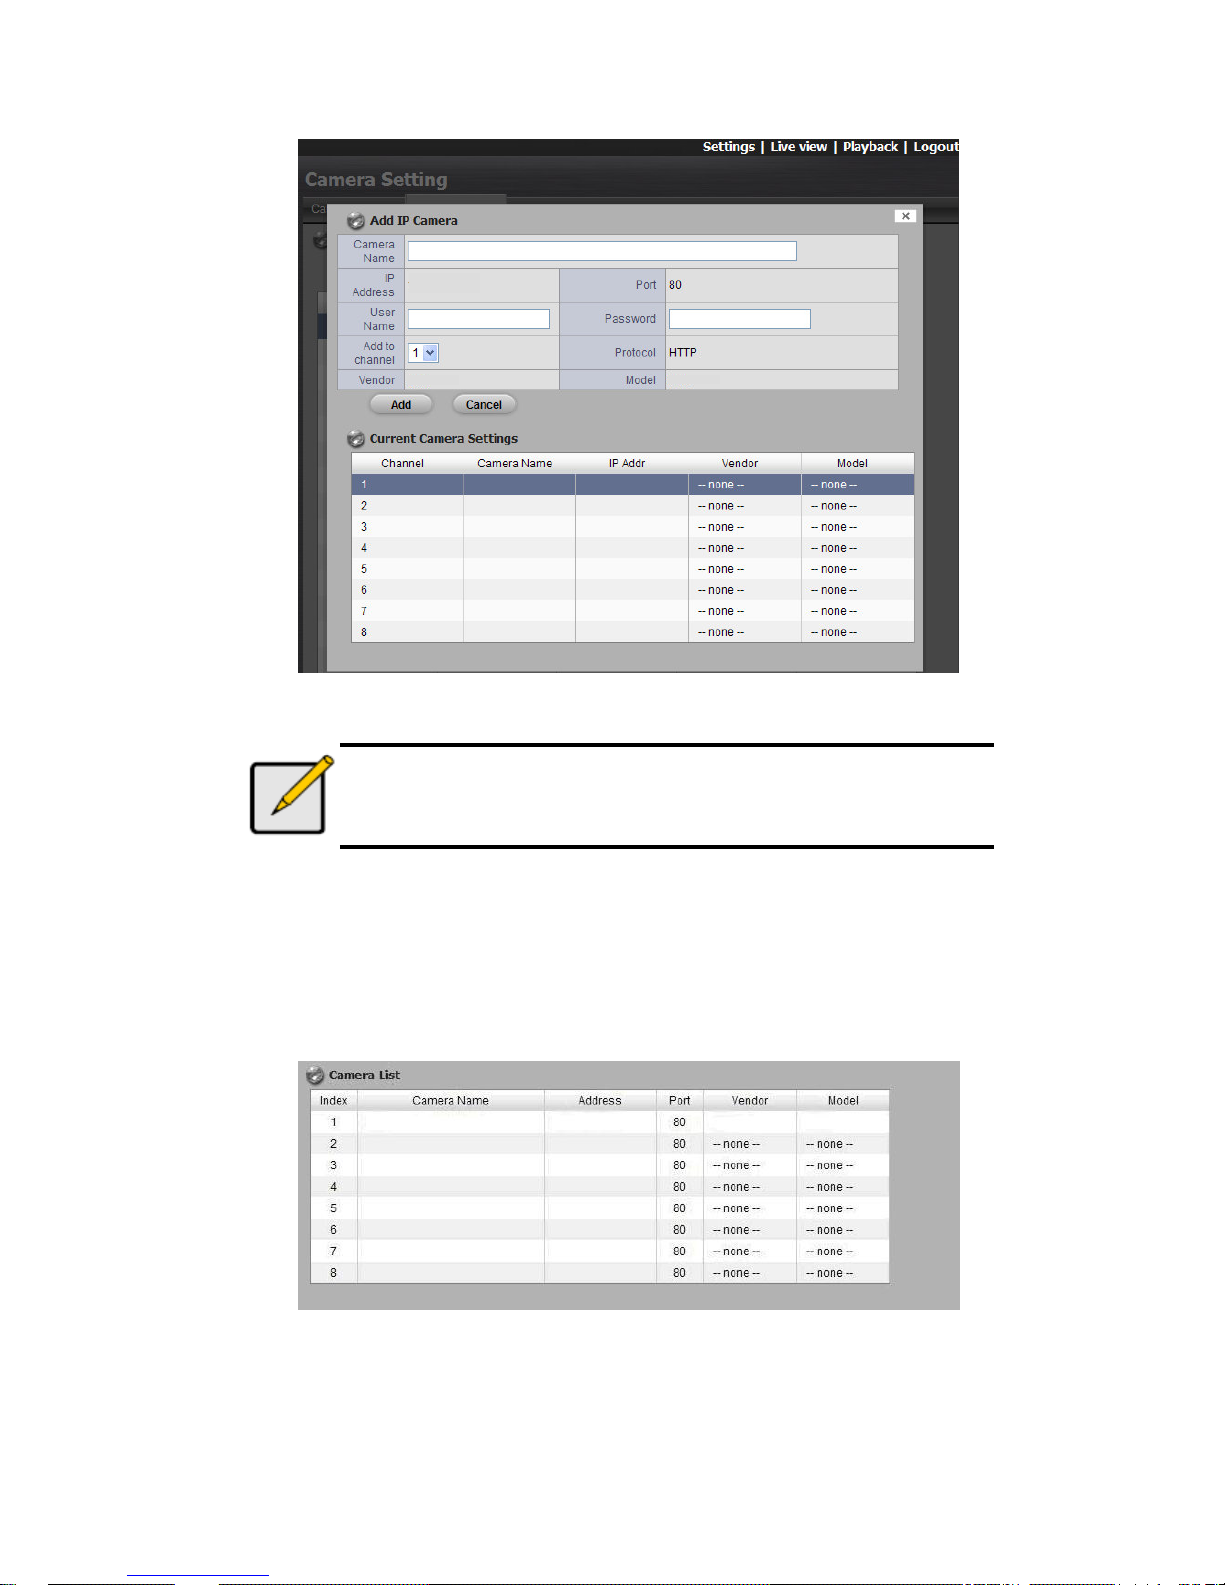
6. After clicking the icon, the camera settings page will pop-up. Click
the item to which you want to add a camera.
7. Enter the camera name, user name, and password of the camera.
IP Address Vendor Model Name Mac Address
Page 12
11
Note
Some cameras will limit the login authority to the administrator. In
this case, you will need to change the user name and password
to the administrator’s to log into those cameras.
8. Click the Add button to add finish adding the camera.
9. After clicking the Add button, the updated camera list will be displayed
in the Camera Settings tab.
10. Repeat step 5 through 8 to add other cameras in your list.
Camera Name IP Address
Vendor
Model Name
IP Address
Model Name Vendor
Page 13
12
Add Cameras without UPnP function
1. Open Internet Explorer and login the unit.
2. Click IP Camera/ Camera Settings.
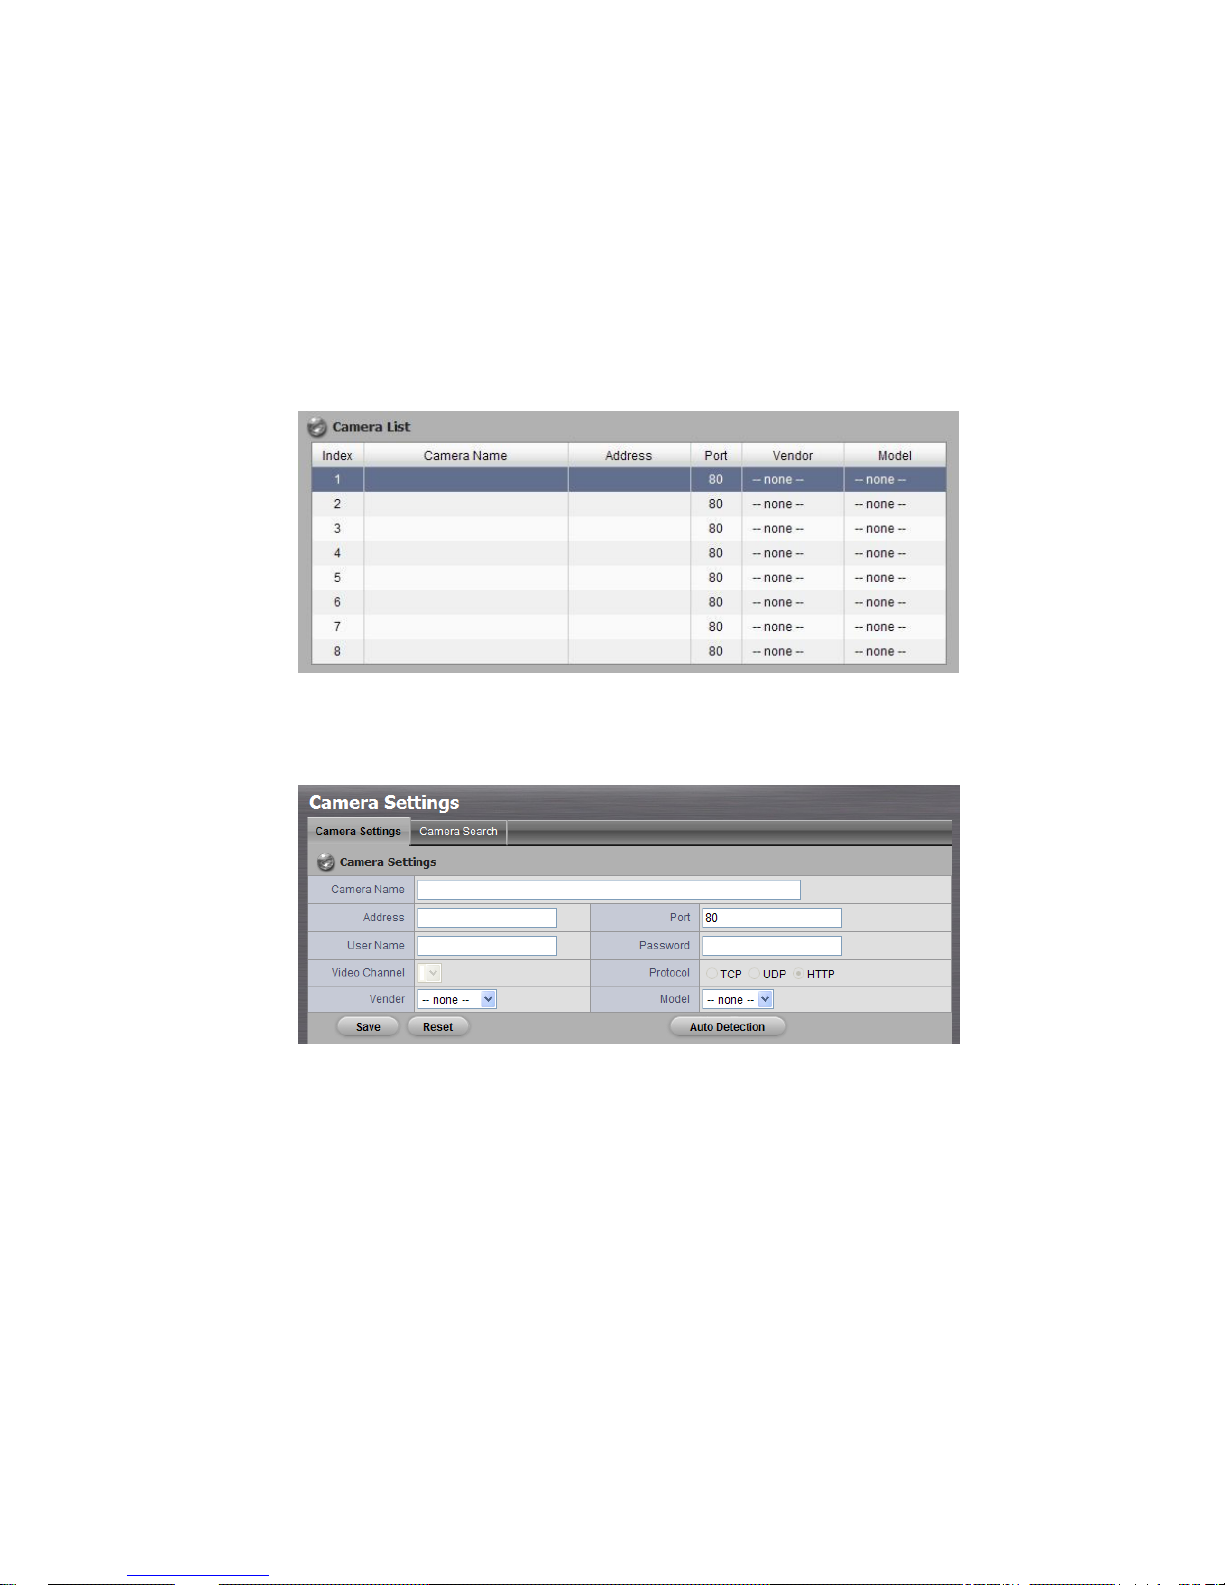
3. Click the Camera Settings tab, and the camera list will be displayed in
the bottom of the page.
4. Click the item which you want to add a camera.
5. Insert the information of this camera on the top of the page.
Camera name: name this camera.
Address: the IP address.
Port: the transmission port.
User name: login user name.
Password: login password.
Video Channel: select the number of analog cameras supported by
one video server from the list.
Protocol: data transmission protocol.
Vendor: camera vendor name.
Model: camera model name.
Page 14

13
Note
Some cameras will limit the login authority to the administrator
only. In this condition, you need to change the login user name
and password to the administrator’s to login those cameras.
6. Click the Save button.
Save: save the information of this camera.
Reset: return to the latest saved settings of the selected camera.
Auto Detection: after inserting IP address, port, user name, and
password, click this button to automatically find out all the information
of this camera. (such as Camera Channel, Protocol, Vendor, Model)
7. Repeat step 4 through 6 to add other cameras in your list.
Step 8: Live View Function
There are two ways to implement the live view function: through Internet
Explorer or through the Remote Live Viewer application.
Internet Explorer
1. Open Internet Explorer and log in to the unit.
2. Set the cameras.
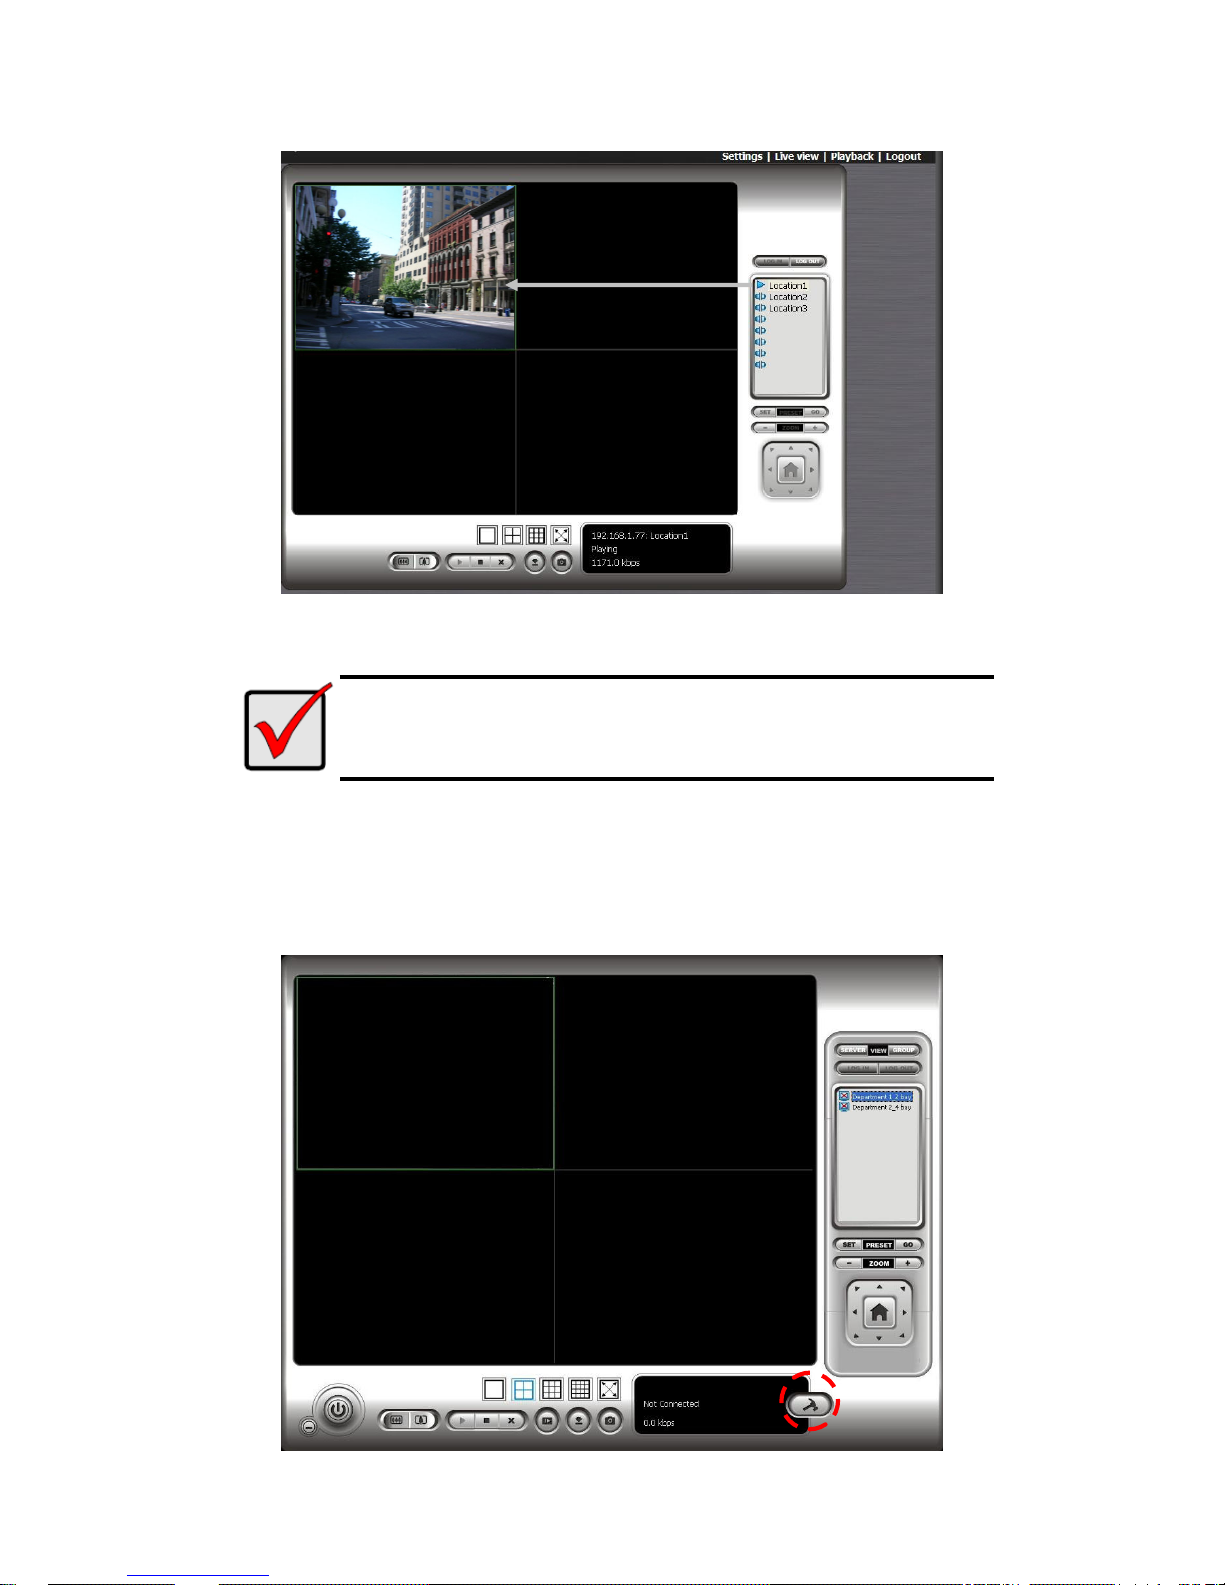
3. Click the Live view button on the top of the page.
4. Select a camera(s) from the camera list on the right and then drag it to
where you wish the image to be displayed.
Page 15
14
Important
When running Internet Explorer, do not use the function “Open in
New Window”, as it may cause the browser to become unstable.
Remote Live Viewer Application
1. Go to Start > NUUO NVRmini > Remote Live Viewer.
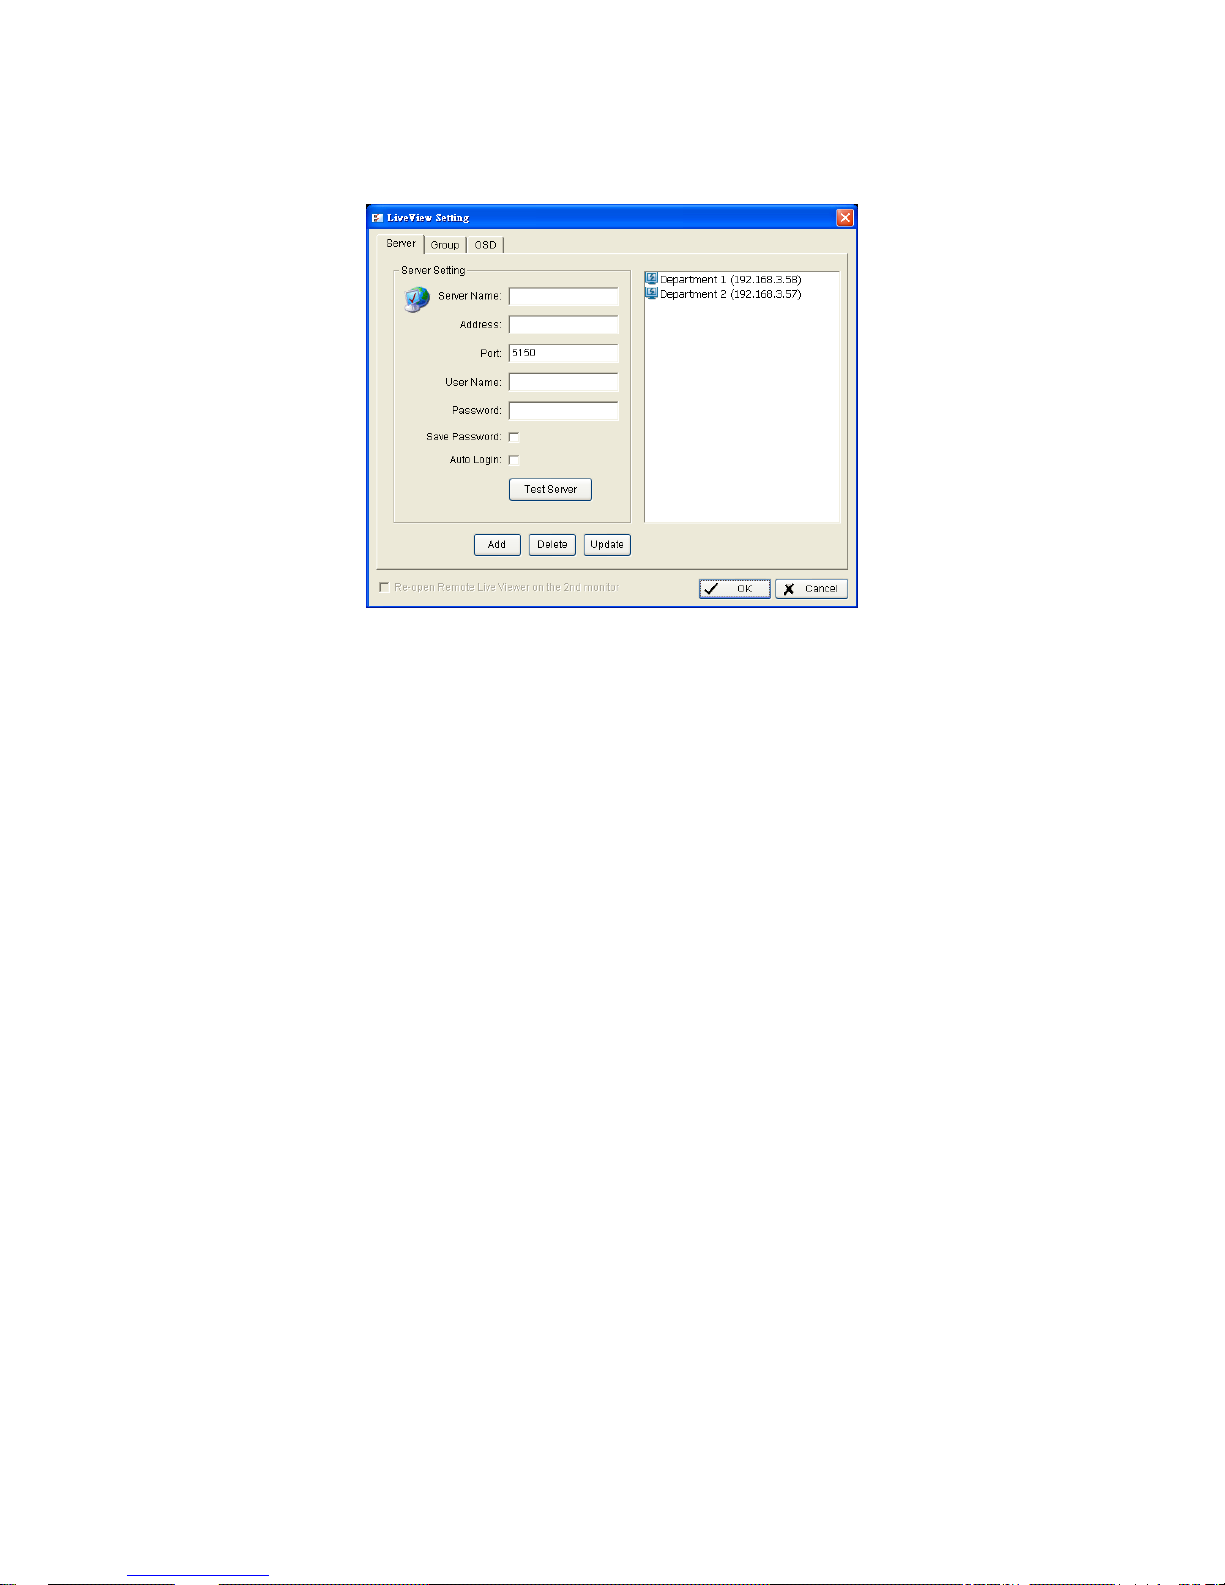
2. Click the Live View Setting button.
Page 16
15
3. Insert the unit name.
4. Insert the IP address.
5. Modify the port if necessary.
6. Insert the user name.
7. Insert the password.
8. Check the Save Password/ Auto Login option.
9. Click the Test Server button to test the connection between the local
application and the remote unit.
10. Click the Add button to add this unit into your remote server list.
11. Click the OK button.
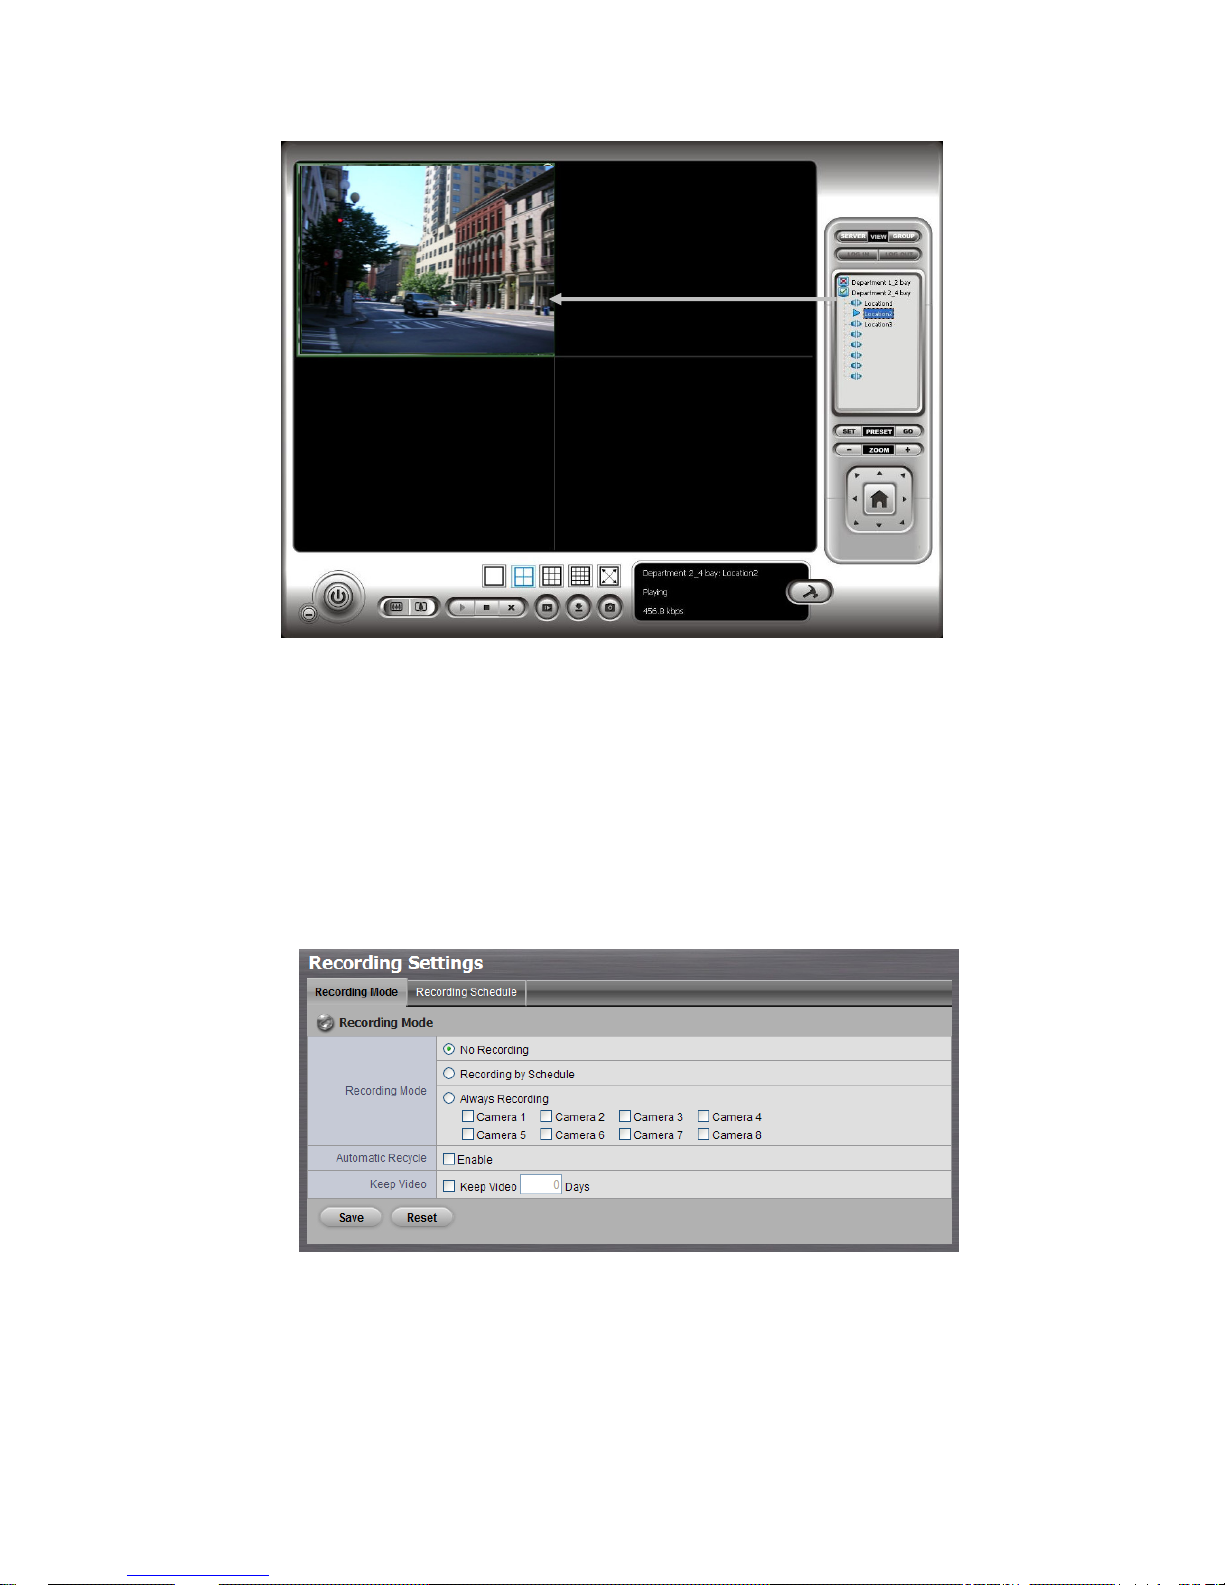
12. Click the unit you wish to access in your remote server list.
13. Click the Log In button to access your unit.
14. Select a camera(s) from the camera list on the right and then drag it to
where you wish the image to be displayed.
Page 17
16
Step 9: Set Recording
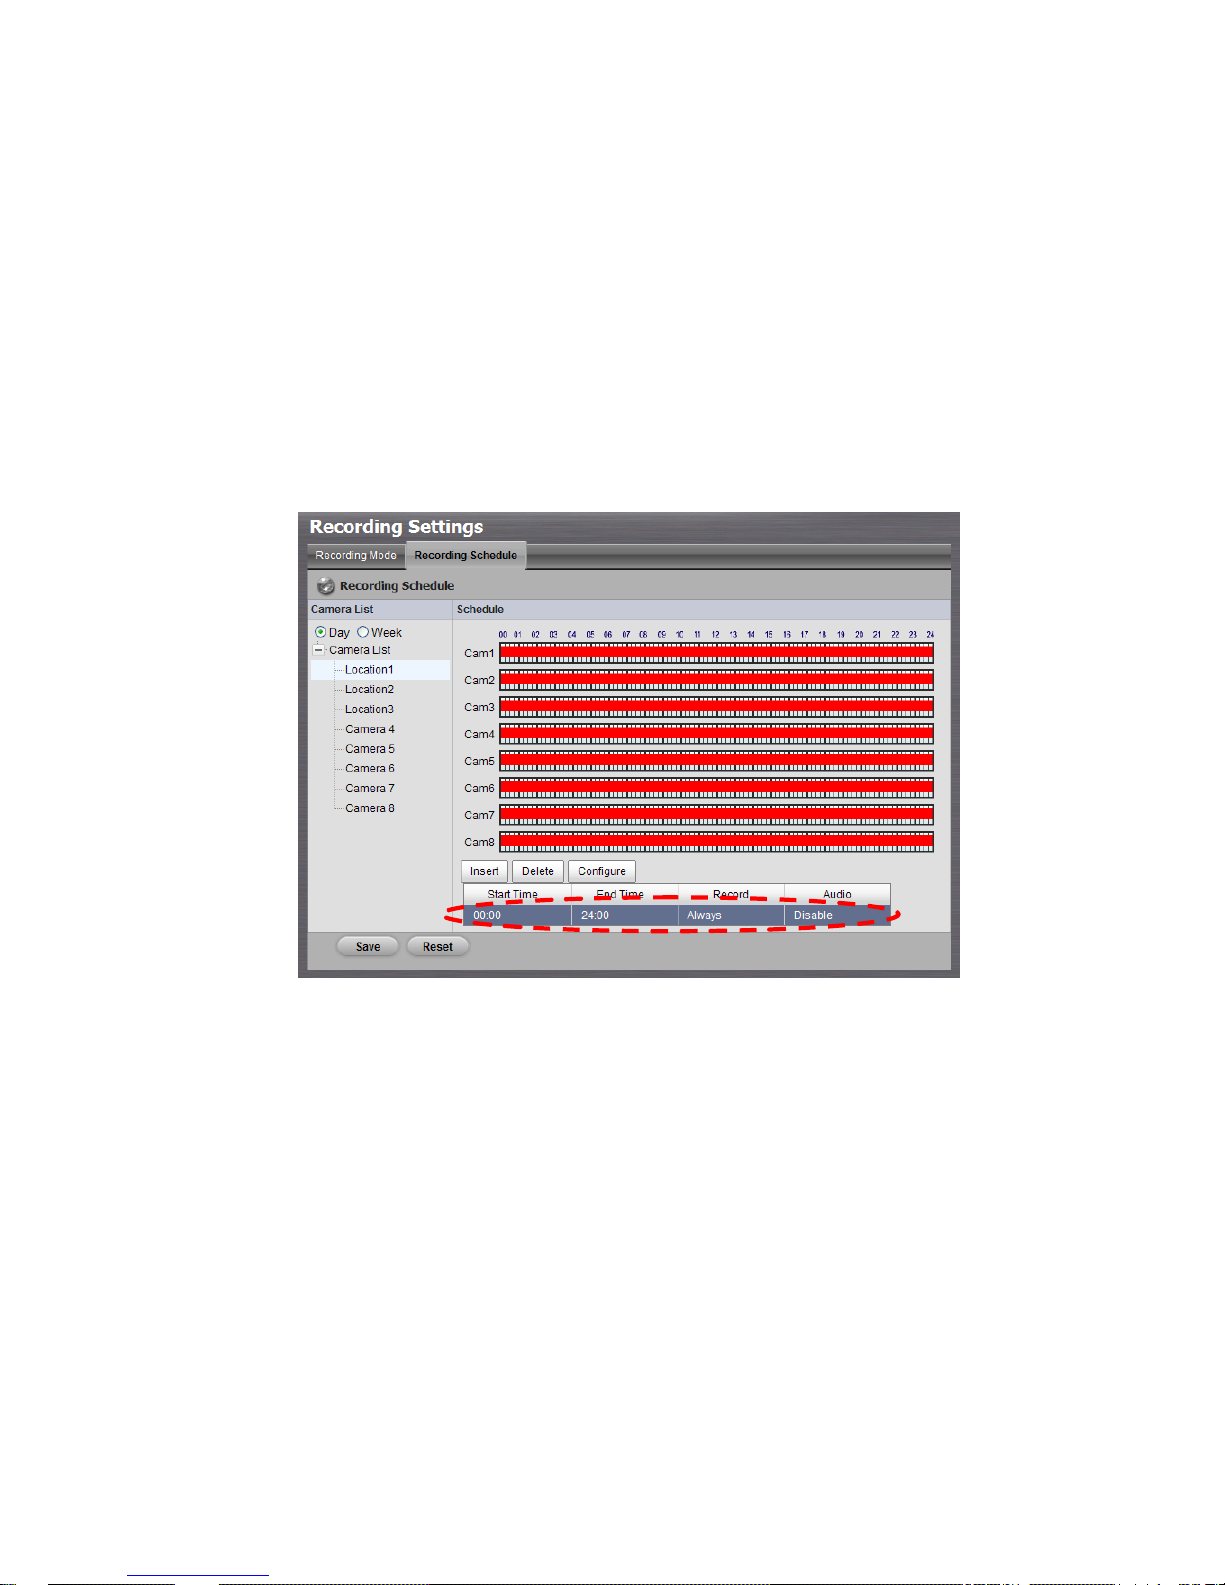
1. Open Internet Explorer and log in to the unit.
2. Click Recording & Event/Recording settings.
3. Click the Recording Mode tab.
4. If selecting Always Recording, the chosen cameras will begin to
record immediately.
No Recording: turn off the recording.
Recording by Schedule: record according to a schedule.
Always Recording: the chosen cameras are constantly recording
Automatic Recycle: check the Enable option to recycle disk space
Page 18
17
automatically when the disk space is full.
Keep Video: set a period during which the recorded video clips will
be kept intact.
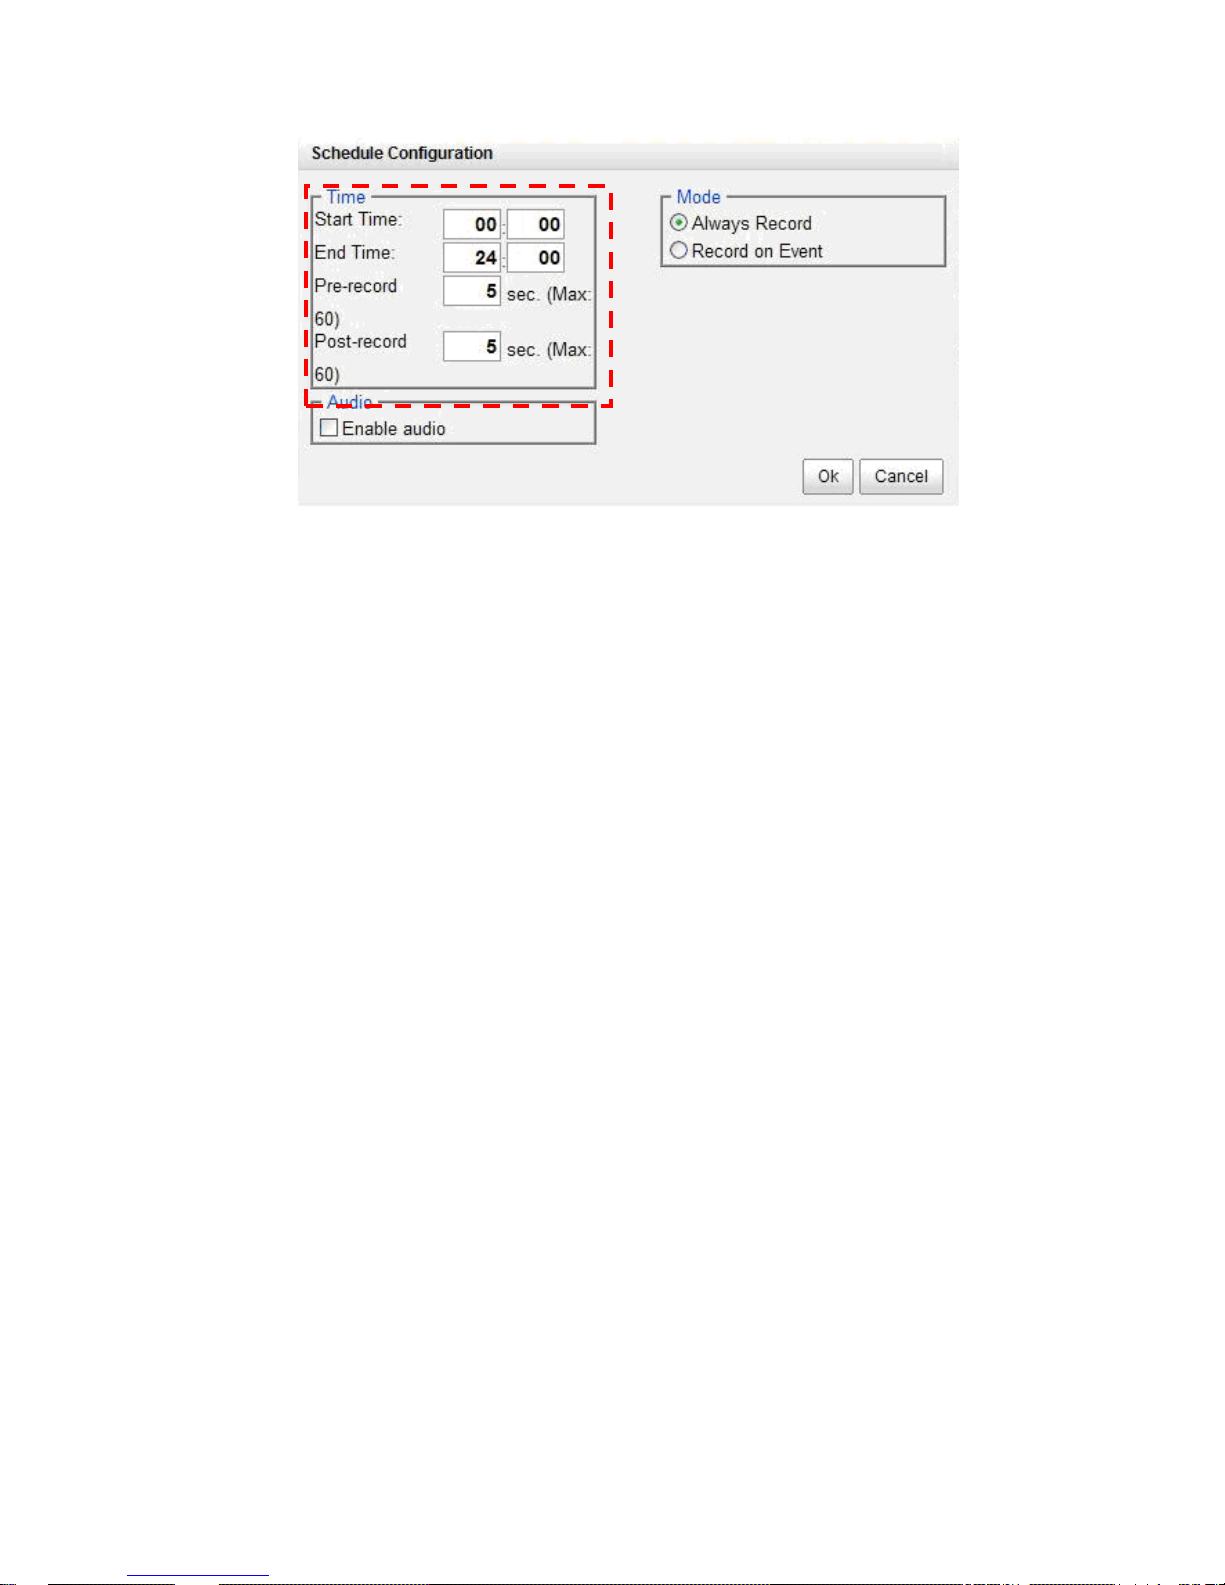
5. If selecting Recording by Schedule, you need to set the schedules of
the cameras.
6. Click Recording & Event/Recording settings.
7. Click the Recording Schedule tab.
8. Click the schedule of the camera which needs to be modified.
9. Click the column in the bottom of the page.
Insert: insert new schedules.
Delete: delete the selected schedule.
Configure: modify the schedule and recording mode setting.
10. The default setting of the camera’s recording schedule is from 00:00 to
24:00. If you want to modify the time slot, click the Configure button to
modify the default setting first.
Page 19
18
11. Choose the recording mode.
Always Record: always record.
Record on Event: record only when triggered by an event. The event
can be triggered by Motion or Digital input.
12. If you want to add another new schedule, click the Insert button to add
a new one.
13. Repeat step 12 to add new schedules for the selected camera.
14. Repeat step 8 through 12 to set other cameras.
15. Click the Save button.
Step 10: Playback Function
There are two ways to implement the playback function: through Internet
Explorer or through the Playback System application.
Internet Explorer
1. Open Internet Explorer and log in to the unit.
2. Click the Playback button on the top of the page.
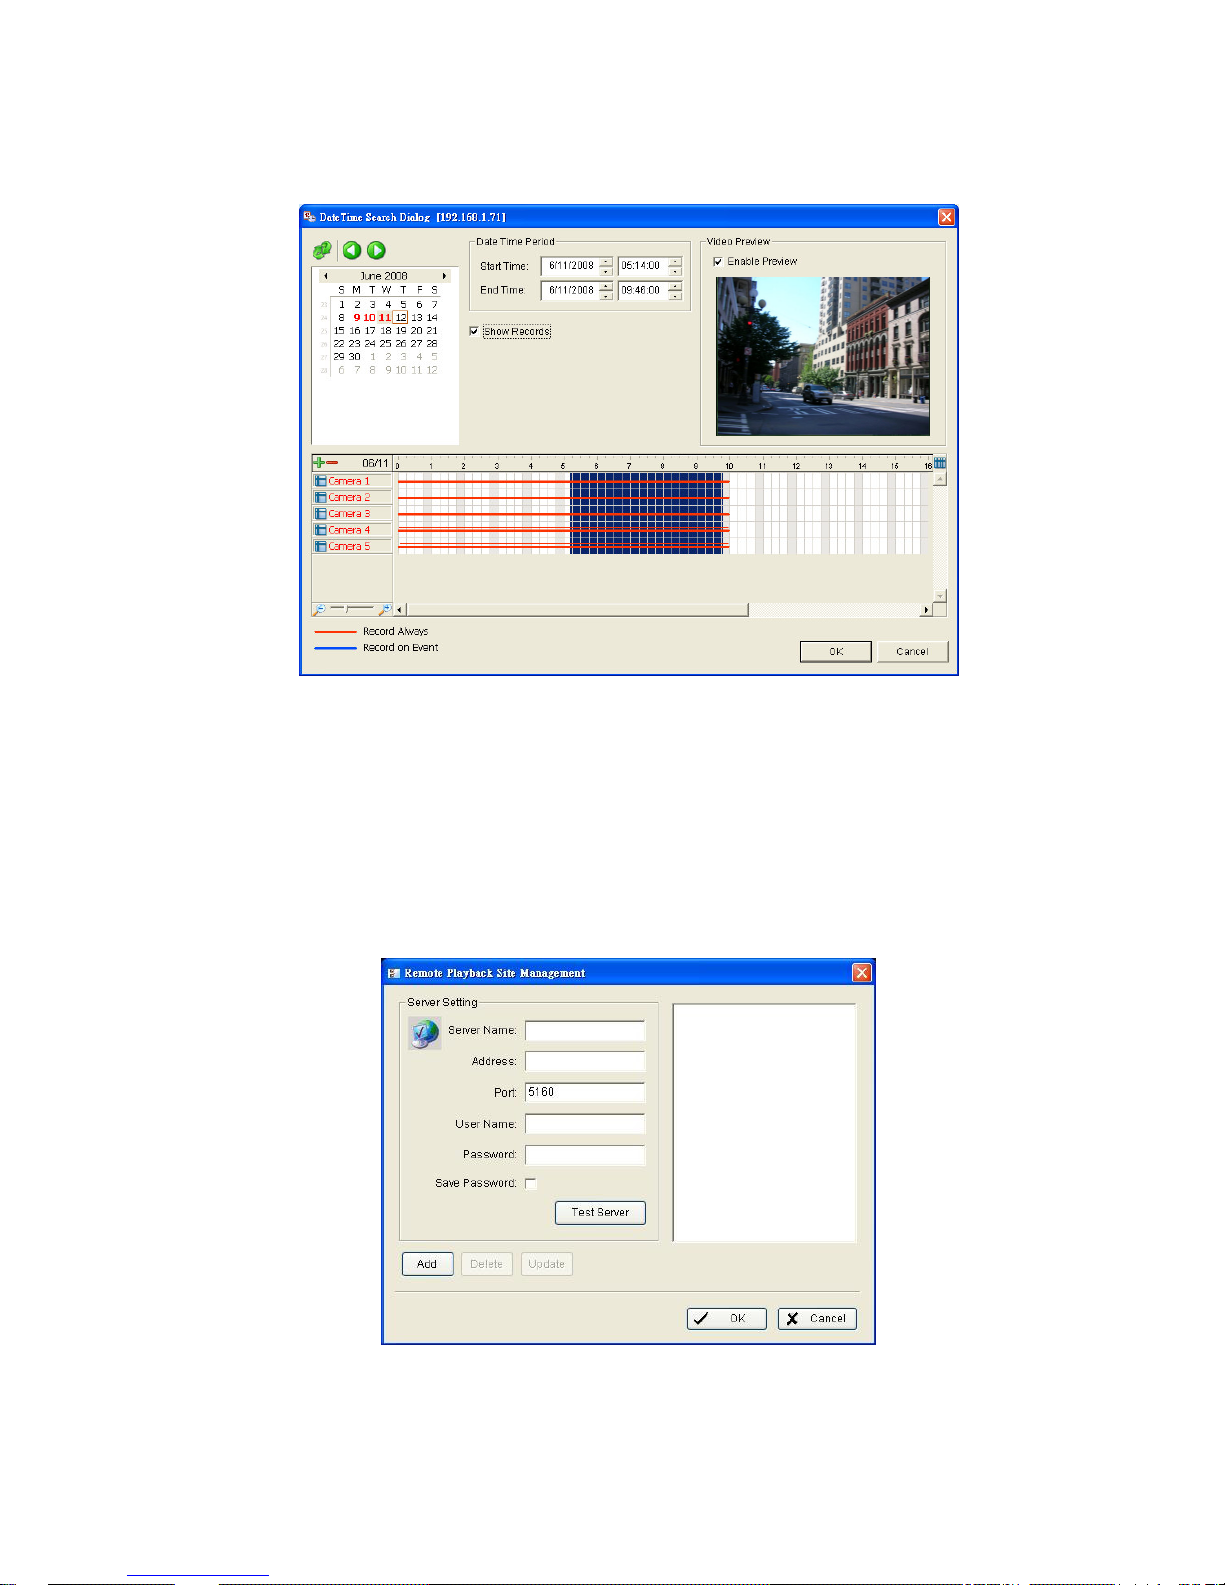
3. Click the Open Record button.
4. The Record Display Window will show the information of the available
video clips. Select the date of the record you wish to search for. See
user manual for more details about this Record Display Window.
5. Highlight the video records that you want to review. See user manual for
Page 20
19
more details.
6. Click the OK button.
Playback System Application
1. Go to Start > NUUO NVRmini > Playback System.
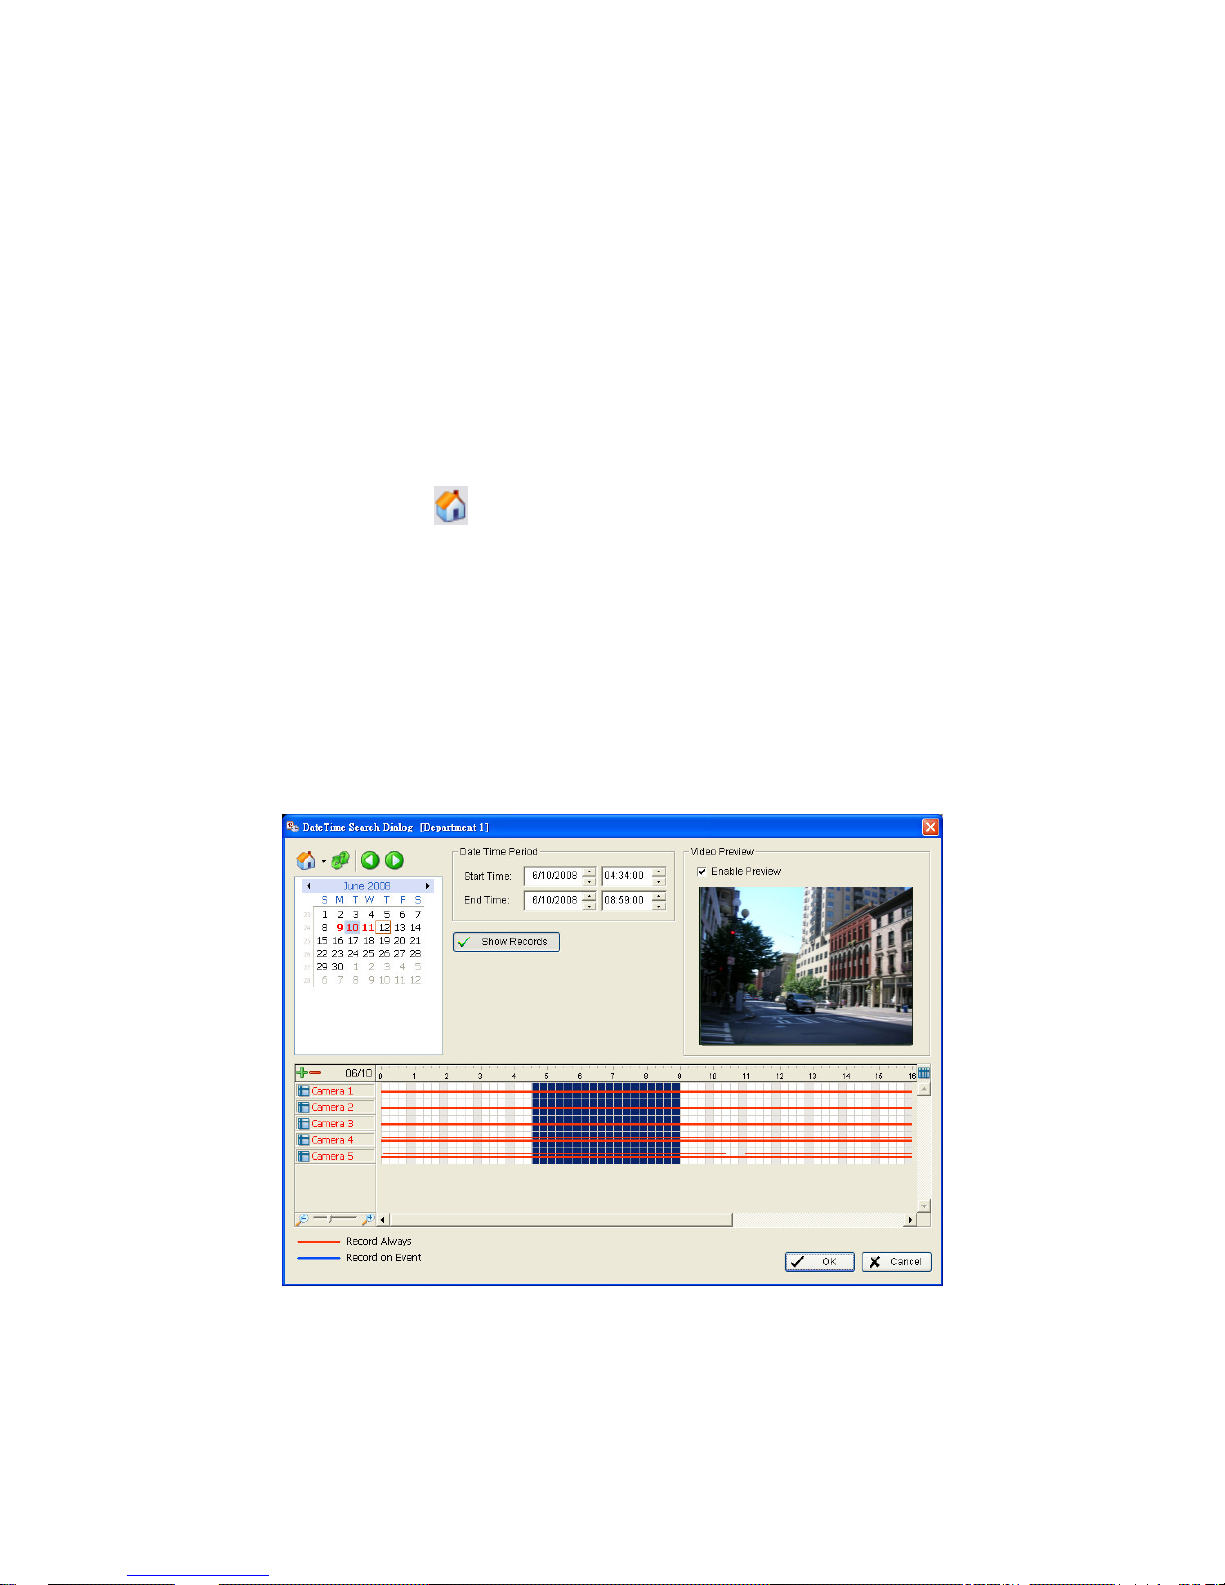
2. Click the Remote Server button.
3. Insert the name of your unit.
Page 21
20
4. Insert the IP address of that unit.
5. Modify the port if necessary.
6. Insert the user name.
7. Insert the password.
8. Check the Save Password option.
9. Click the Test Server button to test the connection between the local
application and the remote unit.
10. Click the Add button to add this unit into the remote server list.
11. Click the OK button.
12. Click the Open Record button.
13. Click the icon
on the top of the Date-Time Panel to obtain the
Remote Playback Site Management dialog, and then select the server
you want to access.
14. The Record Display Window will show the information of the available
video clips. Select the date you want to search the record from. See
user manual for more details about this Record Display Window.
15. Highlight the video records that you want to review. See user manual for
more details.
16. Click the OK button.
Page 22

21
Appendix A: Backup Function
There are three ways to backup your files: through Internet Explorer,
through Playback System application, or through Backup System
application.
Internet Explorer
1. Open Internet Explorer and login the unit.
2. Click the Open Record button to select data.
3. Click the Backup button.
4. Set the Start Time and End Time you want to back up.
5. Select the cameras you want to back up.
6. Select the directory where you want to save the backup data.
7. Click the Backup button.
Playback System Application
1. Go to Start > NUUO NVRmini > Playback System.
2. Click the Open Record button to select data.
3. Click the Backup button.
4. Set the Start Time and End Time you want to back up.
5. Select the cameras you want to back up.
6. Select the directory you want to save the backup data.
7. Click the Backup button.
Backup System Application
1. Go to Start > NUUO NVRmini > Backup System.
2. Insert the IP address of your unit in the login window.
3. Insert the user name.
4. Insert the password.
5. Click the OK button.
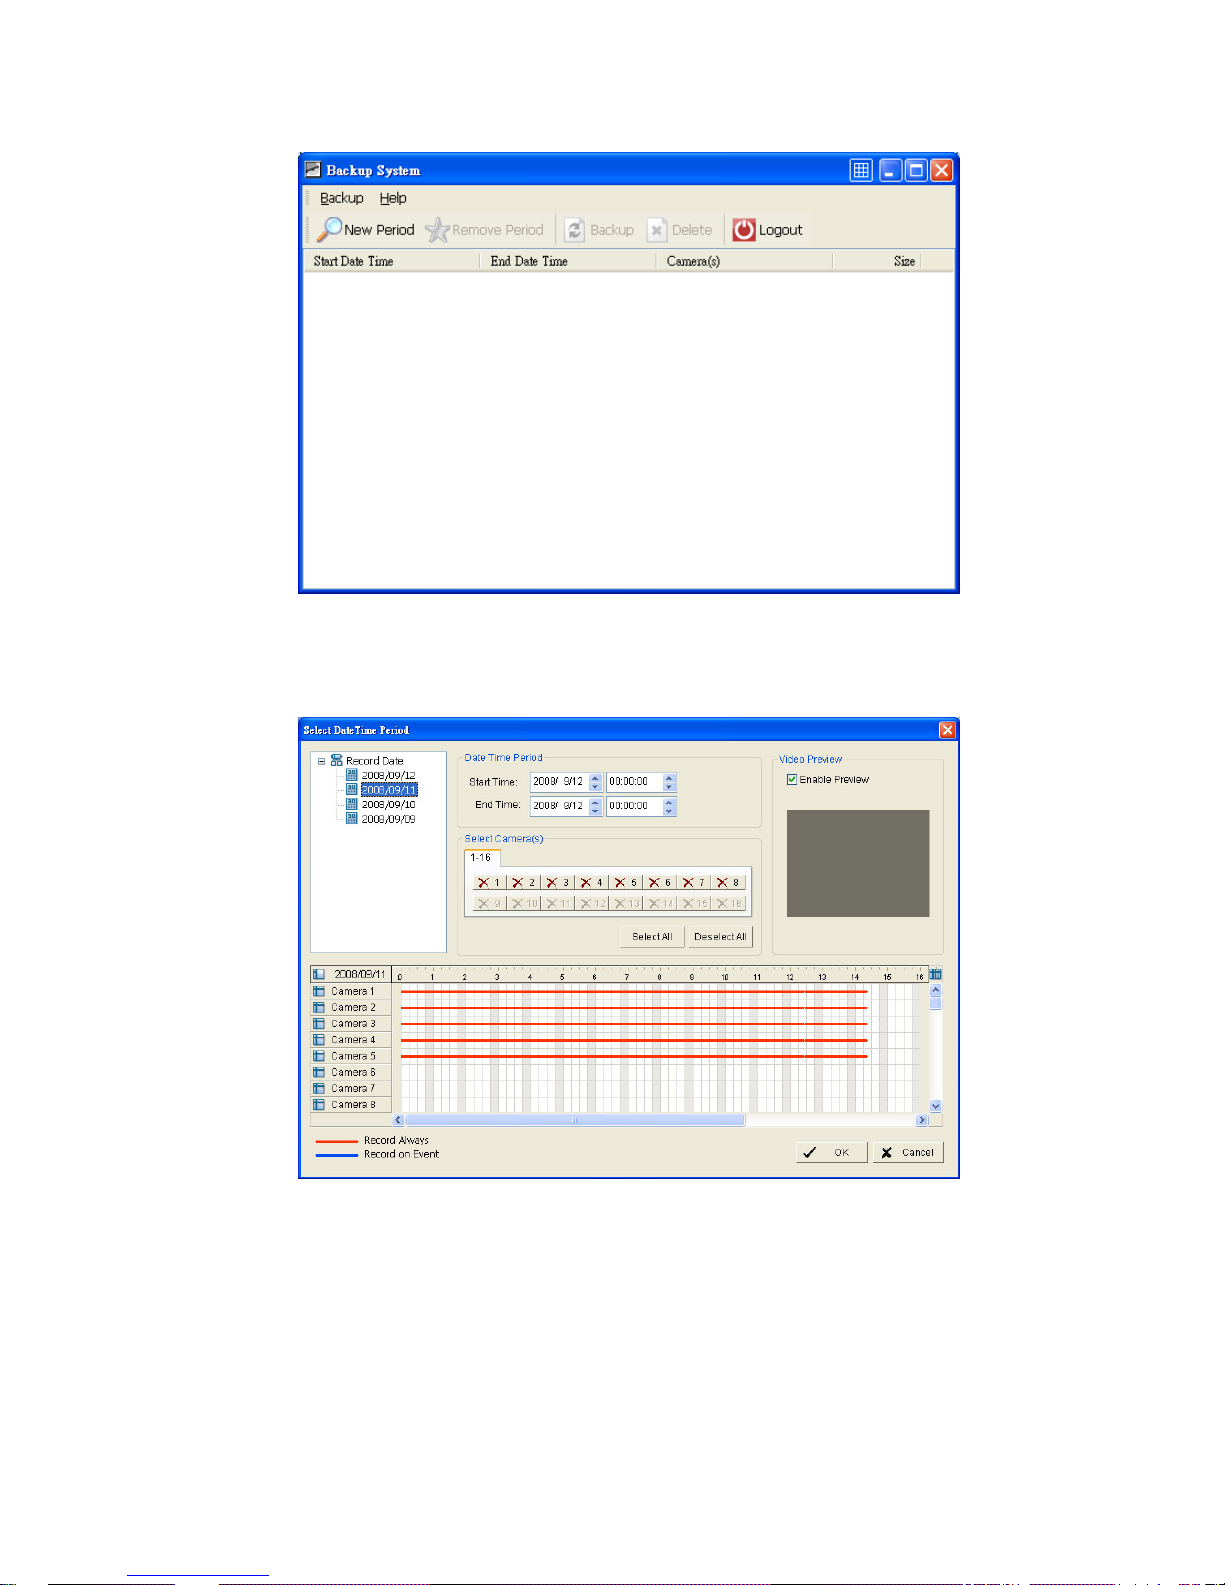
6. Click the New Period button.
Page 23
22
7. Select the record date.
8. Set the Start Time and End Time you want to back up. (or highlight the
video records which you want to back up)
9. Select the cameras you want to back up.
10. Click the OK button.
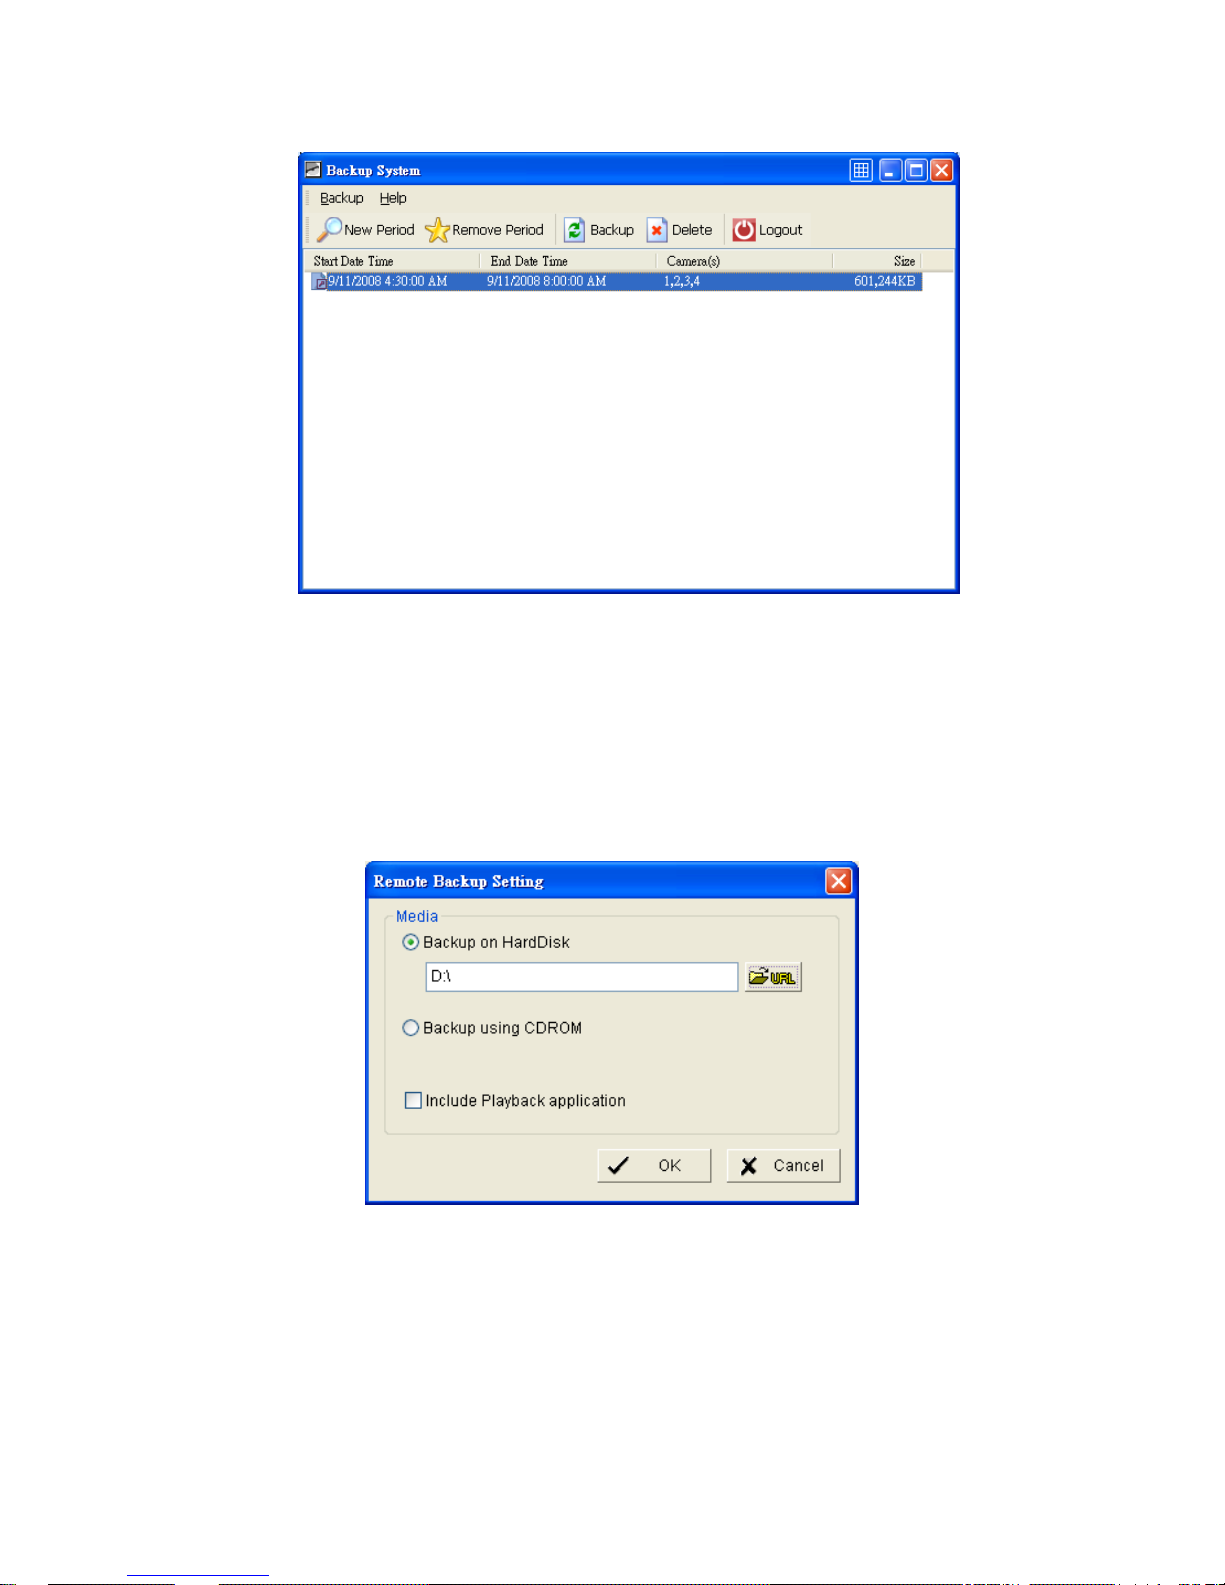
11. Select the time slot which you want to back up.
Page 24
23
12. Click the Backup button.
13. Select the way and directory you want to save the backup data.
14. Check the Include Playback application option, which will add
Playback application into the backup folder.
15. Click the OK button.
Page 25
24
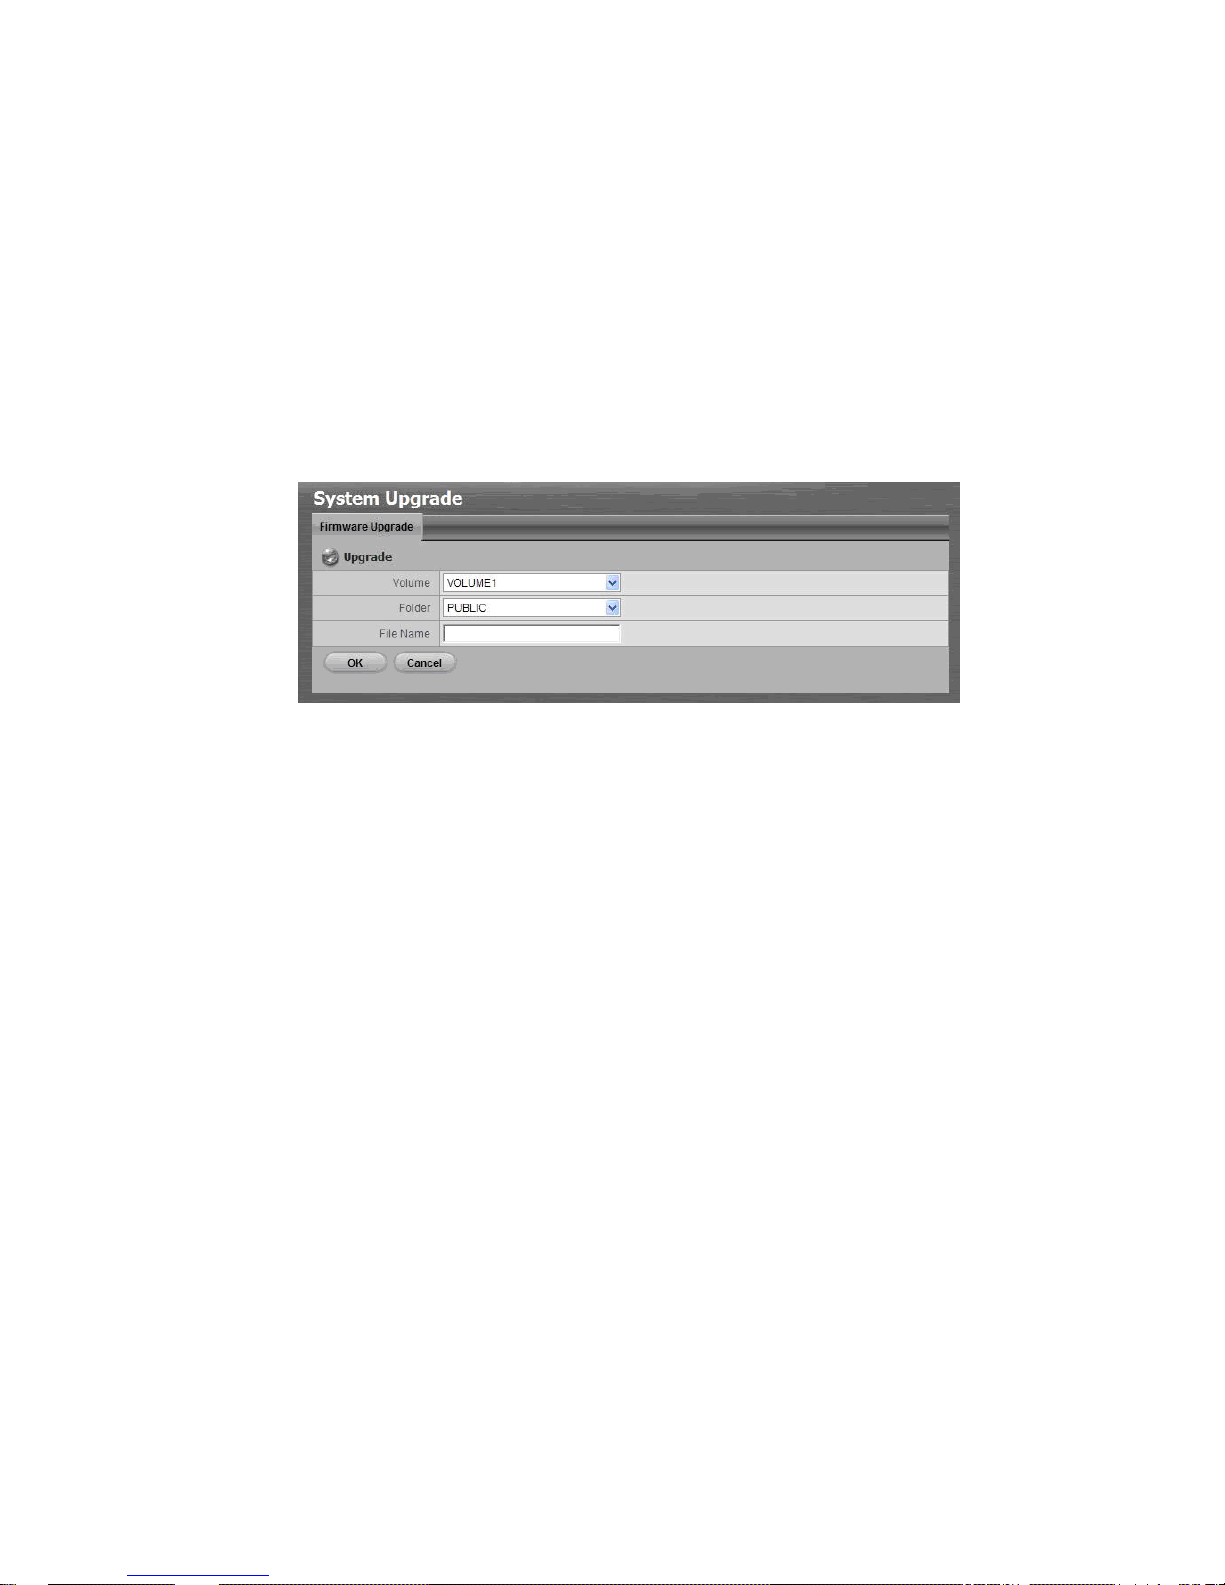
Appendix B: Firmware Upgrade Function
1. Find your unit through Windows Explorer (insert “\\” plus the IP address
of your unit).
2. Use the administrator’s ID and password to login.
3. Put the update file into the folder “public” in your unit.
4. Open Internet Explorer and login the unit.
5. Click System/ System Upgrade.
6. Click the Firmware Upgrade tab.
7. Choose the volume.
8. Choose the folder “public”.
9. Insert the entire file name, including the extension name.
10. Click the OK button.
11. The system will begin the upgrade process.
12. After upgrade, the system will reboot. You will need to log into the unit
again.
Page 26
25
Krok 1: Rozbalení jednotky
Balení obsahuje následující součásti::
Vlastní přístroj
Příručku rychlého startu
Šrouby pro diskovou jednotku (1 balení)
Síťová (napájecí) šňůra
Záruční list
12V DC napájecí transformátor (2 zásuvková jednotka)
CD s aplikacemi pro instalaci, zálohování, “Live View” a přehrávání,
uživatelský manuál a příručkou rychlého startu
Upozornění
Elektronické součásti uvnitř jednotky jsou citlivé a mohou být
poškozeny elektrostatickým výbojem. Prosíme, učiňte příslušná
opatření po celou dobu zacházení s jednotkou nebo jejími
součástmi.
Důležité
Ke konfiguraci jednotky musíte instalovat software na
desktop/laptop počítač běžící pod OS Windows Vista, 2003, XP
Professional, nebo 2000.
2 zásuvková jednotka (4 kanály) přední pohled
Disková jednotka
Diskový pohon
Stavová LED
LED aktivity jednotky
LED aktivity
ethernetu
Tlačítko napájení
Systémová LED
Page 27
26
2 zásuvková jednotka (4 kanály) zadní pohled
4 zásuvková jednotka (8 kanálů) přední pohled
Disková jednotka
Diskový pohon
Stavová LED
LED aktivity jednotky
LED aktivity
ethernetu
Napájecí tlačítko
Systémová
LED
Chladící ventilátor
Konektor USB
Konektor síťového připojení (RJ45)
Napájecí konektor
Page 28
27
4 zásuvková jednotka (8 kanálů) zadní pohled
Krok 2: Instalace diskových jednotek
Tuto jednotku můžete osadit diskovými jednotkami SATA 1,5 Gb/s nebo 3,0
Gb/s. Pro dosažení optimálního výkonu instalujte diskové jednotky
stejného typu a kapacity. Vaše diskové jednotky se stanou diskovým polem
RAID.
1. Otevřete víko v přední části krytu jednotky.
2. Táhněte upínací šachtu diskové mechaniky z uzávěru. Viz obrázek
pohledu „ze předu“.
3. Opatrně položte diskovou jednotku do upínací šachty diskové
mechaniky, nastavte otvory pro šrouby na stranách mechaniky tak, aby
byly zarovnány s otvory na jednotce.
4. Vložte šrouby skrz otvory v upínací šachtě diskové mechaniky a do
stran diskové jednotky.
Použijte pouze zahlubovací šrouby dodané s jednotkou.
Použijte 4 šrouby na jednu diskovou jednotku.
Pečlivě utáhněte každý šroub. Buďte opatrní, nepřekruťte šroub.
5. Vložte upínací šachtu do krytu jednotky.
6. Opakujte krok 2 až 5 pro každou diskovou jednotku.
7. Uzavřete víko v přední části jednotky.
Chladící ventilátor
Konektor síťového
připojení (RJ45)
USB konektor
Ventilátor
napájecího zdroje
Napájecí konektor
Page 29
28
Krok 3: Připojení k síti
1. Připojte jeden konec síťového kabelu do konektoru RJ45 v jednotce.
Viz obrázek zadního pohledu.
2. Připojte druhý konec síťového kabelu k připojení Ethernet (hub nebo
switch).
Důležité
Máte-li vícenásobné připojení k ethernetu, poznamenejte si, ke
které síti byla jednotka připojena. Tuto informaci budete
potřebovat během procesu instalace.
Krok 4: Připojení k napájení
1. Připojte napájecí šňůru ze zásuvky (zdroj 230 V) k napájecímu
adaptéru.
2. Zapojte napájecí adaptér do konektoru na zadní straně krytu jednotky.
Viz obrázek zadního pohledu.
3. Na přední straně jednotky stiskněte tlačítko napájení. Viz obrázek
předního pohledu.
Důležité
Před spuštěním jednotky se ujistěte, že jsou připojeny oba konce
síťového kabelu do konektoru na jednotce a do připojení
k Ethernetu. Prosíme, rovněž umožněte funkci DHCP v síti,
jednotka získá defaultně IP adresu od DHCP.
Bootování jednotky může trvat několik minut. Po úplném nabootování:
Systémová LED svítí zeleně. Viz obrázek předního pohledu.
Bzučák jedenkrát pípne.
Krok 5: Instalace software
1. Vložte instalační CD do vaší CDROM.
2. Dvojím kliknutím na Setup.exe spustíte instalaci.
3. Kliknutím na tlačítko Dalši pokračujte v instalaci.
Page 30
29
4. Klikněte na “I accept the terms of the license agreement” a poté klikněte
na tlačítko Dalši.
5. Vložte vaše “User Name” (uživatelské jméno) „Company Name” (jméno
společnosti), poté klikněte na tlačítko Dalši.
6. Zvolte „setup type“ (typ instalace) a poté klikněte na tlačítko Dalši.
7. Klikněte na tlačítko Install a pokračujte v instalaci.
8. Po dokončení výše uvedeného procesu se zobrazí finální okno
instalace. Stiskněte tlačítko Dokoncit k uzavření instalátoru.
Krok 6: Nastavení jednotky
Software Install Wizard provedl setup-procedury ve vaší jednotce. Po této
proceduře můžete začít vaši jednotku používat.
1. Zvolte Start > NUUO NVRmini > Install Wizard.
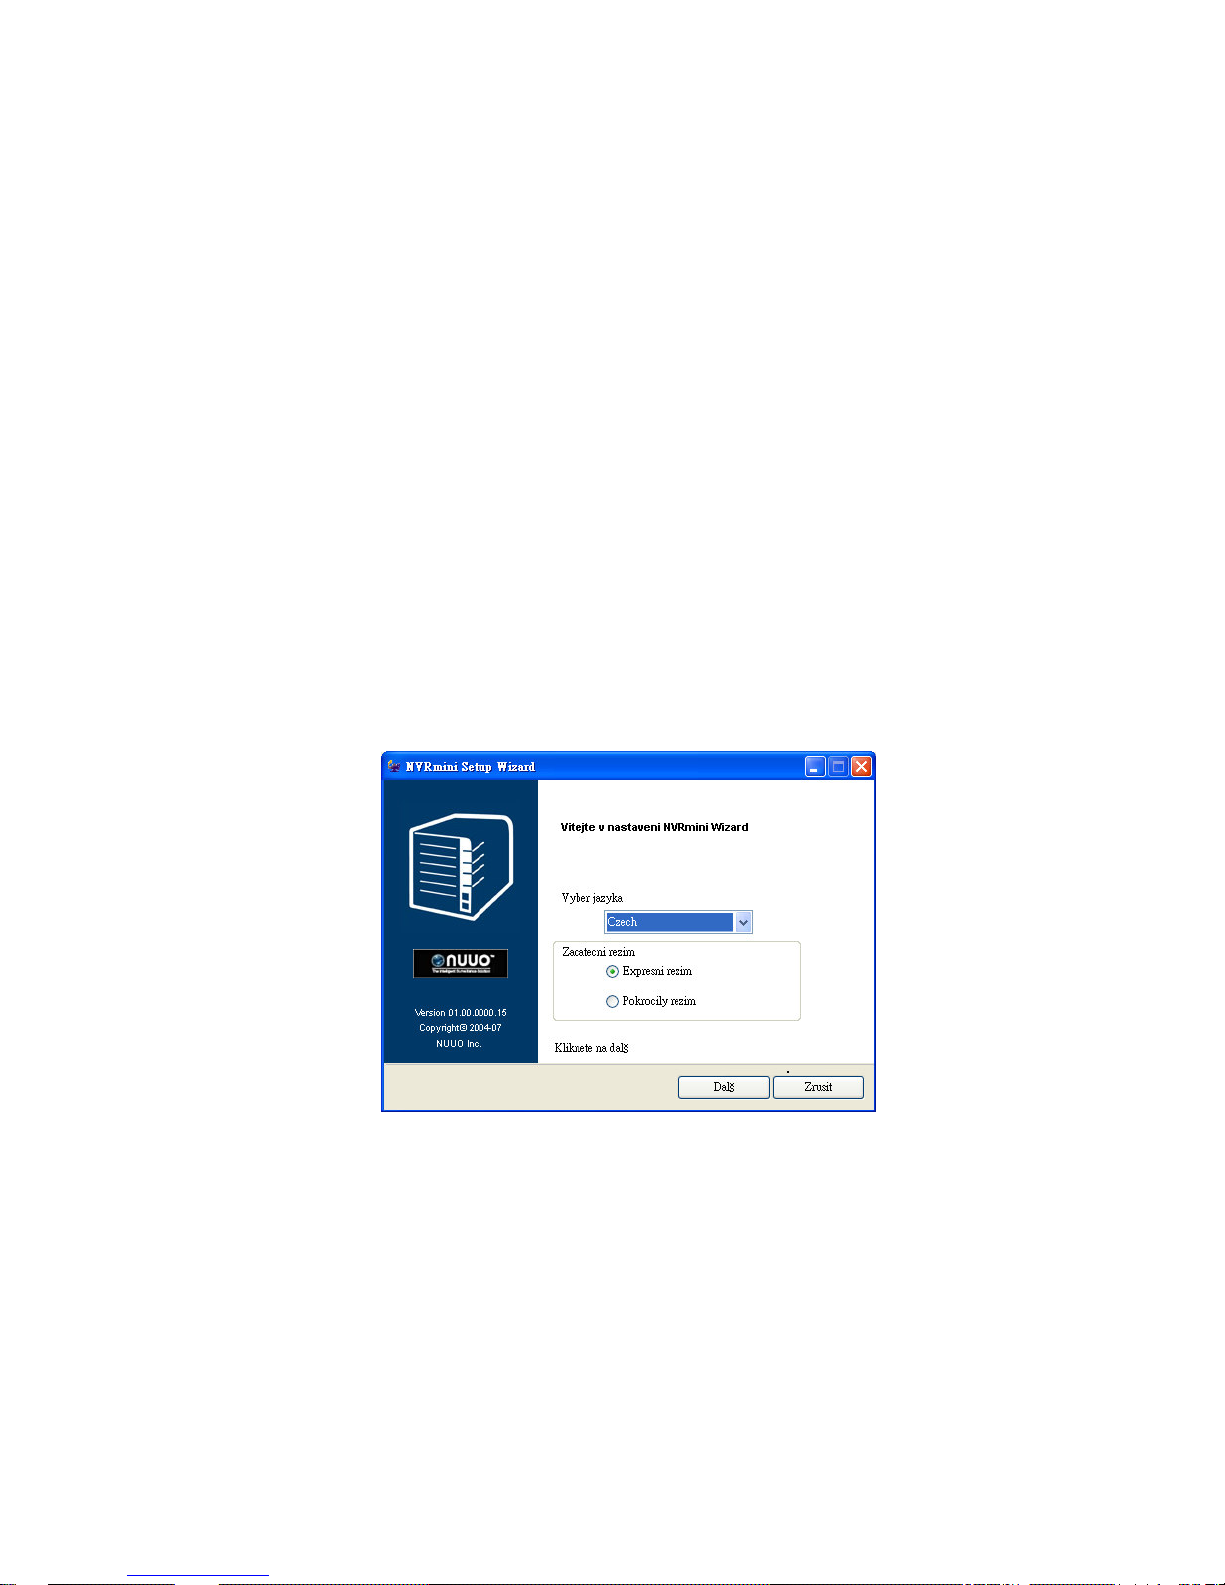
2. Tento program zobrazí defaultní jazykové nastavení a iniciační mód.
3. Zvolte preferovaný jazyk a iniciační mód a stiskněte tlačítko Dalši.
Expresni rezim : nepotřebujete-li nastavit datum, čas, síť a stupeň
RAID (Po kroku 5 skočí přímo ke kroku 9).
Pokrocily rezim : potřebujete-li nastavit datum, čas a síť.
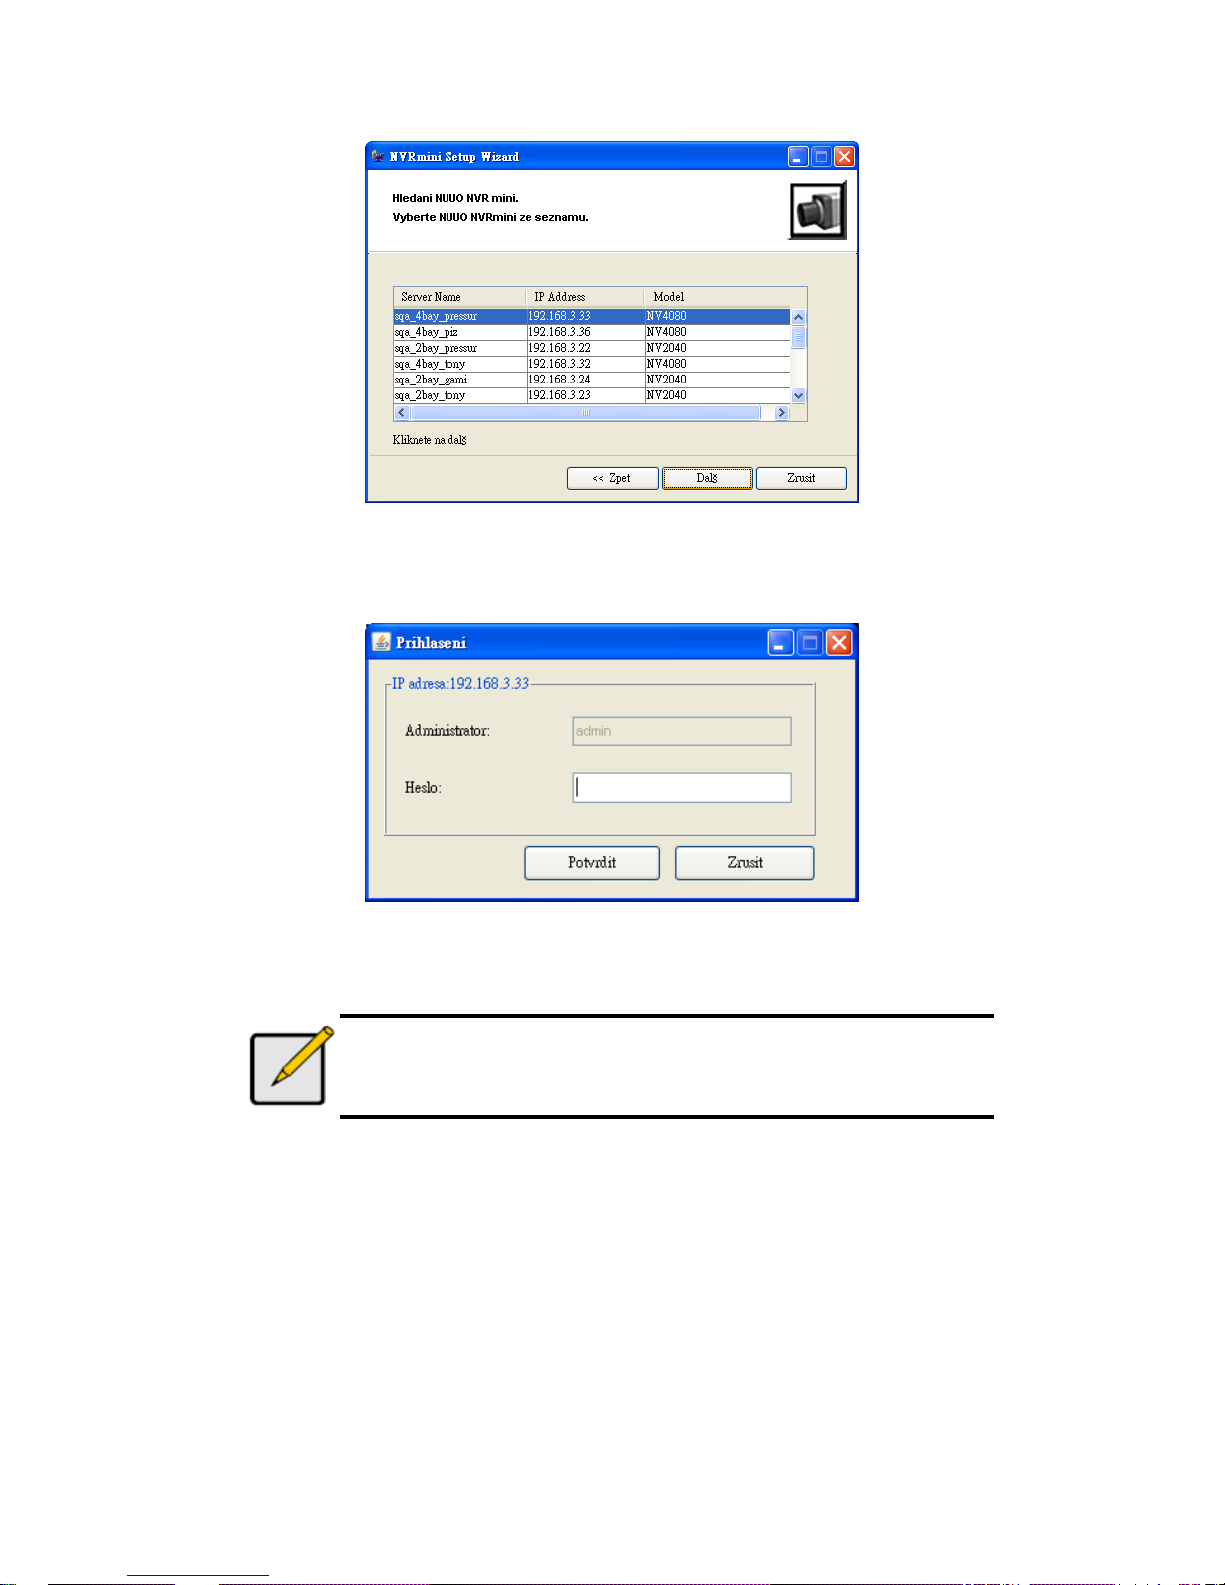
4. Program Install Wizard bude ihned vyhledávat všechny jednotky na
internetu. Zvolte jednu z nich a klikněte na tlačítko Dalš.
Page 31
30
5. Vložte Heslo a klikněte na tlačítko Potvrdit.
Poznámka
Defaultní heslo administrátora je “admin”.
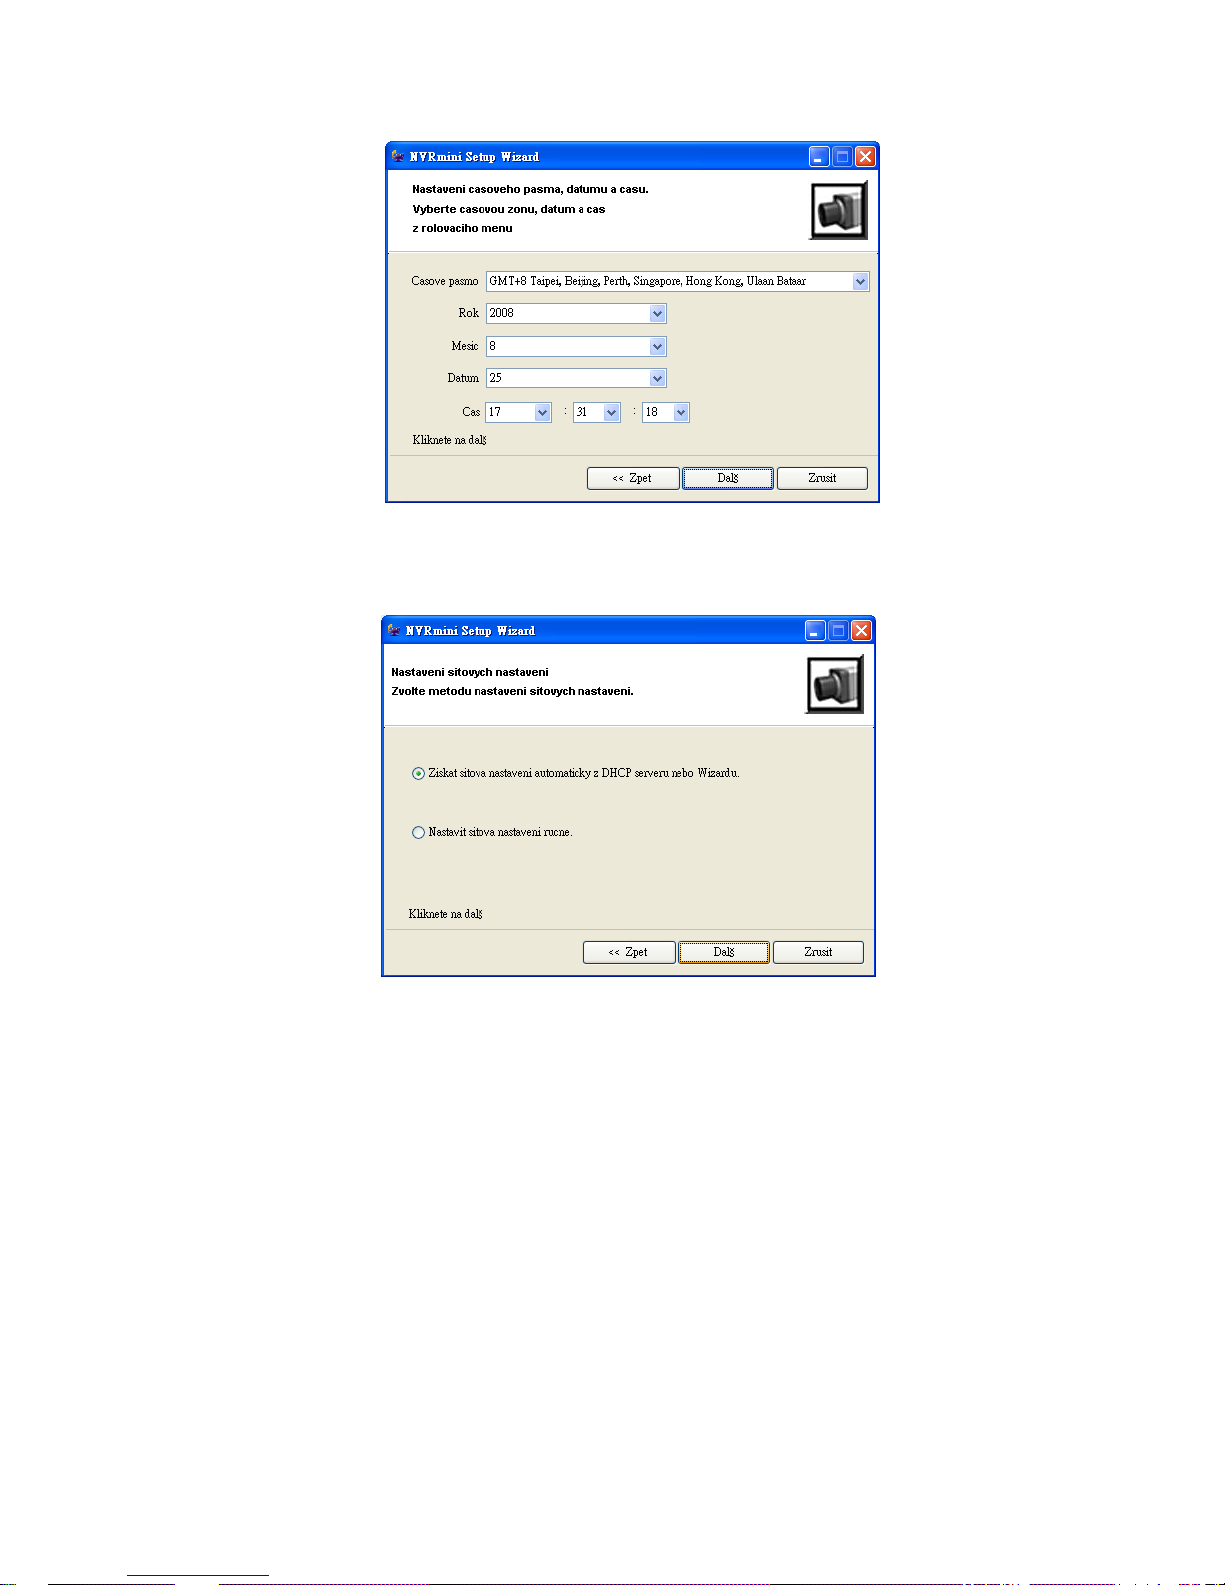
6. Nastavte zónu času, datum a čas a klikněte na tlačítko Dalš.
Page 32
31
7. Proveďte nastavení sítě a klikněte na tlačítko Dalš.
Ziskat sitova nastaveni automaticky z DHCP serveru nebo
Wizardu: aplikuje nastavení IP, masku sítě, bránu, DNS získané z
DHCP serveru.
Nastavit sitova nastaveni rucne : provede vaše specifické
nastavení.
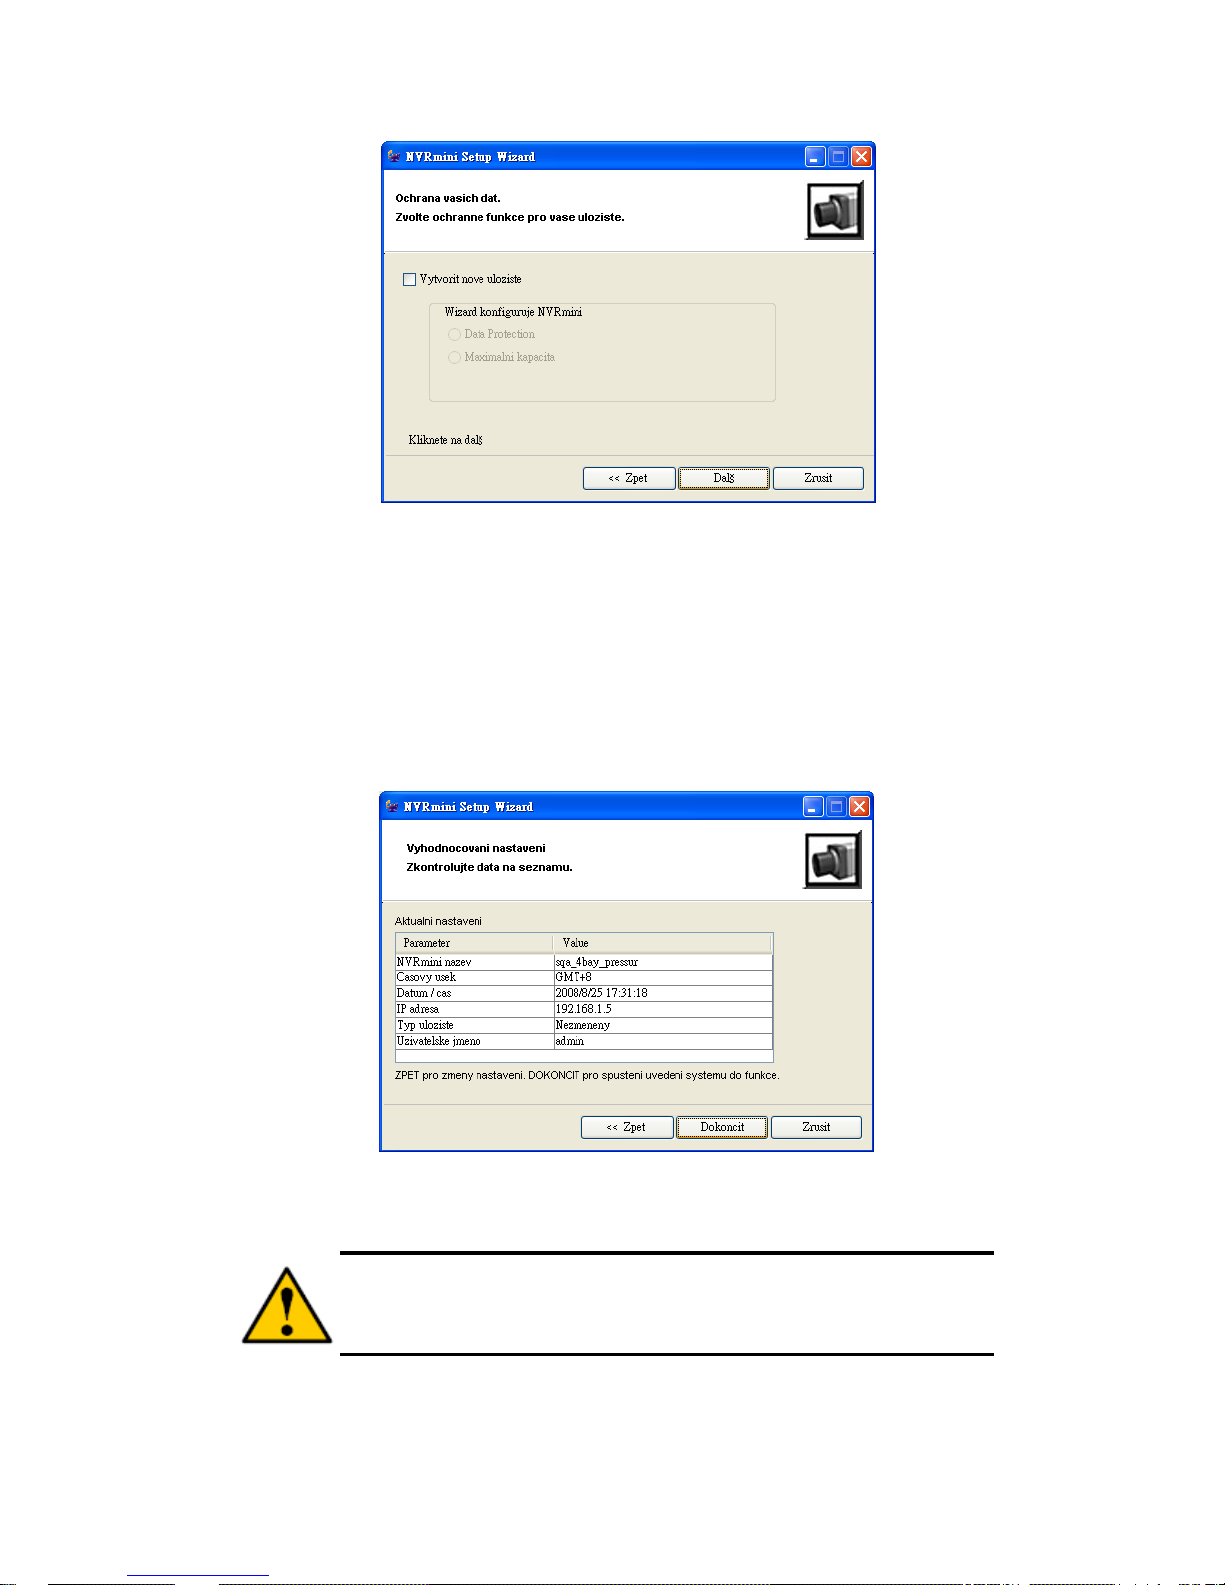
8. Potřebujete-li nastavit nový disk(y), zvolte volbu “Create new storage”.
Po volbě klikněte na tlačítko Dalš.
Page 33
32
Data Protection : Nastaví stupeň RAID na RAID 1 (2 zásuvky) nebo
RAID 5 (4 zásuvky).
Maximální kapacita : nastaví stupeň RAID 0 (2 zásuvky) nebo RAID
0 (4 zásuvky).
9. Zkontrolujte vaše nastavení. Pokud je vše v pořádku, klikněte na
tlačítko Dokoncit k ukončení nastavení.
Upozornění
Jakmile je nastavení jednotky kompletní, začne jednotka
pracovat. Aby byla vaše jednotka stabilní, nevytahujte disky
z jednotky, pokud je systém v chodu.
Page 34
33
Krok 7: Přidání kamer
Přidání UPnP Kamer
1. Otevřete Internet Explorer a přihlaste (zalogujte) jednotku.
2. Klikněte na IP kamera/ Nastaveni kamery.
3. Klikněte na záložku Hledat kameru.
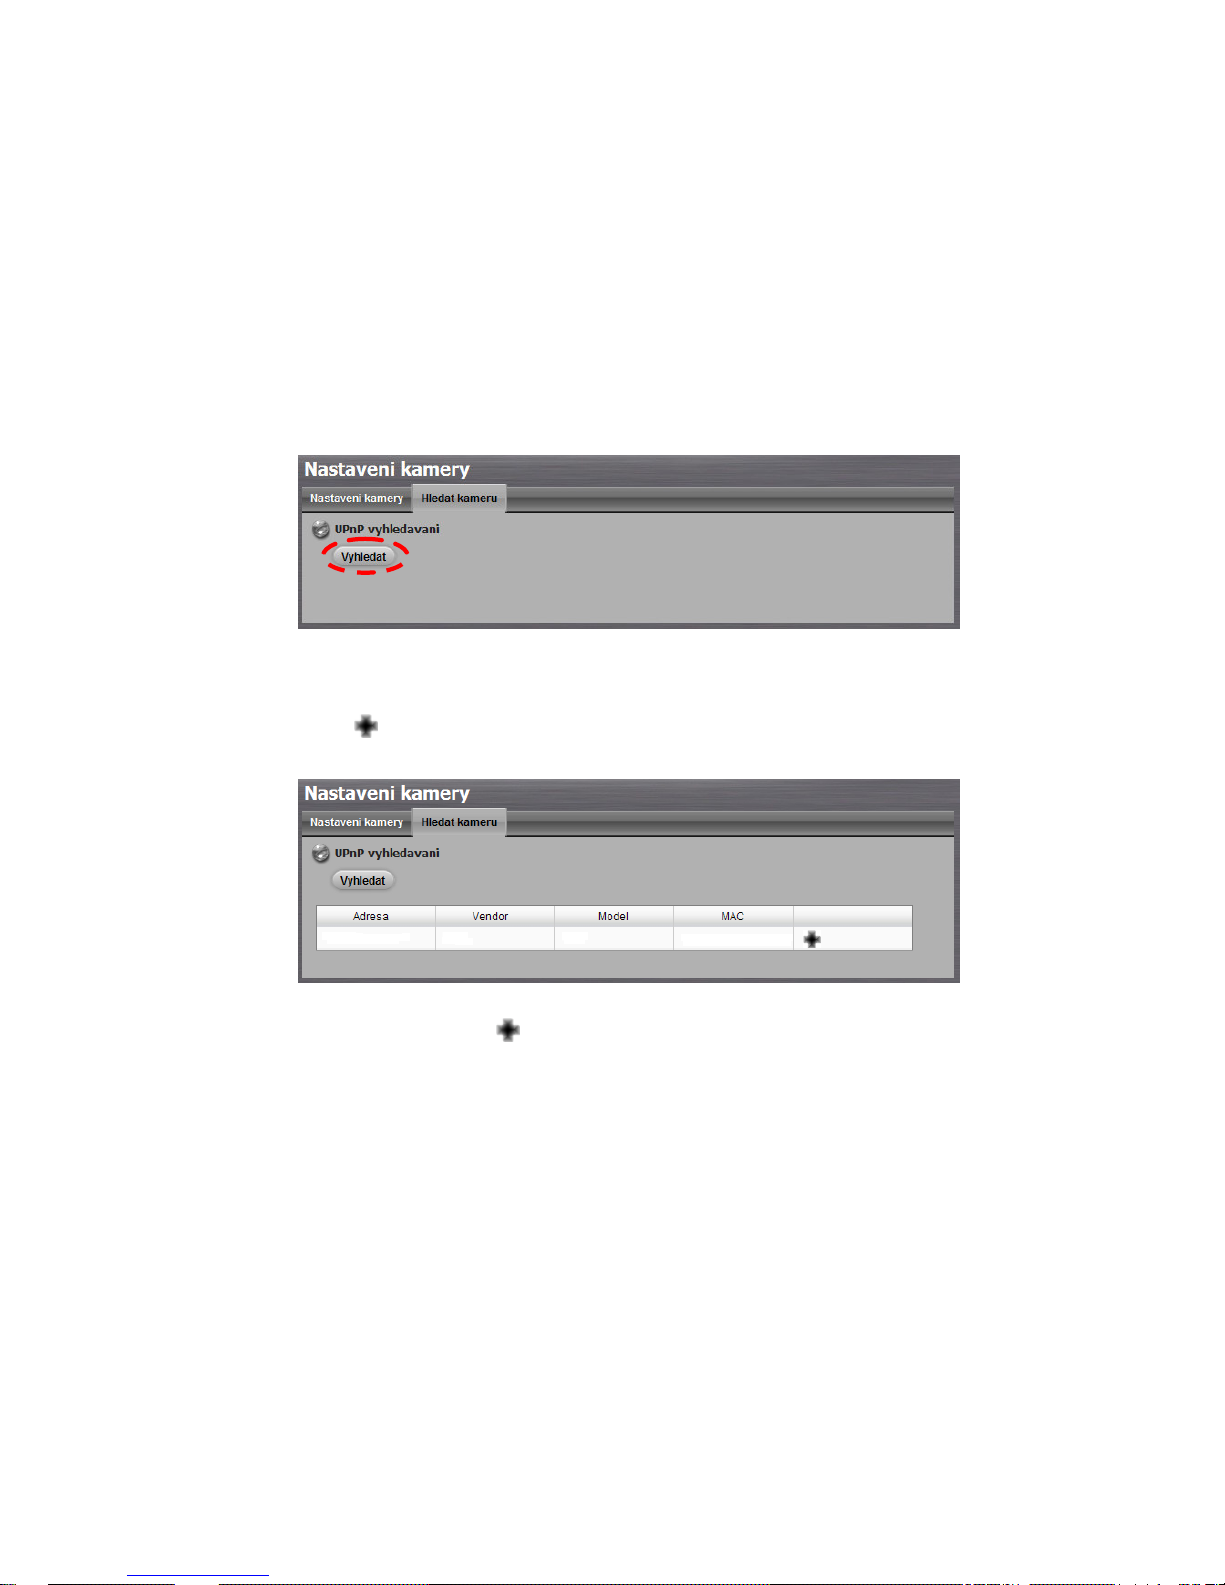
4. Klikněte na tlačítko Vyhledat k vyhledání UPnP kamer.
5. Systém vypíše všechny momentálně dostupné kamery. Klikněte na
ikonu a přidejte kameru do seznamu.
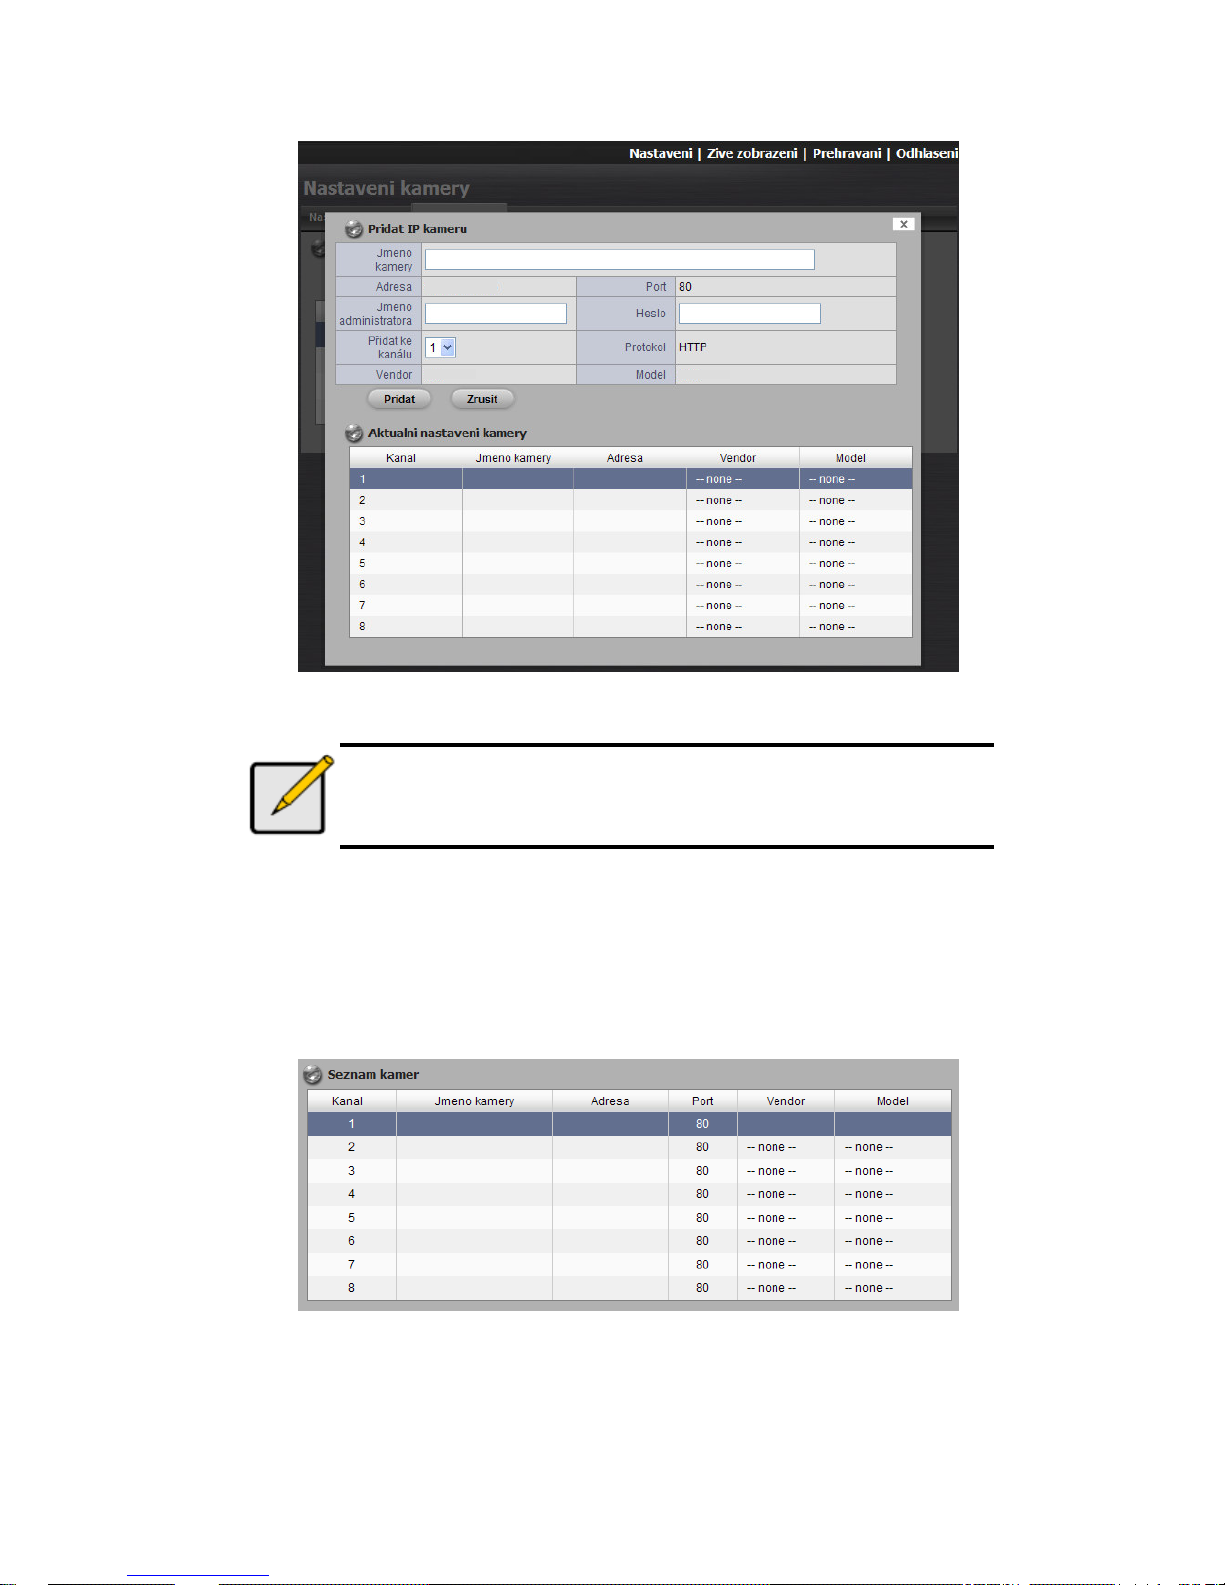
6. Po kliknutí na ikonu , se zobrazí stránka nastavení kamery. Klikněte
na ikonu, pokud chcete přidat kameru.
7. Vložte jméno kamery, uživatelské jméno a heslo kamery.
IP adresa Prodejce Název modelu Mac adresa
Page 35
34
Poznámka
Připojení některých kamer je omezeno administrátotrem.
V tomto případě, k příhlášení těchto kamer, musíte změnit
přihlášení, uživatelské jméno a heslo na administrátorské.
8. Klikněte na tlačítko Pridat k přidání kamery.
9. Po kliknutí na tlačítko Pridat se zobrazí upravený seznam kamer
v tabulce Nastaveni kamery.
10. Opakujte kroky 5 až 8 k přidání další kamery do seznamu.
Jmeno kamery
IP adresa
Prodejce Název modelu
IP adresa
Název modelu
Prodejce
Page 36
35
Přidání kamer bez funkce UPnP
1. Otevřete Internet Explorer a přihlaste (zalogujte) jednotku.
2. Klikněte na IP kamera/ Nastaveni kamery.
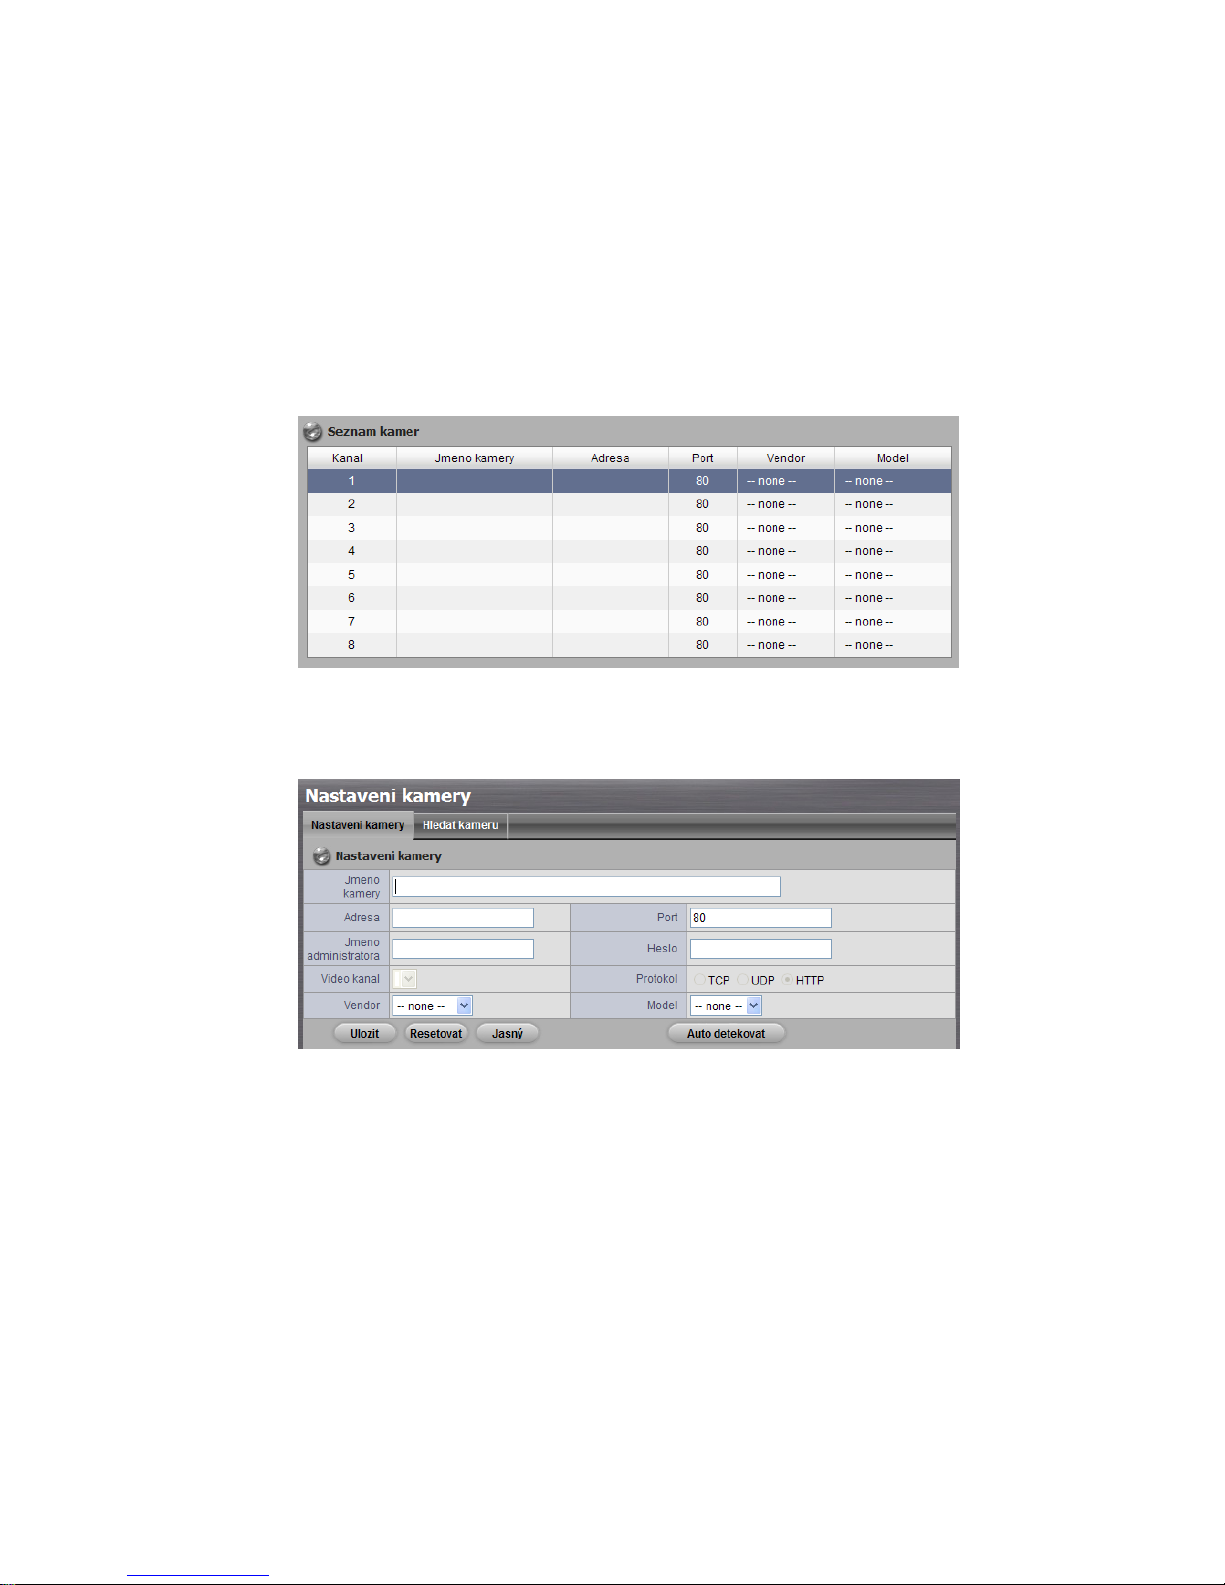
3. Klikněte na záložku Nastaveni kamery a v dolní části stránky se
zobrazí seznam kamer.
4. Klikněte na položku, kam chcete přidat kameru.
5. Vložte informace o kameře do horní části stránky.
Jmeno kamery: jméno kamery.
Adresa: IP adresa.
Port: přenosový port.
Jmeno administratora: přihlašovací jméno.
Heslo: přihlašovací heslo.
Video kanal: zvolte číslo analogové kamery podporované jedním
video serverem ze seznamu.
Protokol: přenosový protokol.
Vendor: prodejce kamery.
Model: model kamery.
Page 37

36
Poznámka
Připojení některých kamer je omezeno administrátotrem.
V tomto případě, k příhlášení těchto kamer, musíte změnit
přihlášení, uživatelské jméno a heslo na administrátorské.
6. Klikněte na tlačítko Ulozit.
Ulozit: uložení informací o kameře.
Resetovat: návrat k poslednímu uloženému nastavení vybrané
kamery.
Auto detekovat: po vložení IP adresy, portu, uživatelského jména a
hesla klikněte na toto tlačítko. Automaticky se vyhledají informace o
kameře (např. kanál, protokol, prodejce, model).
7. Opakujte kroky 4 až 6 k přidání další kamery do seznamu.
Krok 8: Funkce „Live View“
K implementaci této funkce existují dvě cesty: prostřednictvím Internet
Exploreru nebo prostřednictvím aplikace Remote Live Viewer (Vzdálený
živý prohlížeč).
Internet Explorer
1. Otevřete Internet Explorer a zalogujte jednotku.
2. Nastavte kamery.
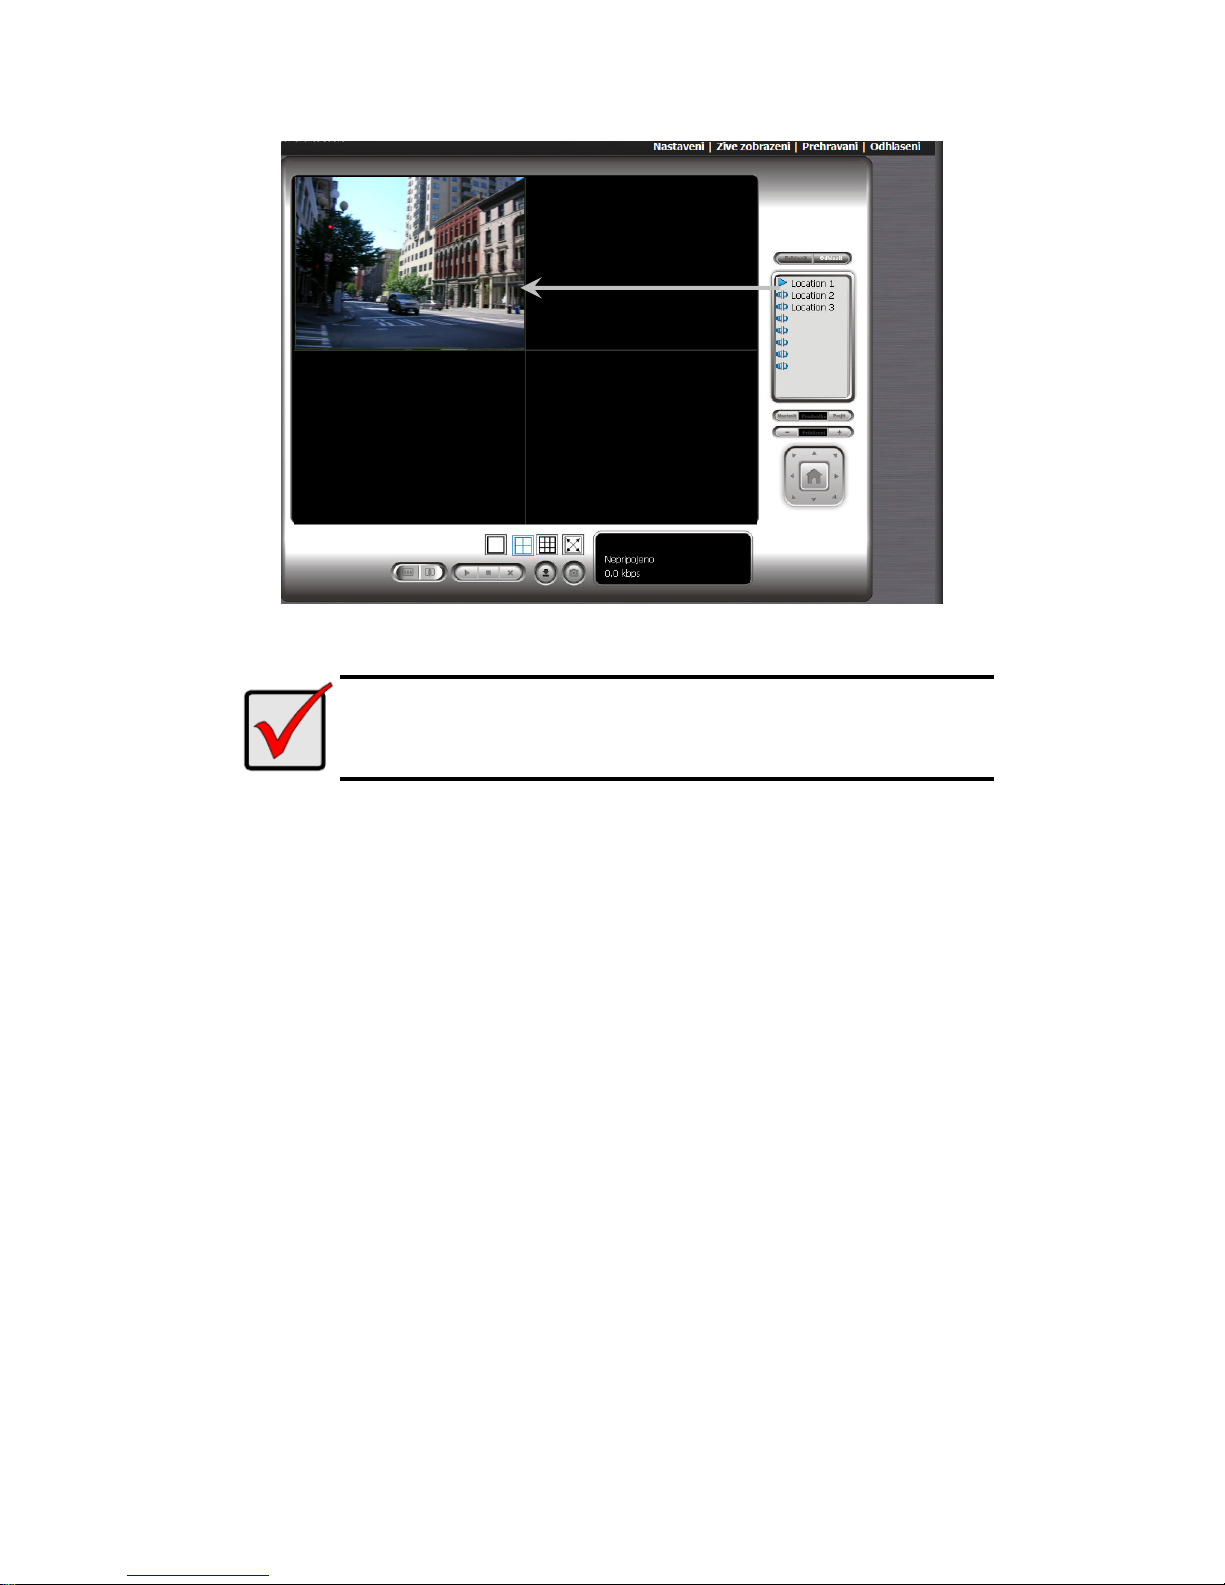
3. Klikněte na tlačítko Zive zobrazeni v horní části stránky.
4. Zvolte kameru(y) ze seznamu vpravo a táhněte ji myší na místo, kde se
má zobrazit obrázek z kamery.
Page 38
37
Důležité
V době, kdy běží Internet Explorer, nepoužívejte funkci „Otevřít
v novém okně (Open in New Window) z důvodu stability
prohlížeče.
Aplikace Remote Live Viewer (Vzdálený živý prohlížeč)
1. Jděte na Start > NUUO NVRmini > Remote Live Viewer (Vzdálený živý
prohlížeč).
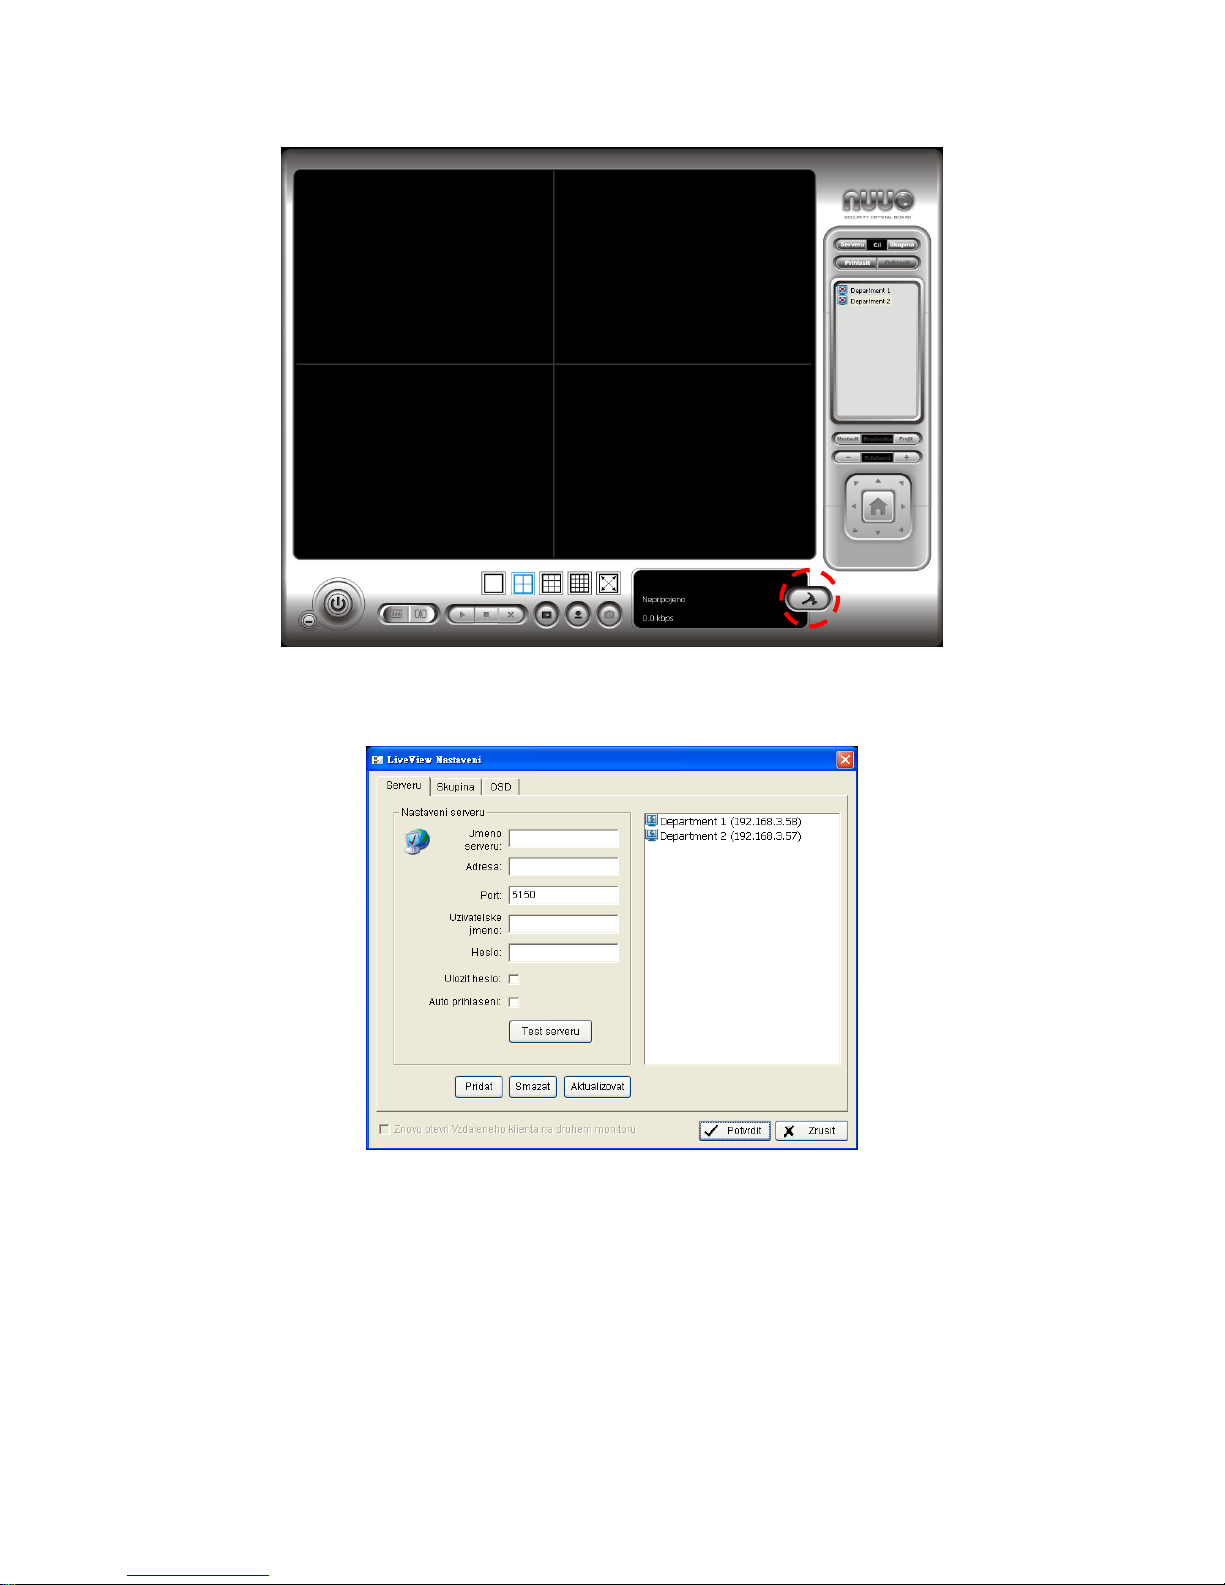
2. Klikněte na tlačítko LiveView Nastavení.
Page 39
38
3. Vložte jméno jednotky.
4. Vložte IP adresu.
5. Je-li to potřebné, upravte port.
6. Vložte uživatelské jméno.
7. Vložte heslo.
8. Zvolte volbu Uložit heslo/ Auto přihlášení.
9. Klikněte na tlačítko Test serveru. Spustí se test spojení mezi lokální
aplikací a ovládáním jednotky.
Page 40
39
10. Klikněte na tlačítko Pridat ke vložení jednotky do seznamu („Vzdálený
server list“).
11. Klikněte na tlačítko Potvrdit.
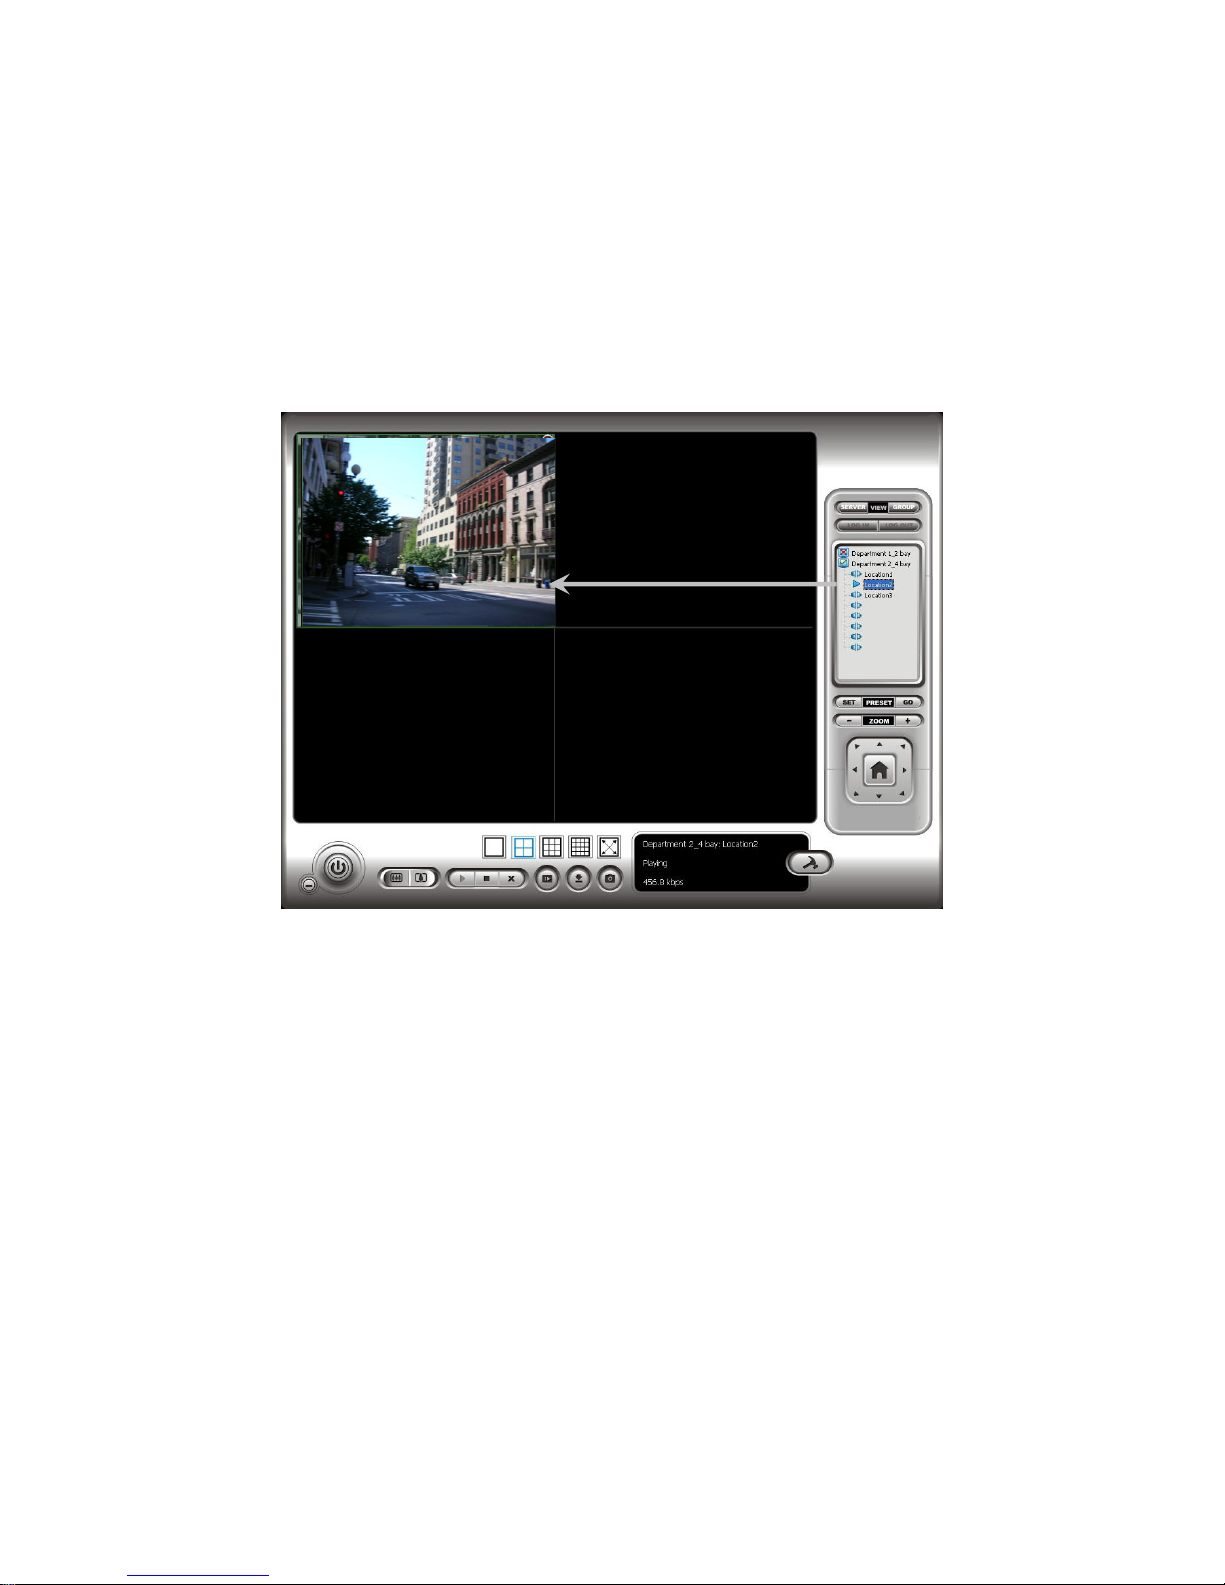
12. Klikněte na jednotku, kterou chcete přihlásit do seznamu.
13. Klikněte na tlačítko Přihlásit k přihlášení vaší jednotky.
14. Vyberte kameru(y) ze seznamu kamer vpravo a táhněte ji na místo,
kam chcete zobrazit obrázek z kamery.
Krok 9: Nastavení nahrávání
1. Otevřete Internet Explorer a zalogujte jednotku.
2. Klikněte na Nahravani a udalost/ Nastaveni nahravani.
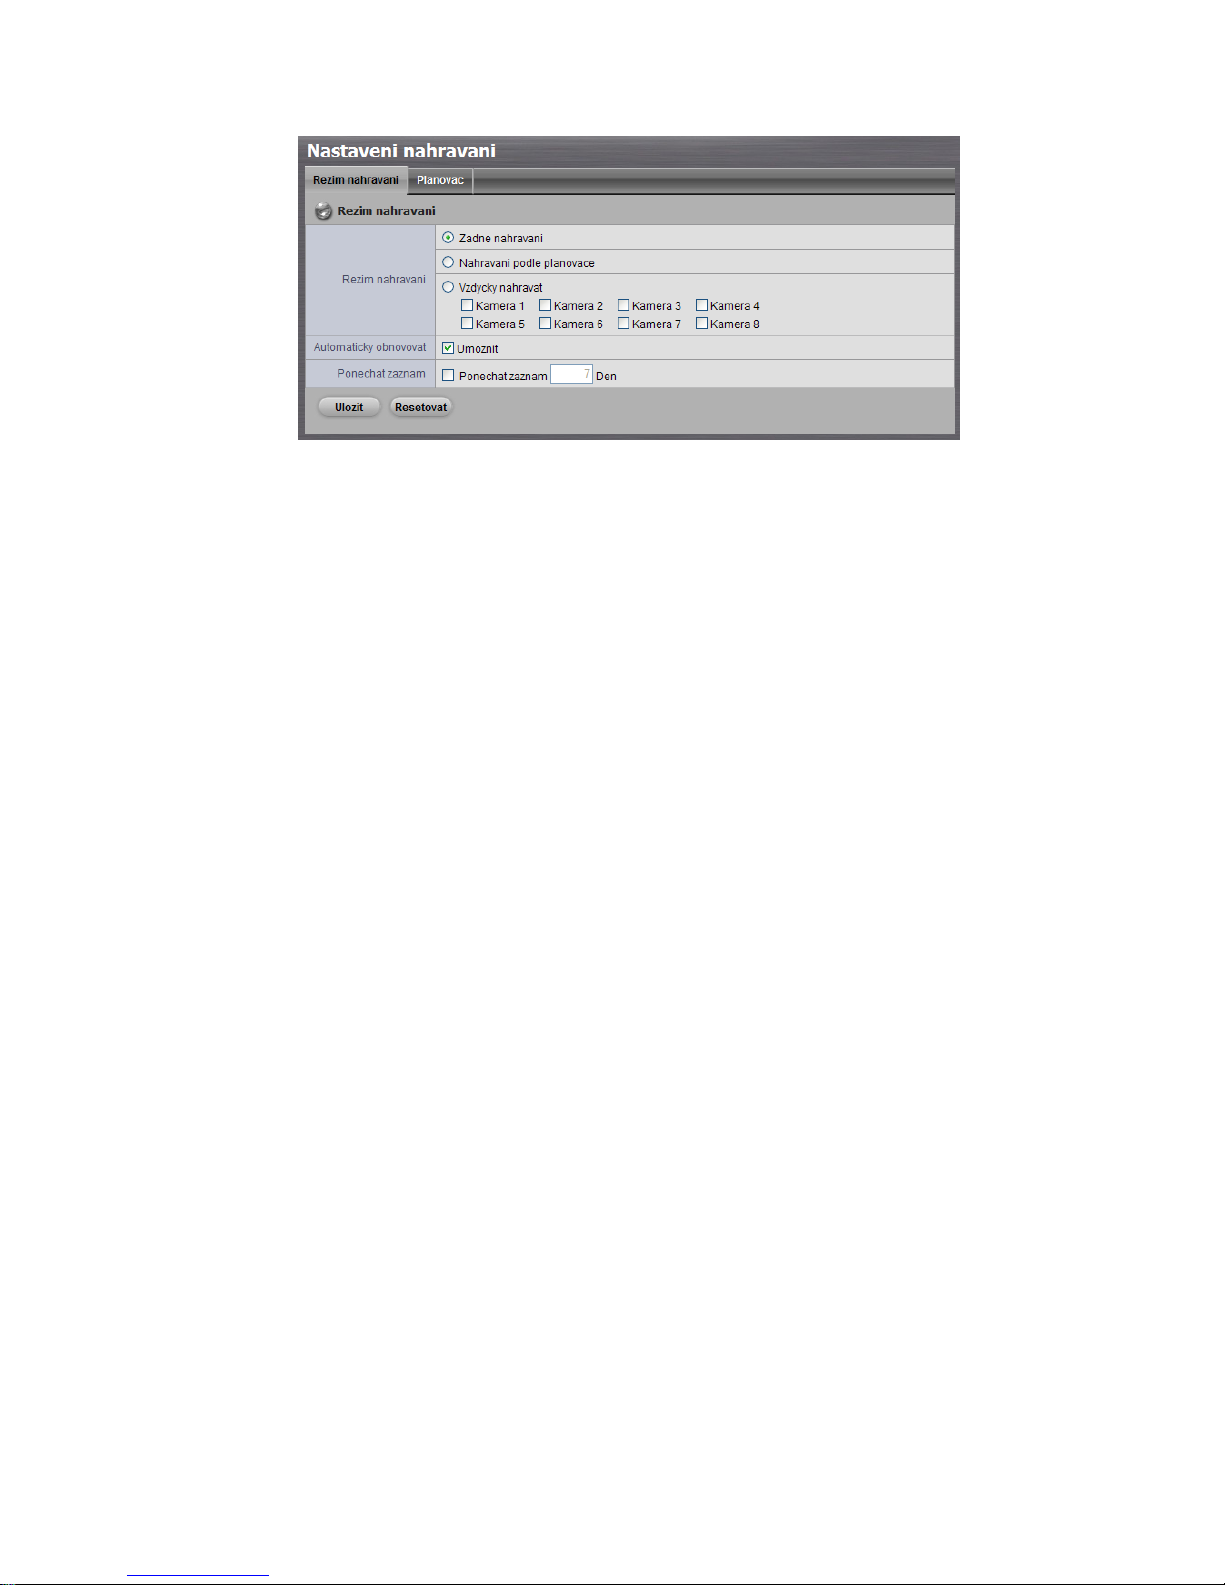
3. Klikněte na záložku Rezim nahravani.
4. Po zvolení Vzdycky nahravat, začnou vybrané kamery ihned nahrávat.
Page 41
40
Zadne nahravani: zrušení nahrávání.
Nahravani podle planovace: nahrávání podle plánu.
Vzdycky nahravat: zahájí u vybraných kamer trvalé nahrávání.
Automaticky obnovovat: zvolením Umoznit u této volby dojde
automaticky po zaplnění disku k jeho uvolnění („recycle disk space“).
Ponechat zaznam: nastavení periody, během níž nebude možné
nahrávané video smazat.
5. Zvolte Nahravani podle planovace, pokud potřebujete nastavit plán
nahrávání kamer.
6. Klikněte na Nahravani a udalost/ Nastaveni nahravani.
7. Klikněte na záložku Planovac.
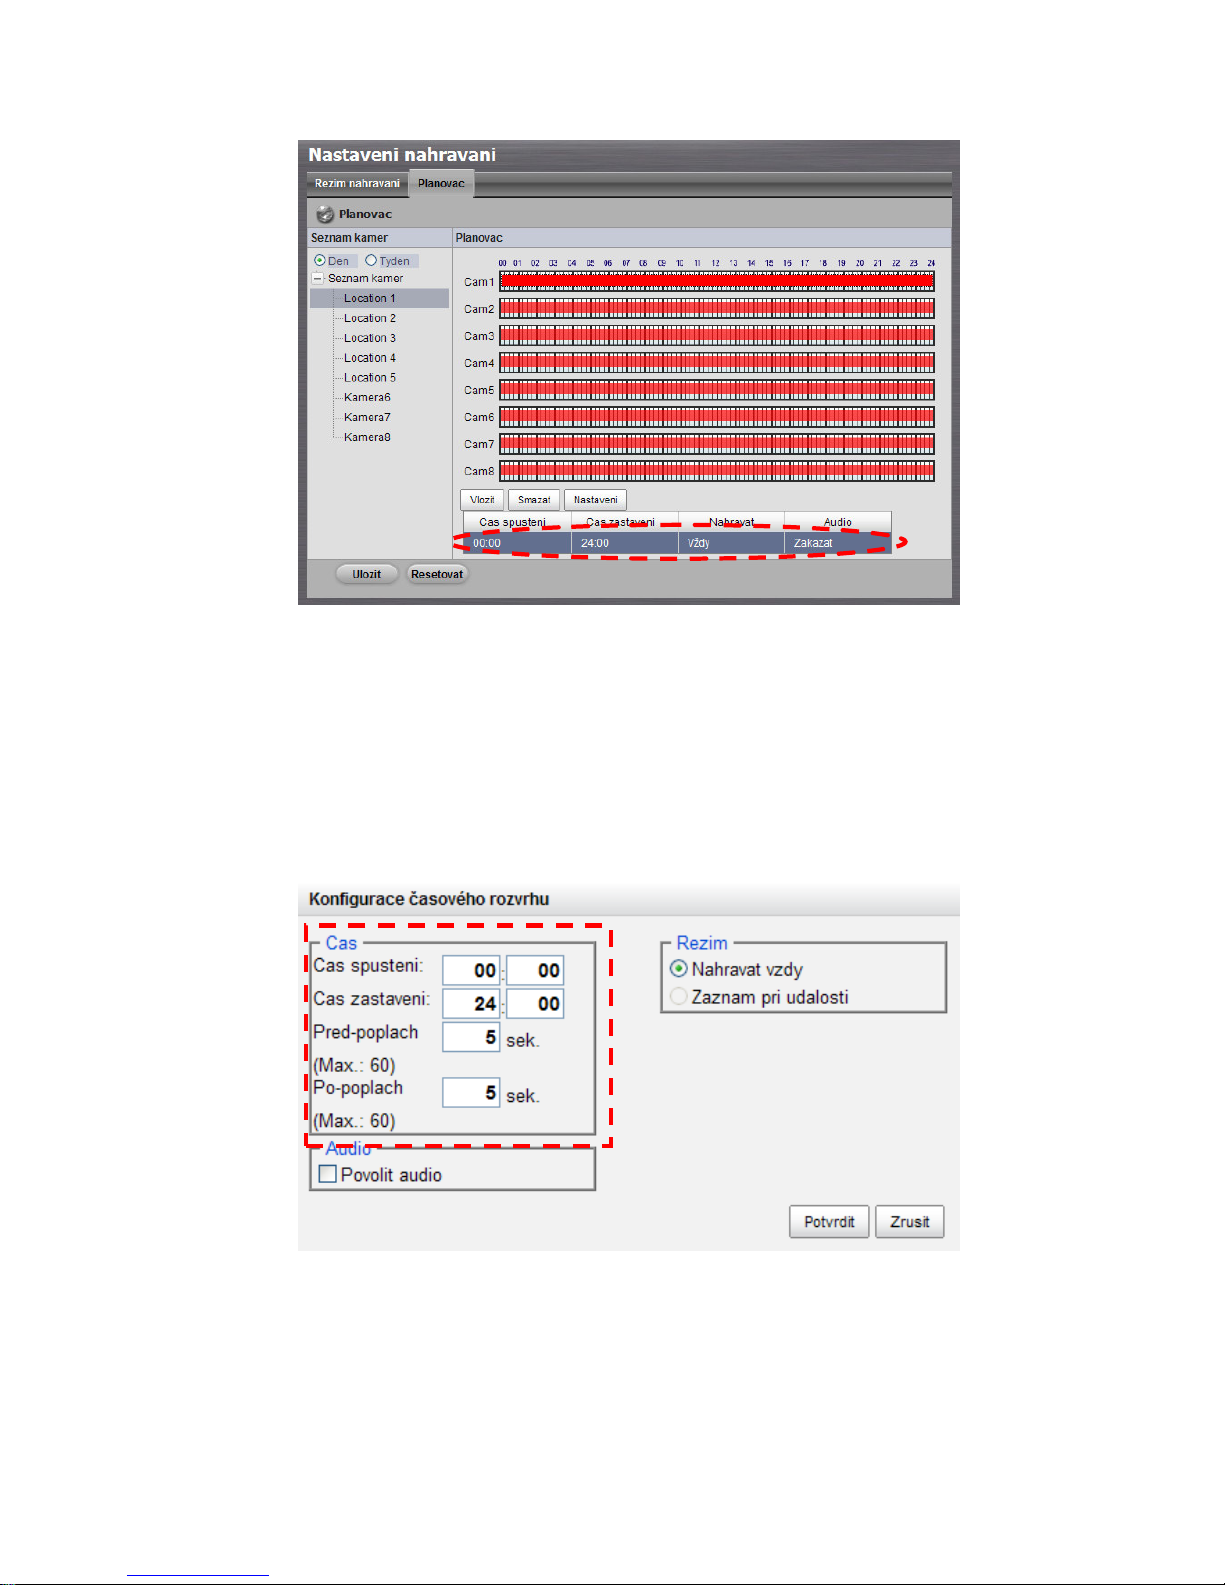
8. Zvolte plán nahrávání kamery, který má být upraven.
9. Klikněte na sloupec v dolní části stránky.
Page 42
41
Vložit: vložení nových plánů.
Smazat: smazání zvoleného plánu.
Nastaveni: úprava plánu a nastavení módu nahrávání.
10. Defaultní nastavení plánu nahrávání kamer je od 00:00 do 24:00 hodin.
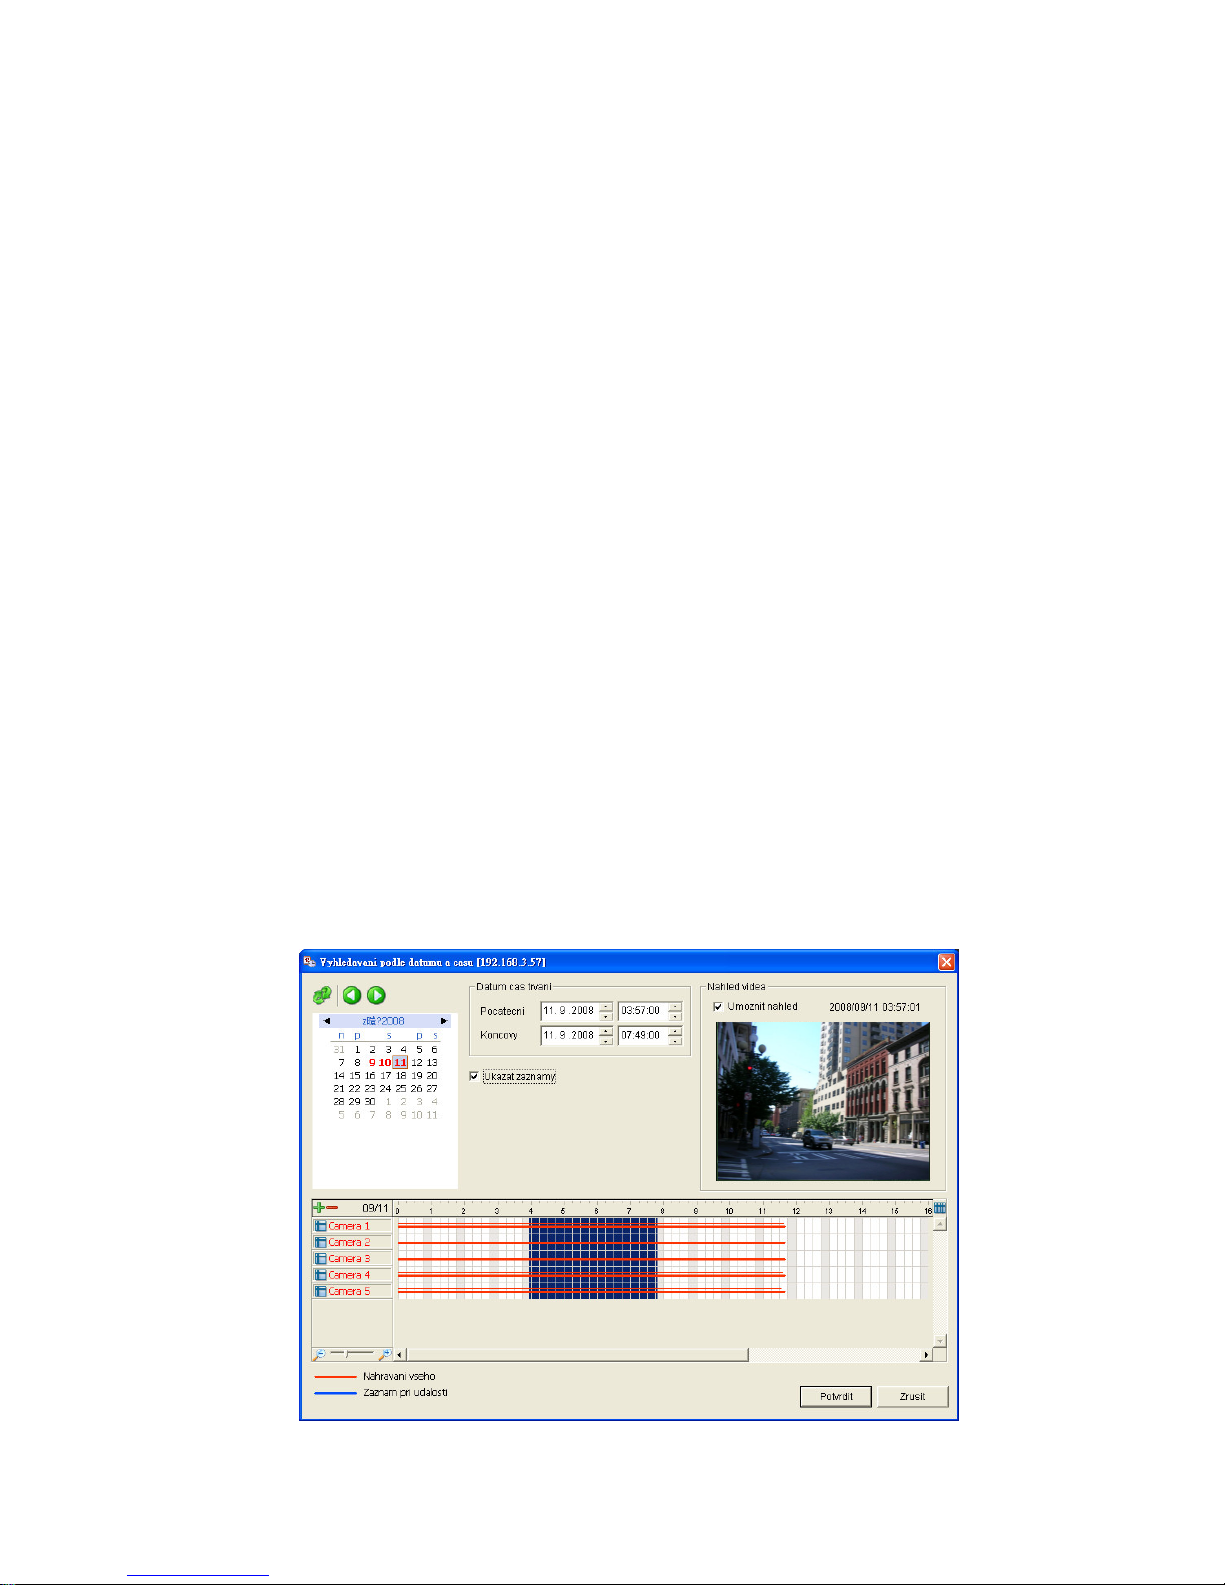
Chcete-li upravit časovou osu, klikněte na tlačítko Nastaveni.
11. Zvolte nahrávací mód.
Nahravat vzdy: stálé nahrávání.
Zaznam pri udalosti: nahrávání podle událostí. Událost může být
Page 43
42
nastavena volbou Pohyb nebo Digitalni vstup.
12. Chcete-li přidat další nový (nahrávací) plán, klikněte na tlačítko Vlozit.
13. Opakujte krok 12 k přidání nových plánů pro vybranou kameru.
14. Opakujte kroky 8 až 12 k nastavení dalších kamer.
15. Klikněte na tlačítko Ulozit.
Krok 10: Funkce přehrávání
Jsou dvě cesty k implementaci této funkce: prostřednictvím Internet
Exploreru nebo prostřednictvím aplikace Playback System (Systém
přehrávání).
Internet Explorer
1. Otevřete Internet Explorer a zalogujte jednotku.
2. Klikněte na tlačítko Prehravani v horní části stránky.
3. Klikněte na tlačítko Otevrit nahrávka.
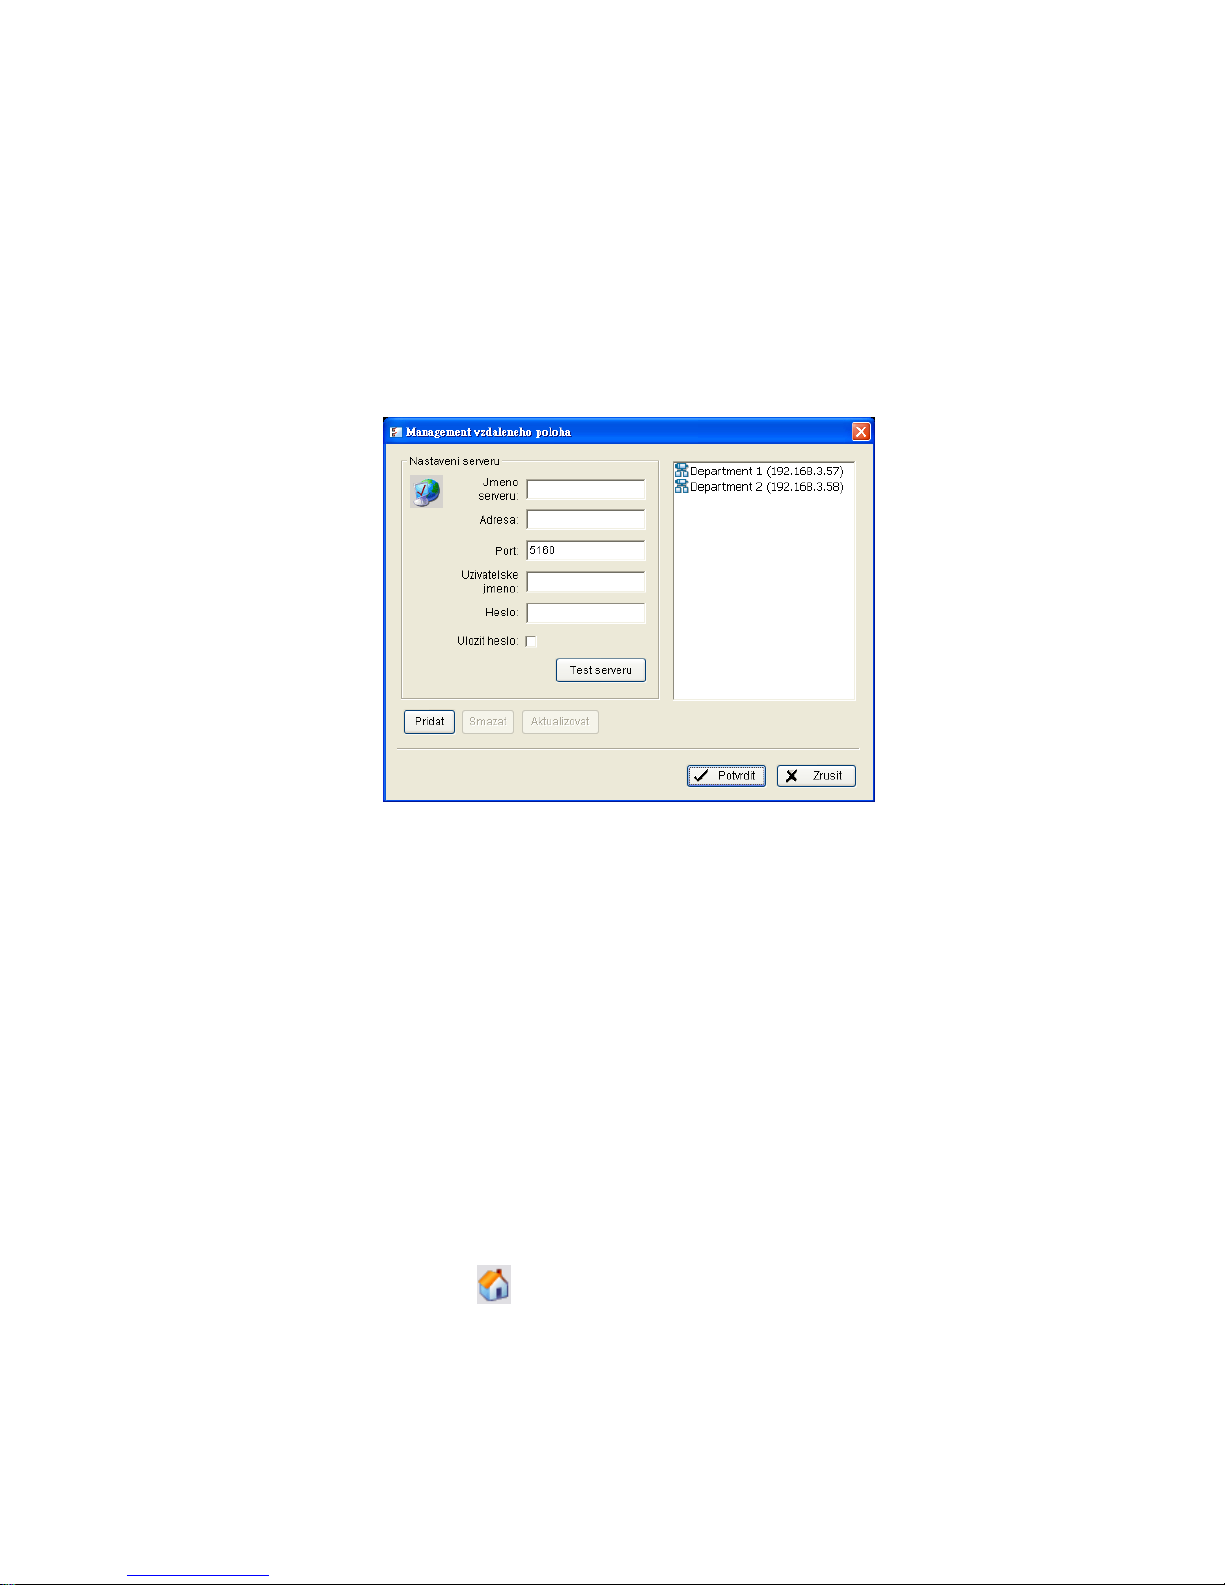
4. Okno „Record“ zobrazí informace o dostupných videoklipech. Zvolte
„date“ (datum) odkud chcete vyhledávat záznamy. Více viz uživatelský
manuál o tomto okně.
5. Označte (zesvětlete) video záznamy, které chcete prohlížet. Více viz
uživatelský manuál.
Page 44
43
6. Klikněte na tlačítko Potvrdit.
Aplikace Playback System (Systém přehrávání)
1. Jděte na Start > NUUO NVRmini > Playback System (Systém
přehrávání).
2. Klikněte na tlačítko Vzdálený serveru.
3. Vložte jméno vaší jednotky.
4. Vložte IP adresu jednotky.
5. Je-li to potřeba, upravte port.
6. Vložte uživatelské jméno.
7. Vložte heslo.
8. Označte volbu Uložit heslo.
9. Klikněte na tlačítko Test serveru ke spuštění testu spojení mezi lokální
aplikací a ovládací jednotkou.
10. Klikněte na tlačítko Pridat ke vložení jednotky do seznamu (Vzdálený
server list).
11. Klikněte na tlačítko Potvrdit.
12. Klikněte na tlačítko Otevrit nahrávka.
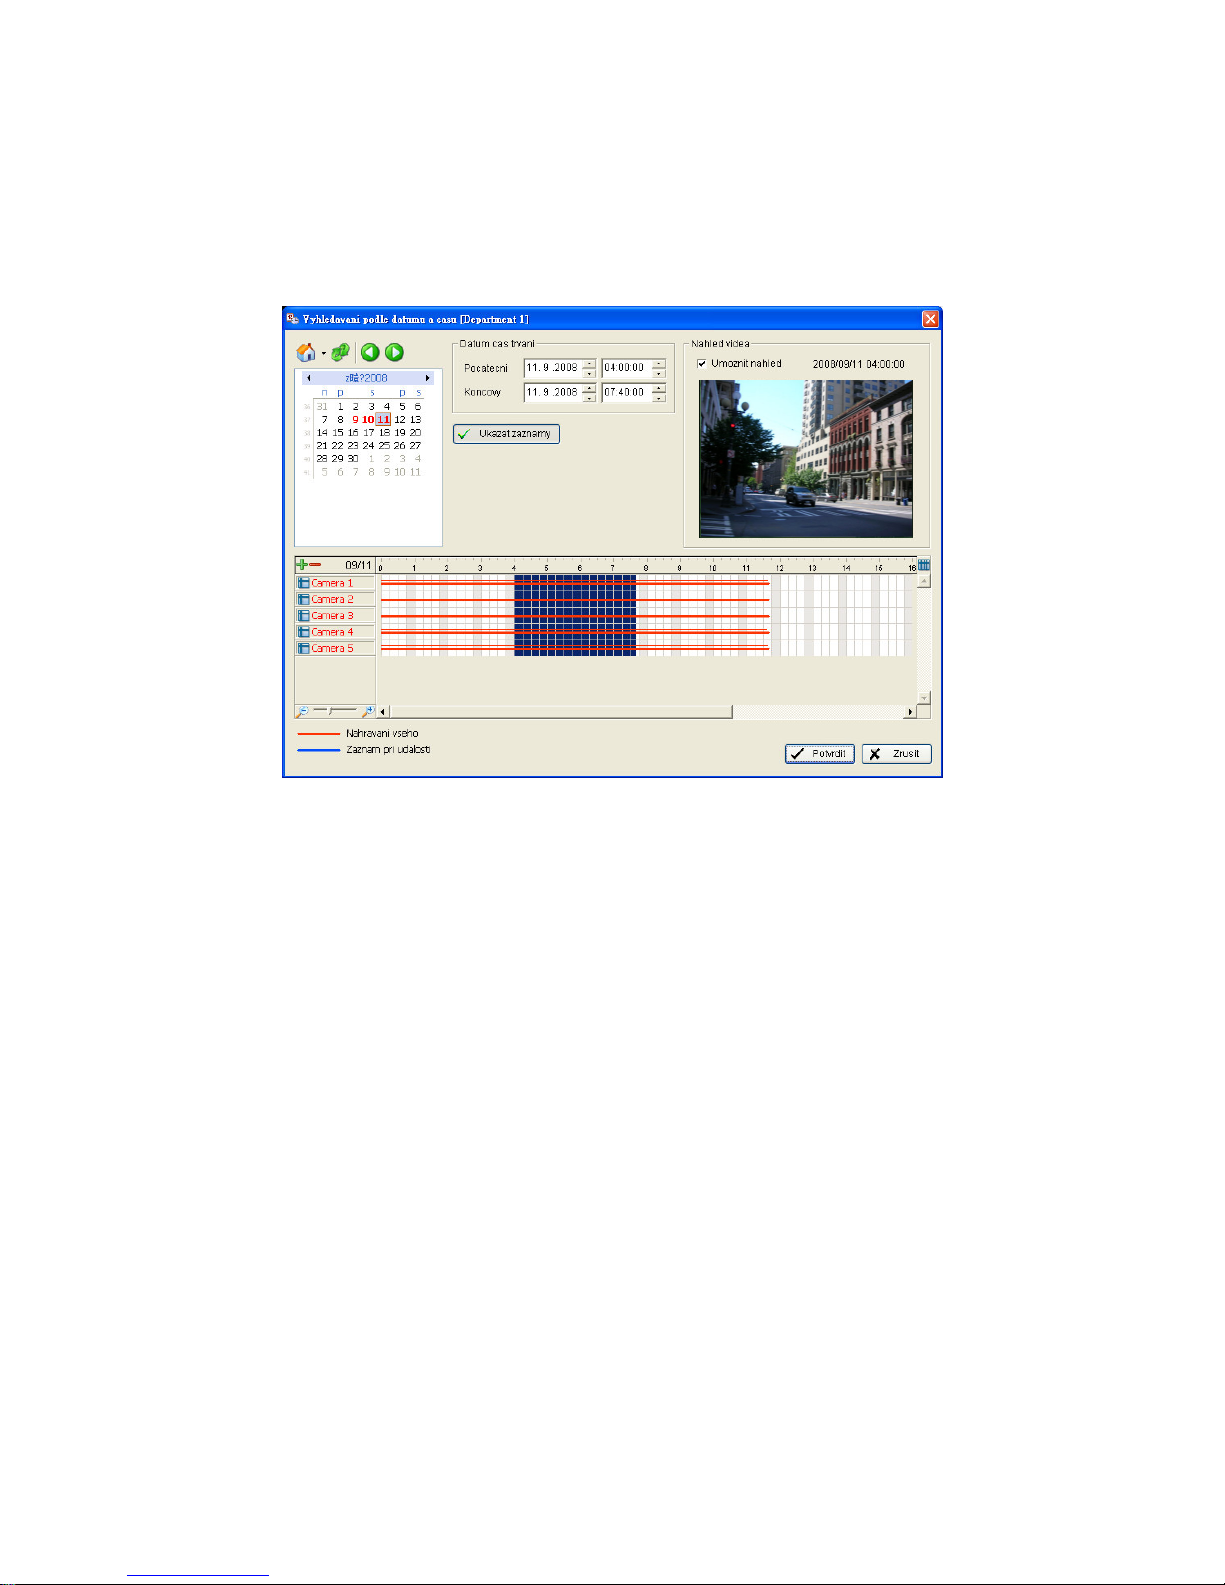
13. Klikněte na ikonu v horní části panelu Date-Time, čímž se otevře
další dialog (Remote Playback Site Management) a zvolte server, ke
kterému se chcete připojit.
14. Okno „Record Display“ zobrazuje informace o dostupných videoklipech.
Page 45
44
Zvolte „date“ (datum) odkud chcete vyhledávat záznamy. Více viz
uživatelský manuál o tomto okně.
15. Označte (zesvětlete) video záznamy, které chcete prohlížet. Více viz
uživatelský manuál.
16. Klikněte na tlačítko Potvrdit.
Page 46

45
Příloha A: Záložní funkce
K zálohování vašich souborů vedou tři cesty: prostřednictvím Internet
Exploreru, prostřednictvím aplikace Playback System (Systém
přehrávání) nebo prostřednictvím aplikace Backup System (Zalohovani
systém).
Internet Explorer
1. Otevřete Internet Explorer a zalogujte jednotku.
2. Klikněte na tlačítko Otevrit nahrávka.
3. Klikněte na tlačítko Zalohovat.
4. Nastavte počáteční a konečný čas, pro který chcete data zálohovat.
5. Zvolte kamery, které chcete zálohovat.
6. Zvolte adresář, kam budou zálohovaná data uložena.
7. Klikněte na tlačítko Zalohovat.
Aplikace Playback System (Systém přehrávání)
1. Jděte na Start > NUUO NVRmini > Playback System (Systém
přehrávání).
2. Klikněte na tlačítko Otevrit nahrávka k selekci dat.
3. Klikněte na tlačítko Zalohovat.
4. Nastavte počáteční a konečný čas, pro který chcete data zálohovat.
5. Zvolte kamery, které chcete zálohovat.
6. Zvolte adresář, kam budou zálohovaná data uložena.
7. Klikněte na tlačítko Zalohovat.
Aplikace Backup System (Zálohovat systém)
1. Jděte na Start > NUUO NVRmini > Backup System (Zálohovat systém).
2. Vložte IP adresu vaší jednotky v přihlašovacím okně.
3. Vložte uživatelské jméno.
4. Vložte heslo.
5. Klikněte na tlačítko Potvrdit.
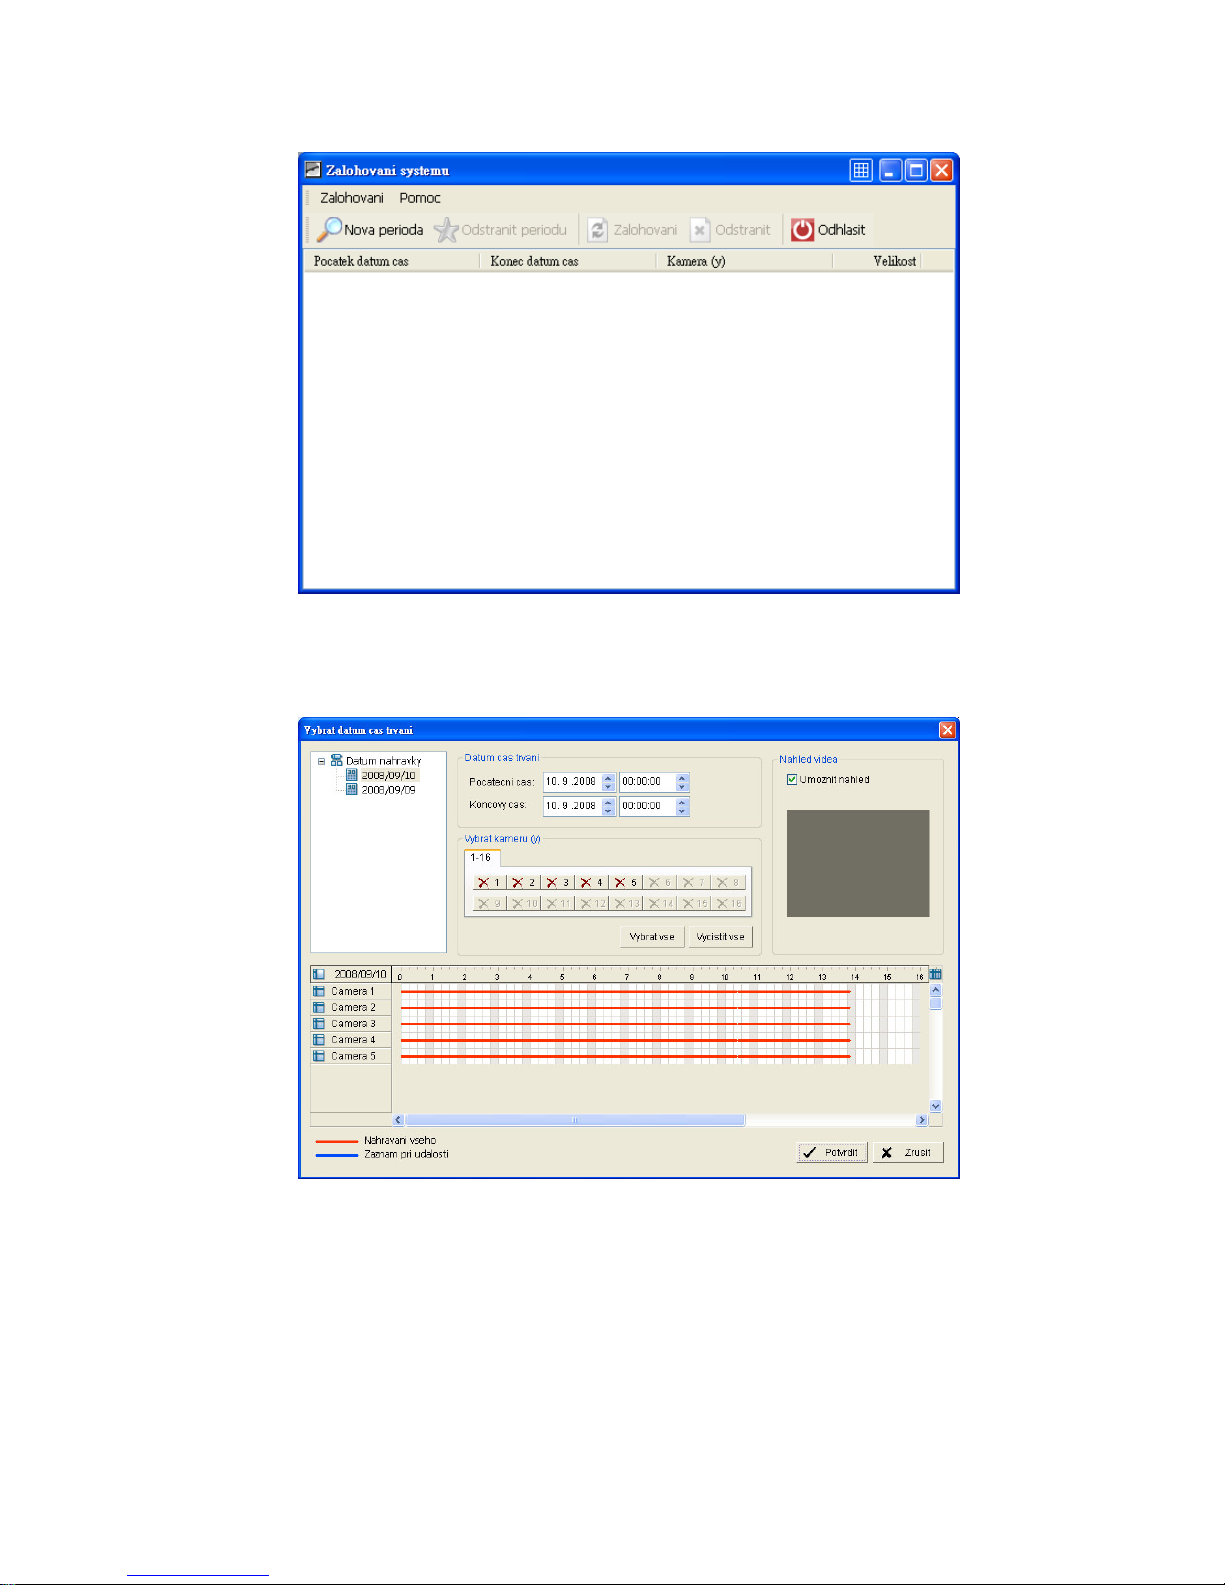
6. Klikněte na tlačítko Nova perioda.
Page 47
46
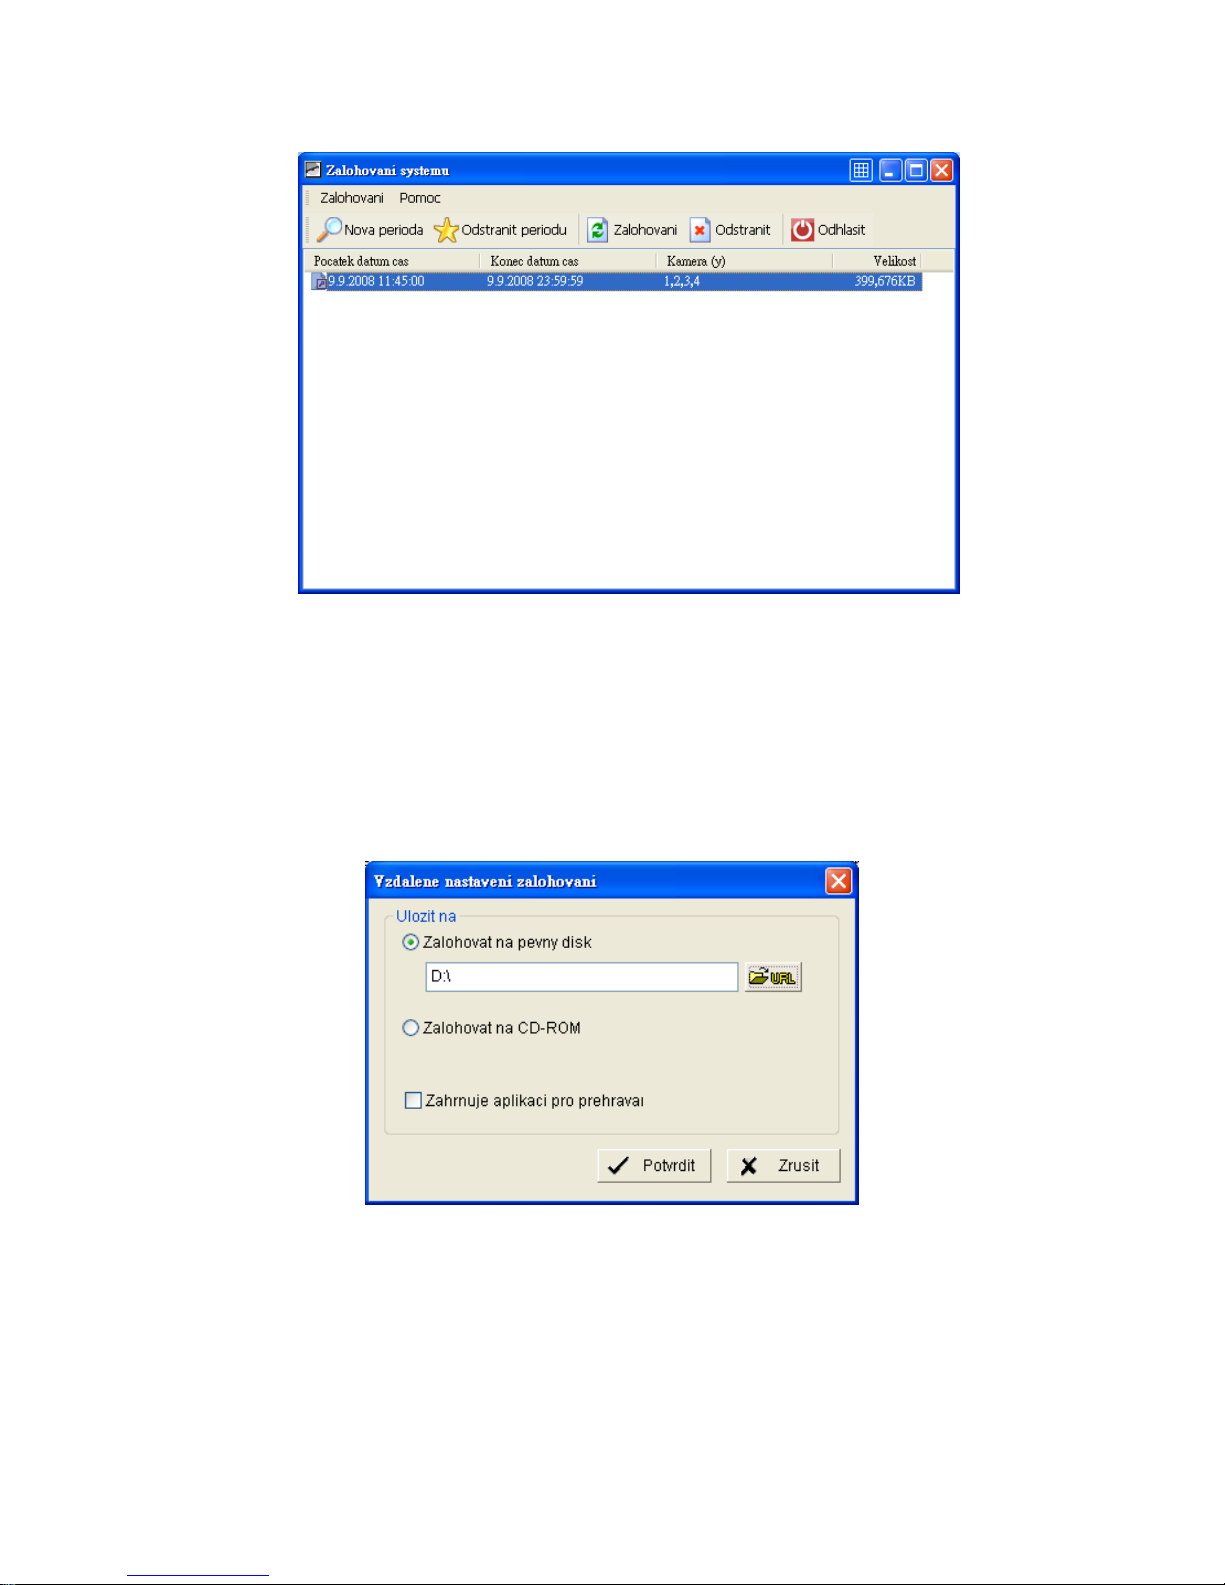
7. Zvolte datum nahrávky.
8. Nastavte počáteční a konečný čas, pro který chcete data zálohovat
(nebo požadované video záznamy označte – zvýrazněte)
9. Zvolte kamery, které chcete zálohovat.
10. Klikněte na tlačítko Potvrdit.
11. Zvolte časový úsek (slot) který chcete zálohovat.
Page 48
47
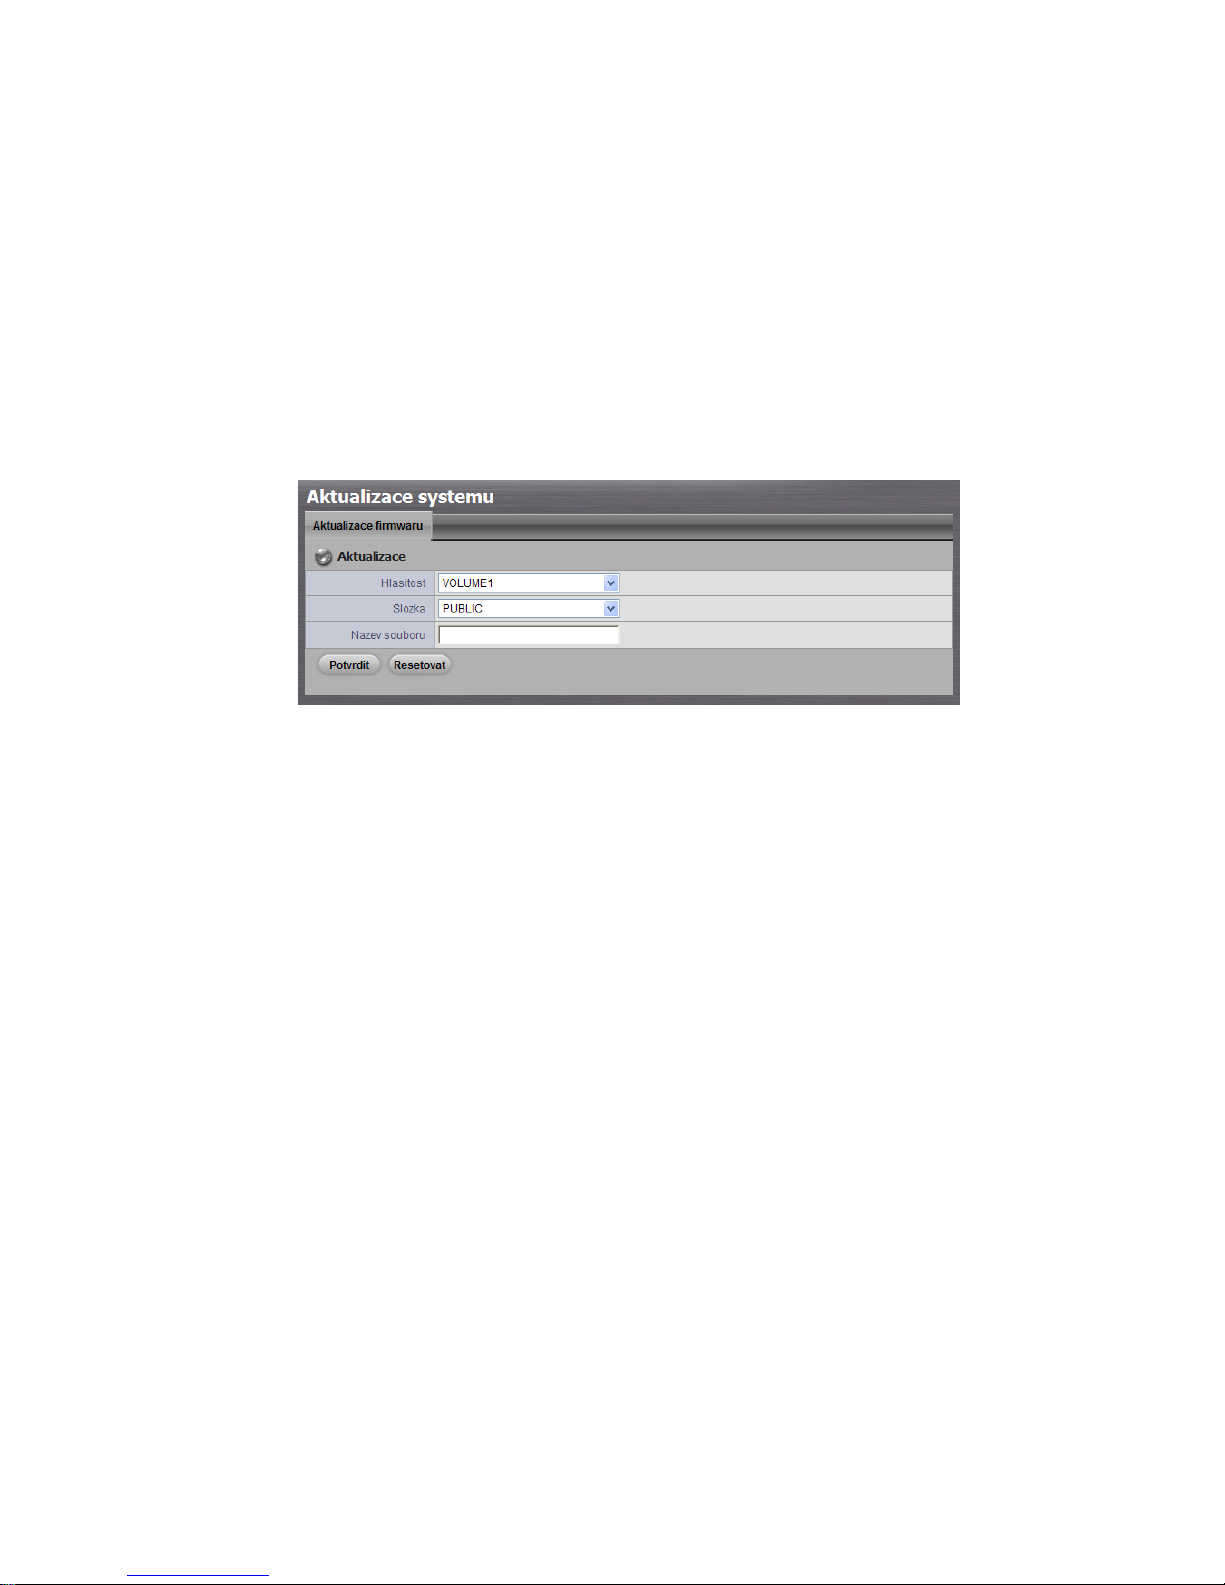
12. Klikněte na tlačítko Zalohovat.
13. Zvolte cestu a adresář, kam chcete zálohovat data.
14. Označte volbu Zahrnuje aplikaci pro přehráváí, která přidá aplikaci
Prehravani do záložního adresáře.
15. Klikněte na tlačítko Potvrdit.
Page 49
48
Příloha B: Funkce Firmware Upgrade
1. Najděte jednotku prostřednictvím Windows Exploreru (vložte “\\” plus IP
adresu vaší jednotky).
2. K přihlášení použijte administrátorské ID a heslo.
3. Uložte updatovací soubor do adresáře “public” ve vaší jednotce.
4. Otevřete Internet Explorer a zalogujte jednotku.
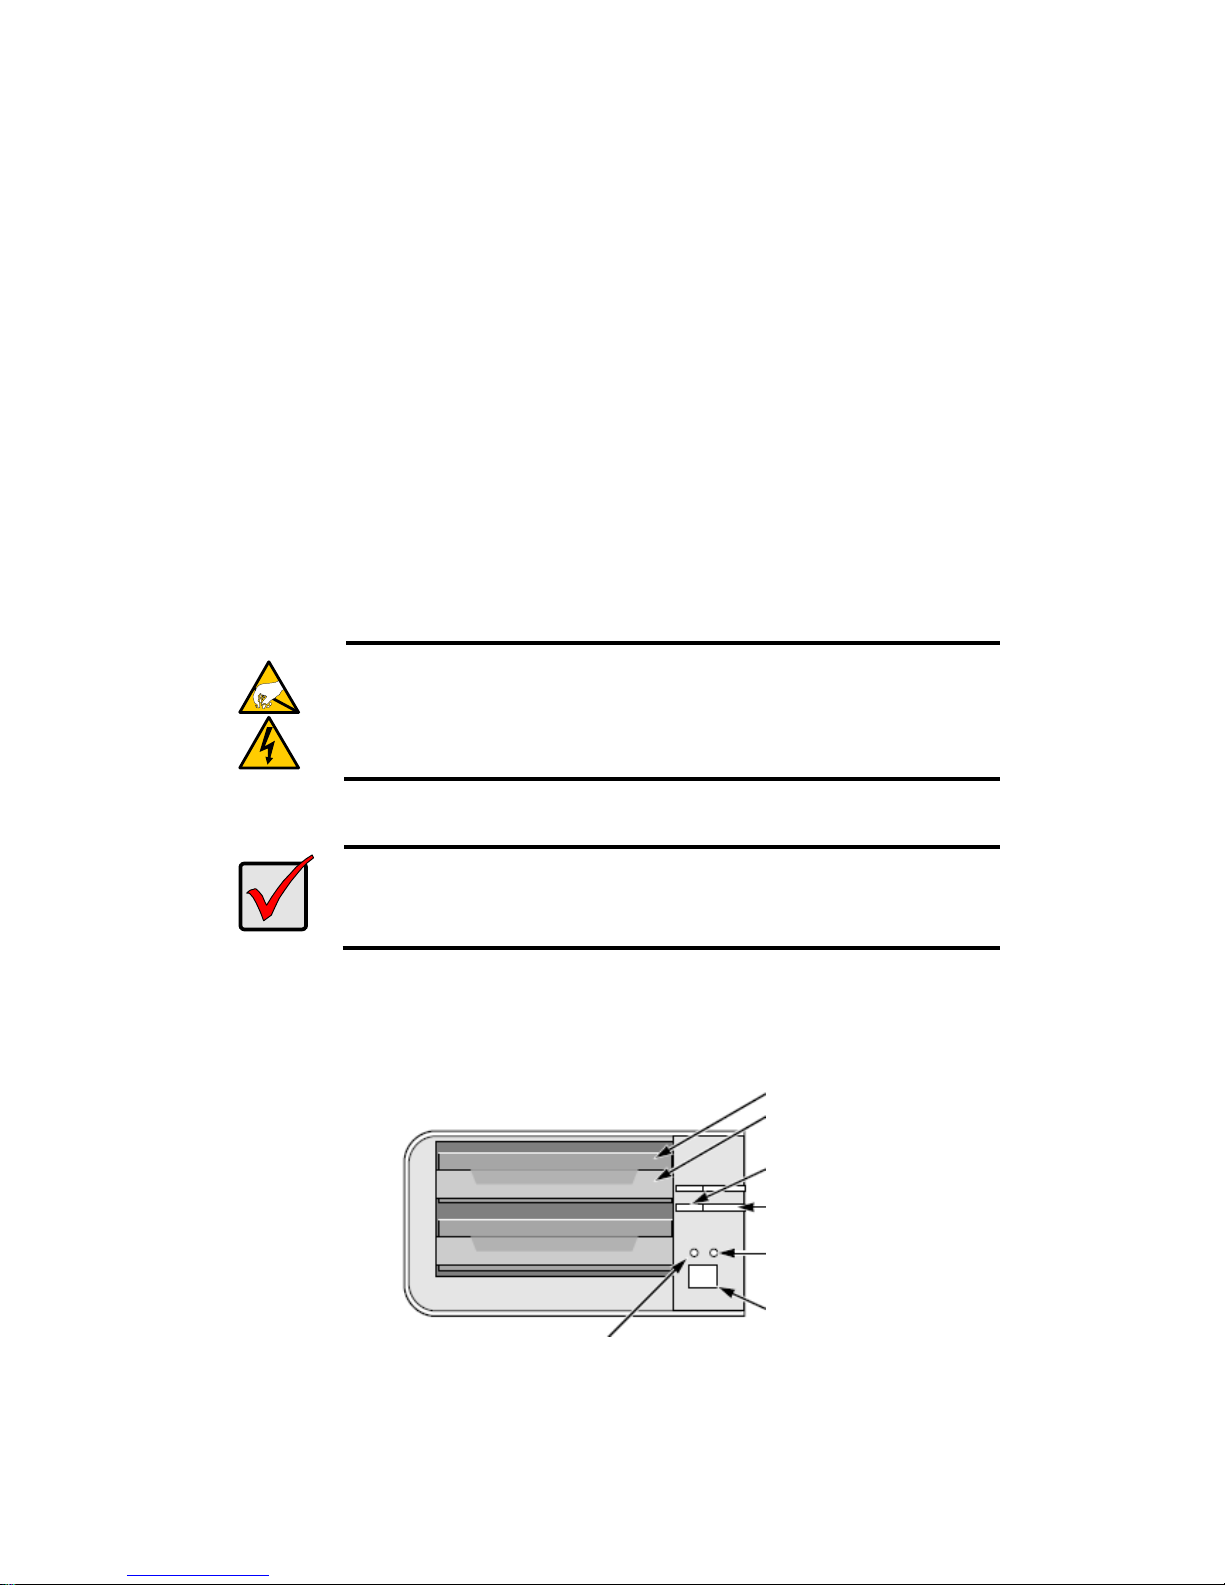
5. Klikněte na System/ Aktualizace systemu.
6. Klikněte na záložku Aktualizace firmwaru.
7. Zvolte volume.
8. Zvolte adresář “public”.
9. Vložte celé jméno souboru včetně přípony.
10. Klikněte na tlačítko Potvrdit.
11. Systém spustí proces upgrade.
12. Po ukončení upgrade se systém restartuje. Poté musíte jednotku
přihlásit znovu.
Page 50
49
Schritt 1: Das Gerät auspacken
Zum Lieferumfang gehören:
Das Gerät
Kurzanleitung
Schrauben für die Festplatten (1 Päckchen)
Netzkabel
Garantiekarte
12V DC Netzadapter (2-Bay)
CD mit Install Wizard (Installationsassistenten), Backup
(Sicherung), Live View (Live Ansicht), und Playback
(Wiedergabe), Benutzeranleitung und Kurzanleitung
Warnhinweis
Die elektronischen Bauteile in diesem Gerät reagieren
empfindlich auf elektrostatische Entladung (ESD). Seien Sie
beim Umgang mit dem Gerät oder seinen Bauteilen stets
vorsichtig.
Wichtig
Um das Gerät konfigurieren zu können, müssen Sie zunächst die
Software auf ein Desktop/Laptop-PC mit Windows Vista, 2003,
XP Professional oder 2000 Betriebssystem installieren.
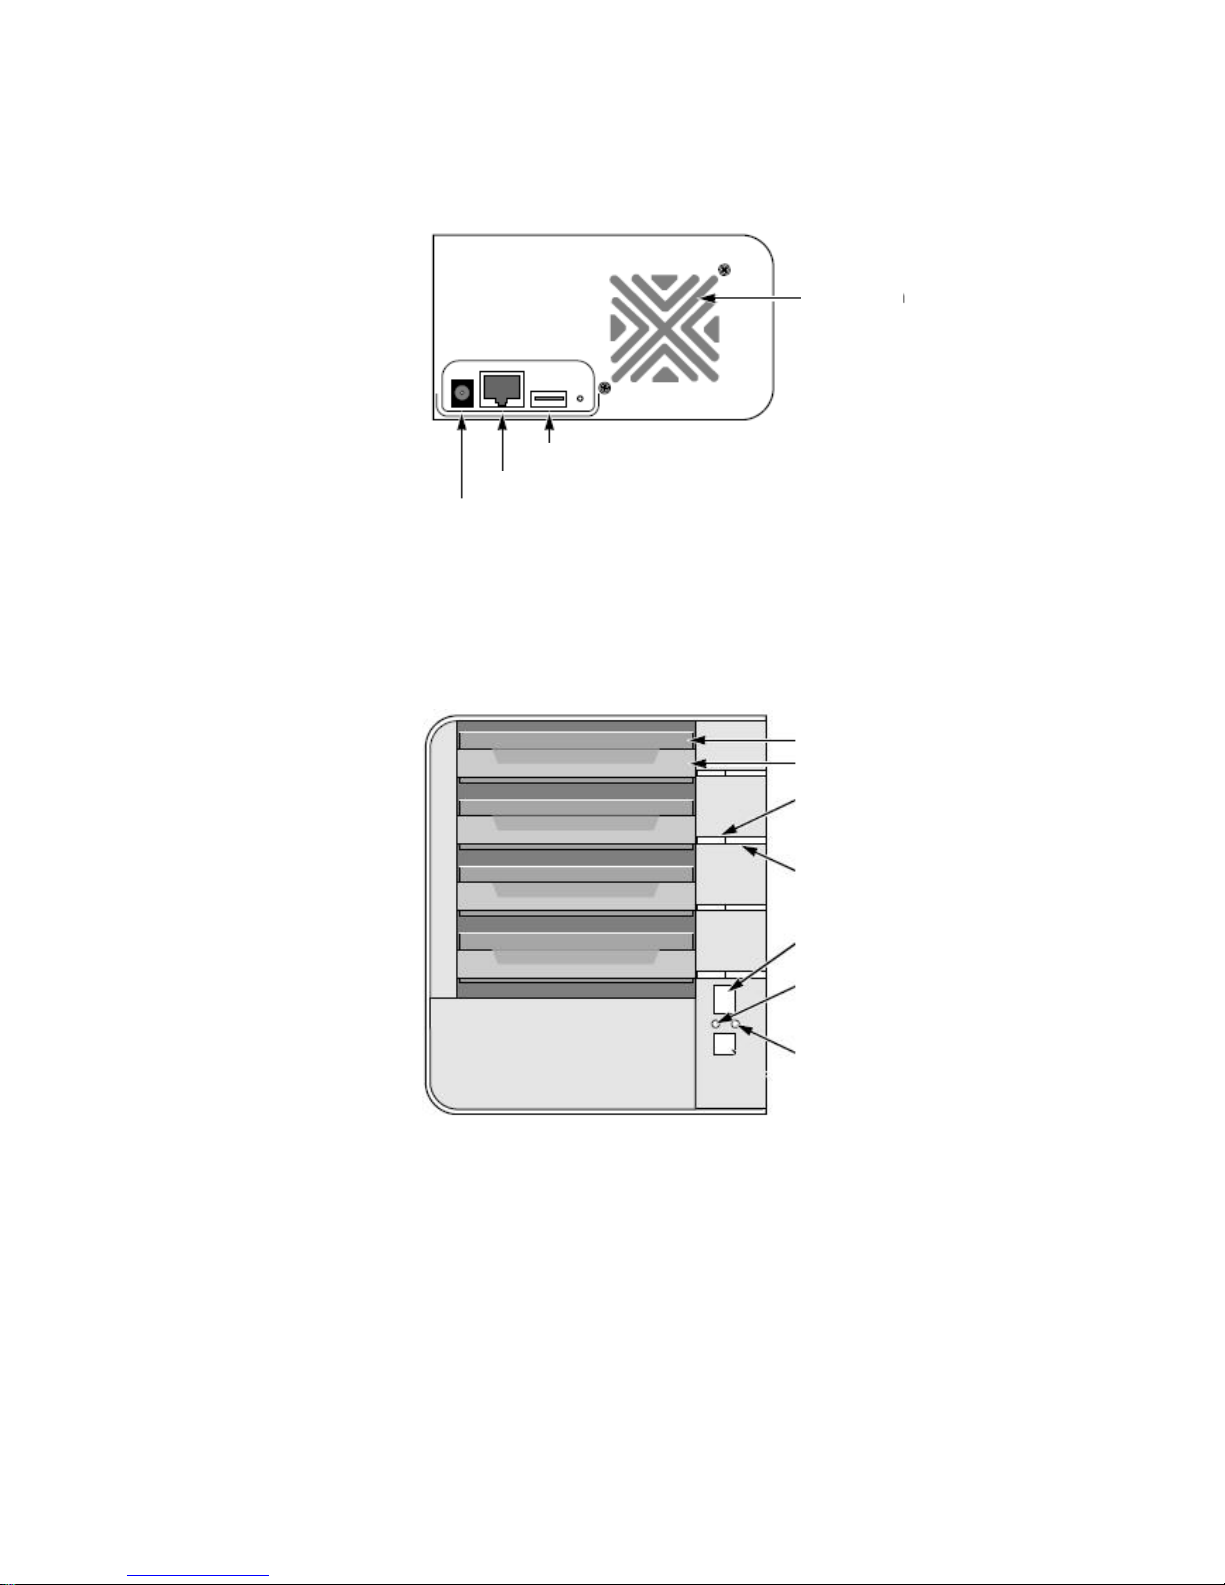
2-Bay (4 Kanäle) Frontansicht
Festplatte
Festplattenträger
Festplattenstatus-LED
Festplattenaktivitäts-LED
Ethernet-Aktivität-LED
Netztaste
Systemstatus-LED
Page 51
50
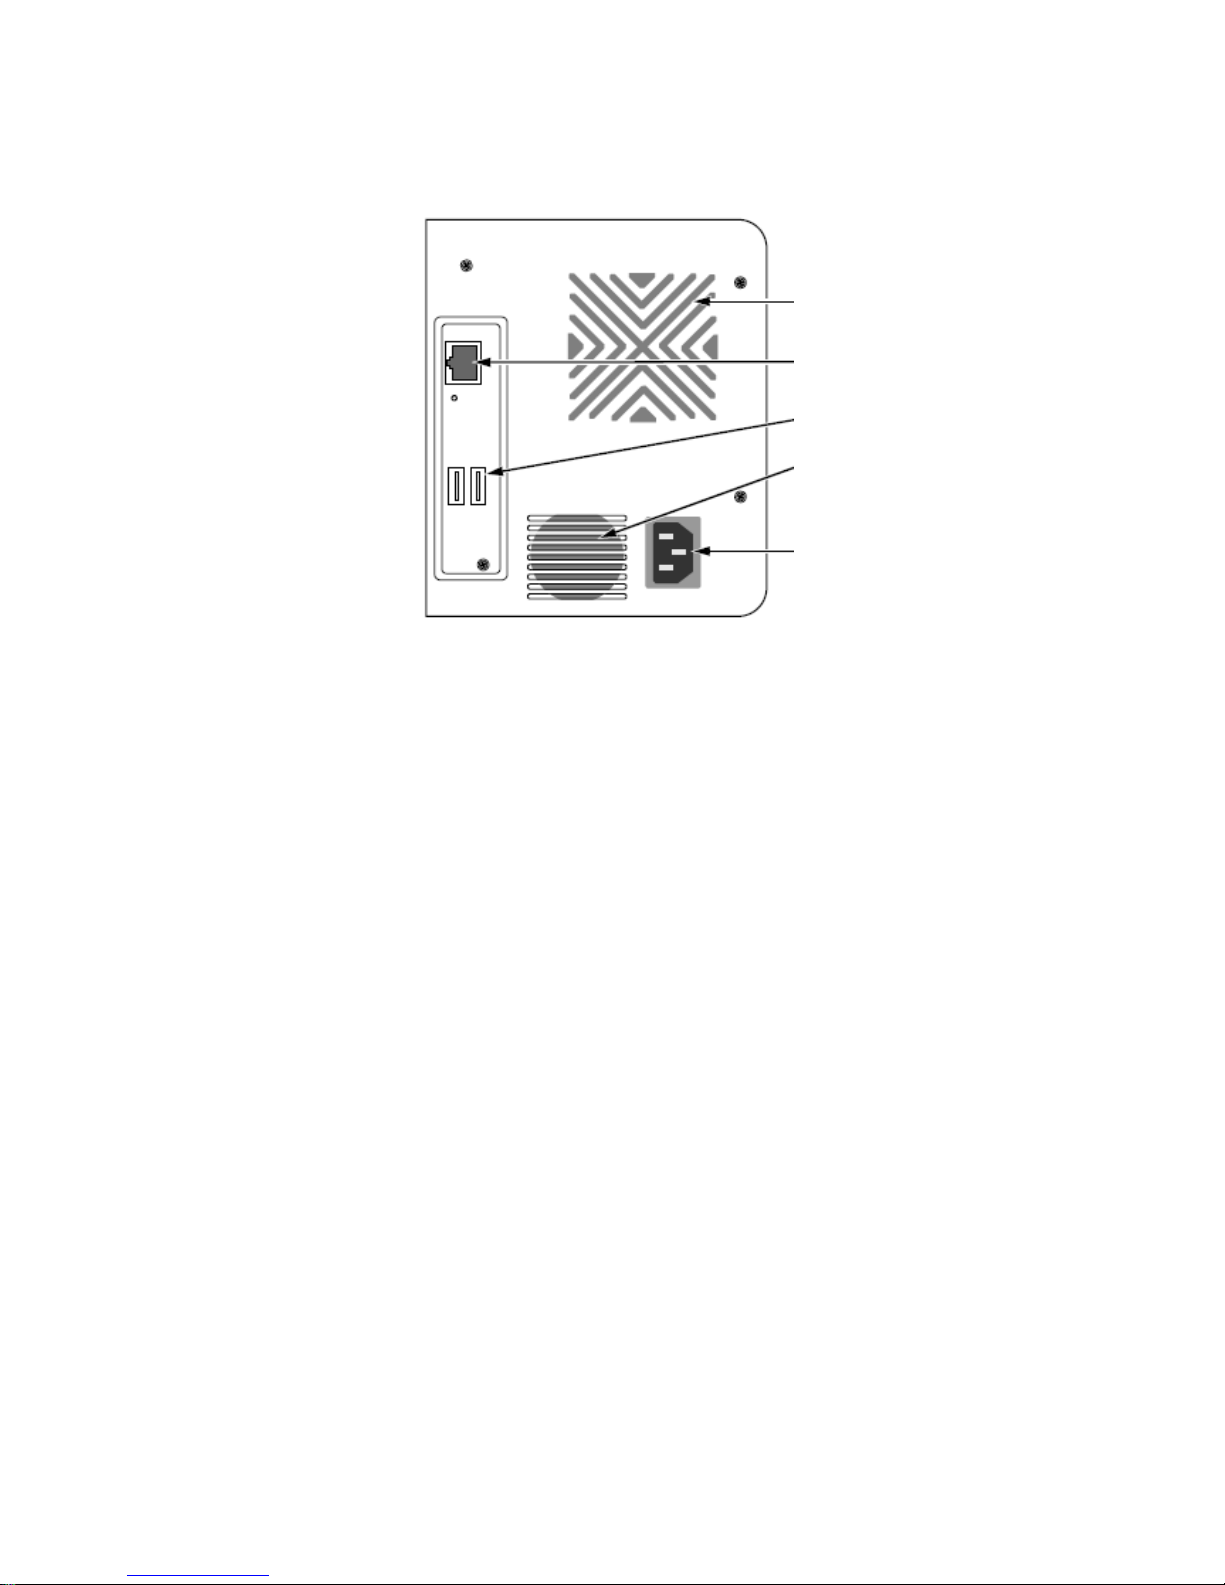
2-Bay (4 Kanäle) Rückansicht
4-Bay (8 Kanäle) Frontansicht
Festplatte
Festplattenträger
Festplattenstatus-LED
Festplattenaktivitäts-LED
Ethernet-Aktivität-LED
Netztaste
Systemstatus-LED
Lüfter
USB-Anschluss
RJ45 Netzwerkverbindung
Netzanschluss
Page 52
51
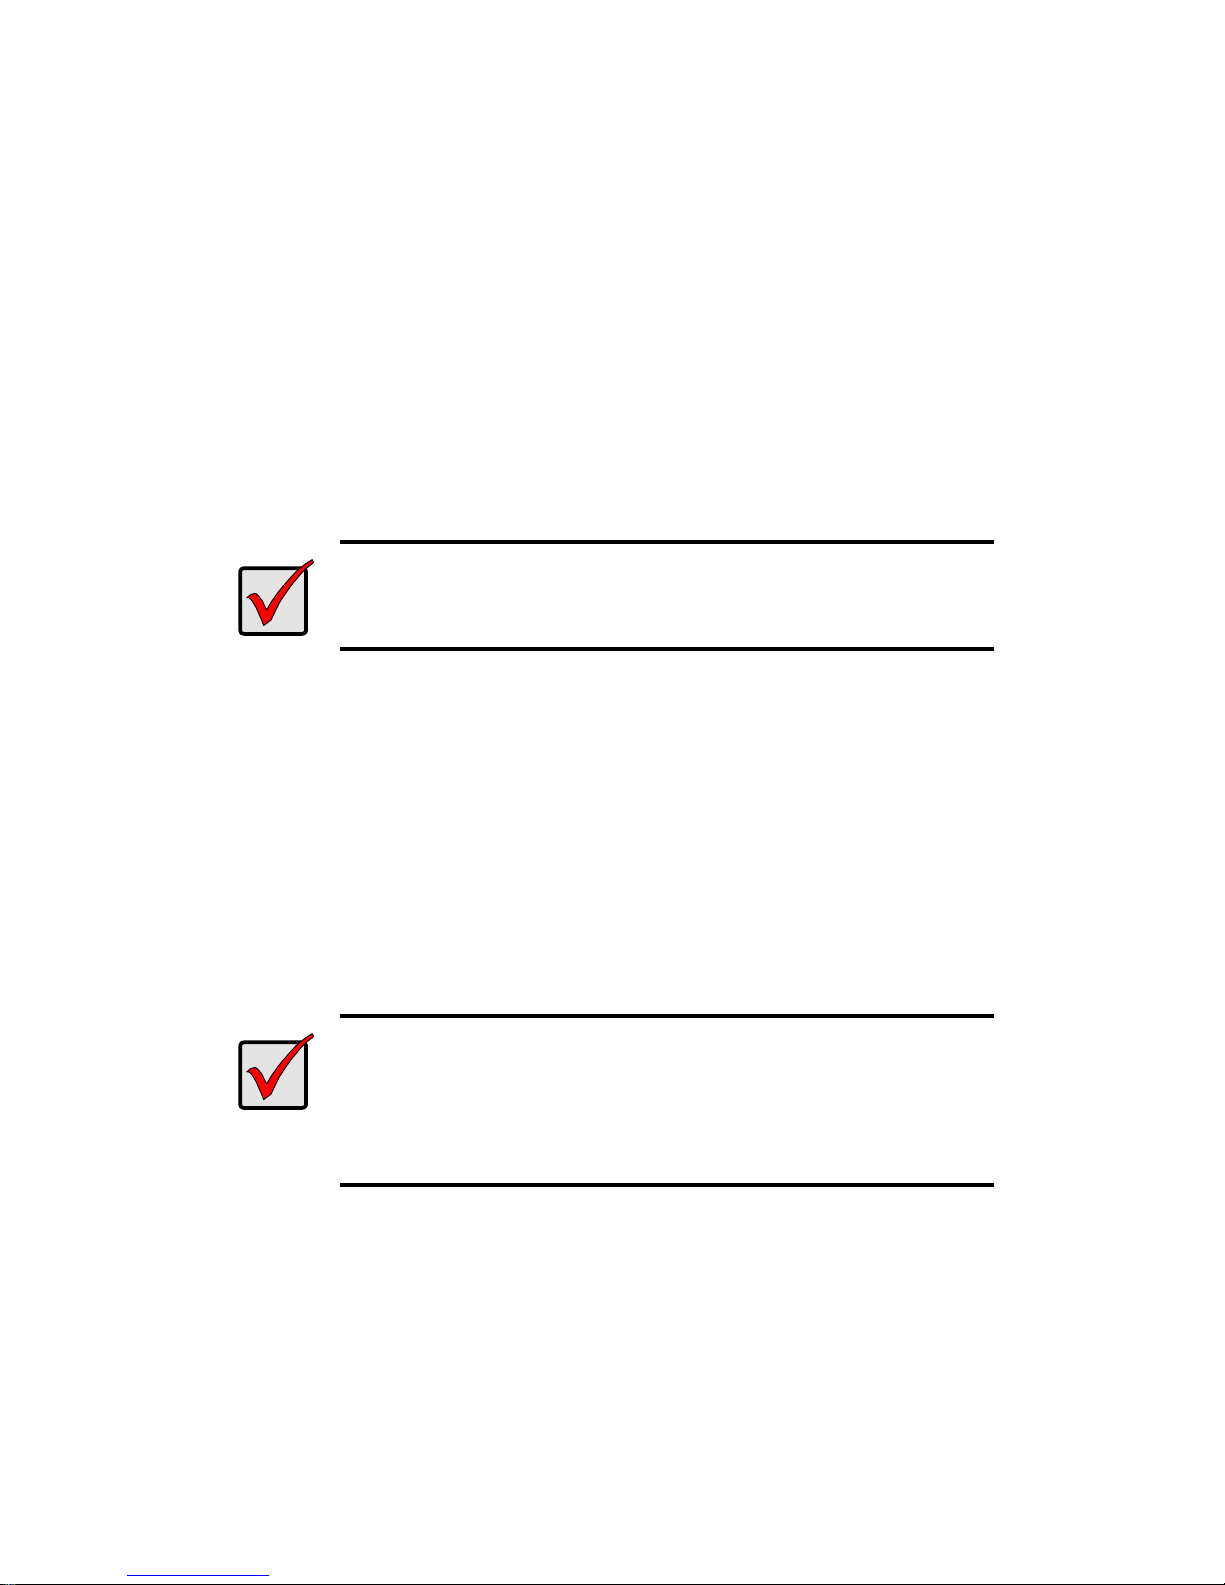
4-Bay (8 Kanäle) Rückansicht
Schritt 2: Installation der Festplatten
Sie können dieses Gerät mit SATA 1.5 Gb/s oder 3.0 Gb/s Festplatten
bestücken. Die beste Leistung erhalten Sie, wenn Sie das gleiche
Festplattenmodell mit derselben Kapazität installieren. Die Festplatten
werden als RAID-Volume in diesem Gerät installiert.
1. Öffnen Sie die Frontklappe des Gehäuses.
2. Ziehen Sie einen Festplattenträger aus dem Gehäuse heraus. Siehe die
Abbildung der Frontansicht.
3. Legen Sie die Festplatte vorsichtig so in den Festplattenträger ein, dass
sich die Schraubenöffnungen an den Seiten des Trägers mit den
Gewindebohrungen im Laufwerk decken.
4. Stecken Sie die Schrauben durch die Bohrungen im Festplattenträger in
die Seiten der Festplatte.
Verwenden Sie bei der Installation ausschließlich die mitgelieferten
Senkkopfschrauben.
Verwenden Sie vier Schrauben pro Festplatte.
Ziehen Sie jede Schraube an. Vermeiden Sie dabei ein Überdrehen.
Lüfter
RJ45 Netzwerkverbindung
USB-Anschluss
Netzteillüfter
Netzanschluss
Page 53
52
5. Installieren Sie den Festplattenträger wieder im Gehäuse.
6. Wiederholen Sie die Schritte 2 bis 5, bis alle Festplatten eingebaut sind.
7. Schließen Sie die Frontklappe des Geräts.
Schritt 3: Verbinden mit dem Netzwerkk
1. Schließen Sie das eine Ende des Netzwerkkabels an den
RJ45-Netzwerkanschluss. Siehe die Abbildung der Rückansicht.
2. Schließen Sie das andere Ende des Netzwerkkabels an den
Ethernet-Hub oder -Switch.
Wichtig
Sollten Sie über mehrere Netzwerke verfügen, vermerken Sie,
mit welchem Ihr Gerät verbunden ist. Sie benötigen diese
Information später beim Setup.
Schritt 4: Anschließen der Netzversorgung
1. Verbinden Sie das Netzkabel mit der Steckdose und dem Netzadapter.
2. Schließen Sie das Netzkabel an der Rückseite des Gehäuses an. Siehe
die Abbildung der Rückansicht.
3. Drücken Sie die Netztaste an der Frontseite des Geräts. Siehe die
Abbildung der Frontansicht.
Wichtig
Achten Sie vor dem Booten darauf, dass die beiden Enden des
Netzwerkkabels an das Gerät und den Ethernet-Router
geschlossen sind. Aktivieren Sie die DHCP-Funktion im
Netzwerk, damit das Gerät seine IP-Adresse standardmäßig
über DHCP erhält.
Das Gerät benötigt etwa eine Minute zum Booten. Wenn das Booten
abgeschlossen ist:
Die Systemstatus-LED leuchtet grün. Siehe die Abbildung der
Frontansicht.
Der Summer piept einmal.
Page 54

53
Schrit 5: Installation der Software
1. Legen Sie die CD in Ihr CDROM-Laufwerk ein.
2. Doppelklicken Sie auf Setup.exe, um mit der Installation zu beginnen.
3. Klicken Sie auf die Schaltfläche WEITER, um mit der Installation zu
beginnen.
4. Klicken Sie auf die Option “Ich stimme den Bedingungen des
Lizenzvertrags zu”, und klicken Sie dann auf die WEITER Schaltfläche.
5. Geben Sie Ihren “Benutzernamen” und “Firmennamen” an, und klicken
dann auf die WEITER Schaltfläche.
6. Wählen Sie den Setuptyp und klicken anschließend auf die WEITER
Schaltfläche.
7. Klicken Sie auf die INSTALLIEREN Schaltfläche, um mit der Installation
fortzufahren.
8. Wenn die Installation beendet ist, wird der abschließende
Installationsdialog angezeigt. Klicken Sie auf die FERTIG STELLEN
Schaltfläche, um das Installationsprogramm zu schließen.
Schritt 6: Einrichten des Geräts
Der Software Installationsassistent führt das Setup auf Ihrem Gerät
durch. Nach diesem Vorgang können Sie das Gerät benutzen.
1. Gehen Sie zu Start > NUUO NVRmini > Install Wizard
(Installationsassistent).
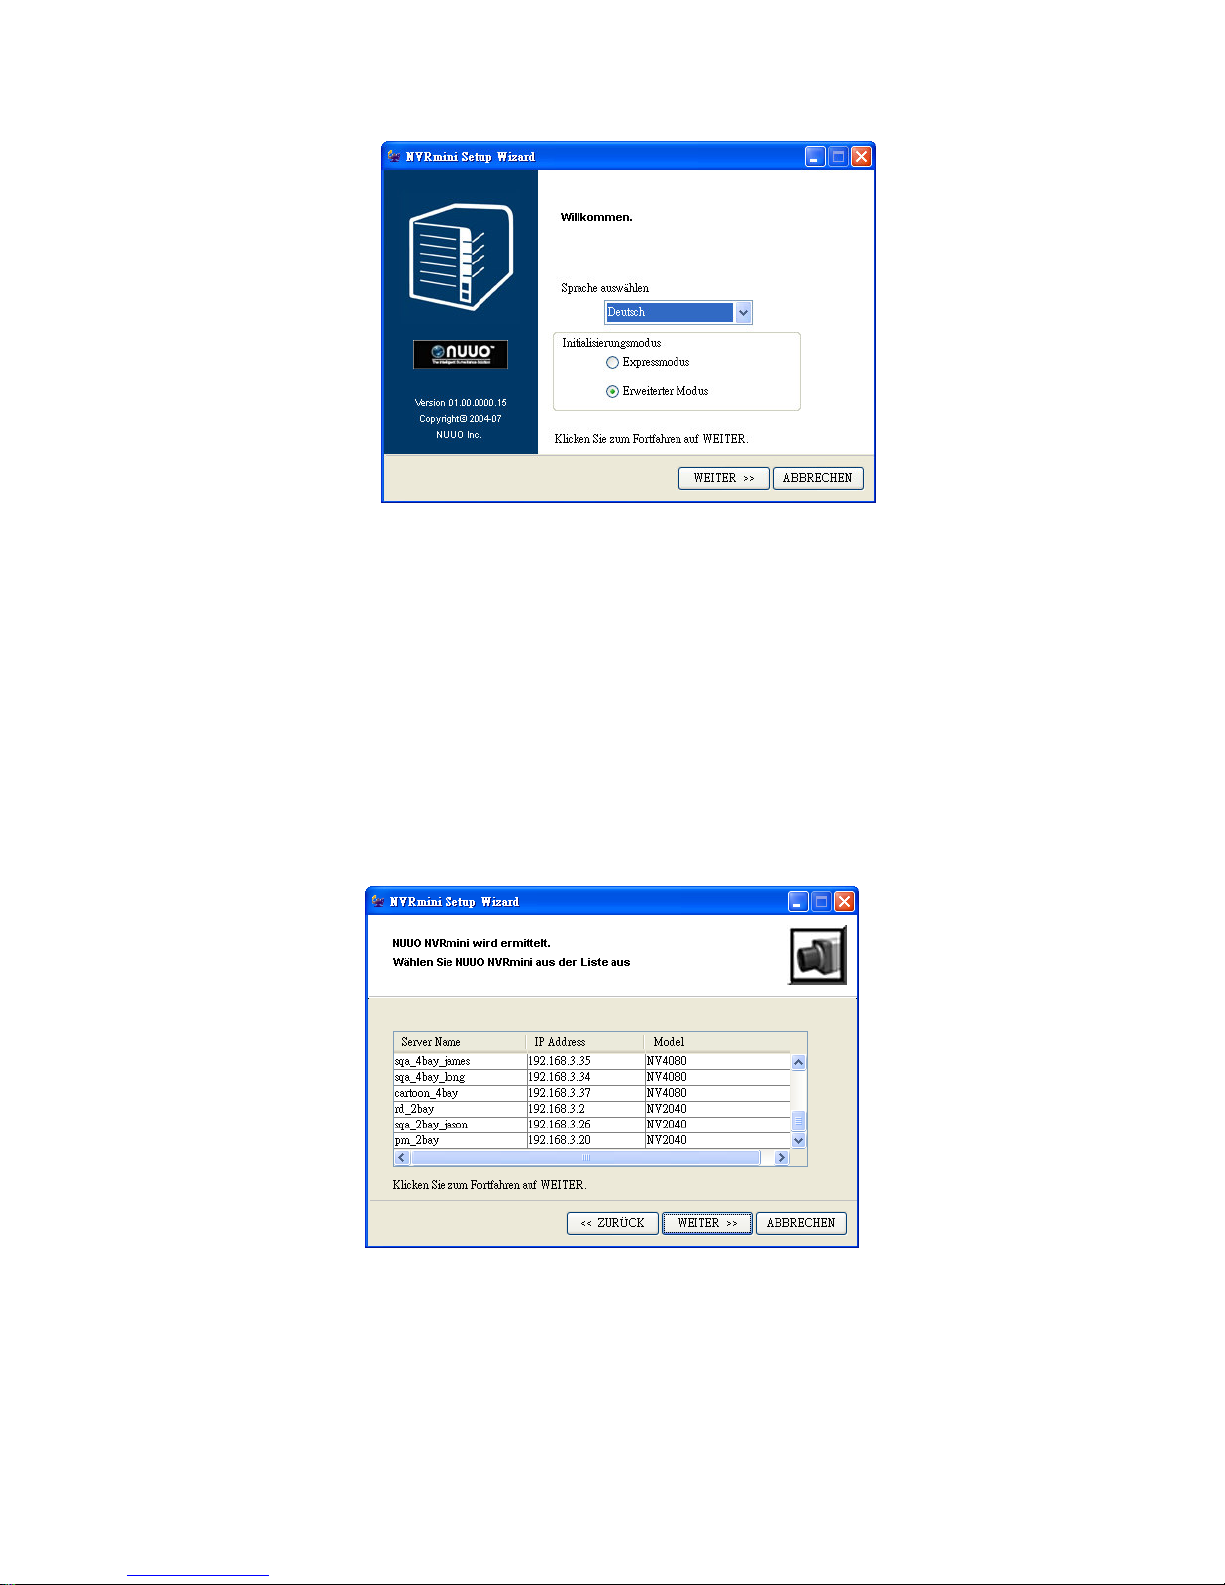
2. Das Programm zeigt die Standard-Spracheinstellung und
Initialisierungsmodus.
3. Wählen Sie die Sprache und einen Initialisierungsmodus aus, und
klicken Sie anschließend auf die WEITER Schaltfläche.
Page 55
54
Expressmodus: Datum, Uhrzeit, Netzwerkeinstellungen und
RAID-Level müssen nicht von Ihnen eingestellt werden. (Gehen Sie
nach Schritt 5 direkt zu Schritt 9.)
Erweiterter Modus: Datum, Uhrzeit, Netzwerkeinstellungen müssen
von Ihnen eingestellt werden.
4. Der Installationsassistent sucht nach allen gerade im Internet
auffindbaren Geräten. Wählen Sie eines davon aus, und klicken Sie auf
die WEITER Schaltfläche.
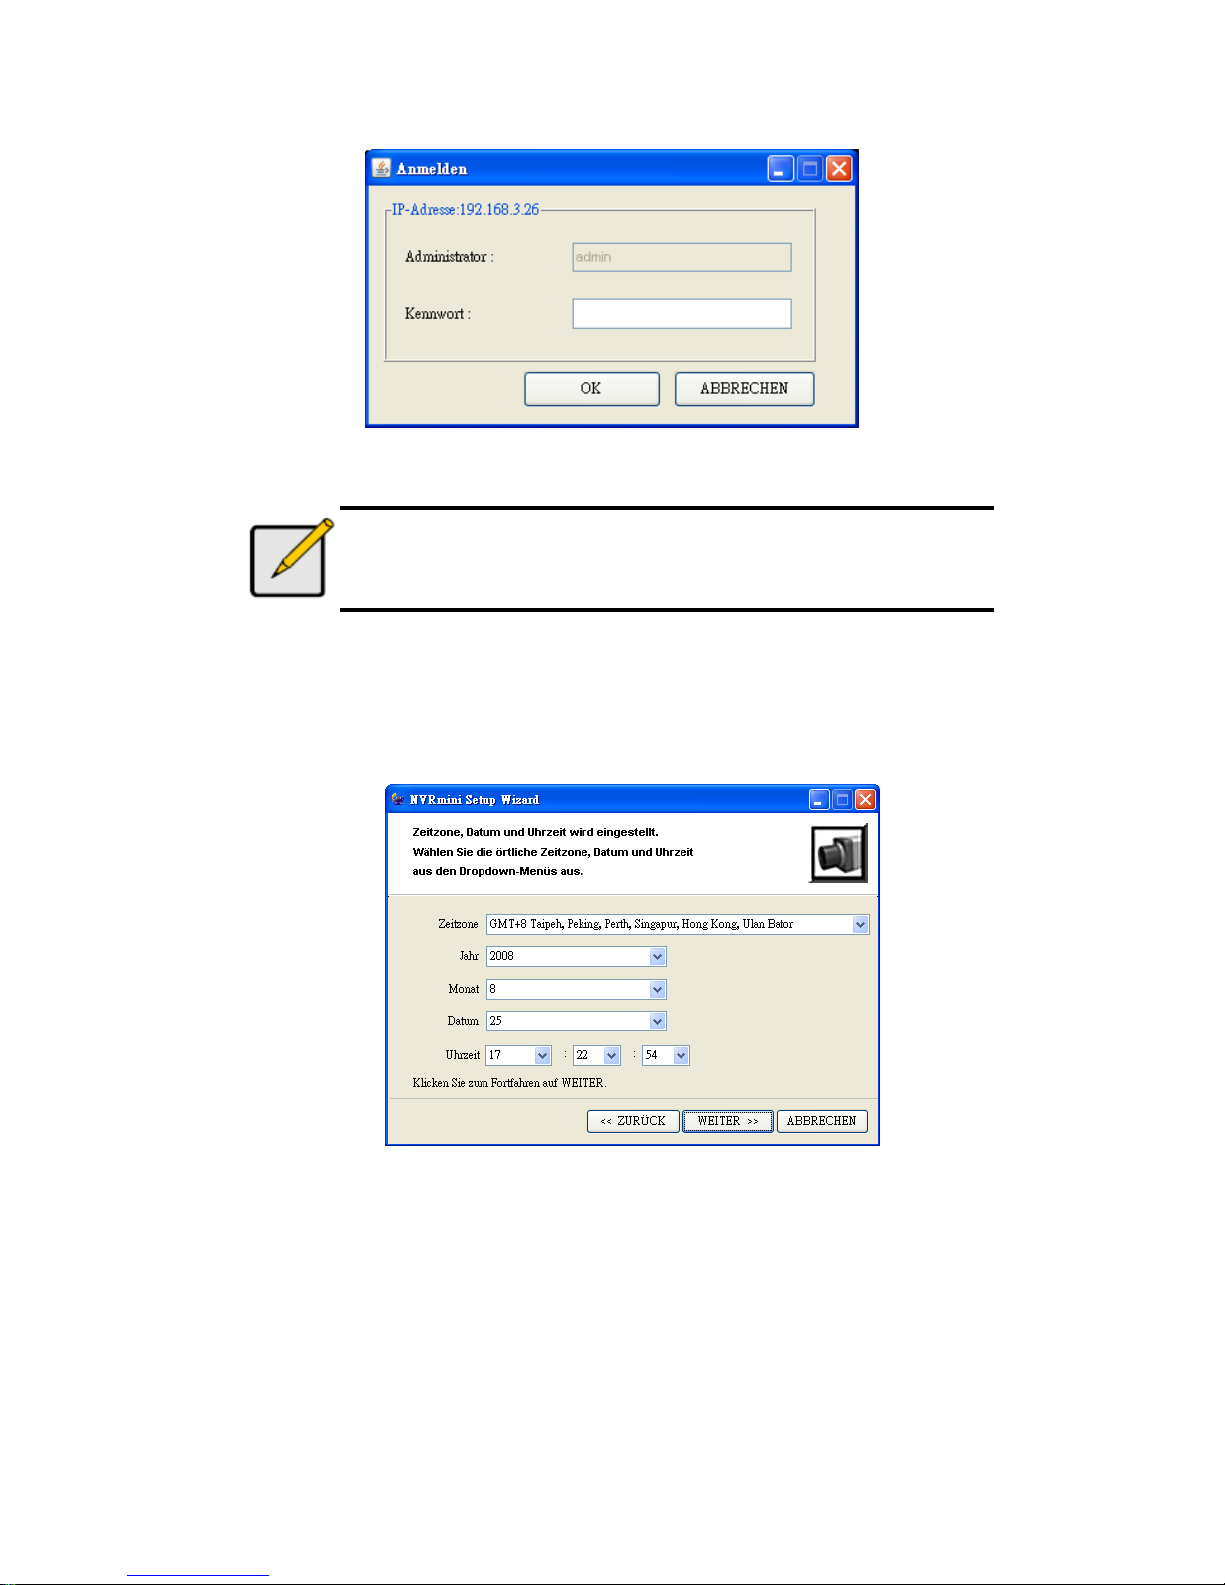
5. Geben Sie das Kennwort ein, und klicken Sie auf die OK Schaltfläche.
Page 56
55
Hinweis
Das Standardkennwort des Administrators ist “admin”.
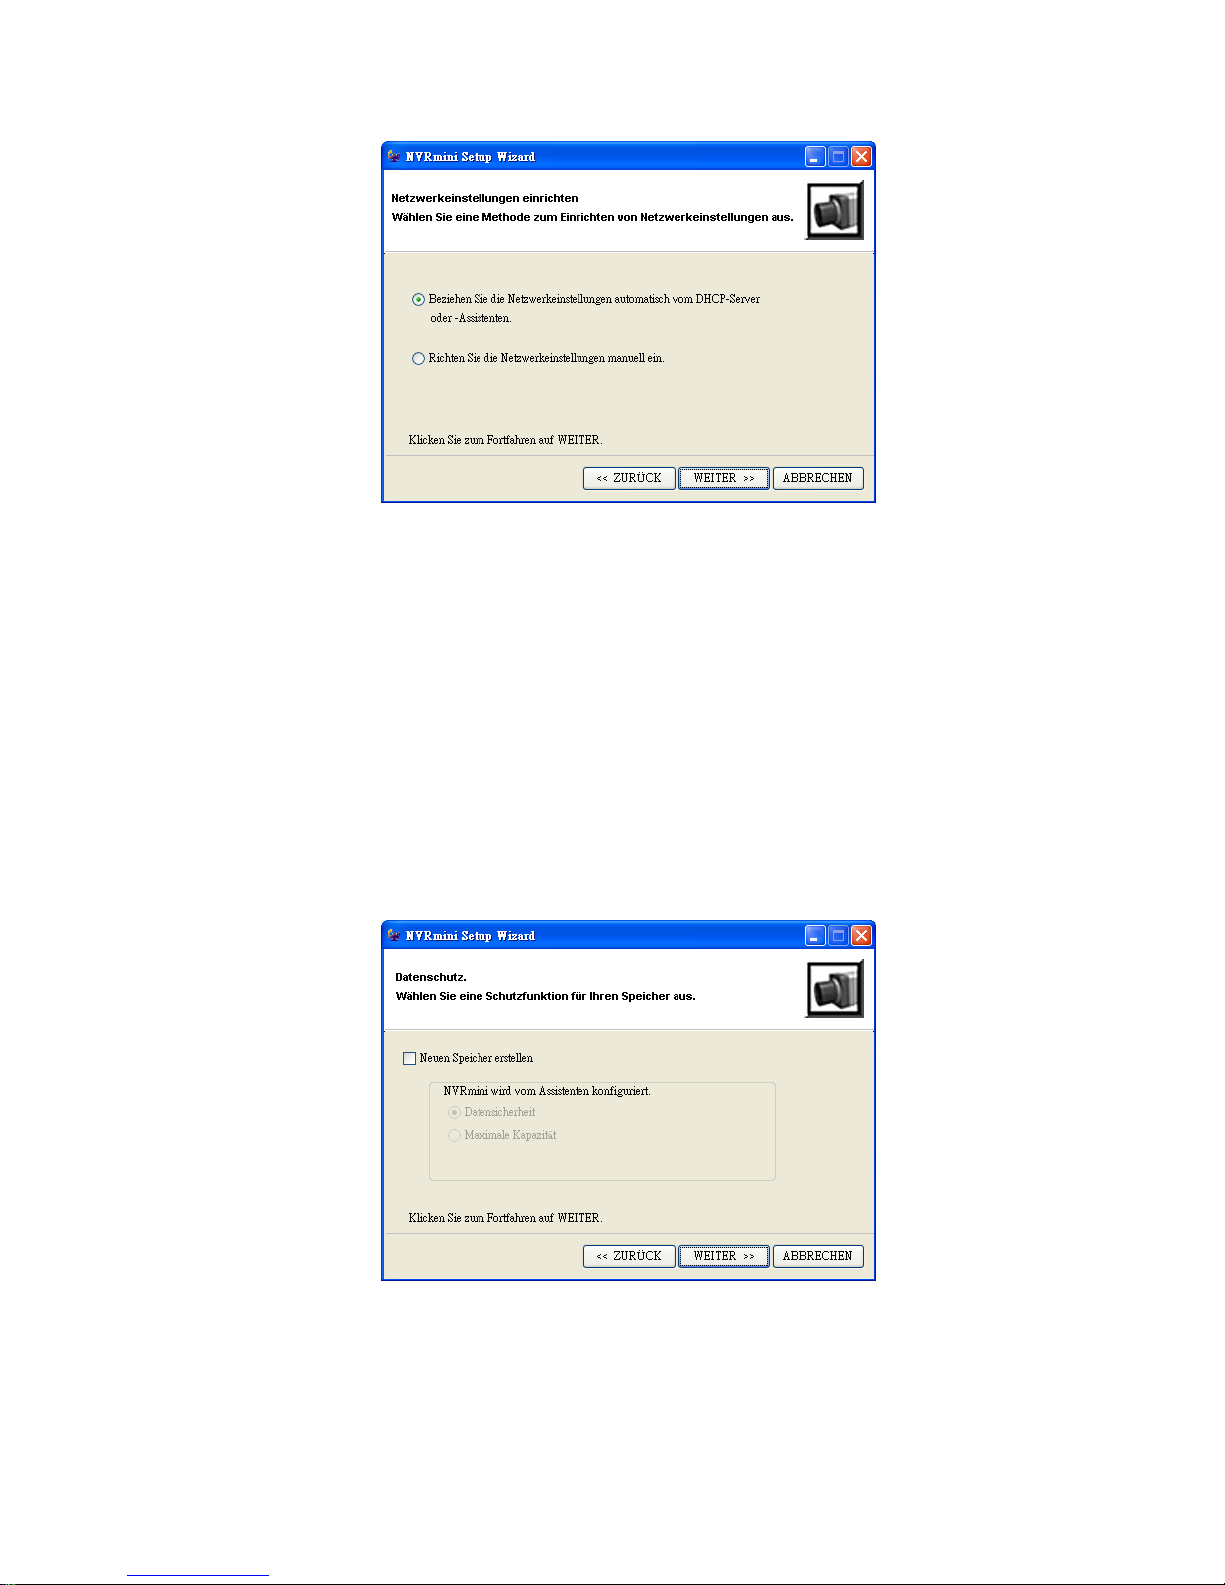
6. Setzen Sie nun die Zeitzone und die Uhrzeit und klicken Sie
anschließend auf die WEITER Schaltfläche.
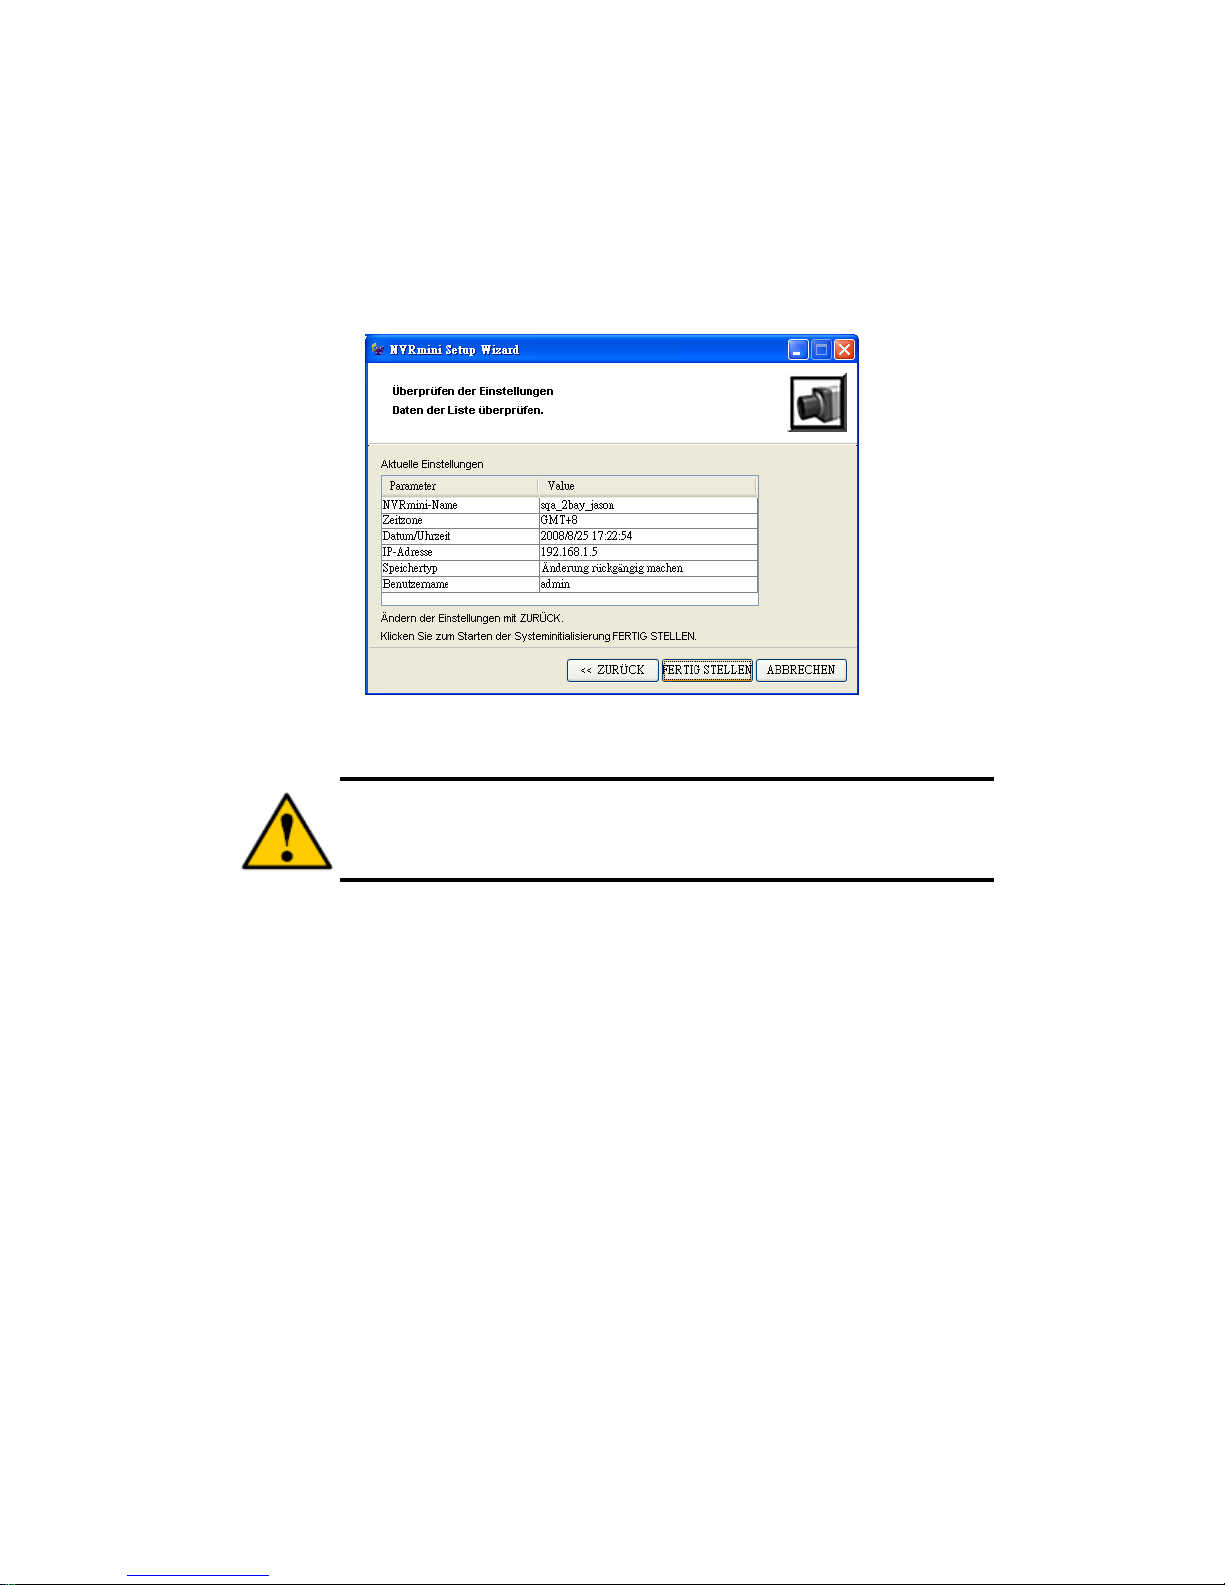
7. Nehmen Sie die Netzwerk-Einstellungen vor, und klicken Sie
anschließend auf die WEITER Schaltfläche.
Page 57
56
Beziehen Sie die Netzwerkeinstellungen automatisch vom
DHCP-Server oder -Assistenten: nutzen Sie die Einstellungen, wie
etwa IP, Netzmaske, Gateway, DNS, die vom DHCP-Server generiert
werden.
Richten Sie die Netzwerkeinstellungen manuell ein: wählen Sie
spezifische Einstellungen.
8. Falls Sie einen neuen Disk setzen wollen, markieren Sie die Option
“Neuen Speicher erstellen”. Klicken Sie nach dem Markieren auf die
WEITER Schaltfläche.
Datensicherheit: setzen Sie das RAID Level auf RAID 1 (2-Bay).
Setzen Sie das RAID Level auf RAID 5 (4-Bay).
Maximale Kapazität: setzen Sie das RAID Level auf RAID 0 (2-Bay).
Page 58
57
Setzen Sie das RAID Level auf RAID 0 (4-Bay).
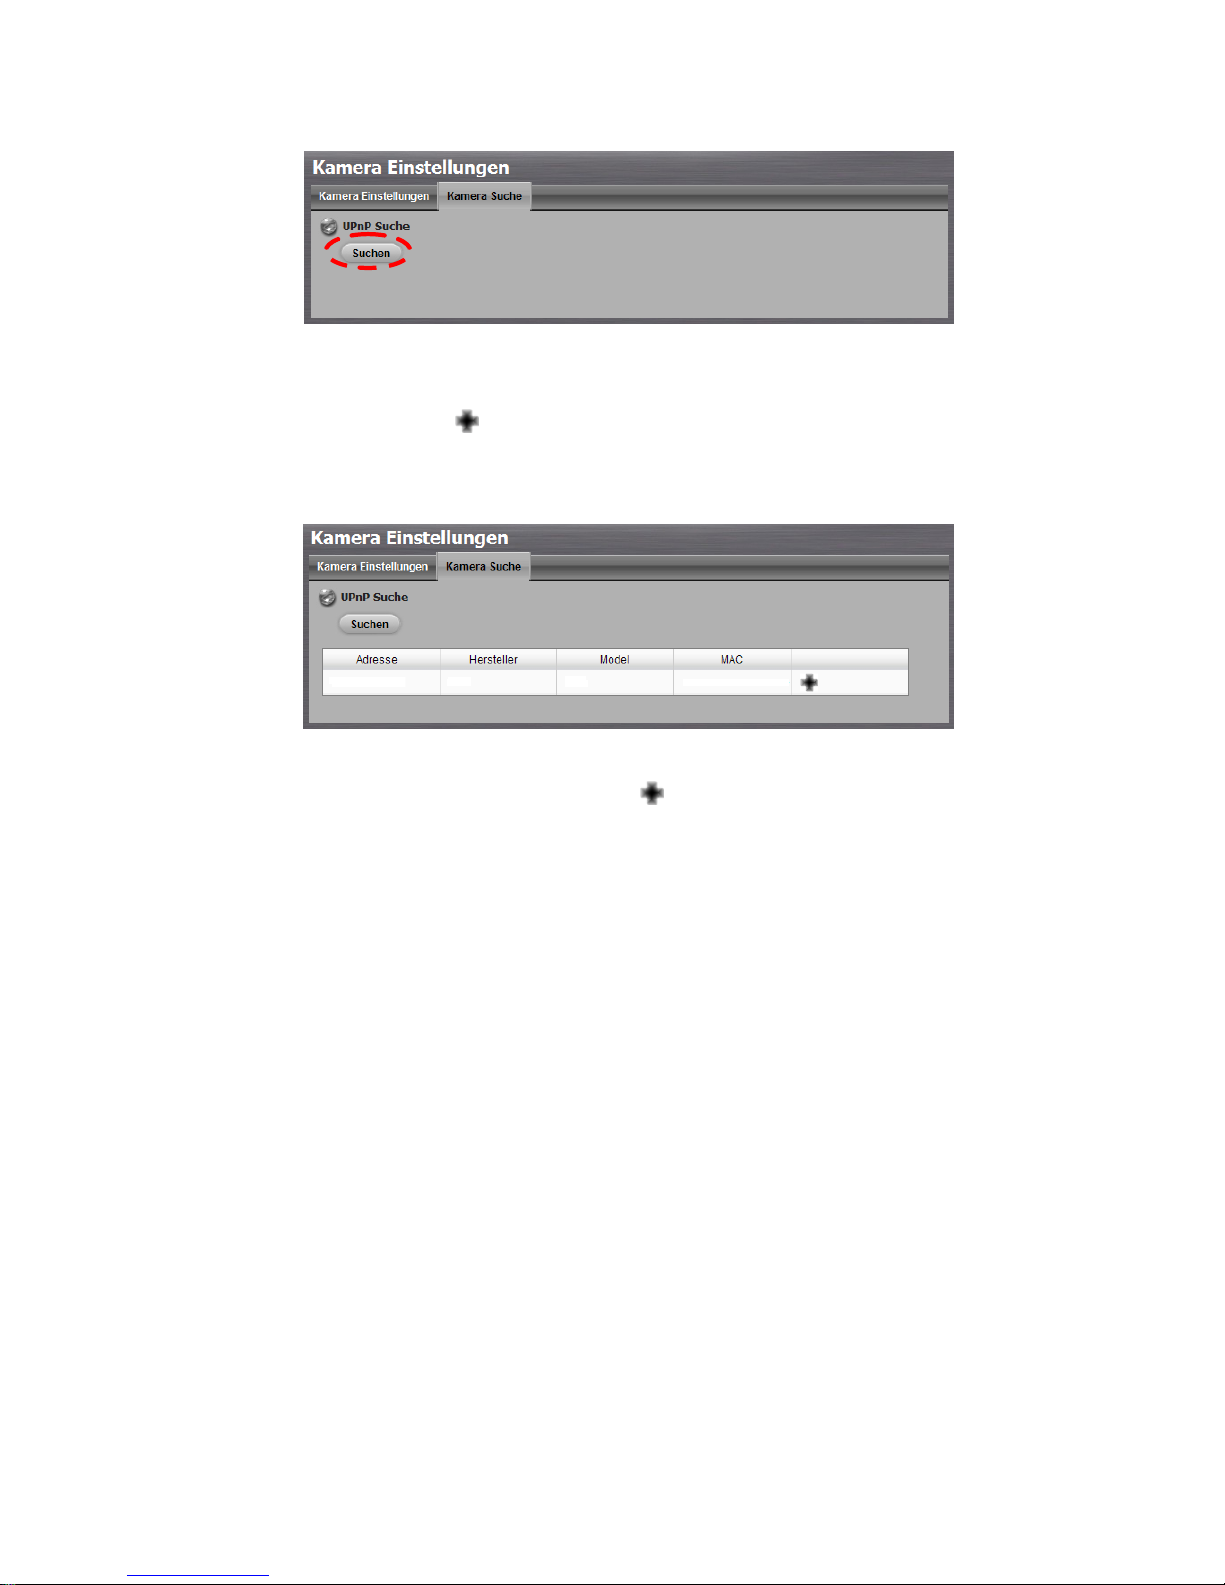
9. Prüfen Sie Ihre Einstellungen. Falls die Einstellungen korrekt sind,
klicken Sie auf die FERTIG STELLEN Schaltfläche, um den
Einstellungsvorgang abzuschließen.
Vorsicht
Nach Abschluss der Geräte-Einstellungen ist das Gerät
einsatzbereit. Um einen stabilen Betrieb zu gewährleisten,
entfernen Sie bei laufendem Systee keine Disks.
Schritt 7: Kameras hinzufügen
UPnP Kameras hinzufügen
1. Öffnen Sie den Internet Explorer und melden Sie das Gerät an.
2. Klicken Sie auf IP-Kamera/ Kamera Einstellungen.
3. Klicken Sie auf Kamera Suche Registerkarte.
4. Klicken Sie auf die Suche Schaltfläche, um nach UPnP Kameras zu
suchen.
Page 59
58
5. Das System listet alle momentan verfügbaren Kameras auf. Klicken Sie
auf das Symbol , um um diese Kamera in die Kamera Liste
aufzunehmen.
6. Nach dem Anklicken des Symbols erscheint die Seite der Kamera
Einstellungen. Klicken Sie auf den Menüpunkt, den Sie einer Kamera
hinzufügen wollen.
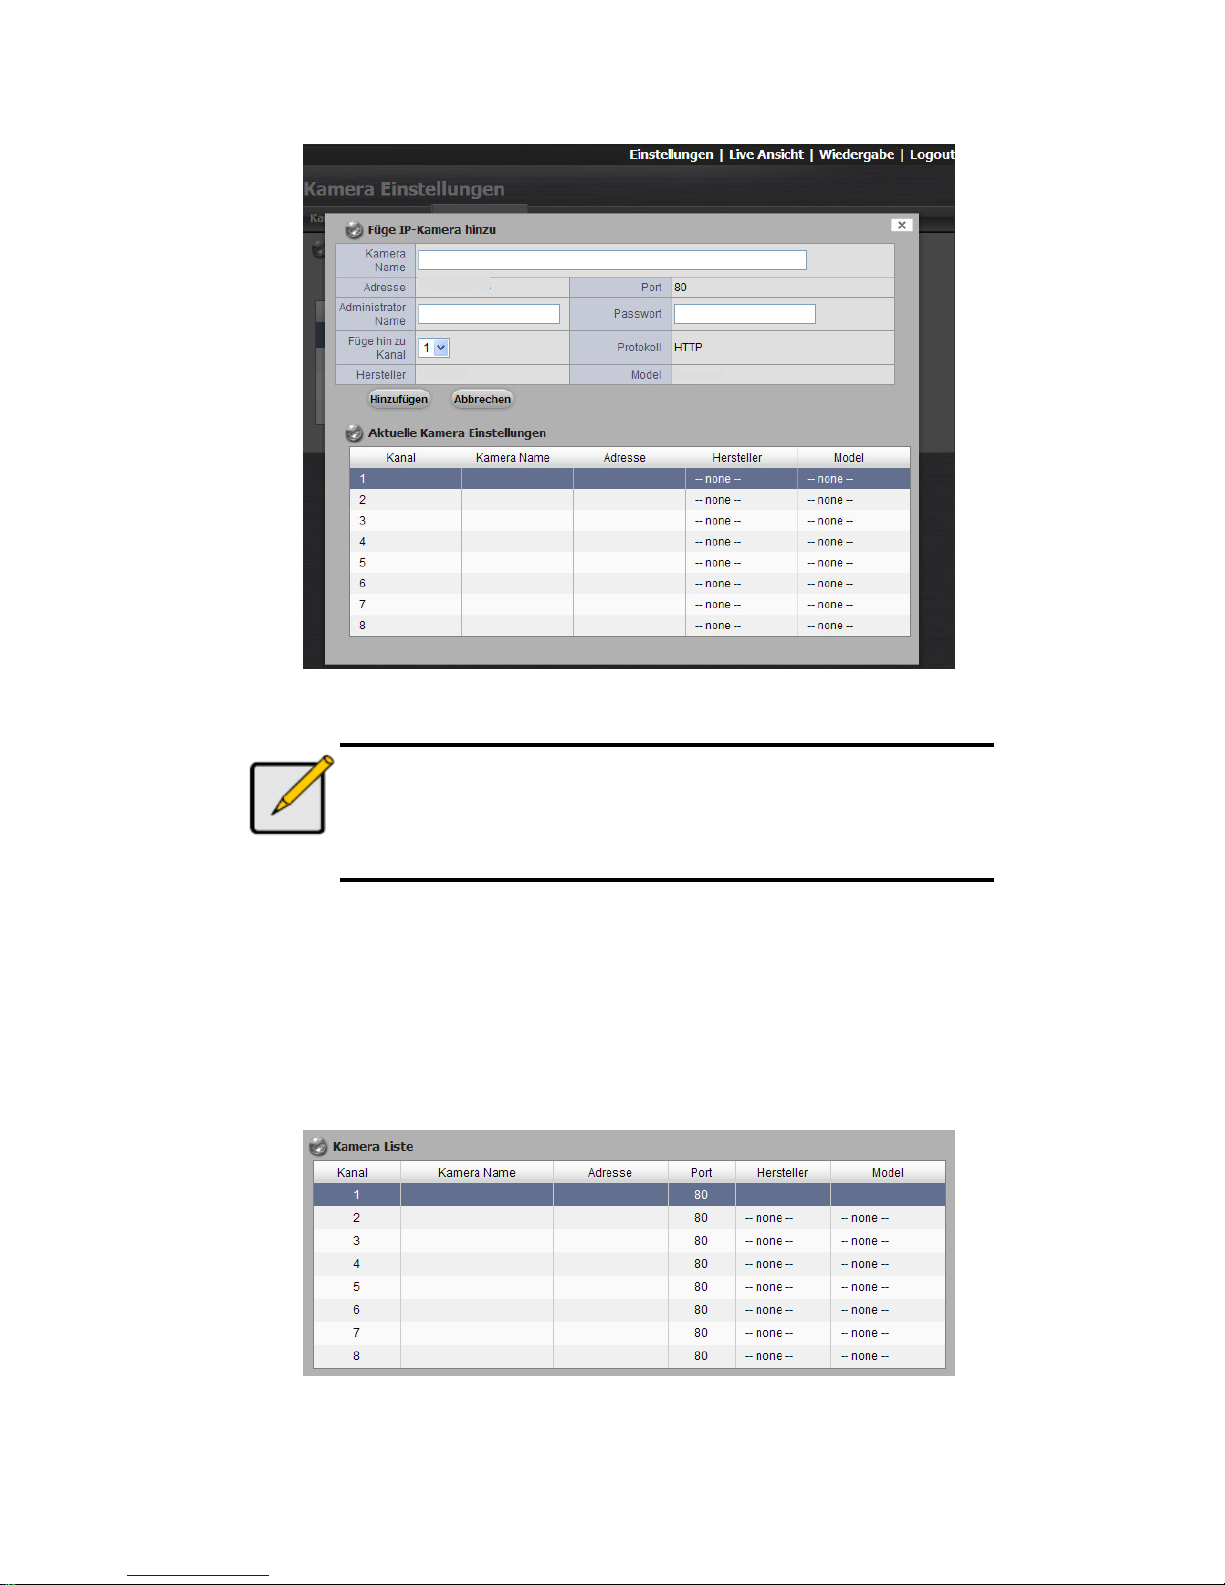
7. Fügen Sie den Kameranamen, Benutzernamen und das Passwort der
Kamera.
IP Adresse Verkäufer Modellname Mac Adresse
Page 60
59
Hinweis
Einige Kameras können nur vom Administrator angemeldet
werden. In diesem Fall müssen Sie den
Anmelde-Benutzernamen und das Passwort des Administrators
nutzen, um diese Kameras anmelden zu können.
8. Klicken Sie auf die Hinzufügen Schaltfläche, um sie hinzuzufügen.
9. Nachdem Sie auf die Hinzufügen Schaltfläche geklickt haben, wird die
aktualisierte Kameraliste in der Kamera Einstellungen Registerkarte
angezeigt.
Kameraname
IP Adresse Verkäuf
Modellname
IP Adresse
Modellname Verkäufer
Page 61
60
10. Wiederholen Sie die Schritte 5 bis 8, um der Liste eine weitere Kamera
hinzuzufügen.
Kameras ohne UPnP Funktion hinzufügen
1. Öffnen Sie den Internet Explorer und melden Sie das Gerät an.
2. Klicken Sie auf IP-Kamera/ Kamera Einstellungen.
3. Klicken Sie auf die Kamera Einstellungen Registerkarte, sodass im
unteren Bereich der Seite die Kameraliste angezeigt wird.
4. Klicken Sie auf den Menüpunkt, den Sie einer Kamera hinzufügen
wollen.
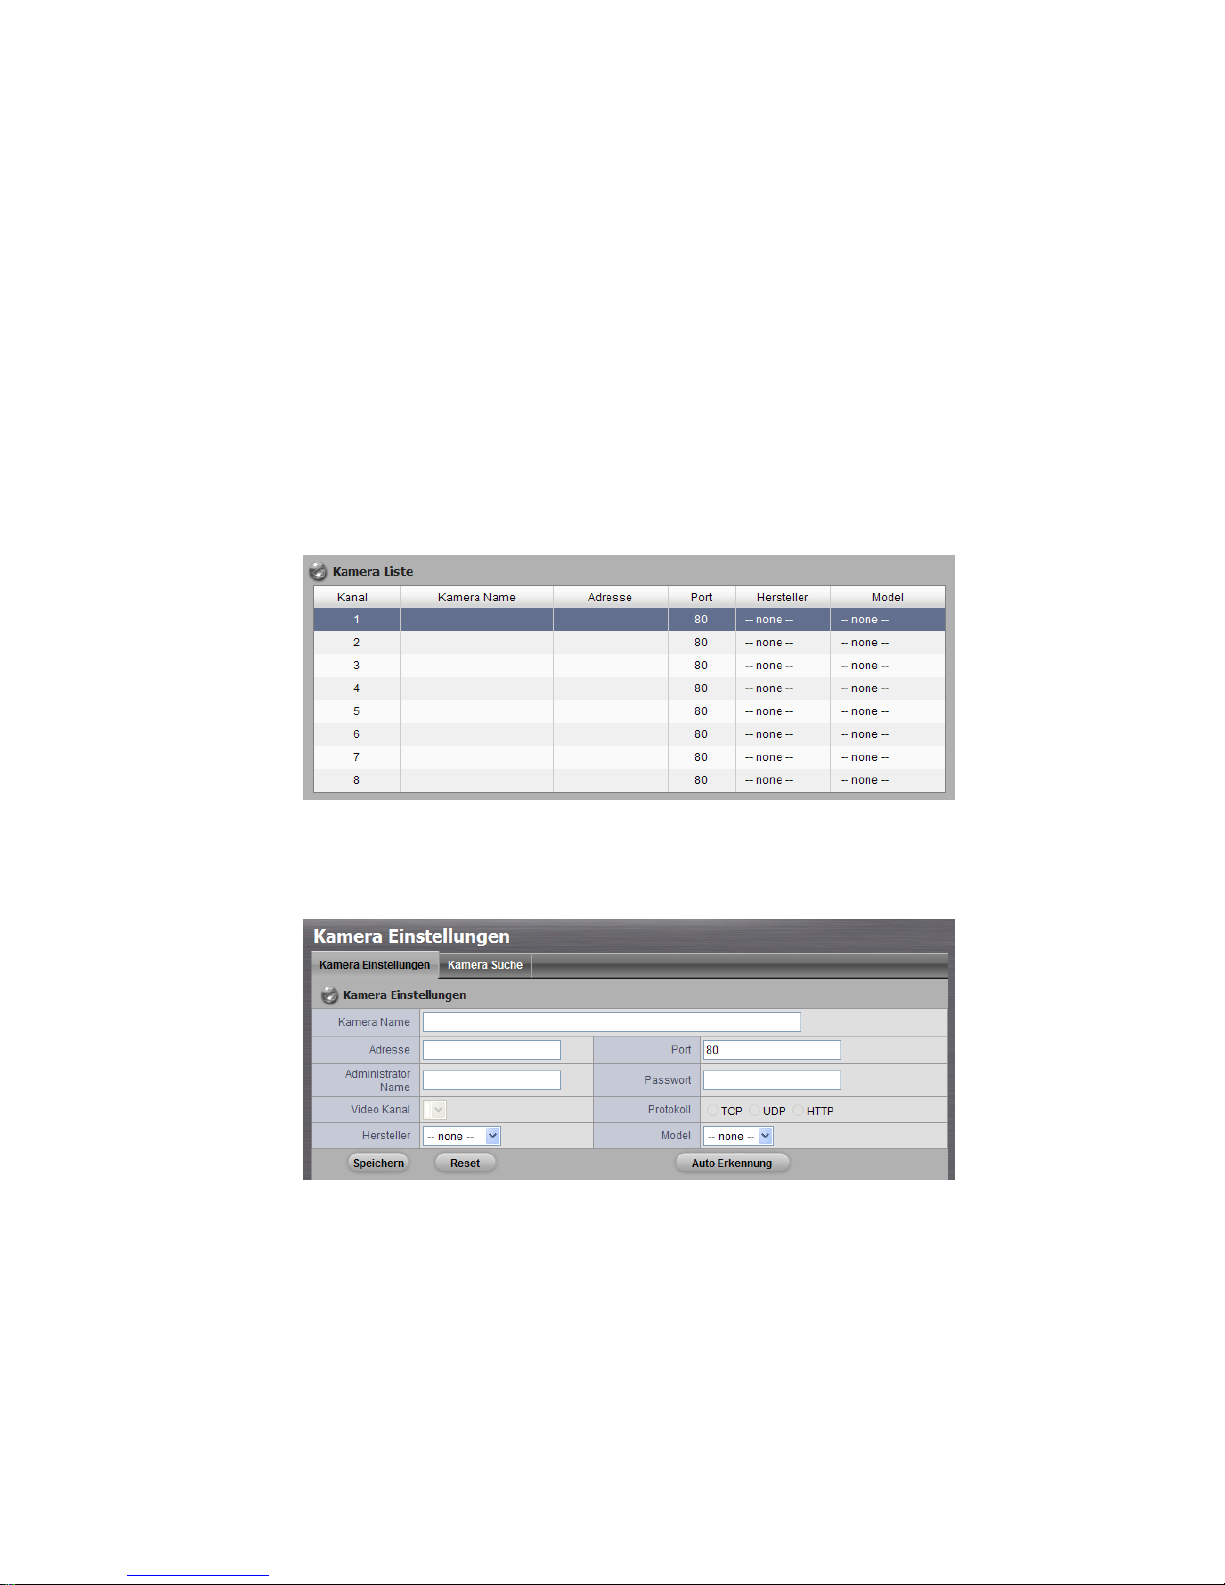
5. Geben Sie die Information der Kamera oben in der Seite an.
Kamera Name: Name der Kamera.
Adresse: die IP Adresse.
Port: der Transmission-Port.
Administrator Name: Benutzername zum Anmelden.
Passwort: Passwort zum Anmelden.
Video Kanal: wählen Sie in der Liste die Nummer der analogen
Page 62

61
Kameras, die ein von einem Videoserver unterstützt werden.
Protokoll: Datenübertragungsprotokoll.
Hersteller: Name des Kameraverkäufers.
Model: Name des Kameramodells.
Hinweis
Einige Kameras können nur vom Administrator angemeldet
werden. In diesem Fall müssen Sie den
Anmelde-Benutzernamen und das Passwort des Administrators
nutzen, um diese Kameras anmelden zu können.
6. Klicken Sie auf die Speichern Schaltfläche.
Speichern: sichert Informationen dieser Kamera.
Reset: kehrt zu den zuletzt gesicherten Einstellungen der gewählten
Kamera zurück.
Auto Erkennung: klicken Sie nach dem Einfügen von IP Adresse,
Port, Benutzername und Passwort auf diese Schaltfläche, um
automatisch alle Kamerainformationen aufzurufen. (wie z.B. Video
Kanal, Protokoll, Verkäufer, Modell)
7. Wiederholen Sie die Schritte 4 bis 6, um der Liste eine weitere Kamera
hinzuzufügen.
Schritt 8: Live Ansicht Funktion
Es gibt zwei Möglichkeiten die Live Ansicht Funktion zu nutzen: mithilfe des
Internet Explorer oder mithilfe des Remote Live Viewer.
Internet Explorer
1. Öffnen Sie den Internet Explorer und melden Sie das Gerät an.
2. Setzen Sie die Kameras.
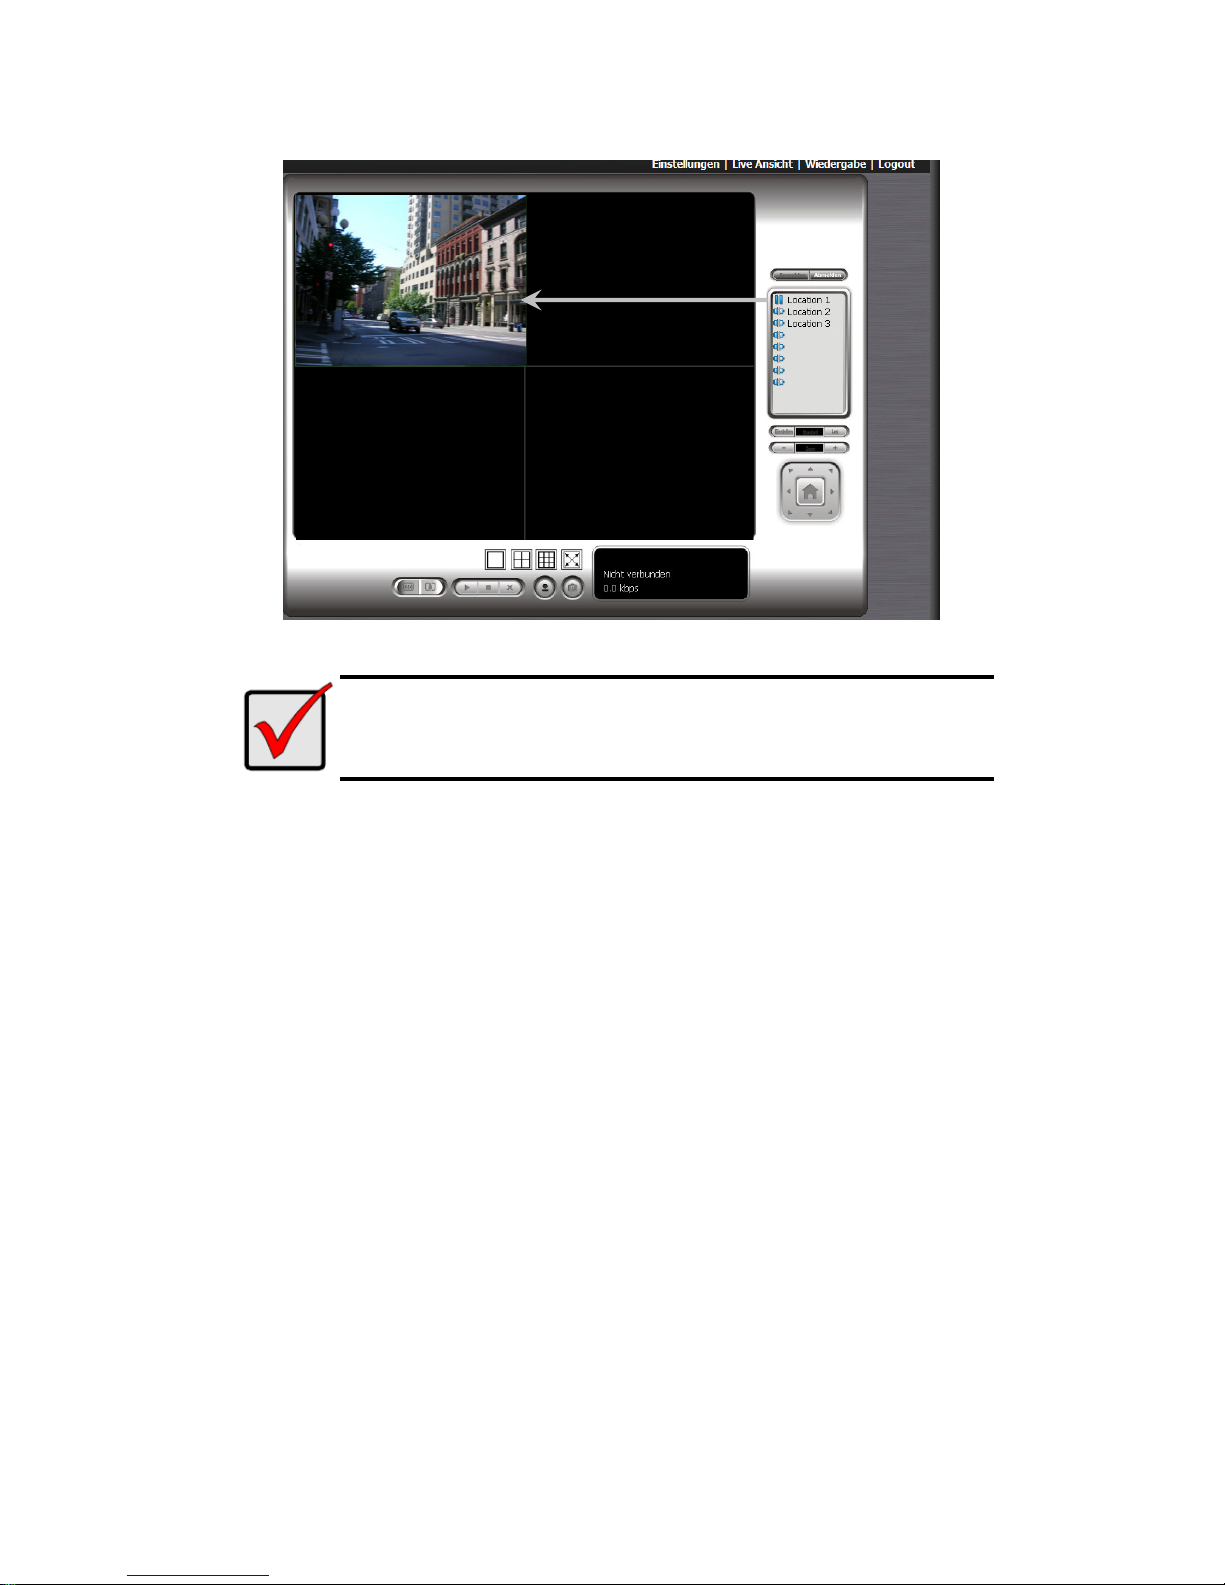
3. Klicken Sie auf die Live Ansicht Schaltfläche oben in der Seite.
4. Wählen Sie die Kamera(s) von der Kameraliste rechts, und ziehen Sie
sie an eine gewünschte Stelle.
Page 63
62
Wichtig
Benutzen Sie bei geöffnetem Internet Explorer niemals die
Funktion “In Neuem Fenster öffnen”, um die Stabilität des
Browsers nicht zu gefährden.
Remote Live Viewer
1. Gehen Sie zu Start > NUUO NVRmini > Remote Live Viewer.
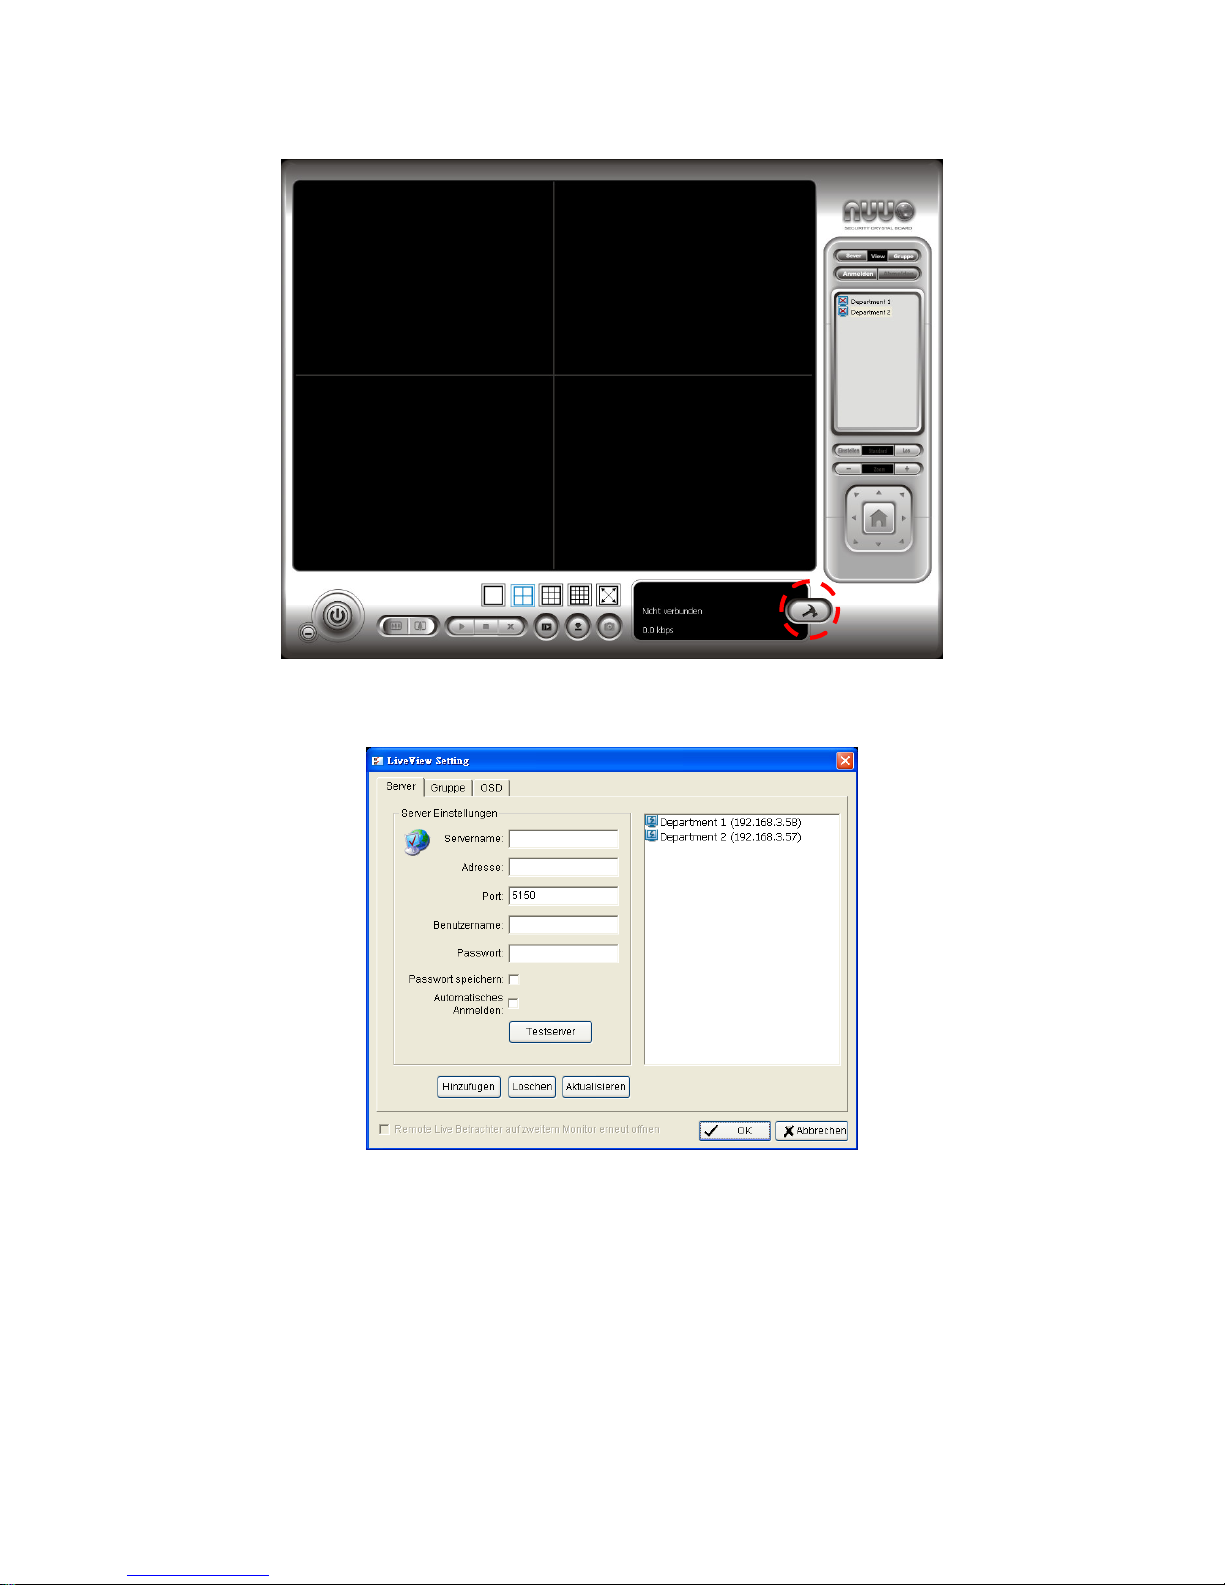
2. Klicken Sie auf die LiveView Setting Schaltfläche.
Page 64
63
3. Geben Sie den Gerätenamen an.
4. Geben Sie die IP Adresse an.
5. Modifizieren Sie, falls nötig, den Port.
6. Geben Sie den Benutzernamen an.
7. Geben Sie das Passwort an.
8. Markieren Sie die Passwort speichern/ Automatisches Anmelden
Option.
9. Klicken Sie auf die Testserver Schaltfläche, um die Verbindung
Page 65
64
zwischen der lokalen Anwendung und dem Remote-Gerät zu testen.
10. Klicken Sie auf die Hinzufügen Schaltfläche, um dieses Gerät der Liste
der Entfernter Server hinzuzufügen.
11. Klicken Sie auf die OK Schaltfläche.
12. Klicken Sie in der Liste der Entfernter Server auf das Gerät, auf das Sie
zugreifen möchten.
13. Klicken Sie auf die Anmelden Schaltfläche, um auf das Gerät
zuzugreifen.
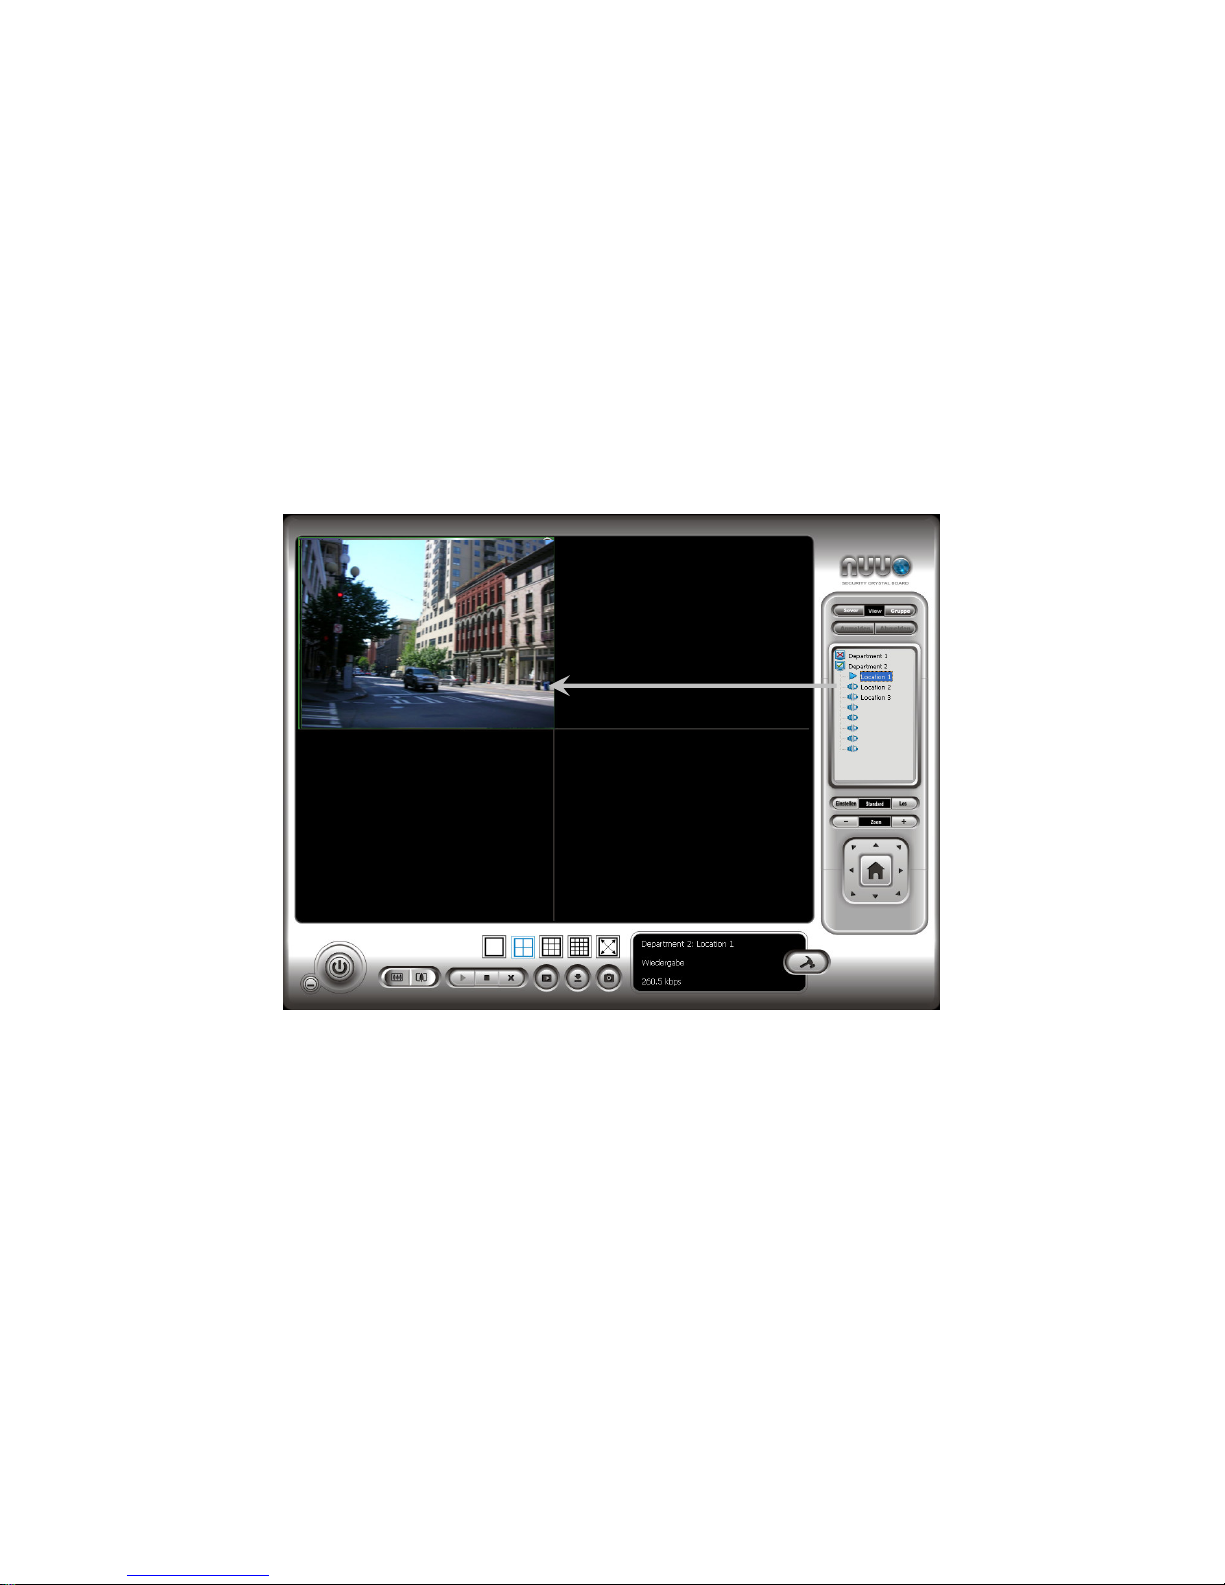
14. Wählen Sie die Kamera(s) von der Kameraliste rechts, und ziehen Sie
sie an eine gewünschte Stelle.
Schritt 9: Eine Aufnahme einrichten
1. Öffnen Sie den Internet Explorer und melden Sie das Gerät an.
2. licken Sie auf Aufnahme & Ereignis/ Aufnahme Einstellungen.
3. Klicken Sie auf die Aufnahmen Modus Registerkarte.
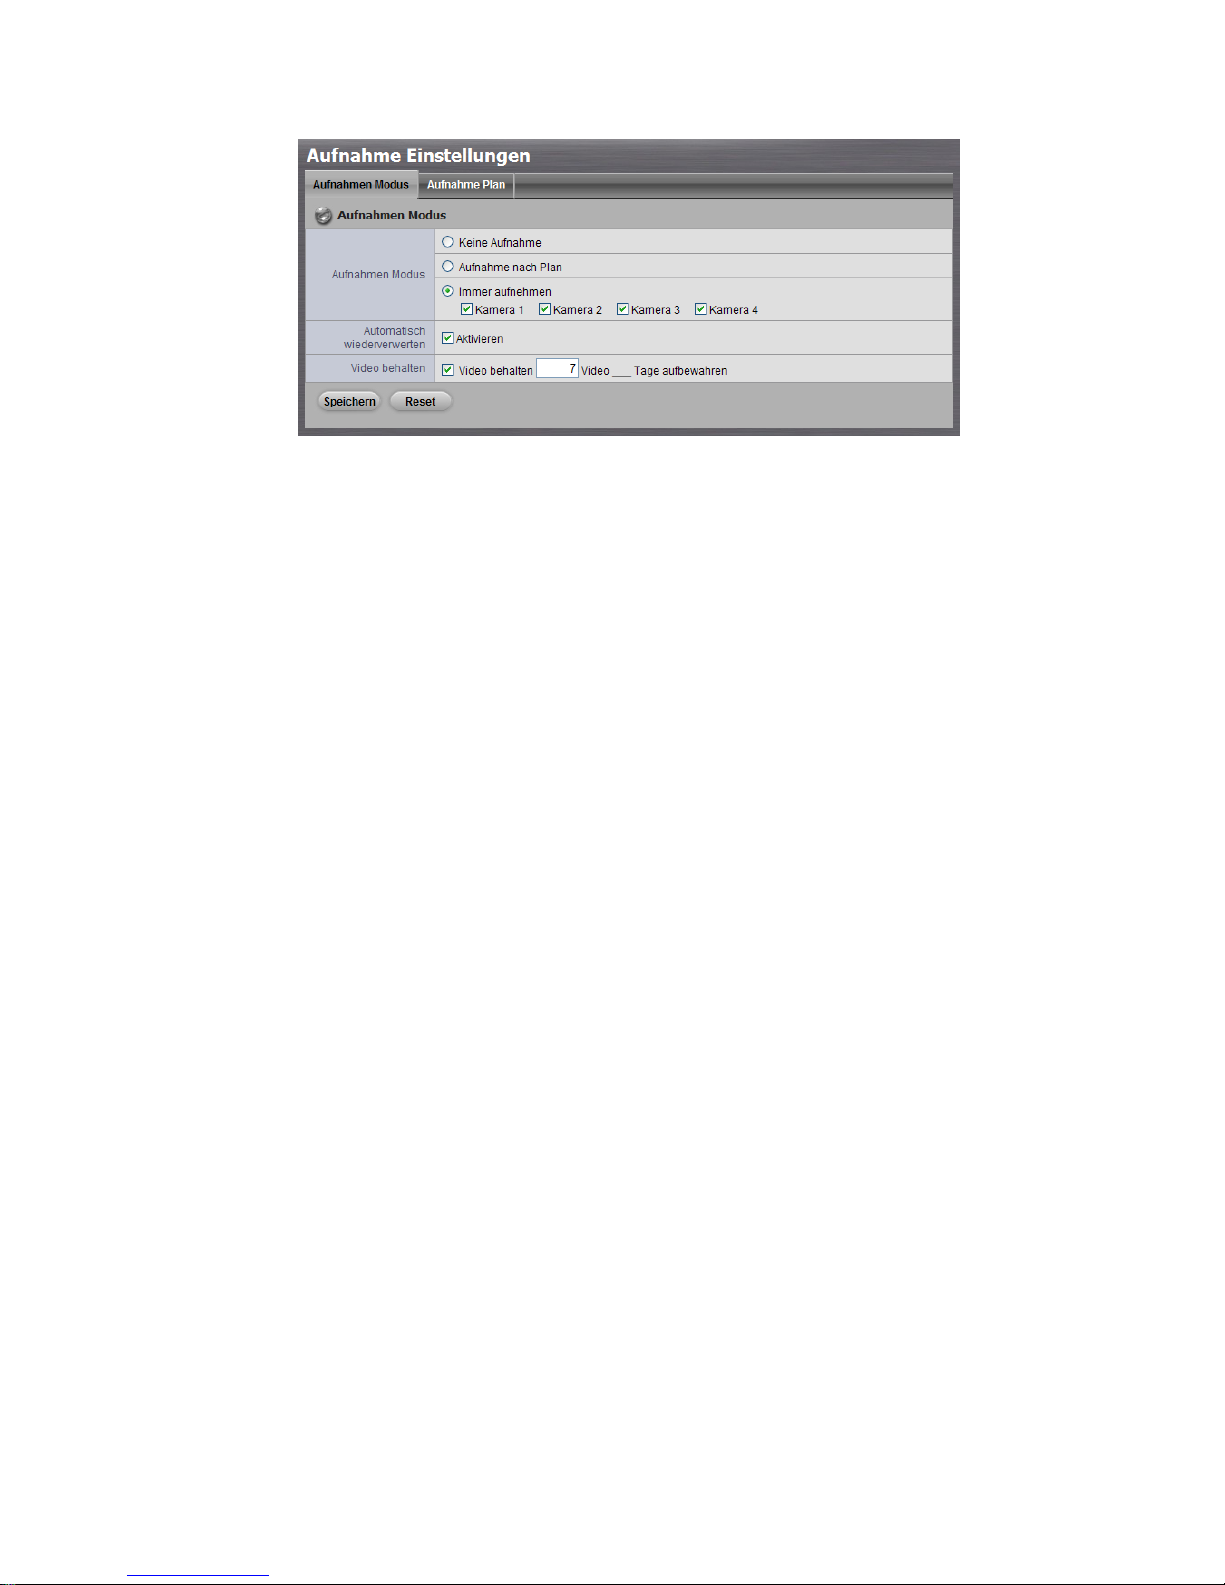
4. Falls Sie Immer aufnehmenwählen, beginnen die gewählten Kameras
sofort mit der Aufnahme.
Page 66
65
Keine Aufnahme: schaltet die Aufnahme aus.
Aufnahme nach Plan: nimmt nach Plan auf.
Immer aufnehmen: schaltet die gewählten Kameras ein und nimmt
fortwährend auf.
Automatisch wiederverwerten: markieren Sie die Aktivieren
Option, um Festplattenplatz automatisch wiederzuverwenden, wenn
die Festplatte voll ist.
Video behalten: setzt einen Zeitraum, in dem die aufgenommenen
Videos intakt bleiben.
5. Falls Sie Aufnahme nach Planwählen, müssen die Pläne der Kameras
gesetzt werden.
6. Klicken Sie auf Aufnahme & Ereignis/ Aufnahme Einstellungen.
7. Klicken Sie auf die Aufnahme Plan Registerkarte.
8. Klicken Sie auf den Plan der Kamera der modifiziert werden soll.
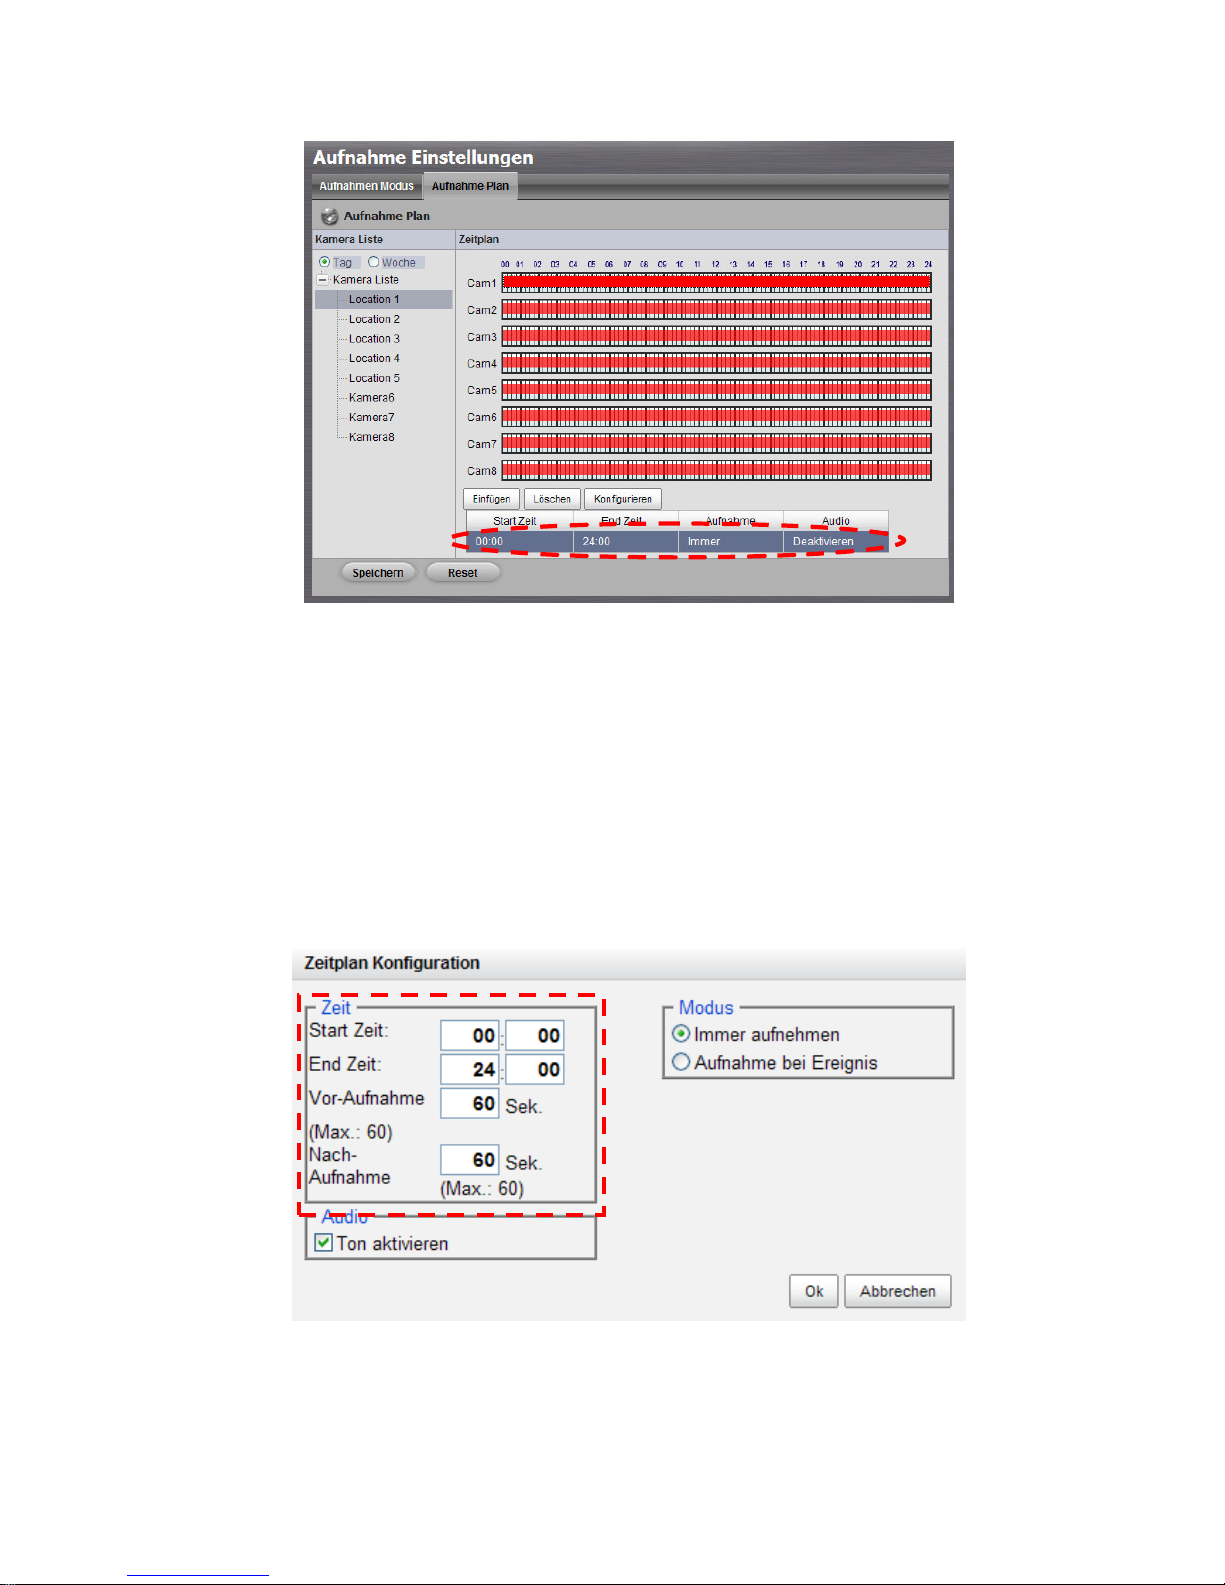
9. Klicken Sie auf die Spalte unten auf der Seite.
Page 67
66
Einfügen: fügt neue Pläne ein.
Löschen: Löscht den ausgewählten Plan.
Konfigurieren: modifiziert Plan und Aufnahmemoduseinstellungen.
10. Die Standardeinstellung des Aufnahmeplans der Kamera ist von 00:00
bis 24:00. Falls Sie diese Zeitangabe modifizieren wollen, klicken Sie
auf die Konfigurieren Schaltfläche, um zuerst die Standardeinstellung
zu modifizieren.
11. Wählen Sie den Aufnahmemodus.
Page 68

67
Immer aufnehmen: nimmt fortwährend auf.
Aufnahme bei Ereignis: Aufnahme wird durch Ereignis ausgelöst.
ein Ereignis kann durch Bewegung oder Digitaler
Eingangausgelöst werden.
12. Falls Sie einen neuen Plan hinzufügen möchten, klick Sie auf die
Einfügen Schaltfläche, um eine neue Hinzufügung vorzunehmen.
13. Wiederholen Sie Schritt 12, um der ausgewählten Kamera einen neuen
Plan hinzuzufügen.
14. Wiederholen Sie die Schritte 8 bis 12, um weitere Kameras
einzurichten.
15. Klicken Sie auf die Speichern Schaltfläche.
Schritt 10: Wiedergabefunktion
Es gibt zwei Möglichkeiten die Wiedergabefunktion zu nutzen: mithilfe des
Internet Explorer oder mithilfe des Playback System
(Wiedergabesystems).
Internet Explorer
1. Öffnen Sie den Internet Explorer und melden Sie das Gerät an.
2. Klicken Sie auf die Wiedergabe Schaltfläche oben in der Seite.
3. Klicken Sie auf die Aufnahme öffnen Schaltfläche.
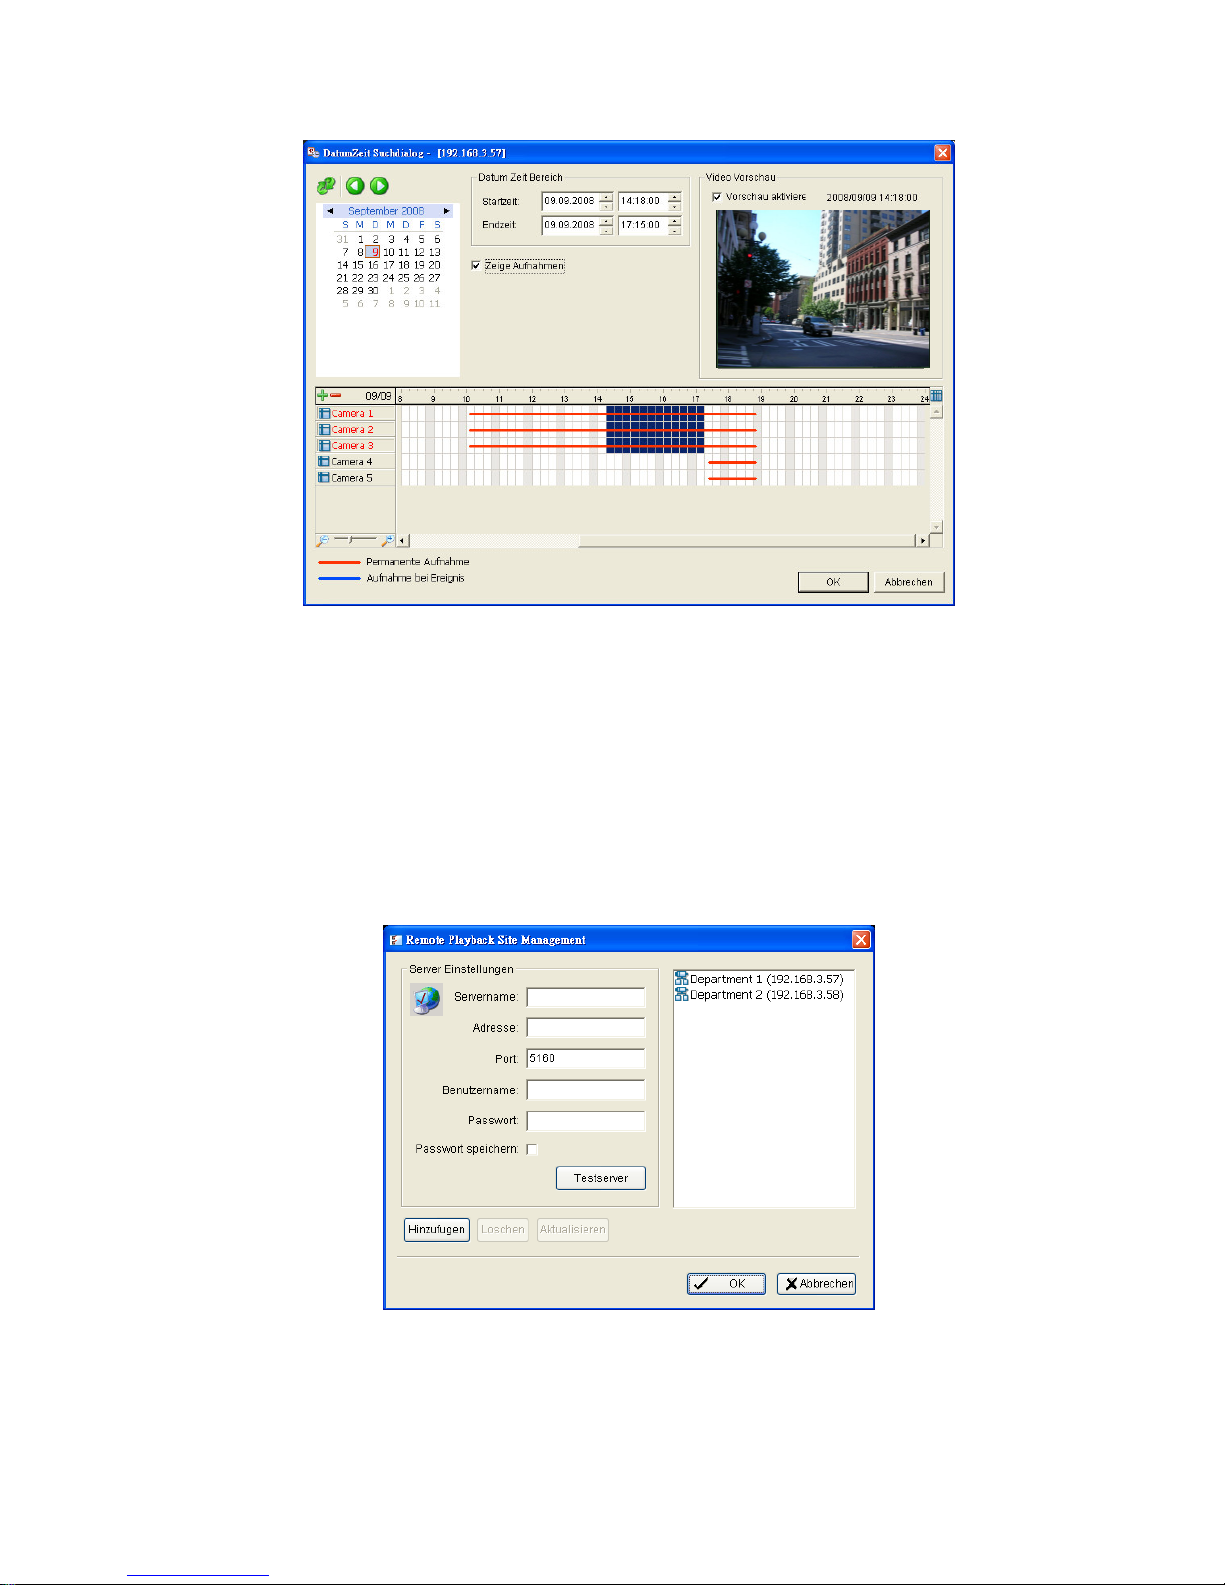
4. Das Aufnahmeanzeigefenster zeigt Informationen zu den verfügbaren
Videos. Wählen Sie das Datum der zu suchenden Aufnahme. In der
Benutzeranleitung finden Sie weitere Details zu dem
Aufnahmeanzeigefenster.
5. Markieren Sie die Videoaufnahmen, die Sie sehen möchten. In der
Benutzeranleitung finden Sie weitere Details.
Page 69
68
6. Klicken Sie auf die OK Schaltfläche.
Playback System (Wiedergabesystem)
1. Gehen Sie zu Start > NUUO NVRmini > Playback System
(Wiedergabesystem).
2. Klicken Sie auf die Entfernter Server Schaltfläche.
3. Geben Sie den Namen Ihres Gerätes an.
4. Geben Sie die IP Adresse dieses Gerätes an.
Page 70
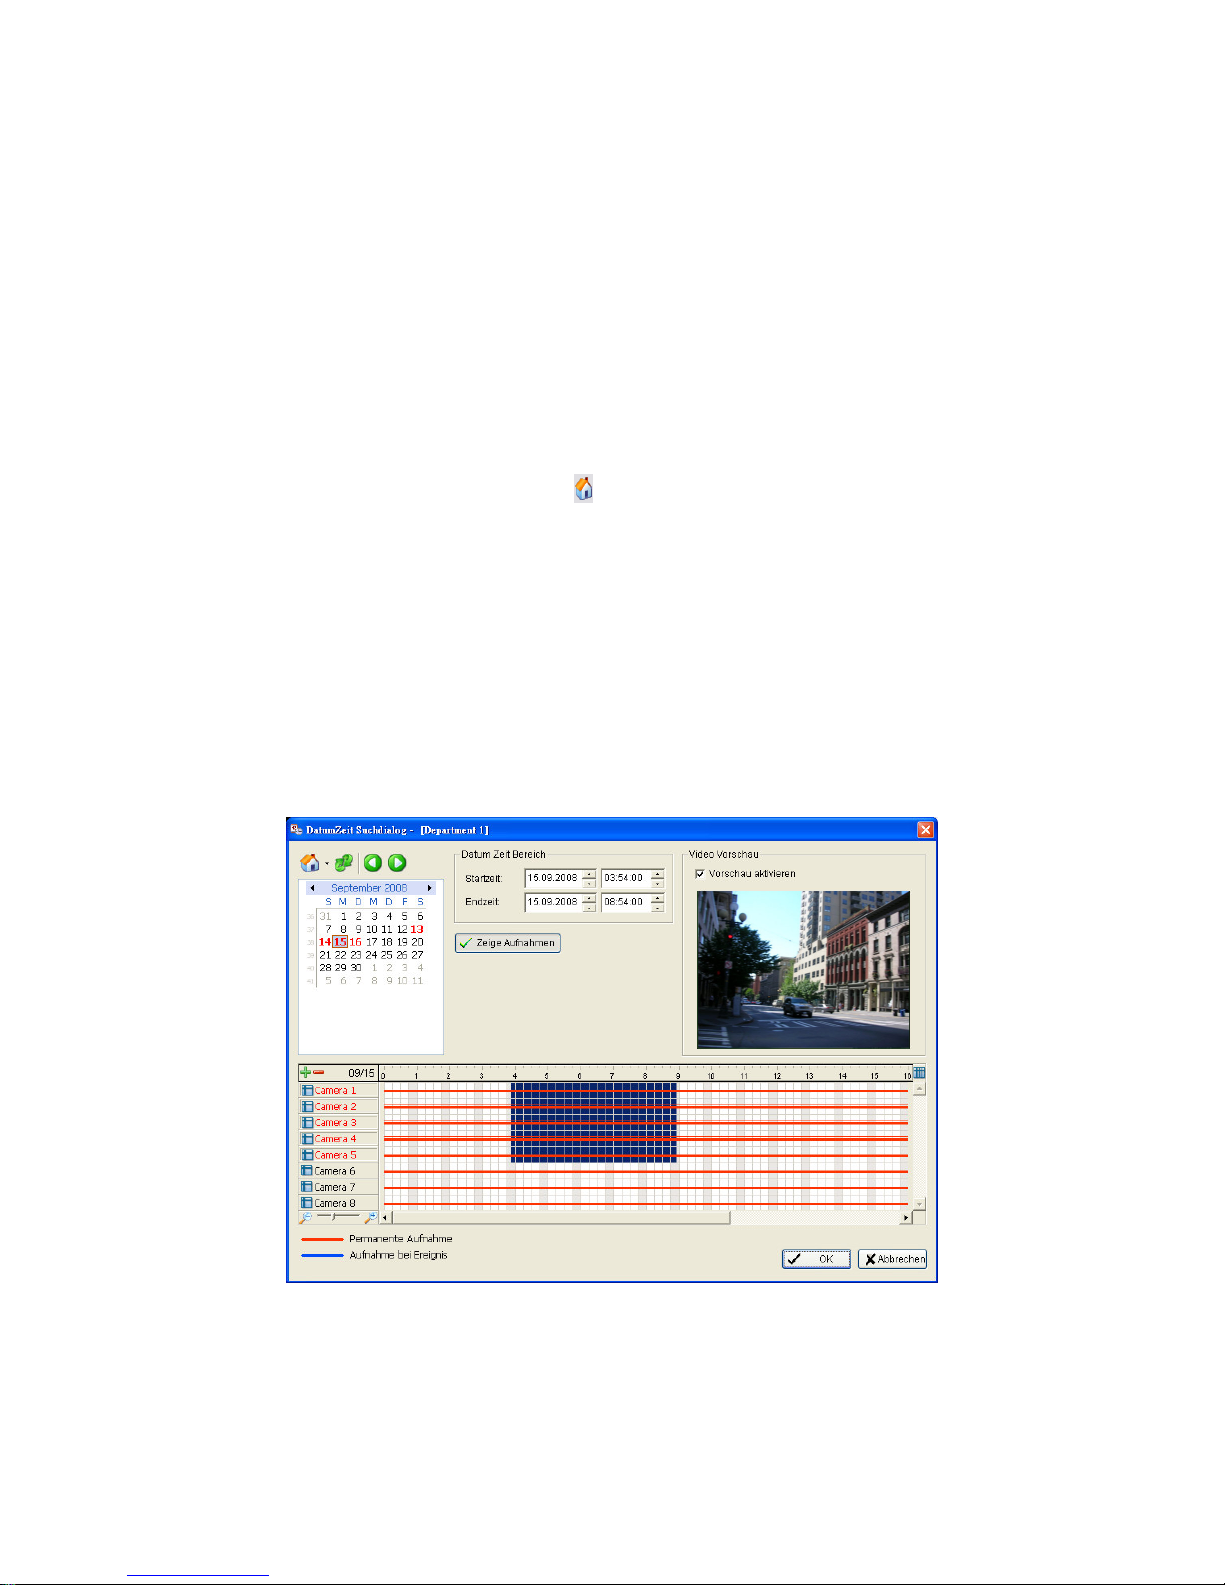
69
5. Modifizieren Sie, falls nötig, den Port.
6. Geben Sie den Benutzernamen an.
7. Geben Sie das Passwort an.
8. Markieren Sie die Passwort speichern Option.
9. Klicken Sie auf die Testserver Schaltfläche, um die Verbindung
zwischen der lokalen Anwendung und dem Remote-Gerät zu testen.
10. Klicken Sie auf die Hinzufügen Schaltfläche, um dieses Gerät der Liste
der Entfernter Server hinzuzufügen.
11. Klicken Sie auf die OK Schaltfläche.
12. Klicken Sie auf die Aufnahme öffnen Schaltfläche.
13. Klicken Sie auf das Symbol
oben im Datum-Zeit Panel, um den
Remote Wiedergabe Management Dialog aufzurufen, und wählen Sie
den Server, auf den Sie zugreifen möchten.
14. Das Aufnahmeanzeigefenster zeigt Informationen zu den verfügbaren
Videos. Wählen Sie das Datum der zu suchenden Aufnahme. In der
Benutzeranleitung finden Sie weitere Details zu dem
Aufnahmeanzeigefenster.
15. Markieren Sie die Videoaufnahmen, die Sie sehen möchten. In der
Benutzeranleitung finden Sie weitere Details.
16. Klicken Sie auf die OK Schaltfläche.
Page 71

70
Anhang A: Backup-Funktion
Es gibt drei Möglichkeiten ein Backup Ihrer Dateien durchzuführen: mithilfe
des Internet Explorer, mithilfe des Playback System
(Wiedergabesystem), oder mithilfe des Backup System
(Sicherungssystem).
Internet Explorer
1. Öffnen Sie den Internet Explorer und melden Sie das Gerät an.
2. Klicken Sie auf die Aufnahme öffnen Schaltfläche, um Daten
auszuwählen.
3. Klicken Sie auf die Datensicherung Schaltfläche.
4. Setzen Sie Start- und Endzeit des Backups.
5. Wählen Sie die Kameras für das Backup.
6. Wählen Sie das Verzeichnis in dem Sie die Backupdaten sichern
wollen.
7. Klicken Sie auf die Datensicherung Schaltfläche.
Playback System (Wiedergabesystem)
1. Gehen Sie zu Start > NUUO NVRmini > Playback System
(Wiedergabesystem).
2. Klicken Sie auf die Aufnahme öffnen Schaltfläche, um Daten
auszuwählen.
3. Klicken Sie auf die Datensicherung Schaltfläche.
4. Setzen Sie Start- und Endzeit des Backups.
5. Wählen Sie die Kameras für das Backup.
6. Wählen Sie das Verzeichnis in dem Sie die Backupdaten sichern
wollen.
7. Klicken Sie auf die Datensicherung Schaltfläche.
Backup System (Sicherungssystem)
1. Gehen Sie zu Start > NUUO NVRmini > Backup System
(Sicherungssystem).
2. Geben Sie die IP Adresse Ihres Geräts im Anmeldefenster an.
3. Geben Sie den Benutzernamen an.
Page 72
71
4. Geben Sie das Passwort an.
5. Klicken Sie auf die OK Schaltfläche.
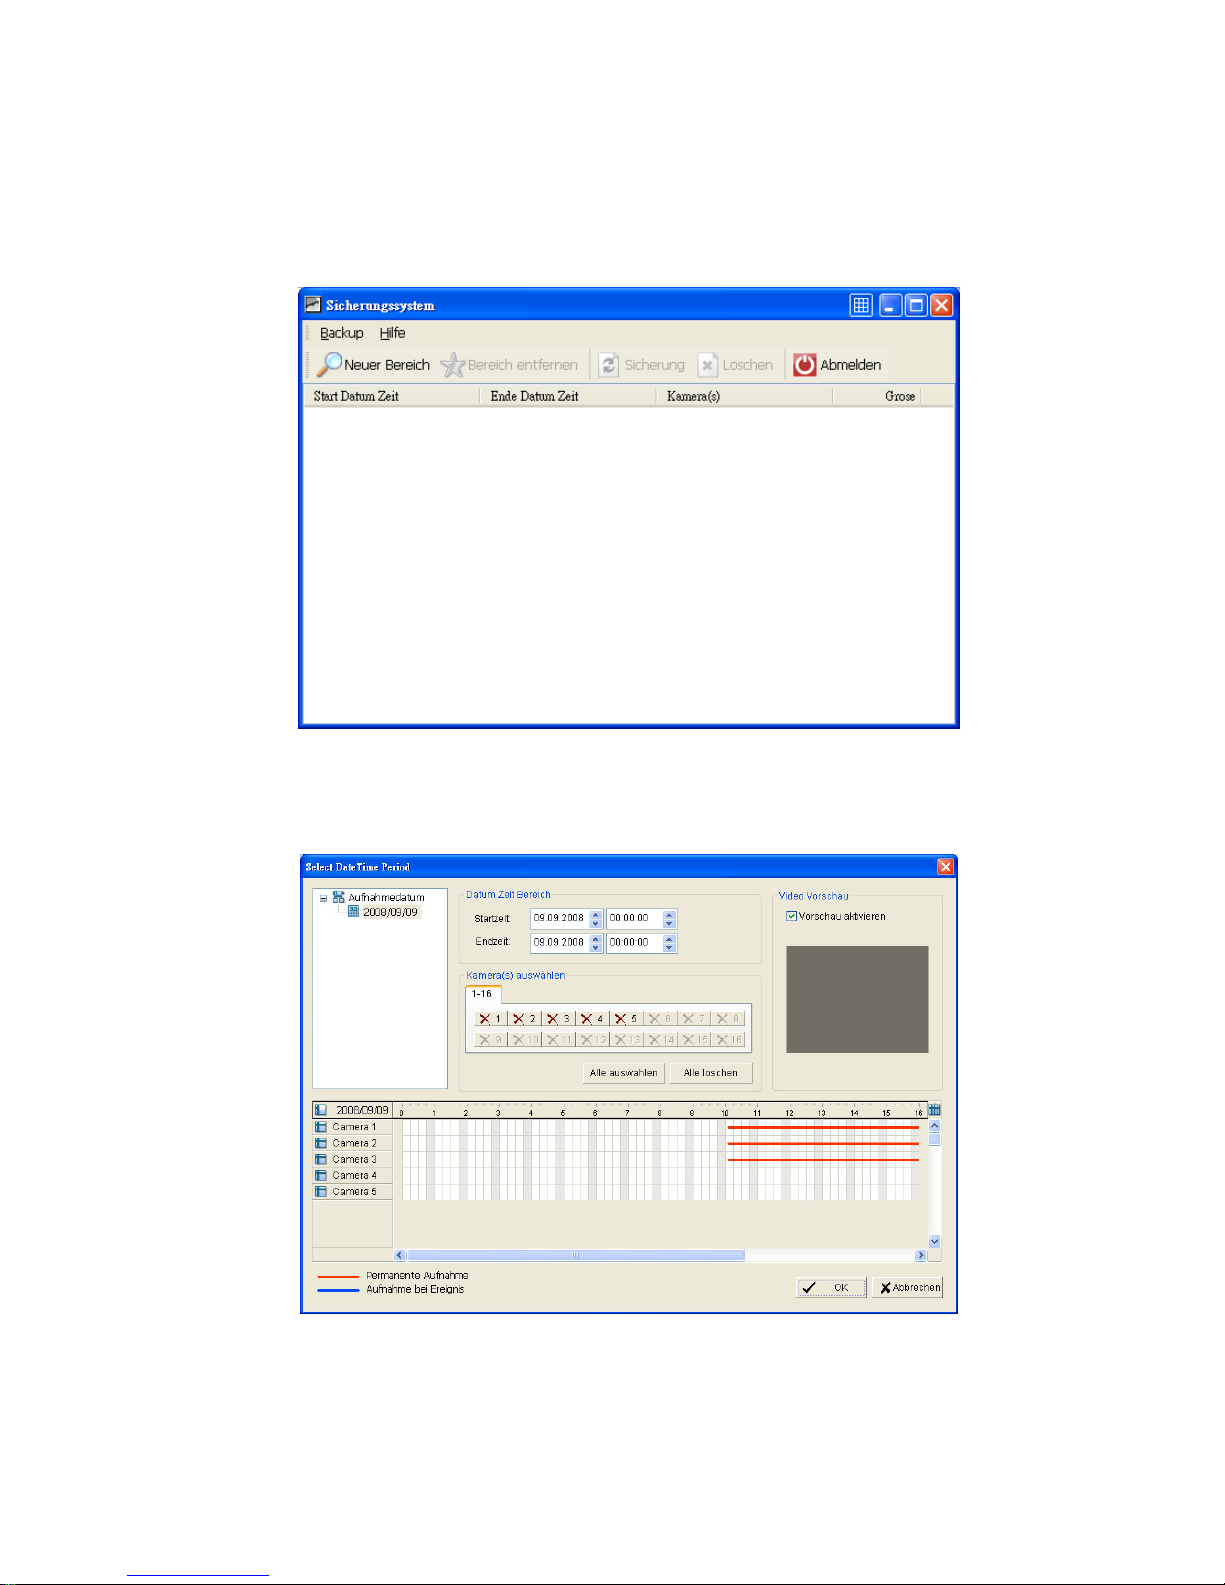
6. Klicken Sie auf die Neuer Bereich Schaltfläche.
7. Wählen Sie das Aufnahmedatum.
8. Setzen Sie Start- und Endzeit des Backups. (oder markieren Sie die
Videoaufnahmen, die durch das Backup gesichert werden sollen)
Page 73
72
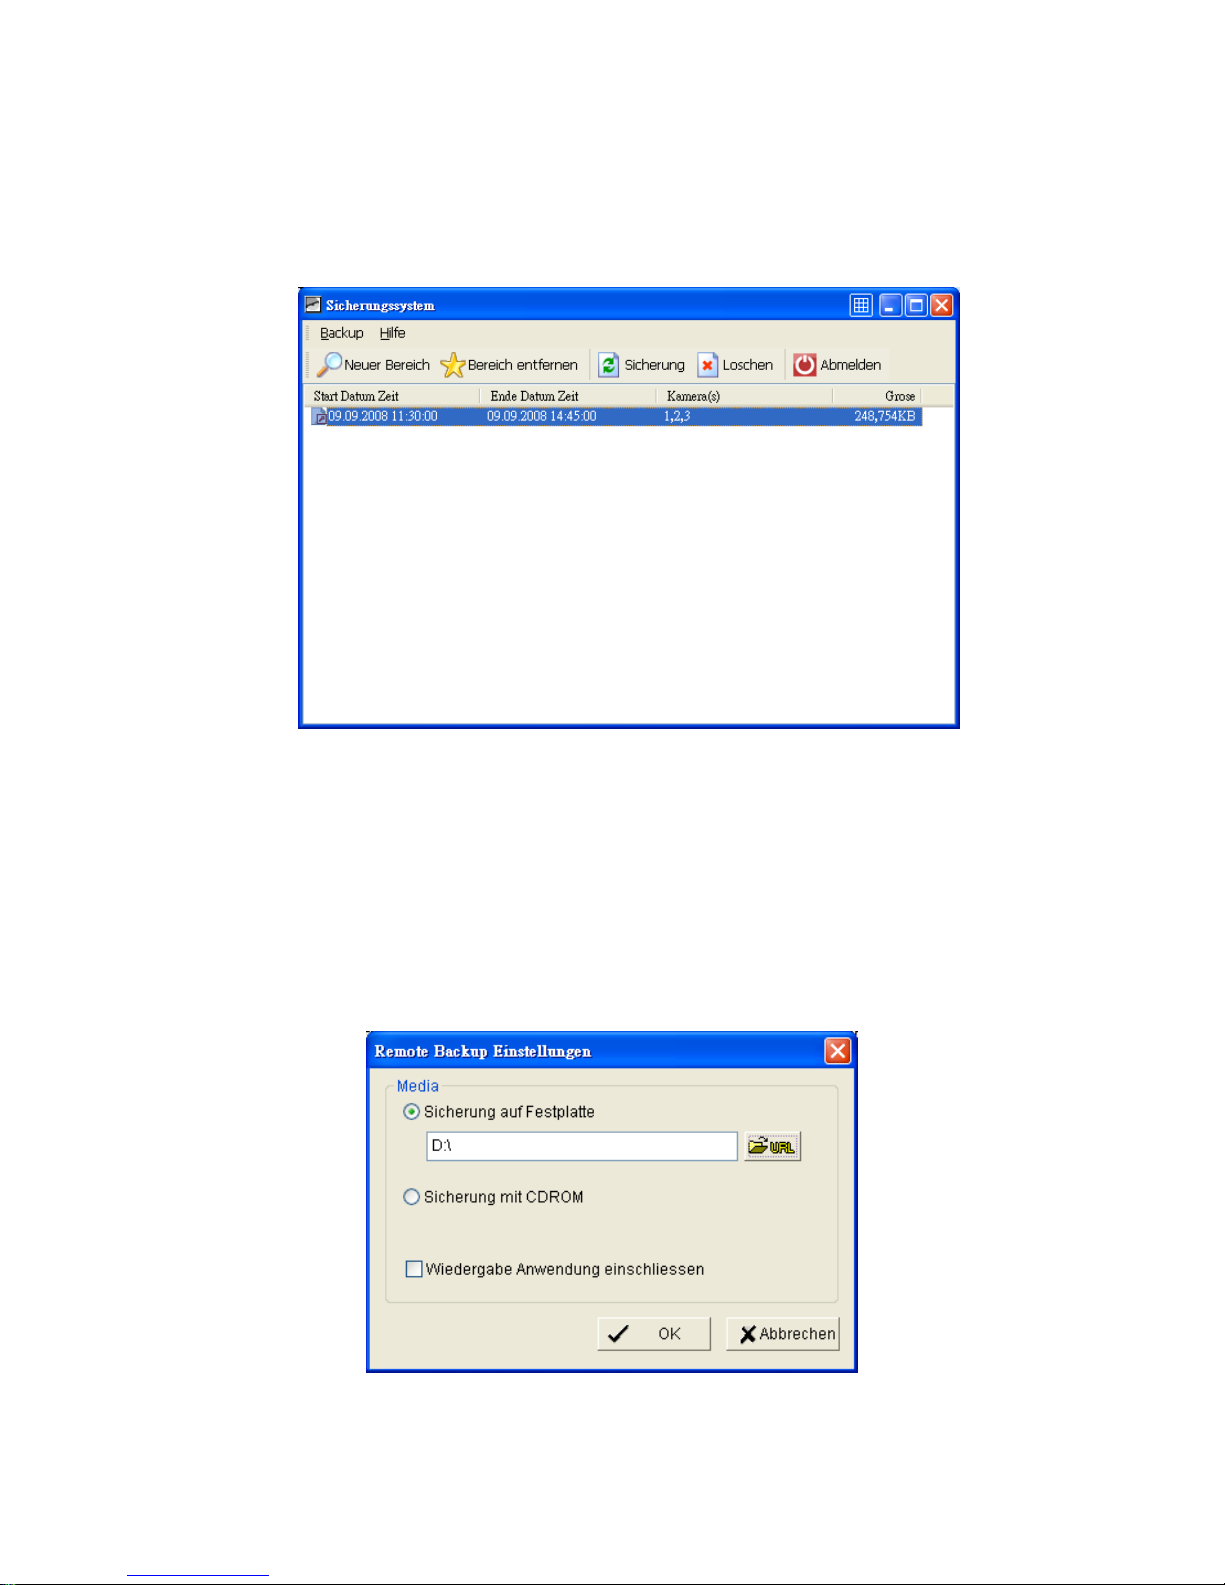
9. Wählen Sie die Kameras für das Backup.
10. Klicken Sie auf die OK Schaltfläche.
11. Wählen Sie die Zeitangabe für das Backup.
12. auf die Sicherung Schaltfläche.
13. Wählen Sie die Methode und das Verzeichnis in dem Sie die
Backupdaten sichern wollen.
14. Markieren Sie die Wiedergabe Anwendung einschliessen Option, die
Wiedergabe in den Backupordner hinzufügt.
15. Klicken Sie auf die OK Schaltfläche.
Page 74
73
Anhang B: Firmware Upgrade-Funktion
1. Finden Sie Ihr Gerät im Windows Explorer (geben Sie “\\” plus die IP
Adresse Ihres Geräts an).
2. Benutzen Sie die Administrator ID und Passwort zum Anmelden.
3. Platzieren Sie die Update Datei in den “public” Ordner Ihres Geräts.
4. Öffnen Sie den Internet Explorer und melden Sie das Gerät an.
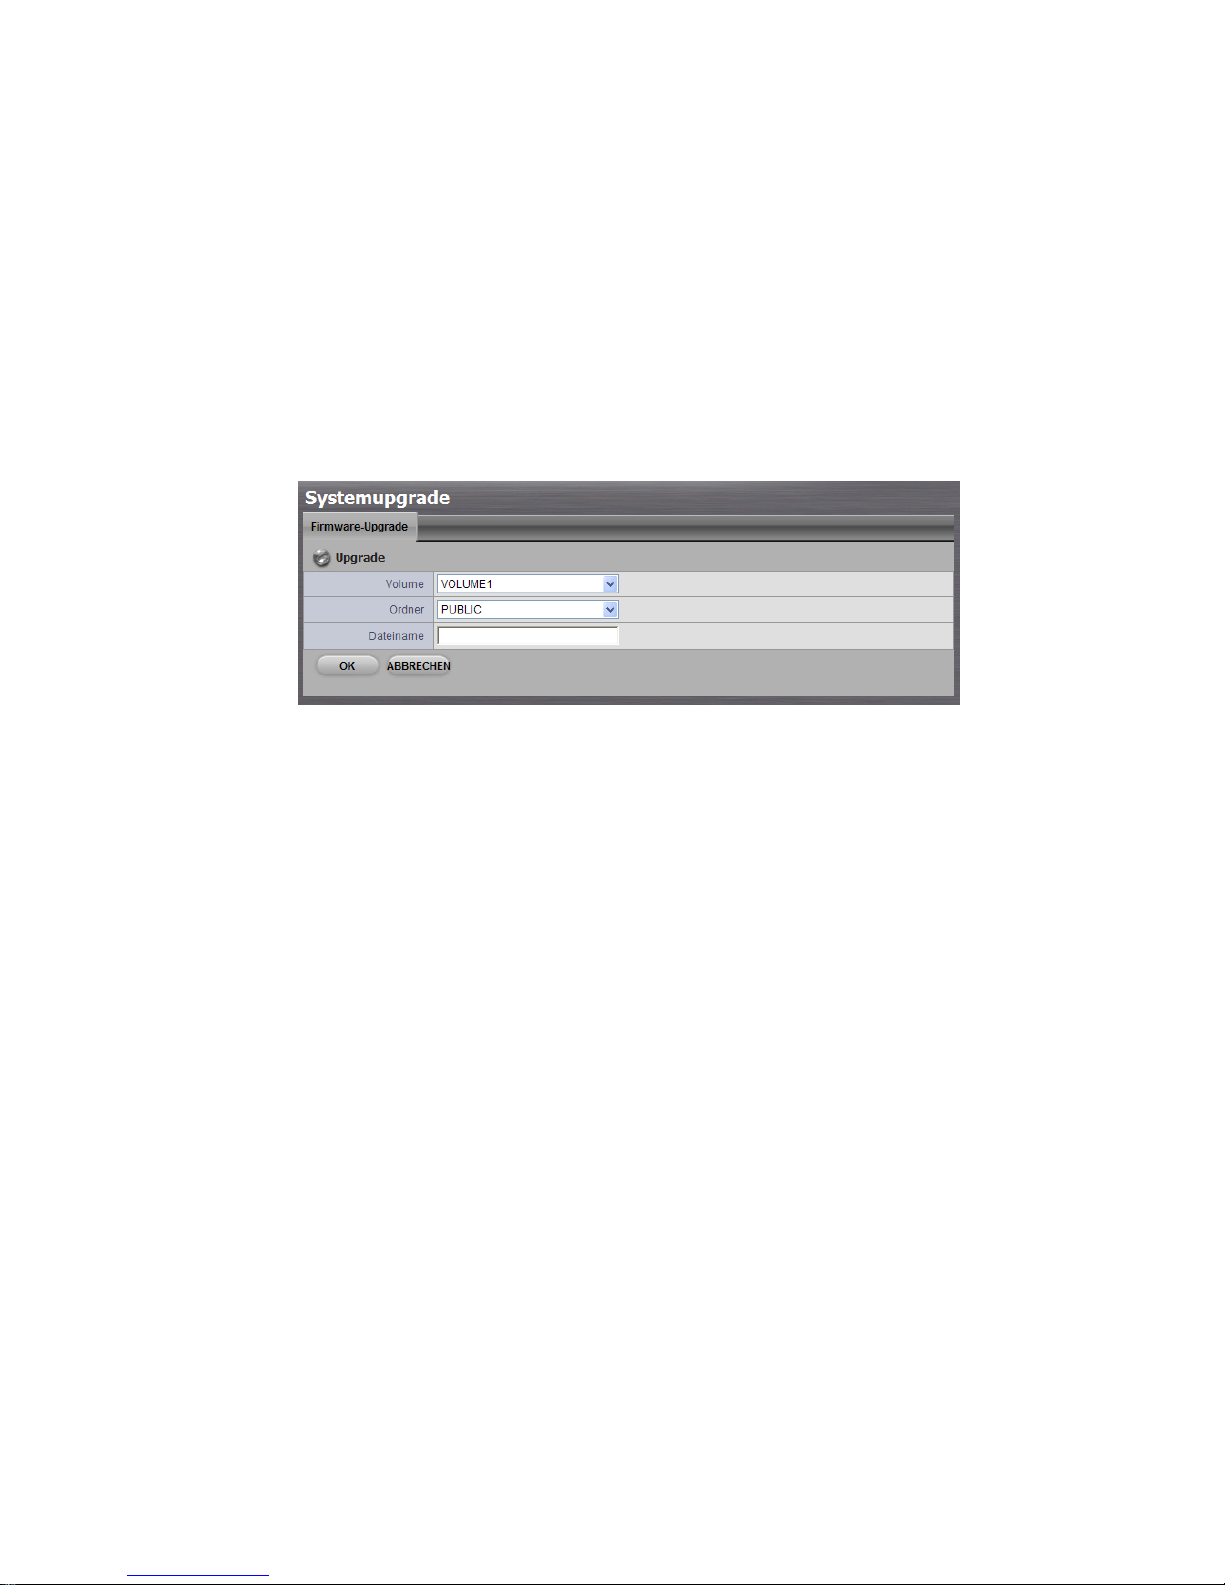
5. Klicken Sie auf System/ Systemupgrade.
6. Klicken Sie auf die Firmware-Upgrade Registerkarte.
7. Wählen Sie ein Volume.
8. Wählen Sie den Ordner “public”.
9. Geben Sie den vollständigen Dateiname an, einschließlich der
Dateierweiterung.
10. Klicken Sie auf die OK Schaltfläche.
11. Das System startet den Upgrade-Vorgang.
12. Nach Abschluss des Upgrades, bootet das System neu. Sie müssen
erneut auf das Gerät zugreifen.
Page 75
74
Etape 1: Déballer l'appareil
L'emballage contient les éléments suivants:
L'appareil
Guide de démarrage rapide
Vis pour les disques (1 sac)
Cordon d'alimentation
Carte de garantie
Adaptateur secteur 12V DC (unité 2 baies)
CD avec les applications Install Wizard (Assistant de
configuration), Backup (Sauvegarde), Live View (Vue directe), et
Playback (Différé), le manuel de l'utilisateur, et le guide de
démarrage rapide
Avertissement
Les composants électroniques de l'appareil peuvent être
endommagés par une décharge électrostatique (ESD). Veuillez
constamment prendre des précautions lorsque vous manipulez
l'appareil ou ses sous-ensembles.
Important
Pour configurer l'appareil, vous devez installer le logiciel sur un
ordinateur de bureau/ordinateur portable utilisant Windows Vista,
2003, XP Professional, ou 2000.
Unité 2 baies (4 canaux) vue de face
Lecteur de disque
Support du lecteur
DEL d'état du lecteur
DEL d'activité du lecteur
DEL d’activité Ethernet
Bouton d'alimentation
DEL d'état du système
Page 76
75
Unité 2 baies (4 canaux) vue de face
Unité 4 baies (8 canaux) vue de face
Lecteur de disque
Support du lecteur
DEL d'état du lecteur
DEL d'activité du lecteur
DEL dactivité Ethernet
Bouton d'alimentation
DEL d'état du système
Ventilateur de refroidissement
Connexion USB
Connexion réseau R
J45
Connexion d'alimentation
Page 77
76
Unité 4 baies (8 canaux) vue arrière
Etape 2: Installer les disques
Vous pouvez équiper cet appareil avec des disques SATA 1,5 Gb/s or 3,0
Gb/s. Pour une performance optimale, installez des disques de modèle et
de capacité identiques. Vos disques deviendront un Volume RAID sur cet
appareil.
1. Ouvrez le couvercle avant du boîtier de l'appareil.
2. Sortez un support de disque du boîtier. Voir la figure de la face avant.
3. Mettez soigneusement le disque dans le support, en alignant les trous
latéraux du support avec les trous du disque.
4. Insérez les vis à travers les trous du support et vissez-les dans les trous
du disque.
Installez uniquement les vis fraisées fournies avec l'appareil.
Installez quatre vis par disque.
Serrez bien chaque vis. Faites attention de ne pas trop serré.
5. Remettez le support du disque dans le boîtier de l'appareil.
6. Répétez les étapes 2 à 5 pour l'autre disque.
7. Ouvrez le couvercle avant du boîtier de l'appareil.
Ventilateur de refroidissement
Connexion réseau RJ45
Connexion USB
Ventilateur de l'alimentation
Connexion d'alimentation
Page 78
77
Etape 3: Connecter au réseau
1. Attachez une extrémité du câble réseau à la connexion réseau RJ45.
Voir la figure de la face arrière.
2. Attachez l'autre extrémité du câble réseau à votre hub ou switch
Ethernet.
Important
Si votre installation est équipée de plusieurs réseaux, notez le
réseau auquel vous connectez l'appareil. Vous aurez besoin de
cette information lors de la configuration.
Etape 4: Connecter l'alimentation
1. Attachez le cordon d'alimentation de la source d'alimentation à
l'adaptateur secteur.
2. Connectez l'adaptateur secteur à l'arrière du boîtier de l'appareil. Voir la
figure de la face arrière.
3. A l'avant de l'appareil, appuyez sur le bouton d'alimentation. Voir la
figure de la face avant.
Important
Avant de redémarrer, veuillez vous assurer que les deux
extrémités du câble du réseau sont respectivement connectés à
l'appareil et au routeur Ethernet. Veuillez également activer la
fonction DHCP du réseau, l'appareil recevra une adresse IP via
DHCP par défaut.
Cela prend environ une minute pour redémarrer l'appareil. Après avoir
redémarré:
La DEL d'état du système s'allume en vert. Voir la figure de la face
avant.
Le buzzer bipe une fois.
Page 79

78
Etape 5: Installer le logiciel
1. Insérez le CD dans votre CDROM.
2. Double-cliquez sur Setup.exe pour commencer l'installation.
3. Cliquez sur le bouton SUIVANT pour commencer l'installation.
4. Cliquez sur l'option « J'accepte les termes du contrat de la licence »,
puis cliquez sur le bouton SUIVANT.
5. Entrez votre « Nom d'utilisateur » et « Nom de compagnie » puis
cliquez sur le bouton SUIVANT.
6. Sélectionnez le type de configuration, puis cliquez sur le bouton
SUIVANT.
7. Cliquez sur le bouton INSTALLER pour procéder à l'installation.
8. Quand les procédés d'installation mentionnés ci-dessus sont terminés,
un écran final apparaît. Cliquez sur le bouton TERMINER pour fermer
l'installateur.
Etape 6: Configuration de l'appareil
Le logiciel de l'Assistant de configuration effectue les procédures de
configuration de votre appareil. Après la procédure, vous pouvez
commencer à utiliser cet appareil.
1. Allez à Démarrer > NUUO NVRmini > Install Wizard (Assistant de
configuration).
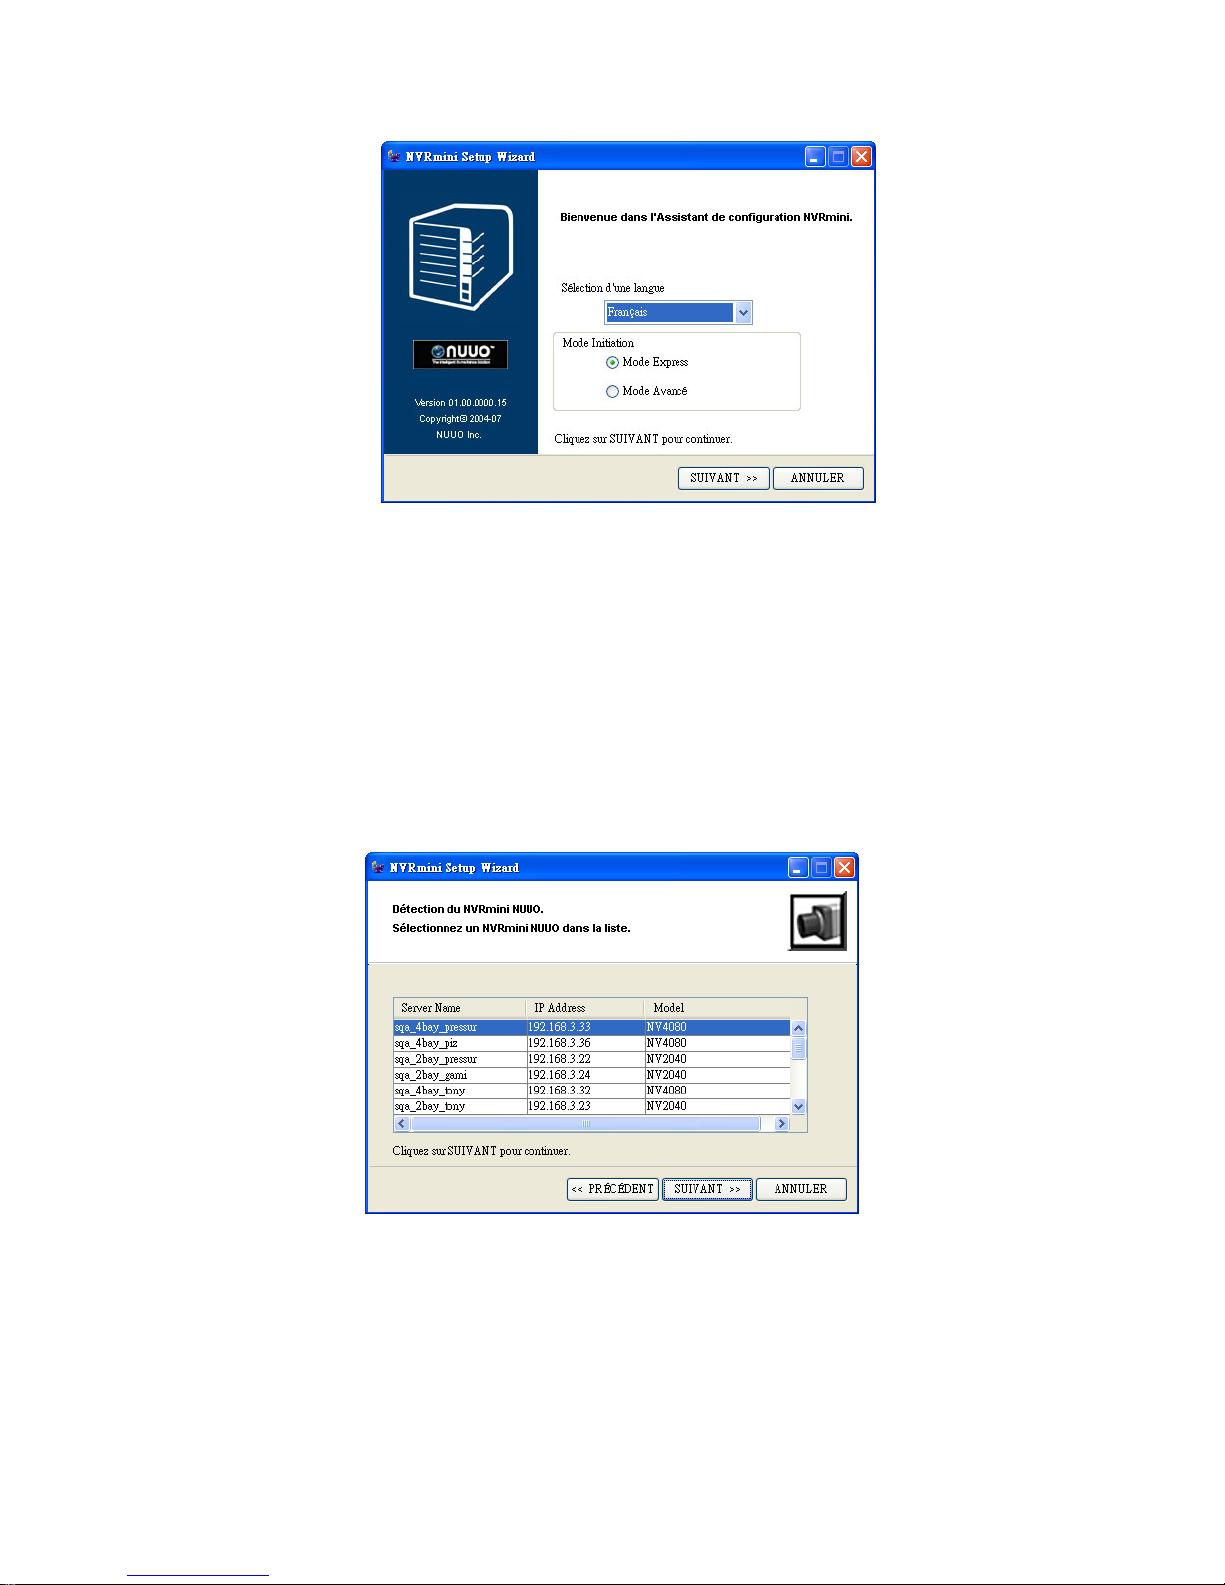
2. Ce programme affichera la langue définie par défaut et le mode
initiation.
3. Choisissez la langue souhaitée et le mode initiation, puis cliquez sur le
bouton SUIVANT.
Page 80
79
Mode Express: vous n'avez pas besoin de configurer la date, l'heure,
le réseau, et le niveau du RAID. (Après l'étape 5, passez directement
à l'étape 9.)
Mode Avancé: vous devez définir la date, l'heure et le réseau.
4. Le programme d'Assistant de configuration recherchera tous les
appareils actuellement présents sur Internet. Choisissez-en un, puis
cliquez sur le bouton SUIVANT.
Page 81
80
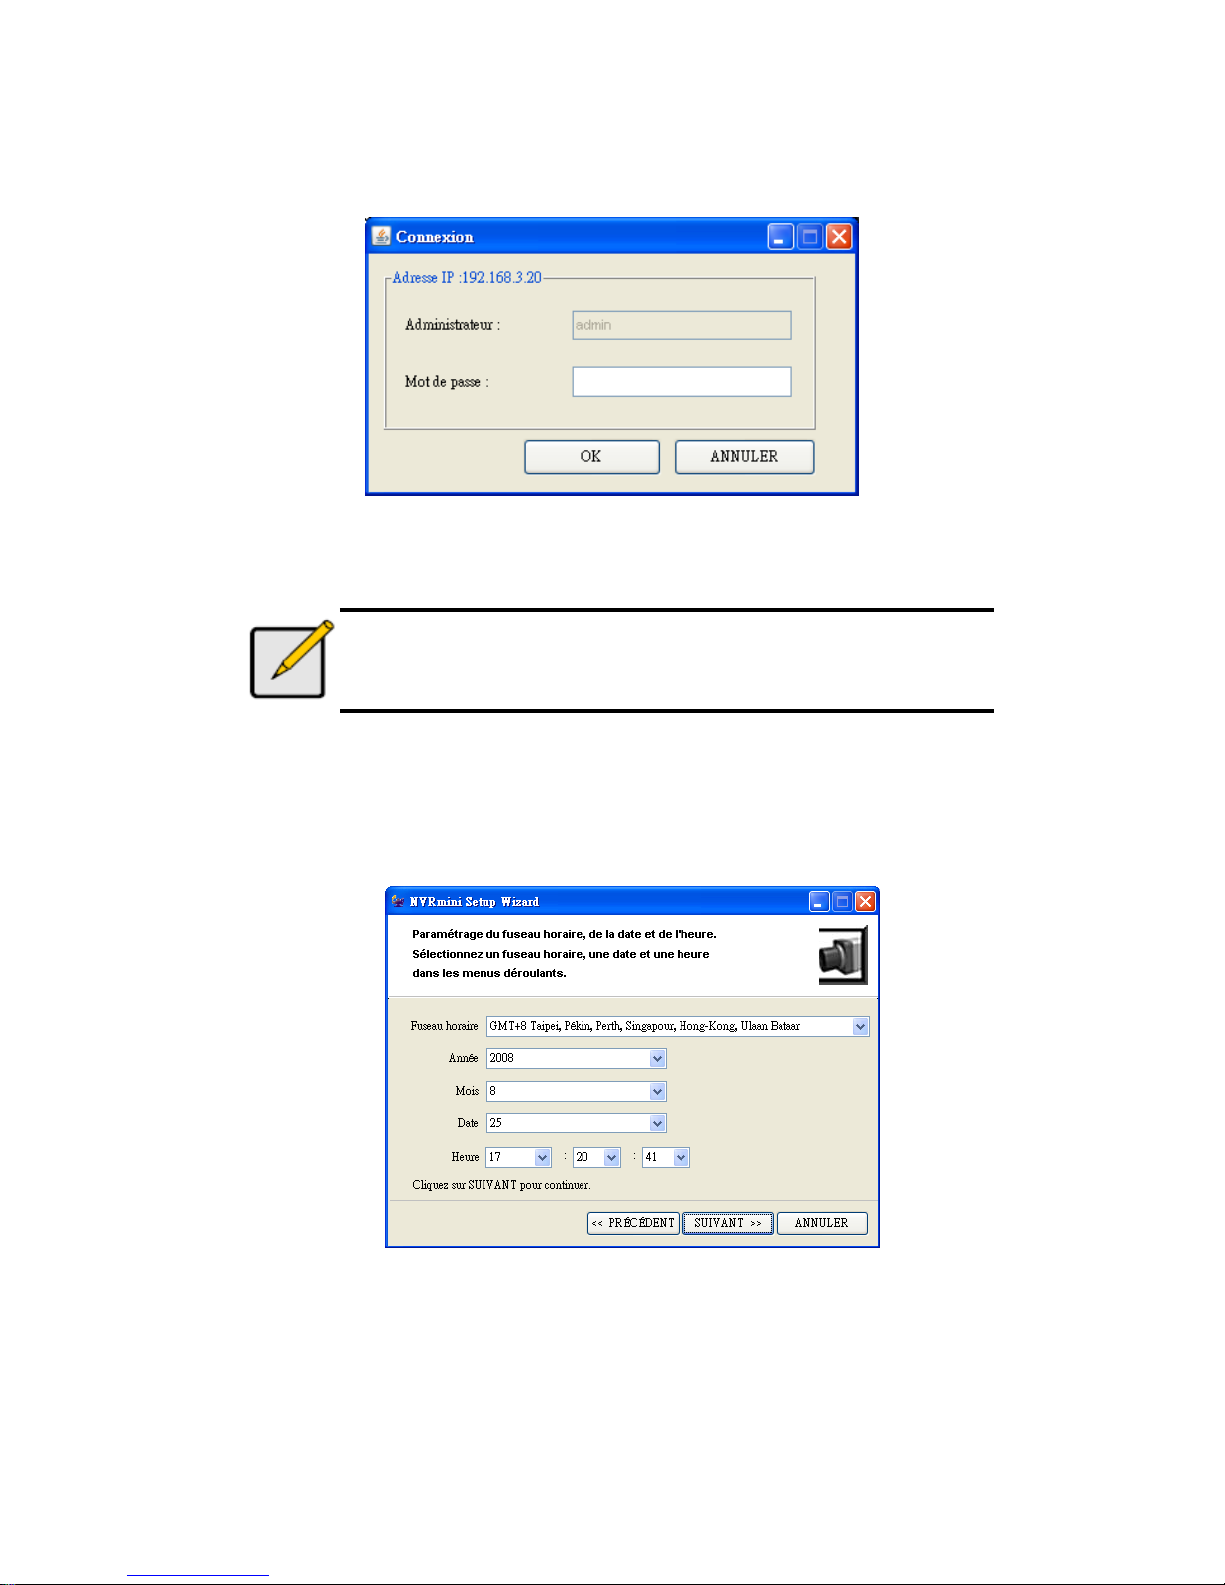
5. Insérez le mot de passe, puis cliquez sur le bouton OK.
Remarque
Le mot de passe par défaut de l'administrateur est « admin ».
6. Définissez le fuseau horaire, la date et l'heure, puis cliquez sur le
bouton SUIVANT.
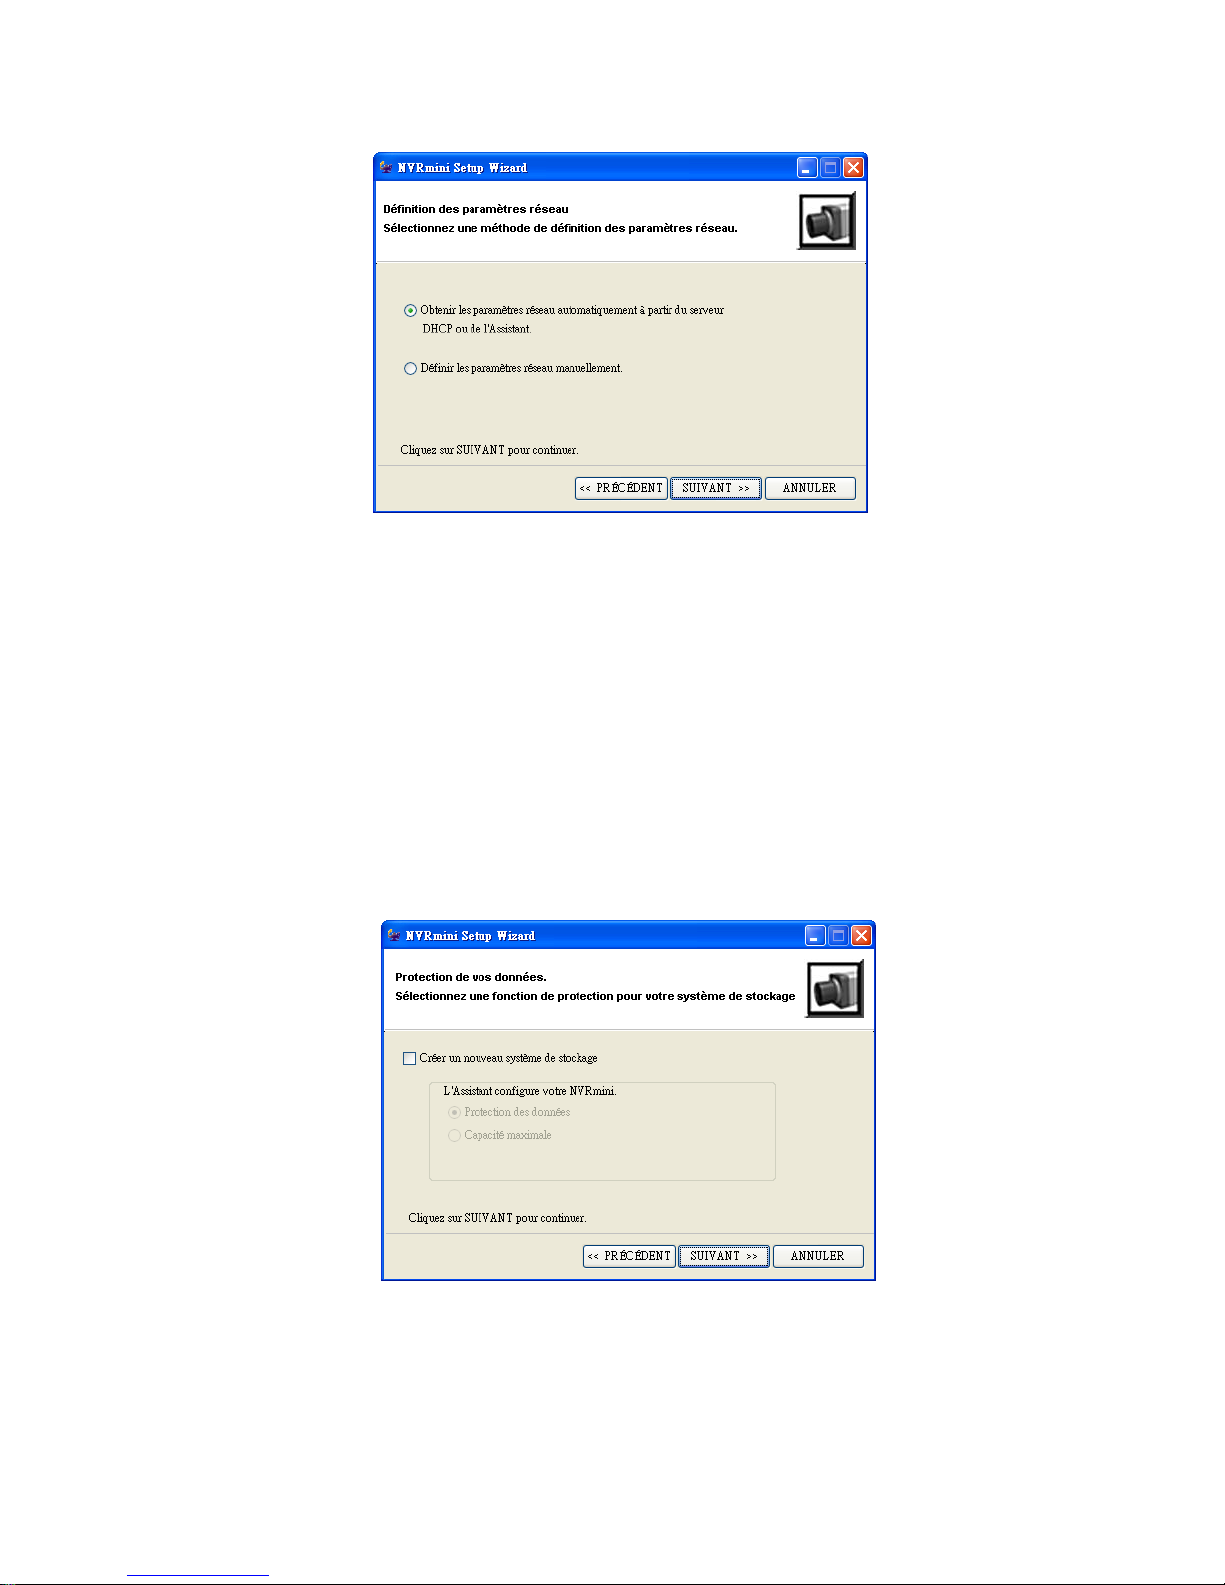
7. Définissez les paramètres du réseau, puis cliquez sur le bouton
SUIVANT.
Page 82
81
Obtenir les paramètres réseau automatiquement à partir du
serveur DHCP ou de l'Assistant: appliquez les paramètres, comme
IP, masque réseau, passerelle, DNS qui sont générés depuis le
serveur DHCP.
Définir les paramètres réseau manuellement: configurez vos
paramètres spécifiques.
8. Si vous avez besoin de configurer un nouveau disque, cochez l'option «
Créer un nouveau système de stockage ». Après avoir coché l'option,
cliquez sur le bouton SUIVANT.
Protection des données: définissez le niveau du RAID au RAID 1 (2
baies). Définissez le niveau du RAID au RAID 5 (4 baies).
Capacité maximale: définissez le niveau du RAID au RAID 0 (2
Page 83
82
baies). Définissez le niveau du RAID au RAID 0 (4 baies).
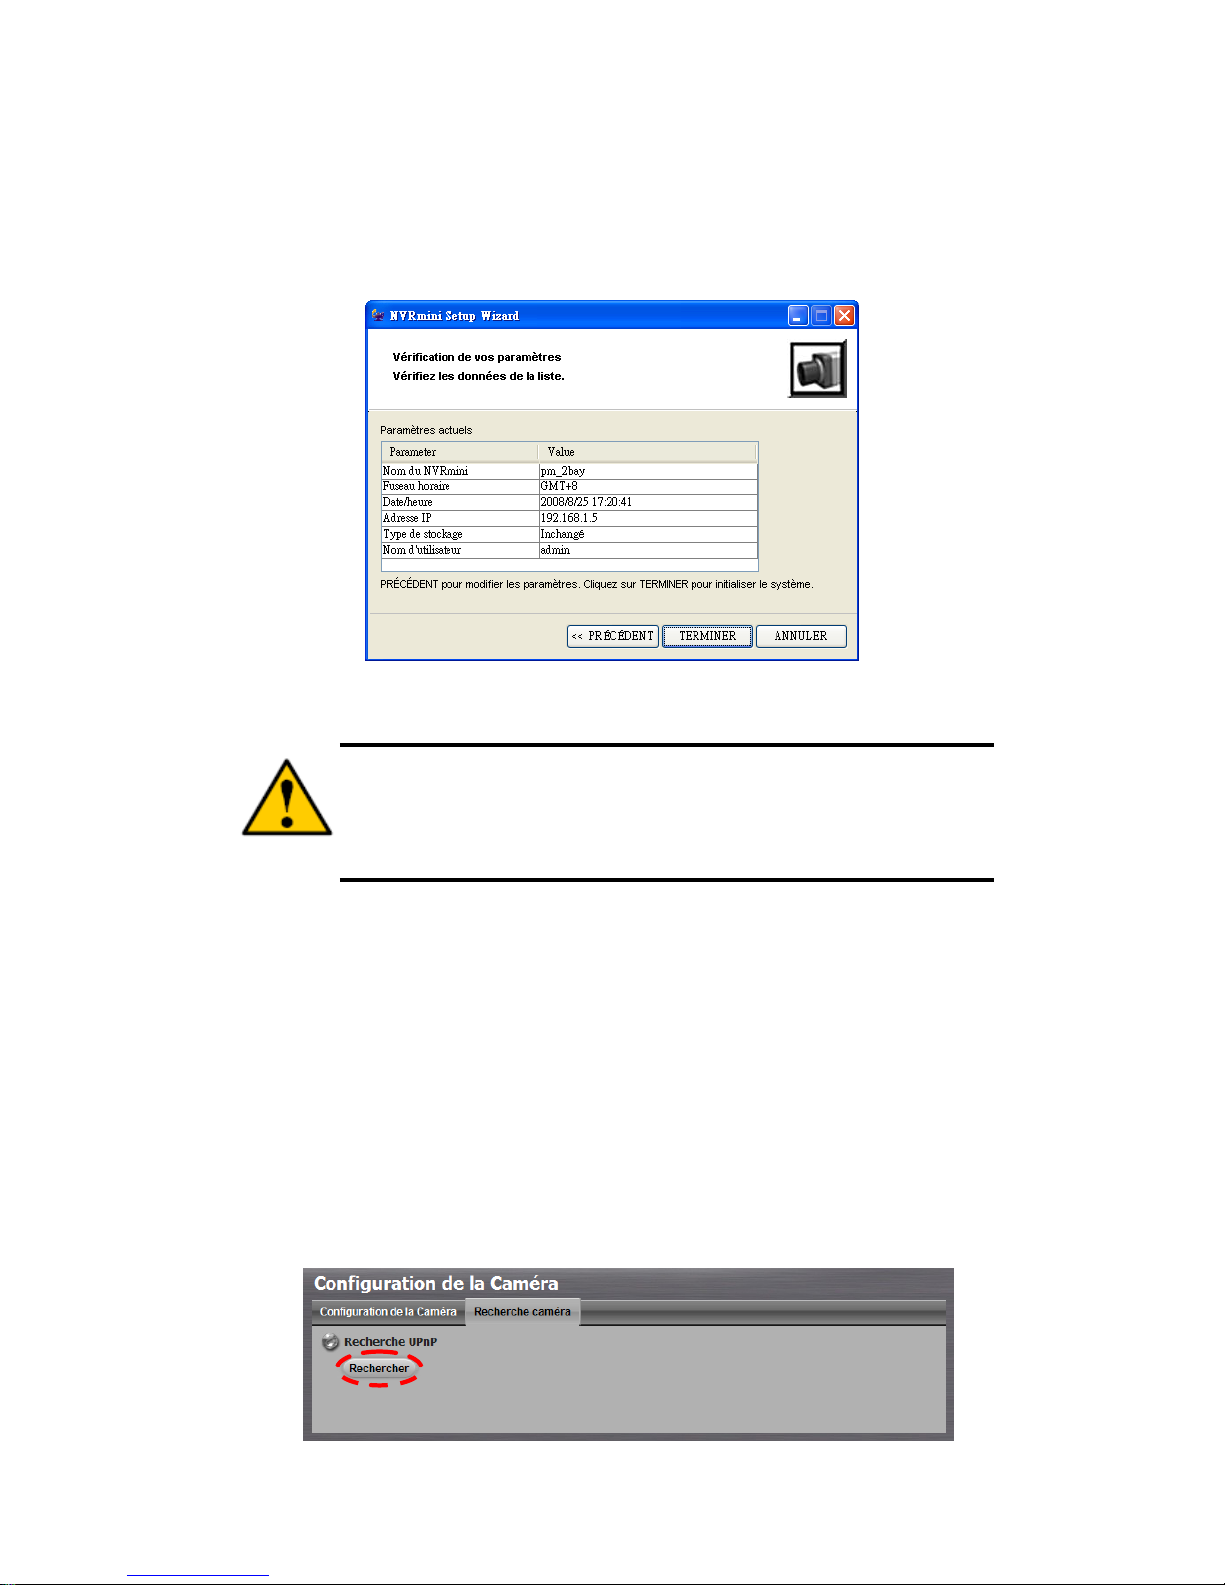
9. Révisez vos paramètres. Si les paramètres sont corrects, cliquez sur le
bouton TERMINER pour terminer le process de configuration.
Attention
Une fois que les paramètres de l'appareil ont été définis,
l'appareil commencera à fonctionner. Afin de préserver la
stabilité de l'appareil, ne retirez aucun disque lorsque le système
est en fonctionnement.
Etape 7: Ajoutez des caméras
Ajoutez des caméras UPnP
1. Ouvrez Internet Explorer et connectez l'appareil.
2. Cliquez sur Caméra IP/ Configuration de la Caméra.
3. Cliquez sur l'onglet Recherche caméra.
4. Cliquez sur le bouton Rechercher pour rechercher des caméras UPnP.
Page 84
83
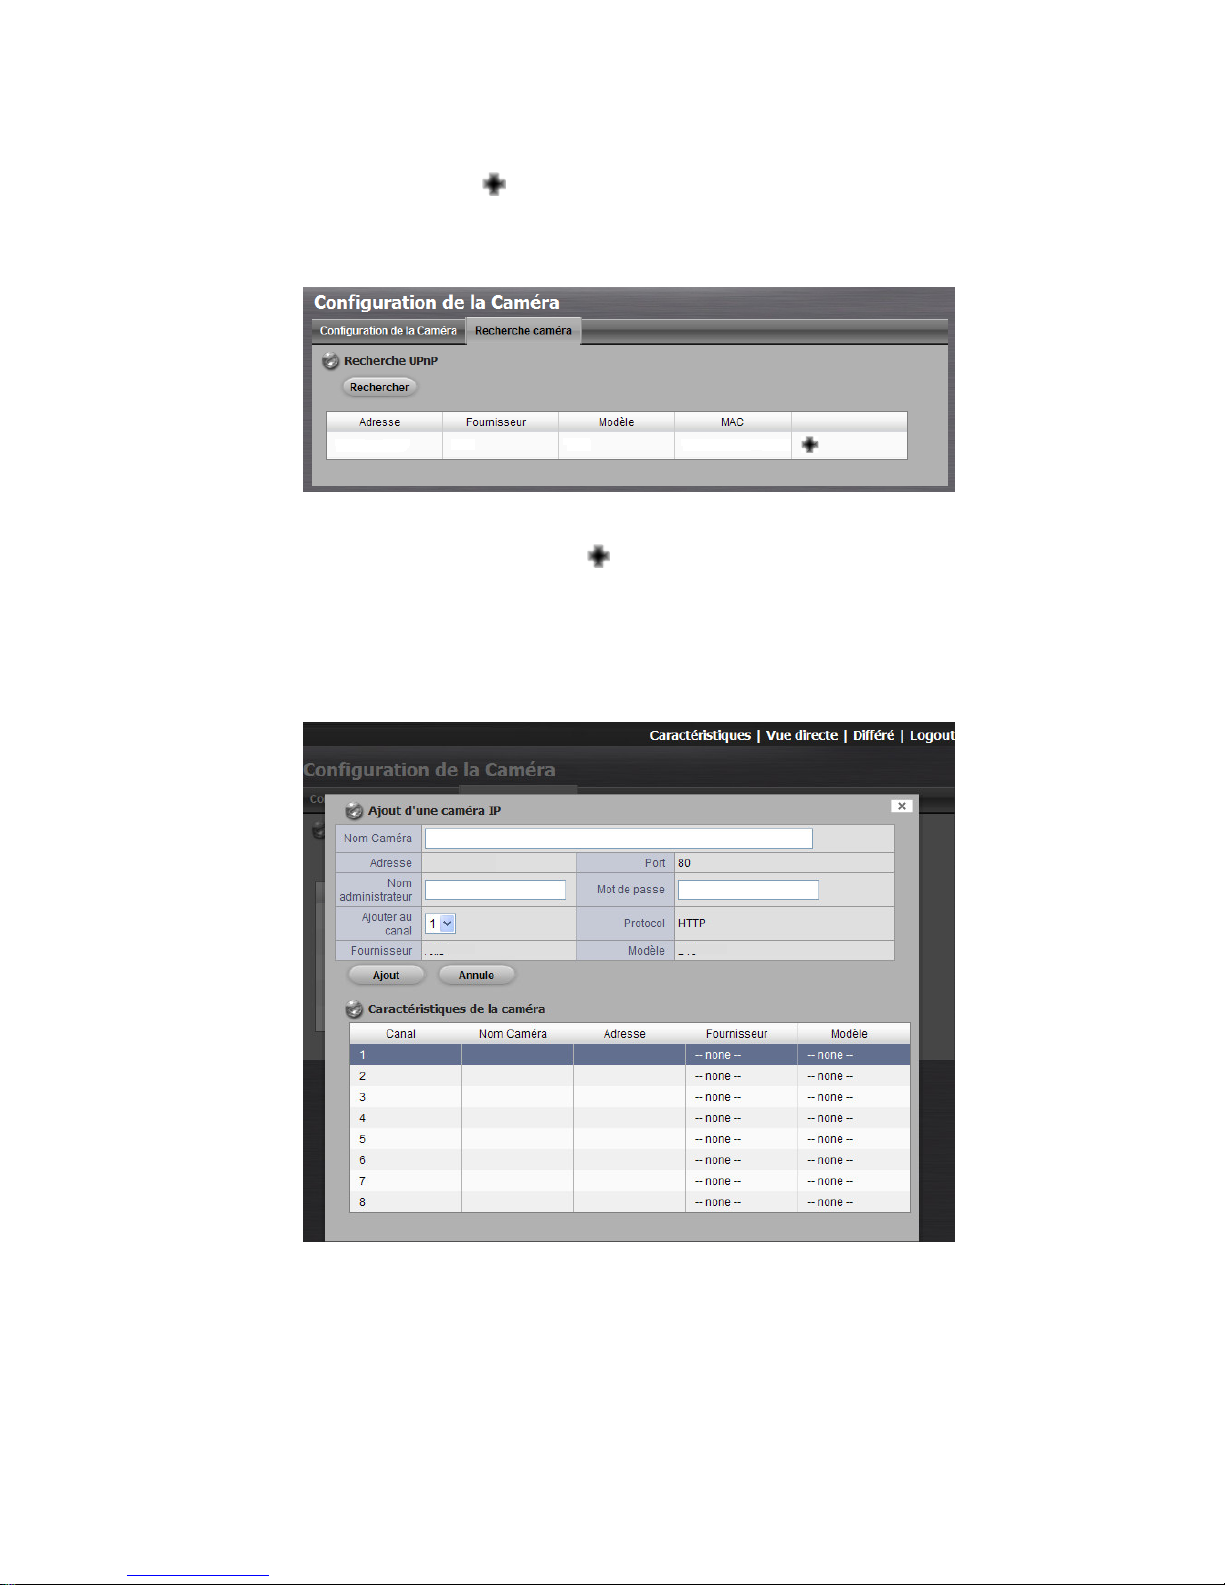
5. Le système listera toutes les caméras disponibles à ce moment-là.
Cliquez sur l'icône
pour ajouter cette caméra à votre liste de
caméras.
6. Après avoir cliqué sur l'icône , la page de configuration de la caméra
apparaîtra. Cliquez sur l'élément que vous voulez ajouter à une caméra.
7. Entrez le nom de la caméra, nom administrateur, et le mot de passe de
la caméra.
Adresse Fourni
Nom du modèle
Adresse Mac
Adresse IP
Nom du modèle
Fournisseur
Page 85
84
Remarque
Certaines caméras limiteront l'autorisation de connexion à
l'administrateur. Dans ce cas, vous devrez changer le nom
d'utilisateur de connexion et le mot de passe de l'administrateur
pour connecter ces caméras.
8. Cliquez sur le bouton Ajout pour l'ajouter.
9. Après avoir cliqué sur le bouton Ajout, la liste des caméras mise à jour
s'affichera dans l'onglet Configuration de la Caméra.
10. Répétez l'étape 5 à 8 pour ajouter d'autres caméras à votre liste.
Ajouter des caméras sans fonction UPnP
1. Ouvrez Internet Explorer et connectez l'appareil.
2. Cliquez sur Caméra IP/ Configuration de la Caméra.
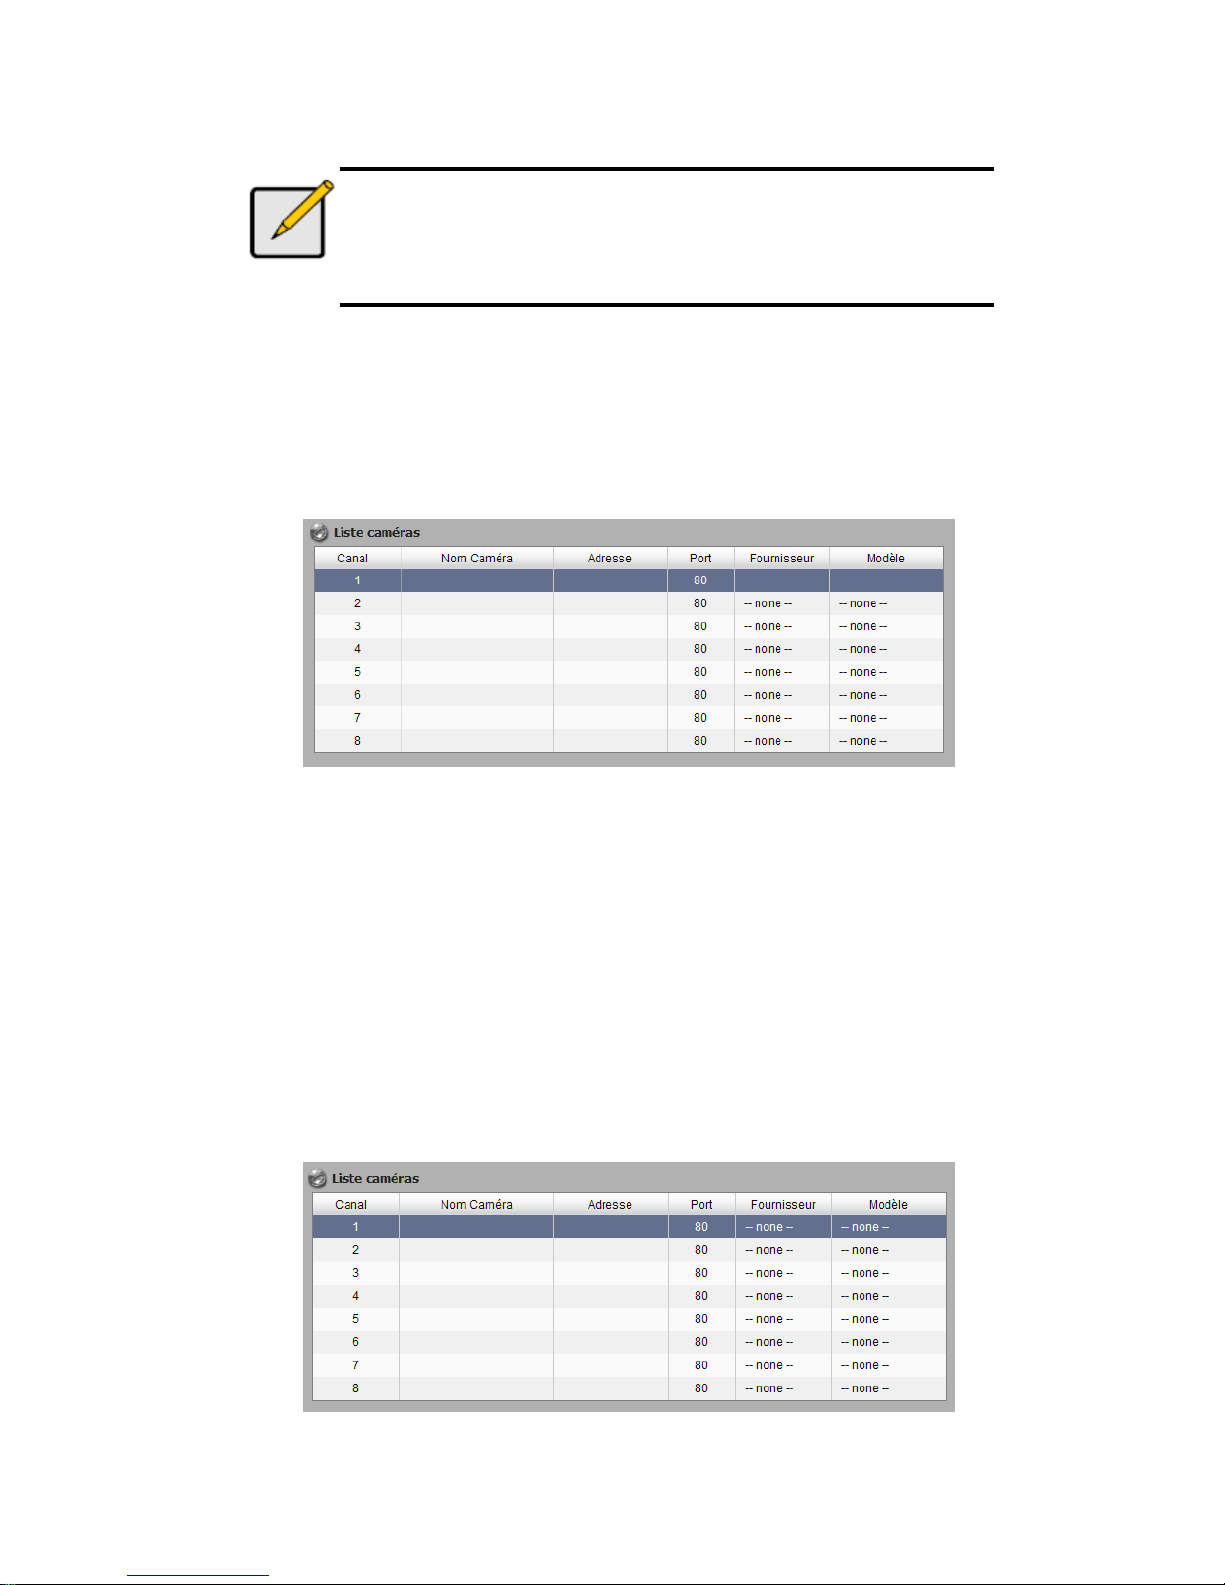
3. Cliquez sur l'onglet Configuration de la Caméra, et la liste des
caméras s'affichera en bas de la page.
4. Cliquez sur l'élément que vous voulez ajouter à une caméra.
Nom de la
Adresse IP
Fournis
Nom du modèle
Page 86
85
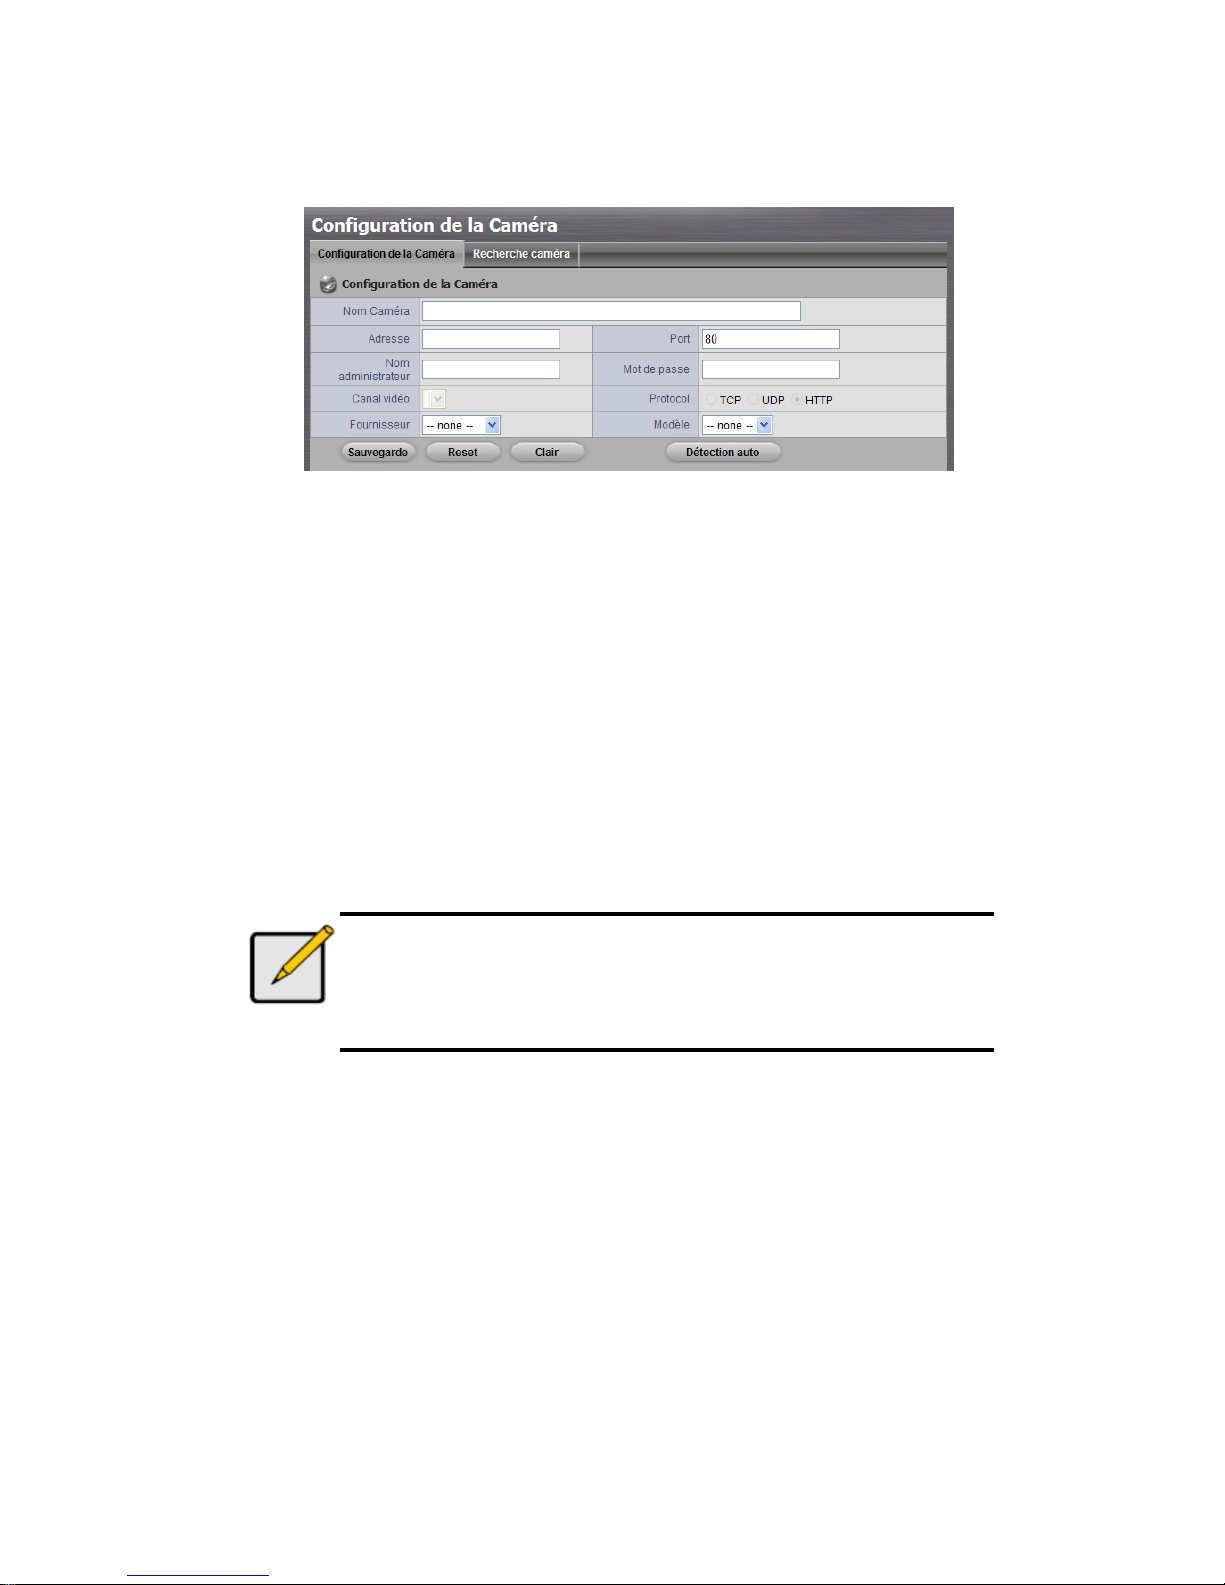
5. Entrez les informations de cette caméra en haut de la page.
Nom caméra: nom de cette caméra.
Adresse: l'adresse IP.
Port: le port de transmission.
Nom administrateur: nom de l'utilisateur de connexion.
Mot de passe: mot de passe de connexion.
Canal vidéo: sélectionnez le nombre de caméras analogiques prises
en charge par un serveur vidéo à partir de la liste.
Protocol: protocole de transmission des données.
Fournisseur: nom du vendeur de caméra.
Modèle: nom du modèle de caméra.
Remarque
Certaines caméras limiteront l'autorisation de connexion à
l'administrateur. Dans ce cas, vous devrez changer le nom
d'utilisateur de connexion et le mot de passe de l'administrateur
pour connecter ces caméras.
6. Cliquez sur le bouton Sauvegarde.
Sauvegarde: enregistre les informations de cette caméra.
Reset: renvoi aux derniers paramètres enregistrés de la caméra
sélectionnée.
Détection auto: après avoir entré l'adresse IP, le port, le nom
d'utilisateur, et le mot de passe, cliquez sur ce bouton pour trouver
automatiquement toutes les informations de cette caméra. (comme le
Canal vidéo, Protocole, Fournisseur, Modèle)
Page 87
86
7. Répétez l'étape 4 à 6 pour ajouter d'autres caméras à votre liste.
Etape 8: Fonction vue directe
Il y a deux façons d'implémenter la fonction vue directe: à travers Internet
Explorer ou à travers l'application Remote Live Viewer (Vue directe
distante).
Internet Explorer
1. Ouvrez Internet Explorer et connectez l'appareil.
2. Configurer les caméras.
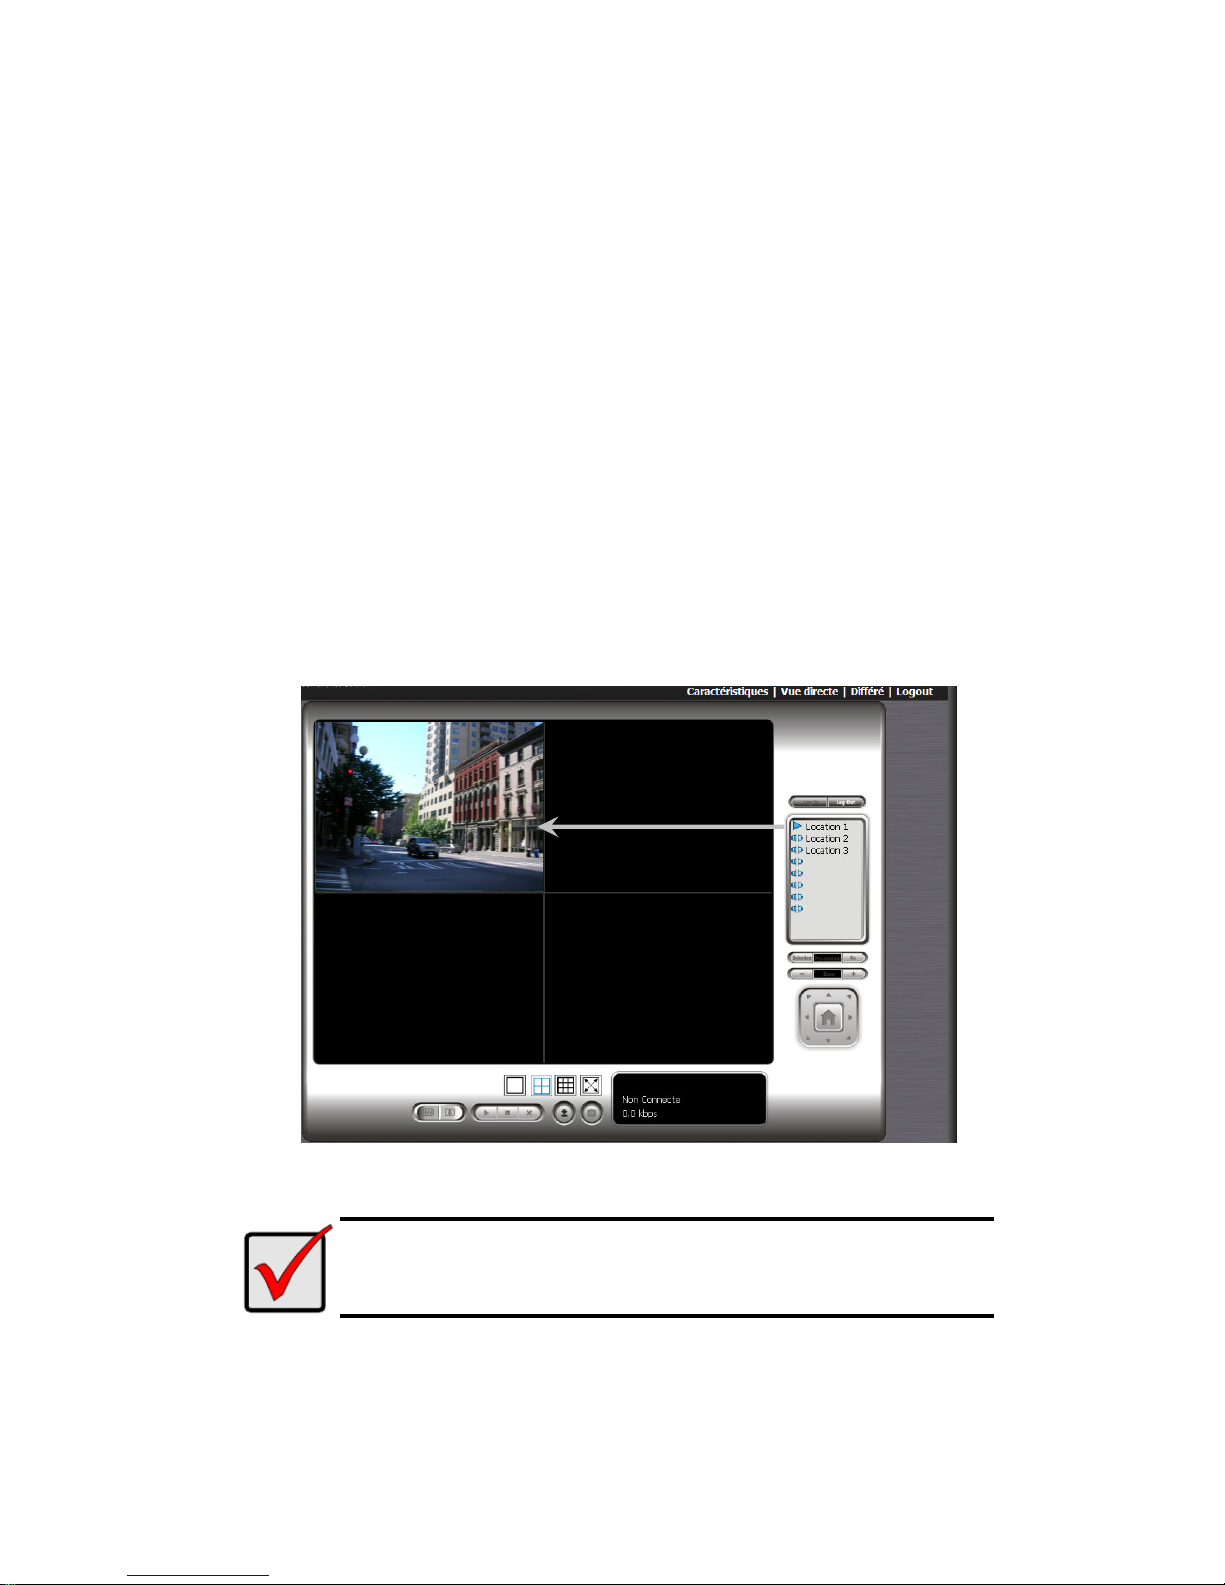
3. Cliquez sur le bouton Vue directe en haut de la page.
4. Sélectionnez une caméra à partir de la liste des caméras sur la droite
puis déplacez la à l'endroit où vous voulez que l'image soit affichée.
Important
Au moment d'exécuter Internet Explorer, n'utilisez pas la fonction
« Ouvrir une nouvelle fenêtre » afin de stabiliser le navigateur.
Page 88
87
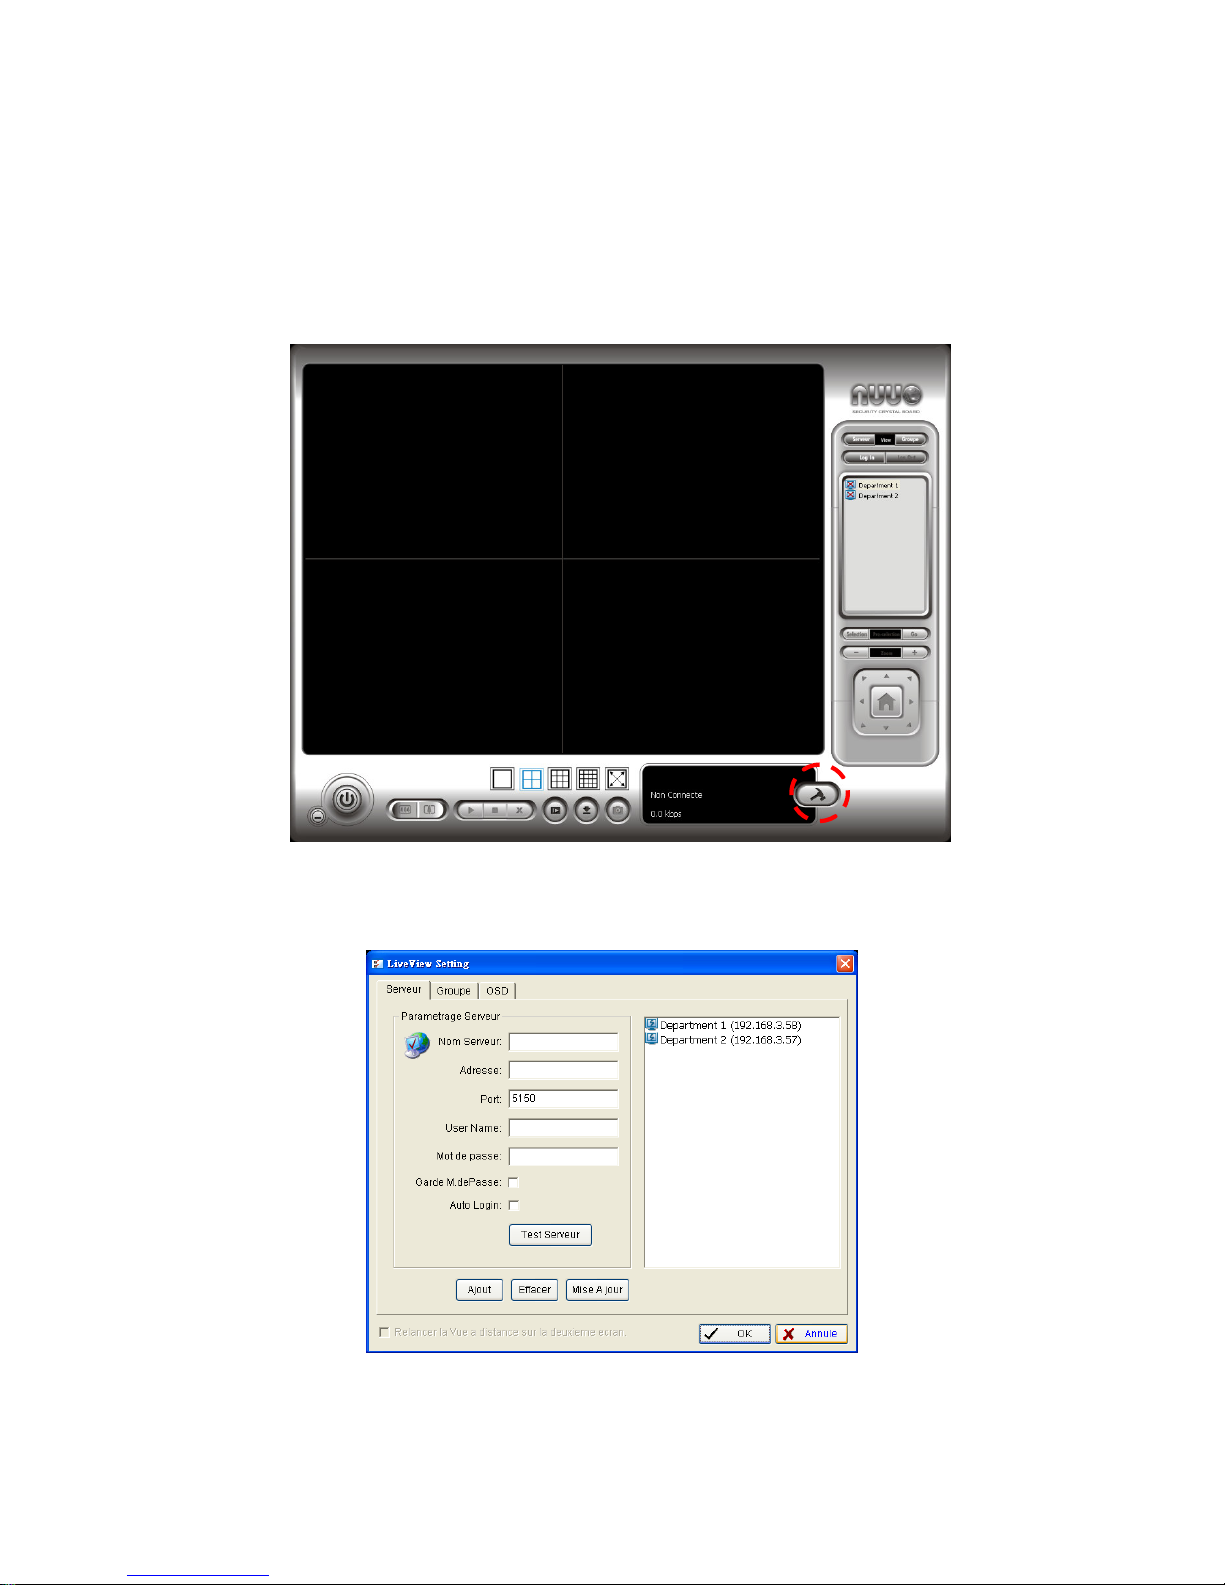
Application Remote Live Viewer (vue directe distante)
1. Allez à Démarrer > NUUO NVRmini > Remote Live Viewer (vue directe
distante).
2. Cliquez sur le bouton LiveView Setting.
3. Entrez le nom de l'appareil.
4. Entrez l'adresse IP.
Page 89
88
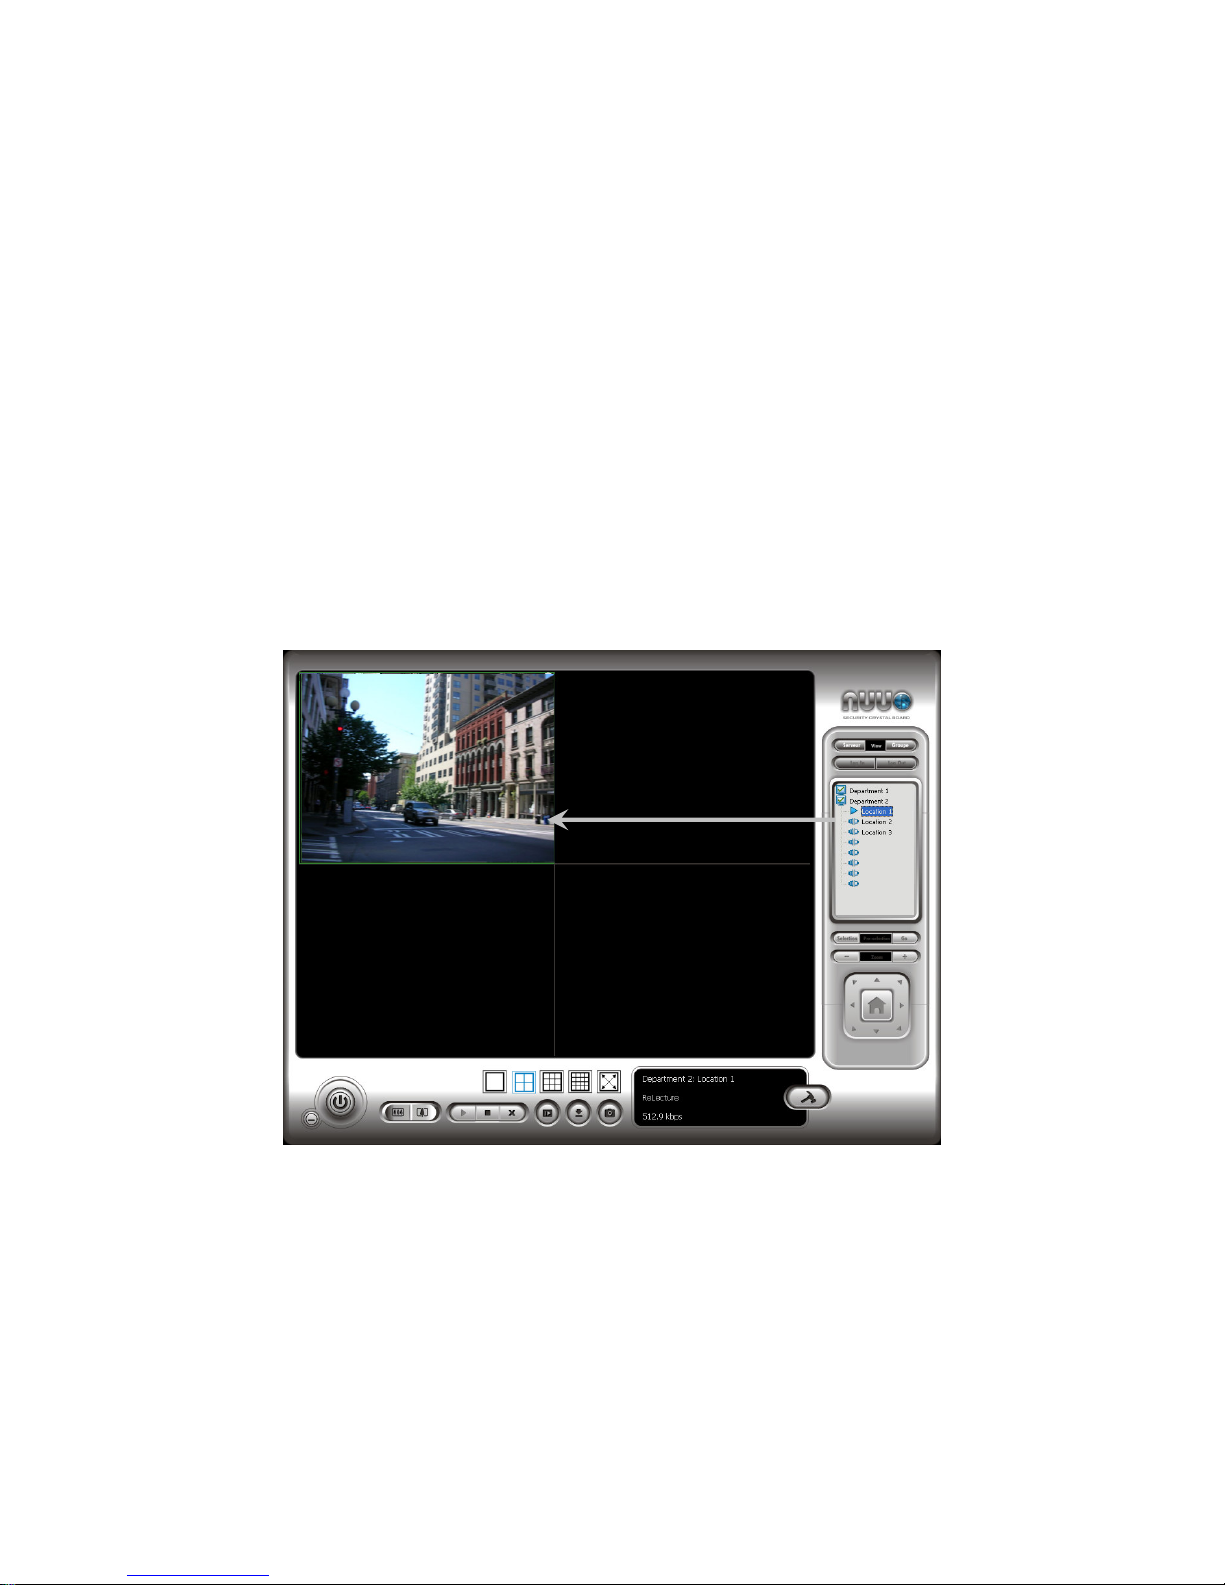
5. Modifiez le port si nécessaire.
6. Entrez le nom d'utilisateur.
7. Entrez le mot de passe.
8. Cochez l'option Garde M.de Passe/ Aoto Login.
9. Cliquez sur le bouton Test Serveur pour tester la connexion entre
l'application locale et l'appareil distant.
10. Cliquez sur le bouton Ajout pour ajouter cet appareil à votre liste de
serveurs distants.
11. Cliquez sur le bouton OK.
12. Cliquez sur l'appareil auquel vous souhaitez accéder dans votre liste de
serveur distant.
13. Cliquez sur le bouton Log In pour accéder à votre appareil.
14. Sélectionnez une caméra à partir de la liste des caméras sur la droite
puis déplacez-la à l'endroit où vous voulez que l'image soit affichée.
Etape 9: Définir l'enregistrement
1. Ouvrez Internet Explorer et connectez l'appareil.
2. Cliquez sur Enregistrement & Evenement/ Enregistrement &
caractéristiques.
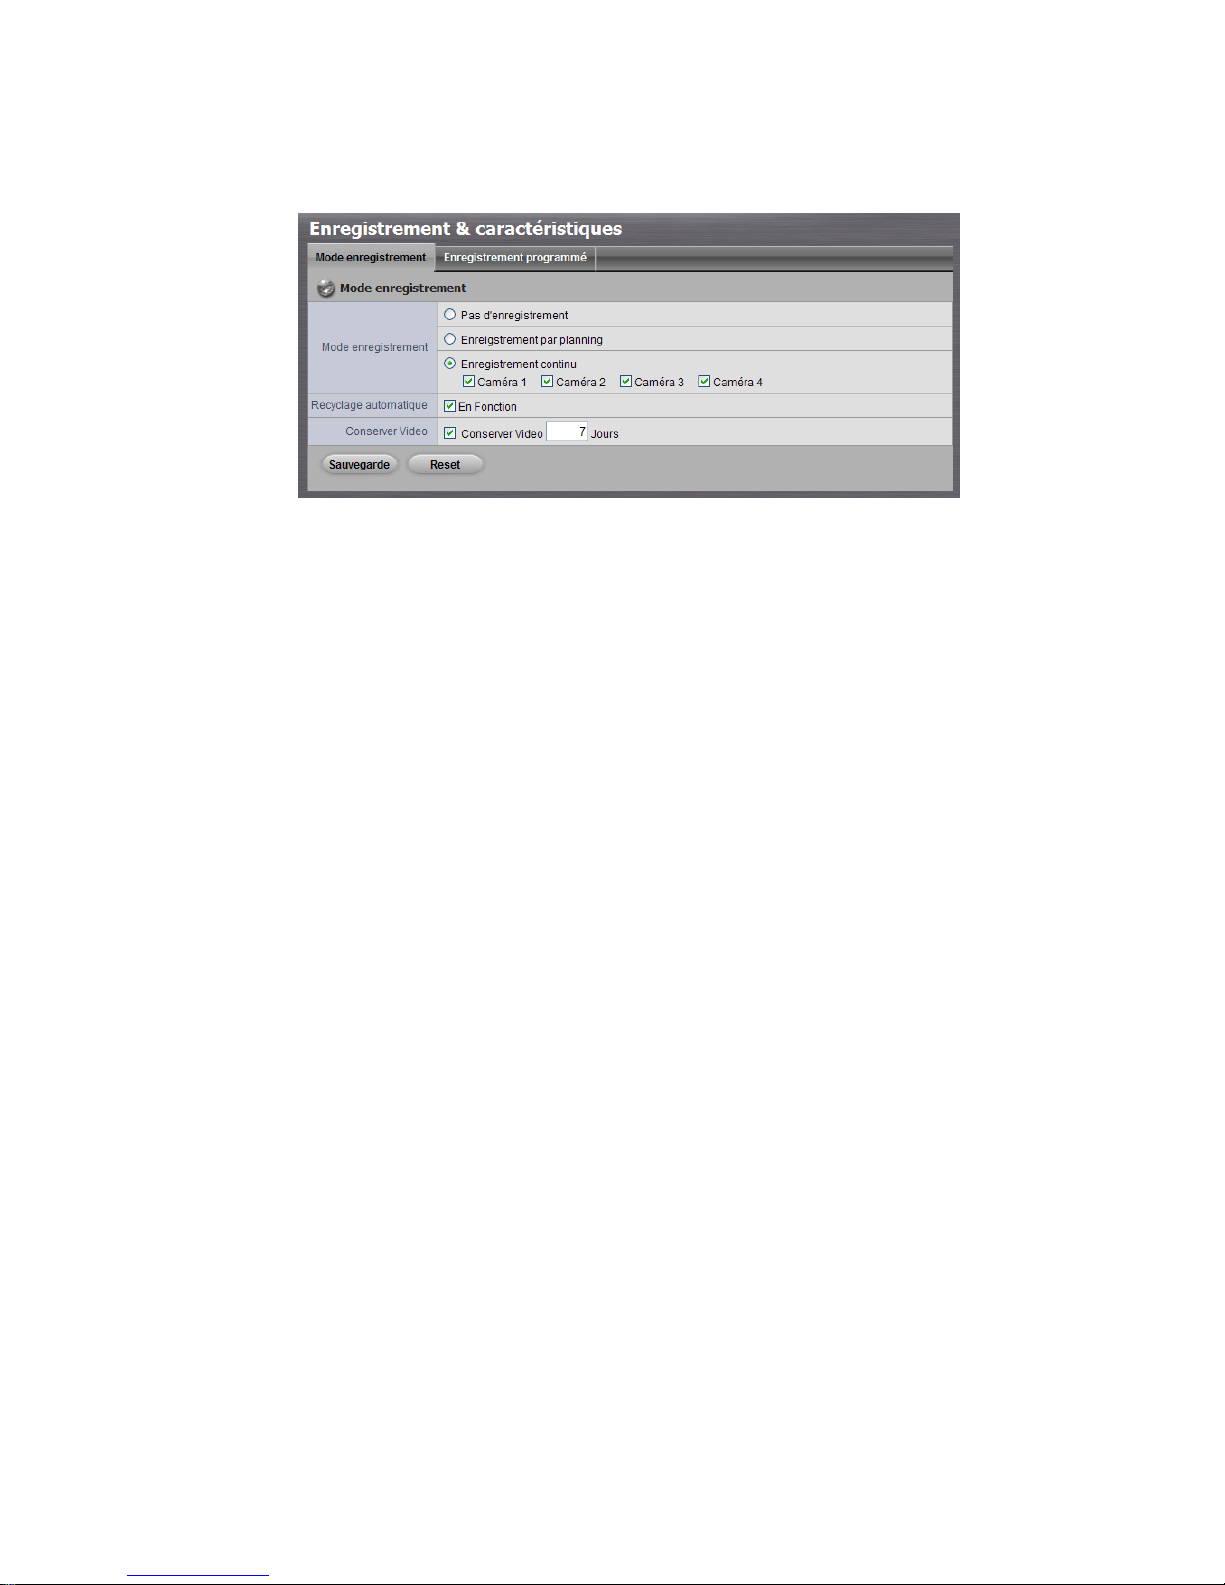
3. Cliquez sur l'onglet Mode enregistrement.
4. Si vous sélectionnez Enregistrement continu, les caméras choisies
Page 90
89
commenceront à enregistrer immédiatement.
Pas d'enregistrement: arrête l'enregistrement.
Enregistrement par planning: enregistrement par planning.
Enregistrement continu: allume les caméras choisies pour
enregistrer en continu.
Recyclage automatique: cochez l'option En Fonction pour recycler
automatiquement l'espace du disque quand le disque est plein.
Conserver vidéo: définissez une période pendant laquelle les
séquences vidéos enregistrées seront conservées intactes.
5. Si vous sélectionnez Enregistrement par planning, vous devrez
définir les plannings des caméras.
6. Cliquez sur Enregistrement & Evènement/ Enregistrement &
caractéristiques.
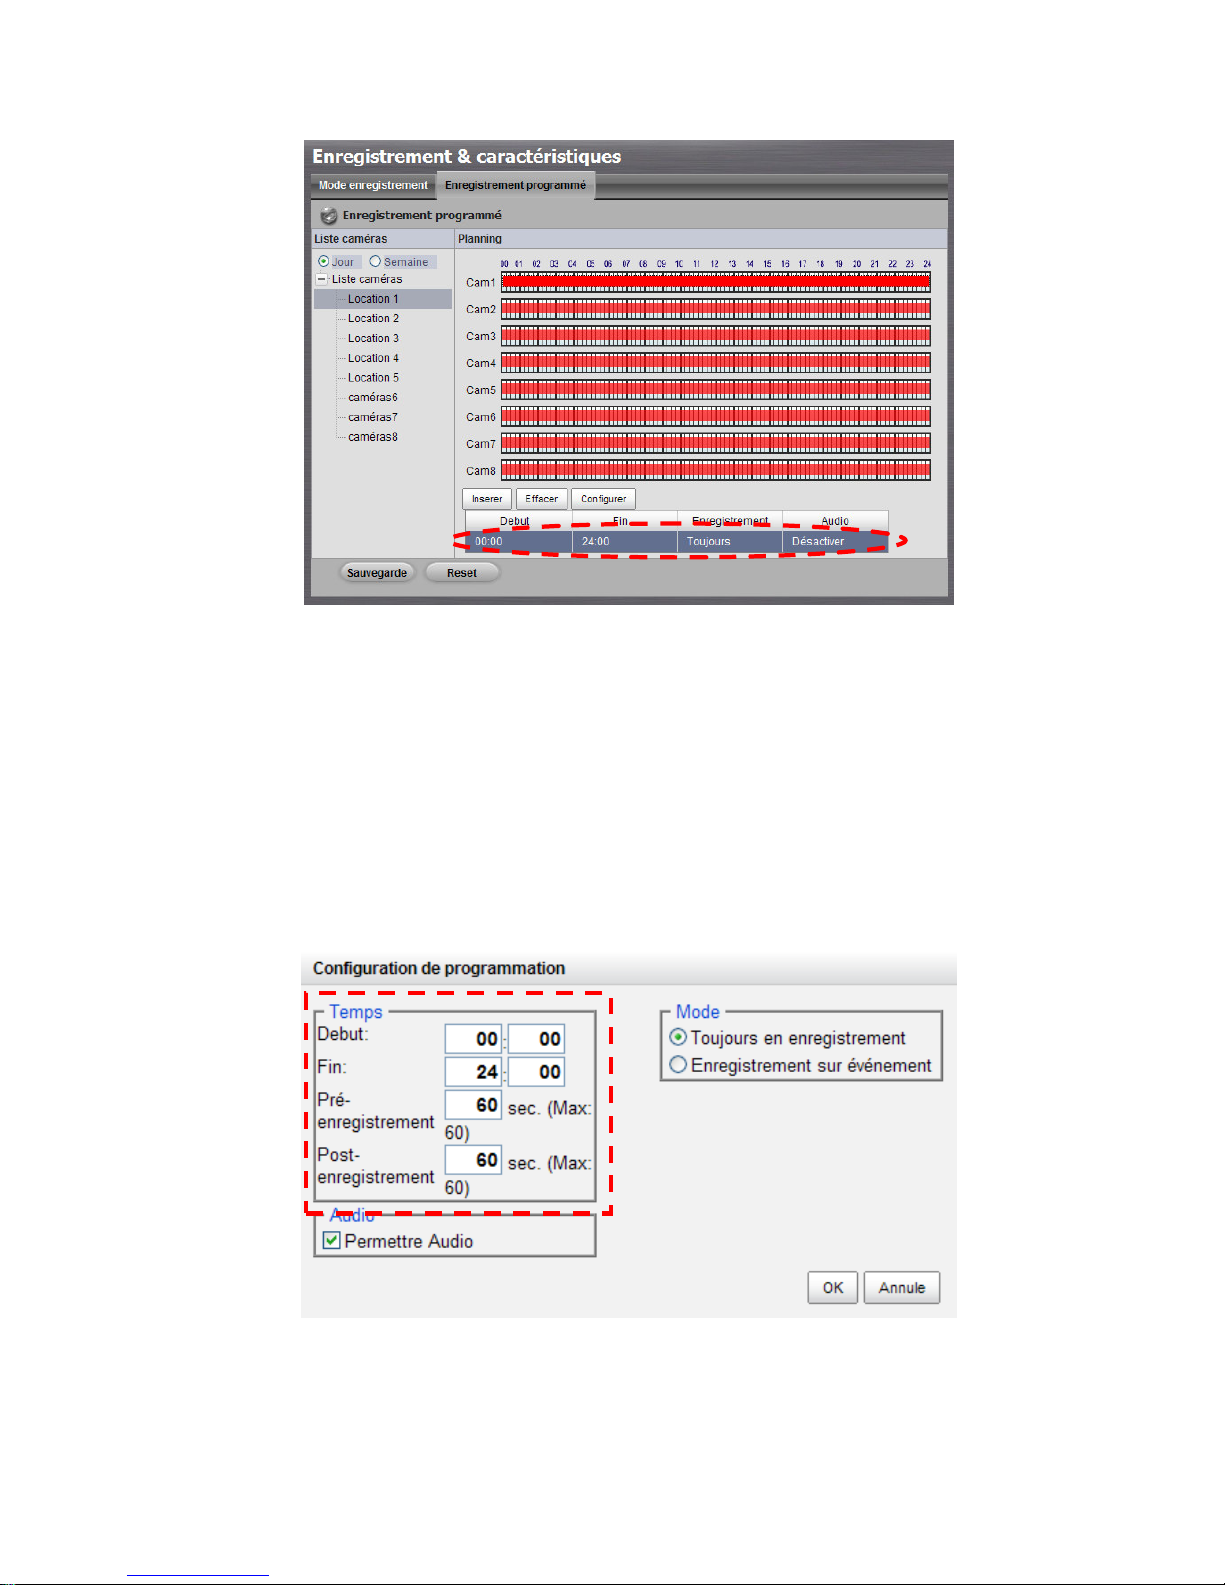
7. Cliquez sur l'onglet Enregistrement programmé.
8. Cliquez sur le planning de la caméra qui a besoin d'être modifée.
9. Cliquez sur la colonne en bas de la page.
Page 91
90
Insérer: insérer des nouveaux plannings.
Effacer: supprimer le planning sélectionnée.
Configurer: modifier le planning et la configuration du mode
d'enregistrement.
10. La configuration par défaut du planning d'enregistrement de la caméra
est de 00:00 à 24:00. Si vous voulez modifier l'heure, cliquez sur le
bouton Configurer pour modifier d'abord la configuration par défaut.
11. Choisissez le mode d'enregistrement.
Page 92

91
Toujours en enregistrement: enregistrer en continu.
Enregistrement sur évènement: enregistrer quand l'évènement se
déclenche. L'évènement peut être déclenché par Mouvement ou
Entrée Digitale.
12. Si vous voulez ajouter un autre planning, cliquez sur le bouton Insérer
pour en ajouter un nouveau.
13. Répétez l'étape 12 pour ajouter des nouveaux plannings pour la
caméra sélectionnée.
14. Répétez les étapes 8 à 12 pour configurer les autres caméras.
15. Cliquez sur le bouton Sauvegarde.
Etape 10: Fonction différée
Il y a deux façons d'implémenter la fonction lecture différée: à travers
Internet Explorer ou à travers l'application Playback System (Système
lecture différée).
Internet Explorer
1. Ouvrez Internet Explorer et connectez l'appareil.
2. Cliquez sur le bouton Différé en haut de la page.
3. Cliquez sur le bouton Ouvrir Enregistrement.
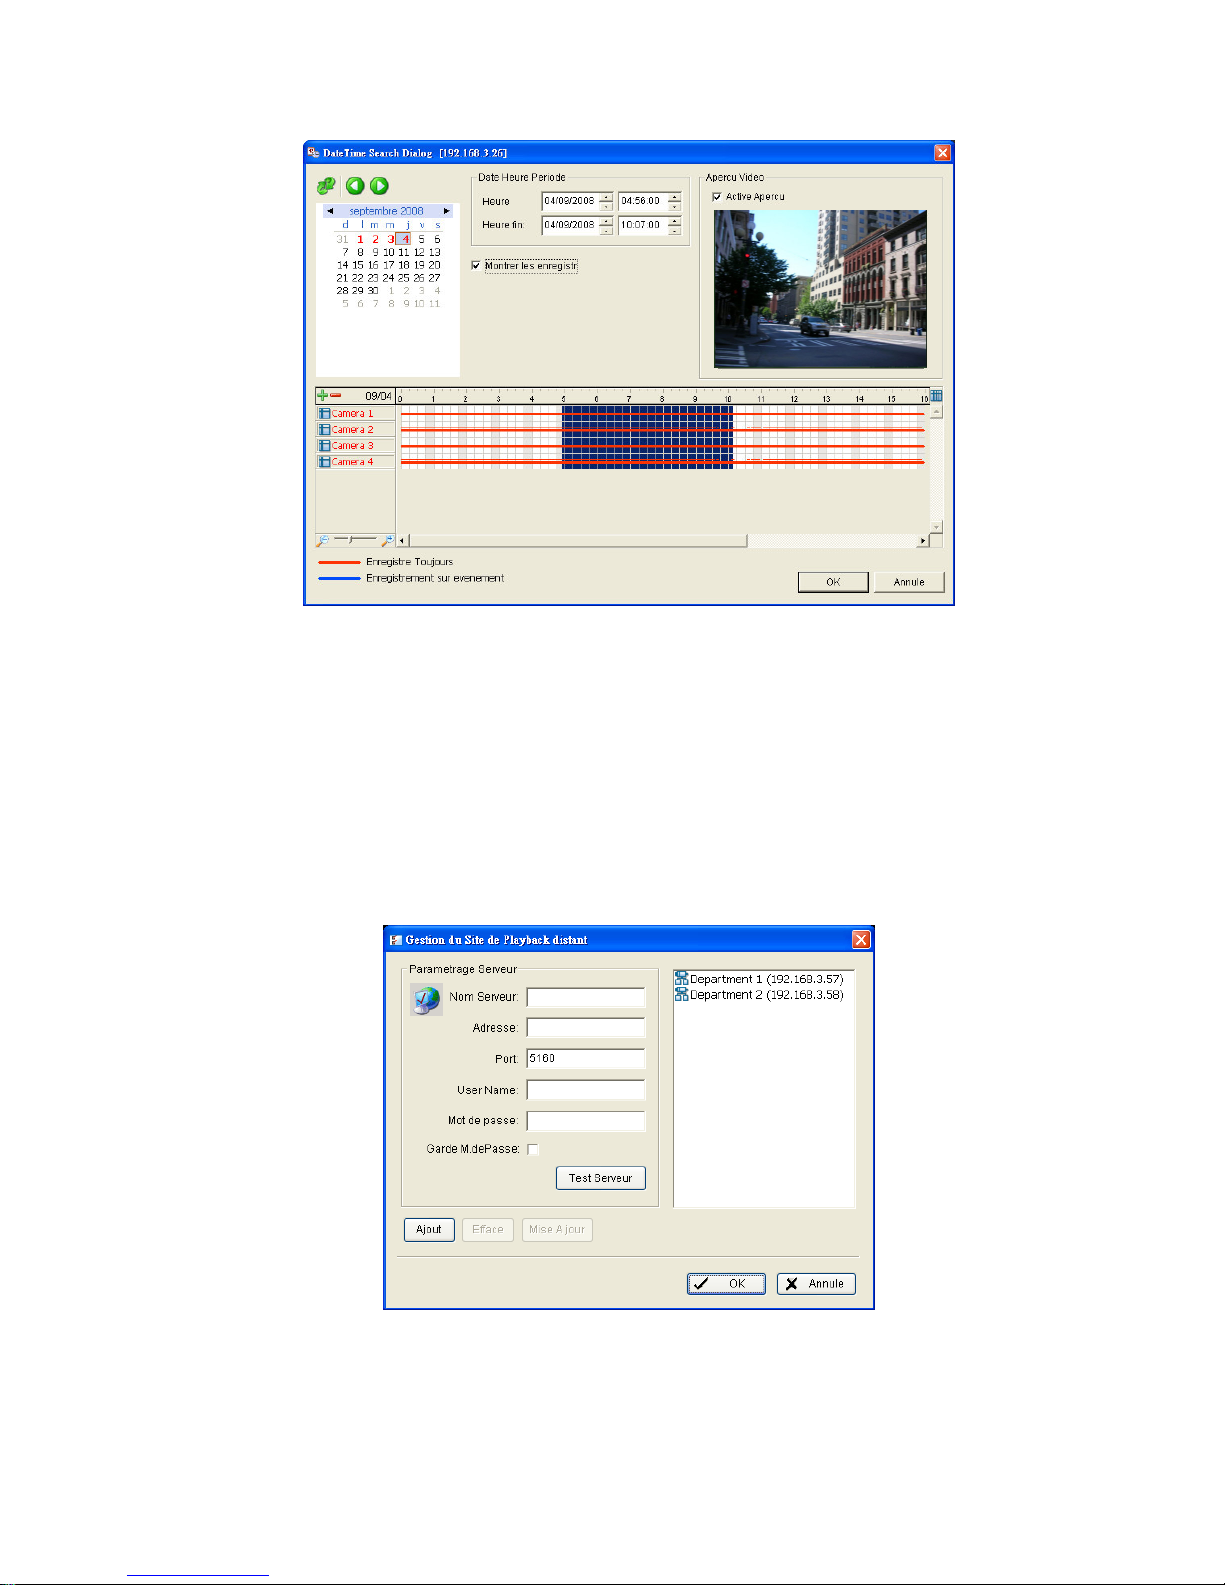
4. La fenêtre d'affichage de l'enregistrement affichera les informations des
séquences vidéos disponibles. Sélectionnez la date à partir de laquelle
vous voulez rechercher l'enregistrement. Consultez le manuel de
l'utilisateur pour plus de détails à propos de cette fenêtre d'affichage de
l'enregistrement.
5. Mettez en surbrillance les enregistrements vidéos que vous voulez
revoir. Consultez le manuel de l'utilisateur pour plus de détails.
Page 93
92
6. Cliquez sur le bouton OK.
Application du Playback System (système de lecture différée)
1. Allez à Démarrer > NUUO NVRmini > Playback System (Système
lecture différée).
2. Cliquez sur le bouton Serveur distance.
3. Entrez le nom de votre appareil.
4. Entrez l'adresse IP de cet appareil.
Page 94
93
5. Modifiez le port si nécessaire.
6. Entrez le nom d'utilisateur.
7. Entrez le mot de passe.
8. Cochez l'option Garde M.de Passe.
9. Cliquez sur le bouton Test Serveur pour tester la connexion entre
l'application locale et l'appareil distant.
10. Cliquez sur le bouton Ajout pour ajouter cet appareil à votre liste de
serveurs distants.
11. Cliquez sur le bouton OK.
12. Cliquez sur le bouton Ouvrir Enregistrement.
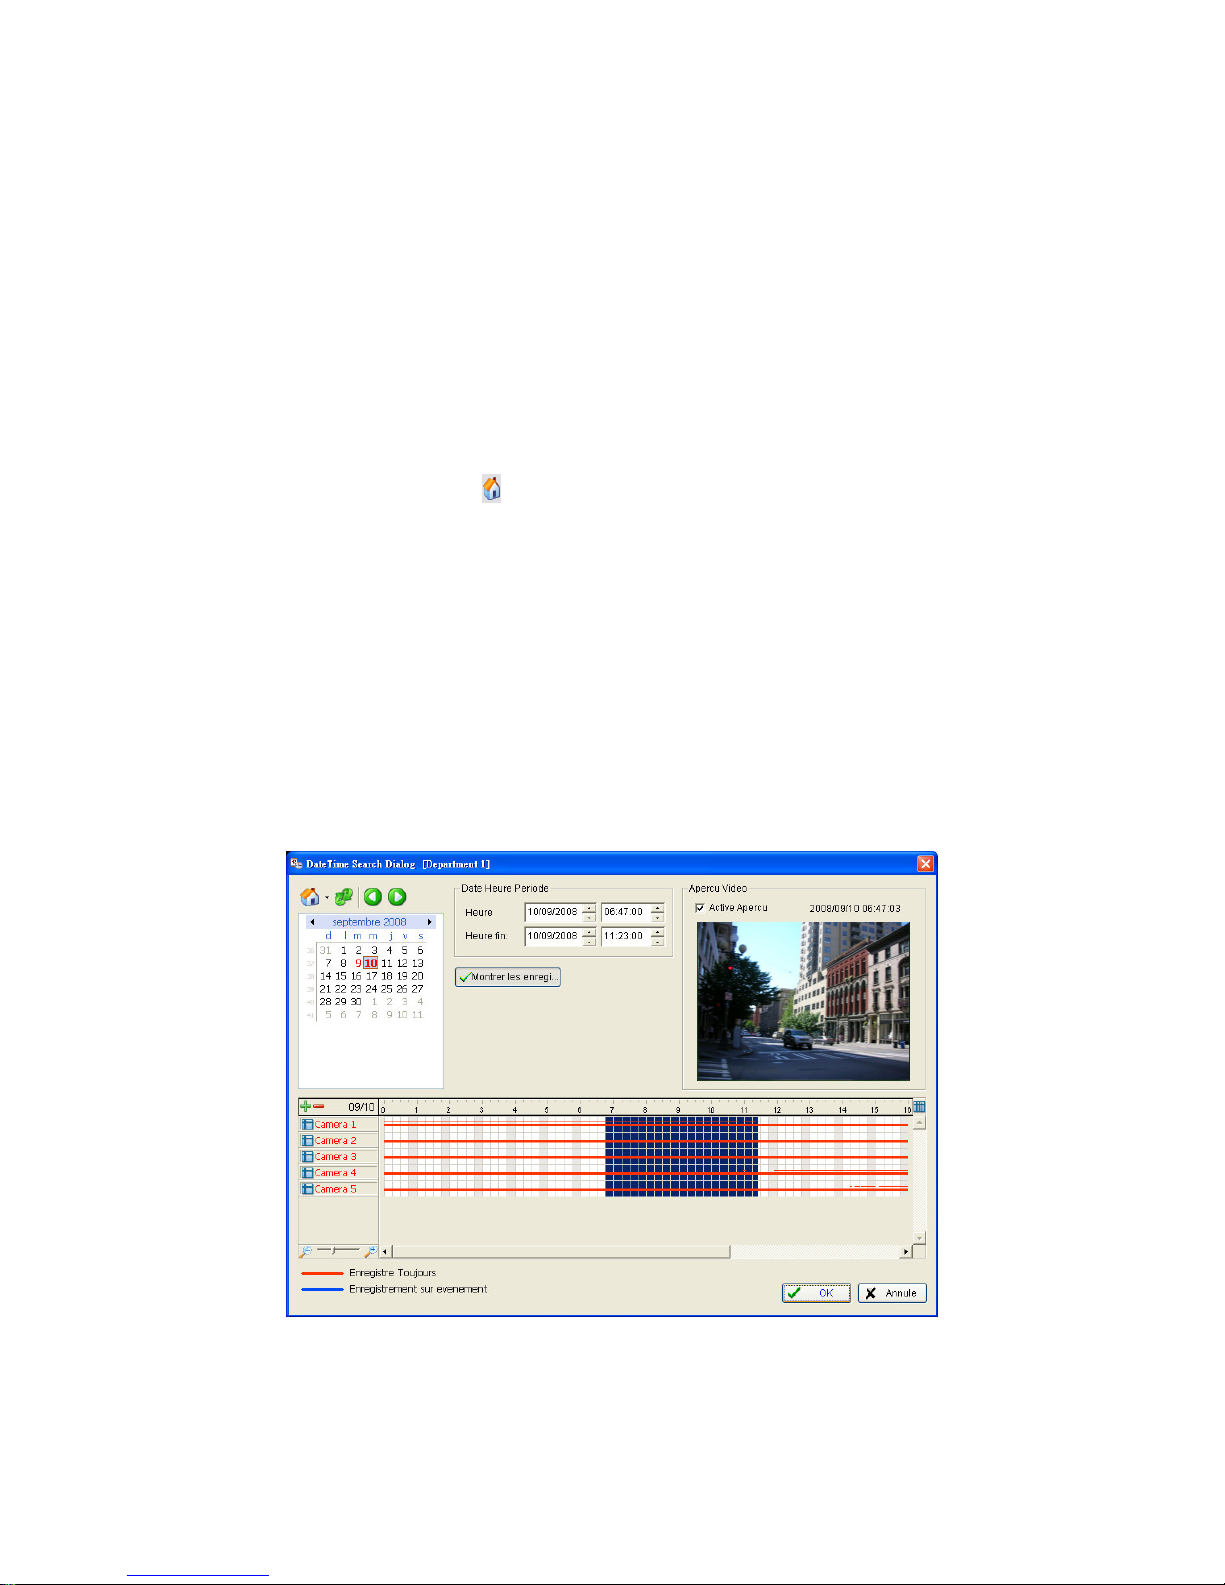
13. Cliquez sur l'icône
en haut du panneau Jour-Heure pour obtenir la
fenêtre Gestion du site de lecture différée distante, puis sélectionnez le
serveur auquel vous voulez accéder.
14. La fenêtre d'affichage de l'enregistrement affichera les informations des
séquences vidéos disponibles. Sélectionnez la date à partir de laquelle
vous voulez rechercher l'enregistrement. Consultez le manuel de
l'utilisateur pour plus de détails à propos de cette fenêtre d'affichage de
l'enregistrement.
15. Mettez en surbrillance les enregistrements vidéos que vous voulez
revoir. Consultez le manuel de l'utilisateur pour plus de détails.
16. Cliquez sur le bouton OK.
Page 95

94
Annexe A: Fonction sauvegarde
Il y a trois façons de sauvegarder vos fichiers: à travers Internet Explorer, à
travers l'application Playback System (Système lecture différée), ou à
travers l'application Backup System (Système de sauvegarde).
Internet Explorer
1. Ouvrez Internet Explorer et connectez l'appareil.
2. Cliquez sur le bouton Ouvrir Enregistrement pour sélectionner les
données.
3. Cliquez sur le bouton Sauvegarde.
4. Définissez le Début et la Fin de la sauvegarde.
5. Sélectionnez les caméras que vous voulez sauvegarder.
6. Sélectionnez le répertoire dans lequel vous voulez sauvegarder les
données de sauvegarde.
7. Cliquez sur le bouton Sauvegarde.
Application du système de lecture différée
1. Allez à Démarrer > NUUO NVRmini > Playback System (Système
lecture différée).
2. Cliquez sur le bouton Ouvrir Enregistrement pour sélectionner les
données.
3. Cliquez sur le bouton Sauvegarde.
4. Définissez le Début et la Fin de la sauvegarde.
5. Sélectionnez les caméras que vous voulez sauvegarder.
6. Sélectionnez le répertoire dans lequel vous voulez sauvegarder les
données de sauvegarde.
7. Cliquez sur le bouton Sauvegarde.
Application du Backup System (système de sauvegarde)
1. Allez à Démarrer > NUUO NVRmini > Backup System (système de
sauvegarde).
2. Entrez l'adresse IP de votre appareil dans la fenêtre de connexion.
3. Entrez le nom d'utilisateur.
4. Entrez le mot de passe.
Page 96
95
5. Cliquez sur le bouton OK.
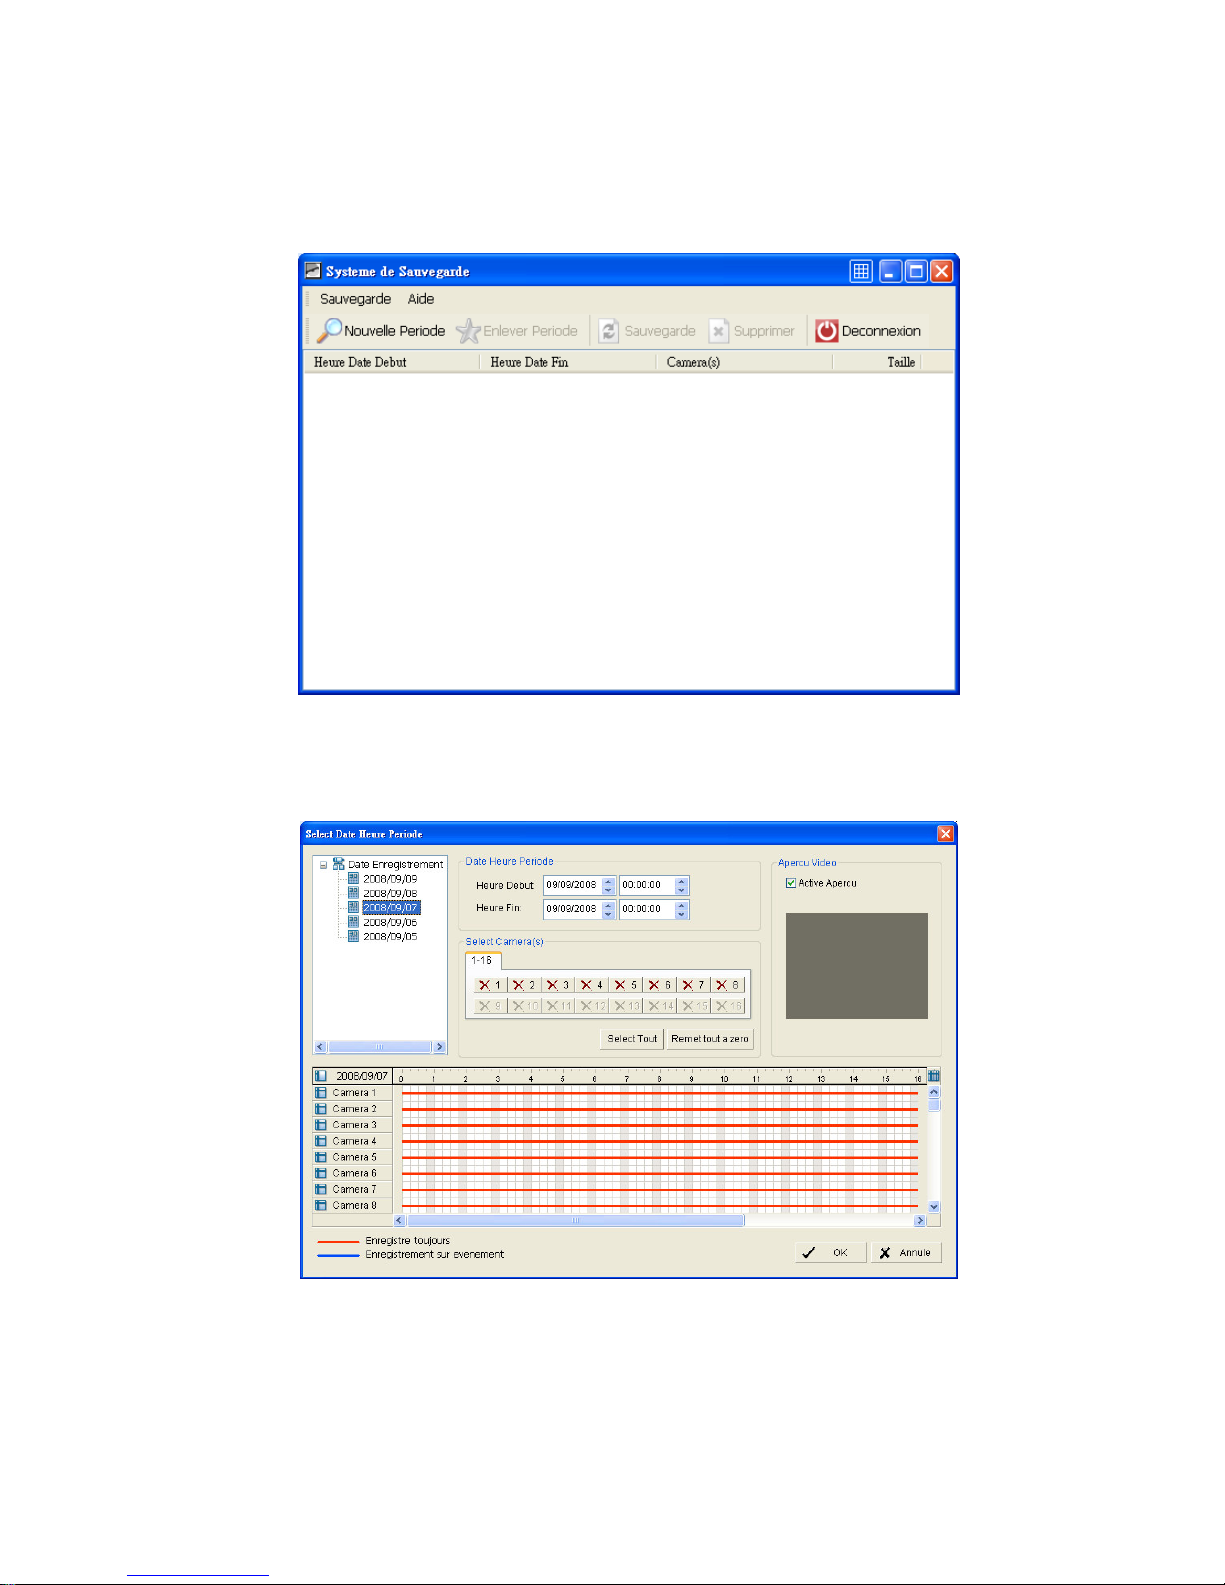
6. Cliquez sur le bouton Nouvelle Période.
7. Sélectionnez la date d'enregistrement.
8. Définissez le Début et la Fin de la sauvegarde. (ou mettez en
surbrillance les enregistrements vidéos que vous voulez sauvegarder)
9. Sélectionnez les caméras que vous voulez sauvegarder.
Page 97
96
10. Cliquez sur le bouton OK.
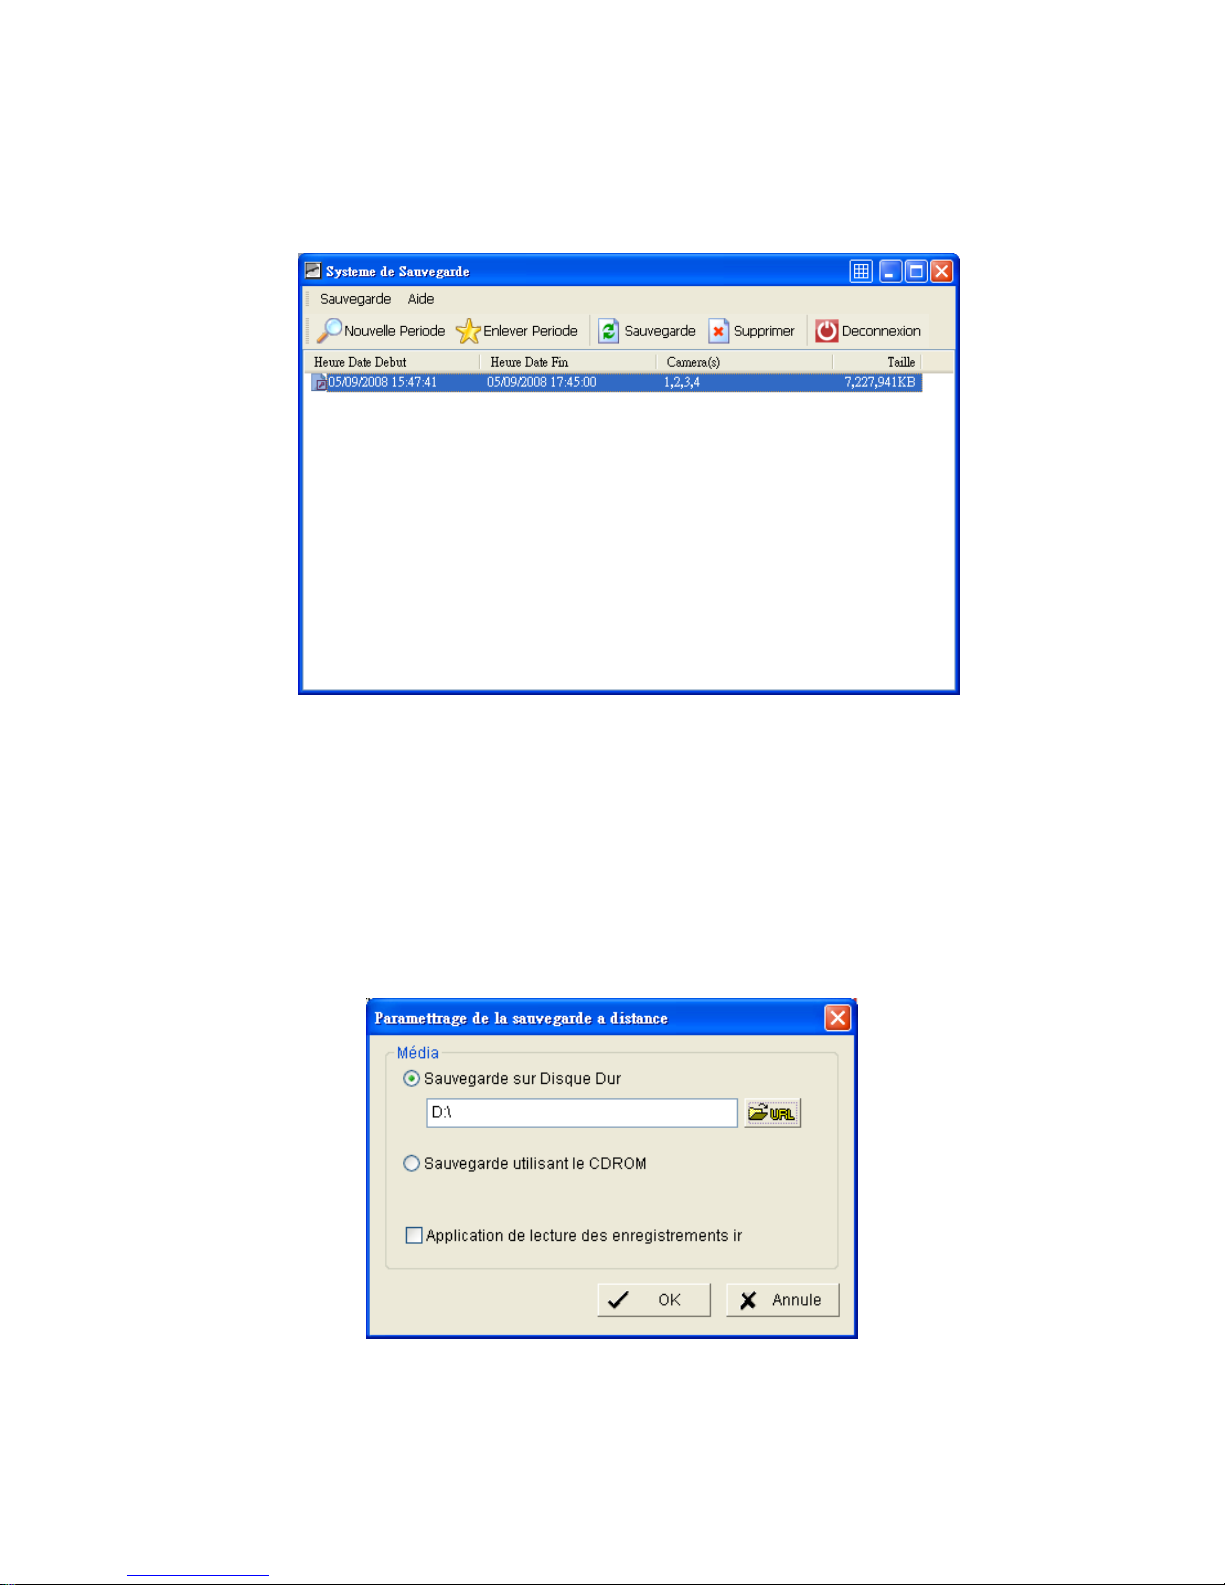
11. Sélectionnez l'heure de la sauvegarde.
12. Cliquez sur le bouton Sauvegarde.
13. Sélectionnez le répertoire dans lequel vous voulez sauvegarder les
données de sauvegarde.
14. Cochez l'option Application de lecture des enregistrements ir, qui
ajoutera l'application Différé dans le dossier de sauvegarde.
15. Cliquez sur le bouton OK.
Page 98
97
Annexe B: Fonction mise à jour firmware
1. Trouvez votre appareil à travers Windows Explorer (entrez “\\” plus
l'adresse IP de votre appareil).
2. Utilisez l'ID et le mot de passe de l'administrateur pour vous connecter.
3. Mettez le fichier mis à jour dans le dossier « publique » de votre
appareil.
4. Ouvrez Internet Explorer et connectez l'appareil.
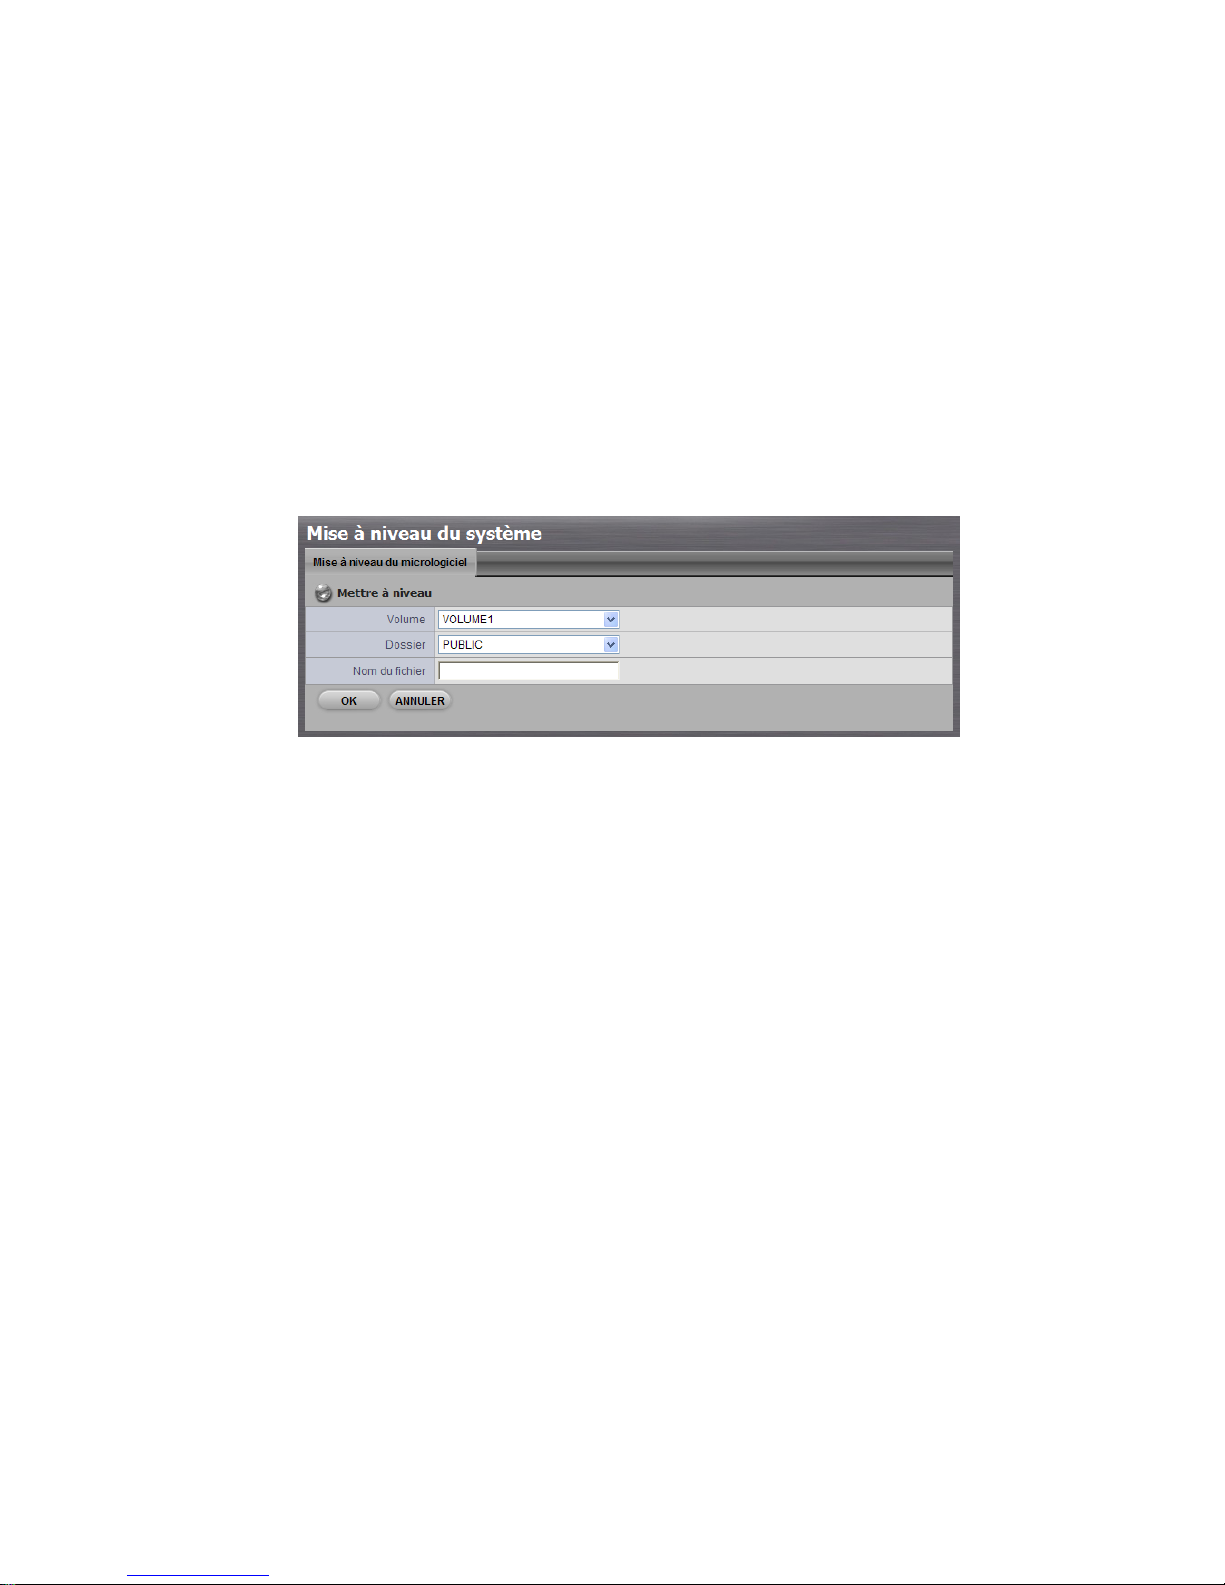
5. Cliquez sur Système/ Mise à niveau du système.
6. Cliquez sur l'onglet Mise à niveau du micrologiciel.
7. Choisissez le volume.
8. Choisissez le dossier « public (publique) ».
9. Entrez le nom du fichier tout entier, en incluant l'extension.
10. Cliquez sur le bouton OK.
11. Le système commencera par le process de mise à jour.
12. Après la mise à jour, le système redémarrera. Vous devrez accéder de
nouveau à l'appareil.
Page 99
98
Fase 1: Togliere l’unità dalla confezione
La confezione dell’unità contiene i seguenti oggetti:
L’unità
Guida di avvio rapido
Viti per l’unità disco (1 pacchetto)
Cavo d’alimentazione
Scheda di garanzia
Trasformatore di alimentazione 12V DC (2 unità di alloggiamento)
CD con Installazione Install Wizard (Guidata), Backup, Live View, e
programmi di Playback (Riproduzione), manuale utente e guida di
avvio rapido
Avvertenza
I componenti elettronici nell’unità sono sensibili e possono essere
danneggiati da Cariche Elettrostatiche (ESD). Si prega di
maneggiare con cautela l'unità o le sue componenti.
Importante
Per configurare l’unità, è necessario installare il software su un
PC/portatile con Windows Vista, 2003, XP Professional, o 2000.
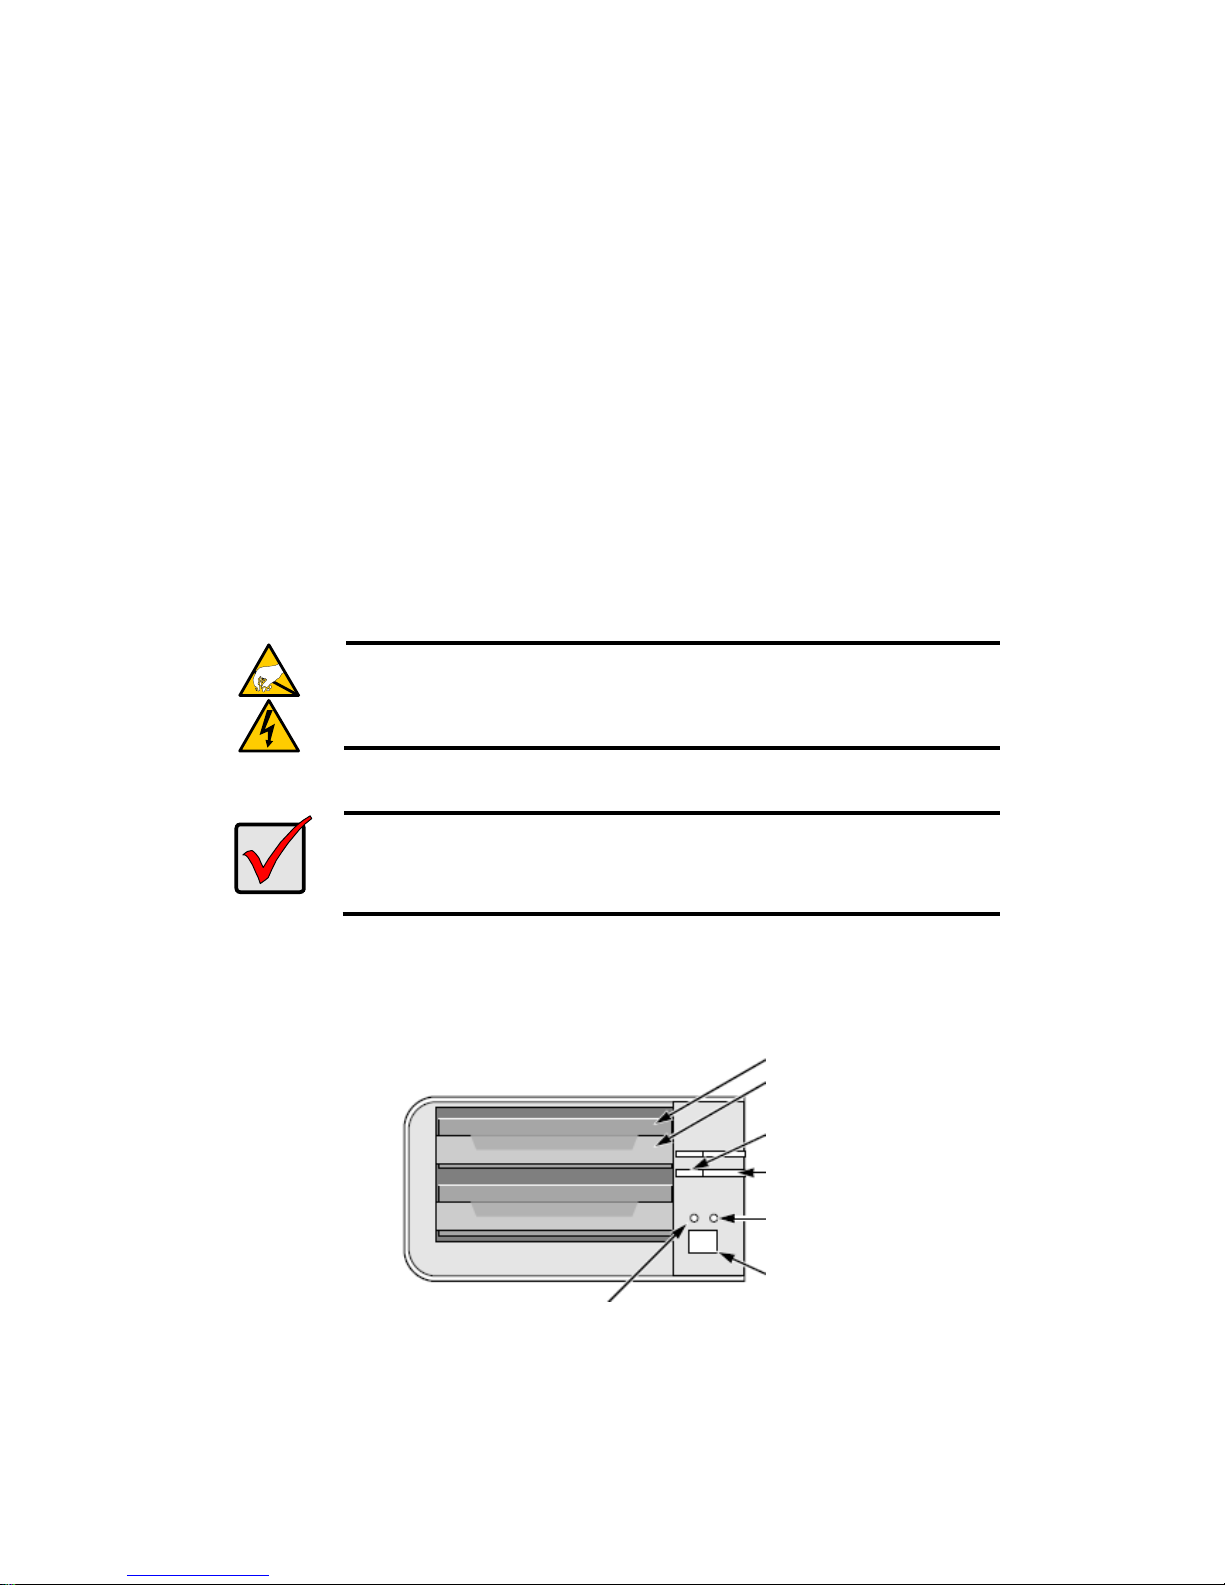
Vista anteriore delle 2 unità di alloggiamento (4 canali)
Unità disco
Supporto dico
LED di stato del disco
LED attività disco
LED attività Ehernet
Interruttore di accensione
LED di stato del sistema
Page 100
99
Vista posteriore delle 2 unità di alloggiamento (4 canali)
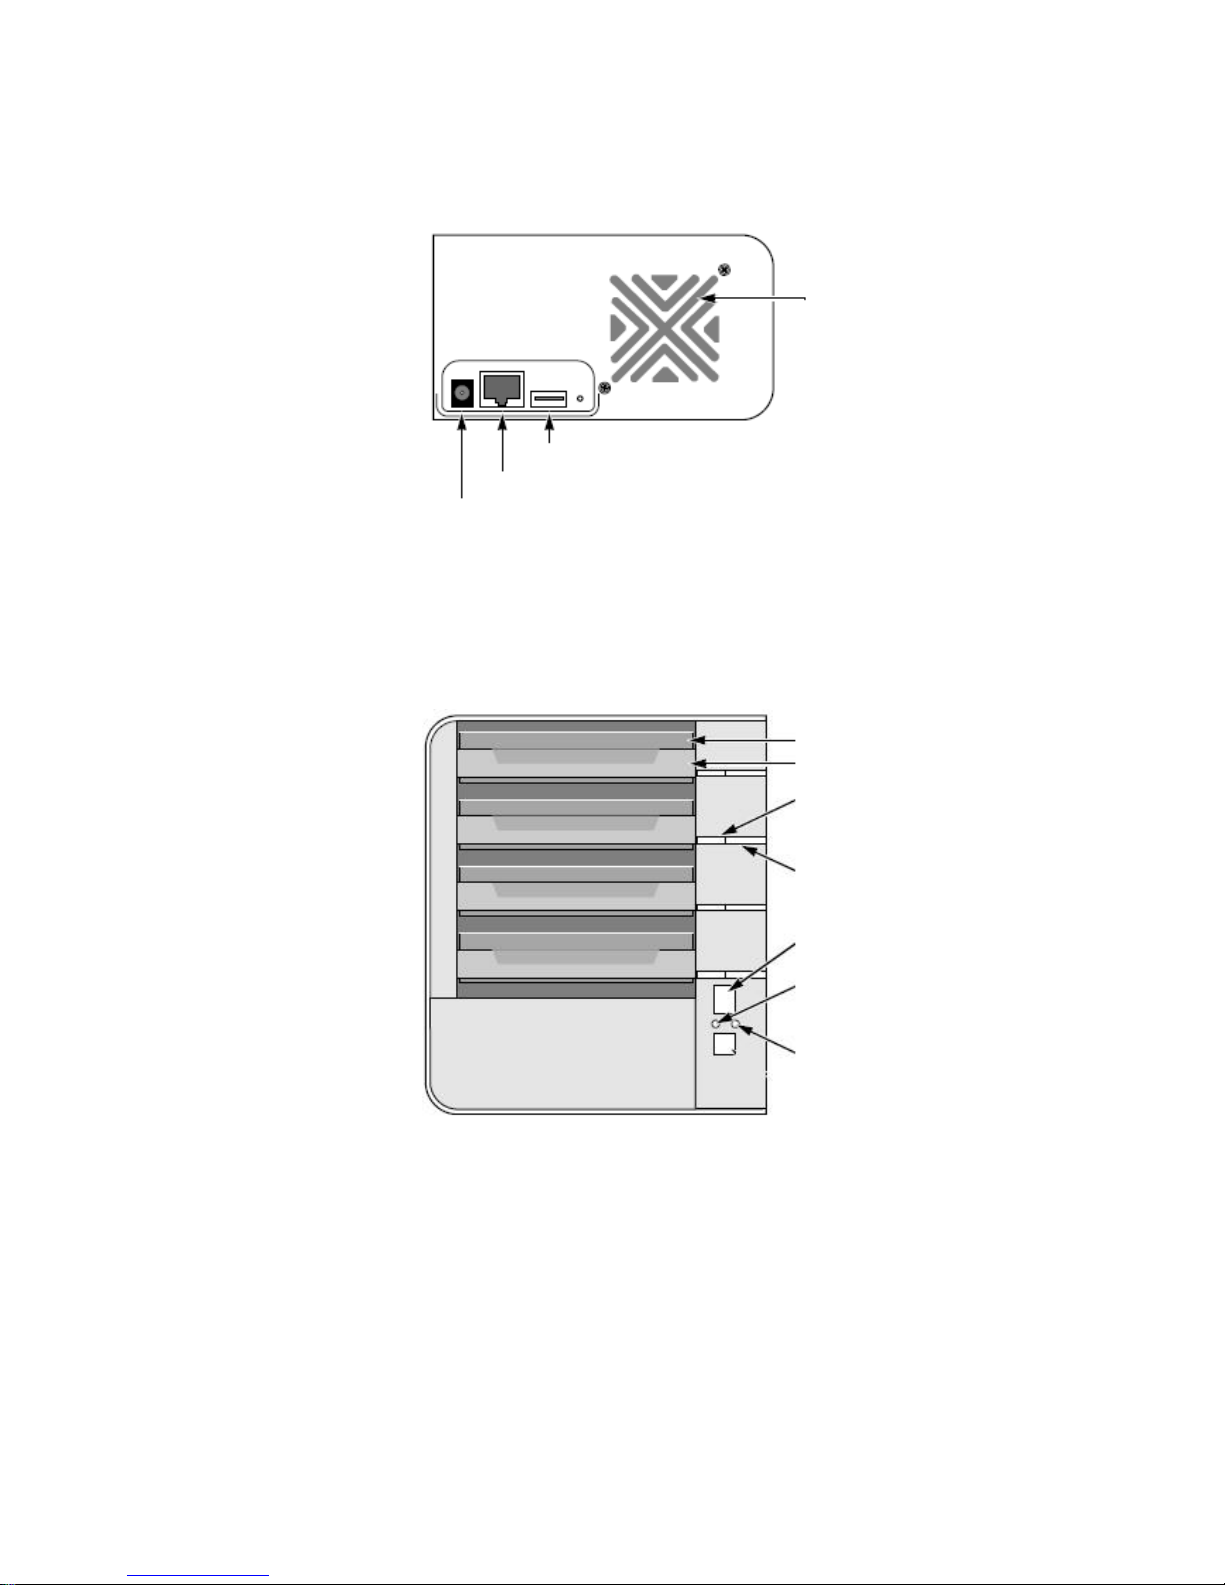
Vista anteriore delle 4 unità di alloggiamento (8 canali)
Interrutore di accensione
LED Attività thernet
LED di stato del disco
Unità Disco
LED attività disco
LED di stato del sistema
Supporto disco
Ventola di
raffreddamento
Connessioni USB
Connessione di rete RJ45
Connessione dell'alimentazione
 Loading...