

NUTRIBULLET VBR-1001A, Veggie Bullet User Manual

VEGGIE BULLET COOKBOOK
HEALTHY CONVENIENT DELICIOUS
VEGGIE
BULLET,

VEGGIE
BULLET,

VEGGIE
BULLET,

HEALTHY CONVENIENT DELICIOUS
VEGGIE
BULLET,

FOR YOUR SAFETY, CAREFULLY READ ALL INSTRUCTIONS
BEFORE OPERATING YOUR VEGGIE BULLET.
SAVE INSTRUCTIONS FOR FUTURE REFERENCE.
Any person using this appliance should carefully read this
instruction manual and exercise appropriate caution.
CAUTION! SHREDDER, SLICER, AND SPIRALIZER BLADES ARE EACH
EXTREMELY SHARP! TO AVOID CUTS OR LACERATIONS, CAREFULLY HANDLE
BLADE DISCS USING CIRCULAR FINGER GRIPS. USE A BRUSH TO SCRUB
BLADES; DO NOT TOUCH BLADES WITH BARE HANDS.
• FOR ADULT USE ONLY. NEVER LEAVE VEGGIE BULLET UNATTENDED AROUND
YOUNG CHILDREN. ALWAYS UNPLUG POWER BASE WHEN NOT IN USE.
• WARNING: TO PROTECT AGAINST ELECTRICAL SHOCK, NEVER IMMERSE
MOTOR BASE, POWER CORD, OR POWER PLUG IN WATER OR ANY LIQUID.
• NEVER ATTEMPT TO OVERRIDE POWER INTERLOCK SWITCH. BEFORE EACH
OPERATION, ASSURE SHOOTER OR SPIRALIZER BASE IS SECURELY LOCKED
ON TO MOTOR BASE, THE LID IS PROPERLY ATTACHED AND LATCHED, AND
THAT THE HINGE-PIN IS CLOSED.
• NEVER OPERATE VEGGIE BULLET NEAR EDGE OF COUNTER OR WITH POWER
CORD DANGLING IN REACH OF YOUNG CHILDREN. NEVER OPERATE NEAR HEAT
SOURCES LIKE A STOVE, WHICH CAN DAMAGE THE UNIT OR POWER CORD.
• CAREFULLY INSPECT POWER CORD AND ENTIRE UNIT FOR DAMAGE
BEFORE EACH USE. IF DAMAGE IS DETECTED, UNPLUG UNIT AND CONTACT
CUSTOMER SERVICE.
• The Veggie Bullet has an automatic power cut-o time of 1 minute to prevent
damage to the motor via overheating. If you need to power the Veggie Bullet
for longer than one minute, simply press the Power Button again aer the
machine has automatically powered o. This will re-start the motor. It is
recommended to wait at least 30 seconds before re-starting the motor aer it
automatically powers o.
IMPORTANT SAFEGUARDS
& CAUTIONARY INFORMATION
• If the motor overheats, the Veggie Bullet will go into Motor Protection Mode.
This causes the motor to shut down until it has cooled — protecting your
Veggie Bullet from permanent damage.
• If your Veggie Bullet goes into Motor Protection Mode you need to:
• UNPLUG THE POWER-BASE to reset the motor, wait 30 to 60 minutes for
the motor to cool down.
• Use a spoon to REPOSITION THE FOOD that caused the overheating and
when motor has cooled, plug the unit back in and try again.
• SUPERHEATED WATER – Liquids such as water, coee, tea or soups when
microwaved are able to be overheated beyond the boiling point without
appearing to be boiling. Visible bubbling or boiling when the container is
removed from the microwave or from the stove is not always present. This
could result in very hot liquids. Never microwave any component of the
Veggie Bullet. Moreover, do not pour hot liquids or hot ingredients into
any Veggie Bullet component as this can cause damage to the unit and can
present the potential risk of burn injuries to the user.
WARNING: VENTILATION CAUTION
• ALWAYS OPERATE THE VEGGIE BULLET ON A CLEAN, LEVEL, HARD, DRY
SURFACE, LEAVING UNOBSTRUCTED SPACE BENEATH AND AROUND THE
POWER BASE TO PERMIT PROPER AIR CIRCULATION SLOTS AND OPENINGS
ON THE BOTTOM OF THE PRODUCT ARE PROVIDED FOR VENTILATION TO
ENSURE RELIABLE MOTOR OPERATION AND PREVENT OVER-HEATING.
• TO PREVENT FIRE HAZARD POWERBASE OPENINGS SHOULD BE FREE OF
DUST OR LINT AND NEVER OBSTRUCTED WITH FLAMMABLE MATERIALS
SUCH AS NEWSPAPERS, TABLE CLOTHS, NAPKINS DISHTOWELS OR PLACE
MATS THAT COULD BLOCK THE VENTS.
VEGGIE
BULLET,
UNPL
UNPL
UG THE POWER-BASE
UG THE POWER-BASE
the motor to cool down.
the motor to cool down.
U
U
se a spoon to REPOSITION THE FOOD that caused the overheating and
se a spoon to REPOSITION THE FOOD that caused the overheating and
when motor has cooled, plug the unit back in and try again.
when motor has cooled, plug the unit back in and try again.
•
•
SUPERHEATED WATER
SUPERHEATED WATER
microwaved are able to be overheated beyond the boiling point without
microwaved are able to be overheated beyond the boiling point without
appearing to be boiling. Visible bubbling or boiling when the container is
appearing to be boiling. Visible bubbling or boiling when the container is

BLADE SAFETY:
CAUTION! BLADES ARE SHARP!
USE EXTREME CARE WHEN HANDLING CUTTING BLADES, ESPECIALLY WHEN
REMOVING THEM FROM THE UNIT AND DURING CLEANING.
• Always inspect your blades for any damage prior to use.
• Avoid contact with moving parts.
• Do not touch the cutting blades, discs, or any moving parts of the Veggie
Bullet while it is plugged in.
• Never push food down into the feed tubes by hand. Always use the proper
Outer/Inner Food Pusher to avoid injury. In the slicer/shredder chute or
the spiralizer chute for guiding food into Veggie Bullet slicer/shredder set
configuration or the spiralizer set configuration.
• Keep hands and utensils out of the container while the Veggie Bullet is powered
on to reduce risk of severe injury to persons or damage to the Veggie Bullet. A
scraper may be used but only when the appliance is powered o and unplugged.
• CAUTION! Keep hands and utensils away from cutting blades while slicing,
shredding, spiralizing or blending food to reduce the risk of severe personal
injury or damage to the device.
• To avoid injury from moving parts or food debris when operating Veggie Bullet,
keep face and fingers out of and away from the Veggie Bullet Slicer/Shredder
discharge outlet. Never place fingers or hands up discharge chute.
• Use the Inner Food Pusher only aer inserting the Outer Food Pusher to
narrow the chute opening and insert the Inner Food Pusher into the Outer
Food Pusher chute opening.
• Do not insert utensils in the slicer/shredder chute or the spiralizer chute for
while the Veggie Bullet is running. Always turn o the powerbase and unplug
the unit before removing the Outer/Inner Pusher from the chute. While unit is
powered o and unplugged, and the lid is unlocked, a spatula or scraper may
be used if necessary to dislodge food stuck in the chute and or blade.
• Empty the spiralizer food basket frequently so that the ingredients do not
obstruct the blade.
• When not in use, do not store blades or discs on the motor sha. To reduce the
risk of injury, never place cutting blades on Motor Base without assembling
the desired configuration.
ELECTRICAL SAFETY:
When using any electrical appliances, basic safety precautions should always be
observed including the following:
• THIS VEGGIE BULLET UNIT IS MANUFACTURED IN COMPLIANCE WITH US
AND CANADIAN ELECTRICAL STANDARDS AND PLUG TYPES. USE OF THIS
PRODUCT IN LOCATIONS WITH DIFFERENT ELECTRICAL SPECIFICATIONS MAY
RESULT IN DAMAGE TO THE PRODUCT AND VOID THE WARRANTY.
• DO NOT USE THE VEGGIE BULLET WITH ANY TYPE OF ADAPTOR OR VOLTAGE
CONVERTER DEVICE. USE OF ADAPTERS AND CONVERTERS IS CONSIDERED
AN UNAUTHORIZED MODIFICATION OF THIS PRODUCT AND AS SUCH WILL
VOID THE WARANTY.
• Only use attachments that are sold by the manufacturer specifically for use
with this product. Use of attachments not recommended or sold by the
manufacturer for use with the Veggie Bullet may cause damage, fire, electric
shock or injury and will void your warranty.
• Always make sure Veggie Bullet Indicator light is powered OFF when
assembling or disassembling.
• ALWAYS POWER OFF THE MOTOR AND UNPLUG THE VEGGIE BULLET WHEN
IT IS NOT IN USE.
• MAKE SURE THE VEGGIE BULLET POWERBASE IS UNPLUGGED BEFORE
ASSEMBLING, DISASSEMBLING, ADDING ADDITIONAL PARTS OR CLEANING.
• CAUTION! To avoid risk of electrical shock, never immerse the cord, plug or
powerbase of the Veggie Bullet in water or other liquids.
• Do not use the Veggie Bullet outdoors or in inclement weather such as rain or
other wet conditions.
• This appliance has important markings on the plug prong. The attachment
plug or entire cord set is not suitable for replacement. If damaged, the
appliance shall be replaced.
• Do not pull, twist or damage the power cord.
• Do not allow the cord to hang over the side of the counter or table.
• Do not allow the cord to touch hot surfaces, including the stove.
• If the appliance malfunctions or is dropped or damaged in any manner, discontinue
use and contact Customer Service for assistance in obtaining a replacement.
• The 500 watt rating of this appliance was obtained by using the 10oz Cup with
Blade Holder Assembly and 200g of Rice at max speed.
VEGGIE
BULLET,
K
K
eep hands and utensils out of the container while the
eep hands and utensils out of the container while the
on to reduce risk of severe injury to persons or damage to the
on to reduce risk of severe injury to persons or damage to the
scraper may be used but only when the appliance is powered o and unplugged.
scraper may be used but only when the appliance is powered o and unplugged.
CACAUTION!
UTION!
shredding, spiralizing or blending food to reduce the risk of severe personal
shredding, spiralizing or blending food to reduce the risk of severe personal

CLEANING SAFEGUARDS
• ALWAYS UNPLUG THE VEGGIE BULLET WHEN CLEANING, ASSEMBLING
OR DISASSEMBLING.
• DO NOT IMMERSE THE POWER BASE IN WATER FOR ANY REASON AS THIS
WILL PERMANENTLY DAMAGE THE MOTOR. USE A DAMP SOAPY CLOTH
TO CAREFULLY WIPE OFF ANY SOIL OR DEBRIS FROM THE OUTSIDE OF
THE POWERBASE.
• CAUTION! BLADES ARE SHARP USE CAUTION WHEN WASHING TO
AVOID INJURY!
• DO NOT IMMERSE THE VEGGIE BULLET PARTS IN BOILING OR VERY HOT
WATER AS THIS MAY PERMANENTLY DAMAGE THE PARTS
• Rinse blades, cups and accessories immediately aer use to prevent debris or
stains from vegetables such as beets and turmeric from drying and sticking to
vessels — if necessary use a dish brush to loosen any debris.
• Carefully hand wash blades only with mild dish soap and warm (not hot) water
using a dish brush as needed to loosen debris.
• All parts other than the power base may be washed in the dishwasher on the
top rack only using the normal setting — do not use the sterilize or high heat
setting as this may cause damage to the parts.
• Dry immediately to avoid water spots.
SAVE THESE INSTRUCTIONS
FOR HOUSEHOLD USE ONLY
• THIS APPLIANCE HAS A POLARIZED PLUG (ONE BLADE IS WIDER THAN THE
OTHER). TO REDUCE THE RISK OF ELECTRICAL SHOCK, THIS PLUG WILL FIT
IN A POLARIZED OUTLET ONLY ONE WAY. IF THE PLUG DOES NOT FIT FULLY
IN THE OUTLET, REVERSE THE PLUG. IF IT STILL DOES NOT FIT, CONTACT A
QUALIFIED ELECTRICIAN. DO NOT MODIFY THE PLUG IN ANYWAY.
GENERAL SAFETY:
CLOSE SUPERVISION IS NECESSARY WHEN ANY APPLIANCES ARE USED BY OR
NEAR CHILDREN. NEVER LEAVE THE VEGGIE BULLET RUNNING UNATTENDED.
• This appliance is not intended for use by children or persons with reduced
physical, sensory or mental capabilities.
• Make sure the Safety Clamps securely lock the cover in place and that the
Outer/Inner Food Pusher is properly inserted in the chute, before operating
the Veggie Bullet.
• Do not attempt to defeat or override Safety Clamp mechanism.
• Do not unlock the lid while the Veggie Bullet is running. Wait for blades
to stop rotating. Power the Veggie Bullet o with the power button on the
powerbase before disengaging the clamps and opening the lid.
• Make sure the motor has completely stopped and powered o before releasing
the clamps and removing covers.
• To avoid clogs in the Food Chutes, foods should be cut into sizes no larger
than 2 inches in diameter when using the larger Outer Pusher or 1 inch in
diameter when using the smaller Inner Food Pusher.
• If food becomes lodged in the feed chute, only use Outer Pusher with Inner
Pusher installed to push the lodged food down. If this does not unclog the
tube, turn o and unplug the Veggie Bullet and disassemble the Slicer/
Shredder Set or Spiralizer Set to remove any remaining lodged food.
VEGGIE
BULLET,
vessels — if necessary use a dish brush to loosen any debris.
vessels — if necessary use a dish brush to loosen any debris.
Car
Car
efully hand wash blades only with mild dish soap and warm (not hot) water
efully hand wash blades only with mild dish soap and warm (not hot) water
using a dish brush as needed to loosen debris.
using a dish brush as needed to loosen debris.
All p
All p
arts other than the power base may be washed in the dishwasher on the
arts other than the power base may be washed in the dishwasher on the
top rack only using the normal setting — do not use the sterilize or high heat
top rack only using the normal setting — do not use the sterilize or high heat

INTRODUCTION 14
Where Health Meets Convenience 14
What You Get 15
Veggie Bullet Base 15
Pusher (Outer & Inner) 15
Shooter Set 16
Spiralizer Set 17
ASSEMBLING YOU R VEGGIE BULLET 18
Shooter Assembly (1) 19
Spiralizer Assembly (2) 23
USING YOUR VEGGIE BULLET 26
Shredding 27
Slicing 28
Spiralizing 29
RECIPES 30
1. MASTERING THE BASICS, PREPPING FOR SUCCESS 30
Vegetables 31
Tips and Tricks: How to Scrub Root Vegetables 31
Vegetable Recipes 32
Beans and Grains 42
Proteins 44
2. NEXT-LEVEL NOSHING 48
Satisfying Salads 49
Slaws, Sides, and Assemble-ables 56
Succulent Slaws and Sides 57
Grains and Bakes 62
‘Appy Hour 66
Bases, Bowls, and Beds 70
Macro Bowls 70
Spiralized Delights 74
Nice “Rice” 88
Hands-On Foods 94
Breakfast Bests 102
Soup’s On 108
Sweet Treats and Tipples 114
Dressings and Sauces 120
INDE X 130
TABLE OF
CONTENTS
VEGGIE
BULLET,
MAS
MAS
TERING THE BASICS, PREPPING FOR SUCCESS
TERING THE BASICS, PREPPING FOR SUCCESS
Vegetables
Vegetables
Veggie Bullet | 1514 | Veg gie Bullet
It’s no secret that most of us intend to eat healthy. But with our busy
schedules and limited time, hitting up that local takeout spot at the
end of the day o en seems much more appealing than preparing
a healthy, homemade, nutritionally balanced meal. In addition to
grocery shopping, cooking, and cleaning, creating meals from scratch
also involves chopping, dicing, shredding, and slicing — all of which
take up the bulk of food preparation time.
That’s where the Veggie Bullet comes in. With settings for shredding,
slicing, and spiralizing, this one-of-a-kind machine preps huge quantities
of vegetables, fruits, cooked meats, and more in mere seconds—allowing
you to prepare and serve a wide variety of healthy foods in fun, exciting
ways. Make zucchini noodles for tonight’s dinner, then shred a whole
head of cabbage for coleslaw, sautés, pickles, and soup later on in the
week. Transform the produce lingering in your fridge into restaurantquality chopped salads, savory hash browns, or carb-friendly grain
substitutes like cauliflower “rice” or broccoli stem “noodles.” Spruce
up your brown-bag lunch by slicing last night’s baked chicken breast
or Sunday’s roast into a delicious, gourmet sandwich. With the Veggie
Bullet, there’s truly no limit to what you can create.
The Veggie Bullet takes the grunt-work out of food prep, eliminating
the extra e ort that o en comes between you and a healthy,
homemade meal. Additionally, its versatility erases the need for bulky
kitchen gadgets that clog up valuable space. With the Veggie Bullet,
the days of hand-grating carrots, slicing uneven potatoes, or cranking
out ‘zoodles’ are finished, as are the hard-to-clean grater, the razorsharp mandolin, and the hand-cranked spiralizer. This exciting 3-in-1
machine essentially does the hardest kitchen work for you, freeing up
time and space for you to enjoy beautiful, healthy food at every meal.
WHERE HEALTH
MEETS CONVENIENCE
A
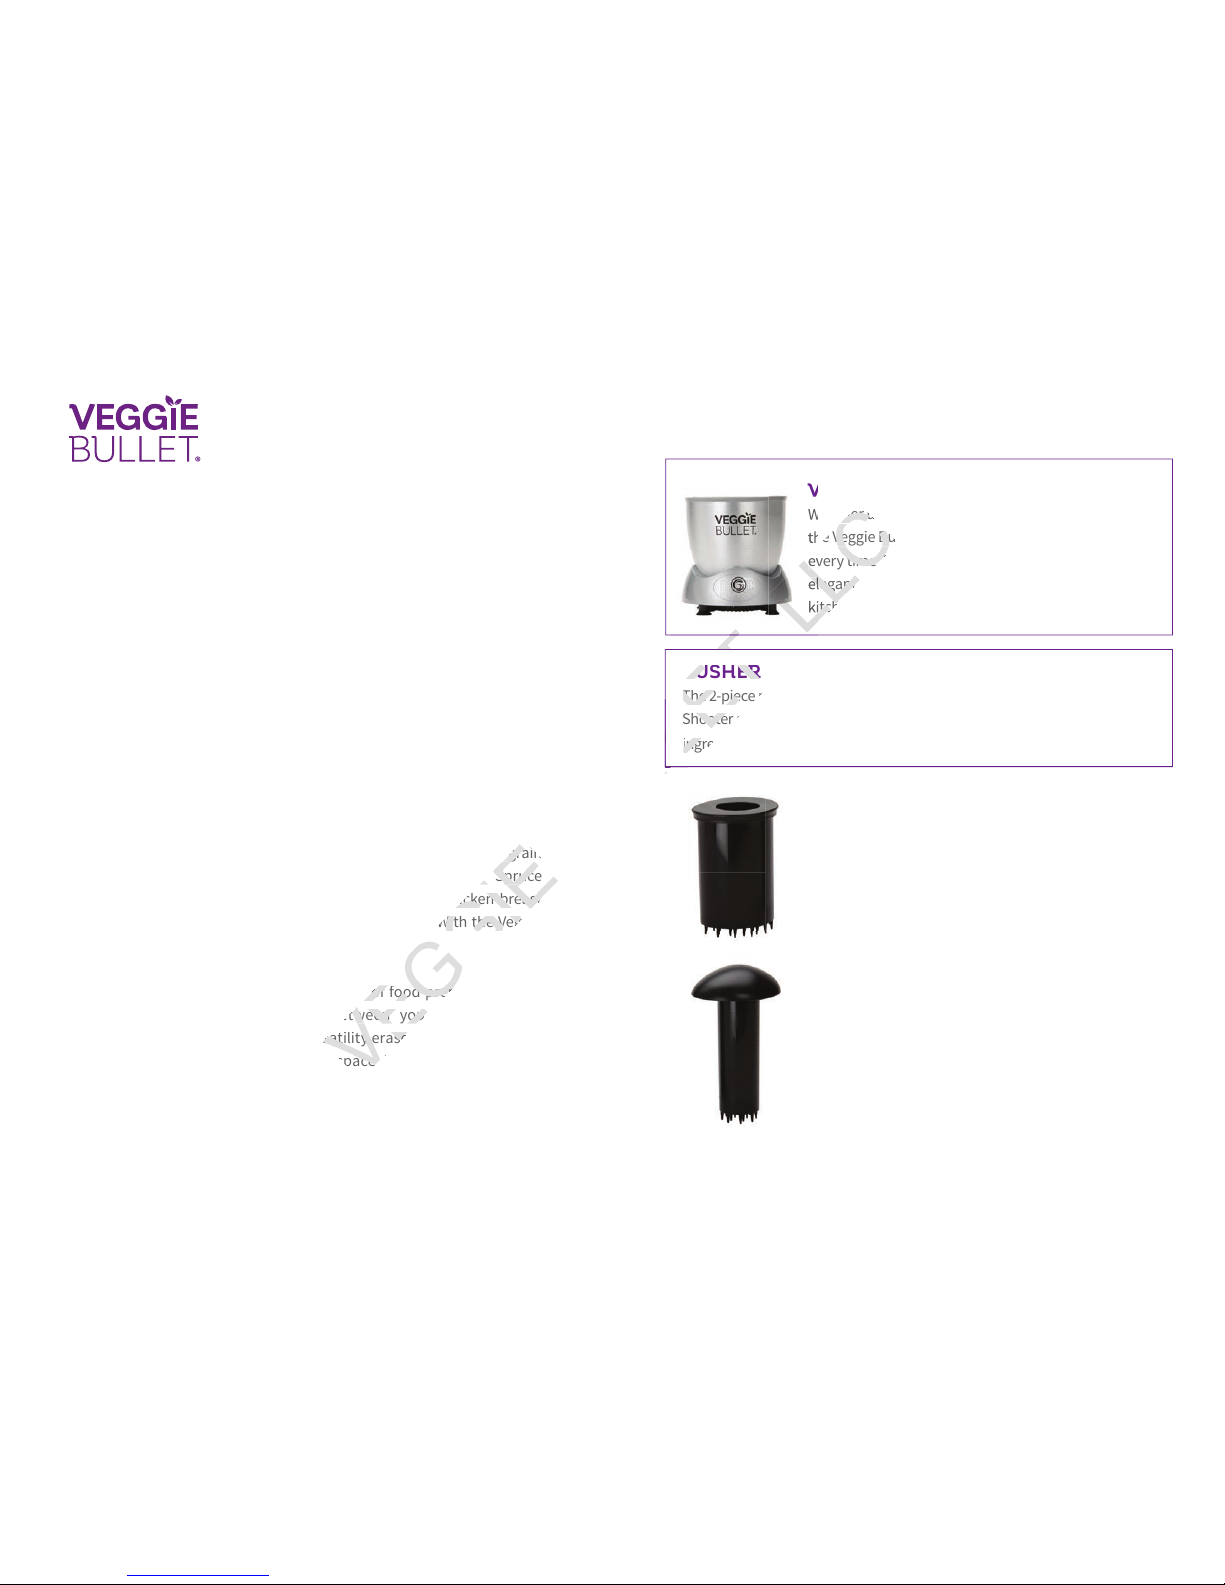
VEGGIE BULLET BASE
Whether using the Shooter or the Spiralizing Set,
the Veggie Bullet Base ensures fast, e icient results
every time. Its compact size, streamlined shape, and
elegant design make it a welcome addition to any
kitchen counter.
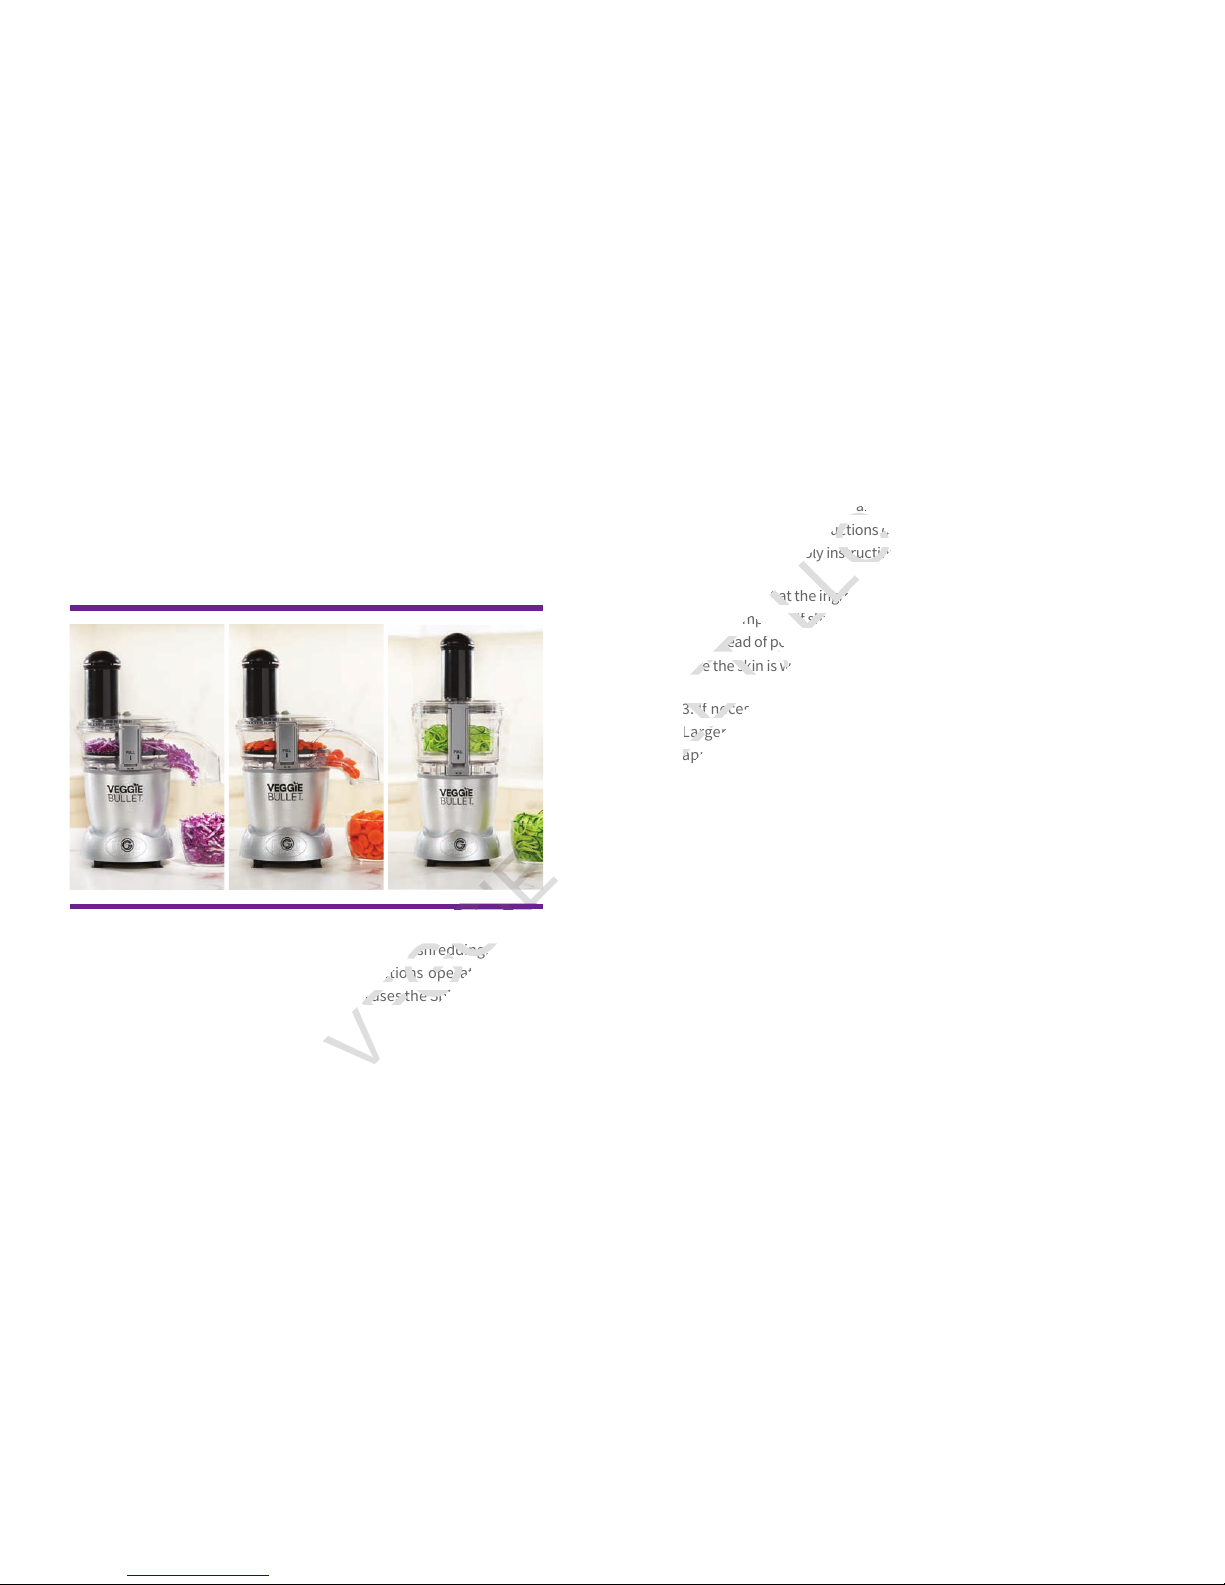
WHAT YOU GET
PUSHER
The 2-piece pusher helps you guide food down the chute of both the
Shooter and Spiralizer lids, giving you more control as you feed your
ingredients into the blades, which results in more consistent, even results.
VEGGIE BULLET BASE
Whether using the Shooter or the Spiralizing Set,
B
A. OUTER PUSHER: The Outer Pusher fits the
width of the the Shooter and Spiralizer Chutes. The
Inner Pusher fits inside of the Outer Pusher and
can be added or removed based on the size of your
ingredients. For larger, wider items like cucumbers,
beet chunks, pieces of meat, and potatoes, use the
Outer Pusher with the Inner Pusher inserted inside
to guide ingredients towards the blade.
B. INNER PUSHER: The Inner Pusher li s out of
the Outer Pusher, revealing a narrow opening
through which to fit thinner items like carrots and
celery. Place these items inside the narrow chute
created by the Outer Pusher, then use the Inner
Pusher to guide them to the blade with accuracy.
Safety Note: The Inner Pusher must only be inserted into the narrower Outer Pusher
chute. Do not attempt to use the Inner Pusher without the Outer Pusher inserted.
VEGGIE
The 2-piece pusher helps you guide food down the chute of both the
The 2-piece pusher helps you guide food down the chute of both the
Shooter and Spiralizer lids, giving you more control as you feed your
Shooter and Spiralizer lids, giving you more control as you feed your
ingredients into the blades, which results in more consistent, even results.
ingredients into the blades, which results in more consistent, even results.
BULLET,
every time. Its compact size, streamlined shape, and
every time. Its compact size, streamlined shape, and
elegant design make it a welcome addition to any
elegant design make it a welcome addition to any
kitchen counter.
kitchen counter.
Veggie Bullet | 1716 | Veg gie Bullet
SHOOTER SET
Use this attachment to
make perfectly sliced and
shredded ingredients.
1A. SHOOTER
This container holds and
shoots out sliced and shredded
food from the Veggie Bullet.
1B. BASE PLATE
The Base Plate spins to quickly
and e iciently move sliced
and shredded food out of the
Veggie Bullet.
1C. SHREDDER/
SLICER BLADE
This double-sided blade o ers
two styles of food prep: the
slicer side yields thin, even
slices, while the shredder
yields restaurant-quality
grated food.
1D. SHOOTER LID
This lid snaps on to keep your
Veggie Bullet
session safe and
clean. This lid has the Shooter
Chute located on the top edge
of the lid.
SPIRALIZER SET
2A: SPIRALIZER BASE
This attachment serves as the
foundation of the Veggie Bullet’s
Spiralizer function.
2B: SPIRALIZER BASKET
This handy container catches
your perfectly-carved noodles.
2C: SPIRALIZER BLADE
Creates twirlable noodles out of
healthy ingredients.
2D: SPIRALIZER LID
This lid helps you keep control
of ingredients as you feed
them into the spiralizer blade.
Use the Outer/Inner Pusher
to fit ingredients through the
Spiralizer Chute.
2D: SPIRALIZER LID
This lid helps you keep control
of ingredients as you feed
them into the spiralizer blade.
2A
1A
2B
1B
2C
1C
2D
1D
VEGGIE
BULLET,
Assembling Your Veggie Bullet | 1918 | As sembling Your Veggie Bullet
ASSEMBLING
YOUR
VEGGIE BULLET
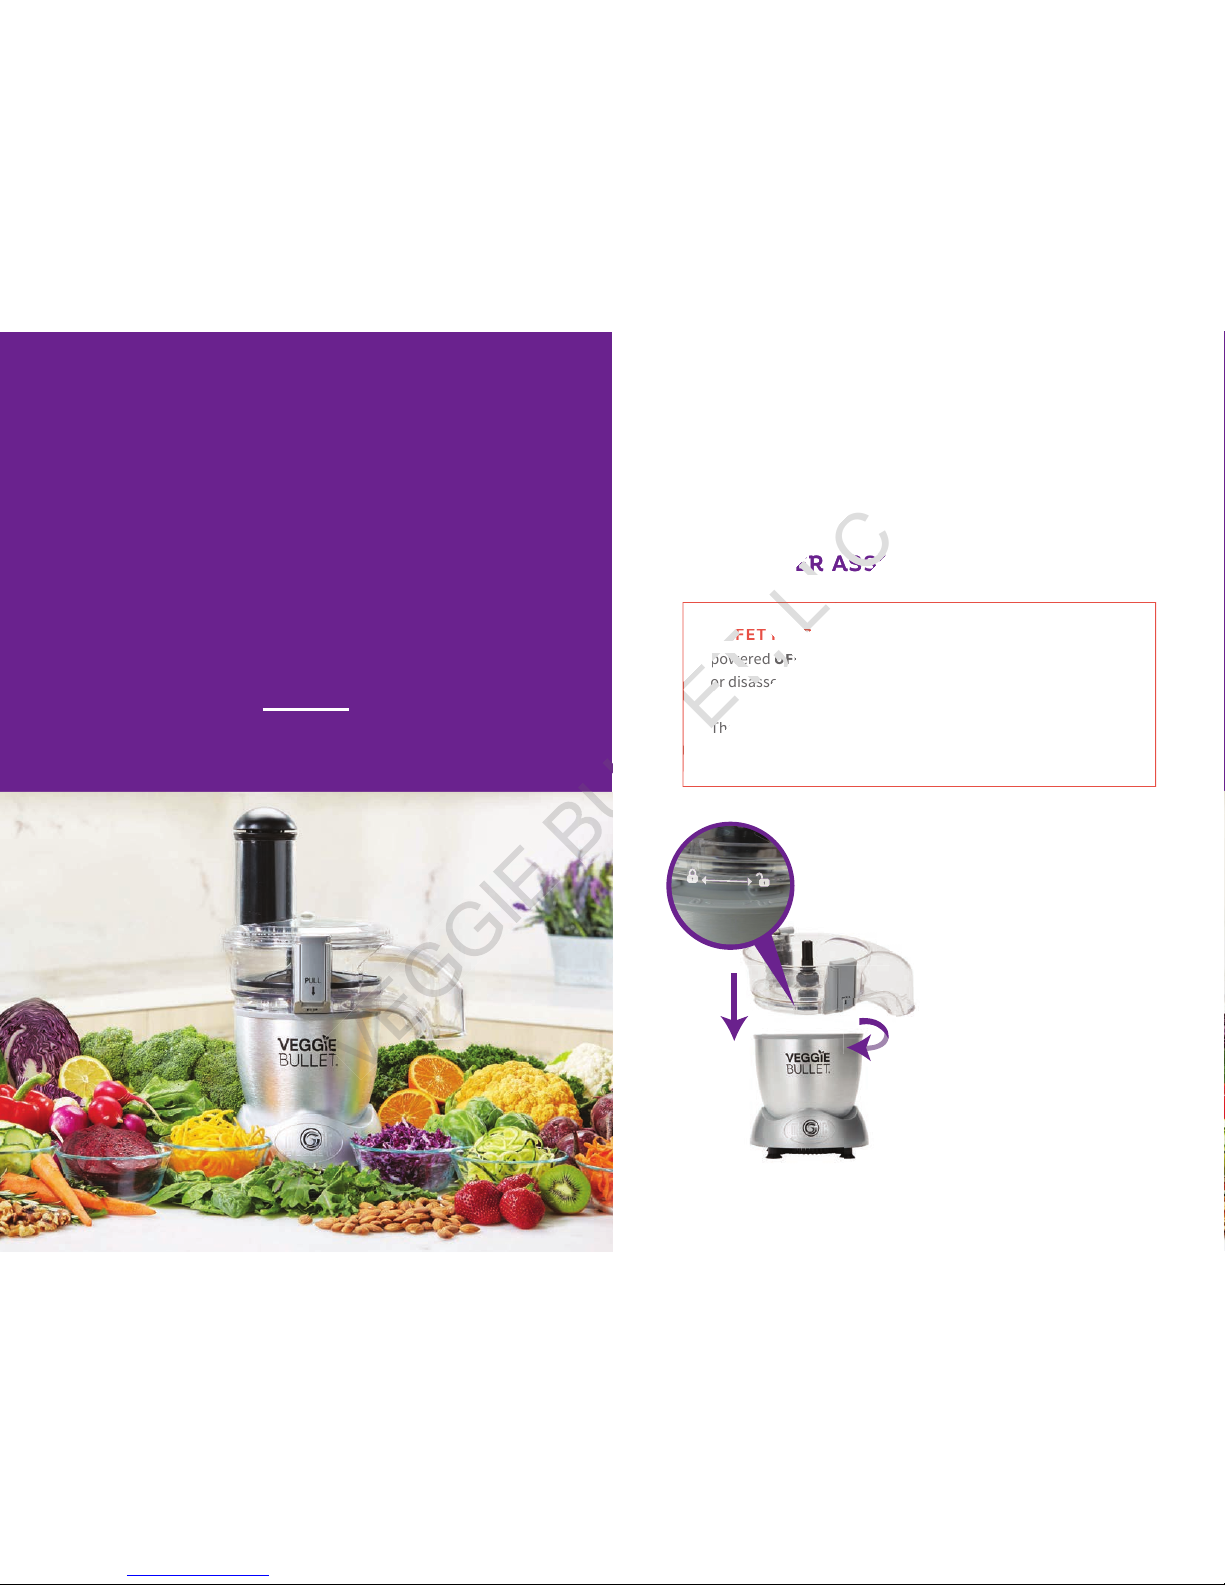
The Veggie Bullet operates with two di erent assemblies: The SHOOTER
and the SPIRALIZER. Use the SHOOTER ASSEMBLY (1) for slicing and
shredding ingredients. Use the SPIRALIZER ASSEMBLY (2) for spiralizing
(making “noodles” out of) ingredients.
A. SHOOTER ASSEMBLY (1)
SAFETY NOTE: Please make sure the Veggie Bullet is
powered O FF, and the Indicator light is RED when assembling
or disassembling.
The SHOOTER LID is the one with the feeder chute positioned
on the outer edge of the lid. The lids are not interchangeable.
STEP 1:
Place the SHOOTER attachment
(1A) on POWER BASE by
aligning the LOCK / UNLOCK
arrow at the bottom with the
UNLOCK icon on POWER BASE,
and then turn clockwise to click
into LOCK position.
To UNLOCK and remove
SHOOTER attachment (1A)
from POWER BASE, simply turn
counter-clockwise toward the
UNLOCK icon and li .
1A
VEGGIE
BULLET,

Assembling Your Veggie Bullet | 2120 | Assembling Your Veggie Bullet
STEP 2:
Place the black BASE PLATE (1B)
inside the SHOOTER attachment
(1A) through the center spindle
and align into place. Make sure
that the BASE PLATE is properly
seated in and aligned with the
spokes on the spindle.
STEP 3:
Using the circular finger grips,
carefully place the SHREDDER /
SLICER BLADE (1C) over the top
of the BASE PLATE (1B) through
the center spindle. Make sure that
the SHREDDER / SLICER BLADE
is properly seated in and aligned
with the spokes on the spindle.
A. For shredding, place
the side labeled “SHRED”
facing upward through the
center spindle.
B. For slicing, place
the side labeled “SLICE”
facing upward through
the center spindle.
BLADE DISCS ARE
SHARP! USE CAUTION
WHEN HANDLING!
S T E P 4 :
Fasten SHOOTER LID (1D) to the back of the SHOOTER attachment
(1A) by squeezing the retractable hinge pin on back of the
SHOOTER and holding the SHOOTER LID at 90 degree angle.
Interlock the metal hinge on the LID with the back metal hinge pin, then
release the hinge pin and close the SHOOTER LID flat over SHREDDER /
SLICER BLADE (1C).
SAFETY NOTE: Check to make sure that the lid is securely locked in
place and that the push button on the hinge pin is not pushed in.
BA
1B
90°
VEGGIE
BULLET,
Assembling Your Veggie Bullet | 2322 | Assembling Your Veggie Bullet
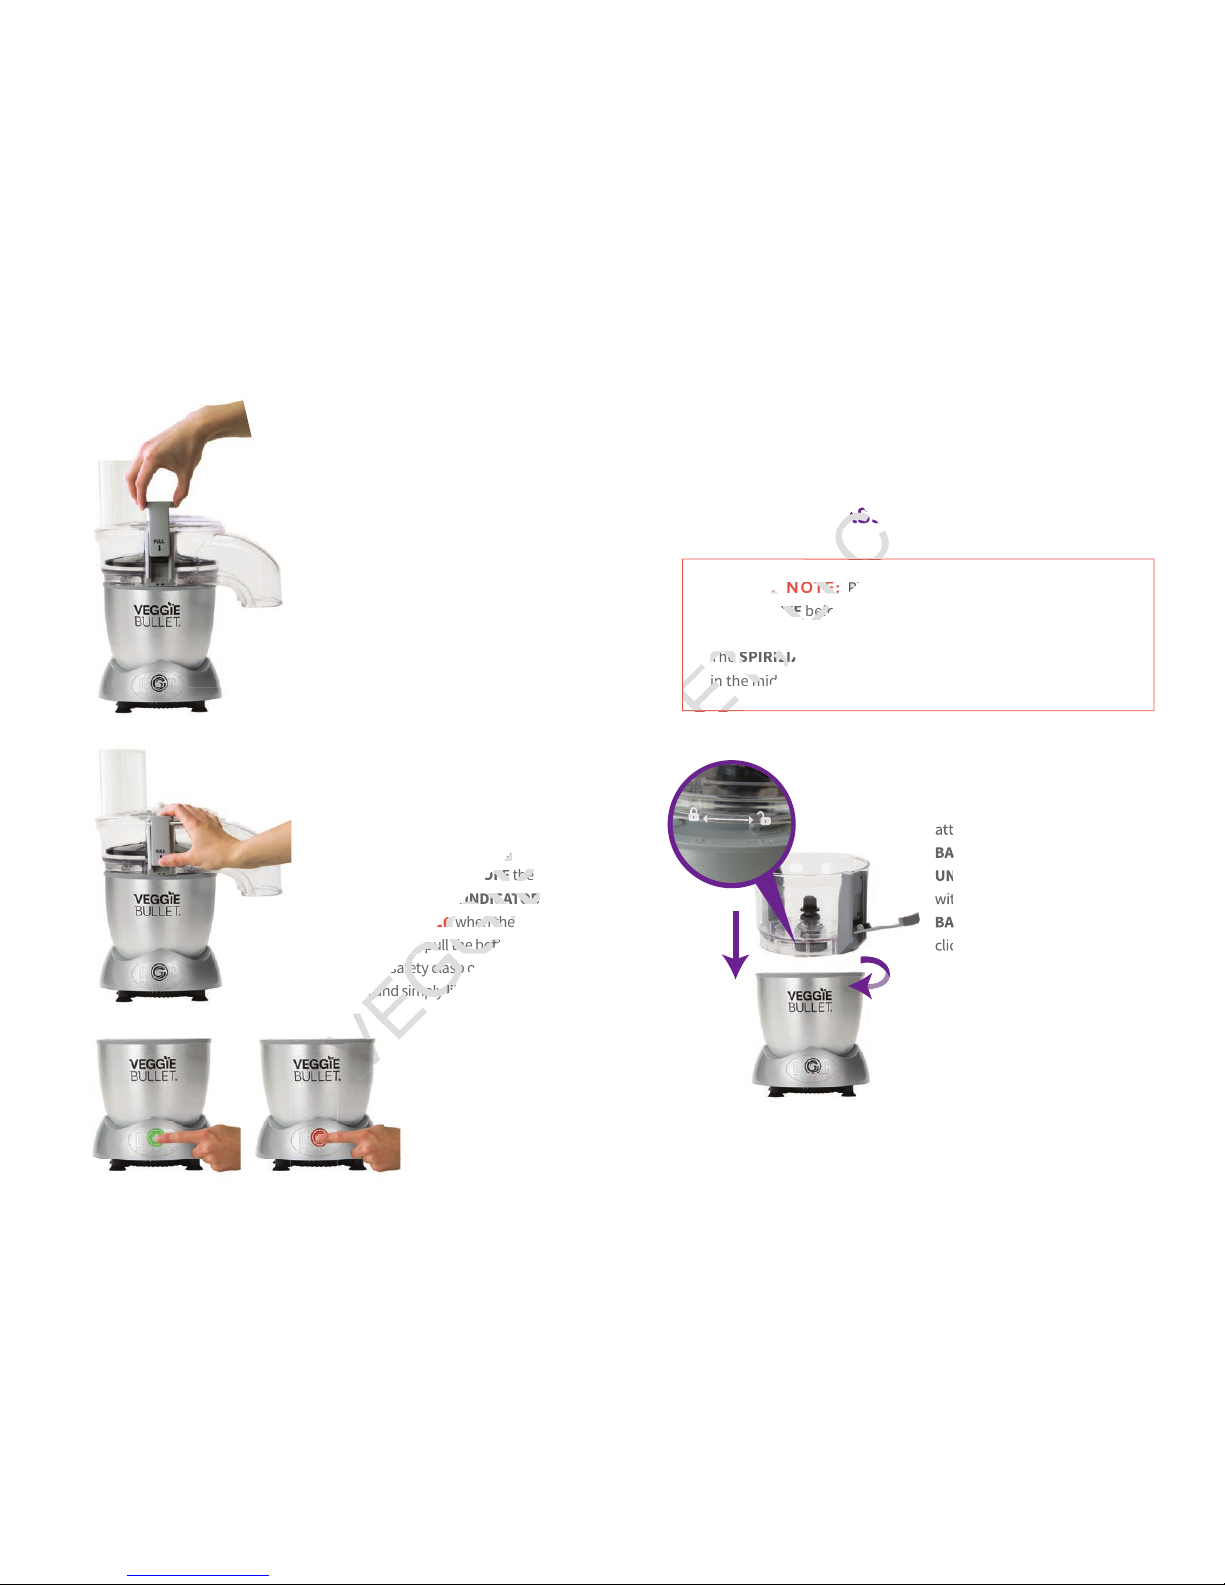
S T E P 5 :
To securely close the SHOOTER
LID (1D), hook the front safety
clasp over the LID and press down
to LOCK. The POWER INDICATOR
LIGHT will glow RED when all
pieces are locked and in place.
Press the Power Button to turn
the machine ON. The Button will
glow GREEN and the motor will
run. If the Button doesn't glow
GREEN (if not glowing at all,
assembly is incorrect), turn o
power and check your assembly
to make sure all pieces are locked
and in place.
To UNLOCK and open the
SHOOTER LID (1D), first press
the Power Button to turn OFF the
machine. The POWER INDICATOR
LIGHT will glow RED when the
unit is o . Then, pull the bottom
arm of the safety clasp outward to
unhook and simply li lid to open.
STEP 1:
Place the SPIRALIZER BASE
attachment (2A) on POWER
BASE by aligning the LOCK /
UNLOCK arrow at the bottom
with the UNLOCK icon on POWER
BASE, and then turn clockwise to
click into LOCK position.
To UNLOCK and remove
SPIRALIZER BASE attachment
(2A) from POWER BASE, simply
turn counter-clockwise toward
the UNLOCK icon and li .
B. SPIRALIZER ASSEMBLY (2)
SAFETY NOTE: Please make sure Veggie Bullet is
powered OFF before assembling or disassembling.
The SPIRILIZER LID is the one with the feeder chute centered
in the middle of the lid. The lids are not interchangeable.
1D
2A
when the
when the
VEGGIE
BULLET,
before assembling or disassembling.
before assembling or disassembling.

Assembling Your Veggie Bullet | 2524 | Assembling Your Veggie Bullet
SAFETY NOTE:
Check to make
sure that the lid is securely locked
in place and that the push button
on the hinge pin is not pushed in.
STEP 5:
To securely close the SPIRALIZER LID (2D), hook the front safety
clasp over the LID and press down to LOCK. The POWER INDICATOR
LIGHT will glow RED when all pieces are locked and in place.
Press the Power Button to turn the machine ON and the indicator light
GREEN. If everything is properly assembled, the Button will glow GREEN
and the motor will run. If the Button doesn't glow GREEN, turn o power
and check your assembly to make sure all pieces are locked and in place.
To UNLOCK and open the SPIRALIZER LID (2D), first turn OFF the
machine by pressing the Power Button. The POWER INDICATOR
LIGHT will glow RED when the unit is o . Then, pull the bottom arm of
the safety clasp outward to unhook and simply li lid to open.
S T E P 4 :
Fasten SPIRALIZER LID (2D)
to the back of the SPIRALIZER
BASE attachment (2A) by
squeezing the retractable
hinge pin on the back of the
SPIRALIZER BASE (2A) and
holding the SPIRALIZE LID (2D)
at 90 degree angle.
Interlock the metal hinge on
the SPIRALIZER LID (2D) with
the back metal hinge pin, then
release the hinge pin and close
the SPIRALIZER LID (2D) flat
over SPIRALIZER BLADE (2C).
2C
2B
2A
2A, 2B
STEP 2:
Place SPIRALIZER BASKET
component (2B) over top of
the center spindle inside of the
SPIRALIZER BASE attachment
(2A). Make sure that the basket
is properly seated in and aligned
with the spokes on the spindle.
S T E P 3 :
Using the circular finger grips,
carefully place the SPIRALIZER
BLADE (2C) on the SPIRALIZER
BASKET (2B) and set the
rectangular notches into place
on the top of the SPIRALIZER
BASKET (2B).
90°
2D
SPIRALIZER BLADE DISC IS SHARP!
USE CAUTION WHEN HANDLING!
SAFETY NOTE: Always
unplug the Veggie Bullet
when not in use.
VEGGIE
BULLET,
Using Your Veg gie Bullet | 2 726 | Using Your Veggie Bullet
USING YOUR VEGGIE BULLET
The Veggie Bullet features three main functions: shredding, slicing,
and spiralizing. The shredding and slicing functions operate with the
Shooter Set (1), while the spiralizing function uses the Spiralizer Set (2).
SHREDDING: HOW TO SHRED YOUR VEGETABLES
USING THE VEGGIE BULLET
1. Make sure the Veggie Bullet Base is powered o, and assemble the
Shooter Set so the lid is on and the Shredder Blade is correctly placed.
For more detailed instructions on how to assemble the machine, view
the Shooter assembly instruction guide on page 19.
2. Make sure that the ingredient you are about to prep is clean and ready
for consumption. If shredding meat, check that it is fully cooked to avoid
the spread of potentially harmful pathogens. If shredding produce, make
sure the skin is washed, scrubbed, and/or peeled accordingly.
3. If necessary, prep ingredients so they will fit down the chute.
Larger or irregularly shaped ingredients like cauliflower, potatoes,
apples, or beets will most likely need to be cut into halves, quarters
or eighths to fit through the machine.
4. Place a large mixing bowl directly below the Shooter Dispenser
so that it catches the shredded ingredients.
5. Next, simply place your ingredient into the chute, turn the
machine on, and guide it down using the pusher. For thinner items
like celery stalks, asparagus, etc., we recommend using the inner
pusher for greater accuracy and control.
6. Finally, turn the machine o and wait for the blade to stop completely
before opening the lid.
WORKS WITH:
Carrots • Cauliflower (Cauliflower Rice) • Be ets
• Zucchini • Yellow squash • Broccoli • Cabbage • Onion
• Potatoes (regular, sweet) • Cheese • Firm Tofu • Brussels Sprouts • Apple
• Mango • Steak • Hard-Boiled Eggs • Cooked Chicken
VEGGIE
BULLET,

Using Your Veg gie Bullet | 2928 | Using Your Veggie Bullet
SPIRALIZING: HOW TO SPIRALIZE YOUR
VEGETABLES USING THE VEGGIE BULLET
1. Make sure the Veggie Bullet Base is powered o, and assemble the
Spiralizer Set. For more detailed instructions on how to assemble the
machine, view the Spiralizer assembly instruction guide on page 23.
2. Make sure that the ingredient you are about to spiralize is clean and
ready for consumption. If spiralizing produce, make sure the skin is
washed, scrubbed, and/or peeled accordingly.
3. If necessary, prep ingredients so they will fit down the chute.
Larger or irregularly shaped ingredients like potatoes, beets, or
butternut squash will most likely need to be cut into halves, quarters
or eighths to fit through the machine. It is extremely important
that you only spiralize one ingredient at a time, whether that is
one whole zucchini or carrot, or one small chunk of beet. Do not
stack ingredients on top of one another or try to crowd the chute with
multiple pieces. Spiralizing works best with oblong, regularly sized
ingredients like zucchini, yellow squash, broccoli stems, and carrots.
4. For thinner ingredients like carrots, keep the outer pusher inside
the chute and only guide the carrot through the blades using the
inner pusher. With larger sized ingredients, keep the machine
turned off and place your ingredient into the chute with both the
inner and outer pusher.
5. Turn the Veggie Bullet machine on, and guide your ingredient
down through the chute and through the spiralizer blade. Once
finished, switch the button OFF and wait for the blades to come to a
complete stop before retrieving the noodles.
WORKS WITH:
Zucchini • Beets • Yellow Squash • Sweet Potato
• Butternut S quash • Carrots • Broccoli Stems • Cucumber • Parsnips
• Kohlrabi
SLICING: HOW TO SLICE YOUR VEGETABLES
USING THE VEGGIE BULLET
1. Make sure the Veggie Bullet Base is powered o, and assemble
the Shooter Set so the lid is on and the Slicer Blade is correctly
placed. For more detailed instructions on how to assemble the
machine, view the Shooter assembly instruction guide on page 19.
2. Make sure that the ingredient you are about to prep is clean and
ready for consumption. If slicing meat, check that it is fully cooked to
avoid the spread of potentially harmful pathogens. If slicing produce,
make sure the skin is washed, scrubbed, and/or peeled accordingly.
3. If necessary, prep ingredients so they will fit down the chute. Larger
or irregularly shaped ingredients like cauliflower, potatoes, apples, or
beets will most likely need to be cut into halves, quarters or eighths
to fit through the machine.
4. Place a large mixing bowl directly below the Shooter Dispenser
so that it catches the sliced ingredients.
5. Next, simply place your ingredient into the chute, turn the
machine on, and guide it down using the pusher. For thinner items
like celery stalks, asparagus, etc., we recommend using the inner
pusher for greater accuracy and control.
6. Finally, turn the machine o and wait for the blade to stop completely
before opening the lid.
WORKS WITH:
Carrots • Radish • Beets • Zucchini • Yellow squash
• Cabbage • Iceberg Lettuce • Leafy gre ens • Onion • Cucumber • Broccoli
• Shallots • Garlic • Potatoes (regular, sweet) • Celery • Firm tomatoes (roma, eg)
• Red pepper • Lemon/lime • Orange • Hard Chee se • Apple • Mango • Kiwi
• Pear • Pineapple • Strawberry • Nuts (almonds, cashews, peanuts)
• Brussels Sprouts • Steak • Turkey • Cooked Chicken
VEGGIE
BULLET,

Vegetables | 3130 | Mas tering the Basic s, Prepping for Success
RECIPES
1. MASTERING THE BASICS,
PREPPING FOR SUCCESS
Before you dive into the world of possibilities with the Veggie Bullet, it’s
good to have a few things on hand. While the Veggie Bullet is great for
shredding, slicing, and spiralizing raw ingredients as you need them,
it’s also an excellent tool for prepping multiple portions of meals,
snacks, and sides in advance to get you through the week.
To expedite meal-making during your busiest days, it’s a good idea to
take an hour or two on a less busy day (say the weekend) to cook some
items ahead of time. That way, when you’re in a rush to get a healthy
dinner on the table or to pack your lunch, you’ll have everything you
need ready to go when you need it.
This section details how to prepare basic ingredients that can be enjoyed
on their own, mixed and matched, or incorporated into more advanced
recipes during the week. All of the following items can be stored for up
to 5 days in the refrigerator, or several months in the freezer.*
*STORAGE DISCLAIMER: Refrigerator and freezer storage instructions are included
in this book as a general guideline, and are based on ideal temperature and
sanitation conditions. Instructions do not account for changes in temperature and
conditions of individual refrigerators and freezers, and it is the user’s responsibility
to gauge whether or not food is safe to eat.
VEGETABLES
TIPS & TRICKS
HOW TO SCRUB ROOT VEGETABLES
Use for beets, carrots, potatoes, parsnips, and turnips
Many recipes in this book instruct you to scrub your vegetables before
preparing. Scrubbing is a great alternative to peeling because it takes
less time, makes less mess and waste, and retains the nutrients and
mineral content of a root’s outermost layer. Here’s the technique we
recommend. You will need:
White vinegar
Warm water
Large bowl
Vegetable Scrubbing Brush
Fill a large bowl with warm water and add 2 Tbsp. white vinegar. Add
desired vegetables and soak for 3-5 minutes. Remove vegetables
from bowl one by one, giving a quick rinse under the tap in warm
water. Scrub the entire surface of the vegetable with your brush and
rinse one more time to get rid of any loose particles and residual
vinegar. Repeat until all of your vegetables are clean.
If you’d like to save time, we suggest scrubbing your veggies as soon
as you get home from the grocery store. That way, they are prepped
and ready to go when the time comes to use them in a recipe.
VEGGIE
BULLET,
Vegetables | 3332 | Vegetables
INGREDIENTS:
1 head of cauliflower, rinsed,
dried, and leaves trimmed
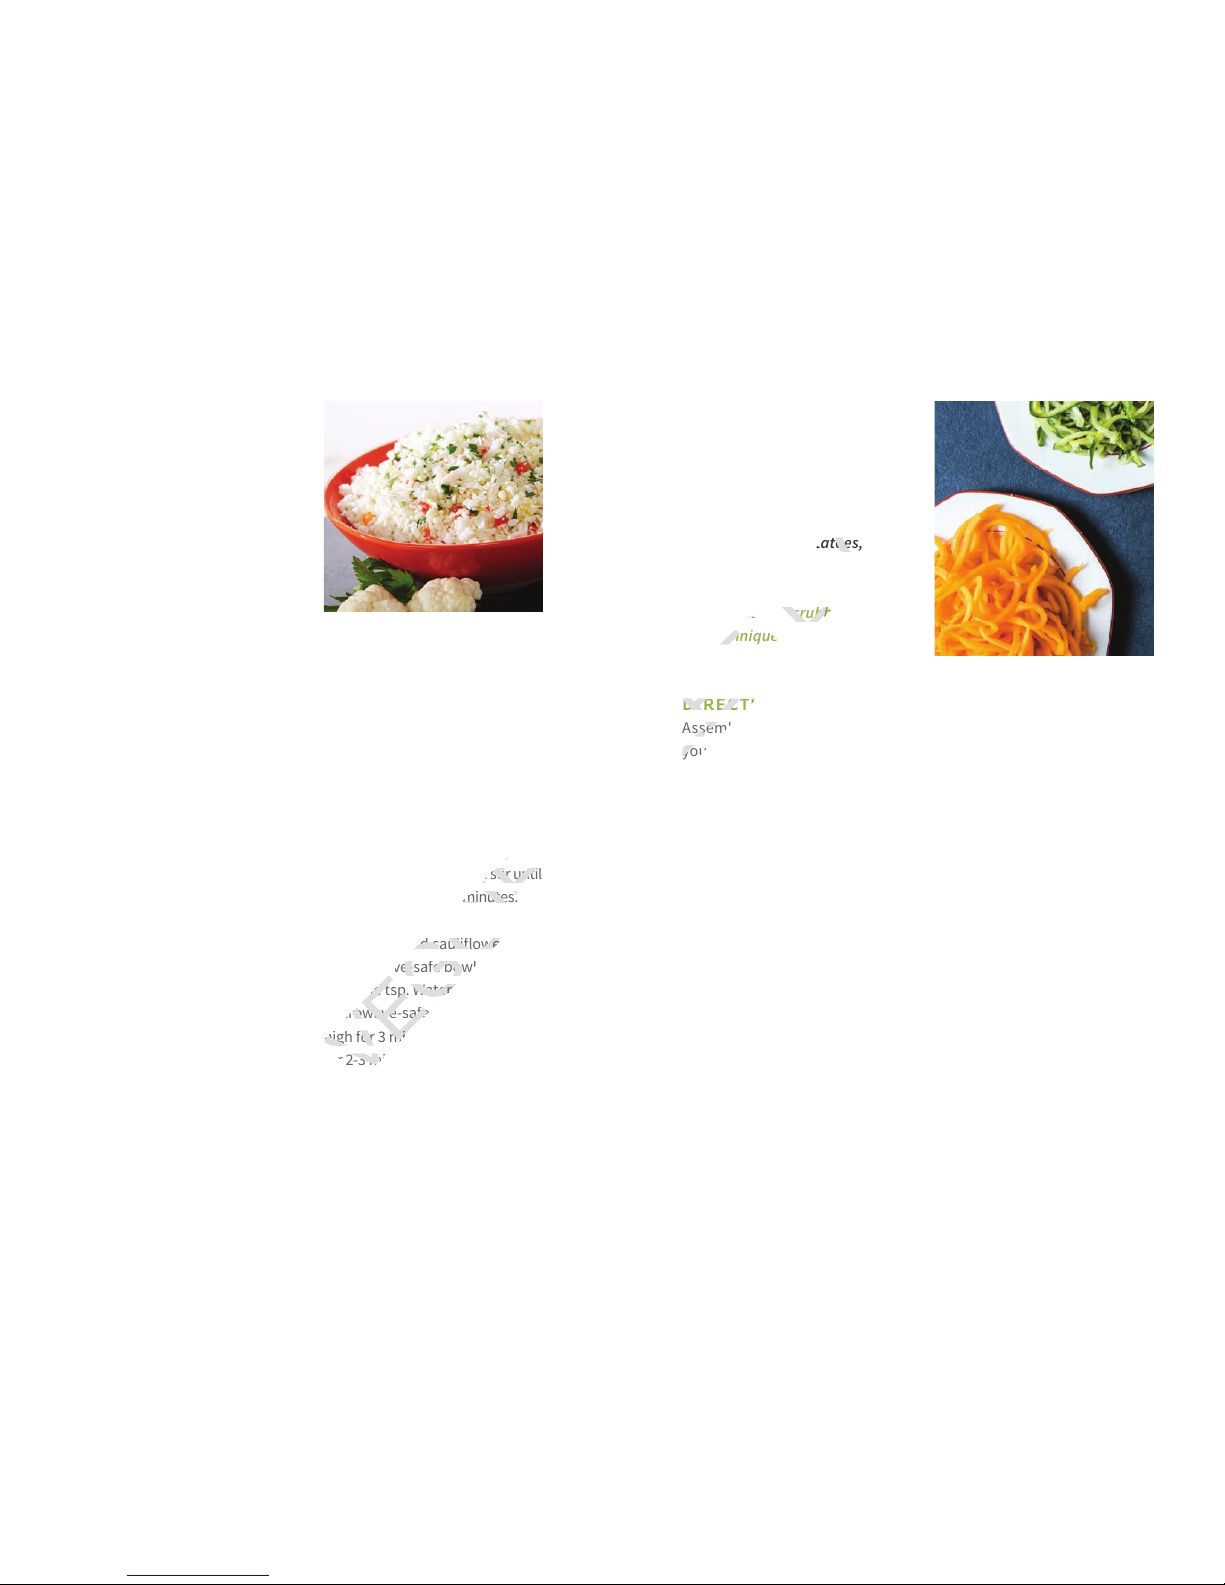
CAULIFLOWER
RICE
MAKES: 4-6 SERVINGS
DIRECTIONS:
Assemble the Shooter Set of
your Veggie Bullet with the
Shredder Blade facing up. Cut
cauliflower into pieces small
enough to fit through the
chute and place a large bowl
underneath the dispenser. Add
several pieces of cauliflower
to the chute, then turn the
Power Base on, using the Outer
Pusher to guide pieces to the
blade. Repeat until the whole
cauliflower is riced.
Cauliflower rice can be enjoyed
raw or cooked. You can also
store it raw if you plan to cook
it with other ingredients later in
the week.
Baked: Toss cauliflower with
1-2 Tbsp. olive oil. Preheat oven
to 425°F. Line a baking sheet
with parchment paper and
SWEET POTATO
NOODLES
MAKES 4-6 SERVINGS
INGREDIENTS:
4 medium sweet potatoes,
scrubbed*
*See pg. 31 for scrubbing
technique
DIRECTIONS:
Assemble the Spiralizer Set of
your Veggie Bullet. If necessary,
cut potatoes lengthwise so
pieces are narrow enough to fit
through the chute. Add potato
pieces to the chute, steadying
with the Outer Pusher, then
turn the Power Base on, using
the Outer Pusher to guide
pieces to the blade. Repeat
with all potato pieces.
Refrigerating raw sweet
potatoes is not recommended,
as it will change their flavor
and texture. Instead, we
recommend cooking the potato
noodles before storing.
Baked: Preheat oven to
450°F. Line a baking sheet with
parchment paper and spread
potatoes in a thin layer. Drizzle
with olive or sunflower seed oil
and season with salt and pepper.
Bake for 10-15 minutes until
tender, turning with tongs every
few minutes to avoid burning.
Sautéed: Add 1-2 Tbsp. of olive,
coconut, or sunflower seed oil
to a large skillet over mediumhigh. Add noodles (in batches,
if necessary) and stir until
soened — about 6-8 minutes.
USED IN: Sweet Potato
Noodle Macro Bowl (pg. 71),
Sweet Potato Pad Thai (pg. 87)
spread cauliflower in a thin
layer. Bake for 20-25 minutes
until lightly brown, turning with
tongs every five minutes to
avoid burning.
Sautéed: Heat 1 Tbsp. olive,
coconut, or sunflower seed oil
in a large skillet over mediumhigh heat. Add cauliflower (in
batches, if necessary) and stir until
soened — about 5-8 minutes.
Steamed: Add cauliflower to
a microwave-safe bowl along
with one tsp. Water. Cover with a
microwave-safe lid and heat on
high for 3 minutes. Allow to cool
for 2-3 minutes before eating.
USED IN: Umami Macro Bowl
(pg. 73), Cauliflower Rice with
Hazlenuts and Tarragon (pg. 89),
Cauliflower "Cous Cous" (pg. 90)
VEGGIE
BULLET,
Assemble the Spiralizer Set of
Assemble the Spiralizer Set of
Vegetables | 3534 | Vegetables
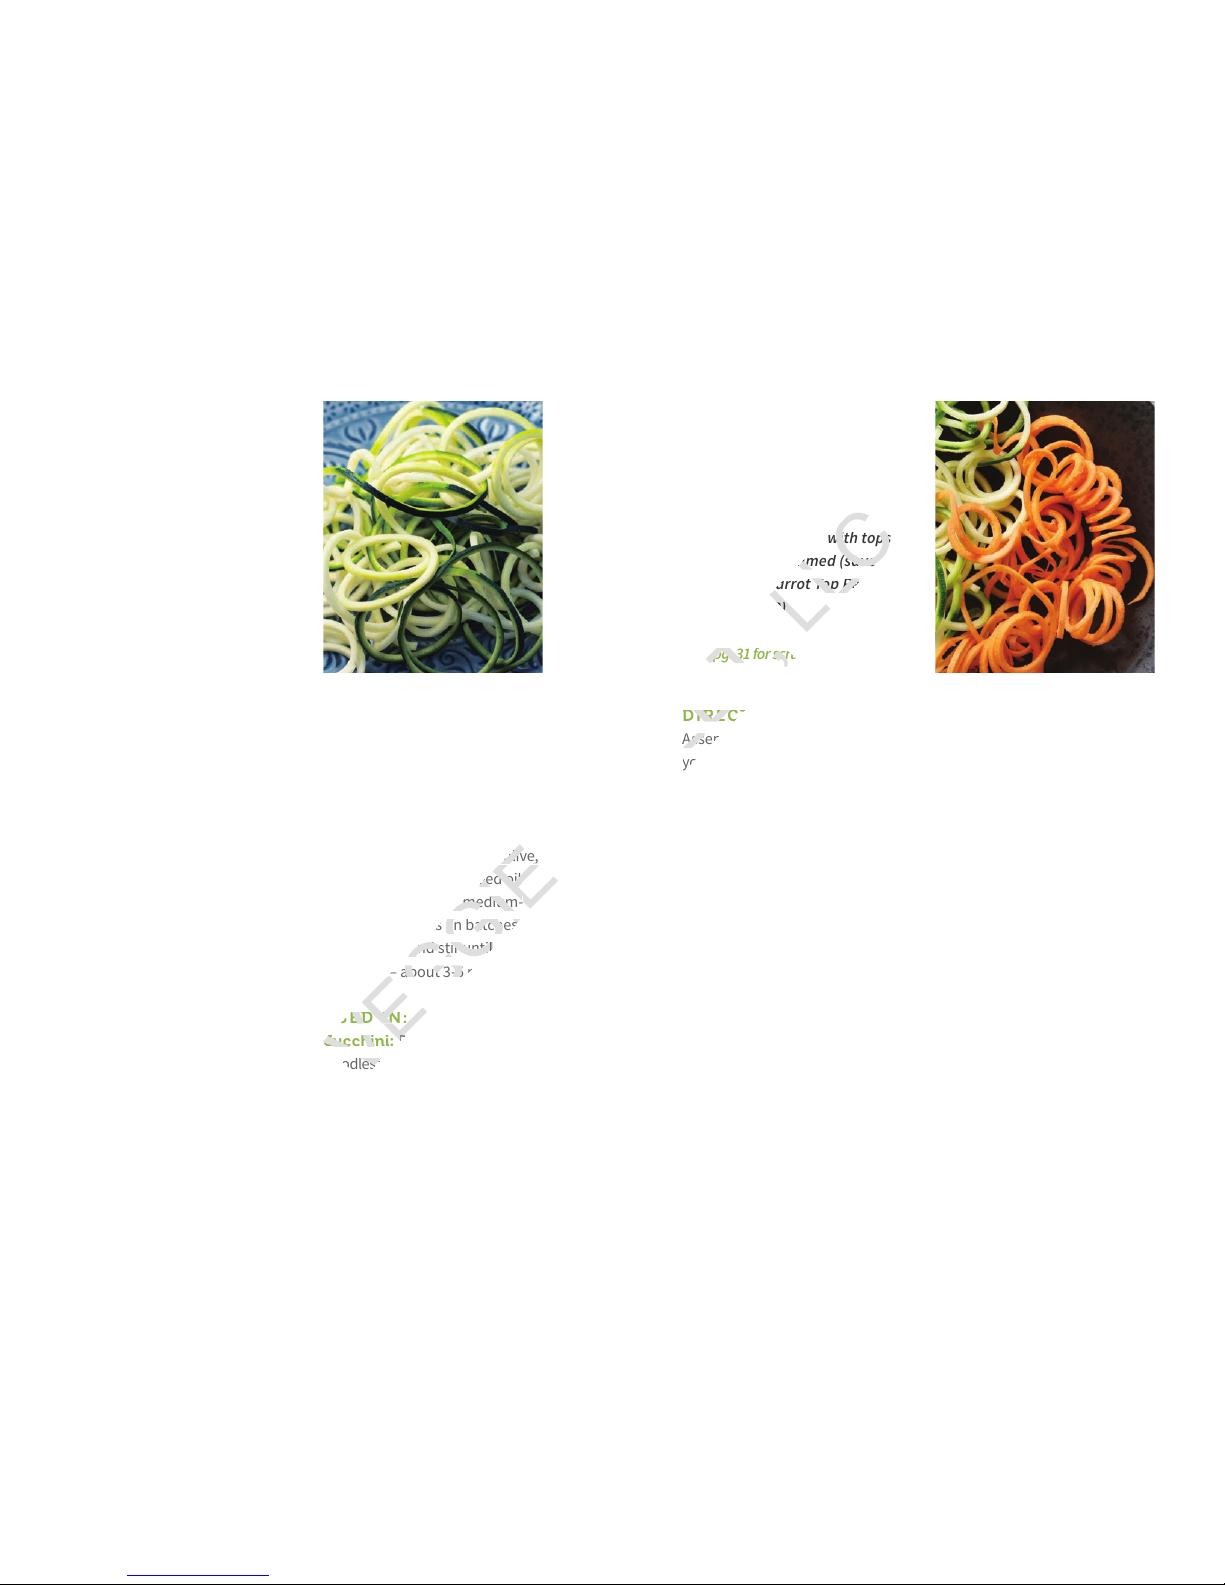
ZUCCHINI
& YELLOW
SQUASH
NOODLES
MAKES 4 SERVINGS
INGREDIENTS:
4 whole, medium zucchini
or yellow squash,
ends trimmed
DIRECTIONS:
Assemble the Spiralizer Set of
your Veggie Bullet. Add zucchini/
squash to the chute lengthwise,
steadying with the Outer Pusher.
Turn on the Power Base, using
the Outer Pusher to guide the
squash to the blade. Repeat with
all zucchini/squash.
Zucchini/squash noodles can
be enjoyed raw or cooked. You
can also store them raw if you
plan to cook them with other
ingredients later in the week.
Baked: Preheat oven to 400°F.
Line a baking sheet with
parchment paper and spread
zucchini/squash in a thin layer.
Drizzle with olive or sunflower
CARROT
NOODLES
MAKES 2-4 SERVINGS
INGREDIENTS:
4 Carrots, scrubbed* with tops
and ends trimmed (save
tops for Carrot Top Pesto
on pg. 128)
*See pg. 31 for scrubbing technique
DIRECTIONS:
Assemble the Spiralizer Set of
your Veggie Bullet. Place the
Outer Pusher into the chute to
narrow the opening. Add your
first carrot to the spiralizer,
placing the thickest side of the
carrot on the bottom (stem
side-down) and steadying with
the Inner Pusher. Turn the Power
Base on, using the Inner Pusher
to guide the vegetable to the
blade. Repeat with all carrots.
Carrot noodles can be enjoyed
and stored both raw and
cooked. Store them raw if you
plan to cook them with other
ingredients later in the week.
seed oil and season with salt
and pepper. Bake for 10-15
minutes until tender, turning
with tongs every few minutes
to avoid burning.
Sautéed: Add 1-2 Tbsp. of olive,
coconut, or sunflower seed oil
to a large skillet over mediumhigh. Add noodles (in batches,
if necessary) and stir until
soened — about 3-5 minutes.
USED IN:
Zucchini: Pesto Zucchini
Noodles with Sautéed Shrimp (pg.
76), Zucchini Bolognese (pg. 81)
Yellow Squash: Yellow Squash
Noodles with Spicy Tomato Sauce
(pg. 77), Spiralized Lo-Mein (pg. 79)
Baked: Preheat oven to
425°F. Line a baking sheet with
parchment paper and spread
carrot noddles in a thin layer.
Drizzle with olive or sunflower
seed oil and season with salt and
pepper. Bake for 5-10 minutes
until tender, turning with tongs
halfway through to avoid burning.
Sautéed: Add 1-2 Tbsp. of olive,
coconut, or sunflower seed oil to
a large skillet over medium-high
heat. Add noodles (in batches,
if necessary) and stir until
soened — about 6-10 minutes.
USED IN: Red Chicken Curry
(pg. 84), Carrot Cake Oatmeal
(pg. 103), Pho (pg. 109)
VEGGIE
BULLET,
Assemble the Spiralizer Set of
Assemble the Spiralizer Set of
with tops
with tops

Vegetables | 3736 | Vegetables
CHOPPED CABBAGE
MAKES 4-6 SERVINGS
You can use either the Shredder or Slicer Blade for this preparation.
The Shredder Blade will yield very small pieces of cabbage while the
Slicer creates slightly larger strips.
Steamed: Bring two inches
of water to boil in a pot over
medium-high heat. Fill a
steamer basket with as much
cabbage as it can hold. Reduce
heat to simmer and carefully
lower the steamer basket into
the pot. Add more cabbage if
the pot will support it. Cover
the pot and let steam for 3-6
minutes until just tender.
Cabbage chopped with the
Shredder Blade will require
less cooking time than cabbage
prepared with the Slicer Blade.
USED IN:
Rainbow Confetti Salad (pg. 50),
Avocado-Edamame Confetti
Boats (pg. 51), Classic Coleslaw
(pg. 57), Crunchy Asian Slaw
(pg. 58), Balsamic Braised
Cabbage (pg. 61), Quinoa Stued
Bell Peppers (pg. 62), Sweet
Potato Macro Bowl (pg. 71),
Southwestern Macro Bowl (pg.
72), Umami Macro Bowl (pg. 73)
INGREDIENTS:
1 large purple or green cabbage,
rinsed and dried, end trimmed
DIRECTIONS:
Assemble the Shooter with either
the Slicer or Shredder Blade facing
up, according to preference. Place
a large bowl underneath the
dispenser. Cut your cabbage into
pieces small enough to fit through
the chute. Add cabbage pieces to
the chute one by one, steadying
with the Pusher. Turn the Power
Base on, using the Outer Pusher to
guide the vegetable to the blade.
Chopped cabbage can be
enjoyed raw or cooked. Raw
cabbage can be added to salads,
soups, stews and more.
Sautéed: Add 1 Tbsp. olive,
coconut, or sunflower seed oil to
a large skillet over medium-high
heat. Add cabbage (in batches,
if necessary) and stir until
soened — about 6-10 minutes.
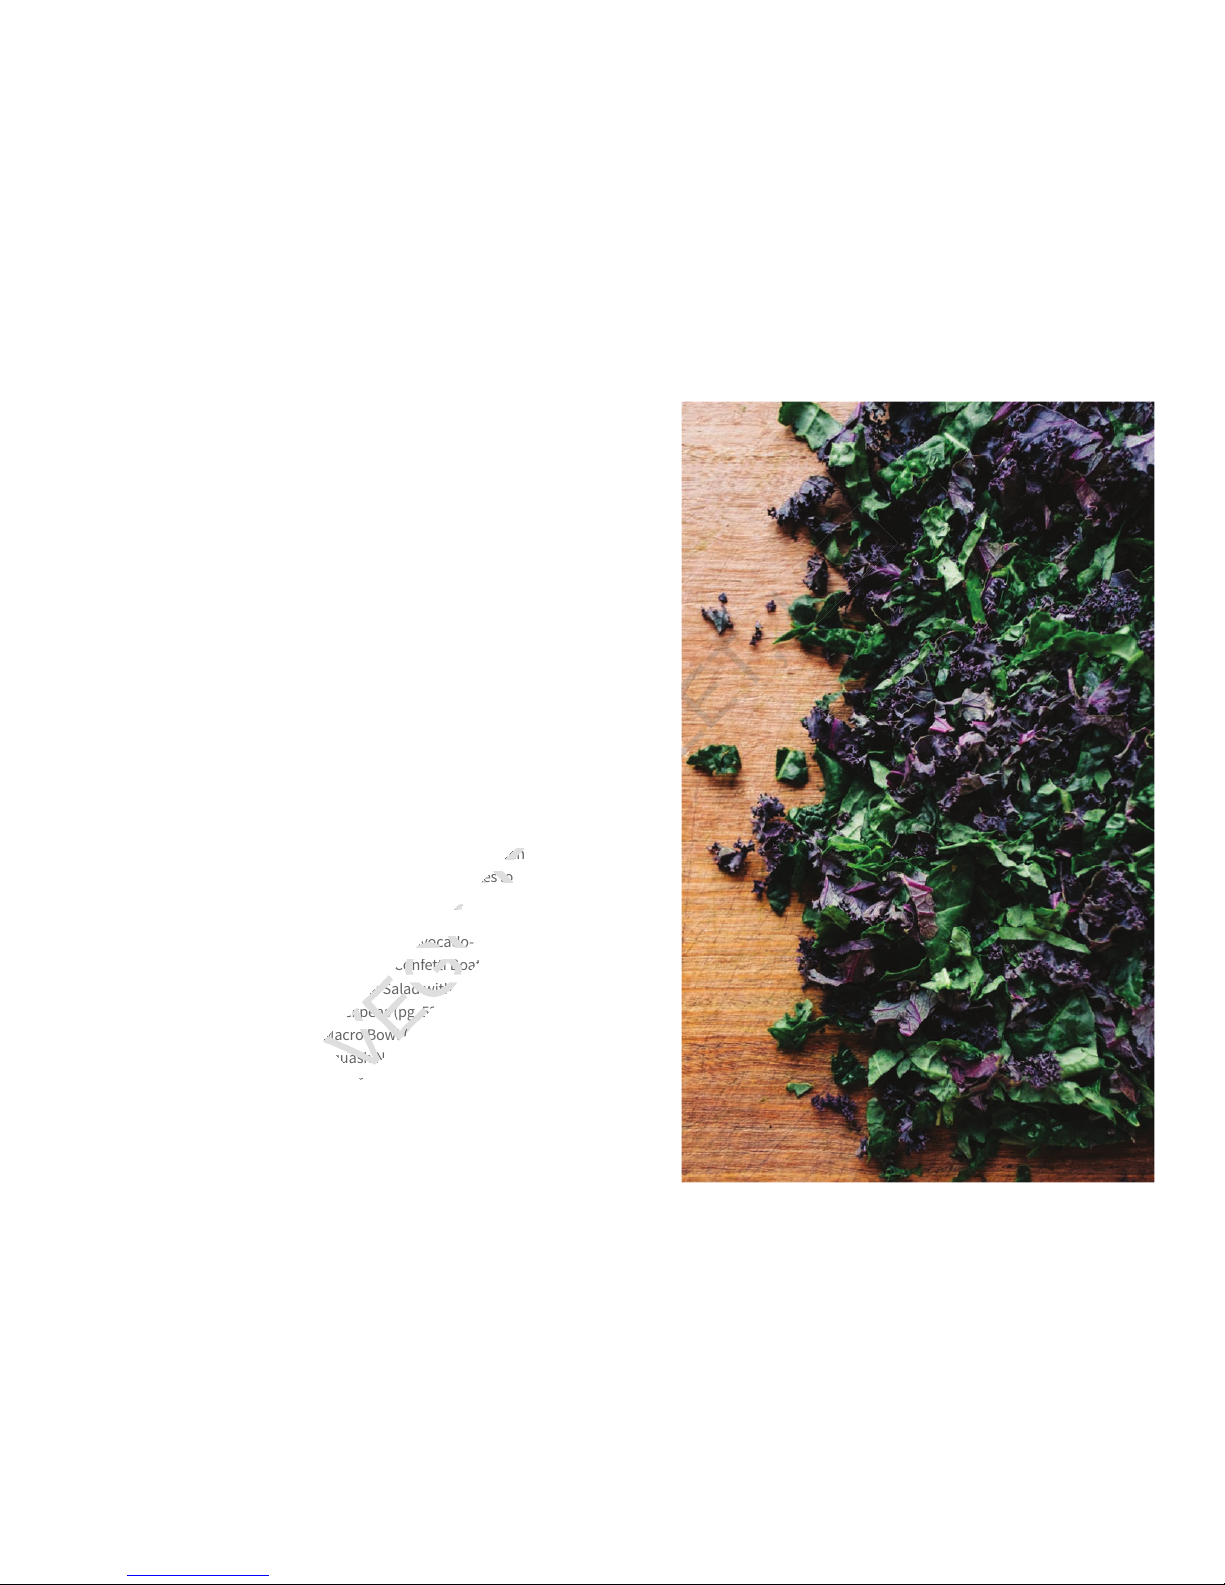
CHOPPED KALE
INGREDIENTS:
1 bunch lacinato or curly kale,
cleaned* and thoroughly dried
*To clean kale, submerge leaves
in a mixture of 3 parts water to
1 part white vinegar for 5-10
minutes to remove any dirt and
debris. Remove leaves in small
groups and thoroughly rinse with
water to remove any vinegar
residue. Pat dry with towels or
run through a salad spinner to
dry. It is important to dry kale
thoroughly, especially if baking or
freezing raw for later use.
DIRECTIONS:
Assemble the Shooter Set of
your Veggie Bullet with the Slicer
Blade facing up. Place a large
bowl underneath the Dispenser.
Trim the kale: on each leaf,
locate the point where the woody
stalk soens into the leaf. From
this point, cut around the stalk in
a downward “V” shape to remove
the stalk while keeping the leafy
area in tact.
Stack the leaves on top of one
another, then roll into a tight
bundle. Stu this roll tightly into
the Chute, steadying with the
Outer Pusher. Turn the Power
Base on, using the Outer Pusher
to guide the kale to the blade.
Kale can be enjoyed raw
or cooked. The taste and
texture of raw kale can be
improved by gentle rubbing
— a technique known as
massaging, detailed below.
Kale can also be sautéed and
steamed for a more traditional
presentation, or baked to make
crispy morsels for snacking or
garnishing.
Massaged: Massaging kale
breaks down the vegetable’s
cellulose, leaving you with
a sweeter, more tender leaf
that’s perfect for raw salads.
Prior to chopping kale with the
VEGGIE
BULLET,
Vegetables | 3938 | Vegetables
Veggie Bullet, stack your kale
leaves and rub them together,
massaging with your hands
until the kale loses some of its
stiness, becoming soer and
more pliable. Feel free to add
a little bit of olive, coconut,
or sunflower seed oil to your
hands while massaging if
desired. It is best to massage
kale right before eating it, since
you’ll be breaking down some
of the structures that help to
keep it fresh in the fridge.
Sautéed: Add 1 Tbsp. olive,
coconut, or sunflower seed oil
to a large skillet over mediumhigh heat. Add kale (in batches,
if necessary) and stir until
soened — about 6-10 minutes.
Steamed: Bring two inches
of water to boil in a pot over
medium-high heat. Fill a
steamer basket with as much
chopped kale as it can hold.
Reduce heat to simmer and
carefully lower the steamer
basket into the pot. Add more
kale if the pot will support it.
Cover the pot and let steam for
5-7 minutes until tender.
Baked: Preheat oven to 300°F.
Line one to two baking sheets
with parchment paper.
Remove the bowl of chopped
kale from underneath the
Veggie Bullet dispenser, and
toss with ½ Tbsp. - 1 Tbsp. olive
or sunflower seed oil, as well as
any seasonings you like (salt,
pepper, spices, etc), taking care
to coat each piece evenly.
Arrange kale in a flat layer on your
baking sheet(s), taking care to
leave some space in between the
leaves. Bake for 10 minutes, then
open the oven, rotate your pan(s),
and cook for an additional 12-15
minutes. Remove from the oven
and let sit for 15-20 minutes to
crisp up before eating.
USED IN: Avocado-
Edamame Confetti Boats (pg.
51), Kale Salad with Cherries and
Chickpeas (pg. 52), Southwestern
Macro Bowl (pg. 72), Butternut
Squash Noodles with Sage, Kale,
Almonds, and Goat Cheese (pg.
82), Sweet Potato Kale Breakfast
Hash (pg. 104)
VEGGIE
BULLET,
Vegetables | 4140 | Vegetables
CHOPPED SWISS CHARD
INGREDIENTS:
1 bunch Swiss chard, cleaned*
and thoroughly dried
*To clean chard, submerge leaves
in a mixture of 3 parts water to 1
part white vinegar for 5-10 minutes
to remove any dirt and debris.
Remove leaves in small groups
and thoroughly rinse with water to
remove any vinegar residue. Pat
dry with towels or run through a
salad spinner to dry. It is important
to dry chard thoroughly, especially
if storing raw for later use.
DIRECTIONS:
Assemble the Shooter Set of
your Veggie Bullet with the Slicer
Blade facing up. Place a large
bowl underneath the Dispenser.
Trim the chard: Chard stalks
are tasty, but they can get
a little dried out and woody
at the ends. Simply trim the
stalks about one inch from
the bottom to prep. Stack the
leaves on top of one another,
then roll into a tight bundle.
Stu this roll tightly into the
Chute, steadying with the Outer
Pusher. Turn the Power Base
on, using the Outer Pusher to
guide the chard to the blade.
Swiss chard can be enjoyed raw
or cooked. Like kale, the taste
and texture of raw chard can be
improved by massaging. Chard
is also delicious when sautéed.
Steaming provides an oil-free
mode of preparation for those
looking to keep things light.
Sautéed: Add 1 Tbsp. olive,
coconut, or sunflower seed oil to
a large skillet over medium-high
heat. Add chard (in batches,
if necessary) and stir until
soened — about 6-10 minutes.
Steamed: Bring two inches
of water to boil in a pot over
medium-high heat. Fill a steamer
basket with as much chopped
chard as it can hold. Reduce heat
to simmer and carefully lower the
steamer basket into the pot. Add
more chard if the pot will support
it. Cover the pot and let steam for
4-6 minutes until tender.
USED IN: Sweet Potato Macro
Bowl (pg. 71), Beet Noodles with
Walnuts, Chard, Orange, and
Tarragon (pg. 83)
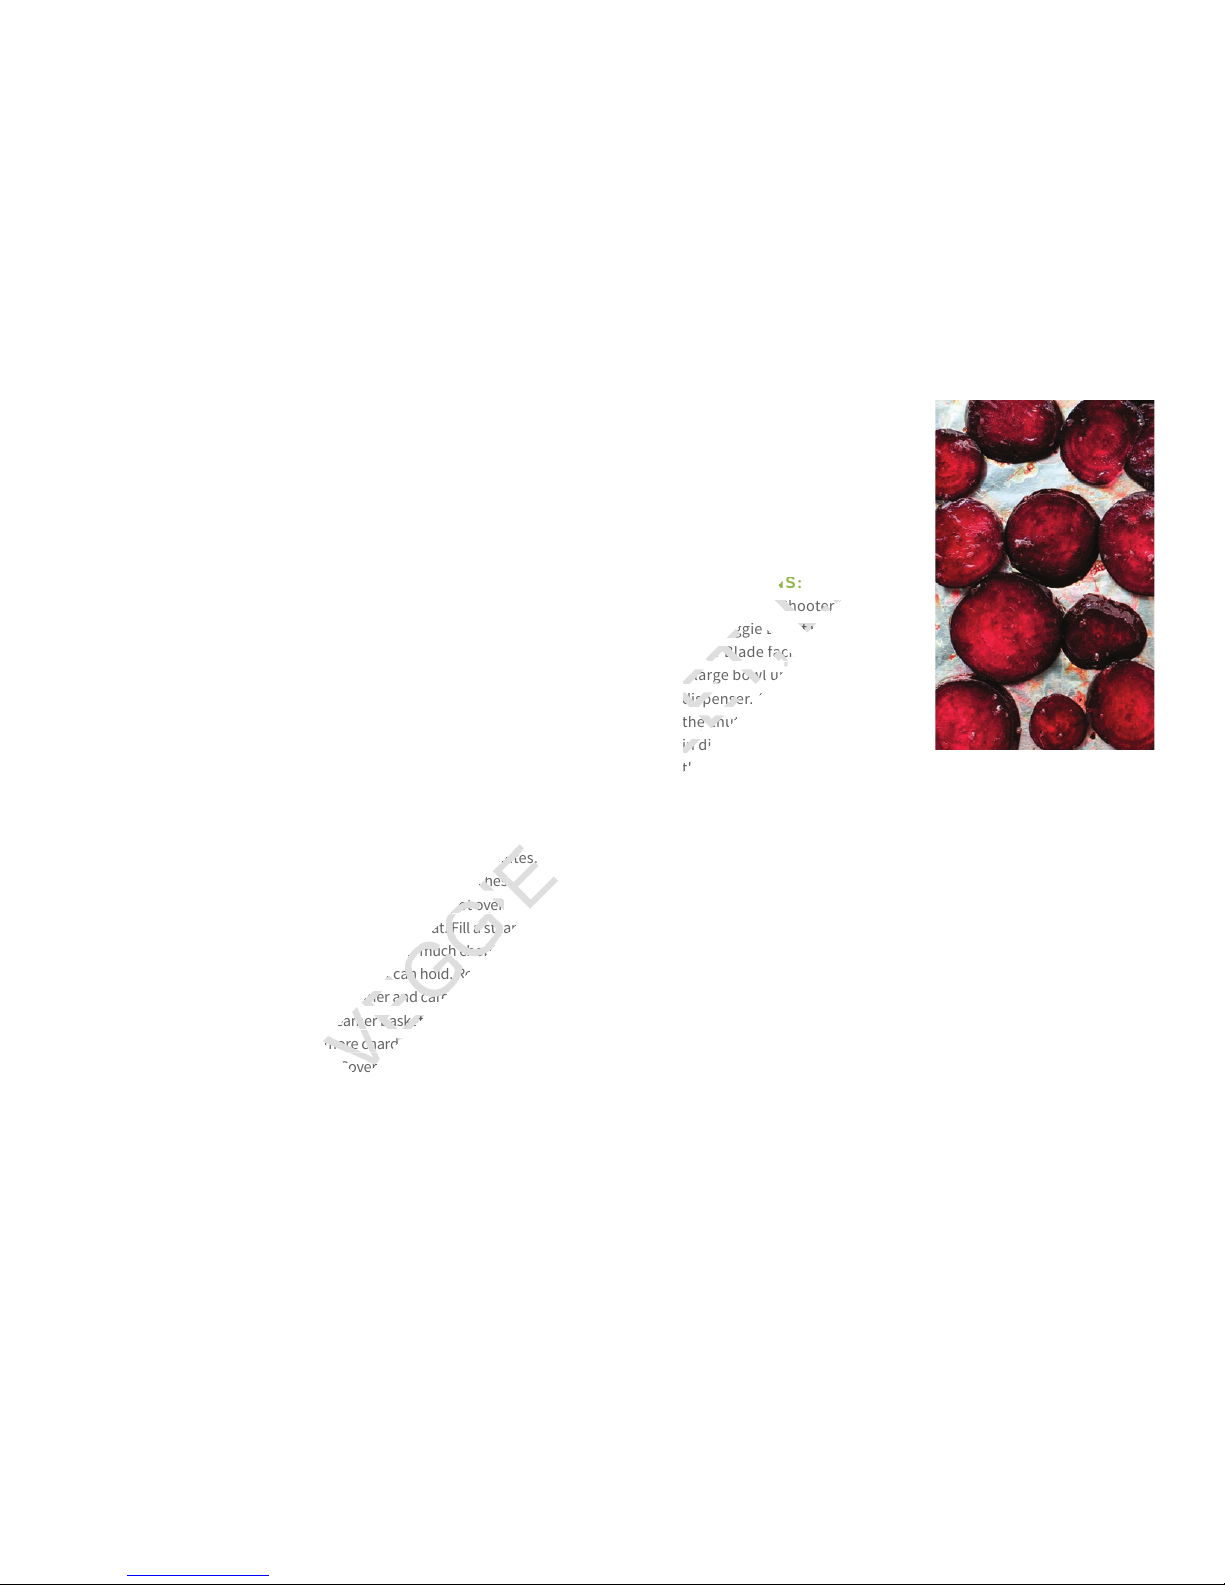
SLICED BEETS
MAKES 4-6 SERVINGS
INGREDIENTS:
4-6 beets, scrubbed
and trimmed
DIRECTIONS:
Assemble the Shooter Set of
your Veggie Bullet with the
Slicer Blade facing up. Place
a large bowl underneath the
dispenser. Add the first beet to
the chute. If your beet is larger
in diameter than the chute, trim
the sides so it can fit through.
Save the trimmings and cook
along with the silces. Steady
the beet with the Outer Pusher,
then turn the Power Base on,
using the Inner and Outer
Pusher assembly to guide the
vegetable to the blade. Repeat
for all beets.
Roasted: Preheat oven to
450°F. Line two baking sheets
with parchment paper and
spread beet slices in a thin
layer on each. Drizzle with
olive or sunflower seed oil and
season with salt and pepper.
Bake for 20-25 minutes the
edges are slightly crisp and
the center is tender, turning
with tongs halfway through to
avoid burning.
Steamed: Bring three inches
of water to boil in a pot over
medium-high heat. Fill a steamer
basket with as many beet slices as
it can hold. Reduce heat to simmer
and carefully lower the steamer
basket into the pot. Add more
slices if the pot will support them.
Cover the pot and let steam for
10-15 minutes until tender.
USED IN: Beet Salad (pg. 60)
VEGGIE
BULLET,
 Loading...