

Page 1
MODELS QTXEN050C • QTXEN090C • QTXEN110C • QTXEN150C
QTXEN SERIES
Page 1
ULTRA SILENT
TM
VENTILATION FAN
READ AND SAVE THESE INSTRUCTIONS
WARNING
TO REDUCE THE RISK OF FIRE, ELECTRIC SHOCK, OR INJURY TO
PERSONS, OBSERVE THE FOLLOWING:
1. Use this unit only in the manner intended by the manufacturer. If you
have questions, contact the manufacturer at the address or telephone
number listed in the warranty.
2. Before servicing or cleaning unit, switch power off at service panel
and lock the service disconnecting means to prevent power from
being switched on accidentally. When the service disconnecting
means cannot be locked, securely fasten a prominent warning device,
such as a tag, to the service panel.
3. Installation work and electrical wiring must be done by a qualified
person(s) in accordance with all applicable codes and standards,
including fire-rated construction codes and standards.
4. Sufficient air is needed for proper combustion and exhausting of
gases through the flue (chimney) of fuel burning equipment to prevent
backdrafting. Follow the heating equipment manufacturer’s guideline
and safety standards, and the local code authorities.
5. When cutting or drilling into wall or ceiling, do not damage electrical
wiring and other hidden utilities.
6. Ducted fans must always be vented to the outdoors.
7. Acceptable for use over a tub or shower when connected to a GFCI
(Ground Fault Circuit Interrupter) - protected branch circuit (ceiling
installation only).
8. This unit must be grounded.
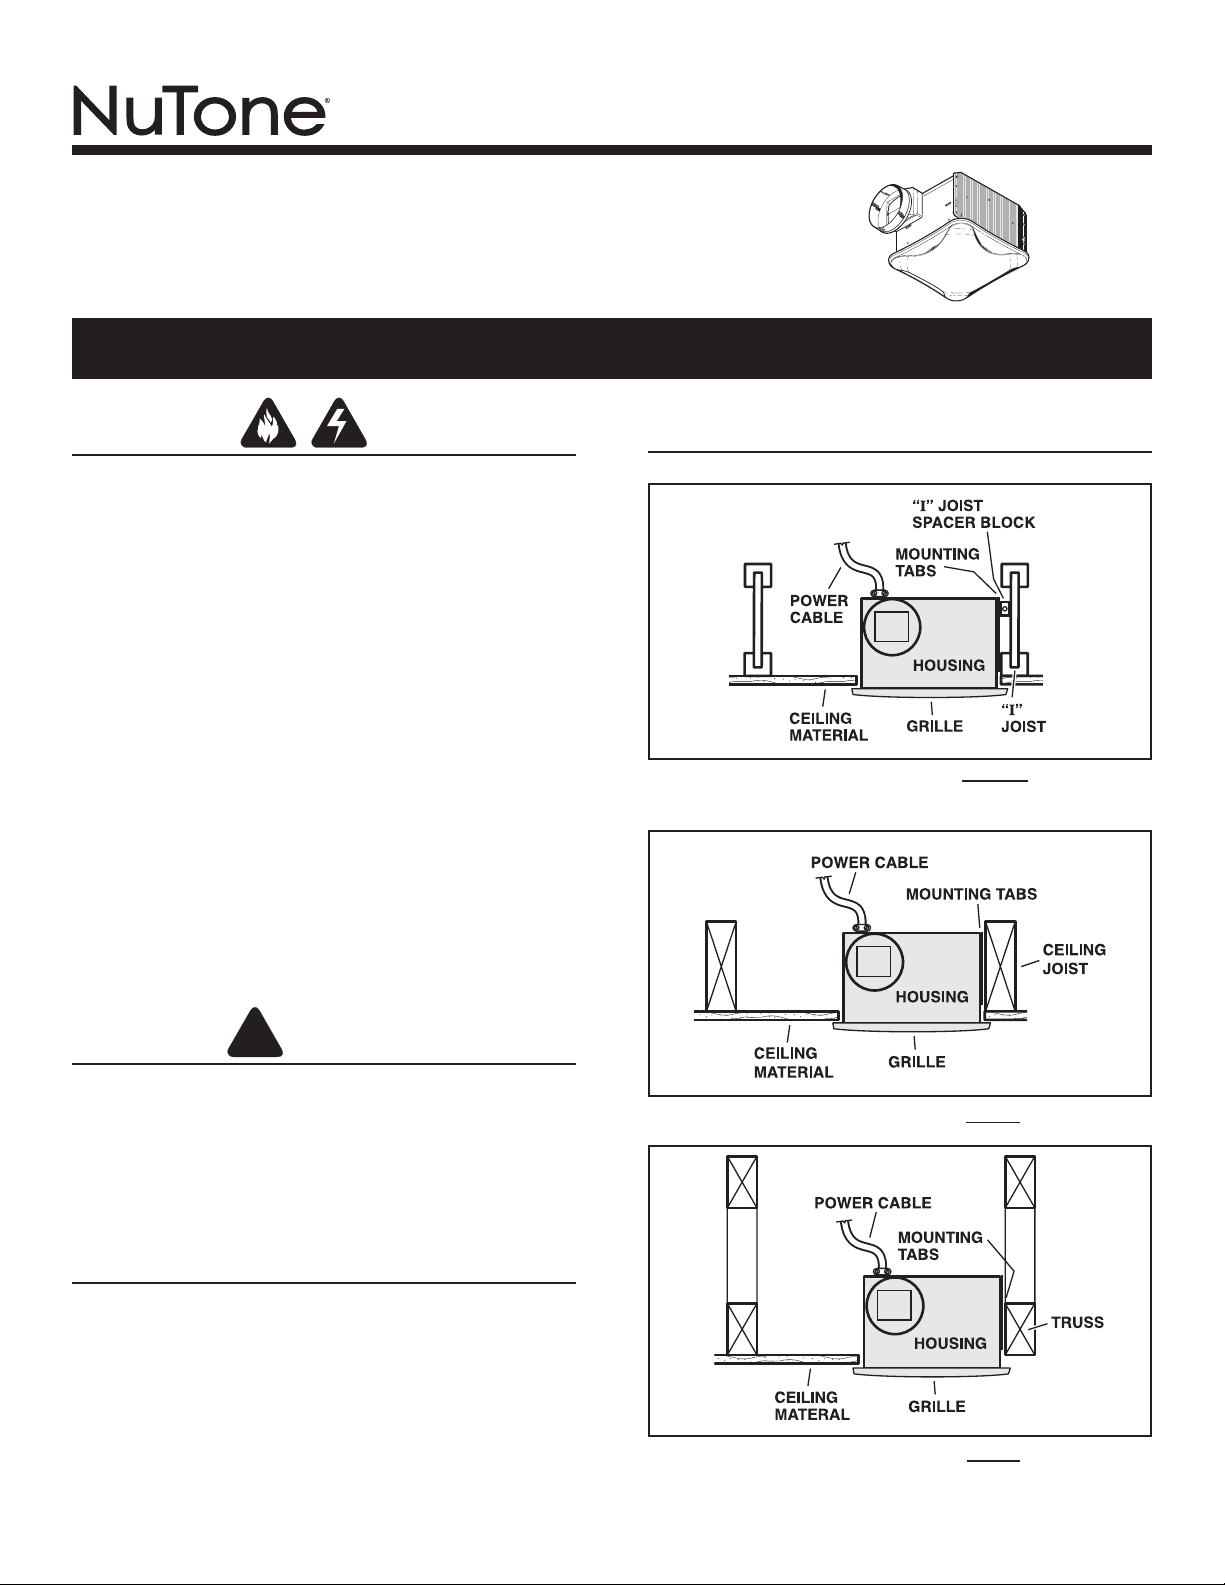
TYPICAL INSTALLATIONS
Housing mounted to I-joists.
Use I-joist spacer block (provided).
CAUTION
1. For general ventilating use only. Do not use to exhaust hazardous or
explosive materials and vapors.
2. To avoid motor bearing damage and noisy and/or unbalanced blower
wheels, keep drywall spray, construction dust, etc. off power unit.
3. Please read specification label on product for further information
and requirements.
!
Housing mounted to joists.
OPERATION
Use an on/off switch or speed control to operate this ventilator. See
“Connect Wiring” for details.
Housing mounted to truss.
INSTALLER: Leave this manual with the homeowner • HOMEOWNER: Cleaning and Maintenance on page 3
Page 2
MODELS QTXEN050C • QTXEN090C • QTXEN110C • QTXEN150C
Page 2
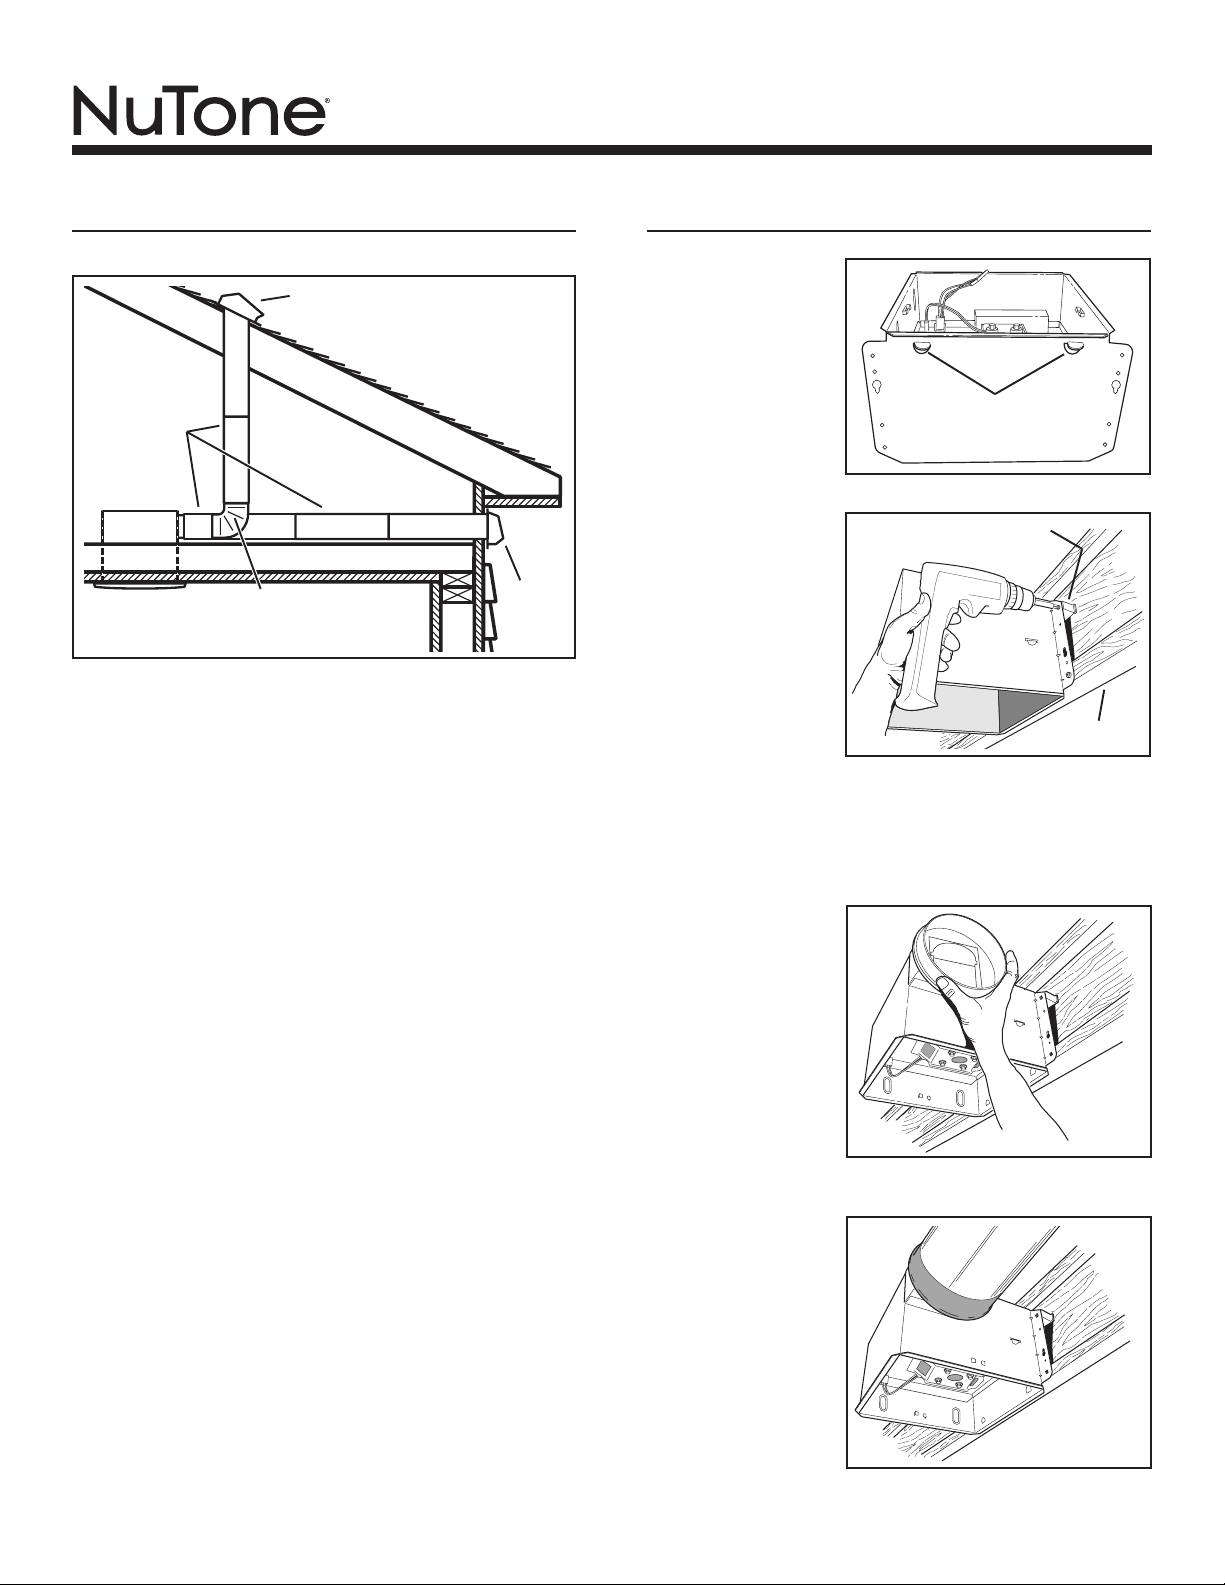
PLAN THE INSTALLATION
ROOF CAP
6-IN. (152.4 mm)
ROUND
DUCT
*
6-IN. (152.4 mm)
ELBOW
Purchase separately
*
The unit will operate most quietly and efficiently when located where
the shortest possible duct run and minimum number of elbows will be
needed.
Plan to supply the unit with proper line voltage and appropriate power
cable.
*
*
WALL
CAP
*
INSTALL HOUSING & DUCT
1. Bend
housing tabs.
Use pliers to bend
housing TABS out
to 900.
TABS
2. Mount
housing to
(use for mounting to I-Joist)
joist.
Hold housing in
place so that the
housing tabs
contact the bottom
of the joist. The
housing mounts
with four (4)
screws or nails.
Screw or nail
housing to joist
through lowest holes in each mounting flange, then through
highest holes. NOTE: Mounting to I-JOIST (shown) requires use
of SPACERS (included) between the highest hole of each
mounting flange and the I-joist.
SPACER
I-JOIST
3. Attach
damper / duct
connector.
Snap damper / duct
connector onto
housing. Make sure
connector is flush
with top of housing
and damper flap
falls closed.
4. Install 6-inch
(152.4 mm)
round
ductwork.
Connect 6-inch
(152.4 mm) round
ductwork to
damper / duct
connector. Run
ductwork to a roof
cap or wall cap.
Tape all ductwork
connections to
make them secure and air tight.
Page 3
MODELS QTXEN050C • QTXEN090C • QTXEN110C • QTXEN150C
Page 3
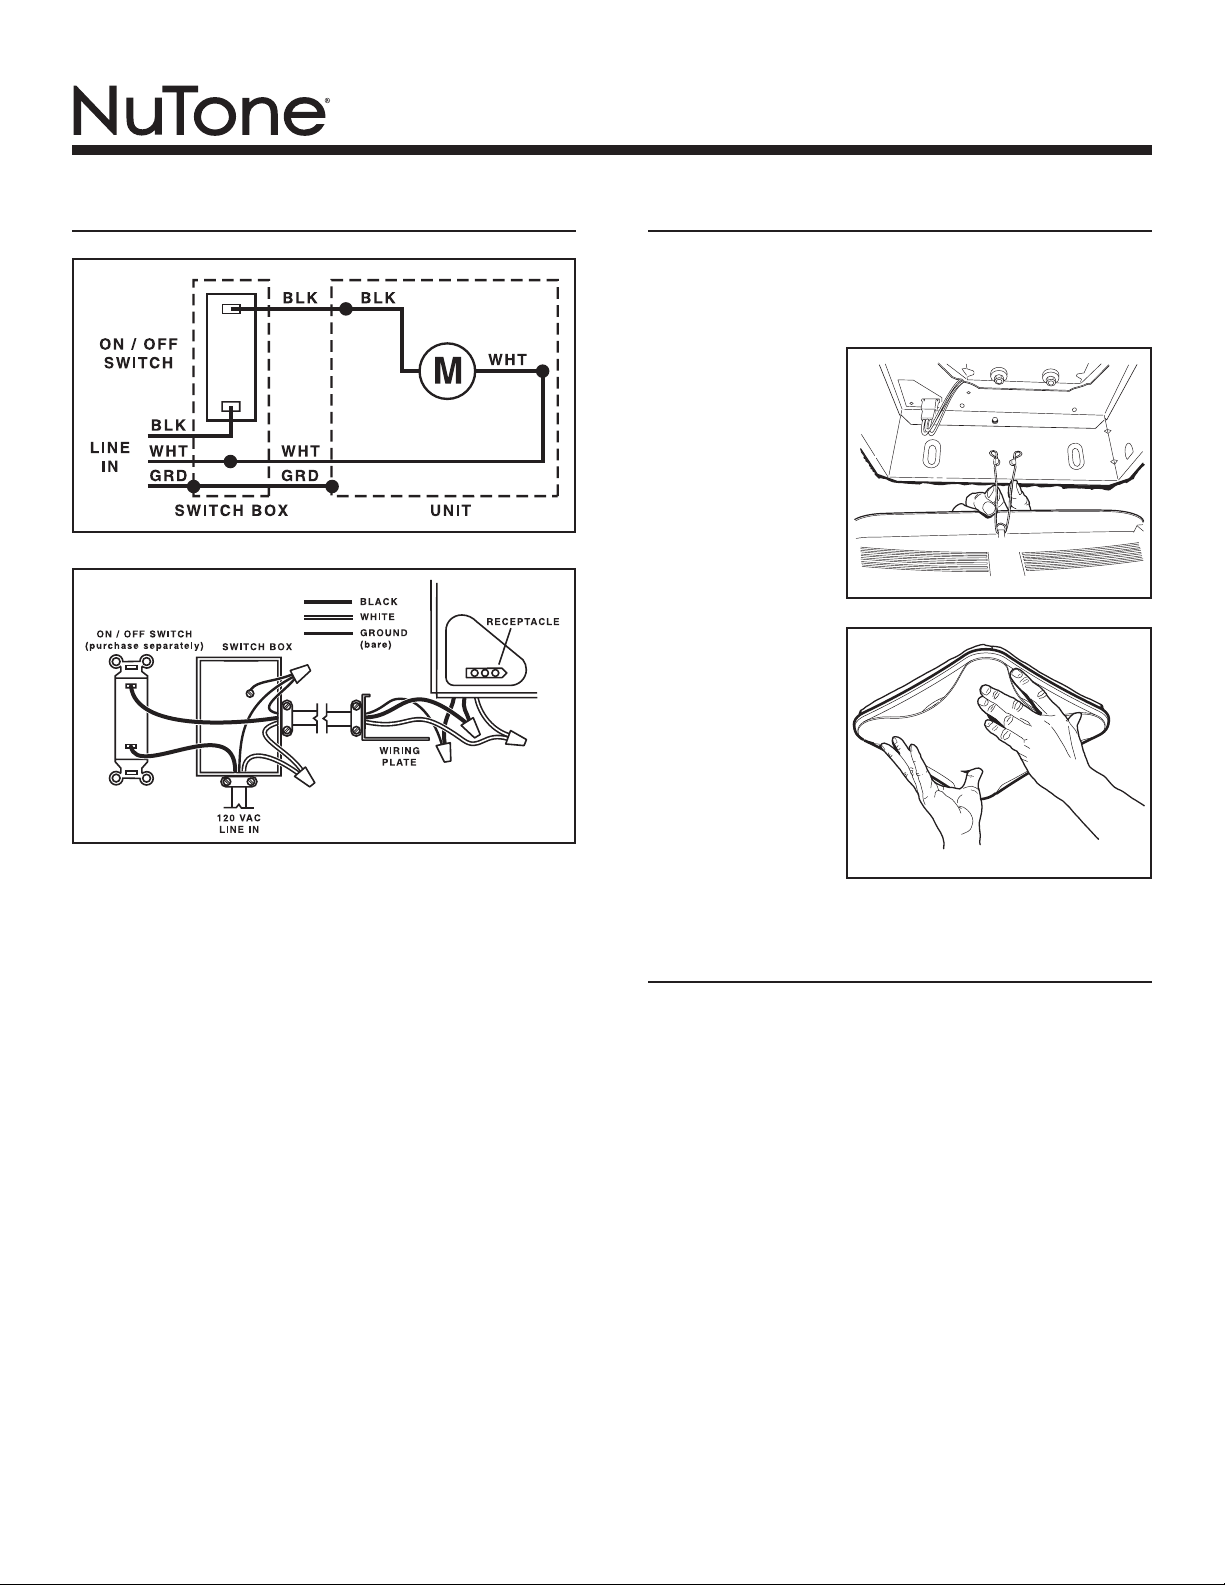
CONNECT WIRING
INSTALL GRILLE
6. Finish ceiling.
Install ceiling material. Cut out around housing.
7. Attach grille to
housing.
Squeeze grille
springs and insert
them into slots on
each side of
housing.
8. Push grille
against
ceiling.
5. Connect electrical wiring.
Run 120 VAC house wiring to installation location. Use proper UL
approved connector to secure house wiring to wiring plate.
Connect wires as shown in wiring diagrams.
CLEANING & MAINTENANCE
For quiet and efficient operation, long life, and attractive appearance lower or remove grille and vacuum interior of unit with the dusting brush
attachment.
The motor is permanently lubricated and never needs oiling. If the motor
bearings are making excessive or unusual noises, replace the motor
with the exact service motor. The blower wheel should also be replaced.
Page 4

SERVICE PARTS
MODELS QTXEN050C • QTXEN090C • QTXEN110C • QTXEN150C
Page 4
Key No. Part No. Description
1 97016466 Housing
2 97016450 Duct Connector - 6" (152.4 mm)
3 98010102 Wiring Plate
4 99170245 Screw, #8-18 X .375 (2 req’d)
5 97016583 Wire Panel/Harness Assembly
6 99020284 Blower Wheel
7 99080560 Motor (QTXEN050C)
99080575 Motor (QTXEN090C)
99080578 Motor (QTXEN110C)
99080565 Motor (QTXEN150C)
8 99100491 Isolator (4 req’d)
9 97016468 Motor Plate
10 99250959 Washer #8 (4 req’d)
11 99260558 Nut, Hex Lock #8-32 (4 req’d)
12 99500397 Insulation (QTXEN150C only)
13 99420648 Threaded Stud
(QTXEN150C only) (4req’d)
14 99260570 Plastic Nut
(QTXEN150C only) (4 req’d)
* 97016587 Blower Assembly (QTXEN050C)
* 97016731 Blower Assembly (QTXEN090C)
* 97016734 Blower Assembly (QTXEN110C)
* 97016591 Blower Assembly (QTXEN150C)
(includes key nos. 6 thru 14)
15 99140199 Grille Spring (2 req’d)
16 97016460 Grille Assembly (includes key no. 15)
17 99111293 Spacer (2 supplied)
SERVICE NOTE
To remove Blower Assembly:
Unplug motor (7).
Remove screw (4) from motor
plate (9) flange.
Find the single TAB on the
motor plate (located next to
the receptacle).
Push up near motor plate tab
while pushing out on side of
housing. Or insert a straightblade screwdriver into slot in
housing (next to tab) and
twist screwdriver.
TAB
Order service parts by “Part No.”
- not by “Key No.”
BROAN-NUTONE CANADA INC.
THREE YEAR LIMITED WARRANTY
Broan-NuTone Canada warrants to the original consumer purchaser of its products that such products will be free from defects in materials and workmanship for a
period of three (3) years from the date of original purchase. THERE ARE NO OTHER WARRANTIES, EXPRESSED OR IMPLIED, INCLUDING, BUT NOT LIMITED
TO, IMPLIED WARRANTIES OF MERCHANTABILITY OR FITNESS FOR A PARTICULAR PURPOSE.
During this three-year period, Broan-NuTone Canada will, at its option, repair or replace, without charge, any product or part which is found to be defective under
normal use and service.
THIS WARRANTY DOES NOT EXTEND TO FLUORESCENT LAMP STARTERS OR TUBES, BULBS OR BATTERIES, FILTERS, DUCT, ROOF CAPS, WALL CAPS
AND OTHER ACCESSORIES FOR DUCTING. This warranty does not cover (a) normal maintenance and service or (b) any products or parts which have been
subject to misuse, negligence, accident, improper maintenance or repair (other than by Broan-NuTone Canada or an authorized representative), faulty installation or
installation contrary to recommended installation instructions.
The duration of any implied warranty is limited to the three-year period as specified for the express warranty.
BROAN- NUTONE CANADA’S OBLIGATION TO REPAIR OR REPLACE, AT BROAN-NUTONE CANADA’S OPTION, SHALL BE THE PURCHASER'S SOLE AND
EXCLUSIVE REMEDY UNDER THIS WARRANTY. BROAN-NUTONE CANADA SHALL NOT BE LIABLE FOR INCIDENTAL, CONSEQUENTIAL OR SPECIAL
DAMAGES ARISING OUT OF OR IN CONNECTION WITH PRODUCT USE OR PERFORMANCE. This warranty supersedes all prior warranties.
To qualify for warranty service, you must (a) notify Broan-NuTone Canada at the address or telephone number stated below (b) give the model number and part
identification and (c) describe the nature of any defect in the product or part. At the time of requesting warranty service, you must present evidence of the original
purchase date.
Date of Installation Builder or Installer
Model Number and Product Description
For the location of your nearest Broan-NuTone Canada Inc. dealer:
Product model number • Date and proof of purchase • The nature of the difficulty
IF YOU NEED ASSISTANCE OR SERVICE:
Dial Toll Free: 1-888-882-7626
Please be prepared to provide:
1140 Tristar Drive, Mississauga, Ontario L5T 1H9
Broan-NuTone Canada Inc.
99043640A
Page 5

MODÈLES QTXEN050C • QTXEN090C • QTXEN110C • QTXEN150C
Â
VENTILATEUR ULTRA SILENT
SÉRIE QTXEN
LIRE ET CONSERVER CES INSTRUCTIONS
Page 1
MC
AVERTISSEMENT
POUR RÉDUIRE LE RISQUE D’INCENDIE, D’ÉLECTROCUTION OU DE
BLESSURES, OBSERVER LES RÈGLES SUIVANTES :
1. N’utiliser cet appareil que de la manière prévue par le fabricant. Pour
toute question, contacter le fabricant à l’adresse ou au numéro de
téléphone indiqué dans la garantie.
2. Avant de faire l’entretien de l’appareil ou de le nettoyer, couper
l’alimentation électrique au panneau principal et verrouiller le dispositif
de sectionnement pour éviter que l’on rétablisse le courant
accidentellement. Lorsque le dispositif de sectionnement ne peut
pas être verrouillé, attacher de manière sûre un avertissement,
comme une étiquette par exemple, au panneau principal.
3. L’installation et le câblage électrique doivent être effectués par une
ou des personnes qualifiées, en respectant tous les codes et toutes
les normes applicables, y compris les codes et normes de
construction pour les risques d’incendie.
4. Il faut suffisamment d’air pour obtenir une combustion et une
évacuation correctes des gaz par la cheminée d’un équipment brûlant
un combustible, afin d’éviter tout refoulement. Suivre les directives
et les normes de sécurité du fabricant de l’équipement de chauffage
et celles des autorités locales de codification.
5. Lorsque l’on découpe ou que l’on perce un mur ou un plafond, faire
attention à ne pas endommager le câblage électrique et les autres
installations qui y sont cachées.
6. Les ventilateurs possédant un conduit doivent toujours être
raccordés à un évent extérieur.
7. Si cet appareil doit être installé au-dessus d’une douche ou d’une
baignoire, il doit être conçu pour cette application et doit être raccordé
à une branche de circuit protégée par un disjoncteur différentiel
(installation au plafond seulement).
8. Cet appareil doit être mis à la terre.
INSTALLATIONS TYPES
CÂBLE
D'ALIMENTATION
MATÉRIAU
DU PLAFOND
LANGUETTES
DE FIXATION
BOÎTIER
GRILLE
Boîtier monté sur les solives en I
Utiliser l’espaceur (fourni).
C
BLE D'ALIMENTATION
BOÎTIER
MATÉRIAU
DU PLAFOND
GRILLE
ESPACEUR DE
SOLIVE EN
SOLIVE EN
LANGUETTES DE FIXATION
I
I
SOLIVE
DE PLAFOND
ATTENTION
1. Pour une utilisation de ventilation générale seulement. Ne pas l’utiliser
pour extraire des matières ou des vapeurs dangereuses ou
explosives.
2. Pour ne pas endommager les roulements du moteur et pour que la
roue de ventilateur ne soit pas déséquilibrée ou bruyante, éviter que
les pulvérisations pour placoplâtre, les poussières de construction,
etc., ne se déposent sur le moteur et la roue de ventilateur.
3. Lire l’étiquette des caractéristiques du produit pour d’autres
renseignements et obligations.
!
FONCTIONNEMENT
Utiliser un interrupteur marche/arrêt ou une commande de vitesse
pour faire fonctionner ce ventilateur. Voir la section « Connexion
électrique » pour plus de renseignements.
INSTALLATEUR : Laisser ce manuel au propriétaire
PROPRIÉTAIRE : Voir les renseignements sur l’utilisation et l’entretien à la page 3
Boîtier monté sur les solives
CÂBLE D'ALIMENTATION
LANGUETTES
DE FIXATION
BOÎTIER
MATÉRIAU
DU PLAFOND
GRILLE
Boîtier monté sur les fermes
FERME
Page 6

MODÈLES QTXEN050C • QTXEN090C • QTXEN110C • QTXEN150C
Page 2
PLANIFICATION DE
L’INSTALLATION
ÉVENT DE TOITURE
CONDUIT ROND
6 po (152,4mm)
Acheté séparément
*
Pour obtenir le fonctionnement le plus silencieux et le plus efficace de
l’appareil, utiliser le parcours de conduit le plus court et comportant un
nombre minimum de coudes.
Prévoir le raccord de l’appareil à la tension secteur appropriée au
moyen d’un câble d’alimentation adéquat.
*
COUDE
6 po (152,4 mm)
*
*
ÉVENT
MURAL
*
INSTALLATION DU BOÎTIER ET
DU CONDUIT
1. Plier les
languettes
du boîtier.
Uliliser des pinces
pour plier les
LANGUETTES du
boîtier à un angle
0
.
de 90
2. Monter le
boîtier sur
les solives.
Maintenir le boîtier
en place de manière
à ce que les
languettes du boîtier
entrent en contact
avec la partie
inférieure de la
solive. Monter le
boîtier au moyen de
quatre (4) vis ou
clous. Clouer ou visser le boîtier à la solive en insérant les vis ou
les clous dans les trous de montage inférieurs de chaque bride
de fixation, puis dans les trous supérieurs. NOTE : Le montage
du boîtier sur les SOLIVES EN I (voir l’illustration) nécessite
l’emploi d’ ESPACEURS (inclus) entre le trou le plus élevé de
chaque bride de fixation et la solive en I.
(Pour le montage
à la solive en I)
LANGUETTES
ESPACEUR
SOLIVE EN I
3. Fixer le
raccord de
conduit/
registre
Encliqueter le raccord
de conduit/registre
sur le boîtier.
S’assurer que le
raccord de conduit
est au même niveau
que le dessus du
boitier et que le
registre soit fermé.
4. Monter le
conduit rond
de 6 pouces
(152,4 mm).
Fixer un conduit
rond de 6 pouces
(152,4 mm) sur le
raccord de conduit/
registre. Rallonger
le conduit jusqu’à
un évent extérieur à
travers un toit ou un
mur. Fixer tous les
raccords de conduit à l’aide de ruban pour les assujettir et
pour qu’ils soient étanches et qu’ils restent en place.
Page 7

MODÈLES QTXEN050C • QTXEN090C • QTXEN110C • QTXEN150C
Page 3
CONNEXION ÉLECTRIQUE
INTERRUPTEUR
MARCHE / ARRÊT
NOIR
ENTRÉE
DE LIGNE
INTERRUPTEUR
MARCHE/ARRÊT
(acheté séparément)
BLANC
TERRE
BOÎTIER D'INTERRUPTEUR APPAREIL
ENTRÉE DE LIGNE
120 V. c.a.
NOIR
BLANC
TERRE
BOÎTIER D'INTERRUPTEUR
NOIR
NOIR
BLANC
TERRE
(cond. nu)
PLAQUE
DE CÂBLAGE
M
BLANC
PRISE DE COURANT
FIXATION DE LA GRILLE
6. Finir le plafond.
Poser le matériau du plafond. Couper le matériau autour du
boîtier.
7. Fixer la grille
au boîtier.
Comprimer les
ressorts de la grille
et les insérer dans
les fentes se
trouvant de chaque
côté du boîtier.
8. Enfoncer la
grille dans le
plafond
5. Connexion du câblage électrique
Faire passer l’alimentation électrique de 120 V c.a. jusqu’à
l’endroit où le ventilateur est installé. Utiliser un connecteur
homologué UL approprié pour connecter le câblage de la
maison à la plaque de câblage. Connecter les fils de la manière
indiquée dans le schéma de câblage.
UTILISATION ET ENTRETIEN
Pour assurer un fonctionnement silencieux et efficace de l’appareil,
en prolonger la durée utile et en conserver l’apparence – abaisser ou
enlever la grille, puis nettoyez l’intérieur de l’appareil à l’aide d’un
aspirateur muni de la brosse à épousseter.
Le moteur est lubrifié à vie. Aucune lubrification n’est nécessaire. Si
les roulements du moteur produisent des bruits excessifs ou
inhabituels, remplacer le moteur par un modèle semblable. Remplacer
également la roue de ventilateur.
Page 8

MODÈLES QTXEN050C • QTXEN090C • QTXEN110C • QTXEN150C
PIÈCES DE RECHANGE
Page 4
Légende N0 de pièce Description
1 97016466 Boîtier
2 97016450 Raccord de conduit de 6 po (152,4 mm)
3 98010102 Plaque de câblage
4 99170245 Vis n0 8-18 X 0,375 po (2 requ.)
5 97016583 Ensemble de boîte de raccordement/
distributeur électrique
6 99020284 Roue de ventilateur centrifuge
7 99080560 Moteur (QTXEN050C)
99080575 Moteur (QTXEN090C)
99080578 Moteur (QTXEN110C)
99080565 Moteur (QTXEN150C)
8 99100491 Coussinet isolant (4 requ.)
9 97016468 Plaque du moteur
10 99250959 Rondelle n0 8 (4 requ.)
11 99260558 Écrou de blocage hexagonal n0 8-32
(4 requ.)
12 99500397 Isolant (QTXEN150C seulement)
13 99420648 Goujon fileté
(QTXEN150C seulement) (4 requ.)
14 99260570 Écrou en plastique
(QTXEN150C seulement) (4 requ.)
* 97016587 Ensemble ventilateur (QTXEN050C)
* 97016731 Ensemble ventilateur (QTXEN090C)
* 97016734 Ensemble ventilateur (QTXEN110C)
* 97016591 Ensemble ventilateur (QTXEN150C)
(comprend nos de légende 6 à 14)
15 99140199 Ressort de grille (2 requ.)
16 97016460 Ensemble grille
(comprend no de légende 15)
17 99111293 Espaceur (2 fournis)
NOTE POUR L’ENTRETIEN
Pour enlever l’ensemble
ventilateur :
Débrancher le moteur (7).
Enlever la vis (4) de la bride
de la plaque du moteur (9).
Repérer la LANGUETTE sur
la plaque du moteur (située
près de la prise de courant).
Lever l’ensemble près de la
languette de la plaque du
moteur tout en appuyant sur
le côté du boîtier pour le
dégager, ou insérer un
tournevis à lame plate dans
une fente du boîtier (près de
la languette) et tourner le
tournevis.
Commander les pièces de rechange
en indiquant le numéro de pièce et
non le numéro de légende.
LANGUETTE
BROAN-NUTONE CANADA INC.
GARANTIE LIMITÉE DE TROIS ANS
Broan-NuTone Canada garantit à l’acheteur consommateur original, de ses produits qu’ils sont exempts de défauts reliés aux matériaux ou à la main-d’oeuvre pour
une période de trois (3) ans à compter de la date d’achat originale. IL N’Y A PAS D’AUTRES GARANTIES, EXPRIMÉES OU IMPLICITES, Y COMPRIS, MAIS SANS
SE LIMITER AUX GARANTIES IMPLICITES POUR FIN DE COMMERCIALISATION ET DE CONVENANCE DANS UN BUT PARTICULIER.
Pendant cette période de trois ans, Broan-NuTone Canada, à son choix, réparera ou remplacera, gratuitement, tout produit ou pièce qui s’avère défectueux dans des
conditions normales d’utilisation et d’entretien.
CETTE GARANTIE NE COUVRE PAS LES DÉMARREURS DE LAMPES FLUORESCENTES OU LES TUBES, LES AMPOULES OU LES BATTERIES, LES FILTRES,
LE CONDUIT, LES ÉVENTS DE TOITURE, LES ÉVENTS MURAUX ET LES AUTRE ACCESSOIRES DE CONDUIT. Cette garantie ne couvre pas (a) l’entretien et
le service normal ou (b) tout produit ou pièce endommagés par suite de mauvais usage, négligence, accident, entretien inapproprié ou réparation (autre que celle
effectuée par Broan-NuTone Canada ou un représentant autorisé), mauvaise installation ou installation contraire au mode d’installation recommandé.
La durée de toute garantie implicite est limitée à une période de trois ans telle qu’elle est spécifiée pour la garantie exprimée.
L’ENGAGEMENT DE BROAN-NUTONE CANADA DE RÉPARER OU DE REMPLACER, AU CHOIX DE BROAN-NUTONE CANADA, DOIT ÊTRE LA SEULE
OBLIGATION EXCLUSIVE EN VERTU DE CETTE GARANTIE. BROAN-NUTONE CANADA NE DOIT PAS ÊTRE TENUE RESPONSABLE DES DOMMAGES
DIRECTS, INDIRECTS OU SPÉCIAUX SURVENANT À CAUSE DE L’UTILISATION OU DE LA PERFORMANCE DE SES PRODUITS OU EN RAPPORT AVEC
CELLES-CI. Cette garantie annule toutes les garanties précédentes.
Pour obtenir le service après-vente aux fins de la garantie, vous devez (a) aviser Broan-NuTone Canada à l’adresse ou au numéro de téléphone ci-dessous,
(b) donner le numéro du modèle et l’identification de la pièce et (c) décrire la nature de tout défaut du produit ou de la pièce. Lorsque vous demanderez le service
après-vente aux fins de la garantie, vous devez présenter une preuve de la date d’achat originale.
Date d’installation Entrepreneur ou installateur
0
de modèle et description du produit
N
Pour connaître le Centre de service Broan-NuTone Canada Inc. autorisé indépendant le plus proche :
Garder à portée de la main : le numéro du modèle • la date et la preuve d’achat • le type de problème
POUR OBTENIR DE L’ASSISTANCE OU DU SERVICE :
Composez le numéro sans frais : 1 888 882-7626
1140 Tristar Drive, Mississauga, Ontario L5T 1H9
Broan-NuTone Canada Inc.
99043640A
 Loading...