

Page 1
MODELS SSQTXE080 • SSQTXE110
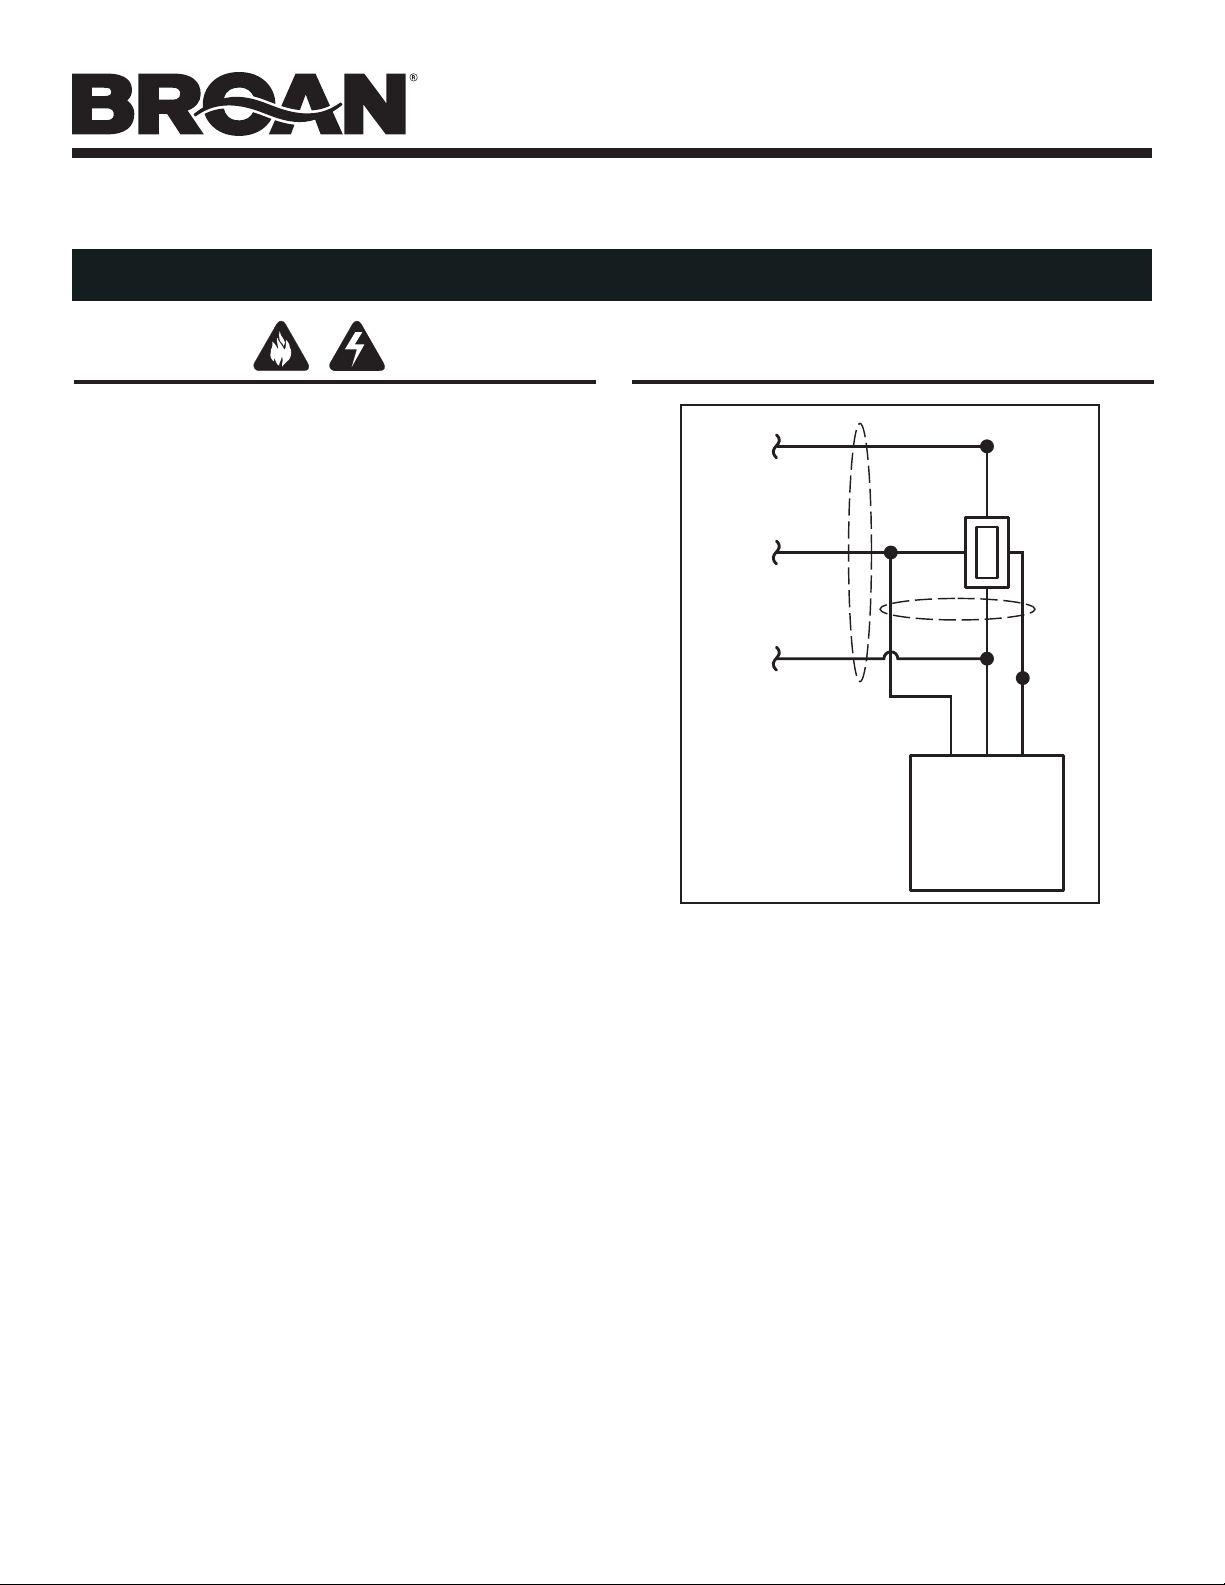
LINE
Black
NEUTRAL
White
LINE
Black
NEUTRAL
White
GROUND
Bare
Copper
GROUND
Green
WHITE
BLACK
CONTROL
FAN
LOAD
Red
GROUND
Bare
Copper
POWER
LINE
(GFCI
protected
if required)
Broan SmartSense® Intelligent Ventilation System
READ AND SAVE THESE INSTRUCTIONS
Page 1
WARNING
TO REDUCE THE RISK OF FIRE, ELECTRIC SHOCK, OR INJURY TO
PERSONS, OBSERVE THE FOLLOWING:
1. Use this unit only in the manner intended by the
manufacturer. If you have questions, contact the
manufacturer at the address or telephone number listed in
the warranty.
2. Before servicing or cleaning unit, switch power off at
service panel and lock the service disconnecting means
to prevent power from being switched on accidentally.
When the service disconnecting means cannot be locked,
securely fasten a prominent warning device, such as a tag,
to the service panel.
3. Installation work and electrical wiring must be done by a
qualified person(s) in accordance with all applicable codes
and standards, including fire-rated construction codes and
standards.
4. Sufficient air is needed for proper combustion and
exhausting of gases through the flue (chimney) of fuel
burning equipment to prevent backdrafting. Follow the
heating equipment manufacturer’s guideline and safety
standards such as those published by the National Fire
Protection Association (NFPA), and the American Society
for Heating, Refrigeration and Air Conditioning Engineers
(ASHRAE), and the local code authorities.
5. When cutting or drilling into wall or ceiling, do not damage
electrical wiring and other hidden utilities.
6. This unit must be grounded.
7. Do not connect this product as a load on a fan speed
control or light dimmer.
8. Read and understand entire instructions before proceeding
with installation.
INSTALLATION
Install controls and wire them as shown. Use following
guidelines:
• IMPORTANT:
QTXE080 Ultra Silent™ fan must be wired to SMSC080
SmartSense® control.
QTXE110 Ultra Silent™ fan must be wired to SMSC110
SmartSense® control.
• Use minimum 75 °C rated electrical wiring.
• Except for required neutral wire, these controls install
like normal switches. Make sure electrician knows each
control location must have a neutral wire. Neutral wire
at switch locations may be code requirement or regular
practice in installation municipality; but unless explicitly
specified, electrician might not install it.
• Specify deep device electrical boxes where controls will
be installed. These controls fit in most North American
electrical boxes; however, deep boxes provide extra
working space which eases installation. Labor cost
savings can offset higher box costs, which is usually
less than a dollar over standard depth boxes. Use boxes
that have 18 cu. in. minimum volume and are at least
1-1/2 in. deep.
•
All controls must be grounded using attached ground wire.
Page 2

CONTROL OPERATION
MODELS SSQTXE080 • SSQTXE110
Page 2
HOW SYSTEM WORKS
Broan SmartSense® system is design to provide recommended
ventilation for desirable indoor air quality. Related ventilation
requirements of *ANSI/ASHRAE Standard 62, “Ventilation
for Acceptable Indoor Air Quality” are fulfilled when this
system is installed accordingly. Ventilation level, which is
based on home square footage and number of bedrooms,
is easily set during installation. Power outages do not
affect settings, since they are stored in power independent
(nonvolatile) memory. Energy usage is optimized by
monitoring fan on-time and adjusting automatic ventilation
as needed. Indoor air quality is provided 24-hours a day,
7-days a week.
A single Broan SmartSense® system is powerful enough
to fulfill ventilation rates for larger homes; however, it is
recommended to use multiple installations for homes with
multiple bathrooms. Multiple installations provide distributed
ventilation throughout the home. Multiple installations are
linked and communicate through home’s normal power
circuits to form an indoor air quality network.
Broan SmartSense® controls are designed and factory set for
multiple installation homes. If a single Broan SmartSense®
system is installed then System Level must be adjusted
accordingly; otherwise, fan may run continuously.
Additional features, which are turned off at factory, include
Vacation and Disabled modes. Vacation mode temporarily
disables system until Master fan is manually turned on.
Disabled mode removes system from automatic ventilation
usage. Disabled mode does not affect manual operation.
* American National Standards Institute / American Society of Heating,
Refrigerating and Air-Conditioning Engineers
HOW LED WORKS
LED works differently in Run and Program modes.
Run Mode: LED is off when fan is off. LED is on when fan
is on manual ventilation; turned on by pressing ON paddle.
LED turns on briefly every second (fast-blink) when fan is
on automatic ventilation; turned on by Broan SmartSense®
system.
Program Mode: LED is on while SET button is pressed. LED
turns on and off every second (slow-blink) when system is in
Program mode.
INDOOR AIR QUALITY NETWORK
A single Broan SmartSense® system is powerful enough
to fulfill ventilation rates for larger homes; however, it is
recommended to use multiple installations for homes with
multiple bathrooms. Multiple installations provide distributed
ventilation throughout the home.
Multiple installations communicate through a home’s
electrical power circuits to form an indoor air quality network.
Communication pathways are called links. A phase coupler
is required if multiple installations are connected to both
electrical power phases.
Individual systems in a multiple installation home can
operate independently; although, it is recommended to link
multiple installations as an indoor air quality network. If a
single Broan SmartSense® system is installed or independent
system operation is desired, proceed with “How To Set System
Level” section. If System Level is not adjusted, fan may not shut
off automatically or run unnecessarily too long.
One Broan SmartSense® control is selected as system Master
during set up. Any control can be selected as system Master,
but typically master bathroom control is chosen. All controls
are factory set as system Masters.
SmartSense® controls that are linked to Master control are
called Slaves. One Master control can link up to 10 Broan
SmartSense® Slave controls.
HOW TO LINK SMARTSENSE® SYSTEM
1. Unless another control is designated and clearly marked
on frame, under decorative plate, or documented on this
instruction sheet as Master control, go to master bathroom
control.
2. Put Master control in Program mode; press and hold SET
button for 3-seconds and then release it.
Note: Master control will automatically exit Program mode
after 4-minutes.
3. LED should be turning on and off every second (slow-blink);
if it isn’t then repeat step 2.
4. Go to first control to link as a Slave.
5. Press and hold SET button until fan turns on. If fan doesn’t
turn on in less than 5-seconds, make sure Master is in
Program mode; which is indicated with LED slow-blink.
Note: At same time Slave turns on, Master fan turns on.
Master fan should turn off automatically in less than
15-seconds.
6. Release Slave’s SET button.
7. If Master control has not automatically turned Slave off
then press Slave’s OFF paddle to manually turn it off.
8. If there are more Slave installations then go back to
Master control and repeat steps 2 through 8.
Note: Master control will automatically exit Program
mode 4-minutes after it is started. Slave link needs to be
made before Master automatically exits Program mode
or Master control’s Program mode needs to be started
again.
Page 3
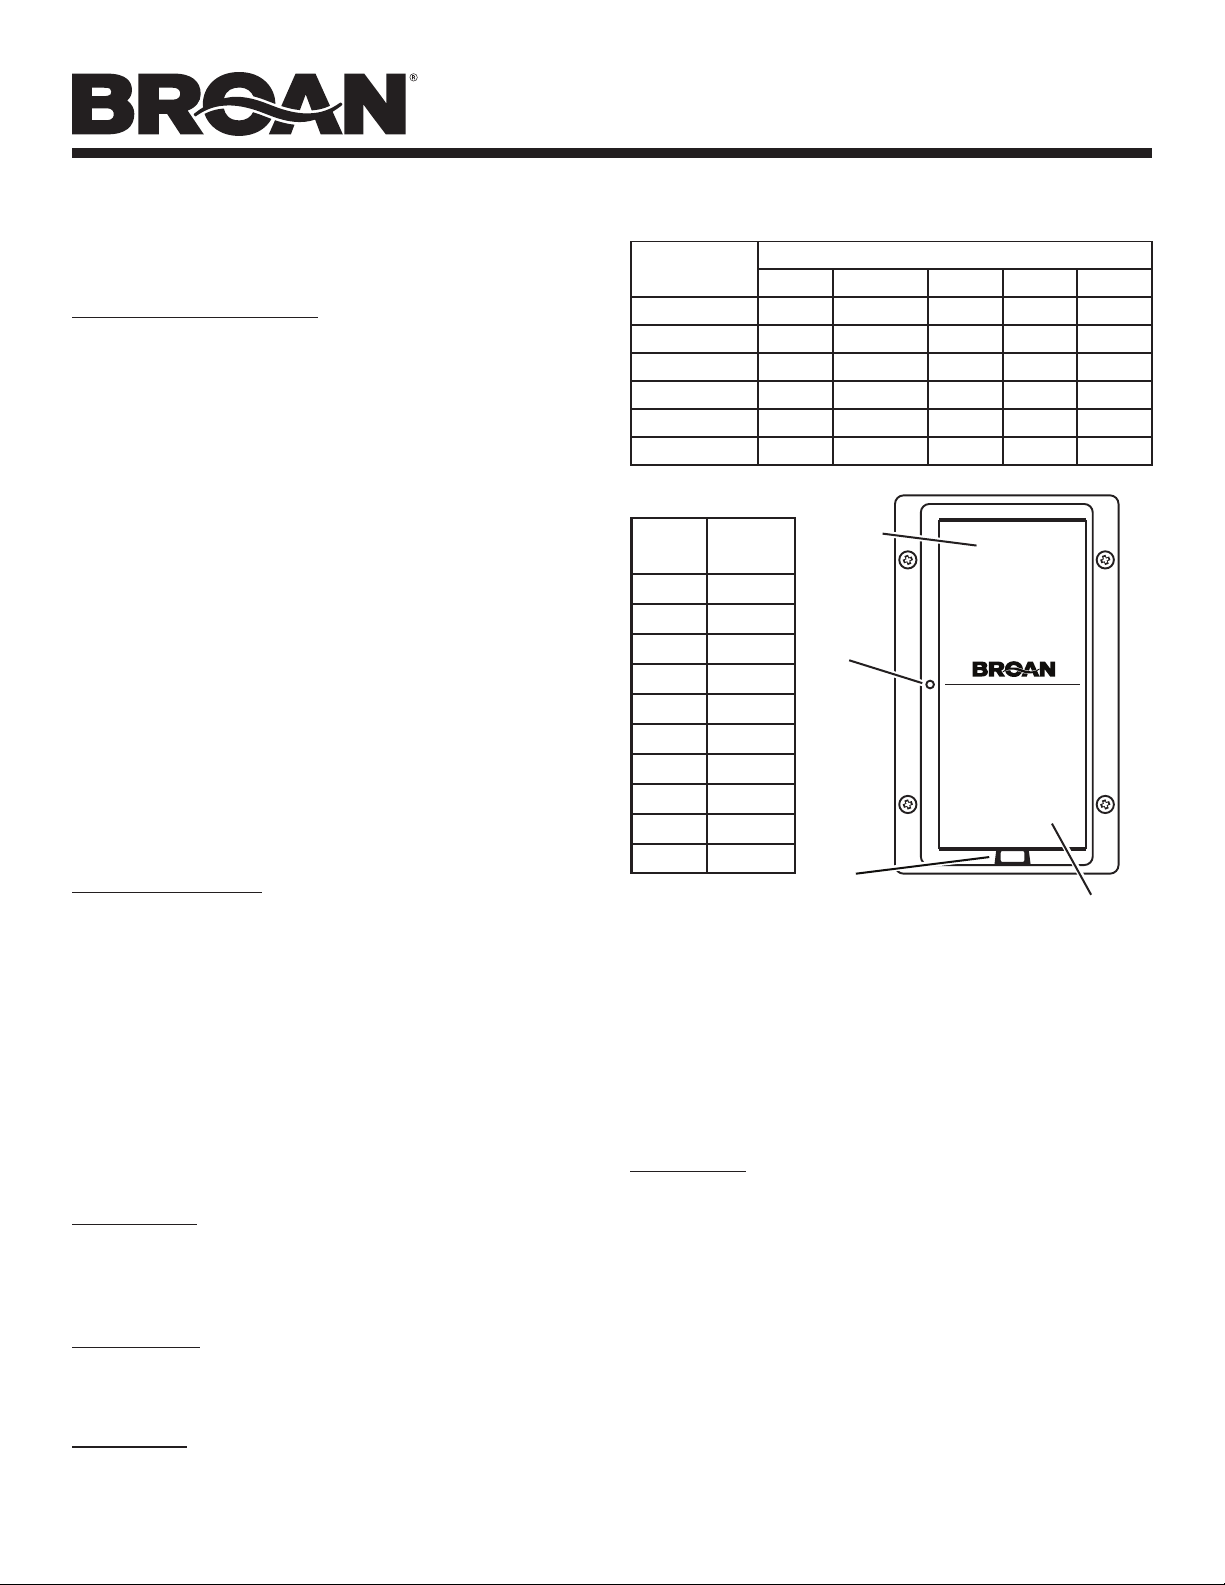
MODELS SSQTXE080 • SSQTXE110
Push to
turn ON
Push to
turn OFF
SmartSense
®
®
Page 3
HOW TO SET SYSTEM LEVEL
Installer, homeowner, or building science expert may adjust
Broan SmartSense® ventilation system level.
Initial Setting of System Level
1. System Level is only set in Master control. If home has
more than one installation then locate Master control;
it is usually in master bathroom or it should be clearly
marked on frame, under decorative plate, or documented
on this instruction sheet.
2. Circle, mark or highlight System Level in Table A using
home’s square footage and number of bedrooms.
Note: Building science experts may calculate different
rate based on air infiltration measurements.
3. Circle, mark or highlight same System Level in Table B.
4. If home’s System Level is 90 then next steps are not
necessary, since control’s System Level is set at factory
to 90.
5. Put Master control in Program mode; press and hold SET
button for 3-seconds and then release it.
6. LED should be turning on and off every second (slow-blink);
if it is not then repeat step 5.
7. Tap (press and release) ON or OFF paddle number of
times from Table B.
8. Exit Program mode; press and release SET button twice.
LED should turn off.
Changing System Level
1. Put Master control in Program mode; press and hold SET
button for 3-seconds and then release it.
2. LED should be turning on and off every second (slow-blink);
if it isn’t then repeat step 1.
3. Press Master control’s paddle ON once and OFF once;
System Level is changed back to factory setting of 90.
4. Tap (press and release) ON or OFF paddle number of
times from Table B.
5. Exit Program mode; press and release SET button twice.
LED should turn off.
FEATURE SELECTIONS
Vacation Mode: Used only with Master control. Temporarily
disables Broan SmartSense® system. Master control will not
automatically turn on its fan or any other system fan. After
Program mode exit, Vacation mode is cancelled when Master
control ON paddle is pressed.
Disabled Mode: When Master control is put in Disabled
mode, it will not turn on any fans for automatic ventilation
and recommended indoor air quality ventilation level is not
assured. Manual control fan operation is not affected.
Vacation Mode
1. Put Master control in Program mode; press and hold SET
button for 3-seconds and then release it.
TABLE A
Floor Area (ft2)
< 1500
1501 - 3000
3001 - 4500
4501 - 6000
6001 - 7500
> 7500
TABLE B
System
Level
165 +5
150 +4
135 +3
120 +2
105 +1
90 0
75 -1
60 -2
45 -3
30 -4
0 - 1 2 - 3 4 - 5 6 - 7 > 7
30 45 60 75 90
45 60 75 90 105
60 75 90 105 120
75 90 105 120 135
90 105 120 135 150
105 120 135 150 165
Taps
ON
PADDLE
LED
SET
BUTTON
Bedrooms
OFF
PADDLE
2. LED should be turning on and off every second (slow-blink);
if it is not then repeat step 1.
3. Press Master control’s ON paddle seven times.
LED should turn off and fan turn on. After 1 to 2-seconds
fan turns off.
Vacation mode is maintained after power loss. Vacation mode
is cancelled when Master control’s paddle is pressed ON and
then OFF; System will then resume automatic operation.
Disabled Mode
1. Put Master control in Program mode; press and hold SET
button for 3-seconds and then release it.
2. LED should be turning on and off every second (slow-blink);
if it is not then repeat step 1.
3. Press Master control’s OFF paddle seven times.
4. Exit Program mode; press and release SET button twice.
LED should turn off.
Disabled mode indefinitely keeps Broan SmartSense®
system from turning fan(s) on automatically to provide
recommended ventilation for desirable indoor air quality.
Disabled mode is maintained after power loss. Disabled
mode is cancelled when Master control System Level is reset
following instructions in section “Changing System Level.”
Page 4

MODELS SSQTXE080 • SSQTXE110
Push to
turn ON
Push to
turn OFF
SmartSense
®
®
Page 4
RESTORING POWER TO CONTROL
Control stores all settings in nonvolatile memory; so they
are not lost when power is removed. After power loss,
control will automatically return fan to its state (on or off)
before power was interrupted.
HOW TO RESTORE CONTROL FACTORY SETTINGS
This “Restore” procedure clears control’s nonvolatile
memory. It returns control to how it was shipped from
factory. All links are removed and any Feature selection is
turned off.
Links are unique for each device pair. If one end of the
link is removed, it is important to remove the other end.
“Restore” only removes links within the particular control.
Other link-end needs to be removed in other control.
CAUTION: Master must be “Restored” if any Slave control
is “Restored” or if any Slave control is removed from
System. Master and all Slave links must be reestablished
using “How To Link SmartSense® System” procedure.
1. Remove power from control’s “brain” by either: (a) turn
circuit breaker off or (b) pull SET button until it stays
extended by itself.
2. Wait 15-seconds.
3. Press and hold SET button.
4. For option (1a), turn circuit breaker on while SET button
is pressed. For option (1b), push in and press SET button
in one motion.
LED should be on while SET button is pressed.
5. Continue holding SET button for 3-seconds and then
release it.
LED should turn off.
6. After less than 5-seconds, fan and LED turn on for 1 to
2-seconds and then turn off; which confirms “Restore”
was successfully accomplished.
7. If control does not respond as described, start process
over with step 1.
HOW TO CHANGE CONTROL COLOR
An almond paddle/frame assembly is included.
1. Use magnetic #1 Philips screwdriver and remove (4)
screws from white paddle/frame.
2. Remove white paddle/frame from control.
Caution: Do not touch or put anything inside control
housing; control damage may result.
3. Place almond paddle/frame on control.
4. Replace (4) screws and lightly tighten them.
Caution: Do not over tighten screws; frame may crack.
PADDLE / FRAME
ASSEMBLY
SCREWS
SCREWS
WARRANTY
Broan-NuTone warrants to the original consumer purchaser of its products that such products will be free from defects in materials or workmanship for a period of one year from
the date of original purchase. THERE ARE NO OTHER WARRANTIES, EXPRESS OR IMPLIED, INCLUDING, BUT NOT LIMITED TO, IMPLIED WARRANTIES OF MERCHANTABILITY OR FITNESS
FOR A PARTICULAR PURPOSE.
During this one-year period, Broan-NuTone will, at its option, repair or replace, without charge, any product or part which is found to be defective under normal use and service.
THIS WARRANTY DOES NOT EXTEND TO FLUORESCENT LAMP STARTERS, TUBES, AND FUSES. This warranty does not cover (a) normal maintenance and service or (b) any products or
parts which have been subject to misuse, negligence, accident, improper maintenance or repair (other than by Broan-NuTone), faulty installation or installation contrary to recommended installation instructions.
The duration of an implied warranty is limited to the one-year period as specified for the express warranty. Some states do not allow limitation on how long an implied warranty
lasts, so the above limitation may not apply to you.
BROAN-NUTONE’S OBLIGATION TO REPAIR OR REPLACE, AT BROAN-NUTONE’S OPTION, SHALL BE THE PURCHASER’S SOLE AND EXCLUSIVE REMEDY UNDER THIS WARRANTY. BROANNUTONE SHALL NOT BE LIABLE FOR INCIDENTAL, CONSEQUENTIAL OR SPECIAL DAMAGES ARISING OUT OF OR IN CONNECTION WITH PRODUCT USE OR PERFORMANCE. Some states
do not allow the exclusion or limitation of incidental or consequential damages, so the above limitation may not apply to you.
This warranty gives you specific legal rights, and you may also have other rights, which vary from state to state. This warranty supersedes all prior warranties.
To qualify for warranty service, you must (a) notify Broan-NuTone at the address or telephone number below, (b) give the model number and part identification and (c) describe the
nature of any defect in the product or part. At the time of requesting warranty service, you must present evidence of the original purchase date.
Broan-NuTone LLC Hartford, Wisconsin www.broan.com 800-558-1711
BROAN-NUTONE ONE YEAR LIMITED WARRANTY
99044470A
Page 5

MODELOS SSQTXE080 • SSQTXE110
LÍNEA
Negro
NEUTRO
Blanco
NEUTRO
Blanco
TIERRA
Verde
BLANCO
NEGRO
CONTROL
VENTILADOR
CARGA
Rojo
TIERRA
Cobre
sin
aislamiento
TIERRA
Cobre
sin
aislamiento
LÍNEA DE
ENERGÍA
(con protección
GFCI, si se
requiere)
LÍNEA
Negro
Sistema de ventilación inteligente SmartSense® de Broan
LEA Y CONSERVE ESTAS INSTRUCCIONES
Página 5
ADVERTENCIA
PARA REDUCIR EL RIESGO DE INCENDIOS, DESCARGAS ELÉCTRICAS
O LESIONES PERSONALES, OBSERVE LAS SIGUIENTES PRECAUCIONES:
1. Use la unidad sólo de la manera indicada por el fabricante.
2. Antes de dar servicio a la unidad o de limpiarla, interrumpa el
3. Una o más personas calificadas deben realizar el trabajo de
4. Se necesita suficiente aire para que se lleve a cabo una
5. Al cortar o perforar a través de la pared o del techo, tenga cuidado
6. Esta unidad debe conectarse a tierra.
7. No conecte este producto como carga de un control de velocidad
8. Lea y entienda todas las instrucciones antes de continuar con
Si tiene preguntas, comuníquese con el fabricante a la dirección
o al número telefónico que se incluye en la garantía.
suministro eléctrico en el panel de servicio y bloquee los medios
de desconexión del servicio para evitar que la electricidad se
reanude accidentalmente. Cuando no sea posible bloquear los
medios de desconexión del servicio, fije firmemente una señal
de advertencia (como una etiqueta) en un lugar visible del panel
de servicio.
instalación y el cableado eléctrico, de acuerdo con todos
los códigos y normas correspondientes, incluidos los
códigos y normas de construcción específicos de protección
contra incendios.
combustión y una extracción adecuadas de los gases a
través del tubo de humos (chimenea) del equipo quemador
de combustible, con el fin de evitar el contratiro. Siga
las directrices y las normas de seguridad del fabricante
del equipo de calentamiento, como las publicadas por
la Asociación Nacional de Protección contra Incendios
(National Fire Protection Association, NFPA), la Sociedad
Americana de Ingenieros de Calefacción, Refrigeración y Aire
Acondicionado (American Society for Heating, Refrigeration
and Air Conditioning Engineers, ASHRAE) y las autoridades
normativas locales.
de no dañar el cableado eléctrico ni otros servicios ocultos.
de un ventilador o de un reductor de intensidad de luz.
la instalación.
INSTALACIÓN
Instale los controles y el cable tal como se indica en la figura. Guíese
por las siguientes pautas:
• IMPORTANTE:
El ventilador QTXE080 Ultra Silent™ debe cablearse al control
SMSC080 SmartSense®.
El ventilador QTXE110 Ultra Silent™ debe cablearse al control
SMSC110 SmartSense®.
• Utilice cable eléctrico con capacidad nominal mínima de 75 °C.
• Excepto cuando se requiere cable neutro, estos controles se instalan
como interruptores normales. Asegúrese de que el electricista
sepa cada ubicación de control que deba tener un cable neutro.
El cable neutro en las ubicaciones de los interruptores puede tener
un requisito de código o una práctica regular en la municipalidad
de la instalación; pero a menos que se especifique explícitamente,
el electricista podría no instalarlo.
• Especifique cajas eléctricas profundas para dispositivos en lugares
donde se instalarán los controles. Estos controles se ajustan a la
mayoría de las cajas eléctricas que se encuentran en América del
Norte; sin embargo, las cajas profundas brindan un espacio de
trabajo adicional, lo cual facilita la instalación. Los ahorros en el
costo de mano de obra pueden compensar los costos más altos de
las cajas, que por lo general es menos de un dólar sobre las cajas
con profundidad estándar. Utilice cajas que tengan un volumen
mínimo de 18 pulgadas cúbicas y con una profundidad mínima de
1 1/2 pulg.
• Todos los controles deben estar conectados a tierra con el cable
a tierra anexo.
Page 6

FUNCIONAMIENTO DEL CONTROL
MODELOS SSQTXE080 • SSQTXE110
Página 6
CÓMO FUNCIONA EL SISTEMA
El sistema SmartSense® de Broan está diseñado para suministrar
la ventilación recomendada para obtener la calidad deseada del
aire bajo techo. Los requisitos de ventilación relacionados de
la norma 62 de *ANSI/ASHRAE, “Ventilación para la calidad
aceptable del aire bajo techo” se cumplen cuando este sistema se
instala como corresponde. El nivel de ventilación, que se basa en
los pies cuadrados de la vivienda y en el número de habitaciones,
se configura fácilmente durante la instalación. Los cortes de
energía eléctrica no afectan los ajustes, puesto que se almacenan
en una memoria independiente de la electricidad (no volátil). El
uso de la energía se optimiza monitoreando el tiempo de encendido
del ventilador y ajustando la ventilación automática según sea
necesario. La calidad del aire bajo techo se suministra las 24 horas
del día, los 7 días de la semana.
Un solo sistema SmartSense® de Broan es lo suficiente poderoso
como para satisfacer los índices de ventilación en viviendas
grandes; no obstante, se recomienda usar instalaciones múltiples
en viviendas con varios baños. Las instalaciones múltiples
suministran una ventilación distribuida por toda la vivienda. Las
instalaciones múltiples se enlazan y comunican a través de los
circuitos eléctricos normales de la casa, para formar una red de
calidad del aire bajo techo.
Los controles SmartSense® de Broan están diseñados y configurados
en fábrica para viviendas con instalación múltiple. Si se instala un
solo sistema SmartSense® de Broan, entonces el nivel del sistema se
debe ajustar según corresponda; de otra manera, el ventilador podría
funcionar de manera continua.
Las funciones adicionales, que se desactivan en la fábrica, incluyen
modos de vacaciones y de desactivación. El modo de vacaciones
desactiva temporalmente el sistema hasta que el ventilador
maestro se enciende manualmente. El modo de desactivación hace
que el sistema deje de usar la ventilación automática. El modo de
desactivación no afecta el funcionamiento manual.
* Instituto Nacional Americano de Normas / Sociedad Americana de
Ingenieros de Calefacción, Refrigeración y Aire Acondicionado.
CÓMO FUNCIONA EL LED
El LED funciona de manera diferente en los modos de
Funcionamiento y Programa.
Modo de funcionamiento: El LED se apaga cuando el ventilador
se apaga. El LED se enciende cuando el ventilador está en modo
manual; se enciende presionando la paleta de encendido (ON).
El LED se enciende brevemente cada segundo (destello rápido)
cuando el ventilador está en ventilación automática; se enciende
con el sistema SmartSense® de Broan.
Modo de programa: El LED se enciende mientras se presiona el
botón SET (Ajustar). El LED se enciende y apaga cada segundo
(destello lento) cuando el sistema está en modo de Programa.
RED DE CALIDAD DE AIRE BAJO TECHO
Un solo sistema SmartSense® de Broan es lo suficiente poderoso
como para satisfacer los índices de ventilación en viviendas
grandes; no obstante, se recomienda usar instalaciones múltiples
en viviendas con varios baños. Las instalaciones múltiples
suministran una ventilación distribuida por toda la vivienda.
Las instalaciones múltiples se comunican a través de los circuitos
eléctricos de la vivienda, para formar una red de calidad de aire
bajo techo. Las rutas de comunicación se conocen como enlaces.
Se requiere un acoplador de fase si se conectan instalaciones
múltiples en ambas fases de la energía eléctrica.
Los sistemas individuales en una vivienda con instalaciones
múltiples pueden funcionar de manera independiente; aunque se
recomienda enlazar instalaciones múltiples como una red de calidad
de aire bajo techo. Si se instala un solo sistema SmartSense® de
Broan o si se desea un funcionamiento independiente de los sistemas,
proceda con la sección “Cómo configurar el nivel del sistema”. Si
no se ajusta el nivel del sistema, es posible que el ventilador no se
apague automáticamente o que funcione innecesariamente demasiado
tiempo.
Se seleccionó un control SmartSense® de Broan como maestro
del sistema durante la configuración. Cualquier control se puede
seleccionar como maestro del sistema, pero usualmente se elige el
control de la recámara principal. Todos los controles se configuran
en fábrica como maestros del sistema.
Los controles SmartSense® que se enlazan al control maestro se
llaman esclavos. Un control maestro se puede enlazar hasta con
10 controles esclavos SmartSense® de Broan.
CÓMO ENLAZAR EL SISTEMA SMARTSENSE
1. A menos que otro control esté diseñado y claramente marcado
en el bastidor, bajo la placa decorativa o documentado en esta
hoja de instrucciones como control maestro, vaya al control del
baño principal.
2. Ponga el control maestro en modo de programa; presione y
sostenga el botón SET durante 3 segundos y luego suéltelo.
Nota: El control maestro saldrá automáticamente del modo de
programa después de 4 minutos.
3. El LED debe encenderse y apagarse cada segundo (destello
lento); si no, entonces repita el paso 2.
4. Vaya al primer control para enlazarlo como esclavo.
5. Presione y sostenga el botón SET hasta que encienda el
ventilador. Si el ventilador no enciende en menos de 5 segundos,
asegúrese de que el maestro esté en modo de programa, lo cual
se indica con el destello lento del LED.
Nota: Al mismo tiempo que se enciende el esclavo, el ventilador
maestro se enciende. El ventilador maestro debe apagarse
automáticamente en menos de 15 segundos.
6. Suelte el botón SET del esclavo.
7. Si el control maestro no ha apagado automáticamente al esclavo,
entonces presione la paleta OFF para apagarlo manualmente.
8. Si hubiera más instalaciones esclavas, entonces regrésese al
control maestro y repita los pasos del 2 al 8.
Nota: El control maestro saldrá automáticamente del modo
de programa después de 4 minutos de encender. El enlace
esclavo necesita realizarse antes de que el maestro salga
automáticamente de modo de programa, o el modo de programa
del control maestro necesitará iniciarse otra vez.
®
Page 7

MODELOS SSQTXE080 • SSQTXE110
Presione para
ENCENDER
Presione para
APAGAR
SmartSense
®
®
Página 7
CÓMO CONFIGURAR EL NIVEL DEL SISTEMA
El instalador, el propietario de la vivienda o el experto en
construcción pueden ajustar el nivel del sistema de ventilación
SmartSense® de Broan.
Configuración inicial del nivel del sistema
1. El nivel del sistema sólo se puede configurar en control maestro.
Si la vivienda tiene más de una instalación, entonces localice
el control maestro; usualmente en el baño principal, o debe
estar marcado claramente en el bastidor, debajo de la placa
decorativa, o documentarse en esta hoja de instrucciones.
2. Encierre en un círculo, marque o resalte el nivel del sistema en
la Tabla A usando los pies cuadrados de la casa y la cantidad
de habitaciones.
Nota: Los expertos en construcción pueden calcular diferentes
tasas con base en las mediciones de infiltración de aire.
3. Encierre en un círculo, marque o resalte el mismo nivel de
sistema en la Tabla B.
4. Si el nivel del sistema de la vivienda es 90, entonces no es
necesario realizar los siguientes pasos, dado que el nivel del
sistema de control está ajustado en fábrica en 90.
5. Ponga el control maestro en modo de programa; presione y
sostenga el botón SET durante 3 segundos y luego suéltelo.
6. El LED debe encenderse y apagarse cada segundo (destello
lento); si no, entonces repita el paso 5.
7. Golpee ligeramente (presione y suelte) la paleta ON u OFF la
cantidad de veces indicada en la Tabla B.
8. Salga del modo de programa; presione y suelte dos veces el
botón SET. El LED debe apagarse.
Cambio del nivel del sistema
1. Ponga el control maestro en modo de programa; presione y
sostenga el botón SET durante 3 segundos y luego suéltelo.
2. El LED debe encenderse y apagarse cada segundo (destello
lento); si no, entonces repita el paso 1.
3. Presione una vez la paleta ON y una vez OFF en el control
maestro; el nivel de sistema cambia otra vez al ajuste de fábrica
de 90.
4. Golpee ligeramente (presione y suelte) la paleta ON u OFF la
cantidad de veces indicada en la Tabla B.
5. Salga del modo de programa; presione y suelte dos veces el
botón SET. El LED debe apagarse.
SELECCIONES DE FUNCIONES
Modo de vacaciones: Se utiliza solamente con el control maestro.
Inhabilita temporalmente el sistema SmartSense® de Broan.
El control maestro no enciende automáticamente su ventilador o
cualquier otro ventilador del sistema. Después de que salga del
modo de programa, el modo de vacaciones se cancela cuando se
presiona la paleta ON del control maestro.
Modo de desactivación: Cuando el control maestro se pone en modo
de desactivación, no encenderá ningún ventilador para ventilación
automática y no se garantiza el nivel de ventilación con la calidad
de aire bajo techo recomendada. El funcionamiento del ventilador
de control manual no se afecta.
Modo de vacaciones
1. Ponga el control maestro en modo de programa; presione y
sostenga el botón SET durante 3 segundos y luego suéltelo.
2. El LED debe encenderse y apagarse cada segundo (destello
lento); si no, entonces repita el paso 1.
TABLA A
Área del piso
(pies2)
< 1500
1501 - 3000
3001 - 4500
4501 - 6000
6001 - 7500
> 7500
TABLA B
Nivel del
sistema
0 - 1 2 - 3 4 - 5 6 - 7 > 7
30 45 60 75 90
45 60 75 90 105
60 75 90 105 120
75 90 105 120 135
90 105 120 135 150
105 120 135 150 165
PALETA
Golpecitos
(APAGADO)
Recámaras
OFF
165 +5
150 +4
135 +3
LED
120 +2
105 +1
90 0
75 -1
60 -2
45 -3
30 -4
BOTÓN
PARA CONFIGURAR
PALETA OFF
(APAGADO)
3.
Presione siete veces la paleta ON (encendido) del control maestro.
El LED debe apagarse y el ventilador debe encenderse. Después
de 1 a 2 segundos, el ventilador se apaga.
El modo de vacaciones se mantendrá después de un corte de
electricidad. El modo de vacaciones se cancela cuando se presiona
la paleta del control maestro en ON y luego en OFF; el sistema
reanudará el funcionamiento automático.
Modo de desactivación
1. Ponga el control maestro en modo de programa; presione y
sostenga el botón SET durante 3 segundos y luego suéltelo.
2. El LED debe encenderse y apagarse cada segundo (destello
lento); si no, entonces repita el paso 1.
3.
Presione siete veces la paleta OFF (apagado) del control maestro.
4. Salga del modo de programa; presione y suelte dos veces el
botón SET.
El LED debe apagarse.
El modo de desactivación impide indefinidamente que el sistema
SmartSense® de Broan encienda los ventiladores automáticamente
para suministrar una ventilación recomendada para tener la
calidad deseada del aire bajo techo. El modo de desactivación
se mantendrá después de un corte de electricidad. El modo de
desactivación se cancela cuando el nivel del sistema de control
maestro se reinicie siguiendo las instrucciones en la sección
“Cambio del nivel del sistema”.
Page 8

MODELOS SSQTXE080 • SSQTXE110
Presione para
ENCENDER
Presione para
APAGAR
SmartSense
®
®
Página 8
RESTABLECIMIENTO DE LA ENERGÍA AL CONTROL
El control almacena todos los ajustes en la memoria no volátil,
así que no se pierden cuando se pierde la electricidad. Después
de una pérdida de energía, el control regresará automáticamente
al ventilador a su estado (encendido o apagado) antes de que se
interrumpiera la energía.
CÓMO RESTAURAR LOS AJUSTES DE FÁBRICA
DEL CONTROL
Este procedimiento de “Restaurar” despeja la memoria no volátil
del control. Regresa el control a como estaba cuando se envió de
la fábrica. Todos los enlaces se eliminan y se apaga la selección
de cualquier función.
Los enlaces son exclusivos para cada par de dispositivos. Si se
elimina un extremo del enlace, es importante eliminar el otro
extremo. “Restaurar” sólo elimina los enlaces dentro del control
particular. Es necesario eliminar otro extremo de enlace en
otro control.
PRECAUCIÓN: El maestro debe “restaurarse” si algún control
esclavo es “restaurado” o si algún control esclavo se elimina
del sistema. Los enlaces maestro y todos los esclavos deben
reestablecerse usando el procedimiento “Cómo enlazar el
sistema SmartSense®”.
1. Desconecte la electricidad del “cerebro” del control mediante:
(a) Desactive el interruptor automático de circuitos o (b) estire
el botón SET (ajustar) hasta que se mantenga encendido por
sí mismo.
2. Espere 15 segundos.
3. Presione y sostenga el botón SET.
4. Para la opción (1a) encienda el interruptor automático de
circuitos mientras tiene presionado el botón SET. Para la opción
(1b), empuje y presione el botón SET en un movimiento.
El LED se enciende mientras se presione el botón SET
(Ajustar).
5. Continúe sosteniendo el botón SET durante 3 segundos y luego
suéltelo.
El LED debe apagarse.
6. Después de menos de 5 segundos, el ventilador y el LED se
encienden de 1 a 2 segundos, y luego se apagan; esto confirma
que se logró una restauración exitosa.
7. Si el control no responde tal como se describió, inicie el proceso
en el paso 1.
CÓMO CAMBIAR EL COLOR DEL CONTROL
Se incluye un conjunto de paleta/bastidor color almendra.
1. Utilice un desarmador Phillips #1 magnético y retire los cuatro
(4) tornillos de la paleta/bastidor color blanco.
2. Quite la paleta/bastidor color blanco del control.
Precaución: No toque ni ponga nada dentro del bastidor de
control; puede dañarse el control.
3. Coloque la paleta/el bastidor color almendra sobre el control.
4. Reemplace los cuatro (4) tornillos y apriételos ligeramente.
Precaución: No apriete los tornillos en exceso; el bastidor se
puede agrietar.
CONJUNTO DE
PALETA/BASTIDOR
TORNILLOS
TORNILLOS
GARANTÍA
Broan-NuTone le garantiza al consumidor comprador original de sus productos que tales productos estarán libres de defectos en materiales o mano de obra por un período de un
año a partir de la fecha de compra original. NO HAY OTRAS GARANTÍAS EXPLÍCITAS O IMPLÍCITAS, INCLUYENDO, PERO NO LIMITADAS A GARANTÍAS IMPLÍCITAS DE COMERCIALIZACIÓN
O APTITUD PARA UN PROPÓSITO PARTICULAR.
Durante este período de un año, Broan-NuTone reparará o cambiará, a su opción y sin cobro, cualquier producto o pieza que se encuentre defectuosa bajo uso y servicio normal.
ESTA GARANTÍA NO SE EXTIENDE A ARRANCADORES DE LÁMPARAS FLUORESCENTES Y TUBOS. Esta garantía no cubre (a) mantenimiento y servicio normales o (b) cualquier producto
o pieza que hayan sido sometidos a uso equivocado, negligencia, accidente, mantenimiento o reparación indebida (excepto por Broan-NuTone), instalación defectuosa o instalación
contraria a las instrucciones de instalación.
La duración de cualquier garantía implícita se limita a un período de un año según se especifica en la garantía explícita. Algunos estados no permiten limitación a la duración de
una garantía implícita, por lo que esta limitación tal vez no se aplica al caso suyo.
LA OBLIGACIÓN DE BROAN-NUTONE DE REPARAR O CAMBIAR, A OPCIÓN DE BROAN-NUTONE, SERÁ EL ÚNICO Y EXCLUSIVO REMEDIO AL COMPRADOR BAJO ESTA GARANTÍA.
BROAN-NUTONE NO SERÁRESPONSABLE POR DAÑOS INCIDENTALES, CONSECUENTES, O ESPECIALES QUE SURJAN DE O EN RELACIÓN A EL USO O DESEMPEÑO DEL PRODUCTO.
Algunos estados no permiten la exclusión o limitación de daños incidentales o consecuentes, por lo que esta limitación o exclusión tal vez no se aplica en su caso.
Esta garantía le da derechos legales específicos, y usted puede tener otros derechos que varían de estado a estado. Esta garantía reemplaza todas las garantías anteriores.
Para calificar para servicio bajo esta garantía, usted debe (a) notificar a Broan-NuTone en la dirección o al teléfono abajo, (b) dar el número de modelo y la identificación de pieza
y (c) describir el defecto en el producto o pieza. Al solicitar servicio bajo la garantía, usted debe presentar evidencia de la fecha de compra original.
Broan-NuTone LLC Hartford, Wisconsin www.broan.com 800-558-1711
GARANTÍA LIMITADA DE BROAN-NUTONE DE UN AÑO
99044470A
 Loading...