

Page 1
INSTALLATION & OPERATING INSTRUCTIONS
READ AND SAVE THESE INSTRUCTIONS
WIRED / WIRELESS
DOOR CHIME
PUSHBUTTON
To register this product, visit: www.nutone.com
THIS PACKAGE INCLUDES:
n Cast Metal Escutcheon
n Wired Pushbutton
n Wireless Pushbutton and Battery
n Mounting Hardware
WIRED PUSHBUTTON INSTALLATION
WARNING
TO REDUCE THE RISK OF FIRE, ELECTRIC SHOCK, OR INJURY
•
TO PERSONS, OBSERVE THE FOLLOWING:
Use this unit only in the manner intended by the manufacturer. If you
•
have questions, contact the manufacturer at the address or telephone
number listed in the warranty.
Before servicing or cleaning unit, switch power off at service panel and
•
lock the service disconnecting means to prevent power from being
switched on accidentally. When the service disconnecting means
cannot be locked, securely fasten a prominent warning device, such
as a tag, to the service panel.
Installation work and electrical wiring must be done by a qualified
•
person(s) in accordance with all applicable codes and standards,
including fire-rated construction codes and standards.
When cutting or drilling into wall or ceiling, do not damage electrical
•
wiring and other hidden utilities.
Use NuTone® 16 volt transformer with a minimum rating of 10 VA
•
(purchase separately).
When stapling wires to studs or joists, do not allow staples to cut
•
through wire insulation.
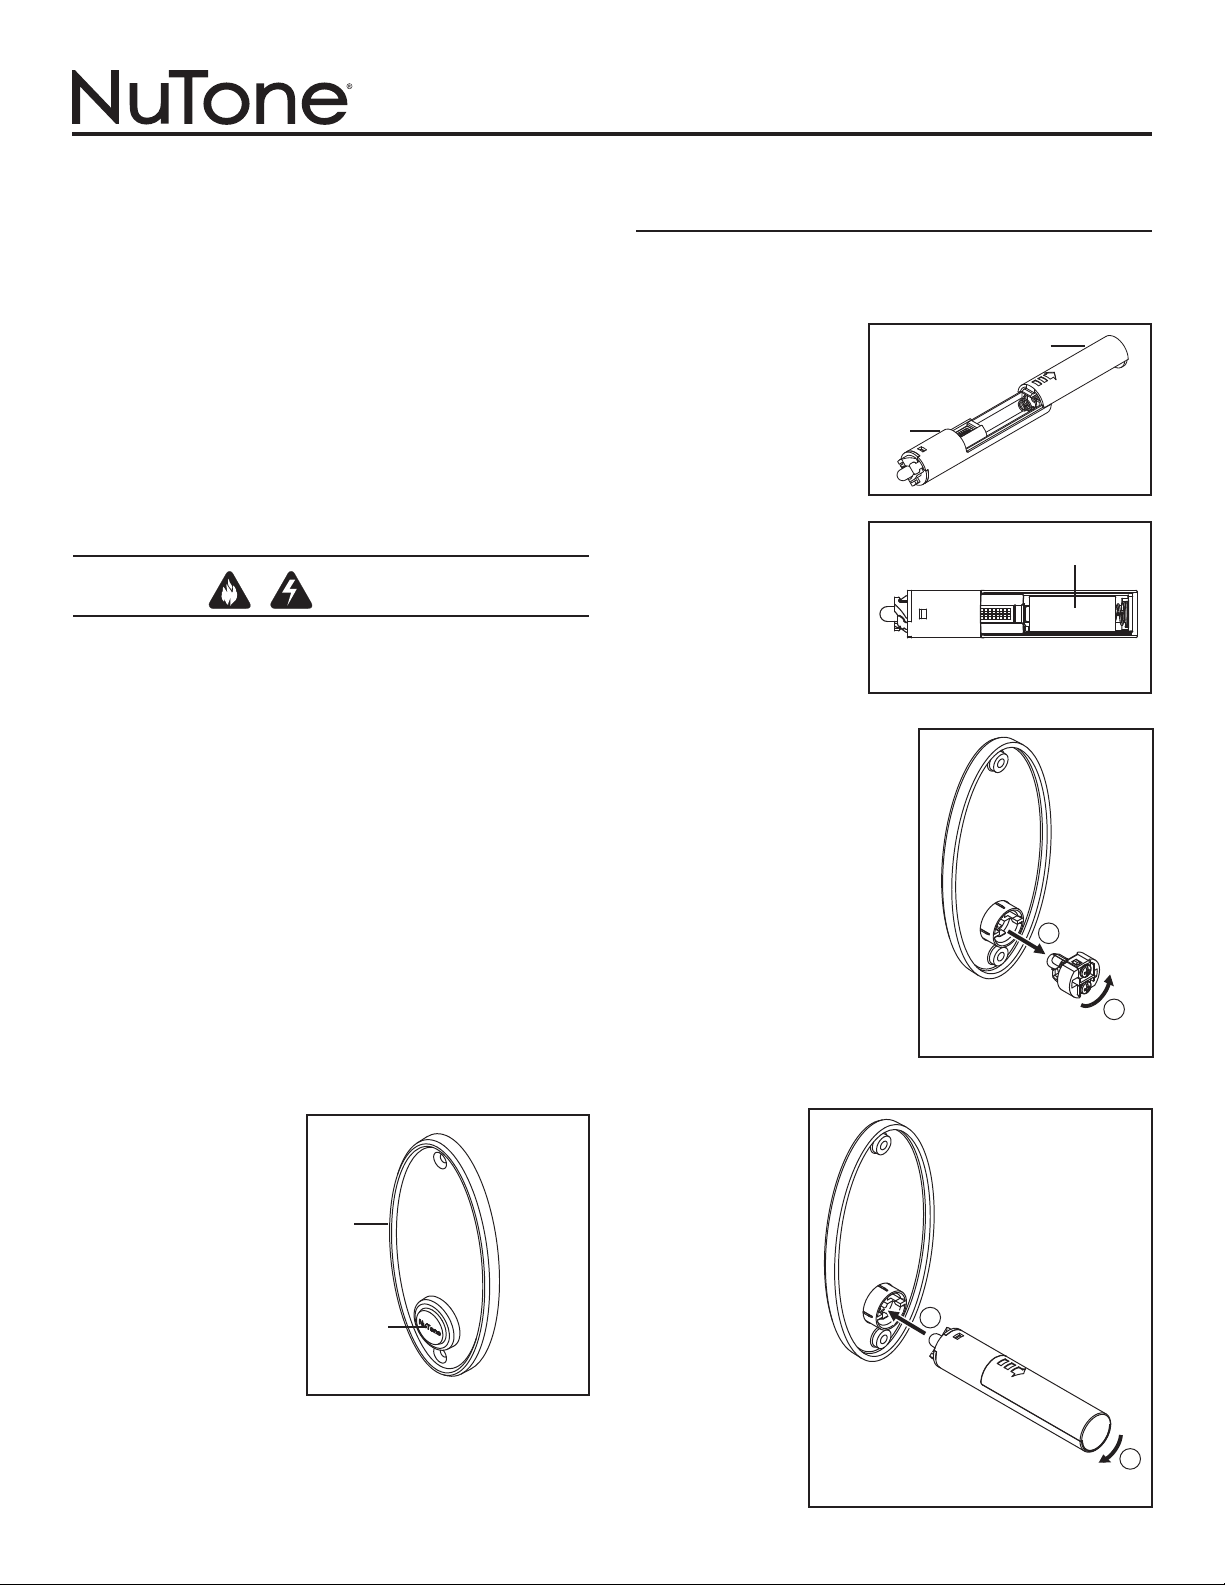
WIRELESS PUSHBUTTON
INSTALLATION
The wireless pushbutton (C) is compatible with NuTone wireless
chimes. (Purchase separately) Refer to installation instructions
provided with wireless chime.
1. Open battery cover (D)
by sliding it in direction
indicated by arrow.
(Figure 2)
C
2. Install battery (E) into
wireless pushbutton.
(Figure 3)
3. Remove wired pushbutton
mechanism from pushbutton /
escutcheon assembly by
turning pushbutton mechanism
counterclockwise and pulling it
out. (Figure 4)
D
FIGURE 2
E
+ -
FIGURE 3
2
1
FIGURE 4
1. Select pushbutton location
and drill a straight and
level 3/4” (19 mm) hole, 1”
(25 mm) deep.
2. Make sure that push button
assembly (A) is inserted
fully into escutcheon (B).
(Figure 1) Install chime
and transformer wires to
pushbutton terminals.
3. Install escutcheon/
pushbutton assembly
into hole and secure with
hardware provided.
4. Restore power at service entrance and press pushbutton to sound
chime.
B
A
FIGURE 1
4. Insert wireless
pushbutton
mechanism and
twist clockwise.
(Figure 5)
5. Test operation.
Hold wireless
pushbutton near
chime and press
pushbutton. If
chime does not
sound - see a.
through c. on
page 2.
1
1
2
FIGURE 5
Page 2

If chime does not sound when wireless pushbutton is pushed:
a. Confirm that code settings on chime mechanism and
wireless pushbutton are the same. (Figure 6)
WIRELESS PUSHBUTTON - EXAMPLE CODE SETTING
CODE SET
SWITCHES 1-6
1 8
{
BATTERY REPLACEMENT
Wireless Chime
Replace batteries following door chime instructions.
Wireless Pushbutton
Remove wireless pushbutton / escutcheon assembly from wall and follow
Step 1 in section titled “Wireless Pushbutton Installation”. Replace battery
with one N Cell, 1.5V alkaline battery. Close battery cover and re-install
wireless pushbutton / escutcheon assembly with hardware.
{
CODE SET
SWITCHES 1-6
WIRELESS CHIME - EXAMPLE CODE SETTING
(Chime will have jumpers or switches)
WIRELESS
CHIME
JUMPERS
JUMPERS REMOVED (OFF) FROM 2, 4, 6
WIRELESS
SWITCHES
SWITCHES 2, 4, 6 IN OFF POSITION
b. Verify proper installation batteries in chime mechanism and
pushbutton. (Figure 3)
c. Check condition of batteries in chime mechanism and pushbutton.
Replace if required.
6. Close battery cover on wireless pushbutton.
7. To install wireless pushbutton / escutcheon assembly, drill a straight
and level 3/4” diameter x 3-1/2” deep hole.
8. Insert wireless pushbutton / escutcheon assembly into hole and
secure to wall using hardware provided.
More than one pushbutton can be used with NuTone wireless chimes.
Refer to Figure 7 to assign a door or tune to each wireless pushbutton.
WIRELESS PUSHBUTTON - ASSIGN TUNE(S) OR DOOR(S)
1 8
CODE SET SWITCHES 7 & 8
ON
Models
LA203WH
LA203RWH
LA204WH
LA204RWH
LA205WH 1 Note 2 Note 3 Note 4 Note
LA206WH
LA522WH
LA532WH
LA533WH
LA600WH Front Back Front Back
7 8
{
7 8
1 2 3 4 5 6ON7 8
SWITCHES 2, 4, 6
IN OFF POSITION
{
ON
{
CHIME
123456
FIGURE 6
7 8
7 8
FIGURE 7
ADDITIONAL WIRELESS DOOR
CHIMES & PUSHBUTTONS
When installing other Wireless Door Chime sets, select different code
settings to avoid interference. If you want all chimes to ring at the same
time, set chimes to the same code settings.
TROUBLESHOOTING FOR WIRELESS
INSTALLATIONS
The range of the door chime depends on location, temperature and battery
condition. If you are having problems with this product, please try the
solutions listed below.
Chime rings on its own:
• A neighbor may have a wireless chime set with the same code settings.
Change the chime and pushbutton code settings. (Figure 6)
Chime doesn’t sound:
• Make sure the pushbutton and the chime code settings are the same.
• Check the batteries in the chime and wireless pushbutton. (Figure 3, 6)
Batteries are OK, but chime does not work when installed:
• Mounting the chime or pushbutton directly on metal, concrete or near
metal studs reduces the range.
• Do not mount the chime too close to ground level concrete slabs which
may also reduce the range. Mount the chime away from the floor.
• Try different locations for the chime closer to the pushbutton. Also, try
to orient the chime at a different angle to increase the range. Range is
most effective to the sides of the pushbutton.
The user is cautioned that changes or modifications not expressly
approved by the party responsible for regulatory compliance
could void the user’s authority to operate this equipment.
Regulatory Information
WARRANTY
NuTone warrants to the original consumer purchaser of its products that such products
will be free from defects in materials or workmanship for a period of one year from the
date of original purchase. THERE ARE NO OTHER WARRANTIES, EXPRESS OR IMPLIED,
INCLUDING, BUT NOT LIMITED TO, IMPLIED WARRANTIES OF MERCHANTABILITY OR
FITNESS FOR A PARTICULAR PURPOSE.
During this one-year period, NuTone will, at its option, repair or replace, without charge,
any product or part which is found to be defective under normal use and service.
THIS WARRANTY DOES NOT EXTEND TO FLUORESCENT LAMP STARTERS, TUBES,
HALOGEN AND INCANDESCENT BULBS, FUSES, FILTERS, DUCTS, ROOF CAPS, WALL
CAPS AND OTHER ACCESSORIES FOR DUCTING. This warranty does not cover (a) normal
maintenance and service or (b) any products or parts which have been subject to misuse,
negligence, accident, improper maintenance or repair (other than by NuTone), faulty installation or installation contrary to recommended installation instructions.
The duration of any implied warranty is limited to the one-year period as specified for the
express warranty. Some states do not allow limitation on how long an implied warranty
lasts, so the above limitation may not apply to you.
NUTONE’S OBLIGATION TO REPAIR OR REPLACE, AT NUTONE’S OPTION, SHALL BE
THE PURCHASER’S SOLE AND EXCLUSIVE REMEDY UNDER THIS WARRANTY. NUTONE
SHALL NOT BE LIABLE FOR INCIDENTAL, CONSEQUENTIAL OR SPECIAL DAMAGES
ARISING OUT OF OR IN CONNECTION WITH PRODUCT USE OR PERFORMANCE. Some
states do not allow the exclusion or limitation of incidental or consequential damages, so
the above limitation or exclusion may not apply to you.
This warranty gives you specific legal rights, and you may also have other rights, which
vary from state to state. This warranty supersedes all prior warranties.
To qualify for warranty service, you must (a) notify NuTone at the address or telephone
number below, (b) give the model number and part identification and (c) describe the
nature of any defect in the product or part. At the time of requesting warranty service, you
must present evidence of the original purchase date.
Broan-NuTone LLC, 926 W. State Street, Hartford, Wisconsin 53027
www.nutone.com 888-336-6151
2
NUTONE ONE YEAR LIMITED WARRANTY
99528433B
Page 3

INSTRUCCIONES DE INSTALACIÓN Y OPERACIÓN
LEA Y CONSERVE ESTAS INSTRUCCIONES
BOTÓN PARA TIMBRE
DE PUERTA CABLEADO /
INALÁMBRICO
Para registrar este producto, visite: www.nutone.com
ESTE PAQUETE CONTIENE:
n Escudete de metal vaciado
n Botón cableado
n Botón inalámbrico y pila
n Herraje de montaje
INSTALACIÓN DEL BOTÓN
CABLEADO
ADVERTENCIA
PARA REDUCIR EL RIESGO DE INCENDIOS, DESCARGAS
•
ELÉCTRICAS O LESIONES PERSONALES, SIGA LAS SIGUIENTES
PRECAUCIONES:
Use la unidad solo de la manera indicada por el fabricante. Si tiene
•
preguntas, comuníquese con el fabricante a la dirección o al número
telefónico que se incluye en la garantía.
Antes de dar servicio a la unidad o de limpiarla, interrumpa el suministro
•
eléctrico en el panel de servicio y bloquee los medios de desconexión
del servicio para evitar que la electricidad se reanude accidentalmente.
Cuando no sea posible bloquear los medios de desconexión del servicio,
fije firmemente una señal de advertencia (como una etiqueta) en un lugar
visible del panel de servicio.
Una o más personas calificadas deben realizar el trabajo de instalación
•
y el cableado eléctrico, de acuerdo con todos los códigos y normas
correspondientes, incluidos los códigos y normas de construcción
específicos de protección contra incendios.
Al cortar o perforar a través de la pared o del cielo raso, tenga cuidado de
•
no dañar el cableado eléctrico ni otros servicios ocultos.
Utilice un transformador NuTone
•
mínima de 10 VA (se compra por separado).
Cuando engrape los cables a los montantes o a las vigas, no permita que
•
las grapas perforen el aislamiento de los cables.
1. Seleccione la ubicación del
botón y perfore un orificio
recto y nivelado de ¾ pulg.
(19 mm) y 1 pulg. (25 mm)
de profundidad.
2. Asegúrese de que el
conjunto del botón (A) esté
totalmente insertado en
elescudete (B). (Figura 1)
Instale el timbre y los cables
del transformador en los
terminales del botón.
3. Instale el conjunto del
escudete/el botón en el
orificio y asegure con el
herraje suministrado.
4. Restaure la electricidad en la entrada de servicio y presione el botón
para escuchar el timbre.
®
de 16 voltios con una capacidad nominal
B
A
FIGURA 1
INSTALACIÓN DEL BOTÓN
INALÁMBRICO
El botón inalámbrico (C) es compatible con los timbres inalámbricos
de NuTone. (Se compra por separado). Consulte las instrucciones de
instalación suministradas con el timbre inalámbrico.
1. Abra la cubierta de la pila
(D) deslizándola en la
dirección señalada por la
flecha. (Figura 2)
2. Instale la pila (E) en el botón
inalámbrico. (Figura 3)
3. Retire el mecanismo del botón
cableado del conjunto de botón/
escudete girando el mecanismo del
botón hacia la izquierda y tirando
de él. (Figura 4)
4. Inserte el
mecanismo del
botón inalámbrico
y gire hacia la
derecha. (Figura 5)
5. Pruebe el
funcionamiento.
Sostenga el
botón inalámbrico
cerca del timbre y
presione el botón.
Si el timbre no
suena, consulte
los puntos a. – c.
en la página 4.
3
C
1
D
+ -
2
FIGURA 2
E
FIGURA 3
1
FIGURA 4
2
FIGURA 5
Page 4

Si el timbre no suena cuando se presiona el botón inalámbrico:
a. Confirme que la configuración del código en el mecanismo del
timbre y en el botón inalámbrico sea la misma. (Figura 6)
BOTÓN INALÁMBRICO – EJEMPLO DE CONFIGURACIÓN
1 8
{
INTERRUPTORES
PARA CONFIGURAR
CÓDIGOS 1-6
TIMBRE INALÁMBRICO – EJEMPLO DE CONFIGURACIÓN
(El timbre tendrá puentes o interruptores)
b. Verifique la instalación adecuada de las pilas en el mecanismo del
timbre y en el botón. (Figura 3)
c. Verifique la condición de las pilas en el mecanismo del timbre y en el
botón. Reemplace si se requiere.
6. Cierre la cubierta de la pila en el botón inalámbrico.
7. Para instalar el conjunto del botón inalámbrico/escudete, perfore un
orificio recto y nivelado de ¾ pulg. (19 mm) de diámetro x 3 ½ pulg.
(89 mm) de fondo.
8. Inserte el conjunto del botón inalámbrico/escudete en el orificio y
asegúrelo a la pared utilizando el herraje suministrado.
Se puede usar más de un botón con los timbres inalámbricos NuTone.
Consulte la Figura 7 para asignar una puerta o una melodía a cada botón
inalámbrico.
BOTÓN INALÁMBRICO – ASIGNE MELODÍAS O PUERTAS
INTERRUPTORES PARA CONFIGURAR CÓDIGOS 7 Y 8
ENCENDIDO
Modelos
LA203WH
LA203RWH
LA204WH
LA204RWH
LA205WH 1 nota 2 notas 3 notas 4 notas
LA206WH
LA522WH
LA532WH
LA533WH
LA600WH Frente Atrás Frente Atrás
7 8
DE CÓDIGO
INTERRUPTORES 2, 4, 6 EN
LA POSICIÓN DE APAGADO
{
ENCENDIDOS
1 2 3 4 5 6
INTERRUPTORES 2, 4, 6 EN
LA POSICIÓN DE APAGADO
DE CÓDIGO
PUENTES
DEL TIMBRE
INALÁMBRICO
PUENTES RETIRADOS (APAGADOS) DE 2, 4, 6
INTERRUPTORES
DEL TIMBRE
INALÁMBRICO
INTERRUPTORES 2, 4, 6 EN LA POSICIÓN
1 8
{
ENCENDIDOS
ON
{
123456
DE APAGADO
7 8
FIGURA 6
{
7 8
7 8
7 8
FIGURA 7
CAMBIO DE LAS PILAS
Timbre inalámbrico
Cambie las pilas siguiendo las instrucciones correspondientes al timbre de
la puerta.
Botón inalámbrico
Retire de la pared el conjunto del botón inalámbrico/escudete y siga el paso
1 de la sección titulada “Instalación del botón inalámbrico”. Reemplace la pila
con una pila alcalina de celda N, de 1.5 V. Cierre la cubierta de la pila y vuelva
a instalar con el herraje el conjunto del botón inalámbrico/escudete.
TIMBRES PARA PUERTA Y BOTONES
INALÁMBRICOS ADICIONALES
Cuando instale otros juegos de timbre para puerta inalámbricos, seleccione
códigos diferentes para evitar interferencia. Si desea que todos los timbres
suenen al mismo tiempo, configure los timbres con el mismo código.
RESOLUCIÓN DE PROBLEMAS PARA
LAS INSTALACIONES INALÁMBRICAS
El alcance del timbre de la puerta varía según la ubicación, temperatura y
condición de la pila. En caso de que tenga problemas con este producto, intente
las soluciones descritas a continuación.
El timbre suena por sí solo:
• Es posible que un vecino tenga un juego de timbre inalámbrico con la misma
configuración de los códigos. Cambie la configuración del código del timbre
y el botón. (Figura 6)
El timbre no suena:
• Asegúrese de que el botón y el código del timbre tengan la misma
configuración.
• Verifique las pilas en el timbre y en el botón inalámbrico. (Figuras 3, 6)
Las pilas están buenas, pero el timbre no funciona al instalarse:
• El montaje del timbre o del botón directamente sobre metal, concreto o cerca
de pasadores metálicos reduce el alcance.
• No instale el timbre muy cerca de losas de concreto de piso, puesto que así
también se reduce el alcance. Instale el timbre lejos del piso.
• Trate de colocar el timbre en diferentes puntos más cercanos al botón.
Igualmente, trate de orientar el timbre a ángulos diferentes para aumentar al
alcance. El alcance es óptimo a los lados del botón.
Se advierte al usuario que cualquier cambio o modificación no
aprobado específicamente por las autoridades normativas podría dar
lugar a la anulación del permiso del usuario para operar este equipo.
Información normativa
GARANTÍA
NuTone garantiza al comprador original de sus productos que dichos productos carecerán de
defectos en materiales o en mano de obra por un período de un año a partir de la fecha original
de compra. NO EXISTEN OTRAS GARANTÍAS, EXPLÍCITAS O IMPLÍCITAS, INCLUYENDO, ENTRE
OTRAS, GARANTÍAS IMPLÍCITAS DE COMERCIALIZACIÓN O APTITUD PARA UN PROPÓSITO
PARTICULAR.
Durante este período de un año, NuTone, a su criterio, reparará o reemplazará, sin cargo alguno,
cualquier pieza o producto que se encuentre defectuoso bajo condiciones normales de uso y servicio.
LA PRESENTE GARANTÍA NO CUBRE TUBOS O ARRANCADORES DE LÁMPARAS
FLUORESCENTES, BOMBILLAS HALÓGENAS E INCANDESCENTES, FUSIBLES, FILTROS,
CONDUCTOS, TAPAS DE TECHO O DE PARED Y DEMÁS ACCESORIOS DE CANALIZACIÓN. Esta
garantía no cubre: (a) mantenimiento y servicio normales ni (b) ningún producto o piezas que se
hayan sometido a uso inadecuado, negligencia, accidente, mantenimiento o reparación inadecuada
(no hecha por NuTone), instalación incorrecta o instalación que vaya en contravención de las
instrucciones de instalación recomendadas.
La duración de cualquier garantía implícita se limita a un período de un año, como se especifica en la
garantía expresa. Algunos estados no permiten limitaciones en cuanto al tiempo de vencimiento de
una garantía implícita, por lo que la limitación antes mencionada podría no aplicarse a usted.
LA OBLIGACIÓN DE NUTONE DE REPARAR O REEMPLAZAR, A OPCIÓN DE NUTONE, SERÁ EL
ÚNICO Y EXCLUSIVO RECURSO DEL COMPRADOR BAJO ESTA GARANTÍA. NUTONE NO SERÁ
RESPONSABLE POR DAÑOS INCIDENTALES, RESULTANTES O ESPECIALES QUE SURJAN DE, O
EN RELACIÓN CON, EL USO O RENDIMIENTO DEL PRODUCTO. Algunos estados no permiten la
exclusión o limitación de daños incidentales o resultantes, por lo que la limitación antes mencionada
podría no aplicarse a usted.
Esta garantía le otorga derechos legales específicos, y usted podría tener otros derechos que varían
de un estado a otro. Esta garantía sustituye a todas las garantías anteriores.
Para tener derecho al servicio de la garantía, usted debe (a) notificar a NuTone a la dirección y
número de teléfono que aparecen abajo, (b) proporcionar el número de modelo y la identificación
de la pieza y (c) describir la naturaleza de cualquier defecto en el producto o pieza. En el momento
de solicitar el servicio cubierto por la garantía, debe presentar un comprobante de la fecha de
compra original.
Broan-NuTone LLC, 926 W. State Street, Hartford, Wisconsin 53027
www.nutone.com 888-336-6151
4
GARANTÍA LIMITADA DE UN AÑO DE NUTONE
99528433B
 Loading...