

Page 1

MODEL 9093WH
MODEL 9093WH
Page 1
DELUXE HEAT-A-VENTLITE
®
READ AND SAVE THESE INSTRUC
IMPORTANT INSTRUCTIONS
READ ALL INSTRUCTIONS BEFORE INSTALLING OR USING THIS HEATER.
To reduce the risk of fire, electric shock, or injury to persons,
observe the following:
1. Use this unit only in the manner intended by the manufacturer. If you have questions, contact the manufacturer at the
address or telephone number listed in the warranty.
2. Before servicing or cleaning unit, switch power off at service
panel and lock the service disconnecting means to prevent
power from being switched on accidentally. When the service disconnecting means cannot be locked, securely fasten
a prominent warning device, such as a tag, to the service
panel.
3. Installation work and electrical wiring must be done by a
qualified person(s) in accordance with all applicable codes
and standards, including fire-rated construction codes and
standards.
4. When cutting or drilling into wall or ceiling, do not damage
electrical wiring and other hidden utilities.
5. This heater is hot when in use. To avoid burns, do not let
bare skin touch hot surfaces. Keep combustible materials,
such as furniture, pillows, bedding, papers, clothes, etc. and
curtains at least 3 feet (0.9 m) from the front of the heater.
6. Extreme caution is necessary when any heater is used by
or near children or invalids and whenever the heater is left
operating and unattended.
7. Do not operate any heater after it malfunctions. Disconnect
power at service panel and have heater inspected by a reputable electrician before reusing.
8. Do not use outdoors.
9. To disconnect heater, turn controls to off, and turn off power
to heater circuit at main disconnect panel (or operate internal disconnect switch, if provided).
10. Do not insert or allow foreign objects to enter any ventilation
or exhaust opening, as this may cause an electric shock or
fire, or damage the heater.
11. To prevent a possible fire, do not block air intakes or exhaust
in any manner.
12. A heater has hot and arcing or sparking parts inside. Do not
use it in areas where gasoline, paint, or flammable vapors or
liquids are used or stored.
13. Use this heater only as described in this manual. Any other
use not recommended by the manufacturer may cause fire,
electric shock, or injury to persons.
14. Install heater at least 6 inches from floor or any adjacent
wall.
15. To avoid electrical shock: Do not install unit in a tub or shower enclosure or any location where it may come in contact
with water. Never place a switch where it can be reached
from a tub or shower.
16. This product is designed for installation in ceilings up to a
12/12 pitch. Duct connector must point up. DO NOT MOUNT
THIS PRODUCT IN A WALL.
17. Do not connect heater to dimmer switch or speed control.
18. Ducted fans must always be vented to the outdoors.
19. This product must be grounded.
SAVE THESE INSTRUCTIONS
TIONS
Page 2
INSTALLATION
WARNING: To reduce the risk of fire, do not store or use
gasoline or other flammable vapors and liquids in the vicinity of the heater.
CAUTION: High temperature, risk of fire, keep electrical
cords, drapery, furnishings, and other combustibles at least
3 feet (0.9 m) from the front of the heater and away from the
side and rear.
1. Remove complete assembly from carton. Loosen screws
holding grille and remove the grille.
2. Loosen power unit mounting screws and remove power unit
from rough-in housing.
3. Remove tape from back draft damper and be certain the
damper opens and closes freely.
MOUNTING TO OPEN JOISTS
MODEL 9093WH
Page 2
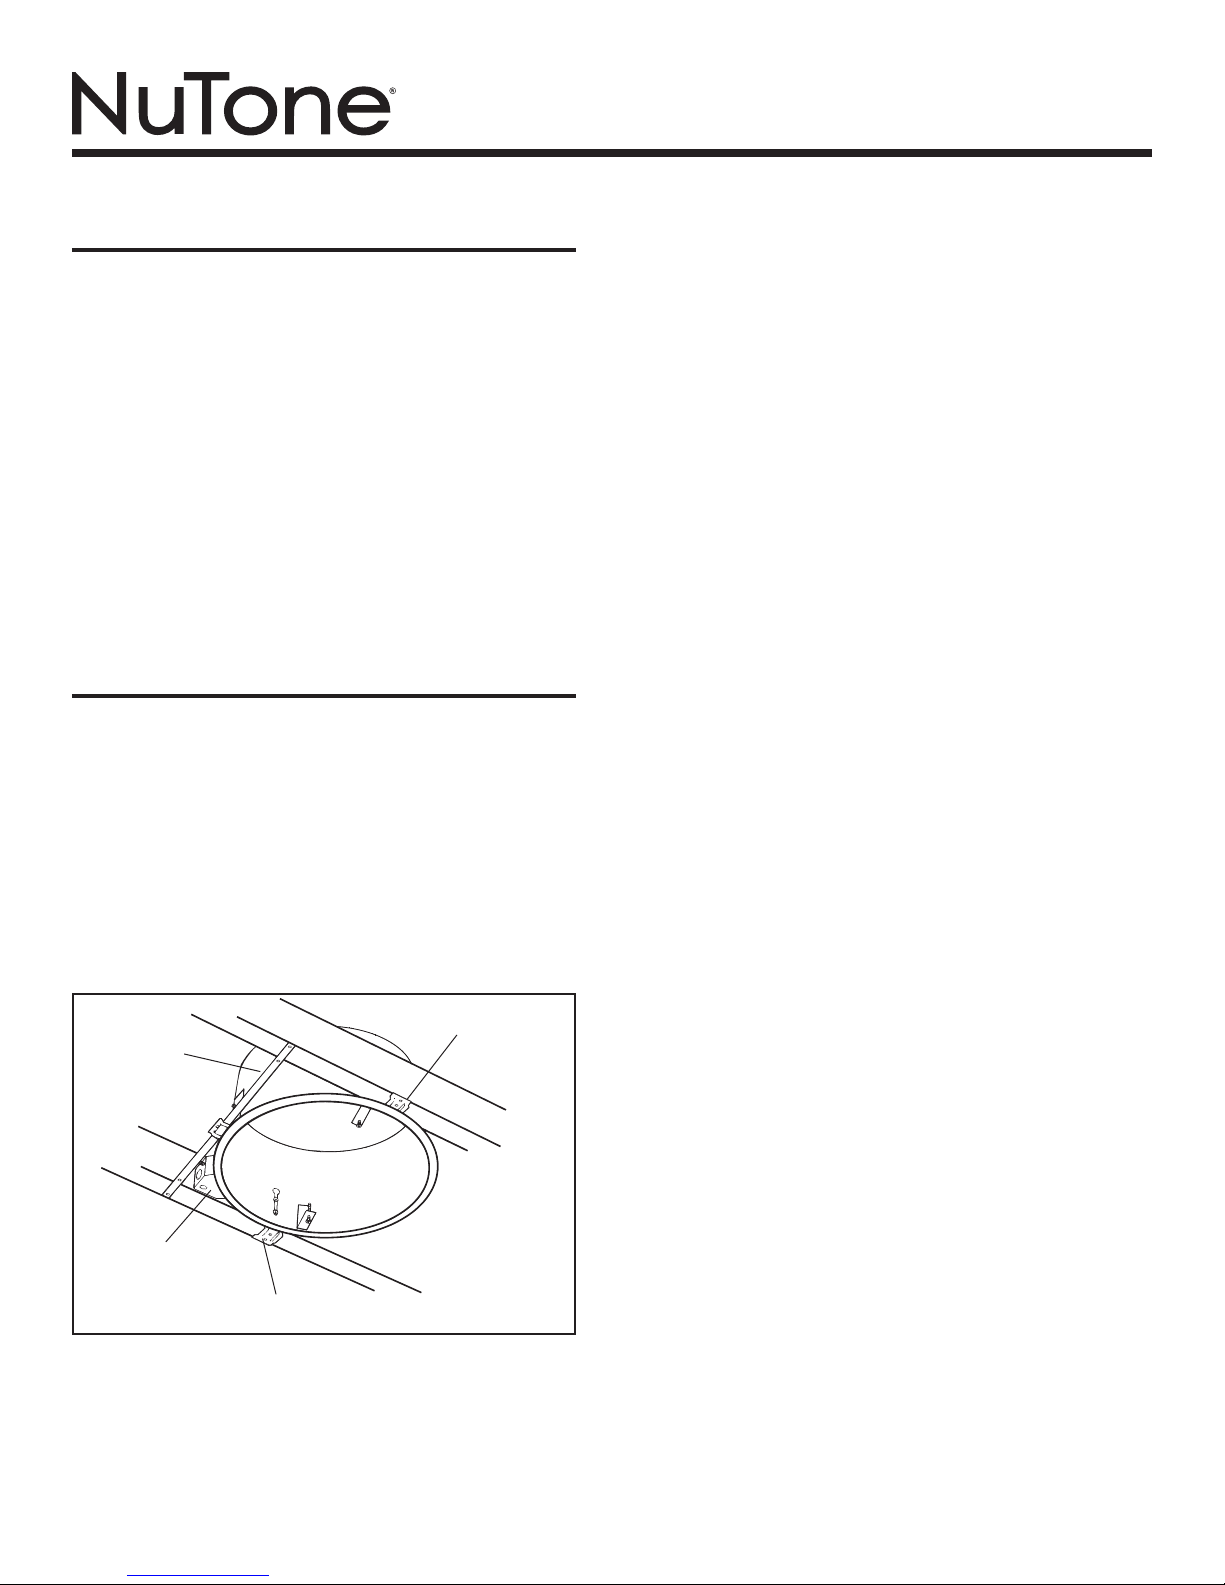
Refer to Figure 1.
1. Insert hanger bar on mounting bracket opposite discharge
opening and mount rough-in housing to ceiling joists at
desired location.
2. Install mounting brackets into slots in housing and adjust
housing so flange will be flush to proposed finished ceiling
line. Tighten screws securely.
3. Attach 4” round duct and vent to outside through wall
or ceiling.
4. Remove junction box cover and desired knockout from
junction box in housing.
ADJUSTABLE
HANGER
BAR
HEATER
OUTLET BOX
NAILING BRACKET
NAILING BRACKET
FIGURE 1
Page 3
MODEL 9093WH
WIRING
Installation work and electrical wiring must be done by
a qualified person(s) in accordance with all applicable
codes and standards, including fire-rated construction
codes and standards.
Refer to Figure 2.
1. Run five (5) wires and ground of 12 gauge from heater’s
junction box to wall switch.
HEATER
JUNCTION
BOX
RED
BLUE
WHITE
BLACK
YELLOW
HOUSE
WIRING
T
HEAT
NIGHT
LIGHT
VENT
LIGHT
Page 3
2. Swing fan and heater unit into place over mounting bracket
screws and tighten securely.
3. Plug in fan and heater assembly to receptacle in junction
box cover.
NIGHT LIGHT
RECEPTACLE
LIGHT
RECEPTACLE
KEY-HOLE
SLOT
SWITCH BOX
(REAR VIEW)
TO HOUSE
PANEL BOARD
BLACK
120vAC
LINE
WHITE
GROUND
HOUSE
WIRING
FIGURE 2
2. The switch installs in a double-gang outlet box. When a
thermostat or timer is used, connect at point marked “T”.
3. Replace junction box cover in heater housing when wiring
is complete.
COMPLETING INSTALLATION
Refer to Figure 3.
1. Insert hooked hinge on power unit to hanger bracket in
rough-in housing.
SLOTTED
HANGER BRACKET
FIGURE 3
KEY-HOLE
SLOT
FIGURE 4
Refer to Figure 4.
4. Install 100 watt bulb and 7 watt lamp for night light.
5. Mount grille and lens assembly over mounting screws in
housing. Tighten securely.
INSTALLATING IN EXISTING
CONSTRUCTION
1. Review “WIRING” section of these instructions.
2. Drill a small hole in ceiling in proposed location (locate
this hole in attic or crawl space).
3. In attic, mark ceiling for cutout by using the housing as
a template. Mark around outside of plaster flange. Make
cutout along this line.
4. Connect wires from switch to heater before mounting
the housing.
5. Install a header between ceiling joists and nail housing to
one joist and header.
NOTE: The two (2) hanger bars (separate pieces) and two
mounting brackets (on the housing) are not needed for this
type of installation.
6. Install ductwork.
7. Install power unit, light bulbs and grille/lens assembly. Refer
to “COMPLETING INSTALLATION”.
NOTE: Please refer to your NuTone catalog for a complete
listing of optional accessory items.
Page 4

OPERATION
Before using heater, make sure heater has been properly installed
according to installation steps beginning with the “INSTALLATION”
section on page 2.
MODEL 9093WH
Page 4
Page 5

MAINTENANCE
The following maintenance and cleaning tasks can be performed
by the user. All other servicing must be performed by an authorized technician If you have any questions, please consult with
our customer service department at: 800-558-1711.
TO REPLACE BULB
Use bulb rated up to 100 watts only and 7 watts only for night
light.
LUBRICATION
The heater is permanently lubricated and never needs oiling
or disassembly.
CLEANING
Clean heater once a month as follows:
1. Turn off power at service panel.
2. Make sure heating element is cool.
3. Use a soft brush attachment to gently vacuum grille openings
or wipe grille clean with a soft cloth.
4. Restore power.
CAUTION: METAL AND ELECTRICAL PARTS SHOULD NEVER
BE IMMERSED IN WATER.
MODEL 9093WH
Page 5
Page 6

MODÈLE DE LUXE 9093WH
MODÈLE 9093WH
Page 6
HEAT-A-VENTLITE
MD
LIRE CES DIRECTIVES ET LES CONSERVER
INSTRUCTIONS
IMPORTANTES
LIRE TOUTES LES INSTRUCTIONS AVANT D’INSTALLER
OU D’UTILISER CET APPAREIL DE CHAUFFAGE.
Observez les directives ci-dessous afin de réduire les risques
d’incendie, de choc électrique ou de blessures corporelles :
1. N’utilisez cet appareil que de la manière prévue par le fabri-
cant. Si vous avez des questions, communiquez avec le fabricant à l’adresse ou au numéro de téléphone indiqués dans
la garantie.
2. Avant de procéder à l’entretien ou au nettoyage de l’appareil,
coupez l’alimentation du panneau électrique et verrouillez
l’interrupteur principal afin d’empêcher que le courant ne
soit accidentellement rétabli. S’il est impossible de verrouiller l’interrupteur principal, fixez solidement un message
d’avertissement, par exemple une étiquette, sur le panneau
électrique.
3. La pose de l’appareil et les travaux d’électricité doivent être
effectués par des personnes qualifiées conformément à la
réglementation en vigueur, notamment les normes de la construction ayant trait à la protection contre les incendies.
4. Veillez à ne pas endommager le câblage électrique ou
d’autres équipements non apparents lors de la découpe ou
du perçage du mur ou du plafond.
5. Cet appareil de chauffage devient chaud en fonctionnant.
Pour ne pas vous brûler, évitez tout contact de la peau nue
avec les surfaces chaudes. Gardez les objets combustibles,
tels que les meubles, oreillers, articles de literie, papiers,
vêtements, etc. et rideaux à au moins x mètre (x pieds) de
l’avant de la chaufferette.
6. Il faut faire extrêmement attention lorsqu’une chaufferette est
utilisée par des enfants ou des personnes invalides ou près
d’eux et si l’appareil est laissé en marche sans surveillance.
7. Ne faites pas fonctionner une chaufferette si elle est dé-
fectueuse. Débranchez l’alimentation au panneau électrique
et demandez à un électricien de l’examiner avant de la réutiliser.
8. Ne l’utilisez pas à l’extérieur.
9. Pour débrancher la chaufferette, mettez les commandes sur
arrêt et coupez l’alimentation du circuit au panneau électrique (ou utilisez l’interrupteur interne, s’il y en a un).
10. N’insérez et ne laissez pénétrer aucun corps étranger dans
les ouvertures de ventilation ou de sortie d’air au risque de
provoquer un choc électrique, un incendie ou d’endommager
la chaufferette.
11. Pour prévenir tout incendie possible, n’obstruez pas les pris-
es d’air et les sorties de quelque manière que ce soit.
12. La chaufferette contient des pièces brûlantes et qui produisent
des arcs ou des étincelles à l’intérieur. Ne l’utilisez pas dans
un endroit où de l’essence, de la peinture ou des vapeurs ou
liquides inflammables sont utilisés ou entreposés.
13. N’utilisez cette chaufferette que tel qu’expliqué dans ce manuel. Toute autre utilisation non recommandée par le fabricant
peut provoquer un incendie, un choc électrique ou des blessures corporelles.
14. Installez chauffe au moins 6 pouces du sol ou un mur adjacent.
15. Pour éviter un choc électrique: Ne pas installer l’appareil
dans une enceinte de baignoire ou d’une douche ou tout
autre endroit où il pourrait entrer en contact avec de l’eau.
Ne placez jamais un interrupteur où il peut être accessible
depuis une baignoire ou une douche.
16. Ce produit est conçu pour une installation dans les plafonds
jusqu’à une hauteur 12/12. Le raccord de conduit doit pointer
vers le haut. NE PAS MONTER CE PRODUIT DANS UN
MUR.
17. Ne pas brancher chauffe à gradateur ou contrôle de vitesse.
18. Les ventilateurs avec conduits doivent toujours être évacués
vers l’extérieur.
19. Ce produit doit être mis à la terre.
CONSERVER CES
INSTRUCTIONS
Page 7

INSTALLATION
AVERTISSEMENT : Pour réduire les risques d’incendie,
n’entreposez pas et n’utilisez pas de l’essence ni des liquides
ou vapeurs inflammables à proximité de la chaufferette.
ATTENTION : Température élevée, le risque d’incendie, les
fils électriques, tentures, mobilier et autres combustibles
au moins 3 pieds (0,9 m) du devant de l’appareil et loin de
la côté et à l’arrière.
1. Sortez tout l’ensemble du carton d’emballage. Desserrez les vis
de la grille et enlevez celle-ci.
2.
Desserrez les vis de montage de l’appareil et retirez-le du
boîtier brut.
3. Enlevez le ruban adhésif du clapet anti-retour et vérifiez qu’il
s’ouvre et se ferme librement.
MONTAGE SUR DES SOLIVES
Consultez la figure 1.
1. Insérez la barre de suspension sur le support de montage
du côté
l’endroit souhaité.
2. Installez les supports de montage dans les fentes du boîtier
et ajustez sa hauteur de sorte que la bride soit au raz de la
future surface finie du plafond. Serrez les vis fermement.
3. Fixez un conduit rond de 10 cm (4 po) et acheminez-le
jusqu’à l’extérieur au travers du mur ou du plafond.
4. Enlevez le couvercle de la boîte de jonction et détachez
l’ouverture préamorcée appropriée dans le boîtier.
opposé à la sortie et fixez le boîtier brut aux solives à
MODÈLE 9093WH
Page 7
BARRE DE
SUSPENSION
AJUSTABLE
BOÎTIER DE
CHAUFFERETTE
BRIDE DE CLOUAGE
BRIDE DE CLOUAGE
FIGURE 1
Page 8

MODÈLE 9093WH
CÂBLAGE
La pose de l’appareil et les travaux d’électricité doivent être
effectués par des personnes qualifiées conformément à la
réglementation en vigueur, notamment les normes de la
construction ayant trait à la protection contre les incendies.
Consultez la figure 2.
1. Acheminez cinq (5) fils avec un fil de terre de calibre 12
entre la boîte de jonction de la chaufferette et l’interrupteur
mural.
2. L’interrupteur doit être installé dans une boîte électrique
double. Lorsqu’un thermostat ou une minuterie est utilisé,
connectez-le à la borne marquée « T ».
BOÎTE DE
JONCTION DE LA
CHAUFFERETTE
NOIR
BLEU
JAUNE
BLANC
ROUGE
CÂBLAGE DE LA
MAISON
T
CHALEUR
VENT.
Page 8
2. Pivotez le ventilateur et la chaufferette en place sur les vis de
montage et serrez celles-ci fermement.
3. Branchez l’ensemble de chaufferette et ventilateur dans la
prise du couvercle de la boîte de jonction.
Consultez la figure 4.
4. Installez une ampoule de 100 watts et une autre de 7 watts
pour la veilleuse.
5. Posez l’ensemble de grille et de lentille sur les vis de
montage dans le boîtier. Serrez fermement.
SOCLE DE
VEILLEUSE
SOCLE
D’AMPOULE
NOIR
LIGNE
BLANC
LUMIÈRE
FIL DE
TERRE
CÂBLAGE DE
LA MAISON
FIGURE 2
VEILLEUSE
BOÎTE D’INTERRUPTEUR
(VUE ARRIÈRE)
AU PANNEAU
ÉLECTRIQUE
DE LA MAISON
120 VCA
3. Replacez le couvercle de la boîte de jonction dans le boîtier
de la chaufferette, une fois le câblage terminé.
FINITION DE L’INSTALLATION
Consultez la figure 3.
1.
Insérez le crochet articulé de l’appareil dans le support du
boîtier brut.
FENTE DE SUPPORT
FIGURE 3
TROU DE
SERRURE
TROU DE
SERRURE
FIGURE 4
INSTALLATION DANS UNE
CONSTRUCTION EXISTANTE
1. Révisez la section « CÂBLAGE » de ces instructions.
2. Percez un petit trou dans le plafond à l’endroit souhaité
(repérez ce trou dans le grenier ou l’entretoit).
3. Dans le grenier, tracez la ligne de découpe en vous servant
du boîtier comme modèle. Tracez autour de la bride de
finition. Coupez le long de cette ligne.
4. Connectez les fils de l’interrupteur à la chaufferette avant de
fixer le boîtier.
5. Installez une entretoise entre les solives et clouez le boîtier à
une solive et à l’entretoise.
REMARQUE : Les deux (2) barres de suspension (pièces
séparées) et les deux supports de montage (sur le boîtier)
ne sont pas nécessaires dans ce type d’installation.
6. Installez les conduits.
7. Installez l’appareil, les ampoules et l’ensemble de grille/
lentille. Consultez « FINITION DE L’INSTALLATION ».
REMARQUE : Consultez votre catalogue NuTone pour la
liste complète des accessoires offerts en option.
Page 9

FONCTIONNEMENT
Avant d’utiliser la chaufferette, assurez-vous qu’elle est correctement installée selon les directives indiquées à la section «
PLANIFICATION » à la page 7.
MODÈLE 9093WH
Page 9
Page 10

MAINTENANCE
L’utilisateur peut effectuer les tâches d’entretien et de nettoyage suivantes. Tous les autres travaux doivent être confiés à un
technicien agréé. Pour toute question, veuillez vous adresser au
service à la clientèle au : 800-558- 1711.
POUR REMPLACER L’AMPOULE
Utilisez ampoule nominale jusqu’à 100 watts seulement et seulement 7 watts pour l’éclairage de nuit.
LUBRIFICATION
Le moteur de la chaufferette est lubrifié en permanence et n’a
pas besoin d’être huilé ni démonté.
NETTOYAGE
Nettoyez chauffage une fois par mois comme suit :
1. Coupez le courant au panneau de service.
2. Assurez-vous que les ampoules sont cool.
3. Utilisez une brosse douce pour aspirer doucement ouvertures
de la grille ou essuyer grille avec un chiffon doux.
4. Rétablir l’alimentation.
ATTENTION : LES PIÈCES MÉTALLIQUES ET ÉLECTRIQUES
NE DOIVENT JAMAIS ÊTRE IMMERGÉS DANS L’EAU.
MODÈLE 9093WH
Page 10
Page 11

MODELO 9093WH
MODELO DE LUJO 9093WH
HEAT-A-VENTLITE®
LEA Y CONSERVE ESTAS INSTRUCCIONES
INSTRUCCIONES IMPORTANTES
LEA TODAS LAS INSTRUCCIONES ANTES DE INSTALAR O
USAR ESTE CALENTADOR.
Para reducir el riesgo de incendios, descargas eléctricas o lesiones personales, observe las siguientes precauciones:
1. Use la unidad solo de la manera indicada por el fabricante. Si
tiene preguntas, comuníquese con el fabricante a la dirección
o al número telefónico que se incluye en la garantía.
2. Antes de dar servicio a la unidad o de limpiarla, interrumpa el
suministro eléctrico en el panel de servicio y bloquee los medios de desconexión del servicio para evitar que la electricidad
se reanude accidentalmente. Cuando no sea posible bloquear
los medios de desconexión del servicio, fije firmemente una
señal de advertencia (como una etiqueta) en un lugar visible
del panel de servicio.
3. El trabajo de instalación y el cableado eléctrico deben estar
a cargo de personal capacitado, de acuerdo con todos los
códigos y normas correspondientes, incluidos los códigos y
normas de construcción específicos sobre protección contra
incendios.
4. Al cortar o perforar a través de la pared o del cielo raso, tenga
cuidado de no dañar el cableado eléctrico ni otros servicios
ocultos.
5. Este calentador se calienta cuando se usa. Para evitar que-
maduras, no deje que la piel desnuda toque las superficies
calientes. Mantenga materiales combustibles como muebles,
almohadas, ropa de cama, papeles, ropa, etc., así como las
cortinas, por lo menos a 3 pies (0.9 m) de la parte delantera
del calentador.
6. Es necesario tener extremo cuidado cuando se use un calen-
tador cerca de niños o personas inválidas, y siempre que el
calentador se deje funcionando y sin atención.
7. No haga funcionar ningún calentador después de que pre-
sente una falla. Desconecte la energía eléctrica en el panel
de servicio y pida que un electricista acreditado inspeccione
el calentador antes de volverlo a usar.
8. No lo use en exteriores.
9. Para desconectar el calentador, mueva los controles a la
posición de apagado y desconecte la energía eléctrica al
circuito del calentador en el panel de desconexión principal
(o active el interruptor de desconexión interna, si existe).
10. No inserte ni permita que objetos extraños entren en la aber-
tura de ventilación o de escape, pues esto puede ocasionar
una descarga eléctrica, un incendio o daños al calentador.
11. Para prevenir un posible incendio, no bloquee la entrada o
salida del aire de ninguna manera.
12. El calentador tiene piezas calientes y que pueden generar
arcos eléctricos o chispas en el interior. No lo use en áreas
donde se use o almacene gasolina, pintura o vapores o
líquidos flamables.
13. Use este calentador solamente como se describe en este
manual. Cualquier otro uso no recomendado por el fabricante
puede ocasionar un incendio, una descarga eléctrica o lesiones a personas.
14. Instale el calentador por lo menos 6 pulg. desde el piso o
cualquier pared adyacente.
15. Para evitar golpe eléctrico: No instale la unidad en una bañera
o recinto de ducha. Nunca coloque un interruptor en un lugar
que pueda ser alcanzado desde una bañera o ducha.
16. Este producto se diseña para la instalación en techos hasta
una echada de 12/12. Conector de conductor debe señalar
hacia arriba. NO MONTE ESTE PRODUCTO EN UNA TECHO.
17. No conecte el calentador a un variador de luz o control de
velocidad.
18. Los ventiladores con conductos siempre se deben conectar
hacia el exterior.
19. Este producto debe ser conectado a tierra.
GUARDE ESTAS INSTRUCCIONES
Página 11
Page 12

INSTALACIÓN
ADVERTENCIA: Para reducir el riesgo de incendio, no almacene ni
use gasolina u otros vapores y líquidos flamables en las cercanías
del calentador.
PRECAUCIÓN: Temperatura alta, el riesgo de incendio, mantenga los
cables eléctricos, cortinas, muebles y otros materiales combustibles
por lo menos 3 pies (0,9 m) del frente del calentador y lejos de la
cara y la parte trasera.
1. Retire el conjunto completo de la caja. Afloje los tornillos que
sostienen la rejilla y retire la rejilla.
2. Afloje los tornillos de montaje de la unidad de potencia y retire la unidad de potencia de la cubierta de empalme.
3. Retire la cinta del regulador de contracorrientes y asegúrese
de que el regulador se abra y se cierre libremente.
MONTAJE EN VIGUETAS
ABIERTAS
Vea la figura 1.
1. Inserte la barra de suspensión sobre la abertura de descarga
opuesta del soporte de montaje y monte la cubierta de empalme
sobre las viguetas del cielo raso en la ubicación deseada.
2. Instale los soportes de montaje en las ranuras de la cubierta y
ajústela de tal manera que el reborde esté a nivel sobre la línea del
cielo raso terminado propuesto. Apriete bien los tornillos.
3. Fije un conducto redondo de 4 pulgadas (10 cm) y ventile hacia el
exterior a través de la pared o el cielo raso.
4. Retire la cubierta de la caja de conexiones y el agujero ciego
deseado de la caja de conexiones en la cubierta.
MODELO 9093WH
Página 12
BARRA DE
SUSPENSIÓN
AJUSTABLE
CAJA DE
SALIDA
PARA EL
CALENTADOR
SOPORTE
CLAVADO
SOPORTE
CLAVADO
FIGURA 1
Page 13

CABLEADO
El trabajo de instalación y el cableado eléctrico deben estar a cargo de
personal capacitado, de acuerdo con todos los códigos y normas correspondientes, incluidos los códigos y normas de construcción específicos sobre protección contra incendios.
Vea la figura 2.
1. Tienda cinco (5) cables y la tierra de calibre 12 de la caja
de conexiones del calefactor al interruptor de pared.
CAJA DE
CONEXIONES DEL
CALEFACTOR
AZUL
ROJO
NEGRO
BLANCO
AMARILLO
CABLEADO DE LA
VIVIENDA
T
MODELO 9093WH
Página 13
2. Oscile la unidad de ventilador y calefactor en su lugar
montando los tornillos de soporte y apretando firmemente.
3. Enchufe el conjunto del ventilador y calefactor al receptáculo
en la cubierta de la caja de conexiones.
RECEPTÁCULO
PARA LA
LÁMPARA DE
NOCHE
RECEPTÁCULO DE
LA LÁMPARA
NEGRO
BLANCO
LÍNEA DE
120 VCA
VENT.
LUZ
TIERRA
CABLEADO DE
LA VIVIENDA
FIGURA 2
CALOR
LÁMPARA
DE NOCHE
CAJA DE INTERRUPTORES
(VISTA POSTERIOR)
AL TABLERO DEL
PANEL DE LA CASA
2. El interruptor se instala en una caja de conexiones de
doble toma. Cuando se use un termostato o temporizador,
conecte en el punto marcado con “T”.
3. Reemplace la cubierta de la caja de conexiones en la caja
del calefactor cuando termine el cableado.
FINALIZAR LA INSTALACIÓN
Vea la figura 3.
1. Inserte el reborde con ganchos en la unidad de potencia al
soporte colgante en la caja de empalme.
SOPORTE
COLGANTE
RANURADO
FIGURA 3
RANURA TIPO
BOCALLAVE
RANURA TIPO
BOCALLAVE
FIGURA 4
Vea la figura 4.
4. Instale una bombilla de 100 watts y una lámpara de 7 watts
para la lámpara de noche.
5. Monte el conjunto de la rejilla y la lente sobre los tornillos de
montaje en la caja. Apriete firmemente.
INSTALACIÓN EN UNA
CONSTRUCCIÓN EXISTENTE
1. Revise la sección “CABLEADO” de estas instrucciones.
2. Perfore un orificio pequeño en el sitio propuesto del cielo raso
(ubique este orificio en el ático o en el espacio entresuelos).
3. En el ático, marque el recorte en el cielo raso usando la caja
como una plantilla. Marque alrededor del exterior de la brida de
mampostería. Haga el recorte a lo largo de esta línea.
4.
Conecte los cables del interruptor al calefactor antes de montar la caja.
5. Instale un cabezal entre las vigas del cielo raso y clave la caja del
clavo a una viga y al cabezal.
NOTA: Para este tipo de instalación no se necesitan las dos barras
(2) colgantes (piezas por separado) y los dos soportes de montaje
(en la caja).
6. Instale los conductos.
7. Instale la unidad eléctrica, las bombillas de luz y el conjunto de
rejilla/lentes. Consulte “FINALIZAR LA INSTALACIÓN”.
NOTA: Consulte su catálogo NuTone, donde podrá encontrar una
lista completa de artículos accesorios opcionales.
Page 14

OPERACIÓN
Antes de usar el calentador, asegúrese de que esté instalado adecuadamente, de acuerdo con los pasos de instalación indicados en
“INSTALACION” en la página 12.
MODELO 9093WH
Página 14
Page 15

MAINTENIMIENTO
Reemplace los focos con dos (2) focos incandescentes de 100
watts (máximo) y un (1) foco de luz nocturna de 7 watts.
El usuario puede realizar las siguientes tareas de mantenimiento y limpieza. Todos los demás servicios los debe realizar un
técnico autorizado. Si tiene preguntas, consulte a nuestro departamento de servicio al cliente llamando al: 800-558- 1711.
PARA CAMBIAR LA BOMBILLA
Utilice bombillas de hasta sólo 100 vatios y 7 vatios sólo para
luz de la noche.
LUBRICACIÓN
El calentador está permanentemente lubricado y nunca necesitará ponerle aceite ni desarmarlo.
LIMPIEZA
Limpie el calentador una vez al mes tal como sigue:
1. Apague la energía eléctrica en el panel de servicio.
2. Asegúrese de que el elemento de calefacción esté frío.
3. Use un aditamento de cepillo suave para aspirar suavemente
aberturas de la rejilla o limpie la rejilla con un paño suave.
4. Restaure la energía eléctrica.
CUIDADO – LAS PIEZAS METALICAS Y ELECTRICAS NUNCA
SE DEBEN SUMERGIR EN AGUA.
MODELO 9093WH
Página 15
Page 16

MODEL / MODÈLE / MODELO 9093WH
Page / Página 16
SERVICE PARTS / PIÈCES DE RECHANGE / PIEZAS DE SERVICIO
Key No / Part Number/
Repère / N° de pièce/ Description Description Descripción
Clave N° N° de pieza
1
2
3
4
5
6
7
8
9
10
11
12
13
14
15
16
17
18
19
20
21
22
23
24
25
26
27
28
29
30
31
44388000
101284000
35962000
35963000
30124000
11390000
27544000
99271494
69314000
27546000
58120000
61993000
69355000
69353000
57769000
58000000
57767000
66583000
66142000
64966000
35964000
30156000
36271000
28058015
56706000
27561000
0469A000
52858015
85918000
85921000
85920000
Hanger Bar Set
Ceiling Mtg. Bracket Assembly - Set of 3
Outlet Box
Outlet Box Cover
Receptacle / Socket / Wire Assembly
Duct Assembly
Heat Box Assembly
Thermal Protector
Insulator Bushing Set (2 req.)
Element Support (5 req.)
Heating Element - 1500 Watt
Blower Housing Assembly
Power Unit - Heater
Power Unit - Ventilator
Motor - Heater
Motor - Ventilator
Motor Mounting Plate
Blower Wheel - Heater
Blower Wheel - Ventilator
Light Socket Assembly
Reflector
Lamp Socket Assembly - Night Light
Grille Assembly
Screw - for Lens Mounting Brackets
Lens Mounting Bracket
Lens
Grille with Lens Mounting Brackets
Grille Screw
Switch Assembly
Switch - Double Toggle
Wall Plate
Ensemble de barre de suspension
Ensemble de supports de montage au plafond - Jeu de 3
Boîte électrique
Couvercle de boîte électrique
Ensemble de prise / douille / fils
Ensemble de conduit
Ensemble de boîtier de chaufferette
Protecteur thermique
Ensemble de bagues isolantes (2 req.)
Support d’élément (5 req.)
Élément chauffant - 1500 watts
Ensemble de boîtier de ventilateur
Unité motorisée - Chaufferette
Unité motorisée - Ventilateur
Moteur - Chaufferette
Moteur - Ventilateur
Plaque de montage de moteur
Roue à ailettes - Chaufferette
Roue à ailettes - Ventilateur
Ensemble de socle d’ampoule
Réflecteur
Ensemble de socle d’éclairage - Veilleuse
Ensemble de grille
Vis - pour supports de lentille
Supports de lentille
Lentille
Grille avec supports de lentille
Vis de grille
Ensemble d’interrupteurs
Interrupteurs - Doubles à bascule
Plaque murale
Juego de barras de suspensión
Conjunto de soportes para montaje en cielo raso - Juego de 3
Caja de conexiones
Cubierta de la caja de salida
Conjunto de receptáculo / base / conjunto de cables
Conjunto de conductos
Conjunto de la caja del calefactor
Protector térmico
Juego de bujes aislantes (se requieren 2)
Soporte del elemento (se requieren 5)
Elemento calefactor - 1500 watts
Conjunto de la caja del ventilador
Unidad de potencia - Calefactor
Unidad de potencia - Ventilador
Motor - Calefactor
Motor - Ventilador
Placa de montaje del motor
Disco del ventilador - Calefactor
Disco del ventilador - Ventilador
Conjunto de la base para la luz
Reflector
Conjunto de la base para la luz - Lámpara de noche
Conjunto de la rejilla
Tornillo - para soportes de montaje de la lente
Soporte de montaje de la lente
Lente
Rejilla con soportes de montaje de la lente
Tornillo de la rejilla
Montaje del interruptor
Interruptor - Doble palanca
Placa para pared
9
11
10
16
4
5
3
1
29
6
30
7
15
31
8
28
17
18
20
21
22
27
13
24
19
12
23
25
2
26
17
14
Page 17

MODEL / MODÈLE / MODELO 9093WH
Page / Página 17
WARRANTY OWNER: Broan-NuTone warrants to the original consumer purchaser of its products that such products will be free from defects in materials or workmanship for a period of one (1) year from
the date of original purchase. THERE ARE NO OTHER WARRANTIES, EXPRESS OR IMPLIED, INCLUDING, BUT NOT LIMITED TO, IMPLIED WARRANTIES OF MERCHANTABILITY OR FITNESS FOR A
PARTICULAR PURPOSE.
During this one year period, Broan-NuTone will, at its option, repair or replace, without charge, any product or part which is found to be defective under normal use and service. THIS WARRANTY
DOES NOT EXTEND TO FLUORESCENT LAMP STARTERS OR TUBES, FILTERS, DUCT, ROOF CAPS, WALL CAPS AND OTHER ACCESSORIES FOR DUCTING. This warranty does not cover (a) normal
maintenance and service or (b) any products or parts which have been subject to misuse, negligence, accident, improper maintenance or repair (other than by Broan-NuTone), faulty installation or
installation contrary to recommended installation instructions.
The duration of any implied warranty is limited to the one year period as specified for the express warranty. Some states do not allow limitation on how long an implied warranty lasts, so the above
limitation may not apply to you.
BROAN-NUTONE’S OBLIGATION TO REPAIR OR REPLACE, AT BROAN-NUTONE’S OPTION, SHALL BE THE PURCHASER’S SOLE AND EXCLUSIVE REMEDY UNDER THIS WARRANTY. BROAN-NUTONE
SHALL NOT BE LIABLE FOR INCIDENTAL, CONSEQUENTIAL OR SPECIAL DAMAGES ARISING OUT OF OR IN CONNECTION WITH PRODUCT USE OR PERFORMANCE. Some states do not allow the
exclusion or limitation of incidental or consequential damages, so the above limitation or exclusion may not apply to you. This warranty gives you specific legal rights, and you may also have other rights,
which vary from state to state. This warranty supersedes all prior warranties.
WARRANTY SERVICE: To qualify for warranty service, you must (a) notify Broan-NuTone at the address or telephone number below, (b) give the model number and part identification and (c)
describe the nature of any defect in the product or part. At the time of requesting warranty service, you must present evidence of the original purchase date.
Date of Installation
Builder or Installer
Model No. and Product Description
Broan-NuTone LLC Hartford, Wisconsin www.nutone.com 888-336-3948
Rev. 08/2007
GARANTIE DU PROPRIÉTAIRE: Broan-NuTone garantie à l’acheteur original de ses produits que ces derniers seront exmpts de tout défaut de matériaux et de fabrication pour une période d’un
(1) an à compter de la date d’acha. AUCUNE AUTRE GARANTIE, IMPLICITE OU EXPRESSE, N’EST DONNÉE, Y COMPRIS, MAIS SANS S’Y LIMITER, GARANTIE DE MARCHANDIBILITÉ OU
D’ADAPTATION À UN USAGE PARTICULIER.
Pendant cette période d’un an, Broan-NuTone procédera au remplacement ou à la réparation sans aucuns frais, mais à sa propre discrétion, de tout produit ou pièce jugé défectueux dans le cadre
d’une utilisation normale. CETTE GARANATIE NE VISE PAS LES DISPOSITIFS D’AMORCAGE NI LES TUBES DES LUMINAIRES FLUORESCENTS. Cette garantie ne couvre pas (a) l’entretien et le
service courants ni (b) les produits et les pièces ayant fait l’objet du’n usage abusif, de négligence, d’un accident, d’un entretien ou d’une réparation non appropriée (par du personnel non autorisé
par Broan-NuTone) d’une mauvaise installation ou d’une installation non conforme aux directives d’installation fournies.
La durée de toute garantie implicite est limitée à la période de deux ans précisée pour la garantie expresse. Certains états ne reconnaissent pas les restrictions relatives à la durée des garanties
implicites; il se pourrait donc que cette restriction ne s’applique pas dans votre cas.
LE REMPLACEMENT OU LA RÉPARATION PAR BROAN-NUTONE, À SA PROPRE DISCRÉTION, DE TOUT PRODUIT OU PIÈCE DÉFECTUEUX CONSTITUE LE SEUL REMÈDE DE L’ACHETEUR
EN VERTU DE CETTE GARANTIE. BROAN-NUTONE NE PEUT ÊTRE TENUE RESPONSABLE DES DOMMAGES INDIRECTS, CONSÉCUTIFS OU SPÉCIAUX ATTRIBUABLES À UTILISATION OU AU
RENDEMENT DU PRODUIT. Certains états ne reconnaissent pas les restrictions ni les exclusions relatives aux dommages indirects, consécutifs ou spéciaux; il se pourrait donc que cette restriction
ne s’applique pas dans votre cas. La présente garantie vous accorde des droits spécifiques, mais vous pourriez aussi avoir d’autres droits en fonction de l’état dans lequel vous résidez. Cette
garantie remplace toute autre garantie donnée précédement.
SERVICE SOUS GRANTIE: Pour être admissible au service sous garantie, vous devez (a) aviser Broan-NuTone, à l’adresse ou au numéro de téléphone ci-dessous, (b) fournir le numéro du
modèle et la description de la pièce et (c) décrire la nature défaut de la pièce ou du produit. Au moment de la demande de service sous garantie, vous devez fournir une preuve de la date
d’achat originale.
Date d’installation
Entrepeneur ou installateur
N° de modèle et description du produit
Broan-NuTone Canada Mississauga, Ontario www.nutone.ca 877-896-1119
Broan-NuTone LLC Hartford, Wisconsin www.nutone.com 888-336-3948
Broan-NuTone Canada Mississauga, Ontario www.nutone.ca 877-896-1119
IF YOU NEED ASSISTANCE OR SERVICE - CONTACT:
POUR OBTENIR DE L’ASSITANCE OU DU SERVICE - CONTACTEZ:
One Year Limited Warranty
Garantie limitée d’un an
Rev. 08/2007
GARANTÍA DEL PROPIETARIO: Broan-NuTone garantiza al comprador consumidor original de sus productos por un período de un (1) año desde la fecha original de compra, que tales productos están libres de
defectos en material y mano de obra. NO HAY OTRAS GARANTÍAS, EXPRESAS O IMPLÍCITAS, INCLUYENDO, ENTRE OTRAS, GARANTÍAS IMPLÍCITAS DE COMERCIALIZACIÓN O ADAPTABLES A UN PROPÓSITO EN
PARTICULAR.
Durante este período de un año, Broan-NuTone reparará o reemplazará a su opción y sin costo, cualquier producto o parte que se encuentre defectuoso bajo condiciones normales de uso y servicio. ESTA GARANTÍA NO
CUBRE A LOS ARRANCADORES PARA LÁMPARAS FLUORESCENTES O A LOS TUBOS FLUORESCENTES, FILTROS, CONDUCTOS, TAPAS DE TECHO, TAPAS DE PARED Y OTROS ACCESORIOS PARA CANALIZACIÓN.
Esta garantía no cubre (a) Mantenimiento y servicios normales, ni (b) Productos o partes sujetos a mal uso, negligencia, accidente, mantenimiento inadecuado o reparaciones (por otros ajenos a Broan-NuTone),
instalación defectuosa o una instalación contraria a las instrucciones de instalación recomendadas.
La duración de cualquier garantía implícita está limitada a un periodo de un año según se especifica en la garantía expresa. Algunos estados no permiten limitación en cuanto a la duración de una garantía implícita, por
lo que la limitación arriba indicada puede que no se aplique a usted.
LA OBLIGACIÓN DE BROAN-NUTONE DE REPARAR O REEMPLAZAR A SU OPCIÓN, SERÁ EL ÚNICO Y EXCLUSIVO RECURSO QUE TENDRÁ EL COMPRADOR BAJO ESTA GARANTÍA. BROAN-NUTONE NO SERÁ
RESPONSABLE POR DAÑOS INCIDENTALES, CONSECUENTES O ESPECIALES QUE RESULTEN A CONSECUENCIA O SEAN INDEPENDIENTES DEL USO O DESEMPEÑO DEL PRODUCTO. Algunos estados no permiten
la exclusión o limitación de daños incidentales o consecuentes, de modo que la limitación o exclusión arriba indicada puede que no se aplique a usted. Esta garantía le proporciona derechos legales específicos, y usted
podría tener otros derechos, los cuales varían de un estado a otro. Esta garantía reemplaza a todas las garantías anteriores.
SERVICIO DE GARANTÍA: Para tener derecho al servicio de garantía, usted debe (a) notificar a Broan-NuTone a la dirección o al número de teléfono indicado abajo, (b) indicar el número de modelo y la
identificación de la parte y (c) describir la naturaleza de cualquier defecto en el producto o parte. Al momento de solicitar el servicio por la garantía, usted debe presentar un comprobante de la fecha original de
compra.
Fecha de la instalación
Constructor o instalador
Número de modelo y descripción del producto
Garantia Limitada de un Año
SI NECESITA ASISTENCIA O SERVICIO - COMUNÍQUESE A:
Broan-NuTone LLC Hartford, Wisconsin www.nutone.com 888-336-3948
Broan-NuTone Canada Mississauga, Ontario www.nutone.ca 877-896-1119
Rev. 08/2007
Page 18

MODEL / MODÈLE / MODELO 9093WH
Page / Página 18
Page 19

MODEL / MODÈLE / MODELO 9093WH
Page / Página 19
Page 20

MODEL / MODÈLE / MODELO 9093WH
Page / Página 20
99045153A
 Loading...