

Page 1

Levator Elite LE9011
Nu-Tek® Levator Elite
Single Channel EMG, EMS & ETS
• EMG Triggered Stimulation (Passive +Active), Muscle
Stimulation and EMG Modes
• One channel EMG and One channel EMS stimulation
• One channel ETS with stimulation on one channel
• Nu-Tek scale scoring for Pelvic Floor Muscle and used as
an assessment tool
• Programs for Incontinence treatment, Pelvic floor muscle
development and neuromuscular Rehabilitation
• User programs for EMG/ETS (1 phase) and STIM (up to 5
stimulation phases) mode
Application:
• Promote continence
• Improve Pelvic floor Exercise
• Re-educate the Pelvic muscles
Standard Accessories:
NULEADPATRD
NULEADEARTH
ACPROBEV
ACF35050
Nu-Tek Patient Lead- Red
Nu-Tek Earth Lead - Black
Incontinence Probe - Vaginal
AllCare Electrodes - 5cm x 5cm - Square-
Self Adhesive
Specifications:
Power Supply: 1.5V AA baeries, 6V
Low Voltage Warning: ≤4V±0.2V
Dimensions: 139mm×68mm×33mm (L*W*H)
Weight: 156g (without baeries)
EMG: One Channel:
EMG Range: 0.2 to 2000μV
Sensitivity: 0.1μV
Accuracy: 4% of μ V reading, +/- 0.3μV at 200 Hz
Work/Rest Periods: 2-99 seconds
STIM: One Channel:
Stimulation Intensity: 90V±10V (V max), Adjustable from 0 to
Pulse Width:
Pulse Rate:
Work/Rest periods:
Ramp Time (up and
down):
Treatment Time:
Programs
90mA (on 1000Ω)
50-450μS (2% accuracy)
2-100Hz (2% accuracy)
1-99 seconds
0.1-9.9 seconds
1-99 minutes
Pre-set: 11 Customs:3
Optional Accessories:
NUSOFTWARE
ACPROBEA
ACF35090
ACF350R
Nu-Tek Biofeedback Soware
Incontinence Probe - Anal
AllCare Electrodes - 5cm x 9cm - Rectangle
- Self Adhesive
AllCare Electrodes - 5cm - Round
- Self Adhesive
Code: Description:
NULEVATOR Nu-Tek® Levator Elite
physiosupplies.co.uk
REDEFINING | PHYSIOTHERAPY | FITNESS | MEDICAL
The Warehouse Beck Bank West, Pinchbeck, Spalding, Lincolnshire, PE11 3QN Phone: 01775 640972 Email: sales@physiosupplies.co.uk
Page 2

Nu-Tek Levator Elite
User Manual
www.nutekmedical.com
Page 3

- Page 2 -
Nu-Tek Levator Elite User Manual
Table of Contents
Contents
Warnings--------------------------------------------------------------------------
Introduction----------------------------------------------------------------------
Contra-Indication and Precautions-----------------------------------------
Keypad Layout-------------------------------------------------------------------
Lead / Electrode connection Assembly-----------------------------------
Quick start instructions--------------------------------------------------------
Clinical Mode - Program - Phase--------------------------------------------
EMG mode operation--------------------------------------------------
Examples of EMG treatment-----------------------------------------
EMG Parameters--------------------------------------------------------
EMG and ETS Threshold----------------------------------------------
EMG in patient mode -------------------------------------------------
EMG measurement-----------------------------------------------------
Conditions respond to EMG-----------------------------------------
STIM mode operation-------------------------------------------------
STIM Parameters--------------------------------------------------------
ETS mode operation---------------------------------------------------
ETS Parameters---------------------------------------------------------
Data Report for progress-----------------------------------------------------
System setting----------------------------------------------------------------
Statistics--------------------------------------------------------------------------
More about EMG statistics----------------------------------------------------
Electrodes Types and Tips----------------------------------------------------
Care, Maintenance, Accessories and Disposal--------------------------
Specications--------------------------------------------------------------------
Information regarding Electromagnetic
compatibility and interference (EMC)------------------------------------
Trouble shooting---------------------------------------------------------------
Warranty--------------------------------------------------------------------------
Appendix-program------------------------------------------------------------
Page
3
4
6
7
8
9
13
14
15
17
18
19
20
21
22
23
24
25
26
27
29
31
32
33
35
37
42
45
Issue Date: 06/05/2016 Document Number: LE9011-Rev. V1.1 2016
c
46
Page 4
- Page 3 -
Nu-Tek Levator Elite User Manual
Warnings
※ This device must be used with the guidance of a Physiotherapist or Doctor.
※ Type BF equipment, Continuous Operation.
※ Do not immerse device into water or any other substance.
※ Do not use the device in the presence of a ammable anaesthetic gas
mixture and air or with Oxygen or Nitrous Oxide.
※ This device uses 4 x AA Batteries. If using rechargeable Nickel Metal
Hydride batteries, be sure to use a CE approved battery charger. Never
connect it directly to a battery charger or to any other mains powered
equipment.
※ To avoid the eects of electromagnetic interference, never use the device
in the EMG mode, within 4 metres of a mobile telephone or near any
other powerful radio interference producing equipment that causes
electrical sparks etc. In the EMG mode, the device may be susceptible to
strong interfering radio type emissions that may lead to temporally
increased EMG microvolt readings. The reading will immediately return
to the correct value when the interference ceases. (Remember that a
relaxed muscle should read below 4μV).
※ Patient electrodes including all skin surface electrodes, vaginal and rectal
probe are for single patient use only!
※ Do not use stimulation on your facial area unless you are under strict
guidance from a qualied clinician.
※ Application of electrodes near the thorax may increase the risk of cardiac
brillation.
※ Operation in close proximity (e.g. 1m) to a shortwave or microwave
therapy equipment may produce instability in the stimulator output.
※ Simultaneous connection of a patient to a high frequency surgical
equipment may result in burns at the site of the stimulator electrodes
and possible damage to the stimulator.
※ No modication of this equipment is allowed!
※ Keep the device out of reach of children
※ Skin irritation from the electrode gel and electrode burns are potential
adverse reactions. If skin irritation occurs, discontinue use and consult
your physician.
※ Do not apply stimulation over the patient's neck because this could cause
severe muscle spasms resulting in closure of the airway, diculty in
breathing, or adverse eects on heart rhythm or blood pressure.
※ Do not apply stimulation in the presence of electronic monitoring
equipment (e.g., cardiac monitors, ECG alarms), which may not operate
properly when the electrical stimulation device is in use.
Device name: Nu-Tek Levator Elite Model number: LE9011
Page 5
- Page 4 -
Nu-Tek Levator Elite User Manual
Introduction
The Nu-Tek Levator Elite combined EMG [electromyography] and
Neuromuscular Stimulation is a simple to use advanced product for reducing
incontinence in females with urinary incontinence. The device has been
developed to enhance and support the Clinician, to assist the end user at
home to learn more about their Pelvic muscle and above all to improve their
Pelvic Muscle strength and their incontinence therapy.
The Nu-Tek Levator Elite: EMG Biofeedback measures the Pelvic contraction,
and assists users to maximise Pelvic oor exercises, after periodic training, it
also helps to assess the pelvic oor muscle condition, quantify the need for
further treatment and evaluate report on the patient’s progress. Muscular
Stimulation improves blood circulation, capillary bed density and strengthens
the Pelvic oor muscles. EMG triggered stimulation facilitate those with
accid muscles; ETS helps reduce the symptoms in Genuine Stress
incontinence in some patient’s and is being used more frequently by
clinicians for this condition
For the end user, in patient mode, a simple and easy to understand EMG
Biofeedback bar graph displays the Nu-Tek pelvic muscle strength
grading on a scale of 1 to 6, and assists the user to meet their pre-set targets.
In the therapy mode, the EMG graph can be changed to a waveform format,
as viewed on the LCD screen of the device or using the Nu-Tek software
link on a desk top or laptop computer . The waveform can be used to
help analyse the patient’s condition. Periodically the doctor or therapist will
be able to download newly developed programs for Muscle Stimulation, EMG
Biofeedback and EMG- TRIGGERED STIMULATION. This helps this unique
product to keep abreast of any clinical trials where the conclusion is that a
specic program or program set may assist in enhancing the treatment of
continence. The Nu-Tek Levator Elite has 3 clinical modes: EMG, ETS, and
STIM. Each of these modes has custom programs. The device also includes
pre-set EMG and STIM programs: there are 20 pre-set Pelvic muscle
stimulation programs: Genuine Stress, Urge, Frequency, weekly maintenance.
Lack of sensation, rectal stimulation and several other Patient conditions. One
pre-set EMG program for assessment. The custom program has a diverse
range of parameters that can be programmed by the patient or therapist to
meet individual user conditions. Any one of the pre-set or custom programs
can also be selected freely by the user. The essential performance of the
device are free from the production of unwanted or excessive stimulation
output and free from the display of incorrect numerical values associated
with measure to be performed.
Page 6

- Page 5 -
Nu-Tek Levator Elite User Manual
Customer Care
We welcome constructive comments regarding our equipment particularly
those that might help us to improve existing features, add new ones and / or
develop new products for the future.
Page 7
- Page 6 -
Nu-Tek Levator Elite User Manual
Contra-Indications and Precautions
STIM: Neuromuscular Stimulation (NMS)
Before using this device you must rst seek the advice of your doctor or
therapist.
Neuromuscular Stimulation should not be used by:
※ Patients tted with demand style cardiac pacemakers
※ During pregnancy (unless medically advised)
※ Patients with undiagnosed pain conditions
※ Do not place electrodes:
- Over carotid sinus nerves
- Over larynx or trachea
- Inside mouth
- On anaesthetised or desensitised skin
- Do not drive a vehicle while the device is stimulating and attached to
your body
※ Skin irritation from the treatment of NMS or EMG itself does not generally
occur. However, rubber electrodes may irritate some skin types, therefore;
in this case we recommend using hypoallergenic self adhesive electrodes.
※ The patient should only use the device for what it was prescribed for
※ Do not immerse the device in water or any other liquid substance
※ Do not use stimulation on your facial area unless you are under strict
guidance from a qualied clinician
EMG
There are no precautions when using EMG unless used for pelvic oor
exercising or assessment. In this case EMG should not be used:
※ During menstrual period
※ Inammation or infection in the vaginal area or urinary tract.
※ With patients who have diminished mental capacity or physical
competence who cannot handle the device properly.
※ The absence of sensation due to denervation of the pelvic oor.
※ In children - when using internal probe.
Page 8
- Page 7 -
Nu-Tek Levator Elite User Manual
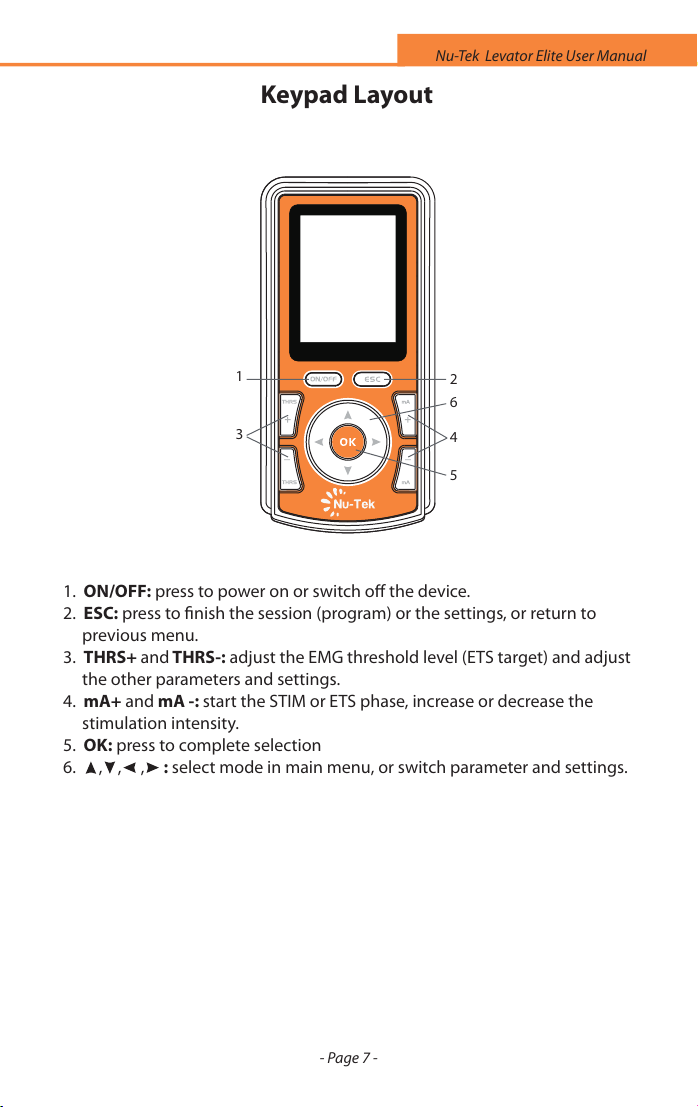
Keypad Layout
1
3
2
4
6
5
1. ON/OFF: press to power on or switch o the device.
2. ESC: press to nish the session (program) or the settings, or return to
previous menu.
3. THRS+ and THRS-: adjust the EMG threshold level (ETS target) and adjust
the other parameters and settings.
4. mA+ and mA -: start the STIM or ETS phase, increase or decrease the
stimulation intensity.
5. OK: press to complete selection
6. , , , : select mode in main menu, or switch parameter and settings.
Page 9

- Page 8 -
Nu-Tek Levator Elite User Manual
Lead / Electrode Connection Assembly
USB cable: Connection to the PC
REF: Reference wire (REF) for precise EMG measurement
CH: dual conductor lead wire for STIM or EMG
Note: The REF EMG lead / electrode is only required for EMG and ETS and
NOT for Neuromuscular stimulation.
The lead wires, electrodes, vaginal probe and REF wires are supplied
as part of the kit.
E
V
Page 10

- Page 9 -
Nu-Tek Levator Elite User Manual
Quick Start Instructions
1. Insert four AA batteries
Remove battery cover. Insert batteries as labelled inside the battery
compartment and then replace the back cover.
2. Insert lead wire
Insert the lead wire/s into the sockets of the device. The round black EMG
reference lead wire connects to the round black socket in the top of the
unit; the red stimulation lead wire connects to the red socket.
IMPORTANT! If you don’t use the round EMG reference wire (REF), your
EMG and ETS results will be inaccurate.
3. Skin electrodes/probe placement
When using the EMG or ETS phase, connect the EMG reference lead wire
to a surface skin electrode and place it appropriately on the body, making
sure the skin is free from grease and dirt; repeat the above procedure with
the other two skin electrodes. If using a probe, place the single surface
skin electrode on the thigh area and then insert the probe.
4. Turn on Levator Elite by pressing the ON/OFF button once for 3 seconds.
Note: This product has a Patient Mode which we suggest the general
public use and a Therapy Mode which is more practical for the Clinician.
Selecting the Therapy Mode requires a password. When selected the
Patient Mode, the product would be locked. The details setting method
refer to “Change using mode” of page 27. In Patient Mode, you can not
select the therapy program and set the parameters of the custom
program.
5. The EMG, the Patient Mode uses the Nu Tek bar graph; the Therapy Mode
uses a line graph.
6. There are pre-set (ready to use) programs and custom programs (which
can be adjusted by the patient or therapist in Therapy Mode). The
parameters of pre-set programs can not be changed.
Note: Individual custom programs set for the patient should ideally be
under the guidance of a doctor or therapist in Therapy Mode.
Using the circular button black arrow keys navigate to select EMG and press
the OK button. The screen displays Training Program and Assessment
Program. In Assessment Program, there is only one preset program: Threshold
= 30μV, WIDE Filter, ABOVE Biofeedback sound, Work time = 5s, Rest time =
5s, and 5 Trials, AUTO threshold is advised to be used to see the treatment
progress during periodic training. In the Training program, there are two
custom programs, you can select all the EMG Biofeedback parameters by
using the up and down black arrow keys, and change settings by using the
THRS+ and THRS- buttons. In Patient Mode, the program, work time, rest
time,trial and A/M threshold can not be adjust.
Page 11
- Page 10 -
Nu-Tek Levator Elite User Manual
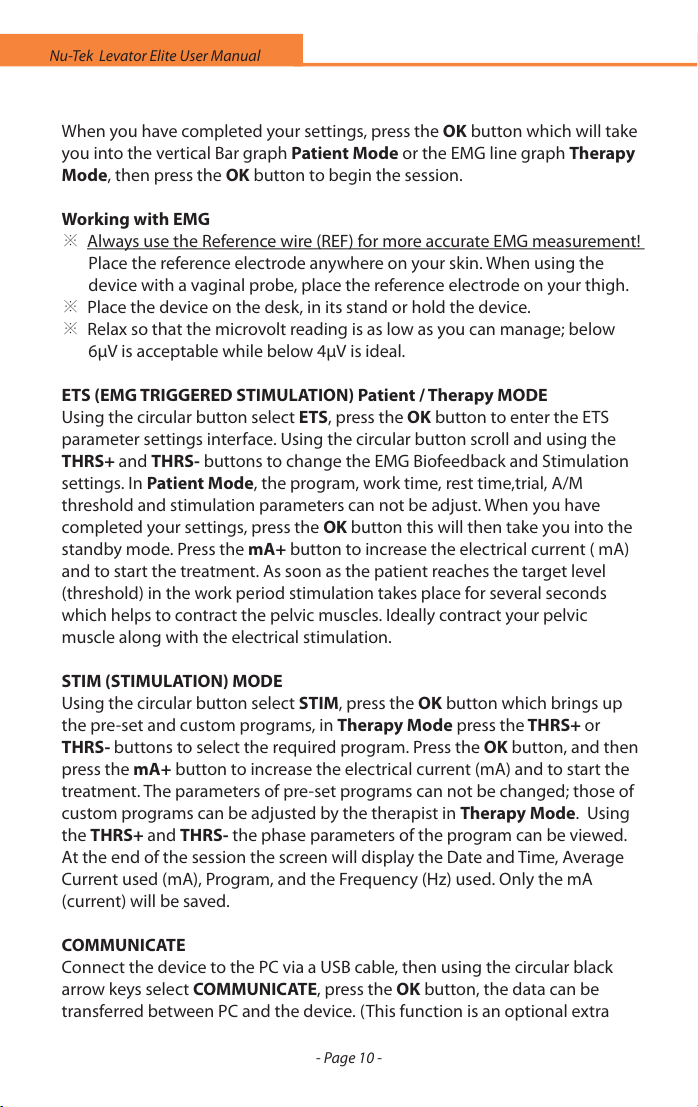
When you have completed your settings, press the OK button which will take
you into the vertical Bar graph Patient Mode or the EMG line graph Therapy
Mode, then press the OK button to begin the session.
Working with EMG
※ Always use the Reference wire (REF) for more accurate EMG measurement!
Place the reference electrode anywhere on your skin. When using the
device with a vaginal probe, place the reference electrode on your thigh.
※ Place the device on the desk, in its stand or hold the device.
※ Relax so that the microvolt reading is as low as you can manage; below
6µV is acceptable while below 4µV is ideal.
ETS (EMG TRIGGERED STIMULATION) Patient / Therapy MODE
Using the circular button select ETS, press the OK button to enter the ETS
parameter settings interface. Using the circular button scroll and using the
THRS+ and THRS- buttons to change the EMG Biofeedback and Stimulation
settings. In Patient Mode, the program, work time, rest time,trial, A/M
threshold and stimulation parameters can not be adjust. When you have
completed your settings, press the OK button this will then take you into the
standby mode. Press the mA+ button to increase the electrical current ( mA)
and to start the treatment. As soon as the patient reaches the target level
(threshold) in the work period stimulation takes place for several seconds
which helps to contract the pelvic muscles. Ideally contract your pelvic
muscle along with the electrical stimulation.
STIM (STIMULATION) MODE
Using the circular button select STIM, press the OK button which brings up
the pre-set and custom programs, in Therapy Mode press the THRS+ or
THRS- buttons to select the required program. Press the OK button, and then
press the mA+ button to increase the electrical current (mA) and to start the
treatment. The parameters of pre-set programs can not be changed; those of
custom programs can be adjusted by the therapist in Therapy Mode. Using
the THRS+ and THRS- the phase parameters of the program can be viewed.
At the end of the session the screen will display the Date and Time, Average
Current used (mA), Program, and the Frequency (Hz) used. Only the mA
(current) will be saved.
COMMUNICATE
Connect the device to the PC via a USB cable, then using the circular black
arrow keys select COMMUNICATE, press the OK button, the data can be
transferred between PC and the device. (This function is an optional extra
Page 12

- Page 11 -
Nu-Tek Levator Elite User Manual
and the user will need to purchase the Nu-Tek System, the USB connection
cable to the PC).
DATA MANAGE
Using the circular button to select DATA MANAGE, press the OK button, then
using or select Data query , Delete data or Send data to pc, then press the
OK button. The information is stored and displayed on the two linear graphs
on the LCD screen. The two vertical graphs are combined by up to 90 records
respectively, and the history of the user’s sessions can be viewed. For training
data, the device saves the data on a daily basis to form statistics. In the
Assessment data, the device stores the weekly statistics by carrying out an
assessment of the programs once or twice per week. The device can store
more than one patient’s statistics, but it can not distinguish between dierent
patients. Only when the device connected via the Nu- Tek PC software, can
the recorded data in PC be distinguished between dierent patients. The user
can delete the treatment data when selected Delete Data and press OK
button.
SYSTEM SETTING
Using the circular button select SYSTEM SETTING, press the OK button which
will bring up the various options, including Date and Time, Backlight Setting,
Sound Setting, Set Language (English, German, French, Italian, Spanish),
Change Using Mode, Factory Data Reset. Using the circular button scroll
down to the settings you want to change, press the OK button, then using
the THRS+ and THRS- buttons to set the various options. Use or to select
Save or Cancel, press the OK button. If you select Factory Data Reset, all the
values are restored to the original factory setting. (Note: If the factory setting
is restored all the patient’s statistics will be lost)
PROGRAM MANAGE
Using the circular button select PROGRAM MANAGE, press the OK button.
Then using or select Downloaded Programs (There are three modes:
EMG, ETS, and STIM. For either mode, there are up to a maximum of 3
programs) or To Download Programs, then press the OK button. For
example, select Downloaded Programs, to view the downloaded program,
press the OK button, to use the program. Only the last selected downloaded
program in Therapy Mode is available for display and for use in the Patient
Mode. Select to download Programs by connecting the device to the PC via
the USB cable. If three programs have been downloaded the fourth program
will not be possible, at this point the screen displays a prompt for the user to
choose which one program to select to make up the three programs.
Page 13

- Page 12 -
Nu-Tek Levator Elite User Manual
T
PROGRAM
EMG THERAPY MODE
PARAMETER MANAGE
Using the circular button select PARAMETER MANAGE, press the OK
button to bring up the details.
OPERATING MANAGE
Using the circular button select OPERATING MANAGE, press OK button to
bring up the details.
7. After completing the settings, Press the ESC button to exit.
8. When you have nished, press and hold the ON/OFF button for 3 seconds
to turn o the device. Remove and replace the skin electrodes onto the
clear plastic lm, reseal them in the plastic zip bag and store them in a
cool place. If using a vaginal or rectal probe thoroughly clean the probe
and seal it in plastic zip bag.
Page 14
- Page 13 -
Nu-Tek Levator Elite User Manual
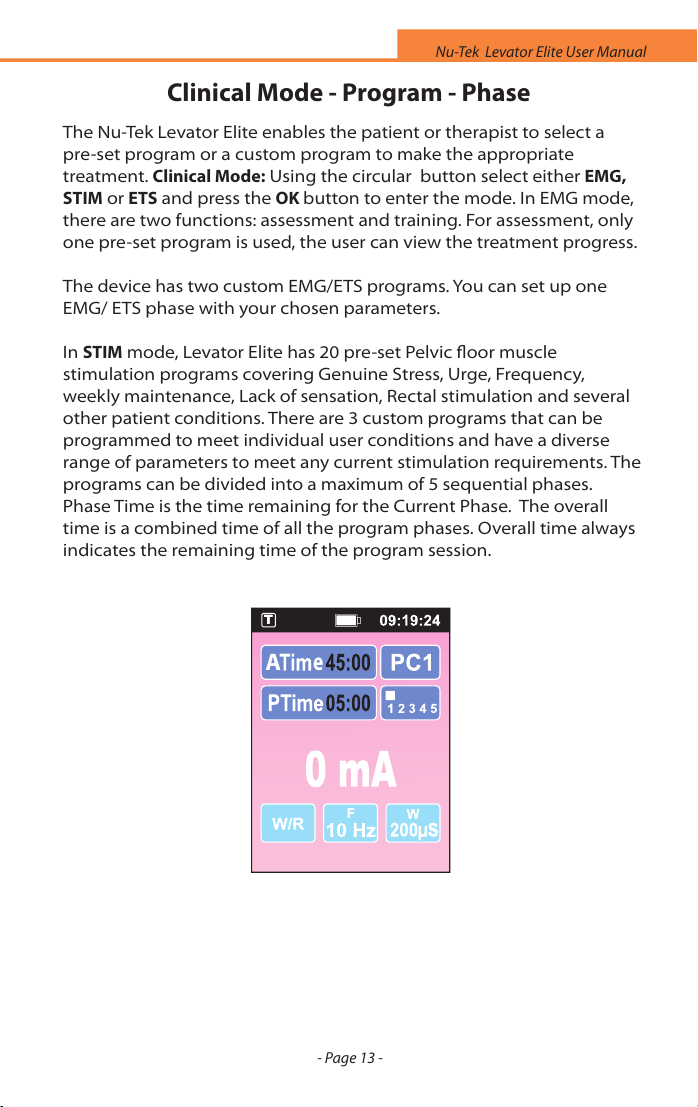
Clinical Mode - Program - Phase
The Nu-Tek Levator Elite enables the patient or therapist to select a
pre-set program or a custom program to make the appropriate
treatment. Clinical Mode: Using the circular button select either EMG,
STIM or ETS and press the OK button to enter the mode. In EMG mode,
there are two functions: assessment and training. For assessment, only
one pre-set program is used, the user can view the treatment progress.
The device has two custom EMG/ETS programs. You can set up one
EMG/ ETS phase with your chosen parameters.
In STIM mode, Levator Elite has 20 pre-set Pelvic floor muscle
stimulation programs covering Genuine Stress, Urge, Frequency,
weekly maintenance, Lack of sensation, Rectal stimulation and several
other patient conditions. There are 3 custom programs that can be
programmed to meet individual user conditions and have a diverse
range of parameters to meet any current stimulation requirements. The
programs can be divided into a maximum of 5 sequential phases.
Phase Time is the time remaining for the Current Phase. The overall
time is a combined time of all the program phases. Overall time always
indicates the remaining time of the program session.
A
e
T
Page 15
- Page 14 -
Nu-Tek Levator Elite User Manual
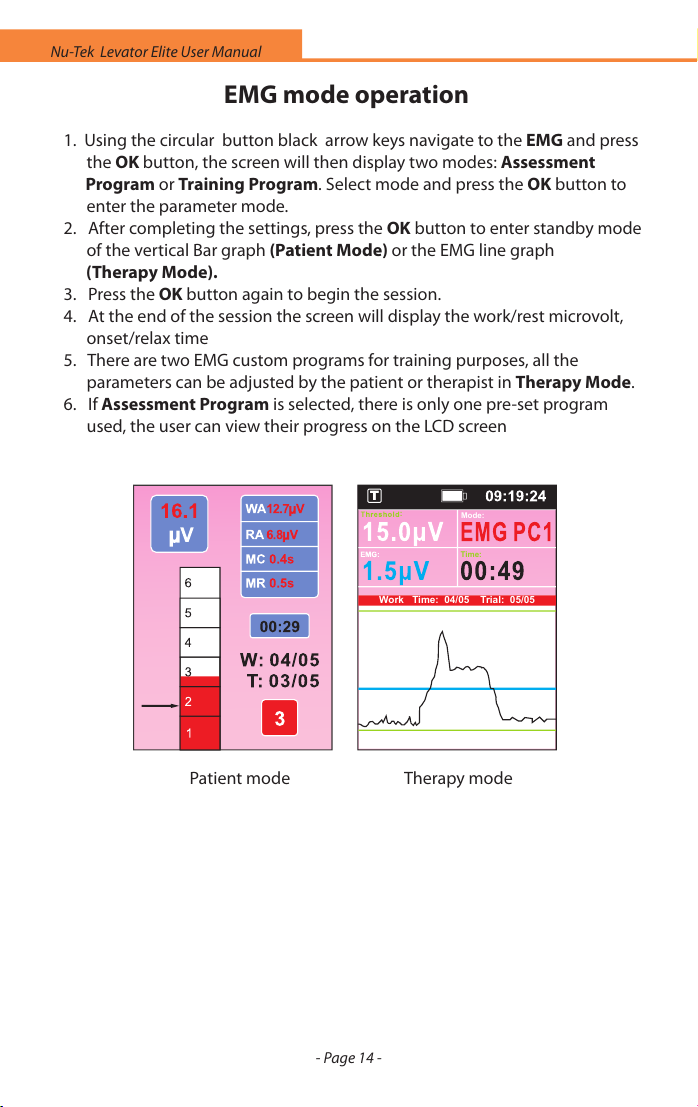
EMG mode operation
1. Using the circular button black arrow keys navigate to the EMG and press
the OK button, the screen will then display two modes: Assessment
Program or Training Program. Select mode and press the OK button to
enter the parameter mode.
2. After completing the settings, press the OK button to enter standby mode
of the vertical Bar graph (Patient Mode) or the EMG line graph
(Therapy Mode).
3. Press the OK button again to begin the session.
4. At the end of the session the screen will display the work/rest microvolt,
onset/relax time
5. There are two EMG custom programs for training purposes, all the
parameters can be adjusted by the patient or therapist in Therapy Mode.
6. If Assessment Program is selected, there is only one pre-set program
used, the user can view their progress on the LCD screen
Patient mode Therapy mode
Time:
Work Time: 04/05 Trial: 05/05
Mode:
:
T
Page 16

- Page 15 -
EMG Work/Rest
The W/R phase consists of Work and Rest periods and repeated Trial times
(repetitions). During the Work period, the patient is prompted to contract
their muscle. During the Rest period, the patient is prompted to relax their
muscles. At the end of the work/rest sessions the EMG values display the
information on the LCD screen of the device. The device can also be linked to
a PC or laptop computer.
Relaxation test:
The ideal resting value when conducting work/rest sessions for improving
the Pelvic Floor Muscle is 4 μV (microvolt). The relaxing value is just as
important as the pelvic oor muscle contracting value. The resting time for
the pelvic oor muscle exercises should be at least 5 seconds and longer, if
the user is unable to contract their pelvic oor muscle above muscle strength
scale 1.
Rapid contractions:
The patient should perform 5 rapid contractions, note how quickly the bar
graph rises and falls. If the contractions and release times are slow, the user
will need to improve their fast twitch muscle bres by conducting quality
Pelvic oor muscle exercises at least once per day or more. If after a few
weeks there is no marked improvement, consider electrical stimulation using
a setting of 35Hz, 220µS Pulse Duration, for 20 -25 minutes per day.
Contract and hold:(Endurance Training)
The patient should contract the pelvic oor muscle for as long as possible, 5
seconds is reasonable, 10 seconds would indicate a strong muscle, any longer
would be excellent.
Work/rest session:
Two basic purposes for Work/Rest session:
1. Enhances Pelvic Floor Muscle exercises for both strengthening and relaxing
the muscles, and to ascertain if other forms of treatment are required.
2. Periodically perform Work/Rest session and note the results, especially the
data of the assessment program. This allows the patient or therapist to see
or analyse muscle improvements, which can be organised or used as a
valuable clinical report.
To run the assessment Work/Rest session:
1. The assessment program ideally should follow the settings: Work Time=5s,
Rest Time=5s, =5s, Threshold=30μV, ABOVE feedback sound, WIDE lter,
Nu-Tek Levator Elite User Manual
Examples of EMG treatment
Page 17

- Page 16 -
Nu-Tek Levator Elite User Manual
AUTO threshold and 5 Trials. Use the WIDE lter band for continence as the
measurement will be more accurate. When using the electrodes near heart
the proximity of the upper arms, back, etc., use the NARROW lter band
(lters out the unwanted heart beat frequencies).
2. Press the OK button, the initial REST prompt will appear, followed by 5
repetitions (trials) of 5 sec of Work followed by 5 sec of Rest. At the end of
the sessions the user can view the session statistics on screen at the end
of the last Rest period. During the Work period, the patient should contract
the muscle as hard and rmly as possible, ideally during Rest period the
patient should relax as quickly as possible, below 4μV or lower. Suggest to
patient to run the assessment program each week or at another suitable
time.
3. When the device is connected to the PC, the PC Software records the
statistics and stores the information on to the database.
Page 18

- Page 17 -
Nu-Tek Levator Elite User Manual
EMG Parameters
Note:
1. In Therapy Mode, you can change all the EMG Biofeedback settings.
2. Electrodes placed on the lower abdominals, legs, arms and back, face,
buttock or pelvic area use WIDE lter band setting.
All other areas i.e.upper abdominals, chest, shoulder, upper arms and back
use NARROW lter band setting.
NARROW setting is used due to the interference from the heart beat
frequency, this interference has to be eliminated.
Program time
Threshold(µV)
Filter
Biofeedback
Work/Rest time(S)
Threshold setting
Max:99mins
0.6-2000μV, During work period the patient is
prompted to contract above the Threshold. In the
rest phase the patient is prompted to relax their
muscle.
Wide/Narrow
Above/Below/Continue/OFF:
Above the threshold, Below the threshold,
Continue-sound, OFF-no bar graph sound
Auto/Manual
Trial Number of work/rest repetitions, 2-99
2-99 sec
EMG Parameter
Custom Program 1
T
Page 19

- Page 18 -
Nu-Tek Levator Elite User Manual
EMG and ETS Threshold
What is EMG THRESHOLD?
Threshold is an EMG value measured in μV (microvolt). For strong muscles
which perform higher EMG biofeedback muscle contractions the threshold
level will be higher than for weak or accid muscles. In ETS mode (EMG
Triggered Stimulation) the patient needs to contract the muscle above the
target threshold to trigger the stimulation.
Auto threshold:
To select Auto threshold of the EMG or ETS parameter setting mode use the
THRS+ or THRS- buttons. Automatic threshold is designed to adjust the EMG
muscle strength scale (and the point of ETS triggering) to the actual level of
the patient’s EMG biofeedback muscle contraction
Auto threshold during EMG session:
Select the EMG mode and press OK to begin the EMG session. Work/Rest
prompts will appear. During each Work period the device measures Work
Average EMG, at the beginning of the next Work period, the threshold is set
at 80% of the previous Work Average. (This functionality is available only for
Auto threshold)
Auto threshold during ETS session:
Select the ETS mode, press mA+ button to start the session. If the target
threshold is reached (EMG will trigger the stimulation) in seconds, the device
will increase the target threshold for the next trial. For example , the work
period is 20 seconds, If the patient reaches the threshold very quickly in
Sector A (1-5s), the next threshold will be calculated as previous threshold
plus 12.5%; if reached the threshold in Sector B(6-10s), as previous threshold
plus 5%, if reached in Sector C(11-15s), as same as the previous threshold. If
the Patient had diculties with triggering from EMG to stimulation in Sector
D(16-20s), or didn’t trigger the stimulation during the Work period, the next
threshold will be reduced by 5%.
MANUAL threshold
At any time when the EMG or ETS is displayed, the threshold can be adjusted
manually by pressing the THRS+ or THRS- buttons.
NOTE! For better control of ETS Score statistics we recommend to use
Manual threshold for ETS session.
Page 20

- Page 19 -
Nu-Tek Levator Elite User Manual
EMG in Patient Mode
In the Patient Mode, a simple and easy to understand EMG Biofeedback bar
graph displays the pelvic oor muscle strength and assists the user to meet
their pre-set targets. The bar graph scale on the device is divided between
1- 5, plus 6 as an extra for those people who can contract above the standard
scoring of 5.
Note:
The normal resting muscle tone is 4 Microvolt’s (μV) or lower. Between work/
rest trials it can be for some users a challenge to relax the pelvic oor muscle
as low as 4μV, under 6μV in such circumstances is satisfactory
Muscle Strength Grading Scale (Nu Tek Scale)
Measured in EMG Microvolt’s μV
Scale 1
Scale 2
Scale 3
Scale 4
Scale 5
Scale 6
Virtually no muscle contraction and very little microvolt readings
Moderate muscle contraction with increased movement and
microvolt reading and a longer muscle contraction holding time
Firm contraction and improved muscle holding time
Strong contraction with much longer muscle holding time
Robust contraction with greatly improved muscle holding time
Slight muscle contraction with little movement, increase microvolt
reading and a short muscle contraction holding time
Page 21

- Page 20 -
Nu-Tek Levator Elite User Manual
EMG measurement
1. If the Patient measures EMG near the heart we suggest using the NARROW
lter band to lter out the heart beat. For measurement of the pelvic
2. The lter makes sure the 50Hz [Europe] and 60 Hz [USA] (mains) frequencies
do not interfere with the muscle biofeedback measured in microvolt.
Specic ltering as well as other adjustments and improvements allows the
device to measure the EMG down to as low as 0.2μV.
3. REMEMBER WHEN USING EMG! Please always be sure to use the reference
distorted or too
high. (see the picture on page 7 for how to connect the reference lead wire).
4. To avoid the eects of electromagnetic interference, never use the Nu-Tek
Levator Elite in the EMG Mode, within 3-4 metres of a mobile telephone or
near any other powerful radio interference producing equipment that
causes electrical sparks etc. In the EMG Mode, the device may be
susceptible to strong interfering radio type emissions that may lead to
temporary increased EMG microvolt readings. The reading will immediately
return to the correct value when the interference ceases. (Remember that
a relaxed muscle should read below 4μV).
muscle always use the WIDE BAND FILTER
electrode otherwise the EMG signal will be incorrect,
Page 22

- Page 21 -
Nu-Tek Levator Elite User Manual
Conditions respond to EMG
Available Nu-Tek software Protocol for EMG Training
※ The Nu -Tek® Software provides additional benets for EMG training:
- It displays the EMG graph on the computer screen.
- It creates Templates.
- It features a patient database with the history of the sessions.
- It produces comprehensive progress reports based on assessment
statistics.
- It downloads newly developed programs; this helps the unique product
to keep abreast of any clinical trials.
- Many other additional functions useful for clinicians and patients.
※ Use the Nu-Tek Software manual to learn more about the optional
Nu-Tek Software.
Conditions known to respond to EMG:
※ Incontinence
※ Neuro feedback
※ Pelvic oor pain
Page 23

- Page 22 -
Nu-Tek Levator Elite User Manual
STIM mode operation
Program Phase
1. Using the circular button select the STIM mode, press the OK button and
enter parameters setting.
2. using and select PR or PC, then press the THRS+ or THRS- buttons
to select the required program. The parameters in the pre-set programs
can not be changed. Setting up custom programs should be under the
guidance and set by the therapist or doctor in Therapy Mode. Use the
circular button to select the parameters, then using the THRS+ or THRS-
buttons set the parameter settings – Frequency {Hz}, Pulse duration {µS},
work and rest times, ramp up and ramp down times.
3. Press the OK button, then press the mA + button to increase the electrical
current (mA) until you reach a comfortable level of stimulation. After
each phase of a program session, the user may need to press the mA+
button to continue stimulation
4. To stop stimulation press and hold the ON/OFF for 3 seconds, or the ESC,
OK , , , , buttons to stop the treatment.
5. At the end of the session, the screen will display the statistics: average
current intensity (mA). In some patients the mA level (current) can have a
bearing on the sensory nerve damage.
STIM
STIM SYNPhase Type
Phase Time(m)
Work Fre. (Hz)
Rest Fre. (Hz)
Width(uS)
Work Time(s)
Rest Time(s)
Ramp Up(s)
Ramp Down(s)
1
10
0
200
5
8
1.0
1.0
Custom Program 1
1/5
05:00
T
Page 24

- Page 23 -
Nu-Tek Levator Elite User Manual
STIM Parameters
Program time
Phase type
Phase time(m)
Frequency (Hz)
Pulse Width(µS)
Ramp down /up time (s)
Work/Rest time (s)
1- 99mins
W/R, CON
1~99min
2-100 Hz
0.1-9.9sec
1-99 sec
Note:
In Therapy Mode, all the parameters of the custom programs are available.
In Patient Mode (Locked Mode), the parameters can not be changed.
Conditions known to respond to NMS (Stimulation):
※ Strengthening of the Pelvic Muscles
※ Urge
※ Genuine Stress
※ Neuro degeneration of sensory nerves
※ Overactive Bladder
※ Prolapse
※ Frequency
50 - 450 µS
STIM Parameters
Page 25

- Page 24 -
Nu-Tek Levator Elite User Manual
ETS mode operation
ETS treatment is especially useful for Pelvic Floor Muscle improvement. ETS
begins with EMG Work/Rest training. The Patient can adjust the desired
Target (EMG Threshold) level by pressing the THRS+ or THRS- buttons.
If the patient reaches the Target during the Work period of EMG, the EMG
triggers the Stimulation which helps the patient keep their pelvic oor
muscle contracted. ETS mode also enables the patient to stimulate weak
muscles by setting a low level threshold target and adjusting the work and
rest periods to meet individual patient requirements.
Example: Assuming patient has weak pelvic oor muscle, set threshold level
at 5 microvolt, ETS and EMG Work at 5 sec, ETS and EMG Rest at 10 sec and
Stimulation time at 5 sec, when the patient reaches the threshold level in the
EMG working period, the EMG triggers the stimulation and each trial has a
constant stimulation time of 5 sec.
Work time, Rest time and the Stimulation time must be taken into
consideration in order to adjust the basic ETS treatment parameters.
Patient mode Therapy mode
Conditions known to respond to ETS
※ Pelvic oor conditions - Genuine Stress and Flaccid muscle
ATime:
STIM:
ETS STIM: 7mA
T
T
Page 26

- Page 25 -
Nu-Tek Levator Elite User Manual
ETS Parameters
Program time
Threshold(µV)
Filter
Biofeedback
Work/Rest time (s)
Trial
Threshold setting
STIM time(s)
Pulse width(µS)
Ramp up/down
time(s)
50-450 μS
Frequency(Hz)
Max:99mins
0.6-2000μV, During work period the patient is
prompted to contract above the Threshold. In the
rest phase the patient is prompted to relax their
pelvic muscle.
Wide/Narrow
2-99 sec
Number of work/rest repetitions, 2-99
Auto/Manual
1-99sec
2-100Hz
Above/Below/Continue/OFF :
Above the threshold, Below the threshold, Continue-
sound, OFF-no bar graph sound
Auto/Manual
Note:
For custom program: in Therapy Mode therapist can change all the EMG
Biofeedback and stimulation settings.
ETS Parameters
0.1-9.9sec
Threshold setting
Custom Program 1
Custom Program 1
T T
Page 27

- Page 26 -
Nu-Tek Levator Elite User Manual
Data Report for progress
The Nu-Tek Levator Elite has a built-in ability to store and send Patient’s day
-by-day home compliance and periodic assessment data to the PC. (The
Nu-Tek Software can be purchased at an additional cost, for details contact
Shenzhen Dongdixin Technology Co., Ltd.
Step by step with the Data Report
Step 1. Check or Set the Date/Time
View the next page on how to change Date and Time settings. The
statistics will be saved on a daily or periodic basis. It is very important
to make sure the date is correct.
Step 2. Select the program to train or assess
After completing the training session or assessment, the record is
stored automatically. The device can store every 90 records of 90 days
or 90 weeks.
Note: Only in Patient Mode, the training record can be stored automatically.
Step 3. Instruct the patient when, how often and how to use the device.
The patient follows the clinician’s instructions on how to use the
program, and how to handle statistics recorded for training or
assessment.
Step 4.Connect the Device to the PC and download the statistics to PC.
After long term training (days or months) and periodic assessment
(after weeks or months) is completed, connect the device to the PC
via the USB cable, switch on device and select COMMUNICATE. Then
press ESC button to main menu. Select DATA MANAGE, press the
OK button to select Send data to PC, then press the OK button to
download the statistics to the PC.
Step 5. PATIENT statistics
The device stores and records one patient’s training and assessment
data at a time for up to 90 recordings. This data can be downloaded
onto the Nu-Tek PC software. To record new patient’s data the Device
must rst clear the saved data.
Page 28

- Page 27-
Nu-Tek Levator Elite User Manual
Page 29

- Page 28 -
Nu-Tek Levator Elite User Manual
Page 30

- Page 29 -
Nu-Tek Levator Elite User Manual
Statistics
Statistics on the Device LCD
To check the statistics, the patient must complete the session . After each
session, the device displays the last session statistics. In addition, for training
of EMG, ETS or STIM, the device stores the rst statistics and records on a daily
basis data per one calendar day. For assessment of EMG, the device stores the
weekly statistics by carrying out an assessment program every one or two
weeks, Select the mode and program; press the OK (EMG mode)or mA+ (ETS
and STIM mode) button and follow the instructions on the LCD screen, until
all phases of the program are completed. Then the statistics of the last used
program will be displayed on the LCD.
1. WORK AVG This is the work average for the session measured in (μV)
microvolt. The average readings will vary from one patient
to another.
2. REST AVG This is the work average for the session measured in (μV)
microvolt. The average readings will vary from one patient
to another.
3. ONSET TIME This is the average onset of muscle contraction measured in
seconds; readings below 1 sec are considered normal for
most muscles.
4. RELAX TIME This is the average muscle relaxed measured in seconds;
readings below 1 sec are considered normal for most
muscles.
5. W/R PEAK This is the average peak value measured in μV. The value
will vary from one patient to another.
6. WORK DEV This is the average muscle deviation when contracting the
muscle. Deviation percentages vary according to the muscle
type.
7. REST DEV This is the average muscle deviation; when the muscle is
relaxing.
8. STIM TIME This is total electrical stimulation time during ETS.
9. ETS AVG This is the average Stimulation level measured in mA; the
value indicates the average mA level used by the patient
during stimulation treatment.
10. THRS AVG This is the average Target/Threshold level measured in μV;
the value indicates the average Target reached by the
patient during the ETS treatment. (Auto or Manual)
11.ETS SCORE This is the percentage of the patient’s score during the ETS
Treatment. If the patient reached the Target very fast, the
Page 31

- Page 30 -
Nu-Tek Levator Elite User Manual
score will be higher. Example: 10%: it means that the
Patient’s average in reaching the Target had a long delay,
at the end of the ETS Work cycles. 90%: the patient is
reaching the Target almost immediately. The Patient’s
muscle condition is good.
12.STIM AVG This is the average Stimulation level measured in mA; the
value indicates the average mA level used by the patient
During STIM treatment.
Page 32

- Page 31 -
Nu-Tek Levator Elite User Manual
1. WORK AVG Work Average: The average value in microvolt of all the
Work segments excluding the rst second of each
segment.
2. REST AVG Rest Average: The average value of the Rest segments
excluding the rst second.
3. ONSET TIME Average Onset: The average time taken after each
respective "Work" prompt to reach 75% of the average
value of the previous work period. If the onset of trial(s) is
longer than 2 seconds, it (or they) will be rejected. The
display will indicate the average of only those trials which
were 2 seconds or less.
4. RELAX TIME Average Release: The average time taken, after the REST
prompt to reach 37.5% of the average EMG from the
previous work period. If any Release of the trials is longer
than 2 seconds then it (or they) will be rejected. The display
will indicate the average of only those trials which were 2
seconds or less.
5. W/R PEAK Work/Rest Peak: It is the peak value during the whole cycle
of all the trials.
6. WORK DEV Average Deviation (per second) of Work. It is the average
deviation of one second samples from the average value in
the second in which they occur (excluding the rst second
of each Work segment).
7. REST DEV Average Deviation (per second) of Rest. The average
deviation of one second samples from the average value in
the second in which they occur (excluding the rst second
of each Rest segment).
More about EMG Statistics
Page 33

- Page 32 -
Nu-Tek Levator Elite User Manual
Electrodes Types and Tips
※ Self-Adhesive Hypoallergenic electrodes have a typical life span (if looked
after) of 4/6 weeks. We recommend cleaning the skin before placing the
electrodes. After use place the electrodes back onto the plastic lm and
in the zip-tag plastic pouch. Store in a cool environment.
Skin Electrode Types Available: 50 x 50mm, square (recommended for
general use) other electrode sizes are available, typically 50 x 100mm,
40 x 40mm and 30mm dia.
A Few Good Tips [Self- Adhesive Electrodes]
※ If you nd the electrodes will not stick due to oily skin, cleanse the skin
with soap and water, then rinse and dry the area around the electrode site.
If this does not work, try cleansing the skin with a swab impregnated with
alcohol.
※ Clip away hair on the skin using scissors; don’t use a razor to remove the
hairs!
※ The electrodes conductive material is water-based. If it becomes saturated
(e.g. from perspiration), it will lose its adhesive qualities. After use leave
the electrodes face up overnight to dry out (replace on plastic lm in the
morning). At some point the electrodes will become dry. Moisten the
adhesive surface with a few drops of water, and apply onto the plastic lm
overnight. This procedure will increase the electrode life by few more days.
※ Place the tacky surface to the prescribed skin area by pressing the
electrode rmly against the skin.
Transparent Film
Connection Cables
Page 34

- Page 33 -
Nu-Tek Levator Elite User Manual
Care, Maintenance,Accessories and Disposal
WARNING! Only medically approved accessories should be used!
CONTROL DEVICE
※ Wipe the surface once a week with a damp cloth or antiseptic wipe
※ Do not use cleaning sprays or alcohol based cleaning solutions
※ Control device disposal: please return to Shenzhen Dongdixin
Technology Co., LTD or to the appointed distributor.
ACCESSORIES
Battery:
※ This device uses 4 x AA Batteries. Never connect the Nu -Tek® Levator Elite
directly to a battery charger or to any other mains powered equipment.
※ To replace the batteries, open the battery door on the rear of the device.
To open, press down on the raised rib of the battery door near the
middle of the device. Pull the four batteries out and replace them with
the new batteries. When inserting the batteries, follow the polarity
information on the bottom of the device's battery compartment. This
simple procedure can be performed by the end user and does not
require specialist expertise.
※ Remove battery completely from device if not in use for any extended
period of time (typically one week).
※ Low battery indicator is shown on LCD display. When ashing, replace
batteries. (Replace with quality batteries)
※ Batteries may be fatal if swallowed. Therefore, keep the batteries and
the product out of the range of children, if a battery was swallowed,
consult a physician immediately.
Lead Wires:
※ the lead wires should be handled carefully and never stretched, as this
can cause the stimulation to function below normal standards or not at
all.
※ Examine lead wires before each treatment for loose connections or
damage.
※ Avoid stretching and twisting the lead wires.
※ Store the lead wires carefully after each use.
※ Lead wires Disposal: please return to the supplier from whom you’ve
purchased them.
Self-Adhesive Electrodes:
※ Check that the short connectors are well connected to the electrodes
※ Replace electrodes onto plastic lm after use. If they drop onto the oor
debris will adhere to the conductive gel making the electrodes ineective
Page 35

- Page 34 -
Nu-Tek Levator Elite User Manual
Electrode life can be considerably reduced by:
※ The type and condition of the skin
※ Deep seated moisturizers or make-up
※ Storing electrodes in hot conditions
Vaginal / Rectal Probes:
※ Check if the connectors have not become separated from the probe
※ We advise you to use Shenzhen Dongdixin Technology Co., Ltd. Probes.
※ Cleaning: Remember! The Vaginal or Rectal probe is for use with one
Patient only! Carefully clean the Probe after use. Wash the probe gently in
mild soapy water, rinse and make sure the probe is completely dry before
returning to storage in the plastic bag. Read carefully the probe
instruction of use, originally attached to the probe package.
NOTE:
Only Shenzhen Dongdixin Technology Co., Ltd. or appointed distributors
/importers are approved to undertake servicing.
Please contact us about our Vaginal /Rectal Probe
Disposal
If you need to dispose of the device and/or accessories, do so in
accordance with the statutory regulations, Contact your local
administration or a disposal company.
Page 36

- Page 35 -
Nu-Tek Levator Elite User Manual
Specications
1. EMG
1.1 Single channel EMG
1.2 EMG Range: 0.2 to 2000 μV RMS (continuous)
1.3 Sensitivity: 0.1 μV RMS
1.4 Accuracy: 4% of μV reading +/-0.3 μV at 200 Hz
1.5 Selectable Band pass lter - 3db Bandwidth,
a. Wide: 18 Hz +/- 4 Hz to 370 Hz +/- 10%
b. Narrow: 100 Hz +/- 5% to 370 Hz +/- 10%
1.6 Notch lter: 50 Hz (Canada 60Hz) - 33 dbs (0.1% accuracy)
1.7 Common Mode Rejection Ratio: 130 dbs Minimum @ 50 Hz
1.8 Battery: 1.5V, AA battery
1.9 Work / Rest periods: 2-99 seconds
1.10 Number of Trials: 2-99
2. STIM (Neuromuscular Stimulation)
2.1 Single channel Stimulator
2.2 Amplitude: 0-90 mA into1000 Ohm load - actual mA will tend to be less
than indicated due to Electrode impedance
2.3 Type: Constant current, maximum output voltage 90 Volts +10/-10 Volts
2.4 Waveform: Symmetrical, rectangular, bi-phasic with net zero DC current
2.5 Pulse width selection: 50 - 450 μS (2% accuracy)
2.6 Pulse rate selection: 2-100 Hz (2% accuracy)
2.7 Work / Rest periods: 1-99 seconds
2.8 Time: 1 - 99 minutes
2.9 Ramp up time: 0.1 - 9.9 seconds
2.10 Preset and user programmable treatment Programs
2.11 Automatic output shut o with detection of open electrode above 1mA
Battery: Low battery indication at 4V +/- 0.2 volts, automatic shut o when
voltage drops below the low indication. Replace the batteries immediately!
When changing batteries it is recommended to have done it within ten
minutes so that the internal clock is not lost. If the internal clock is lost, the
setting of the internal clock can be done from the system setting menu.
The device switches o automatically when not in use (energy saving):
For example when in some interfaces and no key pressed over 3 minutes.
Service life of the device: 3 years
Service life of the batteries: With new super heavy duty batteries,
approximately 30 days when used for 25 minutes a day in program 01 at 45
level intensity.
Environmental Conditions for use:
5ºC~40ºC, 15%-93% Humidity.
Page 37

- Page 36 -
Nu-Tek Levator Elite User Manual
Environmental conditions for storage & transport:
-10ºC~50ºC, 0-93% Humidity.
Atmospheric pressure:70.0 kPa ~106.0 kPa
Dimensions: Length 139mm, Width 68 mm, Depth 33 mm.
Weight: 156g (without batteries).
Page 38

- Page 37 -
Nu-Tek Levator Elite User Manual
Information regarding Electromagnetic
compatibility and interference (EMC)
Nu-Tek products are designed to produce very low levels of radio frequency
(RF) emissions (interference), to reduce the eects of interference
produced by other equipment operating in their vicinity and damage due to
electrostatic discharge all when operating in a typical domestic and or clinical
environment. They are certied to meet the international EMC standard
EN60601-1-2. For more information please refer to the tables 1, 2, 3 and 4.
The Nu-Tek Levator Elite may be subjected to Electromagnetic Interference.
Additionally, the power supplies of some notebook computers can give o
substantial amounts of interference which the device is susceptible. This can
happen when the power supply "block" has only a two pin connector
connecting it to the mains with no earth.
As a precaution, make sure that the power cable from the notebook is placed
as far away as possible from the connection wires of the device.
Try to keep the Nu-Tek Levator Elite close to the patient’s body (in the "eld"
of the patient) either on their lap, in their pocket or clipped to their belt. Keep
the electrode wires as close as possible to the patients’ body and not
dangling freely.
A relaxed muscle ideally should read below 4 microvolt (μV). If even when the
patient’s muscle is soft and relaxed to the touch, the reading is still high, try
turning o the notebooks external main power supply. (The notebook will
continue to run on its own internal battery). If the μV reading(s) suddenly
reduce(s) and then go back up after turning on the notebook power supply,
it means that and interference has occurred.
Page 39

- Page 38 -
Nu-Tek Levator Elite User Manual
Guidance and manufacturer’s declaration - electromagnetic emissions
Emissions test
Compliance
Electromagnetic environment - guidance
The Nu-Tek Levator Elite is intended for use in the electromagnetic environment
specied below. The customer or the user of the device should assure that it is used
in such an environment.
The device uses RF energy only for its internal
function. Therefore, its RF emissions are very low
and are not likely to cause any interference in
nearby electronic equipment.
The device is suitable for use in all
establishments , including domestic and those
directly connected to the public low-voltage
power supply network that supplies buildings
used for domestic purposes.
RF emissions
CISPR 11
RF emissions
CISPR11
Harmonic
emissions
lEC 61000-3-2
Voltage
uctuations /
icker emissions
lEC 61000-3-3
Group 1
Class B
Not
Applicable-
Battery
Operated
Device
Not
Applicable-
Battery
Operated
Device
Guidance and manufacturer’s declaration - electromagnetic immunity
Immunity test
IEC 60601
test level
Compliance
level
Electromagnetic
environment - guidance
The Nu-Tek Levator Elite is intended for use in the electromagnetic environment
specied below. The customer or the user of the device should assure that it is used
in such an environment.
Floors should be wood, concrete
or ceramic tile. If oors are
covered with synthetic material,
the relative humidity should be
at least 30%.
Mains power quality should be
that of a typical commercial or
hospital environment.
Mains power quality should be
that of a typical commercial or
Electrostatic
discharge (ESD)
lEC 61000-4-2
Electrical fast
transient/burst
IEC 61000-4-4
Surge
IEC 61000-4-5
±6 kV contact
±8 kV air
±2 kV for
power supply
lines
±1 kV line(s)
to line(s)
±6 kV contact
±8 kV air
Not Applicable-
Battery
Operated
Device
Not Applicable
- Battery
Table 1
Table 2
Page 40

- Page 39 -
Nu-Tek Levator Elite User Manual
Mains power quality should be
that of a typical commercial or
hospital environment. If the
user of the device requires
continued operation during
power mains interruptions, it is
needed that the device be
powered from an
uninterruptible power supply.
Power frequency Magnetic elds
should be at levels characteristic
of atypical location in a typical
commercial or hospital
environment.
NOTE: U
T
is the a.c. mains voltage prior to application of the test level.
Voltage dips,
short
interruptions and
voltage
variations on
power supply
input lines
IEC 61000-4-11
Power
frequency
(50/60 Hz)
magnetic eld
IEC 61000-4-8
<5% U
T
(>95%
dip in UT) for
0.5 cycle 40%
UT (60% dip in
UT) for 5 cycles
70% UT (30%
dip in UT) for
25 cycles <5%
UT (>95% dip in
UT ) for 5
seconds
3 A/m 3 A/m
Not Applicable
- Battery
Operated
Device
Guidance and manufacturer’s declaration - electromagnetic immunity
Immunity test
IEC 60501 test
level
Compliance
level
Recommended separation
distance
Electromagnetic
environment - guidance
The Nu-Tek Levator Elite is intended for use in the electromagnetic environment
specied below. The customer or the user of the device should assure that it is used
in such an environment.
Portable and mobile RF
communications equipment
should be used no closer to any
part of the device, including
cables, than the recommended
separation distance calculated
from the equation applicable to
the frequency of the transmitter.
Table 3
Operated
Device
hospital environment.
Page 41

- Page 40 -
Nu-Tek Levator Elite User Manual
d=1.2√P
d=1.2√P , 80MHz to 800MHz
d=1.2√P , 800MHz to 2,5GHz
where P is the maximum output
power rating of the transmitter
in watts (W) according to the
transmitter manufacturer and d
is the recommended separation
distance in meters (m).
Field strengths from xed RF
transmitters, as determined by
an electromagnetic site survey,
(a) Should be less than the
compliance level in each
frequency range.
(b) Interference may occur in
the vicinity of equipment
marked with the following
symbol:
NOTE 1 At 80 MHz ends 800 MHz. the separation distance for the higher frequency
range applies.
NOTE 2 These guidelines may not apply in all situations. Electromagnetic
propagation is aected by absorption and reection from structures, objects and
people.
a Field strengths from xed transmitters, such as base stations for radio (cellular/
cordless) telephones and land mobile radios, amateur radio, AM and FM radio
broadcast and TV broadcast cannot be predicted theoretically with accuracy. To
assess the electromagnetic environment due to xed RF transmitters, an
electromagnetic site survey should be considered. If the measured eld strength
in the location in which the device is used exceeds the applicable RF compliance
level above, should be observed to verify normal operation. If abnormal
performance is observed, additional measures may be necessary, such as
reorienting or relocating the Nu-Tek Levator Elite.
b Over the frequency range 150 kHz to 80 MHz, eld strengths should be less than
3V/m.
Conducted RF
lEC 61000-4-6
Radiated RF
lEC 61000-4-3
3 Vrms
150 kHz to
80 MHz
3 V/m
80 MHz to
2.5 GHz
3 Vrms
3 V/m
Page 42

- Page 41 -
Nu-Tek Levator Elite User Manual
Recommended separation distances between portable and mobile RF
communications equipment and the Nu-Tek Levator Elite
Rated maximum output
power of transmitter W
0,01
0,1
1
10
100
0.12
0.37
1.17
3.69
11.67
0.12
0.37
1.17
3.69
11.67
0.23
0.74
2.33
7.38
23.33
Separation distance according to frequency of t
ransmitter m
150 kHz to
80 MHz
d=1.2√P
80 MHz to
800 MHz
d=1.2√P
800 MHz to
2,5 GHz
d=2.3√P
The device is intended for use in an electromagnetic environment in which radiated
RF disturbances are controlled. The customer or the user of the device can help
prevent electromagnetic interference by Maintaining a minimum distance between
portable and mobile RF communications equipment (transmitters) and the
Nu-Tek Levator Elite as recommended below, according to the Maximum output
power of the communications equipment.
For transmitters rated at a maximum output power not listed above, the
recommended separation distance d in meters (m) can be estimated using the
equation applicable to the frequency of the transmitter, where P is the maximum
output power rating of the transmitter in watts (W) according to the transmitter
manufacturer.
NOTE 1 At 80 MHz and 800 MHz the separation distance for the higher frequency
range applies.
NOTE 2 These guidelines may not apply in all situations. Electromagnetic
propagation is aected by absorption and reection from structures, objects and
people.
Table 4
Page 43

- Page 42 -
Nu-Tek Levator Elite User Manual
Trouble Shooting
If you are experiencing trouble with the device, please follow the steps below:
1. Check the lead wires for splits or breaks in the wire or at the end where the
connectors are attached to the wire.
2. Check the lead wires of surface and or internal electrodes. Poor quality
electrodes will cause incorrect readings. We always recommend the use
of good quality electrodes. we also recommend you keep a spare pack of
electrodes.
3. If you are using Vaginal or Rectal probes, we suggest the usage of
conductive gel as recommended by the physiotherapist or doctor.
4. Some patients’ vaginal aperture may be too large for some internal probes
causing intermittent contact with the walls of the pelvic oor muscle. In
such cases try larger probe. We provide dierent size vaginal probes.
5. If connected to a laptop or desk top computer, Check the USB cable for any
visible damage as this may obstruct the signal from the device to the
computer.
6. If none of the above-mentioned problems help, try to restore factory
setting. In system setting, using ,
select Factory Data Reset, select
Save.
If this problem causes ongoing diculties, please contact Shenzhen
Dongdixin Technology Co., Ltd. for assistance.
Stimulation Mode
1. If the current mA reverts back to zero and you see displayed Electrode
falling o on the LCD screen, it may be due to an open circuit (no
connection) between the input lead wires connected to the unit and the
lead wires connected to the surface electrodes. Remember! Our device
will not produce the stimulation output without electrodes placed on
your body! We suggest replacing the electrodes rst and then check the
lead wires connected to the unit, try a new set of electrodes, and or
another set of lead wires.
2. If the stimulation current mA fails, please be sure that the battery is fully
charged.
WE STRONGLY ADVISE YOU TO KEEP A SPARE SET OF DUAL AND SINGLE
CONDUCTOR LEAD WIRES!
If you cannot nd the answer from the above list of suggestions, please visit
our website www.nutek-emg.com, select CONTACT US.
Page 44

Type BF applied part
Refer to instruction manual because of the higher levels of
output
Complies with MDD 93/42/EEC and amended by directive
2007/47/EC requirements. Notied body TÜV Rheinland
(CE0197)
The name and the address of the manufacturer
Electrical devices are recyclable material and should not
be disposed of with household waste after their useful
life! Help us to protect the environment and save
resources and take this device to the appropriate
collection points. Please contact the organization which
is responsible for waste disposal in your area if you have
any questions
0197
The name and the address of the Authorized EC-
representative in Europe
Transportation and storage temperature from -10℃
to 50℃
50℃
-10℃
- Page 43 -
Nu-Tek Levator Elite User Manual
※ Contact your Distributor who may be able to guide you through any
issues.
※ You will need to obtain notice from the Distributor from whom you
purchased the device before returning it to them for replacement or
repair (sometimes the returned products are not faulty and there is
another reason for it not working, in this situation you might be
charged for postage and/or product examination).
Symbols on the rear and top cabinet housing of Levator Elite explained:
Page 45

- Page 44 -
Nu-Tek Levator Elite User Manual
70.0KPa
106.0 KPa
Transportation and storage humidity limits from 0%
to 93%
Transportation and storage atmospheric pressure
limits from 70.0 kPa to106.0 kPa
Keep dry
Represent the manufacture date and Serial number.
0%
93%
%
Page 46

Warranty
Shenzhen Dongdixin
Technology Co., Ltd. provides a warranty to the original
purchaser that this product will be free from defects in the material,
components and workmanship for a period of 2 years from the date of
purchase. If the distributor - from whom the product was purchased by the
user – is satised that the product is defective, the user may return the device
directly to this Distributor who will forward it to Shenzhen Dongdixin
Technology Co., Ltd. All such returns from the Distributor to Shenzhen
Dongdixin Technology Co., Ltd. must be authorised by Shenzhen Dongdixin
Technology Co., Ltd. in advance. The liability of Shenzhen Dongdixin
Technology Co., Ltd. under this limited product warranty does not extend to
any misuse or abuse such as dropping or immersing the device in water or
other liquid substance or tampering with the device or normal wear and tear.
Any evidence of tampering will nullify this warranty.
- Page 45 -
Nu-Tek Levator Elite User Manual
Page 47

STIM: Continence
NO Application Phase Mode Phase
time(min)
Frequency
(Hz)
Pulse
width
(μS)
Overall
time
(min)
P1
P2
Female urge
incontinence1
External stress using
surface Electrodes on
the lower back
Female genuine stress 1
1 SYN
SYN
SYN
SYN
CONT
or
SYN
CONT
or
SYN
CONT
SYN
SYN
25 10 240 25668
6 12
10
6 10
5-6 8
8
8
8
/
7
7
597-8
/
/ /
6 9
6 8
6 15P3
Frequency
1
P11
P12
P13
P14
P15
P16
P17
P18
P19
P20
PC1
PC2
Female and Male
Rectal stimulation
1
1-2
20 35 220
220
20
P4
Female genuine stress 2
1 25 10 250 25
P5
1-2
10-35 20-35 300 45
OAB using surface
Electrodes on the
Tibial Nerves
P6 1 25 10
25 10
220 25
External Stress using
surface electrodes on
the buttock
P7 1 30 35 450 30
30
30
Sensory nerve testP9 1 SYN
1 SYN
SYN
SYN
SYN
SYN
SYN
4 20 220 4
Regenerate Sensory
Nerves
P10 1-5
1-5
SYN1-5
1-5
5-10
SYN 5-10
5-6
4-40 200-300 35
Mixed Stress/Urge/
Frequency
P8 1-3
1-3
1-4
1-4
SYN1-4
5-10 10-35 200-240 25
1 20 35 250 20
20 35 250 20
Work
time
(s)
Rest
time
(s)
Pelvic Floor Exercise
Work Out
3-35 200-250 6-7 7-10
10-12
27
24
28
14
Maximum Pelvic
Floor Exercise Shoot
Bursts
4-5
4-5
4-35
4-35
4-35
4-35
4-35
4-50
260-300 6
Pelvic Floor
Endurance
5-10 240-300 6-8
Weekly Maintenance 200-240
200
5-6
5
5
New Mums 4-10
4-10
Hysterectomy 200-220 5-6 8-10 25
25
8 23
Prolapse Cystocoele
grade 1 only
Sexual improvement 200-300 6-8
Pain Relief CONT 10-20 3-10 200
Note:
P3: This program allows for a longer resting time of 15 seconds for those who have a weak pelvic
muscle.
P5: Place surface electrodes size 100 x50mm on lower back site S2-S3 50mm either side of spine.
P6: Place electrodes on lower leg above the ankle using surface electrodes size 100 x 50mm OAB
{over active bladder}.
You can setup up to 5 stimulation phases, each phase can be Synchronous or Continuous,
and Custom program used to set up individual requirements, maximum treat time is 99
mins.
- Page 46 -
Nu-Tek Levator Elite User Manual
Appendix: Program
PC3
Page 48

- Page 47 -
Nu-Tek Levator Elite User Manual
P1
EMG programs
NO Phase Threshold Work time
(sec)
Rest time
(sec)
Trials
(repetitions)
Overall time
(sec)
1 EMG Auto 5 5 5 50
PC1
PC2
You can setup1 EMG phases with your preferable parameters.
ETS programs
PC1
PC2
You can setup1 ETS phases with your preferable parameters.
P7: Place four surface electrodes size 100x50mm, two on the rear and two on the side of the
buttocks (You’re recommended to order Electrodes from your distributor in case you need
more).
P9: This program is to test the level of mA {milli amps} you reach at which you feel a muscle
contraction. If your level of mA reading Is above 40 use P10 to improve Regeneration of
Sensory Nerves.
P11: You’re recommended to purchase rectal probe from your distributor before using this
program.
P12: Use this program once or twice per week to maintain the Pelvic muscle condition.
P16: Use stimulation at least 6 weeks after birth or when advised by a doctor.
P17: Follow your gynaecologist’s or physiotherapist’s advice on the appropriate time to
commence stimulation after hysterectomy.
P18: Use only for cystocele grade 1. Very important you seek guidance from your Therapist
before using Electrical Stimulation.
P8, P10, P13, P14, P15, P19: Contract pelvic oor muscles during stimulation work periods.
 Loading...