

Page 1
DJ-90215Rplus USER MANUAL
Massive Giga DJ Effecct System
Page 2

Caution: Read this before operating your unit.
1
1 To assure the finest performance, please read this manual carefully. Keep it in a safe place
for future reference.
2 Install this sound system in a well ventilated, cool, dry, clean place - away from direct
sunlight, heat sources, vibration, dust, moisture, and/or cold. For proper ventilation, allow
the following minimum clearances around the unit.
Top: 10 cm (4 in)
Rear: 10 cm (4 in)
Sides: 10 cm (4 in)
3 Locate this unit away from other electrical appliances, motors, or transformers to avoid
humming sounds.
4 Do not expose this unit to sudden temperature changes from cold to hot, and do not locate
this unit in an environment with high humidity (i.e. a room with a humidifier) to prevent
condensation inside this unit, which may cause an electrical shock, fire, damage to this unit,
and/or personal injury.
5 Avoid installing this unit where foreign object may fall onto this unit and/or this unit may be
exposed to liquid dripping or splashing. On the top of this unit, do not place:
- Other components, as they may cause damage and/or Discoloration on the surface of
this unit.
- Burning objects (i.e. candles), as they may cause fire, damage to this unit, and/or
personal injury.
- Containers with liquid in them, as they may fall and liquid may cause electrical shock to
the user and/or damage to this unit.
6 Do not plug in this unit to a wall outlet until all connections are complete.
7 Do not operate this unit upside-down. It may overheat, possibly causing damage.
8 Do not use force on switches, knobs and/or cords.
9 When disconnecting the power cable from the wall outlet, grasp the plug; do not pull the
cable.
10 Do not clean this unit with chemical solvents; this might damage the finish. Use a clean,
dry cloth.
11 Only voltage specified on this unit must be used. Using this unit with a higher voltage than
specified is dangerous and may cause fire, damage to this unit, and/or personal injury. We
will not be held responsible for any damage resulting from use of this unit with a voltage
other than specified.
12 To prevent damage by lightning, keep the power cable and outdoor antennas disconnected
from a wall outlet or this unit during a lightning storm.
13 Do not attempt to modify or fix this unit. Contact Qualified service personnel when any
service is needed. The cabinet should never be opened for any reasons.
14 When not planning to use this unit for long periods of time (i.e. vacation), disconnect the
AC power plug from the wall outlet.
15 Be sure to read the TROUBLESHOOTING section on common operating errors before
concluding that this unit is faulty.
16 Before moving this unit, disconnect the AC power plug from the wall outlet.
17 Condensation will form when the surrounding temperature changes suddenly. Disconnect
the power cable from the outlet, then leave this unit alone.
18 When using this unit for a long time, this unit may become warm. Turn the power off, then
leave this unit alone for cooling.
19 Install this unit near the AC outlet and where the AC power plug can be reached easily.
Page 3
TO CUSTOMER
CAUTION
RISK OF ELECTRIC SHOCK
DO NOT OPEN
!
CA UT IO N: TO REDUCE THE RISK OF ELECTRIC SH OC K DO N OT
RE MO VE C OV ER . NO USER-SERVICEABLE PARTS I NS ID E. REFER
SE RVICING TO QU ALIFIED SERVICE PERSONNEL.
WAR NIN G
Thank you for purchasing our products, which displays your superior knowledge of audio
equipment. You have made an excellent product choice.
Please read all safety and operating instructions in this manual carefully before trying to
operate the unit.
INSTALLATION & SAFETY PRECAUTIONS
2
* Always connect the power plug to the voltage range specified to the unit 120V~,60Hz in
order to avoid fire or electric shock.
* Never plug or unplug the unit with wet hands. Never unplug the unit by pulling the power
cord .Always hold the plug firmly when unplugging.
* Never block or cover any slots or openings in the unit as this will give poor ventilation that
may cause overheating.
* Always turn off or unplug the unit before making or changing any connections.
* Never remove any fixed cover,as this may expose dangerous voltage that may cause
electrical shock.
* Never allow electrical/electronic parts to be exposed to dripping or splashing of liquids and
never place an object filled with liquids such as a vase on top or beside the unit.
* Do not put any small metal objects into the unit opening that might cause short-circuit or
electrical shock.
* Always unplug the unit if you will not be using it for a long period of time.
* Never use the unit during a thunderstorm. Immediately unplug the unit.
* Never try to repair or modify this unit. Always send the unit to a qualified service centre for
repair.
Page 4
3
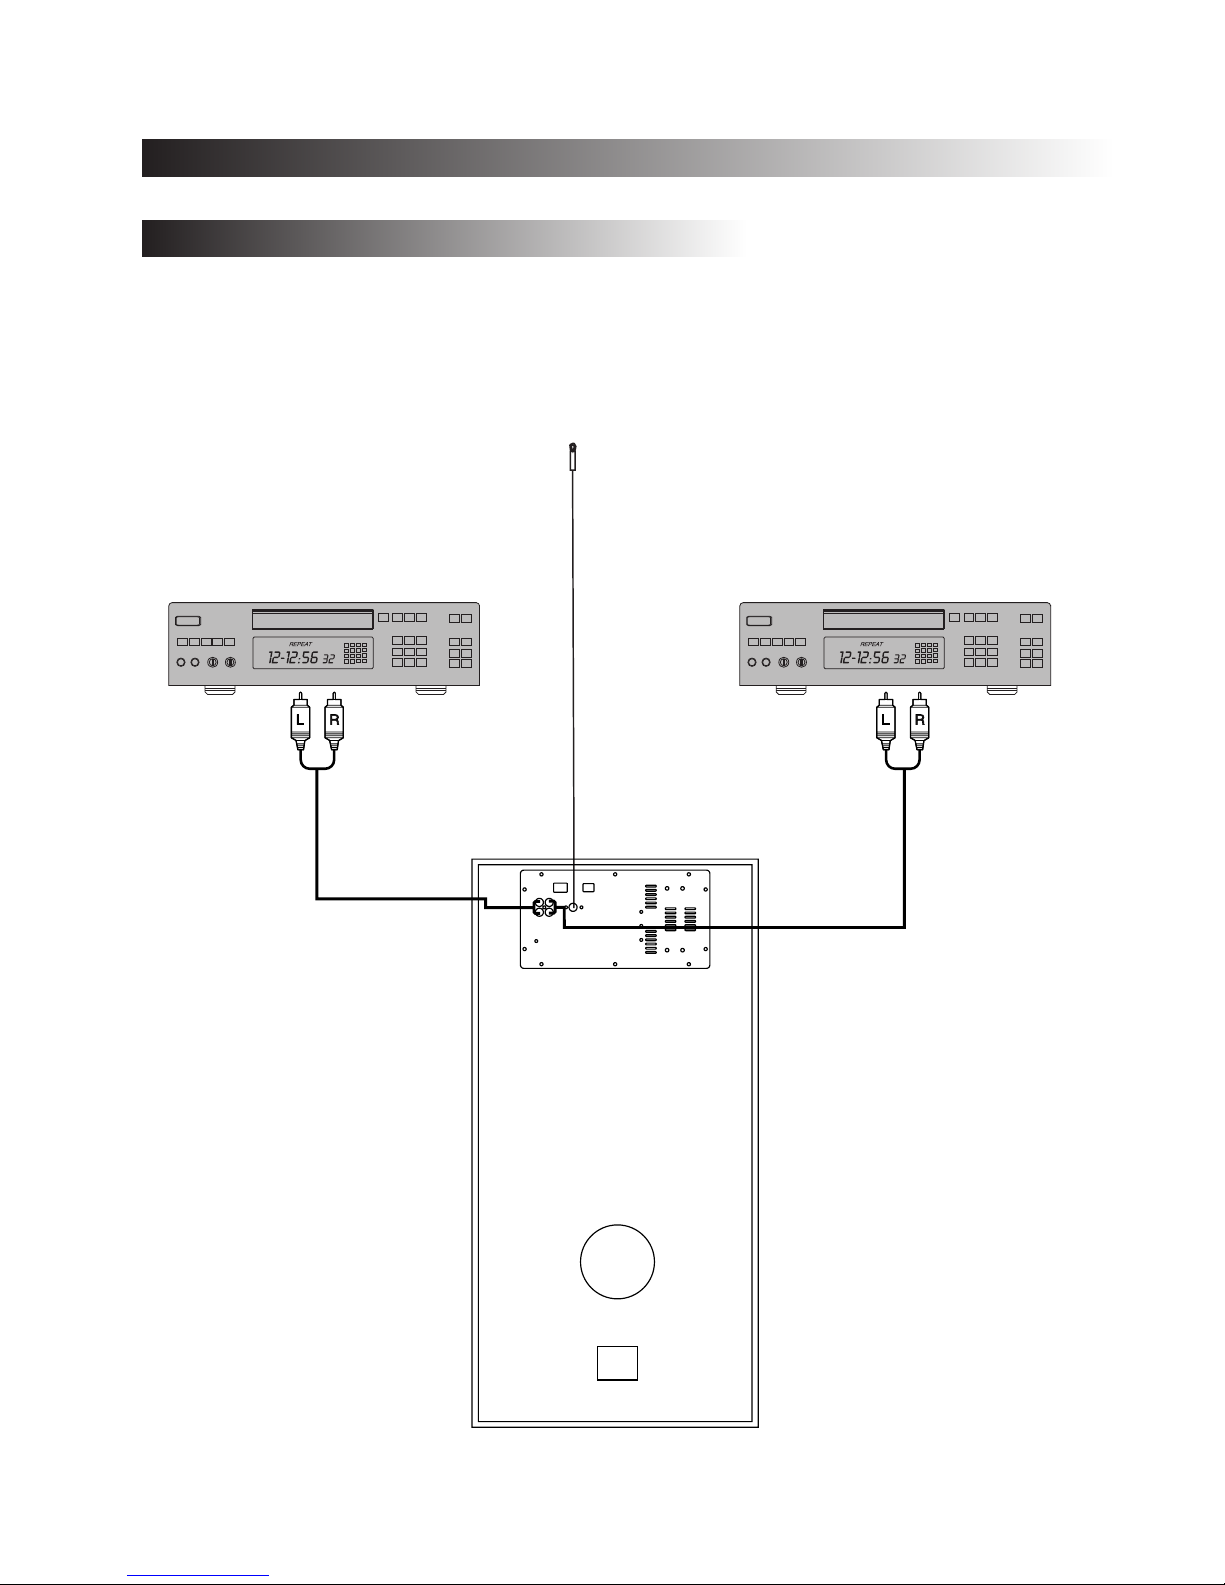
CONNECTIONS
CONNECTION DIAGRAM:
Note:
- Always unplug the unit when making connections.
- Check all connections are firmly fitted.
- Check all speakers are connected to their correct designated position.
FM Antenna
LINE IN
AUX
Page 5

CONTROLS ON PANEL
4
2
4
3
5
6
8
10
9
11
12
7
1
13
14
15
Page 6

5
9.INPUT
Press this key to choose the input mode.
7.LED DISPLAY
8.MENU
This switch selects the menu.
10.VOLUME
.Adjust the unit volume level
3.DJ.EFFECT
Press this key to choose DJ effect.
6.USB A
USB A terminal.
12.REC-USB
REC-USB terminal.
2.STANDBY
4.DJ
Adjust the knob to design and change the music effect.
11.MUTE
.Press this switch to mute,press again recover
14.MICROPHONE 1&2
Microphone 1&2 terminal.
13.PHONES
phones terminal.
15. (PREV)
Press this key to choose previous song.
5. (PLAY/PAUSE)
Press this key to play or pause.
1. (NEXT)
Press this key to choose next song.
CONTROLS ON PANEL
Page 7

6
1 2 4
2.AUX AUDIO INPUT JACK
Connect to AUX signal output jack.
1.LINE IN AUDIO INPUT JACK
Connect to LINE IN signal output jack.
3.Power Switch
.Press this switch to turn the unit on or off
4.FM ANTENNA
5.AC INPUT
AC 120V~,50/60Hz.
3 5
TERMINALS ON REAR
AC 120V~ , 60Hz
Page 8

1. INPUT SELECT
2. STANDBY
3. DJ.EFFECT
4. LIGHT MODE
5. X DRIVE
6. USB A MODE
7. BLUETOOTH MODE
8. VOLUME-
9. NEXT
10. B.WARD
11. TREBLE+
12. PREVIOUS
13. TREBLE-
14. NUMBER BUTTON
15. CHANNEL-
16. CHANNEL+
17. START RECORD
18. RECORD PAUSE
19. MUTE
20. MICROPHONE VOLUME-
21. MICROPHONE VOLUME+
22. MIC ECHO+
23. MIC ECHO-
24. MICROPHONE BASS+
25. MICROPHONE BASS-
26. MICROPHONE TREBLE+
27. MICROPHONE TREBLE-
28. DISCONNECT(BLUETOOTH)
29 VOLUME+
30. PLAY/PAUSE
31. F.WARD
32. BASS+
33. BASS-
34. AUTO
35. FM
36. TUNING+
37. TUNING-
38. REC/USB FOLDER
39. RECORDING PLAYBACK
7
REMOTE CONTROL
REMOTE CONTROL OPERAT IO N:
□ If the remote control c on fl icts with other devices , th e op eration will be affec te d.
□ Do not simultaneous ly p re ss buttons on the unit an d th e re mo te control.
□ Avoid using two remot e co nt rols at the same time as th is w il l ca use a malfunction.
□ Use only UM-4 ``AAA`` s iz e ba tteries. Do not mix old b at te ri es with new ones.
□ If the batteries leak , cl ea n thoroughly before r ep la ci ng with new ones.
□ Do not short two termin al s of t he batteries. Dispo se o f ol d ba tteries in a suitable p la ce .
Page 9

1. Be sure to switch off the power and to connect to corresponding input jacks.
2. Turn on the power and wait 3-4 seconds untill the speaker functions are connected.
3. Select an audio source by pressing the INPUT key on the front panel or on the remote control
to display AUX,LINE IN,USB A,BT,TUNER,RECU.
4. Adjust the VOLUME knob on the front panel or the VOL+/- key on the remote control to adjust
the setting of the main volume.
5. Press the MENU key on the front panel to display TREBLE, BASS, XDRIVE,LIGHT MODE,
VOLUME then adjust the VOLUME knob to change music treble,bass,light mode and sound
effect.
6. Press the DJ EFFECT key on the panel or the DJ button on the remote control to display
SCRATCH,REVERB,BEAT BOX,YEAH,OFF mode,then adjust the DJ knob to design and change
the music effect as you like.
7. Press the LIGHT button on remote control to change the OFF,R,G,B,RG,RB,GB,RGB,AUTO,
DEMO light mode.
8. Press the MUTE key to mute, press it again to reset.
Press X Drive on the remote to turn on/off X-Bass effect.
9. Press the REC/USB FOLDER key, it enable user to switch REC document and NON-REC
document directly.
Tuner applications
1.Before using the radio functions, you must attach the supplied antenna. Adjust the
antenna to obtain optimum reception.
Press the INPUT key on the front panel(amplifier)or on the remote control,to select
“FM”function.
2. Press the CH+/CH- key on the remote control to find radio bands that you have previously
saved .
3. Press or hold the TU+/TU- key on the remote control to adjust the radio frequency manually.
4. Press the AUTO key on the remote control,the machine will scan radio channels from
low-frequency to high-frequency by itself and memorize the channels one by one.
8
To control the light modes coming from the speaker panels by "Speaker" menu or "light
model"button on remote control
•
R = red lights flash
•
G = green lights flash
•
B = blue lights flash
•
RG = red and green lights flash
•
RB = red and blue lights flash
•
GB = green and blue lights flash
•
RGB = red, green, and blue lights flash
•
Auto = the various color combinations cycle through and flash.
•
Demo = lights flash and change color as if they were responding to the beat of the music.
OPERATING
NORMAL FUNCTION
LIGHT COLOR CONTROL FUNCTION
Page 10

KARAOKE FUNCTION
This unit has two USB jack s. Press the IN PUT key to se lect USB A,then you can i nsert
a USB to play music.
Important: The USB port is intend ed only for data transfer only, othe r devices c annot be used with
this USB connection. The use of USB e xtension cords is not recommended.
USB A interface
REC-USB function
The button of RECORD,PAUSE ,PLAYBACK are all for recording use onl y. REC_ USB is recording jack.
Recording function only works i n the mode of AUX ,LINE IN,BT,FM.
1.Recording button : Please in sert your device an d press rec ord button,it will show WAITING for USB
few seconds and then REC ORDING fo r a moment before starting button.
2.RECORD button: Press this butto n when in rec ord mode,it will show WAITING on display for a
seconds. Then start to p lay the fil es recorded.
3.PAUSE button: Press PAUSE button to pause recordin g, press thi s button again to recording.
HEADPHONE JACK
For privat e listening,insert a 6.3mm headphone into the PHO NE JACK. The SPEAKER output is
automatically cut off.
CAUTION: LISTENING AT HIGH POWE R FOR A LONG MOMENT C OULD DAMAGE USER S EARS.
● Turn off any Bluetooth devices previously paired (linked) with this unit.
● Turn on the Bluetooth features on your phone or music player.
● Turn on and set this unit to Bluetooth mode. The flashing blue light BT on LED display
indicates it is in pairing mode.
● Set your phone or music player to search for Bluetooth devices.
● Select DJ-90215Rplus from search results on your phone or music player.
● Select OK or YES to pair this unit with your phone or music player.
● If protected, enter 0000 for passkey steady blue light indicates successful
connection.
● Press the DISCONNECT key on the remote to disconnect the bluetooth.
BLUETOOTH PAIR AND CONNECT
9
1. The machine can auto detect whether MIC 1, MIC2 is inserted.
Please turn off the microphone volume and adjust the volume gradually after inserting
the microphone.
2. Press M.VOL+/- on the remote to change the microphone VOLUME.
3. Adjust ECHO on the remote to change the microphone ECHO.
Note: Do not touch the top of the microphone when singing in oder to avoid howling effect.
Adjust the microphone volume gradually to avoid howling effect.
FUNCTION OF USB READER
Page 11

FM Frequency---------------------------------------------------------------87.5-108MHz
Amplifier Output Power--------------------------------------------------------------120W
Power Consumption----------------------------------------------------------------- 250W
Frequency Response-------------------------------------------------------38Hz~20KHz
Max. Input Capability---------------------------------------------------------------500mV
Distortion---------------------------------------------------------------------------------<1%
S/N---------------------------------------------------------------------------------------75dB
10
SPECIFICATION
● The specification presents only as a reference. Weight and size values are approximate.
● Our product specifications are subject to change without prior notice.
● The content of this manual has been collated carefully. If there are any mistakes caused
by printing or other reasons, please contact us, and we will endeavour to assist you
where possible.
GENERAL REQUIREMENT
Power source ---------------------------------------------------------------AC 120V~,60Hz.
ACCESSORY
Remote control------------------------------------------------------------------------ 1PC
FM Antenna--------------------------------------------------------------------------- 1 SET
User manual------------------------------------------------ ----------------------------1PC
RCA - RCA cable -----------------------------------------------------------------------1PC
Page 12

CAUTION
• The apparatus shall not be exposed to dripping or splashing and that no objects filled
with liquids, such as vases, shall be placed on the apparatus.
• Minimum distances 10 cm around the apparatus for sufficient ventilation.
• The ventilation should not be impeded by covering the ventilation openings with items,
such as newspapers, table-cloths, curtains, etc.
• No naked flame sources, such as lit candles, should be placed on the apparatus.
• When the mains plug or an appliance coupler is used as the disconnect device,the
disconnect device shall remain readily operable. To be completely disconnected the
power input, the mains plug of apparatus shall be disconnected from the mains
completely.
• The main plug of apparatus should not be obstructed or should be easily accessed
during intended use.
• The use of apparatus in tropical climates.
• Attention should be drawn to the environmental aspects of battery disposal.
• Batteries shall not be exposed to excessive heat such as sunshine, fire or the like.
Page 13

FCC Radiation Exposure Statement:
This equipment complies with FCC radiation exposure limits set forth for an uncontrolled environment. This
equipment should be installed and operated with minimum distance 20cm between the radiator & your body.
FCC Warning
This device complies with Part 15 of the FCC Rules. Operation is subject to the following two conditions:
(1) This device may not cause harmful interference, and (2) this device must accept any interference received,
including interference that may cause undesired operation.
NOTE: Any changes or modifications to this unit not expressly approved by the party responsible for compliance
could void the user's authority to operate the equipment.
 Loading...