

Page 1
Transmitter Programming Guide
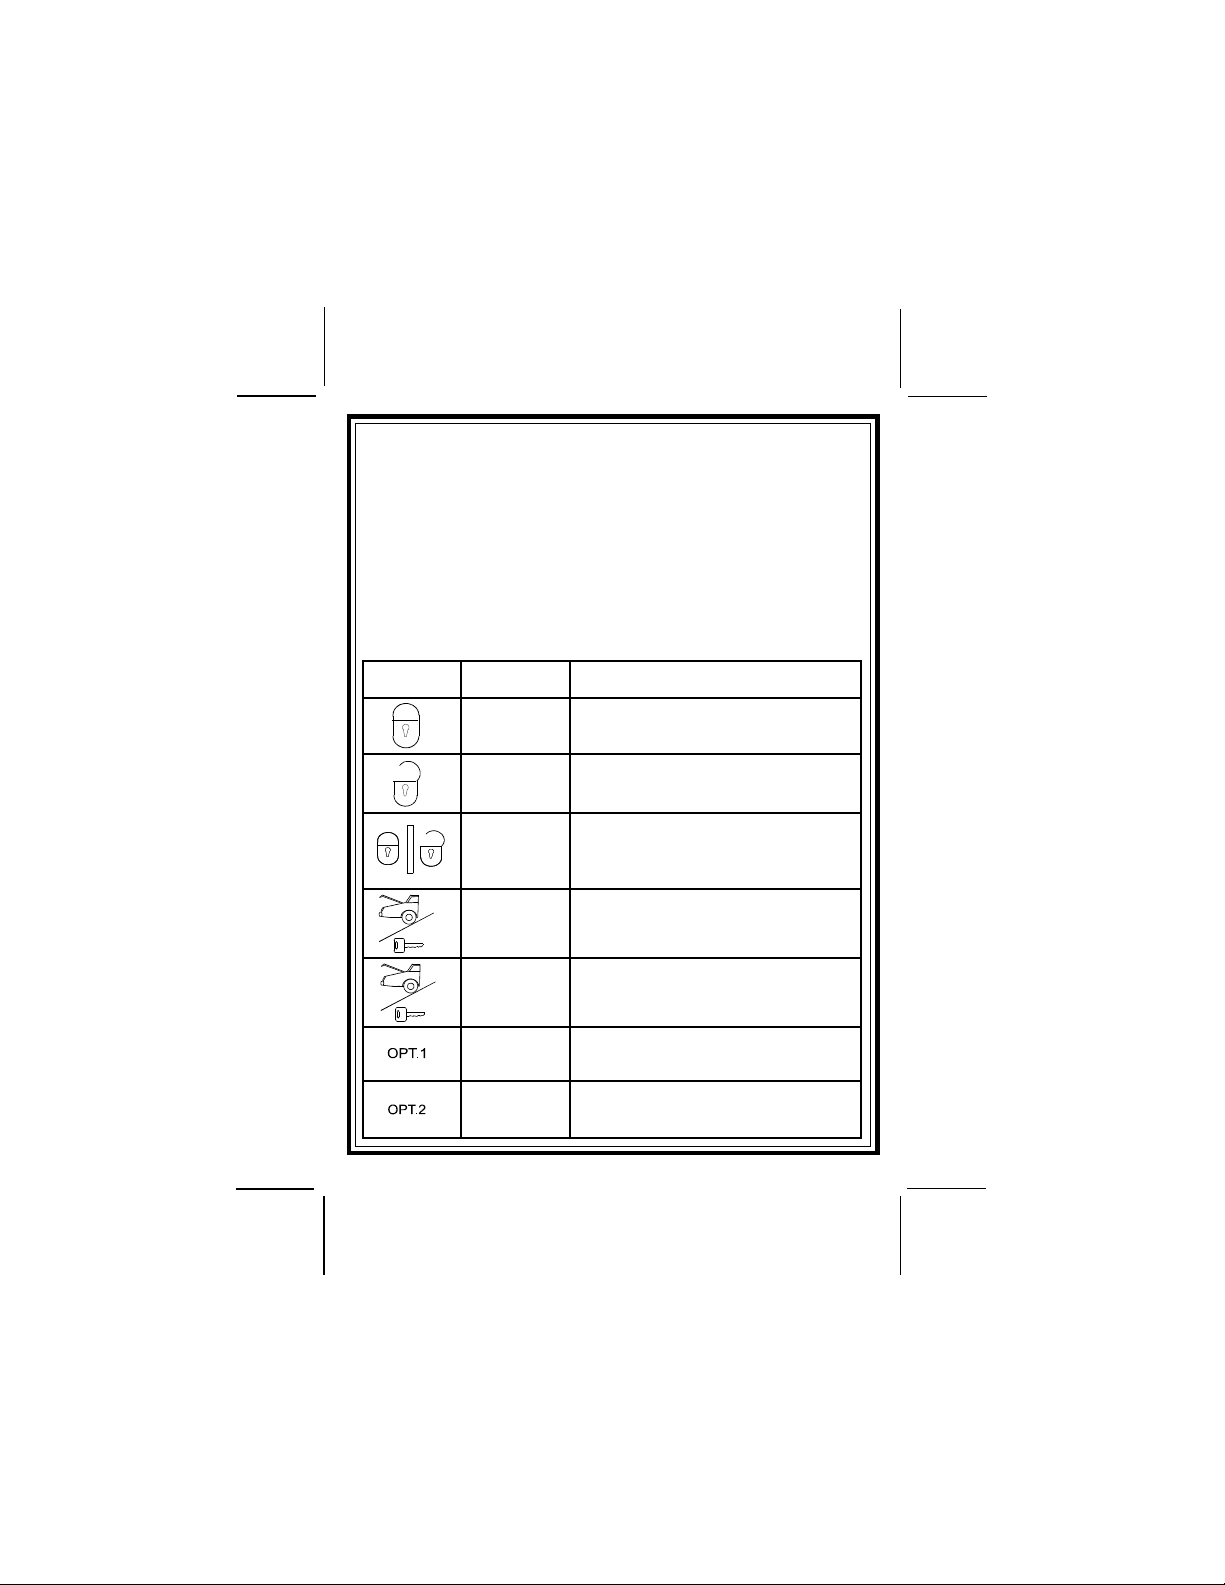
These transmitters makes use of icons (symbols) to identify the reaction your security system/keyless entry/and or remote start system,
where applicable, will have when any icon (button) is pressed.
These icons are programmed at time of installation to meet the needs of
the individual and to complement the vehicle that the system is installed
in. To replace a transmitter or add transmitters, please follow the
programming instructions listed on the pages of this manual.
BUTTON
RECEIVER
CHANNEL
1
2
1
3
3
*4
*5
Lock And Arm Alarm, also initiate and
terminates *Panic
Unlock And Disarm, also initiates and
terminates *Panic. Programmable to
unlock drivers door and or all doors.
Lock and arm/unlock and disarm. May
be programmed to unlock driver's door
or all doors. Also will initiate and
terminate *Panic.
Pulsed or switched output to control
Remote Trunk Release or optional
device connected to channel 3.
When pressed and release two times,
will provide pulsed output or activate the
Remote Start option when installed.
When so equipped, this button can be
used to operate an optional device
connected to channel 4.
When so equipped, this button can be
used to operate an optional device
connected to channel 5.
SYSTEM FUNCTION
* Where So Equipped
1
Page 2

Some of the more popular options available for the unused Option
Buttons of your transmitter are:
AS 9075 Remote car starter
AS 9153 Remote window roll up
AS 9256 Remote trunk release relay
Although the most common use of the transmitter buttons are shown
on the front page of this guide, any button or button combination can be
programmed into any receiver channel. Additionally, if all 4 buttons are
used and you require access to a 5th channel, you would program a
combination of buttons to control the 5th function. i.e... you have
programmed lock for arm, unlock for disarm, trunk for trunk release,
and OPT1 for garage door operation, and you've added a window up
module that you want independent control of, you would program unlock and trunk buttons pressed simultaneously into the receiver to control this function independently. Also, if you do not program a transmitter button into channel 2 which is the separate unlock/disarm channel, then whatever button is programmed into channel 1 will serve
as both lock/arm & unlock/disarm.
PROGRAMMING TRANSMITTERS:
NOTE: It is important to remember that during the programming mode,
each individual step must be completed within 15 seconds of
the previous step. If the 15 second time limit expires between
steps, the unit will automatically exit the program mode. This
is in di ca te d by a long chirp from the siren.
Non alarm models will flash the parking lights only to confirm the
transmitter code has been learned and stored.
NOTE: Because the system may be capable of sounding a siren, the
vehicle horn, or both, where the siren chirp is referenced be-
low, the siren may chirp, the horn may beep, or both devices
may sound.
Note: Some systems are capable of single button programming, if your
alarm module is capable of this feature, simply complete step 4
of these programming instructions for each transmitter you wish
to control your system and exit the program mode by switching
off the ignition key.
TO PROGRAM ADDITIONAL TRANSMITTERS:
1) Enter the vehicle, and turn the ignition switch to the on position.
2) Press and release the valet push button switch three times.
Note: Some systems may use a combination push-button LED
switch. In these systems the push-button and the dash mounted
LED are one and the same.
3) The dash mounted LED will flash 1x, and the siren will chirp 1x,
indicating that the system is ready to accept programming of channel
#1 which is arm/lock, disarm/unlock/unlock 2, and panic functions.
2
Page 3

4) Press and hold the lock or lock/unlock symbol button of the transmitter
you wish to program for 4 seconds or until a long chirp is heard from
the siren.
"Repeat step 4 for each transmitter you wish to program".
NOTE: If your transmitter button has the Lock/Unlock icon on
one button, press and release the valet push button switch 2 times
then move on to step #8.
5) Press and release the valet push button switch one time to advance to
channel 2. The siren will chirp 2 times and the dash mounted LED will
Flash 2 times, indicating that the unit is ready to accept programming
for channel # 2 which is only used for separate lock and unlock
button transmitters, and is the disarm/unlock/unlock 2 and panic.
6) Press and hold the unlock symbol button of the transmitter you wish
to program for 4 seconds or until a long chirp is heard from the siren.
"Repeat step 6 for each transmitter you wish to program".
7) Press and release the valet push button switch one time to advance
to channel 3. The siren will chirp 3 times and the dash mounted LED
will Flash 3 times, indicating that the unit is ready to accept
programming for channel # 3 which is the trunk release/alternate
output channel of the system.
8) Press and hold the trunk/key symbol button of the transmitter you wish
to program for 4 seconds or until a long chirp is heard from the siren.
"Repeat step 8 for each transmitter you wish to program".
9) Press and release the valet push button switch one time to advance
to channel 4 if so equipped. The siren will chirp 4 times and the dash
mounted LED will Flash 4 times, indicating that the unit is ready to
accept programming for channel # 4, optional device (where equipped)
10) Press and hold the Option button of the transmitter you wish to
program for 4 seconds or until a long chirp is heard from the siren.
"Repeat step 10 for each transmitter you wish to program".
11) Press and release the valet push button switch one time to ad-
vance to channel 5 if so equipped. The siren will chirp 5 times and the
dash mounted LED will Flash 5 times, indicating that the unit is ready
to accept programming for channel # 5 optional device (where
equipped)
12) Press and hold the second Option button of the transmitter
you wish to program for 4 seconds or until a long chirp is heard from
the siren.
"Repeat step 12 for each transmitter you wish to program".
13) Within 10 seconds, press and release the valet program
switch one time.
(Siren emits 6 short chirps indicating channel 6 has been entered)
14. Within 10 Seconds, Press and hold the unlock button, (or any
unused button(s)), of the first transmitter you wish to control
Channel 6 output, (Driver Priority 1) until a long chirp is heard from
the siren.
3
Page 4

(Repeat this for each transmitter you wish to operate the Channel
6 output, Driver Priority 1)
15. Within 10 seconds, press and release the valet program switch
one time.
(Siren emits 7 short chirps indicating channel 7 has been entered)
16 .Within 10 Seconds, Press and hold the unlock button (or any
unused button(s)) of the first transmitter you wish to control
Channel 7 output, (Driver Priority 2) until a long chirp is heard from
the siren.
(Repeat this for each transmitter you wish to operate the Channel
7 output, Driver Priority 2)
NOTE: Channels 6 and 7 can be used as a separate output to
control a function other than driver priority. Simply programming any unused transmitter button other than the unlock
button will allow complete independent control of these
outputs.
ERASING TRANSMITTERS IF THEY HA VE BEEN LOST OR STOLEN:
NOTE: Before you begin to erase the lost or stolen transmitter(s), have
all transmitters available that you wish to remain programmed. These
will be used during the program process to identify transmitters
that will continue to be used.
Enter the transmitter program mode:
1. Turn the ignition switch to the “ON” position.
2. Within 10 seconds, press and release the valet/program switch three
times. (Siren emits 1 short chirp indicating channel 1 has been
entered)
3. Within 10 Seconds, press and hold the ARM or ARM/DISARM
button of the first transmitter you wish to remain stored into the
control unit until a single chirp is heard from the siren.
(Repeat this for each transmitter you wish to remain stored in the
control unit).
The receiver stores up to four transmitters. To be certain all transmitter
slots in the receiver are occupied with transmitters you wish to continue to use, and all others are erased, you will have to fill all four
receiver slots. If in step 3 you identified one transmitter, you will have
to fill the additional 3 slots. If in step 3 you identified two transmitters,
you will have to fill the additional two slots, etc...
4. Press and hold any unused button or combination of buttons until a
long chirp is heard from the siren. Release and press the button or
button combination again and again until all remaining slots are full.
NOTE: The button or combination of buttons entered will also control
the arm or arm/disarm function until additional transmitters are
added. All unwanted transmitters are now deleted.
4
Page 5

Notice : The changes or modifications not expressly approved by the party responsible
for compliance could void the user’s authority to operate the equipment.
This device complies with Part 15 of the FCC Rules. Operation is subject to the following two
conditions: (1) this device may not cause harmful interference, and (2) this device must
accept any interference
received, including interference that may cause undesired operation.
910805
5
 Loading...