

Page 1
Page 2

USER’
S MANUAL
GENERAL INFORMATION
Incorporating the powerful single chip decoder,Sunplus 1002 designed to provide FTA. (Free-To-Air)channels with user-friendly OSD (On Screen Display)
.This digital set top box demonstrates extremely high performance and costeffectiveness,whichmakes it your best choice to enjoy the colorful digital life at
home.
1. Main Features
Main Profile Level 4.1 Compliant
Fully MPEG-2 MP@HL & MP@ML; MPEG-1 Layer I, II, III, Dolby Audio(AC3)
Compliant
SCPC & MCPC Receivable from C/KU Band
DiSEqC 1.0/1.1/unicable/1.2/1.3(USALS) Supported
PVR(External USB), EPG For 7 Days Supported
Multi-lingual DVB Subtitle and Teletext supported
Teletext and Subtitle out through OSD
Multimedia Files Playback (by USB)
Automatic and Manual Channel Scan Option
Multi-langual on Menu Screen Supported (English, French, Deutsh, Spanish and
Portuguese, etc)
MPEG-2 Hardware Decoding, Videotext Decoder
Digital Audio output: S/PDIF by Coaxial and Optical, YcbCr Available, RGB
Screen Format: 4: 3/16: 9 Auto
Dual USB 2.0 Upgrade Software/Update Channel Database through USB 2.0 Port
Screen Format: 4: 3/16: 9 Auto
Digital set top box Digital set top box 1
Page 3
USER’S MANUAL
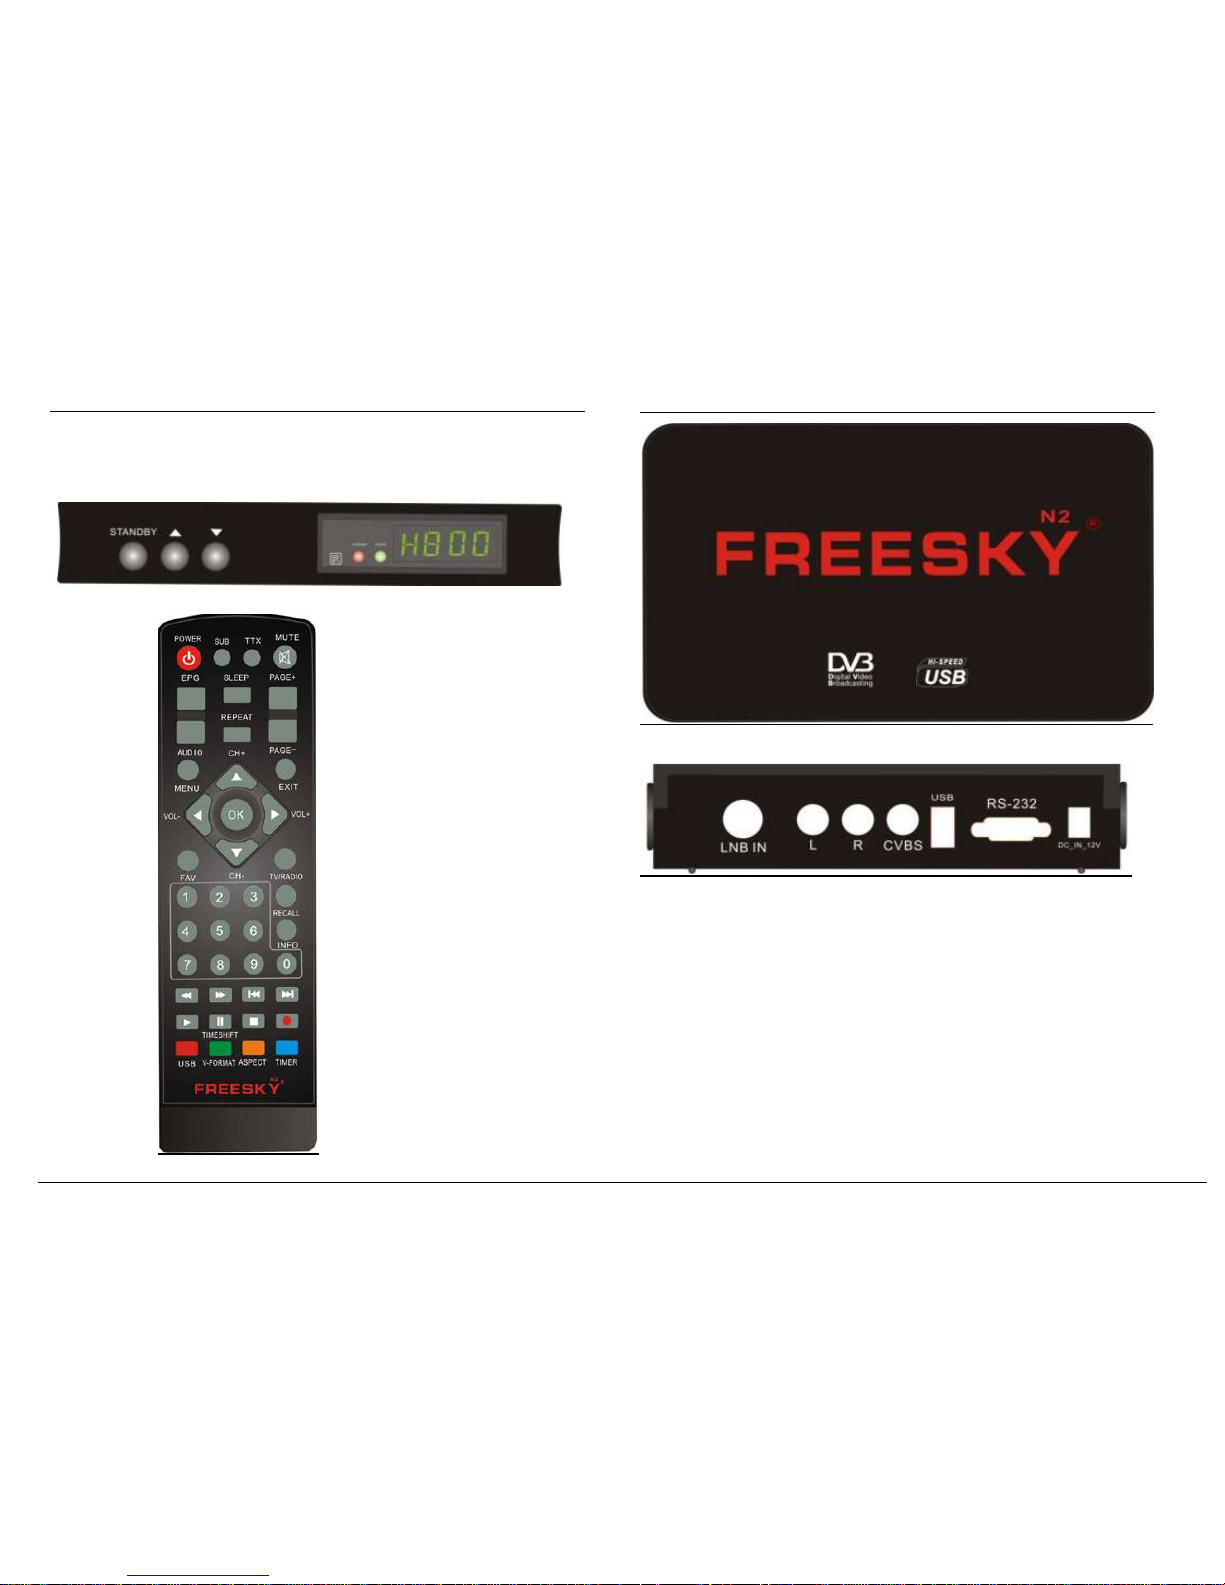
Remote controller
Front panel
Standby : Switches the receiver power on and standby.
USER’S MANUAL
Rear panel
1). LNB IN
Connect the IF cable from your LNB on your main dish to this connector.
2). VIDEO (CVBS outout to TV)
Composite video output for connecting to an AV monitor etc.
3). AUDIO-I LEFT / RIGHT
Stereo audio output socket for the television set or the audio system. (white/red)
4). RS-232
Connect your STB via this connector using a cross female to female RS232 cable
when you wish to upgrade the main software. Alternatively this connector is
also used for channel data transfer from another receiver of the same make and
model type.
5))))HDMI
high definition audio output by connecting to an AV monitor.
Digital set top box 2 Digital set top box 3
Page 4
USER’S MANUAL
1. Menu
Press [MENU] key can open the menu, exit the current menu to last menu or close the
window.
Press [EXIT] key can exit the current menu to last menu or close the window.hannel
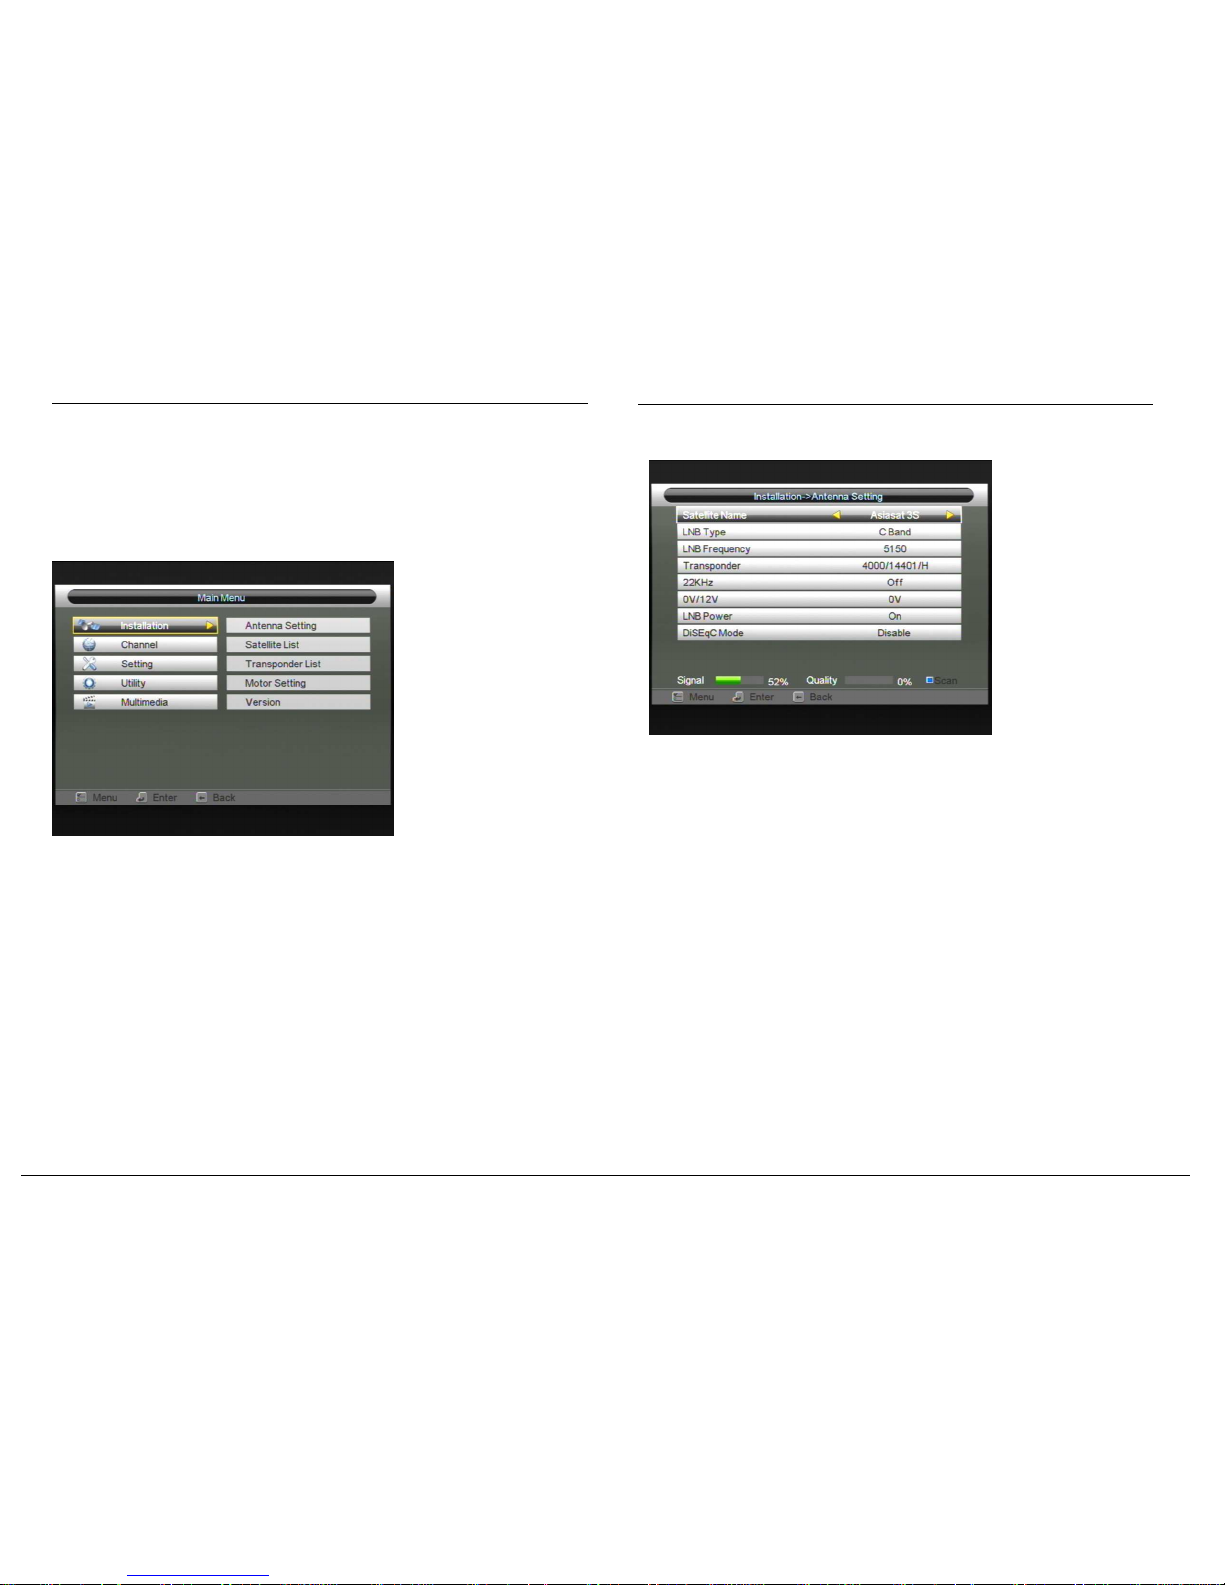
When you press [Menu] key to enter menu, there will display the picture like below:
1.
Press [Up/Down] key to select menu pages among Installation, Channel, Setting
Utility, Multimedia.
2.
Press [OK] or [Right] key to enter the “Installation”. If Menu Lock is “On”, it
will display a dialogue for user to key in password. The default Password is
“0000”.
3.
Press [Up/ Down] key to select menu items among Antenna Setting, Satellite
List, Transponder List, Motor Setting and Version .
4.
Press [Left] key or [Exit] key to go back to main menu.
2. Installation
3. Press [Up/ Down] key to select “Installation”menu items among Antenna
Setting, Satellite List, Transponder List, Motor Setting and Version .
2.1
Antenna Setting
USER’S MANUAL
1.
Press [OK] key to enter the “Antenna Setting”. If Menu Lock is “On”, it will
display a dialogue for user to key in password. The default Password is “0000”.
In Antenna Setup mode:
1.
Satellite: In this item, press [Volume Up/ Volume Down] key can switch
Satellites and press [OK] key can enter satellite list for you to select directly.
2.
LNB Freq: In this item, press [Volume Up/ Volume Down] key can select the
parameter. Option is 5150/5750/5950/9750/10000/10050/10450/10600/10700
/10750/11250/11300/5150-5750/5750-5150/Universal(9750-10600).
3.
DiSEqCMode: You can use [Volume Up/ Volume Down] key to switch options.
There are several options for your selection: Disable /Diseqc Tone Burst A/
Diseqc Tone Burst B/ Diseqc 1.0/ Diseqc 1.1.
4.
22K: You can use [Volume Up/ Volume Down] key to switch “ON / OFF”. When
this item is switched to “ON”, receiver will receive TV and radio input signal
from 22K port. If the item is switched to “Off”, the receiver will receive all
signals from 0K port.
5.
LNB Power: In “LNB Power” item, you can press [Volume Up/ Volume Down]
key to switch “Off/On” functions.
Digital set top box 4 Digital set top box 5
Page 5
USER’S MANUAL
6.
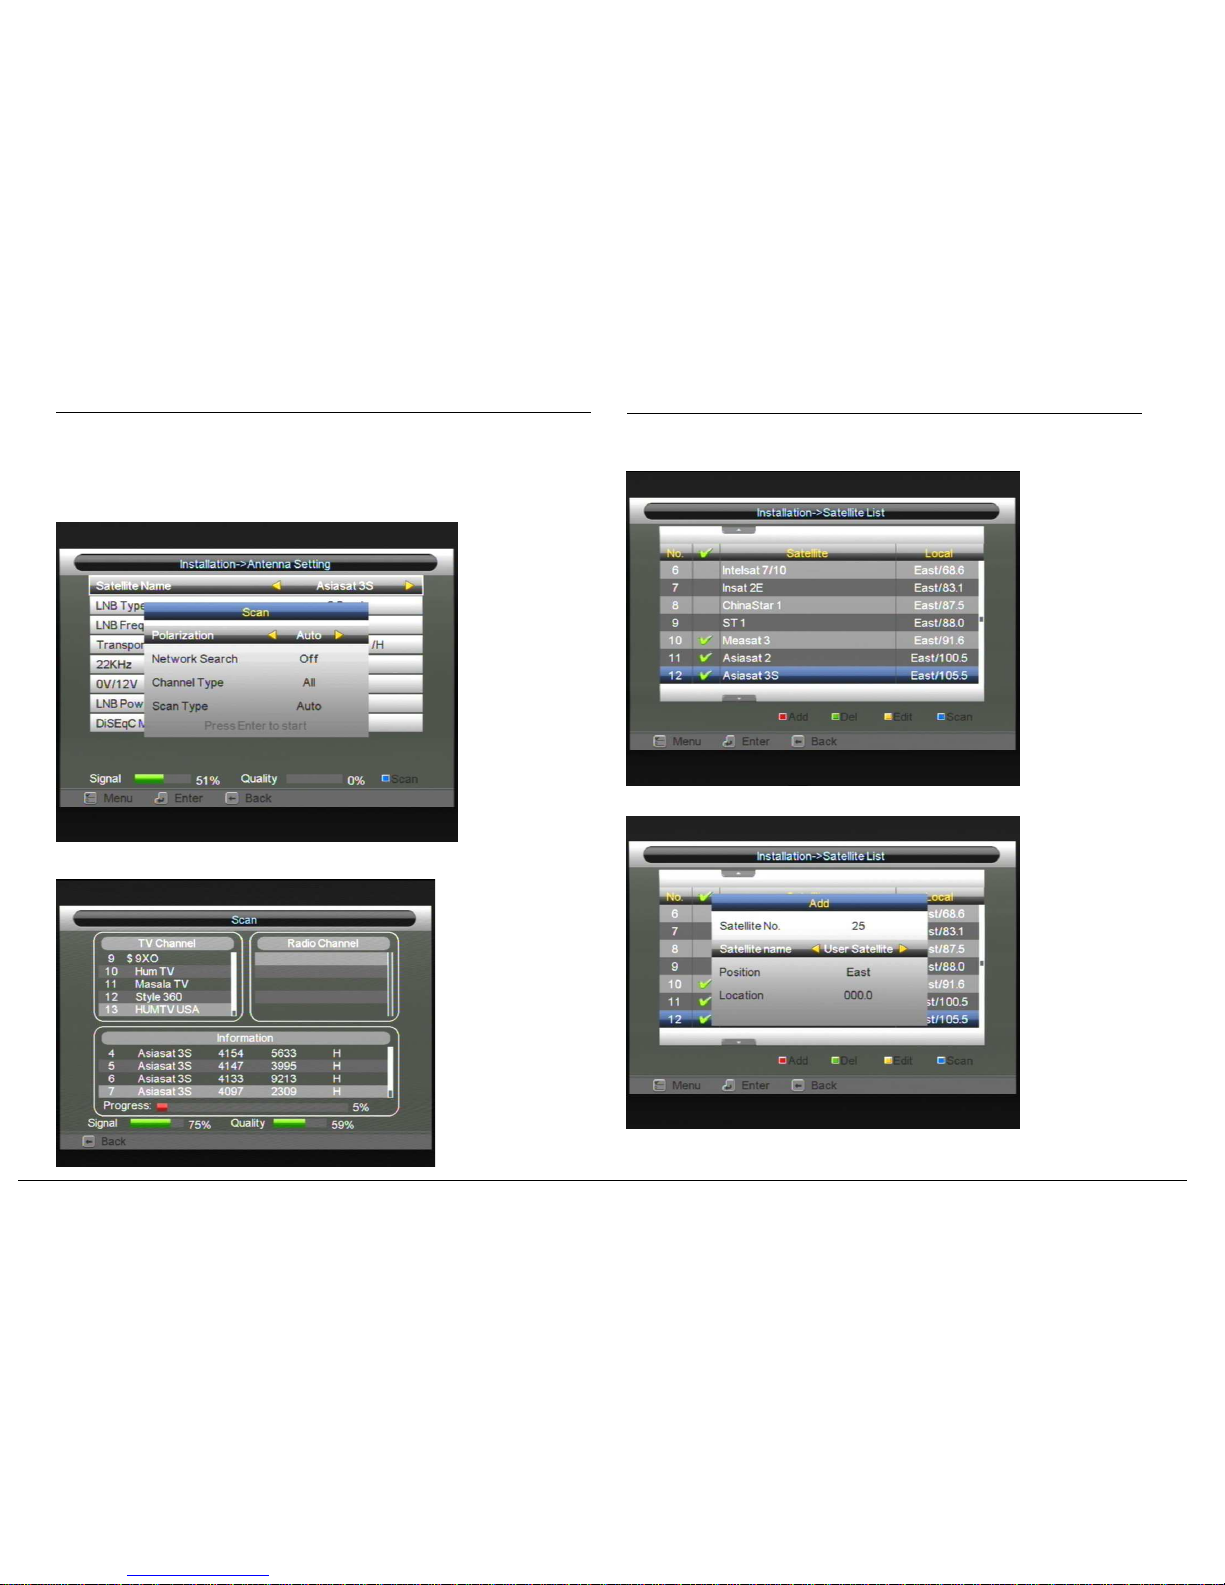
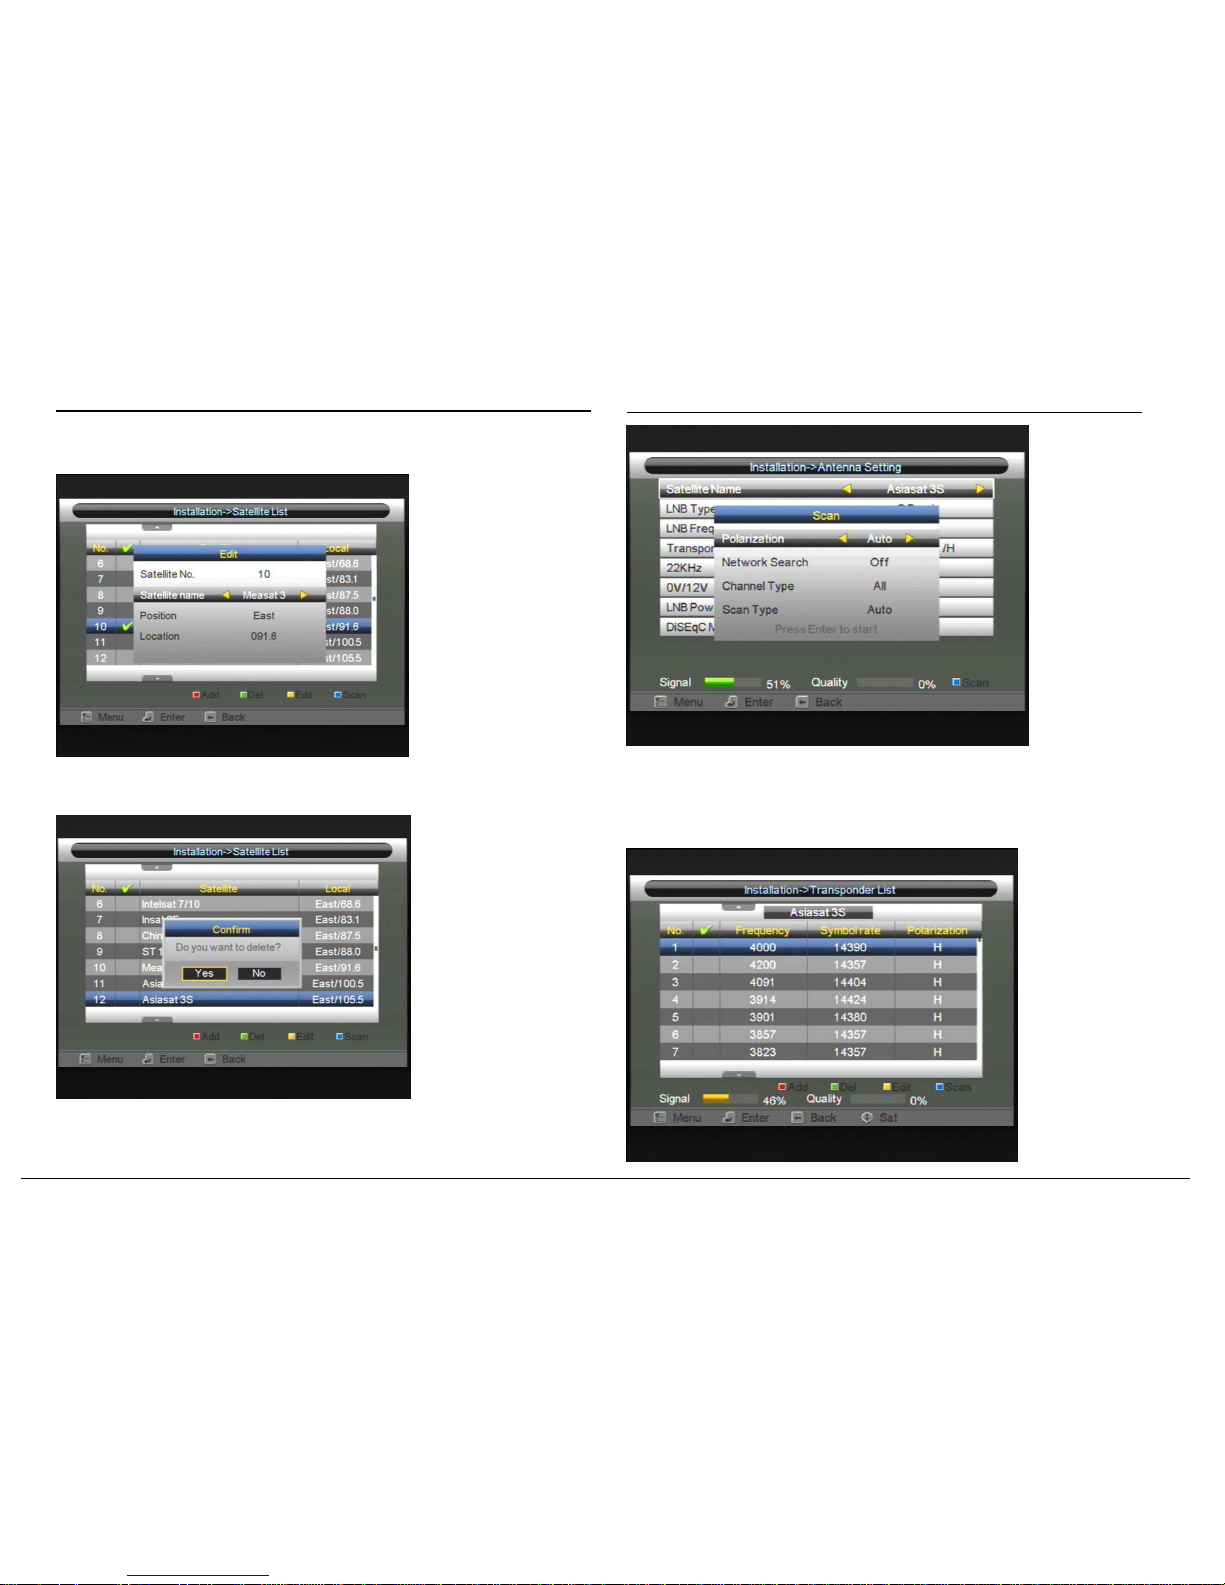
Press [Green] key, you can enter edit Scan menu. You can choise
Polarization(“Auto”, “H”, “V”); Network Search(“ON” , “OFF”); Channel
Type(“ALL”, “FTA”, “Scramble”) and Scan Type(“Auto”, “Present”).
there will display the screen like below:
Press [Enter] to start Scan, there will display like below:
USER’S MANUAL
2.2 Satellite List
When you enter to “Satellite List” menu, there will display the screen like below:
2.
Press [Red] key, you can enter add satellite menu.
Digital set top box 6 Digital set top box 7
Page 6
USER’S MANUAL
3.
Press [Yellow] key, you can enter edit satellite menu. You can edit Satellite
name, number, Position and satellite longitude .
4.
Press [Green] key, you will be asked “Do you want to delete?” Select “Yes” to
delete the satellite that highlight focus on. Select “No” to cancel the operation.
5.
Press [Green] key, you can enter Scan menu:
USER’S MANUAL
5. Press [Exit] key to draw back from “Sateillite List” menu.
2.3 Transponder List
When you enter to “Transponder List” menu, you will see the screen like below:
Digital set top box 8 Digital set top box 9
Page 7
USER’S MANUAL
2.4 Motor Setting
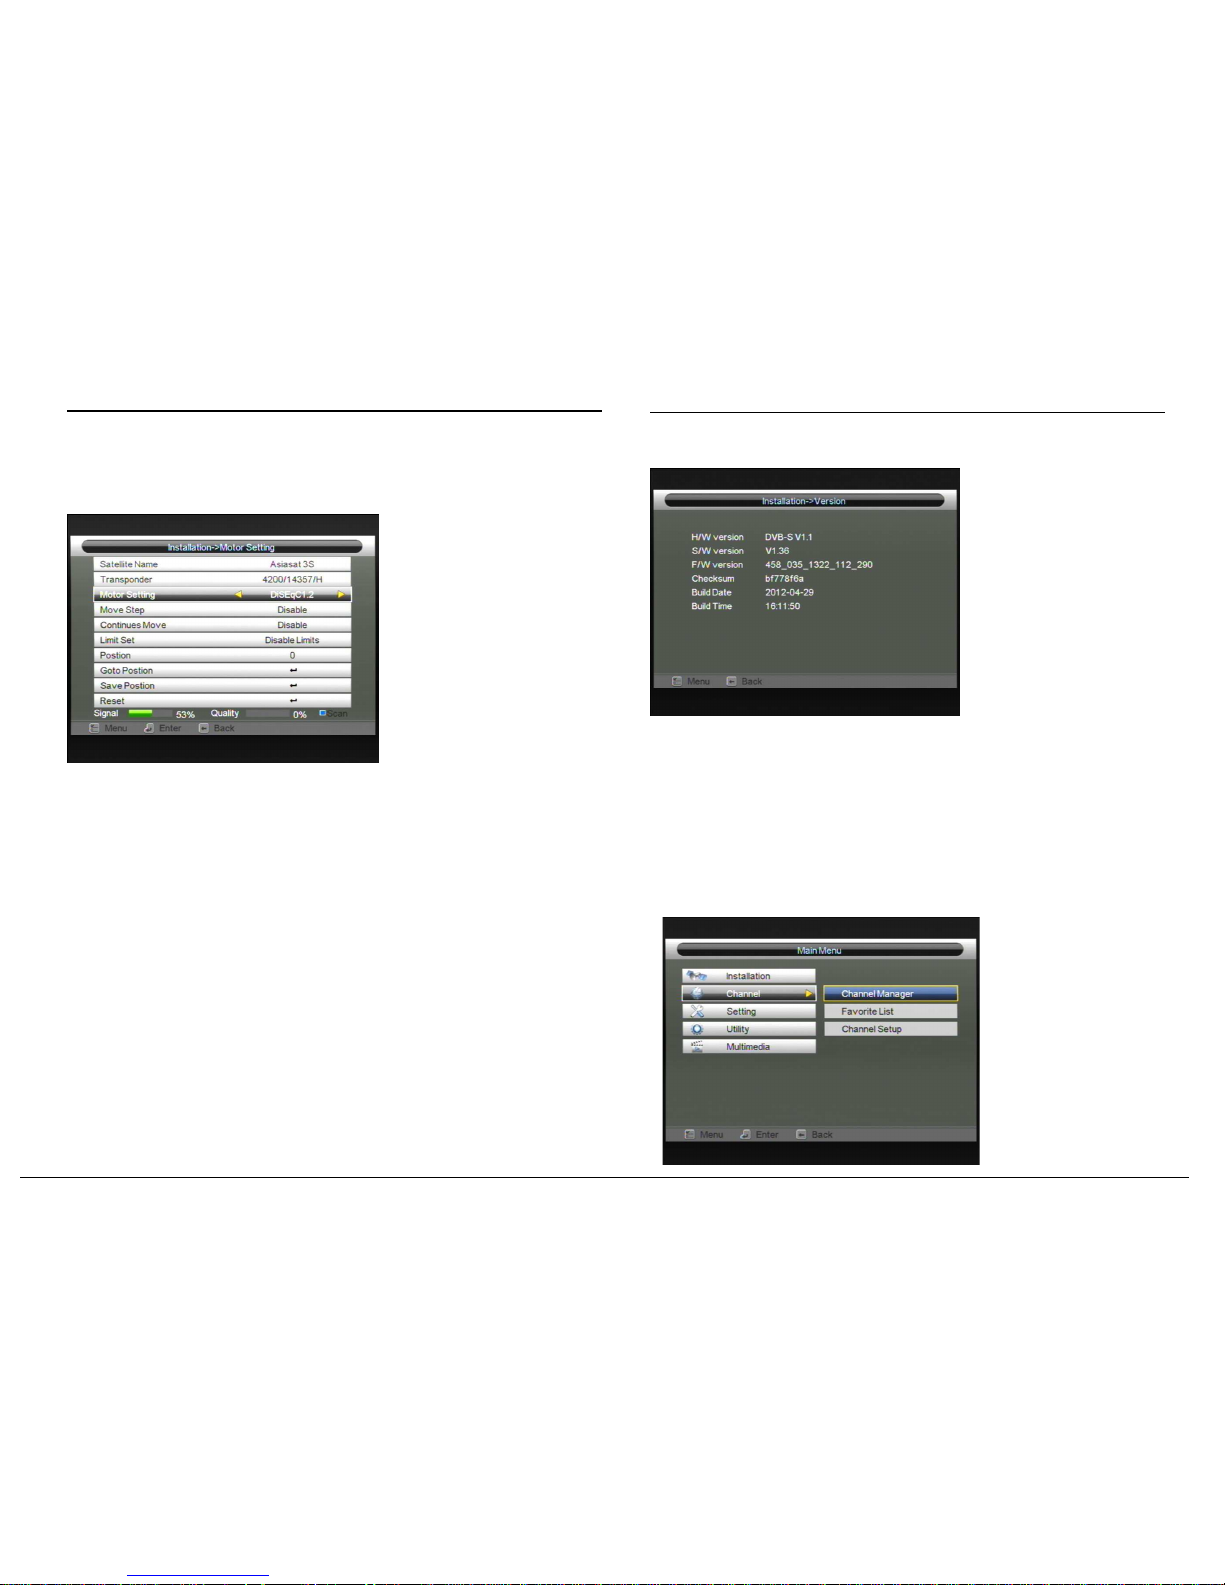
If you select “Motor Setting” in “Installation” menu, there will display the screen like
below:
6.
Satellite: In this item, press [Volume Up/ Volume Down] key can switch Satellites
and press [OK] key can enter satellite list for you to select directly.
7.
Transponder : In this item, press [Volume Up/ Volume Down] key can can select
the parameter. Option is Freq/Sym/Pol. For example: 4072/14224/H.
8.
Motor Setting : Diseqc1.2/Usals/Disable.
9.
Move step/Continues Move : West/East/disable.
10.
Limit Set : When you set “limit setup” to “West Limit/ East Limit”, you can move
the highlight to “Limit Setup” line and move the dish to west or east by pressing
[Left/Right] key manually. When you are moving to the target place, press [OK]
key to save the point.
11.
After set postion “0-63” and select “Goto postion/Save postion ”, you can move
the highlight to “Move step” line and change to “East/West/Disable and press
[EXIT] to save the position.
12.
Reset : Reset Sateillite default Paramter.
2.5 Version
USER’S MANUAL
1.
When you enter to “Version” menu, you will see a screen like above. The screen
displays H/W version, S/W version, F/W version, Build Date, Build Time.
2.
Press [Exit] key to draw back from “Version” menu.
3. Channel
1.
Press [Up/Down] key to select menu pages among Channel Manager ,Favorite
List,Channel Setup.
2.
Press [OK] or [Right] key to enter the “Channel Manager”. If Menu Lock is
“On”, it will display a dialogue for user to key in password. The default Password
is “0000”.
Digital set top box 10 Digital set top box 11
Page 8
USER’S MANUAL
3.1 Channel Manager
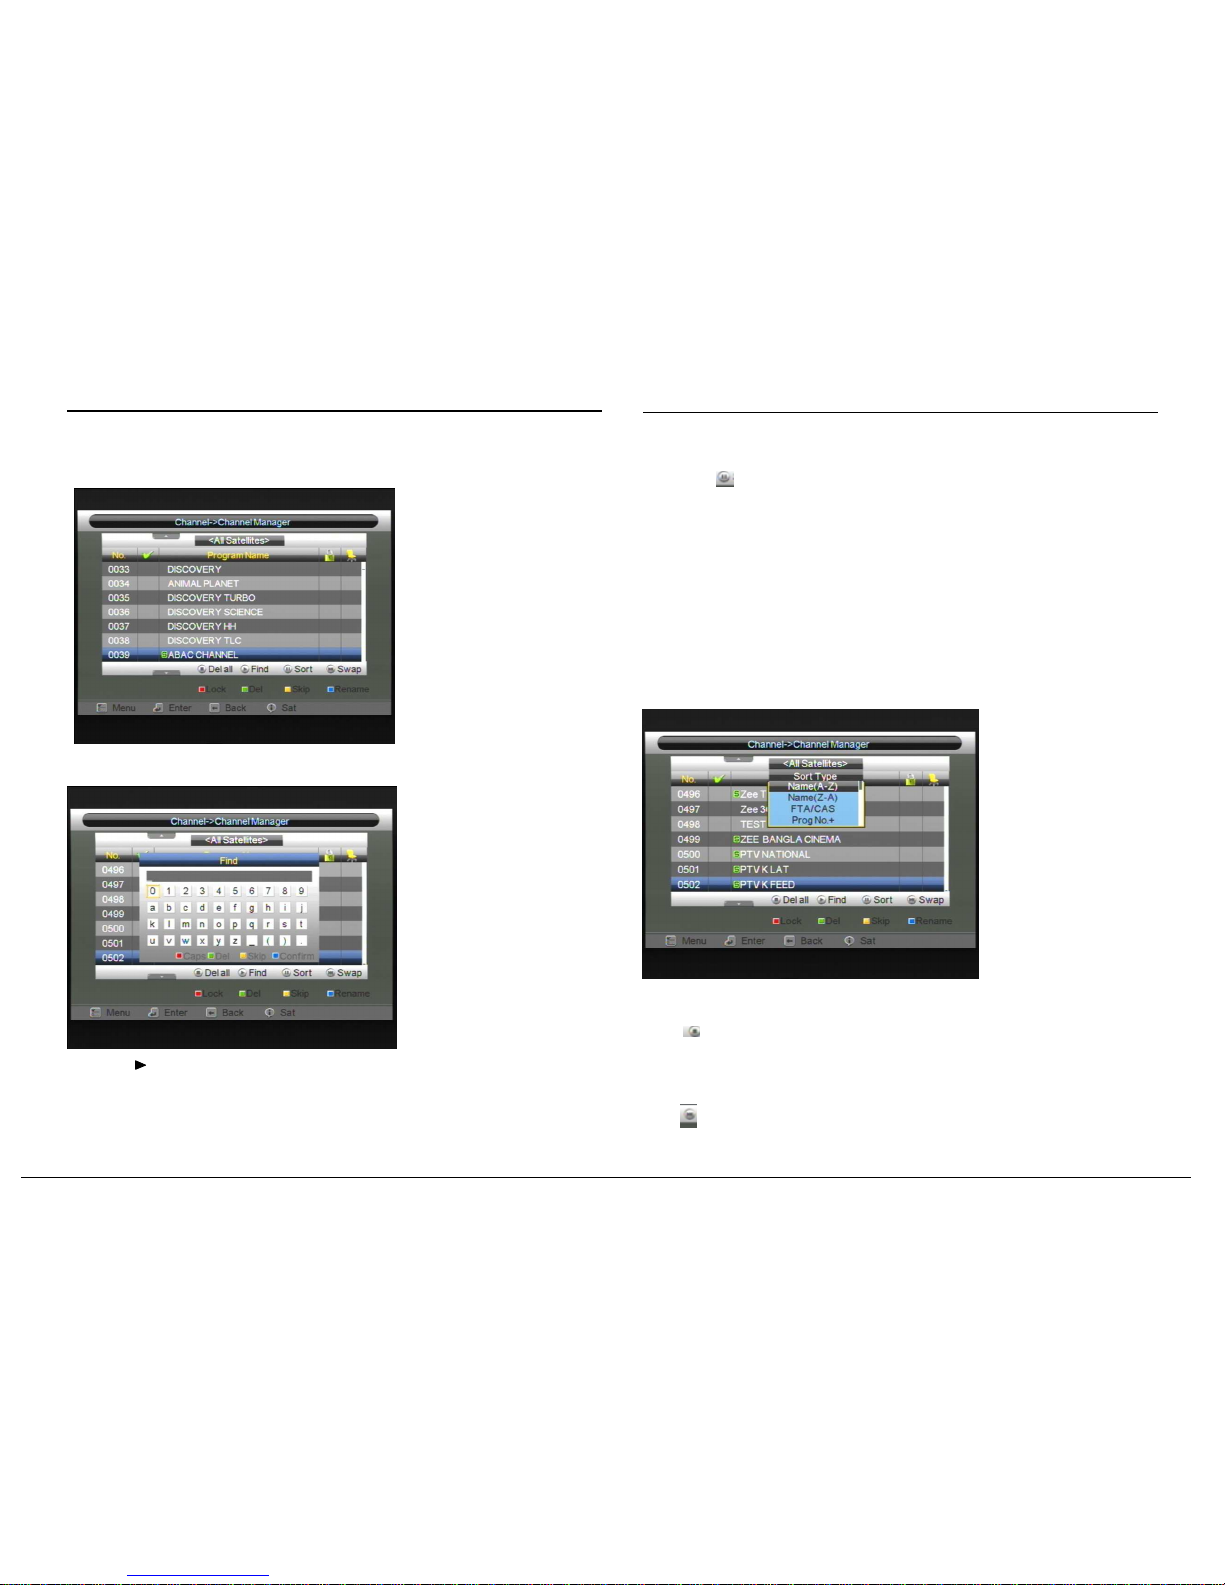
When you enter to “Channel Manager” menu, there will display the screen like below.
3.1.1 Find
Pressing [
] key in Channel manager menu, “Find” window like above. Press
[Left/Right/Up/Down] key to move highlight and press [OK] key to input the selected
symbol or letter into the dialogue. The search result display on the right screen. You can
press [Red] key to caps “x”or “X”,press [Green] key to delete the char, press [Yellow]
key to add s
paces
, press [Blue] key to confirm.
USER’S MANUAL
Pressing [Exit] key can close “Find” window.
3.1.2 Sort
1
Press [ ] key can open the “Sort” window likes above. There are four kinds of
sorting ways. You can press [Channel Up/Channel Down] key to move highlight
and press [OK] key to confirm you selection
2
The five kinds of sorting way are:
Name (A-Z): Sorting in Alphabetical Order, ignore “$” symbol.
Name (Z-A): Sorting in Alphabetical Order, ignore “$” symbol.
FTA: free and scramble sequence. Free channel will in the front of channel
list and scramble channel will at the rear of channel list
Prog No_/Prog No+ Sort channel through Prog No+/Prog No_ sequence.
3.1.3 Del all
Press [ ] key can delete all channel .
3.1.4 Swap
Press[ ] key can swap two channel postion.
3.1.5 Lock
Digital set top box 12 Digital set top box 13
Page 9
USER’S MANUAL
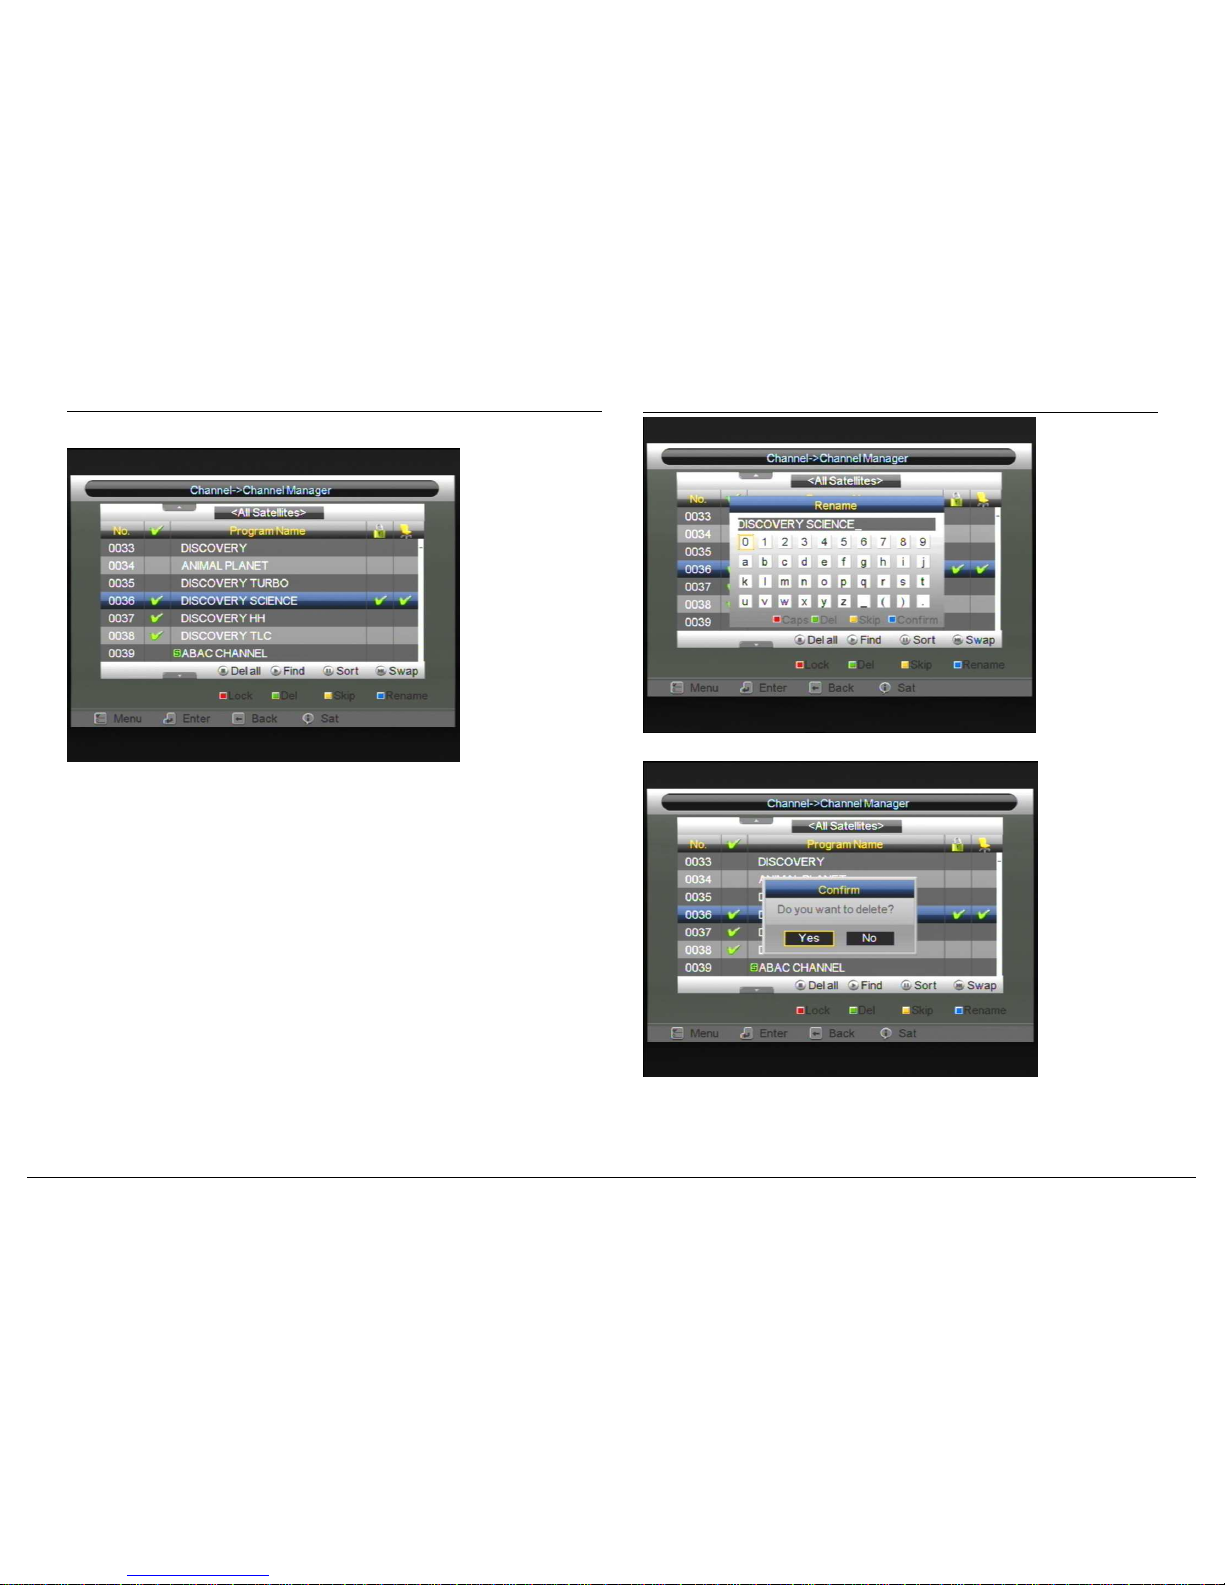
3.1.6 Lock
1.
Press [Red] key can enter lock mode.
2.
Press [Up/Down] key to move the highlight and press [OK] key, you can see
a “lock mark” in the right side of the highlighted channel.
3.
After save and exit menu, STB will request you to input the password while
you want to watch the locked channel.
3.1.7 Skip
1.
. Press [Yellow] key can enter skip mode.
2.
Press [Up/Down] key to move the highlight and press [OK] to make a “skip
mark” in the right side of the highlighted channel.
3.
After save and exit menu, the channel will be skip while user change channel
in the full screen.
3.1.8 Rename
1.
Press [Red] key can switch whether capital.
2.
Press [Yellow] key can enter skip mode.
USER’S MANUAL
3.
Press [Green] key can delete the char on the cursor.
4.
Press [Blue] key can comfirm the operation.
Digital set top box 14 Digital set top box 15
Page 10
USER’S MANUAL
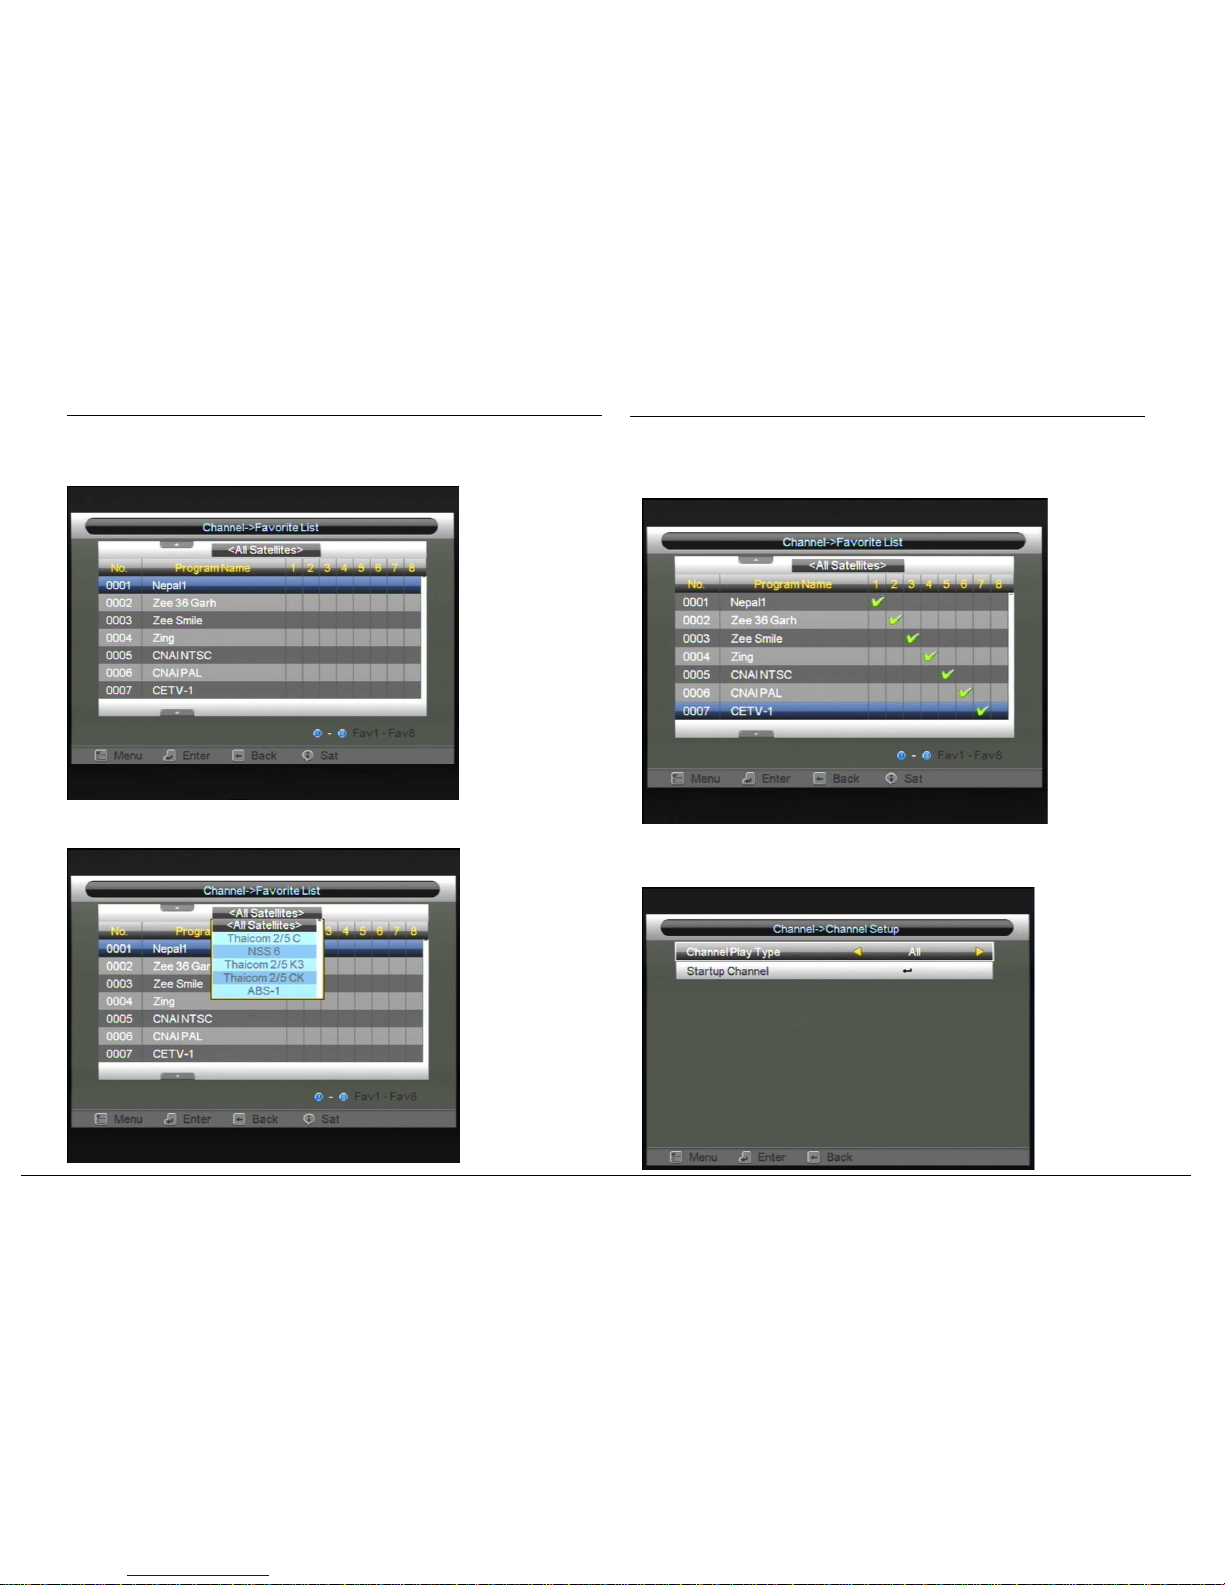
3.2 Favorite List
When you input to “Favorite List” menu, you will see a screen like below:
1.
Press [Sat] key ,You can change Satellites.
USER’S MANUAL
2.
In the window of “Favorite List”, you can press [1-8] key to select favorite
group1-8, you can see a “FAV mark” in the right 1-8 column side of the
highlighted channel.
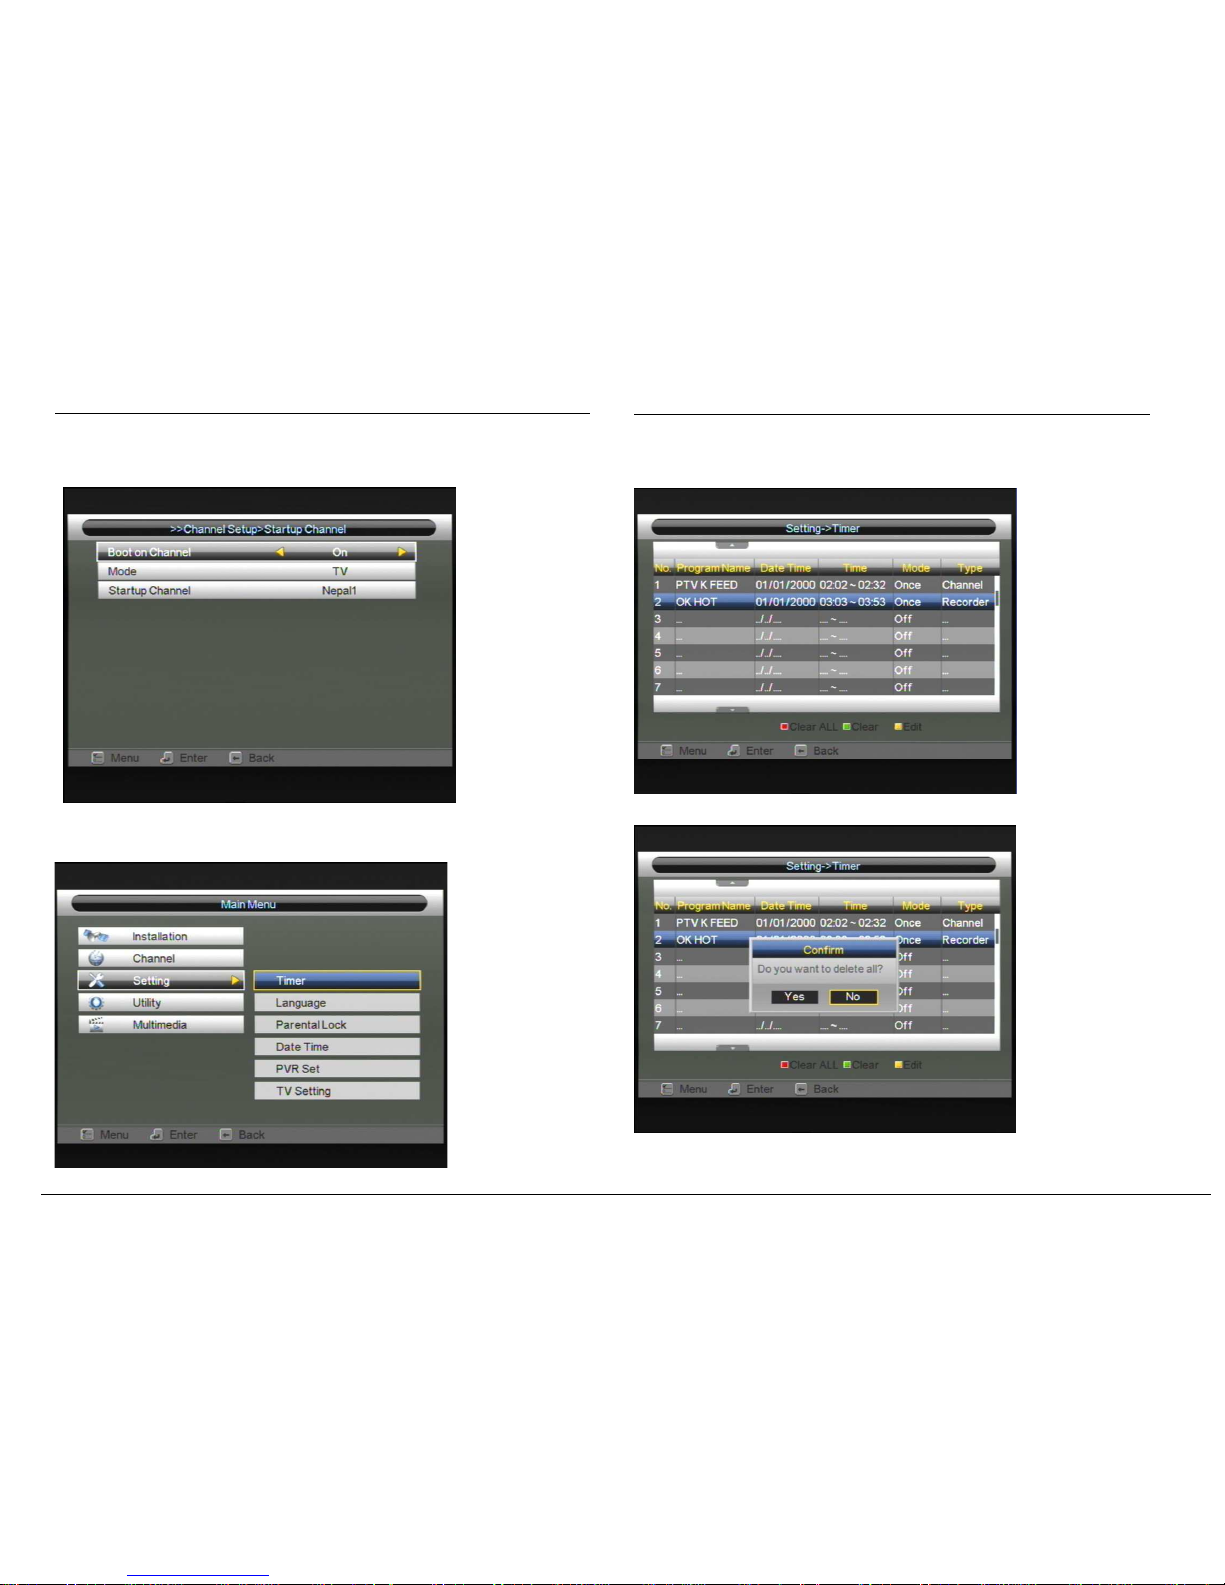
3.3 Channel Setup
When you enter to “Channel Setup” menu, there will display the screen like below:
Digital set top box 16 Digital set top box 17
Page 11
USER’S MANUAL
1.
Channel Play Type : Free; All, Scramble.
2.
In “Startup channel” , if Boot on channel display “on”, there will could set Boot
startup channel Mode(tv or radio), and channel name.
4. Setting
USER’S MANUAL
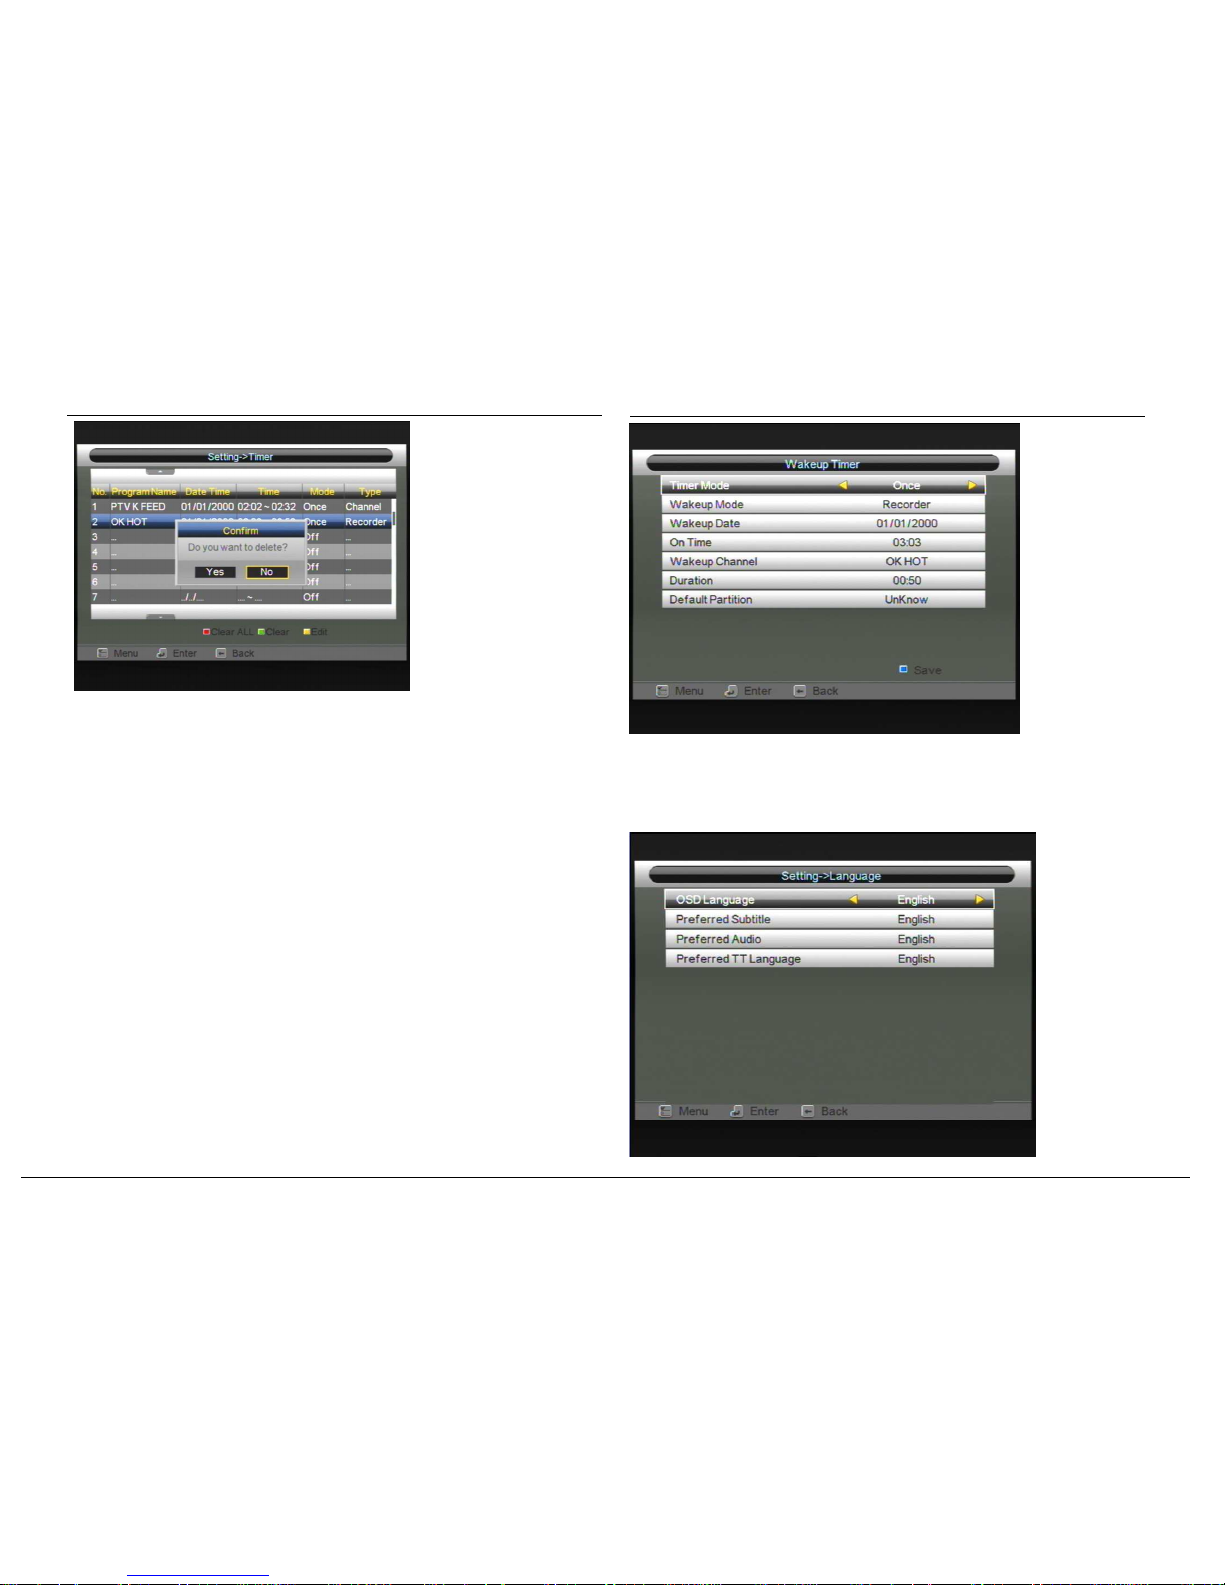
4.1 Timer
When you input to “Timer” menu, you will see a screen like below:
3.
Press [Red] key clear all timer record.
4.
Press [Green] key, can clear one timer record.
Digital set top box 18 Digital set top box 19
Page 12
USER’S MANUAL
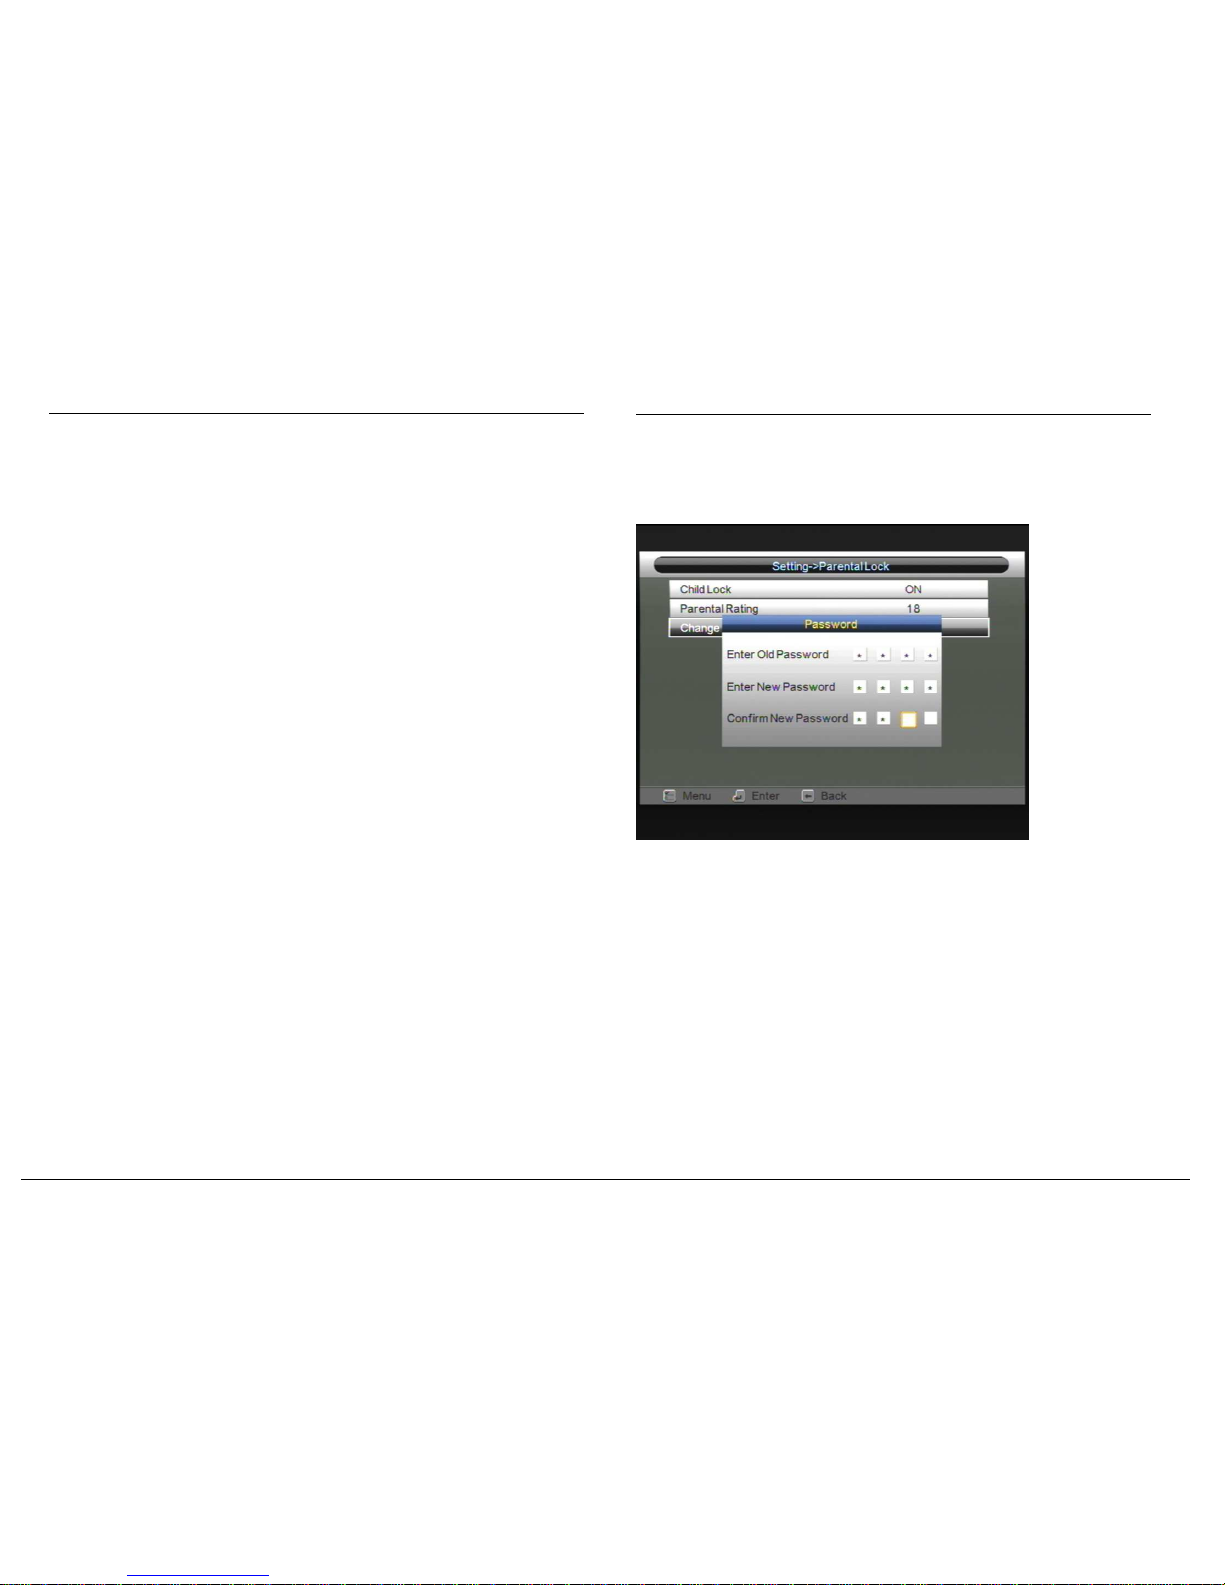
Wakeup Timer
1.
You can press [Yellow] key to open Wakeup Timer menu.
2.
Timer Mode: There are several modes for Timer to setting, include Off, Once,
Daily
3.
Wakeup Mode: Channel, Message, Recorder, on, off.
4.
Wakeup Date: use number keys to input your wakeup date.
5.
On Time: use number keys to input your wakeup time. Once the time’s up, no
matter what the system is in standby mode or in playing mode, the system will
automatically switch to the channel you want and start to play.
6.
Wakeup Channel: press [OK] key to enter channel list and select channel that
you want to setting.
7.
Duration: After you set a time for “Duration” item, once the time’s up, the
system will automatically switch to standby mode. If you want not work this
function, set the duration is 00:00.
8.
press [Blue] key to save timer. press [Exit] key to cancel the operation.
USER’S MANUAL
4.2 Language
When you enter to “Language” menu, you will see the screen like below:
Digital set top box 20 Digital set top box 21
Page 13
USER’S MANUAL
1.
OSD Language: press [Volume Up/ Volume Down] key to select menu languages,
the selections of languages include: English, French, German, Italian, Spanish,
Portuguese, Russian,Turkish, Polish, Arabic, Indonesian, and Thailand.
2.
Subtitle Language: You can set subtitle language. If the streams have this language
you can see the subtitle in language you set.
3.
First Audio: Some channels have more than one audio language for choosing; by
this function you can set the first audio for this channel. If the playing channel has
the same audio as the “First Audio” you set, system will play this audio language
as default. If the channel hasn’t the suited audio language, then the system will
compare automatically with second audio language. The selections of audio
languages include: English, French, German, Russian, Arabic, Portuguese,
Turkish, Spanish, Polish and Italian.
4.
Second Audio: If the channel has no corresponded audio with “First Audio” but
have corresponded audio with “Second Audio”, system will play the second audio
language as default. If no audio language corresponds with the “Second Audio”,
then the default language of current channel will be played automatically. The
selections of audio languages include: English, French, German, Russian, Arabic,
Portuguese, Turkish, Spanish, Polish and Italian.
5.
Teletext: You can set teletext language. If the streams have this language you can
see the teletext in language you set.
6.
Press [Exit] key to draw back from “Language” menu.
4.3 Parental Lock
1.
In “Parental Lock” line, press [OK] key, there will pop a dialogue for you to input
the password. Default password is “0000”. When you input the correct password,
you will see a screen like below:
2.
Child Lock determining that when users wish to play the lock channels, whether
have to input the password or not. If the setting is “Yes”, play the channels with
lock mark will show up a dialogue on the screen and ask for the password.
USER’S MANUAL
2.
If the setting of “Channel Lock” is “No”, the Lock function will invalid.
3.
Parental Rating: This fuction use Lock “EPG” channels.
4.
In “Change Pin Code ” menu , press [OK] key to will display the screen like
below:
5.
New Password is used for revising password; you can input the new password in
this item by using number keys directly. After you filled in 4 digital numbers, the
highlight will auto skip to Confirm Password and ask you to input the new
password again. If the password is correct, the screen will show up a message of
“Saving Data, Please Wait…”. After finish saving and drawback to “System
Setup” menu, the revising is complete.
6.
Press [Exit] key to draw back from the “Parental Lock” menu.
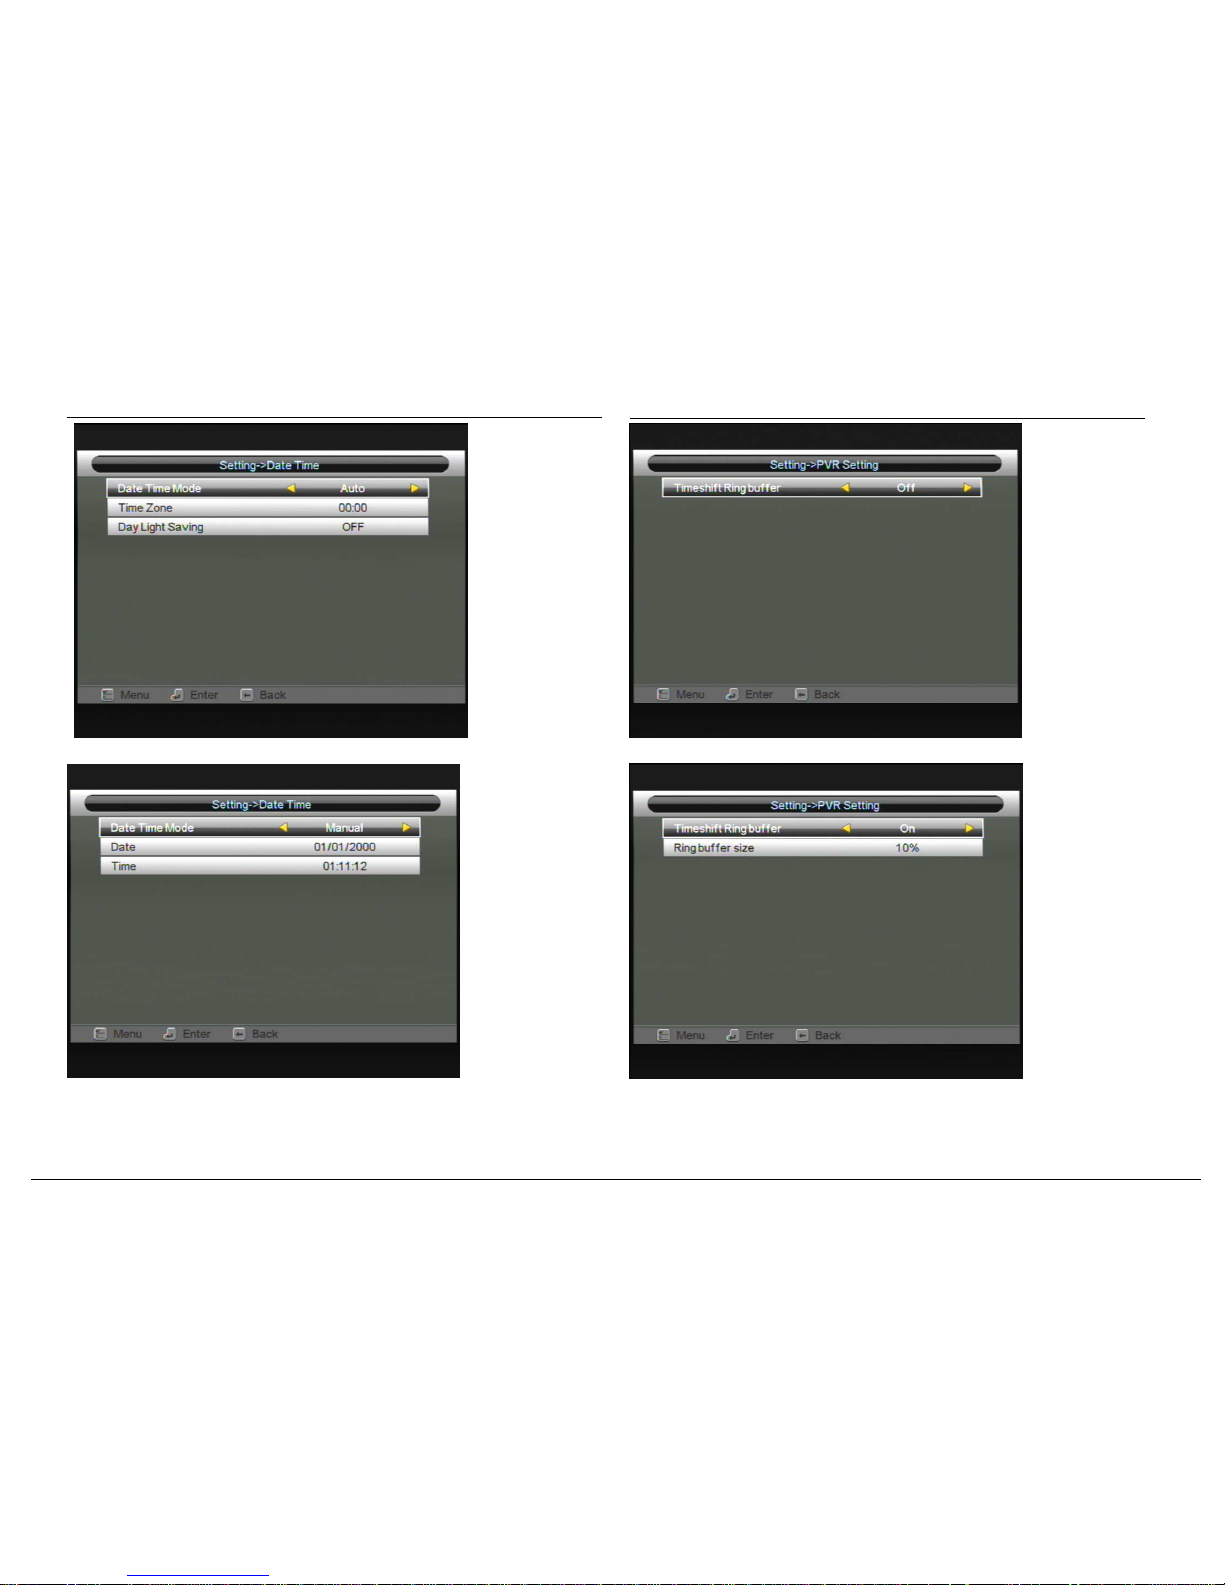
4.4 Date Time
When you input to “Date Time” menu, you will see a screen like below:
1. Date Time Mode : “Auto” means Auto update.
2. Time Zone: You can press [Volume Up / Down] keys to switch “Time Zone” value
and the range are “-12:00 ~ +12:00” increase each half hour progressively.
Digital set top box 22 Digital set top box 23
Page 14
USER’S MANUAL
3.
Date Time Mode : Manual
4.5 PVR Setting
1.If Timeshift Ring buffer set “OFF”
USER’S MANUAL
2. If Timeshift Ring buffer set “ON”
Digital set top box 24 Digital set top box 25
Page 15
USER’S MANUAL
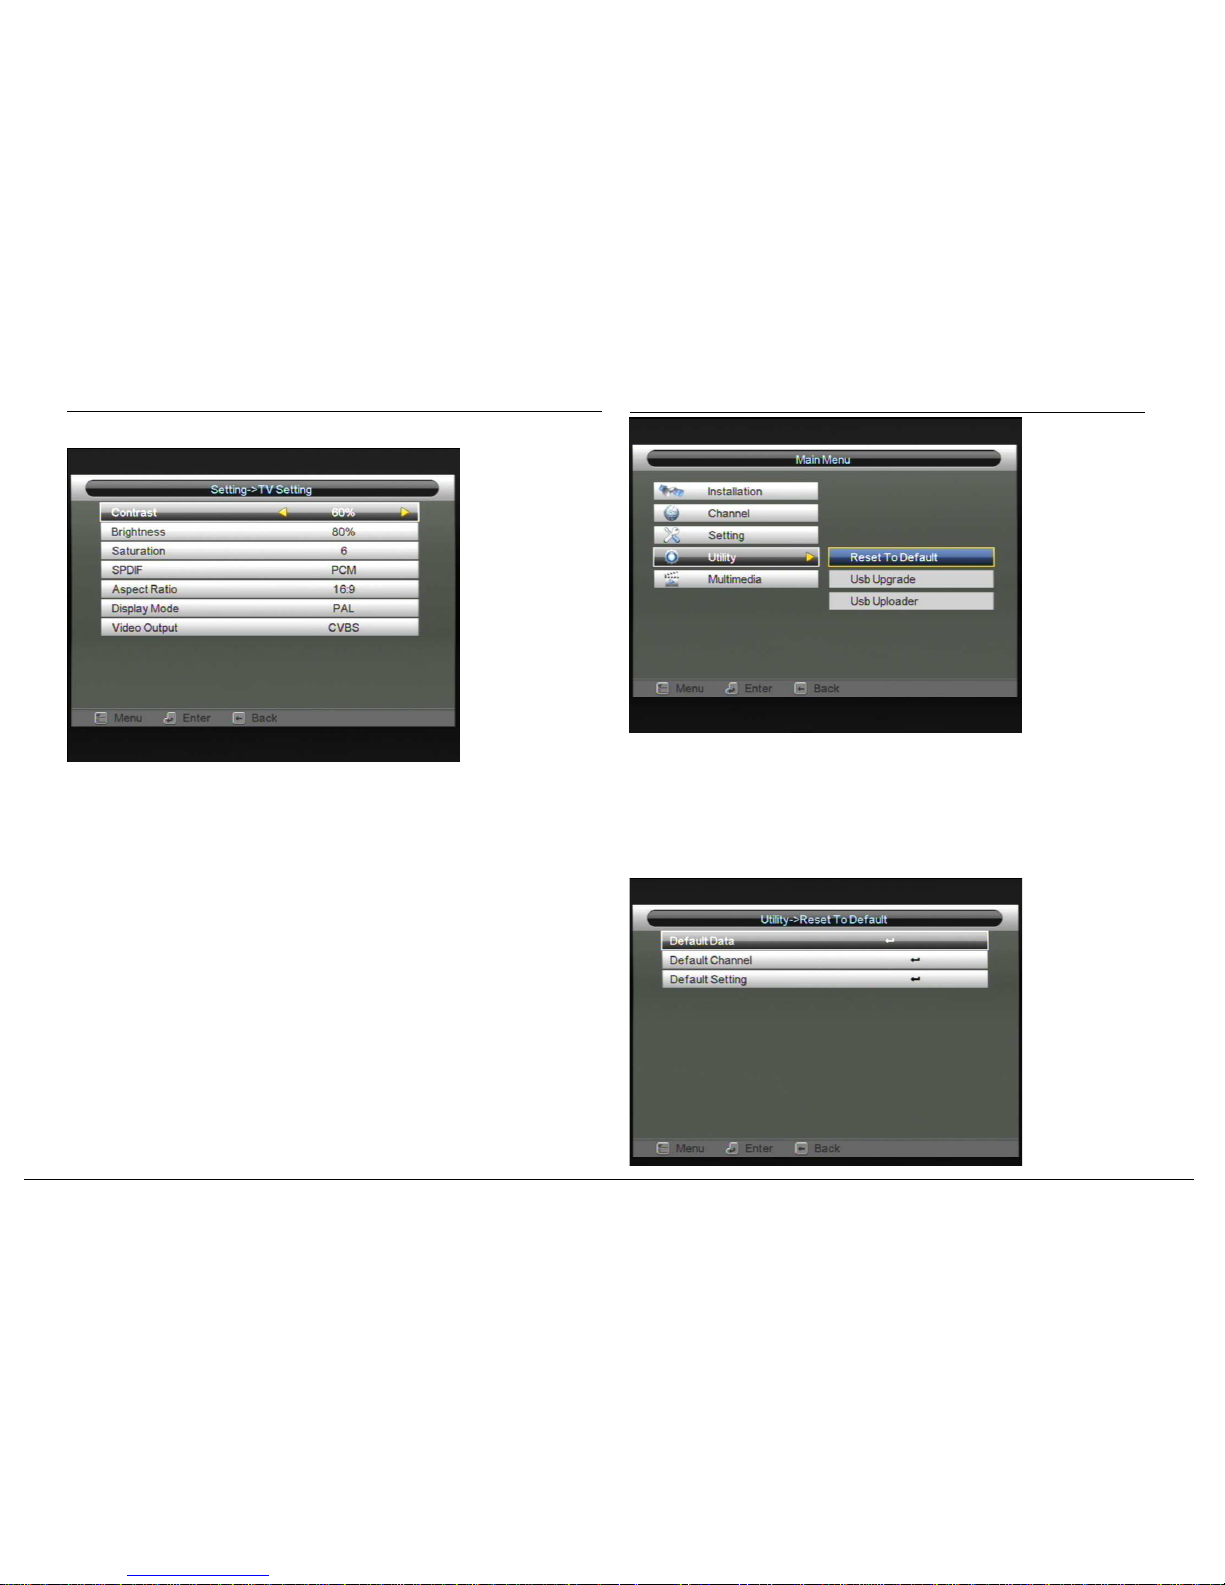
4.6 TV Setting
Contrast: 0~100%
Brightness: 0~100%
Saturation: 1~10
SPDIF : PCM, MUTE, BitStream
Aspect Radio: 16:9, 4:3LB, 4:3PS
Display Mode : PAL ,NTSC,AUTO.
Video Output: CVBS
5. Utility
Press [MENU] key can open the menu, select the “Utility” item, there will display the
three items “Reset To Default”,”Usb Upgrade” and “Usb Uploader” like below:
USER’S MANUAL
5.1 Reset To Default
When you enter to “Utility” menu and select the “Reset To Default” Item, there will
display the screen like below:
Default Data: set the data to default.
Default Channel: set channel to default.
Default Setting: set setting to default.
Digital set top box 26 Digital set top box 27
Page 16
USER’S MANUAL
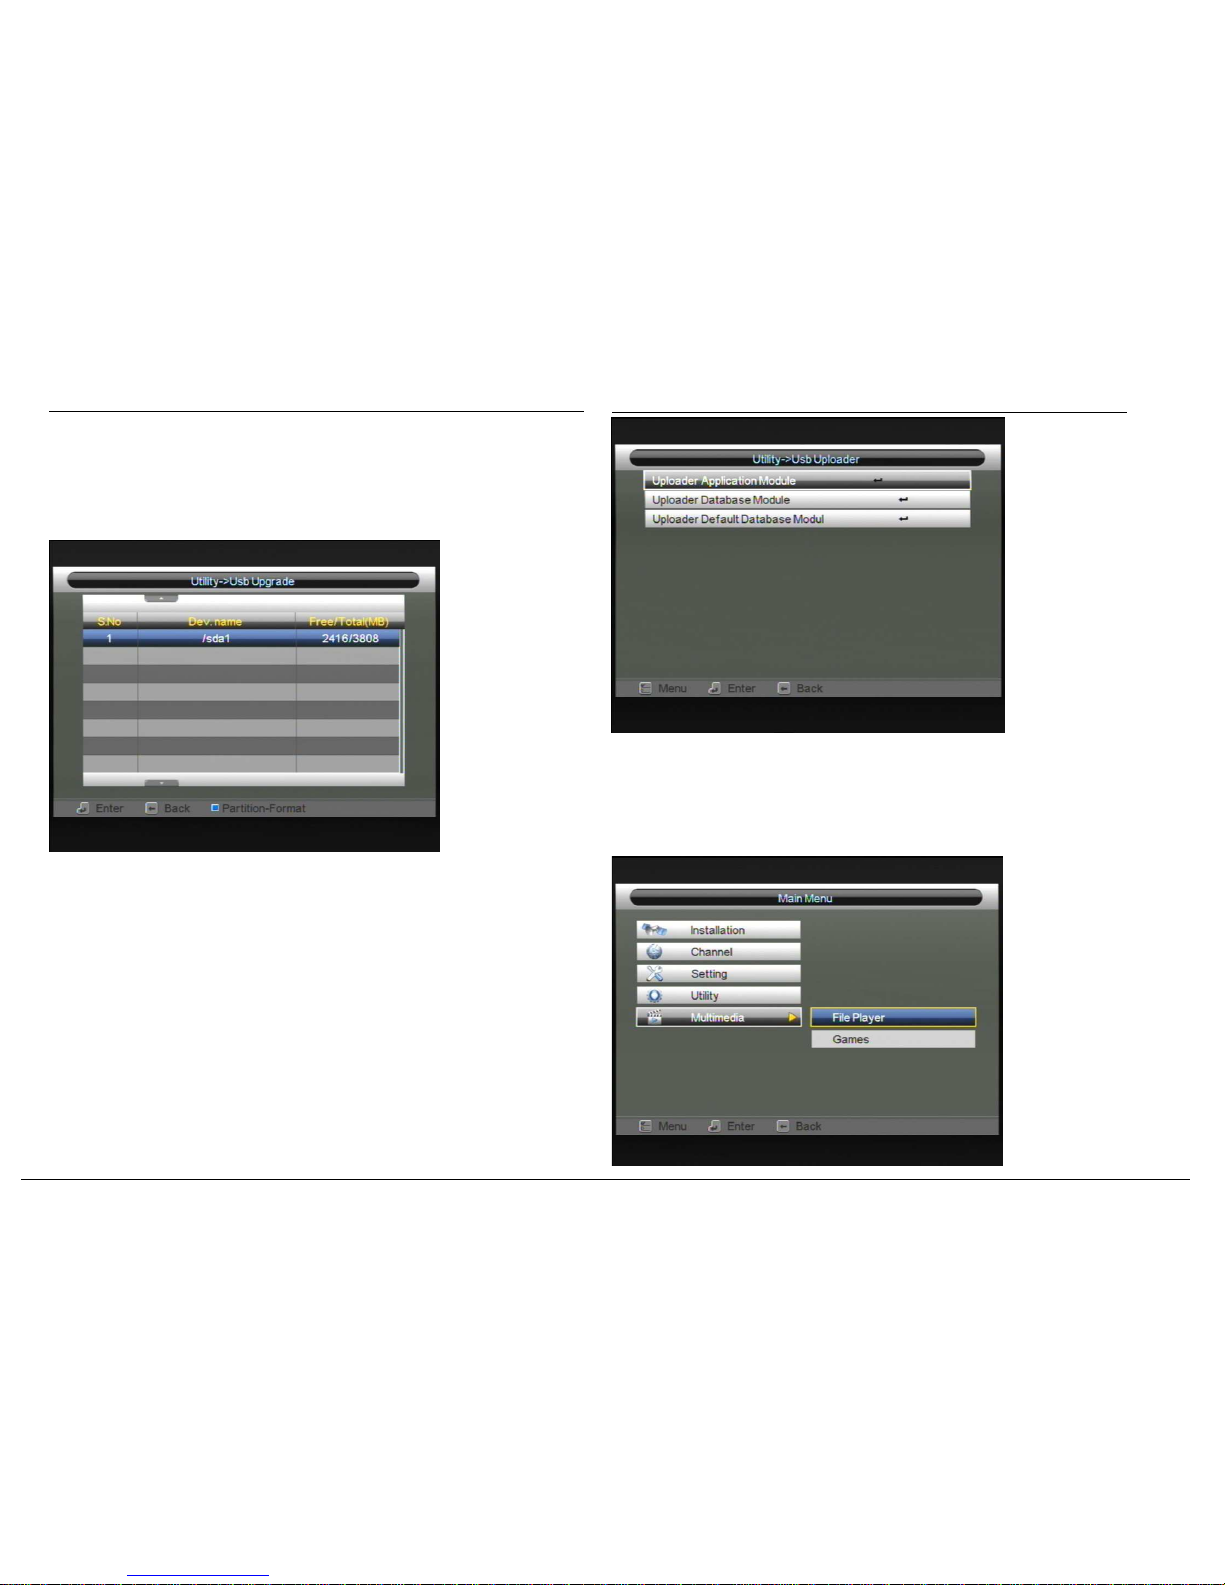
5.2 Usb Upgrade
Select the “Usb Upgrade” Item, there will display the screen like below:
You can select specific bin file to upgrade to box
5.3 Usb Uploader
select the “Usb Upgrade” Item, there will display the screen like below:
you can select specific item to uploader reference module to usb disk.
USER’S MANUAL
6. Multimedia
Press [MENU] key can open the menu, select the “Multimedia” item, there will display
the two items “File Player” and “Games” like below:
Digital set top box 28 Digital set top box 29
Page 17
USER’S MANUAL
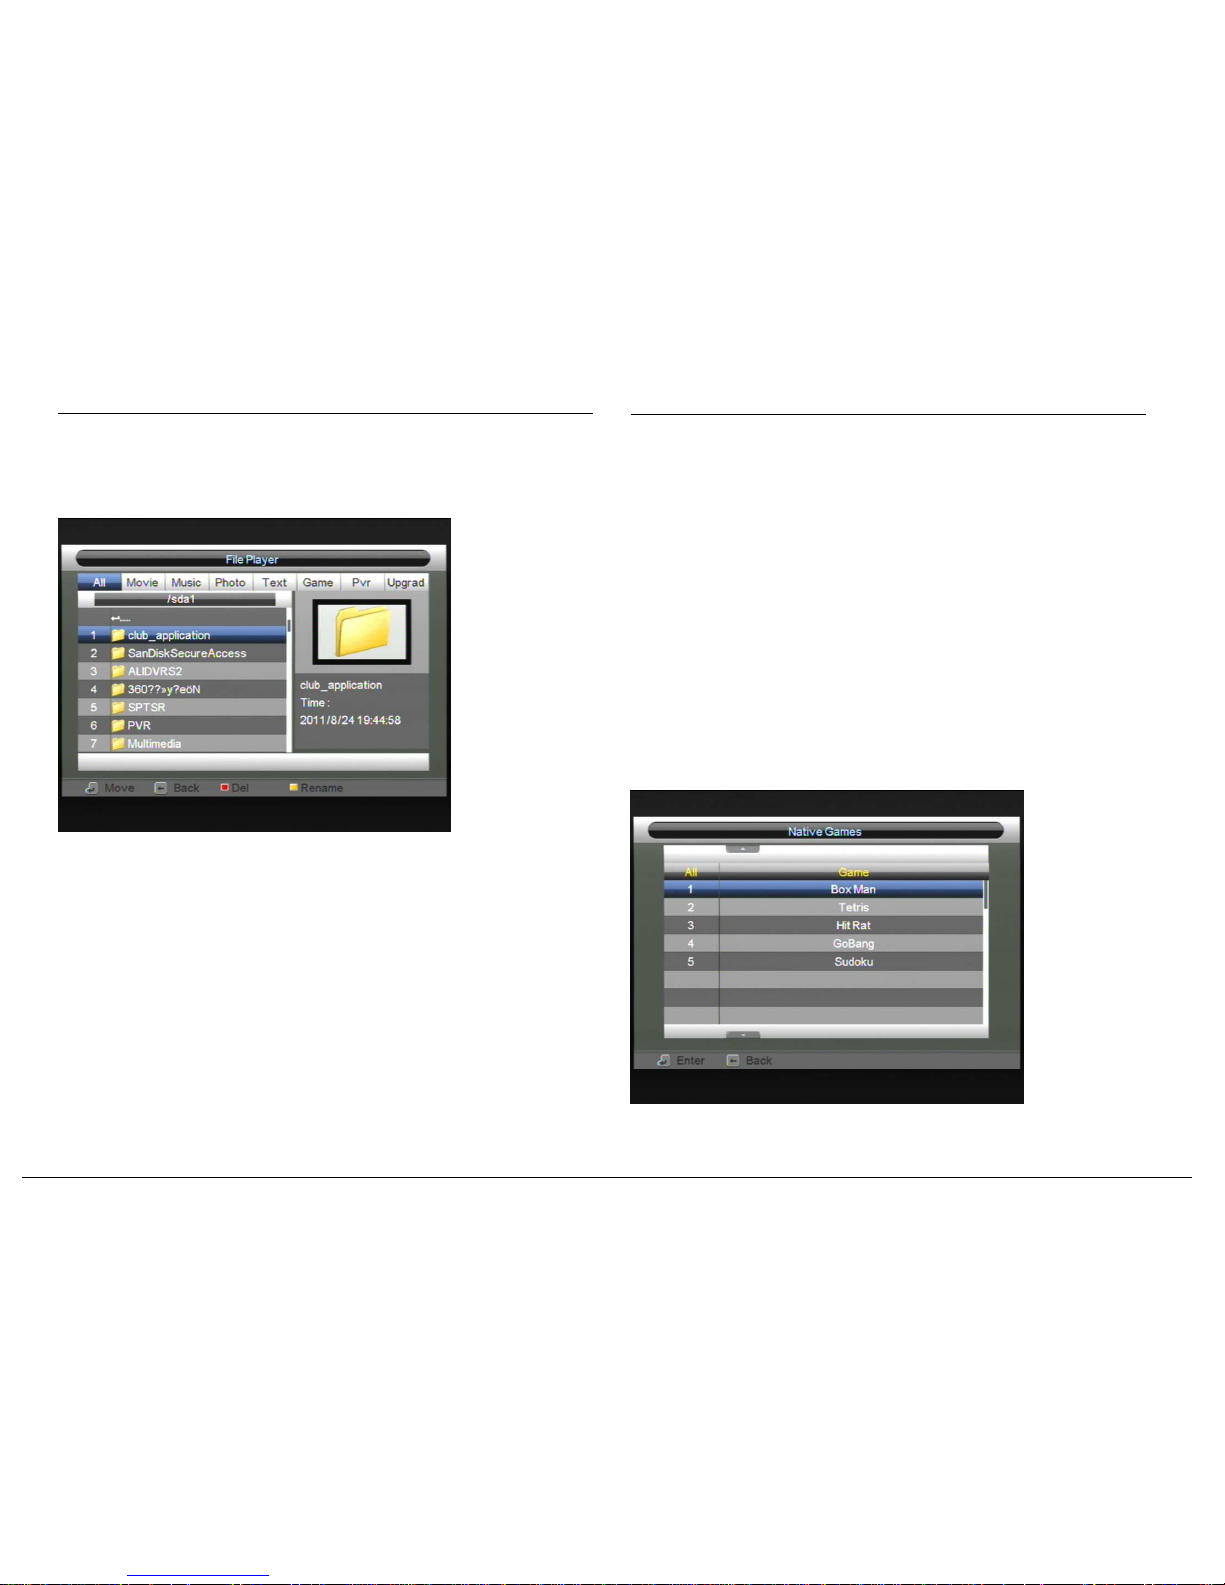
6.1 File player
When you enter to “File Play” menu, and select the specific disk, there will display the
screen like below:
In menu option region:
All: it will list all the file in and sub-directory in current directory.
Movie: it will list all the movie media file and sub-directory in current directory.
Music: it will list all the music media file and sub-directory in current directory.
Photo: it will list all the picture file and sub-directory in current directory.
Text: it will list all the text file and sub-directory in current directory.
Game: it will list all the game file and sub-directory in current directory.
Pvr: it will list all the PVR file and sub-directory in current directory.
Upgrad: it will list all upgrade bin file and sub-directory in current directory.
In menu help region:
Move: Press up/down key to select item.
Back: Press left key to back to Previous page
Del: Press red key to delete file or directory
USER’S MANUAL
Rename: Press yellow key to rename file or directory
To operate the media file:
Play: Press [OK] or [PLAY] key to play one media file.
Pause: Press [PAUSE] key to pause the playing.
Stop: Press [STOP] key to stop the playing.
Fast Forward: Press [FF] key to fast forward the playing.
Fast Backward: Press [FB] key to fast backward the playing.
Reverse slow: Press [REVSLOW] key to slow down the reverse.
Slow: Press [SLOW] key to slow down the forward.
6.2 Games
When you enter to “File Play” menu, and select the specific disk, there will display the
screen like below:
You can select specific game to enter game menu.
Digital set top box 30 Digital set top box 31
 Loading...