

Nurvo Budget 7, 7 Dual Core, 8 Quad Core, 7 Budget, 10.1 Horizon Dual Core Operating Instructions
...Page 1

Contents
Turning your nurvo tablet On and Off .............................................. 2
How to use the touch screen ........................................................... 2
Desktop operation............................................................................ 3
1. Desktop ........................................................................................................................ 3
2. Locking and unlocking your nurvo tablet ..................................................................... 4
Program operation ........................................................................... 4
1.Player ............................................................................................................................ 4
2. How to play Music ........................................................................................................ 5
3. How to use the sound recorder .................................................................................... 5
4. How to use the camera ................................................................................................ 6
5. How to use the browser ............................................................................................... 7
6. How to use the Play Store ............................................................................................ 7
7. How to use the calendar .............................................................................................. 7
8. How to use the clock .................................................................................................... 7
9. How to use the calculator ............................................................................................. 8
10. Manage your downloads ............................................................................................ 9
11. Using maps ................................................................................................................. 9
12. How to set up and use e-mail .................................................................................... 9
Email formats supported are POP3 and SMTP accounts. .............................................. 9
13. Using the file manager ............................................................................................. 11
Settings .......................................................................................... 12
Wi-Fi network settings ................................................................... 14
3G network settings ....................................................................... 14
Expand storage.............................................................................. 15
Installing programs/ Uninstalling the application ........................... 15
Charging the Device ...................................................................... 16
Notes .............................................................................................. 17
1
Page 2

Turning your nurvo tablet On and Off
How to turn on: Press and hold the power switch for five seconds
How to turn off: Press and hold the power switch for five seconds
Ta p Tu r n O f f
Ta p O K
How to lock and unlock the screen: Press the power switch to lock/unlock the screen.
If you need for force a shut-down: If the device stops responding, press the Reset key
to restart the device.
IMPORTANT: Do not force a shut-down unless necessary. Under normal conditions,
please follow the normal procedure ‘How to turn off the device’ shown above.
How to reset the device: Press the Reset key
How to use the touch screen
Tap : Tap the screen to select an icon or option.
Tap and hold: Tap and hold an icon to drag it to the desktop.
Drag and drop: Drag and drop to switch among different applications and features.
Care of your screen: to avoid unnecessary damage to your device, avoid
placing any objects on it.
2
Page 3
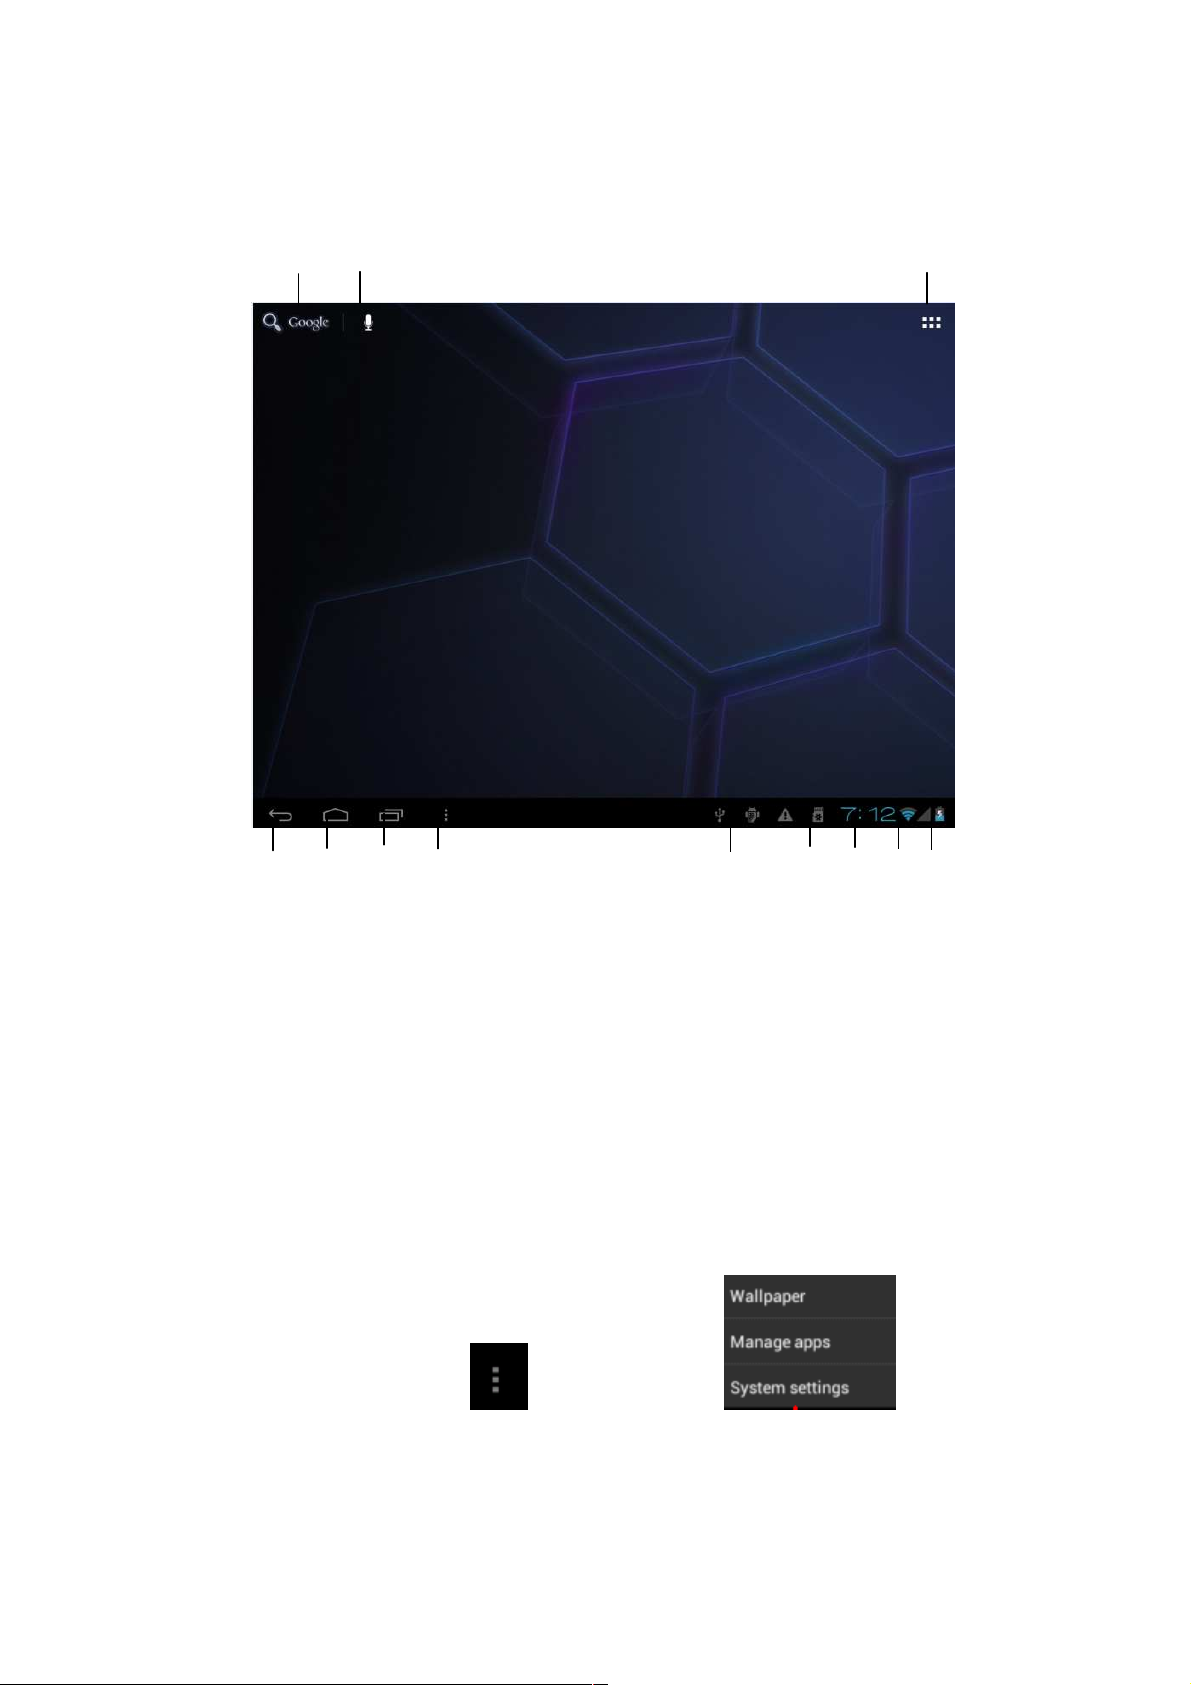
Desktop operation
1. Desktop
3 2 1
1Tap to view all applications
2Voice search
3Google search
4Return to current operation
5Quick desktop link
6Multipage task selection key
7Menu function shortcut
8USB connection symbol
9:TF card connection status
10: Current time
11: 3G/WIFI connection signal symbol
12: Battery status
4
5 6
7
8
9
10
11 12
On desktop, tap the Menu key to show the menu list and
perform the operation. At the same time, set common programs on desktop by tapping
and holding the program icon to move to the desktop;
3
Page 4
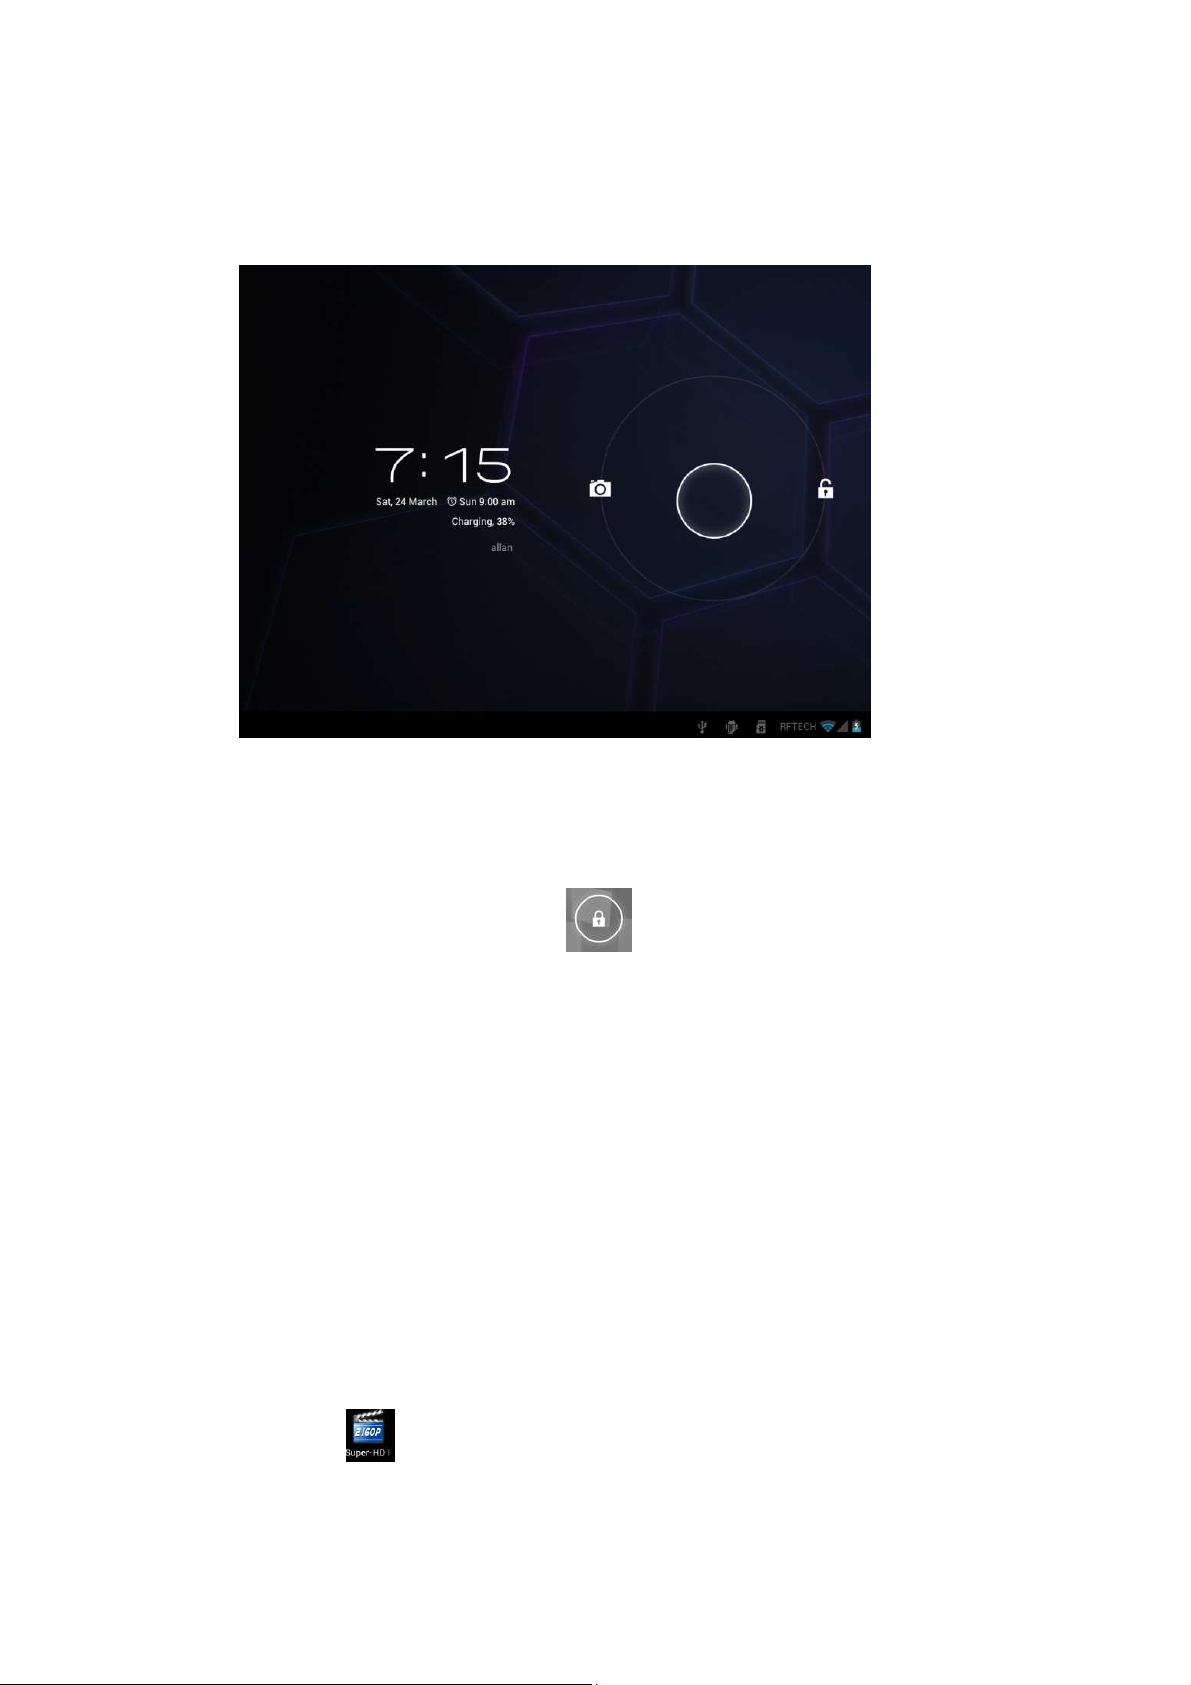
2. Locking and unlocking your nurvo tablet
The tablet will go to sleep if its not used for a while or the power switch is pressed. There
are two levels, a light sleep and a deep sleep. In deep sleep the screen is turned off,
whilst in light sleep shown in the picture above.
Tap, hold and slide the unlocking switch , toward the padlock to unlock your
device. Tap, hold and slide the unlocking switch toward the camera to activate the camera
function. You’ll see the screen provide you with instructions of functions when you tap
and hold the unlock switch also.
Program operation
1. Player
Your nurvo tablet supports the following file formats:
AVI, WMV, RM, RMVB, 3GP, MKV, MP4, ASF, VOB, MPG, MOV up to 1080P
HD-Definition
The compatible picture formats are: JPEG, BMP, GIF, PNG
1. Tap to start the player
2. To choose your video, go to all/contents/my favorite/custom list.
3. Tap the screen to adjust the video (including volume, pause/play, brightness,
4
Page 5
etc.)
4. To browse pictures, tap and then slide across the screen to flip to other
pictures.
5. Tap the icon
6. Tap the icon to delete pictures
for more detailed information or to select other pictures.
2. How to play Music
Your nurvo tablet supports the following music files:
MP3, WMA, OGG, FLAC, WAV, ACC
To play music on your tablet:
1. Tap My Music icon .
2. To choose your music go to music/album/artist/playing list.
3. Tap Previous→ Pause → Next icon to move
between soundtracks
4. To return to previous interface while playing music, tap or
to return to the desktop.
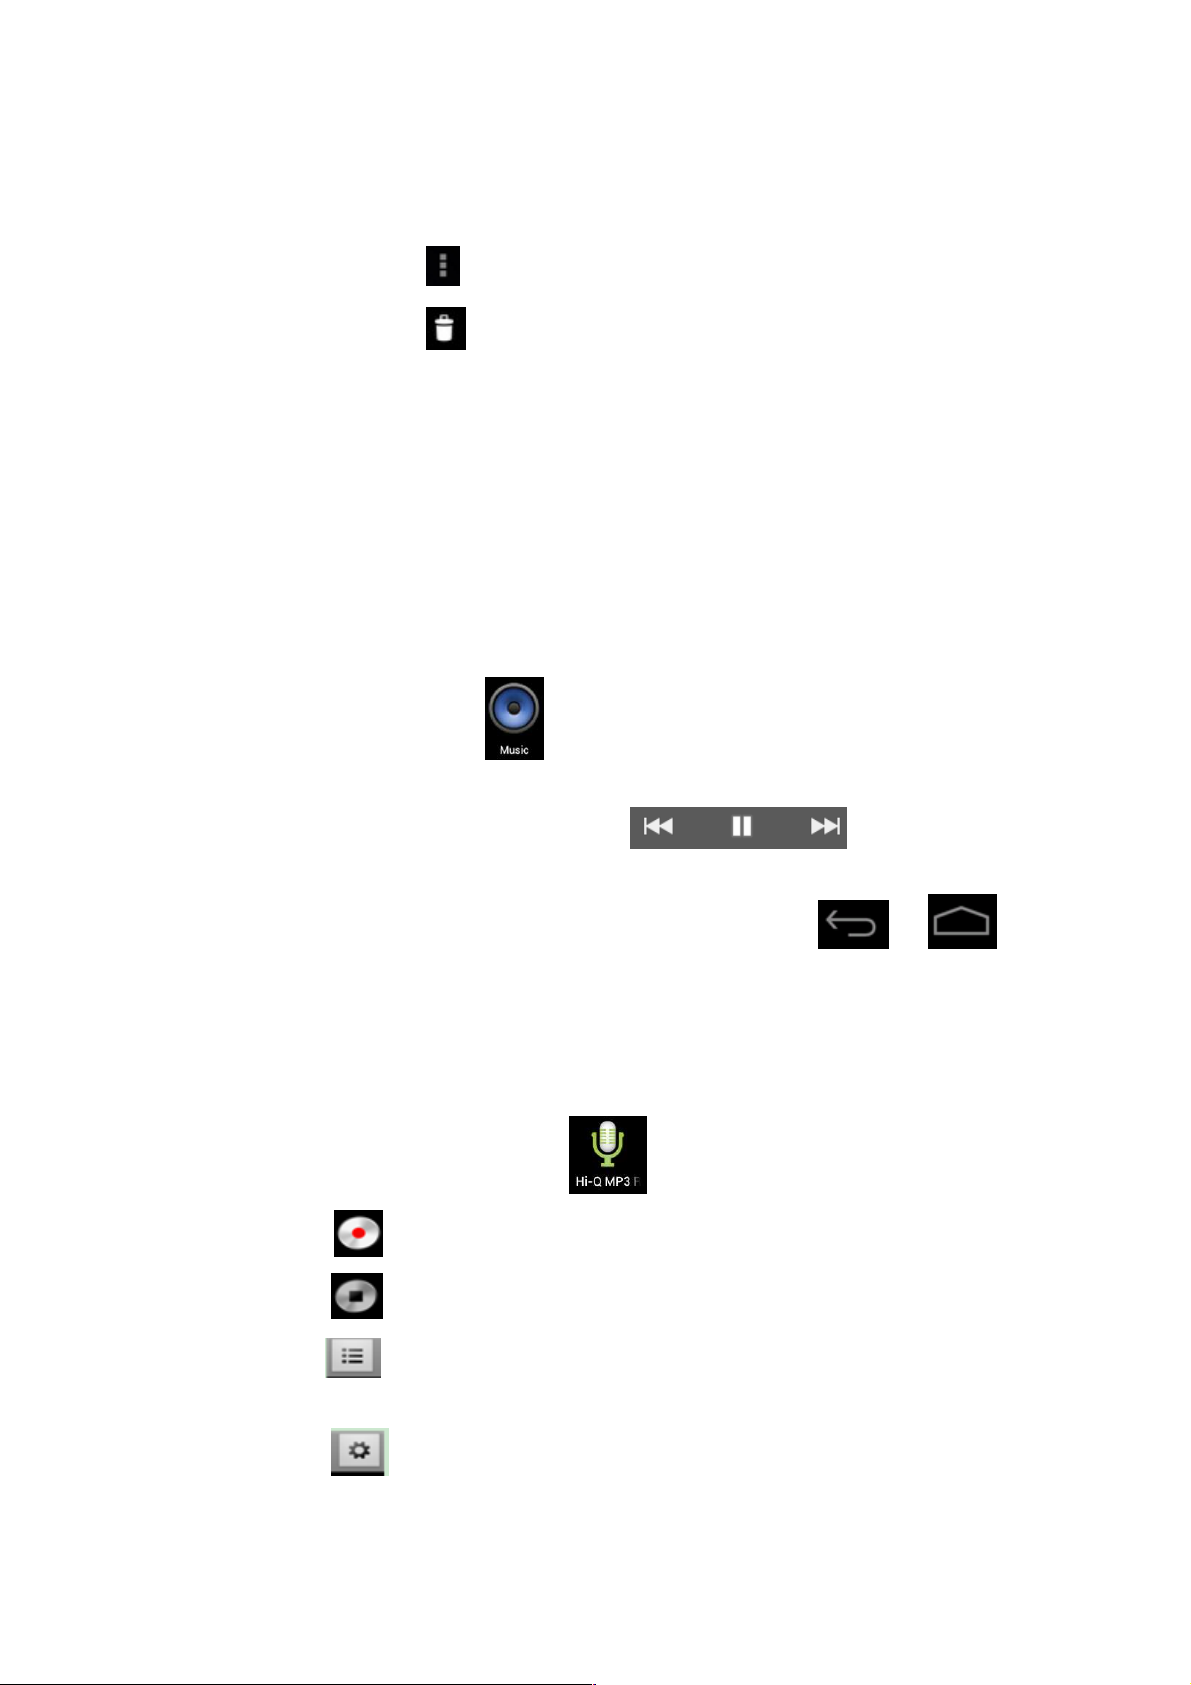
Press the Menu key for music operation, as in the interface below:
3. How to use the sound recorder
1. Click the sound recorder icon .The following interface appears
2. Tap to start recording,
3. Tap to stop the recording,
4.Tap to view the recording files, which will be sorted by time; select a
recording file to play
5. Tap to perform sound recording setting according to the prompt.
5
Page 6
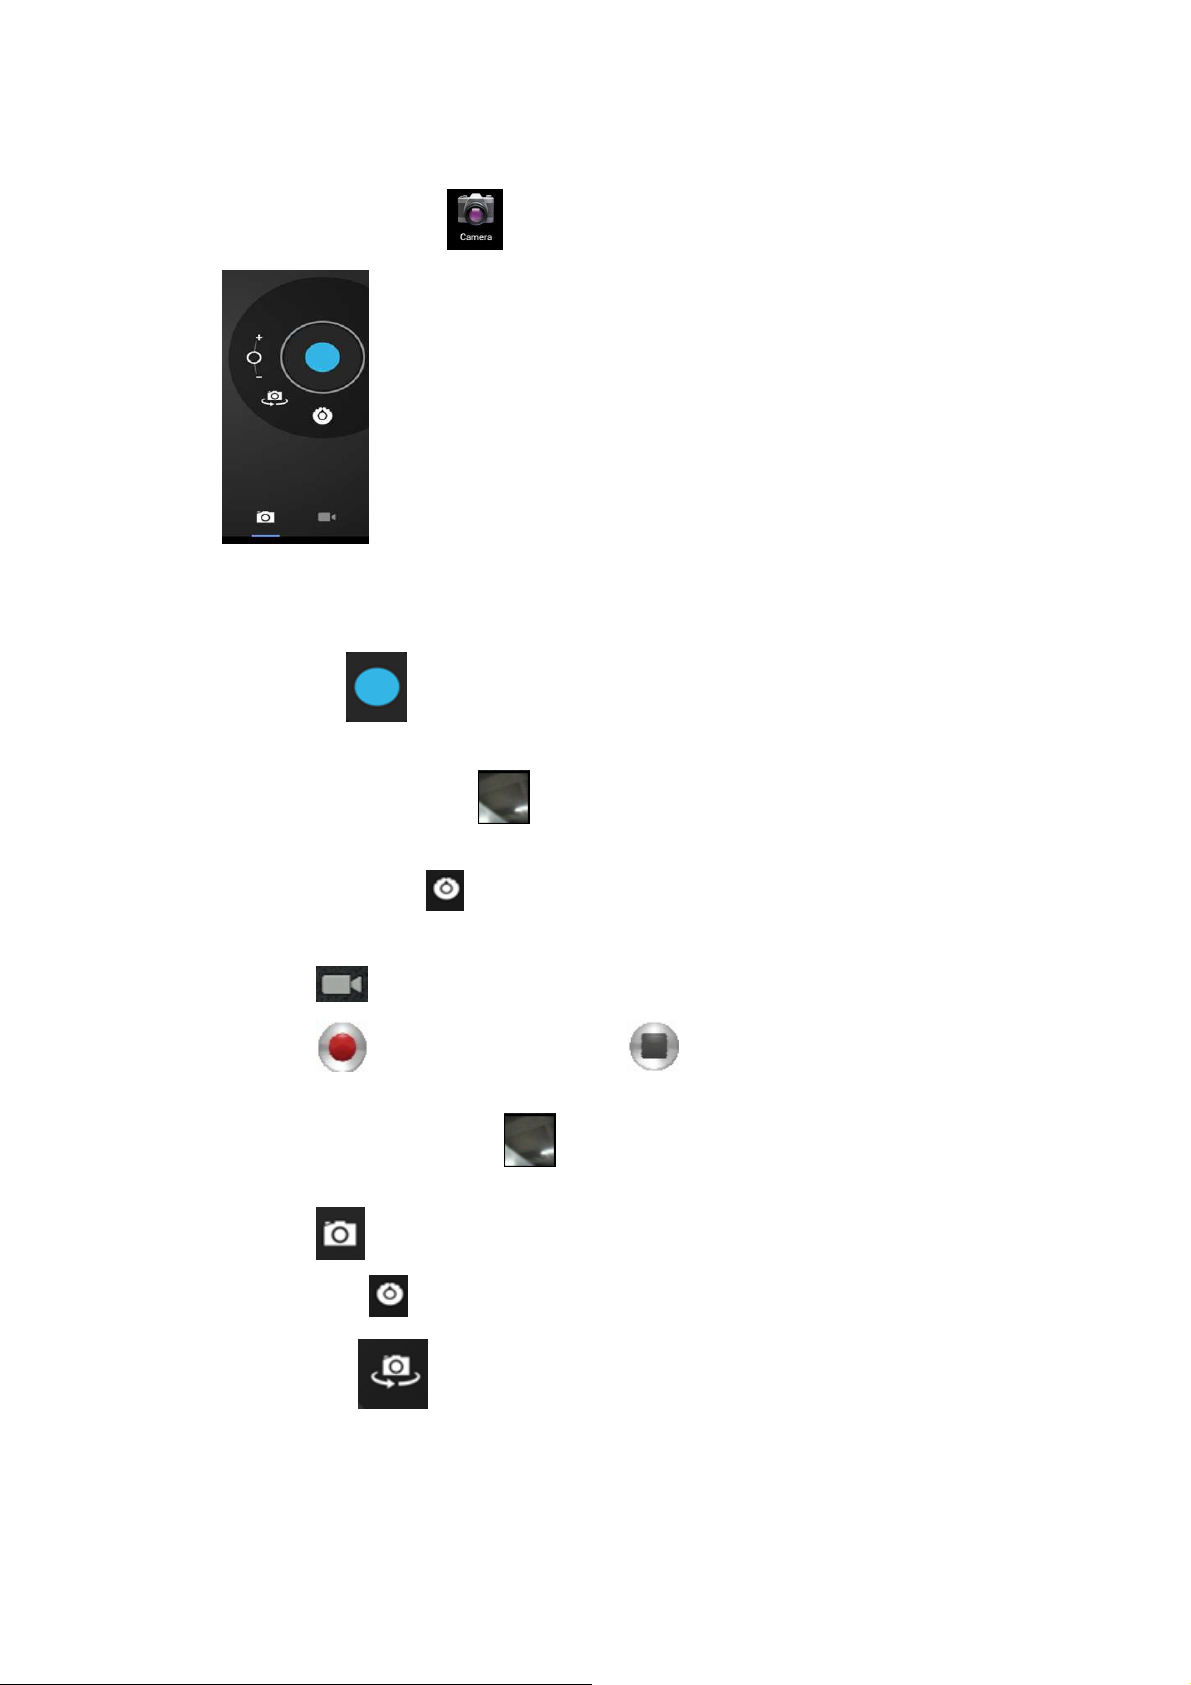
4. How to use the camera
1. Tap the camera icon to turn on the camera and the interface
appears.
How to take pictures
1. Tap to take pictures.
2. The pictures will be saved automatically.
3. Tap the thumbnail of the picture to view the original in Gallery.
4. Press the Back key to return to the camera.
5. Tap the icon for camera settings.
How to record video
1. Tap to switch to the video mode.
2. Tap to start recording, and tap to stop recording.
3. The video files will be saved automatically.
4. Tap the video thumbnail to play the video.
5. Press the Back key to return to the camera.
6. Tap to switch to the camera.
7. Press the key for video settings.
Note: You can tap to switch between front camera and rear camera to take
pictures and record video.
NoteOnly the models with double camera has such function
6
Page 7
5. How to use the browser
Tap the browser icon on desktop to access the Internet:
6. How to use the Play Store
Tap the icon query and download applications.
When the play store is run for the first time, you will be asked to login in in with a Google
account. If you don’t have a GMAIL account, please apply at http://gmail.google.com.
When you have logged in to play, browse and install your chosen apps.
7. How to use the calendar
Tap the calendar icon .
When the calendar is used for the first time, you need to add an Exchange account.
Enter the e-mail address and password of the account, tap Next and follow the
prompt the finish the account setting, and then the calendar is available.
How to add a new event
1. In the Calendar, tap the date where you want to add an event.
2. Select the time → enter the details in each field.
3. Tap OK.
4. Tap the Menu key to select desired calendar interface.
5. The dates with events are displayed in grey.
8. How to use the clock
Tap the clock icon to view current date and time.
Using the alarm clock
You can set several alarm clocks at the same time.
You’ll see this icon in the top of your screen when you have an alarm set.
Adding alarm clock
1. Tap the clock icon .
7
Page 8
2. Press the Menu key → Add alarm clock.
3. Set the alarm clock accordingly.
Note: If you don’t select Repeat, the alarm clock will be deleted
automatically after the alarm time.
4. Tap Enable alarm clock.
5. Tap OK.
Turning off alarm prompt
1. The alarm will show on your screen as well as using the audio you choose.
2.Tap Snooze, which will give you another 10 minutes.
3. Tap Cancel to stop the prompt.
Enabling alarm clock
If you select Repeat in the settings, the alarm clock will be deactivated
temporarily, but won’t be deleted.
1. In the alarm clock interface, tap the icon after desired alarm clock.
2. Tap to re-activate the alarm clock.
Editing alarm clock
1. Tap the clock icon , → tap .
2. Tap a desired alarm clock → edit.
Deleting alarm clock
1. Tap the clock icon , → tap .
2. Tap desired alarm clock and enter.
3. Tap Delete.
4. Tap to return to the desktop.
9. How to use the calculator
1. Tap the calculator icon
2. Use as you would a regular calculator.
3. Tap Clear to delete one, or tap and hold Clear to clear all the results.
8
Page 9
10. Manage your downloads
Tap the download icon to view all your downloaded applications.
Tap to select and install them.
11. Using maps
Please note: This function requires Internet connection.
When you are connected to the internet, tap the map icon to open your current
position automatically; as shown below, you can search desired information;
12. How to set up and use e-mail
Email formats supported are POP3 and SMTP accounts.
Adding e-mail account
You can enter one or more email accounts on your tablet
1. Tap the e-mail icon .
2. In Your account interface, tap Next.
3. In e-mail address option, enter your e-mail address.
4. In the password option, → enter your e-mail password.
5. Tap OK.
6. Manual setting (optional): Some email providers will automatically complete
complete email settings. However, if you may need to manually complete
some details, select the Manual setting to do so.
7. Tap Next.
8. Optional: Enter the account name.
9. Enter the name of the message → Tap OK.
After setting, if you can’t access a free e-mail account, please check with
your e-mail service provider whether their server supports POP and SMTP
protocol.
Inbox
1. Tap the e-mail icon
2. If you’ve only set up one e-mail account, you’ll be taken straight to that
account. If you have set up several accounts, chose which account from the
list displayed.
9
Page 10
3. Tap desired e-mail account → tap Inbox.
Opening e-mail
1. Got to the Inbox, tap and open an e-mail.
2. To view attachments, tap Open, your attachment will be opened in a
suitable application, or tap Save to save the attachment to SD card.
3. To Reply, tap Reply or Reply to all.
a) Write the message you want to send.
b) Tap Send to send the e-mail immediately; tap Drafts to save but do
not send the e-mail, or delete but do not save or send.
4. To delete the e-mail, tap Delete.
Writing new e-mail
1. Go to the Inbox, press the Menu key → Write.
2. Tap Send to, and then enter the address of the recipient.
3. Or if you want to send a cc or bcc, press the Menu key → Add cc and
bcc, and enter the e-mail addresses of the recipients.
4. Enter the subject in the title bar of the e-mail.
5. Tap Write option to enter your personal information.
6. To add an attachment, press the Menu key → tap Add attachment to
add the attachment file.
7. After writing, press the Menu key → tap Send.
Editing e-mail account
1. Tap the e-mail icon .
2. Go to the Inbox, press the Menu key → tap Account setting.
3. Set your e-mail account accordingly.
4. Tap to return to the Inbox interface.
Deleting e-mail account
Please note: If you have several accounts and have deleted the default account, the
next e-mail account in the list will be set to default automatically.
1. Tap the e-mail icon .
2. Go to the Inbox, press the Menu key → tap Account.
3. Tap and hold the account you want to delete.
4. In the popup Account option window, tap Delete account.
5. Tap OK to confirm the operation.
10
Page 11
Setting default e-mail account
You should always have a default account. Therefore, if you have several e-mail
accounts, you can set any one of them to default.
1. Tap the e-mail icon .
2. Go the Inbox, press the Menu key tap → Account setting.
3. Tap Default account to select it.
If you delete the default account, the next e-mail account in the list will be set to
default automatically.
13. Using the file manager
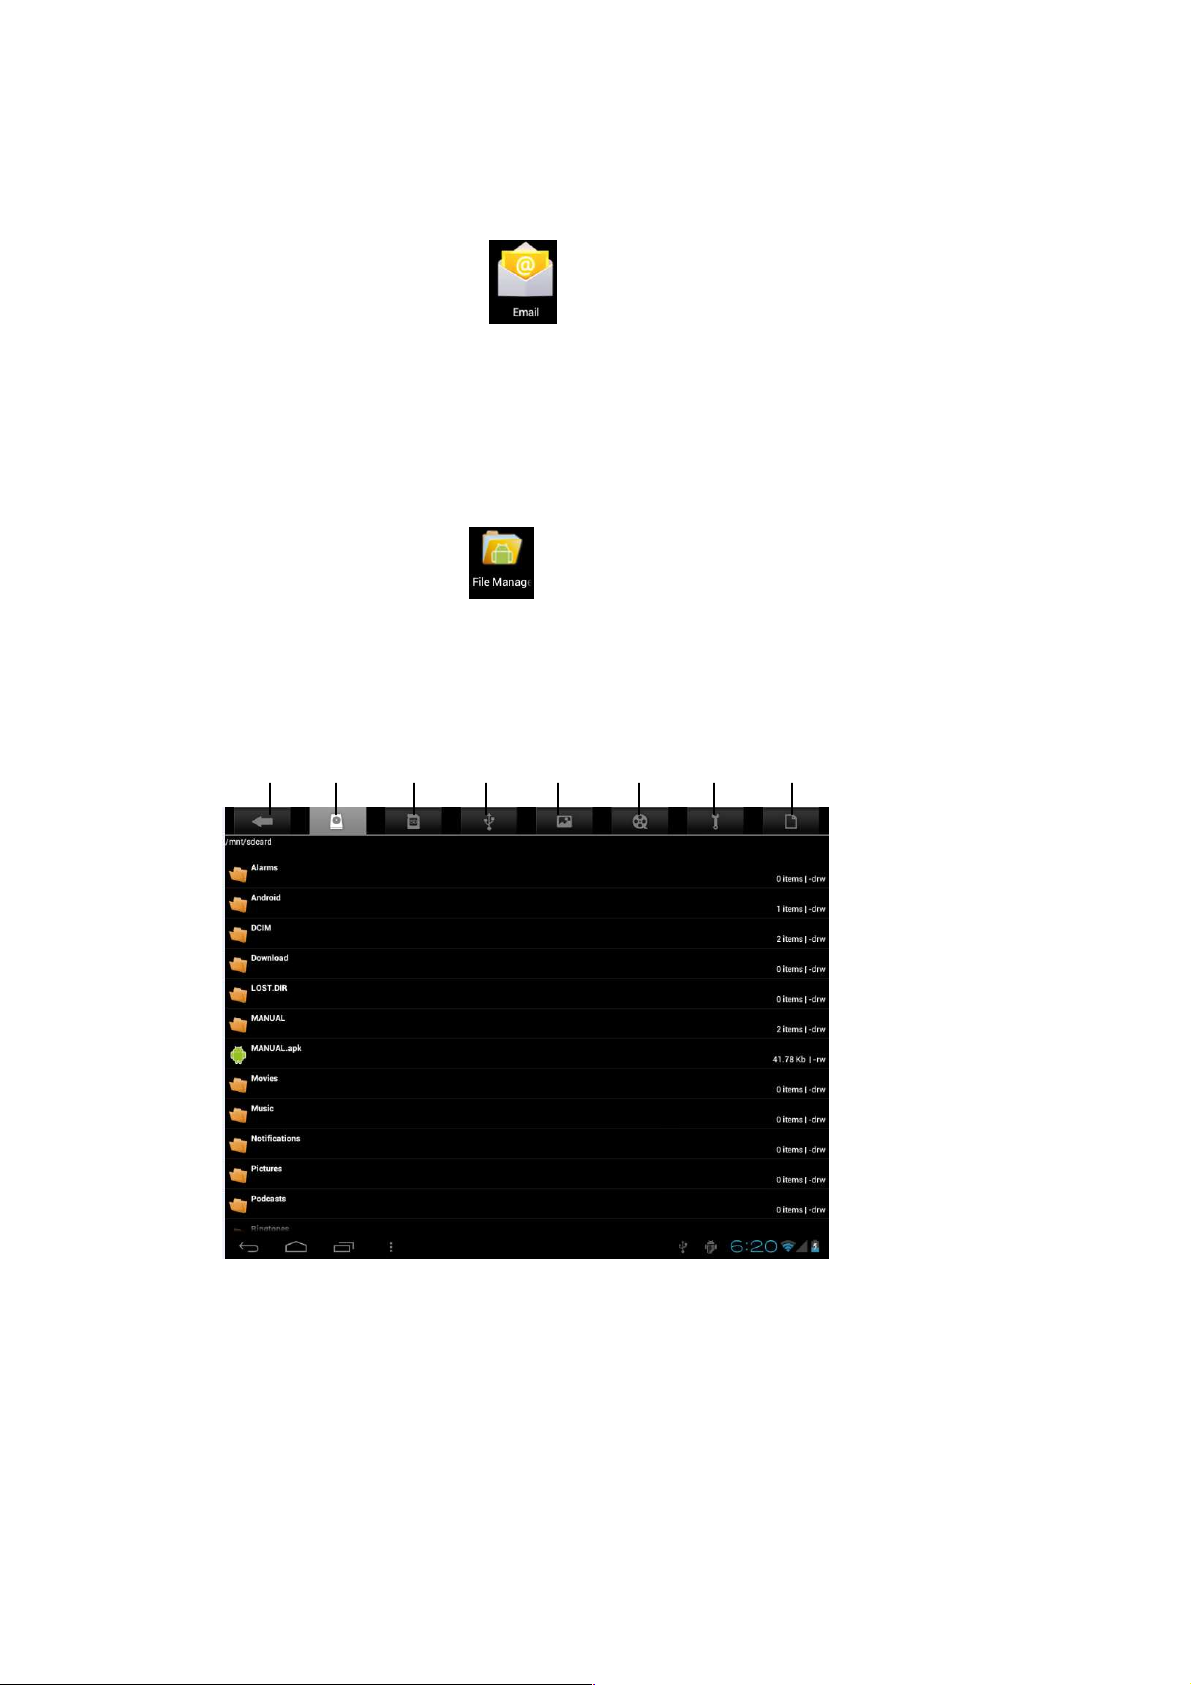
Tap the file manager icon to view the files in all storage devices (internal
memory, SD card, USB storage), and install Android applications to the device
quickly.
The icons in the top of the screen have the following functions:
1
2
3 4 5 6 7 8
1. Back to previous folder 2. Internal memory
3.Micro SD card 4. USB flash drive
5. Picture files 6.Video files
7.Toolbox 8.files manager
11
Page 12
Copying files between PC and the device
You can copy files between external storage device, internal memory and the PC
through File Manager. To copy files to the device, you need to copy to SD card or
USB storage device first.
1. Tap or to show the files in your storage device.
2. Tap and hold the desired file or folder and tap Copy.
3. Tap the icon to return to the internal memory, tap the target folder and
then tap Paste.
Deleting files
Ta p a n d h o l d t h e f i l e o r f o l d e r, t a p D e l e t e a n d t h e n tap OK to delete.
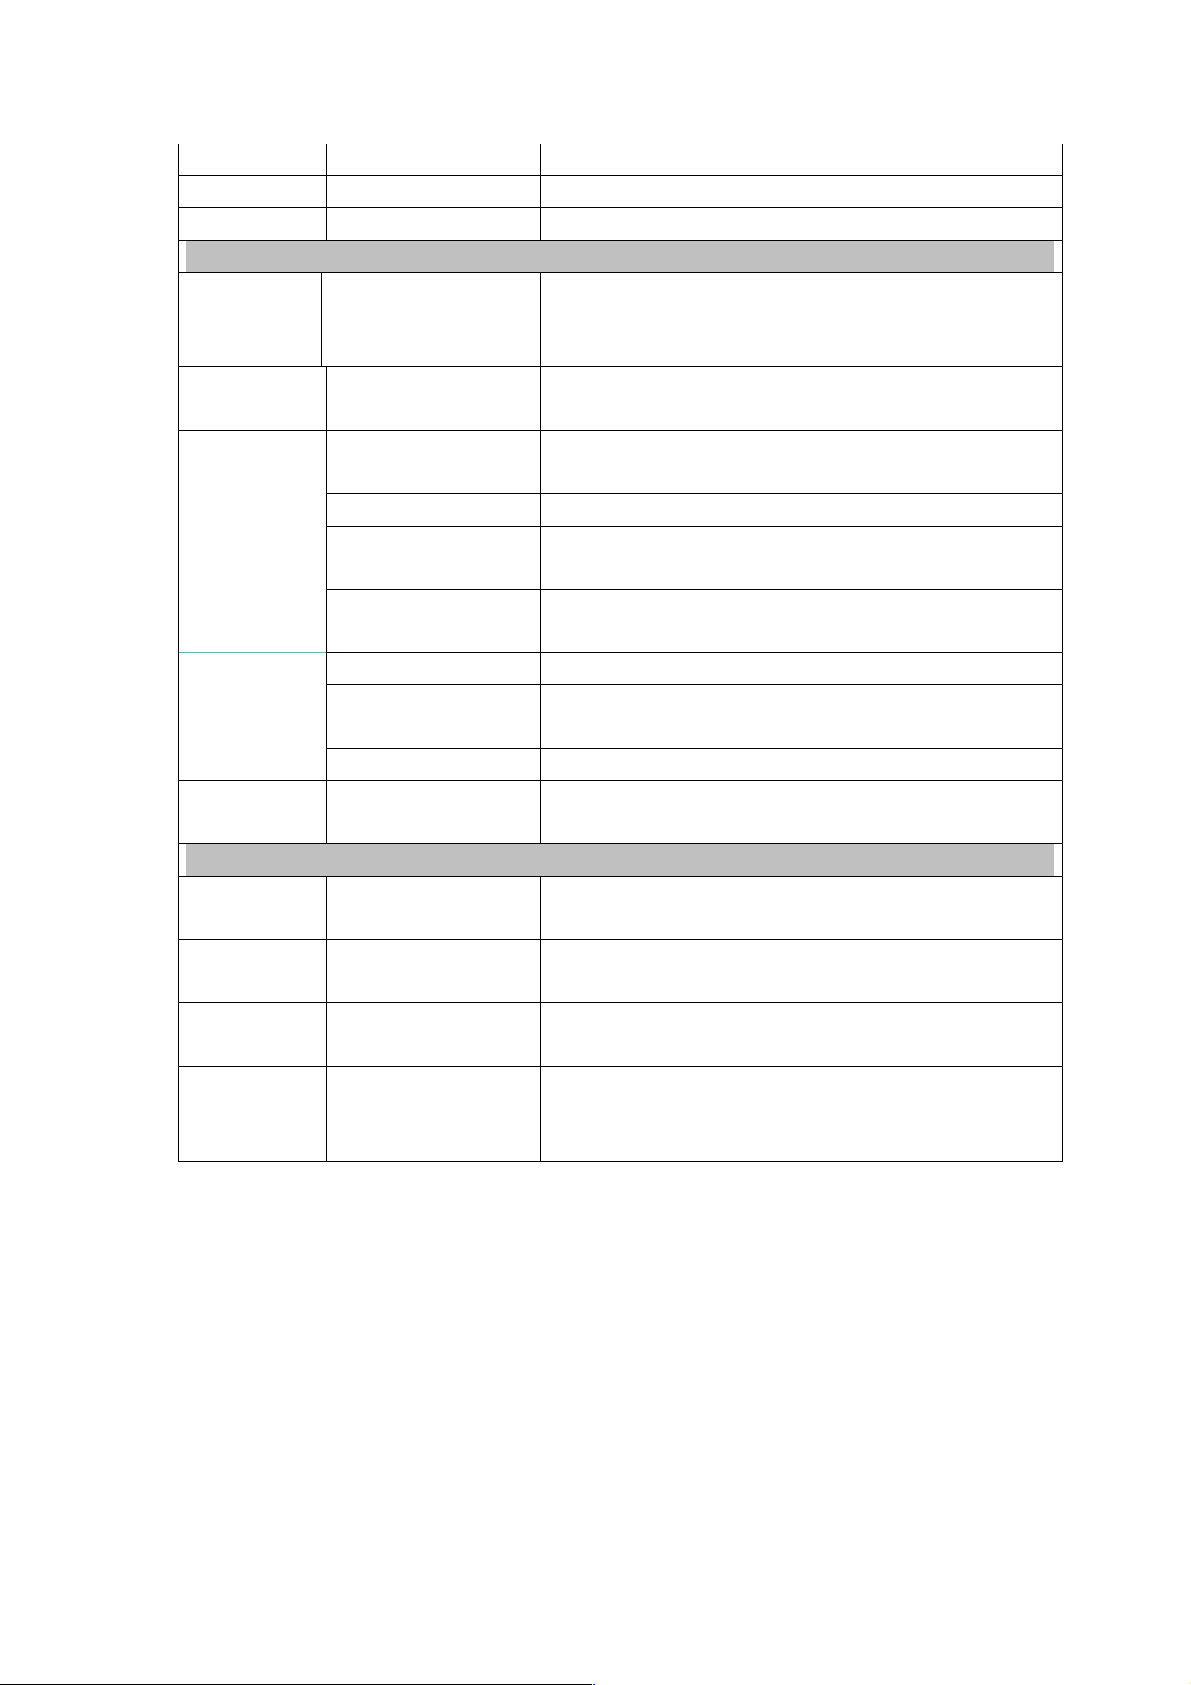
Settings
Wireless and network
Wi-Fi
Flow use Flow data settings and management
More
Device
Flight mode Turn on /off flying mode
Ethernet Cable network configuration
VPN VPN network configuration
Mobile network 3G network setting
3G information Show 3G dongle support model
Volume
Set and manage wireless access point.(View WIFI
network Settings)
Adjust the volume of media, alarm clock and
notification by tapping and dragging the slider
Voice
Display
Storage
and then tapping OK
Notification ringtone Select desired notification ringtone
Screen lock sounds Play sound when locking and unlocking the screen
Adjust the brightness of the screen by tapping and
Brightness
Wallpaper Wallpaper setting
Auto-rotate screen
System hibernate
Font size Adjust font size
Gyroscope Some games and apps may request certain settings
Screen adaptation Adjust the screen size
dragging the slider , and then
tapping OK
Switch orientation automatically when rotating the
device
Adjust the delay before the system automatically
hibernates
Display storage capacity information
12
Page 13
Battery
Application
Personal
Account &
synchronizat
ion
Location
service
Security
Language
and input
method
Backup and
reset
System
Date and
time
Auxiliary
function
Developers
options
About tables
SD Card formatting Remove all the data in the SD card
Add and manage account synchronization
Screen safety
protection
Passwords Passwords setting
Equipment
management
Credentials stored
Keyboard and input
method
Mouse/touch board Adjust the mouse pointer speed
Display battery use information
Display the application situation in device
Set the position of Google services and Google
search applications.
Screen safety protection setting
1. Add or delete device manager.
2. Unknown source APK installation.
Application management and access security
vouchers and other documents.
Set the default language system
Set the default keyboard input method and system
1.backup/data reduction
2. Restore the factory settings.
Set and change the time and data in device.
Set the screen for automatic rotation, display font and
touching effect etc
The basic application for developers
Check messages, power, legal information , model,
Android version, the version of the kernel and the
version number.
13
Page 14
Wi-Fi network settings
Since many functions require Wi-Fi connection, please configure the Wi-Fi
network before operation.
1. Click → Wireless and network.
2. Select to turn on Wi-Fi.
The device will automatically scan and list all available Wi-Fi networks. If the
Wi-Fi connection has icon, you need to enter the valid password.
4. Tap a Wi-Fi connection → if password is required, please enter the
valid password → tap Connect, and the icon appears on the desktop
after connecting to Wi-Fi network.
4. Tap to return to the desktop.
Please note: If you set to hide Wi-Fi, it won’t be scanned automatically. Please
tap Add Wi-Fi Network, and then enter corresponding information to add the
Wi-Fi.
3G network settings
3G compatibility available with use of an external 3G dongle (not supplied) unless
otherwise stated.
Expand storage
1. USB flash drive
Connect one end of the OTG cable to the flash drive and the other end to the
USB OTG interface of the device. You can use the flash drive when it is ready.
Please note: Do not insert/remove the USB flash drive frequently, as it may
cause damage.
2. TF card usage
Please note: The device supports memory card up to 32GB.
Insert the memory card into the slot, press with fingers to clamp it; the screen will
show Preparing SD card, and the TF card is ready for use when the characters
disappear. You can operate when the card is ready.
Removing TF card
14
Page 15
Close all programs or files opened from the memory card. Tap
card and device memory → Remove TF card. Press the card and it will eject.
Please note: Do not insert/remove the memory card repeatedly, or else it may
damage the card. Please use qualified memory card to avoid incompatibility.
Installing programs/ Uninstalling the application
Android applications can be quickly downloaded and installed using the
.
1. Copy desired .apk files to SD card or USB storage device → insert the card
into the device or connect USB flash drive to the device.
2. Tap the file manager icon .
3. Tap or and find the folder that saves .apk files.
→ TF
4. Select an .apk file → Install. After the application is installed, the icon will
appear in the interface that shows all applications.
5. Tap to run the application directly, or tap OK to return to the File Manager
interface.
Downloading applications from Internet directly
Android applications can be downloaded quickly from the Internet and installed
following this method
1. Click the icon to connect to the Internet.
2. Enter the URL and tap the download link of desired application.
3. After downloading, tap and hold the downloaded files (in download log
interface), → click Open → Install.
Connecting to PC to save files
1. Connect the tablet to your PC and the tablet PC can be used as mobile
storage device; to connect to PC, connect one end of the USB cable to the USB
OTG interface of the tablet PC and the other end to the USB interface of PC;
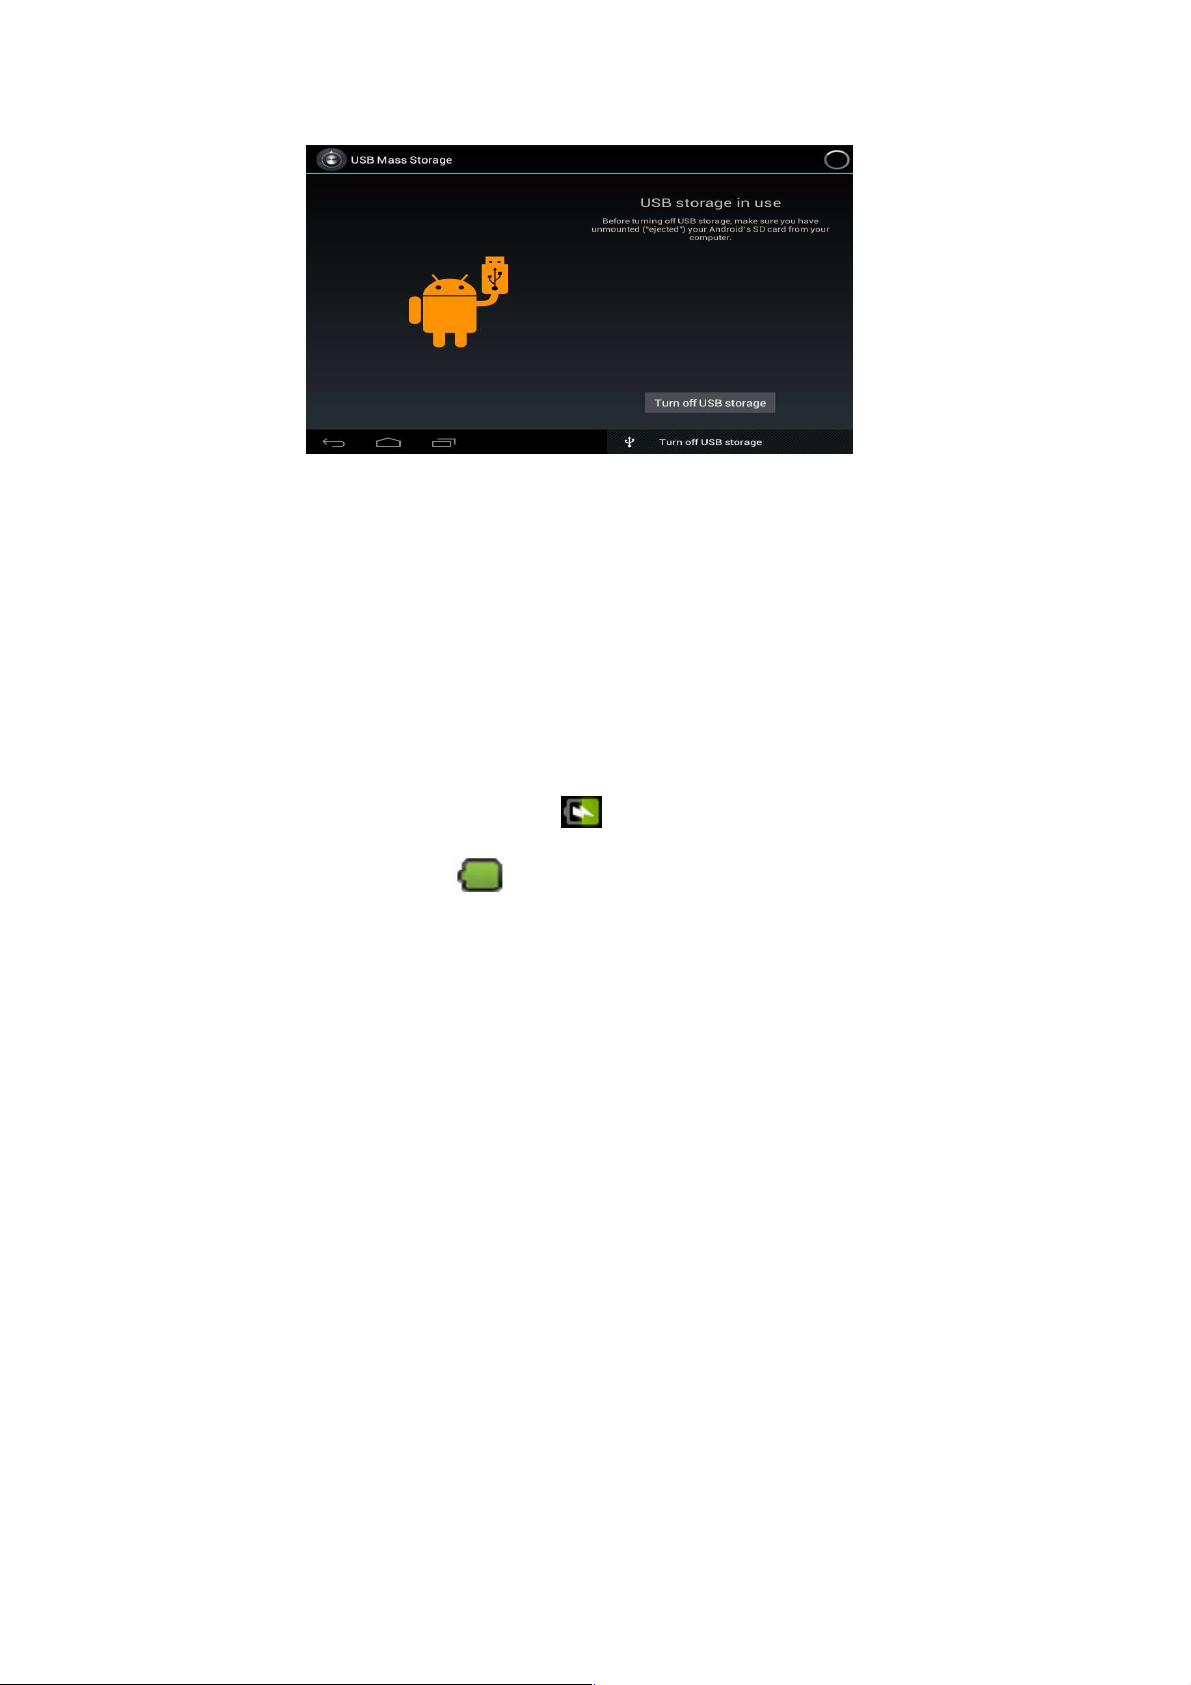
2. When connected, the tablet PC will prompt , click the
icon and then select Turn on USB storage to transmit data between PC and
tablet PC, as shown below:
15
Page 16
Uninstalling the application
Android applications can be uninstalled quickly using this method.
1. Tap Menu key → Settings → Application → Manage applications.
2. Tap an application → Uninstall.
3. Tap OK to uninstall.
Charging the Device
Connect one end of the power adapter to the socket and the other end to the
power jack to charge the device.
During charging, the battery symbol is ; when your tablet is fully charged, the
battery symbol will show as .
Please note: You can use USB cable to charge the device.
You can use the device while charging; however, it will extend the charging time.
● Use the device at least once every week.
● Charge the battery regularly.
● Do not keep the battery too low for long time.
Notes
When you use this device, please follow the safety notice below to prevent fire,
electric shock and injury.
Keep the device away from rain and moisture.
Keep the device away from direct sunlight and heat sources.
Protect the power cord. When charging your tablet make sure the cable is
free from other objects which could damage it, do not step onto it or place
any object on it. Protect the plugs of the power cord especially when connect
to devices.
Please use the original power adapter for charging. Nonconforming
chargers may cause damage.
Do not disassemble the shell or repair it without authorization.
Handle the screen gently. To clear the fingerprints or dust on the screen, use
soft cloth dedicated for camera lens.
16
Page 17

Any images included in this manual are for demonstration purposes only.
17
 Loading...