

Page 1
Sound Machine
User Manual
Care for Your Loved Ones
facebook.com/nursalonline
www.nursal.co/warranty
Page 2
A Big Thank You
We’re thrilled that you have chosen to purchase the Sound Machine.
At NURSAL, we’re committed to providing you with products that
enhance your daily life. We also aim to give our customers excellent
support. Should you have any questions or feedback about your new
product, simply get in touch with our customer support team at
1-855-556-6888, or by email at [email protected]
Enjoy your new product!
ACTIVATE YOUR 12 MONTH WARRANTY & EXCLUSIVE GIFT
Register within 2 weeks aſter receiving your new product.
PLEASE VISIT NOW CUSTOMER SERVICE
www.nursal.co/warranty
1.
Replace batteries when the sound becomes low or the
LED indicator dims.
2.
Refer to the user manual for the order the sounds are
played.
NOTE
3.
Remove batteries if the device is not used for long periods.
[email protected] @nursalonline
Page 3

CONTENTS
PACKAGE CONTENTS
TYPE OF SOUNDS
PRODUCT DIAGRAM
INSTRUCTIONS FOR USE
BATTERY INSTALLATION
BATTERY PRECAUTIONS
PRECAUTIONS
COMMON PROBLEMS AND SOLUTIONS
GENERAL SPECIFICATIONS
FCC STATEMENT
………………………………01
…………………………………01
………………………………02
…………………………03
…………………………04
…………………………04
………………………………………05
………………………08
……………………………………08
…………07
Page 4
@nursalonline
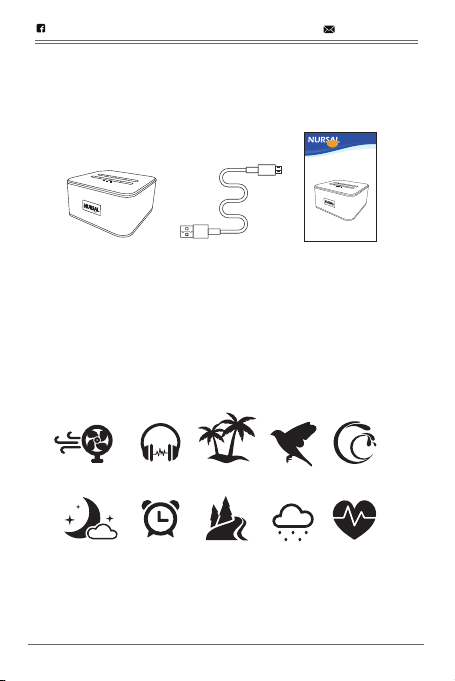
PACKAGE CONTENTS
Size: 5.4inch*5.4inch*2.7inch
Sound Machine
User Manual
1 x Sound device 1 x USB power cable 1 x User manual
TYPE OF SOUNDS
Care for Your Loved Ones
facebook.com/nursalonline
www.nursal.co/warranty
- 01 -
FAN SOUNDS
Summer night
WHITE NOISE
Clock
Rainforest Birds Waves
Rain Mother's heartbeatBrook
Page 5
@nursalonline
10
11
12
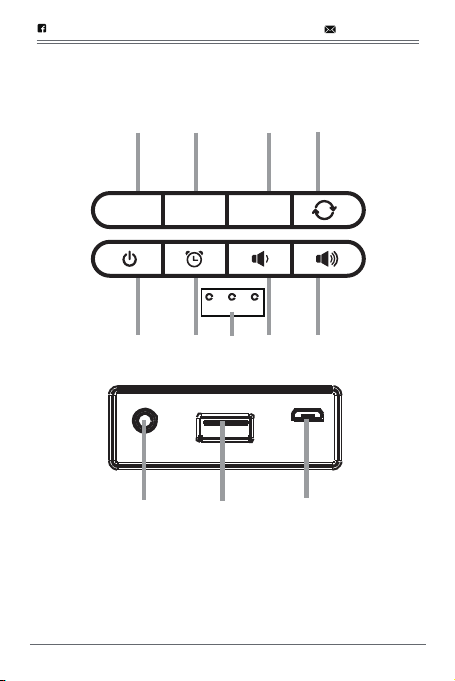
PRODUCT DIAGRAM
TOP VIEW
FAN
SOUNDS
WHITE
NOISES
NATURAL
SOUNDS
30 60 120
4321
REAR VIEW
986 75
1. FAN SOUNDS
3. NATURAL SOUNDS
5. Power on/off button
7. 30/60/120 mins indicator
9. Volume up button
11. USB charging port
- 02 -
2. WHITE NOISE
4. Loop sound button
6. Timer button
8. Volume down button
10. Earphone jack
12. DC IN
Page 6

@nursalonline
INSTRUCTIONS FOR USE
1.
Use the included USB charging cable to power the device. Or
insert 4 x "AA” batteries into the battery compartment at the
bottom of the device (batteries not included).
2.
Press the power button to turn the device on.
3.
Playing sounds:
Press the FAN SOUNDS button repeatedly to switch to
different fan sounds, there are 8 types of fan sounds in total.
Press the WHITE NOISE button repeatedly to switch to
different white noise sounds, there are 8 types of white noise
sounds in total.
Press the NATURAL SOUNDS button repeatedly to switch to
different natural sounds, there are 8 types of natural sounds in
total.
4.
Press the button, the green indicator light on the device will
flash three times, indicating it has entered loop mode. Starting
with the current sound, it will play each sound in a looped
sequence for 3 minutes. Press the button again to cancel loop
mode. Press the or button to adjust volume.
5.
Use the Volume button to adjust the volume level. There are a
total of 16 volume levels.
Press the button repeatedly to set sleep timer to 30/60/120
6.
minutes. The indicator will display below the selected time. The
unit will power off when the chosen time has been reached.
Earphones can be used by inserting them into the earphone jack.
7.
The device has smart memory function, will automatically resume
in the same state as when previously turned off. If the device is
8.
unplugged or the batteries are removed, the device will revert to
the default settings.
Press the Power button again to turn off the device.
9.
NOTE:
Use the 5V USB charging port to charge compatible external devices.
The unit cannot charge external devices when powered by AA batteries.
- 03 -
Page 7
@nursalonline
BATTERY INSTALLATION
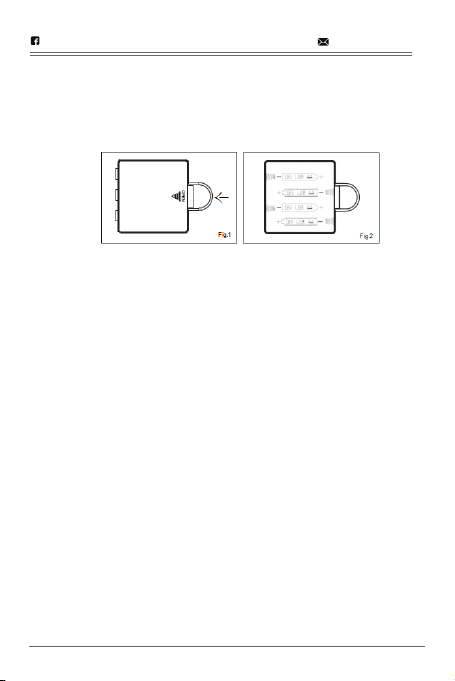
1. 1.Push and lift out the battery cover as shown in Fig.1.
2. Insert 4 x "AA" batteries in the correct position as shown in Fig.2
3. Replace the battery cover.
BATTERY PRECAUTIONS
Follow these precautions when using batteries in this device:
1.
Warning: Danger of explosion if batteries are incorrectly
replaced. Replace only with the same or equivalent type of
battery.
2.
Use only the size and type of battery specified.
3.
Be sure insert the batteries facing the correct polarity as
indicated in the battery compartment. Reversed polarity batteries
may cause damage to the device.
Do not mix different types of batteries together (e.g. Alkaline and
4.
Carbon-zinc) or old batteries with new ones.
If the batteries in the device are completely drained or the device
5.
will not be used for a long period of time, remove the batteries to
prevent damage or injury from possible battery leakage.
Do not try to recharge non-rechargeable batteries; they can
6.
overheat and rupture. (Follow battery manufacturer’s
instructions.)
Do not expose the batteries to excessive heat such as sunshine
7.
or fire.
Remove batteries promptly if drained.
8.
Clean the battery contacts on the device prior to battery
9.
installation.
- 04 -
Page 8

@nursalonline
PRECAUTIONS
1.
Read, Keep and Follow these instructions
All the safety and operating instructions should be read before
the appliance is operated, kept for future reference and
followed.
2.
Heed all warnings
All warnings on the appliance and in the operating instructions
should be adhered to.
Do not use this apparatus near water
3.
The appliance should not be used near water; for example, near
a bath tub, washbowl, kitchen sink, laundry tub, in a wet
basement, or near a swimming pool.
Clean only with a dry cloth
4.
The appliance should be cleaned only as recommended by the
manufacturer.
Do not block the speaker vents on the front of the device
5.
Otherwise the volume will be reduced and the sound quality will
be degraded.
Do not install near any heat sources
6.
such as radiators, heat registers, stoves, or other apparatus
(including amplifiers) that produce heat.
Be sure to use a suitable adapter or USB output (5V
7.
0.5~3A)
8.
Only use attachments/accessories specified by the
manufacturer
- 05 -
Page 9

@nursalonline
9.
Unplug this apparatus during lightning storms or when
unused for long periods of time
10.
Refer all servicing to qualified service personnel
Servicing is required when the device has been damaged in any
way, such as power-supply cord or plug is damaged, objects
have fallen into the device, the device has been exposed to rain
or moisture, does not operate normally, or has been dropped.
11.
Overloading
Do not overload wall outlets and extension cords as this can
result in a risk of fire or electric shock.
12.
Object and liquid entry
Never push objects of any kind into the product through
openings as they may touch dangerous voltage points or short
out parts that could result in fire or electric shock. Never spill or
spray any type of liquid on the product.
13.
Service
Do not attempt to service this product yourself as opening or
removing covers may expose you to dangerous voltage or other
hazards. Refer all servicing to qualified service personnel.
14.
Replacement parts
When replacement parts are required, be sure the service
technician uses replacement parts specified by the
manufacturer or those that have the same characteristics as the
original parts. Unauthorized substitutions may result in fire or
electric shock or other hazards.
15.
Safety check
Upon completion of any service or repairs to this product, ask
the service technician to perform safety checks to determine
that the product is in proper operating condition.
- 06 -
Page 10
@nursalonline
COMMON PROBLEMS AND SOLUTIONS
PRODUCT DIAGRAM
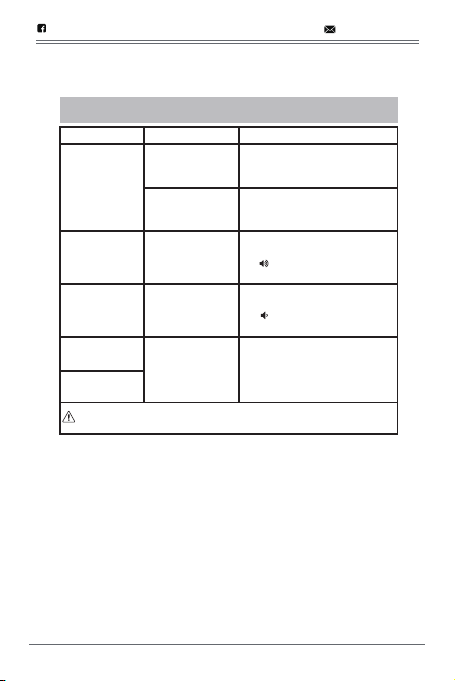
SYMPTOM POSSIBLE CAUSE POSSIBLE SOLUTION
No power
The unit is not
commected to power
source
The batteries are
drained
Connect the USB adapter to
the unit and wall outlet by USB
charging cable
Replace with new batteries
No sound or
sound weak
Sound
distortion/rattle
Abnormal sound
Indicator dimming
Please contact the distributor if you can't solve the problem, do not disassemble the
unit by yourself!
- 07 -
Volume level in
minimum position
Volume level too high
Low battery Replace with new batteries
Raise the volume level by pressing
the Button on the top of unit
Reduce the volume level by pressing
the Button on the top of unit
Page 11

@nursalonline
GENERAL SPECIFICATIONS
Power input:
Audio output: 2x2W.
DC 5V 1A
4*AA batteries (not included).
FCC STATEMENT
This device complies with Part 15 of the FCC Rules.
Operation is subject to the following two conditions:
(1) this device may not cause harmful interference.
(2) this device must accept any interference received,
including interference that may cause undesired operation.
- 08 -
Page 12
 Loading...